

Jenn-Air JJD3030IM00, JJD3030IL00 Owner’s Manual

JENNAIR® INDOOR/OUTDOOR
WARMING DRAWER
TIROIR-RÉCHAUD JENNAIR®
POUR USAGE INTÉRIEUR/EXTÉRIEUR
Use & Care Guide
For questions about features, operation/performance, parts, accessories, or service in the U.S.A., call:
1-800-JENNAIR (1-800-536-6247) or visit our website at www.jennair.com.
In Canada, call: 1-800-JENNAIR (1-800-536-6247) or visit our website at www.jennair.ca.
Guide d’utilisation et d’entretien
Pour des questions à propos des caractéristiques, du fonctionnement/rendement, des pièces, accessoires ou dépannage, composer le:
Au Canada, composer le: 1800JENNAIR (1800536-6247) ou visiter notre site Web au www.jennair.ca.
W11295550A
1800JENNAIR (1800536-6247) ou visiter notre site Web au www.jennair.com.

TABLE OF CONTENTS TABLE DES MATIÈRES
WARMING DRAWER SAFETY.......................................................3
Electrical Requirements ...............................................................4
WARMING DRAWER USE .............................................................4
Control Knob ................................................................................4
Moist-Dry Slide Control ................................................................5
Setting the Controls .....................................................................5
Warming Cookware ......................................................................6
Positioning Racks and Pans ........................................................6
Proong Bread .............................................................................6
Slow Roast Function ....................................................................6
Panel Kit
(Accessory) ...................................................................................7
WARMING DRAWER CARE ..........................................................7
Drawer Slides ...............................................................................7
Warming Drawer ...........................................................................7
General Cleaning ..........................................................................7
TROUBLESHOOTING ....................................................................8
ASSISTANCE OR SERVICE ...........................................................9
In the U.S.A. .................................................................................9
In Canada .....................................................................................9
Accessories ..................................................................................9
SÉCURITÉ DU TIROIR-RÉCHAUD .............................................10
Spécications électriques ..........................................................12
UTILISATION DU TIROIR-RÉCHAUD .........................................12
Bouton de commande ...............................................................12
Curseur de réglage Moist-Dry (humide-sec) .............................13
Réglage des commandes ..........................................................13
Ustensiles de réchauffage ..........................................................14
Positionnement des grilles et des ustensiles .............................14
Levée du pain .............................................................................14
Fonction de cuisson lente ..........................................................14
Ensemble de panneaux (accessoire) .........................................15
ENTRETIEN DU TIROIR-RÉCHAUD ...........................................15
Glissières du tiroir .......................................................................15
Tiroir-réchaud .............................................................................15
Nettoyage général ......................................................................15
DÉPANNAGE .................................................................................16
ASSISTANCE OU SERVICE .........................................................17
Au Canada ..................................................................................17
Accessoires ................................................................................17
2
WARMING DRAWER SAFETY
Your safety and the safety of others are very important.
We have provided many important safety messages in this manual and on your appliance. Always read and obey all safety
messages.
This is the safety alert symbol.
This symbol alerts you to potential hazards that can kill or hurt you and others.
All safety messages will follow the safety alert symbol and either the word “DANGER” or “WARNING.”
These words mean:
You can be killed or seriously injured if you don't immediately
DANGER
WARNING
All safety messages will tell you what the potential hazard is, tell you how to reduce the chance of injury, and tell you what can
happen if the instructions are not followed.
IMPORTANT SAFETY INSTRUCTIONS
follow instructions.
You
can be killed or seriously injured if you don't
instructions.
follow
WARNING: To reduce the risk of fire, electrical shock,
injury to persons, or damage when using the warming drawer,
follow basic precautions, including the following:
Read all instructions.
Proper Installation – Be sure the warming drawer is
properly installed and grounded by a qualified technician.
Never Use the Warming Drawer for Warming or Heating
the Room.
Do Not Leave Children Alone – Children should not be left
alone or unattended in area where warming drawer is in
use. They should never be allowed to sit or stand on any
part of the warming drawer.
Wear Proper Apparel – Loose-fitting or hanging garments
should never be worn while using the warming drawer.
User Servicing – Do not repair or replace any part of the
warming drawer unless specifically recommended in the
manual. All other servicing should be referred to a qualified
technician.
Storage in Warming Drawer – Flammable materials should
not be stored in a warming drawer.
Do Not Use Water on Grease Fires – Smother fire or flame
or use dry chemical or foam-type extinguisher.
Use Only Dry Potholders – Moist or damp potholders on
hot surfaces may result in burns from steam. Do not let
potholder touch hot heating elements. Do not use a towel
or other bulky cloth.
Use Care When Opening Drawer – Let hot air or steam
escape before removing or replacing food.
Do Not Heat Unopened Food Containers – Build-up of
pressure may cause container to burst and result in injury.
Placement of Warming Drawer Racks – Always place
warming drawer racks in desired location while warming
drawer is cool. If rack must be moved while warming
drawer is hot, do not let potholder contact hot heating
element in warming drawer.
DO NOT TOUCH HEATING ELEMENTS OR INTERIOR
SURFACES OF WARMING DRAWER – Heating elements
may be hot even though they are dark in color. Interior
surfaces of a warming drawer become hot enough to
cause burns. During and after use, do not touch, or let
clothing or other flammable materials contact heating
elements or interior surfaces of warming drawer until they
have had sufficient time to cool. Other surfaces of the
warming drawer may become hot enough to cause burns –
among these surfaces are warming drawer vent openings
and surfaces near these openings and warming drawer
doors.
Do not touch hot surfaces. Use handles or knobs.
Do not operate any appliance with a damaged cord or plug
or after the appliance malfunctions or has been damaged
in any manner. Return appliance to the nearest authorized
service facility for examination, repair or adjustment.
The use of accessory attachments not recommended by
the warming drawer manufacturer may cause injuries.
Do not use warming drawer for other than intended use.
To reduce risk of electric shock, do not mount over a sink.
This product is designed for household use only.
SAVE THESE INSTRUCTIONS
3
Electrical Requirements
A
C
D
It is important to make sure you have the proper electrical
connection:
A 115 V, 60 Hz, AC only 15 A or 20 A electrical supply, properly
grounded in accordance with the National Electrical Code and
local codes and ordinances, is required.
It is recommended that a separate circuit, serving only your
warming drawer, be provided.
Recommended Grounding Method
The warming drawer must be grounded. This warming drawer is
equipped with a power supply cord having a 3 prong grounding
plug. To minimize possible shock hazard, the cord must be
plugged into a mating, 3 prong, grounding-type wall receptacle,
grounded in accordance with the National Electrical Code and
local codes and ordinances. If mating wall receptacle is not
available, it is the personal responsibility of the customer to
have a properly grounded, 3 prong wall receptacle installed by a
qualied electrician.
WARMING DRAWER USE
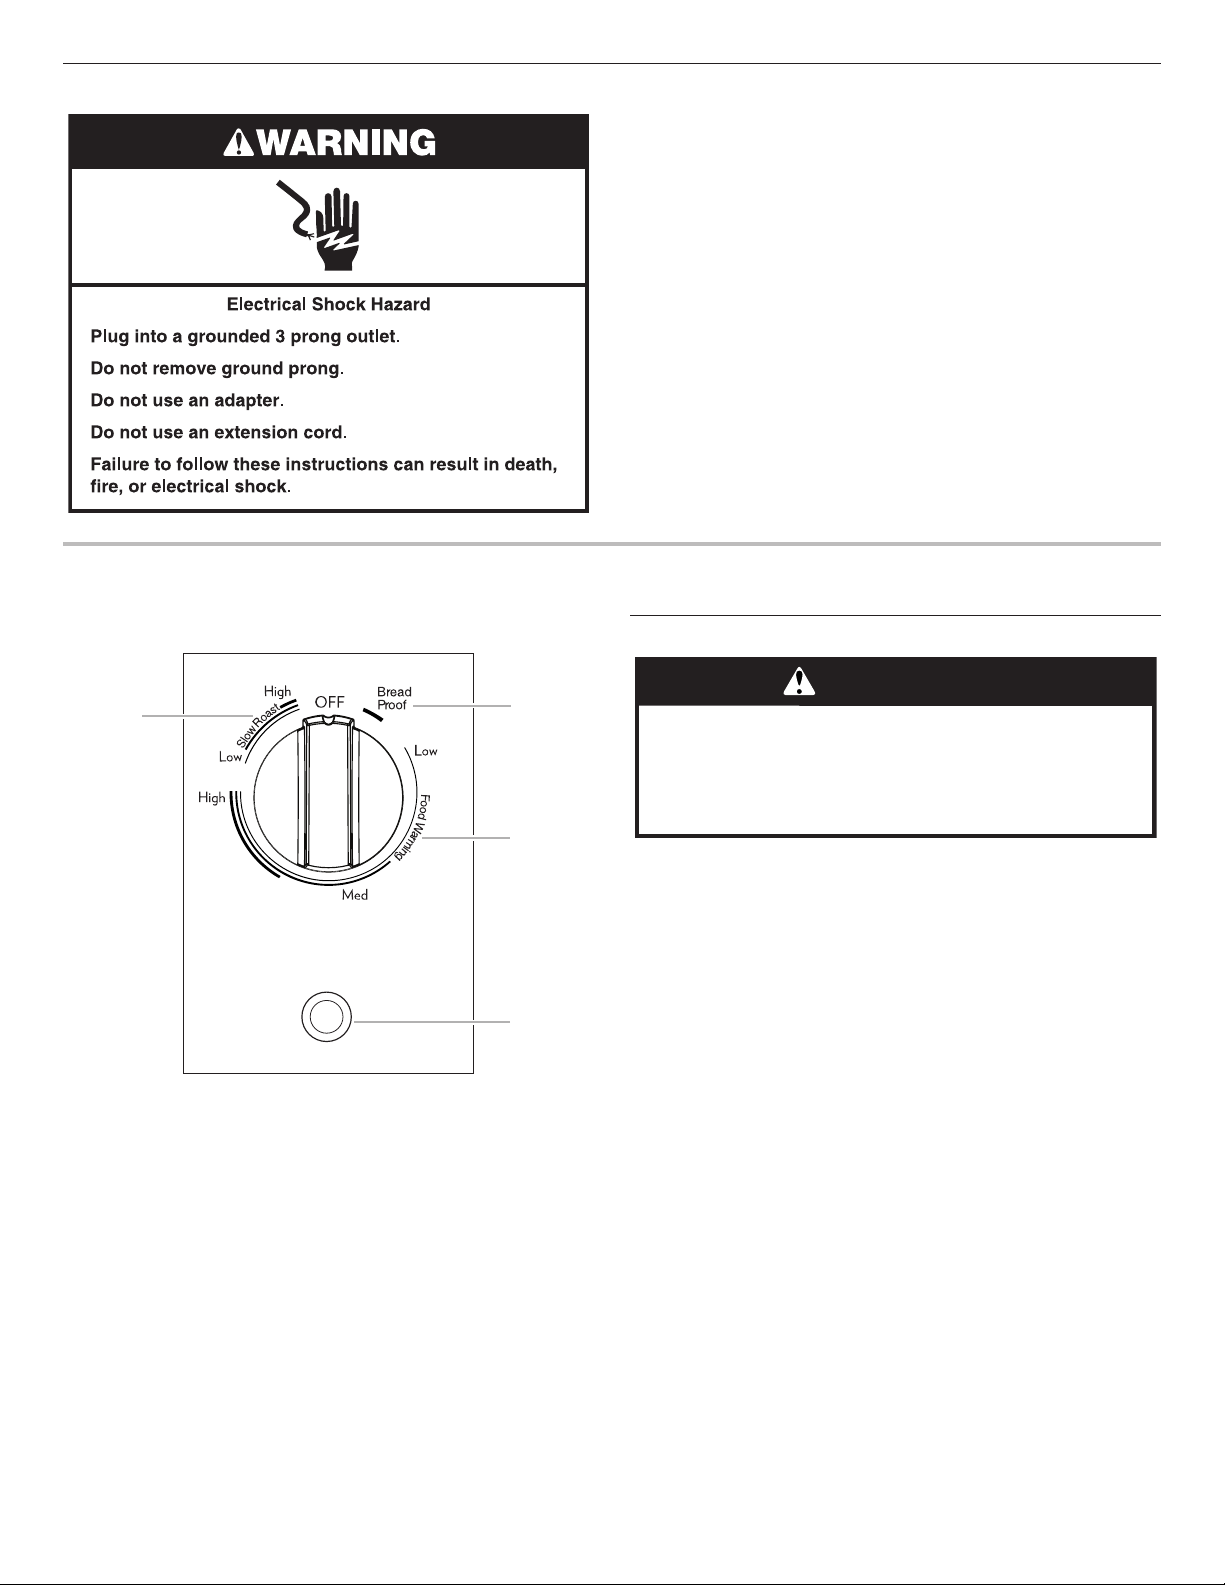
Control Panel
A. Slow roast temperature control zone
B. Proofing bread control position
C. Warming drawer temperature control zone
D. Power indicator light
Power
Control Knob
WARNING
B
Food Poisoning Hazard
Do not let food sit for more than one hour before or
after cooking.
Doing so can result in food poisoning or sickness.
Push in and turn the control knob to turn on the warming drawer.
The blue power indicator light will turn on and remain on while the
warming drawer is in operation.
When nished, turn the control knob to OFF to turn off the
warming drawer. When the warming drawer is turned off, the blue
power indicator light will go out, and the drawer will begin to cool.
The temperature is controlled by rotating the control knob to the
desired setting. The temperature setting ranges from Low to High
on the warming drawer control to keep heated foods warm at the
selected temperatures.
4
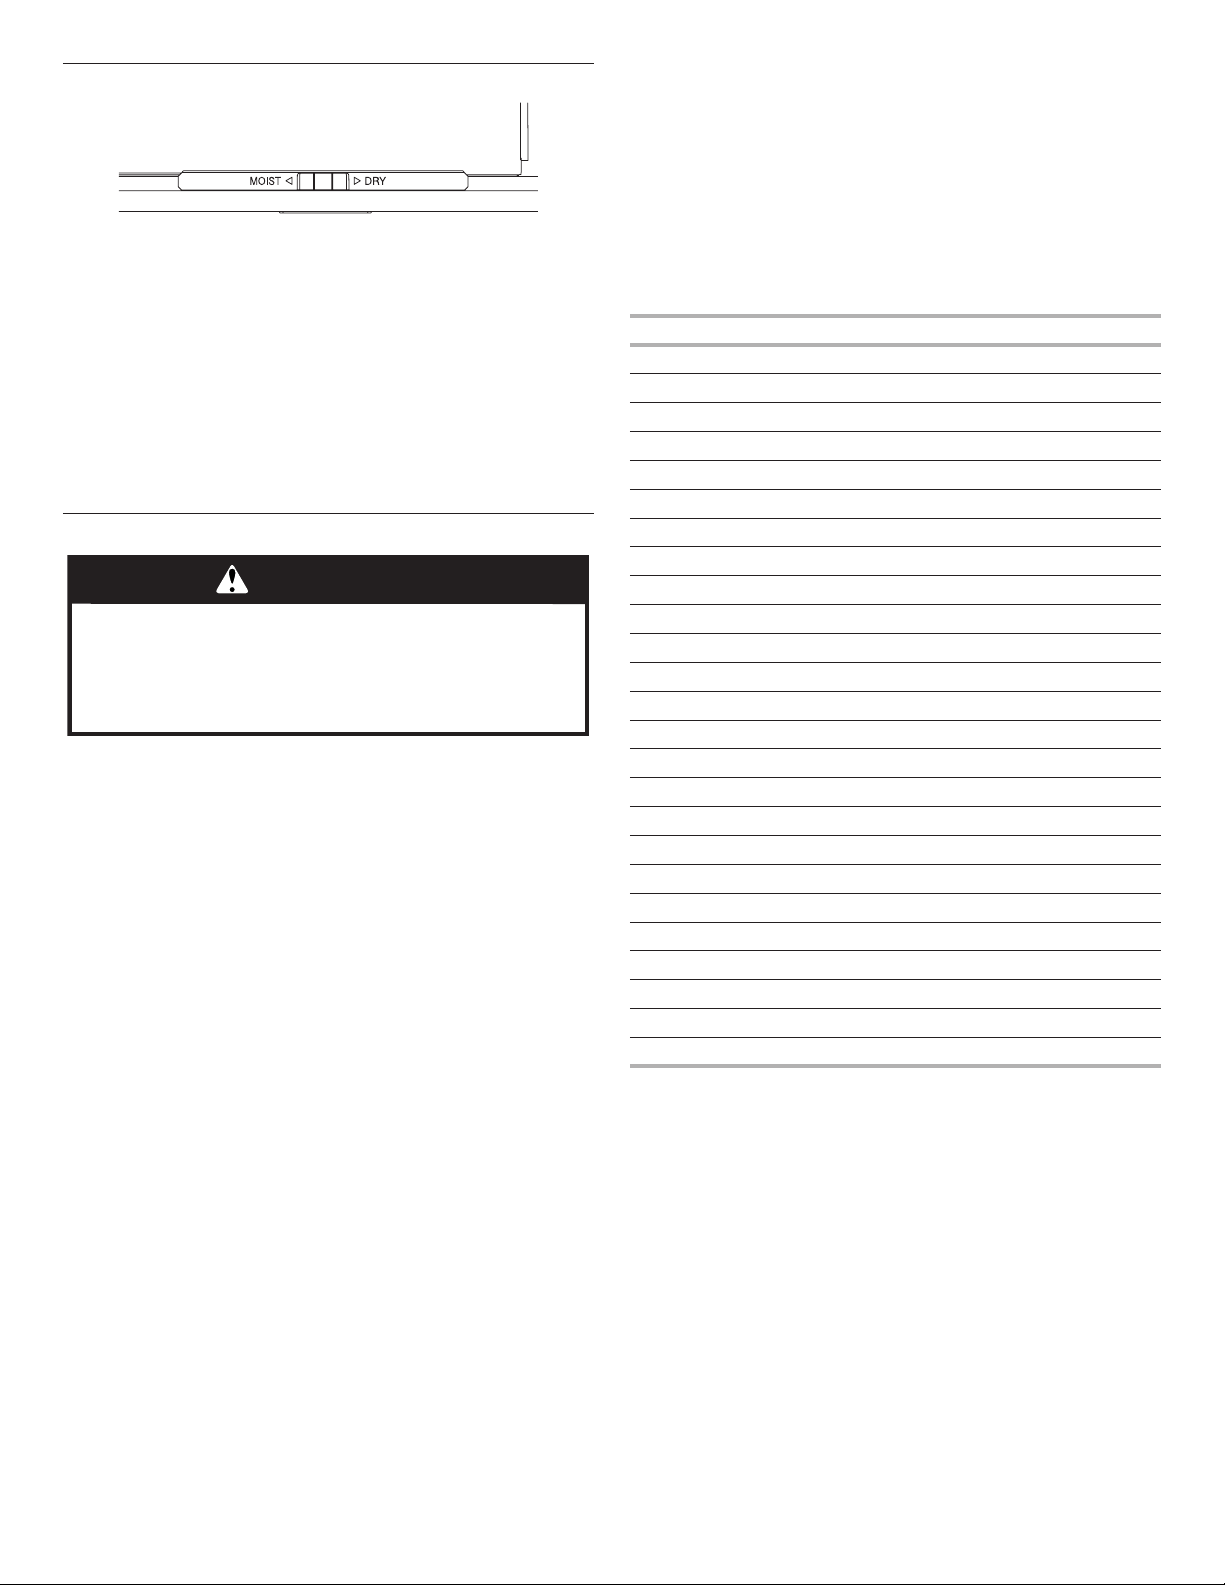
Moist-Dry Slide Control
The Moist-Dry slide control allows you to open or close the vent
slots in the door. The MOIST setting holds moisture in, while
the DRY setting allows steam and moisture to escape from the
drawer.
NOTE: Condensation may form on inner surfaces. This is normal.
To keep foods moist, slide control to MOIST, closing the vents.
Closing the vents will seal the drawer and keep hot foods soft and
moist.
To keep foods crisp, slide control to DRY, opening the vents.
Opening the vents releases moisture from the drawer and keeps
hot foods crisp and dry. See the Warming Drawer Temperature
Chart in the “Setting the Controls” section.
Setting the Controls
WARNING
Food Poisoning Hazard
Do not let food sit for more than one hour before or
after cooking.
Doing so can result in food poisoning or sickness.
The Indoor/Outdoor Warming Drawer is ideal for keeping hot
cooked foods at serving temperature. It is designed to operate
properly either indoors or outdoors at temperatures down to 32°F
(0°C). If the drawer is operated at temperatures colder than 32°F
(0°C), performance may be affected.
Different types of food may be placed in the warming drawer at
the same time.
When keeping several types of food hot, use the setting for the
highest temperature food in the warming drawer. Place foods
requiring the highest temperature on the bottom of the drawer
and those foods requiring the lowest temperature on the elevated
rack.
For best results, do not hold foods in the warming drawer longer
than 1 hour. For smaller quantities or heat-sensitive foods, such
as eggs, do not hold longer than 30 minutes.
Food must be cooked and heated to serving temperature before
being placed in the warming drawer. Cover foods with a lid.
Breads, pastries, and fruit pies may be heated from room
temperature on the High setting. Remove food from plastic bags
and place in oven-safe container.
Oven-safe serving dishes and dinner plates can be heated while
the warming drawer is preheating.
NOTE: To conserve heat, place cookware and positioning rack in
the warming drawer before preheating.
WARMING DRAWER TEMPERATURE CHART
Different foods require different settings in order to maintain the
ideal serving temperature. Use the following chart as a guide.
You can set the drawer temperature anywhere between Low and
High. For best results, meats, seafood and poultry should be set
to medium or higher. Cover food, if desired, to maintain heat and
moisture.
When keeping several different types of food hot, set the drawer
to the food requiring the highest temperature setting. Place
item(s) requiring the highest temperature on the bottom of the
drawer and those items requiring the lowest temperature on the
rack.
FOOD SETTING
Bacon Med to High - DRY
Beef, medium and well-done Med to High - MOIST
Bread, hard rolls Med - DRY
Bread, soft rolls Med - MOIST
Casseroles - with a crisp top Med - DRY
Casseroles Med - MOIST
Coffee cake Med - MOIST
Cooked cereal Med to High - MOIST
Eggs High - MOIST
Fish, Seafood (no breading) High - MOIST
Fish, Seafood (breaded) High - DRY
Fried foods High - DRY
Gravy, Cream Sauces High - MOIST
Ham Med High - MOIST
Hors d’oeuvres (crisp) High - DRY
Lamb Med to High - MOIST
Pancakes, wafes High - DRY
Pies, single crust Med - DRY
Pies, double crust Med to Low - DRY
Pizza High - DRY
Pork Med to High - MOIST
Potatoes, baked Med - DRY
Potatoes, mashed Med to High - MOIST
Poultry High - DRY
Vegetables Med to High - MOIST
To Use:
1. Push in and turn the control knob to the desired food warming
setting: Low, between Low and Med (medium low), Med
(medium), between Med and High (medium high), or High.
NOTE: For best results, meats, seafood, poultry and any
foods containing meat, seafood or poultry should be set to
medium or higher.
2. Select MOIST or DRY setting.
3. Allow warming drawer to preheat. Recommended minimum
preheating times are 5 minutes for Low, 10 minutes for Med,
and 20 minutes for High.
4. Push in and turn the control knob to OFF when nished.
5
Warming Cookware
C
Use only cookware approved for oven use. Follow the cookware
manufacturer’s instructions.
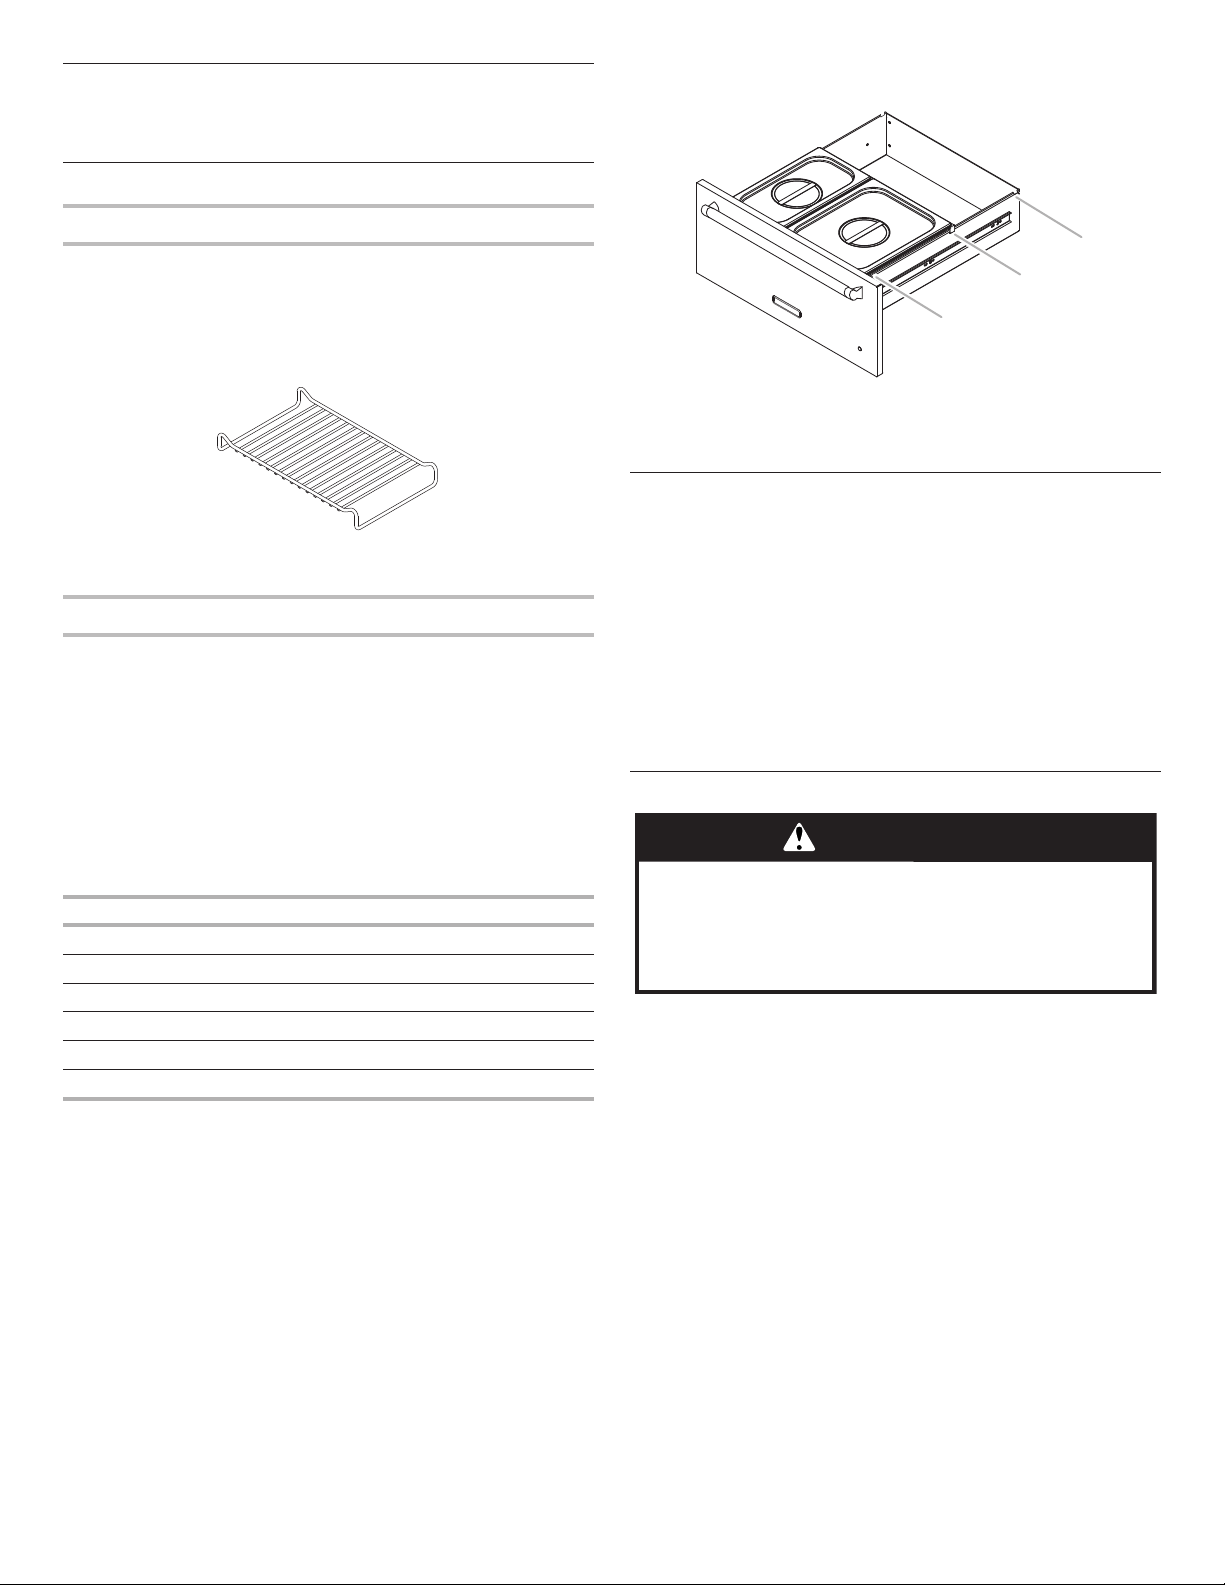
Positioning Racks and Pans
Positioning Rack
When using serving pans, make sure the pan support rails are
properly installed in the locater notch before inserting pans.
The 2 racks accompanying your warming drawer will t from front
to back or side to side.
NOTE: The warming drawer must be fully opened when placing
or removing racks.
Each rack raises an oven-safe container 1¹⁄8" (2.86 cm) from the
bottom of the drawer.
Keep the number of times the drawer is opened to a minimum in
order to maintain set temperature in the warming drawer.
Optional Pans (accessory)
The warming drawer includes 2 pan support rails designed to
hold a variety of serving pan sizes. Pan sizes that can be used are
1/6, 1/9, 1/3, 1/2, and 2/3. A full size serving pan can be placed
across the width of the 27" (68.6 cm) and 30" (76.2 cm) warming
drawer.
1/2 and 1/3 size pans may be purchased from the JennAir®
Customer eXperience Center. See the “Assistance or Service”
section to order.
Other size serving pans can be purchased at various retailers and
restaurant supply stores.
Please refer to the following chart to determine the correct
positioning of the pan support rails for each of the pan sizes.
Pan Size Pan Support Rails
Full* Positions 1 and 3
2/3 Positions 1 and 3
1/2 Positions 1 and 3
1/3 Positions 1 and 3 or 1 and 2
1/6 Positions 1 and 2
1/9 Positions 1 and 2
*Full-size pans cannot be used with the 24" (61 cm) warming
drawer.
B
A
A. Position 1 pan support rail locator notch
B. Position 2 pan support rail locator notch
C. Position 3 pan support rail locator notch
Proofing Bread
Proong bread prepares dough for baking by activating the yeast.
Check dough periodically for progress.
To Proof:
1. Cover dough with lightly oiled waxed paper and place
temperature safe bowl(s) on rack.
2. Set control knob to PROOF setting.
3. Place vent on MOIST setting.
4. Verify doneness by pressing 2 ngers 1/2" (1.27 cm) into
dough. If indentation remains, the dough is ready.
For second proong of dough, repeat steps 1 through 4.
Slow Roast Function
WARNING
Food Poisoning Hazard
Do not let food sit for more than one hour before or
after cooking.
Doing so can result in food poisoning or sickness.
The Slow Roast function in the warming drawer cooks food slowly
at a low temperature over a long period of time.
When the warming drawer is installed outdoors, the Slow Roast
function should not be used when the temperature is below 32°F
(0°C).
There are 2 settings, High and Low. Guidelines for cooking times
are 4 to 5 hours for High and 8 to 10 hours for Low. Smaller
quantities of food may require less time, while larger quantities
may require more time.
When slow roasting, use serving pans (available for purchase) or
oven-safe cookware. To order serving pans, see the “Assistance
or Service” section.
Before slow roasting, thaw frozen foods completely.
IMPORTANT: Brown roasts thoroughly before slow roasting.
6
 Loading...