

Jenn-Air JES9750BAB17, JES9750BAS18, JES9750BAW17, JES9800BAS18, JES9800CAB17 Installation Guide
...
Jenn-AirElectric
DowndraftRange
Cuisini_re61ectriqueb circulationdescendanteJenn-Air
Estufael6ctrica de corrientedescendenteJenn-Air
\
\
I
Printed in USA ©2005 MaytagCorporation REV0-10/05 8101P700-60

Jenn-AirElectricDowndraftRange
PLEASEKEEPTHIS MANUALFOR FUTUREREFERENCE
This manual is intended to assist in the initial installation and adjustments of the range.
• Onlyqualified personnelshould install or service this range.
• Read"SafetyInstructions" in Use&Carebook before using range.
• Improper installation, adjustment, alteration, service, maintenanceor use of range
can result in serious injury or property damage.
• Installer,takecare not to damageflooring.
Donot lift or move range by graspingdoor handles or main top.
S
'All RANGESCANTIP AND CAUSE
_J INJURIES TOPERSONS,
INSTALL ANTI,TIP DEVICESPACKED
Thisrangehasbeen designed in accordancewith the
requirementsof various safety agencies andcomplies with the
maximum allowable wood cabinet temperatures of 194°EIf this
rangeis installed with cabinets that have alower working
temperaturethan 194°F,discoloration, delamination or melting
mayoccur.
Placerange in awell lit area. Donotset range overholesinthe
floor or other locations where it may be subject to strong
drafts.Any opening in the wall behindthe range and in the
floor under the range shouldbe sealed.Make surethe flow of
cooling/ventilation air is not obstructedbelow the range. Note:
A range should NOTbe installed over kitchen carpeting.
MOBILEHOMES
Theinstallationof arangedesignedfor mobile homeinstallationmustconformwith the ManufacturedHomeConstructionandSafetyStandard,Title 24CFR,
Part3280(formerlytheFederalStandardfor MobileHomeConstructionandSafety,Title 24 HUD,Part280)or,when suchstandardis notapplicable,the
Standardfor ManufacturedHomeInstallationsANSIA225.1/NFPA501A,orwith local codes.InCanadathe rangemustbe installedin accordancewith the
currentCSAStandardC22.1- CanadianElectricalCodePart1.
A risk of rangetip-over exists if the appliance is not installed in
accordancewith the provided installation instructions. Theproper use
ofthe ANTI-TIPdevice minimizesthe risk of TIP-OVER.In using this
devicethe consumer must still observe the safety precautions as
stated inthe USEandCAREMANUALand avoid using the ovendoors
asastep stool. Installation instructions are provided for wood and
cement in either floor or wall. Any other type of construction may
require special installation techniques as deemednecessaryto
provide adequatefastening of the ANTI-TIPbracketto the floor or wall.
The bracket must be installed to engagethe RIGHTor LEFTrear
leveling foot. Install the bracket as shown in step 9.
| i: I: Id:1
The rangemustbe installed in accordancewith Localand National
Electric Code(NEC)ANSI/NFPANo.7O-latestedition, or Canadian
Electric CodeCSASTD.C221latest edition. Seerating plate for total
connected KW rating.
Yourlocal utility company will tell you whether the presentelectric
serviceto your homeis adequate.It may be necessaryto increase the
size of the wiring to the house and service switch to take care of the
electrical load demandedby the range.Thekilowatt rating for the
rangeis specified onthe rating plate. Seestep 8for locationof rating
plate.
Mostlocal Building Regulationsand Codesrequire that all electrical
wiring be doneby licensed electricians. All wiring should conform to
Localand National Electrical Codes.This rangerequires asingle phase
three wire 120/240or a 120/208 volt, 60 Hz,ACcircuit. Wiringcodes
requirea separatecircuit berun from the main entrancepanel to the
rangeand that it be equippedwith separate disconnect switch and
fuses,either in the main entrance panel or in a separate switch and
fuse box.
Somemodels are shipped directfrom the factory with service cord
attached.Thereare no rangeconnectionsnecessary onthese models.
Just plug into the wall outlet. On modelsnot provided with a service
cord,connection to thepower supply is necessaryin accordancewith
local codes. Provisionsfor using either conduit or a flexible power cord
areprovided.When using a power supply cord, useonly a supply cord
with closed loopterminals rated either 240 volts, 40 amps or 240 volts,
50 amps that is marked for use with nominal 1-3/8" (34.94mm)
diameter connection opening and markedfor ranges.A4-conductor
cord isto be usedon new branch-circuit installations (1996NEC),
mobile homes,recreationalvehicles and where localcodes prohibit
groundingthrough the neutral conductor.A 3-wire service may be used
when permitted by local codes.Whena powersupply cordis used,a
cord nolonger than 4 feet shouldbe used.
Canada
Thismodelis shippeddirect fromthe factorywith the servicecord
attached.Thereare norangeconnectionsnecessary.

II; II V vJIII[11.'t:1LvA[llVj:11.'L'I[€t:11;[I] .'kvj[HI [€
Follow these procedures to remove appliance for servicing:
1. Sliderangeforward to disengagerangefrom the anti-tipbracket,
2, Disconnectelectricalsupply to appliance,if equipped.
3. Reverseprocedureto reinstall.
4.To preventrangefrom accidentallytipping,rangemustbe secured
tothefloor by slidingrear levelingleg intothe anti-tipbracket.
Whenyour range requiresservice or replacement parts, contact your dealer or authorizedservice agency.Please givethe complete model and serial
number of the range which is located onfront frame behind storagedrawer.
THE APPLIANCE.
JYourrange may not be equipped with some of the features referredto in this manual. J
I
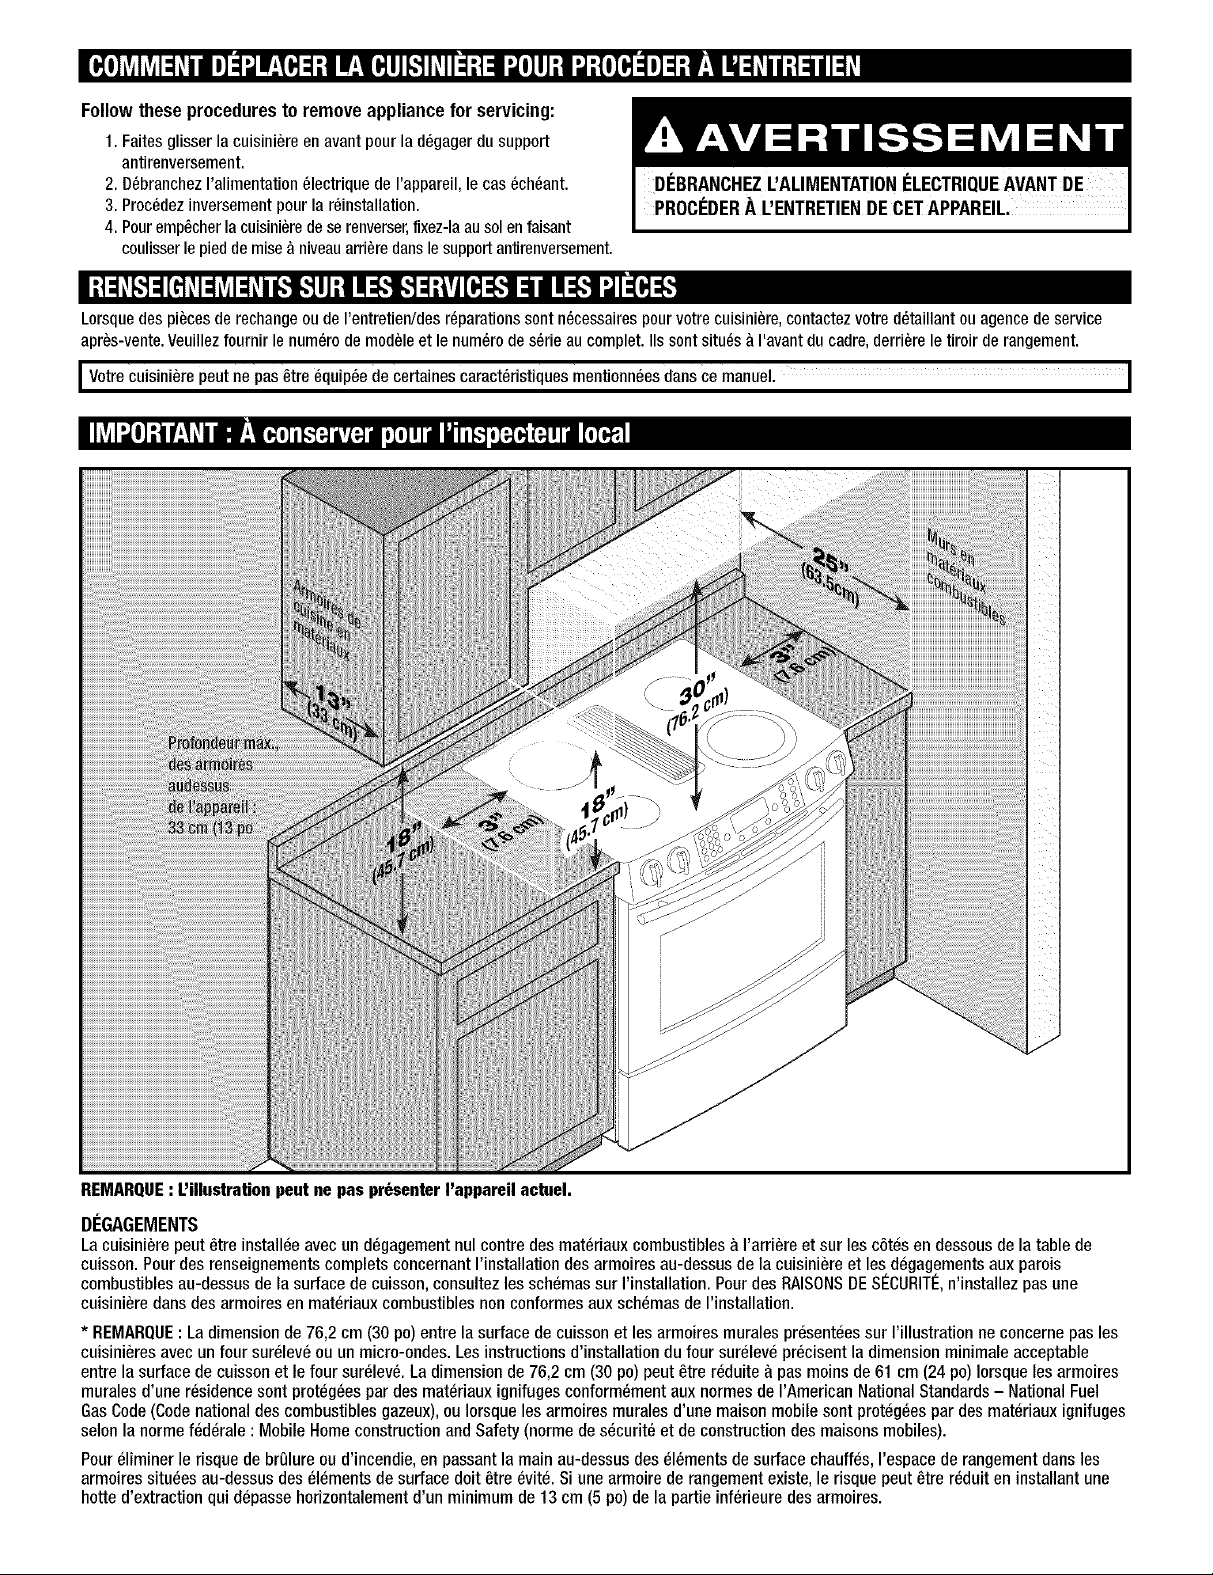
NOTE:Figure may not be representativeof actual unit.
CLEARANCEDIMENSIONS
Rangemay be installed with zeroinches clearanceadjacentto (against)combustible construction at the rear and on the sides below the cooktop. For
complete informationin regard to the installation of wall cabinets abovethe range and clearancesto combustible wall abovethe cooking top see the
installation drawings. For SAFETYCONSIDERATIONSdo not install a range in any combustible cabinetry which is not in accordwith the installation
drawings.
* NOTE:30 inch (76.2 cm) dimension between cooking top and wall cabinet shown on illustration does not apply to ranges with an elevatedoven or
microwave.Theinstallation instructions of the elevatedoven will specify the minimum acceptabledimensionbetween the cooktop and elevated oven.
The30 inch (76.2 cm) dimensionmay be reducedto not less than 24 inches(61 cm)when the wall cabinets in a domestic home are protected with
fireproof materials in accordance with AmericanNational Standards- National Fuel GasCodeor in mobile homes when they are protected with
fireproof materials in accordance with the FederalStandardfor MobileHomeConstructionand Safety.
Toeliminate the risk of burns or fire by reachingover heated surface units, cabinet storagespacelocated abovethe surface units should be avoided.
If cabinet storageis to be provided,the risk can be reducedby installinga range hoodthat projects horizontally a minimum of 5 inches (13 cm)
beyondthe bottom ofthe cabinets

Cuisini re 61ectriqueb circulationdescendanteJenn-Air
VEUILLEZCONSERVERCE MANUELPOURCONSULTATIONULTi:RIEURE
Cemanuelestpr6vu pourvousaiderdans I'installation et les r_glagesde la cuisiniere.
• Seuldu personnelqualifi6 dolt installer oufaire I'entretiende cette cuisinibre.
• Lisezles ,,Instructionsdesbcurit_,, dansle guided'utilisation et d'entretienavantd'utiliser la cuisinibre.
• Uneinstallation,des r6glages,desmodifications,une utilisation ou un entretien,effectubsde fa_on
inappropri6e,peuvententrainerde gravesblessuresou desd_g&tsmatbriels.
• Installateur: Faites attention de nepasendommagerlesol.
AT T EN
Nesoulevezpaset ned_placezpaslacuisini_reenlaprenantparlee
poignbesde porteoupar ledessus.
Cettecuisini_rea_t6 con§ueconform_mentauxexigencesde
diversesagencesconcernbespar la s_curit_et respecteles
temperaturesmaximalespermisesde90 °C(194 °F)pourles
armoiresen bois.Sicettecuisinibreestinstall_eprbsd'armoiresne
supportantqu'unetemperatureinf_rieure__90 °C(194°F),ily a
risquede dbcoloration,d_laminationoufusion.
Placezla cuisinibredansun endroitbien_clair_. NeI'installezpas
au-dessusde trousdansleplancherou& d autresendroitsohelle
risqued'etresoumise_ deforts courantsd'air.Touteouverturedans
letour derrierelacuisinibreet danslesol souslacuisinibredoit _tre
ferrule hermbtiquement.Assurez-vousquela circulationde I'airde
refroidissement/ventilationn'estpasentravbesousla cuisiniere.
REMARQUE:N'installezPASunecuisinieresur de lamoquettede
cuisine.
! TOUTESLESCUISINII:RESPEUVENTSE
i NSTA"EZDESO SPOSmFS
ANTIRENVERSEMENTFOURNISAVEC
'_ LA CUISINIERE,
• SUI#sEZTATLOULATIEoSN!ESINSTRUCTIONS
Unrisqueque la cuisinibrese renverseexistesi I'appareiln'est pas
install6conform6mentauxinstructionsd'installationfournies. L'utilisation
correctedudispositif ANTIRENMERSEMENTminimise le risquede
RENMERSEMENT.M_meavecce dispositif,le consommateurdolt taujours
observerles mesuresdes6curitb pr_cisbesclansle MANUEL
D'UTILISATIONETD'ENTRETIENet _viter de montersur les portesdes
fours.Lesinstructions d'installation sont fourniespourdes endroitsohles
tourset les solssont en boisou enciment.Toutautretype de construction
peutnbcessiterdestechniquesd'installation sp_ciales,pourpermettre la
fixationdusupport ANTIRENVERSEMENTau tour ouau sol. Labride dolt
_tre installbepour enclencher le pied de nivellement arriere DROITou
GAUCHE.Installez la bride comme illustre a I'etape9.
MAISONS MOBILES
L'installationd'une cuisini_recon_uepourune maison mobile dolt _treconformea la ManufacturedHomeConstructionandSafetyStandard(normede
sbcurit_etdeconstructiondesr_sidencespr_fabriqubes),titre 24CFR,partie3280(ant_rieurement,la FederalStandardfor MobileHomeConstructionand
Safety,titre 24 HUD,partie 280)ou,Iorsqu'unetelle normen'est pas applicable,a la norme pourles installationsde r_sidencespr_fabriqu_esANSI
A225.1/NFPA501A,ou conform_mentauxcodes Iocaux.Au Canada,la cuisini_redolt _treinstallbeselonla normecouranteCSAC22.1.
Lacuisini_redolt _tre Jnstallbeconform_mentau NationalElectricalCode
(NEC)ANSI/NFPAno70 - _ditionla plus r_cente,ouconforme auCode
canadiende I'blectricitb,normeCSAC22.1,_dition la plusrbcente.Voyez
sur la plaquesignal_tiquela puissancenominaletotale en kW.
Votrecompagnied'_lectricit_ localevous indiquerasi I'alimentation
_lectriqueactuelle devotre r_sidenceest suffisante. II pourra_tre
n_cessaired'augmenterle calibre du c&blageet de I'interrupteursecteur
pour satisfairela consommationen _lectricitbde la cuisini_re.La
puissancenominaleenkilowatts de la cuisini_re est pr_cis_esur la
plaquesignal_tiquesitu_e sur une plaqueescamotablea I'arriere,au
centre dudosseret. Voir I'btape 8 pour connaffreI'emplacement de la
plaque signaletique.
Lamajorit_ des codeset r_glementsIocauxde la constructionexigeque
le c&blage_lectrique soit installbpardes _lectriciensagrb_s.Toutle
c&blagedolt _treconforme auxcodes_lectriquesIocauxet nationaux.
Cettecuisini_ren_cessiteun circuit C.A.trifilaire, monophas_de 120/240
voltsou de 120/208volts, 60 Hz.Lescodesde c_blagespbcifient qu'un
circuit s_par_ dolt_tre pr_vuentre le panneaudedistribution principal et
la cuisini_re etqu'il dolt _tre_quip_d'un disjoncteuret defusibles
ind_pendants,que ce soit auniveaudu panneauprincipalou dansune
boites_par_eavecfusibleset disjoncteui;
Certainsmodblessont livr_s directementde I'usine avecuncordon
d'alimentation.Aucunraccordementn'est n_cessairesur ces modules.
IIsuffit de brancherle cordondans la prise murale.Surles modelessans
cordon,le raccordementa I'alimentationest nbcessaireconformbmentaux
codesIocaux.II est possibled'utiliser soitun conduitsoit uncordon
souple.Avec un cordonsouple,pour cuisinibres,ne I'utilisez qu'avecdes
cossesferm_espr_vuessoit pour240volts,40A, soit pour240 volts, 50
A- ouvertarede 34,94mm (1-3/8 po)de diam_tre.Uncordona 4
conducteursdolt _treutilis_ sur lesnouvellesinstallationsacircuit de
dbrivation(NEC1996),demaisonsmobiles,de v_hiculesr_cr_atifset la oh
les codesIocauxinterdisent la misea la terreparle neutre.Une
alimentationa3 fils pent _tre utilis_e la ohelle est autorisbeparles codes
Iocaux.Lorsqu'uncordond'alimentationest utilisb, celui-ci nedolt pas
dbpasser1,20m (4 pieds)en Iongueui;
Canada
Cemodbleestlivr_ directement deI'usine avec le cordon d'alimentation.
Aucunraccordementn'est n_cessaire.
Follow these procedures to remove appliance for servicing:
1, Faitesglisserlacuisiniereen avantpourladbgagerdusupport
antirenversement.
2. O6branchezI'alimentation61ectriquede I'appareil,lecas6ch6ant.
3. Proc6dezinversementpourlar6installation.
PROCI_DERA L'ENTRETIENDECETAPPAREIL.
4. Pouremp_cherla cuJsinJ_redeserenverser,flxez-laausolenfaisant
coulisserlepieddemise a niveauarri_redartsle supportantirenveisement.
i It1_F,,_:][__11iVil1_i I,"],,_llInI :i,"],,"]1ltvj[_ _1 i I n:!,111:[_:_
Lorsquedespi_cesde rechangeoude I'entretien/desr6pamtionssont n6cessairespourvotrecuisiniere,contactezvotred_taillantouagencede service
apr_s-vente.Veuillezfournir le num_rodemodeleet le num6rodes_rie aucomplet.IIs sontsitu6sa I'avantdu cadre,derriereletiroir derangement.
JVotrecuisini_repeut ne pas_tre _quip_e decertainescaract_ristiquesmentionn_esdanscemanuel. I
I
REMARQUE:Lillustration peut ne pas pr6senter rappareil actuel,
I
DI_GAGEMENTS
La cuisiniere peut _tre installee avecun d_gagementnul contre des mat_riaux combustiblesa I'arriere et sur les cotes en dessousde la table de
cuisson.Pourdes renseignementscomplets concernant I'installation desarmoires au-dessusde la cuisiniere et les degagementsaux parois
combustibles au-dessusde la surface decuisson,consultezles schemassur I'installation. Pourdes RAISONSDESleCURITI_,n'installez pasune
cuisiniere dansdes armoires en materiaux combustibles non conformes auxschemas de I'installation.
* REMARQUE:Ladimension de 76,2 cm (30 po) entre la surface de cuisson et les armoires murales pr_sentees sur I'illustration neconcerne pas les
cuisini_res avec unfour surelev_ou un micro-ondes. Les instructions d'installation du four sureleve precisentla dimension minimale acceptable
entre la surface de cuisson et le four sur_lev_. Ladimensionde 76,2 cm (30po)peut _tre reduite a pas moins de 61 cm (24 po) Iorsque les armoires
muralesd'une r_sidence sont protegeespar des materiaux ignifuges conform_ment aux normesde i'American NationalStandards- National Fuel
GasCode(Codenational des combustibles gazeux),ou Iorsque les armoires muralesd'une maisonmobile sont protegeespar desmateriaux ignifuges
selon la norme federale : MobileHomeconstruction and Safety (norme desecurit_ et de construction des maisonsmobiles).
Poureliminer le risque de brOlureou d'incendie, en passantla main au-dessus deselements desurface chauffes, I'espace de rangementdarts les
armoires situees au-dessusdes_lements de surface dolt _tre evite. Si une armoire de rangementexiste, le risquepeut _tre reduit en installant une
hotte d'extraction qui depasse horizontalementd'un minimum de 13cm (5 po) de la partie inferieure des armoires.

Estufael6ctricade corrientedescendenteJenn-Air
POR FAVORGUARDEESTEMANUAL PARA REFERENCIAFUTURA
Estemanual esta disefiado para asistirlo enla iflstalaci6fl y ajustes inicialesde la estufa.
• Lainstalaci6n o reparaci6nde esta estufa debeser realizadaunicamente por personal calificado.
• Lea las instrucciones deseguridad en la guia de uso y cuidadoantes de usar la estufa.
• Lainstalaci6n, ajuste, alteraci6n,servicio, mantenimiento o uso inapropiadosde la estufa puede
resultar en lesionesgraveso dafios ala propiedad.
• Instalador:tenga cuidado de nodafiar el piso.
Nolevanteo muevalaestufaporlasmanijasdelapuertaoporla
cubierta.
_,_j VOLCARY CAUSARLES!ONES
k_ _ ! PERSONALES.
GQ
Estaestufarue disefiadadeaeuerdoconlos requerimientosde
variasagenclasde seguddady cumpleconla tempemtui_
maximaparaarmariosdemaderade194°F (90°C).Siesta
estufase instalacon armarioscontemperaturasdetrabajo
menoresde 194°F(90°C),losmismos puedendescolorarse,
deslaminarseo derretirse.
Coloquela estufa en un__reabien iluminada.Nocoloquela
estufasobreagujeros enel piso o en otrasubicacionesdonde
est_ expuestaa r__fagasde vientofuertes. Cualquierabertura
en la pareddetr__sde la estufayen el piso debajode la estufa
debensellarse.Aseg_resedeque el aim de enfriamiento/
ventilaci6nnose obstruyadebajodela estufa. Nota:NOse
debeinstalaruna estufasobreel alfombradode la eocina.
CASASRODANTES
Lainstalacionde unaestufadisefiadapainsu instalacionencasasrodantesdebehacersede acuerdocon la NormadeConstrucci6ny SeguridaddeViviendas
Prefabricadas(ManufacturedHomeConstructionandSafetyStandard),Titulo 24 CFR,Parte3280 (anteriormentela NormaFederalde Construcci6ny
Seguridadde ViviendasPrefabricadas,Titulo24,Parte280)o,cuandodichanormanoseaplique,conla NormadeInstalaci6nenViviendasPrefabricadas
(Standardfor ManufacturedHomeInstallations)ANSIA225/NFPA501Ao con losc6digos locales.En Canada,estaestufa debeinstalarsede acuerdoconla
NormaCSAvigenteC22.1del C6digoCanadiensede Electricidad,Parte1.
Si nosesiguenlas instruccionesde instalaci6n provistas,existeel riesgode
quela estufase vuelque.Elusocorrectodel dispositivoANTIMUELCO
minimizael riesgodeque la estufa SEVUELQUE.Cuandose utilice este
dispositivo,el consumidora0ndebeseguir lasadvertenciasdeseguridad
indicadasen la GUiADEUSOY CUlDAD0y evitar usar la puertadel homo
comopeldafio.Lasinstruccionesde instalaci6nsonespecificas para
instalacionesde la estufaen paredeso pisosde maderay concreto.
Cualquierotrotipo de materialde construccionrequerirael uso det6cnicas
especialesparafijar debidamenteel soporteANTIMUELCOal piso o a la
pared.Elsoporte debeinstalarse parafijar el tornillo niveladortmsero
DERECHOo IZQUlERDO.Instale el soportecomoseindica enel paso9.
• TODASLAS ESTUFASSE PUEDEN
INSTALELOSDISPOSITIVOS
ANTIVUELCOPRoVIsTOS CON LA
} ; ESTUFA'
SIGA TODASLAS INSTRUCCIONES
DEINSTALACION.
Laestufadebeser instaladade acuerdocon el C6digoLocaly Nacional
de Electricidad(NEC)ANSI/NFPANo.70,01timaedici6n,o el C6digode
ElectricidadCanadienseCSASTD.C221,01timaedicion.Yeala placade
informaci6nparala clasificaci6nde KWtotalesconectados.
Sucompafiiade servicio localle podra informarsi el servicioel6ctrico
actualdesu vivienda esel adecuado.Esposiblequeseanecesario
aumentarel tamafio delcableadode lavivienda y del interruptorde
servicio parapodersoportar la carga el_ctrica que requierela estufa.La
clasificaci6nde kilowatts parala estufa esta especificadaenla placade
informaci6nubicadaen la solapa quese encuentraenla partecentral
traseradel protectortrasero. Obtengala ubicaci6nde la placa de
informaci6n en el paso 8.
La mayoriadelos c6digosy normasde construcci6nrequierenquetodo
el cableadoel_ctricosea realizadoporun electricistalicenciado.Todoel
cableadodebe cumplircon los c6digosel_ctricos nacionaly local. Esta
estufa requiereun circuito trifilar de 120/240o 120/208voltios CA,1
fase,60 Hz.Losc6digosde cableadoel6ctricorequierenla presenciade
un circuito separadodesdeel panelel6ctrico principalde entradahasta
la estufay queel mismo est_equipadoconun interruptor de
desconexi6ny fusibles individuales,ya sea enel panelprincipal de
entradao enunacajade fusibleso interruptor separada.
Algunosmodelosvienenequipadosde la fabrica conun cord6nel6ctrico de
servicio instalado.Estosmodelosnorequierenconexionesel_ctricasa la
estufa.Simplementeconecteel enchufeen untomacorrientemural. Paralos
modelosquenovienen provistoscon un cord6nel_ctricode serviciose
requiereuna conexi6nal suministro el_ctricode acuerdocon losc6digos
locales.Seproporcionanprovisionespareusartanto un conductofijo o un
cord6nflexible parala conexi6ndela estufa.Cuandouseun cordonde
suministrodeelectricidad,s61ousecordonesconterminalesde bucle cermdos
clasificadospare240 V,40Ampo para240V,50Ampmarcadosparasu usoen
estufasconuna aberturade conexionnominalde 1-3/8" (34,94mm) de
diametro.Se debeusarun cord6ntetrafilar en la instalaci6ndecircuitos
nuevos(1996 NEC),en casasrodantes,en vehiculosrecreacionalesy dondelos
c6digoslocalesprohibanrealizar unaconexi6na tierra atray,s delconductor
neutro.Sepuedeusaruncircuito trifilar cuando Io permitanlos c6digos
locales.Cuandose usaun cord6nel6ctrico,nose debe usar un cord6nde mas
de4 pies (1,2m) de Iongitud.
Canad_
Estemodeloviene equipadode la fabrica conun cord6nel_ctricode servicio
instalado.Noesnecesariorealizarconexionesa la estufa.

I t]_]1__._Jq:!Ir:l_[o]_I t]:1!:1 _j ILIJ;I.'1:;:!.'!:lk_]:1.'kvl[_[i
Siga los siguientes procedimientos para desinstalar la estufa para
servicio:
1, Deslicelaestufahaciaadelanteparadesengancharladelsoporteantivuelco.
2. Oesconecteel suministroel_ctrico ala estufa si Iotiene.
3. Inviertael procesoparareinstalarla estufa.
DESCONECTEELSUMINISTRO
REPARARELELECTRODOMESTICO.
4. Paraevitarquelaestufase vuelqueaccidentalmente,lamismadebe
asegurarseal pisodeslizandola eltornilloniveladortraseroenel soporteantivuelco.
m =o];tL,,r.,H n[opn;t==hi+'l|ot:
Cuando su estufa requiera reparacion o piezas de repuesto, pongase en contacto con su distribuidor o agencia de servicio autorizado. Por favor indique el
nn_merode modelo completo y el nOmero de serie de la estufa que se encuentran en el marco delantero dett_s del caj6n de almacenamiento.
I Es posible que esta estufa no venga equipada con todas las caractedsticas que se indican en este manual. J
m
NOTA:Lafigura puede no ser exacta a la unidad.
DIMENSIONES DE LOS ESPACIOS DE DESPEJE
Esta estufa se puede instalar sin espacios de despeje contra superficies combustibles en la parte trasera y a los costados de la misma por debajo de la
cubierta. Para obtener informaci6n completa sobre la instalaci6n de los armarios sobre la cubierta y los espacios de despeje para las paredes combustibles
sobre la cubierta vea las figuras de instalaci6n. Por RAZONESDESEGURIDAD,no instale una estufa en ninguna ubicaci6n con armarios combustibles que no
concuerden con las figuras de instalaci6n.
* NOTA: El despeje de 30 pulgadas (76,2 cm) entre la cubierta de coccion y el armario que se muestra en la figura no se aplica alas estufas con hornos
elevados o a los microondas. Las instrucciones de instalaci6n del homo elevado especificaran el espacio minimo entre la cubierta y el homo elevado. El
despeje de 30 pulgadas (76,2 cm) puede ser reducido a no menos de 24 pulgadas (61 cm) cuando los armarios del hogar estan protegidos con materiales a
prueba de fuego de acuerdo con las Normas Nacionales de Estados Unidos (ANS)y el C6digo Nacional de Gaso en las casas rodantes cuando las mismas
estan protegidas con materiales a prueba de fuego de acuerdo con la Norma Federal de Construcci6n y Seguridad de Viviendas M6viles.
Para eliminar el riesgo de quemaduras o de incendios cuando se intenta alcanzar algun objeto sobre los elementos superiores, evite almacenar articulos en
los armarios que estan sobre la estufa. Si se instala un armario sobre la cubierta, se puede reducir el riesgo instalando una campana de ventilaci6n que se
proyecte horizontalmente en un minimo de 5 pulgadas (13 cm) mas alia de la base de los armarios.
 Loading...