

Jenn-Air JED8430BDS18, JED8430BDB18, JED8430BDF18 Owner’s Manual
JENN-AIR DOWNDRAFT RADIANT COOKTOP
JENN-AIR
Form No, A/01/08 Part No, 8111 P528-60
TABLE OF CONTENTS
Important Safety Instructions .....................................1-3
Ducting Information ...........................................................3
Surface Cooking ..............................................................4-6
Care & Cleaning ..................................................................7
Troubleshooting ..................................................................8
Warranty & Service .............................................................9
Guide de rutilisation et entretien ................................10
Guia de Uso y Cuidado ...................................................22
@2006 Maytag Appliances Sales Co. All rights reserved.
Litho U.S.A.
AFETY
Read and follow all instructions before using this
appliance to prevent the potential risk of fire, electric
shock, personal injury or damage to the appliance as a
result of improper usage of the appliance. Use appliance
only for its intended purpose as described in this guide.
To ensure proper and safe operation: Appliance
must be properly installed and grounded by a qualified
technician. Do not attempt to adjust, repair, service, or
replace any part of your appliance unless it is specifically
recommended in this guide. All other servicing should be
referred to a qualified servicer.
Always disconnect power to appliance before servicing.
To Prevent Fire or
Smoke Damage
Be sure all packing materials are removed from the
appliance before operating it.
Keep area around appliance clear and free from
combustible materials.
Many plastics are vulnerable to heat. Keep plastics away
from parts of the appliance that may become warm or
hot.
INSTRUCTIONS
Warning and Important Safety Instructions appearing in
this guide are not meant to cover all possible conditions
and situations that may occur. Common sense, caution,
and care must be exercised when installing, maintaining,
or operating the appliance.
Always contact the manufacturer about problems or
conditions you do not understand.
Recognize Safety Symbols, Words, Labels
To prevent grease fires, do not let cooking grease or
other flammable materials accumulate in or near the
appliance.
in Case of Fire
Turn off appliance to avoid spreading the flame. Extinguish
flame then turn on hood to remove smoke and odor.
, Smother fire or flame in a pan with a lid or cookie sheet.
, NEVER pick up or move a flaming pan.
Do not use water on grease fires. Use baking soda, a dry
chemical or foam-type extinguisher to smother fire or
flame.
Child Safety
NEVER leave children alone or unsupervised near the
appliance when it is in use or isstill hot. Children should
never be allowed to sit or stand on any part of the
appliance as they could be injured or burned.
| M SAF ETY | UCT|
Children must be taught that the appliance and utensils
in it can be hot. Let hot utensils cool in a safe place, out
of reach of small children. Children should be taught that
an appliance is not a toy. Children should not be allowed
to play with controls or other parts of the appliance.
About Your Appliance
If appliance is installed near a window, proper
precautions should be taken to prevent curtains from
blowing over surface elements.
To prevent potential hazard to the user and damage to
the appliance, do not use appliance as a space heater to
heat or warm a room.
To ensure proper operation and to avoid damage to the
appliance or injury, do not adjust, service, repair or
replace any part of the appliance unless specifically
recommended in this guide. Refer all other servicing to
a qualified technician.
NEVER store or use gasoline or other combustible or
flammable materials near surface units or in the vicinity
of this appliance as fumes could create a fire hazard or
an explosion.
Many aerosol-type cans are EXPLOSIVE when exposed
to heat and may be highly flammable. Avoid their use or
storage near appliance.
DO NOT TOUCH HEATING ELEMENTS. Heating elements
may be hot even though they are dark in color. During
and after use, do not touch, or let clothing or other
flammable materials contact heating elements until they
have had sufficient time to cool. Other surfaces of the
appliance may become hot enough to cause burns.
Cooking Safety
Use dry, sturdy potholders. Damp potholders may cause
burns from steam. Dish towels or other substitutes
should never be used as potholders because they can
trail across hot elements and ignite or get caught on
appliance parts.
Wear proper apparel. Loose fitting or long hanging-
sleeved apparel should not be worn while cooking.
Clothing may ignite and cause burns if garment comes in
contact with heating elements.
NEVER heat unopened containers on the surface unit.
Pressure building up in the container may cause the
container to burst resulting in burns, injury or damage
to the appliance.
PREPARED FOOD WARNING: Follow food
manufacturer's instructions. If a plastic frozen food
container and/or its cover distorts, warps, or is otherwise
damaged during cooking, immediately discard the food
and its container. The food could be contaminated.
Always turn off all controls when cooking is completed.
Utensil Safety
This appliance has been tested for safe performance
using conventional cookware. Do not use any devices or
accessories that are not specifically recommended in this
guide. The use of devices or accessories that are not
expressly recommended in this guide can create serious
safety hazards, result in performance problems, and
reduce the life of the components of the appliance.
NEVER leave surface units unattended especially when
using high heat. An unattended boilover could cause
smoking and a greasy spillover can cause a fire.
This appliance is equipped with different size surface
elements. Select pans with flat bottoms large enough to
cover element. Fitting pan size to element will improve
cooking efficiency.
If the pan is smaller than the element, a portion of the
element will be exposed to direct contact and could
ignite clothing or potholder.
Only certain types of glass, glass/ceramic, ceramic,
earthenware, or other glazed utensils are suitable for
cooktop service without breaking due to the sudden
change in temperature. Follow utensil manufacturer's
instructions when using glass.
Turn pan handle toward center of cooktop, not out into
the room or over another surface element. This reduces
the risk of burns, ignition of flammable materials, or
spillage if pan is accidently bumped or reached by small
children.
2
| M SAF ETY | UCT|
Glass-Ceramic Cooktop
NEVER cook on broken cooktop. If cooktop should
break, cleaning solutions and spillovers may penetrate
the broken cooktop and create a risk of electric shock.
Contact a qualified technician immediately.
Clean cooktop with caution. Some cleaners can produce
noxious fumes if applied to a hot surface. If a wet
sponge, cloth, or paper towel is used on a hot cooking
area, be careful to avoid steam burn.
Deep Fat Fryers
Use extreme caution when moving the grease pan or
disposing of hot grease. Allow grease to cool before
attempting to move pan.
Save These Instructions for Future Reference
Cleaning Safety
Clean cooktop with caution. Turn off all controls and
wait for appliance parts to cool before touching or
cleaning. Use care to avoid steam burns if a wet sponge
or cloth is used to wipe spills on a hot surface. Some
cleaners can produce noxious fumes if applied to a hot
surface.
Clean only parts listed in this guide.
Important Safety Notice
and Warning
IMPORTANT NOTICE REGARDING PET BIRDS:
Never keep pet birds in the kitchen or in rooms where
the fumes from the kitchen could reach. Birds have a
very sensitive respiratory system. Fumes released during
an oven self-cleaning cycle may be harmful or fatal to
birds. Fumes released due to overheated cooking oil, fat,
margarine and overheated non-stick cookware may be
equally harmful.
Jenn-Air's ventilation system is designed to capture both
cooking fumes and smoke from the cooktop surface. If
the system does not, here are some ducting installation
situations to check:
* 6" diameter round or 3 W' x 10" rectangular ducting
should be used for duct lengths 10'-60'.
Note: 5" diameter round ducting may be used if the
duct length is 10' or less.
No more than three 90° elbows should be used.
Distance between elbows should be at least 18".
Recommended Jenn-Air wall cap MUSTbe used.
Make sure damper moves freely when ventilation
system is operating.
, There should be a minimum clearance of 6" for
cooktop installed near a side wall.
If there is not an obvious improper installation, there
may be a concealed problem such as a pinched joint,
obstruction in the pipe, etc. Installation is
the responsibility of the installer and
installer. The installer should very carefully
i questions should be addressed first by the
check the ducting installation instructions.
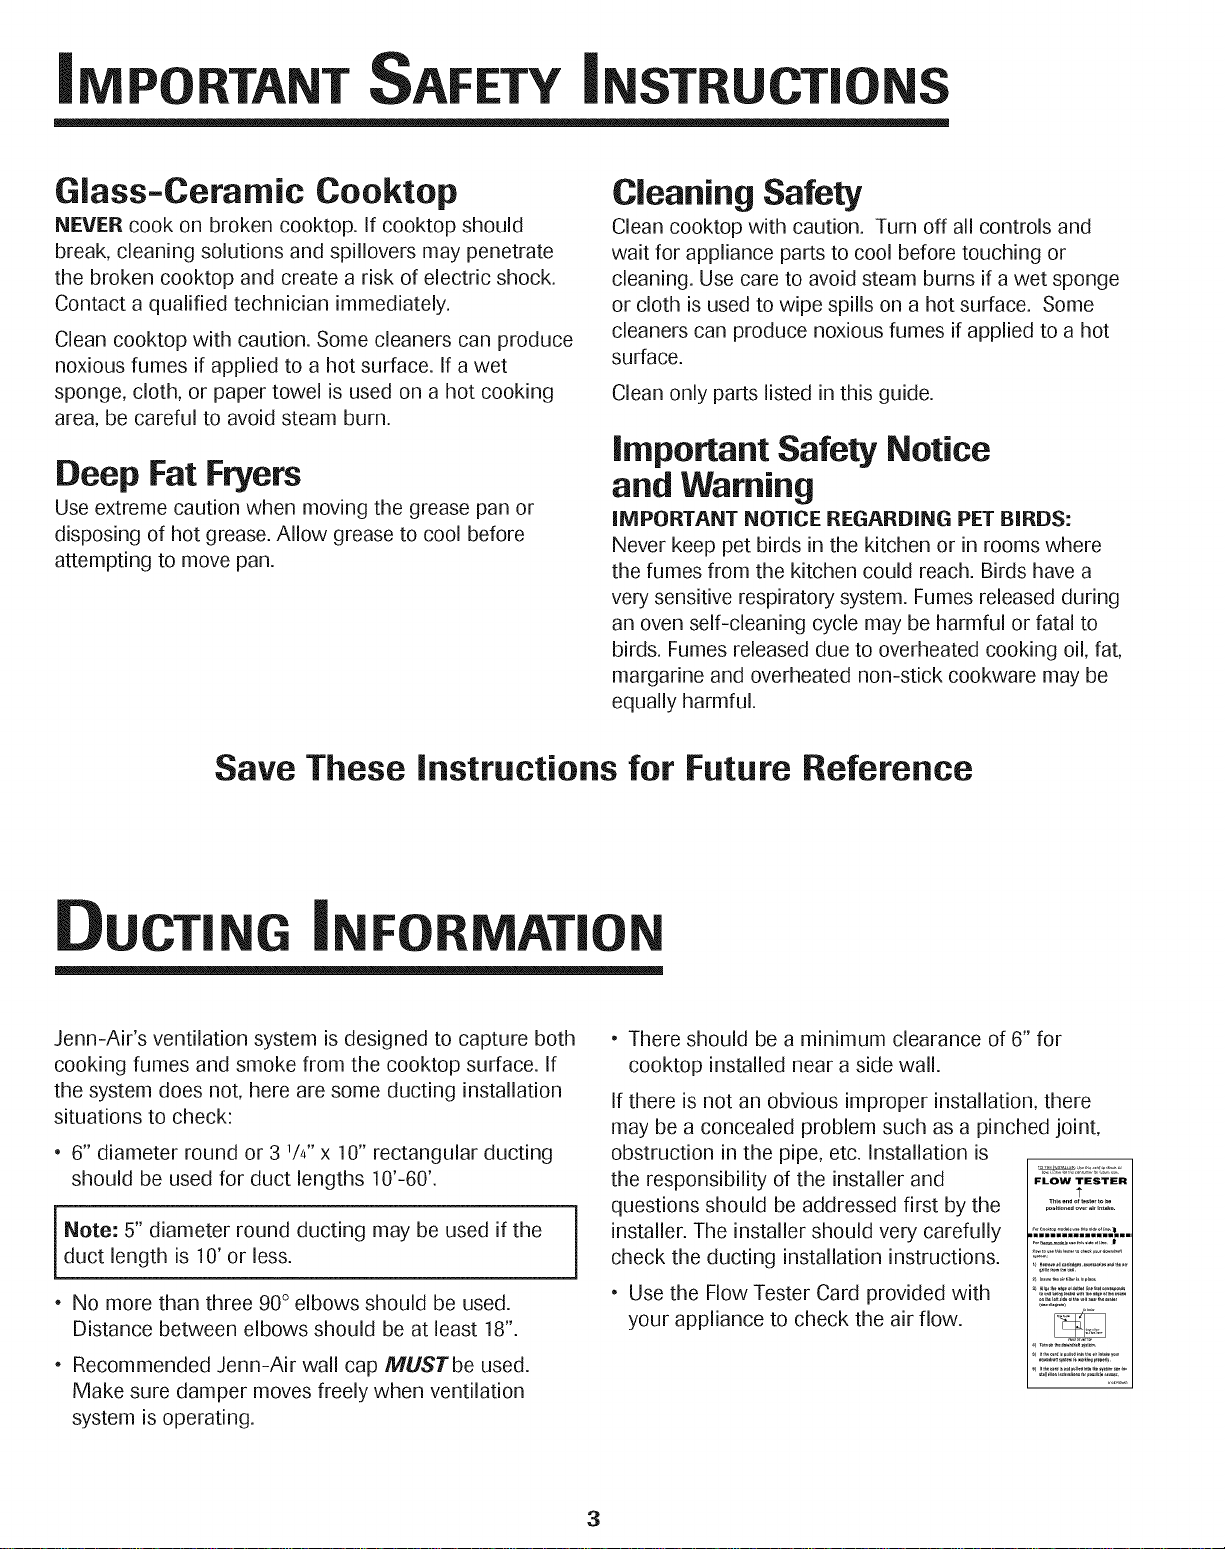
, Use the Flow Tester Card provided with
your appliance to check the air flow.
3
FLOW TESTER
÷
............. ,_o_,,h_o,,_ I
Su Coo
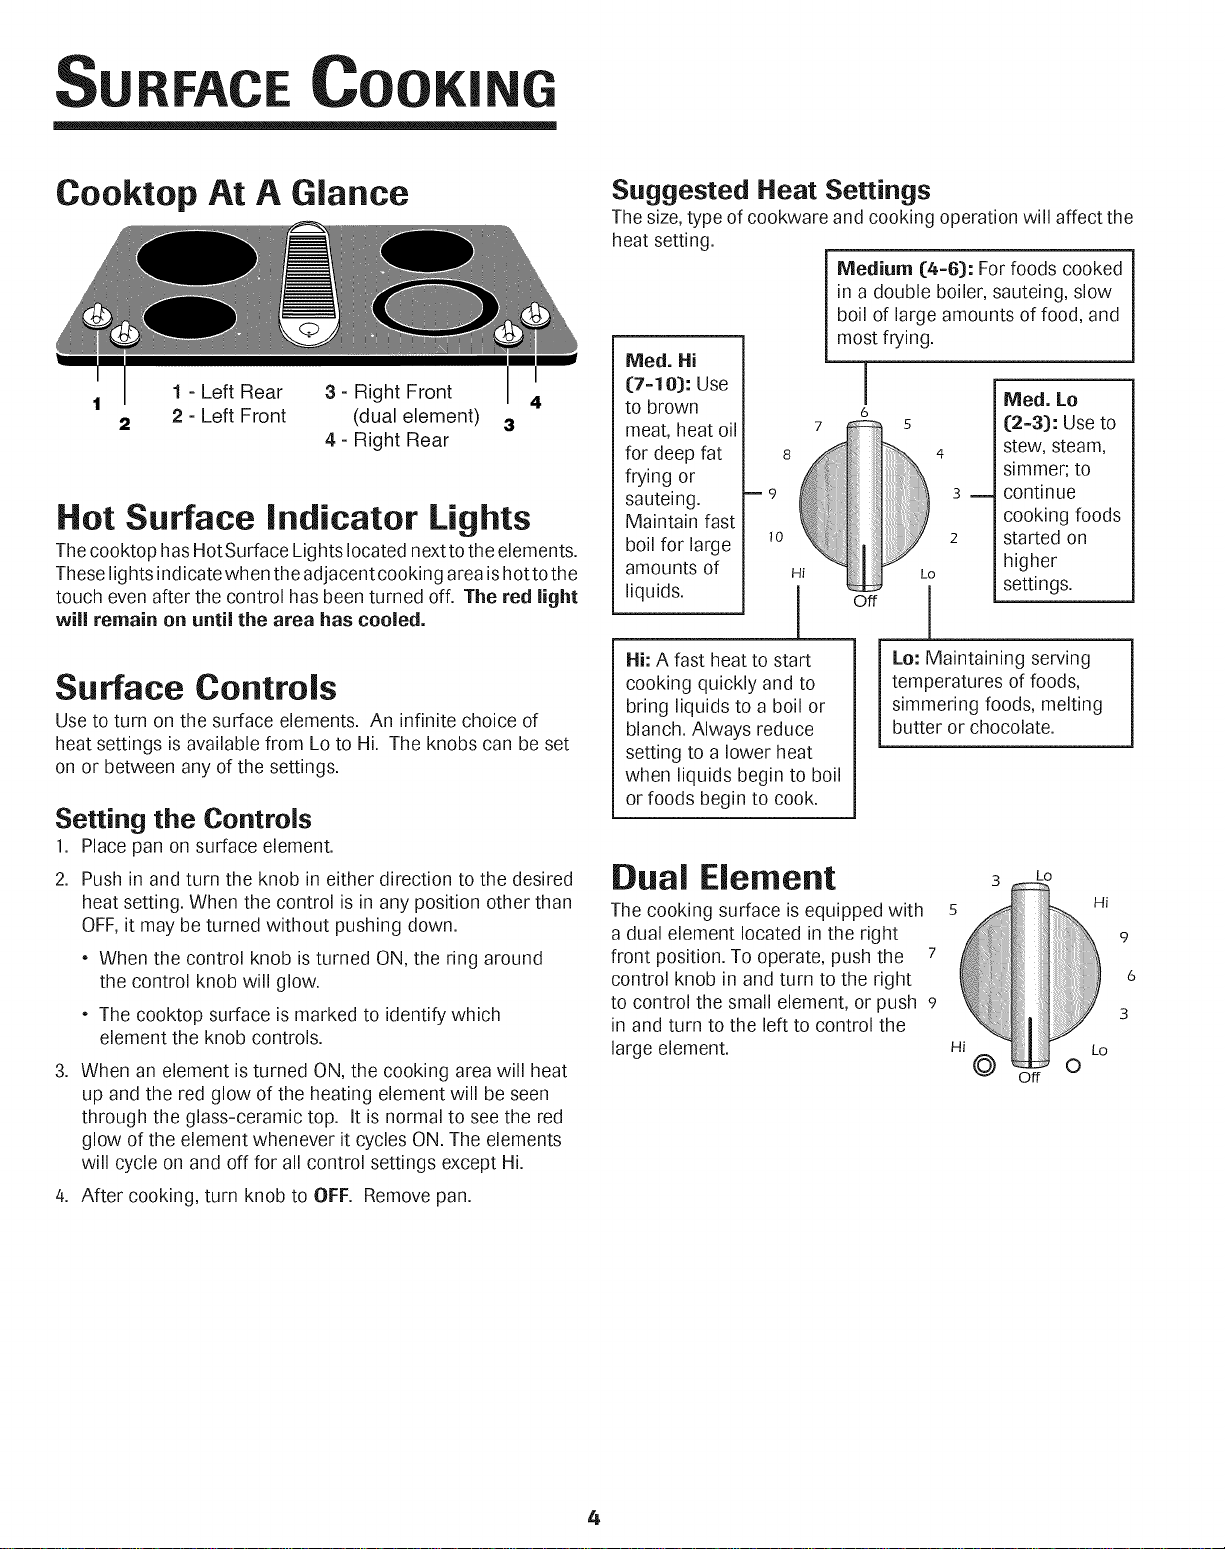
Cooktop At A Glance
I
1 - Left Rear 3 - Right Front 4
2 - Left Front (dual element) 3
4- Right Rear
Hot Surface indicator Lights
The cooktop hasHot Surface Lights located next to the elements.
These lights indicate when the adjacent cooking area is hotto the
touch even after the control has been turned off. The red light
will remain on until the area has cooled.
Surface Controls
Use to turn on the surface elements. An infinite choice of
heat settings is available from Lo to Hi. The knobs can be set
on or between any of the settings.
Setting the Controls
1. Place pan on surface element.
2. Push in and turn the knob in either direction to the desired
heat setting. When the control is in any position other than
OFF,it may be turned without pushing down.
When the control knob is turned ON, the ring around
the control knob will glow.
The cooktop surface is marked to identify which
element the knob controls.
3. When an element isturned ON, the cooking area will heat
up and the red glow of the heating element will be seen
through the glass-ceramic top. It is normal to see the red
glow of the element whenever it cycles ON. The elements
will cycle on and off for all control settings except Hi.
4. After cooking, turn knob to OFF. Remove pan.
Suggested Heat Settings
The size,type of cookware and cooking operation will affect the
heat setting.
Medium (4-6): For foods cooked
in a double boiler, sauteing, slow
I boil of large amounts of food, and
Meal. Hi
(7=10): Use
to brown
meat, heat oil
for deep fat 8
frying or
sauteing. = 9
Maintain fast
boil for large _o
amounts of
liquids.
Hi: A fast heat to start
cooking quickly and to
bring liquids to a boil or
blanch. Always reduce
setting to a lower heat
when liquids begin to boil
or foods begin to cook.
Dual Element
The cooking surface is equipped with 5
a dual element located in the right
front position. To operate, push the 7
control knob in and turn to the right
to control the small element, or push e
in and turn to the left to control the
large element. Hi
Lm_st frying.
I
6
5
Lo: Maintaining serving
temperatures of foods,
simmering foods, melting
butter or chocolate.
Meal. Lo
(2=3): Use to
stew, steam,
simmer; to
B m continue
cooking foods
2 started on
higher
settings.
Lo
©
O
Hi
Lo
9
6
3
4
Su Coo
Smoothtop Surface
Smoothtop Surface Notes:
, Cooktop may emit light smoke and odor the first few
times the cooktop is used. This is normal.
* Smoothtop cooktops retain heat for a period of time
after the element is turned off. Turn the elements off
a few minutes before food is completely cooked and use
the retained heat to complete cooking. When the Hot
Surface light turns off, the cooking area will be cool
enough to touch. Because of the way they retain heat, the
smoothtop surface will not respond to changes in settings
as quickly as coil elements.
, In the event of a potential boilover, remove the pan from
the cooking surface.
, The smoothtop surface may appear discolored when hot.
This is normal and will disappear when the surface cools.
Cooking Areas
The cooking areas on your cooktop are identified by perma-
nent circles on the smoothtop surface. For most efficient
cooking, fit the pan sizeto the element size.
Pans should not extend more than 1/2to 1=inch beyond
the cooking area.
When a control is turned on, a glow can be seen through the
smoothtop surface. The element will cycle on and off to
maintain the preset heat setting, even on Hi.
Formore informationon cookware, refer to Cookware
Recommendations on page 6.
Tips to Protect the
Smoothtop Surface
Cleaning (see page 7 for more information:)
, Before first use, clean the cooktop.
, Clean your cooktop daily or after each use. This will keep
your cooktop looking good and can prevent damage.
, If a spillover occurs while cooking, immediatelyclean the
spill from the cooking area while it is hot to prevent atough
cleaning chore later. Using extreme care, wipe spill with a
clean dry towel.
, Do not allow spills to remain on the cooking area or the
cooktop for a long period of time.
, Never use abrasive cleansing powders or scouring pads
which will scratch the cooktop.
, Never use chlorine bleach, ammonia or other cleansers not
specifically recommended for use on glass-ceramic.
To Prevent Marks & Scratches
, Do not use glass pans. They may scratch the surface.
, Never place a trivet or wok ring between the surface and
pan. These items can mark or etch the top.
, Do not slide aluminum pans across a hot surface. The pans
may leave marks which need to be removed promptly. (See
Cleaning, page 7.:)
, Make sure the surface and the pan bottom are clean before
turning on to prevent scratches.
, To prevent scratching or damage to the glass-ceramic top,
do not leave sugar, salt or fats on the cooking area. Wipe the
cooktop surface with a clean cloth or paper towel before
using.
, Never slide heavy metal pans across the surface since these
may scratch.
To Prevent Stains
• Never use a soiled dish cloth or sponge to clean the cooktop
surface. A film will remain which may cause stains on the
cooking surface after the area isheated.
, Continuously cooking on a soiled surface may/will result in a
permanent stain.
To Prevent Other Damage
, Do not allow plastic, sugar or foods with high sugar content
to melt onto the hot cooktop. Should this happen, clean
immediately.(See Cleaning, page 70
Never let a pan boil dry as this will damage the surface and
pan.
Never use cooktop as a work surface or cutting board.
Never cook food directly on the surface.
Do not use a small pan on a large element. Not only does
this waste energy, but it can also result in spillovers burning
onto the cooking area which requires extra cleaning.
Do not use non-flat specialty itemsthat are oversized or
uneven such as round bottom woks, rippled bottom and/or
oversized canners and griddles.
Do not use foil or foil-type containers. Foil may melt onto the
glass. If metal melts on the cooktop, do not use. Call an
authorized Jenn-Air Servicer.
Cookware Recommendations
Using the right cookware can prevent many problems, such
asfood taking longer to cook or achieving inconsistent
results. Proper pans will reduce cooking times, use less
energy, and cook food more evenly.
5
Su Coo
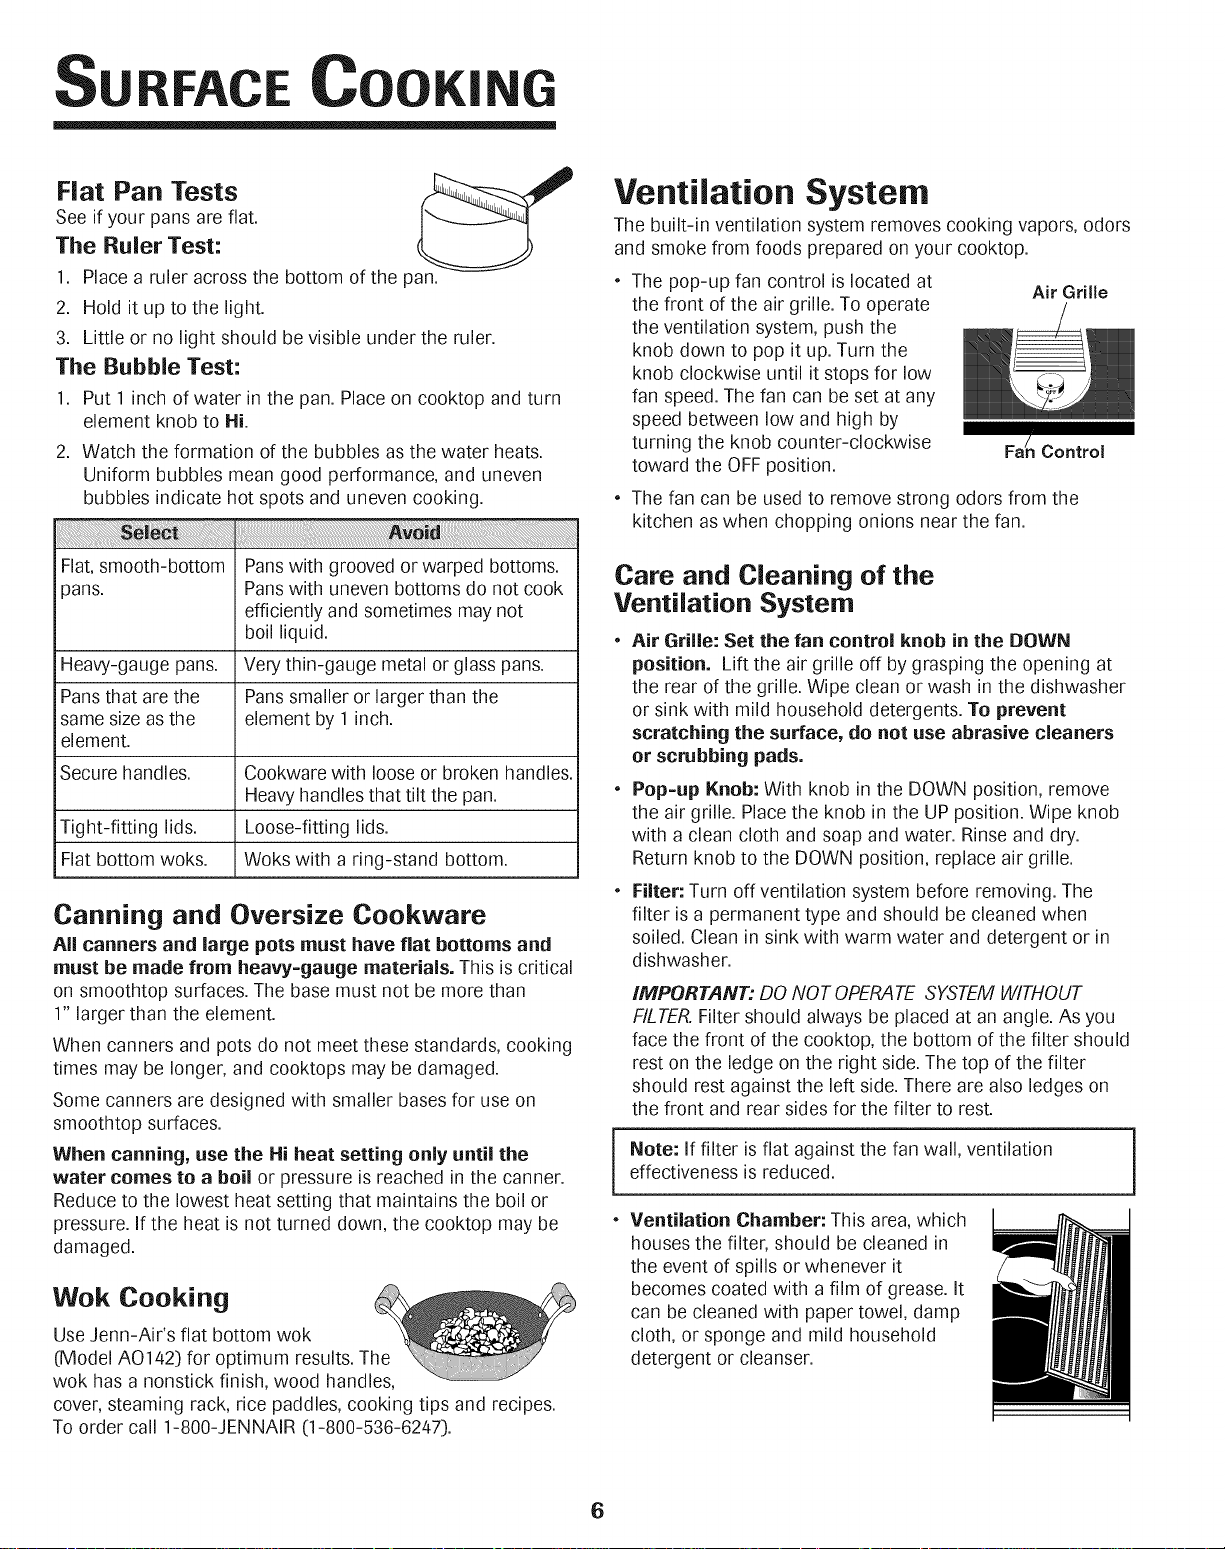
Fiat Pan Tests
See if your pans are fiat.
The Ruler Test:
1. Place a ruler across the bottom of the pan.
2. Hold it up to the light.
3. Little or no light should be visible under the ruler.
The Bubble Test:
1. Put 1 inchof water in the pan. Place on cooktop and turn
element knob to Hi.
2. Watch the formation of the bubbles asthe water heats.
Uniform bubbles mean good performance, and uneven
bubbles indicate hot spots and uneven cooking.
Flat,smooth-bottom Panswith grooved or warped bottoms.
pans. Panswith uneven bottoms do not cook
efficiently and sometimes may not
boil liquid.
Heavy-gauge pans. Very thin-gauge metal or glass pans.
Pansthat are the Panssmaller or larger than the
same size as the element by 1 inch.
element.
Secure handles. Cookware with loose or broken handles.
Heavy handles that tilt the pan.
Tight-fitting lids. Loose-fitting lids.
Flat bottom woks. Woks with a ring-stand bottom.
Canning and Oversize Cookware
All canners and large pots must have fiat bottoms and
must be made from heavy=gauge materials. This is critical
on smoothtop surfaces. The base must not be more than
1" larger than the element.
When canners and pots do not meet these standards, cooking
times may be longer,and cooktops may be damaged.
Some canners are designed with smaller bases for use on
smoothtop surfaces.
When canning, use the Hi heat setting only until the
water comes to a boil or pressure is reached in the canner.
Reduce to the lowest heat setting that maintains the boil or
pressure. If the heat is not turned down, the cooktop may be
damaged.
Wok Cooking
Use Jenn-Air's flat bottom wok
(Model A0142) for optimum results. The
wok has a nonstick finish, wood handles,
cover, steaming rack, rice paddles, cooking tips and recipes.
To order call 1-800-JENNAIR ([1-800-536-6247).
Ventilation System
The built-in ventilation system removes cooking vapors, odors
and smoke from foods prepared on your cooktop.
The pop-up fan control is located at
the front of the air grille. To operate
the ventilation system, push the
knob down to pop itup. Turn the
knob clockwise until it stops for low
fan speed. The fan can be set at any
speed between low and high by
turning the knob counter-clockwise
toward the OFFposition.
, The fan can be used to remove strong odors from the
kitchen aswhen chopping onions near the fan.
Care and Cleaning of the
Ventilation System
, Air Grille: Set the fan control knob in the DOWN
position. Lift the air grille off by grasping the opening at
the rear of the grille. Wipe clean or wash in the dishwasher
or sink with mild household detergents. To prevent
scratching the surface, do not use abrasive cleaners
or scrubbing pads.
, Pop=up Knob: With knob in the DOWN position, remove
the air grille Place the knob in the UP position Wipe knob
with a clean cloth and soap and water. Rinse and dry.
Return knob to the DOWN position, replace air grille.
Filter: Turn off ventilation system before removing. The
filter is a permanent type and should be cleaned when
soiled. Clean in sink with warm water and detergent or in
dishwasher.
iMPORTANT: DO NOT OPERATE SYSTEMWITHOUT
FILTER.Filter should always be placed at an angle. As you
face the front of the cooktop, the bottom of the filter should
rest on the ledge on the right side. The top of the filter
should rest against the left side. There are also ledges on
the front and rear sides for the filter to rest.
Note: If filter isflat against the fan wall, ventilation
effectiveness isreduced.
[
Ventilation Chamber: This area,which
houses the filter, should be cleaned in
the event of spills or whenever it
becomes coated with a film of grease. It
can be cleaned with paper towel, damp
cloth, or sponge and mild household
detergent or cleanser.
Air Grille
Fa/ Control
6
CAR & CLEAN
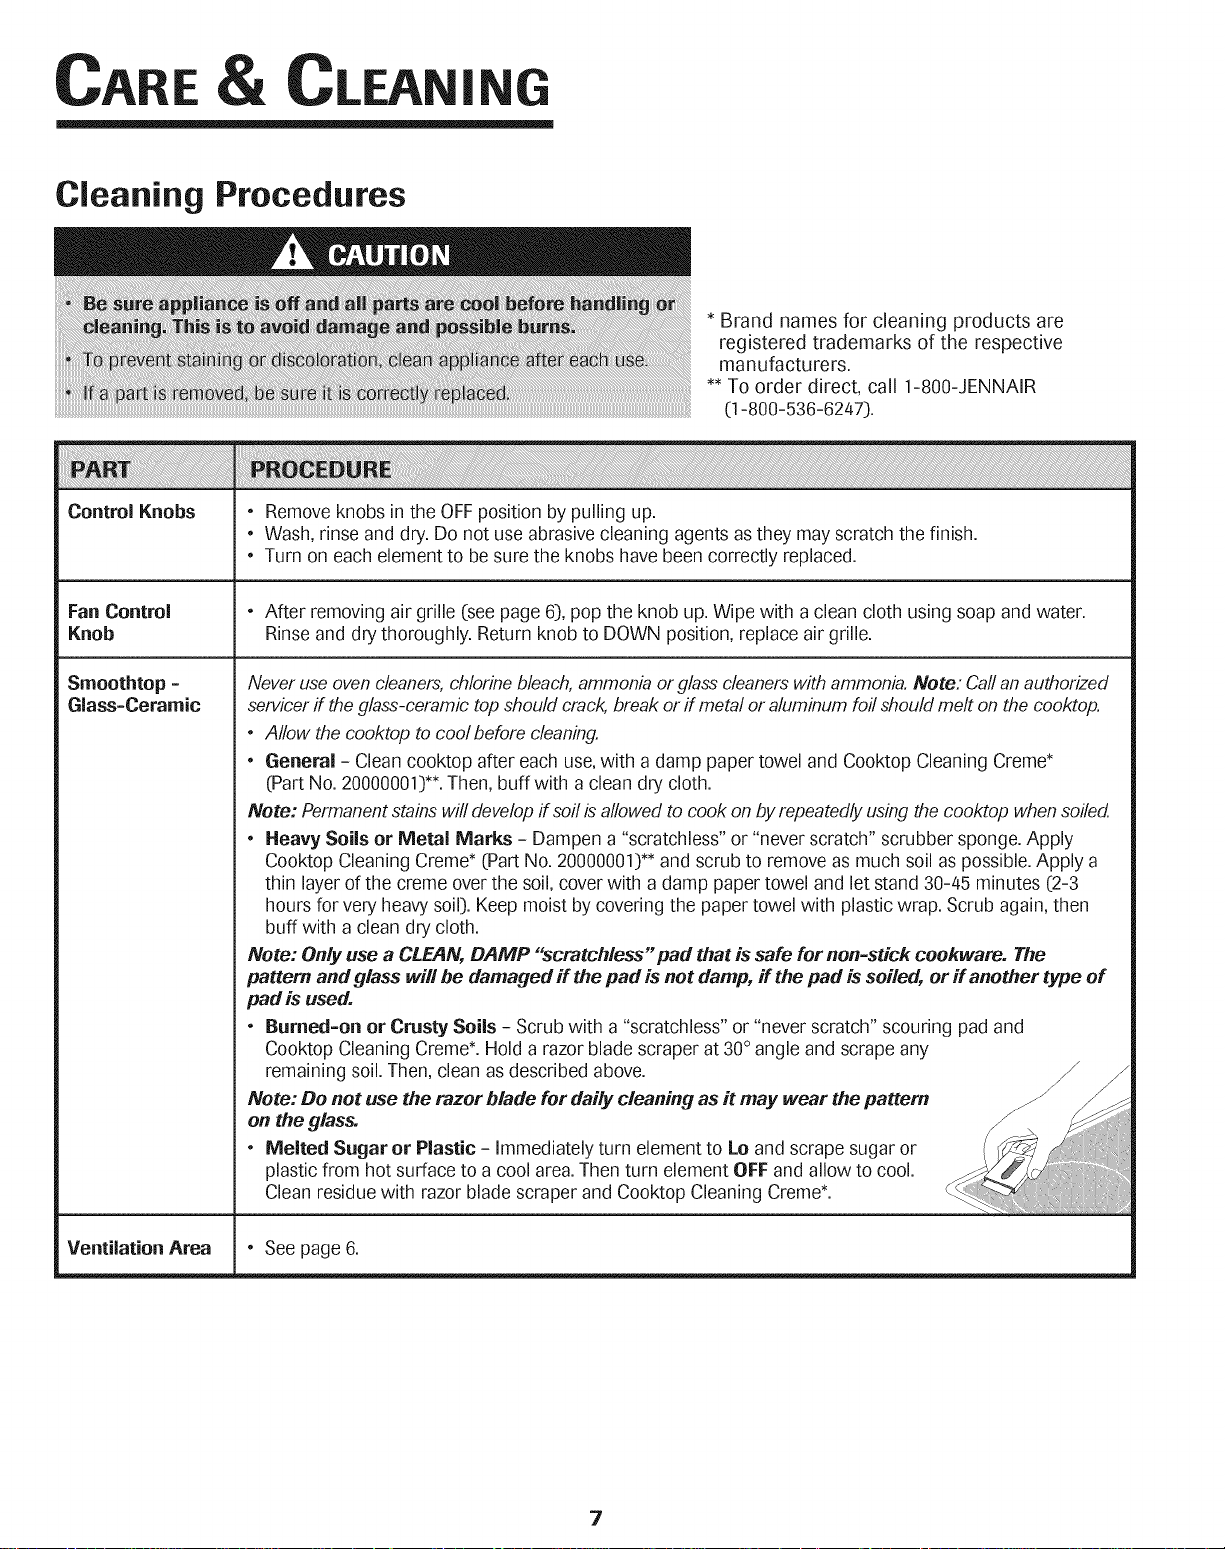
Cleaning Procedures
* Brand names for cleaning products are
registered trademarks of the respective
manufacturers.
** To order direct, call 1-800-JENNAIR
(1-800-536-6247).
Control Knobs
Fan Control
Knob
Smoothtop =
Glass=Ceramic
Removeknobs in the OFFposition by pulling up.
Wash, rinse and dry. Do not use abrasive cleaning agents asthey may scratch the finish.
Turn on each element to be sure the knobs have been correctly replaced.
After removing air grille (see page 6), pop the knob up. Wipe with aclean cloth using soap and water.
Rinseand dry thoroughly. Return knob to DOWN position, replace air grille.
Never use ovencleaners,chlorinebleach, ammonia or glass cleaners with ammonia.Note: Callan authorized
servicerff the glass-ceramic top should crack,break or ff metal or aluminum foil should melt on the cooktop.
, Allow the cooktop to cool before cleaning.
, General - Cleancooktop after each use,with a damp paper towel and Cooktop Cleaning Creme*
(part No. 20000001)**.Then, buffwith a clean dry cloth.
Note: Permanent stains will developff soil b allowed to cook on byrepeatedly using the cooktop when soiled.
Heavy Soils or Metal Marks - Dampen a "scratchless" or "never scratch" scrubber sponge. Apply
Cooktop Cleaning Creme* (part No. 20000001)**and scrub to remove as much soil as possible.Apply a
thin layerof the creme over the soil, cover with a damp paper towel and let stand 30-/45minutes (2-3
hours for very heavy soil). Keep moist by covering the paper towel with plastic wrap. Scrub again, then
buff with a clean dry cloth.
Note: Only use a CLEAN, DAMP "scratchless" pad that is safe for non=stick cookware. The
pattern and glass will be damaged if the pad is not damp, if the pad is soiled, or if another type of
pad is used.
, Burned=on or Crusty Soils - Scrub with a "scratchless" or "never scratch" scouring pad and
Cooktop Cleaning Creme*. Hold a razor blade scraper at 30° angle and scrape any
remaining soil.Then, clean as described above.
Note: Do not use the razor blade for daily cleaning as it may wear the pattern
on the glass.
, Melted Sugar or Plastic - Immediately turn element to Lo and scrape sugar or
plastic from hot surface to a cool area.Then turn element OFF and allow to cool.
Clean residue with razor blade scraper and Cooktop Cleaning Creme*.
Ventilation Area
See page 6.
7
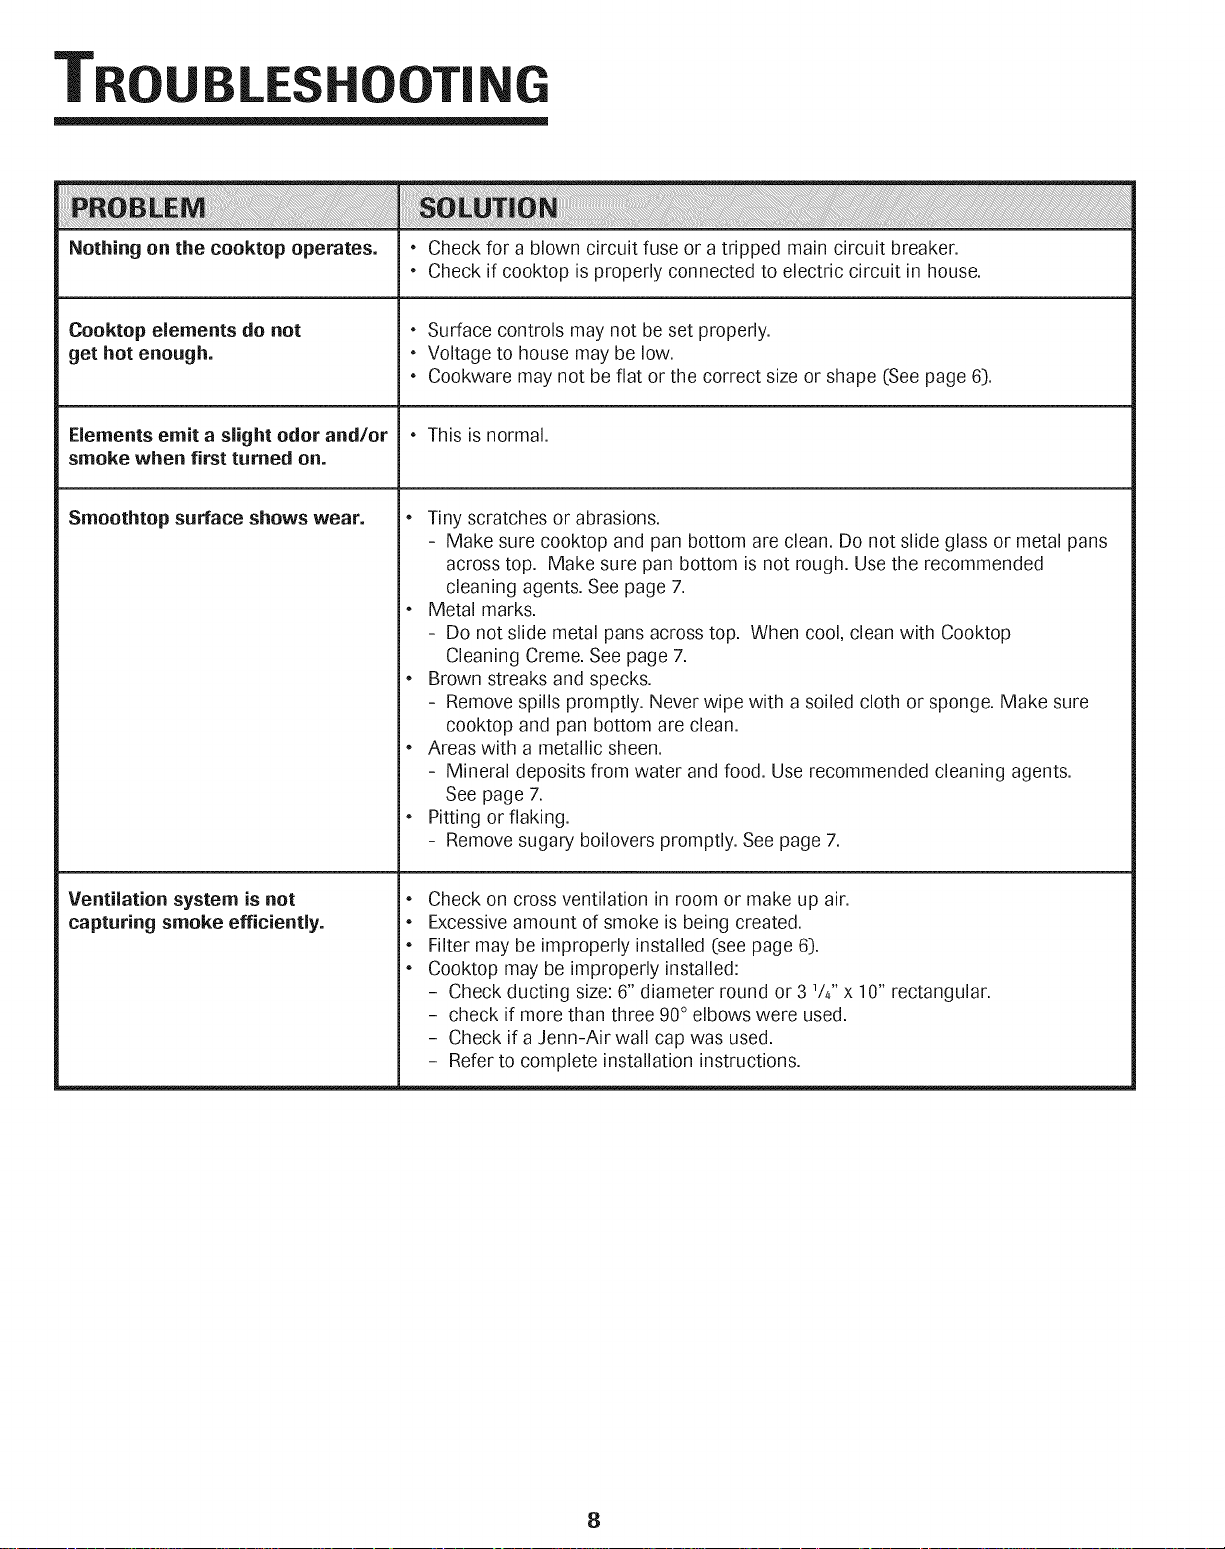
T LES
Nothing on the cooktop operates. ', Check for a blown circuit fuse or a tripped main circuit breaker.
* Check if cooktop is properly connected to electric circuit in house.
Cooktop elements do not
get hot enough.
Elements emit a slight odor and/or
smoke when first turned on.
Smoothtop surface shows wear.
Ventilation system is not
capturing smoke efficiently.
* Surface controls may not be set properly.
Voltage to house may be low.
Cookware may not be flat or the correct size or shape ([Seepage 6).
', This is normal.
Tiny scratches or abrasions.
- Make sure cooktop and pan bottom are clean. Do not slide glass or metal pans
across top. Make sure pan bottom is not rough. Use the recommended
cleaning agents. See page 7.
Metal marks.
- Do not slide metal pans across top. When cool, clean with Cooktop
Cleaning Creme. See page 7.
Brown streaks and specks.
- Remove spills promptly. Never wipe with a soiled cloth or sponge. Make sure
cooktop and pan bottom are clean.
Areas with a metallic sheen.
- Mineral deposits from water and food. Use recommended cleaning agents.
See page 7.
', Pitting or flaking.
- Remove sugary boilovers promptly. See page 7.
Check on cross ventilation in room or make up air.
Excessiveamount of smoke is being created.
', Filter may be improperly installed ([seepage 6).
* Cooktop may be improperlyinstalled:
- Check ducting size: 6" diameter round or 3 ]/f' x 10" rectangular.
- check if more than three 90° elbows were used.
- Check ifa Jenn-Air wall cap was used.
- Refer to complete installationinstructions.
8
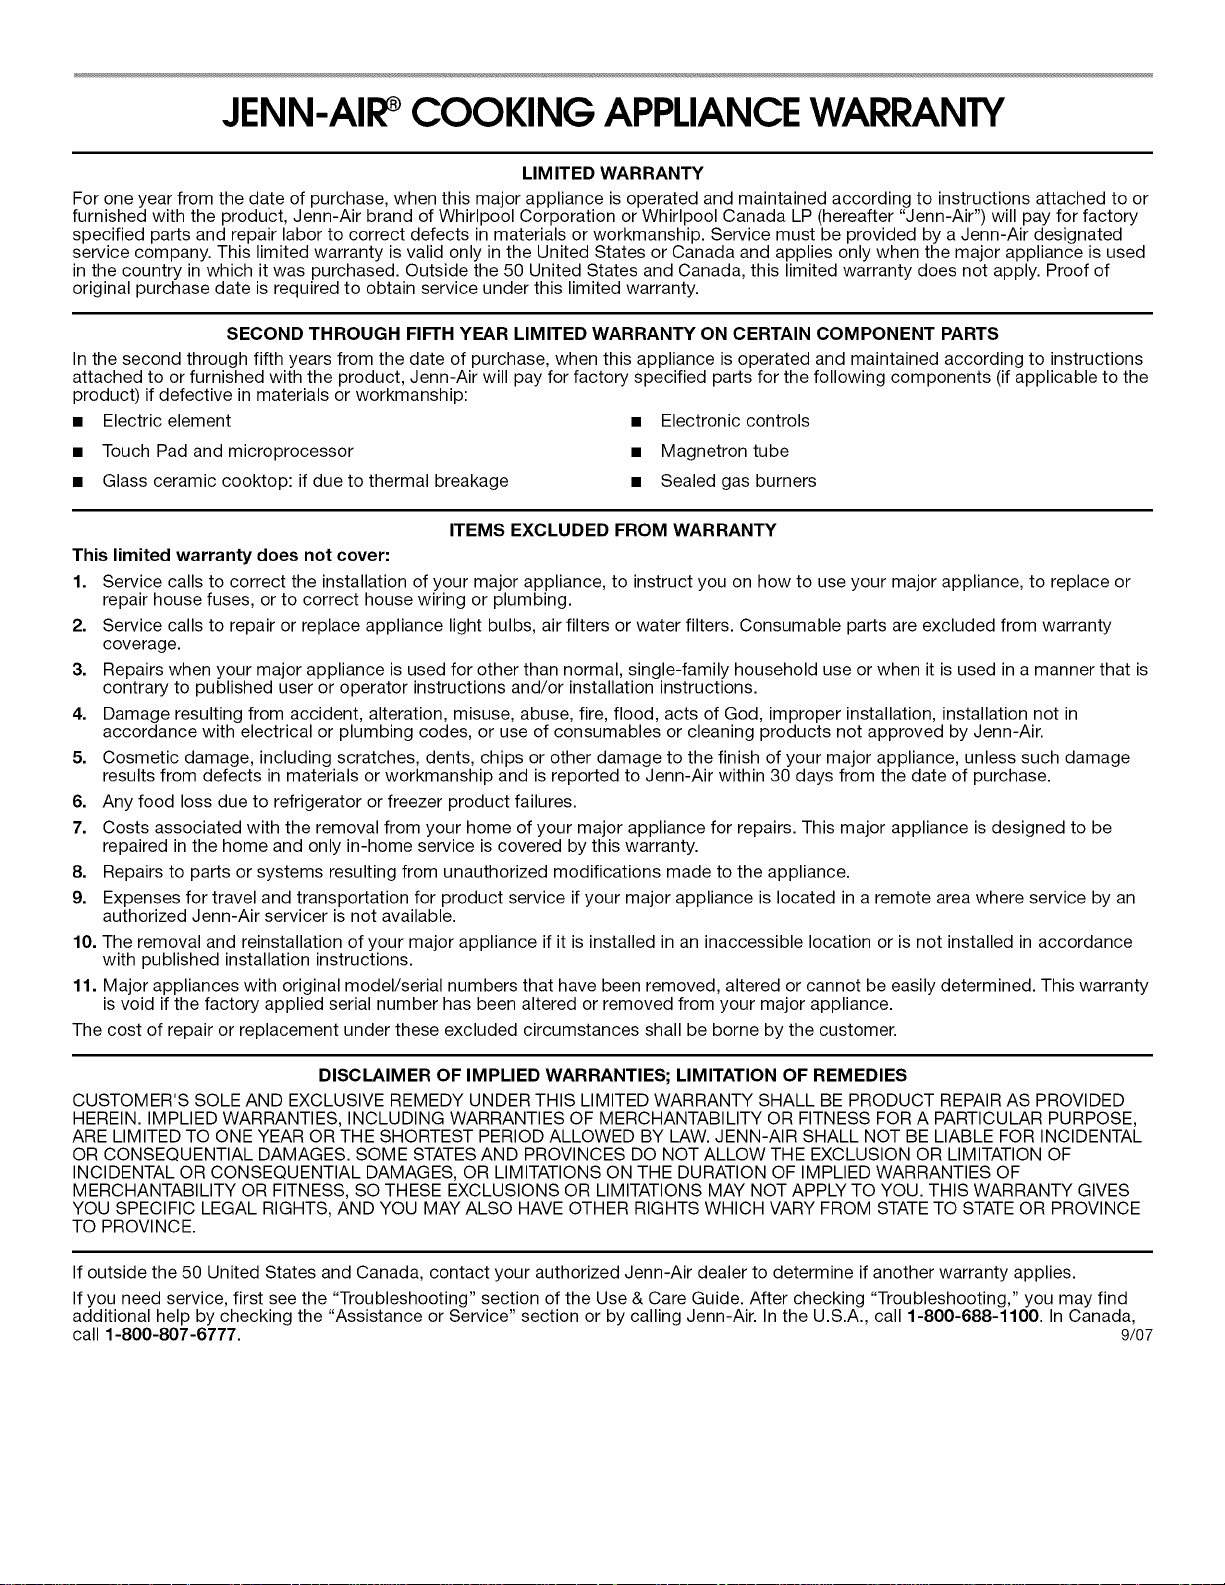
JENN-AIR COOKING APPLIANCEWARRANTY
LIM ITED WARRANTY
For one year from the date of purchase, when this major appliance is operated and maintained according to instructions attached to or
furnished with the product, Jenn-Air brand of Whirlpool Corporation or Whirlpool Canada LP (hereafter "Jenn-Air") will pay for factory
specified parts and repair labor to correct defects in materials or workmanship. Service must be provided by a Jenn-Air designated
service company. This limited warranty is valid only in the United States or Canada and applies only when the major appliance is used
in the country in which it was purchased. Outside the 50 United States and Canada, this limited warranty does not apply. Proof of
original purchase date is required to obtain service under this limited warranty.
SECOND THROUGH FIFTH YEAR LIMITED WARRANTY ON CERTAIN COMPONENT PARTS
In the second through fifth years from the date of purchase, when this appliance is operated and maintained according to instructions
attached to or furnished with the product, Jenn-Air will pay for factory specified parts for the following components (if applicable to the
product) if defective in materials or workmanship:
• Electric element • Electronic controls
• Touch Pad and microprocessor
• Glass ceramic cooktop: if due to thermal breakage
ITEMS EXCLUDED FROM WARRANTY
This limited warranty does not cover:
1. Service calls to correct the installation of your major appliance, to instruct you on how to use your major appliance, to replace or
repair house fuses, or to correct house wiring or plumbing.
2. Service calls to repair or replace appliance light bulbs, air filters or water filters. Consumable parts are excluded from warranty
coverage.
3. Repairs when your major appliance is used for other than normal, single-family household use or when it is used in a manner that is
contrary to published user or operator instructions and/or installation instructions.
4. Damage resulting from accident, alteration, misuse, abuse, fire, flood, acts of God, improper installation, installation not in
accordance with electrical or plumbing codes, or use of consumables or cleaning products not approved by Jenn-Air.
5. Cosmetic damage, including scratches, dents, chips or other damage to the finish of your major appliance, unless such damage
results from defects in materials or workmanship and is reported to Jenn-Air within 30 days from the date of purchase.
6. Any food loss due to refrigerator or freezer product failures.
7. Costs associated with the removal from your home of your major appliance for repairs. This major appliance is designed to be
repaired in the home and only in-home service is covered by this warranty.
8. Repairs to parts or systems resulting from unauthorized modifications made to the appliance.
9. Expenses for travel and transportation for product service if your major appliance is located in a remote area where service by an
authorized Jenn-Air servicer is not available.
10. The removal and reinstallation of your major appliance if it is installed in an inaccessible location or is not installed in accordance
with published installation instructions.
11. Major appliances with original model/serial numbers that have been removed, altered or cannot be easily determined. This warranty
is void if the factory applied serial number has been altered or removed from your major appliance.
The cost of repair or replacement under these excluded circumstances shall be borne by the customer.
• Magnetron tube
• Sealed gas burners
DISCLAIMER OF IMPLIED WARRANTIES; LIMITATION OF REMEDIES
CUSTOMER'S SOLE AND EXCLUSIVE REMEDY UNDER THIS LIMITED WARRANTY SHALL BE PRODUCT REPAIR AS PROVIDED
HEREIN. IMPLIED WARRANTIES, INCLUDING WARRANTIES OF MERCHANTABILITY OR FITNESS FOR A PARTICULAR PURPOSE,
ARE LIMITED TO ONE YEAR OR THE SHORTEST PERIOD ALLOWED BY LAW. JENN-AIR SHALL NOT BE LIABLE FOR INCIDENTAL
OR CONSEQUENTIAL DAMAGES. SOME STATES AND PROVINCES DO NOT ALLOW THE EXCLUSION OR LIMITATION OF
INCIDENTAL OR CONSEQUENTIAL DAMAGES, OR LIMITATIONS ON THE DURATION OF IMPLIED WARRANTIES OF
MERCHANTABILITY OR FITNESS, SO THESE EXCLUSIONS OR LIMITATIONS MAY NOT APPLY TO YOU. THIS WARRANTY GIVES
YOU SPECIFIC LEGAL RIGHTS, AND YOU MAY ALSO HAVE OTHER RIGHTS WHICH VARY FROM STATE TO STATE OR PROVINCE
TO PROVINCE.
If outside the 50 United States and Canada, contact your authorized Jenn-Air dealer to determine if another warranty applies.
If you need service, first see the "Troubleshooting" section of the Use & Care Guide. After checking "Troubleshooting," you may find
additional help by checking the "Assistance or Service" section or by calling Jenn-Air. In the U.S.A., call 1-800-688-1100. In Canada,
call 1-800-807-6777. 9/07
 Loading...