

Jenn-Air JDB6510AWG, JDB6510AWK, JDB6510AWR, JDB6510AWU Owner's Manual
44
4
Dishwa
For Future Assistance ................
Safety Instructions ..................
Loading the Dishwasher ............ 2-4
Dishwashing Essentials .............. 5
Controls At A Glance. ...............
Operating Tips
Starting the Dishwasher ............
Adding a Forgotten Item ........... .7
What Can & Cannot Be Washed
Care & Cleaning
Common Questions &Answers . . ~ . .9-20
Warranty
Note: In our continuing effort to improve the
quality of our appliances, it may be necessary to
make changes to the appliance without revising
this guide.
..................... .7
.......
...................
........................
1
1
6
.7
7
8
11
Llame al telefono 1-800-688-l 100 si desea
instructiones en Espafiol de este folleto, numero
de pieza 1600980 1.
Part No. 6 915286 B
For Future Assistance
Congratulations on your choice of a Jenn-Air dishwasher!
Before you use your new appliance, please read this guide
carefully. You will find instructions on the proper operation
and maintenance of your new dishwasher.
Please record the date of purchase, model, and serial number in the spaces provided below. Model and serial numbers can be found in the upper left of the tub opening.
Date of Purchase
Model Number
Serial Number
ZMPORTANT: Keep this guide and the sales receipt in
a safe place for future reference. Proof of original purchase date is needed for warranty service.
If you have questions. write us (include your model, serial
number and phone number) or call:
Jenn-Air Customer Assistance
Maytag Appliances Sales Company
Attn. CAIRS” Center
P.O. ‘Box 2370
Cleveland, TN 37320-2370
l-800-688-1 100 USA and CANADA
l-800-688-2080 TTY USA (for deaf, hearing
impaired or speech impaired)
Mon.-Fri., 8am-8pm Eastern Time
Internet: http://www.jennair.com
Products with a@ label have been listed with Underwriter’s
Laboratories. Inc. ~ those with a CSA tag have been listed
with Canadian Standards Association. Nevertheless, as
with any other equipment using electricity and moving
parts. there is a potential hazard.
a WARNING - When using your dishwasher, follow
basic precautions, including the following:
I. Read all instructions before using the dishwasher.
2. USC the dishwasher only for its intended function.
3. Disconnect electrical power to dishwasher before
attempting to service.
4. To avoid electrical shock hazard, the sides and back
must be enclosed and the front panels must be attached
before electrical power is applied to the dishwasher.
Refer to the installation instructions for proper grounding procedures.
5. Connect to a properly rated, protected and sized power
supply circuit to avoid electrical overload.
6. Children should never be permitted to operate, or play
in, with. or around this dishwasher.
7. To reduce the risk of injury when loading items to be
washed, sharp or pointed items should be located with
the handles up. Also, load sharp items so they are not
likely to damage the door seal.
8. Do not touch the heating element on the bottom of the
tub during or at the completion of a cycle. It will be
hot.
9. Use only detergents and rinse additives designed for an
automatic dishwasher. Never use soap, laundry deter<rent, or hand washing detergent in your dishwasher.
e
Keep these products out of reach of children.
10. Do not sit, stand on or abuse the door or dish racks of
the dishwasher.
11. Under certain conditions, hydrogen gas may be produced in a hot water system that has not been used for
two weeks or more. Hydrogen gas is explosive. If the
hot water system has not been used for such a period,
turn on all hot water faucets and let the water tlow
from each for several minutes. This will release any
accumulated hydrogen gas. As the gas is flammable,
do not smoke or use an open flame during this process.
12. Do not wash plastic items unless marked “dishwasher
safe”
or the equivalent. For plastic items not so
marked, check the manufacturer’s recommendations.
13. Do not tamper with controls.
14. Always remove the door to the washing compartment
when removing an old dishwasher from service or discarding it.
Save These Instructions

Loading the Dishwasher
2
Getting
+ Don’t Prerinse. Simply scrape off any bones or large
food particles.
+ If connected to a food waste disposer, make certain the
disposer is empty before starting the dishwasher.
+ Remove certain foods (such as mustard, mayonnaise.
lemon juice, vinegar. salt or dressings) from stainless
steel flatware as soon as possible. These foods may
cause rusting and pitting if allowed to remain in contact
with the surface for an extcndcd period of time.
R e
c o
m m e n d e d
For best dishwashing results follow these guidelines to determine the best arrangement for your items.
Started
L o a d i n
+ Items can be centered behind a single tine or loaded at
an angle to maximize space.
+ Load items so they do not rest over the top of the wash
tower.
+ Avoid blocking the upper and lower spray arms by not
allowing items to extend beyond the racks.
Place all items in the racks so they are separated and facing center.
g (Rack features vary by model)
Upper Rack
10
Place Settings
Glasses, cups, stemware, light-weight plastics. small
plates, bowls, pans,
loaded in this rack. Do not load glasses over the tines.
Correct
long-handled utensils etc. can be
incorrect
Tine
out
Tine
in
The Vari-Lock”’ Snugger on the left secures lightweight
items in place. It can be adjusted by grasping the wavy
wire and rotating it left to snug items against the outer rack
or to the right to rest on top of light items. Do not load
items on top of the wire.
The wavy wire on the Vari-Lock”’ Snugger and the StackRack is designed to hold stemware in place. Taller
stemware will fit better on the right side as the upper rack
is deeper on this side.
The Stack-Rack on the right side of the upper rack folds up
or down for loading flexibility. Fold it down to hold longhandled knives, spatulas and spoons or short items like
cups or juice glasses. Fold it up for taller items like glasses, bowls, plates, etc.
s
Loading the Dishwasher
I
4444444+4444444444444444~444444444444444444444444~4
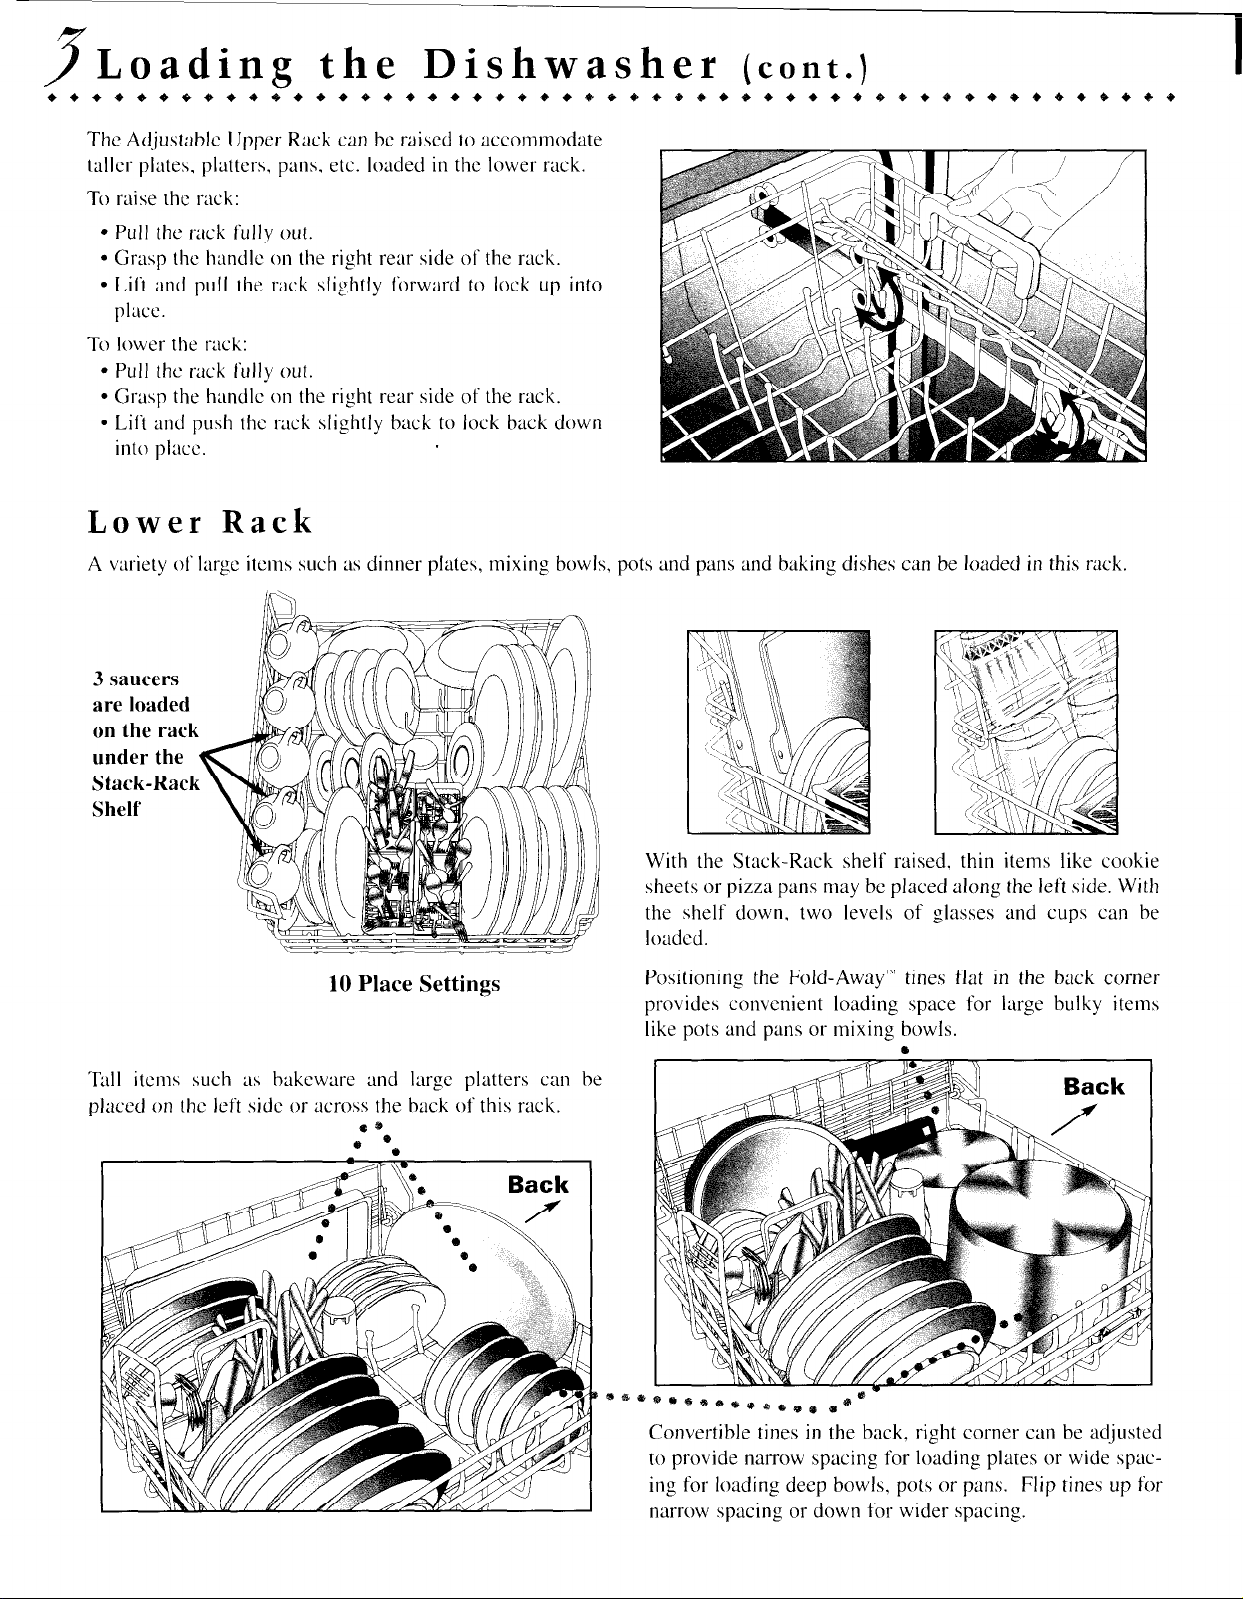
The Ad.justablc Upper Rack can bc raised to accommodate
taller plates. platters,
To raise the rack:
l
Pull the rack fully out.
l
Grasp the handle
l
Lift and
place.
~LIII
To lower the rack:
l
Pull the rack fully out.
l
Grasp the handle
l
Lift
and
push the rack slightly back to lock back down
into place.
Lower Rack
pans,
etc. loaded in the lower rack.
on
the right rear side of the rack.
the rack slightly forward to lock up into
on
the right rear side of the rack.
(cont.)
A variety of large items such as dinner plates, mixing bowls, pots and
3 saucers
are loaded
With the Stack-Rack shelf raised, thin items like cookie
sheets or pizza pans may be placed along the left side. With
the shelf down, two levels of glasses and cups can be
loaded.
10 Place Settings
Positioning the Fold-Away’” tines tlat in the back corner
provides convenient loading space for large bulky items
like pots and pans or mixing bowls.
Tall items such as bakeware and large platters
can
be
placed on !hc left side or across the back of this rack.
o*
a .a
I
45Tri. I
Back 1
pans
and baking dishes can be loaded in this rack.
.
Convertible tines in the back, right corner can be adjusted
to provide narrow spacing for loading plates or wide spacing for loading deep bowls, pots or pans. Flip tines up for
narrow spacing or down for wider spacing.
 Loading...