

Jenn-Air JBZFL30IGX, JBZFR30IGX, JBZFR24IGX, JBZFL24IGX, JBZFL18IGX User Manual
...
Us ae ude
COLUMN REFRIGERATION
Gude ’uil et ’ettn
RÉFRIGÉRATION COLONNE
W10918236C


INTRODUCTION
SAFETY
Your safety and the safety of others are very important.
We have provided many important safety messages in this manual and on your appliance. Always read and obey all safety messages.
This is the safety alert symbol.
This symbol alerts you to potential hazards that can kill or hurt you and others.
All safety messages will follow the safety alert symbol and either the word “DANGER” or “WARNING.”
These words mean:
You can be killed or seriously injured if you don't immediately follow instructions.
DANGER
You can be killed or seriously injured if you don't follow instructions.
WARNING
All safety messages will tell you what the potential hazard is, tell you how to reduce the chance of injury, and tell you what can happen if the instructions are not followed.
INTRODUCTION
WARNING:
■ To avoid a hazard due to instability of the
To reduce the risk of shock, or injury when using your refrigerator, follow these basic precautions:
with the instructions.
■ Installation shall be performed only by
manufacturer, or an authorized agent.
■ Plug into a grounded 3 prong outlet.
■ Do not remove ground prong.
■ Do not use an adapter.
■ Do not use an extension cord.
■ Disconnect power to all units before servicing.
■ If the SUPPLY CORD is damaged, it must be
replaced by the manufacturer, its service agent
a hazard.
■ Replace all parts and panels before operating.
IMPORTANT SAFETY INSTRUCTIONS
■ Remove doors from your old refrigerator.
■ Connect to a potable water supply only.
■ Use
■ Ke mmable materials and vapors, such
as gasoline, away from refrigerator.
■ Do not store explosive substances such as
this refrigerator.
■ Use two or more people to move and install
refrigerator.
■ Disconnect power before installing ice maker
(on ice maker kit ready models only).
■ Use a sturdy glass when dispensing ice
(on some models).
■ Do not hit the refrigerator glass doors
(on some models).
SAVE THESE INSTRUCTIONS
■ This appliance is not intended for use by persons
(including children) with reduced physical, sensory
or mental capabilities, or lack of experience and
knowledge, unless they have been given supervision
or instruction concerning use of the appliance by a
person responsible for their safety.
■ Children should be supervised to ensure that they do
not play with the appliance.
■ This refrigerator is intended to be used in household
and similar applications such as:
working environments
–farm houses and by clients in hotels, motels,
and other residential type environments
–bed and breakfast type environments
–catering and similar non-retail applications
INTRODUCTION | 3

INTRODUCTION
PROPER DISPOSAL OF YOUR OLD
REFRIGERATOR
DANGER: Risk of child entrapment. Before
you throw away your old refrigerator or
freezer:
Take off the doors.
Leave the shelves in place so children may
not easily climb inside.
WARNING
Suffocation Hazard
Remove doors from your old refrigerator.
Failure to do so can result in death or
brain damage.
IMPORTANT: Do your part to prevent accidental
child entrapment and suffocation by properly
disposing of your old refrigerator or freezer.
Important information to know about disposal
of refrigerants:
Dispose of refrigerator in accordance with
Federal and Local regulations. Refrigerants
must be evacuated by a licensed, EPA certied
refrigerant technician in accordance with
established procedures.
4 | INTRODUCTION

INTRODUCTION
INTRODUCTION
REGISTERING YOUR APPLIANCE
Gain access to our concierge-level Customer
Support by registering your appliance.
We make product registration simple and
straightforward so you can start using your
exclusive JennAir benefits today.
Registering your appliance allows you to:
■ Streamline your warranty service
If we have your appliance information, we
can help you faster.
■ Protect your purchase
In case of an insurance loss—such as fire,
flood, or theft—your product registration
could serve as a proof of purchase.
■ Keep your family safe
We’ll notify you in the rare case of a safety
notification.
Start taking advantage of these benefits today
by going online to register your appliance at
https://register.jennair.com. In Canada,
register your refrigerator at https://jennair.ca.
PRODUCT IDENTIFICATION
Your product identification, which includes
the model and serial numbers, is listed on the
product rating plate.
Recording this information below allows us to
assist you more easily if your appliance should
ever require service from one of our JennAir®
Authorized Service Providers.
Model Number: ______________________________
Serial Number: _______________________________
Date of Installation: _________________________
Authorized Dealer: __________________________
Authorized Dealer Phone #: _________________
TABLE OF CONTENTS
INTRODUCTION
Safety ............................................................................. 3
Proper Disposal of
Your Old Refrigerator ......................................... 4
Registering Your Appliance ............................ 5
Product Identification ........................................ 5
Product Features .................................................... 6
Refrigerator Controls ........................................... 8
Freezer Controls ...................................................... 10
GETTING STARTED
Before Use ................................................................... 12
Smart Features ........................................................ 12
Smart Grid ................................................................... 13
Automatic Setup (WPS) ..................................... 14
Manual Setup (First-Time Use) ..................... 16
Shelves ........................................................................... 17
Deli/Crisper Drawers ............................................ 17
CARE AND CLEANING
Cleaning ....................................................................... 18
Leather Panel Care ................................................18
Vacation Care ............................................................ 19
Power Interruptions ............................................. 19
Replacing The Water Filter...............................20
TROUBLESHOOTING
Operation ..................................................................... 22
Temperature And Moisture ............................. 23
Ice And Water ........................................................... 23
Lights...............................................................................24
ASSISTANCE
Contact .......................................................................... 25
In The U.S.A. ............................................................... 25
In Canada ..................................................................... 25
Accessories ................................................................. 25
Connected Appliance
Regulatory Notices................................................26
Performance Data Sheet..................................28
Warranty.......................................................................30
TABLE DES MATIÈRES.................35
INTRODUCTION | 5

14.
13.
12.
11.
9.
8.
10.
7.
1.
2.
3.
4.
5.
6.
INTRODUCTION
INTRODUCTION
PRODUCT FEATURES
1. Fully Integrated and Flush
Design with Articulating Hinge
Creates an integrated appearance with
custom cabinets without exposed hinges or
trim pieces.
2. Adjustable Aluminum and
Glass Door Bins
Make it easy to customize storage
according to your preferences, providing
quick access to frequently used items.
Refrigerator and freezer door bins can be
positioned to accommodate a variety of
container sizes.
3. Custom Overlay Design
Ships with factory-installed doors. To create
a finished refrigerator, customers must
purchase either custom overlay panels and
handles from a cabinet manufacturer, or a
JennAir® suite-coordinating panel kit.
4. Obsidian Interior
Showcases food items throughout the
refrigerator or freezer, and provides a
sharper contrast than white interiors.
6 | INTRODUCTION
5. 90°/115° Door Stop Position
Provides options to ensure ample clearance
between the open door and adjacent
cabinetry.
6. Wi-Fi Connectivity
This refrigerator can connect with in-home
Wi-Fi to provide remote control through
the JennAir® App, available to download for
use with either iOS or Android devices.

INTRODUCTION
INTRODUCTION
7. Soft, Auto-Close Crisper Drawers
Provide smooth operation by rolling open
even when fully loaded, and feature an
innovative auto-close design that pulls the
drawer closed.
8. Electronic Temperature-
Controlled Crisper Drawer
(Refrigerator)
Drawer slides open effortlessly, even when
fully loaded, with soft, self-close glides.
Two temperature presets are available on
the interior control to keep items at the
optimal temperature. You can choose from
following:
Produce: 39°F (3.9°C)
Assorted: 37°F (2.8°C)
9. Capacitive Touch Controls with
LED Display
The touch panel houses the control menu
and function controls. The touch keypads
are very sensitive and only require a light
touch. The controls are located in the
midsection of each column for easy access.
10. Electronic Temperature-
Controlled Deli Drawer
(Refrigerator)
Deli slides open effortlessly, even when fully
loaded, with soft, self-close glides.
Five temperature presets are available on
the interior control to keep items at the
optimal temperature. You can choose from
following:
Produce: 39°F (3.9°C)
Assorted: 37°F (2.8°C)
Beverage: 34°F (1°C)
Deli: 33°F (0.6°C)
Meat: 32°F (0°C)
Electronic Temperature-
Controlled Deli Drawer (Freezer)
Three temperature presets are available
on the interior control to keep items at the
optimal temperature. You can choose from
following:
Assorted: 0°F (-17.8°C)
Spirits: -2°F (-18.9°C)
DeepFreeze: -8°F (-22.2°C)
11. Water Dispenser (Refrigerator)
Allows you to dispense filtered water.
12. Interior Perimeter LED Theater
Lighting
Perimeter LED lighting elegantly ramps up
to full brightness when the door or interior
drawers are opened, increasing visibility
by minimizing shadows caused by top
lighting. Selecting a cooling zone on the
control panel causes the lighting in the
same zone to pulse.
13. Adjustable Clear Glass Shelves
Tint-free, clear glass shelves that offer an
open, refined look that makes food and
beverages easy to see and locate. Glass
shelves complement the LED lighting for
exceptional clarity that allows more light to
fill the interior.
14. EveryDrop® Filter
EveryDrop® water filters are NSF®† certified
to reduce most contaminants, including
chlorine taste and odor, lead, pesticides,
and trace amounts of pharmaceuticals.
EveryDrop® brand filters are the only filters
tested and certified for your refrigerator
system. Replace your EveryDrop® filter
every 6 months for maximum contaminant
reduction.
15. Automatic Ice Maker (Freezer)
Ensures a continuous supply of fresh ice
cubes made from filtered water.
†®
NSF is a registered trademark of NSF International.
INTRODUCTION | 7

INTRODUCTION
7. 8.
1. 2. 3.
4.
6.5.
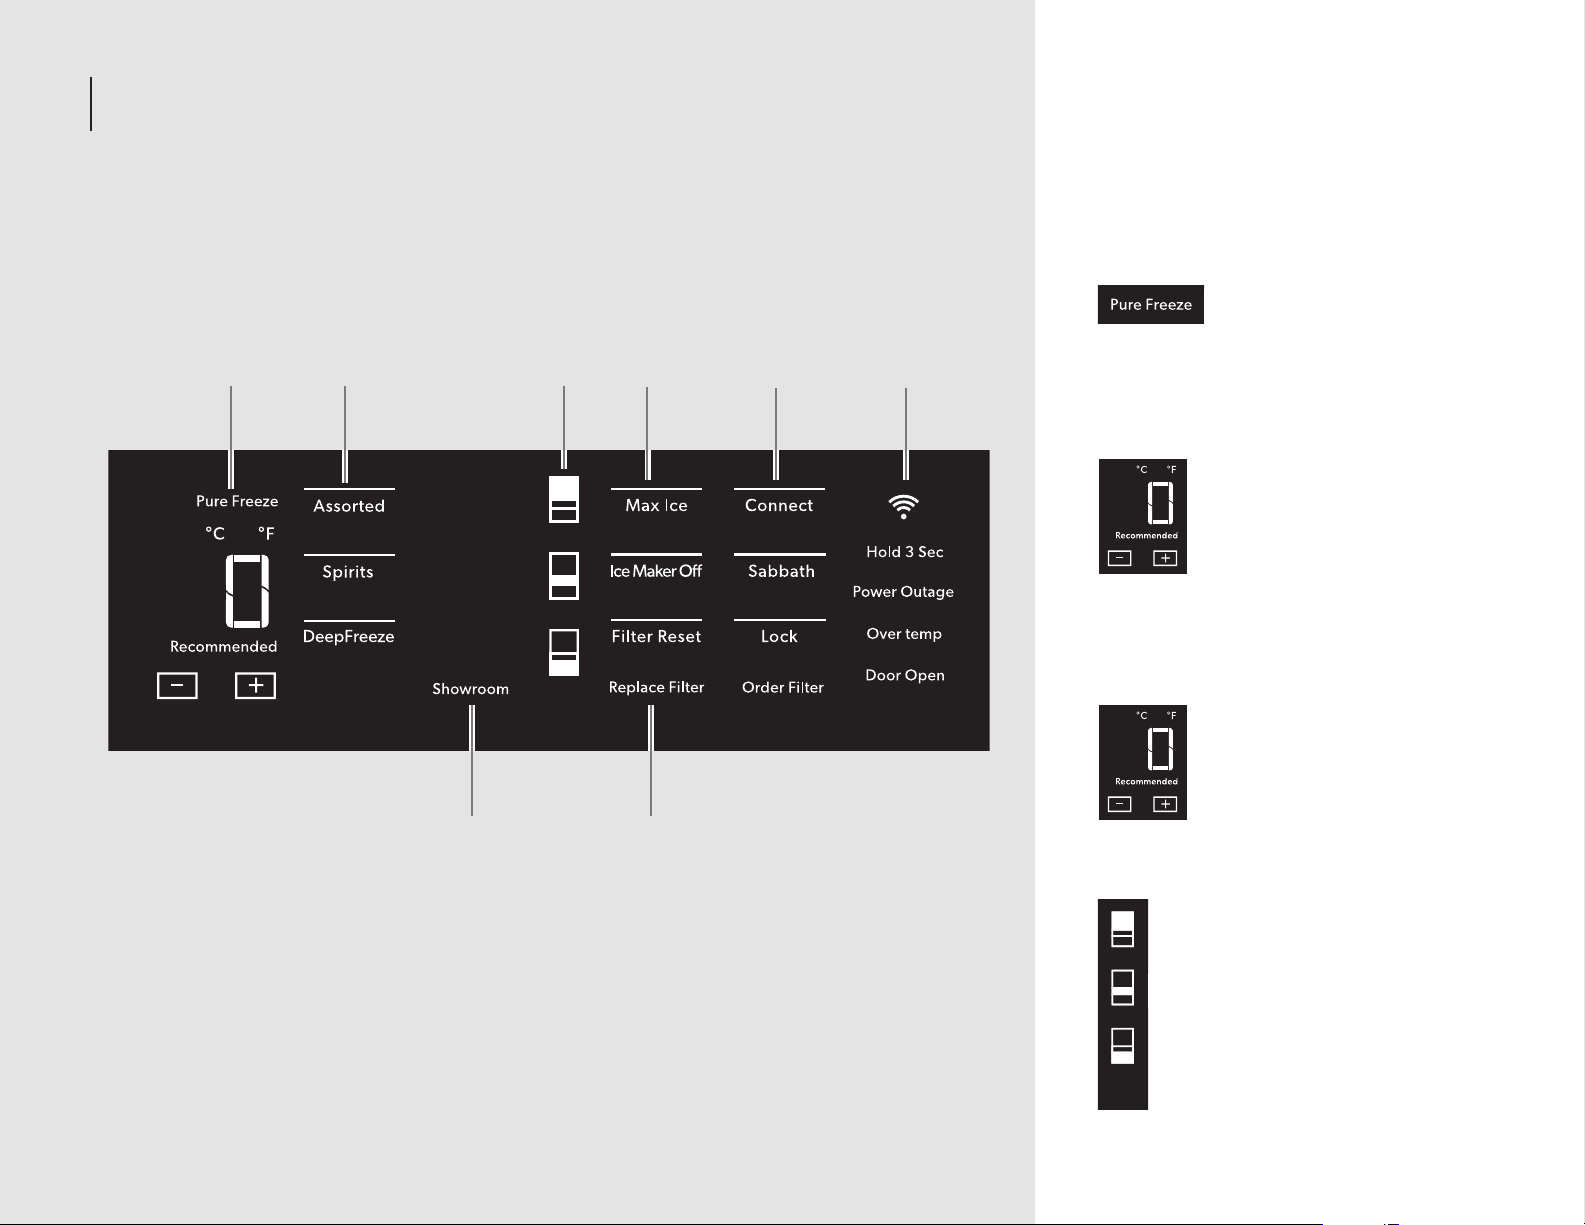
REFRIGERATOR CONTROLS
1. Viewing and Adjusting
Temperature
When you first install your
refrigerator, make sure that
the control is still set to the
recommended setting. The
factory-recommended
temperature is 37°F (3°C).
Touch - or + to select a
temperature seting. Press and hold - and
+ to change display from Fahrenheit to
Celsius.
2. Activate Temperature Mode for
Refrigerator Deli Drawer
Touch Assorted, Beverage,
Deli, Meat, or Produce to
select a zone temperature
setting.
8 | INTRODUCTION
3. Cooling Zones
Select features of your refrigerator are tied
to the perimeter lighting.
Press a zone key to light the
corresponding zone in your
refrigerator.

INTRODUCTION
INTRODUCTION
4. Max Cool
The Max Cool feature
assists with periods of high
refrigerator use, full grocery
loads, or temporarily warm
room temperatures. Press MAX COOL to
activate Max Cool. After the Max Cool cycle
completes, the refrigerator will return to its
previous setting.
5. Connect
Wi-Fi connectivity allows your
Smart Refrigerator to connect
to the Internet and interact
with the JennAir® App from
your smartphone or mobile device. See the
“Automatic Setup—Wi-Fi Protected Setup
(WPS)” section for more information.
Sabbath
Allows the door of the
refrigerator to be opened or
closed during the Sabbath
or other religious holidays
without activating the interior lights or
controls. Press and hold Sabbath for
3 seconds to activate Sabbath mode.
Lock
The control panel can be
locked for easy cleaning or
to avoid unintentional mode
changes.
6. Power Outage
The Power Outage indicator
lets you know if the power
supply to the refrigerator has
been off and the temperature has risen.
Over temp Alarm
Helps avoid food spoilage
and high energy costs by
sounding an alert when
refrigerator temperatures remain at
unusually high levels.
Door Open
The Door Open alarm feature
sounds an alarm when the
refrigerator door(s) or freezer
door is open for 5 minutes
and cooling is turned on. The alarm will
repeat every 2 minutes. Close the door to
turn the alarm and “Door Open” alert off. To
stop the alarm noise with the door open,
press any key.
7. Showroom
This mode is used when the
refrigerator is on display in a
retail store or if you want to
turn the cooling off and
deactivate all other functions except interior
lighting.
To activate showroom mode, press
and hold top and bottom zone
icons simultaneously for 3 seconds.
To deactivate the showroom mode,
press and hold top and bottom
zone icons simultaneously for
3 seconds.
8. Filter Reset
Displays the status of the
water filter. To reset the
filter, press and hold FILTER
RESET for 3 seconds. After
countdown, the “Replace Filter” indicator
will turn off.
Replace Filter
Replace the water filter.
While you are dispensing
water, the “Replace Filter”
icon will flash constantly
from beginning to the end of dispensing.
After 14 days without replacing the water
filter, the “Replace Filter” icon will blink
seven times and an alert tone will sound
three times at the end of dispensing. See
the “Water Filtration System” section.
NOTE: “Replace Filter” will remain
illuminated if a filter reset is not completed.
Order Filter
Order a replacement water
filter.
INTRODUCTION | 9
INTRODUCTION
7. 8.
1. 2. 3.
4.
6.5.
FREEZER CONTROLS
1. Pure Freeze® Feature
Pure Freeze® feature is
activated automatically when
the freezer is at its lowest
setting. The Pure Freeze® setting reduces
freezer burn.
Viewing and Adjusting
Temperature
When you first install your
freezer, make sure that
the control is still set to the
recommended temperature.
The factory recommended
setting is -2°F (19°C) for the
freezer.
Touch - or + to select a temperature setting.
2. Activate Temperature Mode for
Freezer Deli Drawer
Touch Assorted, Spirits, or
DeepFreeze to select a zone
temperature setting.
10 | INTRODUCTION
3. Cooling Zones
Select features of your freezer are
tied to the perimeter lighting.
Press the zone keys to light the
corresponding zones in your freezer.

INTRODUCTION
INTRODUCTION
4. Max Ice
The Max Ice Setting increases
the freezer cooling capacity
improving the ice making
rate.
Ice Maker Off
To turn the ice maker off,
touch ICE MAKER OFF.
5. Connect
Wi-Fi connectivity allows your
Smart Freezer to connect
to the Internet and interact
with the JennAir® App from
your smartphone or mobile device. See the
“Automatic Setup—Wi-Fi Protected Setup
(WPS)” section for more information.
Sabbath
Allows the door of the freezer
to be opened or closed
during the Sabbath or other
religious holidays without
activating the interior lights or controls.
Press and hold Sabbath for 3 seconds to
activate Sabbath mode.
Lock
The dispenser can be locked
for easy cleaning or to avoid
unintentional dispensing.
6. Power Outage
The Power Outage indicator
lets you know if the power
supply to the freezer has
been off and the freezer temperature has
risen.
Over temp Alarm
Helps avoid food spoilage
and high energy costs by
sounding an alert when
freezer temperatures remain at unusually
high levels.
Door Open
The Door Open alarm feature
sounds an alarm when the
refrigerator door(s) or freezer
door is open for 5 minutes
and cooling is turned on. The alarm will
repeat every 2 minutes. Close the door to
turn the alarm and “Door Open” alert off. To
stop the alarm noise with the door open,
press any key.
7. Showroom
This mode is used when the
freezer is on display in a retail
store or if you want to turn
the cooling off and
deactivate all other functions except interior
lighting.
To activate showroom mode, press
and hold top and bottom zone icons
simultaneously for 3 seconds.
To deactivate the showroom mode,
press and hold top and bottom zone
icons simultaneously for 3 seconds.
8. Filter Reset
Displays the status of the
water filter. To reset the
filter, press and hold FILTER
RESET for 3 seconds. After
countdown, the “Replace Filter” indicator
will turn off.
Replace Filter
Replace the water filter.
While you are dispensing
water, the “Replace Filter”
icon will flash constantly from
beginning to the end of dispensing. After 14
days without replacing the water filter, the
“Replace Filter” icon will blink seven times
and an alert tone will sound three times
at the end of dispensing. See the “Water
Filtration System” section.
NOTE: “Replace Filter” will remain
illuminated if a filter reset is not completed.
Order Filter
Order a replacement water
filter.
INTRODUCTION | 11

GETTING STARTED
BEFORE USE
Before using your refrigerator, all packaging
materials should be removed and the interior
should be cleaned.
Remove tape and glue residue from
surfaces before turning on the refrigerator.
With your fingers, rub a small amount of
liquid dish soap over any adhesive and wipe
with warm water to remove.
Do not use sharp instruments, rubbing
alcohol, flammable fluids, or abrasive
cleaners to remove tape or glue. These can
damage the surfaces of your refrigerator.
Dispose of and/or recycle all packaging
materials.
After all packaging materials have
been removed, clean the inside of your
refrigerator.
Flush 3 gallons (11.4 L) of water through
the water system to clear air from the
water line and to keep the dispenser
from dripping and/or avoiding decreased
dispenser flow.
NOTE: If the filter is not installed correctly,
water may dispense at a lower flow rate
and there will be slower ice production.
Improper filter installation may also cause
the water filter housing to leak.
SMART FEATURES
Smart Features help make your every day a
little more efficient by letting you remotely
monitor, manage, and maintain your
refrigerator.
REMOTE TEMPERATURE CONTROL
What it does: Allows you to control the
temperature of your refrigerator remotely from
your mobile device via the JennAir® App.
What it does for you: Lets you control
temperatures in your refrigerator, freezer, and
temp-controlled pantry remotely—not just
when you are standing in front of it.
WATER FILTER STATUS
What it does: Gives you a look at the life
remaining for your air and water filters before a
replacement is needed.
What it does for you: Helps you be more
efficient in planning for, ordering, and replacing
filters.
AUTO REORDER
What it does: Allows you to order replacement
filters, consumables, and accessories via the
JennAir® App for delivery directly to your home.
What it does for you: Simplifies ordering
correct water and air filters—no trips to the
store and searching for the correct filters.
OVER TEMPERATURE
What it does: Sends you a notification when
the temperature in your refrigerator reaches
and rises above a specified value in the
refrigerator and freezer compartments.
What it does for you: Alerts you to overtemperature status to provide input regarding
disposition of refrigerator/freezer contents.
MAX COOLREFRIGERATOR
What it does: Allows you to control your
refrigerator remotely from your mobile device
via the JennAir® App.
What it does for you: Lets you turn on/off Max
Cool options remotely to make temperatures
colder in the refrigerator in anticipation of
loading newly purchased grocery items.
MAX ICEFREEZER
What it does: Allows you to control your freezer
remotely from your mobile device via the
JennAir® App.
What it does for you: Makes fresh-tasting ice
to accommodate your entertainment needs up to 4 pounds in 24 hours.
PURE FREEZE® MODE
What it does: Allows you to receive status
of your refrigerator remotely to your mobile
device via the JennAir® App.
What it does for you: Indicates when
temperatures are adjusted down to a deep
freeze level to reduce freezer burn and helps
frozen items maintain their appearance and
taste.
12 | GETTING STARTED

GETTING STARTED
SMART FEATURES CONT.
SABBATH MODE
What it does: Allows the door of the
refrigerator or freezer to be opened or closed
during the Sabbath or other religious holidays
without activating the interior lights or controls.
Allows you to turn on and off remotely from
your mobile device via the JennAir® App.
What it does for you: Lets you turn on/off
Sabbath mode options remotely.
DOOR OPEN ALERT
What it does: Sends you a notification when
the door of the appliance has been left open.
What it does for you: Alerts you to door ajar
status so you can close the door(s) or call home
to ask someone else to close the door before an
over-temp situation arises.
POWER OUTAGE
What it does: Sends you a notification when
power to your refrigerator goes out, returns, or
highest temperature is reached.
What it does for you: Alerts you to power
status and disposition of the appliance
contents.
SMART GRID
This product has WiFi capability and requires
Internet connectivity and a wireless router
to enable interconnection with an Energy
Management System, and/or with other
external devices, systems, or applications.
GETTING STARTED
GETTING STARTED | 13

GETTING STARTED
AUTOMATIC SETUPWIFI
PROTECTED SETUP WPS
YOU WILL NEED:
A home wireless router capable of WPS (Wi-Fi
protected Setup). The router should be on and
have a live internet connection.
To use this feature you need:
A smartphone running Android 4.3 (or
higher) with a 1280x720 (or higher) screen
or a tablet or a smartphone running iOS 8
(or higher).
A wireless router 2.4 Ghz Wi-Fi b/g/n
connected to internet (verify with your
smart device that the signal of your home
wireless network is strong close to the
appliance).
The Smart Appliance Identification Number
(SAID) from your refrigerator. This is located
on a sticker on the inside of the water filter
door.
SAID:
0123456789
MAC ID:
88:E7:12:XX:YY:ZZ
NOTE: If your home wireless router is not
equipped with a WPS button, please check
the user manual of your router to confirm
if it is WPS capable. If not, alternate setup
instructions are at www.jennair.com/connect.
In Canada, use jennair.ca/connected.
Contains FCC ID:
Contains IC:
10248A-WICHIN01
A5UWICHIN01
1. Set up router
INTERNET
WI-FI PROTECTED
SETUP (WPS)
HOME WIRELESS
ROUTER
Press the WPS button on the router. An
indicator light will begin blinking.
NOTE: The WPS function on your router is
active for 2 minutes. Complete the next step
within that timeframe, or you will need to
reinitiate WPS.
2. Set up refrigeration appliance
(time-sensitive step)
Press and hold CONNECT on
the control panel for
3 seconds.
The Wi-Fi status indicator ( )
on the appliance control
panel will blink slowly
while your appliance and
router attempt to connect. If the
connection is successful, the Wi-Fi status
indicator will illuminate and remain lit.
IF YOUR APPLIANCE DOESN’T CONNECT:
If your appliance and router fail to connect after
2 minutes, the Wi-Fi status indicator will blink
rapidly for 5 seconds and then turn off. Check
any connection instructions for your specific
router, and refer to alternate instructions at
www.jennair.com/connect. In Canada, use
jennair.ca/connected.
NOTE: If this is your first smart appliance, you
will need to download the JennAir® App and
create an online user account.
If you already have the app and a user account,
please skip ahead to Step 4, “Register your
refrigerator in your user account.”
14 | GETTING STARTED
GETTING STARTED
AUTOMATIC SETUPWIFI
PROTECTED SETUP WPS CONT.
DISCONNECT AND RECONNECT WIFI
To disconnect Wi-Fi, press and the hold
CONNECT for 7 to 15 seconds. The Wi-Fi status
indicator will turn off, indicating that you have
disabled Wi-Fi.
To reconnect Wi-Fi, press and hold CONNECT
for 3 seconds on the control panel.
The Wi-Fi status indicator ( ) on the
appliance control panel will blink slowly
while your appliance and router attempt to
connect.
If the connection is successful, the Wi-Fi
status indicator will illuminate and remain
lit.
DISCONNECT AND RECONNECT ROUTER
To disconnect your refrigerator from your
router, press and hold CONNECT for more
than 15 seconds. The Wi-Fi indicator will
turn off, indicating that your refrigerator is
completely disconnected from Wi-Fi and
your router.
To reconnect your appliance to your router
and reconnect Wi-Fi, press and hold
CONNECT for 3 seconds.
The Wi-Fi status indicator ( ) on the appliance
control panel will blink slowly while your
refrigerator and router attempt to connect.
If the connection is successful, the Wi-Fi status
indicator will come on and remain lit.
Press the WPS button on the router. An
indicator light will begin blinking.
NOTE: The WPS function on your router is
active for 2 minutes. Complete the next step
within that timeframe or you will need to
reinitiate WPS.
3. Download JennAir
account
From your mobile device, smartphone, or
tablet, go to www.jennair.com/connect. In
Canada, use jennair.ca/connected. Follow
the instructions to download and install the
JennAir® App.
Once installed, tap the JennAir® App icon to
open the app. You will be guided through the
steps to set up a user account. The App will
make sure to get the necessary personal and
home information as well as information about
your energy company.
®
App and set up user
4. Register your refrigerator in your user
account
Registering your refrigerator in your account
is a necessary step in order for you to take
full advantage of the Smart features. When
prompted by the app, enter the SAID (casesensitive), which can be found on a sticker on
the inside of the water filter door.
My Smart Appliance ID# is:
_________________________________________________
The Wi-Fi status indicator on the refrigerator
control panel will blink slowly while your
refrigerator and router attempt to connect.
NOTE: This blinking only applies to first-time
registration after provisioning. Blinking will
not occur for automatic reconnection after a
connection is established.
Once you’ve connected your refrigerator
to your home Wi-Fi network, it will remain
linked even if the power goes out, you
move the appliance, or if you put it in
storage.
If you replace your wireless router or get a
different Smart appliance, you will need to
repeat this connectivity set-up process.
GETTING STARTED | 15
GETTING STARTED
GETTING STARTED
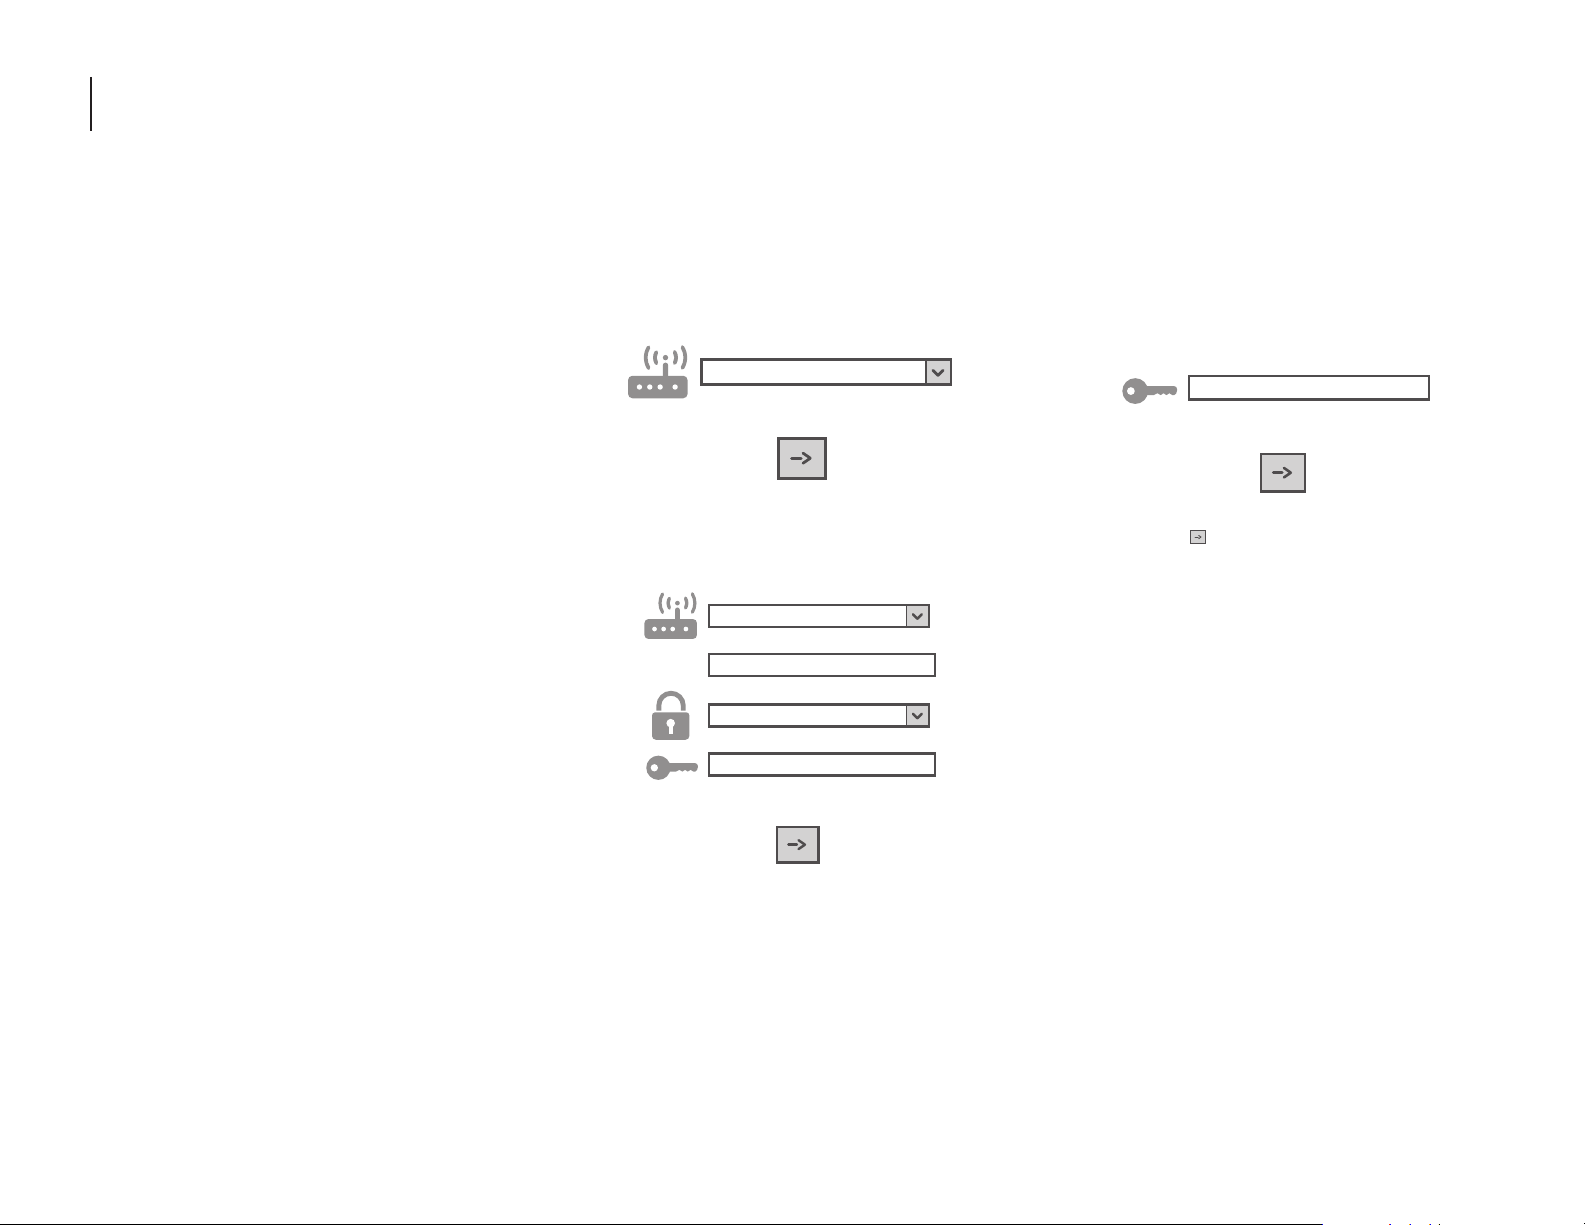
MANUAL SETUP FIRSTTIME USE
ACCESS POINT METHOD
This procedure uses Micro Access Point
technology and is applicable if your router does
not support WPS.
1. Before starting the Setup procedure, please
take note of the home wireless network
name (SSID), its password and the SAID of
appliance. These will be required during the
installation process.
2. Turn on your router and make sure the
internet connection is working.
3. On your appliance, activate the provisioning
process using the AP method. You
should see the Wi-Fi icon blinking on the
appliance HMI.
4. Turn on your smart device (phone or tablet)
and access your list of available wireless
networks in the settings menu.
5. The appliance has created a wireless
network (SSID). Select this network from
the list of available wireless networks. The
network name is made up of the prefix
from your appliance type (e.g. washer,
dryer, etc.) followed by the MAC address (ex.
REFRID_88_E7_12_B3_66_ C3). If you don’t
see it, you may need to refresh the list of
networks or verify the Wi-Fi icon is on the
appliance display.
6. Once you have selected the SSID, a
password will be required. Use the SAID as
a password (i.e., 444441ABCD).
NOTE: This password is case-sensitive.
7. Connect to the network.
8. Wait until your device is confirmed to be
connected to the appliance Wi-Fi network.
9. Open a web browser. If nothing appears,
type “192.168.10.1” in the address bar (URL)
and press Enter. The browser displays a
Smart web page. It is the configuration
page of the Wi-Fi radio of your appliance.
10. In the drop-down list of available networks,
select the name of your home wireless
network.
11. If your home wireless network is hidden,
select “Other” and manually enter its name
(SSID) and security protocol.
WPA2
12. Enter the password for your home wireless
network, if required, and submit.
Remember, this kind of password is casesensitive.
13. Click the “ ” button to submit, and wait a
few seconds.
14. The Wi-Fi icon on the appliance should stop
blinking and turn on permanently once
connected. Otherwise, disconnect and
reconnect the appliance to the main power
and repeat the procedure.
15. The Setup process is complete.
16 | GETTING STARTED

GETTING STARTED
SHELVES
The shelves in your appliance are adjustable to
meet your individual storage needs.
Storing similar food items together in your
appliance and adjusting the shelves to fit
different heights of items will make finding the
exact item you want easier. It will also reduce
the amount of time the refrigerator door is
open and save energy.
Important information to know about glass
shelves and covers:
Do not clean glass shelves or covers with warm
water when they are cold. Shelves and covers
may break if exposed to sudden temperature
changes or impact, such as bumping.
Tempered glass is designed to shatter into many
small, pebble-sized pieces. This is normal. Glass
shelves and covers are heavy. Use both hands
when removing them to avoid dropping.
TO REMOVE AND REPLACE THE SHELF AND
SHELF SUPPORTS:
1. Remove the shelf by tilting it up at the front
and lifting it out of the shelf supports. Pull
the shelf straight out.
2. To replace the shelf, reposition the shelf
supports in the desired location. Check that
they are level and firmly inserted in the
support rails.
3. Place the back of the shelf in the shelf
supports.
4. Lower the front of the shelf and make sure
that it is positioned correctly.
DELICRISPER DRAWERS
TO REMOVE AND REPLACE THE DELI
CRISPER DRAWERS:
1. To remove the deli/crisper drawers, press
the clips located at the bottom of the
drawer.
2. Lift up on the drawer and pull straight out.
1. To replace the deli/crisper drawers, extend
the glides to their fullest extent.
2. Using your fingers, hold the glides in place
as you place the drawer back on the glides.
GETTING STARTED
GETTING STARTED | 17
CARE AND CLEANING
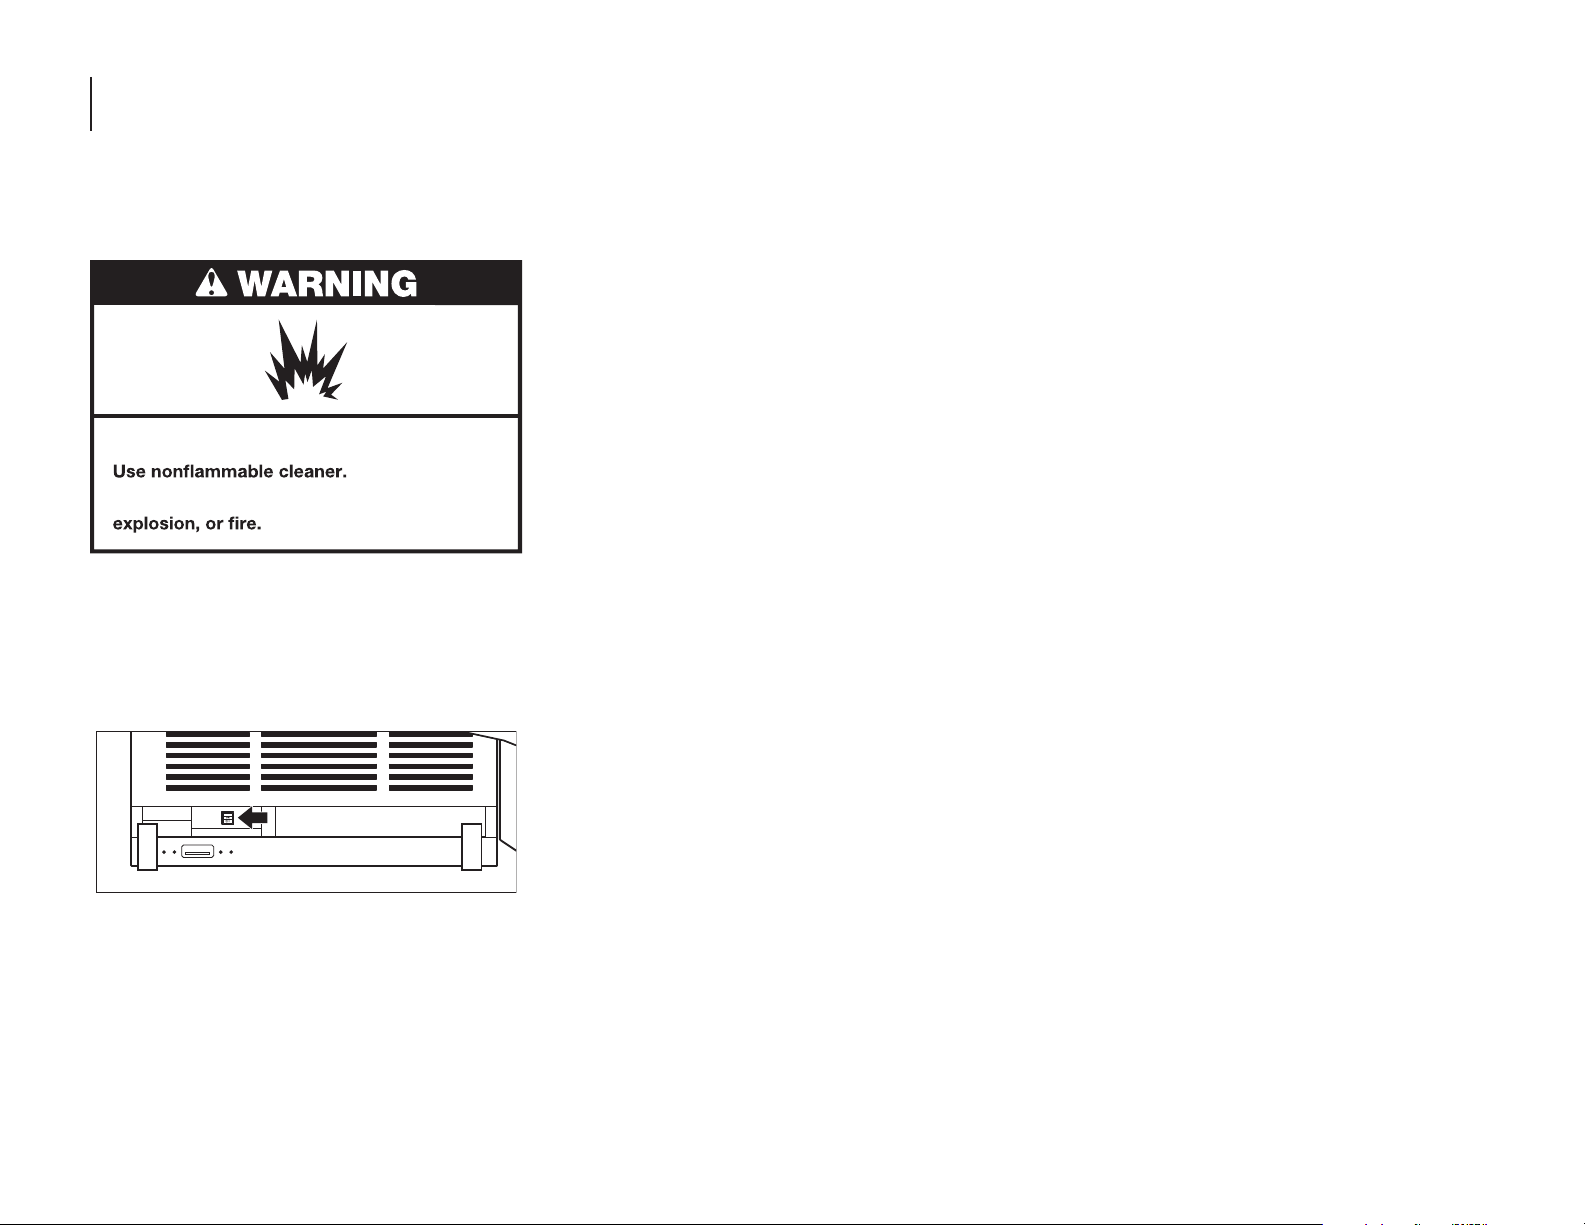
CLEANING
Explosion Hazard
Failure to do so can result in death,
Below are the recommended steps to clean
your appliance.
1. Press the power switch to OFF.
A. To access the power switch, remove the
toe kick by pulling out to release it from
the brackets.
3. Hand wash, rinse, and dry removable
parts and interior surfaces thoroughly. Use
a clean sponge or soft cloth and a mild
detergent in warm water.
Do not use abrasive or harsh cleaners
such as window sprays, scouring
cleansers, flammable fluids, cleaning
waxes, concentrated detergents,
bleaches, or cleansers containing
petroleum on plastic parts, interior,
door liners, or gaskets. Do not use
paper towels, scouring pads, or other
harsh cleaning tools. These can scratch
or damage materials.
To help remove odors, you can wash
interior walls with a mixture of warm
water and baking soda (2 tbs to 1 qt
[26 g to 0.95 L] of water).
4. Wash stainless steel and painted metal
exteriors with a clean sponge or soft cloth
and a mild detergent in warm water. Do not
use abrasive or harsh cleaners, or cleaners
containing chlorine. Dry thoroughly with a
soft cloth.
5. Press the power switch to ON.
6. To replace, press the toekick panel onto
the toekick bracket to engage the gripping
pads.
LEATHER PANEL CARE
Under normal usage conditions, regular
dusting and vacuum cleaning in crevices or
bottoms is all that is necessary to clean the
leather panel.
For minor spots, wipe any excess liquid up
immediately with a clean absorbent cloth or
sponge. If necessary, use a lightly moistened
cloth with clean lukewarm water and let dry
naturally.
NOTE:
Using hairdryer for drying may damage
leather panel, so do not dry using
hairdryers.
Do not use saddle soap, cleaning solvents,
furniture polish, oils, varnish, abrasive
cleaners, detergent soaps, or ammonia on
leather panel.
2. Remove all removable parts (such as
shelves and crispers) from the inside of the
appliance.
18 | CARE AND CLEANING

CARE AND CLEANING
VACATION CARE
1. Remove all food from the
refrigerator/freezer.
2. Empty the ice bin.
3. Turn the power switch to Off.
A. To access the power switch, remove the
toekick by pulling out to release it from
the brackets.
B. To replace, press the toekick panel onto
the toekick bracket to engage the
gripping pads.
4. Clean refrigerator/freezer, wipe it, and dry
well.
5. Tape rubber or wood blocks to the tops of
both doors to prop them open far enough
for air to get in. This stops odor and mold
from building up.
POWER INTERRUPTIONS
If the power will be out for 24 hours or less,
keep the door closed to help food stay cold and
frozen.
If the power will be out for more than 24 hours,
do one of the following:
Remove all frozen food and store it in a
frozen food locker.
Place 2 lbs (907 g) of dry ice in the freezer
for every cubic foot (28 L) of freezer space.
This will keep the food frozen for 2 to 4
days.
If neither a food locker nor dry ice is
available, consume or can perishable food
at once.
REMEMBER: A full freezer stays cold longer
than a partially filled one. A freezer full of meat
stays cold longer than a freezer full of baked
goods. If you see that food contains ice crystals,
it may be refrozen, although the quality and
flavor may be affected. If the condition of the
food is poor, dispose of it.
CARE AND CLEANING
CARE AND CLEANING | 19

CARE AND CLEANING
REPLACING THE WATER FILTER
The water filter should be replaced every 6
months based on a flow rate of
0.75 gpm-0.80 gpm (1.89- 2.27 Lpm) that filters
200 gallons (757 L) of water.
NOTE: If the filter is not installed correctly,
water may dispense at a lower flow rate and
there will be slower ice production. Improper
filter installation may also cause the water filter
housing to leak.
1. To open, push the water filter door up,
which is located at the upper left above the
refrigerator or freezer compartment.
2. Turn the water filter 90° counterclockwise
to unlock.
3. Pull the filter out of the housing.
4. Remove the water filter cap from the water
filter.
20 | CARE AND CLEANING
 Loading...