

Jenn Air Jbl800zaau, Jbl800xaan Owner's Manual

JENN-AIR .... BLENDER
hi O 1) E I N O. J B I 8 o o
USER GUIDE
1)air No. 606 00_(}(}{} 4/0_

jENN-AIR
BLENDER
C {} N (; R A T U I A T I O N S on yOUF purchase of a Jenn Air'" blender, lnspircd by
classic Italia*] &,sign, Jcnn Air captures tile European appetite for life combining
art, form an(l function into bcautiMl appliances for your home'.
Your eye catching Jenn Air blender incorporates an artfully designed pitcher
that can be used to both prepare foods and serve them with eleganee and style.
Complementing the durable (lie cast construction and tempered glassware is a
500 watt motor and oversized stainless steel blade to handle the toughest
blending chores.
hmovative, back lit electronic touch controls give you five powertul speed settings
plus ice crushing mode and momentary pulse action. Designed wifll entertaining in
mind, the large capacity 72 ounce glass pitcher with exclusive Blend and Serve
Design" is beautihll enough to go directly h'om countertop to serving table. And
the elegant bulb shape and unique wi(le bottom (lesign combine to (leliver break
through blending capabilities.
The Jenn Air blender isjust one of the unique otlerings in our expanding line of
small appliances tot your home. And of course, a beautitul addition to our broad
line of fine kitchen major appliances. Jenn Air. For the love of cooking'".

Proof of Purchase
and Product Registration
Always kccp the sales receipt showing the date of purchase of your blender.
Please return the product registration card packaged with this unit or visit
wvcv<jennair.com to register online. Returning this card will allow us to contact
you in the unlikely event of a product saiety recall notification and assist us in
complying with the provisions of the Product Sak'tv Recall Act.
Please complete the following for )Tour personal records:
Model Number
Serial Number
I)ate Purchased
Store Name
Table of Contents
Satetx Instructions .......................................... 3 4
Parts and Features ........................................... _ 6
AssemblingYour Blender . ....................................... 7
OperatingYour Blender . ..................................... 8 10
Speed Control Guide ......................................... 1 1
Care and Cleaning ........................................... 12
BetoreYou (;all tor Service ..................................... 13
Recipes ................................................ 14 17
Warranty/Customer Service .................................. 18 19
Guide de L'utilisateur . ........................................ 20
Gula del Usuario ............................................ 38
What You Need to Know
About Safety Instructions
Warning and important sak, ty instructions appearing in this manual arc not
meant to cover all possible conditions and situations that may occur. Common
sense, caution and care must bc exercised when installing, maintaining or opcr
ating appliance.
Always contact your dealer, distributor, service agent or manutacturer about
problems or conditions you do not understand.
Recognize Safety Symbols,Words, Labels
Important Safeguards
When using electrical appliances, basic sak'ty precautions should alwavs be
observed, including the iollowing:
1 .Read all instructions.
2.To protect against risk of electrical shock, do not immc'rsc the _ord, plug
or blender power base in water or other liquids.
3.Close supervision is necessary when anv appliance is used bv or near chil
dren.
4.Unplug blender fl'om outlet when not in use, beture putting on or taking
off parts, and before cleaning or taking apart the blender pitcher. Never put
hands in blender pitcher or handle the blades when the appliance is plugged
in. Never operate the blender without the pitcher hilly assembled.
g.Avoid contacting moving parts.

6.I)onotoperateanyappliancewithadamagedcordorplug,oraltertheappli
antemaltunctions,orisdroppedordamagedinanymanner.Returnappliance
tofl_enearestauthorizedservicefacilityffsrexamination,repair,electricalor
mechanicaladjustment.CalltheJennAirCustomerServiceCenterat
I 8669823313ff_rassistance.
7.Usingattachmentsnotrecommendedorsoklbytheappliancemanutacturerff)r
usewiththismodel,includingcanningjarsorordinaryjars,isnotrecommended
andmaycausefire,electricshockorinjurytopersons.
8.I)onotusetheblenderoutdoors.
9.I)onotletthecordhangovertheedgeofatableorcounter.I)onotletcord
contacthotsurfaces,includingstove.
10.Keephandsandutensilsoutofpitcherwhileblendingtoreducetheriskof
severeinjurytopersons(51"damagetotheblender.Ascrapermaybeusedbut
mustbeusedonlywhentheblenderisnotrunning.
11.Flashinglightindicatesreadytooperate.Avoidanycontactwifl_bladesormove
ableparts.Whentheblenderisinthe"ON"mode,andthetouchcontrolisillu
minated,donottouchthebladeassembly,interferewithblademovementor
removethepitcherlid.Accidentallytouchingaspeedcontrolmayactivate
the blender.
12.F,lades are sharp. Handle carelulh'.
1_.To reduce risk of injurv, never place the blade assembl,v on the power base with
out the pitcher properl)" attached.
14.Always operate blender with the lid in place.
15.Never leave blender unattended while running.
16.Before blending hot liquids, remove pitcher lid cap h'om lid. Beware of steam (51"
hot vapor. When removing the lid, tilt lid slightly to direct steam awav from
skin. Place a clean cloth over the lid cap opening to avoid splattering. Keep
hands and odler exposed skin away h'om opening to prevent possible burns.
Start with slowest speed.
17.I)o not use an extension cord with this blender.
This product is designed for household use only. I)o not use blender for other than
intended purpose.
SAVE THESE INSTRUCTIONS FOR FUTURE REFERENCE.

@
0
0
1

Parts and Features
1. Pitcher Lid Cap
This center portion of the pitcher lid mc_ybe remo_z'd, allot_gng ingredients to be added
during use. (Be sure to check size o_food load in the blender and the _peed setting prior to
removing cap.)
2. Pitcher Lid
Seal_ the top €the pitcher jar.
3. Pitcher Jar
The 72 ounce gla_s pitcher jar has a unique bldb shaped design that o/fi'rs outstanding
bJending pe_>rmance. The pitcher is beautiful enough to go directly.from the countertop
to the serving tabJe.
4. Pitcher Gasket
This seals the bottom ofthe. [_itcher]ar to the blade base.
5. Blade Base
The _ider bottom c._f_thepitcher jar accommoddtes a larger blade.fi>r improved rollover,
increased.fluid movement and outstanding blending.
6. Base Ring
The base ring screws onto the bottom of the pitcher jar, holding the pitcher gasket and
blade base in place.
7. Blender Power Base
The po_er base _'atures a _00-w(_tt motor and innovative touch controls. The pitcher locks
onto the po_er base with a simple quarter turn.fi_r sqfe, no mess operation.
8. Control Panel
_hee_,_to _L_eto_,ch_'ontrols/eat_,re_,r_,n,_leoUi,'e,, t_°"erfi'l,q_eed_,_,_,,ella__,ni,'e
('ru_h mode and a pulse option. The controh are activated with the touch c?fa..finger"
9. Detachable Power Cord
The detachable power cord is interchangeable _ith other ]enn-Air '_'_malt appliances.

Assembling Your Blender
1. Carefully remove all blender parts h'om the pad<aging.
2. Place the blender power base on a solid, level surtace.
3. Befure first use, wash the pitcher jar, pitcher lid, pitcher
lid cap, pitcher gasket, blade base and base ring in hot,
soapy water. Rinse and <11"7.The pitcher jar is dishwasher
sak'. The pitcher lid, base ring and blade base are all top
rack dishwasher safe.
4. ( arehllly place the pitcher gasket over the blade base,
while keeping lingers away h'om the blades.
5. Turn the pitcher jar upside down.
6. Using caution, place the blade base and pitcher gasket
into the bottom opening of the pitcher jar.
7. Twist the base ring onto bottom of pitcher jar, making
sure it threads evenly and secures the pitcher gasket and
blade base in place. The base ring shoukl be tightened
hand tight onto the pitcher jar. I)o not over tighten.
8.Turn the pitcher jar right side up and place it on top of
the blender power base and turn clockwise to lock the
pitcher in place.
9. Insert the pitcher lid cap into the pitcher lid and tighten
it by turning clockwise. Place the pitcher lid onto the
pitcher jar.
10. Plug the detachable power cord into the blender power
base and a properly grounded 3 prong electrical outlet.
The blender is now ready to use.

Removing pitcher from base
1. Make sure the blender controls are set to "OFF"
and the power cord is unplu_ed.
2. Tm'n the pitcher counterclockwise and lilt the
pitcher up and off the base.
3. I)o not unscrew the base ring fl'om the pitcher jar
until you are ready to remove the blade assembly.
Loosening it will cause leaking.
NOTE: Be sure to operate ,your blender on a clean,
dry, sturdy suvtace.
Operating Your Blender
1. Make sure the touch controls are SET TO "O FF" and l /
the power cord is unplugged. /
2. Place the assembled PITCHER ON TOP OF \
F,LENI)ER BASEand tul'n clockwise to lock the
pitcher in place.
3. LOAD BLENI)ER with tood to be blended and place
the lid securely on flaepitcher jar.
4. TOU(H THE "ON" PAl) on the control panel. The
"ON" pad should illuminate and the WARNING light will flash to indicate that
the blender is ready to operate.
5. TOU(H ONE OF THE FIVE SPEED PAI)S. Reter to the "Speed (ontrol
Guide" in this manual tor suggested settings. Reter to the "Pulse Mode" and
"Ice Crushing Mode" sections in this manual tot use of those controls.

Turning the Blender Off
While the blender is operating, touch file "OFF" pad on the control panel or touch
the active speed setting pad a secoM time and fl_e blender will stop. The "ON" pad
will still be illuminated and the WARNING light will flash to indicate the blender is
ready to operate again. Press the "OFF" pad a second time to completely turn the
blender off.
Auto Shut-o[[
• The blender will automatically shut off if allowed to stand with no control pads
pressed tot 10 minutes.
• lftwo speed settings pads are accidentally touched at the same time, the
blender will shut off. Select desired speed setting pad to start or restart.
Pulse Mode
1.Touch the "ON" pad on the control panel. The "ON" pad will illuminate and the
WARNING light will flash to indicate that the blender is ready to operate.
2. Touch the "PULSE" pad.
3. Select a speed setting and touch the corresponding pad on the control panel.
4. The blender will operate only while you are touching the speed setting pad.
NOTE: When unsure about the appropriate speed setting, try puMng to test
various speeds.
Ice Crushing Mode
1. Load ice cubes in the blender pitcher, making sure to use ice that is thoroughly
fl'ozen. Break up any large chunks of ice.
2. Touch the "ON" pad oi1 the control panel. The "ON" pad will illuminate and the
WARNING light will flash to indicate that the blender is ready to operate.
3. Touch the "(RUSH" pad on the control panel. The blender will automatically
operate in short bursts to crush flae ice.
4. Once the ice is crushed, touch the "OFF" pad on the control panel.
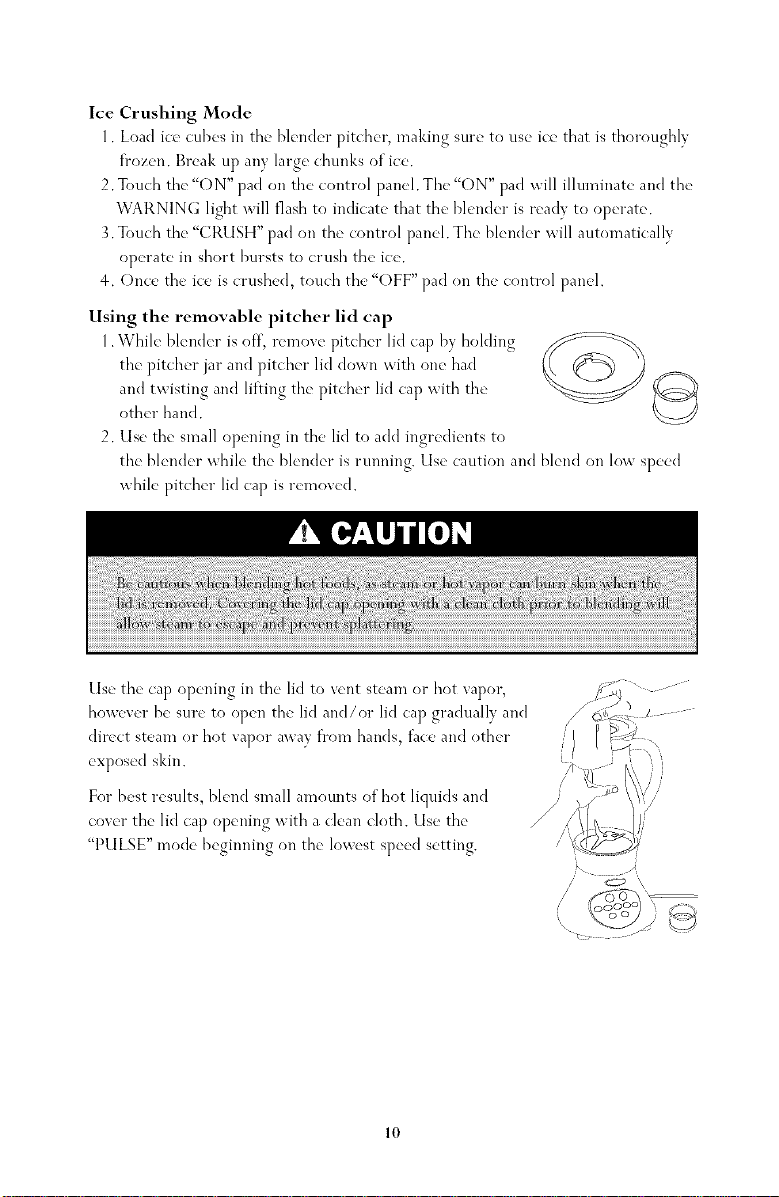
Using the removable pitcher lid cap
1. While bleMer is off, remove pitcher lid cap by holding
the pitcher jar and pitcher lid down with one had
and txsisting and lilting the pitcher lid cap xsith the
other hand.
2. Use the small opening in the lid to add ingredients to
the blender while the blender is running. Use caution and blend on l<_v speed
while pitcher M cap is removed.
Use the cap opening in the lid to vent steam or hot vapor,
however be sure to open the M and/or M cap gradually and
direct steam or hot vapor away fl'om hams, lace and other
exposed skin.
%J
For best results, blend small amounts of hot liquids and
cover the lid cap opening with a clean cloth. Use the
"PULSE" mode beginning on the lowest speed setting.
10
/ ,0\

Speed Control Guide
The following speed control guide provides suggested settings for )'our blender.
If in doubt, start on a lo_er setting and try pulsing to test out various speeds.
F,abv food ingredients puree
F,lended ice drink crush
F,read chop
Cotfee beans liquefy
(rackers chop
Crushed ice crush
Fruit juice fl'om fl'ozen concentrate mix
Milk powder & water liquet.v
Nuts chop
Oatmeal puree
Pancake batter mix
Salad dressing mix
Sauces stir
Smoothies liquet.v
Tips
The "PI_ILSE"mode can be use<{with any speed setting. Simply touch the "P{ILSE"
pad and then touch the desired speed setting.
When crushing ice, be sure to use ice cubes that are frozen solid and break up any
large chunks.
If blending a mixture of liquid and solid ingredients, add the liquid ingredients to
the blender first and then add the solids, unless the recipe states other'Mse.
11
Care and Cleaning
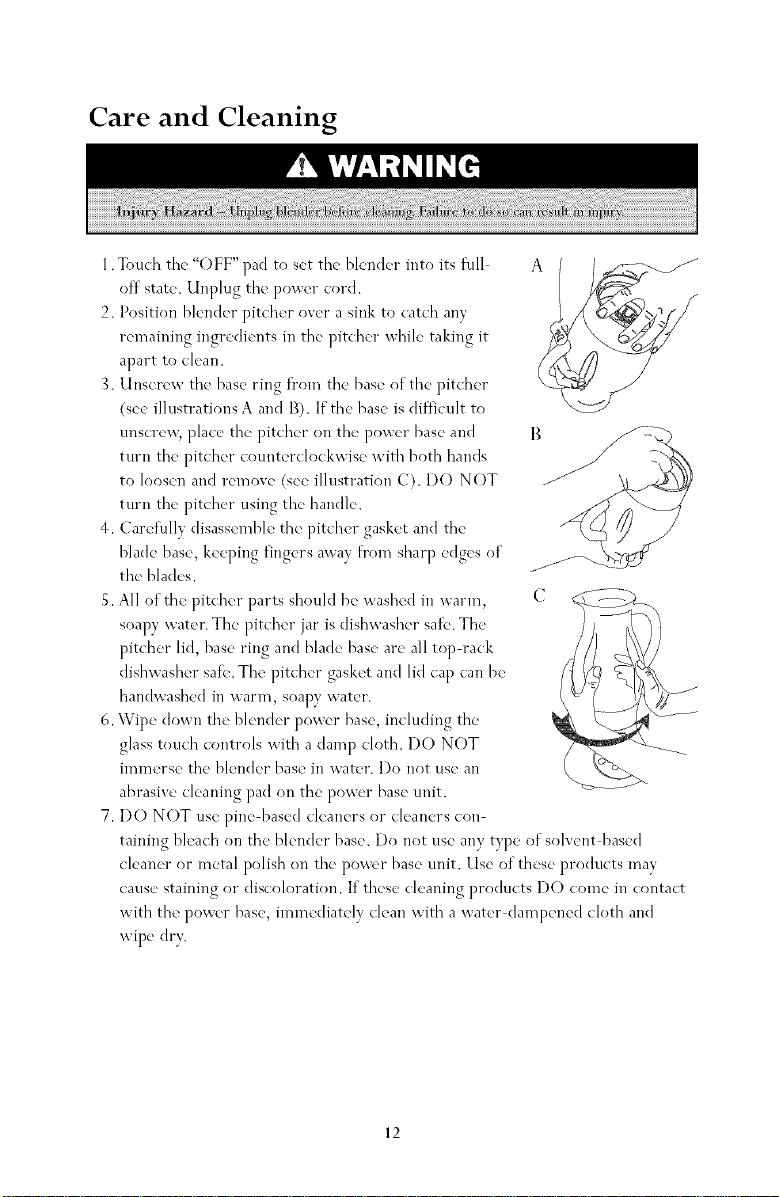
1. Touch the "OFF" pad to set the blender into its full
oil state. Unplug the power cord.
2. Position blcMer pitcher over a sink to catch anv
remaining ingredients in the pitcher while taking it
apart to clean.
3. Unscrew the base ring fl'om the base of the pitcher
(see illustrations A and B). If the base is ditiicuh to
unscre_x; place the pitcher on the power base and
turn tbe pitcher counterclockwise with both bands
to loosen and remove (see illustration C). I)O NOT
turn the pitcher using the handle.
4. Careiully disassemble the pitcher gasket and the
blade base, keeping fingers away fl'om sharp edges of
the blades.
5. All of the pitcher parts should be washed in warm,
soapy water. The pitcher jar is dishwasher safe. The
pitcher lid, base ring and blade base are all top rack
dishwasher safe. The pitcher gasket and lid cap can be
bandwashed in warm, soapy water.
6. Wipe down the blender power base, including the
glass touch controls with a damp cloth. I)O NOT
immerse the blender base in water. I)o not use an
abrasive cleaning pad on the power base unit.
7. I)O NOT use pine based cleaners or cleaners con
raining bleach on the bleMer base. I)o not use any type of solvent based
cleaner or metal polish on the power base unit. Use of these products may
cause staining or discoloration. If these cleaning products I)O come in contact
with the power base, immediately clean with a water dampened cloth and
wipe dry.
B
12

Betbre You Call tbr Service
PROBLEM
The })lender will
not starl.
The hlender is
spattering ingredients
outside the blender
pitcher jar.
The hlender is leaking
around the bottom
of the pitcher.
The hlender motor
is bogging down.
POSSIBLE SOLUTION
• Check th( power cord to mak( sure it is securely fas
ten(d into the bl(nder and into the cl(ctrica] out]et.
• Mak( sure the "ON" pad is illuminated. Next, touch
the desired speed setting.
• Aw_id touching two speed settings at once since this
will cause the blender to turn off.
• Make sure the pitcher lid is securely t3stened into the
pitcher jar befiwe blending.
• If'the pitcher lid has been removed, make sule the
blender is set on a low setting to avoid spattering.
• Fhe bl(n(ler ma) I)( ove]loa(led. Remove so]n( of the
contents and continue blending.
• Make sure the pitcher gasket is positioned between the
pitcher jar an(] the blade base.
• Check to see if the base ring is securely screwed into
place and a]igned evenh around the base oi the
pitcher jar.
• Check to make sure the blender isn't overloaded with
dense h)ods. If so, break into small( r pieces.
• When using the ice "C[_.LISI{" rood(, be sure to use
solidi) hozen ice cubes and break up any large chunks
of"ice.
The [)lender wobbles
on the work surt_ce.
• Make sure the small pads on the Icet o[:the blender are
all snugly pushed in.
• Check to see if the work surlace is level.
13

Recipes
Roasted Yellow Pepper Soup
The ,_Jediterraneanfello." ccdorof thi_ _oW make_it a t ,_erfi'ctchoice(n the fir_t ccmr_e
,_r a late slmm_erdinner.Hgth its rich, meHo,,fiaror, it ,ill be aFFreciatedj'ear-rollnd.
I medium red potato, peeled and cut into 1" cubes
2 stalks celery, coarsely chopped
I carrot, peeled and coarsely chopped
I small onion, peelecl and coarse'IF chopped
1 clove garlic, minced
6 sweet yellow bell peppers, seeded and cut into 1" chunks
2 tablespoons extra virgin olive oil
6 cups chicken stock
I teaspoon green peppercorns
1 cup heavv cream
salt and pepper, to taste
8 leaves of tresh basil
Place potato, celery, carrot, onion, garlic: and yellow bdl pepper pieces on an
oven proof baking tray. I)rizzle with olive oil. Bake at 400 ° F.tor 40 45 rain
utes (Convect Roast 30 35 minutes), or until tender. Cover loosely with toil
and set aside to cool slightly (approximately 20 minutes).
In a large soup pot, bring chicken stock to a boil. Stir in green peppercorns.
Reduce heat to simmer.
Set blender to "puree" and process the roasted vegetables in blender h)r 20 25
seconds or until smooth. Stir puree into the simmering chicken broth. Stir in
heavv cream ant] mix well. Add salt and pepper to taste. I)o not allow soup to
boil. Serve immediately with fl'esh basil leaf garnish.
14

Ricotta and Pine NutTart
with Balsamic Strawberries
En}c_"this detightfid tart sprinkled ._th pine nut_ aM drizzled with str_m'berrie_.
The,filling is mixed in the blenderto createa crean_"texture.
Pastry Crust
2 cups all purpose flour
lJ? cup sugar
14 cups pine nuts, toasted and finely chopped
12 tablespoons unsalted butter, melted
Filling
11"?cups sugar
1 cup water
6 ounces cream cheese
1 cup ricotta cheese
3 egg yolks
2 whole e_s
14 cup pine nuts, whole
Balsamic Strawberries
2 pints fl'esh strawberries
2 tablespoons sugar
1 tablespoon top quality balsamic vinegar
Pastry Crust
In a small bowl, mix flour, sugar and chopped pine nuts. Add melted butter and
mix gently.
Press mixture into bottom and about 1" up the sides of a 10" spring form pan.
Chill tor 10 minutes. Begin making the sugar/water mixture tor the filling. Place
aluminum toil over the pastry and fill with pie weights, dry beans or rice. Bake at
375 ° F (( onvect Bake 350 ° F) tor 15 minutes. Remove toil and pie weights, then
bake an additional 10 minutes, or until golden brown. (ool completely.
15

Filling
In a small saucepan, bring water and sugar to a boil. Boil until sugar is completely
dissolved, about 4 minutes. Transfer to container with a pour spout and allow to
cool 20 minutes.
Add cream cheese, rieotta cheese, e_ yolks and whole eggs to blender pitcher.
Cover with lid and mix 5 seconds. Turn blender off and scrape sides. Resume mix
ing for 15 seconds or until smoofll. Turn blender <ill. Remove the pitcher lid cap.
Set blender to "stir" and with the blender running, add the sugar syrup slowly.
Pour die cheese mixture into the prepared crust. Sprinkle the whole pine nuts over
the top. Return to oven and bake the tart for 40 45 minutes, or until goklen but
still a [)it so[t in the middle. (ool. Serve topped with balsamic strawberries.
Balsamic Strawberries
Clean, hull and slice the strawberries. Place in a shallow pan and sprinkle with
sugar. (<)vex"tightly witli plastic: wrap. Allow to stand at room temperature for
30 minutes. Shake occasionally.
Sprinkle with balsamic vinegar, shake pan to distribute flavor and allow to stand at
room temperature for 30 more minutes.
16
 Loading...