

Jenn-Air DW961 User Manual
Dishw er
For Future Assistance ............. 1
Safety Instructions ............... 1
Check Before Washing ............ 2
Hot Water
Rinse Aid
Detergents
Loading ........................ 3
Cycles At
A Glance ..................... 4
Additional Information ........... 5
Display Window
Adding A Forgotten Item
Cleaning
Storing
What Can & Cannot
Be Washed .................... 6
Common Questions
& Answers .................. 7-9
Notes ......................... 10
Warranty ............... Back Page
t
]For Future Assistance
Thank you for selecting a new Jenn-Air dishwasher! In addition, keep your sales slip or cancelled check should
We appreciate your purchase decision and feel confident any warranty service be required. Proof of original date of
you will be happy with this appliance for years to come. purchase is needed. For additional questions, please con-
For best results, we suggest reading this material to help tact us:
you properly operate and maintain the appliance. Jenn-Air
Should you ever need our future assistance with your dish- 403 West Fourth Street North
washer, a complete model and serial number recorded in Newton, Iowa 50208
the spaces below will be extremely helpful. These numbers
can be found in the upper left comer of the tub opening. ,6, WARNING - Check with the installer to make sure
the appliance has been properly grounded to avoid pos-
sible electrical shock. Be sure you read the Important
Model Number Personal Safety Instructions before you start to use this
dishwasher.
Serial Number In our continuing effort to improve the quality of our
dishwashers, it may he necessary to make changes to
the appearance without revising this guide.
Important Safety Instructions
Products with a @label have been listed with Underwriter's 8. Be careful not to touch the heating element on the bot-
Laboratories, Inc. - those with a CSA tag have been listed tom of the tub during or at the completion of a cycle.
with Canadian Standards Association. Nevertheless, as It may be hot.
with any other equipment using electricity and moving 9. Use only detergents and rinse additives designed for an
parts, there is a potential hazard, automatic dishwasher. Never use soap, laundry deter-
1_ WARNING - When using your dishwasher, follow gent, or hand washing detergent in your dishwasher.
basic precautions, including the following: Keep these products out of reach of children.
10. Do not sit, stand on or abuse the door or dish racks of
1.Read all instructions before using the dishwasher.
the dishwasher.
2. Use the dishwasher only for its intended function. 11. Under certain conditions, hydrogen gas may be pro-
3. Disconnect electrical power to dishwasher before duced in a hot water system that has not been used for
attempting to service, two weeks or more. Hydrogen gas is explosive, If the
hot water system has not been used for such a period,
4. To avoid electrical shock hazard, the sides and back
turn on all hot water faucets and let the water flow
must be enclosed and the front panels must be attached
from each for several minutes. This will release any
before electrical power is applied to the dishwasher.
accumulated hydrogen gas. As the gas is flammable,
Refer to the installation instructions for proper ground- do not smoke or use an open flame during this process.
ing procedures.
12. Do not wash plastic items unless marked "dishwasher
5. Connect to a properly rated, protected and sized power safe" or the equivalent. For plastic items not so
supply circuit to avoid electrical overload, marked, check the manufacturer's recommendations.
6. Children should never be permitted to operate, or play 13. Do not tamper with controls.
in, with, or around this dishwasher.
14. Always remove the door to the washing compartment
7. To reduce the risk of injury when loading items to be when removing an old dishwasher from service or dis-
washed, sharp or pointed items should be located with carding it.
the handles up. Also, load sharp items so they are not
likely to damage the door seal.
Save These Instructions
Check Before Washing
H o t W at e r Aliquid rinseaiddispenser automati- .
cally releases a measured amount of
For best results, hot water is necessary, additive into the final rinse portion of
The incoming water temperature each cycle.
should be 120-140°E To check the
water temperature, turn on the hot To fill the dispenser, turn the cap coun-
water faucet nearest the dishwasher terclockwise to open. Pour the rinse aid _'*'
and let it run into a glass in the sink. into the reservoir. Replace thecap and he
Place a candy thermometer in the glass sure it is securely in place before closing ¢ Use Hot Water to dissolve
and check the temperature once it has the dishwasher door. Check the reservoir and activate detergent, dis-
stopped rising. If the temperature is monthly, solve greasy food soils and
below 120°F, have a qualified person improve drying.
raise the water heater setting. O e t e rg e n t
Additionally: Use a detergent designed specifically ¢ Use a Rinse Aid regularly
, If the outside temperature is unusu- for use in an automatic dishwasher, to improve drying results
ally low, or if your water travels a Other types (laundry, hand soap, etc,) and reduce spotting and
long distance from the water heater will cause oversudsing. For best results filming.
to the dishwasher, you may need to be sure to use fresh detergent and store
increase your home's water heater it in a cool, dry place (not under the • Use the Proper Detergent
setting and/or select water heating sink). Amount for best soil
removal, good drying
options on yourdishwasher. The amount of detergent to use results and prevention of
e_ If you have not recendy used hot depends on the water hardness (mea- filming, etching and spot-
water, the water in the pipes will be sured in grains per gallon-gpg) and the ting.
cold. Run water at the sink until the amount of soil on the dishes.
water is hot. Then start the dish- A basic guideline is: • Load Properly to ensure
washer. 1.) Use 1 teaspoon of detergent per soiled surfaces get adequate
¢ If you've recently done laundry or grain of water hardness, wash action. (See page 3).
2.) A minimum of 3 teaspoons is need-
used hot water for showers, your
water heater may need time to edin soflwater.* • Select the Proper Cycle
recover before operating the dish- 3.) For concentrated detergents, de- & Options based on the
washer, crease the amount by half. amount of food soil, water
If the water hardness is 15 grains or conditions and expected
R i n s e A i d harder, it will be virtually impossible to drying results. (See pages
Rinse aids come in solid or liquid form. get good results with any dishwasher. 4-5).
When using a solid rinse aid, fasten it to The only solution is a mechanical
the back right comer of the lower rack. water softener to improve water quail-
Replace the rinse aid when the contain- ty and detergent effectiveness.
er is empty.
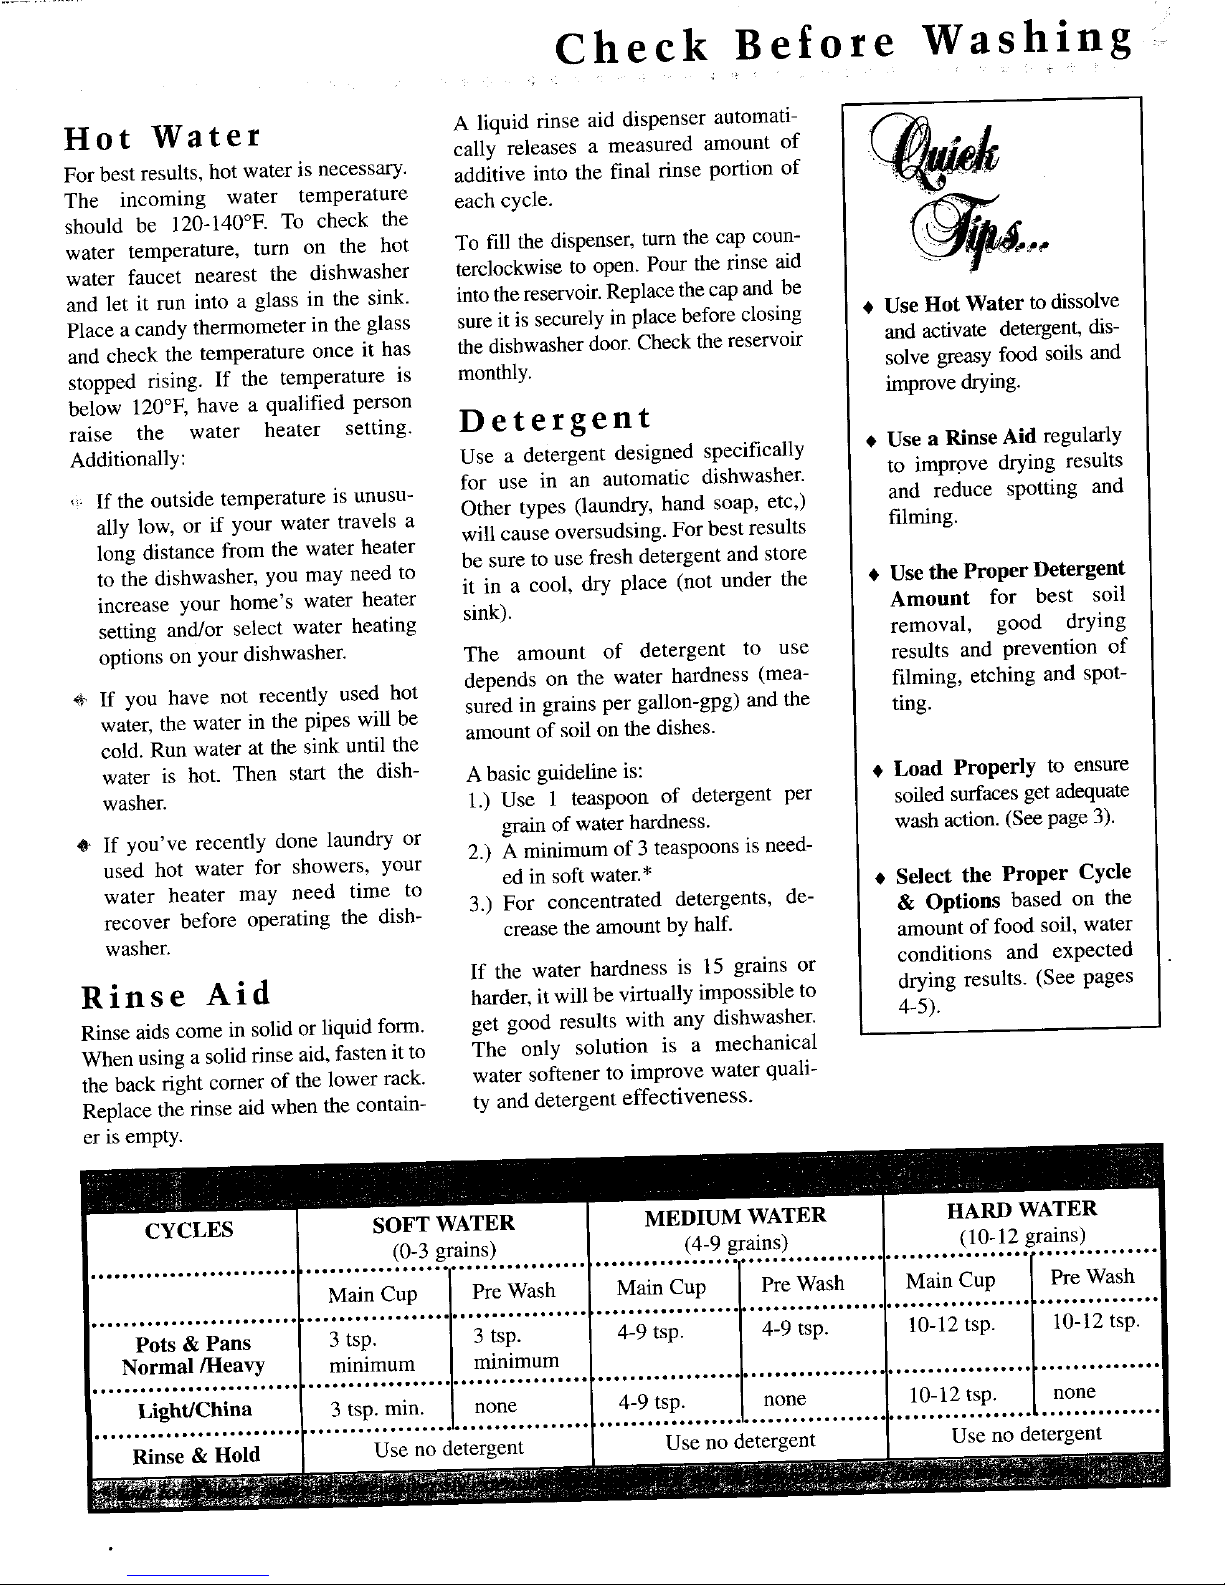
CYCLES SOFT WATER MEDIUM WATER HARD WATER
(0-3 grains) (4-9 grains) (10-12 grains)
Main Cup Pre Wash Main Cup Pre Wash Main Cup Pre Wash
Pots & Pans 3 tsp. 3 tsp. 4-9 tsp. 4-9 tsp. 10-12 tsp. 10-12 tsp.
Normal/Heavy minimum minimum
Light/China 3 tsp. rain. none 4-9 tsp. none 10-12 tsp. none
Rinse & Hold [ Use no detergent [ Use no detergent [ Use no detergent I
/
I I
Loading the Dishwasher
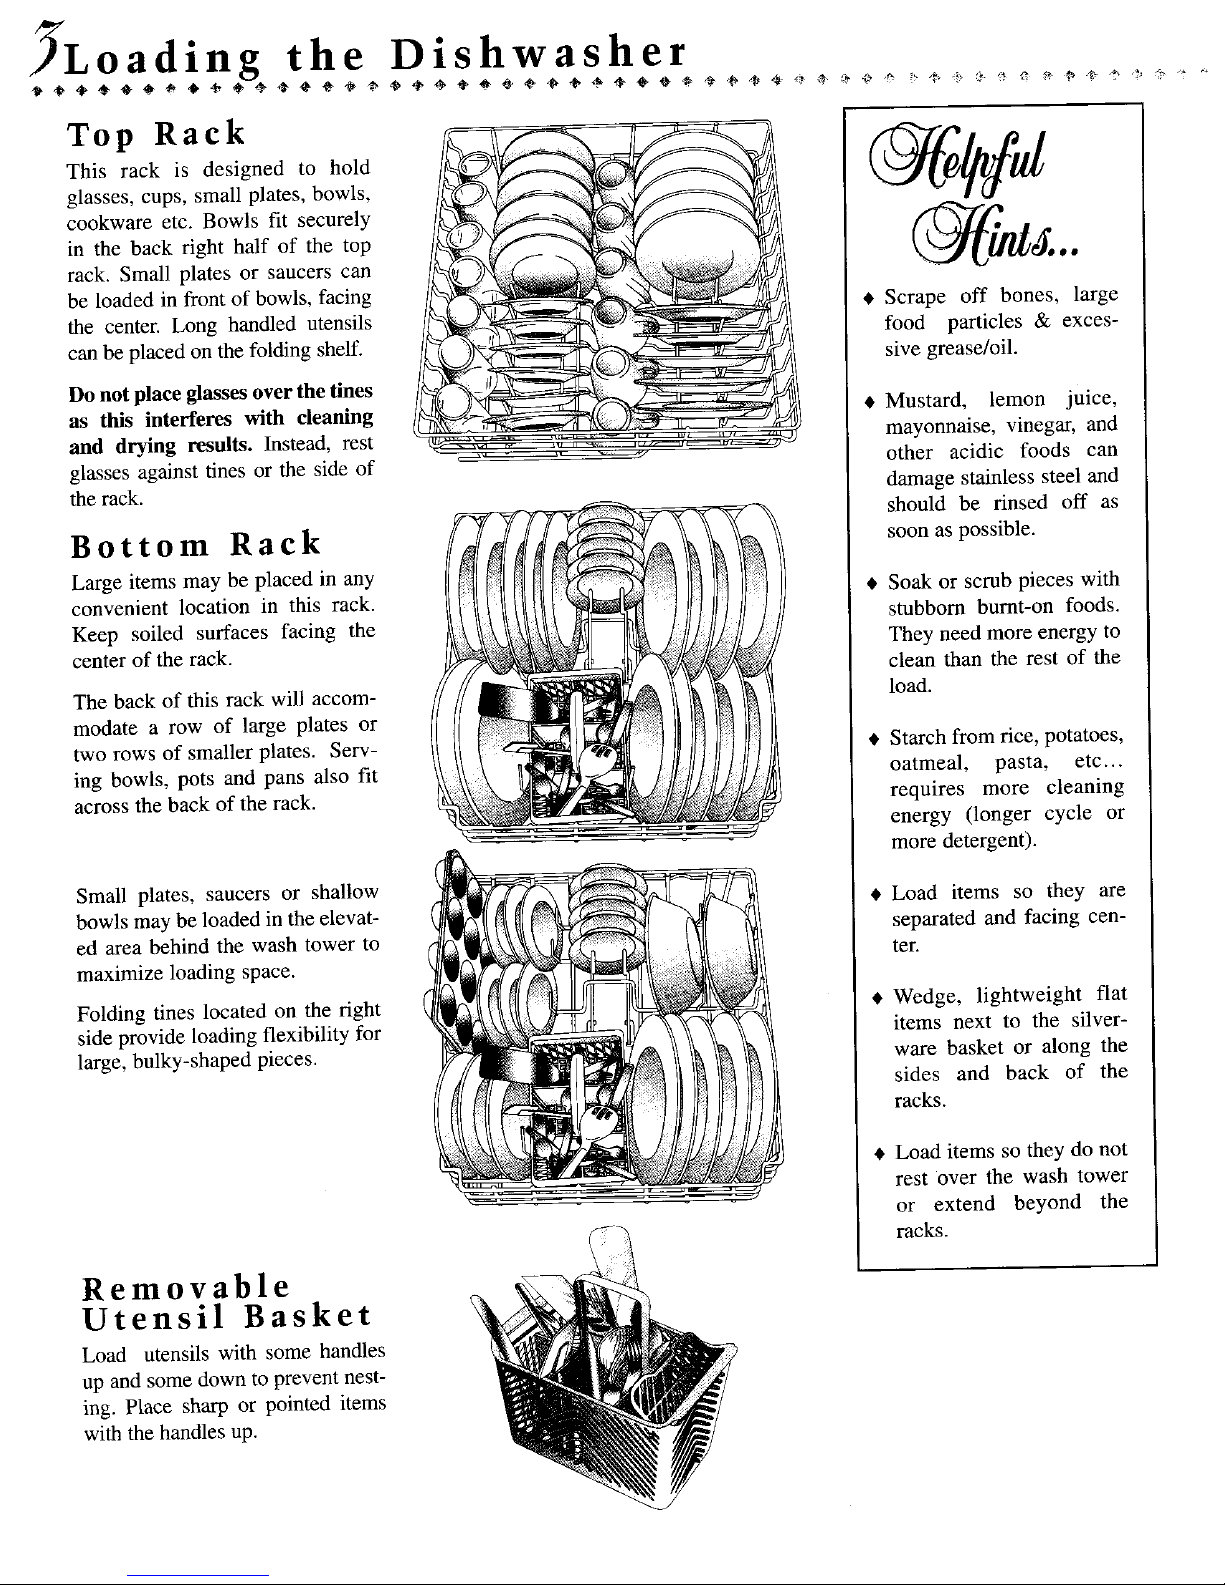
Top Rack
This rack is designed to hold
glasses, cups, small plates, bowls,
cookware etc. Bowls fit securely _-_P-/_J'
in the back right half of the top
rack. Small plates or saucers can *°
be loaded in front of bowls, facing * Scrape off bones, large
the center. Long handled utensils food particles & exces-
can be placed on the folding shelf, sive grease/oil.
Do not place glasses over the fines
as this interferes with cleaning * Mustard, lemon juice,
and drying results. Instead, rest mayonnaise, vinegar, and
glasses against tines or the side of other acidic foods can
the rack. damage stainless steel and
should be rinsed off as
B o t t o m R a C k soon as possible.
Large items may be placed in any , Soak or scrub pieces with
convenient location in this rack. stubborn burnt-on foods.
Keep soiled surfaces facing the They need more energy to
center of the rack. clean than the rest of the
The back of this rack will accom- load.
modate a row of large plates or
two rows of smaller plates. Serv- * Starch from rice, potatoes,
ing bowls, pots and pans also fit oatmeal, pasta, etc...
across the back of the rack. requires more cleaning
energy (longer cycle or
more detergent).
Small plates, saucers or shallow • Load items so they are
bowls may be loaded in the elevat- separated and facing cen-
ed area behind the wash tower to ter.
maximize loading space.
Folding tines located on the right • Wedge, lightweight flat
side provide loading flexibility for items next to the silver-
large, bulky-shaped pieces, ware basket or along the
sides and back of the
racks.
• Load items so they do not
rest over the wash tower
or extend beyond the
racks.
Removable
Utensil Basket
t
Load utensils with some handles
up and some down to prevent nest-
ing. Place sharp or pointed items
with the handles up.
 Loading...