

Page 1

_IENN-AIR
Use and Care Manual
Dishwasher
Model DW960
J, ,[, ,]
Page 2
IMPORTANTPERSONALSAFETYINSTRUCTIONS
Products with a (_ label have been listed with 8. Becareful not to touch the heating
the Underwriters' Laboratories, Inc. - those element on the bottom of the tub during
with a CSA tag have been listed with Canadian or at the completion of a cycle. It may be
Standards Association. Nevertheless, aswith hot.
any other equipment using electricity and
moving parts, there is a potential hazard.
When using your dishwasher, follow basic
precautions, including the following: hand washing detergent in your
I. Read all instructions before using the dishwasher. Keep these products out of
dishwasher, the reach of children.
2. Use the dishwasher only for its intended I 0. Do not sit, stand on or abuse the door or
function, dish racks of the dishwasher.
3. Disconnect electrical power to dishwasher 11. Under certain conditions, hydrogen gas
before attempting to service, may be produced in a hot water system
4. To avoid electrical shock hazard, the sides that has not been used for two weeks or
and back must be enclosed, and the front more. Hydrogen gas is explosive. If the
panels must be attached before electrical hot water system has not been used for
power is applied to the dishwasher. Refer such a period, turn on all hot water faucets
to the installation instructions for proper and let the water flow from each for
grounding procedures, several minutes. This will releaseany
5. Connect to a properly rated, protected flammable, do not smoke or use an open
and sized power supply circuit to avoid
electrical overload.
6. Children should never be permitted to
operate, or play in, with, or around this
dishwasher, manufacturer's recommendations.
9. Use only detergents and rinse additives
designed for an automatic dishwasher.
Never use soap, laundry detergent, or
accumulated hydrogen gas. As the gas is
flame during this process.
12. Do not wash plastic items unless marked
"dishwasher safe" or the equivalent. For
plastic items not so marked, check the
7. To reduce the risk of injury when loading 13. Do not tamper with controls.
items to be washed, sharp or pointed
items should be located with the handles 14. Always remove the door to the washing
up. Also, load sharp items so they are not compartment when removing an old
likely to damage the door seal. dishwasher from service or discarding it.
SAVE THESEINSTRUCTIONS
PAGE2
Page 3
USING YOUR DISHWASHER
HotWateris Essential LoadingYourDishwasher
For proper performance of your dishwasher, Seldom will households have identical dishes;
hot water is necessary to activate the the number and type of articles used will vary
dishwasher detergent and melt fatty food soils, daily. Your dishwasher is designed to be
Set your water heater to deliver 140°F water to flexible and accommodate a wide variety of
the dishwasher. If, for any reason, the dishes and utensils. The following instructions
temperature of the water being delivered by and pictures will help you become familiar
the water heater should be below 140°F, the with your dishwasher. With experience, you
AccuTemp TM Option on your dishwasher will will learn the best arrangement for your
heat the water until the proper temperature is particular needs.
reached. General Recommendations
To check water temperature, turn on the hot
water faucet nearest the dishwasher. Let water • Place all items on racks so they are separated
run into a glass until it is as hot as possible, and face the center to insure the water spray
then check with a candy or meat thermometer, will reach the soiled surfaces. Do not allow
If the temperature at the faucet is below 140°F items to extend out of the racks.
(60°C), have a qualified person raise the water * Make sure the movement of the upper and
heater thermostat setting, lower spray arms is not blocked by items
For more information, see page 11. hanging below the lower rack or tall articles
in the upper rack.
Preparing Dishes • Insure the free flow of water to the detergent
• It is not necessary to rinse dishes before cup by not blocking it with large items.
placing them in your Jenn-Air dishwasher. • Larger, flat, lightweight items (such as plastic
Simply scrape off bones and large pieces of covers) may be wedged next to the
food. silverware basket or along the sides and back
of the racks.
• Foods that have been burned onto cooking
utensils will need to be scraped or soaked. • The wash tower risesthrough the center of
the lower rack during the cycle. For the best
• Certain foods, such as mustard, mayonnaise, cleaning results, avoid blocking it or loading
lemon juice, vinegar, salt or dressings may tall articles next to it.
cause stainless steel flatware to rust and pit if
allowed to remain in contact with the
surface for a period of time. Therefore, it is
best to rinse these food soils off stainless steel
flatware unless the dishwasher is to be
operated soon after loading.
• If your dishwasher drains into a food waste
disposer, make certain the disposer is
completely empty before starting the
dishwasher to provide for proper draining.
PAGE3
Page 4

Upper Rack Lower Rack
The upper rack isdesigned to hold glasses, Large dinner plates and other dishes may be
cups, saucers, small plates, bowls, etc. Bowls fit placed in any convenient location in the lower
securely in the back right half of the top rack. rack with soiled surfaces facing the center.
Small plates, such as salad plates or saucers, loaded in the elevated area behind the wash
can be loaded in front of the bowls, facing the
center. Glassesand cups of varying sizescan be tower.
loaded with flexibility in the center and left
side. If additional space is needed for loading
small plates, the left set of rack tines can also
be used.
When loading glassware, leave a small space
between each piece so they do not touch each
other during the wash cycle. Do not place
glasses over the tines. Instead, rest them
against the side of the rack or tines.
Small plates, saucers or shallow bowls may be
The back half of the lower rack can
accommodate either large dinner plates or two
parallel rows of smaller plates. The right side
has wider spacing to accommodate large
baking pans and bowls.
PAGE4
Page 5
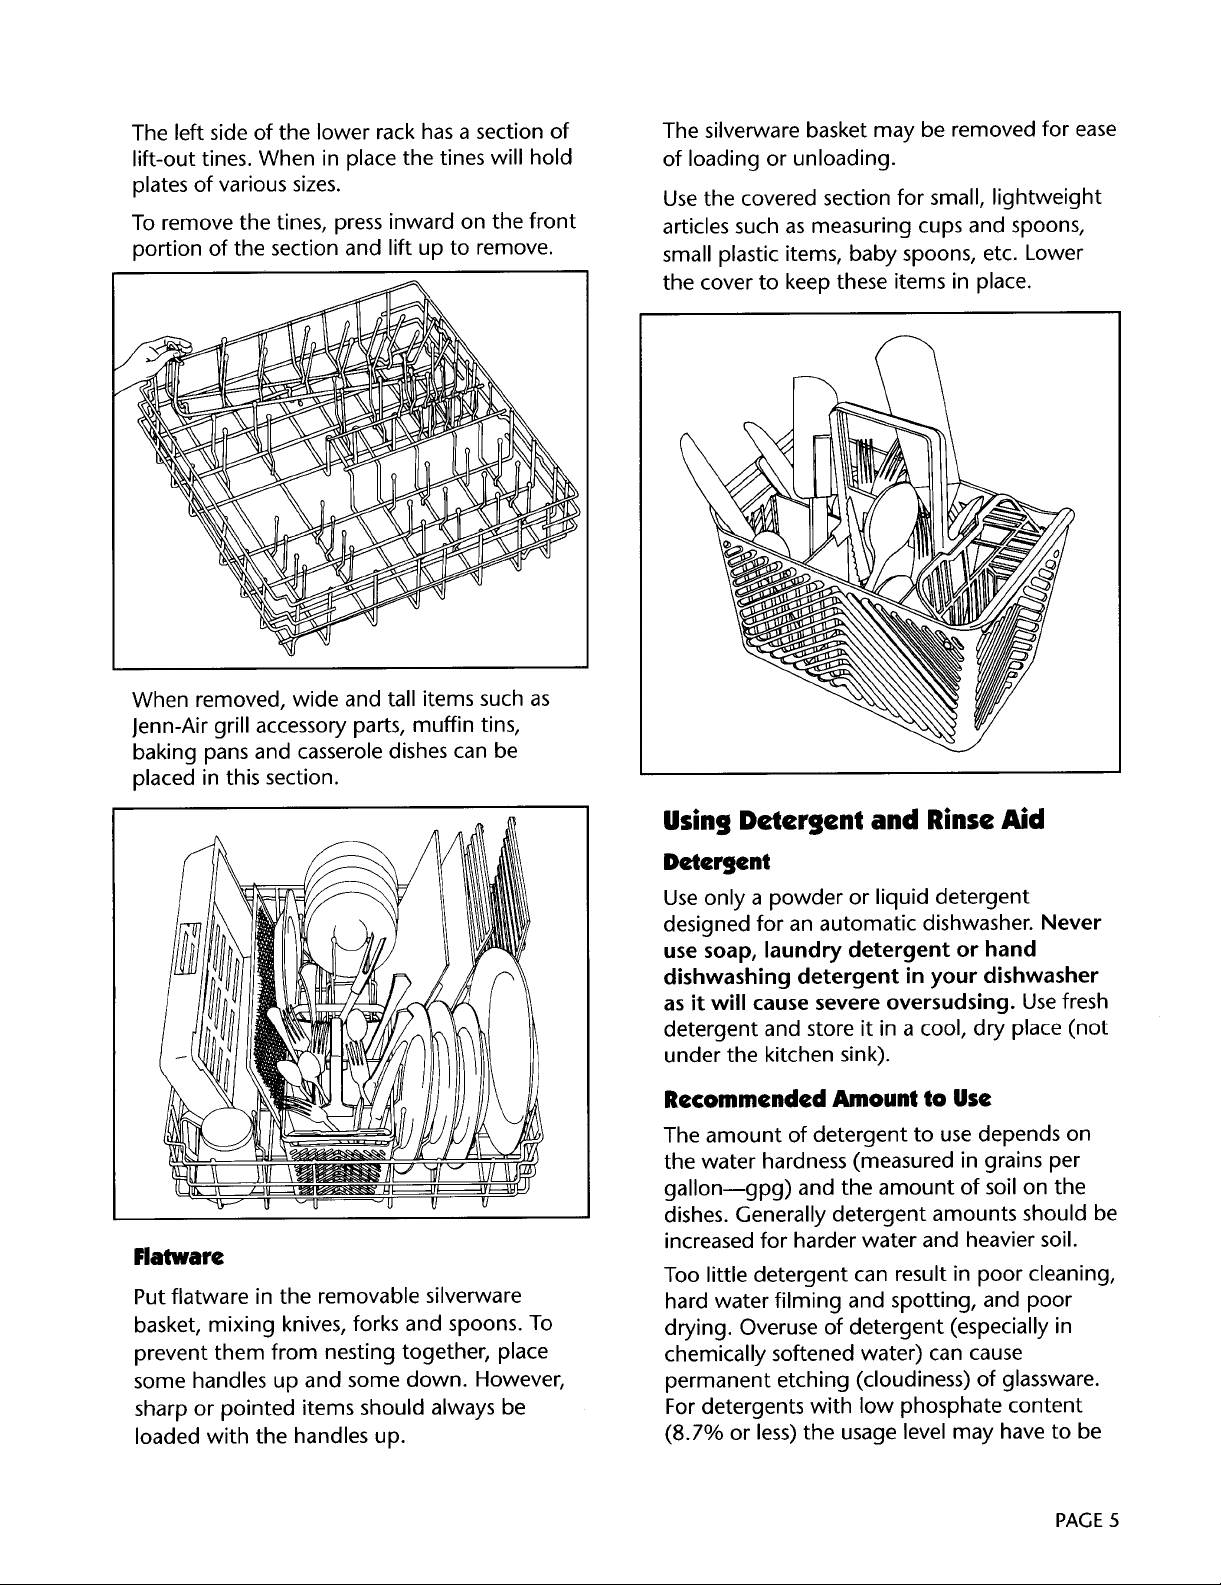
The left side of the lower rack has a section of The silverware basket may be removed for ease
lift-out tines. When in place the tines will hold of loading or unloading.
plates of various sizes. Use the covered section for small, lightweight
To remove the tines, press inward on the front articles such as measuring cups and spoons,
portion of the section and lift up to remove, small plastic items, baby spoons, etc. Lower
the cover to keep these items in place.
_Veehe_egrOl/ed,ceW:do_yapdtsa,lhte_iis stUCshas
baking pans and casserole dishes can be
placed in this section.
UsingDetergent and RinseAid
Detergent
Use only a powder or liquid detergent
designed for an automatic dishwasher. Never
use soap, laundry detergent or hand
dishwashing detergent in your dishwasher
as it will cause severe oversudsing. Use fresh
detergent and store it in a cool, dry place (not
under the kitchen sink).
Recommended Amount to Use
The amount of detergent to use depends on
the water hardness (measured in grains per
gallon--gpg) and the amount of soil on the
dishes. Generally detergent amounts should be
Flatware increased for harder water and heavier soil.
Too little detergent can result in poor cleaning,
Put flatware in the removable silverware hard water filming and spotting, and poor
basket, mixing knives, forks and spoons. To drying. Overuse of detergent (especially in
prevent them from nesting together, place chemically softened water) can cause
some handles up and some down. However, permanent etching (cloudiness) of glassware.
sharp or pointed items should always be Fordetergents with low phosphate content
loaded with the handles up. (8.7% or less)the usage level may have to be
PAGE5
Page 6

increased. The phosphate content is shown on Quick
the side of the box. Placethe proper amount of detergent in the
A basic guideline is one teaspoon of detergent Prewash cup only. Close the lid. The detergent
for each grain of water hardness (gpg). Usea will be dispensed immediately.
minimum of three teaspoons (one tablespoon) Rinse & Hold
in soft water. Refer to the chart below. Do NOT usedetergent with this cycle.
NOTE: When using Ultra dishwasher deter-
Rinse Aid
gents, follow the package recommen-
dations on the amount to use. Your Jenn-Air dishwasher features an automatic
rinse aid dispenser, located near the detergent
!WATERHARDNESS* DETERGENTUSE dispenser on the door interior. Using a rinse
iSoft (0-4 grains) 1-2Tbs. aid improves drying results and reduces
(fill cup to first line) spotting and filming.
Medium (5-8 grains) 2-3 Tbs. To fill, turn dispenser cap counterclockwise to
(fill cup to secondline) open. Remove cap and pour liquid rinse aid
Hard (9-12 grains) 3-4 Tbs. into the opening. Replace cap and turn
(fill cup to third line) clockwise.
*Yourlocalwaterutility cantellyouthe exactdegreeof The clear indicator in the center of the cap
hardnessofyourwatersupply.Inruralareas,yourstate changes from dark to light when the reservoir
universityextensionservicecantellyou how to testyour is nearly empty. This indicates that it is time to
waterhardness, refill the dispenser.
For water hardness over 12 grains, add .....
additional detergent (1 teaspoon for each .....
grain over 12) at the beginning of the main
wash portion of the cycle. (Open door, add
detergent to bottom of tub, close door and
dishwasher will continue through cycle.)
If water is 15 grains or harder, it will be
virtually impossible to get good results with
any dishwasher. The only solution isa
mechanical water softener to improve water ........
quality.
i J _:!!i
Adding Detergent
Add Detergent to Dispenser Cup Just Before You
Select the Cycle and Options.
Normal or Heavy
Placethe proper amount of detergent in both
the Prewash and Main Wash cups. Close the t
lid. Detergent will be released automatically
into the prewash and main wash.
Light
Placethe proper amount of detergent in the
Main Wash cup only. Close the lid. The deter-
gent will be released automatically into the
main wash.
PAGE6
Page 7

What Can and Cannot be Washed themanufacturer, simply test-washasmall
item for several weeks before attempting to
Most tableware, cookware and silverware can wash an entire set.
be safely washed in your Jenn-Air dishwasher. If
you have any doubts about a particular piece REMEMBER: It is the user's responsibility to
of dishware, check with the manufacturer to determine if dishware should be washed in a
see if it is dishwasher safe. If you cannot reach dishwasher.
Dishwasher
Safe? Special Information Special Information
Yes, except High water temperature and High water temperatures
anodized detergents may affect finish, and detergent may
aluminum Check cleaning instructions, discolor or pit finish.
and some
cookware. Cannot withstand high
water temperatures and
No, except Seasoning will be removed, detergents.
for Jenn-Air and iron will rust.
grill-rocks Always check
manufacturer's
Yes, except Always check manufacturer's recommendation before
antique or recommendation before washing. Plastics vary in
hand- washing. Antique hand- their capacity to withstand
painted painted or over-the-glaze high water temperatures
china, maypatternsdiscolor,may fade.If in doubt,Gold leaf and detergents.
Yes, except Always check manufacturer's salt, vinegar, milk
antique or recommendation before products or fruit juice
lightweight washing. Some types of could damage finish.
delicate leaded crystal may etch
crystal, with repeated washings. Run a Rinse & Hold Cycle
Yes, except Milkglass will yellow with could damage finish.
milkglass, repeated dishwasher Commercial "darkening"
No Will discolor.
No Handles may be attached turer's recommendation
test-wash a small item for Run a Rinse & Hold Cycle
several weeks before if not washing immedi-
washing an entire set. ately. Prolonged contact
with foods containing
If in doubt, test-wash a if not washing immedi-
small item for several ately. Prolonged contact
weeks before washing an with food containing salt,
entire set. acid or sulfide (eggs,
mayonnaise and seafood)
washing, may be removed by
detergent.
May rust.
Always check manufac-
to the blade with adhesives before washing. Wood
which may loosen if may warp, crack or
dishwasher washed, discolor.
PAGE7
Page 8

SELECTINGCYCLESAND OPTIONS/STARTING THE DISHWASHER
APPROX. APPROX.
CYCLE SEI-I'ING SEQUENCE CYCLE TIME WATER USE
RINSE& HOLD:
Use to rinse a relatively few soiled dishes Rinse 5 Min. 1.5 Gal.
which are to be held until the dishwasher
isfull. PressRinse& Hold pad.
QUICK:
Use to quickly wash dusty or very lightly Wash L 4.5 Gal.
soiled dishes you wish to store or reuse 2 Rinses _ 15 Min.
immediately. PressQuick pad.
_eat_D_-l_y_ ..... 35 Min. (Optional)
LIGHT:
Usefor china and crystal and for loads PreWash 1
containing medium to light amounts of Rinse / 7.5 Gal.
soil. PressLight pad. Main Wash --43 Min.
2 Rinses
Dry -- 26 Min.
69 Min. + Heating Delay*
NORMAL:
Use for washing loads containing PreWash 9 Gal.
normally soiled dishes. This would 2 Rinses
include dishloads with problem soils. Main Wash
Press Normal pad. 2 Rinses
Dry -- 36 Min.
89 Min. + Heating Delay*
HEAVY:
Use for loads with heavy or dried soils. PreWash 10.5 Gal.
Press Heavy pad. 2 Rinses
Main Wash
3 Rinses
Dry -- 36 Min.
*The AccuTemp option may extend the main washto heatthe water to proper temperature. The HEATING
DELAYindicator will light when the cycleis being extended due to low water temperature.
.... 63 Min.
99 Min. + Heating Delay*
-53 Min.
PAGE8
Page 9

Options: Cancel Heat Dry by pressing the pad again.
No heat will be provided, but the fan will still
AccuTemp operate.
Pressthe AccuTemp pad to insure the water is Cancelling the Heat Dry option on the Quick
heated to the proper temperature for best cycle will eliminate the dry portion entirely in
cleaning and drying results. A small indicator order to shorten the cycle. The load will need
light will glow when it is selected. If the to be towel dried.
water temperature is low, the main wash
will be extended and the Heating Delay Recalling/Changing Options
indicator light will glow.
Each option can be changed anytime the
Pressthe AccuTemp pad again to cancel this dishwasher is on and the door latched.
option. (Note: When the Quick cycle with Heat Dry is
This option is not available in the Quick or selected, options can be changed during the
Rinse & Hold cycles, first minute only.)
NOTE: Your dishwasher features an option
Sani recall which memorizes the option
Pressthe Sani pad to turn the heating selected with a cycle. For example, if
element on during all washes and rinses. Heat Dry is selected with a particular
A small indicator light will glow when it is cycle, it will be recalled automatically
selected. The Sani option helps maintain the next time that cycle is selected.
water temperature and improve drying results.
This option is not available for the Rinse & TO Start Dishwasher:
Hold cycle. Pressthe Sani pad again to cancel NOTE: Run the water from the hot water tap
this option, to clear the line of cold water before
starting.
Heat Dry After loading close the door; press the door
Select this option to provide heat during the until it latches.
fan dry cycle. This option provides faster
drying. A small indicator light will glow when
it is selected, cycle. Pressing Heavy, Normal, Light, Quick
Turn the dishwasher on by firmly pressing
the pad corresponding with the chosen
PAGE9
Page 10

or Rinse & Hold will start the dishwasher Delay:
(Note: The fill will begin after a brief pause). Pressing the Delay pad can delay or interrupt
The indicator light for the selected cycle any cycle from 1 hour to 9 hours.
will glow. To delay a cycle, press the Delay pad, holding
Display Window: it down until the desired amount of delay time
The display window tells how much time is will appear and increase in one hour incre-
left in a cycle or delay period, ments until 9 hours is reached.
Indicator Lights: cycle and dry option. The dishwasher will
The Heating Delay light will glow when automatically start as soon as the delay time
AccuTemp is selected and the cycle is being expires.
extended because the water temperature is The Delay indicator light will glow until the
low. clock has counted down. Delay can be
The Wash light will glow during all washes.
The Rinse light will be on during the two final immediately.
rinses. This feature can also be used to temporarily
The Dry light will be on during the entire dry interrupt a cycle. The cycle will resume from
period (with heat on or off) and goes out the point of interruption when the delay time
when the cycle is completed, runs out or when the Delay pad is pressed
The Clean indicator light will glow from the again.
end of the dry phase until the door isopened.
Special Functions: For best cleaning, the forgotten item should be
appears in the display. When first pressed, I H
After choosing the desired delay time, select a
cancelled by pressing the Delay pad a second
time. The cycle selected will begin
Adding a Forgotten Item:
Drain added early in the cycle.
When the Drain/Off pad is pressed, 1 MIN. 1. Unlatch the door and wait until the sound of
will appear in the display and the dishwasher circulating water stops.
will drain for approximately 1 minute. 2. Open the door and add the item.
To cancel a cycle without draining, press the 3. Close the door and pause briefly before
Drain/Off pad twice. This will immediately latching the door. The cycle will continue at
turn the dishwasher off. the point it was interrupted.
PAGE10
Page 11

SPECIALTIPS
ForBestResults • SelecttheProper Cycle
• Hot Water is a Must The cycle needed depends on the amount of
Hot water dissolves and activates the
dishwashing detergent, dissolves grease on • Select Heat Dry
dishes and helps dry glassesspot-free. Make For faster drying select Heat Dry.
certain all loads are washed in hot water.
Four ways to have a reliable hot water
supply... WaterConditions
1. Maintain a 140°F (60°C) water supply at • Hard Water Deposit
the central water heater. To check water If an unusual amount of calcium is in the
temperature, refer to page 3.
2. If you choose to have your hot water build up on the dishes and interior surface of
below 140°F (60°C), it will be necessary the dishwasher. You may first notice this as
to select the AccuTemp option to achieve "cloudy" glasses.
good results. AccuTemp will add heat
during the main wash and thermo- To determine if the film on the glasses is
statically check the water temperature. If due to hard water, soak a glass
the proper temperature is not reached approximately 15 minutes in undiluted
during the standard main wash time, the white vinegar. Rinse and dry. If film is
HEATING DELAYindicator will light and removed, it is due to hard water (if not
the cycle will be delayed until the removed, see Soft Water Etching).
temperature is reached. To correct:
food soil. See page 8 for cycle descriptions.
water, a lime film or deposit may eventually
3. Let the water from the hot water tap run 1. Increase the amount of detergent used
to clear the line of cold water before according to the degree of water
selecting a cycle, hardness (see page 6).
4. Let the water heater recover if you have
recently done laundry. 2. Check the water temperature (see page
• Use Enough Detergent
For proper soil removal and to prevent action of the water (see page 6).
filming, etching and spotting, an adequate
amount of detergent must be used. We To remove film from dishwasher interior, try
recommend 1 teaspoon of detergent per one of the following:
grain of water hardness with a minimum of 1
tablespoon. Referto page 6 on adding scouring powder.
detergent.
• Use a Rinse Aid 2. Start empty dishwasher on Rinse & Hold
Using a rinse aid improves drying results and 1/2 cup white vinegar to the water. Allow
reduces spotting and filming. See page 6 for
instructions on using a rinse aid. use detergent. Follow with a regular
• Load the Dishwasher Properly detergent wash.
To insure that all soiled surfaces get adequate 3. Use Lime-A-Way according to
wash action, carefully follow the instructions manufacturer's directions.
for loading the dishwasher (pages 3-5). Make
sure nothing extends above or below the NOTE: To remove hard water film from
racksto interfere with the movement of the dishes, add dishes prior to step 3.
upper or lower spray arms.
3). For best results, it should be 140°F.
3. Use a rinse aid to improve the sheeting
1. Remove with a damp cloth and a mild
cycle. During fill, open door and add
dishwasher to complete cycle. Do not
PAGE11
Page 12

• Soft Water Etching EnergySaving Tips
If the cloudy film is not removed after You can help saveenergy if you:
soaking in vinegar (previous procedure),
then the condition isetching. This 1. Washfull loads. Running a half-filled dish-
permanent film occursin unusual conditions washer usesthe same amount of electricity
under which the surface of the glassispitted and hot water as a fully loaded machine.
or eroded. It is permanent. 2. Do not pre-rinse normally soiled dishes.
In the beginning stages, etching may be Select the correct cyclefor the load and use
identified by a "rainbow" look--shades of the recommended amount of detergent for
blue, purple, brown or pink may be seen good washing resultswithout hand rinsing.
when the glass isheld at an angle to the 3. Load correctly for best washing results.
light. In advanced stages the surfaceof the Incorrect loading may cause poor washing
glassware appears frosted, spotted or cloudy, and the need to prewash all or part of the
Certain types of glassware will etch in any load.
dishwasher with the combination of soft 4. Use the Light cycle when dishesare lightly
water (especially mechanically softened), an soiled. It useslesshot water and energy
excessiveamount of detergent, heat and pre- than other cycles.
rinsing. There is no relationship to the cost or
quality of the glass. 5. Fan dry dishes (without heat) when you
don't need them dried quickly. Allow longer
To prevent: drying times (overnight).
1. Adjust the amount of detergent to the
degree of water hardness (see page 6). 6. Useyour dishwasher during off-peak hours.
2. Lower the water temperature to 140°F heavy usage of energy at certain times of
(see page 3). the day. Check with your utility company to
Localutilities recommend this to avoid
3. Avoid using the Heat Dry drying option, see if off-peak ratesexist.
4. Do not manually pre-rinse dishes before
loading in dishwasher. Pre-rinsing prior to Caring for the Dishwasher
loading to remove all food soil aggravates The interior is normally self-cleaning.
etching. Occasionally check the bottom of the
• Rust dishwasher tub and clean out pieces of food
Sometimes the dishes or the interior of the
dishwasher may turn a brown, red or black Periodically clean the bottom edge of the
color if iron or manganese is in the water. To dishwasher door liner. Food and liquids drip
remove discoloration from the dishwasher onto this area when the dishwasher is loaded.
interior, dishes and glassware (no metal Ifyou notice an odor in your dishwasher, it
items): may be due to a strong "chemical" or chlorine
1. Select a rust removing compound, such odor from the dishwasher detergent. Using a
as RoVer Rust Remover. It is available from different detergent, especially a lemon scented
dealers by using Part No. 057961. one, will probably eliminate the odor. In some
2. Start empty dishwasher on Rinse & Hold strong. Purchase a fresh package and see if it is
or rinse portion of the cycle. During fill, better. Lastly, if the dishwasher is run only
open the door and add 1/2 cup RoVer
Rust Remover to the water. Allow the every couple of days, an odor may develop.
dishwasher to complete the cycle, food soil that may cause an odor.
3. Follow with a detergent wash.
The only permanent solution is to install
special filters which can remove iron and 1. Place baking soda in both sides of the
manganese from the water, detergent dispenser. Select the Light cycle
which may collect there.
instances the smell of the rinse aid may be
Use the Rinse & Hold cycle daily to remove any
To remove an odor, try one of the following:
PAGE12
Page 13

and let the dishwasher run for about 20 Changing Panels
minutes. Stop the dishwasher by unlatching
the door and let stand overnight. Then, Your Jenn-Air dishwasher comes with reversible
restart the dishwasher by latching the door panel inserts which are pre-assembled at the
and let it complete the cycle, want before your dishwasher is installed or
2. Select the Light cycle and let the dishwasher choose another color at a later date.
fill with water. Then open the door and
pour 1/4 cup of chlorine bleach into the To Change Panels:
bottom of the dishwasher. Latch the door A. Remove three screws holding the metal
and let the dishwasher complete the cycle, trim strip on one side of the door. Take note
Do not usedetergent, of how the trim comes off.
Clean the control panel and front panel with a B. Grasping the lower part of the door panels,
soft damp cloth and liquid spray cleaner. Do bow panels out carefully at the bottom
not use any abrasive powders or cleaning pads. while sliding panels far enough to clear the
factory. This enables you to select the color you
flange on the trim strip which was not
Winter Storage removed and remove panels.
CAUTION: To protect against rupture of fill
valve, BESUREthe water lines leading to the
dishwasher, are well protected against facing out.
freezing. D. Place door panels (notched side up) behind
1. Run dishwasher through a cycle using Bow the panels so they fit behind the
detergent. If an odor remains, repeat using
baking soda in the dispenser cup or adding control panel at the top.
1/4 cup of chlorine bleach in the bottom of E. Slide the panels under the side metal trim
the tub. Clean the bottom edge of the door which was not removed. To do this, it will
and front lip of the tub with a baking soda be necessary to compress the backing
and water solution, behind the colored panels.
C. Arrange panels so the desired color is
the metal trim at the bottom of the door.
2. Turn the water supply off and drain the F. Reinstall the metal trim which was removed
dishwasher by pressing the Drain/Off pad. earlier. To do this, start by inserting the tip
Repeat this procedure to remove as much end of the trim strip behind the control
water as possible, panel. Align the holes and replace the three
3. Disconnect the electrical supply, screws.
4. Place a pan under the drain outlet. G. The lower access panel is held by four
Disconnect the valve at the inlet and outlet screws (two above the panel and two
and drain the water into the pan. Leave the below). With these removed, the panel may
dishwasher disconnected, be removed to make it easy to change
5. Placethe pan under the drain outlet.
Disconnect the flexible tubing from the H. With the lower accesspanel removed,
pump and drain the water into the pan. remove the four screws along the bottom
Repeat the procedure at the upper hose of panel and remove the trim which holds
outlet. Leave both hoses disconnected, the panels. Once the desired panel is facing
6. Prop the door open. to the dishwasher.
To restore service, reconnect the fill valve and
connect both sides of the pump module. Turn
on the electricity and water supply. Select a
wash cycle and let the dishwasher complete questions concerning changing panels, contact
the cycle. Check connections to make sure
they are water tight, your local Jenn-Air dealer.
panel colors.
out, replace the trim, and reinstall the panel
Use care when changing panels to be certain
you are not injured on sharp edges and that
the panels are not damaged. If you have any
PAGE13
Page 14

BEFOREYOU CALLFOR SERVICE
Check these points if your Does not dry properly
dishwasher... • Besure the Heat Dry option is selected.
Leaves food soil on dishes • Use a rinse aid.
• Check to see that the water heater isset to • Check to see that the water heater is set to
deliver 140°F water at the faucet, deliver 140°F water at the faucet nearest
• Turn on hot water at kitchen sink before the dishwasher. Run water and check
running the dishwasher to be certain that temperature with a candy thermometer.
hot water isentering the first wash cycle. • Increase detergent use according to water
• Select the AccuTemp option, hardness.
• Check water hardness. For extreme hard • Check for improper loading and do not
water conditions it may be necessary to overload. Dishes should not nest together.
install a mechanical water softener. • Plastic items have a porous surface and
• Use the amount of detergent tend to hold water. Towel drying may be
recommended for your water hardness, required.
and be sure it is put in the dispenser as • Glasses,cups, etc., with concave bottoms
directed previously, will hold water.
• Use fresh high phosphate detergent that is • When using the Quick cycle without Heat
not caked. Store detergent in cool, dry Dry, towel drying is required.
place. Stains or discolors dishes
• Select proper cycle for soil level of dish
load. they rub against other things. Load
• Besure dishes are loaded properly with properly.
nothing blocking the path of the wash • Iron deposits in the water can leave a
arms, center spray nozzle or detergent yellow or brown film on dishes. You may
dispenser, desire to have a special filter installed in the
• Check for nesting of dishes that prevents water supply line, or periodically use RoVer
water from reaching all surfaces. Rust Remover (see Water Conditions,
• Check to make sure glasses are not loaded pages 1I-I 2).
• Aluminum utensils can leave marks when
over prongs. Cycle takes too long - (Heating Delay
Leaves glassware cloudy or spotted light stays on)
• Adjust the detergent amount to your water • The AccuTemp option has been selected
hardness as described earlier in this book. which will extend the cycle to heat water
Avoid overuse or underuse of detergent, thermostatically.
• Check to seethat the water heater isset to • Check to see that the water heater isset to
deliver 140°F water at the faucet nearest deliver 140°F water.
the dishwasher. Avoid extremely high or
low temperatures. Clean light remains on
• Usea rinseaid suchasJet-Dry or Crystal • Clean light stayslit until the door is
Clear. opened.
• Do not pre-rinse dishes before loading
them into the dishwasher.
• Refer to Water Conditions for more
information (pages 11-1 2).
PAGE14
Page 15

BEFORE YOU CALL FOR SERVICE (continued) Detergent cup did not empty completely
• Check to see that the cycle has been
Seems noisy completed.
• Water circulation noise is normal. • Besure dispenser is not blocked from wash
• Humming during drain is normal.
• Dishes may not be loaded properly. Dishes
should not be touching one another, detergent is added.
• Wash arm may be hitting an item when • Make sure large items placed in the front
rotating. Load items so nothing blocks the right corner of upper rack are not blocking
wash arm.
• Chopping or grinding noise may be heard
during the cycle when the internal food place.
disposer ischopping food. Leaks
• Detergent cup lid hits door liner when • Check to see that the dishwasher is level as
dishwasher door is opened at end of cycle described in the Installation Instructions.
and is normal. • Suds can cause the unit to overflow so
• Installation (location, flooring, cabinetry, measure detergent carefully. Try another
etc.) can affect noise level, brand of detergent. Use only detergents
• Water valve hissduring fill is normal, designed for automatic dishwashers.
Does not run properly/Won 't fill
• Be sure door is tightly closed and latched.
• Check to seethat water isturned on. Has an odor
action.
• Besure dispenser is not wet when
the detergent cup.
• Usefresh detergent. Store in dry, cool
• Make sure you follow directions on how to
add a forgotten item.
• The cycle is not properly selected. Besure • Soiled dishes held too long in the
the cycle pad is completely depressed, dishwasher can create an odor, therefore
• Cycle will start with drain, we recommend using the Rinse & Hold
• Check your home's circuit breaker or fuse cycle.
box. • Dishwashers will have a "new" smell when
• Inlet hose may be kinked, first installed. (Refer to pages 12-1 3,
• Water inlet valve may be clogged with • Dishwasher not draining properly. (See
sediment and in need of cleaning. "Does not drain properly")
Does not drain properly Chips dishware
• Check to see that the cycle has been
completed. • Be sure dishes are loaded according to the
• The dishwasher may be at a pause from the wash action.
between cycles which isnormal.
• Drain hose may be kinked, antique china and crystal in the
• Check your home's circuit breaker or fuse dishwasher.
box. Resetif necessary. • Do not load glassesover rack tines, or
• Food is backing up in the pipes at the sink. allow to touch each other.
If hooked up to a food waste disposer, be • Do not overload.
sure to run the disposer regularly.
• Some water is normal and keeps sealsfrom
drying.
"Caring for the Dishwasher")
instructions so they do not strike together
• We do not recommend washing fine
PAGE15
Page 16

DISHWASHERWARRANTY
Full One Year Warranty
Any part which fails in normal home use during the first year after the date of original retail purchase, will be repaired or
replaced free of charge.
Limited Two Year Warranty
Any part which fails in normal home use during the second year from the date of original retail purchase, will be repaired
or replaced free of charge for the part itself, with the owner paying all other costs, including labor.
Limited Five Year Warranty on Wash System and Solid State Controls
Any parts of the system including the complete power module assembly, center spray nozzle, spray arms, top wash arm
hose, motor, AND--on Computer Touch Control Models only--any microprocessor and touch pad assemblies which fail
in normal home use during the second through the fifth year from the date of original retail purchase, will be repaired or
replaced free of charge for the part itself, with the owner paying all other costs, including labor.
Limited Five Year Rack Warranty (Available on Select Models)
Should the Duralon TM coated racks rust during the five year period starting from the date of original retail purchase, repair
or replacement will be made free of charge for the part itself, with the owner paying all other costs, including labor.
FULL TWENTY Year Warranty Against Leaks on Dishwasher Tub and Door Liner
Should a water leak develop in the tub or door liner in normal home use during the TWENTY YEARperiod starting from
the date of original retail purchase, repair or replacement of the tub and/or door liner will be made FREEOF CHARGE.
These full warranties and the limited warranties apply when the appliance is located in the United States or Canada.
Appliances located elsewhere are covered by the limited warranties only, which include parts which fail during the first
year.
Canadian Residents
This warranty covers only those appliances installed in Canada that have been listed with Canadian Standards Association
unless the appliances are brought into Canada due to transfer of residence from the United States to Canada.
To Receive Warranty Service
First: Call or write the JENN-AIR dealer from whom your appliance was purchased or the authorized service firm
designated by the dealer.
If you have moved from the selling dealer's service area call or write any authorized JENN-AIR dealer or
authorized service firm at your new location. Check the telephone directory yellow pages to identify the
dealer or service firm in your area.
Second: Should your contact with the dealer or the service firm fail to satisfactorily resolve the problem, contact the
manager of the dealership or the manager of the service firm for assistance.
Third: Should you not receive satisfactory warranty service from one of the above or need help in identifying an
authorized service firm write MAYCOR Appliance Parts and Service Company, P.O. Box 2370, Cleveland, TN
3731 I, and arrangements for warranty service will be made. If the problem is urgent, call MAYCOR at
(615) 472-3333.
When contacting MAYCOR be sure to include the model and serial number of your appliance, the name
and address of the dealer from whom you purchased the appliance and the date of purchase.
This Warranty gives you specific legal rights, and you may also have other rights which vary from state to state.
Should you still have a problem, write to: Major Appliance Consumer Action Panel, 20 North Wacker Drive, Chicago,
Illinois 60606. MACAP is an industry sponsored but independent group of consumer experts who receive and act on
complaints from appliance owners.
NOTE: When writing about an unsolved service problem, please include the following information:
(a) Your name, address and telephone number;
(b) Model number and serial number (found on the upper left corner of the tub opening) of your appliance;
(c) Name and address of your dealer and date the appliance was bought;
(d) A clear description of the problem you are having;
(e) Water hardness, detergent brand and amount, water temperature, and cycle used.
PAGE 16
 Loading...