

mWWJENN-AIR
Use and Care Manual
Dishwashers
Models DW700, DW710, DW730, DW760 & DW860
f I I I I
Model DW860
Page
For Future Reference ................................................................................................................... 2
Important Information ................................................................................................................... 2
Safety Instructions ....................................................................................................................... 3
Using Your Dishwasher ............................................................................................................ 4-7
Hot Water is Essential .............................................................................................................. 4
Preparing Dishes ...................................................................................................................... 4
Loading Your Dishwasher ..................................................................................................... 4-6
Using Detergent and Rinse Aid ............................................................................................. 6-7
Selecting Cycles and Options/Starting the Dishwasher ....................................................... 8-9
What Can and Cannot Be Washed ............................................................................................ 10
Special Tips ........................................................................................................................... 11-13
For Best Results ..................................................................................................................... 11
Water Conditions .............................................................................................................. 11-12
Energy Saving Tips ................................................................................................................ 12
Caring for the Dishwasher ................................................................................................ 12-13
Winter Storage ........................................................................................................................ 13
Changing Panels .................................................................................................................... 13
Before You Call For Service ................................................................................................ 14-15
Warranty ...................................................................................................................................... 16
Congratulations on your choice of a Jenn-Air MODELNUMBER
dishwasher. Your dishwasher has many fea- SERIALNUMBER
tures that offer you excellent cleaning and (numbersappearontheserialplateontheupperleflcornerofthelubopening)
capacity along with energy efficiency. _atePurchased
Beforeyou beginusingyour newdishwasher, JENN-AIRDEALERFROMWHOMPURCHASED
pleasetake afew minutestoreadandbecome
familiar with the instructions in this book. By ADDRESS
followingthe instructions carefully,you will be
able to achieve excellent results with your CITY
dishwasher. PHONE
Should you have any questions about using AUTHORIZEDJENN-AIRSERVICECONTRACTOR
your Jenn-Air dishwasher,writeto us. Besure
to provide the model and serial numbers. ADDRESS
Jenn-Air Customer Assistance
CITY
c/o Maytag Customer Service PHONE
P.O. BOX2370 IMPORTANT:Retainproofofpurchasedocumentsforwarrantyservice.
Cleveland, TN 37320-2370 WARNING-Checkwith installer to makesure appliance
hasbeen grounded to avoid possible electrical shock.
Be sure you readtheIMPORTANTPERSONALSAFETY
INSTRUCTIONSonpage 3 before you start to use this
dishwasher.
2
ProductswithaUL labelhavebeenlistedwith 8. Becarefulnottotouchthe heatingelement
the Underwriters' Laboratories, Inc. - those on the bottom of the tub during or at the
witha CSAtag havebeenlistedwithCanadian completion of a cycle. It may be hot.
Standards Association. Nevertheless,aswith
any other equipment using electricity and 9. Use only detergents and rinse additives
moving parts, there is a potential hazard, designed for an automatic dishwasher.
WARNING - When using your dishwasher, Never use soap, laundry detergent, or
follow basic precautions, including the follow- hand washing detergent in your dish-
ing: washer. Keep these products out of the
reach of children.
1. Read allinstructions beforeusingthe dish-
washer. 10. Do not sit, stand on or abuse the door or
dish racks of the dishwasher.
2. Use the dishwasher only for its intended
function. 11.WARNING: Undercertain conditions, hy-
drogengas maybe producedinahotwater
3. Disconnectelectrical powertodishwasher system that has not been used for two
beforeattempting to service, weeks or more. Hydrogen gas is explo-
sive. If the hot water system has notbeen
4. To avoidelectricalshock hazard,the sides usedforsuch a period,turnonall hotwater
and back must beenclosed, and thefront faucets andletthewater flowfrom eachfor
panels must be attached before electrical several minutes.This will release any ac-
power is applied to the dishwasher. Refer cumulated hydrogen gas. As the gas is
to the installation instructions for proper flammable, do not smoke or use an open
grounding procedures, flame during this process.
5. Connect to aproperlyrated, protected and 12.Do not wash plastic items unless marked
sized power supply circuitto avoid electri- "dishwasher safe" or the equivalent. For
cal overload, plastic items not so marked, check the
manufacturer's recommendations.
6. Children should never be permitted to op-
erate, or play in, with, or around this dish- 13.Do not tamper with controls.
washer,
14.Always remove the door to the washing
7. To reduce the risk of injury when loading compartment when removing an old dish-
itemsto bewashed, sharpor pointeditems washer from service or discarding it.
should be located with the handles up.
Also,loadsharpitemssothey arenotlikely
to damage the door seal.
SAVE THESE INSTRUCTIONS

• Certain foods, such as mustard, mayonnaise,
lemon juice, vinegar, salt or dressings may
For proper performance of your dishwasher, hot cause stainlesssteel flatware to rust and pit if
water is necessary to activate the dishwasher allowed to remain in contact with the surface
detergent and meltfattyfood soils.Set your water fora period oftime.Therefore, it isbesttorinse
heatertodeliveraminimum of 120OFwater to the these food soils off stainless steel flatware
dishwasher, unlessthe dishwasher isto be operated soon
after loading.
Models DW700 & DW710 -The heatingelement
in your dishwasherwillturnon automaticallyto • If yourdishwasherdrainsinto a food waste
heatthewater duringthe mainwashofall cycles disposer,make certainthe disposeris corn-
(theheatingelementwillnotbeonduringRinse& pletelyemptybeforestartingthedishwasher
Hold). to providefor properdraining.
Model DW730 - AutomaticAccuTempTM in the
Normal and Heavy cycles will thermostatically
heatthe water duringthe mainwashandextend Seldom will householdshave identicaldishes.
heatingif neededuntilthe properwatertempera- The numberand type of articlesused will vary
tureisreached, daily.Yourdishwasheris designedto be flexible
and accommodatea wide varietyof dishesand
Models DW760 & DW860 - The AccuTempTM utensils.The followinginstructionsand drawings
Option willthermostaticallyheatthewaterduring willhelpyoubecomefamiliarwithyour dishwash-
the mainwashandextendthe heating,if needed er. With experience,you will learn the best ar-
untilthe proper water temperature is reached, rangement for your particular needs.
Tocheckwatertemperature,turn on the hotwater General Recommendations
faucet nearest the dishwasher. Let water run into • Place all items on the racksso they are sepa-
aglassuntil itis ashot aspossible,thencheckwith rated and face the center to insure the water
a candy or meat thermometer. If the temperature spray will reach the soiled surfaces. Do not
at the faucet is below 120°F have a qualified
person raisethe water heater thermostatsetting. • Make sure the movement of the upper and
For more information, see page 11. hanging belowthe lower rack ortall articlesin
• It is not necessary to rinse dishes before cup by not blocking itwith large items.
placing them in your Jenn-Air dishwasher. • Larger, flat, lightweight items (such as plastic
Simply scrape off bones and large pieces of covers) may be wedged next to the silverware
food. basket or along the sides and back of the
• Foods that have been burned onto cooking
utensilswill need to be scraped or soaked. • The wash tower rises throughthe center ofthe
allow items to extend out of the racks.
lower spray arms is not blocked by items
the upper rack.
• Insurethe free flow of water to the detergent
racks.
lowerrackduring the cycle.Forthe bestclean-
ing results, avoid blocking it or loading tall
articles next to it.
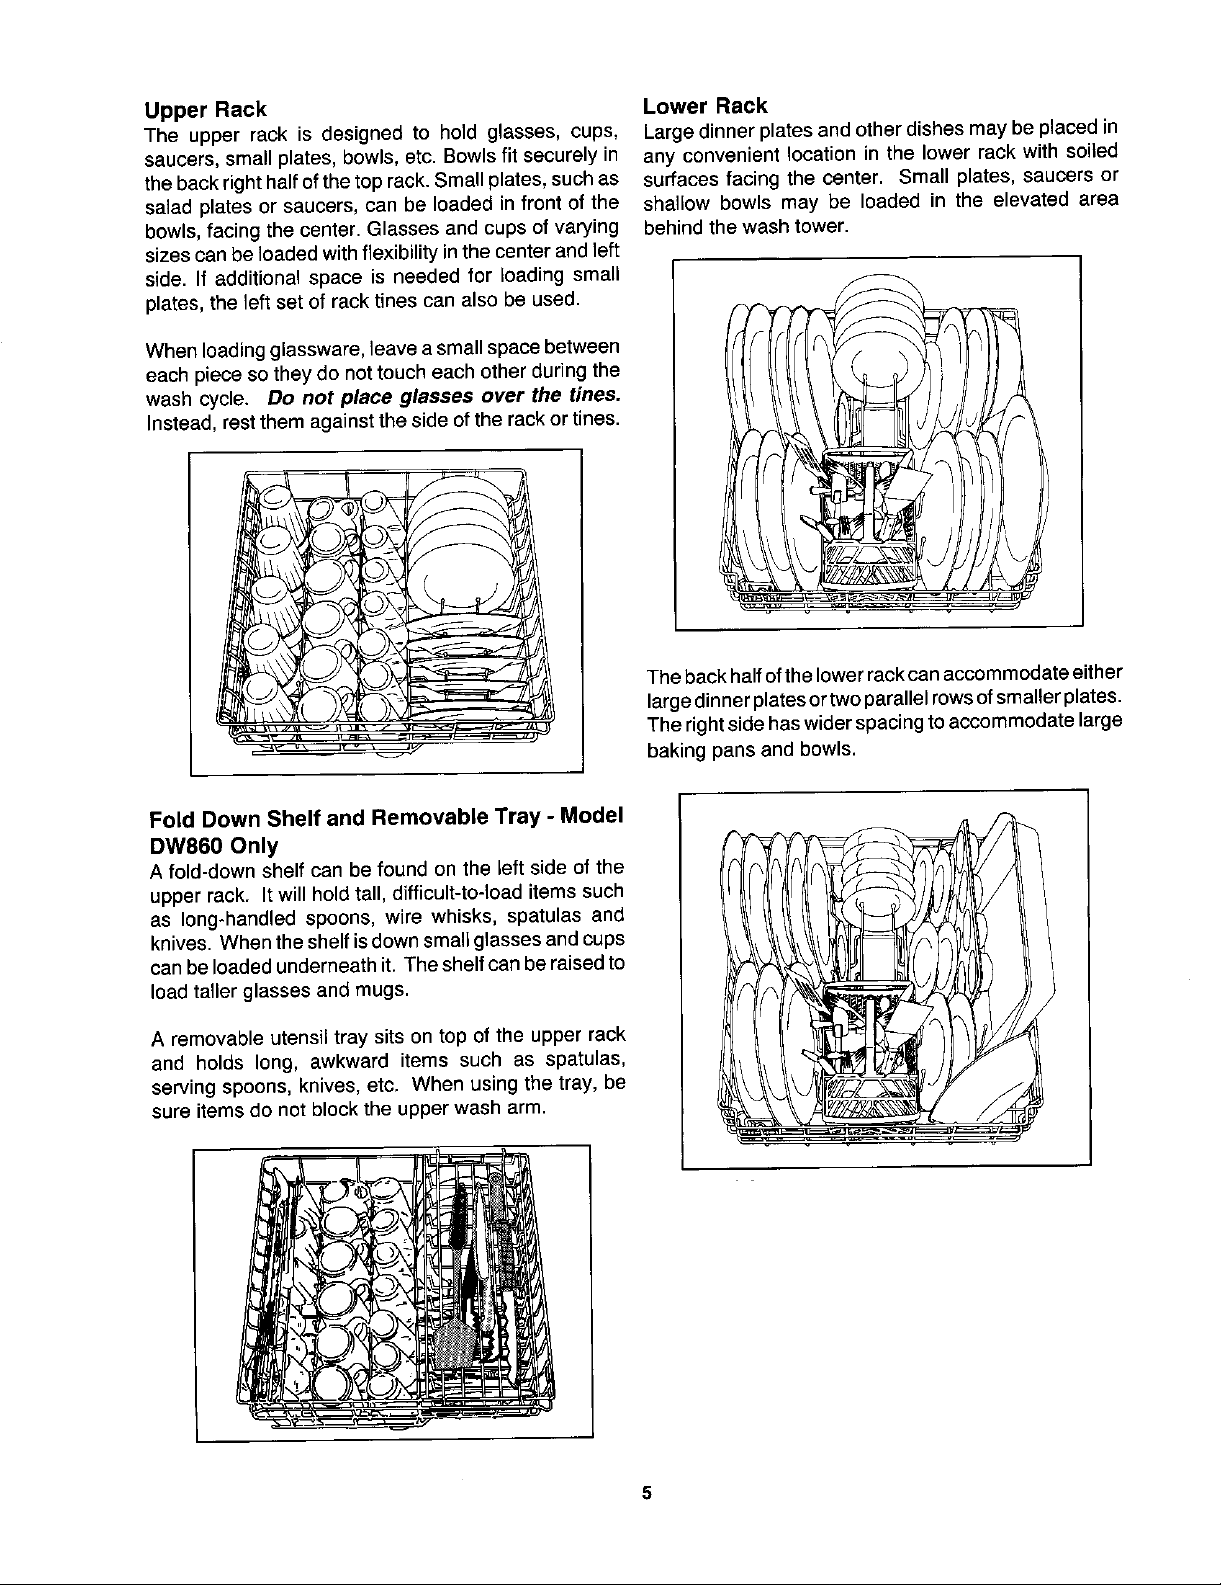
Upper Rack Lower Rack
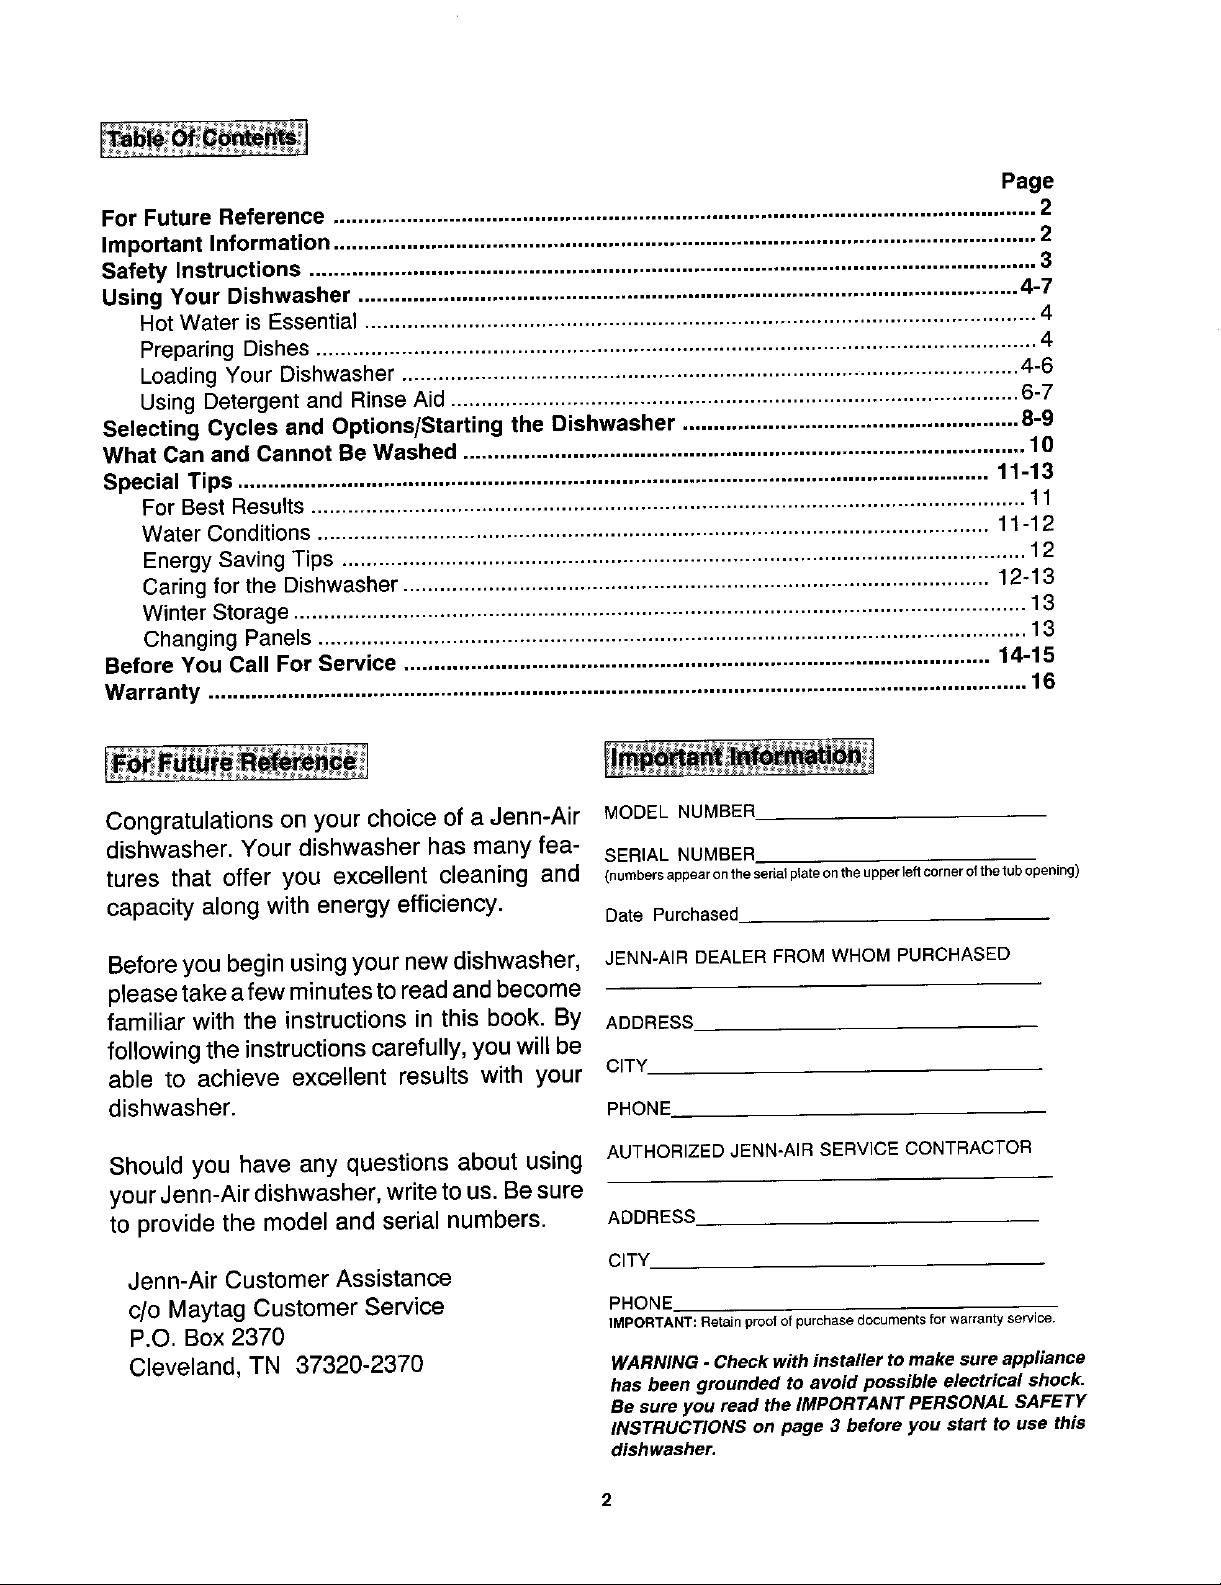
The upper rack is designed to hold glasses, cups, Largedinner plates and other dishes may be placed in
saucers, small plates, bowls, etc. Bowls fit securely in any convenient location in the lower rack with soiled
thebackrighthall'of the top rack. Small plates,such as surfaces facing the center. Small plates, saucers or
salad plates or saucers, can be loaded in front of the shallow bowls may be loaded in the elevated area
bowls, facing the center. Glasses and cups of varying behind the wash tower.
sizescan be loaded with flexibility inthe centerand left
side. If additional space is needed for loading small
plates,the left set of racktines can also be used.
When loadingglassware, leave asmall space between
each piece so they do not touch each other during the
wash cycle, Do not place glasses over the tines.
Instead,restthemagainstthesideofthe rackortines.
Theback halfofthe lowerrackcanaccommodate either
largedinnerplatesortwo parallel rowsofsmallerplates.
Therightside has widerspacingto accommodate large
baking pans and bowls,
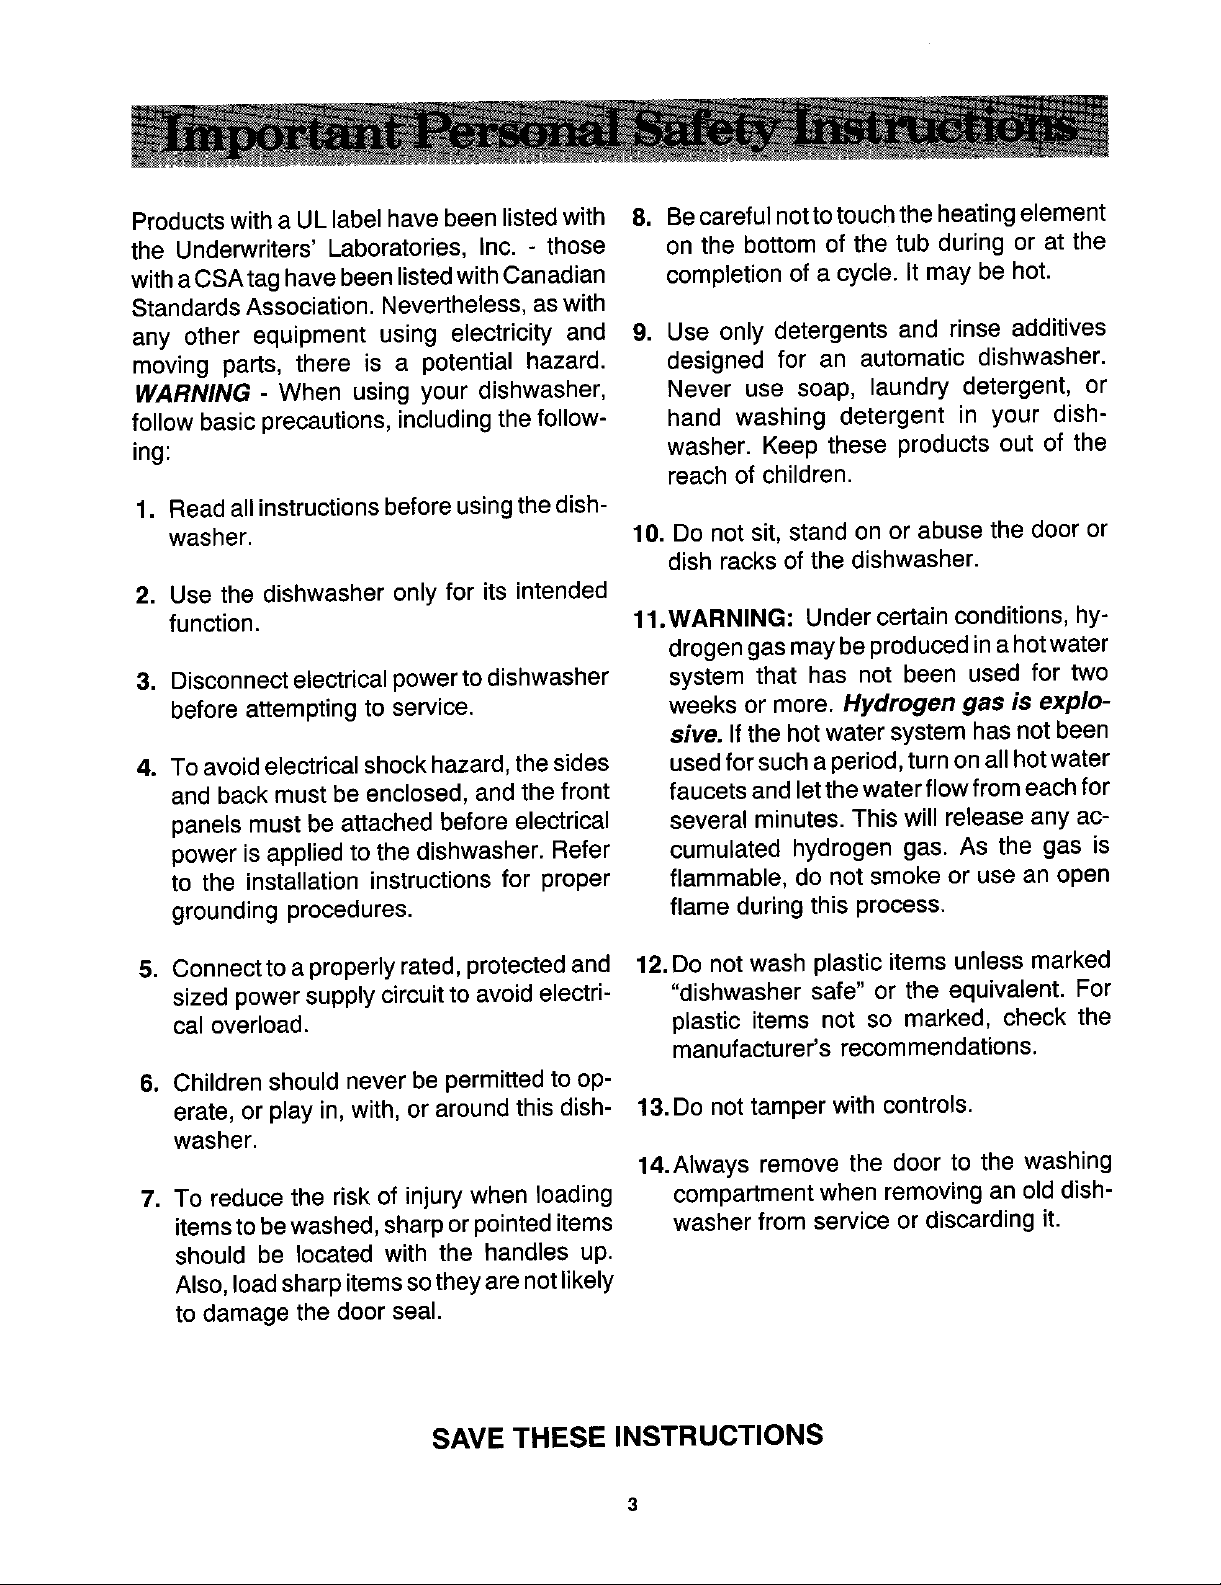
Fold Down Shelf and Removable Tray - Model
DW860 Only
A fold-downshelf canbe found on theleft sideofthe
upper rack. Itwill hold tall, difficult-to-load items such
as long*handledspoons, wire whisks, spatulas and
knives. Whenthe shelf isdownsmall glassesand cups
can beloadedunderneath it. Theshelfcanbe raisedto
loadtaller glasses and mugs.
A removable utensil tray sits on top of the upper rack
and holds long, awkward items such as spatulas,
serving spoons, knives, etc. When usingthe tray, be
sure items do not block the upper wash arm.
5

Models DW730, DW760 & DW860-The left side Use the covered section for small, lightweight
of the lower rack has a section of lift-out tines, articles such as measuring cups and spoons,
When in place the tines will hold plates of various small plastic items, baby spoons, etc. Lower the
sizes.To remove the tines, press inward on the cover to keep these items in place.
front portion of the section and lift up to remove.
I
Models DW730, DW760 & DW860
When removed, wide and tall items such as Jenn- NOTE: Models DW700, DW710 and DW730 -
Air grill accessory parts, muffin tins, baking pans Silverware basket doesn't include a
and casserole dishes can be placed in this sec- handle.
tion.
Detergent
Use only a powder or liquid detergent designed for
an automatic dishwasher. Never use soap, laun-
dry detergent or hand dishwashing detergent
in your dishwasher as it will cause severe
oversudsing. Use fresh detergent and store it in
J
Models DW730, DW760 & DW880 harder water and heavier soil.
Flatware Too little detergent can result in poor cleaning,
Put flatware in the removable silverware basket, hard water filming and spotting, and poor drying.
mixing knives, forks and spoons. To prevent them Overuse of detergent (especially in chemically
from nesting together, place some handles up softened water) can cause permanent etching
and some down. However, sharp or pointed items (cloudiness) of glassware. For detergents with low
should always be loaded with the handles up. phosphate content (8.7% or less) the usage level
The silverware basket may be removed for ease tent is shown on the side of the box.
of loading or unloading.
a cool, dry place (not under the kitchen sink).
Recommended Amount to Use
The amount of detergent to use depends on the
water hardness (measured in grains per gallon--
gpg) and the amount of soilon the dishes. Gener-
ally detergent amounts should be increased for
may have to be increased. The phosphate con-
6

A basic guideline is one teaspoon of detergent for Light - Models DW730, DW760 & DW860
each grain of water hardness (gpg). Use a mini- Place the proper amount of detergent inthe Main
mum of three teaspoons (one tablespoon) in soft Wash cup only. Close the lid.The detergent willbe
water. Refer to the chart below, released automatically intothe main wash.
NOTE: WhenusingUItradishwasherdetergents, Rinse & Hold
follow the package recommendations Do NOT use detergent with this cycle.
on the amount to use.
Rinse Aid
Water Your Jenn-Air dishwasher features an automatic
Hardness* Detergent Use rinse aid dispenser, located near the detergent
Soft 3 teaspoons dispenser on the door interior. Rinseaid improves
(0-3 grains) (fillcupto firstline) drying results and reduces spotting and filming.
Medium 4-9 teaspoons
(4-9 grains) (fillcuptosecondorthirdline To fill, turn dispenser cap counterclockwise to
Hard 10-12 teaspoons open. Remove cap and pour liquid rinse aid into
(10-12 grains) (fillcup to level full) the opening. Replace cap and turn clockwise.
*Yourlocal water utilitycan tellyou the exactdegree of The clear indicator inthe center ofthe cap changes
hardnessof yourwater supply.In rural areas, your from dark to light when the reservoir is nearly
stateuniversityextensionservicecantell youhowto empty. This indicates that it is time to refill the
testyourwaterhardness, dispenser. Note: When the cap is removed and
For water hardness of 13-14 grains, add addi-
tional detergent (1 teaspoon for each grain over
12) at the beginning of the main wash portion of
the cycle. (Open door, add detergent to bottom of
tub, close door and dishwasher will continue
through cycle.)
an "E" can be seen at the bottom of the rinse aid
dispenser, it is empty.
If water is 15 grains or harder, it will be virtually
impossible to get good results with any dish-
washer. The only solution is a mechanical water
softener to improve water quality.
Adding Detergent
Add Detergent to Dispenser Cup Just Before
You Se/ect the Cyc/e and Options.
Normal or Heavy
Place the proper amount of detergent in both the
Prewash and Main Wash cups. Close the lid.
Detergent will be released automatically into the
prewash and main wash.
7

_ JI_NN -AI_
_ on _. H_nQ , ivied
• • • • Slid
aD D u " i ll._]
m
Wash
Model DW860
Rinse & Hold Rinse 5 Min. 1.5 Gal.
Use to rinsea relativelyfew 13 Min. (DW700 only) 3.0Gal.(DWT00only)
soileddisheswhichare to be
held untilthe dishwasheris
full.Turn to Rinse& Holdon
dial.
Light** PreWash ] 7.5 Gal.
Usefor chinaandcrystaland Rinse / 45 Min.
for loadscontainingmedium MainWash
to lightamountsof soil.Press 2 Rinses
Lightbuttonand turnthe dial Dry 25 Min.
to Start. 70 Min.+ Heating Delay*
Normal 9 Gal.
Use for washing loads con- PreWash 9.5Gal.(DW700only)
tainingnormallysoileddishes. 2 Rinses ' 55 Min.
This would include dishloads Main Wash
with problem soils. PressNor- 2 Rinses
malbuttonand turnthe dial to Dry 25 Min.
Start. (Note DW700 Owners: 80 Min. + Heating Delay*
Turn dial to Normal.)
Heavy PreWash 10.5 Gal.
Use for loads with heavy or 2 Rinses ' 65 Min. 11Gal.(DW700Only)
dried soils. Press Heavy but- Main Wash
ton and turn the dial to Start. 3 Rinses
(Note DW700 Owners: Turn Dry .125Min.
dial to Heavy.) 90 Min. + Heating Delay*
* Thedishwashermayextendthe mainwashto heatthewaterto propertemperature.On ModelsDW730,
DW760& DW860,the heatingdelayindicatorwill lightwhenthe cycleis beingextendeddueto lowwater
temperature.NOTE:ModelDW730doesn'thavea heatingdelayforthe Lightcycle.
** LightcycleisavailableonDW730,DW760& DW860modelsonly.

AccuTempTM - Models DW760 & DW860 Only
If, for any reason, the incomingwater is below On - The On lightwill glow duringall washes,
120°F, pressthe AccuTempTM buttonto insure rinsesandthedryingperiod.
the waterisheatedto the propertemperaturefor
best cleaningand drying results. If the water Heating Delay-The HeatingDelaylightindicates
temperature is low, the main wash will be themainwashisbeingextendedtoheatthe water
extended andthe HeatingDelay indicatorlight to the propertemperature.
will glow.
Press the Cancel buttonto cancel this option. Clean (Models DW760 & DW860 only) - The
Clean lightwill glow after the drying period is
This optionis not availablein the Rinse & Hold completedas a reminderthat the dishes have
cycle, gonethroughawashanddrycycle.It will remain
lit until the dial is manually turned to the Off
Heat Dry position (vertical line after the dry section).
Selectthisoptionto provideheat forfasterdrying.
Delay Start (Model DW860 only) - The Delay
Fan Dry - Models DW710 & DW730 Only Startlightwillglowduringthe Delaytimeperiod.It
Depressthisbuttontoturnthe heatingelementoff willgo off whenthe dishwasherstarts.
duringthe fan dry cycle.
Cancel - Models DW760 & DW860 Only
Pressthe Cancel buttonto cancel the Heat Dry For best cleaning,the forgottenitem shouldbe
AND/ORtheAccuTempTM options.NOTE: Ifheat added earlyin the cycle.
dry has been cancelled, a fan will still operate
duringthe dry cycle. 1. Unlatchthe doorand wait untilthe soundof
circulatingwater stops.
Delay Start - Model DW860 Only
Select thisoptiontodelaystartthedishwasherfor 2. Openthe doorand add the item.
approximately1 - 6 hours.To select,turnthe Set
Dialtothe desirednumberof hours. 3. Closethedoorandpausebrieflybeforelatch-
ing the door. The cycle will continueat the
pointit was interrupted.
Note: Run the water from the hotwater tap to
clear the line of cold water before starting the
dishwasher.
After loading,press the buttonfor the desired
wash cycle (Heavy, Normalor Light).Pressthe
buttonforthedesiredoptions.SetthedialtoStart.
Note DWT00 Owners: Turn the dial to desired
setting.
To selectRinse & Holdsetthe dialat the begin-
ningoftheRinse&Holdsection.AccuTempTM and
Heat Dryare notavailablewiththiscycle.
After selectingthe cycle and optionspressthe
dooruntilitlatches.The motorwillrunfora minute
ortwobeforethedishwasherbeginstofill.TheOn
indicatorwilllight.
9

Most tableware, cookware and silverware can be facturer, simply test-wash a small item for several
safely washed in your Jenn-Air dishwasher. Ifyou weeks before attempting to wash an entire set.
have any doubts about a particular piece of Remember: It is the user's responsibility to deter-
dishware, check with the manufacturer to see if it mine if dishware should be washed in a dish-
is dishwasher safe. If you cannot reach the manu- washer.
Yes, except High water temperature No Cannot withstand high
anodized and detergents may af- water temperatures and
aluminum fect finish. Check clean- detergents.
and some ing instructions.
cookware. Yes(If labeled Always check manu-
"dishwasher facturer's recommenda-
No, except Seasoning will be re- safe") tionbeforewashing. Plas-
for Jenn-Air moved, and ironwill rust. tics vary in their capacity
grill-rocks to withstand high water
temperatures and deter-
Yes, except Always check manufac- gents.
antique or turer' recommendation
handpainted before washing. Antique Yes RunaRinse&HoldCycle
china, handpainted orover-the- if not washing immedi-
glaze patterns may fade. ately. Prolonged contact
Gold leafmay discolor. If withfoodscontainingsalt,
in doubt, test-wash a vinegar,milkproductsor
small item for several fruit juice could damage
weeks beforewashingan finish.
entire set.
Yes, except Always check manuf- Yes, except RunaRinse&HoldCycle
antique or acturer's recommenda- those with if not washing immedi-
lightweight tion before washing, commercial ately. Prolonged contact
delicate Some types of leaded "darkening". with food containingsalt,
crystal, crystal may etch with re- Note: Do not acid or sulfide (eggs,
peated washings, if in wash with mayonnaise and sea-
doubt, test-wash a small stainless food) could damage fin-
itemforseveralweeksbe- steel or ish.Commercial"darken-
forewashinganentireset. copper, ing" may be removed by
detergent.
Yes, except Milk glass will yellow with
milk glass, repeated dishwasher
washing. No May rust.
No Will discolor. No Always check man-
ufacturer'srecommenda-
tion before washing.
Wood may warp, crack
No Highwater temperatures or discolor.
and detergent may
discolor or pit finish.
11)

Select the Proper Cycle
The cycle needed depends on the amount of food
Hot Water is a Must soil. See page 8 for cycle descriptions.
Hot water dissolves and activates the dishwashing
detergent, dissolves grease on dishes and helps Select Heat Dry
dry glasses spot-free. Make certain all loads are For faster drying select Heat Dry.
washed in hot water. Ways to have a reliable hot
water supply...
1. Maintain a minimum of 120°F water supply at
central water heater. To check water tempera- Hard Water Deposit
ture, refer to page 4. If an unusual amount of calcium is in the water, a
2. Let the water from the hot water tap run to lime film or deposit may eventually build up on the
clear the line of cold water before selecting a dishes and interior surface of the dishwasher. You
cycle, may first notice this as "cloudy" glasses.
3. Let the water heater recover if you have re-
cently done laundry. To determine if the film on the glasses is due to
4. Models DW760 & DW860 Only - If your hot hard water, soak a glass approximately 15 min-
water is below 120°F it will be necessary to utes in undiluted white vinegar. Rinse and dry. If
selecttheAccuTempTMoptiontoachievegood film is removed, it is due to hard water (if not
results. AccuTemp TM will add heat during the removed, see Soft Water Etching).
main wash and thermostatically check the
water temperature. If the proper temperature To correct:
is not reached during the standard main wash
time, the heating delay indicator will light and 1. Increase the amount of detergent used ac-
the cycle will be extended until the tempera- cording to the degree of water hardness. (See
ture is reached, p. 7.)
2. Check the water temperature. (See p. 4.)
Use Enough Detergent 3. Use a rinse aid to improve the sheeting action
For proper soil removal and to prevent filming, of the water. (See p. 7.)
etching and spotting, an adequate amount of
detergent must be used. We recommend 1 tea- To remove film from dishwasher interior, try
spoon of detergent per grain of water hardness one of the following:
with a minimum of 3 teaspoons. See page 7 on
adding detergent. 1. Remove with a damp cloth and a mild scouring
powder.
Use a Rinse Aid 2. Startemptydishwasheron Rinse&Holdcycle.
Using a rinse aid improves drying results and During fill, open door and add 1/3 cup RoVer
reduces spotting and filming. See page 7 for Rust Remover to water. Allow dishwasher to
instructions on using a rinse aid. complete cycle. Do not use detergent. Follow
with a regular detergent wash.
Load the Dishwasher Properly
To insure that all soiled surfaces get adequate
wash action, carefully follow the instructions for
loading the dishwasher. (See pp. 4-6.) Make sure
nothing extends above or below the racks to
interfere with the movement of the upper or lower
spray arms.
11

Soft Water Etching
If the cloudy film is not removed after soaking in
vinegar (previous procedure), then the condition You can help save energy if you:
is etching. This permanent film occurs in unusual
conditions under which the surface of the glass is 1. Wash full loads. Running a half-filled dish-
pitted or eroded. It is permanent, washer uses the same amount of electricity
and hot water as a fully loaded machine.
In the beginning stages, etching may be identified 2. Do not pre-rinse normally soiled dishes. Se-
by a"rainbow" look--shades of blue, purple, brown lect the correct cycle for the load and use the
or pink may be seen when the glass is held at an recommended amount of detergent for good
angle to the light. In advanced stages the surface washing results without hand rinsing.
of the glassware appears frosted, spotted or 3. Load correctly for best washing results. Incor-
cloudy, rect loading may cause poor washing and the
need to prewash all or part of the load.
Certain types of glassware will etch in any dish- 4. Use the Light cycle when dishes are lightly
washer with the combination of soft water (espe- soiled. It uses less hot water and energy than
cially mechanically softened), an excessive amount other cycles.
of detergent, heat and prerinsing. There is no 5. Most models - fan dry dishes (without heat)
relationship to the cost or quality of the glass, when you don't need them dried quickly. Allow
longer drying times (overnight).
To prevent: 6. Use your dishwasher during off-peak hours.
Local utilities recommend this to avoid heavy
1. Adjust the amount of detergent to the degree usage of energy at certain times of the day.
of water hardness. (See p. 7.) Check with your utility company to see if off-
2. Lower the water temperature to 120°F. (See peak rates exist.
p. 4.)
3. Avoid using the Heat Dry drying option.
4. Do not manually pre-rinse dishes before load-
ing in dishwasher. Pre-rinsing prior to loading The interior is normally self-cleaning. Occasion-
to remove all food soil aggravates etching, ally check the bottom of the dishwasher tub and
Rust
clean out pieces of food which may collect there.
Sometimes the dishes or the interior of the dish- Periodically clean the bottom edge of the dish-
washer may turn a brown, red or black color if iron washer door liner. Food and liquids drip onto this
or manganese is in the water. To remove discol- area when the dishwasher is loaded.
oration from the dishwasher interior, dishes and
glassware (no metal items): If you notice an odor in your dishwasher, it may be
due to a strong "chemical" or chlorine odor from
1. Select a rust removing compound, such as the dishwasher detergent. Using a different deter-
RoVer Rust Remover. It is available from gent, especially a lemon scented one, will prob-
dealers by using Part No. 057961. ably eliminate the odor. In some instances the
2. Start empty dishwasher on Rinse & Hold or smell of the rinse aid may be strong. Purchase a
rinse portion of the cycle. During fill, open the fresh package and see if it is better. Lastly, if the
door and add 1/2 cup RoVer Rust Remover to dishwasher is run only every couple of days, an
the water. Allow the dishwasher to complete odor may develop. Use the Rinse & Hold cycle
the cycle, daily to remove any food soil that may cause an
3. Follow with a detergent wash. odor.
The only permanent solution is to install special
filters which can remove iron and manganese
from the water.
12

To remove an odor, try one of the following:
1. Place baking soda in both sides of the deter- Your Jenn-Air dishwasher comes with reversible
gent dispenser, Select the Light cycle and let panel inserts which are pre-assembled at the
the dishwasher runfor about20 minutes, Stop factory This enables you to select the color you
the dishwasher by unlatching the door and let want before your dishwasher isinstalledorchoose
stand overnight. Then, restart the dishwasher another color at a later date.
by latching the door and let it complete the
cycle. To Change Panels
2. Select the Light cycle and let the dishwasher
fill with water. Then open the door and pour Door Panel
1/4 cup of chlorine bleach into the bottom of 1. Remove three screws holding the side trim
the dishwasher. Latch the door and let the strip on one side of the door. Take note of how
dishwasher complete the cycle. Do not use the trim comes off.
detergent. 2. Grasping the lower part of the door panel(s),
bow panel(s) out carefully at the bottom while
Clean the control panel and front panel with a soft sliding panel(s) far enough to clear the flange
damp cloth and liquid spray cleaner. Do not use
any abrasive powders or cleaning pads. remove panel(s).
CAUTION: To protect against rupture of fill valve, the metal trim at the bottom of the door. Bow
BE SURE the water lines leading to the dish- the panels so they fit behind the control panel
washer, are well protected against freezing, at the top.
1. Run dishwasher through a cycle using deter- which was not removed. To do this, it will be
gent. If an odor remains, repeat using baking necessary to compress the backing behind
sodain the dispenser cup or adding 1/4cupof the colored panel(s).
chlorine bleach in the bottom of the tub. Clean 6. Reinstall the side trim which was removed
the bottom edge of the door and front lip of the earlier. Align the holes and replace the three
tub with a baking soda and water solution, screws.
2. Turn the water supply off and set the dish-
washer to drain (select Rinse & Hold cycle). Lower Panel - Most Models
Once Rinse & Hold is completed, open the 1. The lower access panel is held by four screws
door and return Timer to Off. (two above the panel and two below). With
3. Disconnect the electrical supply, these removed, the panel may be removed to
4. Place a pan under the drain outlet. Disconnect make it easy to change panel colors.
the flexible tubing from the pump and drain the 2. With the lower access panel removed, remove
water into pan by pushing down on drain arm the four screws along the bottom of panel and
lever. Reconnect hose and secure clamp, remove the trim which holds the panels. Once
5. Prop the door open. the desired panel is facing out, replace the
To restore service, turn on the electricity and
water supply. Select a wash cycle and let the
dishwasher complete the cycle. Check connec- Use care when changing panels to be certain you
tions to make sure they are water tight, are not injured on sharp edges and that the panels
on the trim strip which was not removed and
3. Arrange panel so the desired color is facing
out.
4. Place door panel(s) (notched side up) behind
5. Slide the panel(s) under the side metal trim
trim, and reinstall the panel to the dishwasher.
are not damaged. If you have any questions
concerning changing panels or wish to purchase
a different color panel, contact your local Jenn-Air
dealer.
13
Check these points if your dishwasher... • Increase detergent use accordingto water
hardness.
Leaves food soil on dishes • Checkfor improperloadingand do not over-
• Check to see that the water heater is set to load.Dishesshouldnotnesttogether.
delivera minimumof 120°F water at the fau- • Plasticitemshavea poroussurfaceandtend
cet. to holdwater.Towel dryingmaybe required.
• Turn on hotwaterat kitchensinkbeforerun- • Glasses,cups,etc.,withconcavebottomswill
ning the dishwasher to be certain that hot hold water.
water is entering the first wash cycle.
• Models DW760 & DW860 Only - Select the Stains or discolors dishes
AccuTempTM option. • Aluminum utensilscanleavemarkswhen they
• Checkwater hardness.Forextreme hardwater rub against other things. Load properly.
conditions it may be necessary to install a e lrondepositsin thewater can leaveayellow or
mechanicalwater softener, brown film on dishes. You maydesire to have
eUse the amount of detergent recommended aspecialfilterinstalledinthewatersupplyline,
for your water hardness, and be sure it is put or periodicallyuseRoVerRust Remover. (See
in the dispenser as directed previously. Water Conditions, pp. 11-12.)
• Usefresh highphosphatedetergentthat is not
caked. Store detergent in cool, dry place. Cycle takes too long
• Select propercycle for soil level of dish load. (Heating Delay light stays on)
• Be sure dishes areloaded properlywith noth- • Model DW730 -The water temperature is too
ingblockingthe path ofthe wash arms, center low and the dishwasher is automatically ex-
spray nozzle or detergent dispenser, tending the cycle to heat water to the proper
• Check for nesting of dishes that prevents temperature.
water from reaching all surfaces. • Models DW760 & DW860 - The AccuTempTM
• Check to make sure glasses are not loaded optionhasbeenselectedwhichwillextendthe
over prongs, cycleto heatwaterthermostaticallywhenwater
temperature is low.
Leaves glassware cloudy or spotted
• Adjust the detergent amount to your water Clean light remains on
hardness as described earlier in this book. • Turn dialslightly clockwise until lightshuts off.
Avoid overuse or underuse of detergent.
• Check to see that the water heater is set to Seems noisy
deliver a minimumof 120°Fwater atthe faucet • Water circulation noise is normal.
nearestthe dishwasher.Avoid extremely high • Humming during drain is normal.
or low temperatures.
• Use a rinse aid such as Jet-Dry. • Dishes may not be loaded properly. Dishes
• Do not pre-rinse dishes before loading them should not be touching one another.
into the dishwasher. • Wash arm may be hitting an item when rotat-
e Refer to Water Conditions for more informa- ing. Load items so nothing blocks the wash
tion. (See pp. 11-12.) arm.
• Chopping or grinding noise may be heard
Does not dry properly during the cycle when the internal food dis-
• Be sure the Heat Dry option is selected, poser is chopping food.
• Use a rinse aid.
• Check to see that the water heater is set to • Detergent cup lid hits door liner when dish-
delivera minimumof 120°Fwateratthe faucet washer door is opened at end of cycle and is
nearestthe dishwasher. Runwater and check normal.
temperature with a candy thermometer. • Installation (location,flooring, cabinetry, etc.)
can affect noise level.
• Water valve hiss during fill is normal.
14

Does not run properly/Won't fill Has on odor
• Be sure door is tightly closed and latched. • Soiled dishes heldtoo longin the dishwasher
• Check to see that water is turned on. can create an odor. Use the Rinse & Hold
• The cycle is notproperly selected. Besurethe cycle.
dial isturned far enoughorthe cycle buttonis • Dishwashers will have a "new" smell when
completely depressed, first installed.
• Motor runs 1-2 minutes before fill begins.
• Checkyourhome'scircuit breakerorfuse box.
• Inlet hose may be kinked. "Does not drain properly")
• Water inlet valve may be clogged with sedi-
ment and in need of cleaning. Chips dishware
Does not drain properly instructions so they do not strike together
• Check to see that the cycle has been com- from the wash action.
pleted. • We do not recommend washing fine an-
• Drain hosemay be kinked, tique china and crystal in the dishwasher.
• Checkyourhome'scircuitbreakerorfusebox. • Do not load glasses over rack tines, or
Reset if necessary, allow to touch each other.
• Foodis backingupin the pipesatthe sink.If
hookedupto a foodwastedisposer,besure
to runthe disposerregularly.
• Some water is normaland keeps sealsfrom
drying.
• Dishwasher not draining properly. (See
• Besure dishesare loaded accordingtothe
• Do notoverload.
Detergent cup did not empty completely
• Check to see that the cycle has been com-
pleted.
• Be sure dispenseris notblockedfromwash
action.
• Be suredispenserisnotwet whendetergent
isadded.
• Makesurelargeitemsplacedinthefrontright
corner of upper rack are not blockingthe
detergentcup.
• Usefresh detergent.Storeindry, coolplace.
Leaks
• Checkto see thatthe dishwasheris levelas
describedin the InstallationInstructions.
• Sudscan causethe unitto overflowso mea-
suredetergentcarefully.Try anotherbrandof
detergent.Useonly detergentsdesigned for
automaticdishwashers.
• Makesureyoufollowdirectionsonhowtoadd
a forgottenitem.
15

DISHWASHER WARRANTY
Full One Year Warranty
i Any part which failsin normalhomeuse duringthe firstyear after the date of original retail purchase, will be repaired or
replaced free of charge.
Limited Two Year Warranty
Any partwhichfailsinnormalhomeuseduringthesecondyearfromthedateoforiginalretailpurchase,willbe repaired
or replacedfree of chargeforthe part itself,withthe ownerpayingall othercosts,includinglabor,
Limited Five Year Warranty on Wash System and Solid State Controls
Any parts ofthe system includingthecompletepower module assembly,center spray nozzle,spray arms, top wash arm
hose, motor, AND---on Computer Touch Control Models only--any microprocessor and touch pad assemblies which fail
in normal home use duringthe second through the fifth year from the date of original retail purchase, will be repairedor
replaced free of charge for the part itself, with the owner paying all other costs, including labor.
Limited Five Year Rack Warranty (Available on Select Models)
Shouldthe DuralonTM coatedracksrustduringthefive year periodstartingfromthedateof originalretailpurchase,repair
or replacement will be made free of charge for the part itself, withthe ownerpaying al7other costs, includinglabor.
FULL TWENTY Year Warranty Against Leaks on Dishwasher Tub and Door Liner
Shoulda water leak developin the tubor doorlinerin normalhomeuseduringtheTWENTY YEAR periodstartingfrom
hedate of originalretailpurchase,repair or replacementofthe tuband/ordoor linerwillbe made FREE OF CHARGE,
These full warranties and the limited warranties apply when the appliance is located in the UnitedStates or Canada.
Appliances located elsewhereare covered bythe limitedwarrantiesonly, which includeparts which fail duringthefirst year.
Canadian Residents
ThiswarrantycoversonlythoseappliancesinstalledinCanadathathave beenlistedwithCanadianStandardsAssociation
unlessthe appliances are brought into Canada due to transfer of residence from the United States to Canada.
To Receive Warranty Service
First: Call or write the JENN-AIR dealer from whom your appliance was purchased or the authorized service firm
designated by the dealer.
If you have moved from the selling dealer's service area call or write any authorized JENN-AtR dealer or
authorized service firm at your new location. Check the telephone directory yellow pages to identify the
dealer or service firm in your area.
Second: Should your contact with the dealer or the service firm fail to satisfactorily resolve the problem, contact the !
manager of the dealership or the manager of the service firm for assistance.
Third: Should you not receive satisfactory warranty service from one of the above or need help in identifying an
authorized service firm write Jean-Air Customer Assistance, c/o Maytag Customer Service, P.O. Box 2370,
Cleveland,TN 37320-2370, and arrangementsfor warranty service will be made. If the problem is urgent, caJI
Jenn-Air Customer Assistance, c/o Maytag Customer Service at (800) 688-1100.
When contactingJean-Air CustomerAssistance, c/o Maytag Customer Service besureto includethe model and
serial number ofyour appliance, the nameand address of the dealer from whom you purchased the appliance
and the date of purchase.
This Warranty gives you specific legal rights, and you may alsohave other rights which vary from state to state.
Should you still have a problem, write to: MajorAppliance Consumer Action Program, 20 North Wacker Drive, Chicago,
Illinois 60606. MACAP is an industry sponsored but independent group of consumer experts who receive and act on
complaints from appliance owners.
NOTE: When writing about an unsolved service problem, please include the renewing information:
(a) Your name, address and telephone number;
(b) Modelnumber and serial number (found on the upper left corner of the tub opening) of your appliance;
(c) Name and address of your dealer and date the appliance was bought;
(d) A clear description of the problem you are having;
(e) Water hardness, detergent brand and amount, water temperature, and cycle used.
JENN-AIR
3035 SHADELAND •INDIANAPOLIS. IN 46226-0901
Cat.No.DU760UE PartNo.6-913590 10/95
 Loading...