

Page 1

JENN-AIR
Use and Care Manual
Pro-Style °Gas Grill
_ Range Cookto_
Model JGD8348, CVG4380P
l
Printedin U.S.A. Cat. No. CA4380UE
©1996 Jenn-Air PartNo. 8111P197-60 6/96
Page 2
WARNING: If the information in this manual is
not followed exactly, afire or explosion may re-
sult causing property damage, personal injury
or death.
- Do not store or use gasoline or other flam-
mable vapors and liquids in the vicinity of
this or any other appliance.
- WHAT TO DO IF YOU SMELL GAS
• Do not try to light any appliance.
• Donottouch any electrical switch; do not
use any phone in your building.
• Immediately callyour gas supplier from a
neighbor's phone. Follow the gas
supplier's instructions.
• If you cannot reach your gas supplier,
call the fire department.
• Extinguish any open flame.
- Installation and service must be performed
by a qualified installer, service agency or
the gas supplier.
- SAVETHESE INSTRUCTIONS FORFUTURE REFERENCE-
Page 3
Read before operating your cooktop
All appliances - regardless of the manufacturer - have the potential
throughimproperorcareless use to create safety problems. Therefore
the followingsafety precautionsshould be observed:
1. Besureyourapplianceisproperlyinstalledandgroundedbya qualified
technician.
2. Neveruseyourapplianceforwarmingorheatingtheroom,Thiswarning
isbasedonsafetyconsiderations.
3. Childrenshouldnotbe leftaloneor unattendedin areawhereapplianceis
in use. They should never be allowedto sit or stand onany part of the
appliance.
4. Wearproperapparel. Loose-fitting or hanging garments should never
be wornwhileusingtheappliance.
5. Do not repair or replace any part of the appliance unless specifically
recommendedinthis manual. All otherservicingshouldbe referredto an
authorizedJenn-AirServiceContractor.
6. Do not store combustiblematerials,gasoline or other flammable vapors
and liquidnearcooktop.
7. Donotusewaterongreasefires. Smotherfireorflameorusedrychemical
orfoam-typeextinguisher.
8. Useonly dry potholders. Moistor damppotholderson hot surfacesmay
result in burnsfromsteam. Do not use a towel or other bulkycloth.
9. Selectcookwarelargeenoughtoproperlycontainfoodandavoidboilovers
orspillovers. This willsave on cleaningand preventhazardousaccumu-
lationsoffood,sinceheavysplatteringor spilloverslefton acooktopcan
ignite. Pansize is especiallyimportantin deep fat frying.
10. Never leave cooktop unattended at Hi heat settings. Boilover causes
smokingand greasyspilloversthat mayignite.
11. TYPEOF COOKWARE- Avoid pansthat are unstableandeasilytipped.
Inchoosingpans,lookforeasily-graspedhandlesthatwillstaycool. Pans
thataretooheavywhenfilledwithfoodcanalsobea hazard. Ifpanhandles
twistand cannotbetightened,discardthe pan.
12. HANDLES- Alwaysturn pan handlesto the sideor backof thecooktop-
notoutintotheroomwhere theyare easily hit. COOKWARE HANDLES
SHOULDBETURNED INWARDAND NOT EXTENDOVERADJACENT
SURFACEBURNERSto minimizebums,ignitionofflammablematerials,
andspillagedue to unintentionalcontactwiththecookware.
Page 4

13. CAUTION- Do notstore items of interestto children in cabinetsabove
cooktop-childrenclimbingonthecooktoptoreach itemscouldbeseriously
injured.
14. Donot touchgrillandsurfaceburnerareas, areasnear burners,or metal
landingspace. Duringand after use,theseareas may be hotenoughto
causeburns.Avoidcontactwiththeseareasbyclothingorotherflammable
materialsuntilthey have had sufficienttimeto cool.
15. Do not heat unopenedfoodcontainers. Buildupof pressure maycause
containerto burst andresultin injury.
16. Keepallcontrols"OFF" whenunit is not in use.
17. Keepventducts unobstructed.
18. GREASE- Greaseisflammableand should behandledcarefully. Never
leaveanycookingoperationunattended. Letfat coolbeforeattemptingto
handle it. Do notallow grease to collect aroundthe cooktop. Wipe up
spilloversimmediately.
19. Ifthe cooktop is installed near a window, proper precautionsshould be
taken to prevent curtains from blowing over burners creating a FIRE
HAZARD.
20. Donotusealuminumfoil to lineaerationtrayor burnerbasin. Restriction
of normalairflowmay resultin unsafeoperation.
21. Donotusecookwareon the grill section ofthis appliance.
22. Beforeservicing your appliance, disconnect power to the cooktop at the
mainfuseor circuitbreakerpaneland atthe electrical receptacle.
23. Always allow hot pans to cool in a safe place out of the reach of small
children.
24. Afaintgasodormayindicateagas leak. Ifa gas odorisdetected,shutoff
thegassupplyto thecooktop. Call your installeror local gascompanyto
havethe possibleleakchecked. Never use a match or other flame to
locatea gas leak.
25. Cleanonlypartslistedinthismanualanduseproceduresrecommended.
26. Flamesizeshouldbeadjustedsoitdoesnotextendbeyondtheedgeofthe
cookware. Thisinstructionisbasedonsafetyconsiderations.
27. Thisappliancehasbeentestedforsafe performanceusingconventional
cookware.Donotuseanydevicesoraccessoriesthatarenotspecifically
recommendedinthismanual.Donotuseeyelidcoversforthesurfaceunits
orstovetopgrills.Theuseofdevicesoraccessoriesthatarenotexpressly
recommendedinthismanualcancreateserioussafetyhazards,resultin
performanceproblems,and reducethe life of the componentsof the
appliance.
Page 5
Important Safety Notice and Warning
The CaliforniaSafe DrinkingWater andToxic EnforcementAct of 1986 (Propo-
sition65) requires the Governor of California to publisha list of substances
knownto the State of California to cause cancer or reproductive harm, and
requiresbusinesses to warn customers of potential exposures to such sub-
stances.
Users ofthis appliance are hereby warned that burning of gas can result in low-
level exposure to some of the listed substances, including benzene, formalde-
hyde and soot, due primarily to the incomplete combustion of natural gas or
liquid petroleum (LP) fuels. Properly adjusted burners will minimize incomplete
combustion. Exposure to these substances can be minimized by properly vent-
ing the burners to the outdoors.
WARNING
Electrical Grounding Instructions
The appliance is equipped with a three-prong grounding plug for your protec-
tion against shock hazard and should be plugged directly into a properly
grounded three-prong receptacle. Do not cut or remove the grounding prong
from this plug.
Congratulations on your choice of a Jenn-Air gas cooktop. The indoor grilling of
meats, fish or fowl is an attractive and healthy way to prepare these foods.
Before you begin cooking with your new cooktop, please take a few minutes to
read and become familiar with the instructions in this book. Should you have
any questions about using your Jenn-Air gas cooktop, write to us. Be sure to
provide the model number.
Jenn-Air Customer Assistance
c/o Maytag Customer Service
P.O. Box 2370
Cleveland, TN 37320-2370
5
Page 6
The built-in ventilation system removes cooking vapors, odors and smoke from foods
prepared on the cooktop, grill and grill accessories.
Regular use of this system will insure a more comfortable and less humid kitchen which
isfree of heavy cooking odors and fumes that normally create a frequent need for clean-
ing and redecorating.
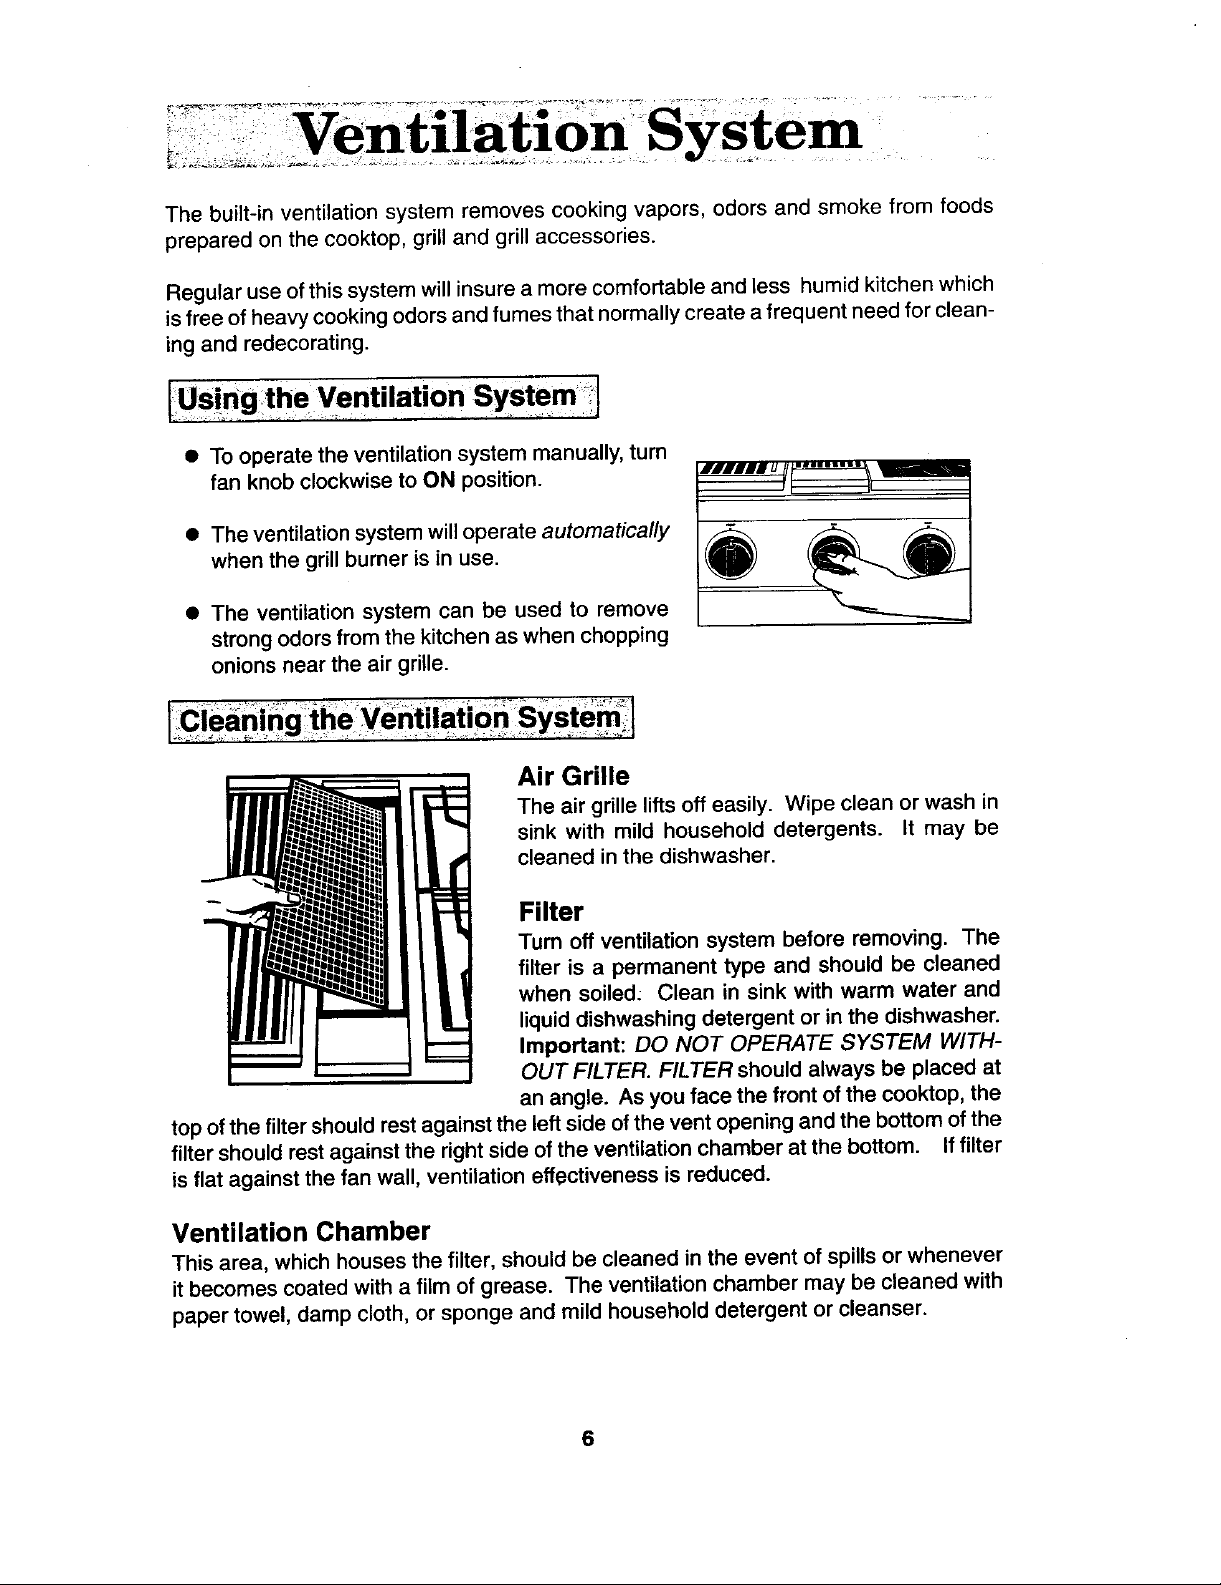
• To operate the ventilation system manually, turn
fan knob clockwise to ON position, ummuuli ......... _
• The ventilation system will operate automatically _ _---._/_
when the grill burner is in use.
• The ventilation system can be used to remove
strong odors from the kitchen as when chopping
onions near the air grille.
g
Air Grille
The air grille lifts off easily. Wipe clean or wash in
sink with mild household detergents. It may be
cleaned inthe dishwasher.
Filter
Turn oft ventilation system before removing. The
filter is a permanent type and should be cleaned
when soiled: Clean in sink with warm water and
liquid dishwashing detergent or in the dishwasher.
Important: DO NOT OPERATE SYSTEM WITH-
OUT FILTER. FILTER should always be placed at
an angle. As you face the front of the cooktop, the
top of the filter should rest against the left side of the vent opening and the bottom of the
filter should rest against the right side of the ventilation chamber at the bottom. If filter
is flat against the fan wall, ventilation effectiveness is reduced.
VentilationChamber
This area, which housesthe filter, shouldbe cleaned in the event of spillsorwhenever
itbecomescoated with a film ofgrease. The ventilationchamber may be cleaned with
papertowel, damp cloth,or sponge and mild householddetergentor cleanser.
6
Page 7

lSize of Cookware1
To achieveoptimumcockingperformance usecookpotswithflatbottomsand tightfitting
covers. Flame size should be adjusted so it does not extend beyond the edge of the
cookware. This instructionis basedon safetyconsiderations. Adjustingthe size ofthe
flame to fitthe size of the ccokware also helpsto save fuel.
Important: Leave a minimumof 11/2"between side of pan and surroundingsurfaces,
such ascountertopbacksplashor sidewalls, to allow heat to escape to avoid possible
damage to these areas.
• Aluminum cookware heats evenly and quickly. A slightly larger flame size can be
used. The flame canbe adjusted so itcomes to the edge ofthe cookware. However,
the flame should NEVER be adjusted so that it extends beyond the bottom of the
cookware.
• Stainless steel cookware with copper or aluminum cores heat evenly and fairly
quickly. The flame size should be adjusted to extend only halfway between center
and edge of the cookware bottom for best results.
• Cast iron cookware heats slowly.
• Check manufacturer's recommendations before using porcelain on steel, porcelain
on cast iron, glass, glass-ceramic, earthenware or other glazed cookpots.
l!C°vered c°° are I
Ifthe cookware is covered, less fuel will be needed. Therefore, a lower flame size can
be used.
Note: Food will not cook any faster when more than the amount of heat needed to
maintain a gentle boil is used.
Page 8

Yournewcooktopburnershavebeenpresetfor an"average"setofconditions.Regional
variancesingaspressureand atmosphericconditionssuch as heightabovesea level
mayaffectyourinitialflameperformance.
Whenthecontrolknob isturnedON,gasentersthe mixertubeandmixeswithair. This
airandgasmixtureflowstotheburnerheadandislightedbyasparkfromthesolidstate
igniter.
A properlyadjustedburnerwith clean portswill light withina few seconds. The cone-
shapedflamewillbeclearblue incolorwith aclearlydefinedinnercone. There should
benotraceofyellowintheflame. Ayellowflameindicatesanimpropermixtureofairand
gas. Ifyourflamedoesnotresemblethe"correct"flameas describedabove,followthe
air shutteradjustmentinstructionsbelow.
Thevariablesurfacecontrolsforthesurfaceburnersandgrillburnerprovideflexibilityin
settingselection.
Note:The grillcan bereplacedwithanoptionalsurface burnermodule,ModelAG202.
Surface Burners
Incaseofprolongedpowerfailure,youcanmanuallylightthesurfaceburnerbyholding
alightedmatchneartheburnerportsandslowlyturningthecontrolknobcounterclockwise
(afterdepressing)untilthegasignites. Thereis nofansosmokeandcondensationcan
gather.
Grill
INCASEOFPOWERFAILUREOR IFTHE DOWNDRAFTFANISINOPERABLE,DO
NOTUSEGRILL. VENTILATIONSYSTEMWILLNOTOPERATE.
Air ShutterAdjustment
To Adjust Surface Burner Air Shutter (Some models):
Loosenfasteningscrewwitha phillipsscrew- _ SURFACEBURNERROTATEAIR
driverand rotateairshuttertoincreaseorde- _ "_ MIXERHEAOTO
creasethesizeoftheairopening.Astheshut- -_ _ SCREW MAKEAIR
ter isturnedobservechangeinflameappear- _:-_(/ -._- AA,_SHU,,_
ance.Adjustmentissatisfactorywhenaclearly G_.
defined,evenblueflameresultsattheHiflame A,ROPENIN
__ ADJUSTMENT
AIR OPENING "_'%'_/TO _JJ TO
setting. Afteradjustment,tightenscrew. OPEN_"
AIR SHLWIER SHU'I I _R ON
CLOSE
Page 9

To adjust grill burner air shutters and surface burner air shutters (Some
models):
The left hand air shutter controls the rear half of the grill burner or the rear surface
burner. The right hand shutter controls the front half of the grill burner or the front sur-
face burner.
Slide air shutter backward or forward to in-
crease or decrease the size of the air open- AIRSHU'CIER
ing.
screwdriver blade may be required to make
Air shutters fit snugly on the burner, so a x.__;_
this adjustment. Observe change in flame ap- A_RO_NG3;;_. "_
pearance as the air shutter is moved. Adjust- AIRSHUttERi /__,_,-_==
ment is satisfactory when a clearly defined, _ SLOTANDTWISTWITH
INSERT SCREWDRIVER BLADE
SLIGHT PRESSURE TO ALLOW
even blue flame results at the Hi flame set- AIRSHUTrERTOSLIDEEASILY.
ting.The snug fit of the air shutter assures it
willremainpositionedcorrectly.
On any burner,closing the air shutter too far will cause the flame to become softand
yellowtipped. Opening the air shuttertoo wide willcause the flame to blowaway from
the burner ports.Proper adjustmentwill produce a sharp, clearly defined even, blue
flame.
Lo FlameAdjustment
This appliance has been shipped from the factory with Lo and Med flame settings
adjustedfor usewith naturalgas and average installations.There is a wide variety of
conditionscausedbyaltitudeand gasmixturescontrolledbyutilitycompanieswhichwill
vary and affect the gas flame and performance. Adjustments should be made at time of
installation. If conditions change, follow the procedures outlined below to adjust the Lo
setting.
1. Light burner and set control knob for low flame.
2. Remove control knob from valve stem.
CAUTION: Never use a metal blade to pry
knob off. -- _ CLOC_S_
3. Insert a slender,thin-blade screwdriver into TOREDUOE
jL _MESlZ_
the recess at center of valve stem and en-
gage blade with slot in adjusting screw.
4. Turn center stem adjusting screw slightly
to set flame size. Note: Turn clockwise to cou,_Lcc_s_
TO INCREASEFLAME
reduce or counterclockwise to increase S=E
flame size.
5. Replace controlknob when adjustment is
completed.
Properadjustmentwillproducea stable, steady blue flame of minimumsize.The final
adjustmentshould be checked by turning knob from Hi to Lo several times without
extinguishingthe flame. This adjustment,at the Lo setting,will automaticallyprovide
the properflamesize at Med setting.
9
Page 10

To Set Controls I
• Since the controls are a push-turn type, they must be pushed in before turning. To
set (from the OFF position), push in on control knob and immediately turn counter-
clockwise to the MTE position until burner ignites. After ignition, turn knob clockwise
to desired setting.
• Igniter willcontinue to spark until knob isturned clockwise back to or past Hi position
on knob.
1. 2. FAN 3. 4. 5. 6.
1. Left rear surface burner or grill. Note: When using an AG202 surface
2. Left front surface burner or grill, burner assembly with control locations
3. Center rear surface burner. #1 and #2, the control knob may be
4. Center front surface burner, turned to a position lower than the Lo
5. Right rear surface burner, setting. (The Lo setting is set for the
6. Right front surface burner, grill burner.)
The size and type of cookware and the amount and type of food being cooked will
influence the setting needed for best results. The setting indicated should serve as a
guide while you become familiar with your cooktop.
Use the Hi flame setting to quickly bring foods to a boil or "_
to begin a cooking operation. Then reduce to a lower _(_) ._._./_'_
setting to continue cooking. Neverleave food unattended __
over a Hi flame setting.
Mealsetting is usedto continue a cooking operation. Food "_
will not' cook any faster when a higher flame setting is
used than that needed to maintain a gentle boil. Re-
member, water boils at the same temperature whether
boiling gently or vigorously. -,
Use Lo setting to keep food at serving temperatures with- __ _f(_
out further cooking. You may find that some cooking may
take place if the cookware is covered.
10
Page 11

1. Be sure control knobs are turned OFF.
2. If the grill burner and grill grates are in place, remove before installing a surface
burner module. Clean burner basin of any grease accumulation. (See page 18for
cleaning recommendations.)
3,. Position the burner assembly with the mixer tube openings toward the orifices.
Slide the burner assembly toward the orifices until opening for igniter is over the
igniter. Lower intoplace until side openings are restingon the burner supports and
igniter is centered between the two flash tubes.
4. Installthe aeration tray by inserting the prong at theendof thepan intotheopening
in the end of the burner basin. Lower the opposite end into the cooktop.
Note" Before first use, read the Surface Burner Grates Care instructions found
on page 17.
Remove BurderModble 1
1. Control knobs should be in the OFF position and the cooktop should be cool.
2. Remove the aeration tray by lifting up the front end on the right side (back end on
the left side) until the top clears the opening of the cooktop by about 5 inches.
3. Hold aeration tray by the sides and slide away to remove the prong from the
opening and clear the surface burners.
4. Lift up on the sides of the surface burner assembly bracket about 2 inches. Slide
away from the orifices.
5. A storage tray, Model AG350, is available and can be used for storing a surface
burner module.
assembly. Model AG202 air shutters have been adjusted for compatibility on
INOTE- Optional surface burner assembly, Model AG202, can replace the grill burner
INOTE" Do not disassemble the surface burner assembly.
the left side.
11
Page 12

Thegrill consistsof twoblackgrillgratesand a grillburner. Only installthe grillon
the leftsideofyourcooktop.
1, Before installinggrill components,be certain controlknobs are in the OFF
position.
2. Positionthegrillburnerwithmixertubeopeningstowardtheorifices.Slidethe
burner towardstheorificesuntilthe igniteris in betweenfrontandreargrill
sections.Lowerintoplaceuntilsideopeningsarerestingontheburnersupport
pins.
3. Placethegrillgratesonthetopof thecooktop.
NOTE: Beforeusingthe grillforthe firsttime,heatthe E-venHeatTMgrillburnerto
removetheprotectiveshippingcoating.HeatthegrillonHifor10minutesand
use the vent systemto remove any additionalsmoke during cooling.
Remov?Gdl! Modq i l
1. Removegrillcomponentsoncetheyarecool.BesurecontrolknobsareintheOFF
position.
2. Removegrillgrates.
3. Removegrillburner.
12
Page 13

IUsing the Grill J
• Beforethefirst use, washyour new grillgratesin hotsoapywater, rinseand dry.
Then "season"the surfaceby wiping on a thin coating of cookingoil. Remove
excessoil by wiping againwith another papertowel. This procedureshould be
repeatedwhen: a) cleaninginthe dishwashersince the detergentmay remove
seasoning,or b)anytimeasugar-basedmarinade(forexample,barbecuesauce)is
goingto beused.
• Usenonmetallicspatulasor utensilstoprevent damagingtheExcalibur®nonstick
grillgratefinish.
• PreheatthegrillonHifor5 minutes.Preheatingimprovestheflavorandappearance
of meatsand quicklysearsthe meatto help retainthejuices.
• Excessiveamountsoffatshouldbe trimmedfrommeats. Only anormalamountis
necessarytoproducethesmokeneededforthatsmoked,"outdoor"flavor.Excessive
fat can createcleaningandflare-upproblems.
• Allowingexcessiveamountsof greaseor drippingsto constantlyflame voids the
warrantyon thegrill grates.Excessiveflare-upsindicatethateitherthe grill interior
needstobecleanedorthatexcessiveamountsoffatareinthemeatorthemeatwas
notproperlytrimmed.
• Greasedrippingswill occasionallyigniteto produce harmlesspuffs of flame for a
secondortwo. Thisisa normalpartofthe cookingprocess.
• NEVERLEAVEGRILLUNATTENDEDDURINGGRILL OPERATION.
Should excess grease cause sustained flare-up
1. Turn on FANmanually.
2. ImmediatelyturngrillcontrolknobstoOFFposition.
3. Removemeatfromgrill.
IMPORTANT
• Donotusealuminumfoilinsidethe grillarea.
• Donotusecharcoalorwoodchipsinthegrillarea.
• Donotallowburnerbasintobecomeoverloadedwithgrease.Cleanaftereachuse.
• Donotcovergratescompletelywithmeat.Leaveairspacebetweeneachsteak,etc.
toallowproperventilationaswellaspreventflare-ups.
13
Page 14

r
IGrill Guide
Preheat grillon Hi, 5 minutes,for best flavor
Type . . ; _;r"--:__ :e Setting CookingTime..:'_-_ Procedure..
Steak(1/2:_/4") °= _" = _ •
_:!Rare • ; _ i: _;;:Hi_"t 6to't0 min_e_
•:. Well _-:,--_-..-_--_---_, ,,-,._:Bl:.....
_"_.we,-'___:'_-_;::/i_:_!__'__%___'_;i.:'_"i;_i_i
Hamburgers_;_3-4Oz.}-_;'-_T!TAed_20°t625mi_"
Fish " : ::'
Small,Whole(1") ! Med 15to20 minutes Brushwithbutter.Turnafterhalf
Shrimp •Med 10to20minUteS_ ::_Tumandbrushwithbutteror ::
(skewered) " , • .__-_:::_._-,--_-_marinade_equently..-_-,-;-:,
GarlicBread Med 4 to6minutes' -Turnafterhalfthetime. .,
HotDogBuns,
HamburgerBuns Med 1to2 minutes Turnafter halfthetime.
14
Page 15

IGri!ling TiPsl
With your Jenn-Air, grill literally any food you've considered "at its best" when prepared
outdoors can now be prepared indoors with less fuss and great flavor.
The following suggestions are good rules to follow and will increase your enjoyment of
the equipment.
• Be sure to follow directions on page 13 for using the grill.
• Suggested cooking times and control settings are approximate due to variations
in meats. Experience will quickly indicate cooking times as well as which settings
work best.
• For best results, buy top grade meat. Meat that is at least 3/4inch will grill better
than thinner cuts.
• Score fat on edges of steak, but do not cut into meat, to prevent curling while
cooking.
• Forthe attractive "branded" look on steaks, be sure grill ispreheated. Allow one
side of meat to cook todesired doneness, or untiljuices appear onthe top surface,
before turning. Turn steaks and hamburgers just once. Manipulating food causes
loss ofjuices.
• When basting meats or applying sauces to foods, remember that excessive
amounts wind up inside your grill and do not improve the food flavor. Apply sauces
duringthe last 15to 20 minutesof cooking time unless recipe specifies otherwise.
Plus, any time a sugar-based marinade, (for example, barbecue sauce) is going
to be used, the grates should be "seasoned" prior to preheating. (See p. 13.)
• There are many meat marinades which will help tenderize less expensive cuts of
meat for cooking on the grill.
• Certain foods, such as poultry and non-oilyfish, may need some extra fat. Brush
with oil or melted butter occasionally while grilling.
• Use tongs with long handles or spatulas for turning meats. Do not use forks as
these pierce the meat, allowing juices to be lost.
• To help retain meat juices, salt after turning meat or after cooking is completed.
15
Page 16

Theknobson thecontrolpanelcan beremovedwiththe contro]sintheOFFposition. Pull
each knobstraightfrom the shaft. Wash knobs inwarm soapywater or dishwasher; do
not useabrasive cJeansersor materials. To replaceeach knob,match flat part of knob
opening withthe flat of the shaft, returning in OFFposition.
Important: Never use a metal bladeto pry knob off.
Be surethe grillis coolandcontrols are OFF. These are madefrom cast aluminum and
are coated withthe Excalibur_ nonstick finish.
• After the grill grates have cooled, wipe off grates with a paper towel. Wash cool
grates (DO NOT IMMERSE HOTGRILL GRATES INWATER) with soap or deter-
gent in hotwater in the sink orwash them inthe dishwasher. Be sureto remove all
food residue beforecooking on the grill grates again.
• Remove stubborn spots with a plastic mesh puff or pad. For best results, use only
thosecleaning productswhich state theyare recommendedfor usewhen cleaning
noflstick surfaces.
• If gratesare washedinthedishwasher,seasonwith oilpriortogrilling,
• DonotusemetalbrushesorabrasJvescouringpadsorotherscrubbersJntendedto
clean outdoor charcoal grills. These will remove the finish as well as scratch the
grates. Do not clean in the self.cleaning oven or use oven cleaners on the grates.
ThegrJlfburnershouldbe cleaned aftereach use. It canbe c}eenedwith a soapyS.O.S.
pad or in the dishwasher. Rinse anddry thoroughly before using again. For heavy soil,
burner shouldbecleaned first witha soapy S.O.S. pad,rinsed anddried. Then it can be
cleaned in a self-clean oven for 2 hours.
NOTE: Checkto be sure alJburner ports are open. To open c_oggedports, insert a)
toothpick directly into each port.
16
J
Page 17

[Surface Burner Assembly]
To clean thesurface burnerassembly(surface burnergrates,aerationtray, andsurface
burners).
• Lightsoil - wash in hotsoapywater,rinse and dry.
• Moderate soil- use Comet, BonAmi, a soft scrubcleanser or plasticpuff.
• Heavy soil - for occasional use only, use oven cleaner followingmanufacturer's
directions.
NOTE:
• The porcelain enamel used on your cooktop is acid resistant, not acid proof.
Therefore, acid foods (such as vinegar, tomato, milk, etc.) spilled on the cooktop
should be wiped up immediately with a dry cloth.
• Do NOT use abrasive cleaners, S.O.S. or Brillo pads.
• Remove sugar spills immediately.
• Do NOT clean in a self-clean oven.
• Check to be sure all burner ports are open. To open clogged ports, insert a
toothpick directly into each port.
Although the burner grate is durable, it will gradually lose its shine and/or discolor,
regardless of the care you take of it. This isdue to its exposure to the high temperature
of the gas flame.
To preserve the porcelain enamel finish as long as possible, have a pan on the grate
before you turn on the burner and lower theflame when food reaches the desired cooking
temperature.
• To clean light soil,wipewithsoapy cloth or nonabrasive cleanser, such asSoft Scrub.
Rinse, buff with soft cloth; polish with glass cleaner if necessary.
• To clean moderate soil or discoloration of the surface (excessive heatwill cause a
golden discoloration), clean with Zud, Bar Keepers Friend, or Luneta (Jenn-Air
Model A912, Part No. 712191). With a sponge or cloth, rub cleanser with the grain
to avoid streaking the surface. Rinse well, buff dry; polish with a glass cleaner if
necessary to remove cleanser residue and smudge marks.
• Heavy soil, such as burned on food soil, can be removed by first cleaning as per the
instructions for moderate soil. Stubborn stains can be removed with a damp Scotch-
Brite scour-pad; rubevenly with the grain to avoid streaking the surface. Rinsewell,
buff with dry cloth; polish with glass cleaner ifnecessary to remove cleanser residue
and smudge marks. Scotch-Brite is also useful in buffing and removing minor
scratches.
Note on the control panel:
• Do NOT useabrasivecleaners.
• Do NOT useScotch Britepads.
• Clean with soapy clothor Luneta.
17
Page 18

JIgnitersI
• Itisimportanttokeepigniterportopeningsonburnersclearandfreeofobstructions
to avoid ignitionfailure and possiblegas buildup. If theportopeningsare blocked,
usea toothpickto removefoodparticles.
• The igniter cap and stem can be cleaned with warm soapy water and a plastic
scrubber. Thewireelectrode inside the cap can be cleaned with a small brush. Rinse
and dry.
This area is located under the grilland surface burners andshould be cleaned after each
use of the grill.
• To remove light soil, clean with soapy water or with cleaners such as Fantastic or 409.
For easier cleanup, a) spray with household cleaner; b) cover with papertowels; c)
add small amount of water to keep the paper towel moist; d) cover and wait 15
minutes; e)wipe clean.
• To remove moderate soil, scrub with Comet, BonAmi, a softscrub cleanser orplastic
scrubber.
• To remove stubborn soil, spray withan oven cleaner; let soak overnight; wipe clean;
rinse and dry.
Drain Jar
A drainjar islocatedbelow the grillbasinpan
under the countertop. Check periodically to
prevent spillovers. Unscrew and remove. If
jar is broken,replace with any heat tempered
jar, such as a canning jar, which has a stan-
dard screw neck.
Serial Plate
DO NOT CLEAN.
18
Page 19

Jenn-Air's ventilation system is designed to capture both cooking fumes and smoke
while grilling. If the system does not, these are some ducting installation situations to
check:
• 6" diameter round or 31/4' x 10" rectangular ducting should be used for duct lengths
10'-60'. Note: 5" diameter round ducUng must be used if the duct length is 10'
or less.
• No morethan three900elbowsshouldbeused. Distancebetween elbowsshould
be at least 18".
• RecommendedJenn-Airwallcap shouldbe used. Make suredampermovesfreely
whenventilationsystem isoperating.
• There shouldbe a minimumclearance of 6" forcooktop installednear a side wall.
Ifthereisnotan obviousimproperinstallation,there maybe a concealedproblemsuch
as a pinched joint,obstructionin the pipe, etc. Installationis the responsibili_ of the
installerandquestionsshouldbeaddressedfirstbythe installer.The installershouldvery
carefullycheck theducting installationinstructions.
19
Page 20

Check the following list to be sure a service call is really necessary.
If grill or surface burner fails to light:
• checkto be sure unit is properlyconnectedto powersupply,
• checkfora blowncircuit fuse or a tripped maincircuit breaker.
• checkto be sure burneris correctly ratedfor yourtypeofgas.
• checkto be sure burnerports or ignition portsare not clogged.
• checkto be sure igniteris clicking. If igniterdoesn'tclick,turn controlknoboff.
• checkto be sure regulatorisset for correctfuel.
• checkto be sure inletpressureis adequate.
If the flame is uneven:
• burnerportsmaybeclogged.
• flamesettingmay needto be adjusted. (See p. 9.)
If grill or surface burner flame lifts off the ports:
• shutteronthemixertubeneedsto becloseduntilflamesettlesontheburner
ports. (See pp.8-9.)
If grill or surface burner flame is yellow in color:
• shutteronthemixertubeneedstobeopeneduntilyellowdisappears.(Seepp.8-
9.)
ff YOU Need Service:_i. _;i - . : -,":_ i'.___::
• callthedealerfromwhomyourappliancewaspurchasedottheauthorizedJenn-
Air Service Contractorlistedin the_YellowPages_Yout:Jehn_Air Service
Contractorcan providebetter,andfasterserviceif you:canaccuratelydescribe
problemsandgivemodelandsedalnumberof the.appliance,Be suretoretain
proofof purchase_toverify warr...a_.ty:status, Referto WARRANTY forfurther
information ofowner'srespohs_ilitiesforwarranty_:service.!_::_-_i'i. . _ " ,- ' ..
• ifthedealeror servicecompanycannotresolve,theptoblern,wdtetoJenn-Air
.CustomerAssistance,c/oMaytagCustomerService._P,OiBox2370,,Cleveland,
TN 37320-2370,1-800-688-1100(U.S.-andontado) or.-423_47.2-3333.
• useandcaremanuals,servicemanuals,andpartscatalogsare availablefrom
Jenn-AirCustomerAssistance,c/o MaytagCustomerService,
All specificationssubjecttochangebymanufacturerwithoutnotice.
r , i , B q i
2O
Page 21

Model Number
Serial Number
Date
JENN-AIR DEALER FROM WHOM PURCHASED
Address
City
Phone
AUTHORIZED JENN-AIR SERVICE CONTRACTOR
Address
City
Phone
Important: Retain proof of purchase documents for warranty service.
21
Page 22

22
Page 23

Griddle - Model AG302 r_'_',_
Self-draininggriddlemakesmanyfavorite
foodseasiertofix. Family-sizedsurface
lets you cook several pancakes,ham-
burgers,orgrilledsandwichesatthesame
time. _-.--.' _-------'
Wok - Model AO142 _ _..._ _/_
Ideal for stir-frying,steaming,braising,
and stewing. Wok has nonstickfinish,
woodhandles,cover,steamingrack,rice
paddlesandcookingtips.
Surface Burner Module - Model AG202
Includessurface burnerassembly,aera-
tiontray,and two blacksurface burner
grates.
Grill Cover - Model AG341
Attractivegrillcoverprotectsgrillwhennot
inuse.Texturedsteelwithmoldedhandles.
NOTE: Onlytheseaccessoriesareapprovedforusewithyourgasgrill-range.DO I
NOTUSEJenn-Airelectricgrill-rangeaccessoriesonyourgasgrill-range.
23
I
 Loading...