

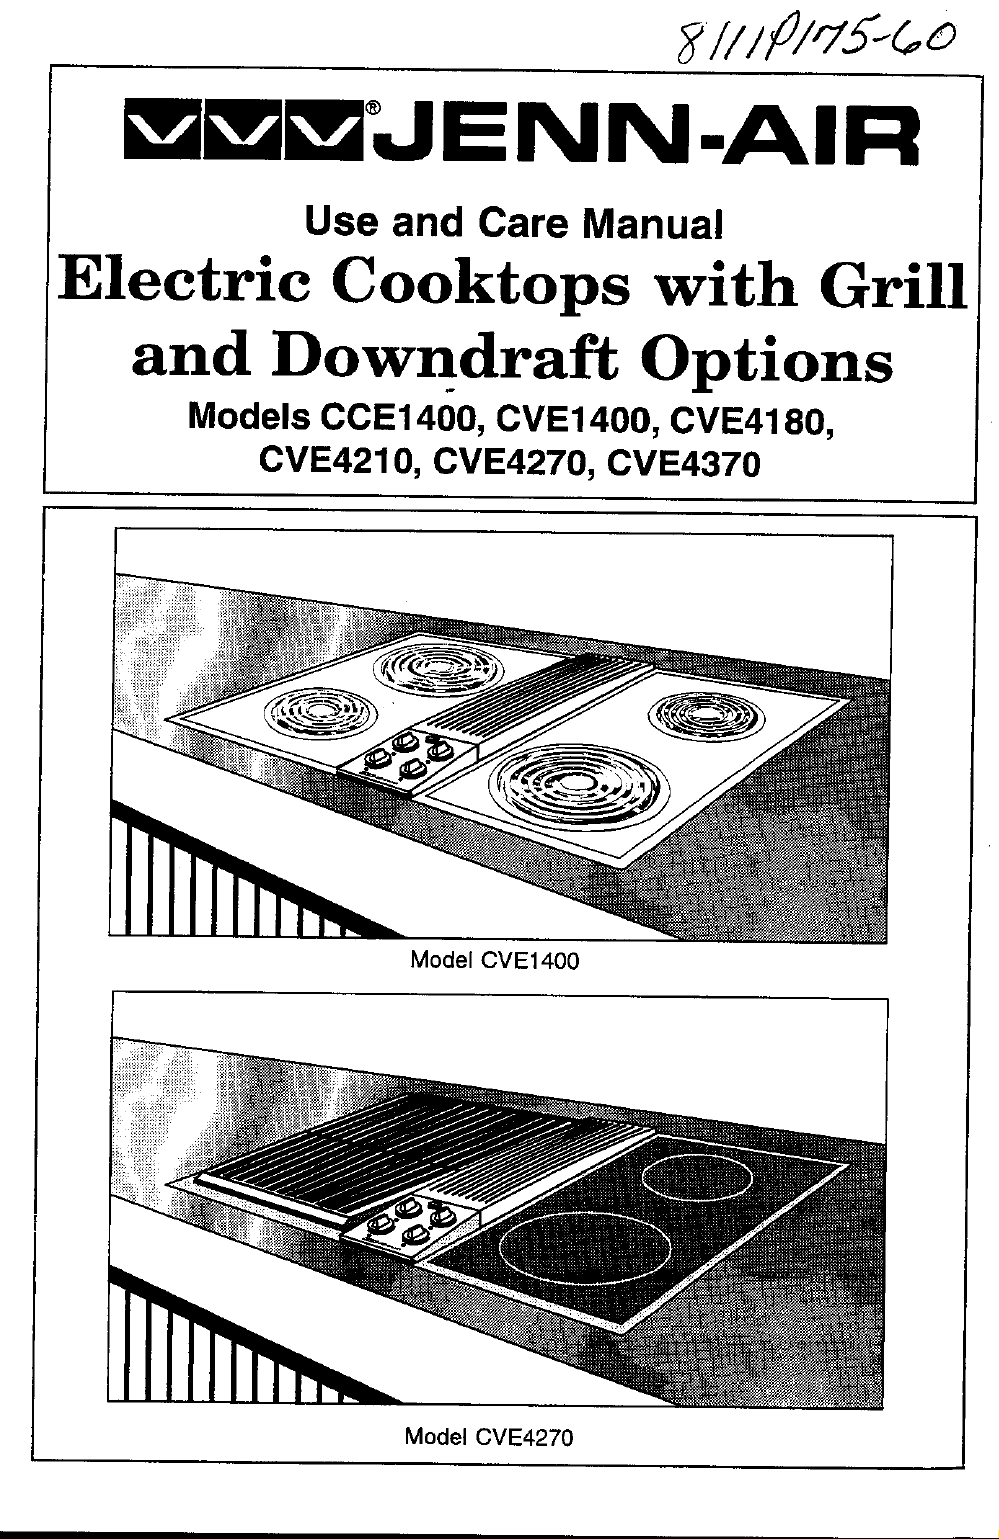
Page 1
Page 2
_iii_¸i!/_! !
Read before operating your cooktop
All appliances - regardless of the manufacturer- have the potentialthrough
improperor careless use to create safety problems. Therefore the following
safetyprecautionsshouldbe observed:
1. Be sureyourapplianceis properlyinstalledand groundedby a qualified
technician.
2. Never useyour appliancefor warmingorheatingthe room.
3. Childrenshouldnotbeleftaloneorunattendedinareawhere applianceis
in use. They shouldnever be allowedto sit or standon any part of the
appliance.
4. Wear properapparel. Loose-fittingor hanginggarmentsshouldneverbe
wornwhileusingtheappliance.
5. Do not repair or replace any part of the appliance unless specifically
recommendedinthismanual. Allotherservicingshouldbe referredto an
authorizedJenn-AirService Contractor.
6. Flammablematerialsshouldnotbe storednear surfaceunits.
7. Donotusewaterongreasefires. Smotherfireorflameorusedrychemicai
or foam-type extinguisher.
8. Use onlydry potholders. Moistordamp potholderson hotsurfacesmay
resultinburnsfromsteam. Donotletpotholdertouchhotheatingelements.
Do notusea towel or other bulkycloth.
9. Use proper pan size. Many appliances are equippedwith one or more
surface unitsofdifferentsize. Selectcookwarehavingflat bottomslarge
enoughtocoverthesurface unitheatingelement. Theuse ofundersized
cookwarewillexposea portionoftheheatingelementtodirectcontactand
may resultinignitionofclothing.Properrelationshipofcookwaretoheating
elementwillalso improveefficiencyand performance.
10. Never leave surface units unattended at high heat settings. Boil over
causes smokingand greasyspilloversthatmay ignite.
11. Onconventionalelementcooktopsmakesurethat drippans are inplace.
Absence ofthese pansduringcookingmay subjectwiringorcomponents
underneathto damage.
12. Do not use aluminumfoil to line surface unit drip pans or grillbasin.
Installationof these linersmay resultinan electricshock orfire hazard.
13. Glazed cookware - only certain types of glass, glass-ceramic,ceramic,
earthenware, or other glazed cookwareare suitablefor cooktopsurface
withoutbreakingduetothesuddenchangeintemperature. Useonlysuch
cookwareas you knowhasbeen approvedfor thispurpose.
2
Page 3
14. Cookwarehandlesshouldbe turned inwardand notextendoveradjacent
surface heatingelementsto avoid burns,ignitionof flammablematerials
and spillagedue to unintentionalcontactwiththe cookware.
15. Do notsoakor immerseremovableheatingelementsin water.
16. CAUTION - Do not store itemsof interestto childrenin cabinetsabove
cooktop-childrenclimbingonthecooktoptoreachitemscouldbeseriously
injured.
17. Do nottouchsurface unitsor areas near units. Surface unitsor heating
elements may be hoteven though they are dark in color. Areas near
surface unitsmaybecome hot enoughto cause burns. Duringand after
use,donottouchorletclothingorotherflammablematerialscontactthese
areas untilthey have had sufficienttime to cool. Other surfaces may
become hot enoughto cause burns - among these surfaces are the
cooktop.
18. Do notcook on glass-ceramiccookingsurface if the cooktopis broken.
Cleaningsolutionsand spilloversmay penetratethe brokencooktopand
createa shockhazard.ContactanauthorizedJenn-AirServiceContractor.
19. Cleanglass-ceramiccooktopswithcaution. If wetspongeor clothisused
towipespillsona hotcookingarea, becarefultoavoidsteamburns.Some
cleanserscan produce noxiousfumes if applied to a hot surface.
20. Donotoperatewithdamagedcookingelementafter anyproductmalfunc-
tionuntilproperrepairhas been made.
21. Keep allswitches"OFF" when unitisnot in use.
22. Cleanonlypartslistedinthismanualand useproceduresrecommended.
23. Thisappliancehasbeen testedfor safe performance usingconventional
cookware. Donotuseany devicesoraccessoriesthatare notspecifically
recommendedinthismanual.Donotuseeyelidcoversforthesurfaceunits
orstovetopgrills. The useof devicesoraccessoriesthat arenotexpressly
recommendedinthismanualcan create serioussafety hazards, resultin
performance problems, and reduce the life of the componentsof the
appliance.
- SAVETHESE INSTRUCTIONS -
3
Page 4
Congratulationson your choice of a Jenn-Airelectriccooktop. The chart belowde-
scribesthe differencesbetween models.
Model# Downdraft Convertible Grill/Elements included
CCE1400 no no 4 coilelements
CVE1400 yes no 4 coil elements
CVE4180 yes left bay 1grill, 2 coil elements
CVE 4210 yes 2 bays none
CVE4270 yes 2 bays 1grill
CVE4370 yes 3 bays 1 grill
Beforeyou begin cookingwithyour new cooktop, please take a few minutesto read
and becomefamiliar withthe instructionsin this book. On the followingpages you will
find a wealth of information regardingall aspects of using your new cooktop. By
followingtheinstructionscarefully,youwill be able tofullyenjoyand properlymaintain
yourcooktopand achieveexcellentresultswiththefood you prepare.
Shouldyou have any questionsaboutusingyourJenn-Aircooktoporneed a use and
care manualfor your cooktop cartridge,write to us at Jenn-Air Customer Assis-
tance, c/o Maytag Customer Service, P.O. Box 2370, Cleveland, TN U.S.A. 37320-
2370. Be sure to providethe model numberfor the manualrequested.
=.
Accessories ...................... Installing ................................................................... 12
Optional ................................................................... 20
Cartridges ........................ Installing ........... :......................................................... 7
Optional ................................................................... 21
Cleaning ........................... Cooktop Parts .................................................... 17-18
Grill........................................................................... 16
ConventionalCdil Cooktop........................................................................... 10-11
Cookwsre ......................... General ............................................................ 8-9, 10
Canning ................................................................ 9,11
Ducting................................................................................................................ 19
Grill .................................. Cleaning................................................................... 16
Grill Guide................................................................ 14
GrillingTips.............................................................. 15
Installing................................................................... 12
Usage ...................................................................... 13
Safety Precautions........................................................................................... 2-3
Service Information............................................................................................. 22
Surface Controls................................................................................................... 6
VentilationSystem................................................................................................ 5
4
Page 5

The built-inventilationsystem removescookingvapors,odors and smoke from foods
prepared on the cooktop, grill and grill accessories. Regular use of this system will
insure a more comfortable and less humid kitchen which is free of heavy cooking
odors and fumes that normally create a frequent need for cleaning and redecorating.
I Using the Ventilation System I
• Tooperate theventilationsystem manually, pushthe switch locatedinfrontof the
air grille.If you pushon the left side of the switch,the fan will operateat the Lo
speed. If you pushon the rightside of the switch,the fan willoperate at the Hi
speed. To turn the fan off, the switchshouldbe returnedto the middle (level)
position.
• The ventilationsystemwill operateautomatically whenthe grillelementis in use.
DuringgdllJng,thefan speedis automaticallyset forthe Hi settingAND cannotbe
changedto Lo speed.
• Use Hi fan speed for capturingsteam. Use Lo fan speed for capturingsmoke
when pan frying.
• Thefan can be usedto removestrongodorsfromthe kitchenas when chopping
onionsnearthe fan.
controlthat mayturnonthedowndraftfan when largecookpotsare used
for extendedperiodson the largeelements. The fan will shut offwhen
the cooktophascooled down. (See p. 10.)
I NOTE CVE1400 OWNERS: Thecooktopis designedwith an automatic
I Cleaning the Ventilation System I
Air Grille: The airgrilleliftsoffeasily. Wipe cleanorwashinsinkwithmildhousehold
detergents. May be cleaned indishwasher.
Filter: Turnoffventilationsystembeforeremoving.Turnfilter
, retainer clipto removefilter.Thefilter isa permanent type and
should be cleaned when soiled. Clean insinkwithwarm water
IMPORTANT: DO NOT OPERATE SYSTEM WITHOUT
and liquid dishwashing detergent or in dishwasher.
FILTER. Filter shouldalways be placed at an angle. As you
face the front of the cooktop, the top of the filter should rest
against the left side of the vent opening and the bottom of the
filter should rest against the right side of the vent chamber at
the bottom. (NOTE: Iffilter isflat against the fanwall, ventilation
effectiveness is reduced.)
Ventilation Chamber: This area, which houses the filter,
shouldbe cleanedintheeventof spillsorwheneverit becomes
...........................................coatedwitha film ofgrease.The ventilationchamber maybe
cleaned with paper towel, damp cloth, or spongeand with a
mild householddetergentor cleanser.
5
Page 6
The infinite surface controls provide flexibility insetting selection when using the cook-
top or grill.
JTo Set Controls J
• Since the controls are a push-turn type, they must be pushed down before turn-
ing. To set (from the OFF position), push down on control knob and turn in either
direction to desired setting.
• When the control is in any position, other than OFF, it may be turned in any direc-
tion without pushing down.
• The red light bar (in front of the control knob area) will glow when any control knob
is ON.
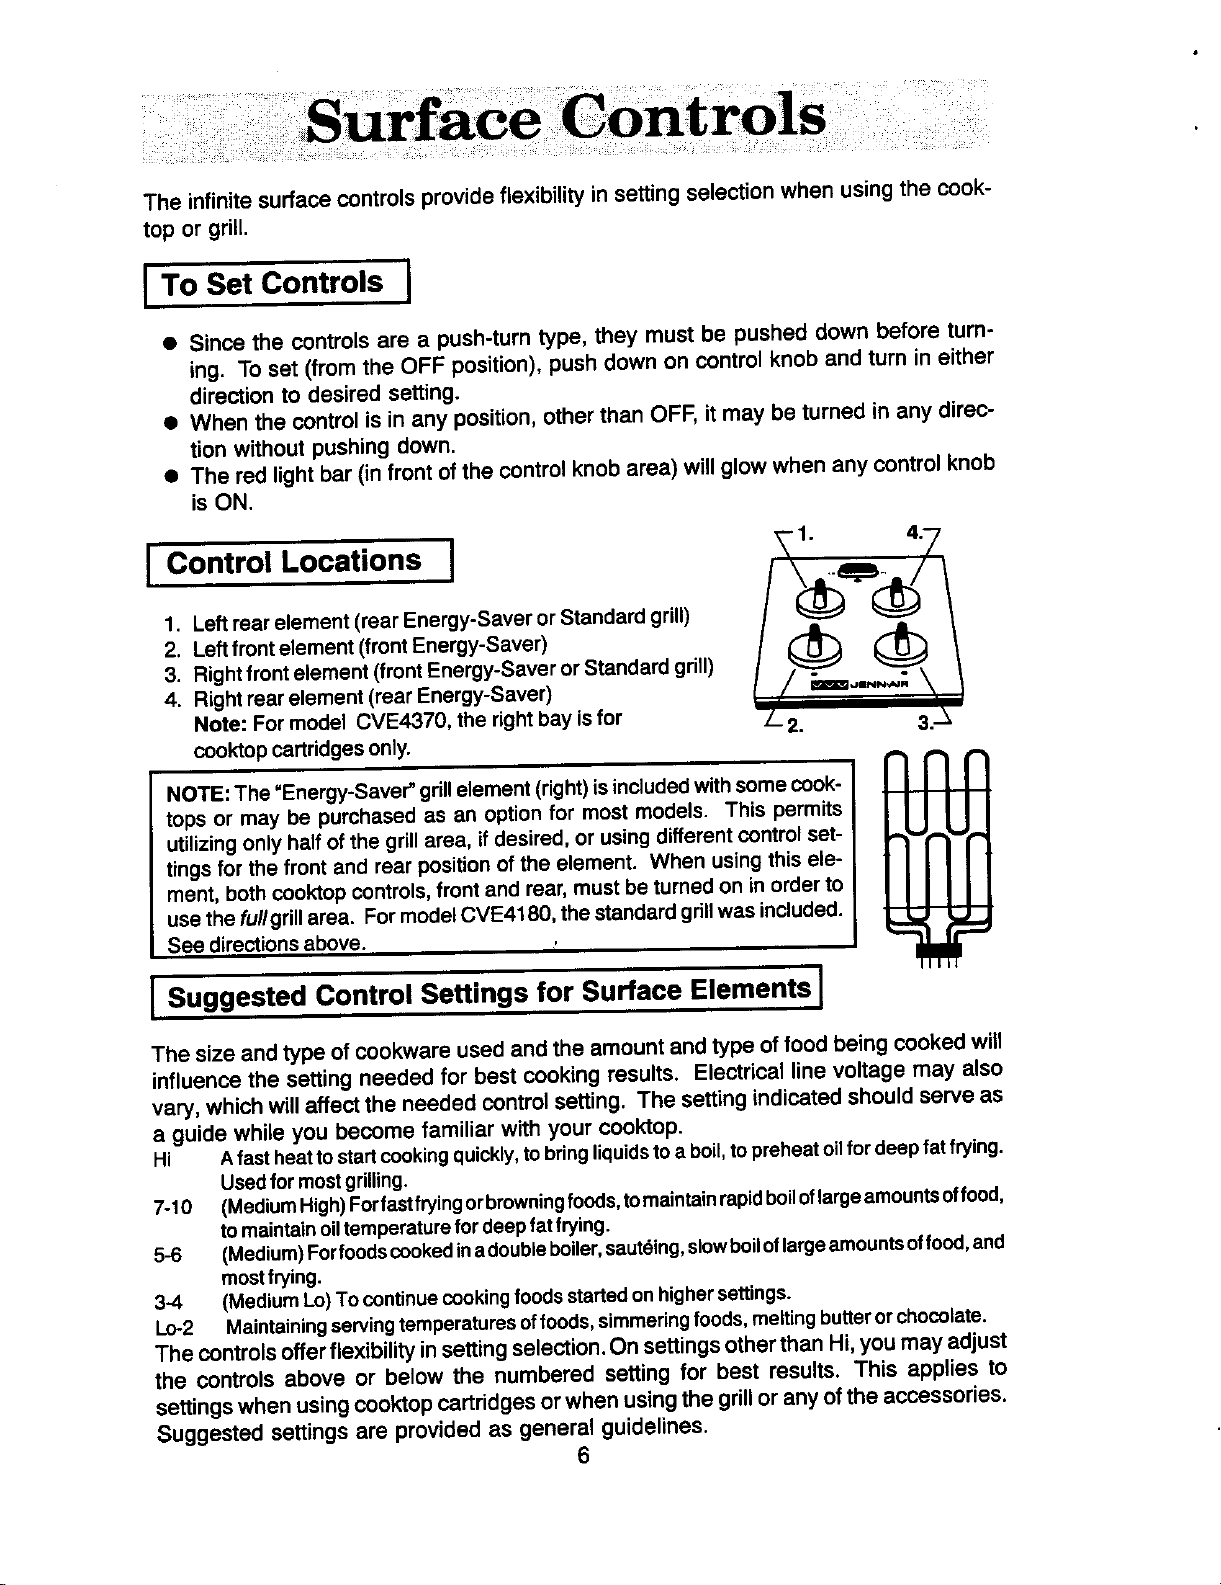
I Control Location s j _1. 4.7
3. Rightfrontelement (frontEnergy-SaverorStandardgrill)
1, Leftrearelement(rearEnergy-SaverorStandardgrill) /\_i_ I2. Leftfrontelement(frontEnergy-Saver) //I_ _
4, Rightrear element (rear Energy-Saver) _ _"
Note: For model CVE4370, the rightbay isfor / 2. 3.-_
cooktopcartridgesonly. ,- . ,-
NOTE: The =Energy-Saver"grillelement(right)isincludedwithsome cook-
tops or may be purchased as an optionfor most models. This permits I
utilizingonly half of the grill area, if desired, or usingdifferent controlset- ,. -...- - ,.
tingsfor the front and rearposition ofthe element. When using thisele-
ment, both cooktopcontrols,front and rear, must be turned on in orderto I
usethe fullgrill area. For model CVE4180, thestandardgrillwas included.
See directions above. , _ _"
I I
-I---
I
I"q-FF
JSuggested ControlSettings for SurfaceElementsI
The size and type of cookware used and the amount and type of food being cooked will
influence the setting needed for best cooking results. Electrical line voltage may also
vary, which will affect the needed control setting. The setting indicated should serve as
a guide while you become familiar with your cooktop.
Hi Afastheattostartcookingquickly,to bringliquidstoa boil,topreheatoilfordeepfatfrying.
Usedformostgrilling.
7-10 (MediumHigh)Forfastfryingorbrowningfoods,tomaintainrapidboiloflargeamountsoffood,
tomaintainoiltemperaturefordeepfatfrying.
5-6 (Medium)Forfoodscookedinadoubleboiler,saut6ing,slowboiloflargeamountsoffood,and
mostfrying.
3-4 (MediumLo)Tocontinuecookingfoodsstartedonhighersettings.
Lc-2 Maintainingservingtemperaturesoffoods,simmeringfoods,meltingbutterorchocolate.
The controlsoffer flexibility in setting selection, Onsettings otherthan Hi,you may adjust
the controls above or below the numbered setting for best results. This applies to
settings when usingcooktop cartridges or when using the grillor any of the accessories.
Suggested settings are provided as general guidelines.
6
Page 7
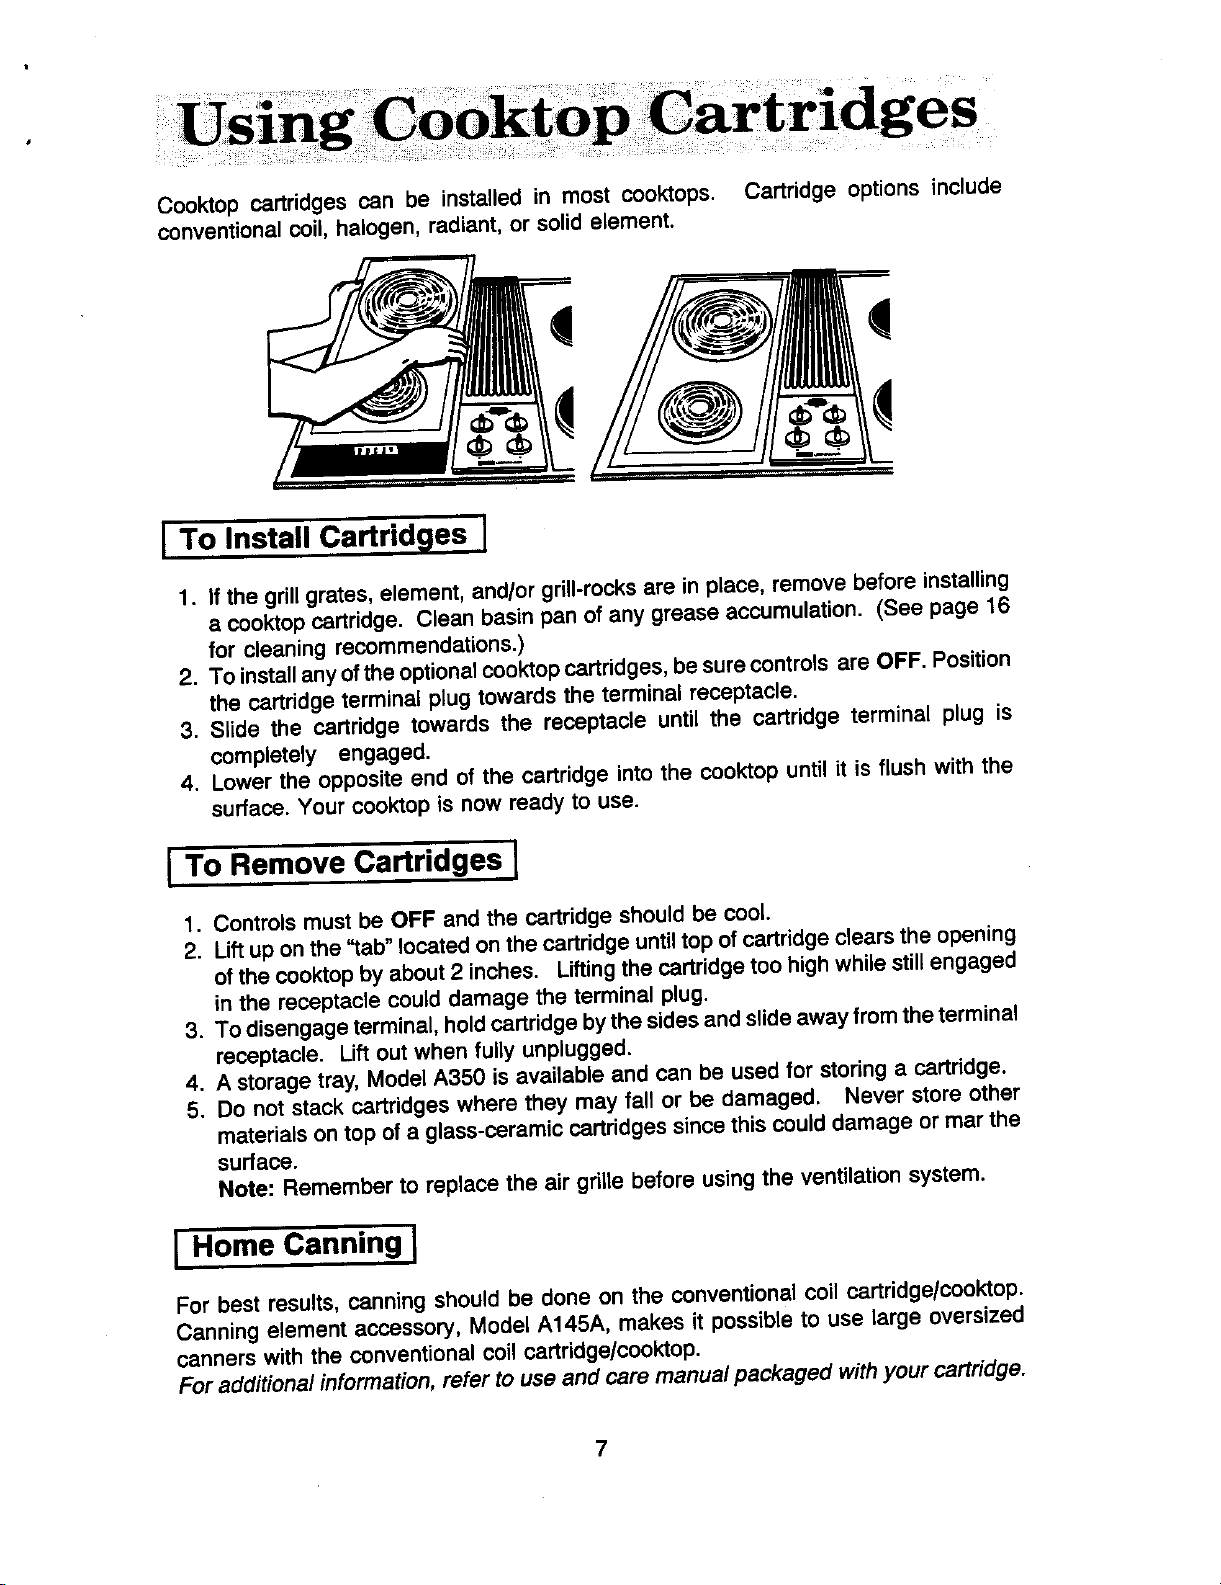
I
Cooktop cartridges can be installed in most cooktops. Cartridge options include
conventionalcoil, halogen,radiant,orsolidelement.
1. If the grillgrates,element,and/orgrill-rocksare in place, remove beforeinstalling
a cooktopcartridge. Clean basinpan of any greaseaccumulation. (See page16
for cleaningrecommendations.)
2. To installanyoftheoptionalcooktopcartridges,be surecontrols are OFF. Position
the cartridge terminalplugtowardsthe terminalreceptacle.
3. Slide the cartridge towardsthe receptacle until the cartridge terminal plug is
completely engaged.
4. Lowerthe oppositeend of the cartridgeintothe cooktopuntilit isflush with the
surface.Your cooktopis now ready to use.
I To Remove Cartridges I
1, Controlsmustbe OFF andthe cartridge shouldbe cool
2. Liftuponthe"tab"locatedonthecartridgeuntiltop ofcartridgeclearsthe opening
ofthecooktopby about2 inches, Liftingthe cartridgetoohighwhilestillengaged
in the receptaclecoulddamage the terminalplug.
3. To disengageterminal,holdcartridge bythesidesandslideaway fromtheterminal
receptacle. Lift out when fully unplugged.
4. A storagetray,ModelA350 is availableand can be used forstoringa cartridge.
5. Do notstackcartridgeswhere they may fall or be damaged. Never store other
materialsontopofa glass-ceramiccartridgessincethiscoulddamageormarthe
surface.
Note: Rememberto replacethe air gdlle before usingthe ventilationsystem.
For best results,canningshouldbe done on the conventionalcoilcartridge/cooktop.
Canningelement accessory,Model A145A, makes it possibleto use large oversized
cannerswiththe conventionalcoil cartridge/cooktop.
For additiona/ information, refer to useand care manua/ packaged withyour cartridge.
Page 8

To achieve optimum cooking performance, use heavy gauge, f/at, smooth bottom
cookpotsthatconformtothediameteroftheelement (nomorethanoneinchoverhang).
Propercookpotswillminimizecookingtimes,uselesselectricity,cookfoodmoreevenly
and requirelesswater or oil.
Cookpotswiththin,unevenbottomsdonot adequatelyconductheatfrom the element
tothefoodinthecookpotswhichresultsinhotspots,burnedor underdonefood. Using
bad cookpotsalsorequiresmorewater, time, and energyto cookfood.
I Selecting Proper Cookware I
• Select heavy gauge cookpots. Usually heavy gauge cookpots will not change
shapewhen heated.
• Use cookpots with flat, smooth bottoms. Thetwowaystodetermineifcookpots
havea flat, smoothbottomare the rulertest and the cookingtest.
I RulerTest: I
1. Place the edge of ruler acrossthe --
bottom of the pot. i.,._.,.,.,
2. Holdupto the light.
3. No lightshould be visible under the
ruler.
I Cooking Test: I
1. Put 1 inch of water intothe cookpot.
2. Place cookpot on the element. Turn
controlto the HI setting.
3. Observethebubbleformationtodeterminetheheatdistribution.Ifthe bubblesare
uniformacrossthe cookpot,thecookpotwillperformsatisfactorily.If the bubbles
are notuniform,the bubbleswillindicatethe hotspots.
• Match the size of the cookpot to the size of the element. Ideally,the cookpot
willbe the same size or slightlylarger.
8
Page 9

I Improper Cookware J
• Do not use cookware that extends more than 1 inch beyondthe edge of the
element.
• Donotuseasmall cookpotona largeelement.Notonlycan thiscausetheelement
torequiremoreenergyandtime, butitcanalso resultinspilloversburningontothe
elementwhichcauseextra effort in cleaning.
• Do not use nonflatspecialty itemsthat are oversized,uneven or do not meet
propercookwarespecificationssuch as roundbottomwokswithrings, griddles,
rippledbottom canners,lobsterpots, largepressurecanners, etc.
[ Home Canning I
Acceptable canning pots should not be oversized and musthave a flat bottom. Note:
Canning element accessory, A145A, makes it possibleto use large oversized, flanged
or rippled bottom canners. (See p 11.) When canners do not meet these standards, the
use of the HIheat setting becomesexcessive and may result in damage to the cooktop.
Inaddition, water may not come to a boil and canners may not reach 10 lb. of pressure.
The acceptable canning procedure uses the HI setting just long enough to bring the
water to a boil, then lower the setting to maintain the water temperature.
I Characteristics of Cookware Materials I
Heavy gauge cookpotswith flat, smoothbottoms will usuallywork in a similarway.
However,there are somedifferencesinthe cookingperformanceofvariousmaterials.
• Aluminum cookpotsheatquicklyand evenly. Bestsuitedforsimmering,braising,
boiling and frying.
• Stainless steel cookpots will evenly distribute heat if constructed of tri-ply or
combined with other metals such as aluminum and copper. Use for cooking
functions similar to aluminum.
• Cast iron cookpots are slow to heat but cook more evenly once temperature is
reached. Use for long term low heat cooking or for browning and frying.
• Glass ceramic, earthenware, heat-proof glass or glazed cookpots can be used if
recommended by the manufacturer for cookpot cooking. Do not use with trivets.
Best used on low to medium control settings.
• Porcelain enamel-on-steel or porcelain enamel-on-cast iron should be used
accordingto manufacturer'sdirections. Do not allowto boildry.
Page 10

• For best results,always userecommendedcookware.
• Differentcookpotsand differentamountsoffoodbeing preparedwillinfluencethe
controlsettingsneededfor bestresults. Forfastestcooking,startwiththe surface
controlon Hi for one minute;then turnthe controlto the lower desiredsetting.
Coveringpans, wheneverpossible,speedscookingand is more energyefficient.
• Donotallowpansto boildry as thiscoulddamage boththe cooktopand the pan.
• Donotdropheavy cookwareon the cooktopsurface.
I Selecting Proper Cookware I
• Select cookware with flat bottoms. Flat bottom pans are the fastest and best
conductorsof heat and providethemostconsistentand satisfactoryresults. The
entirebottomofthepanshouldtouchtheheatingelementevenly, Avoidusingpans
withconvex,concaveorirregularbottoms.Apanwhichisnotfiatreceivesthemost
heat atthe pointof contact,whichcauses "hotspots"andunevenheatdistribution.
Hotspotscanresultinscorchingor burningofthe food. Unevenheat distribution
slowsthe cookingprocessandwastesenergy.
• To determineif panisflat, laya straightedge ruleragainstthe bottom. (See p.8)
• Do notusea panwitha turneddownflangearoundthebottomora ripplebottom.
• Donotusea pansthatextendmorethan 1inchon eithersideofthe element. Use
thecorrectsizepanforthesizeoftheheatingelement. (Seeexceptionsforcanners
and stockpotsbelow.)
• Do not use wire trivetsor any kind of heat retardingpad betweenthe pan and
element. Reduce the controlsetting instead.
• Specialcookingequipmentwithoutflatbottoms,suchas the Orientalwok,should
not be used on the cooktop. Use the Jenn-Air wok accessory, Mode/A0142, on
the cooktop. It has a flat bottomand isdesignedto be usedonthe smallelement.
• Large stockpotsand canners should be used with Jenn-Air's "Big-pot"canning
elementonly(ModelA145A). The use oflarge pansonthe largeelementon Hi for
extendedperiodsof timecan causedamageto the cooktop,discolorchromedrip
pans,shortenthelifeofthe element,aswellastrapexcessheatinsidethecooktop.
NOTE:CCE1400OWNERS:Sustainedtrappedheatcancausethelargeelements
tocycleoff.Elementswillcyclebackonafterthecooktophascooleddown.
CVE1400OWNERS:Sustainedtrappedheatcancausethedowndraftfantocycle
on. Downdrafffanwillc)/cleoffafterthecooktophascooleddown.
J Large Stockpots or Canners J
Canning element accessory, Model
A145A,makesitpossibleto uselarge
oversized flanged or rippled bottom
ca.nners. RIGHT
L J
i i
10
Page 11

I Follow These ProceduresWhen Canning J
• BringwatertoboilatHi setting;after boilinghas begun,reduceheatto lowestsetting
thatwillmaintainboiling.
• Make certaincannerfits overcenterof surfaceunit.
• Flat-bottomedcannersgivethe best canningresults.
• Use canningrecipesfrom a reputablesourcesuchas the manufacturerof your
canner and manufacturersof canningjars.
• Rememberthat canning is a processthat createslarge amountsof steam. Be
carefulandfollowequipmentinstructionstoavoidburnsfromsteamorhotcanners.
• Rememberthatifyourareahaslowvoltageattimes,canningmaytake longerthan
indicatedbythe directions.
I Cleaning the Conventional Coil Cooklop I
Be sure all control knobs are in the OFF position beforecleaningor removingheating
elements.
Neverimmerse cartridgein waterto clean. Thiscandamagewiring.Adrainholewithin
the cartridgepermitsdrainageofnormalspillsintothe porcelainbasinpanwhere itwill
drainintothegreasecontainer.Bottomofcartridgemaybewipedcleanwithdetergent
solutionif necessary.
I Heating ElementsI
Undernormal conditions, mostsoilwillburnoffelements. The heatingelementsunplug
foryourconvenienceincleaningthedrippans. Liftthe elementsslightlyandpullaway
fromreceptacle. DO NOT IMMERSE ELEMENTS IN WATER. To replace elements,
pushcompletelyintothe receptacle. Make surethe elementsfit flat.
I Drip Pans I
Tokeepthelike-newappearance,olden freouent/v and never allow an_vthinato burn on
twice. Remove soiledpans by first removingcooledheatingelement.
• For light to moderate soil: Clean by wipingwith soapy dishclothor Cooktop
CleaningCreme (Part No.20000001) and spongeor cleanin dishwasher. Rinse
and dry,
• To loosen baked on soils: Place drippansin panwith 2 quartsof water and boil
for 20 minutes. Remember,all drip pans cannotbe boiledat once because ele-
mentbeing used must have a drip pan in place.
• For stubborn stains:RublightlywithsoapyS.O.S. padsor nonabrasivecleansers.
Note on Chrome Drip Pans: Do notuse abrasivecleansers,steel wool orcleansers
not recommendedfor use on chrome. A bluingof the drip pans indicatesimproper
cookwareselectionand/or usingexcessivelyhighheat and cannot be removed.
Note on Porcelain Drip Pans: For extremely stubbornstains,use an oven cleaner.
Allow to sit overnight,then rinse. CAUTION: When usingan oven cleaner, avoid
sprayingotherareas.
11
Page 12

The grillaccessoryconsistsoftwo black grillgrates,a grillelement and two grill-rocks.
/lllllll/liliJ
I To Install Grill I
1. Before installinggrillcomponents,be certainsurface controlsare OFF.
2. Placethetwo grill-rocksintoanempty basinpanwiththeirhandlesrunningparallel
to the frontofthe cooktop. These grill-rocksmustbe usedsince theysupportthe
grillelement.
3. Positionthe grill elementwith the terminal plug towardsthe terminalreceptacle.
Slide the element towards the receptacle until the terminal plug is completely
engaged.The grillelementshouldrestonthe handlesof the grill-rocks.
4. Place the black grillgratesonthe top ofthe cooktop.
Note: The cookingbayon the extreme rightof Model CVE4370 acceptscooktop
cartridgesonly.
I To Remove Grill I
1. Removegrillcomponentsonce they are cool. Besure controlsare OFF.
2. To removegrillelement, pullaway from receptacle untilit is unplugged. (Note:
Liftingtheelementtoo highwhilestillengagedin the receptaclecoulddamagethe
terminalplug.)
3. A storagetray,ModelA350, is availableforpurchaseand can be usedforstoring
the grill assembly.
I Installing Other Accessories I
1. Remove the two black grill grates fromthe grill. Now you are readyto use the
optionalgrillaccessories.
2. Reviewthe instructionsfor installingand usingthe accessoriesthatare packaged
withthe accessory.
12
Page 13

¢
I Using the Grill I
• Before the first use, wash your new grill grates in hot soapy water, rinse and dry.
Then "season"the surface by wipingon a thin coatingof cookingoil. Remove
excessoil by wipingagain with anotherpapertowel. This procedureshouldbe
repeatedwhen either: a) cleaningin the dishwashersince the detergent may
removeseasoning,orb)anytimeasurgar-basedmarinade(forexample,barbecue
sauce)isgoingto be used.
• Preheatthe grillonHi for5 minutes. Preheatingimprovestheflavor, appearance
ofmeats andquicklysearsthemeatto helpretainthejuices. The heatingelement
shouldglowa brightcherryred.
• Use nonmetallic spatulas or utensils toprevent damaging the Excalibur ®nonstick
grill grate finish.
• Excessive amounts of fat should be trimmed from meats. Only a normalamount
is necessary to producethe smoke needed for that smoked, =outdoor"flavor.
Excessivefat cancreate cleaningand flare-upproblems.
• Allowing excessive amounts of grease or drippings to constantly flame voids the
warranty on thegrill grates. Excessiveflare-upsindicatethateitherthegrillinterior
needsto be cleanedorthat excessiveamountsoffat are inthe meator the meat
was notproperlytrimmed.
• Grease drippingswilloccasionallyigniteto produceharmlesspuffsofflame for a
secondortwo. This is a normalpartofthe cookingprocess.
• NEVER LEAVE GRILL UNA'I-rENDED DURING GRILL OPERATION.
I Should excess grease cause sustained flare-up I
1. Turn on Fan manually.
2. Immediately turn grill control(s)OFF.
3. Remove meat from grill.
IMPORTANT
• Do not use aluminumfoil insidethe grillarea.
• Do not use charcoalorwoodchipsin the grillarea.
• Do not allowgrill-rocksto become overloadedwith grease. Clean frequently.
• Do not covergratescompletelywithmeat. Leave airspace between each steak,
etc. toallow properventilationas well as preventflare-ups.
13
Page 14

JGrill Guide I
Preheat grill on Hi, 5 minutes, for best flavor.
Type Setting Cooking Time Procedure
Steak(1/2- 3/4")
Rare Hi gto12minutes Turnafter5to 6 minutes.
Medium Hi 12 to 19minutes Tumafter6 to9 minutes.
Well Hi 16to 23 minutes Tumafter8to 11 minutes.
Steak(1 - 1 1/4")
Rare Hi 10to17minutes "rumafter5to8 minutes.
Medium Hi 19to26 minutes Turnafter9to 12 minutes.
Well Hi 24to 32 minutes Turnafter12to 16 minutes.
Hamburgers(3-4oz.) 10 15to25 minutes Tumafterhalfthetime.
PorkChops(1/2-3/4") 10 30 to40 minutes Turnoccasionally.
Fully-cooked
SmokedPorkChops Hi 10to15 minutes Turnonce.
HamSlices(1/2") 10 15 to20 minutes Turnonce.
Fully-cookedsausages
HotDogs Hi 5to10 minutes Turnoccasionally.
Polish Hi 10to20minutes Turnonce.
FreshSausage
l.inks 10 10to 15 minutes Turnoccasionally.
Patties(21/2"
diameter) 10 15to20 minutes Tum occasionally.
ItalianSausage 10 25 to35 minutes Piercecasingwithafork.
Turnonce.
LambChops 10 25to35 minutes Tum occasionally.Brushwith
glaze,ifdesired.
Chicken
BonelessBreasts 10 25to35 minutes Turnoccasionally.
Bone-in 10 45to60 minutes Turn occasionally.Brush
withmarinadeorglazeduring
last10minutes.
Fish
Steaks(1") 10 20to 30 minutes Brushwithbutter. Turnafter half
thetime,
Fillets(1/2") 10 10tot5 minutes Start skinsidedown. Brush
(withskinon) withbutter. Turn after half
thetime.
Shrimp 10 8to12 minutes Tum andbrushwithbutteror
(skewered) marinadefrequently.
GarlicBread Hi 2to4 minutes Turnafterhalfthetime.
HotDogBuns
HamburgerBuns 10 2to3 minutes
Note: Thischartisa suggestedguide.Cookingtimesandcontrolsettingsareapproximatedue
tovariationsinmeatsandvoltage.
14
Page 15

JGrilling Tips I
With yourJenn-Airgrillandaccessories,literallyanyfoodyou'veconsidered"atitsbest"
whenpreparedoutdoorscannow be preparedindoorswithlessfuss and greatflavor.
The followingsuggestionsaregoodrulestofollowand willincreaseyourenjoymentof
the equipment.
• Be suretofollowdirectionson page 13 for usingthe grill.
• Suggestedcookingtimesandcontrolsettingsare approximateduetovariationsin
meatsandelectricalvoltage. Experiencewillquicklyindicatecookingtimesaswell
as whichsettingswork best.
• Use the Energy-Savergrillelementforgrillingsmallamountsoffoodonhalfofthe
gdllorforkeepingcookedfoodswarm or preparingfood requiringdifferentcontrol
settings.
• Forbest results,buytop grademeat. Meat thatis at least 3/4 inchwillgrillbetter
than thinnercuts.
• Score fat on edges of steak, but do not cut into meat, to preventcurlingwhite
cooking.
• Forthe attractive=branded"tookon steaks,be suregrillis preheated. Allow one
sideof meatto cookto desireddoneness,oruntiljuicesappearonthetop surface,
beforeturning. Turnsteaksand hamburgersjustonce. Manipulatingfoodcauses
loss of juices.
• When basting meats or applying sauces to foods, remember that excessive
amounts wind up inside yourgrilland do not improve thefood flavor. Apply sauces
duringthe last 15 to 20 minutes of cooking time unless recipe specifies otherwise.
Sugar-basedsauces, excessively used,will caramelize onthegrill-rocks and create
extra cleaning.
• There are many meat marinades which will help tenderize less expensive cuts of
meat for cooking on the grill,
• Certain foods, such as poultry and non-oily fish, may need some extra fat. Brush
with oil or melted butter occasionally while grilling.
• Usetongswith long handles or spatulasfor turning meats. Donotuseforks as these
pierce the meat, allowing juices to be lost.
• To help retain meat juices, salt after turning meat or after cooking is completed.
• Should grilled foods be prepared and ready before you're ready to serve, turn
control to a low setting and cover meat with a single sheet of foil. FoodwiUcontinue
to cook.
15
Page 16

I Cleaning the Grill J
Be sure the grill iscooland controlsare OFF.
Grill Grates: These are madefromcastaluminumandare coatedwiththeExcalibur_
nonstickfinish.
• Afterthe grillgrateshavecooled,wipe offgrateswitha papertowel. Wash cool
grates (DO NOT IMMERSE HOT GRILL GRATES IN WATER) with soap or
detergentinhotwaterinthesinkorwashthem inthedishwasher.Besuretoremove
all foodresiduebeforecookingonthe grillgratesagain.
• Removestubbornspotswitha plasticmeshpuffor pad. Forbestresults,useonly
thosecleaningproductswhichstatetheyare recommendedforusewhencleaning
nonstick surfaces.
• If grateswere washedinthe dishwasher,seasonwithoil priorto grilling.
• Do not use metal brushes or abrasive scouring pads or other scrubbers intended
to clean outdoor charcoal grills. Thesewillremovethe finishaswellas scratchthe
grates. Do not clean in self-cleaning oven or use oven cleaners on the grates.
Grill-rocks: These are made fromcast-ironwhichhave been coated withporcelain
enamel.
• The grill-rocksshouldbe cleaned frequentlyor after any excessivebuild-upof
grease. Tocleanlightsoil,use detergentand a plasticscrubber,suchasTufty,or
washinthe dishwasherifburnedon residueisfirstremoved. For heavysoil,soak
in hot soapywater to which a cleanser,such as householdammonia, has been
added. Stubbornspotson grill-rocks,such as burned on residue from sauces,
can be scrubbedwitha stiffbristlebrush.
• An oven cleaner, such as Easy-Off, can be used for burnedon soil. Follow
manufacturer'sdirections:sprayon cleanerand let soak overnight. Do not clean
grill-rocks in the self-cleaning oven.
Grill Element: The grillelementshouldnever be immersedin water. Most soilwill
burnoffduringuse. The terminalblockmay be cleanedwithwarmsoapywater. Donot
useabrasivecleanersor materials. Dry thoroughlybeforereinsertinginthe cooktop.
Porcelain Basin Pan: This area is locatedunderthe grill-recksand/or cartridges.
Clean after each heavy use ofthe grill.
• To removelightsoil,cleanwithsoapywaterorwithcleanerssuch as Fantastikor
409. For easier cleanup, a ) spraywithhouseholdcleaner; b) cover with paper
towels;c) add smallamountofwater to keepthe papertowelmoist;d) coverand
wait 15 minutes;and e) wipe clean.
• To remove moderatesoil, scrub withComet, Bon Ami, a soft scrub cleanseror
plasticscrubber.
• Toremovestubbornsoil,spray with an oven cleaner,let soakovernight,wipe
clean, rinseand dry.
16
Page 17

[ Control Knobs I
The knobsonthe controlpanelcanbe removedwiththe controlsin the OFF position.
Pulleach knob straightfrom the shaft. Wash knobsin warm soapy water or dish-
washer;do not use abrasivecleansersor materials. To replaceeach knob,matchflat
partof knobopeningwiththe springonthe shaft, returninginOFF position.
I Control Knob Area I
Use mildcleansers, such as soapywaterormildliquidsprays,suchas409 orFantastik.
Wipe withsponge,damp clothorpapertowel. Do not scrub with S.O.S. pads or abra-
sive cleansers.
I StainlessSteel Cooktop [
• To clean light soil, wipe with soapy clothor nonabrasivecleanser, such as Soft
Scrub. Rinse, buffwithsoftcloth;polishwithglasscleaner if necessary.
• Toclean moderatesoilor discolorationofthe surface (excessiveheatwillcausea
goldendiscoloration),clean with Zud, Bar Keepers Friend, or Luneta (Jenn-Air
ModelA912, PartNo. 712191). Witha spongeorcloth,rubcleanserwiththegrain
to avoidstreakingthe surface. Rinsewell, buffdry; polishwith a glasscleaner if
necessary to remove cleanser residue and smudge marks.
• Heavy soil, such as burned onfood soil, can be removed by first cleaning as per the
instructions for moderate soil. Stubborn stains can be removed with a damp
Scotch-Brite scour-pad; rub evenly with the grain to avoid streaking the surface.
Rinse well, buff with dry cloth;polish with glass cleaner if necessary to remove
cleanser residue and smudge marks. Scotch-Brite is also useful in buffing and
removing minor scratches.
• Stubborn food stains may also be removed by spraying with Easy-Off oven cleaner.
Allow to set overnight, then rinse. If stains remain, clean with recommended
cleansers suchas Zud, Luneta(Jenn-AirModelA912, Part No.712191), or Scotch-
Brite scour-pad. CAUTION: When using Easy-Off, avoid sprayingareas other than
the stainless steel such as the air grille and control knob area. Immediately wipe
up any spray from these areas with a damp cloth. Read the manufacturer's
precautions on using oven cleansers. Hint: Easy-Off can be used to clean the
porcelain burner basin area.
17
Page 18

JPorcelainizedSteel Cooktop I
• Wash cool cooktop with warm soapy water and rinse. Polishwith a drycloth.
• Tocleanstubbornspots,cleanwithCooktopCleaningCreme (PartNo.20000001)
and a sponge. Do not use abrasive or caustic cleaning agents which may
permanentlydamagethe finish.
• NEVER WIPE OFF A WARM OR HOT PORCELAIN ENAMELSURFACE WITH A
DAMP CLOTH.
NOTE:
• The porcelainenamel used on yourcooktop is acid resistant,not acid proof.
Therefore,acidfoods(suchasvinegar,tomato,milk,etc.)spilledonthe cooktop
shouldbe wiped upimmediatelywitha dry cloth.
• Removesugar spillsimmediately.
I Under Counter I
Grease Jar: A grease jar is located I I
beloweachgrillbasin(underthecounter).
Check periodicallyto preventspillovers.
Unscrewand remove. The grease jar
can be replacedwith any heat tempered
jar, suchas a canningjar, which has a
standardscrew neck.
Serial Plate: DO NOT CLEAN.
r 1
18
Page 19

...... •
i
.... i
Jenn-Air's ventilationsystem is designed to capture both cookingfumes and smoke
whilegrilling. Ifthe systemdoes not,theseare someductinginstallationsituationsto
check:
• 6" diameterroundor 3 1/4" x 10"rectangularductingshouldbe used. Note: 5"
diameterroundductingmay be usedif the ductlengthis 10' or less.
• No morethanthree90°elbowsshouldbeused. Distancebetweenelbowsshould
beat least18".
• RecommendedJenn-Air wall cap shouldbe used. Make sure damper moves
freely whenventilationsystemis operating.
• There shouldbea minimumclearanceof 6" for cooktopinstalledneara sidewall.
If there is not an obviousimproper installation,there may be a concealed problem
suchas a pinchedjoint,obstructioninthe pipe,etc. Installationisthe responsibilityof
the installerand questionsshouldbe addressedfirst by the installer. The installer
shouldverycarefullycheckthe ducting installationinstructions.
19
Page 20

• i_i'iil _ i _i _ _ _ • i i_ _'
• _,_•_•_• • .... _ • i IIL i_•_!ii¸I•_!:I_I!U: _•: • •_ ••: ¸_¸¸ !ill • • _•
B
Griddle Grill Accessory Model Grill Cover
Model A302 A158 Model A341
Self-draining griddle Grill accessoryincludes Attractivegrillcover
makes many favorite 2 grill-rocks, Energy- protects grillwhen
foods easier to fix. Saver grillelement, and not in use. Tex-
Family-sizedsurfacelets two black nonstickgrill tured steel with
you cook several grates. 2800 watt grill moldedhandles.
pancakes,hamburgers, element permitsyou to
orgrilledsandwichesat control temperatures
atime. Hasa blacknon- underfrontand reargrills
stickfinish, independently.
11
Cooker-Steamer Rotiss-Kebab
Model A335 Model A312
Ideal for anything you Enjoy the great flavor of
steam, blanch, poach or rotissed foods indoors all
stew. Includesa dual-posi- year around and make par-
tionbasketandsee-through ties more fun by servingat-
cover.Attractiveblacknon- tractive shish kebabs. In-
stickfinish, dudes chrome finish motor,
rotiss,shishkebab skewers
and all brackets. Folds for
easy storage.
20
Page 21

Wok Accessory Canning Element
Model AO142 Model A145A
Ideal for stir-frying, steaming, Specialcanningelementplugsinto
braising, and stewing. Wok has conventionaicoilcooktop/cartridge
nonstick finish, wood handles, raisingthe heatingelementabove
cover,steamingrack,ricepaddles thecookingsurface. Allowsuseof
and cookingtips. Flat bottomwok oversized utensilsand those with
can be usedon ALL cartridges, warped or rippled bottoms.
I Cooktop Cartridges I
Conventional Halogen Radiant Solid
Coil Element
Conventional Coil*
Rated240 volts........................... A100B-Black Porcelain
A100S- Stainless Steel
A100W-White Porcelain
Halogen
Ratedfor 240 volts......................... A125B-Black
A125W-White
Radiant*
Ratedfor 240 volts........................ A121B-Black
A121W-White
Solid Element
Rated for 240 volts ...... _................. A106B-Black
A106W-White
* To order 208 volt cartridges, add -8 to the model number.
21
Page 22

Checkthe followinglisttobe surea servicecellisreally necessary. A quickreference
ofthis manualmaypreventan unneededservicecell.
If nothing on the cook'top operates:
• checkfor a blowncircuitfuseor a tripped maincircuitbreaker.
• checkif cooktopis properlyconnectedto electriccircuitin house.
If grill heating element or cook'top does not get hot enough:
• checkif heatingelementis pluggedin solidly.
• surfacecontrolsmaynot be set properly.
• voltageto housemay be low.
If ventilation system is not capturing smoke efficiently:
• checkon crossventilationin roomor make upair.
• excessive amount of smoke is being created; check instructionsfor grilling,
trimmingmeats.(See p 13.)
• outsidewall cap may be trappedshut.
• cooktopmaybe improperlyinstalled;check ductinginformation.(See p 19.)
• airfilter may be improperlyinstalled.(See p 5.)
CCE1400 Owners: If larger elements quit during cooking:
• sustainedheatwas trapped. (See pp. 10-11 - Large stockpotsor canners.)
CVE1400 Owners: If downdraft fan automatically turns on during
cooking:
• sustainedheat was trapped. (See pp. 10-11 - Large stockpotsor canners.)
Note: If eitherelement of the cooktopcartridgefails to heat--switch the cartridge to
othersideof cooktop. If itoperateson thatside,thencooktopcontrolswitchmaybeat
fault. If itdoes not heat on either sidc !ndicetionsare that certridgerequiresservice.
In thisevent, you may speed service by deliveringthe lightweightcartridgeto the
authorizedJenn-AirServiceContractor,thusby-passingthetime requiredfor normal
home-service schedules.
If You Need Service
• cellthedealerfromwhomyourappliancewaspurchasedor theauthorizedJenn-
AirServiceContractorlistedinthe YellowPages.YourJenn-AirServiceContrac-
torcan providebetterand fasterservice ifyou can accuratelydescribeproblems
and give modeland serial numberof the appliance. Be sure to retain proofof
purchasetoverifywarrantystatus. Referto WARRANTY for furtherinformation
of owner's responsibilitiesfor warranty service.
• if thedealer or service company cannot resolvethe problem,writeto Jenn-Air
CustomerAssistance,c/o MaytagCustomerService, P.O. Box2370, Cleveland,
TN 37320-2370, USA, 800-688-1100
• use and care manuals,service manuals, and parts catalogs are availablefrom
Jenn-Air CustomerAssistance,c/o Maytag CustomerService.
Allspecificationssubjectto changeby manufacturerwithoutnotice.
22
Page 23

Page 24

 Loading...