

JDSU TT250 User guide

Net-Ritef Continuity and Wiremap Tester
Trace-Ritef Tone Generator and Amplified
Tone Tracer
User's Guide
www.jdsu.com/know

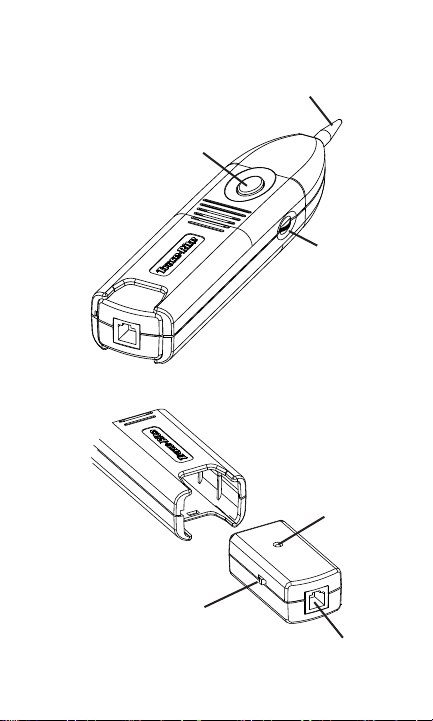
Tracer/Power
Button
Power/Tone
Type Switch
Voltage Probe
Volume
Up/Down
Indicator
LED
RJ11

Remote
RJ11
RJ11
LCD
Screen

Warning!
Do not attach to AC power, this may
damage the Net-Rite™ and the Trace-Rite™
generator and could cause a safety hazard
for the user.
Caution!
Improperly crimped, damaged or un-crimped
plugs can damage the jack on the NetRite™ and Trace-Rite™. Inspect plugs
for proper termination and crimping before
inserting into the tester. Contacts should
always be recessed into the plastic grooves
of the plug.
1

Features
Net-Rite™ Features
Auto-on when sensing the remote or a
•
short
Auto-off when the remote is
•
disconnected to conserve battery life
Ergonomic shape, with soft edges
•
When not in use, the remote stores in
•
the bottom of the main unit
Trace-Rite™ Features
Self-powered Amplified Probe on the
•
Tone Tracer turns on when tone sensor
button is depressed and off when the
button is released
Compact Tone Generator turns off
•
automatically when stored in the bottom
of the Tone Tracer to conserve battery
life
Ergonomic shape with soft edges
•
Two selectable tone styles with LED
•
indicator
Changeable Round Tip Probe
•
Adjustable Volume control
•
2

Instructions for Use
To Wiremap a Cable
Using the RJ45 jacks, connect Net-Rite™
1)
main unit and remote to the cable you
want to test.
An icon and the wiremap are always
2)
displayed. Net-Rite™ reports:
PASS when the cable pins are
a)
properly connected per T568A/B
and there are no other faults, or
an error icon when it does not
b)
pass. Pins with errors flash an error
message: Miswire, Split, Open, Short,
or Reverse.
To Trace a Tone
Using the RJ12 jack on the remote,
1)
connect the Trace-Rite™ Tone Generator
to the cable to be traced.
Slide the Tone Generator switch up to
2)
select one of the two tones (stutter tone
or fast stutter tone). The green LED lights
and flashes intermittently to indicate the
tone generator is powered on and which
tone speed has been selected.
Press and hold the black button on the
3)
Amplified Probe to turn on the probe.
3

Adjust volume control on the side of the
4)
Trace-Rite™ to a comfortable level. If the
signal is very loud when near the cable,
adjust the volume to avoid overloading the
Trace-Rite™. When overloaded, small
increases or decreases in the signal at the
tip cannot be heard.
Hold the tip of the Trace-Rite™ near the
5)
cable to be identified. The signal will be
loudest on the wire or cable attached to
the generator. Separating the wires or
cables may help in isolating the correct
cable.
4
 Loading...