

Page 1

Operating manual
JDC ELECTRONIC SA
Avenue des Sports 42
CH-1400 Yverdon
Switzerland
www.jdc.ch
info@jdc.ch
P: +41 24 445 21 21
F: +41 24 445 21 23
Page 2

2
Page 3

Index
English
Introduction
Items included ......................................................................4
Warranty ..............................................................................4
General description of operation .............................................5
Meteorological measurements and transmitter ........................5
Publication of the measurements ...........................................5
Clock and time synchronization ..............................................5
Technical Specications
General data .........................................................................6
Meteorological transmitter .....................................................6
SIM card and GSM subscription ..............................................7
MeteoLogic software
Installation of the software ....................................................8
USB driver ............................................................................8
Connecting to the station .......................................................8
Setting the time ....................................................................9
Programming the station .......................................................9
Installation guide
Step 1 - Inserting the SIM card ............................................ 10
Step 2 - Installation of the meteorological transmitter ............11
Step 3 - Connecting up the connectors .................................11
Step 4 - Software conguration of the station .......................12
Step 5 - Secure and orientate the station .............................. 12
Step 6 - Connection to earth ................................................12
Technical assistance
Contact ..............................................................................13
F
3
Page 4
Introduction
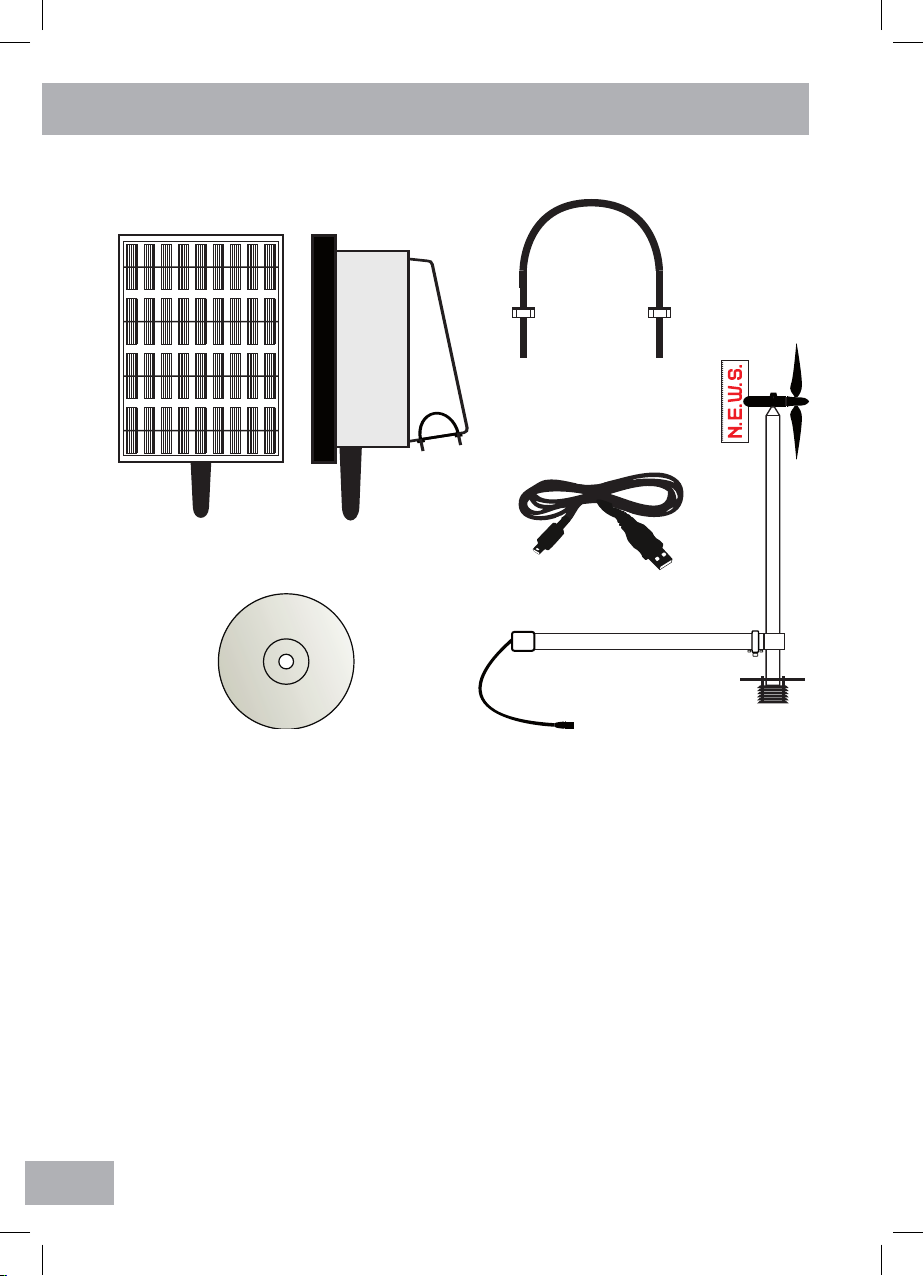
Items included
1x N.E.W.S. weather station
2x clamps
1x transmitter
Your SKYWATCH® N.E.W.S. is guaranteed by JDC ELECTRONIC SA for one year
starting on the date of purchase in respect of all material defects of manufacture. The
warranty does not cover damage caused by incorrect use. JDC ELECTRONIC SA cannot
be held responsible in any case for any consequences, direct or indirect, nor for any
damage that may result from the use of this instrument or from any fault or breakdown
in it.
Warranty
4
1x MeteoLogic CD
1x mini USB cable
Page 5

F
Publication of the measurements
The site meteo.jdc.ch publishes the measurements in graphical form for the 3 preceding
days. This data is sent by the station via GPRS at regular intervals and in a dened daily
time limit.
Since each transmission consumes a large amount of energy, the sending of measurements
for publication can be made different between summer and winter. From the start of
October to the end of March, when the solar panel receives less solar energy, perhaps
none, the daily time limit and the frequency of transmissions can be reduced. These
parameters are dened when the station is set up by using the MeteoLogic software.
Meteorological measurements and transmitter
The Skywatch® N.E.W.S. station acquires and records a series of measurements from
the transmitter every 10 minutes (recommendation of the WMO).
The meteorological transmitter is tted with an anemometer to measure the mean
direction, the mean speed and the maximum speed of the wind, with a humidity and
temperature sensor and optionally with a pressure sensor.
5
General description of operation
Skywatch® N.E.W.S. is an autonomous meteorological station designed for monitoring
the atmospheric conditions at a site.
It is tted with a meteorological transmitter that measures wind, temperature, relative
humidity, and (as an option) barometric pressure.
Powered from a small solar panel and a battery, the station can easily be installed on
sites that are isolated and have extreme conditions.
Finally, with its GPRS modem, it automatically and periodically transmits its measurements
to the Internet site http://meteo.jdc.ch.
Clock and time synchronization
The station has an internal clock which enables time stamping of the measurements and
synchronization of the measurements and transmissions. At the end of each sending of
data, the clock is resynchronized with the date and time of the GSM network. The local
time zone is also included in this synchronization.
Page 6

Meteorological transmitter:
Wind
Sampling 1 measurement per second
Average wind direction
Measuring range
Precision
Resolution
0 to 360°
± 5°
1°
Mean and maximum wind speed
Measuring range
Precision
Resolution
3 to 200 km/h
± 3%
0.1 km/h
Technical Specications
General data:
Dimensions (L x H x D) Housing: 210 x 330 x 220 mm
Transmitter: 540 x 500 x 150 mm
Weight Housing: 6.5 kg
Transmitter: 1 kg
Protection class Housing: IP 67
Transmitter: IP 67
Materials Housing: stainless steel
Transmitter: stainless steel and
PVC shock
Power Supply Solar panel 12 V, 5 W
Battery 6 V, 12 Ah
Battery operation (without sun) Approx. 3 months
(transmitting 10 times per day)
Measuring channels Wind direction, mean wind speed,
maximum wind speed, air temperature,
relative air humidity. Pressure as an option.
Recording 90,000 time-stamped measurements in
non-volatile memory
Clock Internal with time zone
Conguration connector mini USB
Operating temperature Measurement and recording: -30 … +80 °C
Data transmission: -25 … +70 °C
6
Page 7

F
7
Temperature and humidity
Air temperature
Measuring range
Precision
Resolution
-40 to +90 °C
± 0.6 °C (0 to +50 °C)
± 1.5 °C (-40 to +90 °C)
0.1 °C
Air relative humidity
Measuring range
Precision
Resolution
0 to 100 %RH
± 1.8 %RH (10 to 90 %RH)
0.1 %RH
Barometric pressure (option)
Measuring range
Absolute precision
Resolution
10 to 1100 mbar
± 1.5 mbar (750 to 1100 mbar)
0.1 mbar
The Skywatch® N.E.W.S. station has a GPRS modem for data transmission via the GSM
network. To make use of the latter, an active SIM card must be installed, with or without
a subscription. The type of subscription linked to this SIM card needs to permit data
transmission via GPRS. Options that include the volume of data could be appropriate.
For information, one data transmission can be between 5 kB and 30 kB, depending on
the interval between sendings.
Please note: the SIM card should be congured without a security PIN code before it is
inserted into the device. This can be carried out on an ordinary mobile telephone.
SIM card and GSM subscription
Page 8

Connecting to the station
Once installed, the MeteoLogic software can be run
and the rst step is to select the serial port to be
used. By clicking on
Serial port
in the
Con guration
menu, the list of available serial ports is generated
and displayed for selection. Click OK after making the
selection.
Remark: the USB cable must be connected to the station before carrying out this
con guration.
Click on the menu
Connect
to open communications with the Skywatch® N.E.W.S.
weather station. The following window appears and displays the con guration and
parameters of the station.
MeteoLogic software
The MeteoLogic software was developed as a user interface for setting up the station.
Installation of the software
To start the installation of the software, double-click on the le
setup.exe
on the CD
under software. Then all that is required is to follow the instructions.
USB driver
When the station is connected to the PC by using the USB cable, a new virtual serial
port is installed on the computer. If necessary, the driver is available on the CD under
//
misc/driver
.
8
Page 9

F
9
Programming the station
By clicking on
Programming
in the
Device
menu, the user can program the name of the
site in the
Station
tab. In the tab
GPRS transmissions
the transmission intervals and daily
time limit can be dened depending on the season.
Setting the time
Use the software to set the time in the
station by clicking on
Time set
in the
Device
menu.
The times of measurement and
transmission are automatically
synchronised using the new time.
Page 10

Installation guide
MADD - DL1 - V1.1
1
1
2
1
2
Unscrew the two nuts
shown in the diagram.
Withdraw the station from
the housing, being careful
with the wires.
Orientate the station as shown in the
illustration opposite, and insert the
SIM card in the location provided as
shown.
nut
nut
10
Step 1 - Inserting the SIM card
Remember to remove the PIN
code protection of the SIM card
by using a separate mobile
telephone.
1
2
3
Replace the station into the housing,
being careful with the wires.
4
7
Page 11

A
B
C
Connector of the
MeteoLogic transmitter
Solar panel connector
USB connector
Pass the horizontal bar of the
transmitter through the two clamps at
the rear of the station and tighten the
screws of the clamps.
Connect the transmitter to socket as
shown below.
1
2
1
Connect the solar panel to socket as
shown below.
F
11
Step 3 - Connecting up the connectors
Step 2 - Installation of the meteorological transmitter
1
A
A
B
A
B
C
A
B
A
Page 12

Place the station against its support pole,
position the clamps in the holes provided
for this purpose and screw them into
place.
The clamps are available in 3 different
diameters:
Ø 45 - 60 mm
Ø 60 - 74 mm
Ø 74 - 90 mm
Step 5 - Secure and orientate the station
N
E
S
O
Accurate orientation of the
station is crucial for the validity
of the measurements of wind
direction.
The arm of the sensor must
point accurately to the east.
The solar panel will then face
the south.
12
Refer to the previous chapter “MeteoLogic Software”.
Step 6 - Connection to earth
To improve protection of the station when there is lightning or overvoltage from
electromagnetic effects, it is advisable to provide a good earth connection for
the housing. Suitable materials can be obtained as an option.
View from above
The choice of diameter must be specied
with the order.
1
2
1
Step 4 - Software conguration
Page 13

F
13
Technical assistance
Contact
If there is a problem and for all technical questions, please contact us directly:
E-mail: support@jdc.ch
Telephone: +41 24 445 21 21
Fax: +41 24 445 21 23
www.jdc.ch
 Loading...