

Page 1
Thank you for purchasing the JDC SkywatchLog
interface for the SKYWATCH® GEOS N°11. This
system will connect your GEOS to your PC, enabling
you to download all stored data, view historical and
real-time data from your GEOS, and make calibration
adjustments to the instrument itself.
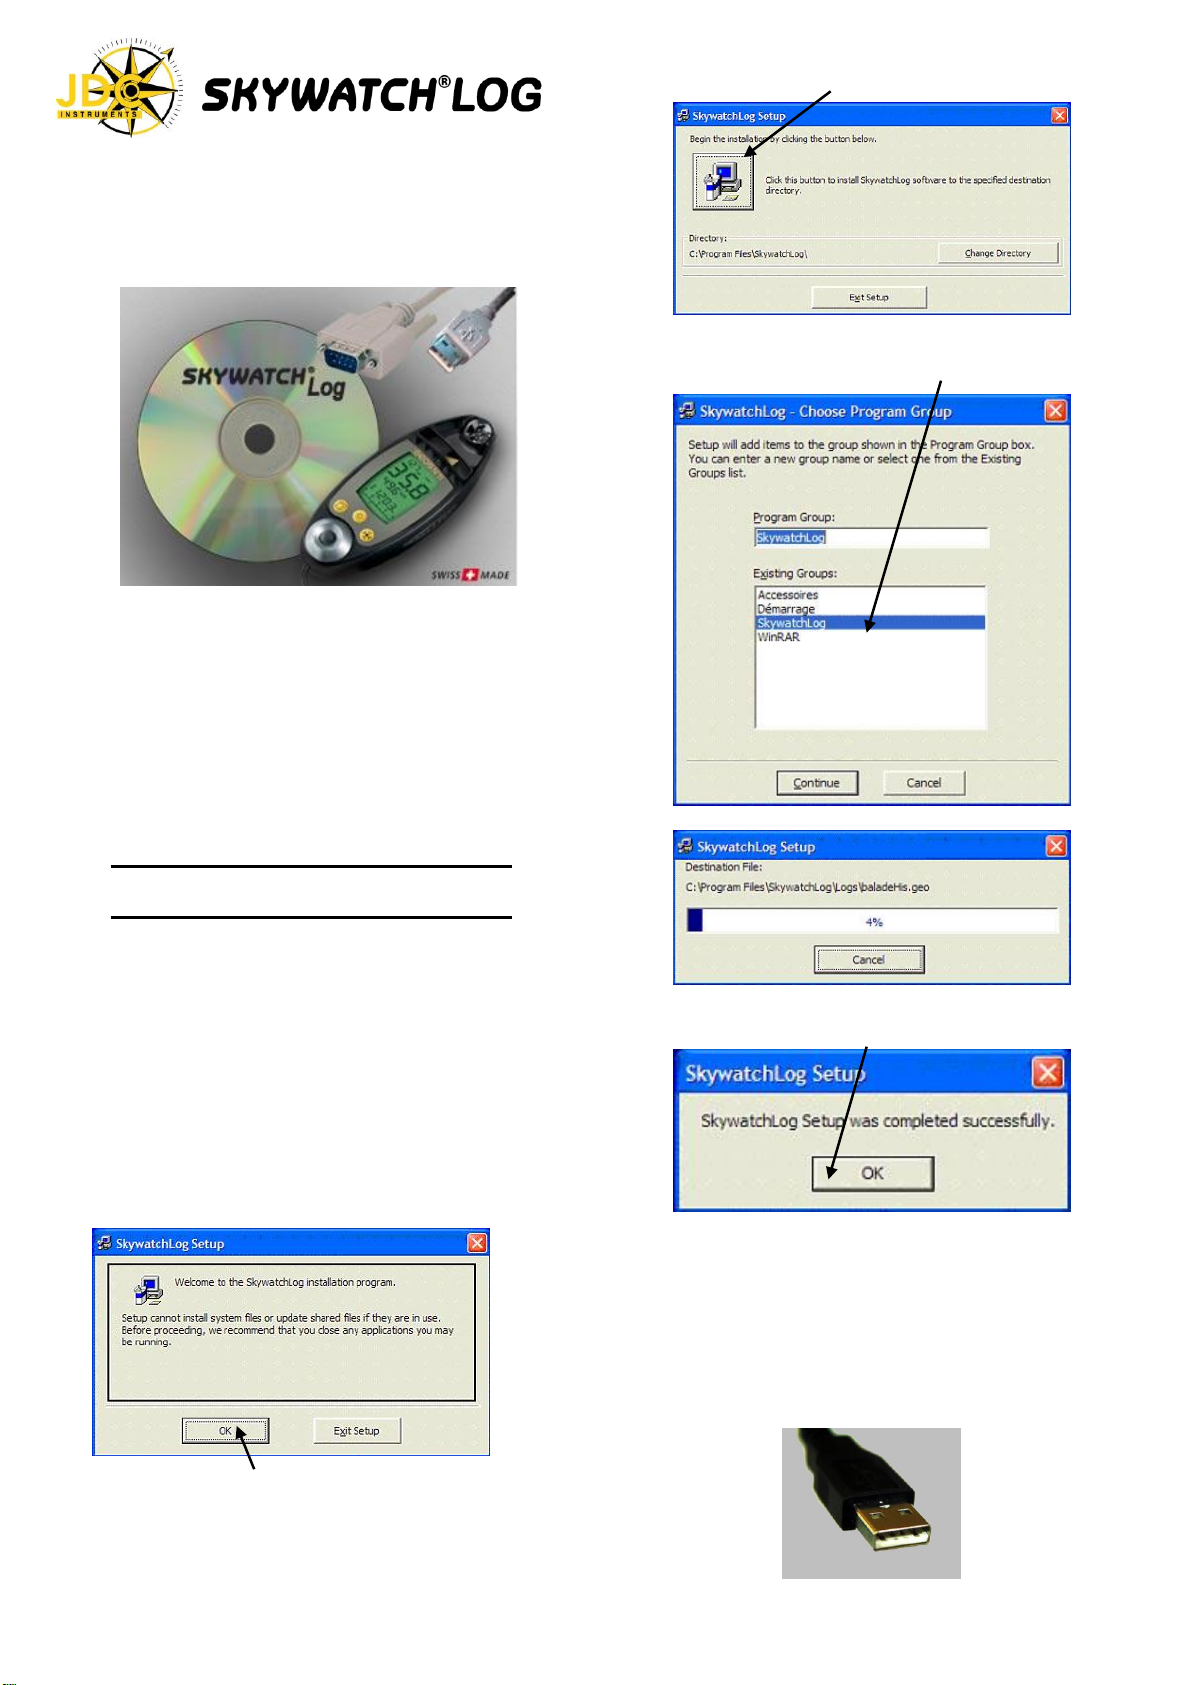
Change this directory if you wish, then click the
setup button.
The setup will include the SkywatchLog into a
program group (on the “Start” menu of your PC) for
quick access to the program.
Items Included:
SKYWATCHLOG CD-ROM
Cable Adapter (Either USB or RS232 Port
connector)
Velcro strap
Required:
GEOS N°11 instrument
PC with USB or RS232 port
Windows 98 or higher
INSTALLATION INSTRUCTIONS
1. INSTALL SKYWATCHLOG PROGRAM
** DO NOT CONNECT THE ADAPTER TO THE PC YET **
Insert the SKYWATCHLOG CD-ROM
If the setup does not start automatically, select
“My Computer” and double-click on the CD drive to
start the setup.
“Copying Files, please wait” is displayed. The
Setup program is copying files to a temporary
folder for use during installation.
The Welcome screen is displayed; click “OK” to
continue the setup process.
“SkywatchLog Setup” window is displayed. The
default location for the program and data is
displayed as “C:\ProgramFiles\SkywatchLog”.
Install is running…
The setup will create the program icons and install
the program. Select “OK” when complete.
The installation of the SkywatchLog program is
now complete; you must next setup the
USB/RS232 port hardware.
2. INSTALL THE USB OR RS232 CONVERTER
** INSERT THE CABLE ADAPTER INTO DESIRED
PORT, DO NOT CONNECT THE GEOS **
- 1 -
Page 2
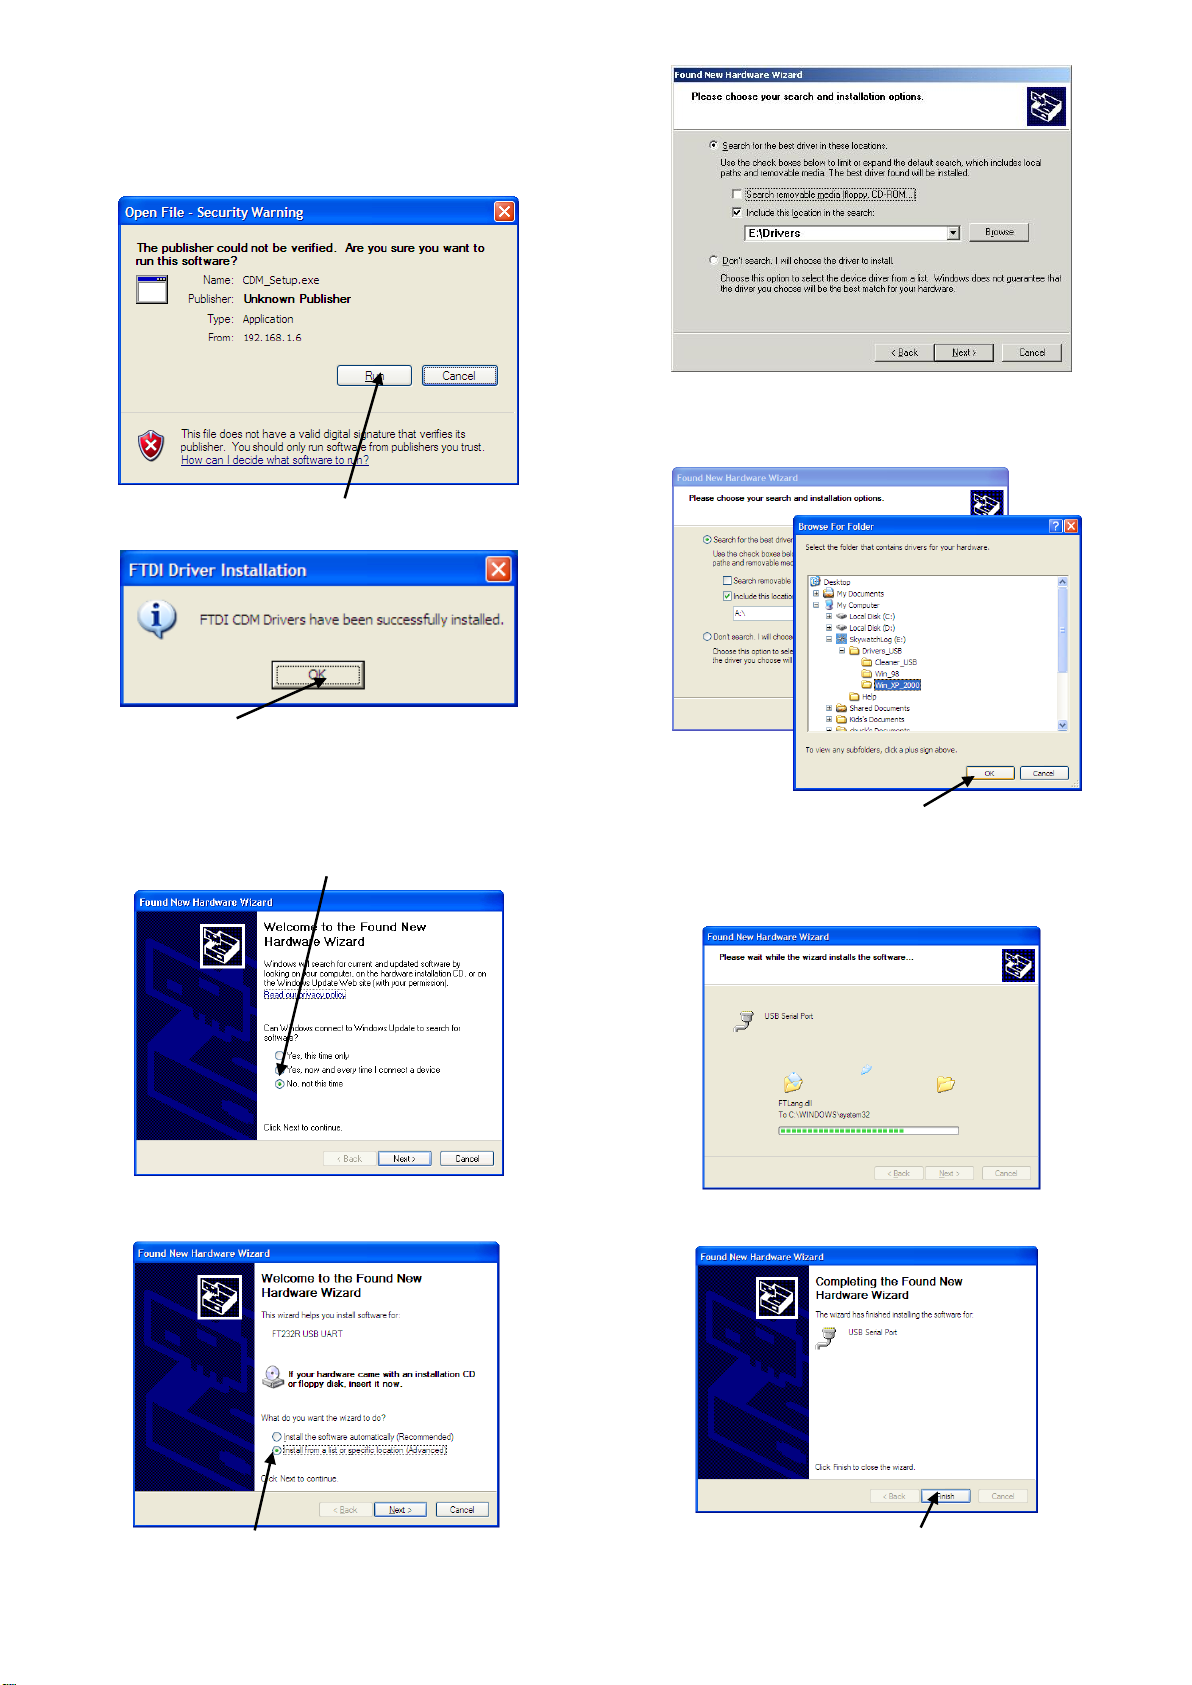
If you have a RS232 CONVERTER, you can
A
B
C
directly go to the point 3.
Launch program « CDM_Setup.exe » that is in:
«Your CD driver:\Drivers_USB\Win_XP_2000\ ».
You might be asked to confirm the program execution.
Confirm it by clicking on “Run”.
The Driver software will be installed. Click “OK".
When you plug your USB connection, a window
«Installation Assistant for new hardware detected»
might be displayed.
Click on «No, not for this time », and on «next». Please
note that depending on your Windows set up, this
window may not appear.
A) Select «Search for the best driver in these locations».
B) Select «Include this location in the search».
C) Click on «Search».
Once in «Select a folder», look for the driver
folders that are on the SkywatchLog CD and select
the one corresponding to your Windows system.
Click on «OK», and on «Next».
Window «Installation Assistant for new hardware
detected» is displayed.
“Found New Hardware Wizard” screen will appear.
Select “Install from a list or specific location” and select
NEXT.
- 2 -
Install is in progress.
Installation is now completed. You have just
installed the USB Converter. Click on «Finish».
Page 3
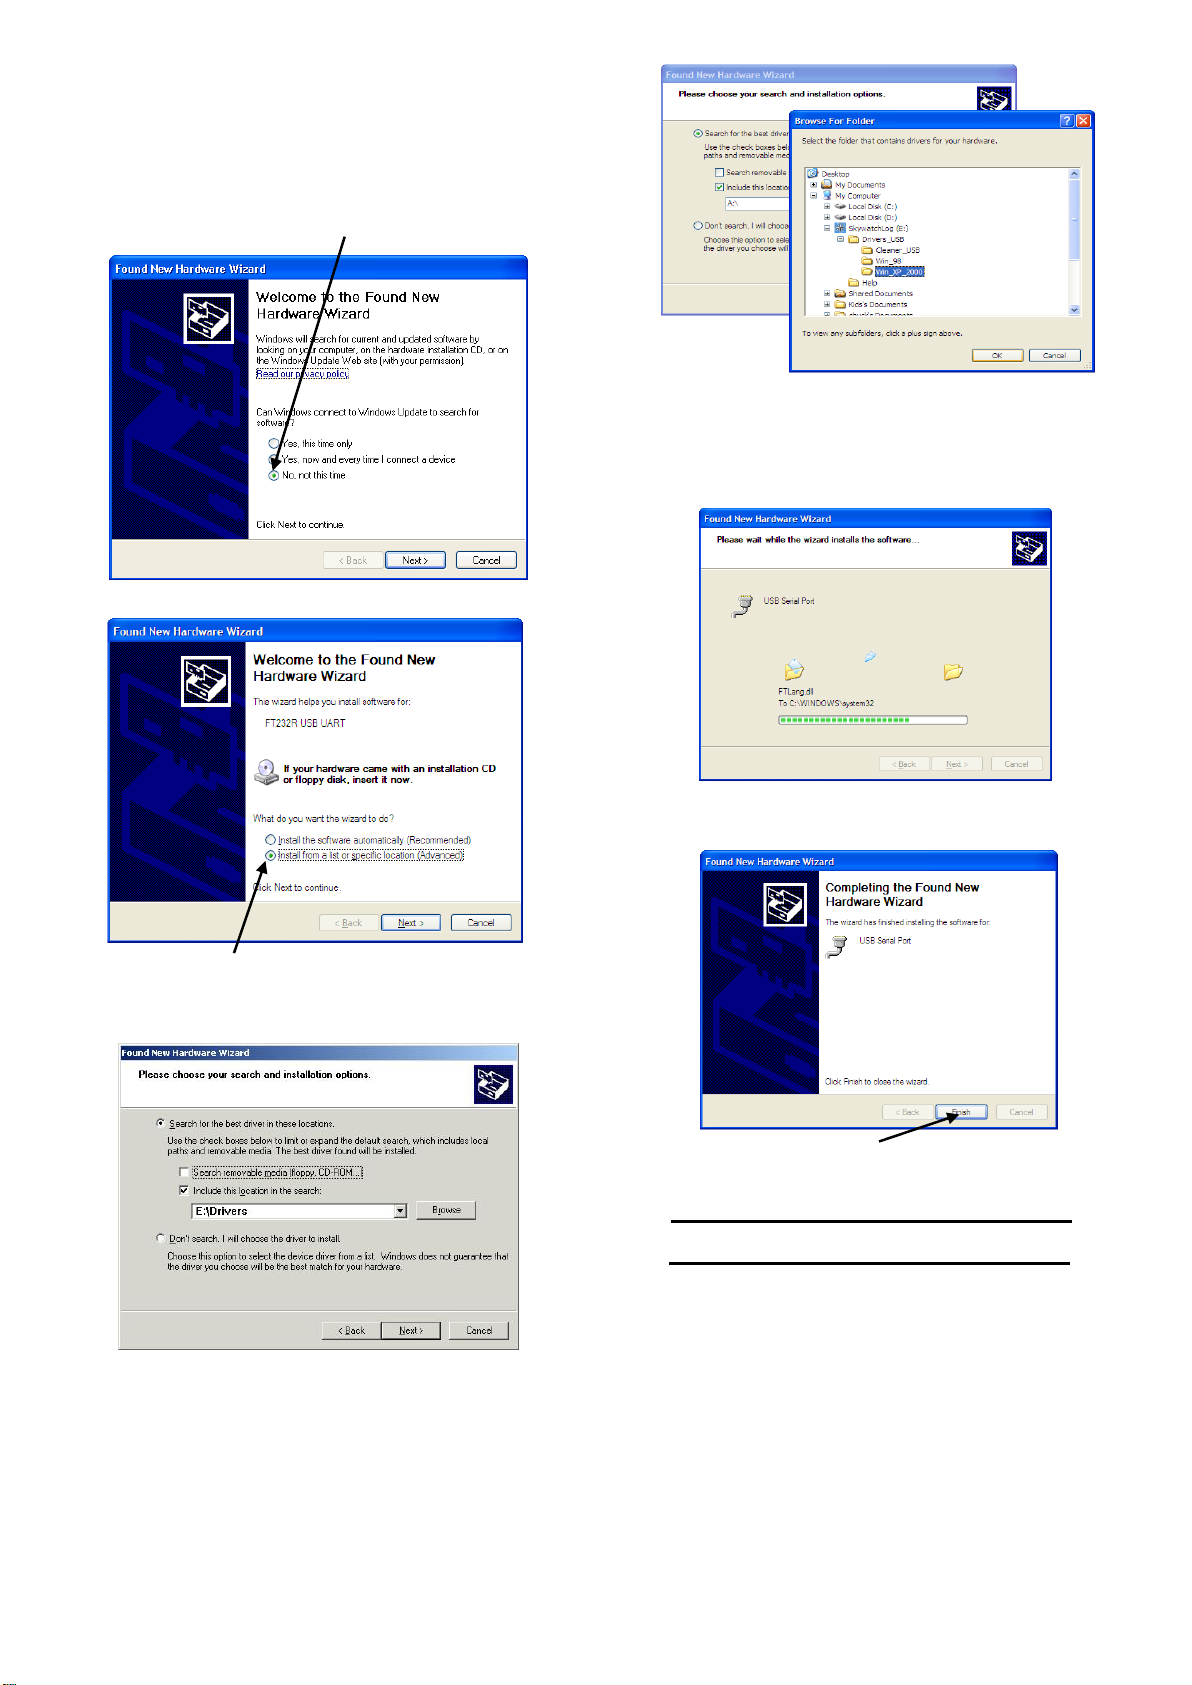
3. Install USB Serial Port (COM)
C
A
B
Now you need to install the USB Serial Port (COM).
Proceed the same way than for the USB Converter
that you have just installed. Window «Installation
Assistant for new hardware detected» is displayed.
Click on «No, not this time », and on «next». Please
note that depending on your Windows set up, this
window may not appear.
“Found New Hardware” screen will appear. Select
“Install from a list or specific location” and select
NEXT.
A) Select «Sear for the best pilot in these locations».
B) Select «Include this location in the search».
C) Click on «Search».
Once in «Select a folder», look for the drivers that
are on the SkywatchLog CD and select the ones
corresponding to your Windows system. Click on
«OK», and on «Next».
Install is in progress.
Installation is now completed. Click on «Finish».
PROGRAM INSTRUCTIONS
You can now run the SkywatchLog software.
(Default location is START -> ALL PROGRAMS ->
1. CONNECT THE GEOS N°11 TO THE PC
The PC adapter has the USB or RS232 connector on
one end, and a square flat disc on the other. The disc
is what captures the data from the GEOS, with no plug.
To connect, first turn on the GEOS
SKYWATCHLOG)
- 3 -
Page 4

IMPORTANT: The GEOS cannot be in the “STORAGE”
mode to communicate with the PC. The GEOS can be
in either the off or on mode for downloading and
viewing real time data.
2. DOWNLOAD DATA FROM GEOS N°11
To download all data from the GEOS, select
FILES -> Download GEOS n°11 Data
Place the flat disc over the LCD screen, padded side
down and secure with the included strap. Connect the
USB or RS232 connector to your computer.
Start SkywatchLog (default location is START -> ALL
PROGRAMS -> SKYWATCHLOG).
The program starts in the historical graph mode, with
no data showing.
Select FILES -> PREFERENCES.
The Preferences screen is now displayed.
On the left pane (white) select “SKYWATCH GEOS
n°11”. This is the calibration screen for the GEOS.
You can choose to download all the data in the GEOS,
data since the last power-on of the GEOS, or define a
period. This is useful if you are interested in gathering
data during a certain trip, climb or weather event. You
can also choose to download measurements made
manually or automatic data saves. Click “Confirm”.
Click on “Scan Port Com GEOS n°11. The program
then searches for the GEOS. Due to sensitivity, it may
not find the GEOS on the first try. Re-try the Scan Port.
If the GEOS is still not found, remove the disc from the
face of the GEOS, turn the GEOS off, then back on.
Replace the disc onto the GEOS and repeat the scan.
- 4 -
The data will be downloaded from the GEOS. This will
take some time, depending on how much data is
stored in the GEOS. Please note that the data will NOT
be erased from the GEOS; that is done in the
“Preferences” section of the program. It is not unusual
to take up to an hour to download large amounts of
data.
Page 5

3. VIEW HISTORIC
C
Once the data is uploaded, all data can be viewed on
the graph.
A) Line graph for each set of data
B) Scale for each data line
C) Time and date
D) Selection of data displayed
Use the checkboxes in (D) to select which data to
view. Use the dropdown boxes to select which data to
show for that color. Note that six or fewer sets of data
can be displayed. If one box is changed to a
measurement already listed in a different box, that box
will automatically switch to another measurement.
Select “Modes [Zoom Axis]” to select zoom or scroll
when using the mouse. Click and drag the mouse to
zoom or scroll the graph, timeline, or scale.
To save the data to a file, select FILES -> SAVE
The “Console” view will display the measurements on
weather dials. Select what is displayed on each dial by
selecting from the drop down menus.
The “Real Time Historical Record” will display the
same graph as in historical, but the data points will be
added and the graph will scroll from right to left.
You can choose “Auto-Save” when entering the Real
time mode to automatically save the data, preventing
from loss of data. This data can then be opened to
view or export at a later time
To stop Real Time mode, select REAL TIME -> Stop
Real Time
5. EXPORT DATA
You can export data on different formats than the ones
specific to SkywatchLog. Go to FILES -> EXPORT
DATA AS…
To open a saved file (.geo or .new) from the software,
go to FILES -> OPEN.
4. VIEW REAL TIME DATA
To view and record data in real time. Select WINDOW
-> Real Time Historical or Console Real Time. If data
is displayed, the program will prompt to save the
current file before starting a new record.
Select REAL TIME -> Record Real Time to start
recording the GEOS 11 in real time. Note that the
GEOS 11 does not have to be “ON” for information to
be displayed and stored. This is useful for saving
battery life on the GEOS.
- 5 -
Page 6

You can choose from 2 formats : .txt and .csv.
o The Text format (*.txt) allows a reading on
standard text editors, such as Windows
Notepad.
o The Comma-separated values format (*.csv)
allows to easily export data to Microsoft® Excel.
Write the new settings to the GEOS with “Write GEOS
n°11 Setup”. To input the GEOS’ settings, select “Read
GEOS n°11 Setup”.
6. PREFERENCES
Settings can be accessed and changed from the
FILES -> PREFERENCES menu. Select from the left
pane (white) which area to set preferences, and the
right area to make adjustments.
Select “General” from the left pane to adjust the
measurement units for wind, temperature, pressure,
and altitude. Exporting options are also found here.
To select another language, go in FILES ->
PREFERENCES.
Once in «PREFERENCES», choose «LANGUAGE»
and click in the writing zone «LANGUAGE», select the
desired language and click on «CONFIRM».
For more information, please refer to the help menu in
the SkywatchLog software and to our web site.
Avenue des Sports 42 - 1400 Yverdon-les-Bains – Suisse
Tél. 0041 (24) 445 2121 - Fax 0041 (24) 445 2123
JDC ELECTRONIC SA
info@jdc.ch – www.jdc.ch
In « SKYWATCH Geos N°11 », you will find the set up
panel that will allow you to set up the following
parameters :
o Time and date
o Altitude and air pressure
o Recording frequency of meteorological data
o The duration before automatic switch off
o The backlight duration
Advanced calibration can be done by selecting “GEOS
n°11 Advanced Calibration” in the right panel. This
includes an offset for daily time (in case the GEOS’
clock is slightly fast or slow), and many other settings
not normally used except by the advanced user.
- 6 -
 Loading...