

Page 1
1
Page 2

2
JCBD-JS2
PENDULUM JIGSAW
JCB is a byword around the world for quality, innovation and success.
With the application of stringent design parameters and utilising high
performance, modern materials and manufacturing processes, your
JCB product has been developed for optimum functionality and
practical application.
Used for the purposes for which it is intended, and with careful
maintenance, as outlined in this User Guide, your JCB product will
give years of satisfactory service.
Please read all of these safety and operating instructions
carefully before using this jigsaw. Please pay particular
attention to all of the sections of this User Guide that
carry warning symbols and notices.
Contents page
Product specification 3
Pack contents 3
Electrical safety 4
Safety instructions 5-6
Parts identification 7
Fitting the blade 8
Fitting the rip fence guide 9
Adjusting the cutting angle 9
Fitting the anti-splinter insert 10
Fitting the anti-scratch base plate 10
Using the blade guard 11
Fitting the vacuum adaptor 11
Setting the pendulum action 11
Variable speed selector 12
Operating the trigger switch 12
Using the jigsaw 13
Cleaning and maintenance 14
Service and repair 14
Environmental protection 14
Guarantee 15
Page 3

PRODUCT SPECIFICATION
Model number JCBD-JS2
Rated voltage 230VAC 50Hz
Input power 710 watts
No load variable speed 400 - 3200 strokes per minute
Pendulum action 4 stage
Mitre cutting 0 - 45o (Left and right)
Maximum cutting depth Wood - 80 mm
Steel - 10 mm
Aluminium - 30 mm
3
A - weighted sound pressure level Lp = 87.4 dB (A)
A - weighted sound power level Lw = 100. 4 dB (A)
Weighted root mean square vibration: 4.1 m/sec
PACK CONTENTS
Jigsaw JCBD-JS2
Parallel fence guide
Vacuum adaptor
Anti scratch base plate (fitted to base plate)
2 x wood cutting jigsaw blades (coloured black)
2 x metal cutting jigsaw blades (coloured red)
2
Anti splinter base plate insert
Hexagonal key
Carry case
Page 4
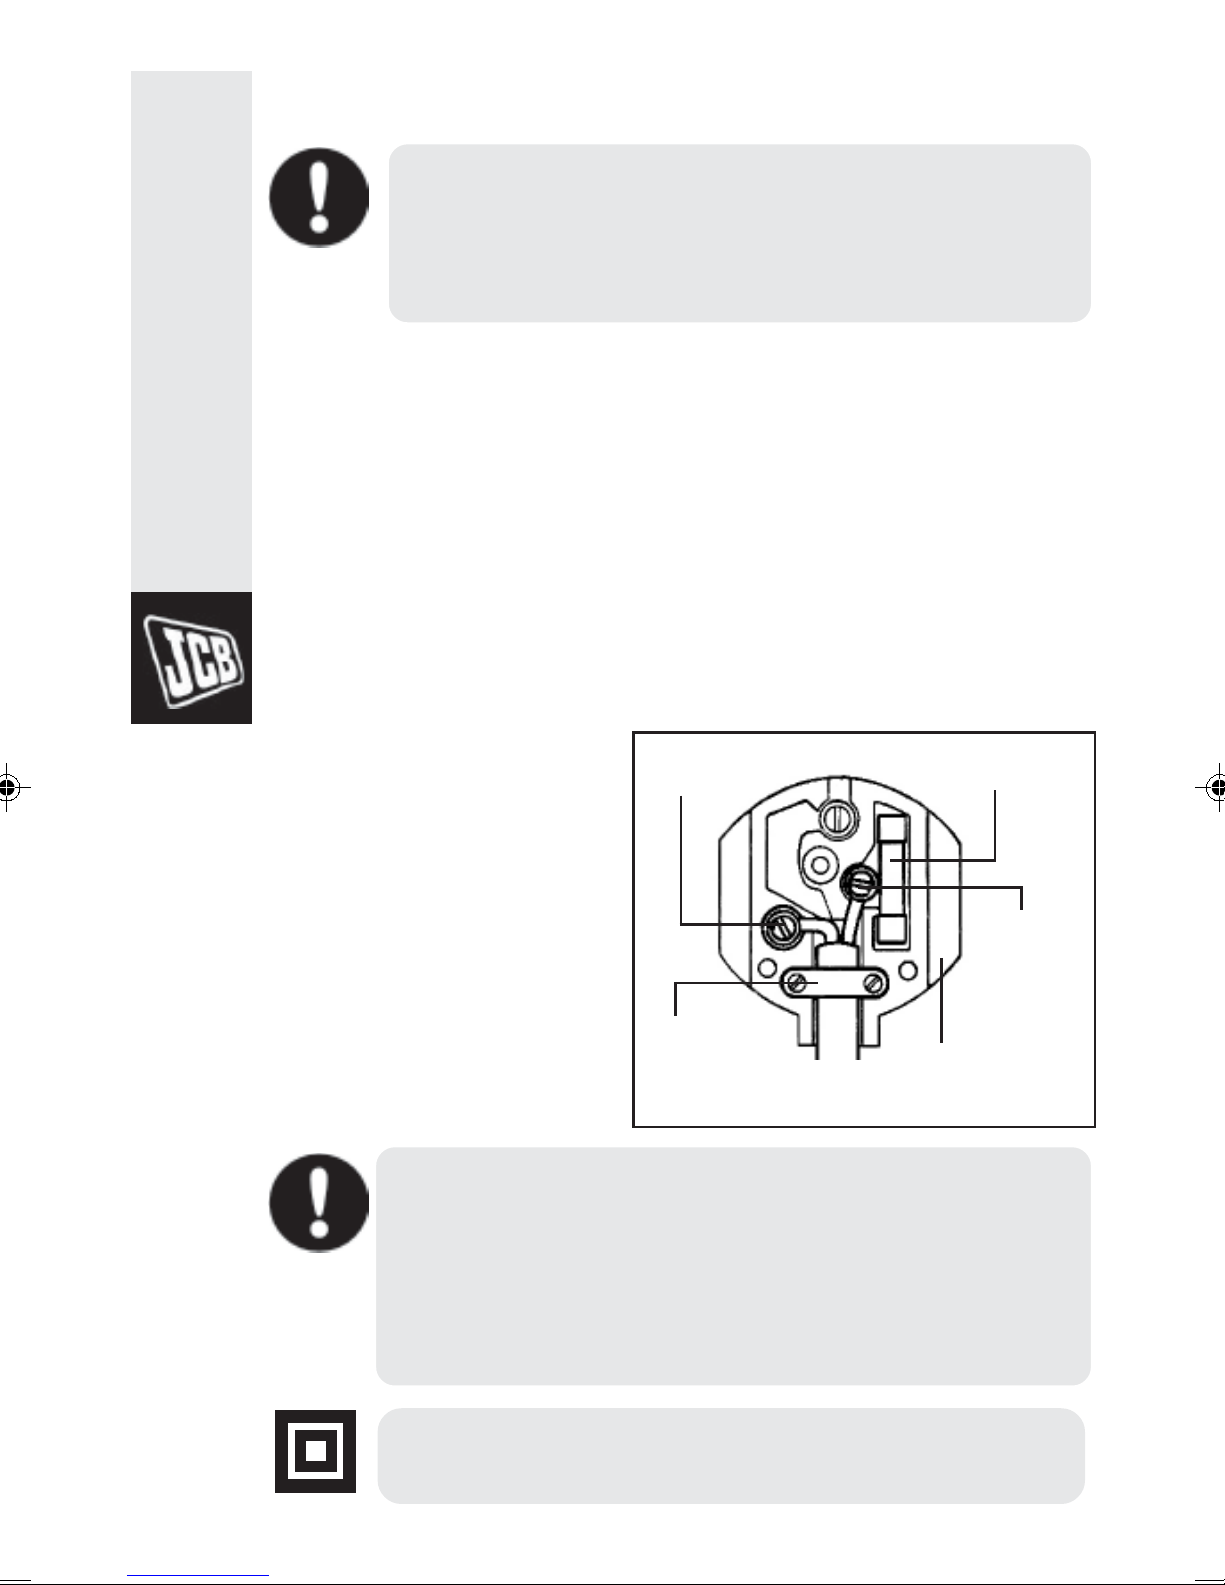
ELECTRICAL SAFETY
4
Warning: Read these safety instructions carefully
before connecting the jigsaw to the mains supply.
Make sure that the voltage of the electricity supply
is the same as that indicated on the rating plate on
the jigsaw.
This jigsaw may be fitted with a non-rewireable plug. If it becomes
necessary to change the fuse in the plug, the fuse cover must be
refitted. If the fuse cover is lost or damaged, the plug must not be
used until a suitable replacement is fitted. If the plug has to be
changed because it is not suitable for your socket, or becomes
damaged, it should be cut off and an appropriate plug fitted,
following the wiring instructions shown below. The plug that is
removed must be disposed of safely. Insertion into a 13 amp socket
could cause an electrical hazard.
The wires in the mains lead are coloured in accordance with
the following code:- Blue = neutral; Brown = live.
If the colours of the wires in
the mains lead of the jigsaw,
do not correspond with the
markings on the terminals
Connect Blue
to N (neutral)
Fit the
recommended
fuse
of your plug, proceed as
follows.
The blue wire must be
connected to the terminal
marked N, or coloured black.
The brown wire must be
connected to the terminal
marked L, or coloured red.
Warning: No connection should be made to the Earth
terminal of the plug. A 5 amp fuse must be fitted.
This jigsaw is designed to operate on 230VAC 50 Hz.
Connecting it to any other power source may cause
damage to the tool. Do not allow this jigsaw to be
exposed to rain, or moisture.
This symbol indicates that this tool is Double
Insulated and does not require an Earth connection.
Make sure that
the outer sheath
of the cable is
held by the clamp
Connect
Brown to
L (live)
Mains plug made
to BS1363/A
requirements
Page 5

SAFETY INSTRUCTIONS
Warning: When using this jigsaw, basic safety
precautions, including the following should be
observed to reduce the risk of fire, electric shock
and personal injury. Make sure that you have read
all of these instructions before using the jigsaw.
Keep this user guide in a safe place for future
reference.
KEEP WORK AREA CLEAN - Cluttered work areas invite
accidents and injuries.
CONSIDER WORK AREA ENVIRONMENT - Do not expose power
tools to rain. Do not use power tools in damp, or wet locations.
Keep work area well lit. Never use power tools where there is a risk
of fire, or explosion.
KEEP CHILDREN AWAY - Do not allow children to touch the tools.
Visitors should be kept away from the work area.
STORE IDLE TOOLS - When not in use, all tools should be stored
in a dry, secure place out of the reach of children.
DO NOT FORCE THE TOOL - It will perform better and more
safely at the level for which it was designed.
USE THE RIGHT TOOL - Do not force small tools to do the job of
a heavy duty tool, or use for purposes for which they were not
intended.
DRESS PROPERLY - Do not wear loose clothing, or jewellerythat
can be caught in moving parts. Tie back long hair.
SAFETY GLASSES - Use safety glasses, and if appropriate, use dust
masks.
PROTECT YOUR EARS - Wear ear protectors.
DO NOT OVERREACH - Keep proper footing and balance at all
times.
SECURE THE WORK - Use clamps, or vices to hold the
workpiece. It is safer and it frees both hands to operate the tool.
MAINTAIN YOUR TOOLS - Keep the accessories sharp and clean.
Keep all handles and grips dry and clean.
DISCONNECT TOOLS - Disconnect all tools from the mains
supply when not in use, or when making adjustments etc.
REPAIRS - Have the tool repaired by a qualified person.
STAY ALERT - Watch what you are doing. Use common sense and
caution. Never operate tools when you are tired.
DO NOT ABUSE THE MAINS LEAD - Never carry the tool by the
mains lead, or pull it to disconnect it from the mains socket. Keep
the mains lead away from heat, oil and sharp edges.
AVOID UNINTENTIONAL STARTING - Never carry a plugged in
tool with a finger on the switch and ensure that the tool is switched
off when plugging in to the mains supply.
5
Page 6

6
SAFETY INSTRUCTIONS continued
Warning: Before operating this jigsaw make sure that
you have read and fully understand all of these extra
safety precautions. These safety precautions must be
observed when operating the jigsaw. Ensure that the
jigsaw is unplugged from the mains supply before
fitting, or removing the blade, or making any other
adjustments.
Make sure that the hexagonal key has been removed from the
blade securing cup head screws before switching the jigsaw on.
Remove all nails and metal objects from the workpiece before
starting to cut.
The jigsaw blade will continue to run for a few seconds after the
jigsaw is switched off. Always wait until the blade has completely
stopped before putting the jigsaw down.
Make sure that the jigsaw blade is securely and tightly fitted and
that the blade guard is in place before switching on.
Hold the jigsaw firmly and apply the base plate to the workpiece,
without engaging the blade, before switching on.
Make sure that the cutting path of the jigsaw is free of obstacles,
both above and below the cutting surface.
Do not work with the jigsaw above your head, or on overhead
applications.
If the blade becomes jammed, switch off immediately and
disconnect from the mains supply before clearing the obstruction.
Use only sharp and undamaged jigsaw blades. Always replace
blunt, bent, cracked, or damaged saw blades.
When cutting, the base plate must be flat on the work surface.
Make sure that the mains lead is kept to the rear of the work
area, away from the blade.
Never place your hand or fingers in front of the jigsaw blade when
cutting.
Page 7

PARTS IDENTIFICATION
1
6
13
12
34
2
7
5
6
11
14 15 16
17
1 Variable speed selector
2 On/Off trigger switch
3 Lock-On button
4 Handle
5 Mains cable
6 Cooling vents
7 Dust extraction port
8 Base plate adjustment
9 Base plate screw
7
910
8
18
10 Anti-scratch base plate cover
11 Parallel fence guide fixing screws
12 Blade guard
13 Pendulum adjustment lever
14 Hexagonal key
15 Anti-splinter insert
16 Dust extraction port adaptor
17 Parallel fence guide
18 Carrying/storage case
Page 8

8
FITTING THE BLADE
Warning: Ensure that the jigsaw is disconnected
from the mains supply before fitting, or removing the
blade, or making adjustments to the base plate, the
blade support roller, or the parallel fence guide.
To fit the blade to the jigsaw, proceed as follows.
1. Slide the blade guard to the upper position.
2. Loosen the two cup headed blade securing screws, using the
hexagonal key provided. Access to the two blade securing
screws can be gained through the slots in the front of the
blade guard.
3. Make sure that the blade teeth are facing forwards.
4. Push the blade shank as far as it will go into the blade
locating clip.
5. Slightly tighten the two blade securing screws alternately, to
position the blade.
5. Ensure that the blade is straight.
6. Fully tighten the two blade securing screws.
7. Push the blade guard down to the lower position.
If replacement blades are needed, standard plane, parallel
shank, 90 mm saw length blades are generally available from
most good DIY/tool stores.
Blade
securing
screws
Blade
guard
Blade
locating
clip
Warning: Use only sharp and undamaged jigsaw
blades. Do not use blunt, bent, cracked, or damaged
blades.
Page 9

FITTING THE PARALLEL FENCE GUIDE
The parallel fence guide helps you to cut in a straight line,
parallel to the edge of the workpiece. To fit and adjust the
parallel fence guide, proceed as follows.
1. Loosen the parallel fence guide locking screws.
2. Push the parallel fence guide through the locating slots.
3. Set the width required and tighten the locking screws.
When cutting, ensure that the parallel fence guide is resting
against the edge of the workpiece.The parallel fence guide can
be fitted to either side of the base plate.
Parallel fence
guide locking
screws
Parallel fence guide
9
ADJUSTING THE CUTTING ANGLE
To allow you to achieve angle cuts, the base plate can be tilted to
any angle up to of 45 on either side.
To adjust the cutting angle proceed as follows.
1. Make sure that the jigsaw is disconnected from the mains supply.
2. Raise the blade guard to the upper position.
3. Loosen the base plate adjusting screw.
4. Set the base plate at the required angle.
5. Retighten the base plate adjusting screw.
6. Make a test cut on a scrap of material to ensure that the
correct angle has been set.
Base plate
adjusting
screw
Page 10

FITTING THE ANTI-SPLINTER
10
INSERT
The-anti splinter insert should be fitted to the base plate when cutting
wood. The insert can only be used when the base plate is in the 90
position. To fit the insert, press it upwards from below, into the recess
provided in the base plate. To remove the insert push it down and out
of the base plate.
Anti-splinter
insert
Antisplinter
insert
FITTING THE ANTI-SCRATCH
BASE PLATE COVER
The anti-scratch base plate cover is supplied to prevent damage to
the surface of delicate, or fragile materials. To fit it, place it over the
metal base plate and push firmly until it snaps into place. To remove
the cover, carefully lever out the end clips.
Base
plate
Base plate
cover
End clips
Page 11

USING THE BLADE GUARD
Warning: Ensure that the blade guard is in the lower
position when operating the jigsaw. If the base plate
is positioned to make an angle cut make sure that the
base plate is in the lowest possible position. Do not
use the jigsaw without the blade guard.
FITTING THE DUST EXTRACTION
PORT ADAPTOR
The jigsaw is supplied with a dust extraction port and a dust
extraction port adaptor. It may be necessary to fit the adaptor
before connecting to a
vacuum cleaner.
The adaptor has a bayonet
fitting. Push the adaptor into
the dust extraction port and
twist it to secure it. The dust
extraction will be most
efficient when the blade
guard is in the lower
position.
Twist
Adaptor
Push
Dust
extraction
port
11
SETTING THE PENDULUM ACTION
The 4 stage, pendulum action is designed to give the most efficient
cutting action in a variety of materials.
To set the pendulum action, rotate the
adjuster to the desired setting. When the
correct setting is selected, the blade
achieves maximum penetration on the
upward cutting stroke and is lifted back,
away from the material, on the downward
non-cutting stroke. This gives improved
quality of cut, and longer blade life. The
table below shows the recommended
settings.
Position Wood Metal Plastic
III Fast cuts - PVC
II Thick wood - Fibreglass
Acrylic
I Plywood Aluminium -
Chipboard Non-ferrous -
0 Thin wood Sheet metal -
Fine cuts
Page 12

VARIABLE SPEED SELECTOR
12
The variable speed selector dial is used to control the speed at
which the saw operates. This is known as the blade stroke rate. To
pre-select the required blade stroke rate, turn the selector
dial to the relevant number. A low number gives a low stroke rate
and a high number gives a high stroke rate. The stroke rate should
be adjusted according to the material being cut. The table below
shows some recommended settings. It should only be used as a
guide. Make a test cut on a scrap of material to ensure that the
correct stroke rate has been selected.
Material Setting
Wood 5 - 6
Metal 2 - 3
Aluminium 3 - 5
PVC 3 - 4
Variable speed
selector dial
OPERATING THE TRIGGER SWITCH
To switch the jigsaw on, fully squeeze the ON/OFF trigger switch.
To switch the jigsaw off, release the trigger switch. If continuous
operation is required, the trigger switch can be locked in the ON
position. To lock the switch ON, squeeze the trigger switch, press
the lock-on button and release the trigger switch. To release the
lock-on button squeeze the trigger switch and then release it.
Make sure that you release the lock-on button before
disconnecting from the mains supply. Before plugging the jigsaw
into the mains supply, make sure that the trigger switch is in the
OFF position.
Switch in Off position Switch in locked-On position
Page 13

USING THE JIGSAW
Warning: Make sure your cutting line is free of nails
before cutting. Do not cut hollow pipes. Do not cut
wood thicker than 80mm, steel thicker than 10mm, or
aluminium thicker than 30mm. Make sure that you
have adequate clearance for the blade beneath the
material. Make sure the blade is not touching the
material when you first operate the trigger switch.
Do not remove the jigsaw from the workpiece until
the blade has stopped moving. The blade and the
material will be hot when cutting is finished.
CUTTING METCUTTING MET
CUTTING MET
CUTTING METCUTTING MET
The jigsaw will cut light gauge ferrous sheet and non-ferrous
metals such as copper, brass and aluminium. Cutting metal will
take longer than cutting any other material and you should not
force the blade into the metal as this will shorten the life of the
blade and may damage the material that you are cutting.
Where possible you should clamp the workpiece to a backing
sheet such as plywood, or other soft material. Then cut both
the metal and the backing piece together. Make sure that you
have selected the correct metal cutting jigsaw blade for the job.
It is advisable to spread a thin film of oil along the cutting line
before starting to cut.
ALAL
AL
ALAL
13
CUTTING LCUTTING L
CUTTING L
CUTTING LCUTTING L
The blades of the jigsaw cut on the upstroke. Any splintering of
the material will therefore occur on the upper face nearest the
base plate. When sawing thin wood or plastic laminates, use a
fine tooth metal cutting blade and cut from the back surface of
the material. To further minimize the risk of chipping the edges,
clamp a piece of scrap wood, or hardboard to both sides of the
material and cut through the complete assembly.
POCKET CUTTINGPOCKET CUTTING
POCKET CUTTING
POCKET CUTTINGPOCKET CUTTING
To make a cut which is not on the edge of the material, first
mark clearly the start point for the cut you wish to make. Drill a
10mm hole in the material and lower the blade through the
hole until the base is flat against the workpiece. Now cut in the
normal way.
AMINAAMINA
AMINA
AMINAAMINA
TESTES
TES
TESTES
Page 14

14
CLEANING AND MAINTENANCE
Warning: Make sure that the jigsaw is switched off
and disconnected from the mains supply before
starting any cleaning, or maintenance procedures.
After use, clean all dust and wood chippings from the jigsaw.
Clean all of the ventilation slots on the motor housing. The
blade locating clip and support roller should be kept clean and
lightly oiled at regular intervals. Keep the handle clean and free
from oil and grease. Resin and glue on the blade causes poor
cutting results. Clean the blade after use. Make sure that the
base plate is free from dirt and grease. There are no user
servicable parts inside this jigsaw. Refer to qualified service
personnel if internal maintenance is required. Always store the
jigsaw in the carrying case. If replacement blades are needed,
standard plane, parallel shank, 90 mm saw length blades are
generally available from most good DIY/tool stores.
SERVICE AND REPAIR
Should the jigsaw require repair during the guarantee period,
please return it to the place of purchase. You will need to
provide proof of purchase to obtain a free of charge repair or
replacement. If the jigsaw should require repair after the
guarantee has expired, please contact the Customer Help Line
on 0845 602 1381.
ENVIRONMENTAL PROTECTION
Recycle unwanted materials instead of disposing of
them as waste. All tools, accessories and packaging
should be sorted, taken to a recycling centre and
disposed of in a manner which is compatible with
the environment.
Page 15

GUARANTEE
This product is guaranteed for twelve months from the date of
original purchase. Any defect that arises due to faulty materials,
or workmanship will be repaired free of charge, where possible,
during this period by the dealer from whom you purchased it.
The guarantee is subject to the following provisions:
The guarantee is only valid within the boundaries of the country
of purchase.
The product must be correctly assembled and operated in
accordance with the instructions contained in this User Guide.
The guarantee does not cover accidental damage, misuse, or
consumable items such as jigsaw blades.
The guarantee will be rendered invalid if the product is resold, or
has been damaged by inexpert repair.
15
The manufacturer disclaims any liability for incidental, or
consequential damages.
The guarantee is in addition to and does not diminish your
statutory, or legal rights.
Customer Help Line number: 0845 602 1381
IDS-JS2-REV4-JUN02
Page 16

 Loading...