

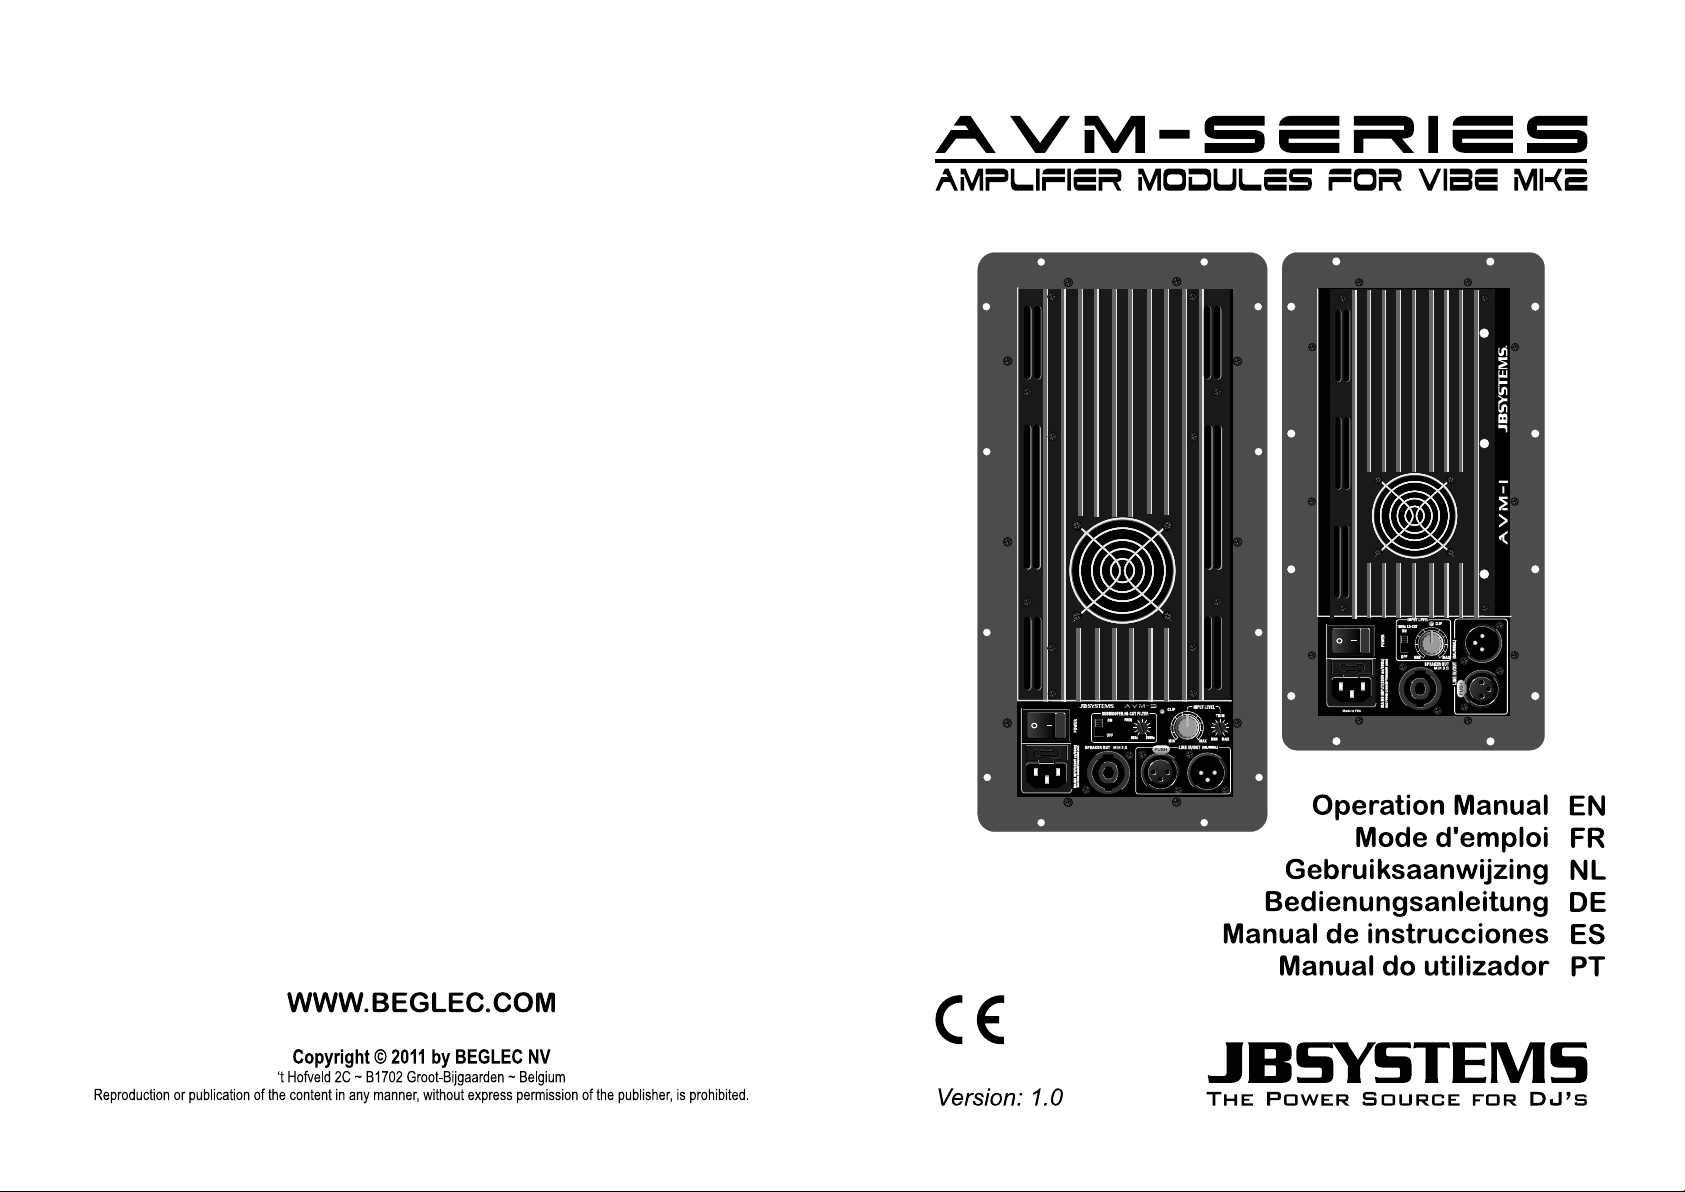
Page 1
Page 2
EN - DISPOSAL OF THE DEVICE
Dispose of the unit and used batteries in an environment friendly manner
according to your country regulations.
FR - DÉCLASSER L’APPAREIL
Débarrassez-vous de l’appareil et des piles usagées de manière écologique
Conformément aux dispositions légales de votre pays.
NL - VERWIJDEREN VAN HET APPARAAT
Verwijder het toestel en de gebruikte batterijen op een milieuvriendelijke
manier conform de in uw land geldende voorschriften.
DU - ENTSORGUNG DES GERÄTS
Entsorgen Sie das Gerät und die Batterien auf umweltfreundliche Art und
Weise gemäß den Vorschriften Ihres Landes.
ES - DESHACERSE DEL APARATO
Reciclar el aparato y pilas usadas de forma ecologica conforme a las
disposiciones legales de su pais.
PT - COMO DESFAZER-SE DA UNIDADE
Tente reciclar a unidade e as pilhas usadas respeitando o ambiente e em
conformidade com as normas vigentes no seu país.
Page 3
ENGLISH OPERATION MANUAL
SAFETY INSTRUCTIONS:
To prevent fire or shock hazard, do not expose this appliance to rain or moisture.
To avoid condensation to be formed inside, allow the unit to adapt to the surrounding temperatures when
bringing it into a warm room after transport. Condense sometimes prevents the unit from working at full
performance or may even cause damages.
Don’t place metal objects or spill liquid inside the unit. No objects filled with liquids, such as vases, shall
be placed on this appliance. Electric shock or malfunction may result. If a foreign object enters the unit,
ely disconnect the mains power.
No naked flame sources, such as lighted candles, should be placed on the appliance.
Prevent use in dusty environments and clean the unit regularly.
Inexperienced persons should not operate t
m save ambient temperature is 40
Always unplug the unit when it is not used for a longer time or before you start servicing.
The electrical installation should be carried out by quali
electrical and mechanical safety in your country.
Check that the available voltage is not higher than the one stated on the rear panel of the unit.
The socket inlet shall remain operable for disconnectio
The power cord should always be in perfect condition. Switch the unit immediately off when the power
cord is squashed or damaged. It must be replaced by the manufacturer, its service agent or similarly
qualified persons in order to avoid
cord come into contact with other cables!
When the power switch is in OFF position, this unit is not completely disconnected from the mains!
This appliance must be earthed to in order comply with safety regulations.
to prevent electric shock, do not open the cover. Apart from the mains fuse there are no user
repair a fuse or bypass the fuse holder.
In the event of serious operating problems, stop using the appliance and contact your dealer immediately.
Please use the original packing when the device is to be transported.
Due to safety reasons it is prohibited to make unauthorized modifications to th
CLEANING THE APPLIAN
Clean by wiping with a polished cloth slightly dipped with water. Avoid getting water inside the unit. Do not
use volatile liquids such as benzene or thinner which will damage the unit.
CAUTION
The lightning flash with arrowhead symbol within the equilateral triangle is intended to alert the
use or the presence of un
ficient magnitude to constitute a risk of electric shock.
The exclamation point within the equilateral triangle is intended to alert the user to the presence
of important operation and maintenance (servicing) instructions
This symbol means: indoor use only
This symbol means: Read instructions
This symbol means: Safety Class I appliance
OPERATION MANUAL
AMPLIFIER MODULES
°C. Don’t use this unit at higher ambient temperatures.
fied personal only, according to the regulations for
replace a damaged fuse with a fuse of the same
e unit.
CAUTION:
To reduce the risk of electric shock, do not
serviceable parts inside.
e personnel only.
insulated “dangerous voltage” within the product’s enclosure that may
in the literature accompanying
ENGLISH
OPERATION MANUAL
Thank you for buying this JB Systems®product. To take full advantage of all possibilities, please read these
operating instructions very carefully.
FEATURES
This unit is radio-interference suppressed. This appliance meets the requirements of the current European
and national guidelines. Conformity has been established and the relevant statements and documents have
been deposited by the manufacturer.
Class-D amplifier module for installation inside the VIBE Mk2 speakers
All you need is a screwdriver and 5 minutes of your time to make the transformation, no technical skills
required!
High output power:
AVM-1: 300Wrms @ 8ohm ~ 500Wrms @ 4ohm
AVM-2: 500Wrms @ 8ohm ~ 850Wrms @ 4ohm
AVM-3: 800Wrms @ 8ohm ~ 1300Wrms @ 4ohm
Balanced / unbalanced line input/output (XLR) with volume control.
Integrated active filters for easy setup of top / subwoofer combinations:
AVM-1: 100Hz low-cut filter, used to cut low frequencies to the speaker cabinet when used in
combination with an active subwoofer.
AVM-2/3: 90-250Hz adjustable hi-cut filter for use in active subwoofers.
Speakon output for optional passive 8ohm cabinet. (preferable same model)
IEC input mains connector with integrated switch.
BEFORE USE
Before you start using this unit, please check if there’s no transportation damage. Should there be any, do
not use the device and consult your dealer first.
Important: This device left our factory in perfect condition and well packaged. It is absolutely necessary
for the user to strictly follow the safety instructions and warnings in this user manual. Any damage caused
by mishandling is not subject to warranty. The dealer will not accept responsibility for any resulting
defects or problems caused by disregarding this user manual.
Keep this booklet in a safe place for future consultation. If you sell the fixture, be sure to add this user
manual.
To protect the environment, please try to recycle the packing material as much as possible.
Check the contents:
Check that the carton contains the following items:
User manual
AVM-amplifier module
Power cable.
be of suf
this appliance.
This unit is for indoor use only.
immediat
Keep the unit away from children.
Maximu
Never let the power-
In order
serviceable parts inside.
Never
type and electrical specifications!
remove the top cover. No userRefer servicing to qualified servic
-
his device.
n from the mains.
a hazard.
Always
JB SYSTEMS
®
1/28 AVM-AMPLIFIER MODULES
JB SYSTEMS
CE:
®
2/28 AVM-
Page 4
ENGLISH OPERATION MANUAL
ENGLISH OPERATION MANUAL
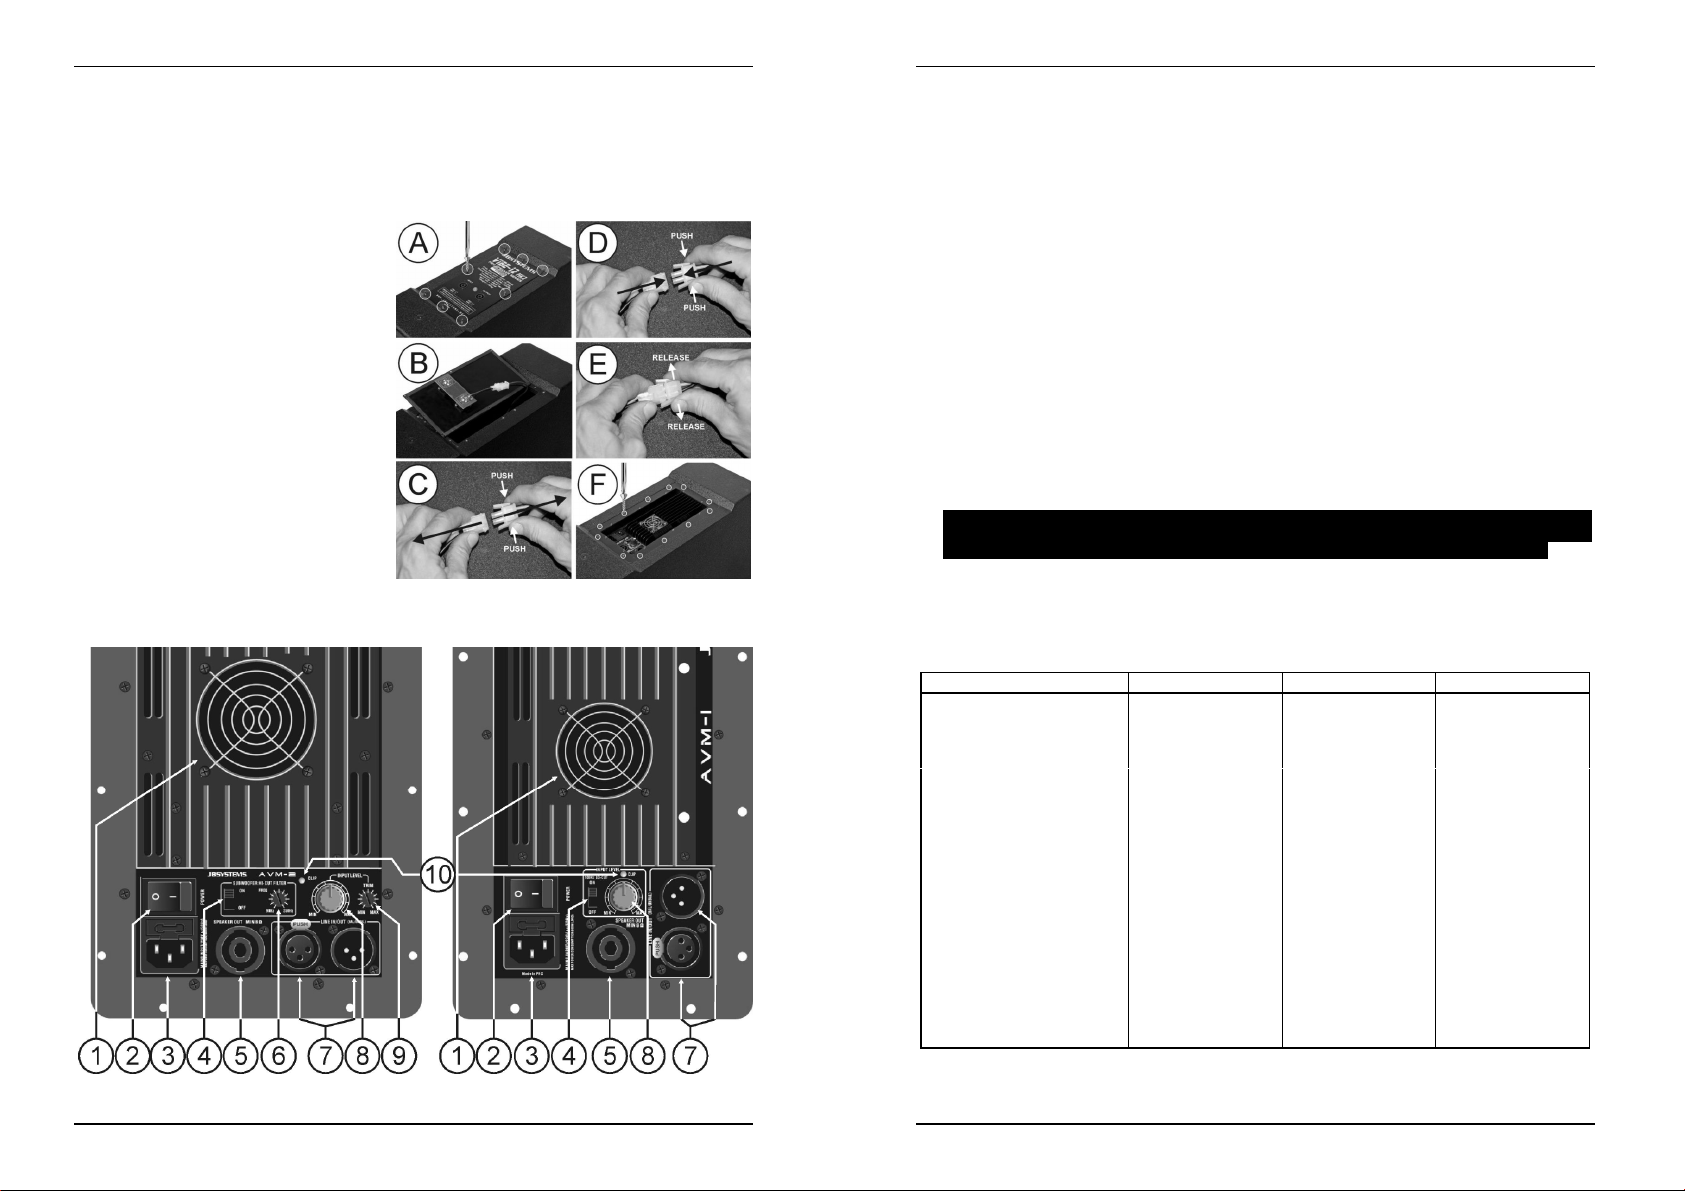
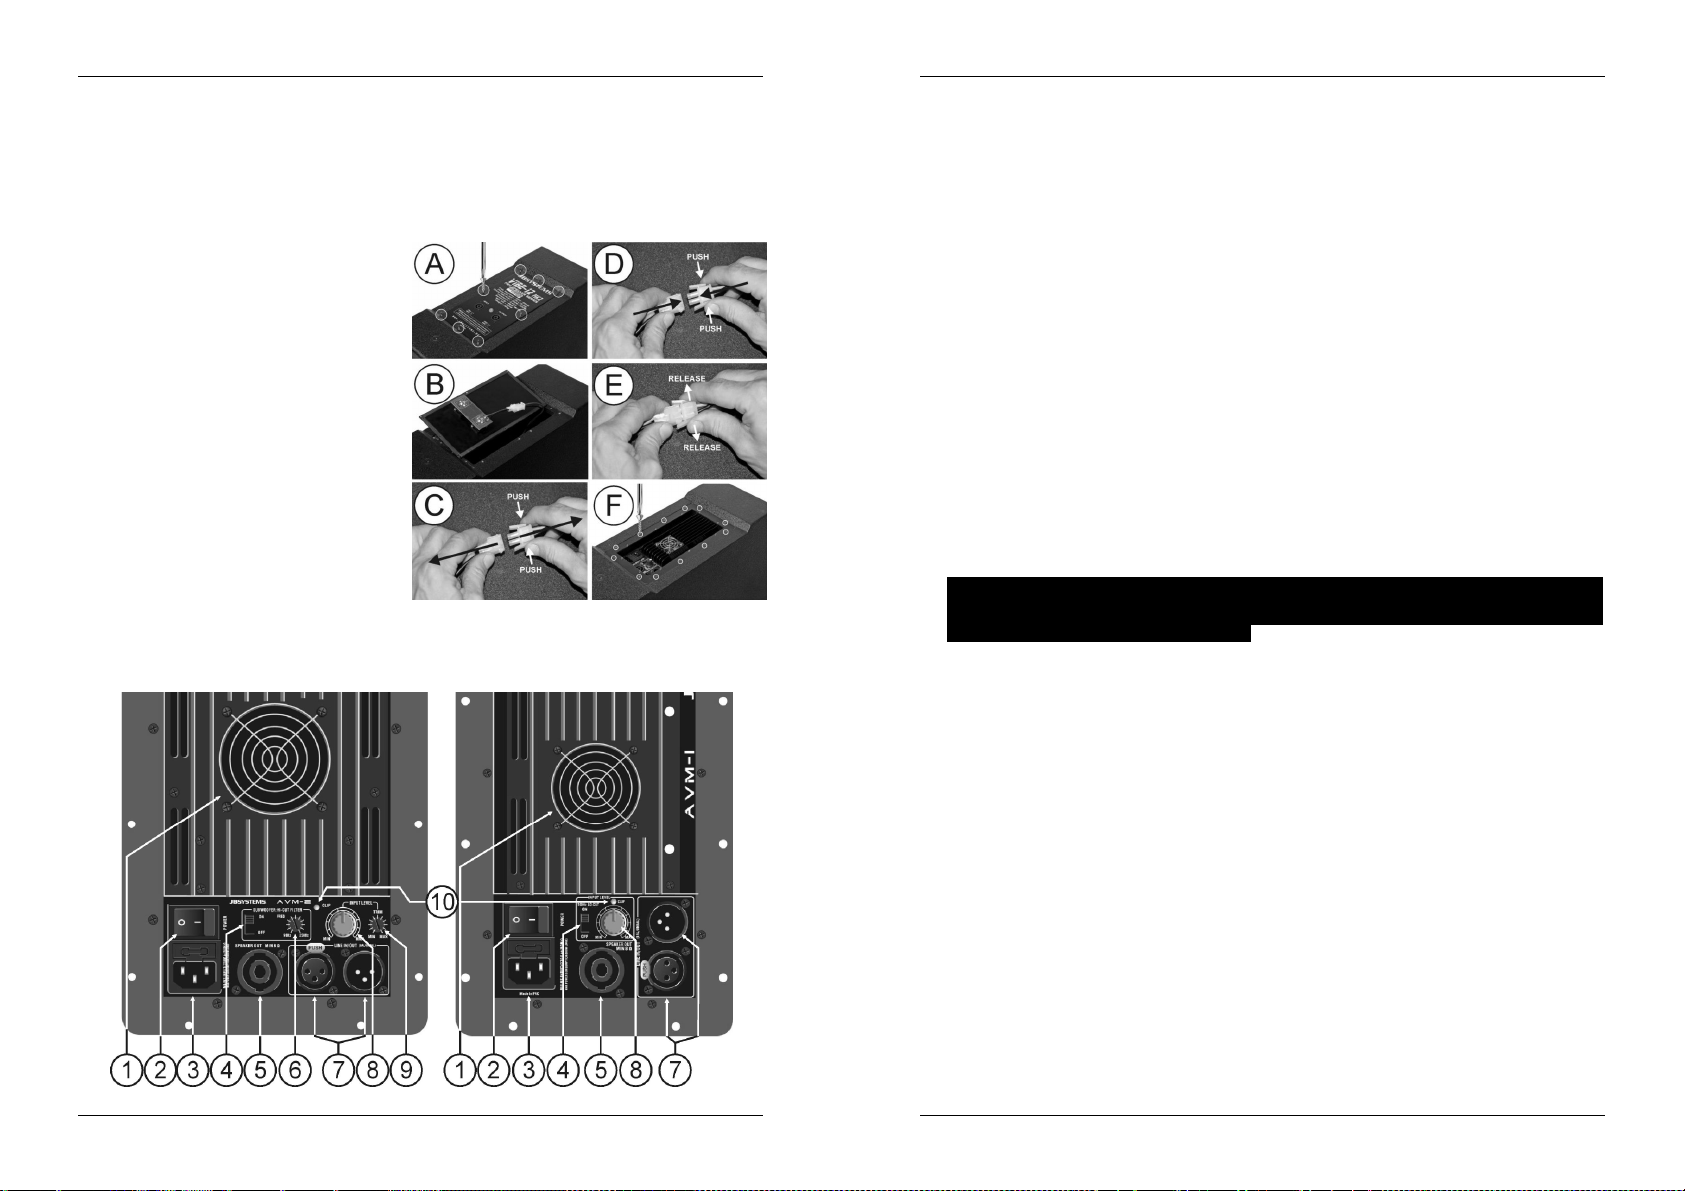
INSTALLATION AND CONNECTIONS
Check if your VIBE-speaker is already prepared for use with the new AVM-amplifier modules: ONLY the
Mk2-serie is adapted for use with the AVM-amplifiers!
If you have an older cabinet, installation is quite complicated and should only be considered if you are a well
skilled person for the job. The installation inside older cabinets is not explained!
If your VIBE-speaker cabinet is prepared for easy installation of the AVM-modules than please proceed with
the installation as described below:
A. Unplug the passive VIBE-cabinet from the
amplifier and unscrew the screws that keep
the metal connector plate in place.
B. Keep the screws for later and remove the
connector plate: on the back you will notice
a special connector.
C. To disconnect the special connector, press
the connector lock and separate the two
connectors. Remove the original connector
plate and put the AVM-amplifier module in
place.
D. The amplifier module uses the same
connector as the original connector plate:
press the lock and join the 2 connector parts
together.
E. Make sure the lock function is on: you
should hear a “click”. Double-check if the
connectors are well joined! If not, bad
connections could occur due to vibrations.
F. Put the amplifier module in place and use
the original screws to fasten the module.
FUNCTIONS
AVM-2 / AVM-3 AVM-1
1. FAN & VENTILLATION HOLES: during its operation the amplifier produces heat that must be
dissipated. The fans inside the amplifier must be able to evacuate the heat in the most effective way.
Therefore is it very important not to cover any of the ventilation openings as this may result in
overheating.
2. POWER SWITCH: Used to switch the internal amplifier on/off. The LED will turn on when the cabinet is
switched on.
3. MAINS INPUT: Mains input with IEC socket and integrated fuse holder, connect the supplied mains
cable here.
4. FILTER SWITCH: used to switch the integrated active filter on/off:
AVM-1: 100Hz low-cut filter, used to cut low frequencies to the speaker cabinet when used in
combination with an active subwoofer.
AVM-2/3: 90-250Hz adjustable hi-cut filter for use in active subwoofers.
5. SPEAKER OUTPUT: you can connect a second “passive” speaker cabinet to this Speakon output.
Connections are +1 and -1.
Attention: This output only supports 8Ω loads!!! Never connect a 4Ω speaker or more than one 8Ω
speaker cabinet to this output! This can damage the amplifier module. If AVM-2 is mounted in VIBE30
Mk2 it is NOT allowed to connect an additional passive speaker!
6. FILTER CONTROL: (only on AVM-2 / AVM-3) used to adjust the hi-cut crossover frequency of the
internal crossover. You can adjust the frequency between 90Hz and 250Hz: perfect to make an active
system based on a subwoofer + top cabinet! For most subwoofer applications a crossover point
between 90Hz and 150Hz is OK, however while listening and comparing you will easily find the optimal
settings for your system.
7. LINE INPUT/OUTPUT: This input accepts both balanced and unbalanced line level signals. The output
makes it possible to connect several speaker cabinets to the same line output of a mixer.
8. MASTER LEVEL: Used to set the volume of the amplifier. Always set the master level to zero when
you switch the cabinet on, after this turn up the volume to the desired level.
IMPORTANT: be aware that the power of the AVM-modules often exceeds the max. power of the
VIBE-cabinets they will be used in. This means that you must be very careful and always start
with the master level (8) or trimmer (9) almost closed, than increase the level step by step.
9. TRIMMER: Used to limit the input level of the line input, with this trimmer you can set the maximum
power of the amplifier, even if the master level (8) is set to maximum.
10. CLIP LED: is lit when the limiter is working. You are working on the limits of the amplifier, please turn
the volume a little down.
SPECIFICATIONS
MODEL AVM-1 AVM-2 AVM-3
Power 8Ω (1kHz, THD+N <0,1%)
Power 4Ω (1kHz, THD+N <0,1%)
Freq. Resp. (+/-2dB) 20 – 20.000Hz 20 – 20.000Hz 20 – 20.000Hz
Input Sensitivity line
Input impedance
S/R ratio (A-weighted)
Damping factor 320 350 350
Cooling
Line input / output
Outputs
Protections
Fuse (5x20mm) T5AL / 250V T8AL / 250V T12AL / 250V
Power supply
Power consumption (peak/4Ω )
Dimensions (mm)
Hole cutout (mm) 253x123mm 298x138mm 298x138mm
Weight (without mains cable)
Every information is subject to change without prior notice
You can download the latest version of this user manual on our website: www.beglec.com
300Wrms 500Wrms 800Wrms
500Wrms 850Wrms 1300Wrms
1V 1V 1V
20 kΩ 20 kΩ 20 kΩ
>86dB >88dB >92dB
Magnetic field fan Magnetic field fan Magnetic field fan
Balanced XLR 3pin Balanced XLR 3pin Balanced XLR 3pin
Speakon +1/-1 Speakon +1/-1 Speakon +1/-1
Thermal, Limiter,
Current limiter, short
circuit, DC-protection
AC230V / 50Hz AC230V / 50Hz AC230V / 50Hz
630W 1000W 1550W
275x145x72mm 320x160x78mm 320x160x78mm
2kg 3kg 3kg
Thermal, Limiter,
Current limiter, short
circuit, DC-protection
Thermal, Limiter,
Current limiter, short
circuit, DC-protection
JB SYSTEMS
®
3/28 AVM-AMPLIFIER MODULES
JB SYSTEMS
®
4/28 AVM-AMPLIFIER MODULES
Page 5

FRANCAIS MODE D’EMPLOI
INSTRUCTIONS DE SECURITE:
Afin d’éviter tout risque d’incendie ou de décharge électrique, ne pas exposer cet appareil à la pluie ou
Pour éviter la formation de condensation à l’intérieur de l’appareil, patientez quelques minutes pour laisser
adapter à la température ambiante lorsqu’il arrive dans une pièce chauffée après le transport.
La condensation empêche l'appareil de fonctionner de manière optimale, et elle peut même causer des
Cet appareil est destiné à une utilisation à l’int
Ne pas insérer d’objet métallique ou renverser de liquide dans l’appareil.
tels que des vases, ne peut être placé sur cet appareil.
nement.
immédiatement de la source d’alimentation.
Aucune source de flamme nue, telle que des bougies allumées, ne peut être placée sur l'appareil.
Ne pas utiliser l'appareil dans un environn
Ne pas laisser l'appareil à portée des enfants.
Les personnes non expérimentées ne doivent pas utiliser cet appareil.
La température ambiante maximale d’utilisation de l’appareil est de 45°C.
Débranchez toujours l’appareil si vous ne l’utilisez pas de manière prolongée ou avant d’entreprendre des
Les installations électriques ne peuvent être faites que par du personnel qualifié et conformément a
règlements de sécurité électrique et mécanique en vigueur dans votre pays.
vous que la tension d’alimentation de la source d’alimentation de la zone dans laquelle vous vous
trouvez ne dépasse pas celle indiquée à l’arrière de l’appareil.
ise doit toujours être accessible pour que le cordon secteur puisse être enlevé à tout moment.
Le cordon d’alimentation doit toujours être en parfait état.
cordon devait être écrasé ou endommagé.
remplacé par le constructeur, son agent ou un technicien qualifié.
Ne laissez jamais le cordon d’alimentation entrer en contact avec d’autres câbles
Quand l’interrupteur principal est en position OF
L’appareil doit être à la masse selon les règles de sécurité.
Utilisez toujours des câbles appropriés et certifiés lorsque vous installez l’appareil.
Pour éviter toute décharge électrique, n
de pièces pouvant être changées par l’utilisateur à l’intérieur.
circuiter un fusible.
type et ayant les mêmes spécifications électriques
En cas de problèmes de fonctionnement sérieux, arrêtez toute utilisation de l’appareil et contactez votre
Utilisez l’emballage d’origine si l’appareil doit être transporté.
CAUTION
La flèche dans un triangle met l'utilisateur
isolation dans l'appareil, ce qui peut causer un risque d'électrocution.
Un point d'exclamation dans un triangle prévient de la présence d'instructions relatives au
nnement et à la maintenance se trouvant dans le manuel fourni avec l'appareil.
uniquement pour usage à l'intérieur.
Lire le mode d’emploi.
appareil construit selon les normes de sécur
MODE D’EMPLOI
AMPLIFIER MODULES
Aucun objet contenant un liquide,
Cela risquerait de provoquer une décharge
Si un corps étranger est introduit dans l’appareil, déconnectez
ement poussiéreux et le nettoyer régulièrement.
Ne pas l’utili
Mettez immédiatement l’unité hors tension si le
risque de choc électrique, le cordon doit être
F, cet appareil n'est pas complètement isolé du courant
En dehors du fusible principal, il n’y a pas
un fusible endommagé par
afin de réduire le risque d’électrocution,
le couvercle de l’appareil.
pièce à l’intérieur de l’appareil que vous puissiez
Confiez l’entretien uniquement à
en garde contre la présence de haute tension sans
ité classe I
MODE D’EMPLOI
Nous vous remercions d’avoir acheté ce produit JB Systems®. Veuillez lire ce mode d’emploi très
attentivement afin de pouvoir exploiter toutes les possibilités de cet appareil.
EN VOUS INSCRIVANT POUR LA LETTRE D’INFORMATION VOUS SEREZ TOUJOURS
TENU AU COURANT DES DERNIÈRES NOUVELLES CONCERNANT NOS PRODUITS:
NOUVEAUTÉS, ACTIONS SPÉCIALES, JOURNÉES PORTES OUVERTES, ETC.
SURFEZ SUR: WWW.BEGLEC.COM
CARACTERISTIQUES
Cet appareil ne produit pas d’interférences radio. Il répond aux exigences nationales et européennes. La
conformité a été établie et les déclarations et documents correspondants ont été déposés par le fabricant.
Module d'amplification de Classe D destiné à être installé à l'intérieur des enceintes de la série VIBE Mk2.
Tout ce dont vous avez besoin pour faire la transformation sont un tournevis et quelques minutes de votre
temps; pas besoin d’être un expert en électronique!
Puissance de sortie élevée :
AVM-1 : 300 Wrms @ 8ohm ~ 500 Wrms @ 4ohm
AVM-2 : 500 Wrms @ 8ohm ~ 850 Wrms @ 4ohm
AVM-3 : 800 Wrms @ 8ohm ~ 1300 Wrms @ 4 ohms
Entrées et sorties ligne, symétriques et asymétriques (jack et XLR), avec contrôle de volume.
Filtre actif intégré pour faciliter la réalisation de systèmes top / caisson basse:
AVM-1: filtre coupe bas réglé à 100Hz, ce qui empêchera d’envoyer des fréquences basses dans
vos enceintes lors-ce qu’elles sont utilisés en combinaison avec un caisson basse actif.
AVM-2/3: filtre coupe-haut réglable de 90 à 250Hz pour une utilisation dans des caissons basse.
Sortie au format Speakon pour une enceinte passive de 8 ohms (de préférence du même modèle).
Connecteur d'entrée IEC pour l'alimentation secteur, avec interrupteur intégré.
AVANT L’UTILISATION
Quelques instructions importantes:
Avant d’utiliser cet appareil, assurez-vous de l’absence de dommages liés au transport. En cas de
dommages, n’utilisez pas l’appareil et contactez le vendeur.
Important: Cet appareil a quitté notre usine en parfaite condition et bien emballé. Il est primordial que
l’utilisateur suive les instructions de sécurité et avertissements inclus dans ce manuel. La garantie ne
s’applique pas en cas de dommage lié à une utilisation incorrecte. Le vendeur ne prend pas la
responsabilité des défauts ou de tout problème résultant du fait de n’avoir pas tenu compte des mises en
garde de ce manuel.
Conservez ce manuel dans un endroit sûr pour toute consultation future. Si vous vendez l’appareil,
assurez-vous d’y joindre ce manuel également.
Afin de protéger l’environnement, merci de recycler les emballages autant que possible.
Vérifiez le contenu:
Vérifiez si l'emballage contient bien les articles suivants :
Mode d'emploi
Module d'amplification AVM.
Câble d'alimentation secteur.
FRANCAIS
fonctio
Ce symbole signifie:
Ce symbole signifie :
Ce symbole signifie:
l’humidité.
l’appareil s’
dommages.
électrique ou un dysfonction
température.
réparations.
Assurez-
La pr
230V !
Ne jamais réparer ou courtun fusible de même
revendeur immédiatement.
ATTENTION:
n’enlevez jamais
remplacer vous-même.
des techniciens qualifiés.
érieur uniquement.
Pour éviter tout
e pas ouvrir l’appareil.
Remplacez systématiquement
Il n’y a aucune
ser au-delà de cette
ux
!
!
JB SYSTEMS
®
5/28 AVM-AMPLIFIER MODULES
JB SYSTEMS
®
6/28 AVM-
Page 6

FRANCAIS MODE D’EMPLOI
FRANCAIS MODE D’EMPLOI
Pour des raisons de sécurité, il est interdit d’apporter une quelconque modification à l’appareil non
spécifiquement autorisée par les parties responsables.
NETTOYAGE:
Nettoyez l’appareil à l’aide d’un chiffon doux, légèrement humide. Evitez d’introduire de l’eau à l’intérieur de
l’appareil. N’utilisez pas de produits volatils tels que le benzène ou le 'thinner', qui peuvent endommager
l’appareil.
INSTALLATION ET CONNEXIONS
Vérifiez si votre première enceinte VIBE est déjà adaptée pour fonctionner avec l'un des nouveaux modules
amplificateurs AVM. UNIQUEMENT la série Mk2 est adaptée à recevoir les amplificateurs AVM !
Si vous êtes en possession d'une enceinte plus ancienne, l'installation est très compliquée, et à ce titre, elle
ne devrait être prise en considération que si vous êtes une personne parfaitement formée pour accomplir ce
genre de travail. Attention : l'installation dans des enceintes anciennes n'est pas expliquée dans les lignes
qui suivent !
Si votre enceinte VIBE est donc effectivement adaptée pour fonctionner avec l'un des nouveaux modules
amplificateurs AVM, alors, veuillez procéder à l'installation comme elle est décrite dans les lignes cidessous.
A. Débranchez l'enceinte VIBE passive de son
ampli, puis enlevez les vis qui maintiennent
en place la plaque sur laquelle sont fixés les
connecteurs.
B. Mettez les vis de côté en prévision du
remontage et enlevez la plaque de connexion
: sur sa face arrière, vous remarquerez un
connecteur spécial.
C. Pour déconnecter ce connecteur spécial,
appuyez sur le verrouillage du connecteur et
séparez les deux parties du connecteur.
Enlevez la plaque de connexion d'origine et
mettez en place le module d'amplification
AVM.
D. Le module d'amplification AVM utilise le
même connecteur que celui présent sur la
plaque de connexion d'origine : appuyez sur
le verrouillage du connecteur et fixez
ensemble les deux parties du connecteur.
E. Assurez-vous que la fonction de verrouillage
est bien enclenchée : vous devriez entendre
un "clic". N'hésitez pas à vérifier une nouvelle
fois si les deux parties du connecteur sont bien assemblées ! Si tel n'était pas le cas, les vibrations de la
musique pourraient provoquer une connexion médiocre.
F. Après avoir mis le module d'amplification en place, utilisez les vis d'origine pour fixer le module.
FONCTIONS
AVM-2 / AVM-3 AVM-1
1. ORIFICES DE VENTILATION : pendant son fonctionnement l’amplificateur produit de la chaleur qui doit
être dissipée. Les ventilateurs à l’intérieur de l’amplificateur doivent pouvoir évacuer la chaleur le plus
efficacement possible. Pour cela il est très important de ne couvrir aucun orifice de ventilation car ceci
peut provoquer une surchauffe.
2. INTERRUPTEUR DE MISE SOUS TENSION : utilisé pour mettre l'amplificateur interne sous ou hors
tension. La LED s'allumera dès que l'enceinte sera mise sous tension.
3. ENTREE D'ALIMENTATION SECTEUR : Entrée pour l'alimentation secteur dotée d'un socket IEC et
d'une protection à fusible intégrée ; c'est ici que vous devez connecter le câble d'alimentation secteur.
4. INTERRUPTEUR DU FILTRE: est utilisé pour allumer/éteindre le filtre actif intégré:
AVM-1: filtre coupe bas réglé à 100Hz, ce qui empêchera d’envoyer des fréquences basses dans
vos enceintes lors-ce qu’elles sont utilisés en combinaison avec un caisson basse actif.
AVM-2/3: filtre coupe-haut réglable de 90 à 250Hz pour une utilisation dans des caissons basse.
5. SORTIE HAUT-PARLEUR : Cette sortie au standard Speakon permet de connecter une seconde
enceinte passive (donc, sans module AVM intégré). Les connexions utiles sont le +1 et le -1.
Attention : cette sortie n'est prévue que pour fonctionner avec une charge de 8 ohms !!! Ne connectez
donc jamais un haut-parleur de 4 ohms ou plusieurs haut-parleurs de 8 ohms à cette sortie ! En effet,
cela pourrait endommager le module d'amplification. Si l’AVM-2 est installé dans un VIBE30 Mk2, vous
NE pouvez PAS connecter une enceinte passive supplémentaire!
6. CONTRÔLE DE FILTRE: (uniquement sur les AVM-2 / AVM-3) il est utilisé pour ajuster la fréquence
coupe-haut du crossover interne. On peut faire varier cette fréquence entre 90 HZ et 250 Hz : c'est
exactement ce qu'il faut pour élaborer un système basé sur un subwoofer et des enceintes satellites
surélevées ! Pour la plupart des applications avec subwoofer, une fréquence de coupure entre 90 Hz et
150 Hz peut convenir, mais cependant, l'idéal est d'écouter et de comparer afin de trouver les réglages
idéaux propres à votre système.
7. ENTRÉE ET SORTIE LIGNE : Le connecteur d'entrée accepte des niveaux ligne symétriques tout
comme des niveaux ligne asymétriques. Quant à la sortie, elle permet de relier entre elles plusieurs
enceintes actives (donc munies d'un module AVM) à partir d'une seule et même sortie ligne d'une table
de mixage.
JB SYSTEMS
®
7/28 AVM-AMPLIFIER MODULES
JB SYSTEMS
®
8/28 AVM-AMPLIFIER MODULES
Page 7

FRANCAIS MODE D’EMPLOI
Puissance sous
8
Ω
Réponse en fréquence
Rapport signal sur bruit
Refroidissement
Entrée/sortie ligne
Protections
8. NIVEAU GENERAL : Bouton utilisé pour régler le volume de l'ampli. Lorsque vous mettez l'enceinte
sous tension, il y a lieu de mettre systématiquement le niveau général à zéro, pour ensuite tourner
prudemment le bouton de volume afin d'atteindre le niveau désiré.
IMPORTANT: soyez conscients du fait quel la puissance des modules AVM dépasse souvent la
puissance maximale que sont capables de supporter les enceintes VIBE. Soyez donc très
prudents et commencez toujours par régler le niveau de sortie (8) et du trimmer (9) sur une
position presque fermée, et augmentez le niveau petit-à-petit.
9. TRIMMER: est utilisé pour limiter le signal d’entrée. A l’aide de ce réglage, vous pouvez définir la
puissance maximale de l’amplificateur, même en ayant le volume de sortie (8) en position maximale.
10. LED CLIP: s’allume quand le limiteur se met en route. Vous travaillez à la limite de l’amplificateur,
veuillez diminuer un peu le volume.
CARACTERISTIQUES TECHNIQUES
MODEL AVM-1 AVM-2 AVM-3
(1kHz, THD+N <0,1%)
Puissance sous 4Ω
(1kHz, THD+N <0,1%)
(+/-2dB)
Sensibilité d'entrée ligne
Impédance d'entrée
(A-weighted)
Facteur d’amortissement
Sorties
Fusible (5x20mm)
Alimentation secteur
Consommation (peak/4Ω )
Dimensions (mm) 275x145x72mm 320x160x78mm 320x160x78mm
Dimensions découpe (mm)
Poids (sans câble d’alimentation)
Chacune de ces informations peut être modifiée sans avertissement préalable. Vous pouvez
télécharger la dernière version de ce mode d’emploi de notre site Web: www.beglec.com
300Wrms 500Wrms 800Wrms
500Wrms 850Wrms 1300Wrms
20 – 20.000Hz 20 – 20.000Hz 20 – 20.000Hz
1V 1V 1V
20 kΩ 20 kΩ 20 kΩ
>86dB >88dB >92dB
320 350 350
Ventilateur sous
champs magnétique
XLR à 3 broches
symétrique
Speakon +1/-1 Speakon +1/-1 Speakon +1/-1
Thermique, limiteur,
limiteur de courant,
coupe-circuit,
protection DC
T5AL / 250V T8AL / 250V T12AL / 250V
AC230V / 50Hz AC230V / 50Hz AC230V / 50Hz
630W 1000W 1550W
253x123mm 298x138mm 298x138mm
2kg 3kg 3kg
Ventilateur sous
champs magnétique
XLR à 3 broches
symétrique
Thermal, Limiter,
Current limiter, short
circuit, DC-protection
Ventilateur sous
champs magnétique
XLR à 3 broches
symétrique
Thermal, Limiter,
Current limiter, short
circuit, DC-protection
NEDERLANDS HANDLEIDING
GEBRUIKSAANWIJZING
Hartelijk dank voor de aankoop van dit JB Systems®product. Om ten volle te kunnen profiteren van alle
mogelijkheden en voor uw eigen veiligheid is het aangeraden de aanwijzingen zeer zorgvuldig te lezen voor
U het apparaat begint te gebruiken.
DOOR U OP ONZE MAILINGLIJST IN TE SCHRIJVEN ONTVANGT U STEEDS DE
LAATSTE INFORMATIE OVER ONZE PRODUKTEN: NIEUWIGHEDEN, SPECIALE
ACTIES, OPENDEURDAGEN, ENZ.
SURF NAAR: WWW.BEGLEC.COM
KARAKTERISTIEKEN
In dit apparaat is radio-interferentie onderdrukt. Dit product voldoet aan de gangbare Europese en nationale
voorschriften. Het is vastgesteld dat het apparaat er zich aan houdt en de desbetreffende verklaringen en
documenten zijn door de fabrikant afgegeven.
Class-D versterkermodule voor de VIBE Mk2 klankkasten
Het enige wat u nodig heeft zijn een schroevendraaier en enkele minuten van uw tijd om uw klankkast om
te bouwen; technische kennis is niet vereist!
Hoog uitgangsvermogen:
AVM-1: 300Wrms @ 8ohm ~ 500Wrms @ 4ohm
AVM-2: 500Wrms @ 8ohm ~ 850Wrms @ 4ohm
AVM-3: 800Wrms @ 8ohm ~ 1300Wrms @ 4ohm
Symmetrische / asymmetrische line ingang/uitgang (XLR) met niveauregelaar.
Ingebouwde actieve filters voor het eenvoudig samenstellen van top / subwoofer combinaties:
AVM-1: 100Hz low-cut filter, welke u kunt gebruiken om geen lage frequenties naar uw klankkast te
sturen wanneer deze gebruikt wordt in combinatie met een actieve subwoofer.
AVM-2/3: regelbare 90-250Hz hi-cut filter voor een gebruik in actieve subwoofers.
Speakon uitgang waarop een optionele passieve klankkast van 8ohm kan aangesloten worden. (bij
voorkeur van hetzelfde model)
IEC voedingsconnector met geïntegreerde schakelaar.
EERSTE INGEBRUIKNAME
Belangrijke instructies:
Controleer voor het eerste gebruik van het apparaat of het tijdens het transport beschadigd werd. Mocht er
schade zijn, gebruik het dan niet, maar raadpleeg eerst uw dealer.
Belangrijk: Dit apparaat verliet de fabriek in uitstekende staat en goed verpakt. Het is erg belangrijk dat
de gebruiker de veiligheidsaanwijzingen en raadgevingen in deze gebruiksaanwijzing uiterst nauwkeurig
volgt. Elke schade veroorzaakt door verkeerd gebruik van het apparaat valt niet onder de garantie. De
dealer aanvaardt geen verantwoordelijkheid voor mankementen en problemen die komen door het
veronachtzamen van deze gebruiksaanwijzing.
Bewaar deze brochure op een veilige plaats om hem in de toekomst opnieuw te kunnen raadplegen.
Indien U ooit het apparaat verkoopt mag u niet vergeten om de gebruiksaanwijzing bij te voegen.
Om het milieu te beschermen, probeer zoveel mogelijk het verpakkingsmateriaal te recycleren.
Controleer de inhoud:
Kijk na of de verpakking volgende onderdelen bevat:
Gebruiksaanwijzing
AVM versterkermodule
Voedingskabel
JB SYSTEMS
®
9/28 AVM-AMPLIFIER MODULES
JB SYSTEMS
®
10/28 AVM-AMPLIFIER MODULES
Page 8

NEDERLANDS
VEILIGHEIDSVOORSCHRIFTEN:
Stel dit apparaat niet bloot aan regen of vocht, dit om het risico op brand en elektrische schokken te
laat het apparaat aan de omgevingstemperatuur wenn
het transport, naar een warm vertrek is overgebracht. Condensatie kan het toestel soms verhinderen
perfect te functioneren. Het kan soms zelfs schade aan het apparaat toebrengen.
Gebruik dit apparaat uitsluitend binnenshuis.
stukken metaal en mors geen vocht binnen in het toestel om elektrische schokken of storing
te vermijden. Objecten gevuld met water, zoals bvb. Vazen, mogen
Indien er toch een vreemd voorwerp of water in het apparaat
Open vuur, zoals brandende kaarsen, mogen niet op het apparaat geplaatst worden.
Zorg dat het toestel niet in een stoffige omgeving wordt gebruikt en maak het regelmatig schoon.
t de buurt van kinderen.
Dit apparaat mag niet door onervaren personen bediend worden.
De maximum veilige omgevingstemperatuur is 40°C. Gebruik het apparaat niet bij hogere temperaturen.
Trek altijd de stekker uit wanneer het apparaat gedurende langere t
de onderhoudsbeurt te beginnen.
De elektrische installatie behoort uitsluitend uitgevoerd te worden door bevoegd personeel, volgens de in
uw land geldende regels betreffende elektrische en mechanische veiligheid.
ntroleer dat de beschikbare spanning niet hoger is dan die aangegeven op de achterzijde van het
Het stopcontact zal steeds vrij toegankelijk blijven zodat de stroomkabel op elk moment kan worden
De elektrische kabel behoort altijd i
elektrische kabel gekneusd of beschadigd is. De kabel moet vervangen worden door de fabrikant zelf, zijn
dealer of vergelijkbare bekwame personen om een brand te voorkomen.
ische draad nooit in contact komen met andere draden.
Als de netschakelaar zich in OFF (uit) positie bevindt dan is dit apparaat niet volledig van het lichtnet
Volgens de veiligheidsvoorschriften moet deze installatie geaard worden.
sche schokken te voorkomen, moet U de behuizing niet openen. Afgezien van de zekering zitten
er geen onderdelen in die door de gebruiker moeten worden onderhouden.
een zekering en overbrug de zekeringhouder nooit. Vervang een beschadigde zek
door een zekering van hetzelfde type en met dezelfde elektrische kenmerken.
Ingeval van ernstige problemen met het bedienen van het toestel, stopt U onmiddellijk het gebruik ervan.
Contacteer uw dealer voor een eventuele reparatie.
CAUTION
De bliksempijl die zich in een gelijkbenige driehoek bevindt is b
gebruik of de aanwezigheid van niet
het toestel die voldoende kracht heeft om een risico van elektrocutie in te houden.
binnen de gelijkbenige driehoek is bedoeld om de gebruiker erop te wijzen dat
er in de meegeleverde literatuur belangrijke gebruik en onderhoudsinstructies vermeld staan
betreffende dit onderdeel.
Dit symbool betekent: het apparaat mag enkel binnenhuis
Dit symbool betekent: Lees de handleiding!
Dit symbool betekent: Klasse I apparaten
Het toestel is geschikt om gemonteerd te worden op stand
tandaard ontvlambare oppervlakten omvatten bouwmaterialen
materialen van meer dan 2mm dik
AMPLIFIER MODULES
op dit apparaat worden geplaatst.
geraakt, moet U het direct van het lichtnet
ijd niet wordt gebruikt of alvorens met
n uitstekende staat te zijn. Zet het apparaat onmiddellijk af als de
WAARSCHUWING:
Om het risico op elektrocutie zoveel
mogelijk te vermijden mag u nooit de behuizin
verwijderen. Er bevinden zich geen onderdelen in het
toestel die u zelf kan herstellen. Laat de herstellingen
enkel uitvoeren door een bevoegde technicus.
edoeld om u te wijzen op het
geïsoleerde onderdelen met een “gevaarlijke spanning” in
worden gebruikt.
aard ontvlambare oppervlakten.
zoals hout en houtbevattende
HANDLEIDING
NEDERLANDS HANDLEIDING
Gebruik best de originele verpakking als het toestel vervoerd moet worden.
Om veiligheidsredenen is het verboden om ongeautoriseerde modificaties aan het toestel aan te brengen.
g
ONDERHOUD
Reinig het toestel met een zacht, lichtjes bevochtigd doek. Vermijd water te morsen in het toestel. Gebruik
nooit vluchtige producten zoals benzeen of thinner, dit kan het toestel beschadigen.
Het uitroepteken
S
voorkomen.
Om condensatie te voorkomen:
Plaats geen
afkoppelen.
Houd het apparaat ui
Co
toestel.
uitgetrokken.
-
en wanneer het, na
nooit
INSTALLATIE EN AANSLUITING
Controleer of uw VIBE klankkast voorzien is om de AVM versterkermodules te installeren. ALLEEN de Mk2
serie is aangepast om de AVM versterkers te ontvangen!
Indien u over een ouder model beschikt is de installatie heel wat moeilijker om uit te voeren. In dit geval kan
de installatie alleen overwogen worden indien u over heel wat kennis en ervaring heeft. Het installeren in
oudere klankkasten wordt hier niet beschreven!
Indien uw PL klankkast een gepast model is voor het eenvoudig installeren van de AVM modules, gelieve
dan de installatie uit te voeren zoals hieronder wordt beschreven:
A. Ontkoppel de passieve klankkast van de
versterker en maak de schroeven van de
metalen aansluitplaat (aan de achterkant) los.
B. Bewaar de schroeven voor later en verwijder
de connectorplaat: u zult aan de achterkant
een speciale connector zien.
C. Om deze connector los te maken moet u op
de vergrendeling van de connector drukken
om de 2 delen te kunnen scheiden. Verwijder
de originele afdekplaat en maak de AVM
versterkermodule klaar.
D. Op de versterkermodule bevindt zich hetzelfde
type connector als op de originele afdekplaat:
druk dus weer op de vergrendeling om de 2
connectordelen samen te brengen.
E. Controleer zeker of de connectordelen goed in
elkaar zitten: tijdens het monteren moet u een
“klik” horen. Indien deze connector niet goed
gemonteerd is zou deze later kunnen
loskomen door de trillingen.
F. Bevestig de versterkermodule in de klankkast
met de 8 originele schroeven.
Laat de elektr
gescheiden!
Om elektri
Repareer nooit
steeds
JB SYSTEMS
®
11/28 AVM-
ering
JB SYSTEMS
®
12/28 AVM-AMPLIFIER MODULES
Page 9

NEDERLANDS HANDLEIDING
Vermogen op 8
Ω
Vermogen op 4
Ω
Ingangsgevoeligheid
line
Ingangsimpedantie
verhouding
weighted)
Koeling
Line ingang/uitgang
Uitgangen
Beveiliging
Voeding
Verbruik
Installatieopening
Gewicht
NEDERLANDS HANDLEIDING
FUNCTIES
AVM-2 / AVM-3 AVM-1
1. VENTILATOR & VENTILATIEOPENINGEN: tijdens zijn werking produceert de versterker hitte die moet
worden afgevoerd. De ventilatoren in de versterker moeten de warmte op een zo efficiënt mogelijke
manier kunnen evacueren. Daarom is het zeer belangrijk om geen enkele ventilatieopening af te dekken
aangezien dit een oververhitting kan veroorzaken.
2. VOEDINGSSCHAKELAAR: wordt gebruikt om de interne versterker aan/uit te zetten. De LED gaat aan
wanneer de versterker aan staat.
3. NETAANSLUITING: voedingsingang via een IEC stekker met geïntegreerde zekeringhouder. Sluit hier
de meegeleverde voedingskabel aan.
4. FILTER SCHAKELAAR: wordt gebruikt om de ingebouwde actieve filter in/uit te schakelen:
AVM-1: 100Hz low-cut filter, welke u kunt gebruiken om geen lage frequenties naar uw klankkast te
sturen wanneer deze gebruikt wordt in combinatie met een actieve subwoofer.
AVM-2/3: regelbare 90-250Hz hi-cut filter voor een gebruik in actieve subwoofers.
5. SPEAKER OUT: u kunt via deze Speakon uitgang een “passieve” klankkast van 8 Ohm aansluiten. De
aansluiting is als volgt: +1 en -1.
Opgelet: U kunt deze uitgang alleen belasten met een 8Ω klankkast!!! Sluit NOOIT een 4Ω klankkast of
meer dan één 8Ω klankkast aan op deze uitgang! Dit kan de versterkermodule beschadigen. Wanneer
een AVM-2 ingebouwd is in een VIBE30 Mk2 mag u GEEN extra passieve klankkast aansluiten !
6. FILTER CONTROL: (alleen op de AVM-2 / AVM-3) wordt gebruikt om de hi-cut cross-over frequentie
van de interne cross-over in te stellen. U kunt deze frequentie instellen tussen 90Hz en 250Hz: ideaal
om een actief ‘subwoofer + top’ systeem op te bouwen! Voor de meeste subwoofer toepassingen is een
cross-over punt tussen 90Hz en 150Hz ligt OK, hoewel u het best de optimale instelling van uw systeem
vindt door gewoon te luisteren en te vergelijken.
7. LINE IN/OUT: hier kunt u zowel symmetrische als asymmetrische line signalen insturen. U kunt de line
uitgang gebruiken om het ingangssignaal door te sturen naar een volgende versterker.
8. MASTER LEVEL: Met deze knop kunt u het algemene uitgangsniveau van de versterker instellen. Zet
deze knop steeds op ‘nul’ (min) wanneer u de versterker aanzet en stel daarna het gewenste niveau in.
BELANGRIJK: vergeet niet dat de kracht van de AVM modules dikwijls het maximum vermogen
van de VIBE klankkaste overschrijdt. U moet dus zeer voorzichtig te werk gaan en steeds starten
met de volumeregeling (8) en trimmer (9) bijna gesloten, daarna kunt u voorzichtig het volume
opdrijven
9. TRIMMER: wordt gebruikt om het ingangsniveau te begrenzen. U kunt het maximum niveau van de
versterker bepalen, zelfs wanneer de algemene uitgangsniveauregeling (8) op maximum staat.
10. CLIP LED: is aan wanneer de limiter werkt. U werkt dan aan de maximumgrens van de versterker,
gelieve het volume een beetje te verlagen.
EIGENSCHAPPEN
MODEL AVM-1 AVM-2 AVM-3
(1kHz, THD+N <0,1%)
(1kHz, THD+N <0,1%)
Freq. Resp. (+/-2dB)
S/R
Damping factor
Zekering (5x20mm)
Afmetingen (mm)
(zonder voedingskabel)
U kan de laatste versie van deze handleiding downloaden via onze website: www.beglec.com
(A-
(peak/4Ω )
(mm)
Elke inlichting kan veranderen zonder waarschuwing vooraf
300Wrms 500Wrms 800Wrms
500Wrms 850Wrms 1300Wrms
20 – 20.000Hz 20 – 20.000Hz 20 – 20.000Hz
1V 1V 1V
20 kΩ 20 kΩ 20 kΩ
>86dB >88dB >92dB
320 350 350
Ventilator in
magnetisch veld
Symmetrische 3-pins
XLR
Speakon +1/-1 Speakon +1/-1 Speakon +1/-1
Thermisch, Limiter,
Stroombegrenzer,
kortsluiting, DC-
beveiliging
T5AL / 250V T8AL / 250V T12AL / 250V
AC230V / 50Hz AC230V / 50Hz AC230V / 50Hz
630W 1000W 1550W
275x145x72mm 320x160x78mm 320x160x78mm
253x123mm 298x138mm 298x138mm
2kg 3kg 3kg
Ventilator in
magnetisch veld
Symmetrische 3-pins
XLR
Thermisch, Limiter,
Stroombegrenzer,
kortsluiting, DC-
beveiliging
Ventilator in
magnetisch veld
Symmetrische 3-pins
XLR
Thermisch, Limiter,
Stroombegrenzer,
kortsluiting, DC-
beveiliging
JB SYSTEMS
®
13/28 AVM-AMPLIFIER MODULES
JB SYSTEMS
®
14/28 AVM-AMPLIFIER MODULES
Page 10

DEUTSCH BEDIENUNGSANLEITUNG
SICHERHEITSHINWEISE
Zur Vermeidung von Stromschlag oder Feuer, Gerät bitte nicht Regen oder Feuchtigkeit aussetzen.
Kondensation im Inneren des Geräts bitte nach dem Transport in eine warme
Umgebung zum Temperaturausgleich einige Zeit ausgeschaltet stehen lassen. Kondensation kann zu
Leistungsverlust des Geräts oder gar Beschädigung führen.
feuchten Räumen und Umgebungen verwenden.
Keine Metallgegenstände oder Flüssigkeiten ins Innere des Geräts gelangen lassen. Keine mit Flüssigkeit
gefüllten Gegenstände, z.B. Vasen, auf das Gerät stellen. Kurzschluss oder Fehlfunktion können die Folge
einmal vorkommen sollte, bitte sofort Netzstecker ziehen und vom Stromkreis
Offene Brandquellen, wie z.B. brennende Kerzen, sollten nicht auf das Gerät gestellt werden.
Nicht in staubiger Umgebung verwenden und regelmäßig reinigen.
Für Kinder unerreichbar aufbewahren.
Unerfahrene Personen sollen das Gerät nicht bedienen.
Umgebungstemperatur darf 40ºC nicht überschreiten.
Stets Netzstecker ziehen, wenn das Gerät für einen längeren Zeitraum nicht genutzt oder es gewartet
sche Anschlüsse nur durch qualifiziertes Fachpersonal überprüfen lassen.
Sicherstellen, dass Netzspannung mit Geräteaufkleber übereinstimmt.
Die Netzsteckdose sollte immer gut erreichbar sein, um das Gerät vom Netz zu trennen.
Netzkabel betreiben.
durch den Hersteller, seinen Vertrieb oder durch eine qualifizierte Person ersetzt werden.
Netzkabel nicht mit anderen Kabeln in Berührung kommen lassen!
Das Gerät ist nicht vollständig vom
Sicherheitsbestimmungen zu entsprechen, muss dieses Gerät geerdet werden.
Gerät nicht öffnen. Abgesehen vom Tausch der Sicherung sind keine zu wartenden Bauteile i
Sicherung niemals reparieren oder überbrücken, sondern immer durch gleichartige Sicherung ersetzen!
Bei Fehlfunktion Gerät nicht benutzen und sich mit dem Händler in Verbindung setzen.
Bei Transport bitte Originalverpackung verwenden, um
Aus Sicherheitsgründen dürfen an dem Gerät keine unbefugten Veränderungen vorgenommen werden.
Die Reinigung des Geräts erfolgt mit einem leicht mit Wasser angefeuchteten Tuch. Vermeiden Sie, dass
innere gelangt. Verwenden Sie keine brennbaren Flüssigkeiten wie Benzin oder
Verdünner, die das Gerät beschädigen würden.
CAUTION
Das Blitzsymbol im Dreieck weist den Benutzer darauf hin, dass eine Berührungsgefahr mit
nicht isolierten Teilen im Geräteinneren, die eine gefährliche Spannung führen, besteht. Die
Spannung ist so hoch, das hier die Gef
Das Ausrufezeichen im Dreieck weist den Benutzer auf wichtige Bedienungs
Wartungshinweise in den Dokumenten hin, die dem Gerät beiliegen.
Dieses Symbol bedeutet: Nur innerha
Dieses Symbol bedeutet: Achtung! Bedienungsanleitung lesen!
Dieses Symbol bedeutet: Klasse I Klassifizierung
BEDIENUNGSANLEITUNG
AMPLIFIER MODULES
Ist die Zugangsleitung beschädigt, muss diese
Netz getrennt, wenn der Netzschalter sich in der AUS
Schäden am Gerät zu vermeiden.
Um sich nicht der Gefahr eines elektrischen
Schlags auszusetzen, entfernen Sie keines der
befinden sich keine vom
Benutzer reparierbaren Teile
Reparaturen dem qualifizierten Kundendienst
ahr eines elektrischen Schlages besteht.
DEUTSCH
BEDIENUNGSANLEITUNG
Vielen Dank, dass Sie sich für den Erwerb dieses JBSystems®-Produkt entschieden haben. Bitte lesen Sie
diese Bedienungsanleitung sorgfältig vor der Inbetriebnahme durch, zur vollen Ausschöpfung der
Möglichkeiten, die dieses Gerät bietet, sowie zu Ihrer eigenen Sicherheit.
EIGENSCHAFTEN
Das Gerät ist funkentstört und erfüllt die Anforderungen der europäischen und nationalen Bestimmungen.
Entsprechende Dokumentation liegt beim Hersteller vor.
Klasse-D-Verstärkermodul zum Einbau in Lautsprecher der VIBE Mk2 Serie.
Sie benötigen lediglich einen Schraubendreher und 5 Minuten Zeit für diesen Umbau. Es bedarf dazu
absolut keiner technischen Fähigkeiten!
Hohe Ausgangsleistung:
AVM-1: 300 Wrms @ 8 ohm ~ 500 Wrms @ 4 ohm
AVM-2: 500 Wrms @ 8 ohm ~ 850 Wrms @ 4 ohm
AVM-3: 800 Wrms @ 8 ohm ~ 1300 Wrms @ 4 ohm
Symmetrischer/Asymmetrischer Leitungseingang/-ausgang (XLR) mit Lautstärkenregelung
Integrierte aktive Filter für einfaches Setup von oben / Subwoofer-Kombinationen:
AVM-1: 100Hz Tiefensperre, zum Sperren von tiefen Frequenzen im Lautsprecher, wenn in
Kombination mit einem aktiven Subwoofer [Bassbox].
AVM-2/3: regelbarer 90-250Hz Höhensperre zur Verwendung in aktiven Subwoofer.
Speakon-Ausgang für als Zubehör gelieferte passiver 8 Ohm Box. (Vorzugsweise gleiche Modell)
IEC-Eingang-Netzstecker mit eingebautem Schalter.
VOR DER ERSTBENUTZUNG
Wichtige Hinweise:
Vor der Erstbenutzung bitte das Gerät zuerst auf Transportschäden überprüfen. Sollte das Gerät einen
Schaden aufweisen, Gerät bitte nicht benutzen, sondern setzen Sie sich unverzüglich mit Ihrem Händler in
Verbindung.
Wichtiger Hinweis: Das Gerät hat das Werk unbeschädigt und gut verpackt verlassen. Es ist wichtig,
dass der Benutzer sich streng an die Sicherheitshinweise und Warnungen in der Bedienungsanleitung
hält. Schäden durch unsachgemäße Handhabung sind von der Garantie ausgeschlossen. Der Händler
übernimmt keine Verantwortung für Schäden, die durch Nichtbeachtung der Bedienungsanleitung
hervorgerufen wurden.
Die Bedienungsanleitung zum zukünftigen Nachschlagen bitte aufbewahren. Bei Verkauf oder sonstiger
Weitergabe des Geräts bitte Bedienungsanleitung beifügen.
Aus Umweltschutzgründen Verpackung bitte wiederverwenden oder richtig trennen.
Überprüfen Sie den Inhalt:
Folgende Teile müssen sich in der Geräteverpackung befinden:
Bedienungsanleitung
AVM-Verstärkermodul
Netzkabel
Zur Vermeidung von
Gerät nicht im Freien und in
sein. Falls es doch
trennen.
wird.
Elektri
Gerät nicht mit beschädigtem
befindet.
Um den gesetzlichen
enthalten.
ACHTUNG:
Gehäuseteile. Im Geräteinneren
. Überlassen Sie
.
- und
lb von Räumen verwenden.
-Stellung
m Gerät
JB SYSTEMS
®
15/28 AVM-AMPLIFIER MODULES
WARTUNG
Wasser in das Gerät
JB SYSTEMS
®
16/28 AVM-
Page 11
DEUTSCH BEDIENUNGSANLEITUNG
DEUTSCH BEDIENUNGSANLEITUNG
EINBAU UND ANSCHLÜSSE
Überprüfen Sie, ob Ihr VIBE-Lautsprecher bereits für den Gebrauch mit dem neuen AVM-Verstärkermodul
ausgelegt ist. NUR die Mk2-Serie ist für den Einsatz mit dem AVM-Verstärker angepasst!
Wenn Sie eine ältere Box haben, ist der Einbau ziemlich kompliziert und sollte nur von Fachkräften
vorgenommen werden. Der Einbau in ältere Boxen wird hier nicht erläutert!
Wenn Ihr VIBE-Lautsprecher für den Einbau von AVM-Modulen ausgelegt ist, gehen Sie beim Einbau
gemäß den nachfolgenden Anweisungen vor:
A. Trennen Sie die passive VIBE-Box vom
Verstärker und lösen Sie die
Befestigungsschrauben der Anschlussplatte.
B. Bewahren Sie die Schrauben auf und
entfernen Sie die Anschlussplatte: an der
Rückseite sehen Sie einen Spezialstecker.
C. Um den Spezialstecker abzuklemmen, die
Steckerverriegelung drücken und die beiden
Steckverbinder trennen. Die ursprüngliche
Anschlussplatte entfernen und das AVMVerstärkermodul anbringen.
D. Das Verstärkermodul verwendet denselben
Stecker wir die Anschlussplatte: drücken Sie
die Verriegelung und verbinden Sie die beiden
Teile wieder miteinander.
E. Überprüfen Sie, dass die Verriegelung
funktioniert: Sie müssen eine Klicken hören.
Gehen Sie absolut sicher, dass die
Steckvorrichtungen richtig miteinander
verbunden sind! Wenn nicht können durch
Schwingungen Wackelkontakte entstehen.
F. Setzen Sie das Verstärkermodul an seinen
Platz und verwenden Sie die Originalschrauben, um das Modul zu befestigen.
FUNKTIONEN
AVM-2 / AVM-3 AVM-1
1. VENTILATOR UND LÜFTUNGSÖFFNUNGEN: Während des Betriebes erzeugt der Verstärker Hitze die
abgeführt werden muss. Die Lüfter im Inneren des Verstärkers müssen in der Lage sein die Hitze am
effektivsten abzuführen. Dafür ist es absolut wichtig die Lüftungsöffnungen nicht zu verdecken, da der
Verstärker sonst überhitzt wird.
2. NETZSCHALTER: zum Ein-/Ausschalten des eingebauten Verstärkers. Die LED geht an, wenn die Box
angeschaltet wird.
3. NETZEINGANG: Netzeingang mit IEC-Buchse und eingebautem Sicherungssockel. Schließen Sie das
mitgelieferte Netzkabel hier an.
4. FILTERSCHALTER: zum Ein-/Ausschalten des eingebauten Aktivfilters:
AVM-1: 100Hz Tiefensperre, zum Sperren von tiefen Frequenzen im Lautsprecher, wenn in
Kombination mit einem aktiven Subwoofer [Bassbox].
AVM-2/3: regelbarer 90-250Hz Höhensperre zur Verwendung in aktiven Subwoofer.
5. LAUTSPRECHER-AUSGANG: Sie können einen zweiten „passiven” Lautsprecher an diesen Speakon-
Ausgang anschließen. Die Anschlüsse sind +1 und -1.
Achtung: Dieser Ausgang ist nur für 8Ω Belastung ausgelegt!!! Niemals einen 4Ω Lautsprecher oder
mehr als eine 8Ω Lautsprecherbox an diesen Ausgang anschließen! Dies kann das Verstärkermodul
beschädigen. Wenn AVM-2 in VIBE30 Mk2 montiert ist, ist es nicht erlaubt eine zusätzliche passive
Lautsprecher an zu schließen!
6. FILTER-STEUERUNG: (nur auf der AVM-2 / AVM-3) zum Einstellen der hi-cut Weichenfrequenz der
integrierten Weiche. Sie können die Frequenz zwischen 90Hz und 250Hz einstellen: ideal um ein
Aktivsystem auf Grundlage eines Tieftöners (Subwoofer) + Mittelhochtonbox zu realisieren! Für die
meisten Tieftöner-Anwendungen ist ein Überschneidungspunkt zwischen 90Hz und 150Hz OK. Sie
werden allerdings beim Zuhören und Vergleichen leicht die optimalen Einstellungen für Ihr System
herausfinden.
7. LEITUNGSEINGANG/AUSGANG: Dieser Eingang ist sowohl für symmetrische als auch für
asymmetrische Leitungssignale geeignet. Der Ausgang ermöglicht den Anschluss von mehreren
Lautsprecherboxen an denselben Leitungsausgang eines Mischers.
8. MASTER PEGEL: zum Einstellen der lautstärke des Verstärkers. Setzen Sie den Masterpegel stets auf
Null, wenn Sie die Box einschalten. Drehen Sie anschließend die Lautstärke auf den gewünschten Wert.
WICHTIG: Beachten Sie, dass die Leistung der AVM-Module oft die maximale Leistung der VIBEBoxen, in denen sie eingesetzt werden, überschreitet. Dies bedeutet, dass Sie sehr vorsichtig
sein sollten und stets mit geschlossenem Master-Pegel (8) oder Trimmer (9) starten sollten und
dann den Pegel schrittweise erhöhen sollten.
9. TRIMMER: zum Begrenzen des Eingangspegels des Line-Eingangs. Mit diesem Trimmer können Sie
die Maximalleistung des Verstärkers einstellen, auch wenn der Master-Pegel (8) auf Maximum gestellt
ist.
10. CLIP LED: Leuchtet wenn der Limiter greift. Sie arbeiten am Limit des Verstärkers, bitte regeln sie die
Lautstärke etwas runter.
JB SYSTEMS
®
17/28 AVM-AMPLIFIER MODULES
JB SYSTEMS
®
18/28 AVM-AMPLIFIER MODULES
Page 12

DEUTSCH BEDIENUNGSANLEITUNG
Leistung
8
Ω
Leistung
4
Ω
Eingangsimpedanz
S/R ratio
(A-weighted)
Leitungseingang
/-Ausgang
Ausgänge
Sicherung
(5x20mm)
Abmessungen
(mm)
Au
sschnitt
(mm)
TECHNISCHE DATEN
MODEL AVM-1 AVM-2 AVM-3
(1kHz, THD+N <0,1%)
(1kHz, THD+N <0,1%) 500Wrms 850Wrms 1300W rms
Frequenzgang (+/-2dB)
Eingangsempfindlichkeit line
Dämpfungsfaktor
Kühlung
Schutzvorrichtungen
Stromversorgung
Leistungsaufnahme (peak/4Ω )
Gewicht (ohne Netzkabel)
Technische Änderungen können auch ohne Vorankündigung vorgenommen werden!
Sie können sich die neueste Version dieses Benutzerhandbuches von unserer Website
300Wrms 500Wrms 800Wrms
20 – 20.000Hz 20 – 20.000Hz 20 – 20.000Hz
1V 1V 1V
20 kΩ 20 kΩ 20 kΩ
>86dB >88dB >92dB
320 350 350
Magnetfeld- Lüfter Magnetfeld- Lüfter Magnetfeld- Lüfter
symmetrisches
3 -poligen XLR
Speakon +1/-1 Speakon +1/-1 Speakon +1/-1
Thermischer Schutz,
Begrenzer,
Strombegrenzer,
Kurzschlussschutz,
GS-Schutz
T5AL / 250V T8AL / 250V T12AL / 250V
AC230V / 50Hz AC230V / 50Hz AC230V / 50Hz
630W 1000W 1550W
275x145x72mm 320x160x78mm 320x160x78mm
253x123mm 298x138mm 298x138mm
2kg 3kg 3kg
herunterladen: www.beglec.com
symmetrisches
3 -poligen XLR
Thermischer Schutz,
Begrenzer,
Strombegrenzer,
Kurzschlussschutz,
GS-Schutz
symmetrisches
3 -poligen XLR
Thermischer Schutz,
Begrenzer,
Strombegrenzer,
Kurzschlussschutz,
GS-Schutz
ESPAÑOL MANUAL DE FUNCIONAMIENTO
MANUAL DE FUNCIONAMIENTO
Gracias por comprar este producto JB Systems®. Para sacar el máximo partido a todas las funciones, lea
detenidamente estas instrucciones de funcionamiento.
CARACTERÍSTICAS
Esta unidad es a prueba de interferencias de radio. Este producto cumple con los requisitos de las
directrices nacionales y europeas actuales. Se ha establecido la conformidad y las instrucciones y
documentos correspondientes han sido depositados por el fabricante.
Módulo amplificador clase D para instalarse dentro de altavoces de la serie VIBE Mk2
Todo lo que necesita es un destornillador y 5 minutos de su tiempo para hacer la transformación, no
requiere conocimientos técnicos!
Alta potencia de salida:
AVM-1: 300Wrms @ 8ohm ~ 500Wrms @ 4ohm
AVM-2: 500Wrms @ 8ohm ~ 850Wrms @ 4ohm
AVM-3: 800Wrms @ 8ohm ~ 1300Wrms @ 4ohm
Entrada/salida de línea balanceada/desbalanceada (XLR) con control de volumen.
Filtros activos integrados para una fácil configuración de las principales combinaciones del subwoofer:
AVM-1: filtro de corte bajo 100Hz, para cortar las frecuencias bajas en el gabinete del altavoz
cuando se utiliza en combinación con un subwoofer activo.
AVM-2/3: 90-250Hz filtro de corte hi ajustable para uso en los subwoofers activos.
Salida de activación de altavoces para el gabinete de 8 ohmios pasivo opcional. (Preferible mismo
modelo)
Conector de cable IEC macho con interruptor integrado.
ANTES DE UTILIZAR EL APARATO
Antes de comenzar a utilizar esta unidad, compruebe que no existan daños ocasionados durante el
transporte. Si observa algún daño, no utilice el dispositivo y póngase primero en contacto con su
distribuidor.
Importante: Este dispositivo ha salido de nuestras instalaciones en perfecto estado y bien embalado. Es
absolutamente necesario que el usuario siga estrictamente estas instrucciones y advertencias de
seguridad que aparecen en este manual de usuario. Cualquier daño producido por un manejo
inadecuado queda excluido de la garantía. El distribuidor no asumirá ninguna responsabilidad por
cualquier defecto o problema que surja por no haber seguido el manual de usuario.
Guarde este folleto en un lugar seguro para consultarlo en el futuro. Si vende este aparato más adelante,
asegúrese de incluir este manual de usuario.
Para proteger el medio ambiente, recicle el material de embalaje en la medida de lo posible.
Compruebe el contenido:
Compruebe que la caja contiene los siguientes elementos:
Manual de usuario
Módulo amplificador AVM
Cable de alimentación
JB SYSTEMS
INSTRUCCIONES DE SEGURIDAD:
CAUTION
El símbolo en forma de rayo con cabeza de flecha dentro de un triángulo equilátero se emplea
para alertar sobre el uso o presencia de “voltaje peligroso” no aislado dentro de la carcasa del
producto con la magnitud suficiente para constituir un riesgo de descarga eléctrica.
®
19/28 AVM-AMPLIFIER MODULES
JB SYSTEMS
®
PRECAUCIÓN: Para reducir el riesgo de descargas
eléctricas, no quite la cubierta superior. No existen piezas en
el interior que pueda mantener o reparar el usuario. Asigne el
mantenimiento y las reparaciones sólo a personal cualificado.
20/28 AVM-AMPLIFIER MODULES
Page 13

ESPAÑOL
ndios o riesgos de descarga, no exponga la unidad a la lluvia o a la humedad.
Para evitar que se forme condensación en el interior, deje que la unidad se adapte a la temperatura
exterior cuando la lleve a una habitación cálida después de transportarla. A v
impide que la unidad funcione a pleno rendimiento y puede incluso provocar daños.
Esta unidad sólo se puede usar en el interior.
No coloque objetos metálicos ni derrame líquidos dentro del reproductor de la unidad. No deberá colocar
bre la unidad objetos con líquidos, como jarrones. Se pueden producir descargas eléctricas o fallos de
funcionamiento. Si algún objeto extraño entra en la unidad, desconecte inmediatamente el suministro
No coloque sobre el aparato fuentes de lla
Evite el uso en ambientes con polvo y limpie la unidad regularmente.
Mantenga la unidad lejos de los niños.
Las personas sin experiencia no deben utilizar este aparato.
La máxima temperatura ambiente para que el funcionamiento s
unidad a temperaturas ambiente superiores.
Desenchufe siempre la unidad cuando no vaya a ser utilizada durante un largo periodo de tiempo o antes
La instalación eléctrica sólo debe ser llev
regulaciones sobre seguridad eléctrica y mecánica de su país.
Compruebe que el voltaje disponible no supera el que se indica en el panel trasero de la unidad.
La entrada de toma deberá permanecer oper
El cable de alimentación siempre debe estar en perfecto estado. Apague la unidad inmediatamente
cuando observe daños o desperfectos en el cable de alimentación. Debe ser reemplazado por el
ente de servicio o por personas cualificadas para evitar cualquier peligro.
¡Nunca deje que el cable de alimentación entre en contacto con otros cables!
¡Aunque el interruptor de alimentación esté en posición desconectada OFF, la unidad no estará
ente desconectada de la red eléctrica!
Este aparato debe conectarse a tierra para cumplir con las regulaciones de seguridad.
Para evitar descargas eléctricas, no abra la cubierta. Aparte del fusible de red no hay piezas en el interior
que el usuario pueda dar mantenimiento.
repare un fusible ni derive el soporte del fusible. ¡Reemplace
fusible del mismo tipo y de la misma especificación eléctrica!
En caso de que ocurran problemas de funcionamiento
contacto con su distribuidor inmediatamente.
Utilice el embalaje original cuando tenga que transportar el dispositivo.
Por razones de seguridad se prohíbe realizar modificaciones no autorizadas en la unidad
LIMPIEZA DE LA UNIDA
Limpie con un paño pulido ligeramente empapado en agua. No deje entrar agua en la unidad. No utilice
líquidos volátiles como bencina o diluyente, puesto que dañarán la unidad.
INSTALACIÓN Y CONEXIONES
ya se encuentre en condiciones para utilizarse con los nuevos módulos
SOLAMENTE la serie Mk2 está adaptado para su uso con los amplificadores
Si tiene una cabina más antigua, la instalación será un poco complicada y sólo deberá
la capacitación necesaria para realizar el trabajo.
El signo de exclamación dentro del triángulo equilátero se emplea para alertar al usuario de la
presencia de instrucciones
acompaña a este aparato.
Usar sólo en el interior.
Leer las instrucciones.
Aparato de seguridad clase I.
MANUAL DE FUNCIONAMIEN
AMPLIFIER MODULES
ea seguro es de 40 °C. No utilice la
ada a cabo por personal cualificado, de acuerdo con las
able para la desconexión de la red eléctrica.
el fusible dañado por un
serios, deje de utilizar el aparato y póngase en
¡En las instrucciones no se explica la instalación dentro
de funcionamiento y mantenimiento importantes en el texto que
Este símbolo indica:
Este símbolo indica:
Este símbolo indica:
Para evitar ince
so
eléctrico.
de comenzar el mantenimiento.
fabricante, por su ag
completam
de este aparato a las
Nunca
mas, como velas encendidas.
siempre
TO
eces la condensación
ESPAÑOL MANUAL DE FUNCIONAMIENTO
Si su cabina de altavoz VIBE está preparada para que la instalación de los módulos AVM sea sencilla,
proceda entonces con la instalación descrita a continuación:
A. Desconecte la cabina VIBE pasiva del amplificador y desatornille los tornillos que mantienen la placa
metálica del conector en su lugar.
B. Conserve los tornillos para utilizarlos
después y quite la placa del conector: En la
parte trasera podrá observar un conector
especial.
C. Para desconectar el conector especial,
presione el dispositivo de bloqueo del
conector y separe los dos conectores. Quite
la placa del conector original y coloque el
módulo amplificador AVM en su lugar.
D. El módulo amplificador utilizar el mismo
conector que la placa del conector original:
Presione el dispositivo de bloqueo y una las
2 piezas del conector.
E. Asegúrese de que se encuentre activada la
función de bloqueo: Deberá escuchar un
“clic”. ¡Vuelva a comprobar por segunda
ocasión que los conectores se encuentren
bien unidos! Si no es así, pueden
presentarse conexiones con fallos debido a
las vibraciones.
F. Coloque el módulo amplificador en su lugar y
utilice los tornillos originales para sujetar el módulo.
FUNCIONES
AVM-2 / AVM-3 AVM-1
.
D:
Compruebe que su altavoz VIBE
amplificadores AVM. ¡
de una cabina que sea más antigua!
JB SYSTEMS
®
21/28 AVM-
considerarse si tiene
AVM!
1. VENTILADOR & ORIFICIOS DE VENTILACIÓN: durante su funcionamiento, el amplificador genera
calor que es necesario disipar. Los ventiladores entro del amplificador deben ser capaces de evacuar
el calor de la forma más eficaz. Por lo tanto, es muy importante no cubrir los orificios de ventilación,
porque ello podría provocar un sobrecalentamiento de la unidad.
JB SYSTEMS
®
22/28 AVM-AMPLIFIER MODULES
Page 14

ESPAÑOL MANUAL DE FUNCIONAMIENTO
Potencia 8
Ω
Resp. Frec
.
(+/-2dB)
S
ensibilidad de entrada
line
a
Factor de amortiguamiento
Enfriamiento
Entrada
Fusible
Consumo de energía
Dimensiones
(mm)
Peso
2. INTERRUPTOR DE ALIMENTACIÓN: Se utiliza para encender/apagar el amplificador interno. El LED
se encenderá al momento de encender la cabina.
3. ENTRADA DE RED: Entrada de red eléctrica con la toma IEC y el soporte de fusible integrado,
conecte el cable de red suministrado aquí.
4. INTERRUPTOR DE FILTRO: se utiliza para encender o apagar el filtro activo integrado:
AVM-1: filtro de corte bajo 100Hz, para cortar las frecuencias bajas en el gabinete del altavoz
cuando se utiliza en combinación con un subwoofer activo.
AVM-2/3: 90-250Hz filtro de corte hi ajustable para uso en los subwoofers activos.
5. SALIDA DE ALTAVOZ: Puede conectar un segundo gabinete de altavoz “pasivo” en esta salida de
activación de altavoz. Las conexiones son +1 y -1.
Atención: ¡¡¡Esta salida sólo es compatible con cargas de 8 Ω!!! ¡Nunca conecte un altavoz de 4 Ω o
más de una cabina de altavoz de 8 Ω en esta salida! Esto puede averiar el módulo amplificador. Si una
AVM-2 se monta en un VIBE30 Mk2, NO está permitido para conectar un altavoz pasivo adicional!
6. CONTROL DE FILTRO: (sólo en AVM-2 / AVM-3) se utiliza para ajustar la frecuencia de cruce hi-cut
del filtro de cruce interno. Puede ajustar la frecuencia entre 90Hz y 250Hz: perfecto para crear un
sistema activo basado en un altavoz de graves + armario superior Para la mayoría de las aplicaciones
del altavoz de graves un punto de cruce entre 90Hz y 150Hz está bien, no obstante, escuchando y
comparando encontrará fácilmente loa ajustes óptimos para sus sistema.
7. ENTRADA/SALIDA DE LÍNEA: Esta entrada acepta tanto las señales de nivel de línea balanceadas
como las desbalanceadas. La salida ayuda a conectar varias cabinas de altavoces en la misma salida
de línea de un mezclador.
8. NIVEL MAESTRO: Se utiliza para ajustar el volumen general del amplificador. Siempre ajuste el nivel
maestro en cero cuando encienda la cabina, después de esto puede subir el volumen hasta el nivel
deseado.
IMPORTANTE: ser conscientes de que la potencia de los modulos AVM excede la potencia
maxima de las cajas utilizadas Vibe. Esto significa que usted debe tener mucho cuidado y
arrancar con el nivel principal (8) o ajuste (9) casi cerrados, aumentando el nivel paso a paso.
9. TRIMMER: Se utiliza para limitar el nivel de entrada de la entrada de línea, con este condensador de
ajuste, puede definir la potencia máxima del amplificador, incluso si el nivel de maestría (8) está al
máximo.
10. CLIP LED: se ilumina cuando el limitador está trabajando. Usted está trabajando en los límites del
amplificador, por favor, baje el volumen un poco.
ESPAÑOL MANUAL DE FUNCIONAMIENTO
ESPECIFICACIONES
MODEL AVM-1 AVM-2 AVM-3
(1kHz, THD+N <0,1%)
Potencia 4Ω
(1kHz, THD+N <0,1%)
Impedancia de entrada
Relación S/R (A-weighted)
/salida de línea
Salidas
Protecciones
(5x20mm)
Suministro de alimentación
Corte de orificio (mm)
(sin cable de red) 2kg 3kg 3kg
Puede descargar la última versión de este manual de usuario en nuestra página
(pico /4Ω ) 630W 1000W 1550W
Toda la información está sujeta a cambios sin previo aviso
300Wrms 500Wrms 800Wrms
500Wrms 850Wrms 1300Wrms
20 – 20.000Hz 20 – 20.000Hz 20 – 20.000Hz
1V 1V 1V
20 kΩ 20 kΩ 20 kΩ
>86dB >88dB >92dB
320 350 350
ventilador en el campo
magnético
Balancedo XLR 3pin Balancedo XLR 3pin Balancedo XLR 3pin
Speakon +1/-1 Speakon +1/-1 Speakon +1/-1
Térmica, limitante,
Limitante de corriente,
corto circuito,
protección CC
T5AL / 250V T8AL / 250V T12AL / 250V
AC230V / 50Hz AC230V / 50Hz AC230V / 50Hz
275x145x72mm 320x160x78mm 320x160x78mm
253x123mm 298x138mm 298x138mm
Web:www.beglec.com
ventilador en el campo
magnético
Térmica, limitante,
Limitante de corriente,
corto circuito,
protección CC
ventilador en el campo
magnético
Térmica, limitante,
Limitante de corriente,
corto circuito,
protección CC
JB SYSTEMS
®
23/28 AVM-AMPLIFIER MODULES
JB SYSTEMS
®
24/28 AVM-AMPLIFIER MODULES
Page 15

PORTUGUÊS MANUAL DO UTILIZADOR
De modo a evitar risco de fogo ou choque eléctrico, nã
De forma a evitar a formação de condensação no interior da unidade, ao transportá
quente aguarde algum tempo de modo a que haja uma ambientação à temperatura. A condensação
mpenho da unidade ou até danificá
se unicamente a utilização em espaços fechados
Não introduza objectos de metal nem verta líquidos no interior do produto, correrá risco de choque
eléctrico ou poderá danificar o produto. Caso alg
a de imediato da corrente
Não coloque chamas descobertas (tais como velas acesas) sobre a unidade
Evite locais com poeiras. Limpe a unidade regularmente
do alcance das crianças
Esta unidade deverá ser operada unicamente por pessoas experientes
Temperatura ambiente de funcionamento máxima é de 40ºC. Não utilize esta unidade a temperaturas
Desligue sempre a unidade da corrente qua
A instalação eléctrica deve ser efectuada unicamente por pessoal qualificado, cumprindo os regulamentos
de segurança em instalações eléctricas e mecânicas do seu país
se que a voltagem a utilizar não é superior à voltagem indicada no painel traseiro da unidade
A tomada de corrente deverá permanecer acessível para que a unidade possa ser desligada da corrente
O cabo de alimentação deverá estar sempre em perfeita
imediatamente o cabo caso este apresente algum dano
agente autorizado ou pessoal qualificado de modo a evitar um acidente.
Nunca permita que este cabo entre em contac
Quando o interruptor de potência está na posição de repouso, esta unidade não está desconectada
completamente da corrente de alimentação principal.
Este dispositivo deve ser ligado à terra em ordem a cumprir com os regulamentos de seg
De forma a não correr risco de choque eléctrico não abra a cobertura da unidade. À excepção do fusível,
não existem peças que possam ser substituídas pelo utilizador
repare um fusível nem tente operar a unidade sem fusível. Substitua
por outro com as mesmas características
Em caso de problemas sérios de funcionamento, interrompa a utilização da unidade e contacte
Caso seja necessário transportar a unidade utilize a embalagem origin
de segurança, são proibidas quaisquer alterações não autorizadas à unidade
LIMPEZA DA MESA DE MISTURA
Utilize um pano limpo ligeiramente humedecido em água. Evite introduzir água dentro da unidade. Não
eno ou diluente, irá danificar a unidade.
LIGAÇÕES
já está preparada para usar com os novos módulos amplificadores
Apenas a série MK2 está adaptada para uso com os amplificadores AVM!
velha, a instalação é um pouco complicada e apenas deverá ser considerada se é
uma pessoa qualificada para o serviço. A instalação dentro de colunas mais velhas não é explicada!
está preparada para fácil instalação dos módulos
O símbolo composto por um triângulo equilátero com um ponto de exclamação alerta o
utilizador para a presença de instruções importa
Este símbolo significa: utilização unicamente em espaços fechados
Este símbolo significa: Leia instruções
Este símbolo significa: Aparelho Classe I
MANUAL DO UTILIZAD
AMPLIFIER MODULES
o exponha este produto a chuva ou humidade
um objecto estranho entre em contacto com o interior da
ndo não a utilizar durante longos períodos de tempo ou antes
s condições. Desligue a unidade e substitua
substituído pelo fabricante, pelo
sempre
AVM
ntes de utilização e manutenção do produto.
MANUAL DO UTILIZADOR
Parabéns e obrigado por ter adquirido este produto JB SYSTEMS®. Por favor leia atentamente este manual
do utilizador de forma a saber como utilizar esta unidade correctamente. Após ler este manual, guarde-o
num lugar seguro de forma a poder consultá-lo no futuro.
CARACTERÍSTICAS
Esta unidade está protegida contra interferências rádio. Este produto cumpre as exigências impostas pelas
presentes directivas nacionais e europeias. A conformidade deste produto foi comprovada e as declarações
e documentos relevantes foram efectuados pelo fabricante.
Modulo amplificador classe D para instalação dentro das colunas série VIBE Mk2
Tudo o que precisa é de uma chave de parafusos e 5 minutos do seu tempo para fazer a transformação,
não é necessária qualquer formação técnica.
Alta saída de potência:
AVM-1: 300Wrms @ 8ohm ~ 500Wrms @ 4ohm
AVM-2: 500Wrms @ 8ohm ~ 850Wrms @ 4ohm
AVM-3: 800Wrms @ 8ohm ~ 1300Wrms @ 4ohm
Entrada / saída de linha balanceada / não balanceada (XLR) com controlo volume
Filtros activos integrados para fácil instalação combinações topos / swbwoofer:
AVM-1: filtro de corte baixo, usado para cortar as baixas frequências para a coluna quando usada
em combinação com um subwoofer activo.
AVM-2/3: filtro de corte alto ajustável entre 90-250Hz para uso em subwoofers activos
Saída Speakon para coluna passiva de 8 ohm. (de preferência do mesmo modelo)
Entrada de alimentação IEC com interruptor integrado.
ANTES DE UTILIZAR
Antes de utilizar esta unidade verifique se existem danos provocados durante o transporte. Caso existam
danos aparentes, não utilize a unidade e contacte o seu revendedor.
Importante: Esta unidade deixou a nossa fábrica em perfeitas condições e devidamente embalada. É
imprescindível que o utilizador siga as instruções de segurança e avisos descritos neste manual.
Quaisquer danos provocados por utilização incorrecta não serão cobertos pela garantia. O revendedor
não será responsável por quaisquer danos ou problemas causados pelo incumprimento das instruções
deste manual.
Guarde este manual num local seguro para consulta futura. Caso venda esta unidade, forneça este
manual.
Proteja o ambiente. Recicle o material desta embalagem.
Verifique o conteúdo:
Certifique-se que a caixa contém os seguintes artigos:
Manual do utilizador
Modulo amplificador AVM
Cabo de alimentação
INSTRUÇÕES DE SEGURANÇA:
CAUTION
O símbolo composto por um triângulo equilátero com um relâmpago no interior alerta para a
presença de voltagem perigosa não isolada no interior do produto que poderá constituir risco
de choque eléctrico.
ATENÇÃO: De forma a evitar o risco de choque eléctrico,
não remova peças da unidade. Não tente fazer
reparações. Contacte pessoal qualificado
PORTUGUÊS
poderá afectar o dese
Esta unidade destina-
unidade, desligue-
Mantenha esta unidade fora
ambientes mais elevadas.
de efectuar manutenção.
Certifique-
Nunca
imediatamente o seu revendedor.
Por motivos
utilize líquidos voláteis como benz
INSTALAÇÃO E
Verifique se a sua coluna VIBE
Se tem uma coluna mais
Se a sua coluna VIBE
instalação como descrita em baixo:
OR
.
-la para ambiente
-la.
.
.
.
.
.
.
.
.
. Deverá ser
to com outros cabos!
urança.
.
um fusível danificado
!
al.
.
:
AVM.
por favor siga com a
JB SYSTEMS
®
25/28 AVM-AMPLIFIER MODULES
JB SYSTEMS
®
26/28 AVM-
Page 16

PORTUGUÊS MANUAL DO UTILIZADOR
AVM-1
AVM-2
AVM-3
Potência 8
Ω
Potência 4
Ω
Sensib. entrada linha
Impedância entrada
Rácio
Arrefecimento
Entrada/Saída linha
Protecções
Consumo
Dimensões
(mm)
Orifício
Peso
PORTUGUÊS MANUAL DO UTILIZADOR
A. Desligue a coluna passiva VIBE do
amplificador e desaparafuse os parafusos que
mantêm a placa dos conectores no sítio.
B. Guarde os parafusos para mais tarde e
remova a placa dos conectores: na parte
traseira irá encontrar um conector especial.
C. Para desligar este conector, aperte o trinco do
conector e separe os dois conectores. Retire
a placa de conectores original e coloque o
módulo amplificador AVM no lugar.
D. O módulo amplificador usa o mesmo conector
de que a placa de conectores original:
pressione o trinco e junte as 2 partes do
conector.
E. Certifique-se que a função trinco fica fixa:
deverá ouvir um clique. Verifique se as
ligações ficaram bem juntas! Se não, más
ligações podem ocorrer devido a vibrações.
F. Coloque o módulo amplificador no lugar e use
os parafusos originais para apertar o módulo.
CONTROLOS E FUNÇÕES
AVM-2 / AVM-3 AVM-1
1. VENTOINHA E ORIFÍCIOS DE VENTILAÇÃO: Durante o funcionamento é produzido calor que deve
ser dissipado. As ventoinhas no interior do amplificador têm de poder evacuar o calor da maneira mais
eficiente. Portanto, de modo a evitar o sobreaquecimento, é muito importante que não cubra os orifícios
de ventilação.
2. INTERRUPTOR POTÊNCIA: Usado para ligar/desligar o amplificador interno. O LED irá acender
quando a coluna estiver ligada.
3. ENTRADA ALIMENTAÇÃO: Entrada de alimentação com encaixe IEC e suporte de fusível integrado,
conecte o cabo de alimentação aqui.
4. INTERRUPTOR FILTRO: usado para ligar/desligar o filtro activo integrado:
AVM-1: filtro de corte baixo de 100Hz, usado para cortar as frequências baixas para a coluna
quando usada com um subwoofer activo.
AVM-2/3: filtro de corte alto ajustável entre 90-250Hz para uso em subwoofers activos
5. SPEAKER OUTPUT: Pode conectar uma segunda coluna passiva a esta saída Speakon. As ligações
são +1 -1.
Atenção: Esta saída apenas suporta apenas de cargas de 8Ω!!! Nunca conecte uma coluna de 4Ω ou
uma coluna com mais de 8Ω a esta saída! Isto pode danificar o módulo amplificador. Se o módulo AVM2 for montado numa VIBE30 Mk2 NÃO É PERMITIDO conectar a uma coluna passiva adicional!
6. CONTROLO FILTRO: (apenas no AVM-2 / AVM-3) Usado para ajustar a frequência hi-cut do crossover
interno. Pode ajustar a frequência entre 90Hz e 250Hz: perfeito para formar um sistema activo baseado
em um subwoofer + coluna satélite! Para a maioria das aplicações subwoofer, um pontode crossover
entre 90Hz e 150Hz está OK, entretanto enquanto ouve e compara irá facilmente encontrar a
configuração ideal para o seu sistema.
7. LINE INPUT/OUTPUT: Esta entrada aceita ambos sinais com e sem balanço. A saída torna possível
conectar várias colunas á mesma saída de uma mesa de mistura.
8. NIVEL MASTER: Usado para definir o volume do amplificador. Coloque este controlo sempre este
controlo a zero quando liga / desliga a coluna.
IMPORTANT: tenha atenção que a potência dos módulos AVM geralmente excedem a potência
máxima das colunas VIBE onde serão usadas. Isto significa que deverá ser muito cuidadoso que
comece sempre com o Master (8) ou trimmer (9) quase no mínimo, e depois ir aumentando.
9. TRIMMER: usado para limitar a entrada de nível da entrada de linha, com este controlo pode definir a
potência máxima do amplificador, mesmo que o nível do Master (8) está definido no máximo.
10. LED CLIP: está aceso quando o limitador está a trabalhar. Está a trabalhar nos limites do amplificador,
por favor coloque o volume um pouco mais baixo.
ESPECIFICAÇÕES
MODEL
(1kHz, THD+N <0,1%)
(1kHz, THD+N <0,1%)
Freq. Resp. (+/-2dB)
Sinal/Ruído
Damping factor
Saídas
Fusível (5x20mm)
Alimentação
(pico/4Ω) 630W 1000W 1550W
(mm)
(sem cabo alimentação) 2kg 3kg 3kg
Estas informações estão sujeitas a alterações sem aviso prévio
Pode fazer download da versão mais recente deste manual no nosso site: www.beglec.com
300Wrms 500Wrms 800Wrms
500Wrms 850Wrms 1300Wrms
20 – 20.000Hz 20 – 20.000Hz 20 – 20.000Hz
1V 1V 1V
20 kΩ 20 kΩ 20 kΩ
>86dB >88dB >92dB
320 350 350
Ventoinha campo mag Ventoinha campo mag Ventoinha campo mag
Balanceada XLR 3pin Balanceada XLR 3pin Balanceada XLR 3pin
Speakon +1/-1 Speakon +1/-1 Speakon +1/-1
Térmico, Limitador,
Limitador corrente,
curto-circuito,
protecção DC
T5AL / 250V T8AL / 250V T12AL / 250V
AC230V / 50Hz AC230V / 50Hz AC230V / 50Hz
275x145x72mm 320x160x78mm 320x160x78mm
253x123mm 298x138mm 298x138mm
Térmico, Limitador,
Limitador corrente,
curto-circuito,
protecção DC
Térmico, Limitador,
Limitador corrente,
curto-circuito,
protecção DC
JB SYSTEMS
®
27/28 AVM-AMPLIFIER MODULES
JB SYSTEMS
®
28/28 AVM-AMPLIFIER MODULES
 Loading...