

Page 1
WWW.BEGLEC.COM
Copyright © 2011 by BEGLEC NV
‘t Hofveld 2C ~ B1702 Groot-Bijgaarden ~ Belgium
Reproduction or publication of the content in any manner, without express permission of the publisher, is prohibited.
Version: 1.0
Operation Manual
Mode d'emploi
Gebruiksaanwijzing
Bedienungsanleitung
Manual de instrucciones
Manual do utilizador
EN
FR
NL
DE
ES
PT
Page 2

Page 3

ENGLISH USER MANUAL
ENGLISH USER MANUAL
OPERATION MANUAL
Thank you for buying this JB Systems®product. To take full advantage of all possibilities and for your own
safety, please read these operating instructions very carefully before you start using this unit.
FEATURES
This unit is radio-interference suppressed. This product meets the requirements of the current European and
national guidelines. Conformity has been established and the relevant statements and documents have been
deposited by the manufacturer.
This device was designed to produce decorative effect lighting and is used in light show systems.
An eye-catching blue laser using high quality 15kHz scanners instead of ordinary stepper motors:
Very smooth and soft movements
80 Pre-programmed patterns like: numbers, drawings, words, …
Fabulous preprogrammed laser shows for all kinds of applications: lounge bar, discotheque, mobile DJ, …
Class 3B laser based on 400mW 450nm blue laser.
Several working modes:
DMX-control: 1channel for easy operation or 17 channels for full control
Standalone: sound activated (internal mic) or automatic
IR-remote: infrared remote control.
Master/slave: wonderful synchronized shows
Built-in microphone
3-digit LED display for easy menu navigation
Key actuated on/off switch and emergency switch (interlock) input for additional safety
Complies to EN/IEC 60825-1 Ed2, 2007-03 for Laser Safety
BEFORE USE
Before you start using this unit, please check if there’s no transportation damage. Should there be any, do
not use the device and consult your dealer first.
Important: This device left our factory in perfect condition and well packaged. It is absolutely necessary
for the user to strictly follow the safety instructions and warnings in this user manual. Any damage caused
by mishandling is not subject to warranty. The dealer will not accept responsibility for any resulting defects
or problems caused by disregarding this user manual.
Keep this booklet in a safe place for future consultation. If you sell the fixture, be sure to add this user
manual.
Check the contents:
Check that the cardboard box contains the following items:
Smooth Scan Blue laser
IR remote control
2 keys (for key switch)
Mains cable
Operating instructions
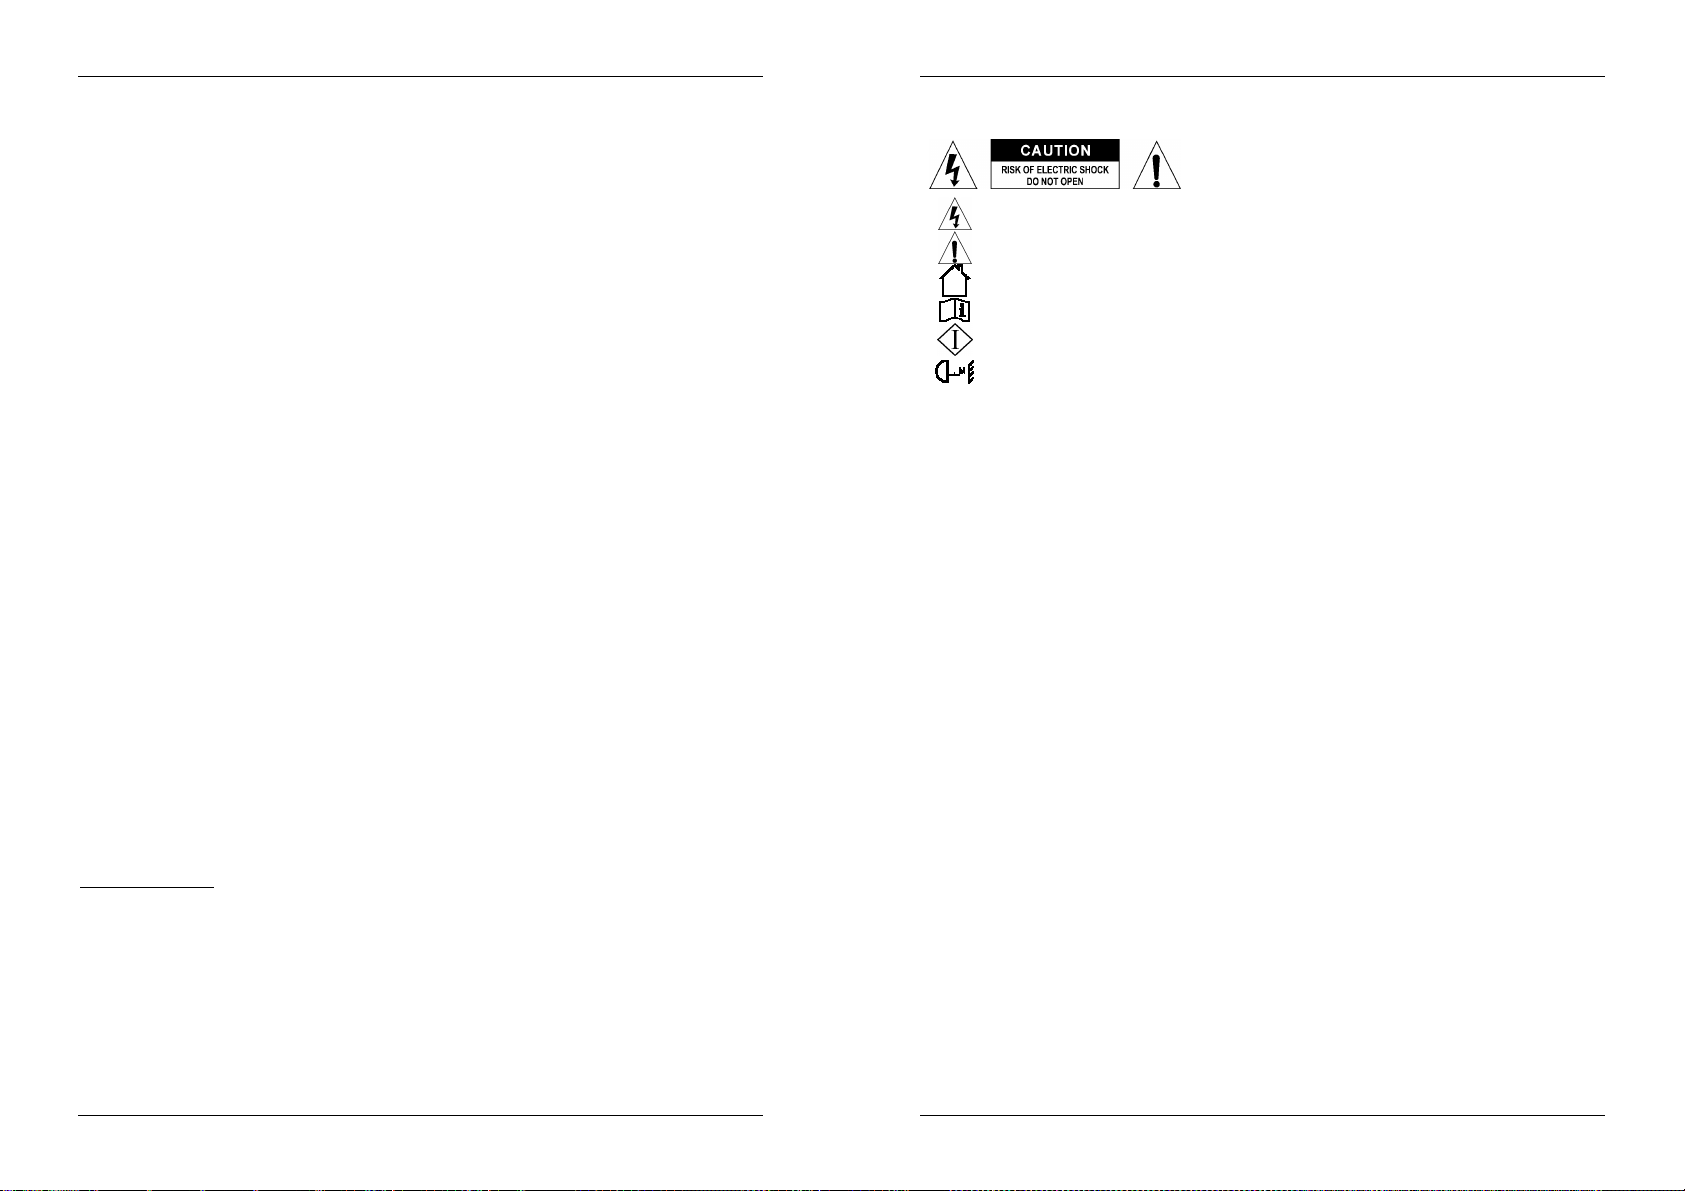
SAFETY INSTRUCTIONS:
CAUTION
The lightning flash with arrowhead symbol within the equilateral triangle is intended to alert the use
or the presence of un-insulated “dangerous voltage” within the product’s enclosure that may be of
sufficient magnitude to constitute a risk of electric shock.
The exclamation point within the equilateral triangle is intended to alert the user to the presence of
important operation and maintenance (servicing) instructions in the literature accompanying this
appliance.
This symbol means: indoor use only.
This symbol means: Read instructions.
This symbol determines: the minimum distance from lighted objects. The minimum distance between
light-output and the illuminated surface must be more than 1 meter.
To protect the environment, please try to recycle the packing material as much as possible.
A new light effect sometimes causes some unwanted smoke and/or smell. This is normal and disappears
after some minutes.
To prevent fire or shock hazard, do not expose this appliance to rain or moisture.
To avoid condensation to be formed inside, allow the unit to adapt to the surrounding temperatures when
bringing it into a warm room after transport. Condense sometimes prevents the unit from working at full
performance or may even cause damages.
This unit is for indoor use only.
Don’t place metal objects or spill liquid inside the unit. Electric shock or malfunction may result. If a foreign
object enters the unit, immediately disconnect the mains power.
Locate the fixture in a well ventilated spot, away from any flammable materials and/or liquids. The fixture
must be fixed at least 50cm from surrounding walls.
Don’t cover any ventilation openings as this may result in overheating.
Prevent use in dusty environments and clean the unit regularly.
Keep the unit away from children.
Inexperienced persons should not operate this device.
The save ambient temperature is between 15° & 40°C. Don’t use this unit at higher ambient temperatures.
Make sure the area below the installation place is free from unwanted persons during rigging, de-rigging
and servicing.
Always unplug the unit when it is not used for a longer time or before replacing the bulb or start servicing.
The electrical installation should be carried out by qualified personal only, according to the regulations for
electrical and mechanical safety in your country.
Check that the available voltage is not higher than the one stated on the rear panel of the unit.
The power cord should always be in perfect condition. Switch the unit immediately off when the power cord
is squashed or damaged. It must be replaced by the manufacturer, its service agent or similarly qualified
persons in order to avoid a hazard.
Never let the power-cord come into contact with other cables!
This fixture must be earthed to in order comply with safety regulations.
Don’t connect the unit to any dimmer pack.
Always use an appropriate and certified safety cable when installing the unit.
In order to prevent electric shock, do not open the cover. Apart from the lamp and mains fuse there are no
user serviceable parts inside.
Never repair a fuse or bypass the fuse holder. Always replace a damaged fuse with a fuse of the same
type and electrical specifications!
In the event of serious operating problems, stop using the fixture and contact your dealer immediately.
The housing and the lenses must be replaced if they are visibly damaged.
Please use the original packing when the device is to be transported.
Due to safety reasons it is prohibited to make unauthorized modifications to the unit.
Important: Never look directly into the light source! Don’t use the effect in the presence of persons suffering
from epilepsy.
CAUTION: To reduce the risk of electric shock, do not remove the top cover.
No user-serviceable parts inside. Refer servicing to qualified service
personnel only.
JB SYSTEMS
®
1/74 SMOOTH SCAN-BLUE LASER
JB SYSTEMS
®
2/74 SMOOTH SCAN-BLUE LASER
Page 4
ENGLISH USER MANUAL
LASER SAFETY INSTRUCTIONS:
According to the EN/IEC 60825-1 Ed2, 2007-03 regulations, this laser falls under the classification 3B.
Direct eye exposure can be dangerous.
ENGLISH USER MANUAL
Avoid direct eye exposure! Laser radiation can cause eye damage
DANGER: LASER RADIATION !
and/or skin damage. All protective measures for a safe operation of
this laser must be applied.
This product is a so-called show laser, emitting radiation with a wavelength spectrum between 400 and
700 nm and producing lighting effects for shows.
Laser Light is different from any other light source with which you may be familiar. The light from this
product can potentially cause eye injury if not set up and used properly. Laser light is thousands of times
more concentrated than light from any other kind of light source. This concentration of light power can
cause instant eye injuries, primarily by burning the retina (the light sensitive portion at the back of the eye).
Even if you cannot feel “heat” from a laser beam, it can still potentially injure or blind you or your audience.
Even very small amounts of laser light are potentially
hazardous even at long distances.
Never look into the laser aperture or laser beams
Never direct the laser beam to people or animals and
never leave this device running unattended.
This laser may only be used for shows. The
operation of a class 3B show laser is only allowed if
the operation is controlled by a skilled and welltrained operator.
Depending on the classification, operating a laser
product can produce laser radiation that may cause permanent eye damage and/or skin damage. The
legal instructions for using a laser product vary from country to country. The user must always inform
himself on the legal instructions valid in his country and apply them to his situation.
The parent document and cornerstone of laser safety standards ANSI Z136.1 (2007) provides guidance for
the safe use of lasers and laser systems by defining control measures for each of the four laser classes.
This valuable document can be obtained from www.laserinstitute.org
Please note that JB SYSTEMS cannot be made liable for damages caused by incorrect installations and
unskilled operation!
DESCRIPTION:
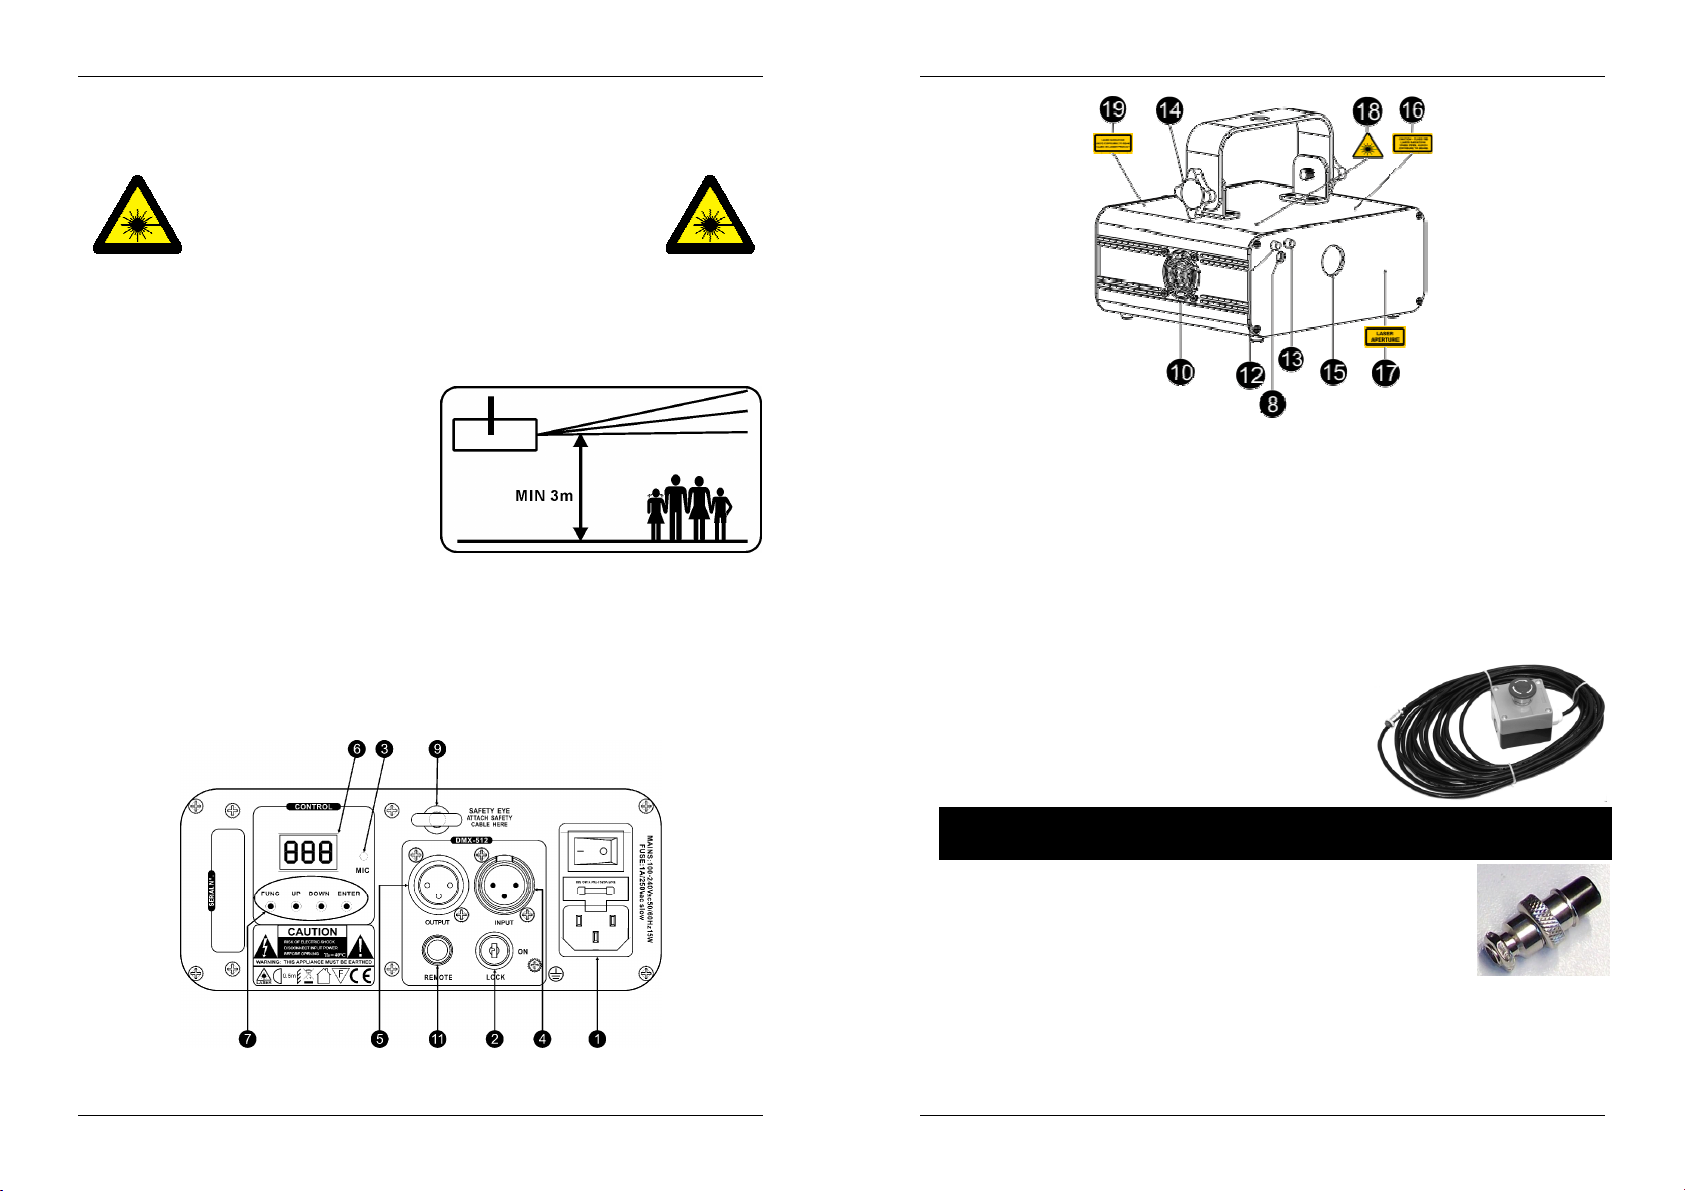
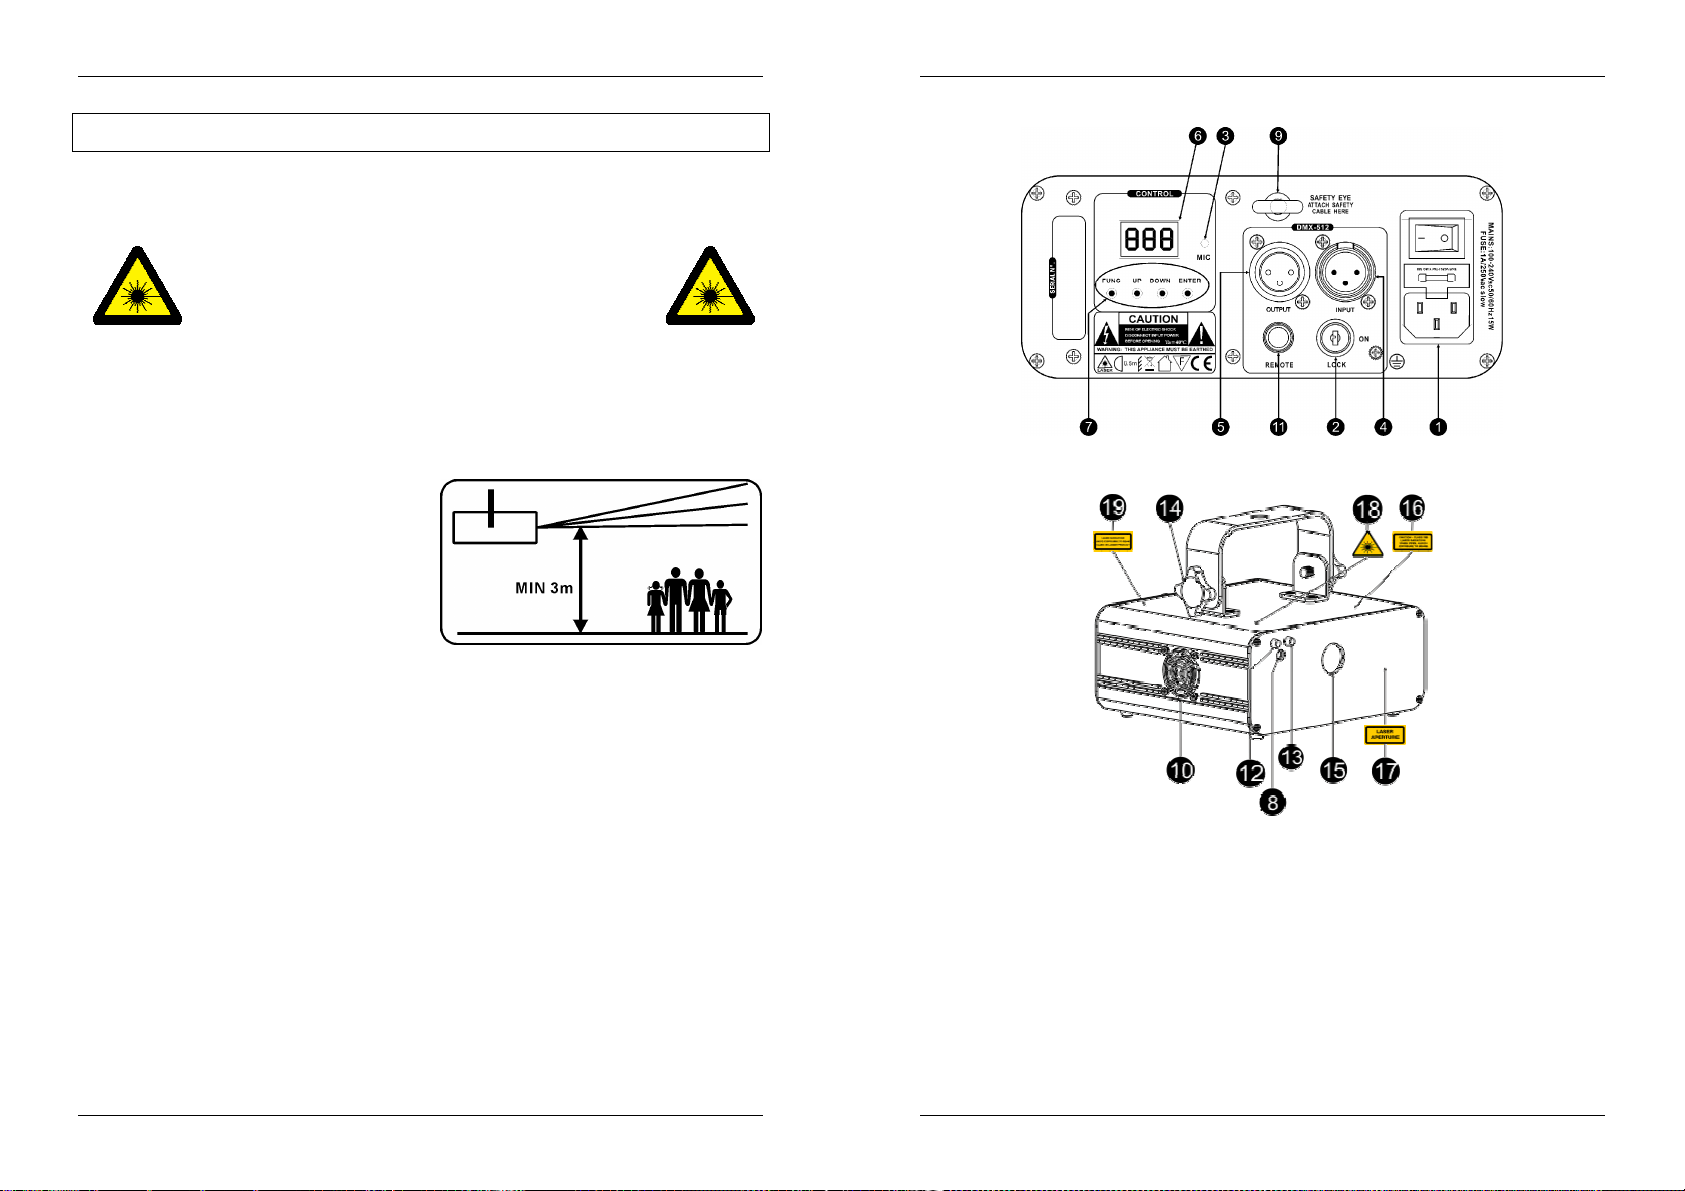
1. MAINS INPUT: IEC socket with integrated fuse holder and switch, connect the supplied mains cable
here.
2. ON/OFF KEY ACTIVATED SWITCH: used to switch the unit on/off. Use the keys to make sure only a
skilled operator is able to switch the laser on.
3. INTERNAL MICROPHONE: The built-in microphone is used to synchronize the laser show to the beat of
the music.
4. DMX INPUT: 3pin male XLR-connector used to connect universal DMX-cables. This input receives
instructions from a DMX-controller.
5. DMX OUTPUT: 3pin female XLR-connector used to connect the LASER with the next unit in the DMX
chain.
6. DISPLAY: shows the selected DMX address when the unit is in DMX-mode. Apart from DMX-mode you
can also select 4 other working modes, see further to learn more about these modes.
7. CONTROL PANEL: Used to select the different functions of the laser, see further to learn how to
operate the unit.
8. IR RECEIVER: used to control the unit by the wireless remote
control.
9. SAFETY EYEBOLT: used to attach a safety cable when the unit
is rigged (see paragraph “overhead rigging”
10. COOLING FAN: used to cool the components inside the
enclosure. Make sure to never cover this fan outlet!
11. INTERLOCK input: used to connect the optional emergency stop
switch (see picture). When you push this switch the laser beam
will disappear immediately.
IMPORTANT! For your own safety we strongly recommend to connect this optional switch!
THERE WILL BE NO LASER OUTPUT WHEN THE INTERLOCK INPUT IS NOT USED!
Temporary solution: install the spare connector on the laser. (see picture)
12. POWER LED: indicates that the unit is switched on.
13. SOUND LED: flashes to the sound of the music detected by the internal
microphone.
14. HANGING BRACKET: with 2 knobs on both sides to fasten the unit and a
mounting hole to fix a mounting hook.
15. LASER OUTPUT: the laser beam exits the enclosure, make sure to NEVER look
inside the unit through this opening while the laser effect is switched on!
16. WARNING LABEL: “Caution – Class 3B laser. Laser Radiation when open. Avoid
exposure to beam.”
17. WARNING LABEL: “Laser Aperture”
18. LASER WARNING SIGN: warns against a potentially dangerous laser when not used by skilled
operators.
19. WARNING LABEL: “Laser Radiation. Avoid exposure to beam. Class 3B laser product”
JB SYSTEMS
®
3/74 SMOOTH SCAN-BLUE LASER
JB SYSTEMS
®
4/74 SMOOTH SCAN-BLUE LASER
Page 5
ENGLISH USER MANUAL
ENGLISH USER MANUAL
OVERHEAD RIGGING
Important: The installation must be carried out by qualified service personal only. Improper
installation can result in serious injuries and/or damage to property. Overhead rigging requires
extensive experience! Working load limits should be respected, certified installation materials
should be used, the installed device should be inspected regularly for safety.
Make sure the area below the installation place is free from unwanted persons during rigging, de-rigging
and servicing.
Locate the fixture in a well ventilated spot, far away from any flammable materials and/or liquids. The
fixture must be fixed at least 50cm from surrounding walls.
The device should be installed out of reach of people and outside areas where persons may walk by or be
seated.
Before rigging make sure that the installation area can hold a minimum point load of 10times the device’s
weight.
Always use a certified safety cable that can hold 12 times the weight of the device when installing the unit.
This secondary safety attachment should be installed in a way that no part of the installation can drop
more than 20cm if the main attachment fails.
The device should be well fixed; a free-swinging mounting is dangerous and may not be considered!
Don’t cover any ventilation openings as this may result in overheating.
The operator has to make sure that the safety-relating and machine-technical installations are approved by
an expert before using them for the first time. The installations should be inspected every year by a skilled
person to be sure that safety is still optimal.
CAUTION EYE DAMAGE: Always position the laser in a way that prevents the
audience from looking directly into the laser beams. The installation should assure that
the beam will not strike the audience.
HOW TO SET UP AND CONTROL THE UNIT
You can operate the unit in 5 ways:
1) MUSIC CONTROLLED MODE:
The laser runs a preprogrammed sequence to the rhythm of the music. Select this mode when only 1 laser
is used (standalone) or when the laser is placed as the first (master) unit in a chain with several units.
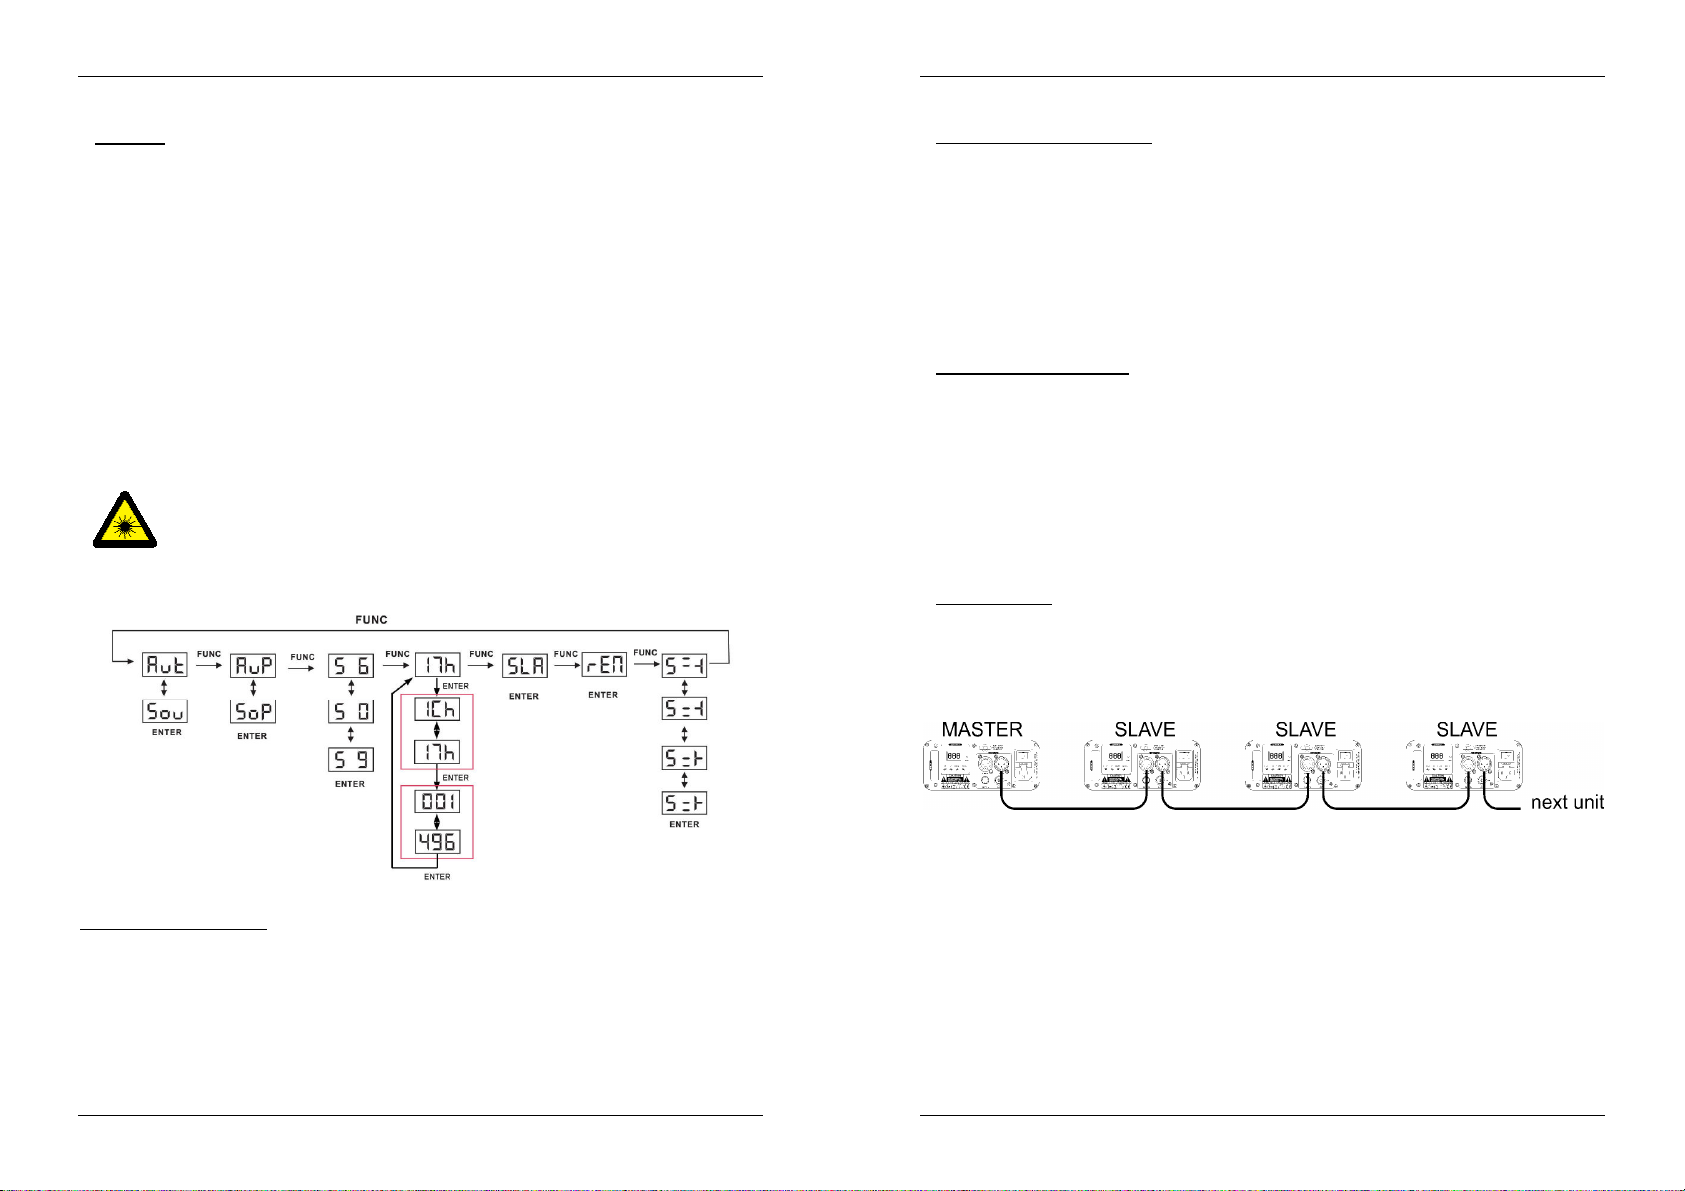
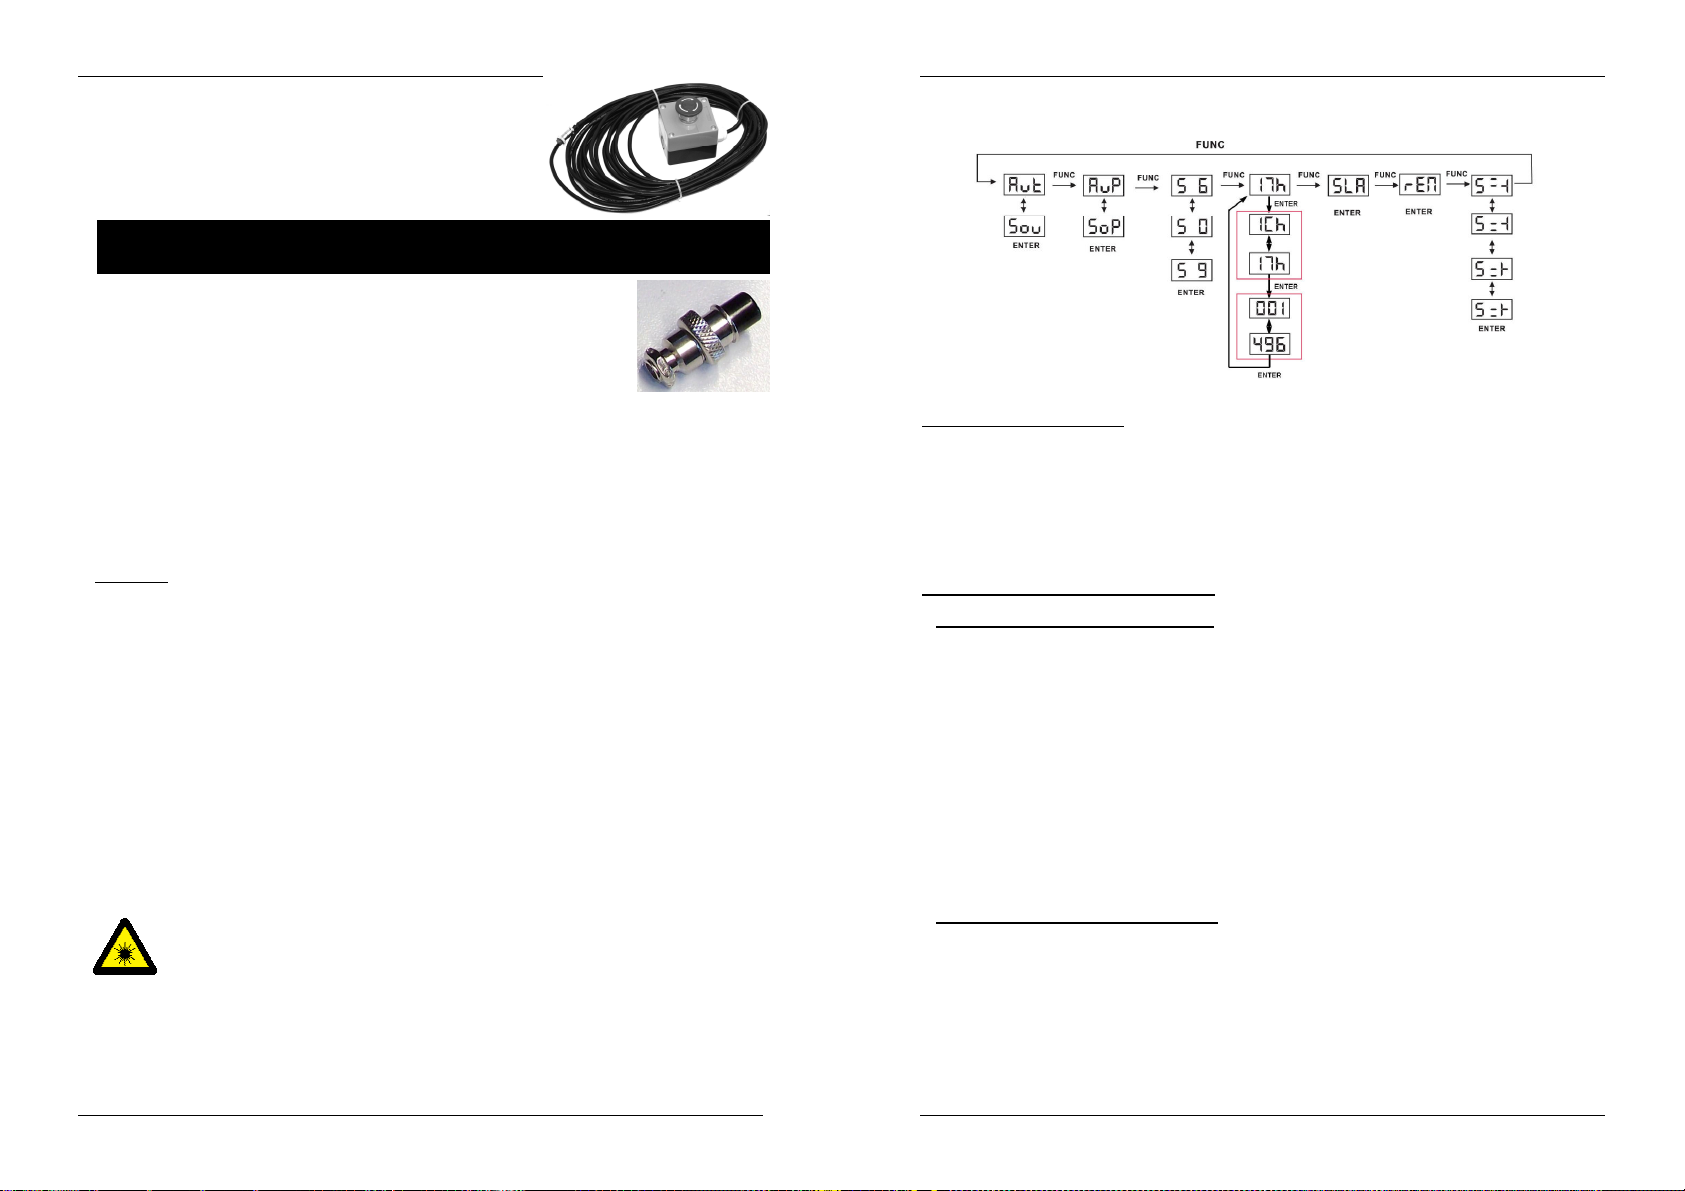
Press the FUNC-button until the display shows one of the following: Sou or Aut, Sop or Aup.
Please check carefully the Menu chart above.
Now use the UP or DOWN buttons to select only the following modes:
o Sop (Sound activated random show, containing pattern effects)
o Sou (Sound activated shows)
Press the ENTER-button to confirm your choice.
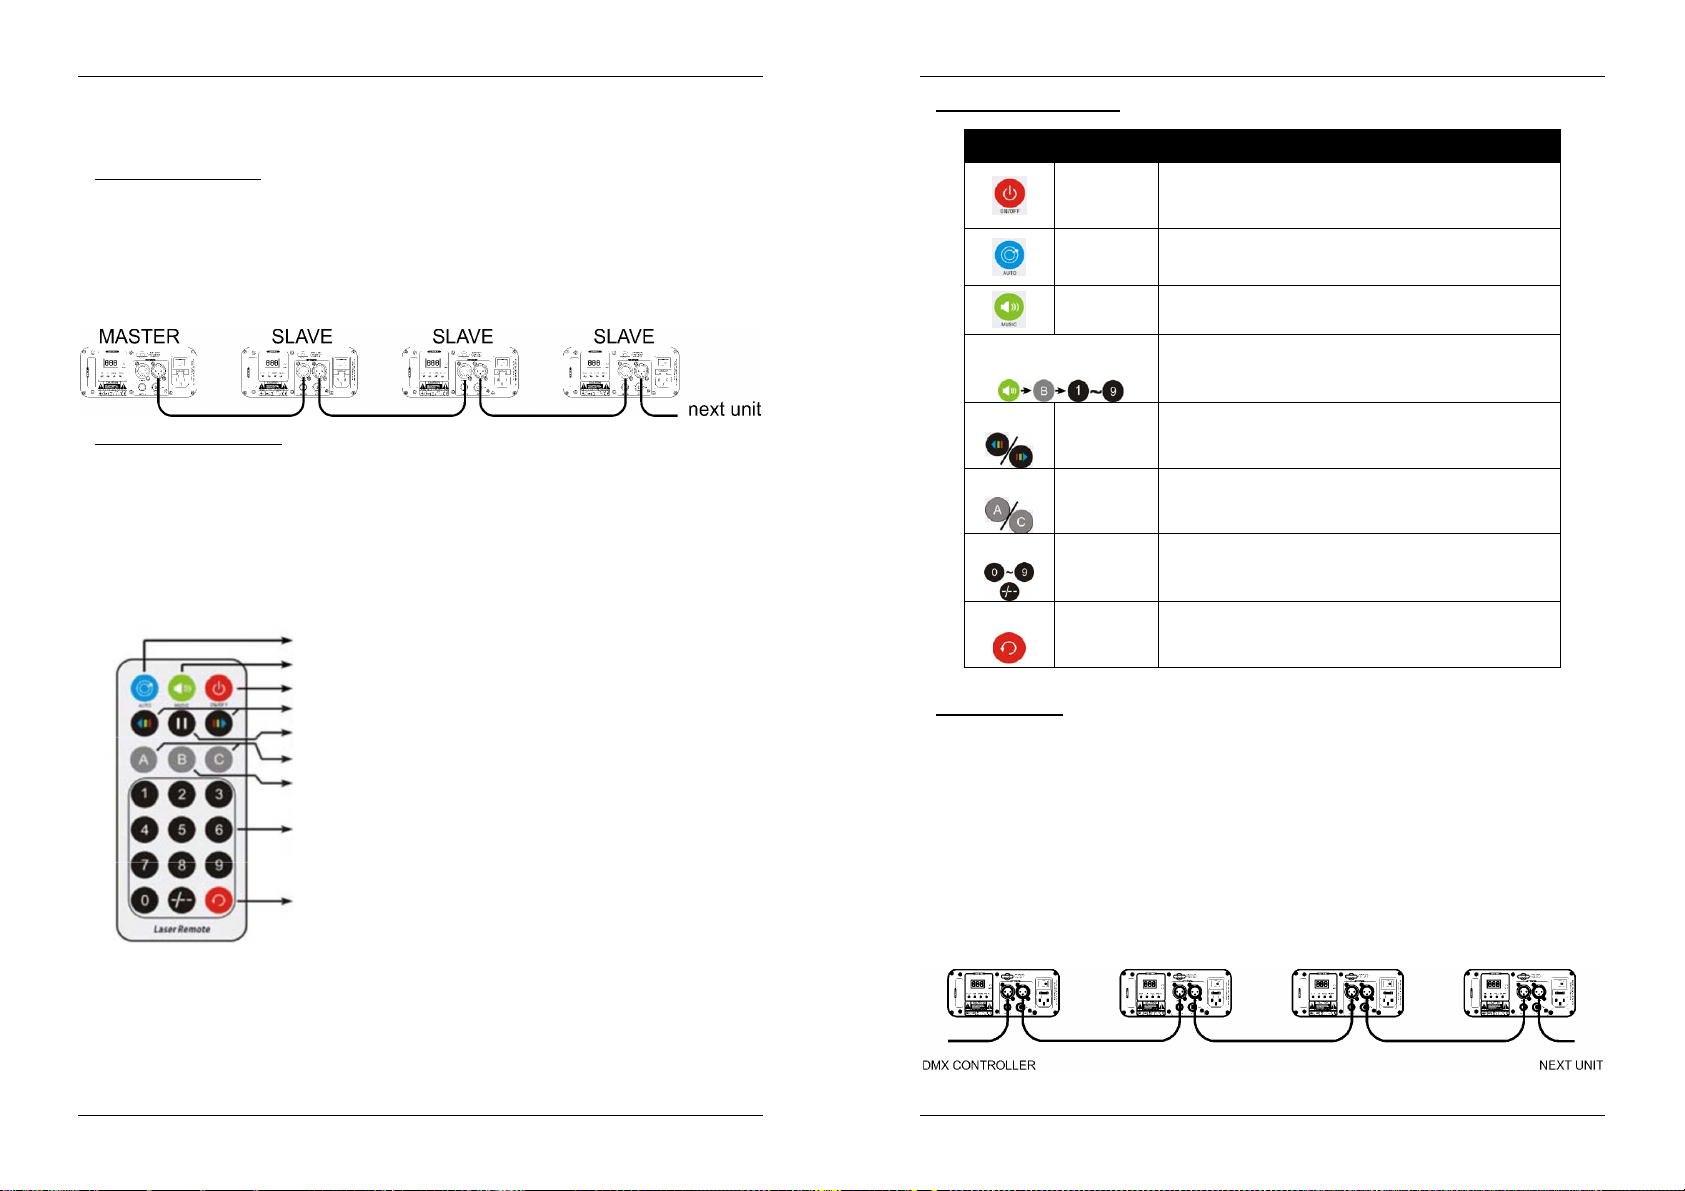
You can connect several LASERs together: just put the first unit of the chain in one of the sound activated
effect modes and all other units in “Slave mode” (display shows “SLA”) to make them all work in perfect
sync!
Note: When no music is detected, the laser output will be shut off (blackout).
2) FULL AUTOMATIC MODE:
The laser automatically runs a preprogrammed sequence. Select this mode when only 1 laser is used
(standalone) or when the laser is placed as the first (master) unit in a chain with several LASERs.
Press the FUNC-button until the display shows one of the following: Sou or Aut, Aup or SOP.
Please check carefully the Menu chart above.
Now use the UP or DOWN buttons to select only the following modes:
o Aut (Automatic shows)
o Aup (automatic random show, containing pattern effects)
Press the ENTER-button to confirm your choice.
The laser automatically runs a preprogrammed sequence.
You can connect several SMOOTH SCAN BLUE LASERs together: just put the first unit of the chain in
one of the automatic effect modes and all other units in “Slave mode” (display shows “SLA”) to make them
all work in perfect sync!
3) SLAVE MODE:
The laser follows the instructions given by the first Smooth Scan Blue laser (master) in the chain.
Connect the DMX input of the laser to the DMX output of the previous laser in the chain.
Press the FUNC-button until the display shows “SLA”
Press the ENTER-button to confirm your choice.
You can connect several lasers together. Please put the first unit of the chain in “Music or automatic
mode” and all other units in “Slave mode” (display shows “SLA” to make them all work in perfect sync!
MUSIC INPUT SENSITIVITY:
The unit works to rhythm of the beat when used in standalone or master/slave mode
To set the input sensitivity, follow these steps:
Press the FUNC-button until the display shows “S 0” …”S 9”
Press the ENTER-button to confirm your choice.
Use DOWN and UP button to select a value between “S 0” (very low sensitivity) and “S 9” (high
sensitivity).
Once the mode is selected, press the ENTER button save it.
JB SYSTEMS
®
5/74 SMOOTH SCAN-BLUE LASER
JB SYSTEMS
®
6/74 SMOOTH SCAN-BLUE LASER
Page 6
ENGLISH USER MANUAL
DMX
-
-
ENGLISH USER MANUAL
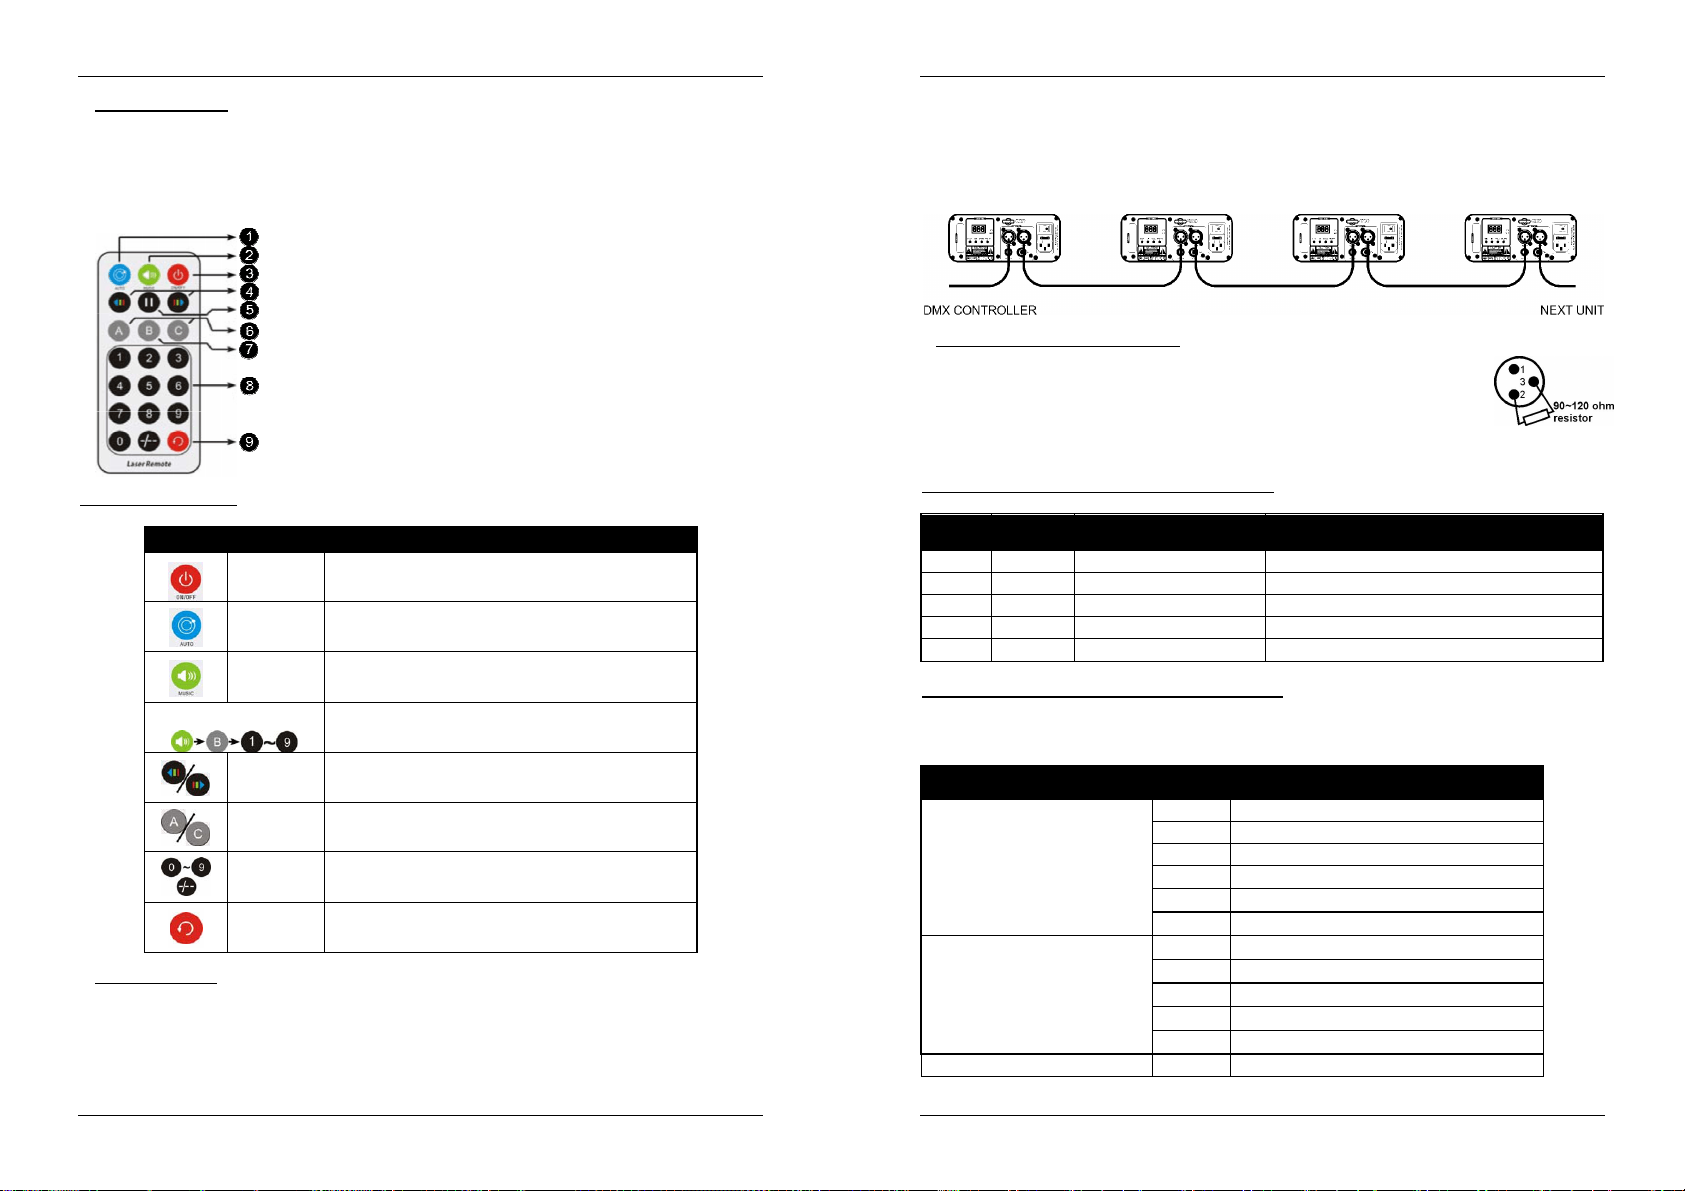
4) IR remote MODE:
The laser can be controlled by the IR remote control:
Press the FUNC-button until the display shows: “REM”.
Press the ENTER-button to confirm your choice.
Note: In any standalone mode (excepted REM and SLA), press ON/OFF for 2 second to activate remote
function.
AUTO SHOW
MUSIC SHOW
LASER ON/OFF
COLOR
EFFECT PAUSE
CHANGING PATTERN
SOUND SENSIVITY
FIXED PATTERN (FROM 1 TO 48)
PATTERN REPEATING
Remote control details:
Button function Description
In REM mode, turn on/off the laser. In any oder
ON/OFF
AUTO
MUSIC
Sound sensivity
COLOR
CHANGING
PATTERN
CHANGING
FIXED
PATTERN
PATTERN
REPEAT
5) DMX512 MODE:
The laser can be controlled by any standard DMX-controller in 2 different DMX-modes:
1 CHANNEL MODE: for extremely easy setup and use! (display shows “1Ch”)
17 CHANNEL MODE: for full control on every functionalities. (display shows “17c”)
Connect the DMX input of the laser to the DMX output of the previous unit in the chain or directly to the
DMX-output of your controller.
Press the FUNC-button until the display shows: “1Ch” or “17h”.
standalone mode except SLAVE, press 2s to turn on the
REM mode
Auto running show
Sound activated show, the blue is flashing when the
sound is detected.
In sound activated mode, press music+B+1to 9 to change
the sensivity settings
To change the color from red to green or red & green
To show and change patterns
You can select one pattern from 1 to 48
Last pattern and current pattern cycle repeating
Press the UP/DOWN buttons to select the DMX-mode. (1ch or 17ch)
Press the ENTER-button to confirm your choice.
Press the FUNC-button: the 3 digit number on the display starts blinking.
Select the DMX-address
Press the ENTER-button to confirm your choice.
Note: the display blinks when the unit is in DMX-mode and no DMX-signal is detected.
Some more information on DMX512:
The DMX-protocol is a widely used high speed signal to control intelligent light
equipment. You need to “daisy chain” your DMX controller and all the connected light
effects with a good quality XLR M/F balanced cable. To prevent strange behavior of the
light effects, due to interferences, you must use a 90Ω to 120Ω terminator at the end of
the chain. Never use Y-splitter cables, this simply won’t work!
Each effect in the chain needs to have its proper starting address so it knows which commands from the
controller it has to decode.
1 CHANNEL DMX-CONFIGURATION OF THE LASER:
position
value function remarks
4 210-255 SOU Sound activated show
3 150-209 AUT Automatic show
2 090-149 SOP Sound activated pattern effect show
1 030-089 AUP Auto running pattern effect show
0 000-029 STANDBY Laser output off
17 CHANNEL DMX-CONFIGURATION OF THE LASER:
IMPORTANT REMARK: DMX Channel1 is used to set the different working modes of the laser.
To use the laser in full 17 channel mode, channel 1 must be set to value 221 or higher.
Depending on the DMX-values of channel1, different mode can be applied:
Channel
CH1
Mode
CH2
Group
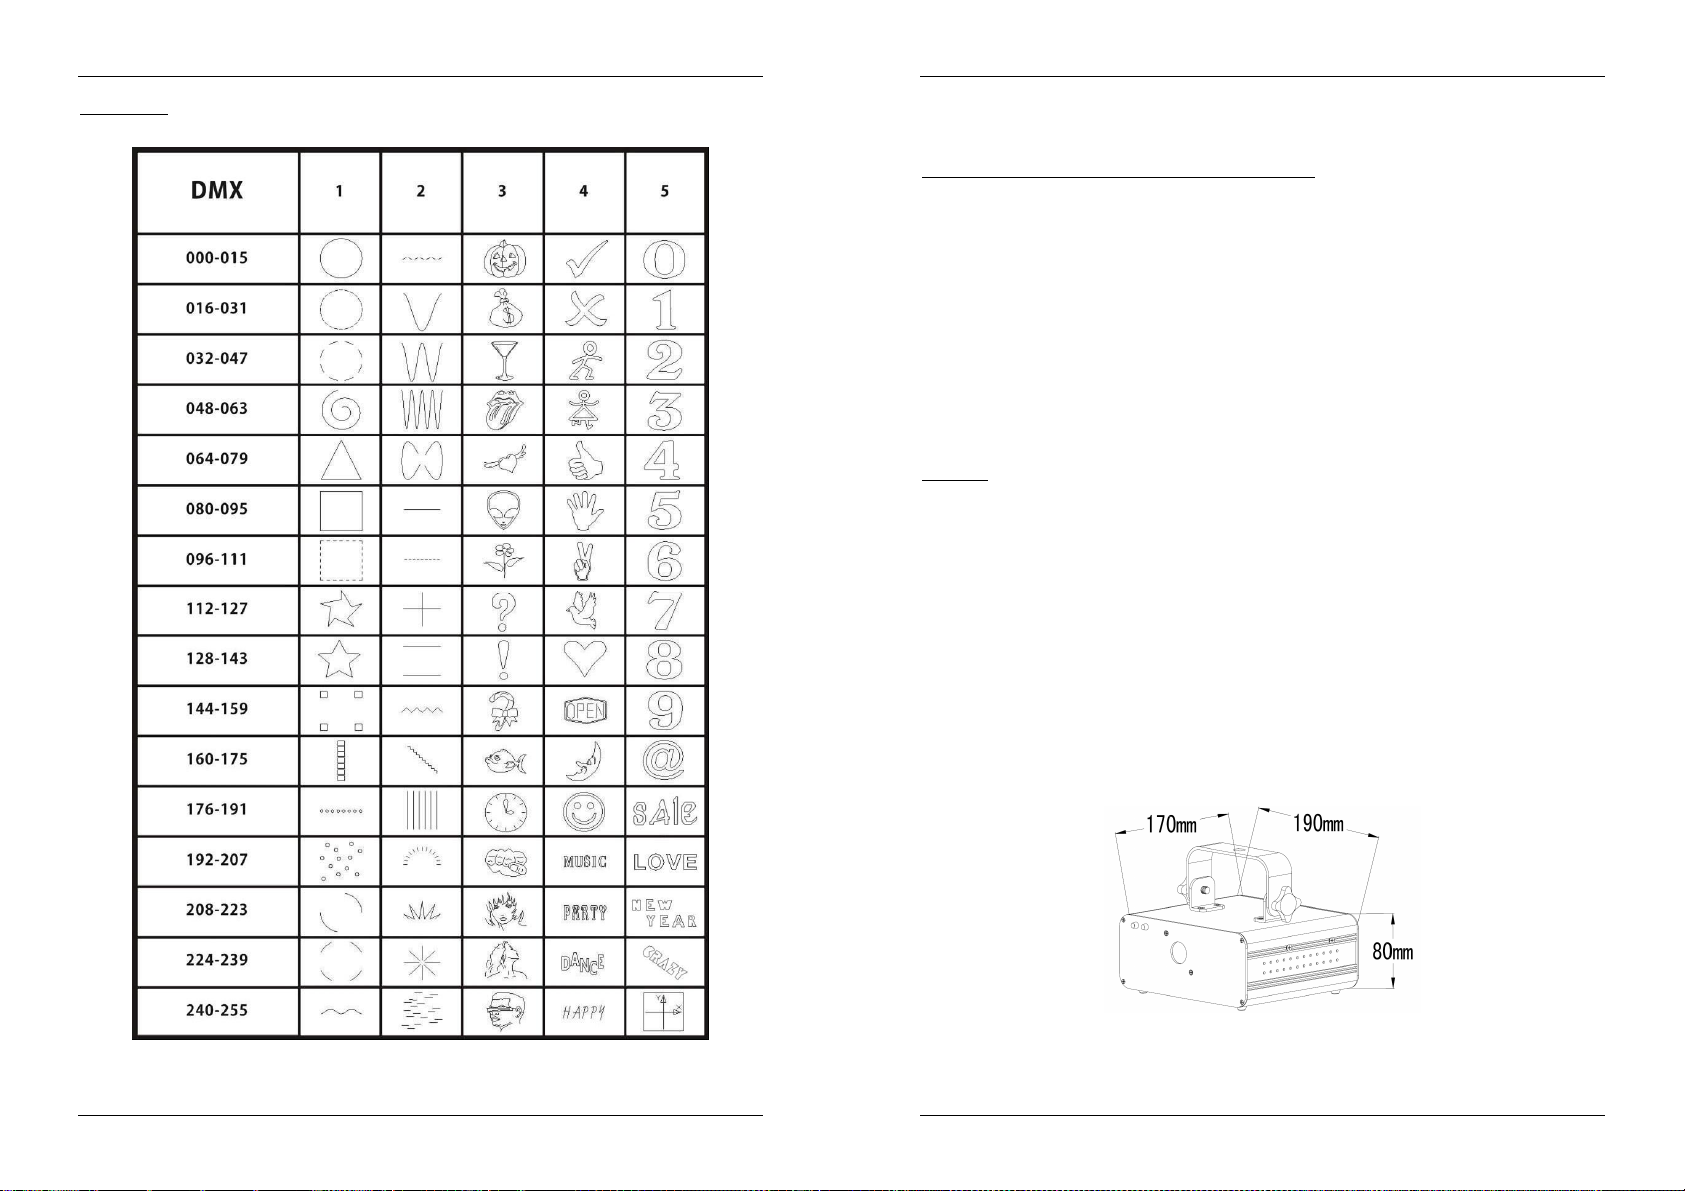
CH3 Pattern 000-255 Every 16 for 1 group, total 80 patterns.
DMX
value function
000-040 Laser OFF
041-080 AUT
081-120 SOU
121-160 AUP
161-200 SOP
201-255 DMX MODE
000-051 1 Group Patterns.
052-103 2 Group Patterns
104-155 3 Group Patterns
156-207 4 Group Patterns
208-255 5 Group Patterns
JB SYSTEMS
®
7/74 SMOOTH SCAN-BLUE LASER
JB SYSTEMS
®
8/74 SMOOTH SCAN-BLUE LASER
Page 7
ENGLISH USER MANUAL
ENGLISH USER MANUAL
000-015 Original (red, green, yellow)
016-031 Red
032-047 Green
CH4
Color
CH5
Clipping
CH6
Zooming
CH7 zoom speed
CH8
X axis rolling
CH9 roll speed
CH10
Y axis rolling
CH11 roll speed
CH12
Z axis rolling
CH13 roll speed
CH14
X axis move
CH15 moving speed 000-255 Fast to slow
CH16
Y axis move
CH17 moving speed
048-063 Yellow
064-111 Color Rolling
112-159 Color Jumping
160-207 Color Moving
208-255 Strobing
000 Full pattern without clipping
001-127 0%~99% fixed pattern clipped
128-255 Clipping Speed
000-127 100%
128-169 Zooming IN
170-209 Zooming OUT
210-255 Alternately Zooming
000-255 Fast to slow
000-127 0
128-191 Clockwise rolling
192-255 Anticlockwise rolling
000-255 Fast to slow
000-127 0
128-191 Clockwise rolling
192-255 Anticlockwise rolling
000-255 Fast to slow
000-127 0
128-191 Clockwise rolling
192-255 Anticlockwise rolling
000-255 Fast to slow
000-127 0
128-191 Clockwise rolling
192-255 Anticlockwise rolling
000-127 0
128-191 Clockwise rolling
192-255 Anticlockwise rolling
000-255 Fast to slow
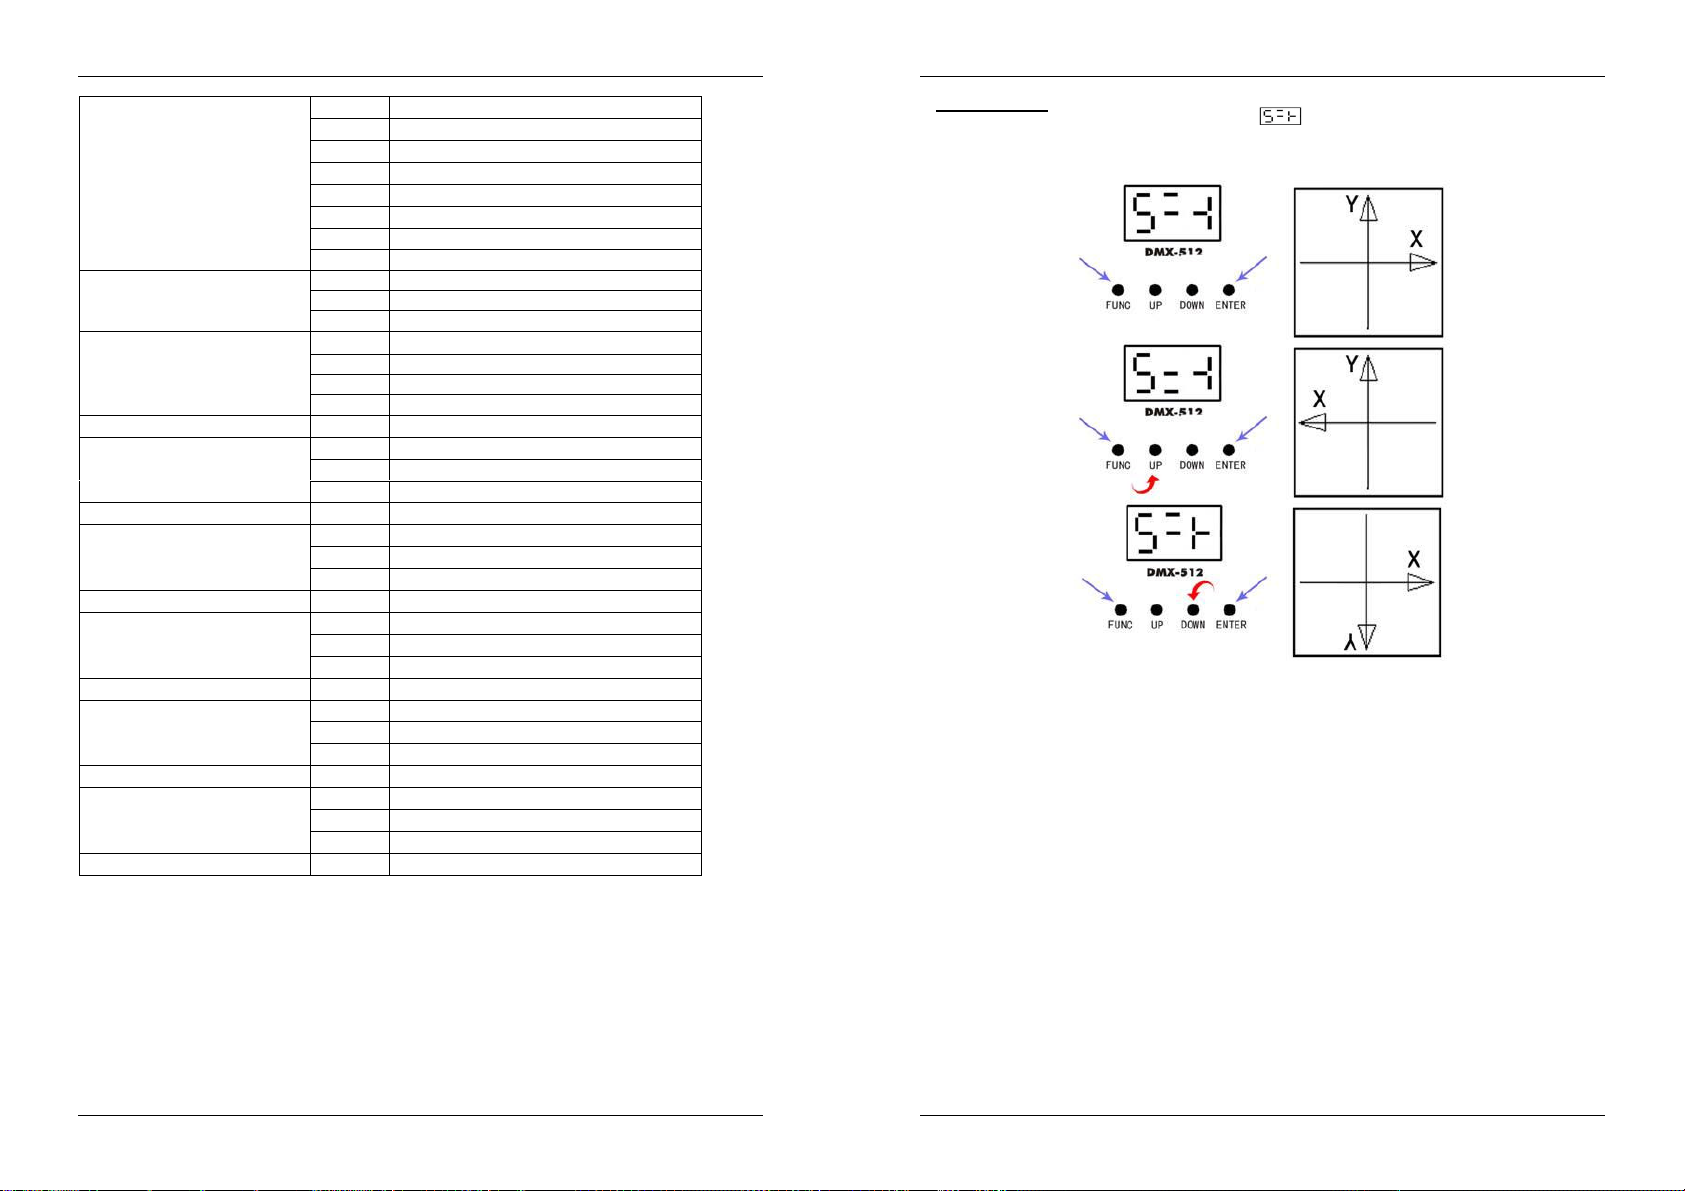
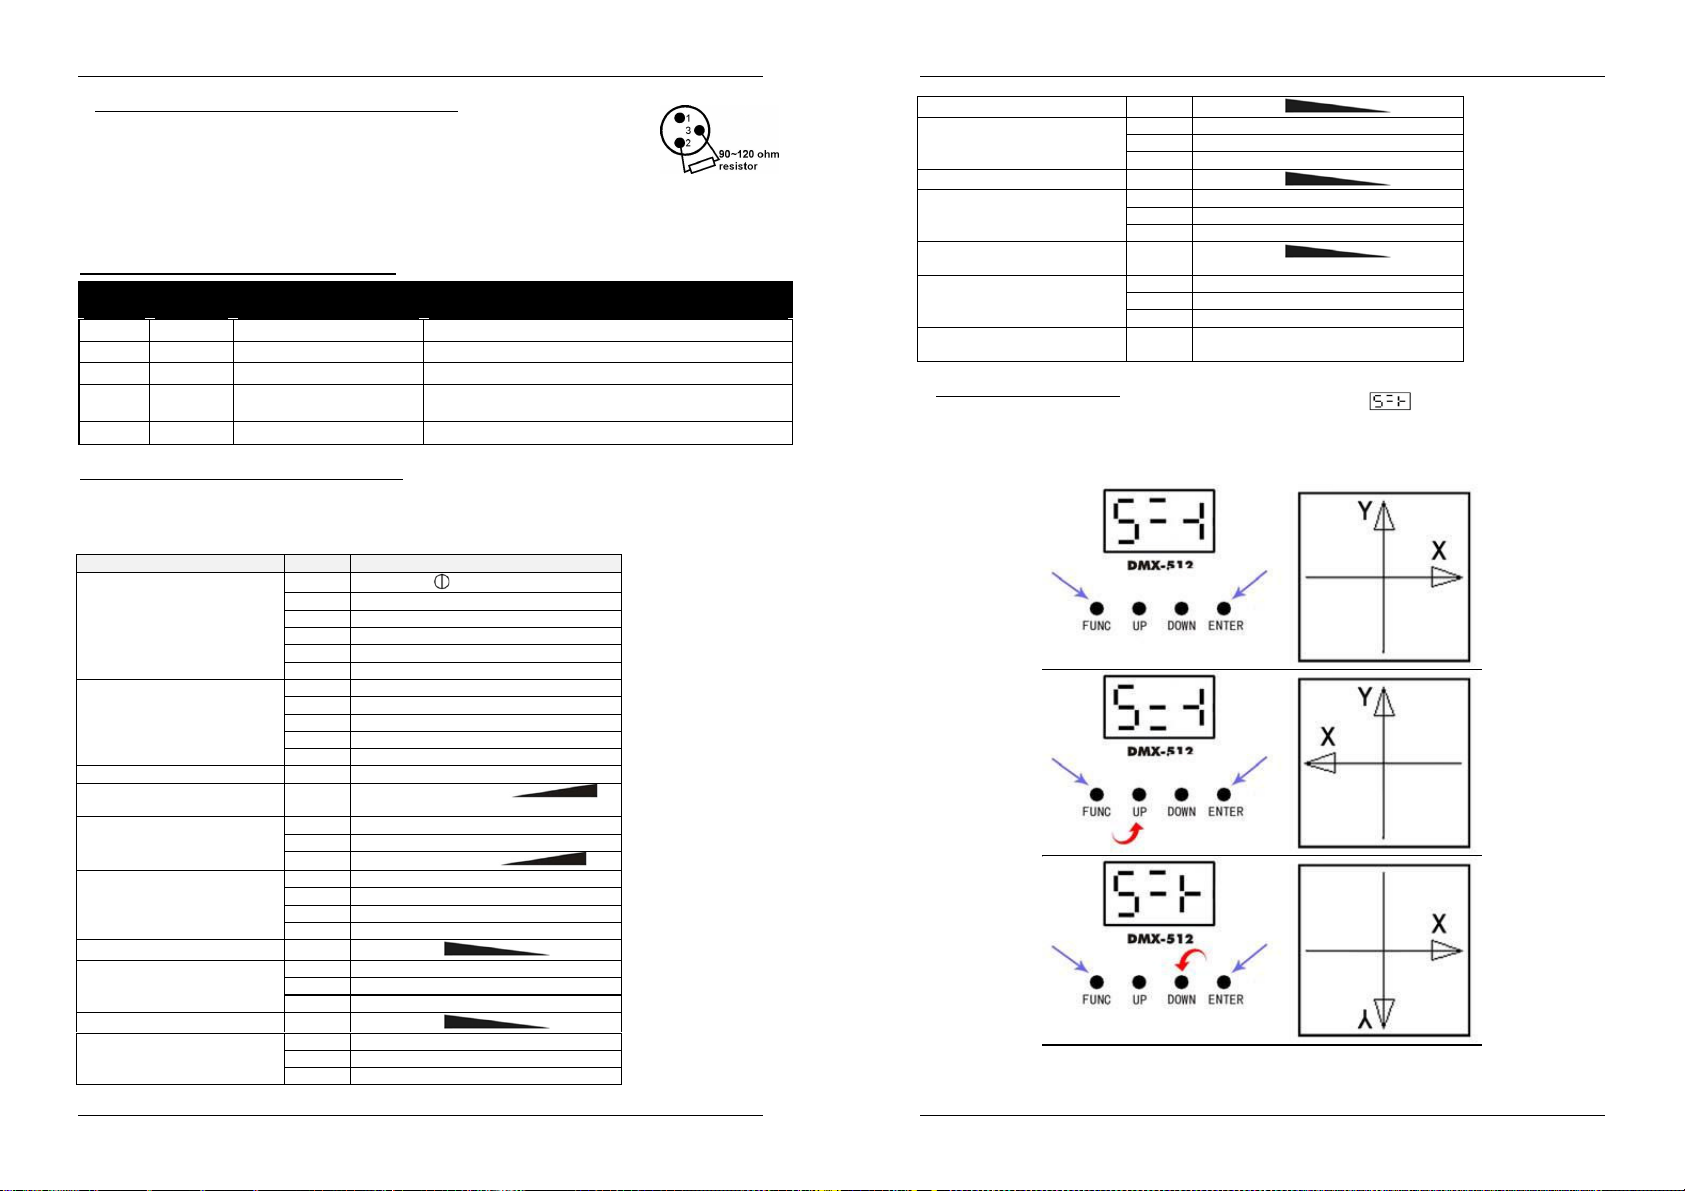
Pattern settings:
Press the FUNC-button until the display shows
Press up or down until the laser shows the Y arrow axis on the top and X arrow axis on the right.
Then press “Enter” to confirm the selection
JB SYSTEMS
®
9/74 SMOOTH SCAN-BLUE LASER
JB SYSTEMS
®
10/74 SMOOTH SCAN-BLUE LASER
Page 8
ENGLISH USER MANUAL
ENGLISH USER MANUAL
Pattern list
MAINTENANCE
Make sure the area below the installation place is free from unwanted persons during servicing.
Switch off the unit, unplug the mains cable and wait until the unit has been cooled down.
During inspection the following points should be checked:
All screws used for installing the device and any of its parts should be tightly fastened and may not be
corroded.
Housings, fixations and installations spots (ceiling, truss, suspensions) should be totally free from any
deformation.
When an optical lens is visibly damaged due to cracks or deep scratches, it must be replaced.
The mains cables must be in impeccable condition and should be replaced immediately when even a
small problem is detected.
In order to protect the device from overheat the cooling fans (if any) and ventilation openings should be
cleaned monthly.
The interior of the device should be cleaned annually using a vacuum cleaner or air-jet.
The cleaning of internal and external optical lenses and/or mirrors must be carried out periodically to
optimize light output. Cleaning frequency depends on the environment in which the fixture operates: damp,
smoky or particularly dirty surroundings can cause greater accumulation of dirt on the unit’s optics.
Clean with a soft cloth using normal glass cleaning products.
Always dry the parts carefully.
Clean the external optics at least once every 30 days.
Clean the internal optics at least every 90 days.
Attention: We strongly recommend internal cleaning to be carried out by qualified personnel!
SPECIFICATIONS
Mains Input: AC 100~240V, 50/60Hz
Fuse: 250V 1A slow blow (20mm glass)
Total Power consumption: 13W
Sound Control: Internal microphone
DMX connections: 3pin XLR male / female
DMX channels: 1 or 17 channels
DMX starting address: 001 512
Laser Power: 400mW Blue CW laser (λ = 450nm)
Laser radiation class: 3B
Beam diameter @ aperture: <5mm
Divergence (each beam) <12 mrad
Divergence (total output) <90°
Scanner speed: 15kHz
Working temperature: 10°C to 40°C
Laser Safety Standard: EN/IEC 60825-1 Ed2, 2007-03
Size: see picture below
Weight: 1.5kg
JB SYSTEMS
You can download the latest version of this user manual on our website: www.beglec.com
®
11/74 SMOOTH SCAN-BLUE LASER
JB SYSTEMS
Every information is subject to change without prior notice
®
12/74 SMOOTH SCAN-BLUE LASER
Page 9
FRANCAIS GUIDE D’UTILISATION
GUIDE D’UTILISATION
Nous vous remercions d'avoir acheté ce produit JB Systems®. Pour tirer pleinement profit de toutes les
possibilités et pour votre propre sécurité, lisez ces instructions très attentivement avant d'utiliser cet appareil.
CARACTÉRISTIQUES
Cet appareil ne produit pas d’interférences radio. Ce produit répond aux exigences des directives
européennes et nationales actuelles. La conformité a été établie et les déclarations et documents
correspondants ont été déposés par le fabricant.
Ce dispositif a été conçu pour produire un effet d'éclairage décoratif et est utilisé dans les systèmes de jeu
de lumière.
Un laser accrocheur bleu utilisant des balayeurs à 15kHz de haute qualité au lieu de moteurs à pas
ordinaires :
Mouvements sans à coups et continus
80 motifs préprogrammés tels que : chiffres, dessins, mots etc.
Shows laser préprogrammés merveilleux adaptés à toute utilisation : bar lounge, discothèques, DJ mobiles
etc.
Laser de Classe 3B basé sur un laser bleu 450nm 400mW.
Plusieurs modes de fonctionnement :
Contrôlé par DMX (Digital Multiplexing (multiplexage numérique) : 1 canal pour une utilisation facile ou
17 canaux pour une utilisation complète
Autonome : activation sonore (par micro interne) ou automatique
Télécommande IR : Contrôle par télécommande à infrarouge.
Maître/Esclave : des shows magnifiques synchronisés
Microphone intégré
Affichage à LED à 3 chiffres pour une navigation simple dans les menus
Interrupteur Marche/Arrêt et interrupteur de sécurité actionnés par une clef (verrouillage) pour plus de
sécurité
Conforme aux normes EN/IEC 60825-1 Ed2, 2007-03 concernant la Sécurité Laser
AVANT UTILISATION
Avant d'utiliser cet appareil, vérifiez s'il n'a pas été endommagé durant le transport. En cas de dommages,
n'utilisez pas l'appareil et consultez immédiatement votre revendeur.
Important : Cet appareil est expédié de notre usine en parfait état et bien emballé. Il est absolument
nécessaire que l'utilisateur suive strictement les instructions et les avertissements de sécurité se trouvant
dans ce manuel. Tout dommage dû à une mauvaise manipulation n'est pas garanti. Le revendeur
n'accepte aucune responsabilité pour tous les défauts et problèmes dus au non respect de ce manuel.
Conservez ce manuel dans un endroit sûr pour toute consultation future. Si vous vendez l'appareil, veillez
à joindre ce manuel.
Vérifiez le contenu :
Vérifiez que le carton contient les articles suivants :
Laser bleu de balayage continu
Télécommande IR
2 clefs (pour interrupteur à clé)
Câble d'alimentation secteur
Guide d'utilisation
FRANCAIS GUIDE D’UTILISATION
INSTRUCTIONS DE SÉCURITÉ:
ATTENTION:afin de réduire le risque d’électrocution, n’enlevez
jamais le couvercle de l’appareil. Il n’y a aucune pièce à
l’intérieur de l’appareil que vous puissiez remplacer vous-même.
La flèche dans un triangle met l'utilisateur en garde contre la présence de haute tension sans
isolation dans l'appareil, ce qui peut causer un risque d'électrocution.
Un point d'exclamation dans un triangle prévient de la présence d'instructions relatives au
fonctionnement et à la maintenance se trouvant dans le manuel fourni avec l'appareil.
Ce symbole signifie: uniquement pour usage à l'intérieur.
Ce symbole signifie : Lire le mode d’emploi.
Ce symbole signifie: appareil construit selon les normes de sécurité classe I
Ce symbole représente la distance de recul minimum à respecter, c'est-à-dire, la distance
Pour protéger l'environnement, essayer de recycler autant que possible les matériaux d'emballage.
Un jeu de lumière neuf provoque parfois une certaine fumée et/ou odeur indésirables. Ceci est normal et
Pour éviter tout incendie ou électrocution, n'exposez pas cet appareil à la pluie ou l'humidité.
Pour éviter une formation de condensation interne, laissez l'appareil s'adapter à la température ambiante
Cet appareil est destiné à un usage intérieur seulement.
Ne placez pas d'objets métalliques et ne renversez pas de liquides à l'intérieur de l'appareil. Un choc
Fixez l'appareil dans un endroit bien aéré, loin de tout matériau et/ou liquide inflammable. Le luminaire doit
Ne couvrez pas les ouvertures de ventilation, cela pourrait entraîner une surchauffe.
Evitez une utilisation dans des environnements poussiéreux et nettoyez l'appareil régulièrement.
Gardez l'appareil loin de la portée des enfants.
Les personnes inexpérimentées ne doivent pas utiliser cet appareil.
La température ambiante doit être entre 15° et 40°C. N'utilisez pas cet appareil à des températures
Assurez-vous qu'aucune personne étrangère ne se trouve dans la zone en dessous de l'emplacement
Débranchez toujours l'appareil lorsqu'il ne pas être utilisé pendant une longue période ou avant de
L'installation électrique doit être effectuée par du personnel qualifié, conformément à la réglementation en
Vérifiez que votre tension n'est pas supérieure à celle indiquée sur le panneau arrière de l'appareil.
Le cordon d'alimentation doit toujours être en parfait état. Eteignez immédiatement l'appareil dès le cordon
Ne laissez jamais le cordon d'alimentation entrer en contact avec d'autres câbles !
Ce luminaire doit être mis à la terre pour être conforme réglementation en matière de sécurité.
Ne connectez pas l'appareil à aucun variateur de lumière.
Utilisez toujours un câble de sécurité approprié et certifié lors de l'installation de l'appareil.
Afin d'éviter un choc électrique, n'ouvrez aucun panneau. A part la lampe et le fusible, il n'y a aucune pièce
Ne réparez jamais un fusible et ne court-circuitez jamais le porte-fusible. Remplacez toujours un fusible
En cas de sérieux problèmes de fonctionnement, cessez d'utiliser l'appareil et contactez immédiatement
Le boîtier et la lentille doivent être remplacés s'ils sont visiblement endommagés.
Utilisez l'emballage d'origine pour transporter l'appareil.
minimum entre le projecteur et la surface à éclairer. Cette distance doit être de plus de 1 mètre.
disparaît après quelques minutes.
quand vous la mettez dans une pièce chauffée après le transport. La condensation empêche parfois
l'appareil de fonctionner à plein rendement ou peut même causer des dommages.
électrique ou un dysfonctionnement peut en résulter. Si un corps étranger pénètre dans l'appareil,
débranchez immédiatement l'alimentation secteur.
être fixé à au moins 50 cm des murs environnants.
ambiantes plus élevées.
d'installation durant le montage, le démontage et l'entretien.
remplacer la lampe ou avant de faire l'entretien.
matière de sécurité électrique et mécanique dans votre pays.
d'alimentation est écrasé ou endommagé. Il doit être remplacé par le fabricant, son agent de service ou
une personne de même qualification afin d'éviter tout danger.
réparable par l'utilisateur.
endommagé par un fusible du même type ayant les mêmes spécifications électriques !
votre revendeur.
Confiez l’entretien uniquement à des techniciens qualifiés.
JB SYSTEMS
®
13/74 SMOOTH SCAN-BLUE LASER
JB SYSTEMS
®
14/74 SMOOTH SCAN-BLUE LASER
Page 10
FRANCAIS GUIDE D’UTILISATION
FRANCAIS GUIDE D’UTILISATION
Pour des raisons de sécurité, il est interdit d'apporter des modifications non autorisées à l'appareil.
Important : Ne regardez jamais directement dans la source de lumière ! N'utilisez pas le jeu de lumière en
présence de personnes souffrant d'épilepsie.
CONSIGNES DE SÉCURITÉ CONCERNANT LE LASER :
Selon les règlements EN/IEC 60825-1 Ed2, 2007-03, ce laser est un laser de classe 3B. La fixation du
laser peut être dangereuse.
Éviter de fixer directement le laser ! Le rayonnement laser peut
provoquer des lésions oculaires et/ou de la peau. Toutes les
mesures de protection pour une utilisation sécuritaire de ce laser
Ce produit est un jeu de lumière laser, émettant un rayonnement de spectre de longueur d'onde entre 400
et 700 nm et produisant des effets de lumière pour des shows.
La lumière laser est différente de toute autre source de lumière qui vous est familière. La lumière produite
par cet appareil peut causer des lésions oculaires s'il n'est pas réglé et utilisé correctement. La lumière
laser est une lumière concentrée, des milliers de fois plus puissante que tout autre type de lumière. Cette
concentration de puissance lumineuse peut provoquer des lésions oculaires instantanées, surtout en
brûlant la rétine (la partie à l'arrière de l'œil sensible à la lumière). Un faisceau laser peut toujours vous
brûler ou vous aveugler même si vous ne sentez de "chaleur".
Même à de longues distances, un très petit laser
peut être potentiellement dangereux.
Ne regardez jamais dans l'ouverture du laser ou les
faisceaux laser
Ne dirigez jamais un faisceau laser vers des
personnes ou des animaux et ne laissez jamais cet
appareil en marche sans surveillance.
Ce laser ne doit être utilisé que pour des spectacles.
Un laser de spectacle de classe 3B ne doit être
manipulé que par un opérateur qualifié et bien formé.
Selon la classification, l'utilisation d'un appareil laser
peut produire un rayonnement laser qui peut causer des lésions oculaires et/ou de la peau permanentes.
Les règlements d'utilisation d'un appareil laser varient d'un pays à l'autre. L'utilisateur doit toujours être au
courant des règlements juridiques en vigueur dans son pays et les appliquer à sa situation.
La documentation principale et fondamentale des normes de sécurité laser ANSI Z136.1 (2007) fournit des
conseils pour l'utilisation sécuritaire des lasers et systèmes laser en définissant des mesures de contrôle
pour chacune des quatre classes laser. Cette importante documentation peut être obtenue à partir du site
web www.laserinstitute.org
Il convient de noter que JB SYSTEMS ne peut être tenu responsable des dommages causés par des
installations incorrectes et des utilisations non appropriées !
DANGER : RAYONNEMENT LASER !
doivent être appliquées.
DESCRIPTION :
JB SYSTEMS
1. TENSION D'ENTRÉE : Prise IEC avec porte-fusible et interrupteur ; branchez le câble d'alimentation
secteur fourni dans cette prise.
2. INTERRUPTEUR ON/OFF ACTIONNÉ PAR CLEF : utilisé pour mettre en marche l'appareil ou l'arrêter.
Utilisez des clefs pour vous assurer qu'un opérateur qualifié soit autorisé à manipuler le laser.
3. MICROPHONE INTERNE : Le microphone intégré est utilisé pour synchroniser le show laser au rythme
de la musique.
4. ENTRÉE DMX : connecteur XLR 3 broches mâle utilisé pour les câbles DMX universels. Cette entrée
reçoit des instructions d'un contrôleur DMX.
5. SORTIE DMX : connecteur XLR 3 femelle pour connecter le LASER de l'unité suivante de la chaîne
DMX.
6. ECRAN : indique l'adresse DMX sélectionnée lorsque l'appareil est en mode DMX. A part le mode DMX,
4 autres modes sont également disponibles, voir plus loin pour en savoir plus sur ces modes.
7. PANNEAU DE COMMANDE : Utilisé pour sélectionner les différentes fonctions du laser, voir plus loin
pour apprendre comment utiliser l'appareil.
8. RÉCEPTEUR IR : utilisé pour contrôler l'appareil à l'aide de la télécommande sans fil.
9. BOULON À ŒIL DE SÉCURITÉ : utilisé pour attacher un câble de sécurité au cours du levage de
®
15/74 SMOOTH SCAN-BLUE LASER
JB SYSTEMS
®
16/74 SMOOTH SCAN-BLUE LASER
Page 11
FRANCAIS GUIDE D’UTILISATION
FRANCAIS GUIDE D’UTILISATION
l'appareil (reportez-vous au paragraphe "Montage au plafond".
10. VENTILATEUR DE REFROIDISSEMENT : utilisé pour refroidir les
composants à l'intérieur du boîtier. Veillez à ne jamais couvrir cette
sortie du ventilateur !
11. Entrée de verrouillage : utilisé pour connecter l'interrupteur d'arrêt
d'urgence optionnel (voir image). Quand vous poussez cet
interrupteur, le faisceau laser disparaît immédiatement.
IMPORTANT! Pour votre sécurité nous vous conseillons d’utiliser ce commutateur optionnel!
IL N'Y AURA PAS DE RAYON LASER LORSQUE L'ENTRÉE «INTERLOCK» N'EST PAS UTILISÉE!
Solution temporaire: installer le connecteur de rechange sur le laser. (voir photo)
12. Témoin d'alimentation : indique que l'appareil est allumé.
13. LED pour le son : clignote au son de la musique détectée par le microphone
interne.
14. SUPPORT DE SUSPENSION Support de suspension au mur avec 2 boutons sur
les deux côtés pour attacher l'appareil et un trou de montage pour un crochet de
fixation.
15. PUISSANCE DU LASER : il s'agit de l'ouverture par laquelle sort le faisceau laser
; il ne faut JAMAIS regarder à l'intérieur à travers cette ouverture lorsque le laser est en marche !
16. ÉTIQUETTE D'AVERTISSEMENT : "Attention - Laser de classe 3B. Rayonnement laser lorsqu'il est
ouvert. Évitez l'exposition au faisceau."
17. ÉTIQUETTE D'AVERTISSEMENT : "Ouverture laser"
18. ÉTIQUETTES D'AVERTISSEMENT LASER : mettent en garde contre les dangers laser lorsque
l'appareil n'est pas utilisé par des opérateurs qualifiés.
19. ÉTIQUETTE D'AVERTISSEMENT : "Rayonnement laser. Évitez l'exposition au faisceau. Produit laser
de classe 3R"
MONTAGE AU PLAFOND
Important : L'installation ne doit être effectuée que par un personnel qualifié. Une mauvaise
installation peut entraîner des blessures et/ou dommages graves. Un montage au plafond exige
une grande expérience ! Les limites de charge de fonctionnement doivent être respectées, des
matériels d'installation certifiés doivent être utilisés, l'appareil installé doit être inspecté
régulièrement pour vérifier les conditions de sécurité.
Assurez-vous qu'aucune personne étrangère ne se trouve dans la zone en dessous de l'emplacement
d'installation durant le montage, le démontage et l'entretien.
Fixez l'appareil dans un endroit bien aéré, loin de tout matériau et/ou liquide inflammable. Le luminaire doit
être fixé à au moins 50 cm des murs environnants.
L'appareil doit être installé hors de la portée des gens, loin des passages et des endroits où des
personnes peuvent s'asseoir.
Avant de soulever l'appareil, assurez-vous que le point de suspension peut supporter une charge d'au
moins 10 fois le poids de l'appareil.
Lors de l'installation, utilisez toujours un câble de sécurité certifié qui peut supporter 12 fois le poids de
l'appareil. Ce support de suspension de sécurité secondaire doit être installé de manière à ce qu'aucune
partie de l'installation ne puisse tomber de plus de 20 cm si le support principal lâche.
L'appareil doit être bien fixé, un montage balançant est dangereux et ne doit pas être entrepris !
Ne couvrez pas les ouvertures de ventilation, cela pourrait entraîner une surchauffe.
L'opérateur doit s'assurer que la sécurité relative à l'installation et les conditions techniques sont
approuvées par un expert avant d'utiliser l'appareil pour la première fois. Les installations doivent être
inspectées chaque année par une personne qualifiée pour être sûr que la sécurité est toujours optimale.
ATTENTION LÉSIONS OCULAIRES : Orientez toujours le laser de manière
que le public ne puisse pas regarder directement les faisceaux laser. L'installation doit
être faite de manière que le faisceau ne soit orienté vers le public.
COMMENT CONFIGURER ET CONTRÔLER L'APPAREIL
SENSIBILITE A LA MUSIQUE :
L'appareil fonctionne au rythme de la musique lorsqu'il est utilisé en mode autonome ou
maître/esclave
Pour définir la sensibilité d'entrée, procédez comme suit :
Appuyez sur la touche FUNC jusqu'à ce que l'écran affiche “S 0” …”S 9”
Appuyez sur la touche ENTER pour confirmer votre choix.
Utilisez les touches DOW N/UP pour sélectionner une valeur comprise entre "S 0" (Très faible sensibilité)
et "S 9" (Haute sensibilité).
Une fois le mode est sélectionné, appuyez sur la touche ENTER pour l'enregistrer.
Vous pouvez utiliser l'appareil de 5 façons :
1) MODE CONTRÔLÉ PAR LA MUSIQUE :
Le laser exécute une séquence préprogrammée pour le rythme de musique. Sélectionnez ce mode si un
seul laser est utilisé (autonome) ou lorsque le laser est placé comme la première (maître) unité d'une
chaîne.
Appuyez sur la touche FUNC jusqu'à ce que l'écran affiche l'un des éléments suivants : Sou ou Aut,
Sop ou Aup.
Veuillez consulter attentivement l’ordre du menu ci-dessus.
Utilisez les touches UP/DOWN pour sélectionner :
o Sop (show aléatoire activé par le son avec effets de modèle)
o Sou (Shows activés par le son)
Appuyez sur la touche ENTER pour confirmer votre choix.
Vous pouvez vous connecter plusieurs LASER ensemble : pour les faire toutes fonctionner en parfaite
synchronisation, il suffit de mettre la première unité de la chaîne dans l'un des modes d'effets sonores
activés et toutes les autres unités en mode "esclave" (l'écran affiche "SLA") !
Remarque : Lorsqu'aucune musique n'est détectée, le laser sera arrêté (blackout).
2) MODE ENTIEREMENT AUTOMATIQUE :
Le laser exécute automatiquement une séquence préprogrammée. Sélectionnez ce mode si un seul laser
est utilisé (autonome) ou lorsque le laser est placé comme la première (maître) unité d'une chaîne.
Appuyez sur la touche FUNC jusqu'à ce que l'écran affiche l'un des éléments suivants : Sou ou Aut,
Sop ou Aup.
Utilisez les touches UP/DOWN pour sélectionner :
o Aut (Shows automatiques)
o Aup (show aléatoire automatique avec effets de modèle)
Appuyez sur la touche ENTER pour confirmer votre choix.
Le laser exécute automatiquement une séquence préprogrammée.
JB SYSTEMS
®
17/74 SMOOTH SCAN-BLUE LASER
JB SYSTEMS
®
18/74 SMOOTH SCAN-BLUE LASER
Page 12
FRANCAIS GUIDE D’UTILISATION
ACTIVER/DESACTIVER LE LASER
COULEUR
SENSIBILITE AU SON
FRANCAIS GUIDE D’UTILISATION
Vous pouvez connecter plusieurs LASER BLEU DE BALAYAGE CONTINU ensemble : pour les faire
toutes fonctionner en parfaite synchronisation, il suffit de mettre la première unité de la chaîne dans l'un
des modes d'effets automatique et toutes les autres unités en mode "esclave" (l'écran affiche "SLA") !
3) MODE ESCLAVE :
Le laser suit les instructions données par le premier Laser de balayage continu bleu (maître) dans la
chaîne.
Connectez l'entrée DMX du laser à la sortie DMX du laser précédent dans la chaîne.
Appuyez sur la touche FUNC jusqu'à ce que l'écran affiche "SLA"
Appuyez sur la touche ENTER pour confirmer votre choix.
Vous pouvez vous connecter plusieurs lasers ensemble. Pour les faire toutes fonctionner en parfaite
synchronisation, il suffit de mettre la première unité de la chaîne dans le mode "musique" ou le mode
"automatique" et toutes les autres unités en mode "esclave" (l'écran affiche "SLA" !
4) Mode Télécommande IR :
Le laser peut être contrôlé par la télécommande IR :
Appuyez sur la touche FUNC jusqu'à ce que s'affiche à l'écran. “REM”.
Appuyez sur la touche ENTER pour confirmer votre choix.
Remarque :
Dans tout mode autonome (à l'exception de REM et SLA), appuyez sur ON/OFF pendant 2
secondes pour activer la fonction télécommande.
Les touches de couleurs sont désactivées par le laser bleu à balayage lent
SHOW AUTOMATIQUE
SHOW AVEC MUSIQUE
Entrées de télécommande :
Touches Fonction DESCRIPTION :
ON/OFF
AUTO
MUSIC
Sensibilité au son
Changemen
t de
couleurs
CHANGEME
NT DE
MODELE
MODELE
FIXE
REPETITIO
N DE
MODELE
Dans tout mode autonome à l'exception de SLA : Maintenez
appuyée pendant 2 secondes pour activer le mode REM.
Show activé par le son. Le témoin bleu de musique clignote
En mode show activé par le son, appuyez sur MUSIC+B+1~ 9
pour régler la sensibilité, « 9 » est la plus forte sensibilité.
Bascule entre ses différentes couleurs rouge et vert, vert,
Répétition en basculant entre le dernier modèle et le modèle
En mode REM : ON/OFF le laser
Show AUTO (automatique)
lorsque le son est détecté.
Pour afficher et modifier les modèles
Vous pouvez sélectionner un modèle de 1 à 48
rouge
actuel
JB SYSTEMS
5) MODE DMX512 :
PAUSE EFFET
CHANGEMENT DE MODELES
Le laser peut être contrôlé par un contrôleur DMX standard en 2 modes DMX différents :
MODE 1 CANAUX : pour une configuration et utilisation extrêmement facile ! (L'écran affiche
"1Ch")
MODE 17 CANAUX : pour un contrôle complet de toutes les possibilités. (L'écran affiche "17c")
Connectez l'entrée DMX du laser à la sortie DMX de l'unité précédente dans la chaîne ou directement à
MODELE FIXE
DE 1 A 48
la sortie DMX de votre contrôleur.
Appuyez sur la touche FUNC jusqu'à ce que s'affiche à l'écran. “1C” ou “17C”.
Appuyez sur les touches UP/DOWN pour sélectionner le mode DMX. (1Ch ou 17ch)
Appuyez sur la touche ENTER pour confirmer votre choix.
MODELE REPETITIF
®
19/74 SMOOTH SCAN-BLUE LASER
Appuyez sur la touche FUNC. Le nombre à 3 chiffres à l'écran se met à clignoter.
Sélectionnez l'adresse DMX
Appuyez sur la touche ENTER pour confirmer votre choix.
Remarque : l'affichage clignote lorsque l'appareil est en mode DMX et aucun signal DMX n'est détecté.
JB SYSTEMS
®
20/74 SMOOTH SCAN-BLUE LASER
Page 13
FRANCAIS GUIDE D’UTILISATION
Valeur
CANAL
VALEUR
FONCTION
Lumière stroboscopique
Vitesse de déplacement CA
Vitesse de déplacement CA
FRANCAIS GUIDE D’UTILISATION
Quelques informations supplémentaires sur DMX512 :
Le protocole DMX est largement utilisé pour contrôler des équipements lumineux
intelligents au moyen d'un signal de haute vitesse. Vous devez mettre en chaîne votre
contrôleur DMX avec toutes les unités connectées au moyen d'un câble XLR M/F
symétrique de bonne qualité. Pour éviter un comportement anormal des effets de
lumière, à cause des interférences, vous devez utiliser un terminateur de 90Ω à 120Ω à la fin de la chaîne.
N'utilisez jamais de séparateurs de câbles en Y, cela ne fonctionne pas !
Chaque effet de lumière dans la chaîne doit avoir sa propre adresse de départ afin qu'il sache quelles
commandes du contr ôleur à décoder.
CONFIGURATION DU LASER DMX 1 CANAUX :
position
DMX Fonction remarques
4 210-255 SOU Show activé par le son.
3 150-209 AUT Show automatique
2 090-149 SOP Show activé par les effets sonores d'un modèle
show s'exécutant automatiquement sur les effets
1 030-089 AUP
sonores d'un modèle
0 000-029 VEILLE Laser arrêté
CONFIGURATION DU LASER DMX 17 CANAUX :
REMARQUE IMPORTANTE : DMX 1 canal est utilisé pour définir les différents modes de
fonctionnement du laser.
Pour utiliser le laser en mode 17 canaux, le canal 1 doit avoir une valeur supérieur ou égale à 221.
Selon la valeur DMX du canal 1, différents modes peuvent être appliqués :
MODE CA 1
GROUPE CA 2
MODELE CA 3
4
DECOUPAGE CA 5
Zoom avant/arrière CA 6
C7 Vitesse de zoom
Axe Y de roulement CA 8
Vitesse de roulement CA 9
Axe X de roulement CA 10
000-040
041-080 AUT
081-120 SOU
121-159 AUP
161-200 SOP
201-255 MODE DMX
000-051 Modèles du Groupe 1.
052-103 Modèles du Groupe 2
104-055 Modèles du Groupe 3
156-207 Modèles du Groupe 4
208-255 Modèles du Groupe 5
000-255 Chaque 16 d'un groupe, total 80 Modèles.
CA
000-255
001-127 Modèle fixe découpé à 0%~99%
128-255
000-127 100%-5% fixed pattern zoomed
128-169 Zoom avant
170-209 Zoom arrière
210-255 Zoom alterné
000-255
000-127 Axe Y de roulement 0 -359 degrés
128-191 Roulement dans le sens horaire
192-255 Roulement dans le sens antihoraire
000-127 Axe X de roulement 0 -359 degrés
128-191 Roulement dans le sens horaire
192-255 Roulement dans le sens antihoraire
Laser éteint
Lumière stroboscopique
000 Modèle entier sans découpage
Vitesse de découpage
Rapide à lent
0-255
Rapide à lent
Vitesse de roulement CA 11
Axe Z de roulement CA 12
Vitesse de roulement CA 13
Axe X de déplacement CA 14
15
Axe X de déplacement CA 16
17
Paramétrage des modèles :
0-255
000-127 Axe Z de roulement 0 -359 degrés
128-191 Roulement dans le sens horaire
192-255 Roulement dans le sens antihoraire
000-127 128 positions différentes sur l'axe X
128-191 Déplacement dans le sens horaire
192-255 Déplacement dans le sens antihoraire
000-127 128 positions différentes sur l'axe Y
128-191 Déplacement dans le sens horaire
192-255 Déplacement dans le sens antihoraire
Rapide à lent
0-255
Rapide à lent
0-255
Rapide à lent
0-255 Rapide à lent
Appuyez sur la touche FUNC jusqu'à ce que s'affiche à l'écran.
Appuyez sur jusqu'à ce que le laser affiche la flèche de l'axe des Y en haut et la flèche de l'axe des X à
droite.
Appuyez sur "Enter" pour confirmer la sélection
JB SYSTEMS
®
21/74 SMOOTH SCAN-BLUE LASER
JB SYSTEMS
®
22/74 SMOOTH SCAN-BLUE LASER
Page 14

FRANCAIS GUIDE D’UTILISATION
FRANCAIS GUIDE D’UTILISATION
Liste des motifs
ENTRETIEN
Assurez-vous qu'aucune personne étrangère ne se trouve dans la zone en dessous de l'emplacement
d'installation durant l'entretien.
Eteignez l'appareil, débranchez le câble secteur et attendez que l'appareil refroidisse.
Lors de l'inspection les points suivants doivent être vérifiés :
Toutes les vis utilisées pour l'installation de l'appareil et chacune de ses composantes doivent être
solidement fixées et ne peuvent être rouillées.
Les boîtiers, les supports et les boutons d'installation (plafond, poutre, suspensions) ne doivent pas être
déformés.
Quand une lentille optique est visiblement endommagée en raison de fissures ou de rayures profondes,
elle doit être remplacée.
Les câbles d'alimentation doit être dans un état impeccable et doivent être remplacés immédiatement
même si un petit problème est détecté.
Afin de protéger l'appareil de toute surchauffe, les ventilateurs de rafraîchissement (le cas échéant) et les
ouvertures de ventilation doivent être nettoyés mensuellement.
L'intérieur de l'appareil doit être nettoyé une fois par an à l'aide d'un aspirateur ou d'un jet d'air.
Le nettoyage des lentilles optiques et/ou miroirs internes et externes doit être effectué périodiquement
pour optimiser le flux lumineux. La fréquence de nettoyage dépend de l'environnement dans lequel
l'appareil fonctionne : des environnements humides, enfumés ou particulièrement sales peuvent causer
l'accumulation de saleté sur l'optique de l'appareil.
Nettoyez avec un chiffon doux en utilisant des produits de nettoyage pour verre normal.
Séchez toujours les pièces soigneusement.
Nettoyez les optiques externes au moins une fois tous les 30 jours.
Nettoyez les optiques internes au moins tous les 90 jours.
Attention : Nous vous conseillons fortement de faire effectuer le nettoyage interne par un personnel
qualifié !
SPÉCIFICATIONS
Tension d'entrée : 100 ~ 240VAC, 50/60Hz
Fusible : 250V 1A à action retardée (verre 20 mm)
Consommation totale : 13W
Réglage du son : Microphone interne
Connexions DMX : XLR 3 broches mâle/femelle
Canaux DMX : 1 ou 17 canaux
Adresse DMX de départ : 001 512
Puissance du laser : 400mW Bleu CW laser (ë = 450nm)
Classe de rayonnement laser : 3B
Diamètre du faisceau à la sortie : <5mm
Divergence (chaque faisceau) <12 mrad
Divergence (puissance totale) <90°
Vitesse du balayeur : 15kHz
Température de fonctionnement : 10°C à 40°C
Normes de Sécurité Laser : EN/IEC 60825-1 Ed2, 2007-03
Dimensions : voir image ci-dessous
Poids : 1,5kg
JB SYSTEMS
Vous pouvez télécharger la dernière version de ce manuel sur notre site web : www.beglec.com
®
23/74 SMOOTH SCAN-BLUE LASER
JB SYSTEMS
Toutes les informations peuvent être modifiées sans préavis
®
24/74 SMOOTH SCAN-BLUE LASER
Page 15

NEDERLANDS GEBRUIKSHANDLEIDING
GEBRUIKSAANWIJZING
Hartelijk dank voor de aankoop van dit JB Systems®product . Om ten volle van alle mogelijkheden te
profiteren en voor uw eigen veiligheid, lees deze gebruiksaanwijzing zorgvuldig voordat u met dit apparaat
start.
KENMERKEN
Dit apparaat is radio-interferentie onderdrukt . Dit product voldoet aan de eisen van de huidige Europese en
nationale richtlijnen . Overeenstemming is vastgesteld en de desbetreffende verklaringen en documenten
zijn door de fabrikant gedeponeerd.
Dit apparaat is ontworpen om decoratieve effectverlichting te produceren en wordt in lichtshowsystemen
gebruikt.
Een opvallende blauwe laser met 15 kHz scanners van hoge kwaliteit in plaats van de gewone
stappenmotoren:
Zeer soepele en zachte bewegingen
80 Voorgeprogrammeerde patronen, zoals: getallen, tekeningen, woorden, ...
Prachtige voorgeprogrammeerde lasershows voor allerlei toepassingen: loungebar, discotheek, mobiele
DJ, ...
Klasse 3B laser op basis van een 400mW 450nm blauwe laser.
Verschillende werkmodi:
DMX-besturing: 1 kanaal voor een eenvoudige bediening of 17 kanalen voor een volledige controle
Standalone : geluidgestuurd (ingebouwde microfoon) of automatisch
IR-afstandsbediening: Infrarood afstandsbediening
Master/Slave: prachtige gesynchroniseerde shows
Ingebouwde microfoon
3-cijferig LED-display voor eenvoudige menunavigatie
Sleutel bediende aan-/uitschakelaar en noodstop (interlock) ingang voor extra veiligheid
Voldoet aan EN/IEC 60825-1 Ed2, 2007-03 voor Laserveiligheid
VÓÓR GEBRUIK
Voordat u met het gebruik van dit apparaat start, controleer of er geen transportschade aanwezig is. Mocht
er schade zijn, gebruik het apparaat niet en raadpleeg eerst uw dealer.
Belangrijk: Dit apparaat verliet de fabriek in perfecte staat en goed verpakt. Het is absoluut noodzakelijk
voor de gebruiker om de veiligheidsinstructies en waarschuwingen in deze handleiding strikt op te volgen.
Eventuele schade veroorzaakt door verkeerd gebruik valt niet onder de garantie. De dealer zal niet
aansprakelijk worden gesteld voor eventuele fouten of problemen veroorzaakt door het negeren van deze
handleiding.
Bewaar dit boekje op een veilige plaats voor toekomstige raadpleging. Als u de armatuur verkoopt, zorg
ervoor deze handleiding erbij te voegen.
Controleer de inhoud:
Controleer of de kartonnen doos de volgende items bevat:
Smooth Scan blauwe laser
IR-afstandsbediening
2 sleutels (voor de sleutelschakelaar)
Netsnoer
Gebruiksaanwijzing
NEDERLANDS GEBRUIKSHANDLEIDING
VEILIGHEIDSVOORSCHRIFTEN:
WAARSCHUWING: Om het risico op elektrocutie zoveel
mogelijk te vermijden mag u nooit de behuizing verwijderen. Er
bevinden zich geen onderdelen in het toestel die u zelf kan
herstellen. Laat de herstellingen enkel uitvoeren door een
bevoegde technicus.
De bliksempijl die zich in een gelijkbenige driehoek bevindt is bedoeld om u te wijzen op het
gebruik of de aanwezigheid van niet-geïsoleerde onderdelen met een “gevaarlijke spanning” in
het toestel die voldoende kracht heeft om een risico van elektrocutie in te houden.
Het uitroepteken binnen de gelijkbenige driehoek is bedoeld om de gebruiker erop te wijzen dat
er in de meegeleverde literatuur belangrijke gebruik en onderhoudsinstructies vermeld staan
betreffende dit onderdeel.
Dit symbool betekent: het apparaat mag enkel binnenhuis worden gebruikt.
Dit symbool betekent: Lees de handleiding!
Dit symbool betekent: Klasse I apparaten
Dit symbool bepaalt: de minimumafstand van te belichten voorwerpen. De minimumafstand
Om het milieu te beschermen, probeer het verpakkingsmateriaal zoveel mogelijk te recyclen.
Een nieuw lichteffect veroorzaakt soms enige ongewenste rook en/of geur. Dit is normaal en verdwijnt na
Om vuur of elektrische schokgevaar te voorkomen, stel dit apparaat niet bloot aan regen of vocht.
Om te voorkomen dat binnenin condensatie wordt gevormd, laat het apparaat aan de
Dit apparaat is uitsluitend geschikt voor gebruik binnenshuis.
Plaats geen metalen voorwerpen of mors geen vloeistoffen in het toestel. Elektrische schokken of storing
Plaats de armatuur op een goed geventileerde plek, verwijderd van brandbare materialen en/of
Bedek geen ventilatieopeningen, omdat het tot oververhitting kan leiden.
Voorkom het gebruik in stoffige omgevingen en maak het regelmatig schoon.
Houd het apparaat buiten bereik van kinderen.
Onervaren personen mogen dit apparaat niet bedienen.
De veilige omgevingstemperatuur ligt tussen 15 & 40°C. Gebruik dit apparaat niet bij hogere
Zorg ervoor dat het gebied onder de installatieplaats tijdens het takelen, onttakelen en onderhoud vrij is
Ontkoppel altijd het apparaat wanneer het voor een langere tijd niet wordt gebruikt of alvorens de lamp te
De elektrische installatie dient alleen door gekwalificeerd personeel te worden uitgevoerd, in
Controleer of de beschikbare spanning niet hoger is dan aangegeven op het achterpaneel van het
Het netsnoer moet altijd in perfecte staat zijn. Schakel het apparaat onmiddellijk uit als het netsnoer wordt
Laat het netsnoer nooit met andere kabels in contact komen!
Deze armatuur moet worden geaard om aan de veiligheidsvoorschriften te voldoen.
Sluit het apparaat niet aan op een dimmerpack.
Gebruik bij het installeren van het apparaat altijd een geschikte en gecertificeerde veiligheidskabel.
Om elektrische schokken te voorkomen, open de afdekking niet. Afgezien van de lamp en de zekering zijn
Repareer nooit een zekering of sluit nooit de zekeringhouder kort. Vervang altijd een kapotte zekering
In het geval van ernstige problemen, stop met het gebruik van de armatuur en neem onmiddellijk contact
tussen projector en het verlichte voorwerp moet meer dan 1 meter zijn.
enkele minuten.
omgevingstemperatuur aanpassen wanneer het na transport in een warme kamer wordt gebracht.
Condens verhindert soms het apparaat op volle capaciteit te werken of kan zelfs schade veroorzaken.
kan het gevolg zijn. Als een vreemd voorwerp in het apparaat terechtkomt, trek onmiddellijk de stekker uit
het stopcontact.
vloeistoffen. De armatuur moet op minstens 50 cm vanaf de omringende muren worden bevestigd.
omgevingstemperaturen.
van ongewenste personen.
vervangen of het onderhoud te beginnen.
overeenstemming met de voorschriften voor elektrische en mechanische veiligheid in uw land.
apparaat.
platgedrukt of beschadigd. Als het netsnoer beschadigd is, moet deze door de fabrikant, zijn
vertegenwoordiger, of door een vergelijkbaar bevoegde persoon worden vervangen, om een gevaar te
voorkomen.
er geen te onderhouden onderdelen binnenin aanwezig.
met een zekering van hetzelfde type en elektrische specificaties!
op met uw dealer.
JB SYSTEMS
®
25/74 SMOOTH SCAN-BLUE LASER
JB SYSTEMS
®
26/74 SMOOTH SCAN-BLUE LASER
Page 16

NEDERLANDS GEBRUIKSHANDLEIDING
NEDERLANDS GEBRUIKSHANDLEIDING
De behuizing en de lenzen moeten vervangen worden als ze zichtbaar beschadigd zijn.
Gebruik de originele verpakking als het toestel vervoerd moet worden.
Vanwege veiligheidsredenen is het verboden om ongeautoriseerde wijzigingen op het apparaat aan te
brengen.
Belangrijk: Kijk nooit rechtstreeks in de lichtbron! Gebruik het effect niet in de aanwezigheid van personen
die aan epilepsie lijden.
LASER VEILIGHEIDSINSTRUCTIES:
Volgens de EN/IEC 60825-1 Ed2, 2007-03 regelgeving, valt deze laser onder de classificatie 3B. Directe
blootstelling aan de ogen kan gevaarlijk zijn.
Vermijd directe blootstelling aan het oog! Laserstraling kan
oogletsel en/of beschadiging van de huid veroorzaken. Alle
beschermende maatregelen voor een veilig gebruik van deze laser
Dit product is een zogenaamd showlaser, zend straling uit met een golflengtespectrum tussen 400 en 700
nm en het produceert lichteffecten voor shows.
Laserlicht is anders dan elke andere lichtbron waarmee u misschien bekend mee bent. Het licht van dit
product kan mogelijk oogletsel veroorzaken, indien niet correct ingesteld en correct gebruikt wordt.
Laserlicht is duizenden malen meer geconcentreerd dan het licht van elke andere vorm van lichtbron.
Deze concentratie van licht macht kan tot direct oogletsel leiden, voornamelijk door het verbranden van het
netvlies (het lichtgevoelige gedeelte aan de achterkant van het oog). Zelfs als u geen "warmte" van een
laserstraal, kunt voelen, kan het nog steeds u of uw publiek mogelijk verwonden of verblinden.
Zelfs zeer kleine hoeveelheden van het laserlicht is
potentieel gevaarlijk, zelfs op lange afstanden.
Kijk nooit in het laserdiafragma of de laserstralen
Richt de laserstraal nooit op mensen of dieren en laat
dit apparaat nooit zonder toezicht werken.
Deze laser mag alleen worden gebruikt voor shows.
De werking van een klasse 3B laser is alleen
toegestaan als het gebruik wordt bediend door een
deskundige en goed opgeleide operator.
Afhankelijk van de classificatie, kan het bedienen van
een laserproduct laserstraling produceren die
permanent oogletsel en/of beschadiging van de huid kan veroorzaken. De wettelijke voorschriften voor het
gebruik van een laserproduct verschillen van land tot land. De gebruiker moet zich altijd over de wettelijke
voorschriften informeren die geldig zijn in zijn land en deze in zijn situatie toepassen.
Het bovenliggende document en de hoeksteen van de laserveiligheidsnormen ANSI Z136.1 (2007) geven
richtlijnen voor het veilig gebruik van lasers en lasersystemen door het definiëren van beheersmaatregelen
voor elk van de vier laser klassen. Dit waardevolle document kan worden verkregen bij
www.laserinstitute.org.
Houd er rekening mee dat JB SYSTEMS niet aansprakelijk kan worden gesteld voor schade veroorzaakt
door onjuiste installaties en onervaren gebruik!
GEVAAR: LASERSTRALING!
moet worden toegepast.
BESCHRIJVING:
1. ENERGIEVOORZIENING: Lichtnetingang met IEC-aansluiting en geïntegreerde zekeringhouder, sluit
hier het meegeleverde netsnoer op aan.
2. SLEUTEL GEACTIVEERDE ON/OFF-SCHAKELAAR: Wordt gebruikt om het apparaat aan/uit te
schakelen. Gebruik de sleutel om ervoor te zorgen dat slechts een bekwame medewerker in staat is om
de laser in te schakelen.
3. INGEBOUWDE MICROFOON: De ingebouwde microfoon wordt gebruikt om de lasershow op het ritme
van de muziek te synchroniseren.
4. DMX-INGANG: 3-pins mannelijke XLR-connector die gebruikt wordt om de universele DMX-kabels aan
te sluiten. Deze ingang ontvangt instructies van een DMX-controller.
5. DMX-UITGANG: 3-pins vrouwelijke XLR-connector die gebruikt wordt om de LASER met de volgende
eenheid in de DMX-keten te verbinden.
6. DISPLAY: toont de geselecteerde DMX-adres wanneer het apparaat is in DMX-modus is geschakeld.
Naast de DMX-modus kunt u ook kiezen voor 4 andere werkmodi, zie verderop voor meer informatie
over deze modi.
7. BEDIENINGSPANEEL: wordt gebruikt om de verschillende functies van de laser te selecteren, zie
verderop om te leren hoe het apparaat te bedienen.
8. IR-ONTVANGER: Wordt gebruikt om het apparaat via de draadloze afstandsbediening te bedienen.
JB SYSTEMS
®
27/74 SMOOTH SCAN-BLUE LASER
JB SYSTEMS
®
28/74 SMOOTH SCAN-BLUE LASER
Page 17

NEDERLANDS GEBRUIKSHANDLEIDING
NEDERLANDS GEBRUIKSHANDLEIDING
9. VEILIGHEIDSOOGBOUT: wordt gebruikt om een
veiligheidskabel te bevestigen wanneer het apparaat is
opgetuigd (zie paragraaf “Hijsen boven personen”).
10. KOELVENTILATOR: Wordt gebruikt om de onderdelen in de
kast te koelen. Zorg ervoor dat u deze ventilatoruitlaat nooit
afdekt!
11. INTERLOCK-ingang: Wordt gebruikt om de optionele
noodstopschakelaar aan te sluiten (zie foto). Wanneer u op deze
schakelaar drukt zal de laserstraal onmiddellijk verdwijnen.
BELANGRIJK! we raden ten sterkste aan om deze optionele schakelaar aan te sluiten!
DE LASER WERKT NIET ZOLANG DE INTERLOCK INGANG NIET WORDT GEBRUIKT.
Tijdelijke oplossing: installeer de reserve connector op de laser. (zie foto)
12. Voeding-LED: geeft aan dat het apparaat is ingeschakeld.
13. Geluid-LED: knippert op het geluid van de muziek gedetecteerd door de interne
microfoon.
14. OPHANGBEUGEL: met 2 knoppen aan beide zijden om het apparaat te
bevestigen en een montagegat om een ophanghaak te bevestigen.
15. LASER-UITGANG: de laserstraal verlaat hier de behuizing; zorg ervoor om
NOOIT door deze opening in het toestel te kijken, terwijl de lasereffect is
ingeschakeld!
16. WAARSCHUWINGSLABEL: "Voorzichtig - Klasse 3B laser. Laserstraling indien geopend. Vermijd
blootstelling aan de straal.”
17. WAARSCHUWINGSLABEL: “Laserdiafragma”
18. LASERWAARSCHUWINGSETIKETTEN: waarschuwen tegen een potentieel gevaarlijke laser als deze
niet door ervaren operators wordt gebruikt.
19. WAARSCHUWINGSLABEL: “Laserstraling. Vermijd blootstelling aan de straal. Klasse 3b laserproduct”
HIJSEN BOVEN PERSONEN
Belangrijk: De installatie moet alleen worden uitgevoerd door gekwalificeerd
onderhoudspersoneel. Onjuiste installatie kan tot ernstig letsel bij personen en schade aan
goederen leiden. Hijsen boven personen vereist veel ervaring! Werklastgrenzen moeten in acht
worden genomen, gecertificeerde installatiematerialen moeten worden gebruikt, het geïnstalleerde
apparaat moet regelmatig worden gecontroleerd op veiligheid.
Zorg ervoor dat het gebied onder de installatieplaats tijdens het takelen, onttakelen en onderhoud vrij is
van ongewenste personen.
Plaats de armatuur op een goed geventileerde plek, verwijderd van brandbare materialen en/of
vloeistoffen. De armatuur moet op minstens 50 cm vanaf de omringende muren worden bevestigd.
Het apparaat moet buiten het bereik van mensen en buiten de gebieden waar personen kunnen lopen of
zitten worden geïnstalleerd.
Alvorens te hijsen, controleer of de installatieplek een minimum puntbelasting van 10 keer het gewicht van
het apparaat kan dragen.
Gebruik bij het installeren van het apparaat altijd een gewaarmerkte veiligheidskabel die 12 keer het
gewicht van het apparaat kan dragen. Deze secundaire veiligheidsbevestiging dient op een zodanige
wijze te worden geïnstalleerd zodat geen enkel onderdeel van de installatie meer dan 20 cm kan vallen als
de hoofdbevestiging het begeeft.
Het apparaat moet goed worden bevestigd; een vrij pendelende montage is gevaarlijk en mag niet worden
overwogen!
Bedek geen ventilatieopeningen, omdat het tot oververhitting kan leiden.
De exploitant moet ervoor zorgen dat de veiligheidsgerelateerde en machinetechnische installaties door
een deskundige zijn goedgekeurd alvorens deze voor de eerste keer te gebruiken. De installaties dienen
jaarlijks door een ervaren persoon worden geïnspecteerd om te controleren of de veiligheid nog steeds
optimaal is.
OPGELET OOGBESCHADIGING: Plaats altijd de laser op een zodanig wijze zodat
voorkomen wordt dat het publiek direct in de laserstralen kijkt. De installatie dient te
garanderen dat de straal niet het publiek raakt.
HOE HET APPARAAT IN TE STELLEN EN TE BEDIENEN
MUZIEK-INGANGSGEVOELIGHEID:
Het apparaat werkt op het ritme van de muziek bij gebruik in stand-alone- of master/slave-modus.
Voor het instellen van de ingangsgevoeligheid, ga als volgt te werk:
Druk op en houd de “FUNC”-knop ingedrukt totdat de display "S 0" ... "S 9" weergeeft
Druk op de “ENTER”-knop om uw keuze te bevestigen.
Gebruik de “DOW N”- en “UP”-knop om een waarde tussen “S 0” (zeer lage gevoeligheid) en “S 9” (hoge
gevoeligheid) te selecteren.
Zodra de modus is geselecteerd, druk op de “ENTER”-knop om het op te slaan.
U kunt het apparaat op 5 manieren bedienen:
1) MUZIEKGESTUURDE MODUS
De laser draait een voorgeprogrammeerde sequentie op het ritme van de muziek af. Selecteer deze
modus wanneer alleen 1 laser wordt gebruikt (standalone) of wanneer de laser wordt geplaatst als het
eerste (master) apparaat in een keten met meerdere apparaten.
Druk op en huod de “FUNC”-knop ingedrukt totdat de display één van de volgende opties weergeeft:
Sou of Aut, Sop of Aup.
Zie bovenstaand menu.
Gebruik de “UP”- of “DOWN”-knoppen om te selecteren:
o Sop (Geluid geactiveerde willekeurige show, met een patroon effecten)
o Sou (Geluidgeactiveerde shows)
Druk op de “ENTER”-knop om uw keuze te bevestigen.
U kunt meerdere LASER’s met elkaar verbinden: schakel gewoon het eerste apparaat in de keten in één
van de geluid geactiveerde effectmodi en alle andere apparaten in de "Slave”-modus (display toont
"SLA"), zodat ze allemaal perfect synchroon werken!
Opmerking: Wanneer er geen muziek wordt gedetecteerd, zal de laseruitgang worden uitgeschakeld
(blackout).
2) VOLAUTOMATISCHE MODUS:
De laser draait automatisch een voorgeprogrammeerde sequentie. Selecteer deze modus wanneer alleen
1 laser wordt gebruikt (standalone) of wanneer de laser wordt geplaatst als het eerste (master) apparaat in
een keten met meerdere LASER’s.
Druk op en huod de “FUNC”-knop ingedrukt totdat de display één van de volgende opties weergeeft:
Sou of Aut, Sop of Aup.
Gebruik de “UP”- of “DOWN”-knoppen om te selecteren:
o Aut (Automatische shows)
o Aup (automatische willekeurige show, met patrooneffecten)
Druk op de “ENTER”-knop om uw keuze te bevestigen.
De laser draait automatisch een voorgeprogrammeerde sequentie.
JB SYSTEMS
®
29/74 SMOOTH SCAN-BLUE LASER
JB SYSTEMS
®
30/74 SMOOTH SCAN-BLUE LASER
Page 18

NEDERLANDS GEBRUIKSHANDLEIDING
LASER AAN/UIT
KLEUR
GELUIDGEVOELIGHEID
NEDERLANDS GEBRUIKSHANDLEIDING
U kunt meerdere SMOOTH SCAN BLAUWE LASER’s met elkaar verbinden: schakel gewoon het eerste
apparaat in de keten in één van de automatische effectmodi en alle andere apparaten in de “Slave”-modus
(display toont “SLA”), zodat ze allemaal perfect synchroon werken!
3) SLAVE-MODUS:
De laser volgt de instructies van de eerste Smooth Scan BLAUWE LASER (master) in de keten.
Sluit de DMX-ingang van de laser aan op de DMX-uitgang van de vorige laser in de keten.
Druk op de “FUNC”-knop op het apparaat, totdat de display “SLA” weergeeft.
Druk op de “ENTER”-knop om uw keuze te bevestigen.
U kunt meerdere LASER’s met elkaar verbinden. Schakel het eerste apparaat in de keten in de muziek
geactiveerde of automatische effectmodi en alle andere apparaten in de “Slave”-modus (display toont
“SLA”), zodat ze allemaal perfect synchroon werken!
4) IR-AFSTANDSBEDIENING:
De laser kan via de IR-afstandsbediening worden bediend:
Druk op en houd de “FUNC”-knop ingedrukt totdat de display weergeeft “REM”.
Druk op de “ENTER”-knop om uw keuze te bevestigen.
Opmerking:
In elke standalone-modus (met uitzondering van REM en SLA), druk 2 seconden op “ON/OFF”
om functies op afstand te activeren.
De kleurtoetsen zijn ongeldig met de Smooth Scan blauwe laser
AUTO-SHOW
MUZIEKSHOW
Afstandsbedieningingangen:
Knop Functie Beschrijving
In de “REM”-modus: schakel de laser ON/OFF.
ON/OFF
AUTO
MUSIC
Geluidgevoeligheid
KLEUR VERANDEREN
PATROON
VERANDEREN
VAST PATROON
PATROONHERHALING
In een willekeurige alleenstaande modus behalve de SLA
modus: druk 2 seconden in om de REM modus te activeren.
AUTO lopende show
SOUND geactiveerde show. De blauwe LED muziekindicator
knippert wanneer het geluid wordt waargenomen.
Druk tijdens een geluidgeactiveerde show op MUZIEK+B+1~ 9
om de gevoeligheid in te stellen, “9” is het gevoeligst.
Doorloop Geprogrammeerde kleur, Rood & Groen, Groen,
Rood
Om patronen te laten zien en te veranderen
U kunt één patroon van 1 tot 48 selecteren
Het laatste en huidige patrooncyclus herhalen
JB SYSTEMS
EFFECT PAUZE
VERANDERENDE PATROON
5) DMX512-MODUS:
De laser kan door elke standaard DMX-controller in 2 verschillende DMX-modi worden bestuurd:
1 KANAALMODUS: voor zeer eenvoudige installatie en gebruik! (display toont "1Ch")
17 KANAALMODUS: voor volledige bediening van alle functies. (display toont “17c”)
VAST PATROON
VAN 1 TOT 48
Sluit de DMX-ingang van de laser aan op de DMX-uitgang van de vorige laser in de keten of
rechtstreeks op de DMX-uitgang van uw controller.
Druk op en houd de “FUNC”-knop ingedrukt totdat de display weergeeft . “1C” of “17C”.
Druk op de “UP”- of “DOWN”-knoppen om de DMX-modus te selecteren. (1Ch of 17ch)
PATROON HERHALEN
Druk op de “ENTER”-knop om uw keuze te bevestigen.
Druk op de “FUNC”-knop: het 3-cijferige nummer op de display begint te knipperen.
Selecteer het DMX-adres
Druk op de “ENTER”-knop om uw keuze te bevestigen.
Opmerking: de display knippert wanneer het apparaat in de DMX-modus is geschakeld en geen DMXsignaal wordt gedetecteerd.
®
31/74 SMOOTH SCAN-BLUE LASER
JB SYSTEMS
®
32/74 SMOOTH SCAN-BLUE LASER
Page 19

NEDERLANDS GEBRUIKSHANDLEIDING
DMX
-
KANAAL
WAARDE
FUNCTIE
NEDERLANDS GEBRUIKSHANDLEIDING
Enige informatie meer over DMX512:
De DMX-protocol is een veel gebruikte hoge snelheidsignaal om intelligent
lichtapparatuur te bedienen. U moet uw DMX-controller in “daisychain” koppelen en alle
aangesloten lichteffecten met een goede kwaliteit gebalanceerde kabel linken. Om
vreemd gedrag van de lichteffecten als gevolg van storingen te voorkomen, moet u een
90 Ω tot 120 Ω terminator aan het eind van de keten gebruiken. Gebruik nooit Y-splitter-kabels, dit zal
gewoon niet werken
Elk lichteffect in de keten heeft een goed startadres nodig, zodat het weet welke commando’s van de
controller het moet decoderen.
1 KANAALS DMX-CONFIGURATIE VAN DE LASER:
Positie
waarde Functie Opmerkingen
4 210-255 SOU Geluidgeactiveerde show
3 150-209 AUT Automatische show
2 090-149 SOP Geluid geactiveerd patroon effectshow
1 030-089 AUP Automatisch patroon effectshow
0 000-029 STANDBY LASER-uitgang uitgeschakeld
17 KANAALS DMX-CONFIGURATIE VAN DE LASER:
BELANGRIJKE OPMERKING: DMX Kanaal1 wordt gebruikt om de verschillende werkingsmodi van de
laser in te stellen.
Voor het gebruik van de laser in de volledige 17-kanaals modus, moet kanaal 1 op de waarde 221 of
hoger worden ingesteld.
Afhankelijk van de DMX-waarden van kanaal 1, kunnen een andere modus worden toegepast:
CH 1 MODUS
CH 2 GROEP
CH 3 PATROON
CH 4 Strobe
CH 5 KNIPPEN
CH 6 ZOOM
000-040
041-080 AUT
081-120 SOU
121-159 AUP
161-200 SOP
201-255 DMX-MODUS
000-051 1 Groeppatronen.
052-103 2 Groeppatronen
104-055 3 Groeppatronen
156-207 4 Groeppatronen
208-255 5 Groeppatronen
000-255 Elk 16 voor 1 groep, in totaal 80 patronen.
000-255
000 Volledige patroon zonder knippen
001-127 0%~99% vast patroon geknipt
128-255
000-127 100%-5% vast patroon gezoomd
128-169 Inzoomen
170-209 Uitzoomen
210-255 Afwisselend zoomen
Laser OFF(UIT)
Strobe
Knipsnelheid
CH7 zoomsnelheid
CH 8 Y-AS ROLLEN
CH 9 ROLSNELHEID
CH 10 X-AS ROLLEN
CH 11 ROLSNELHEID
CH 12 Z-AS ROLLEN
CH 13 ROLSNELHEID
CH 14 X-AS BEWEGEN
CH 15 BEWEEGSNELHEID
CH 16 X-AS BEWEGEN
CH 17 BEWEEGSNELHEID
000-255
000-127 0 -359 graden vaste Y-as gerold
128-191 Rechtsom rollen
192-255 Linksom rollen
0-255
000-127 0 -359 graden vaste X-as gerold
128-191 Rechtsom rollen
192-255 Linksom rollen
0-255
000-127 0 -359 graden vaste Z-as gerold
128-191 Rechtsom rollen
192-255 Linksom rollen
0-255
000-127 128 verschillende vaste posities op X-as
128-191 Rechstom bewegen
192-255 Linksom bewegen
0-255
000-127 128 verschillende vaste posities op Y-as
128-191 Rechstom bewegen
192-255 Linksom bewegen
0-255 Snel naar langzaam
Snel naar langzaam
Snel naar langzaam
Snel naar langzaam
Snel naar langzaam
Snel naar langzaam
JB SYSTEMS
®
33/74 SMOOTH SCAN-BLUE LASER
JB SYSTEMS
®
34/74 SMOOTH SCAN-BLUE LASER
Page 20

NEDERLANDS GEBRUIKSHANDLEIDING
NEDERLANDS GEBRUIKSHANDLEIDING
Patroon instellingen:
Druk op en houd de “FUNC”-knop ingedrukt
Druk op de “UP”- of “DOWN”-knoppen totdat de laser de pijl van de Y-as bovenaan en pijl van de X-as
aan de rechterkant weergeeft.
Druk op de “ENTER”-knop om de selectie te bevestigen.
totdat de display weergeeft
Patroonlijst
JB SYSTEMS
®
35/74 SMOOTH SCAN-BLUE LASER
JB SYSTEMS
®
36/74 SMOOTH SCAN-BLUE LASER
Page 21

NEDERLANDS GEBRUIKSHANDLEIDING
ONDERHOUD
Zorg ervoor dat het gebied onder de installatieplaats tijdens het takelen, onttakelen en onderhoud vrij is
van ongewenste personen.
Schakel het apparaat uit, ontkoppel het netsnoer en wacht totdat het apparaat is afgekoeld.
Tijdens de inspectie moeten de volgende punten worden gecontroleerd:
Alle schroeven gebruikt voor het installeren van het apparaat of onderdelen van het apparaat, moeten
stevig worden bevestigd en mogen niet gecorrodeerd zijn.
Behuizingen, bevestigingen en installatieplaatsen (plafond, dragers, ophangingen) moeten volledig vrij van
vervorming zijn.
Wanneer een optische lens zichtbaar door scheuren of diepe krassen is beschadigd, moet het worden
vervangen.
De netsnoeren moeten in perfecte conditie zijn en onmiddellijk worden vervangen wanneer zelfs een klein
probleem wordt gedetecteerd.
Om het apparaat tegen oververhitting te beschermen moeten de ventilatoren (indien aanwezig) en
ventilatieopeningen maandelijks worden gereinigd.
Het interieur van het apparaat moeten jaarlijks met een stofzuiger of luchtstraal worden gereinigd.
Het reinigen van de interne en externe optische lenzen en/of spiegels moet regelmatig worden uitgevoerd
om de lichtopbrengst te optimaliseren. De frequentie van reiniging hangt af van de omgeving waarin de
armatuur werkt: een vochtige, rokerige of bijzonder vuile omgeving kan leiden tot een grotere opeenhoping
van vuil op de optiek van het apparaat.
Reinig met een zachte doek met behulp van normale reinigingsmiddelen voor glas.
Droog de onderdelen altijd zorgvuldig.
Reinig de externe optiek ten minste eenmaal per 30 dagen.
Reinig de interne optiek ten minste eenmaal per 90 dagen.
Opgelet: Wij raden nadrukkelijk aan om het inwendig reinigen door gekwalificeerd personeel uit te
laten voeren!
SPECIFICATIES
Energievoorziening: AC 100~240 V, 50/60 Hz
Zekering: 250 V 1 A traag (20 mm glas)
Totaal energieverbruik: 13 W
Geluidbesturing: Ingebouwde microfoon
DMX-aansluitingen: 3-pins XLR mannelijk/vrouwelijk
DMX-kanalen: 1 of 17 kanalen
DMX-startadres 001 512
Laservermogen: 400 mW Blauwe CW laser (λ = 450 nm)
Laserstraling klasse: 3B
Bundeldiameter bij diafragma: < 5 mm
Divergentie (elke balk) <12 mrad
Divergentie (totale opbrengst) <90°
Scannersnelheid: 15kHz
Bedrijfstemperatuur: 10°C tot +40°C
Laserveiligheidsnorm: EN/IEC 60825-1 Ed2, 2007-03
Afmetingen: Zie afbeelding hieronder
Gewicht: 1,5kg
DEUTSCH BEDIENUNGSANLEITUNG
BEDIENUNGSANLEITUNG
Vielen Dank für den Kauf dieses JBSystems®-Produkts. Bitte lesen Sie bitte diese Bedienungshinweise
sorgfältig vor der Inbetriebnahme durch, um alle Möglichkeiten des Geräts voll zu nutzen sowie zu Ihrer
eigenen Sicherheit.
EIGENSCHAFTEN
Dieses Gerät ist entstört. Das Gerät entspricht den aktuellen europäischen Anforderungen und nationalen
Richtlinien. Die Konformität wurde nachgewiesen und die entsprechenden Erklärungen und Unterlagen
liegen beim Hersteller vor.
Dieses Gerät wird zur Erzeugung von dekorativen Beleuchtungseffekten in Lichtshows eingesetzt.
Ein auffälliger blauer Laser mit hochwertigen 15kHz-Scannern anstelle gewöhnlicher Schrittmotoren:
Sehr ruhige und weiche Bewegungen.
80 vorprogrammierte Muster wie: Zahlen, Zeichnungen, Wörter usw.
Herrliche, vorprogrammierte Lasershows für unterschiedlichste Anwendungsbereiche: Lounge-Bar,
Diskothek, mobiler DJ usw.
Klasse 3B Laser, der auf einem blauen 450nm Laser mit 400mW basiert.
Mehrere Betriebsarten:
DMX-Controller: 1 Kanal für eine einfache Bedienung oder 17 Kanäle für vollständige Steuerung.
Einzelbetrieb: Musikaktiviert (internes Mikrofon) oder automatisch
IR-Fernbedienung: Infrarot-Fernbedienung.
Master/Slave: Wundervolle synchronisierte Shows.
Eingebautes Mikrofon
3-stelliges LED-Display für einfache Navigation im Menü
Schlüsselbetätigter Ein-/Ausschalter und Notschalter (Verriegelung)-Eingang für zusätzliche Sicherheit.
Entspricht EN/IEC 60825-1 Ed2, 2007-03 für Lasersicherheit.
VOR DER ERSTBENUTZUNG
Vor der Erstbenutzung bitte das Gerät zuerst auf Transportschäden überprüfen. Sollte das Gerät einen
Schade aufweisen, benutzen Sie es nicht, sondern wenn Sie sich unverzüglich an Ihren Händler.
Wichtiger Hinweis: Dieses Gerät hat das Werk unbeschädigt und gut verpackt verlassen. Es ist wichtig,
dass der Benutzer sich streng an die Sicherheitshinweise und Warnungen in der Bedienungsanleitung
hält. Schäden durch unsachgemäße Handhabung sind von der Garantie ausgeschlossen. Der Händler
übernimmt keine Verantwortung für Schäden, die durch Nichtbeachtung der Bedienungsanleitung
hervorgerufen wurden.
Die Bedienungsanleitung zum zukünftigen Nachschlagen bitte an einem sicheren Ort aufbewahren. Bei
Verkauf oder sonstiger Weitergabe des Geräts bitte die Bedienungsanleitung beifügen.
Packungsinhalt prüfen:
Vergewissern Sie sich, dass folgende Artikel mitgeliefert wurden:
Smooth Scan Blue Laser
IR Fernbedienung
2 Schlüssel (für Schlüsselschalter)
Netzkabel
Bedienungsanleitung
Alle informatie is onderhevig aan verandering zonder voorafgaande kennisgeving.
U kunt de nieuwste versie van deze handleiding van onze website downloaden: www.beglec.com.
JB SYSTEMS
®
37/74 SMOOTH SCAN-BLUE LASER
JB SYSTEMS
®
38/74 SMOOTH SCAN-BLUE LASER
Page 22

DEUTSCH BEDIENUNGSANLEITUNG
ACHTUNG:
befinden sich keine vom Benutzer
SICHERHEITSHINWEISE
Schlags auszusetzen, entfernen Sie keines der Gehäuseteile.
Im Geräteinneren
reparierbaren Teile. Überlassen Sie Reparaturen dem
qualifizierten Kundendienst.
Das Blitzsymbol im Dreieck weist den Benutzer darauf hin, dass eine Berührungsgefahr mit nicht
isolierten Teilen im Geräteinneren, die eine gefährliche Spannung führen, besteht. Die
Spannung ist so hoch, das hier die Gefahr eines elektrischen Schlages besteht.
Das Ausrufezeichen im Dreieck weist den Benutzer auf wichtige Bedienungs- und
Wartungshinweise in den Dokumenten hin, die dem Gerät beiliegen.
Dieses Symbol bedeutet: Nur innerhalb von Räumen verwenden.
Dieses Symbol bedeutet: Achtung! Bedienungsanleitung lesen!
Dieses Symbol gibt an: der minimale Abstand von beleuchteten Gegenständen. Der minimale
Aus Umweltschutzgründen Verpackung bitte wiederverwenden oder richtig trennen.
Ein neuer Lichteffekt kann manchmal zu unerwünschtem Rauch oder Gerüchen führen. Diese
Erscheinung ist normal und verschwindet nach einigen Minuten.
Zur Vermeidung von Feuer und Stromschlag Gerät weder Regen noch Feuchtigkeit aussetzen.
Zur Vermeidung von Kondensation im Inneren des Geräts bitte nach dem Transport in eine warme
Umgebung einige Zeit zum Temperaturausgleich ausgeschaltet stehen lassen. Kondensation kann zu
Leistungsverlust des Geräts oder gar Beschädigung führen.
Nur für den Einsatz im Innenbereich.
Keine Metallgegenstände oder Flüssigkeiten ins Innere des Geräts gelangen lassen. Ein Kurzschluss oder
eine Fehlfunktion können die Folge sein. Falls es doch einmal vorkommen sollte, bitte sofort den
Netzstecker ziehen und vom Stromkreis trennen.
Das Gerät nur an einem gut belüfteten Ort und entfernt von entflammbaren Materialien oder Flüssigkeiten
aufstellen. Der Mindestabstand an allen Seiten muss mindestens 50cm betragen.
Die Ventilationsöffnungen nicht abdecken, da Überhitzungsgefahr.
Nicht in staubiger Umgebung verwenden und regelmäßig reinigen.
Für Kinder unerreichbar aufbewahren.
Unerfahrene Personen dürfen das Gerät nicht bedienen.
Die zulässige Umgebungstemperatur liegt zwischen 15°C und 40°C. Verwenden Sie dieses Gerät nicht bei
höheren Umgebungstemperaturen.
Stellen Sie sicher, dass sich während des Auf- oder Abbaus und der Wartung keine unbefugten Personen
unterhalb des Geräts befinden.
Trennen Sie das Gerät vom Netz, wenn es nicht verwendet wird oder wenn Sie Wartungsarbeiten
vornehmen oder wenn Sie eine Lampe wechseln.
Die elektrische Installation darf nur von qualifiziertem Personal, unter Beachtung der Vorschriften zur
elektrischen und mechanischen Sicherheit in Ihrem Land durchgeführt werden.
Vergewissern Sie sich, dass die Netzspannung nicht höher ist, als auf dem Typenschild auf der
Geräterückseite angegeben.
Das Gerät nicht mit einem beschädigten Netzkabel in Betrieb nehmen. Wenn das Netzkabel quetscht oder
beschädigt wurde, schalten Sie das Gerät sofort aus. Im Falle von Beschädigungen muss das Netzkabel
vom Hersteller, einem autorisierten Kundendienstmitarbeiter oder einer ähnlich qualifizierten Person
ersetzt werden, um Gefährdungen zu vermeiden.
Lassen Sie das Netzkabel niemals mit anderen Kabeln in Berührung kommen!
Zur Einhaltung der Sicherheitsbestimmungen muss das Gerät geerdet sein.
Das Gerät nicht an einen Dimmer anschließen.
Ausschließlich vorschriftsmäßige Kabel zur Installation verwenden.
Zur Vorbeugung gegen elektrische Schläge keine Abdeckungen entfernen. Außer der Lampe und der
Sicherung hat das Gerät keine vom Benutzer austauschbaren Teile.
Eine Sicherung niemals reparieren oder überbrücken. Eine durchgebrannte Sicherung stets durch eine
gleichwertige Sicherung ersetzen!
Bei Fehlfunktion das Gerät nicht benutzen und sich mit dem Händler in Verbindung setzen.
Bei sichtbaren Beschädigungen müssen Gehäuse und Optik ersetzt werden.
Bei Transport bitte die Originalverpackung verwenden, um Schäden am Gerät zu vermeiden.
Abstand zwischen Projektor und dem belichteten Gegenstand muss mehr als 1 Meter betragen.
Um sich nicht der Gefahr eines elektrischen
DEUTSCH BEDIENUNGSANLEITUNG
Aus Sicherheitsgründen dürfen an dem Gerät keine unbefugten Veränderungen vorgenommen werden.
Wichtiger Hinweis: Nicht direkt in die Lichtquelle blicken! Das Gerät nicht verwenden, wenn sich Personen
im Raum befinden, die unter Epilepsie leiden.
SICHERHEITSHINWEISE FÜR LASER:
Entsprechend den Bestimmungen EN/IEC 60825-1 Ed2, 2007-03 fällt dieser Laser unter die
Klassifizierung 3B. Direkte Einstrahlung in die Augen kann gefährlich sein.
Nicht in den Laserstrahl blicken! Laserstrahlung kann zu Augen-
oder Hautverletzungen führen. Alle Schutzmechanismen für einen
sicheren Betrieb dieses Lasers müssen angewandt werden.
Dieses Produkt ist ein sogenannter Show-Laser, der eine Strahlung mit einer W ellenlänge zwischen 400
und 700 nm abgibt und Lichteffekte für Shows produziert.
Laserlicht unterscheidet sich von allen Lichtquellen, die Sie kennen. Das Licht von diesem Produkt kann
zu Augenverletzungen führen, wenn es nicht korrekt eingestellt ist. Laserlicht ist Tausende Male
konzentrierter als Licht von anderen Lichtquellen. Diese Konzentration von Leuchtkraft kann zu
unmittelbaren Augenverletzungen führen, hauptsächlich durch Einbrennen in die Netzhaut (der
lichtempfindliche Teil auf der Rückwand des Auges). Selbst wenn Sie keine Wärme vom Laserstrahl
spüren können, kann er Sie oder Ihr Publikum dennoch potentiell verletzen oder blenden.
Selbst kleine Dosen Laserlicht sind potenziell
gefährlich, selbst bei großem Abstand.
Blicken Sie keinesfalls in das Lasergerät oder in den
Laserstrahl.
Richten Sie den Laserstrahl keinesfalls auf
Menschen oder Tiere aus und lassen Sie das Gerät
nicht unbeaufsichtigt, wenn es in Betrieb ist.
Dieser Laser darf nur für Shows benutzt werden. Der
Betrieb eines Klasse 3B Show-Lasers ist nur
zulässig, wenn der Betrieb durch einen
ausgebildeten Bediener überwacht wird.
Abhängig von der Klassifizierung kann der Betrieb eines Laserprodukts Laserstrahlen verursachen, die zu
permanenten Augen- bzw. Hautverletzungen führen können. Die Rechtsvorschriften zur Benutzung eines
Laserprodukts sind von Land zu Land verschieden. Der Benutzer muss sich stets über die gültigen
Rechtsvorschriften für sein Land informieren und diese auf die Situation anwenden.
Der Eckpfeiler der Lasersicherheit ist die Norm ANSI Z136.1 (2007), sie bietet Richtlinien für die sichere
Nutzung von Lasern und Lasersystemen, indem die Kontrollmechanismen für jede der vier Laserklassen
beschrieben werden. Dieses Dokument können Sie bei www.laserinstitute.org erhalten.
Bitte beachten Sie, dass JB SYSTEMS nicht für Schäden durch unsachgemäße Installation und
unsachgemäßen Betrieb verantwortlich ist!
GEFAHR: LASERSTRAHLUNG!
JB SYSTEMS
®
39/74 SMOOTH SCAN-BLUE LASER
JB SYSTEMS
®
40/74 SMOOTH SCAN-BLUE LASER
Page 23

DEUTSCH BEDIENUNGSANLEITUNG
BESCHREIBUNG:
1. NETZSPANNUNG: Netzanschluss mit IEC-Buchse mit integrierter Sicherung zum Anschluss des
Netzkabels.
2. ON/OFF SCHLÜSSELSCHALTER: Ein- und Ausschalten des Geräts. Der Schlüsselschalter
gewährleistet, dass kein Unbefugter den Laser in Betrieb nehmen kann.
3. EINGEBAUTES MIKROFON: Das eingebaute Mikrofon dient der Synchronisierung der Laser-Show mit
dem Rhythmus der Musik.
4. DMX EINGANG: 3-poliger XLR-Stecker zum Anschließen von gängigen DMX-Kabeln. Dieser Eingang
empfängt die Signale eines DMX-Controllers.
5. DMX AUSGANG: Die 3-polige XLR-Buchse verbindet den LASER mit der nächsten Einheit in der DMX-
Kette.
6. ANZEIGE: Zeigt die gewählte DMX-Adresse an, wenn das Gerät sich im DMX-Modus befindet.
Abgesehen vom DMX-Modus können Sie auch 4 weitere Betriebsarten wählen. Im Folgenden erfahren
Sie mehr über diese Betriebsarten.
7. BEDIENFELD: Auswahl der die verschiedenen Funktionen des Lasers. Im Folgenden erfahren Sie mehr
zur Bedienung des Geräts.
8. R-EMPFÄNGER: Dient der Steuerung des Geräts mit der Fernbedienung.
9. SICHERHEIT-SAUGBOLZEN: zur Anbringung eines Sicherheitskabels bei Überkopfmontage (s.
Abschnitt „Überkopfmontage“).
DEUTSCH BEDIENUNGSANLEITUNG
10. LÜFTER: Dient der Kühlung der Komponenten im Gehäuse. Decken Sie diese Lüftungsschlitze
keinesfalls ab!
11. VERRIEGELUNGS-Eingang: Anschluss eines optionalen Not-
Ausschalters (siehe Abbildung). Wenn dieser Schalter gedrückt
wurde, wird der Laserstrahl sofort ausgeschaltet.
WICHTIG! Wir empfehlen nachdrücklich, diesen
DER LASER WIRD NICHT FUNKTIONIEREN, WENN DER
Temporäre Lösung: Installieren Sie das Ersatz-Anschluss
12. BETRIEBSANZEIGE-LED: Zeigt an, dass das Gerät eingeschaltet ist.
13. Sound-LED: Blinkt im Rhythmus der Musik, die vom internen Mikrofon
aufgenommen wird.
14. BÜGEL ZUM AUFHÄNGEN mit zwei Knöpfen auf jeder Seite zur Befestigung
des Geräts und einer Montageöffnung, um eine Montagevorrichtung zu
befestigen.
15. LASER-AUSGANG: Austritt des Laserstrahls aus dem Gehäuse. Wenn der Laser-Effekt eingeschaltet
ist, schauen Sie NIEMALS durch diese Öffnung in das Gerät!
16. AUFKLEBER MIT WARNHINWEISEN: „Vorsicht – Klasse 3B Laser. Laserstrahlung wenn geöffnet.
Nicht in den Strahl blicken.“
17. AUFKLEBER MIT WARNHINWEISEN: „Laseraustritt“
18. LASER-WARNAUFKLEBER: Warnung vor potenziell gefährlicher Laserstrahlung bei unsachgemäßer
Benutzung.
19. AUFKLEBER MIT WARNHINWEISEN: „Laserstrahlung. Nicht in den Strahl blicken. Lasersystem der
Klasse 3B”
Notausschalter anzuschließen!
INTERLOCK EINGANG NICHT VERWENDET WIRD.
auf der Laser. (siehe Bild)
ÜBERKOPF-MONTAGE
Wichtiger Hinweis: Die Montage ausschließlich durch qualifiziertes Fachpersonal durchführen
lassen. Unvorschriftsmäßiger Einbau kann erhebliche Verletzungen und/oder Schäden
verursachen. Die Überkopf-Montage setzt die entsprechende Erfahrung voraus! Die
Belastungsgrenzen müssen beachtet, geeignetes Installationsmaterial muss verwendet und das
installierte Gerät muss in regelmäßigen Abständen überprüft werden.
Stellen Sie sicher, dass sich während des Auf- oder Abbaus und der Wartung keine unbefugten Personen
unterhalb des Geräts befinden.
Das Gerät nur an einem gut belüfteten Ort und entfernt von entflammbaren Materialien und/oder
Flüssigkeiten aufstellen. Der Mindestabstand an allen Seiten muss mindestens 50cm betragen.
Das Gerät außerhalb der Reichweite von Personen und nicht in niedrigen Durchgängen oder in der Nähe
von Sitzgelegenheiten installieren.
Vor Montage sicherstellen, dass die gewählte Position wenigstens das 10-fache Gerätegewicht
aufnehmen kann.
Zur Aufhängung stets geeignetes Befestigungsmaterial verwenden, das das 12-fache Gerätegewicht
aushalten kann. Eine zweite Sicherungsaufhängung muss angebracht werden, die ein Absacken des
Geräts von mehr als 20 cm verhindert, sollte die Befestigung brechen.
Das Gerät gut befestigen. Eine freischwingende Aufhängung ist gefährlich und sollte auf gar keinen Fall in
Betracht gezogen werden!
Die Ventilationsöffnungen nicht abdecken, da Überhitzungsgefahr.
Der Betreiber muss sicherstellen, dass die sicherheitsrelevanten und technischen Installationen vor
Erstbetrieb fachmännisch vorgenommen worden sind. Installationen sollten jährlich durch qualifiziertes
Fachpersonal überprüft werden, um jederzeit einen sicheren Betrieb zu gewährleisten.
VORSICHT SCHÄDIGUNG DER AUGEN: Stellen Sie den Laser stets so auf, dass
das Publikum nicht direkt in den Laserstrahl blicken kann. Die Installation muss
gewährleisten, dass der Strahl nicht auf das Publikum ausgerichtet ist.
JB SYSTEMS
®
41/74 SMOOTH SCAN-BLUE LASER
JB SYSTEMS
®
42/74 SMOOTH SCAN-BLUE LASER
Page 24

DEUTSCH BEDIENUNGSANLEITUNG
LASER
EIN/AUS
FARBE
MUSIKEMPFINDLICHKEIT
EINSTELLEN UND BEDIENEN DES GERÄTS
MUSIK-EINGANGSEMPFINDLICHKEIT:
Die Einheit reagiert im Einzel-oder Master-/Slave-Modus auf den Rhythmus.
Befolgen Sie zum Einstellen der Eingangsempfindlichkeit folgende Schritte:
Drücken Sie die Taste FUNC, bis das Display „S 0“ …„S 9“ anzeigt.
Bestätigen Sie Ihre Auswahl mit ENTER.
Wählen Sie mit den Tasten DOWN und UP einen Wert zwischen „S 0“ (sehr geringe Empfindlichkeit) und
„S 9“ (hohe Empfindlichkeit).
Wenn der gewünschte Modus eingestellt ist, speichern Sie Ihre Auswahl mit ENTER.
Sie können das Gerät auf 5 Weisen in Betrieb nehmen:
1) MUSIKGESTEUERTER MODUS:
Der Laser lässt eine vorprogrammierte Sequenz im Rhythmus der Musik ablaufen. Wählen Sie diesen
Modus, wenn nur 1 Laser verwendet wird (Standalone) oder wenn der Laser das erste Gerät (Master) in
eine Kette mit mehreren Geräten ist.
Drücken Sie die Taste FUNC, bis das Display eine der folgenden Anzeigen zeigt Sou, Aut, Sop oder
Aup.
Bitte überprüfen Sie sorgfältig die Menü Tabelle oben.
Wählen Sie jetzt mit den Tasten UP und DOWN aus:
o Sop (Musikgesteuerte, zufällige Show mit Muster- Effekten)
o Sou (Musikgesteuerte Shows)
Bestätigen Sie Ihre Auswahl mit ENTER.
Sie können mehrere LASER miteinander verbinden: Stellen Sie einfach am ersten Gerät in der Kette
einen der musikgesteuerten Effekt-Modi und an allen anderen Geräten den „Slave-Modus“ (Das Display
zeigt „SLA“ an) ein, um sie mit perfekter Synchronisation laufen zu lassen!
Hinweis: Wenn keine Musik erkannt wird, wird der Laser ausgeschaltet (Blackout).
2) VOLLAUTOMATISCHER MODUS:
Der Laser lässt eine vorprogrammierte Sequenz automatisch ablaufen. Wählen Sie diesen Modus, wenn
nur 1 Laser verwendet wird (Standalone) oder wenn der Laser das erste Gerät (Master) in eine Kette mit
mehreren LASERN ist.
Drücken Sie die Taste FUNC, bis das Display eine der folgenden Anzeigen zeigt: Sou Aut, Sop oder
Aup.
Wählen Sie jetzt mit den Tasten UP und DOWN aus:
o Aut (Automatische Shows)
o Aup (Automatische, zufällige Show mit Muster-Effekten)
Bestätigen Sie Ihre Auswahl mit ENTER.
DEUTSCH BEDIENUNGSANLEITUNG
Der Laser lässt eine vorprogrammierte Sequenz automatisch ablaufen.
Sie können mehrere SMOOTH SCAN BLUE LASER miteinander verbinden: Stellen Sie einfach am ersten
Gerät in der Kette einen der musikgesteuerten Effekt-Modi und an allen anderen Geräten den „SlaveModus“ (Das Display zeigt „SLA“ an) ein, um sie mit perfekter Synchronisation laufen zu lassen!
3) SLAVE- MODUS:
Der Laser folgt den Befehlen, die vom ersten Smooth Scan BLUE Laser (Master) in der Kette kommen.
Verbinden Sie den DMX-Eingang des Lasers mit dem DMX-Ausgang des vorherigen Lasers in der
Kette.
Drücken Sie die Taste FUNC, bis das Display „SLA“ anzeigt.
Bestätigen Sie Ihre Auswahl mit ENTER.
Sie können mehrere Laser miteinander verbinden. Stellen Sie am ersten Gerät der Kette den
„musikgesteuerten oder automatischen Modus“ und an allen anderen Geräten in den „Slave-Modus“ (Das
Display zeigt „SLA“ an) ein, um sie mit perfekter Synchronisation laufen zu lassen!
(4) IR-Fernbedienungs-MODUS
Der Laser kann mittels der IR-Fernbedienung gesteuert werden:
Drücken Sie die Taste FUNC, bis das Display „REM“ anzeigt.
Bestätigen Sie Ihre Auswahl mit ENTER.
Hinweis:
Drücken Sie in jedem Standalone-Modus (mit Ausnahme von REM und SLA) für 2 Sekunden
EIN/AUS, um die Fernbedienungsfunktion zu aktivieren.
Die farbigen Tasten sind beim Smooth Scan blue Laser deaktiviert.
AUTOM SHOW
MUSIK-SHOW
EFFEKT ANHALTEN
MUSTER WECHSELN
FESTES MUSTER
(VON 1 BIS 48)
MUSTER WIEDERHOLEN
JB SYSTEMS
®
43/74 SMOOTH SCAN-BLUE LASER
JB SYSTEMS
®
44/74 SMOOTH SCAN-BLUE LASER
Page 25

DEUTSCH BEDIENUNGSANLEITUNG
Positio
DMX
-
Wert
CH 3-MUSTER
DEUTSCH BEDIENUNGSANLEITUNG
Details zur Fernbedienung:
Taste Funktion Beschreibung
ON/OFF
AUTO
MUSIC
Musikempfindlichkeit
FARBE
WECHSELN
MUSTER
WECHSELN
FESTES
MUSTER
MUSTER
WIEDERHO
LEN
5) DMX512-MODUS:
Der Laser kann von jedem handelsüblichen DMX-Controller in 2 verschiedenen DMX-Betriebsarten
gesteuert werden:
In jedem Standalone-Modus, ausgenommen den SLA-Modus:
2 Sekunden drücken, um den REM-Modus zu aktivieren.
Musikgesteuerte Show. Die blaue Musik-LED blinkt, wenn
Drücken Sie in der musikgesteuerten Show MUSIC+B+1 bis 9,
um die Empfindlichkeit einzustellen. „9“ ist die empfindlichste
Geht zyklisch durch die programmierte Farbe, Rot u. Grün,
Wiederholt das letzte Muster und den aktuellen Musterzyklus
Im REM-Modus: des Lasers.
Show AUTO ablaufen lassen
Musik erkannt wurde.
Einstellung.
Grün, Rot.
Zeigt Muster an und wechselt diese
Auswahl eines Musters von 1 bis 48
1 KANAL-MODUS: für extrem einfache Einrichtung und Benutzung! (das Display zeigt „1Ch“
an)
17 KANAL-MODUS: Für die vollständige Steuerung aller Möglichkeiten (das Display zeigt „17c“
Verbinden Sie den DMX-Eingang des Lasers mit dem DMX-Ausgang des vorherigen Geräts in der Kette
an).
oder direkt mit dem DMX-Ausgang Ihres Controllers.
Drücken Sie die Taste FUNC, bis das Display folgendes anzeigt: „1C“ oder „17C“.
Wählen Sie mit den Tasten UP/DOWN den DMX-Modus (1Ch oder 17Ch).
Bestätigen Sie Ihre Auswahl mit ENTER.
Drücken Sie die Taste FUNC: Die 3-stellige Zahl auf dem Display beginnt zu blinken.
Wählen Sie die DMX-Adresse.
Bestätigen Sie Ihre Auswahl mit ENTER.
Hinweis: Wenn sich das Gerät im DMX-Modus befindet und kein DMX-Signal erkannt wurde, blinkt das
Display.
Weitere Informationen zu DMX512:
Das DMX-Protokoll ist ein gängiges Hochgeschwindigkeitssignal, um intelligente
Lichtsysteme zu steuern. Sie müssen Ihren DMX-Controller und alle angeschlossenen
Lichteffektgeräte mit einem hochwertigen symmetrischen XLR M/F-Kabel hintereinander
schalten (Daisy Chain). Um durch Interferenzen verursachte Fehlfunktionen der
Lichteffekte zu vermeiden, müssen Sie die Kette mit einem 90Ω bis 120Ω Abschlusswiderstand
abschließen. Verwenden Sie niemals Y-Splitter-Kabel, das funktioniert einfach nicht!
Jeder Lichteffekt in der Kette benötigt eine korrekte Startadresse, so dass er weiß, welche Befehle er vom
Controller zu entschlüsseln hat.
1-KANAL DMX-KONFIGURATION DES LASERS:
n
Wert Funktion Anmerkungen
4 210-255 SOU Musikgesteuerte Show
3 150-209 AUT Automatische Show
2 090-149 SOP Musikgesteuerte Mustereffektshow
1 030-089 AUP Autom. ablaufende Mustereffektshow
0 000-029 STANDBY Laser aus
17-KANAL DMX-KONFIGURATION DES LASERS:
WICHTIGER HINWEIS: DMX-Kanal 1 wird verwendet, um die verschiedenen Betriebsarten des Lasers
einzustellen.
Um den Laser im vollständigen 17-Kanalmodus zu verwenden, muss Kanal 1 auf den Wert 221 oder
höher eingestellt werden.
Je nach den DMX-Werten von Kanal 1 kann eine andere Betriebsart verwendet werden:
KANAL
CH 1-MODUS
CH 2-GRUPPE
CH 4-Stroboskop
CH 5-CLIPING
CH 6-ZOOMING
000-040
041-080 AUT
081-120 SOU
121-159 AUP
161-200 SOP
201-255 DMX-MODUS:
000-051 1 Gruppenmuster.
052-103 2 Gruppenmuster.
104-055 3 Gruppenmuster.
156-207 4 Gruppenmuster.
208-255 5 Gruppenmuster.
000-255 Alle 16 für 1 Gruppe, insgesamt 80 Muster.
000-255
000 Vollständiges Muster ohne Begrenzen
001-127 0%-99% festes, begrenztes Muster
128-255
000-127 100%-5% festes Muster vergrößert
128-169 Hereinzoomen
170-209 Herauszoomen
210-255 Abwechselndes Zoomen
Laser AUS
Stroboskop
Clipping-Geschwindigkeit
Funktion
JB SYSTEMS
®
45/74 SMOOTH SCAN-BLUE LASER
JB SYSTEMS
®
46/74 SMOOTH SCAN-BLUE LASER
Page 26

DEUTSCH BEDIENUNGSANLEITUNG
CH 11
CH7 Zoomgeschwindigkeit
CH 8 ROLLEN UM DIE Y-
ACHSE
CH 9
ROLLGESCHWINDIGKEIT
CH 10 ROLLEN UM DIE X-
ACHSE
ROLLGESCHWINDIGKEIT
CH 12 ROLLEN UM DIE Z-
ACHSE
CH 13
ROLLGESCHWINDIGKEIT
CH 14 VERSCHIEBUNG
AUF DER X-ACHSE
CH 15
VERSCHIEBUNGSGESCH
WINDIGKEIT
CH 16 VERSCHIEBUNG
AUF DER X-ACHSE
CH 17
VERSCHIEBUNGSGESCH
WINDIGKEIT
000-255
000-127 0 -359 Grad festes Rollen um die Y-Achse
128-191 Im Uhrzeigersinn rollen
192-255 Gegen den Uhrzeigersinn rollen
0-255
000-127 0 -359 Grad festes Rollen um die X-Achse
128-191 Im Uhrzeigersinn rollen
192-255 Gegen den Uhrzeigersinn rollen
0-255
000-127 0 -359 Grad festes Rollen um die Z-Achse
128-191 Im Uhrzeigersinn rollen
192-255 Gegen den Uhrzeigersinn rollen
0-255
000-127 128 verschiedene feste Positionen auf der X-Achse
128-191 Verschiebung im Uhrzeigersinn
192-255 Verschiebung gegen den Uhrzeigersinn
0-255
000-127 128 verschiedene feste Positionen auf der Y-Achse
128-191 Verschiebung im Uhrzeigersinn
192-255 Verschiebung gegen den Uhrzeigersinn
0-255 Schnell nach langsam
Langsam nach schnell
Langsam nach schnell
Langsam nach schnell
Langsam nach schnell
Langsam nach schnell
DEUTSCH BEDIENUNGSANLEITUNG
Mustereinstellungen:
Drücken Sie die Taste FUNC, bis das Display folgendes anzeigt:
Drücken Sie die Taste UP oder DOWN, bis der Laser den Pfeil der Y-Achse oben und den Pfeil der X-
Achse rechts anzeigt.
Bestätigen Sie die Auswahl mit „Enter“.
JB SYSTEMS
®
47/74 SMOOTH SCAN-BLUE LASER
JB SYSTEMS
®
48/74 SMOOTH SCAN-BLUE LASER
Page 27

DEUTSCH BEDIENUNGSANLEITUNG
Musterliste
DEUTSCH BEDIENUNGSANLEITUNG
WARTUNG
Stellen Sie sicher, dass sich keine unbefugten Personen unterhalb des Geräts befinden, während es
gewartet wird.
Schalten Sie das Gerät aus, ziehen Sie den Netzstecker und warten Sie, bis es sich abgekühlt hat.
Während der Wartung sind folgende Punkte ganz besonders zu beachten:
Sämtliche Schrauben zur Installation und Befestigung jeglicher Teile müssen fest angezogen und rostfrei
sein.
Gehäuse, Befestigungsmaterialien und Aufhängungen (Decke, Balken, abgehängte Decken) dürfen keine
Anzeichen von Verformung aufweisen.
Wenn die Optik sichtbar beschädigt ist (Sprünge oder tiefe Kratzer), dann müssen die entsprechenden
Teile ausgetauscht werden.
Das Netzkabel muss stets in einwandfreiem Zustand sein und selbst bei kleinsten Beschädigungen
erneuert werden.
Zur Vermeidung von Überhitzung müssen die Ventilatoren (sofern vorhanden) und Lüftungsschlitze
monatlich gereinigt werden.
Das Geräteinnere mindestens einmal pro Jahr mit einem Staubsauger oder einer Luftdüse reinigen.
Die Reinigung der inneren und äußeren optischen Linsen und/oder Spiegel muss in regelmäßigen
Abständen zur Beibehaltung einer optimalen Lichtausbeute vorgenommen werden. Die
Reinigungsintervalle hängen stark von der Umgebung ab: Feuchte, verrauchte und besonders
verschmutzte Umgebung führen zu größerer Verschmutzung auf den Linsen.
Mit einem weichem Tuch und gewöhnlichem Glasreiniger säubern.
Alle Teile stets gut abtrocknen.
Reinigen Sie die externen optischen Teile regelmäßig in einem Intervall von 30 Tagen.
Reinigen Sie die internen optischen Teile wenigstens einmal in einem Zeitraum von 90 Tagen.
Achtung: Wir empfehlen dringend, die Reinigung des Geräteinneren nur von qualifiziertem Personal
durchführen zu lassen!
TECHNISCHE DATEN
Netzspannung: AC 100-240V, 50/60Hz
Sicherung: 250 V 1A langsam (20 mm Glas)
Leistungsaufnahme: 13 W
Klangregler: Eingebautes Mikrofon
DMX-Anschlüsse: 3-poliger XLR-Stecker/Buchse
DMX-Kanäle: 1 oder 17 Kanäle
DMX-Startadresse: 001 512
Laserleistung: 400 mW Bule CW Laser (λ = 450 nm)
Laserklasse: 3B
Strahldurchmesser am Gerät: <5 mm
Abweichung (je Strahl) <12 mrad
Abweichung (Gesamtausgang) <90°
Scannergeschwindigkeit: 15kHz
Betriebstemperatur: 10 °C bis 40 °C
Laser-Sicherheitsstandard: EN/IEC 60825-1 Ed2, 2007-03
Abmessungen: Siehe Abbildung unten
Gewicht: 1,5kg
JB SYSTEMS
Sie können sich die neueste Version dieses Benutzerhandbuches von unserer Website herunterladen:
®
49/74 SMOOTH SCAN-BLUE LASER
JB SYSTEMS
Diese Angaben können sich ohne gesonderten Hinweis ändern.
www.beglec.com
®
50/74 SMOOTH SCAN-BLUE LASER
Page 28

ESPAÑOL MANUAL DE USUARIO
ESPAÑOL MANUAL DE USUARIO
MANUAL DE INSTRUCCIONES
Gracias por comprar este producto JB Systems®. Para aprovechar al máximo todas las posibilidades y para
su propia seguridad, lea cuidadosamente este manual de instrucciones antes de comenzar a utilizar la
unidad.
CARACTERÍSTICAS
Esta unidad tiene supresión de radio interferencia. Este producto cumple con todas las exigencias de las
pautas actuales, tanto europeas como nacionales. Dicha conformidad ha sido establecida y los dictámenes
y documentos han sido consignados por el fabricante.
Este dispositivo fue diseñado para producir efectos de iluminación decorativa y se utiliza en sistemas de
espectáculos de iluminación.
Un atractivo láser que utiliza escáneres de 15kHz de alta calidad en lugar de los motores paso a paso
tradicionales.
Movimientos muy suaves y fluidos.
80 patrones pre-programados, como: números, dibujos, palabras,…
Fabulosos espectáculos láser pre-programados para todo tipo de aplicaciones: bares, discotecas, Dj
móvil,…
Láser de clase 3B, basado en láser azul de 400mW 450nm.
Varios modos de funcionamiento:
Control DMX: 1 canal para una sencilla utilización, o 17 canales para un control total
Modo autónomo: activado por el sonido (micrófono interno), o automático
IR remoto: mando a distancia de infrarrojos.
Maestro/esclavo: maravillosos espectáculos sincronizados
Micrófono integrado
Pantalla LED de 3 dígitos para una navegación sencilla por el menú
Interruptor activado con llave para encendido/apagado, y entrada de interruptor de emergencia (Interlock)
para mayor seguridad.
Cumple con la normativa EN/IEC 60825-1 Ed2, 2007-03 para seguridad Láser.
ANTES DEL USO
Antes de comenzar a utilizar esta unidad, compruebe si no ha sufrido daños durante el transporte. Si
hubiera alguno, no utilice el dispositivo y consulte primero con su concesionario.
Importante: Este dispositivo salió de nuestra fábrica en perfectas condiciones y bien embalado. Es
absolutamente necesario que se obedezcan al pie de la letra las instrucciones y advertencias de
seguridad que aparecen en este manual de usuario. Cualquier daño causado por una mala manipulación
no estará protegido por la garantía. El concesionario no aceptará ninguna responsabilidad por defectos o
problemas resultantes causados por no obedecer lo indicado en este manual de usuario.
Mantenga este folleto en un lugar seguro para futuras consultas. Si vende este equipo, asegúrese de
incluir este manual de usuario.
Compruebe el contenido:
Compruebe que el embalaje contiene los siguientes elementos:
Láser azul Smooth Scan
Mando a distancia IR
2 llaves (para el interruptor con llave)
Cable de alimentación
Instrucciones de operación
INSTRUCCIONES DE SEGURIDAD:
CAUTI ON
El simbolo de un rayo en el interior de un triangulo alerta sobre la presencia o el uso de elementos
no isolados donde un voltaje peligroso constituye un riesgo grande para causar una eventual
electrocución.
El punto de exclamación en el interior de un triangulo alerta al usuario sobre la presencia de
importantes instrucciones de operación y de mantenimiento tenidas en cuenta en el manual de uso.
Este símbolo significa : uso para el interior solamente.
Este símbolo significa : Lea las instrucciones.
Este símbolo se determina: la distancia mínima de objetos iluminado. La distancia mínima entre el
proyector y el objeto iluminado debe ser más de 1 metro.
Para proteger el medio ambiente, intente reciclar el material del embalaje en la mayor medida posible.
Un nuevo efecto lumínico provoca a veces algo de humo y/o olores no deseados. Esto es normal y
desaparece después de algunos minutos.
Para evitar el riesgo de incendio o de descarga eléctrica, no exponga este electrodoméstico a la lluvia ni a
la humedad.
Para evitar que se forme condensación en el interior del equipo, permita que la unidad se adapte a la
temperatura ambiental cuando se lleve a una habitación cálida después del transporte. La condensación
impide a veces que la unidad trabaje a plena capacidad e incluso puede causar daños.
Esta unidad es solamente para uso en interiores.
No coloque objetos metálicos ni derrame líquidos dentro de la unidad. Puede dar como resultado una
descarga eléctrica o un mal funcionamiento. Si un objeto extraño se introduce dentro de la unidad,
desconecte de inmediato la alimentación eléctrica.
Ubique el accesorio en un punto bien ventilado, lejos de materiales y/o líquidos inflamables. El accesorio
debe fijarse por lo menos a 50 cm de las paredes circundantes.
No cubra ninguna abertura de ventilación ya que esto puede provocar sobrecalentamiento.
Evite emplearlo en ambientes polvorientos; limpie la unidad con regularidad.
Mantenga la unidad lejos de los niños.
Este equipo no debe ser utilizado personas inexpertas.
La temperatura ambiente segura está entre 15º y 40ºC. No utilice esta unidad a temperaturas más altas.
Asegúrese de que el área que se encuentra bajo el lugar de instalación esté libre de personas no
autorizadas durante su elevación, descenso y reparación.
Siempre desenchufe la unidad cuando no se vaya a utilizar durante un período de tiempo prolongado,
cuando vaya a sustituir la bombilla o cuando se le vaya a dar servicio.
La instalación eléctrica debe realizarla solamente personal cualificado, de acuerdo con las regulaciones
para la seguridad eléctrica y mecánica de su país.
Compruebe que la tensión disponible no sea superior a la que se indica en el panel posterior de la unidad.
El cable de alimentación debe estar siempre en perfectas condiciones. Apague de inmediato la unidad
cuando el cable de alimentación esté aplastado o dañado. Si el cable de alimentación está dañado, debe
ser sustituido por el fabricante, por su representante de servicio o por una persona de cualificación similar
para evitar un accidente.
¡Nunca permita que el cable de alimentación haga contacto con otros cables!
Este accesorio debe conectarse a tierra para cumplir con las regulaciones de seguridad.
No conecte la unidad a un dispositivo de atenuación.
Cuando instale la unidad utilice siempre un cable de seguridad apropiado y certificado.
Para evitar descargas eléctricas, no abra la cubierta. No hay piezas reparables por el usuario, aparte de la
lámpara y el fusible.
Nunca repare un fusible ni haga una derivación en el portafusibles. ¡Sustituya siempre un fusible dañado
por otro que sea del mismo tipo y que tenga las mismas especificaciones eléctricas!
En el caso de que haya serios problemas de funcionamiento, detenga el uso del accesorio y contacte
inmediatamente con su concesionario.
La carcasa y las lentes deben sustituirse si están visiblemente dañadas.
Utilice el embalaje original cuando haya que transportar el dispositivo.
Debido a razones de seguridad, está prohibido realizar modificaciones no autorizadas a la unidad.
Importante: ¡Nunca mire directamente a la fuente de luz! No utilice el efecto en presencia de personas que
padezcan de epilepsia.
PRECAUCIÓN: Para Reducir el riesgo de electrocución, no quite la
cubierta superior . Ninguna pieza usable adentro para el utilizador.
Dirijase unicamente a personal cualificado.
JB SYSTEMS
®
51/74 SMOOTH SCAN-BLUE LASER
JB SYSTEMS
®
52/74 SMOOTH SCAN-BLUE LASER
Page 29

ESPAÑOL MANUAL DE USUARIO
INSTRUCCIONES DE SEGURIDAD DEL LÁSER:
De acuerdo a las regulaciones EN/IEC 60825-1 Ed2, 2007-03, este láser pertenece a la clasificación 3B.
La exposición directa a los ojos puede ser peligrosa.
ESPAÑOL MANUAL DE USUARIO
¡Evite la exposición directa a los ojos! La radiación láser puede
causar lesiones oculares y/o en la piel. Deben aplicarse todas las
medidas de seguridad para una utilización segura de este láser.
Ese producto se conoce como espectáculo láser, y emite radiación con un espectro de longitud de onda
entre 400 y 700 nm, produciendo efectos luminosos para espectáculos.
La Luz Láser es diferente de cualquier otra fuente de luz con la que pueda estar familiarizado. La luz de
este producto puede causar potencialmente lesiones oculares si no se configura y se usa
adecuadamente. La luz láser está miles de veces más concentrada que la luz de cualquier otra fuente de
luz. Esta concentración de potencia luminosa puede causar lesiones oculares instantáneas, primeramente
quemando la retina (la parte sensible a la luz de la parte posterior del ojo). Incluso aunque no pueda sentir
el “calor” de un haz de láser, éste puede potencialmente lesionar o cegar a su audiencia o a usted.
Incluso cantidades muy pequeñas de luz láser son
potencialmente peligrosas hasta a largas distancias.
No mire nunca dentro de la apertura del láser ni a los
haces de láser.
No dirija nunca el haz de láser a las personas ni
animales y nunca deje este dispositivo funcionando
sin supervisión.
Este láser sólo debe ser utilizado para espectáculos.
La utilización de espectáculos láser de clase 3B sólo
está permitida si está controlada por un operador
experto y bien entrenado.
Dependiendo de la clasificación, utilizar un producto
láser puede producir radiación láser, que puede causar lesiones permanentes oculares y/o en la piel. Las
instrucciones legales para el uso de productos láser puede variar de un país a otro. El usuario siempre
debe informarse de las instrucciones legales vigentes en su país y aplicarlas a su situación.
El documento principal y piedra angular de los estándares de seguridad láser ANSI Z136.1 (2007)
proporcionan guías para el uso seguro del láser y sistemas de láser, definiendo medidas de control para
cada uno de las cuatro clases de láser. Este valioso documento puede obtenerse en
www.laserinstitute.org.
Por favor, tenga en cuenta que JB SYSTEMS no puede hacerse responsable de los daños causados por las
instalaciones incorrectas y la utilización inexperta.
PELIGRO: ¡RADIACIÓN LÁSER!
DESCRIPCIÓN:
1. ALIMENTACIÓN: Conector IEC con porta-fusible incorporado. Conecte aquí el cable de alimentación
suministrado.
2. INTERRUPTOR DE ON/OFF( )ENCENDIDO/APAGADO ACTIVADO POR LLAVE: se utiliza para
encender/apagar la unidad. Utilice las llaves para asegurarse de que sólo un operador experimentado
sea capaz de encender el láser.
3. MICRÓFONO INTERNO: El micrófono incorporado se utiliza para sincronizar el espectáculo de láser
con el ritmo de la música.
4. ENTRADA DMX: conector XLR macho de 3 pines utilizado para conectar los cables DMX universales.
Esta entrada recibe las instrucciones de un controlador DMX.
5. SALIDA DMX: Conector hembra XLR de 3 pines, utilizado para conectar el LÁSER con la siguiente
unidad de la cadena DMX.
6. VISUALIZADOR: Muestra la dirección DMX seleccionada cuando la unidad está en modo DMX.
Además del modo DMX, usted también puede seleccionar otros 4 modos de funcionamiento. Mire más
adelante para saber más acerca de estos modos.
7. PANEL DE CONTROL: Se utiliza para seleccionar las diferentes funciones del láser. Mire más adelante
para saber más acerca de cómo utilizar la unidad.
8. RECEPTOR IR: se usa para controlar la unidad mediante el
mando a distancia.
9. CÁNCAMO DE SEGURIDAD: utilizado para fijar un cable de
seguridad cuando la unidad está izada (consulte el párrafo
"elevación sobre cabeza".
10. VENTILADOR DE REFRIGERACIÓN: se utiliza para enfriar los
componentes internos. ¡Asegúrese de no cubrir nunca la salida
de este ventilador!
11. Entrada INTERLOCK: se usa para conectar el interruptor
opcional de emergencia (vea la imagen). Cuando presione este
interruptor, el haz de láser desaparecerá inmediatamente.
12. LED DE ENCENDIDO: Indica que la unidad está encendida.
13. LED Sonido: parpadea al ritmo de la música detectada por el micrófono interno.
14. SOPORTE PARA COLGAR con 2 mandos a ambos lados para fijar la unidad, y
un orificio para fijar el gancho de montaje.
15. SALIDA DEL LÁSER: el haz del láser sale por aquí; ¡asegúrese de no mirar
NUNCA dentro de la unidad a través de esta apertura mientras los efectos del
láser están encendidos!
16. ETIQUETA DE ADVERTENCIA: “Precaución – láser de Clase 3B. Radiación láser al abrirlo. Evite la
exposición a este haz”.
17. ETIQUETA DE ADVERTENCIA: “Apertura del Láser”
18. ETIQUETAS DE ADVERTENCIA DE LÁSER: advierten de un láser potencialmente peligroso si no es
utilizado por operadores experimentados.
¡IMPORTANTE! le recomendamos conectar este switch de seguridad opcional!
EL LÁSER NO FUNCIONARÁ SI EL ENCLAVAMIENTO DE LA ENTRADA NO SE UTILIZA.
Temporal Solución: Instale el conector adicional en el láser (ver foto)
JB SYSTEMS
®
53/74 SMOOTH SCAN-BLUE LASER
JB SYSTEMS
®
54/74 SMOOTH SCAN-BLUE LASER
Page 30

ESPAÑOL MANUAL DE USUARIO
ESPAÑOL MANUAL DE USUARIO
19. ETIQUETA DE ADVERTENCIA: “Radiación Láser. Evite la exposición a este haz. Producto Láser de
Clase 3R”
ELEVACIÓN SOBRE CABEZA
Importante: La instalación debe efectuarla solamente personal de servicio cualificado. Una
instalación no adecuada puede dar como resultado lesiones serias y/o daños materiales. ¡La
elevación sobre cabeza requiere una experiencia extensa! Deben respetarse los límites de carga
de trabajo, deben utilizarse materiales de instalación certificados, el dispositivo instalado debe
inspeccionarse con regularidad por motivos de seguridad.
Asegúrese de que el área que se encuentra bajo el lugar de instalación esté libre de personas no
autorizadas durante su elevación, descenso y reparación.
Ubique el accesorio en un punto bien ventilado, lejos de materiales y/o líquidos inflamables. El accesorio
debe fijarse por lo menos a 50 cm de las paredes circundantes.
El dispositivo debe instalarse fuera del alcance de las personas y fuera de las áreas donde haya paso de
personas o donde estas permanezcan sentadas.
Antes de efectuar la elevación, asegúrese de que el área de instalación pueda sostener una carga puntual
mínima de 10 veces el peso del dispositivo.
Cuando instale la unidad, utilice siempre un cable de elevación certificado que pueda sostener 12 veces
el peso del dispositivo. Esta segunda fijación de seguridad debe instalarse de forma que ninguna parte de
la instalación pueda caer más de 20 cm si la fijación principal falla.
El dispositivo debe fijarse bien, ¡un montaje de libre oscilación es peligroso y no debe considerarse!
No cubra ninguna abertura de ventilación ya que esto puede provocar sobrecalentamiento.
El operador tiene que estar seguro de que las instalaciones relacionadas con la seguridad y con la técnica
de la máquina sean aprobadas por un experto antes de utilizarlas por primera vez. Las instalaciones
deben inspeccionarse anualmente por una persona con experiencia para asegurarse de que la seguridad
es óptima.
PRECAUCIÓN FRENTE A LESIONES OCULARES: Siempre coloque el láser de una
forma que evite que la audiencia mire directamente a los haces de láser. La instalación
debe asegurar que el haz no estará dirigido a la audiencia.
CÓMO CONFIGURAR Y CONTROLAR LA UNIDAD
Puede utilizar la unidad de 5 formas:
1) MODO CONTROLADO POR MÚSICA:
El láser ejecuta una secuencia preprogramada al ritmo de la música. Seleccione este modo cuando sólo
utilice 1 láser (autónomo), o cuando el láser esté colocado como primera unidad (maestro) de una cadena
de varias unidades.
Pulse el botón FUNC hasta que en la pantalla aparezca uno de los siguientes: Sou, Aut, Sop o Aup.
Por favor revise cuidadosamente la carta del menú de arriba.
Ahora utilice los botones UP y DOWN para seleccionar:
o Sop (Espectáculo aleatorio activado por sonido, incluyendo patrón de efectos )
o Sou (Espectáculos activados por sonido)
Presione el botón ENTER para confirmar su selección.
Puede conectar varios LÁSER entre sí: simplemente ponga la primera unidad de la cadena en uno de los
modos de efectos activados por sonido, y todas las demás unidades en “modo Esclavo” (la pantalla
muestra “SLA”) para hacer que todas ellas funcionen perfectamente sincronizadas.
Nota: Si no se detecta música, la salida del láser se cerrará (se apagará).
2) MODO TOTALMENTE AUTOMÁTICO:
El láser ejecuta de forma automática un secuencia preprogramada. Seleccione este modo cuando sólo
utilice 1 láser (autónomo), o cuando el láser esté colocado como primera unidad (maestro) de una cadena
de varios LÁSER.
Pulse el botón FUNC hasta que en la pantalla aparezca uno de los siguientes: Sou, Aut, Sop o Aup.
Ahora utilice los botones UP y DOWN para seleccionar:
o Aut (Espectáculos automáticos)
o Aup (Espectáculo automático aleatorio, incluyendo patrón de efectos)
Presione el botón ENTER para confirmar su selección.
El láser ejecuta de forma automática una secuencia preprogramada.
Puede conectar varios LÁSER AZUL SMOOTH SCAN entre sí: simplemente punga la primera unidad de
la cadena en uno de los modos de efectos automáticos, y todas las demás unidades en “modo Esclavo”
(la pantalla muestra “SLA”) para hacer que todas ellas funcionen perfectamente sincronizadas.
3) MODO ESCLAVO:
El láser sigue las instrucciones dadas por el primer Láser Azul Smooth Scan (maestro) de la cadena.
Conecte la entrada DMX del láser, a la salida DMX del láser anterior de la cadena.
Pulse el botón FUNC, hasta que en la pantalla aparezca “SLA”.
Presione el botón ENTER para confirmar su selección.
Puede conectar varios LÁSER entre sí. Por favor, ponga la primera unidad de la cadena en “modo Música
o Automático”, y todas las demás unidades en “modo Esclavo” (la pantalla muestra “SLA”) para hacer que
todas ellas funcionen perfectamente sincronizadas.
SENSIBILIDAD DE ENTRADA DE MÚSICA
La unidad trabaja al ritmo del compás cuando se utiliza en modo autónomo o maestro/esclavo
Para ajustar la sensibilidad de entrada, siga estos pasos:
Pulse el botón FUNC hasta que en la pantalla aparezca S 0” …”S 9”
Presione el botón ENTER para confirmar su selección.
Utilice los botones DOWN y UP para seleccionar un valor entre “S 0” (sensibilidad muy baja) y “S 9”
(sensibilidad alta).
Una vez seleccionado el modo, presione el botón ENTER para guardarlo.
JB SYSTEMS
®
55/74 SMOOTH SCAN-BLUE LASER
4) MODO REMOTO POR IR:
El láser puede ser controlado por el mando a distancia de IR:
Pulse el botón FUNC, hasta que en la pantalla aparezca: “REM”.
Presione el botón ENTER para confirmar su selección.
Nota:
JB SYSTEMS
En cualquier modo autónomo (excepto REM y SLA), pulse Encender/Apagar durante 2
segundos para activar la función remota.
Los botones de color están deshabilitados con el láser azul Smooth Scan
®
56/74 SMOOTH SCAN-BLUE LASER
Page 31

ESPAÑOL MANUAL DE USUARIO
ENCENDER/APAGAR LÁSER
COLOR
SENSIBILIDAD AL SONIDO
Valor
ESPAÑOL MANUAL DE USUARIO
ESPECTÁCULO AUTOMÁTICO
ESPECTÁCULO CON MÚSICA
PAUSAR EFECTO
CAMBIAR PATRÓN
PATRÓN FIJO
ENTRE EL 1 Y EL 48
REPETIR PATRÓN
Detalles del mando a distancia:
Botón: Función Descripción
ON/OFF
AUTO Espectáculo de ejecución AUTO.
MUSIC
En modo REM: Enciende/Apaga (ON/OFF) el láser.
En cualquier modo autónomo, excepto el modo SLA: púlselo
durante 2 segundos para activar el modo REM.
Espectáculo activado por SONIDO. El LED azul indicador de
música parpadea al detectar sonido.
5) MODO DMX512:
El láser se puede controlar por un controlador DMX estándar, de 2 modos DMX distintos:
MODO 1 CANAL: ¡para una configuración y uso extremadamente sencillos! (la pantalla
muestra “1Ch”)
MODO 17 CANALES: para un control total de todas las posibilidades. (la pantalla muestra
“17c”)
Conecte la entrada DMX del láser a la salida DMX de la unidad anterior de la cadena, o directamente a
la salida DMX de su controlador.
Pulse el botón FUNC, hasta que en la pantalla aparezca: “1C” o “17C”.
Pulse los botones UP/DOWN para seleccionar el modo DMX. (1Ch o 17ch)
Presione el botón ENTER para confirmar su selección.
Pulse el botón FUNC: el número de 3 dígitos de la pantalla comenzará a parpadear.
Seleccione la dirección DMX.
Presione el botón ENTER para confirmar su selección.
Nota: cuando la unidad está en modo DMX y no se detecta señal DMX, la pantalla parpadea.
Información adicional acerca de DMX512:
El protocolo DMX es una señal de alta velocidad ampliamente utilizada para controlar equipamiento de
iluminación inteligente. Debe encadenar en “cadena daisy” su controlador DMX y todos
los efectos luminosos conectados, con un cable balanceado XLR M/H de buena
calidad. Para evitar un comportamiento extraño de los efectos de luces debido a
interferencias, debe utilizar un terminador de 90Ω a 120Ω al final de la cadena. Nunca
utilice cables repartidores Y, ¡esto simplemente no funcionará!
Cada efecto de la cadena necesita tener su propia dirección de inicio, para que sepa qué comandos del
controlador son los que debe decodificar.
1 CANAL DMX-CONFIGURACIÓN DEL LÁSER:
Sound Sensitivity
(Sensibilidad al sonido)
JB SYSTEMS
CAMBIO DE
COLOR
CAMBIAR
PATRÓN
PATRÓN
REPETIR
PATRÓN
®
FIJO
En espectáculos activados por sonido, pulse MUSIC+B+1~9,
para ajustar la sensibilidad, siendo “9” el más sensible.
Desplazarse por los colores Programados, Rojo y Verde,
Verde, Rojo
Mostrar y cambiar patrones
Puede seleccionar un PATRÓN entre el 1 y el 48
Repetición cíclica del último PATRÓN y el actual
57/74 SMOOTH SCAN-BLUE LASER
Posición
DMX Función Observaciones
4 210-255 SOU Espectáculo activado por sonido
3 150-209 AUT Espectáculo automático
Espectáculo activado por sonido con patrón de
2 090-149 SOP
efectos
1 030-089 AUP Espectáculo automático con patrón de efectos
0 000-029 EN ESPERA Salida del láser apagada
JB SYSTEMS
®
58/74 SMOOTH SCAN-BLUE LASER
Page 32

ESPAÑOL MANUAL DE USUARIO
CANAL
VALOR
FUNCIÓN
PATRÓN CANAL 3
ESTROBO CANAL 4
VELOCIDAD DE ZOOM
VELOCIDAD DE
VELOCIDAD DE
ESPAÑOL MANUAL DE USUARIO
17 CANALES DMX-CONFIGURACIÓN DEL LÁSER:
OBSERVACIÓN IMPORTANTE: El DMX de 1 canal se usa para establecer los diferentes modos de
funcionamiento del láser.
Para utilizar el láser en modo de 17 canales completo, el canal 1 debe estar establecido en el valor
221 o superior.
Dependiendo de los valores DMX del canal 1, pueden aplicarse diferentes modos:
MODO CANAL 1
GRUPO CANAL 2
CORTES CANAL 5
ZOOM CANAL 6
CANAL 7
DESPLAZAMIENTO EJE Y
CANAL 8
VELOCIDAD DE
DESPLAZAMIENTO CANAL
9
DESPLAZAMIENTO EJE X
CANAL 10
VELOCIDAD DE
DESPLAZAMIENTO CANAL
11
DESPLAZAMIENTO EJE Z
CANAL 12
000-040
041-080 AUT
081-120 SOU
121-159 AUP
161-200 SOP
201-255 MODO DMX:
000-051 Patrones de 1 Grupo
052-103 Patrones de 2 Grupos
104-055 Patrones de 3 Grupos
156-207 Patrones de 4 Grupos
208-255 Patrones de 5 Grupos
000-255 Cada 16 por 1 grupo, 80 patrones en total.
000-255 Estrobo
000 Patrón completo sin cortes
001-127 Patrón fijo con cortes 0%~99%
128-255
000-127 Patrón fijo ampliado 100%-5%
128-169 Acercar
170-209 Alejar
210-255 Zoom Alternante
000-255
000-127 Eje Y fijo desplazado de 0 a 359 grados
128-191 En sentido de las agujas del reloj
192-255 En sentido contrario a las agujas del reloj
0-255
000-127 Eje X fijo desplazado de 0 a 359 grados
128-191 En sentido de las agujas del reloj
192-255 En sentido contrario a las agujas del reloj
0-255
000-127 Eje Z fijo desplazado de 0 a 359 grados
128-191 En sentido de las agujas del reloj
192-255 En sentido contrario a las agujas del reloj
Láser Apagado
Velocidad de corte
De rápido a lento
De rápido a lento
Rápido a lento
DESPLAZAMIENTO CANAL
13
MOVIMIENTO EJE X
CANAL 14
MOVIMIENTO CANAL 15
MOVIMIENTO EJE Y
CANAL 16
VELOCIDAD DE
MOVIMIENTO CANAL 17
Ajustes de Patrón:
0-255
000-127 128 posiciones fijas distintas en el eje X
128-191 En sentido de las agujas del reloj
192-255 En sentido contrario a las agujas del reloj
0-255
000-127 128 posiciones fijas distintas en el eje Y
128-191 En sentido de las agujas del reloj
192-255 En sentido contrario a las agujas del reloj
0-255 Rápido a lento
Rápido a lento
Rápido a lento
Pulse el botón FUNC, hasta que en la pantalla aparezca:
Pulse hasta que el láser muestre la flecha del eje Y en la parte superior y la flecha del eje X en la
derecha.
Después pulse “Enter” para confirmar la selección.
JB SYSTEMS
®
59/74 SMOOTH SCAN-BLUE LASER
JB SYSTEMS
®
60/74 SMOOTH SCAN-BLUE LASER
Page 33

ESPAÑOL MANUAL DE USUARIO
ESPAÑOL MANUAL DE USUARIO
Lista de Patrones
MANTENIMIENTO
Asegúrese de que el área que se encuentra bajo el lugar de instalación esté libre de personas no
autorizadas durante el mantenimiento.
Apague la unidad, desenchufe el cable de alimentación y espere hasta que se enfríe.
Durante la inspección deben revisarse los puntos siguientes:
Todos los tornillos utilizados para la instalación del dispositivo y cualquiera de sus componentes deben
estar bien apretados y no pueden estar corroídos.
Los alojamientos, fijaciones y puntos de instalación (techo, tensores, suspensiones) deben estar
totalmente libres de cualquier deformación.
Cuando una lente óptica está visiblemente dañada debido a grietas o arañazos profundos, debe
sustituirse.
Los cables de alimentación deben estar en condiciones impecables y deben sustituirse inmediatamente
incluso si se detecta un problema pequeño.
Para proteger el dispositivo contra el sobrecalentamiento, los ventiladores de enfriamiento (si hay alguno)
y las aberturas de ventilación deben limpiarse mensualmente.
El interior del dispositivo debe limpiarse anualmente utilizando una aspiradora o un chorro de aire.
La limpieza de las lentes ópticas y/o espejos internos y externos debe efectuarse periódicamente para
optimizar la salida de la luz. La frecuencia de la limpieza depende del ambiente en el cual opere el
accesorio: los ambientes húmedos, con humo, o particularmente sucios, pueden causar una mayor
acumulación de suciedad en los elementos ópticos de la unidad.
Límpielo con un paño suave utilizando productos normales para la limpieza del vidrio.
Siempre seque cuidadosamente las piezas.
Limpie la óptica externa al menos una vez cada 30 días.
Limpie la óptica interna al menos cada 90 días.
Atención: ¡Recomendamos enfáticamente que la limpieza se lleve a cabo por personal cualificado!
ESPECIFICACIONES
Alimentación: CA 100~240V, 50/60Hz
Fusible: 250V 1A retardado (cristal 20mm)
Consumo total de energía: 13W
Control por Sonido: Micrófono interno
Conexiones DMX: XLR 3 pines macho / hembra
Conexiones DMX: 1 o 17 canales
Dirección de inicio DMX: 001 512
Potencia de láser: Láser Azul CW de 400mW(λ = 450nm)
Clase de radiación Láser: 3B
Diámetro del haz en la apertura: <5mm
Divergencia (cada haz) <12 mrad
Divergencia (salida total) <90°
Velocidad de escáner: 15kHz
Temperatura de funcionamiento: 10°C a 40°C
Estándar de Seguridad Láser: EN/IEC 60825-1 Ed2, 2007-03
Tamaño: vea la siguiente imagen
Peso: 1.5kg
JB SYSTEMS
Puede descargar la versión más reciente de este manual de usuario en nuestro sitio Web: www.beglec.com
®
61/74 SMOOTH SCAN-BLUE LASER
JB SYSTEMS
Esta información está sujeta a cambios sin notificación previa.
®
62/74 SMOOTH SCAN-BLUE LASER
Page 34

PORTUGUÊS MANUAL DO UTILIZADOR
PORTUGUÊS MANUAL DO UTILIZADOR
MANUAL DE UTLIZAÇÃO
Obrigado por ter adquirido este produto da JB Systems. De modo a tirar total proveito das
possibilidades deste produto, por favor leia este manual com atenção.
CARACTERISTICAS
Esta unidade está protegida contra interferências rádio. Este produto cumpre as exigências impostas pelas
presentes directivas nacionais e europeias. A conformidade deste produto foi comprovada e as declarações
e documentos relevantes foram efectuados pelo fabricante.
Esta unidade destina-se a produzir efeitos luminosos decorativos e é utilizada em sistemas de
espectáculos de luz.
Um efeito laser atractivo ao olhar de duas cores que usa varredores de 15kHz de alta qualidade em vez
de motores de passo a passo normais que permitem:
Movimentos suaves e macios
80 Padrões pré programados como: números, desenhos, palavras, …
Espectáculos laser fabulosos pré programados para todo o tipo de aplicações: bar lounge, discotecas, dj
móveis, …
Laser Classe 3B baseado em 400mW 450nm
Vários modos de funcionamento:
Controlo DMX: 1 canal para operação fácil ou 17 canais para controlo total
Autónomo: activado por som activado com microfone interno ou automático
Comando IR: Controlo remoto por infravermelho.
Master/slave: Espectáculos maravilhosos sincronizados
Microfone incorporado
Visor LED de 3 dígitos para navegação fácil no menu
Interruptor activado por chave ligar/desligar e entrada para interruptor de emergência (interlock) para
segurança adicional
De acordo com a norma EN/IEC 60825-1 Ed2, 2007-03 para segurança laser
ANTES DE UTILIZAR
Antes de utilizar esta unidade verifique se existem danos provocados durante o transporte. Caso existam
danos, não utilize a unidade e contacte o seu revendedor.
Importante: Esta unidade deixou a nossa fábrica em perfeitas condições e devidamente embalada. É
Imprescindível que o utilizador siga as instruções de segurança e avisos descritos neste manual.
Quaisquer danos provocados por utilização incorrecta não serão cobertos pela garantia. O revendedor não
será responsável por quaisquer danos ou problemas causados pelo incumprimento das instruções deste
manual.
Guarde este manual num local seguro para consulta futura. Caso venda esta unidade, forneça este
manual.
Verifique o conteúdo
Verifique que a caixa de cartão contém os seguintes itens:
Smooth Scan Blue Laser
Controlo remoto IR
2 chaves (para o interruptor de chave)
Cabo de alimentação
Manual de instruções
INSTRUÇÕES DE SEGURANÇA:
ATENÇÃO: De forma a evitar o risco de choque eléctrico,
não remova peças da unidade. Não tente fazer reparações.
Contacte pessoal qualificado
O símbolo composto por um triângulo equilátero com um relâmpago no interior alerta para a
presença de voltagem perigosa não isolada no interior do produto que poderá constituir risco
de choque eléctrico.
O símbolo composto por um triângulo equilátero com um ponto de exclamação alerta o
utilizador para a presença de instruções importantes de utilização e manutenção do produto.
Este símbolo significa: utilização unicamente em espaços fechados
Este símbolo significa: Leia instruções
Este símbolo determina: a distância mínima dos objetos iluminados. A distância mínima entre o
projetor e o objeto iluminado deve ser mais de 1 medidor
Proteja o ambiente. Recicle o material desta embalagem.
De modo a evitar risco de fogo ou choque eléctrico, não exponha este produto a chuva ou humidade.
De forma a evitar a formação de condensação no interior da unidade, ao transportá-la para ambiente
quente aguarde algum tempo de modo a que haja uma ambientação à temperatura. A condensação
poderá afectar o desempenho da unidade ou até danificá-la.
Esta unidade destina-se unicamente a utilização em espaços fechados.
Não introduza objectos de metal nem verta líquidos no interior do produto, correrá risco de choque
eléctrico ou poderá danificar o produto. Caso algum objecto estranho entre em contacto com o interior da
unidade, desligue-a de imediato da corrente.
Coloque esta unidade num local arejado, afastado de materiais inflamáveis e/ou líquidos. Esta unidade
deverá ser instalada a pelos menos 50cm de distância de paredes circundantes.
Não cubra os orifícios de ventilação ou a unidade poderá sobreaquecer.
Evite locais com poeiras. Limpe a unidade regularmente.
Mantenha esta unidade fora do alcance das crianças.
Esta unidade deverá ser operada unicamente por pessoas experientes.
Temperatura ambiente de funcionamento máxima é de 45ºC. Não utilize esta unidade a temperaturas
ambientes mais elevadas.
Certifique-se de que não irão passar pessoas sob a área de instalação da unidade durante a instalação e
manutenção.
Aguarde cerca de 10 minutos para que a unidade arrefeça antes de substituir a lâmpada ou de efectuar a
manutenção.
Desligue sempre a unidade da corrente quando não a utilizar durante longos períodos de tempo, antes de
substituir a lâmpada ou de efectuar manutenção.
A instalação eléctrica deve ser efectuada unicamente por pessoal qualificado, cumprindo os regulamentos
de segurança em instalações eléctricas e mecânicas do seu país.
Certifique-se que a voltagem a utilizar não é superior à voltagem indicada no painel traseiro da unidade.
O cabo de alimentação deverá estar sempre em perfeitas condições: desligue a unidade e substitua
imediatamente o cabo caso este apresente algum dano.
Nunca permita que este cabo entre em contacto com outros cabos!
Esta unidade deverá estar ligada à Terra de forma a respeitar as regras de segurança.
Não ligue a unidade a reguladores de intensidade.
Utilize sempre um cabo de segurança aprovado ao instalar a unidade.
De forma a não correr risco de choque eléctrico não abra a cobertura da unidade. À excepção da lâmpada
e do fusível, não existem peças que possam ser substituídas pelo utilizador.
Nunca repare um fusível nem tente operar a unidade sem fusível. Substitua sempre um fusível danificado
por outro com as mesmas características!
Em caso de problemas sérios de funcionamento, interrompa a utilização da unidade e contacte
imediatamente o seu revendedor.
A cobertura e as lentes deverão ser substituídas caso apresentem danos visíveis.
Caso seja necessário transportar a unidade utilize a embalagem original.
Por motivos de segurança, são proibidas quaisquer alterações não autorizadas à unidade.
JB SYSTEMS® 63/74 SMOOTH SCAN BLUE LASER
JB SYSTEMS® 64/74 SMOOTH SCAN BLUE LASER
Page 35

PORTUGUÊS MANUAL DO UTILIZADOR
Importante: Nunca olhe directamente para a luz! Não utilize este efeito luminoso na presença de pessoas
epilépticas.
INSTRUÇÕES DE SEGURANÇA LASER:
De acordo com as normas EN 60825-1:1994 + A1:2002 + A2:2002, este laser enquadra-se na
categoria 3R. A exposição directa dos olhos pode ser perigosa.
PORTUGUÊS MANUAL DO UTILIZADOR
Evite exposição directa dos olhos! A radiação laser pode provocar
PERIGO: RADIAÇÃO LASER!
danos nos olhos e/ou na pele. Devem ser tomadas todas as
mediadas preventivas para garantir o funcionamento seguro desta
unidade laser.
Este tipo de produto é conhecido por show laser, emite uma radiação do espectro luminoso compreendida
entre 400 e 700 nm utilizada para produzir efeitos luminosos em espectáculos de luz.
Esta unidade laser foi construída para que o feixe se mova tão rapidamente que o contacto com os olhos
seja muito breve. Por esta razão a utilização deste
laser num espectáculo de laser é considerada como
segura.
Nunca direccione o feixe para pessoas ou animais. O
funcionamento desta unidade deverá ser sempre
supervisionado.
Este laser destina-se unicamente a utilização em
espectáculos. A utilização de um laser classe 3R só
é permitida quando supervisionada por um técnico
experiente.
Dependendo da categoria da unidade, operar um
produto laser poderá produzir irradiação laser passível de provocar danos permanentes nos olhos ou na
pele. As normas legais para utilização de produtos laser variam de país para país. O utilizador deverá
informar-se sobre as normas legais vigentes no seu pais e aplicá-las.
Tenha em atenção que a JB SYSTEMS não poderá ser responsabilizada por danos resultantes de uma
instalação incorrecta ou utilização imprudente!
DESCRIÇÃO
1. ALIMENTAÇÃO: Ficha IEC com suporte de fusível e interruptor integrado, conectar o cabo de
alimentação aqui.
2. INTERRUPTOR ON/OFF ACTIVADO POR CHAVE: usado para ligar/desligar a unidade. Utilize as
chaves para ter a certeza que apenas um utilizador autorizado consegue ligar o laser.
3. MICROFONE INTERNO: O microfone interno é usado para sincronizar o espectáculo laser á batida da
música.
4. ENTRADA DMX: Conector XLR macho de 3 pinos usado para conectar cabos universais DMX.
5. SAÌDA DMX: Conector XLR fêmea de 3 pinos usado para conectar o LASER com a próxima unidade na
sequência DMX
6. VISOR: mostra o endereço DMX seleccionado quando a unidade está em modo DMX. Para além do
modo DMX pode também seleccionar os outros 4 modos de funcionamento, ver mais á frente para
aprender mais sobre estes modos.
7. PAINEL DE CONTROLO: Usado para seleccionar as diferentes
funções do laser.
8. RECEPTOR IR: usado para controlar a unidade através do
controlo remoto sem fio.
9. ANEL DE SEGURANÇA: Usado para anexar um cabo de
segurança quando a unidade está pendurada.
10. VENTOINHA: Usada para arrefecer os componentes no interior.
Certifique-se de nunca tapar está saída da ventoinha.
11. ENTRADA INTERLOCK: Usado para conectar o interruptor de
desligar de emergência. Quando pressionar este interruptor o
feixe laser irá desaparecer imediatamente.
IMPORTANTE! Para vossa própria segurança nos recomendamos conectar este interruptor
opcional!
NÂO HAVERÁ NENHUMA SAÍDA LASER SE A ENTRADA INTERLOCK NÃO FOR USADA!
Solução temporária: instale o conector sobresselente no laser (ver foto)
JB SYSTEMS® 65/74 SMOOTH SCAN BLUE LASER
12. LED POWER: indica que a unidade está ligada.
13. LED SOUND: Pisca ao som da música detectada pelo microfone interno.
14. BRAÇADEIRA: com 1 aperto de cada lado para apertar a unidade e um orifício
de montagem para fixar um grampo.
15. SAÍDA DO LASER: O laser sai da estrutura, certifique-se que NUNCA olha para
o interior através desta abertura enquanto a unidade está ligada!
16. AUTOCOLANTE DE AVISO: Perigo – Laser de classe 3B. Radiação quando aberto. Evitar Exposição.
JB SYSTEMS® 66/74 SMOOTH SCAN BLUE LASER
Page 36

PORTUGUÊS MANUAL DO UTILIZADOR
PORTUGUÊS MANUAL DO UTILIZADOR
17. AUTOCOLANTE DE AVISO: Saída de Laser
18. SINAL DE AVISO LASER: Avisa contra um laser potencialmente perigoso quando não usado por um
operador especializado.
19. AUTOCOLANTE DE AVISO: Radiação Laser. Evitar exposição ao laser. Produto Laser Classe 3B.
INSTALAÇÃO EM SUSPENSÃO
• Importante: A instalação deve ser realizada por pessoal qualificado. Instalação inadequada pode resultar
em lesões graves e / ou danos à propriedade. Instalação em suspensão requer experiência! Os limites de
carga de trabalho devem ser respeitados, materiais de instalação certificados devem ser usados, o
dispositivo instalado deve ser inspeccionado regularmente para sua segurança.
• Verifique se a área abaixo do local de instalação está livre de pessoas indesejadas durante a instalação,
desinstalação e manutenção.
• Coloque esta unidade num local bem ventilado, longe de materiais inflamáveis e / ou líquidos. A unidade
deverá ser instalada pelo menos 50cm de distância de paredes circundantes.
• O dispositivo deve ser instalado fora do alcance das pessoas e áreas fora onde as pessoas podem passar
ou sentar-se.
• Antes da instalação certifique-se que a área de instalação pode suportar uma carga mínima de 10 vezes o
peso do dispositivo.
• Utilize sempre um cabo de segurança certificadas que pode conter 12 vezes o peso do dispositivo quando
instalar a unidade. Este acessório secundário de segurança deve ser instalado de forma que nenhuma parte
da instalação pode cair mais de 20 centímetros se o anexo principal falhar.
• O dispositivo deve ser bem fixado, uma montagem em falso é perigosa e não pode ser considerada!
• Não cubra as aberturas de ventilação, pois isso pode resultar em sobre aquecimento.
• O operador deve certificar-se que as instalações de segurança relativas e máquinas e técnicos são
aprovados por um especialista antes de usá-los pela primeira vez. As instalações devem ser
inspeccionadas a cada ano por uma pessoa qualificada para ter certeza de que a segurança ainda é óptima.
ATENÇÃO PERIGO PARA OS OLHOS: Fixe a posição do laser de uma forma que impeça
o público de olhar directamente para os feixes de laser. A instalação deve garantir que o feixe
não vai apontar a plateia.
COMO CONFIGURAR E CONTROLAR A UNIDADE
Assim que o modo é seleccionado, pressione o botão ENTER para guardar.
Pode controlar esta unidade de 5 maneiras:
1) MODO CONTROLADO PELA MÚSICA:
O Laser reproduz uma sequência pré programada ao ritmo da música. Seleccione este modo quando
apenas 1 laser é usado (autónomo) ou quando o laser é colocado como primeira unidade (master) numa
cadeia com várias unidades.
Pressione a botão FUNC até que o visor mostre um dos seguintes: Aut, Aup, 17C, 1C, Sla or REM.
Agora utilize os botões UP ou DOWN para seleccionar:
o Sop (espectáculos aleatórios activados por som com padrões e efeitos)
o Sou (espectáculos activados por som em cores RGY)
o So1 (espectáculos activados por som em cor vermelho)
o So2 (espectáculos activados por som em cor verde)
o So3 (espectáculos activados por som em cor amarela)
Pressione o botão ENTER para confirmar a sua escolha.
Pode conectar várias unidades laser em conjunto, simplesmente coloque a primeira unidade da série num
dos modos de efeitos activados por som e todas as outras unidades da cadeia em “Modo Slave” (visor
mostra “SLA”) to para fazer todas elas trabalharem em perfeita sintonia!
Nota: Quando nenhuma música é detectada, a saída laser será desligada (blackout)
2)MODO TOTALMENTE AUTOMÁTICO:
O laser automaticamente reproduz uma sequência pré programada. Seleccione este modo quando
apenas um laser é usado (autónomo) ou quando o laser é colocado no principio (master) numa sequência
de vários LASERS.
Pressione o botão FUNC até que o visor mostre um dos seguintes: Sop, Aut, Aup, 17C 1C, Sla ou
REM.
Agora utilize os botões UP ou DOWN para seleccionar:
o Aut (espectáculos automáticos em cores RGY)
o Au1 (espectáculos automáticos em cor vermelho)
o Au2 (espectáculos automáticos em cor verde)
o Au3 (espectáculos automáticos em cor amarela)
o Aup (espectáculos automáticos aleatórios com padrões e efeitos)
Pressione o botão ENTER para confirmar a sua escolha.
O laser automaticamente reproduz uma sequência pré programada
Pode conectar vários lasers SMOOTH SCAN 3 em conjunto: simplesmente coloque a primeira unidade da
sequência em um dos modos automáticos de efeitos e todos as outras unidades “Modo Slave” (o visor
mostra “SLA”) para fazê-los trabalhar em perfeita sintonia!
3) MODO SLAVE:
O laser segue as instruções dadas pelo primeiro Laser Smooth Scan 3 (master) na sequência.
Conecte a entrada DMX do laser á saída DMX do laser anterior na sequência.
Pressione o botão FUNC até que o visor mostre “SLA”
Pressione o botão ENTER para confirmar a sua escolha.
Pode conectar vários lasers em conjunto. Por favor coloque a primeira unidade da sequência em “modo
Musical ou automaticamente” e todas as outras unidades em “modo Slave” (visor mostra “SLA” para fazêlos trabalhar em perfeita sintonia!
SENSIBILIDADE DE ENTRADA DE MÚSICA:
Esta unidade funciona ao ritmo da batida quando usado em modo autónomo ou master/slave
Para definir a sensibilidade de entrada, siga estes passos:
Pressione o botão FUNC até que o visor mostre “S 0” .. “S 9”
Pressione o botão ENTER para confirmar a sua escolha
Utilize os botões DOWN e UP para seleccionar um valor entre “S 0” (muito baixa sensibilidade) e “S 9”
(alta sensibilidade).
JB SYSTEMS® 67/74 SMOOTH SCAN BLUE LASER
JB SYSTEMS® 68/74 SMOOTH SCAN BLUE LASER
Page 37

PORTUGUÊS MANUAL DO UTILIZADOR
Valor
Valor
4) Modo remoto IR:
O laser pode ser controlado por controlo remoto IR:
Pressione o botão FUNC até que o visor mostre “REM”.
Pressione o botão ENTER para confirmar a sua escolha.
Nota: em qualquer modo autónomo (excepto REM e SLA), pressione ON/OFF por 2 segundos para
activar a função remota.
ESPECTÁCULO AUTO
ESPECTÁCULO MUSIC
LASER LIGADO/DESLIGADO
COR
PAUSA NO EFEITO
MUDAR PADRÃO
SENSIBILIDADE AO SOM
PADRÃO FIXO (DE 1 A 48)
REPETIR PADRÃO
Detalhes do controlo remoto:
Botão Função Descrição
LIGAR /
DESLIGAR
AUTO
Em modo REM: liga/desliga o laser.
Em qualquer outro modo autónomo excepto SLAVE:
pressione 2s to ligar o modo REM
Espectáculo automático
PORTUGUÊS MANUAL DO UTILIZADOR
5) MODO DMX512:
O laser pode ser controlado por qualquer controlador DMX standard de 2 modos DMX diferentes:
MODO 1 CANAL: para uma configuração e uso muito fácil (visor mostra “1Ch”)
MODO 1 CANAL: para controlo total de todas as funções. (visor mostra “17c”)
Conecta a entrada DMX do laser á saída DMX da unidade anterior na sequência ou directamente á
saída DMX do seu controlador.
Pressione o botão FUNC até que o visor mostre “1C” ou “17C”.
Pressione os botões UP/DOWN para seleccionar o modo DMX “1C” ou “17C”.
Pressione o botão ENTER para confirmar a sua escolha
Pressione o botão FUNC: o número de 3 dígitos começa a piscar no visor.
Seleccione o endereço DMX
Pressione o botão ENTER para confirmar a sua escolha
Nota: o visor pisca quando a unidade está em modo DMX e não é detectado sinal DMX.
Alguma informação adicional sobre DMX512:
O protocolo DMX é um sinal de alta velocidade amplamente utilizado para controlar
equipamentos inteligentes de luz. É necessário colocar em cadeia o seu controlador
DMX e todos os efeitos de luz através de um cabo balanceado de boa qualidade
XLR M / F. Para evitar um comportamento estranho dos efeitos de luz, devido a
interferências, deve usar uma resistência de 90Ω a 120Ω para terminador no final
da cadeia. Nunca use um cabo divisor de dados em Y, isso simplesmente não vai funcionar!
Cada efeito na cadeia precisa ter seu endereço inicial correcto para que ele saiba quais os comandos do
controlador que tem de descodificar.
1 CHANNEL DMX-CONFIGURATION OF THE LASER:
MUSIC
Sensibilidade som
MUDAR
CORES
MUDAR
PADRÕES
PADRÕES
FIXOS
REPETIÇÃO
DE
PADRÕES
Espectáculo activado por som, o led azul está a piscar
quando o som é detectado
Em modo activado por som, pressione MUSIC+B+1 até 9
para mudar a sensibilidade
Para mostrar e mudar padrões
Pode seleccionar um padrão de 1 até 48
O padrão actual e o último padrão alternam
repetidamente
JB SYSTEMS® 69/74 SMOOTH SCAN BLUE LASER
Posição
DMX Função Notas
4 210-255 SOU Espectáculo activado por som
3 150-209 AUT Espectáculo automático
Espectáculo de efeito de padrão
2 090-149 SOP
activado por som
Espectáculo de efeito de padrão a
1 030-089 AUP
mudar automático
0 000-029 STANDBY Saída laser desligada
17 CONFIGURAÇÃO DO LASER – CANAL DMX:
NOTA IMPORTANTE: O canal DMX 1 é usado para definir os vários modos de funcionamento do laser
Para usar o laser em modo DMX de 17 canais, o canal deverá ser definido para o valor 221 ou
superior.
Dependendo dos valores DMX do canal 1, diferentes modos podem ser aplicados:
Canal
CH1
Modo
DMX Função
000-040 Laser desligado
041-080 AUT
081-120 AU1
121-160 AU2
JB SYSTEMS® 70/74 SMOOTH SCAN BLUE LASER
Page 38

PORTUGUÊS MANUAL DO UTILIZADOR
PORTUGUÊS MANUAL DO UTILIZADOR
081-100 AU3
101-120 SOU
121-140 SO1
141–160 SO2
161-180 SO3
181-200 AUP
201-220 SOP
221-255 MODO DMX
000-051 Grupo Padrões 1
CH2
Grupo
CH3 Padrão 000-255 Cada 16 para 1 grupo, total 80 padrões.
CH4
Cor
CH5
Clipping
CH6
Zooming
CH7 Velocidade Zoom
CH8
Rotação eixo X
CH9 Velocidade rotação 000-255 Rápido para lento
CH10
Rotação eixo Y
CH11 Velocidade rotação
CH12
Rotação eixo Z
CH13 velocidade de rotação 000-255 Rápido para lento
CH14
Movimento eixo X
052-103 Grupo Padrões 2
104-155 Grupo Padrões 3
156-207 Grupo Padrões 4
208-255 Grupo Padrões 5
000-015 Original
016-031
032-047
048-063
064-111 Cor rolando
112-159 Cor saltando
160-207 Cor movendo
208-255 Efeito strobe
000 Padrão completo sem cortar
001-127 0%~99% padrão fixo cortado
128-255 Velocidade de cor
000-127 100%
128-169 Zooming IN
170-209 Zooming OUT
210-255 Zooming Alternando
000-255 Rápido para lento
000-127 0
128-191 Rotação para a direita
192-255 Rotação para a esquerda
000-127 0
128-191 Rotação para a direita
192-255 Rotação para a esquerda
000-255 Rápido para lento
000-127 0
128-191 Rotação para a direita
192-255 Rotação para a esquerda
000-127 0
128-191 Rotação para a direita
192-255 Rotação para a esquerda
CH15 Velocidade do movimento
CH16
Movimento eixo Y
CH17 Velocidade do movimento
Definições dos padrões:
Pressione o botão FUNC até que o visor mostre
Pressione Up ou Down até que o laser mostre a seta do eixo Y no topo e seta do eixo X na direita.
Depois pressione “Enter” para confirmar a selecção
000-255 Rápido para lento
000-127 0
128-191 Rotação para a direita
192-255 Rotação para a esquerda
000-255 Rápido para lento
JB SYSTEMS® 71/74 SMOOTH SCAN BLUE LASER
JB SYSTEMS® 72/74 SMOOTH SCAN BLUE LASER
Page 39

PORTUGUÊS MANUAL DO UTILIZADOR
PORTUGUÊS MANUAL DO UTILIZADOR
Lista de Padrões
MANUTENÇÃO
Certifique-se que sob a área de instalação da unidade não estará livre de pessoas durante a manutenção.
Desligue o cabo de alimentação da corrente e aguarde que a unidade arrefeça
Durante a inspecção deverá verificar os seguintes pontos:
Todos os parafusos utilizados nas peças da unidade e na instalação deverão estar apertados firmemente
e não poderão estar corroídos.
As estruturas, os pontos de fixação e as áreas de instalação (tecto, armação, etc.) não deverão
apresentar qualquer deformação.
Caso uma lente apresente danos visíveis como fendas ou riscos profundos, deverá ser substituída
imediatamente.
O cabo de alimentação deverá estar em perfeitas condições e deverá ser substituído assim que for
detectado o mais pequeno dano.
As ventoinhas e os orifícios de ventilação deverão ser limpos todos os meses.
Utilize um aspirador ou compressor de ar para limpar o interior da unidade uma vez por ano.
De forma a optimizar a projecção de luz, limpe as lentes ópticas internas e externas e/ou espelhos
periodicamente. A regularidade das limpezas depende do ambiente em que está instalada a unidade: um
ambiente húmido, com fumo ou poeiras dará origem a uma maior acumulação de impurezas nas ópticas
da unidade.
Atenção: Recomendamos a limpeza interna deve ser realizada por pessoal qualificado!
ESPECIFICAÇÕES
Alimentação: AC 100~240V, 50/60Hz
Fusível: 250V 1A fusão lenta (vidro 20mm)
Consumo total de potência: 13W
Controlo Áudio: Microfone interno
Ligações DMX: 3pin XLR macho / fêmea
Canais DMX: 1 ou 17 canais
Endereço Inicial DMX: 001 512
Potência Laser: 400 mW Azul CW laser ( 450nm)
Classe radiação Laser: 3B
Diâmetro @ abertura laser <5mm
Divergência (cada feixe) <2 mrad
Divergência (saída total) <90°
Velocidade do scanner: 15kHz
Temperatura de trabalho: 10°C to 40°C
Segurança Laser Standard: EN/IEC 60825-1 Ed2, 2007-03
Tamanho: Ver na figura em baixo
Peso: 1,5 kg
o Utilize um pano macio e um limpa-vidros normal na limpeza da unidade.
o Seque sempre as peças cuidadosamente.
o Limpe as ópticas externas pelo menos uma vez em cada 30 dias.
o Limpe as ópticas internas pelo menos uma vez em cada 90 dias.
JB SYSTEMS® 73/74 SMOOTH SCAN BLUE LASER
Estas informações estão sujeitas a alterações sem aviso prévio. Pode fazer download da versão
mais recente deste manual no nosso site: www.beglec.com
JB SYSTEMS® 74/74 SMOOTH SCAN BLUE LASER
 Loading...