

Page 1

WWW.BEGLEC.COM
Copyright © 2011 by BEGLEC NV
‘t Hofveld 2C ~ B1702 Groot-Bijgaarden ~ Belgium
Reproduction or publication of the content in any manner, without express permission of the publisher, is prohibited.
Version: 1.3
Operation Manual
Mode d'emploi
Gebruiksaanwijzing
Bedienungsanleitung
Manual de instrucciones
Manual do utilizador
EN
FR
NL
DE
ES
PT
Page 2
Page 3
ENGLISH OPERATION MANUAL
OPERATION MANUAL
Thank you for buying this JB Systems®product. To take full advantage of all possibilities and for your own
safety, please read these operating instructions very carefully before you start using this unit.
FEATURES
This unit is radio-interference suppressed. This product meets the requirements of the current European and
national guidelines. Conformity has been established and the relevant statements and documents have been
deposited by the manufacturer.
Compact but very powerful moving head for Pro DJ, renting companies and discotheques
Based on the very latest 60WATT LED technology from CREE:
Big light output and sharp gobos, thanks to excellent optics
Very low power consumption, only 115W (money saving!)
Extremely brilliant colors compared to units with halogen lamps
No lamp replacements!
Virtually no heat production
Lightweight (no lamp transformers needed)
0-100% dimming and ultra fast strobe function
6 rotating gobos + open, equipped with gobo shaking feature
Independent color wheel with split color function (8 colors + white)
Excellent built-in programs for wonderful, ever changing, light shows:
DMX-control: 1ch, 8ch or 11 channels
Standalone: sound activated with internal mic
Master/slave: wonderful synchronized shows in standalone mode
DMX-master/slave: thanks to this revolutionary new feature several SIRIUS units, working in
master/slave, can still be controlled by 1 or 4 DMX-channels! (even while connected in a DMX chain,
optional mini DMX splitter required)
Two different default settings, easy for rental companies:
PRO-defaults: basic settings (adjustable) for use on professional DMX-controllers.
AUTO-defaults: basic settings (adjustable) for easy master/slave use.
Automatic X/Y re-positioning
Optional remote controllers available: wired CA8 or wireless RF8-SET
Easy software updates via special software upgrade unit
LED-display for easy menu navigation
Beam angle = 15°
BEFORE USE
Before you start using this unit, please check if there’s no transportation damage. Should there be any, do
not use the device and consult your dealer first.
Important: This device left our factory in perfect condition and well packaged. It is absolutely necessary
for the user to strictly follow the safety instructions and warnings in this user manual. Any damage caused
by mishandling is not subject to warranty. The dealer will not accept responsibility for any resulting defects
or problems caused by disregarding this user manual.
Keep this booklet in a safe place for future consultation. If you sell the fixture, be sure to add this user
manual.
Check the contents:
Check that the carton contains the following items:
SIRIUS unit
Omega clamp
IEC-power cable
Eyebolt to install an optional safety cable
Operating instructions
ENGLISH OPERATION MANUAL
SAFETY INSTRUCTIONS:
CAUTION: To reduce the risk of electric shock, do not remove
the top cover. No user-serviceable parts inside. Refer servicing
to qualified service personnel only.
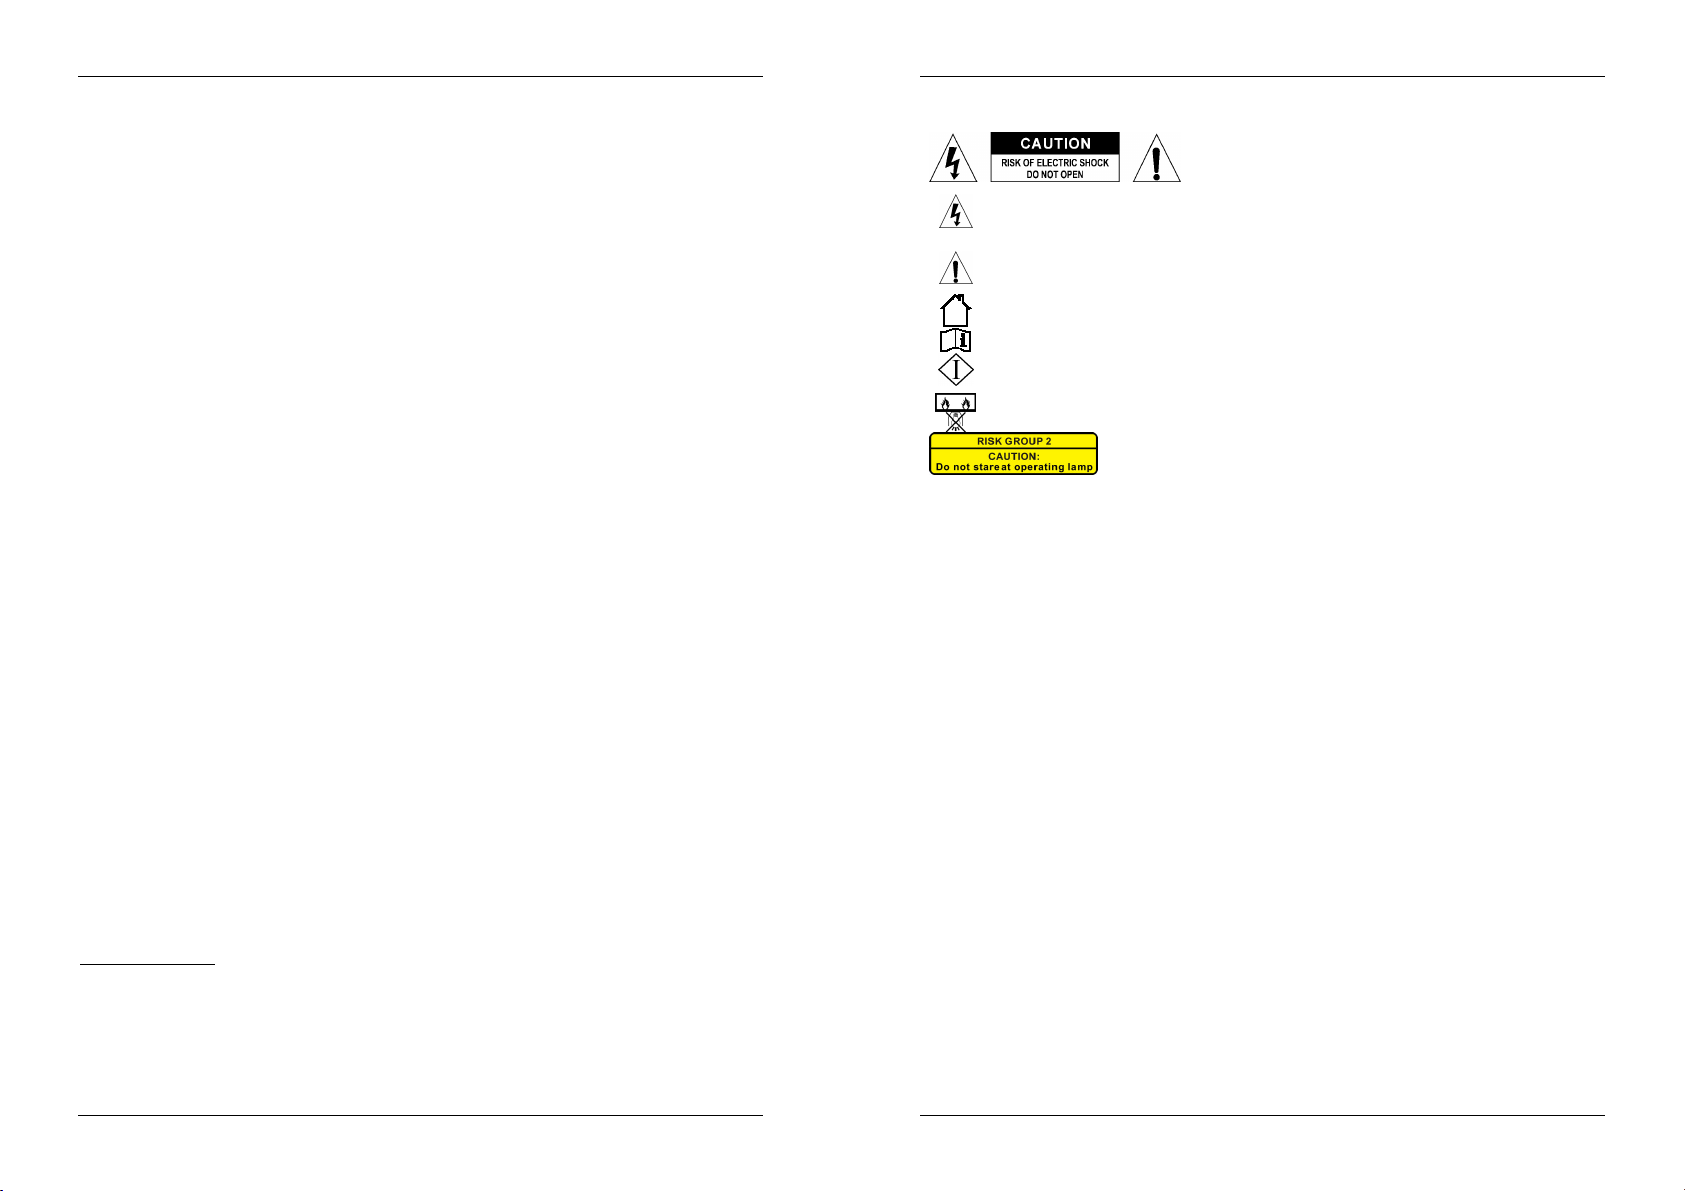
The lightning flash with arrowhead symbol within the equilateral triangle is intended to alert the
use or the presence of un-insulated “dangerous voltage” within the product’s enclosure that may
be of sufficient magnitude to constitute a risk of electric shock.
The exclamation point within the equilateral triangle is intended to alert the user to the presence
of important operation and maintenance (servicing) instructions in the literature accompanying
this appliance.
This symbol means: indoor use only
This symbol means: Read instructions
This symbol means: Safety Class I appliance
The device is not suitable for direct mounting on normally flammable surfaces. (suitable only for
mounting on non-combustible surfaces)
CAUTION: Do not stare at operating lamp.
May be harmful to the eyes.
To protect the environment, please try to recycle the packing material as much as possible.
To prevent fire or shock hazard, do not expose this appliance to rain or moisture.
To avoid condensation to be formed inside, allow the unit to adapt to the surrounding temperatures when
bringing it into a warm room after transport. Condense sometimes prevents the unit from working at full
performance or may even cause damages.
This unit is for indoor use only.
Don’t place metal objects or spill liquid inside the unit. Electric shock or malfunction may result. If a foreign
object enters the unit, immediately disconnect the mains power.
Locate the fixture in a well ventilated spot, away from any flammable materials and/or liquids. The fixture
must be fixed at least 50cm from surrounding walls.
Don’t cover any ventilation openings as this may result in overheating.
Prevent use in dusty environments and clean the unit regularly.
Keep the unit away from children.
Inexperienced persons should not operate this device.
Maximum safe ambient temperature is 40°C. Don’t use this unit at higher ambient temperatures.
Make sure the area below the installation place is free from unwanted persons during rigging, de-rigging
and servicing.
Allow the device about 10 minutes to cool down before to start servicing.
Always unplug the unit when it is not used for a longer time or before to start servicing.
The electrical installation should be carried out by qualified personal only, according to the regulations for
electrical and mechanical safety in your country.
Check that the available voltage is not higher than the one stated on the unit.
The power cord should always be in perfect condition. Switch the unit immediately off when the power cord
is squashed or damaged. It must be replaced by the manufacturer, its service agent or similarly qualified
persons in order to avoid a hazard.
Never let the power-cord come into contact with other cables!
This fixture must be earthed in order to comply with safety regulations.
Don’t connect the unit to any dimmer pack.
Always use an appropriate and certified safety cable when installing the unit.
In order to prevent electric shock, do not open the cover. There are no user serviceable parts inside.
Never repair a fuse or bypass the fuse holder. Always replace a damaged fuse with a fuse of the same
type and electrical specifications!
In the event of serious operating problems, stop using the fixture and contact your dealer immediately.
The housing and the lenses must be replaced if they are visibly damaged.
Please use the original packing when the device is to be transported.
JB SYSTEMS
®
1/85 SIRIUS
JB SYSTEMS
®
2/85 SIRIUS
Page 4
ENGLISH OPERATION MANUAL
ENGLISH OPERATION MANUAL
Due to safety reasons it is prohibited to make unauthorized modifications to the unit.
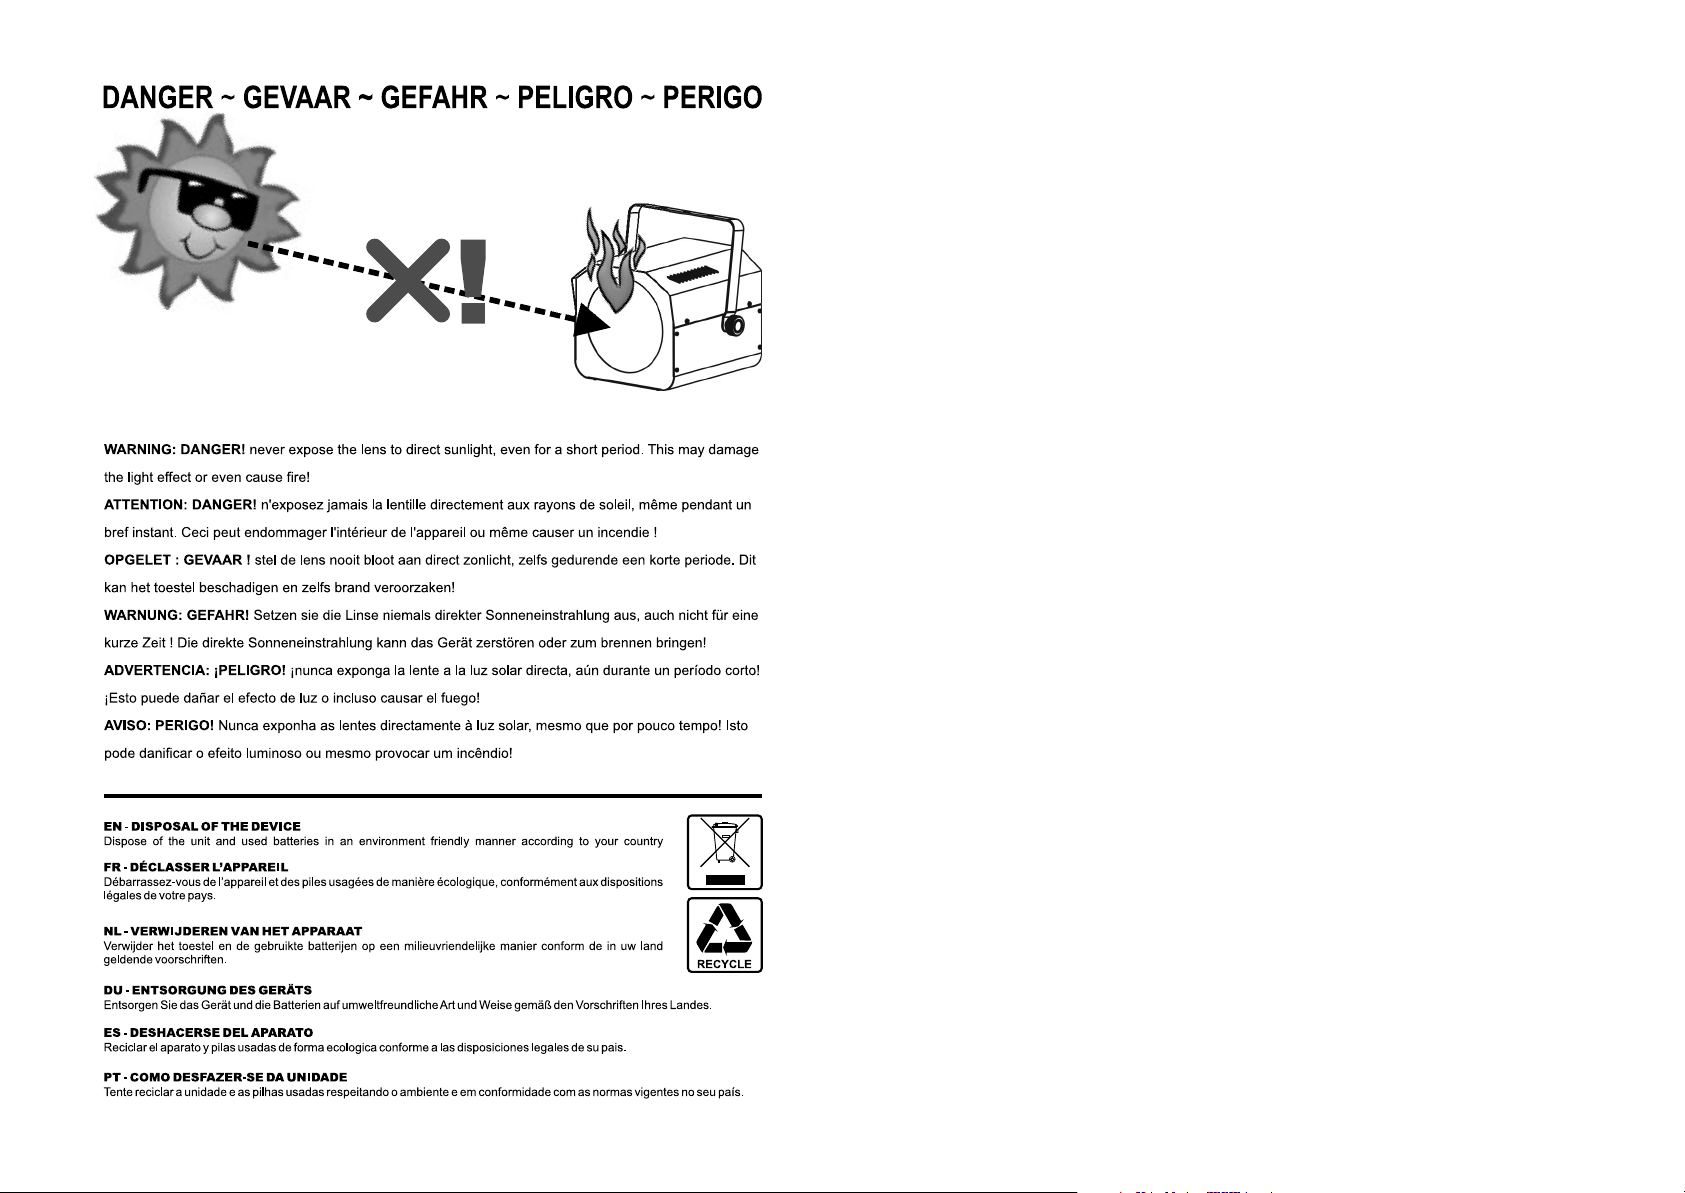
Important: Never look directly into the light source! Don’t use the effect in the presence of persons suffering
from epilepsy.
OVERHEAD RIGGING
Important: The installation must be carried out by qualified service personal only. Improper
installation can result in serious injuries and/or damage to property. Overhead rigging requires
extensive experience! Working load limits should be respected, certified installation materials
should be used, the installed device should be inspected regularly for safety.
Make sure the area below the installation place is free from
unwanted persons during rigging, de-rigging and servicing.
Locate the fixture in a well ventilated spot, far away from
any flammable materials and/or liquids. The fixture must
be fixed at least 50cm from surrounding walls.
The device should be installed out of reach of people and
outside areas where persons may walk by or be seated.
Before rigging make sure that the installation area can hold
a minimum point load of 10times the device’s weight.
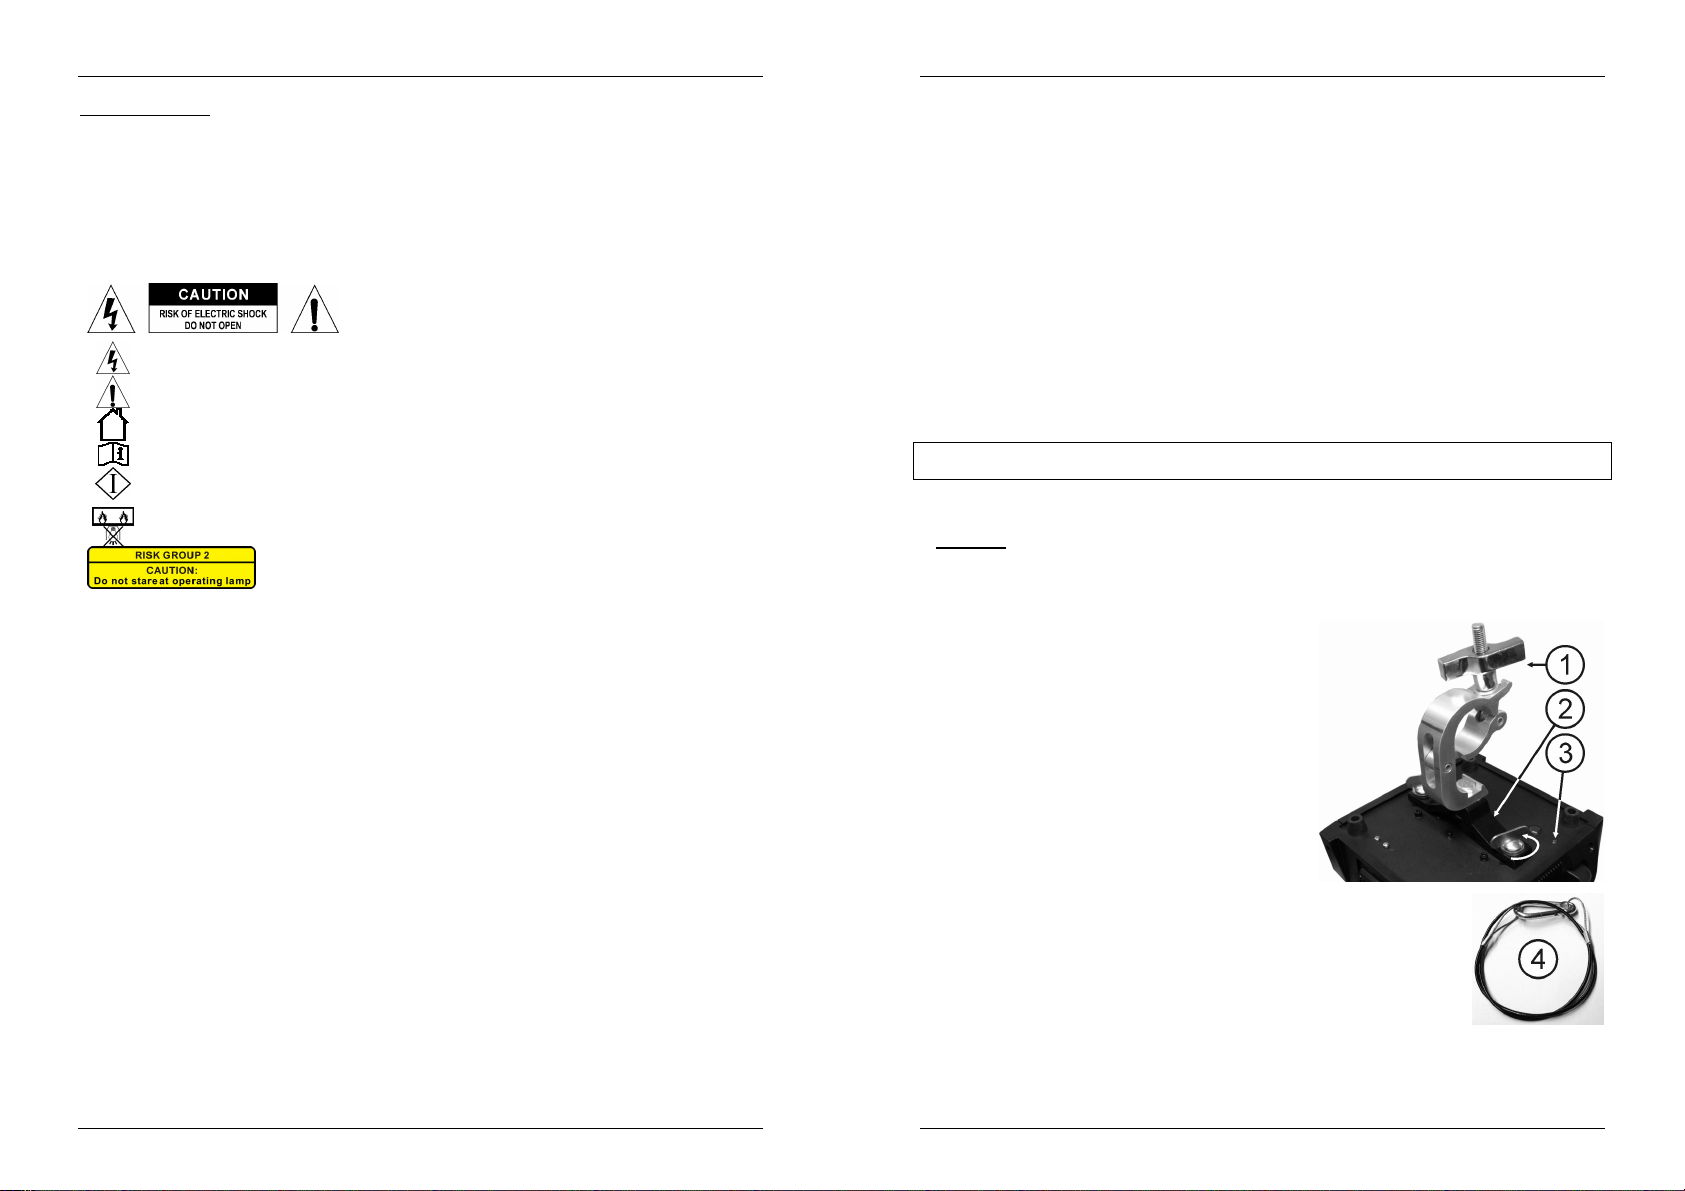
Always use a certified safety cable (number 3 on the
picture) that can hold 12 times the weight of the device
when installing the unit. This secondary safety attachment
should be installed in a way that no part of the installation
can drop more than 20cm if the main attachment fails.
The device should be well fixed; a free-swinging mounting
is dangerous and may not be considered!
Don’t cover any ventilation openings as this may result in overheating.
The operator has to make sure that the safety-relating and machine-technical
installations are approved by an expert before using them for the first time. The
installations should be inspected every year by a skilled person to be sure that
safety is still optimal.
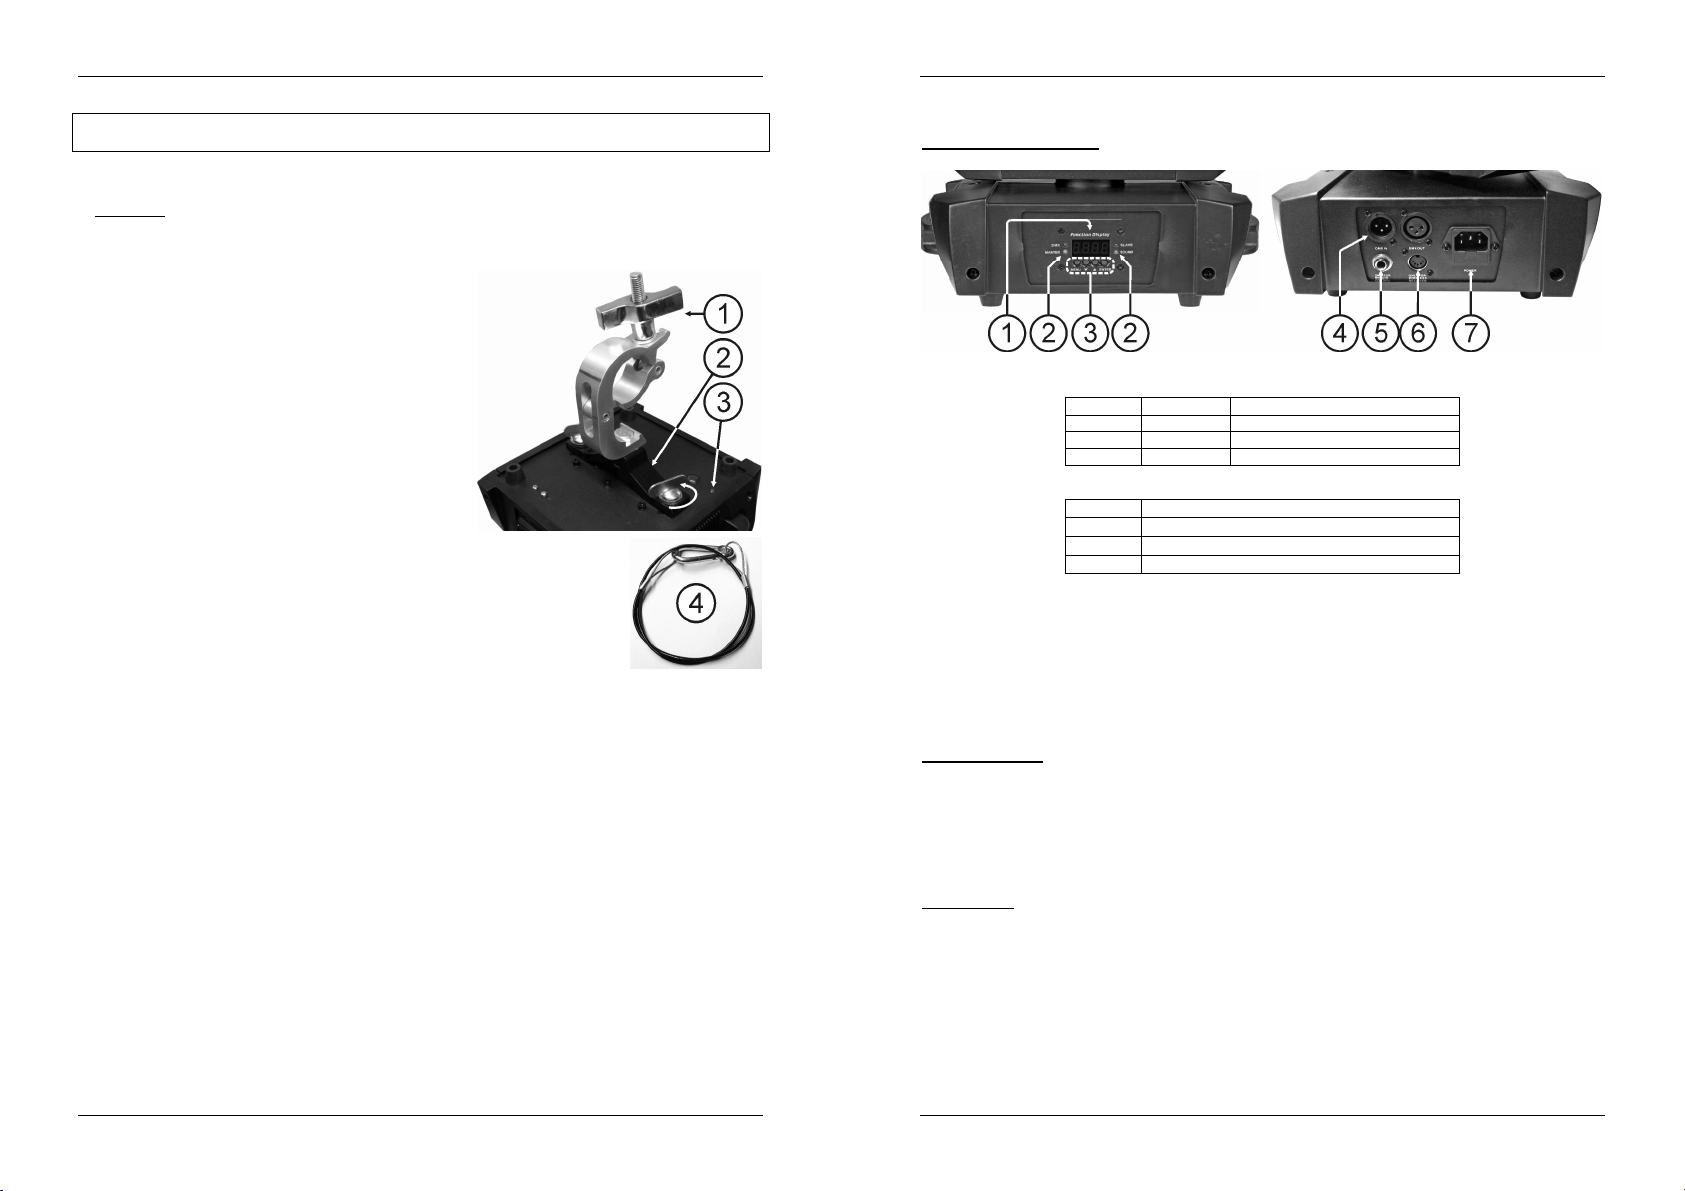
1. Optional Clamp
2. Special omega clamp (included)
3. Threaded hole, used to install the supplied eyebolt
4. Optional safety cable
HOW TO SET UP THE UNIT
CONTROL PANEL:
1. DISPLAY shows the various menus and the selected functions.
2. LEDS
DMX On DMX input present
MASTER On Master mode
SLAVE On Slave mode
SOUND Flashing Sound activation
3. BUTTONS
MENU To select the programming functions
DOWN To go backward in the selected functions
UP To go forward in the selected functions
ENTER To confirm the selected functions
4. DMX INPUT/OUTPUT: used for DMX512 linking. Use good quality 3pin XLR M/F balanced cable to link
the units together.
5. WIRED REMOTE CONTROL INPUT: Used to connect a simple CA-8 hand controller while the unit is
used in standalone or master/slave mode.
6. WIRELESS REMOTE CONTROL INPUT: Used to connect RF-8 wireless controller while the unit is used
in standalone or master/slave mode.
7. MAINS INPUT: with IEC socket and integrated fuse holder, connect the supplied mains cable here.
JB SYSTEMS
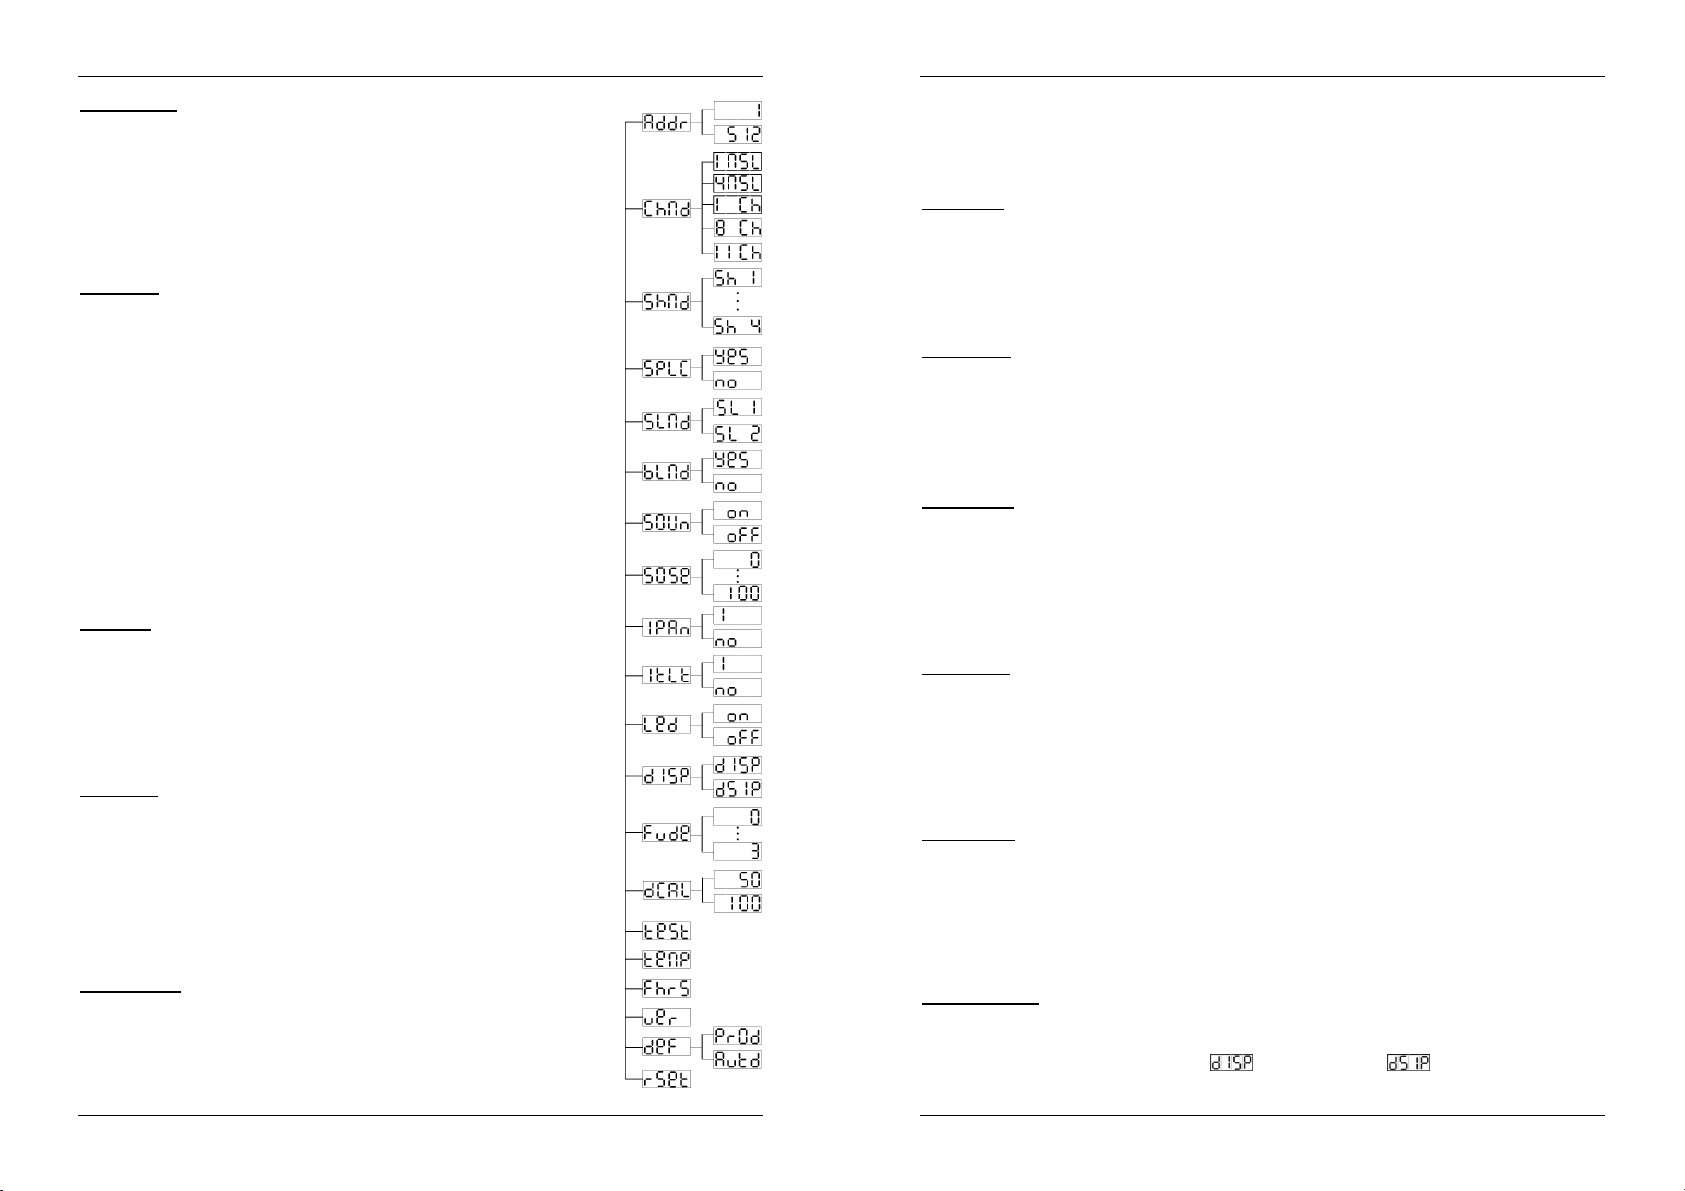
MAIN MENU:
To select any of the functions, press the MENU button up to when the required one is shown on the
display or use the DOWN and UP buttons to browse the menu.
Select the function with the ENTER button (the display blinks).
Use DOWN and UP buttons to change the mode.
Once the required mode is selected, press the ENTER button to confirm.
To go back to the main menu without any change press the MENU button shortly. The main menu is shown
in the chart.
DMX Address
Used to set the starting address in a DMX setup.
Press the MENU button until “Addr” is shown on the display.
Press the ENTER button, the display starts blinking.
Use DOWN and UP buttons to change the DMX512 address.
Once the correct address shows on the display, press the ENTER button to save it.
To go back to the main menu without any change press the MENU button shortly.
If you want to go back to normal running mode: press the MENU button for about 2 seconds.
®
3/85 SIRIUS
JB SYSTEMS
®
4/85 SIRIUS
Page 5
ENGLISH OPERATION MANUAL
ENGLISH OPERATION MANUAL
Channel mode
Used to set the desired channel setup mode.
Press the MENU button until “ChMd” is shown on the display.
Press the ENTER button, the display starts blinking.
Use DOWN and UP buttons to choose 1MSL, 4MSL, 1Ch, 8Ch or 11Ch mode.
Once the desired channel setup mode shows on the display, press the ENTER
button to save it.
To go back to the main menu without any change press the MENU button shortly.
If you want to go back to normal running mode: press the MENU button for about 2
seconds.
Show Mode
Used to choose the Show mode when used in standalone or master/slave
mode.
Press the MENU button until “ShMd” is showing on the display.
Press the ENTER button, the display starts blinking.
Use DOWN and UP buttons to select one of the available shows:
Show 1 (Sh 1): Fixture is placed on the floor. Tilt movement angle 210°.
Show 2 (Sh 2): Fixture is fixed under ceiling. Tilt movement angle 90°.
Show 3 (Sh 3): Fixture is placed on a podium, in front of the audience. The
spot is always projecting to the audience’s direction; i.e. in front of the stage.
Pan movement angle (left to right to left): 160°. Tilt movement angle: 90° (60°
above horizon; 30° below horizon.)
Show 4 (Sh 4): Fixture is fixed under ceiling. The spot is mainly projecting in
front of the stage. Pan movement angle (left to right to left):160°. Tilt
movement angle: 90° (vertically, front 75°; back 15°)
Once the right mode shows on the display, press the ENTER button to save it.
To go back to the main menu without any change press the MENU button shortly.
If you want to go back to normal running mode: press the MENU button for about 2
seconds.
Split Color
You can select if the unit can only show full colors or also split colors.
Press the MENU button until “SPLC” is shown on the display.
Press the ENTER button, the display starts blinking.
Use DOWN and UP button to select “Yes” (Split colors) or “No” (only full colors).
Once the mode is selected, press the ENTER button to save it.
To go back to the main menu without any change press the MENU button shortly.
If you want to go back to normal running mode: press the MENU button for about 2
seconds.
Slave Mode
Used to make the slave unit work in opposite to the master or to work in
complete sync.
Press the MENU button until “SLMd” is shown on the display.
Press the ENTER button, the display starts blinking.
Use DOWN and UP button to select “SL 1” (normal) or “SL 2” (2 light show)
mode.
Once the mode is selected, press the ENTER button to save it.
To go back to the main menu without any change press the MENU button shortly.
If you want to go back to normal running mode: press the MENU button for about 2
seconds.
Blackout Mode
Blackout mode: when no DMX-signal is detected the unit goes in blackout
waiting for a DMX-signal.
No blackout mode: when no DMX-signal is detected, the unit automatically
switches to standalone. Press the MENU button until “bLMd” is shown on the
display.
Press the ENTER button, the display starts blinking.
Use DOWN and UP button to select “Yes” (blackout on) or “No” (blackout off) mode.
Once the mode is selected, press the ENTER button to save it.
To go back to the main menu without any change press the MENU button shortly.
If you want to go back to normal running mode: press the MENU button for about 2 seconds.
Sound State
The unit works to rhythm of the beat when used in standalone or master/slave mode
Press the MENU button until “SOUn” is shown on the display.
Press the ENTER button, the display starts blinking.
Use DOWN and UP button to select “On” or “Off” mode.
Once the mode is selected, press the ENTER button save it.
To go back to the main menu without any change press the MENU button shortly.
If you want to go back to normal running mode: press the MENU button for about 2 seconds.
Sound Sense
Used to set the sensitivity of the internal microphone
Press the MENU button until “SOSe” is shown on the display.
Press the ENTER button, the display starts blinking.
Use DOWN and UP button to select a value between “0” (very low sensitivity) and “100” (high sensitivity).
Once the mode is selected, press the ENTER button save it.
To go back to the main menu without any change press the MENU button shortly.
If you want to go back to normal running mode: press the MENU button for about 2 seconds.
Pan Inversion
Normal: Panning movement is not inversed.
Pan inversion: Panning movement is inversed
Press the MENU button until “IPAn” is shown on the display.
Press the ENTER button, the display starts blinking.
Use DOWN and UP button to select “No” (normal) or “I” (pan inversion) mode.
Once the mode is selected, press the ENTER button to save it.
To go back to the main menu without any change press the MENU button shortly.
If you want to go back to normal running mode: press the MENU button for about 2 seconds.
Tilt Inversion
Normal: Tilt movement is not inversed.
Tilt inversion: tilt movement is inversed
Press the MENU button until “ItLt” is shown on the display.
Press the ENTER button, the display starts blinking.
Use DOWN and UP button to select “No” (normal) or “I” (tilt inversion) mode.
Once the mode is selected, press the ENTER button to save it.
To go back to the main menu without any change press the MENU button shortly.
If you want to go back to normal running mode: press the MENU button for about 2 seconds.
Display on/off
Display on: display is always lit.
Display off: display is dark when not used.
Press the MENU button until the display shows “Led”.
Press the ENTER button, the display starts blinking.
Use DOWN and UP buttons to select “On” (display always lit) or “Off” (display dark when not used).
Once the mode is selected, press the ENTER button to save it.
To go back to the main menu without any change press the MENU button shortly.
If you want to go back to normal running mode: press the MENU button for about 2 seconds.
Display Inversion
Display normal: display is readable when the unit is on the floor.
Display inversion: display is readable when the unit is mounted upside down.
Press the MENU button until “dISP” is shown on the display. (normal display)
Press the ENTER button to toggle between (normal display) and (display inversion).
If you want to go back to normal running mode: press the MENU button for about 2 seconds.
JB SYSTEMS
®
5/85 SIRIUS
JB SYSTEMS
®
6/85 SIRIUS
Page 6
ENGLISH OPERATION MANUAL
Settings
PRO-defaults
AUTO-defaults
ENGLISH OPERATION MANUAL
Function Delay
On the Function channel (CH8 or CH11) you can select some special functions, like “blackout during
gobo change” and others. With this option you can select the delay before a selected function
becomes active.
IMPORTANT INFORMATION: the function delay can only be set to zero seconds (no Delay) when you are
using a DMX-controller or DMX-software using presets for the DMX-values of the special functions.
Never use “no Delay” while using a simple DMX-controller with faders to set the functions manually!
Press the MENU button until “Fude” is shown on the display.
Press the ENTER button, the display starts blinking.
Use DOWN and UP button to select a value between “0” (no Delay) and “3” (3s Delay)
Once the delay is selected, press the ENTER button save it.
To go back to the main menu without any change press the MENU button shortly.
If you want to go back to normal running mode: press the MENU button for about 2 seconds.
Dimmer Calibrate
Due to tolerances in the production process, not all LEDs have exactly the same brightness,
therefore you can use this option to match the Brightness of different machines.
Press the MENU button until “dCAL” is shown on the display.
Press the ENTER button, the display starts blinking.
Use DOWN and UP buttons to select a value between “50” (lowest brightness) and “100” (highest
brightness).
Once the brightness is selected, press the ENTER button save it.
To go back to the main menu without any change press the MENU button shortly.
If you want to go back to normal running mode: press the MENU button for about 2 seconds.
Auto Test
Used to activate the internal “self-test” program which checks all possibilities of the unit.
Press the MENU button until the display shows “teSt”.
Press the ENTER button to start the internal self-test program.
To go back to the functions press the MENU button.
If you want to go back to normal running mode: press the MENU button for about 2 seconds.
Temperature inside the unit
Used to show the temperature inside the unit
Press the MENU button until the display shows “teMP”.
Press the ENTER button to show the internal temperature of the unit on the display.
To go back to the functions press the MENU button again.
If you want to go back to normal running mode: press the MENU button for about 2 seconds.
Fixture Hours
Used to show the number of working hours of the unit.
Press the MENU button until the display shows “FhrS”.
Press the ENTER button to show the number of working hours in the display.
To go back to the functions press the MENU button.
If you want to go back to normal running mode: press the MENU button for about 2 seconds.
Software version
Used to show the software version that is installed in the unit
Press the MENU button until the display shows “ver”.
Press the ENTER button to show the software version on the display.
To go back to the functions press the MENU button.
If you want to go back to normal running mode: press the MENU button for about 2 seconds.
Defaults
Used to choose between 2 sets of default settings, often used by rental companies:
PRO-defaults: basic settings for use on professional DMX-controllers.
AUTO-defaults: basic settings for easy master/slave use.
Press the MENU button until the display shows “deF”.
Press the ENTER: to avoid accidental loss of your settings, the display starts blinking while it shows “no”:
Use DOWN and UP buttons to select “Yes” or “No” and confirm by pressing the ENTER button.
When you select “Yes”, you have the choice between 2 options, each with their own settings:
Prod PRO-defaults are loaded
Autd AUTO-defaults are loaded
Channel mode 11ch 4MSL
Split Colors Yes No
Slave Mode Slave 1 Slave 1
Blackout Mode Yes No
Sound State Off On
Sound Sense 90 90
Pan Inverse No No
Tilt Inverse No No
Backlight No Yes
Function Delay 3s 3s
Starting from these defaults you can easily make your additional settings. The other setup parameters
remain unchanged.
If you want to go back to normal running mode: press the MENU button for about 2 seconds.
Reset
Used to force a reset of the unit.
Press the MENU button until the display shows “rSet”.
Press the ENTER button to reset the unit.
Please also check the chapter about the DMX-channel configuration of the unit to find out how you can force
a reset by DMX.
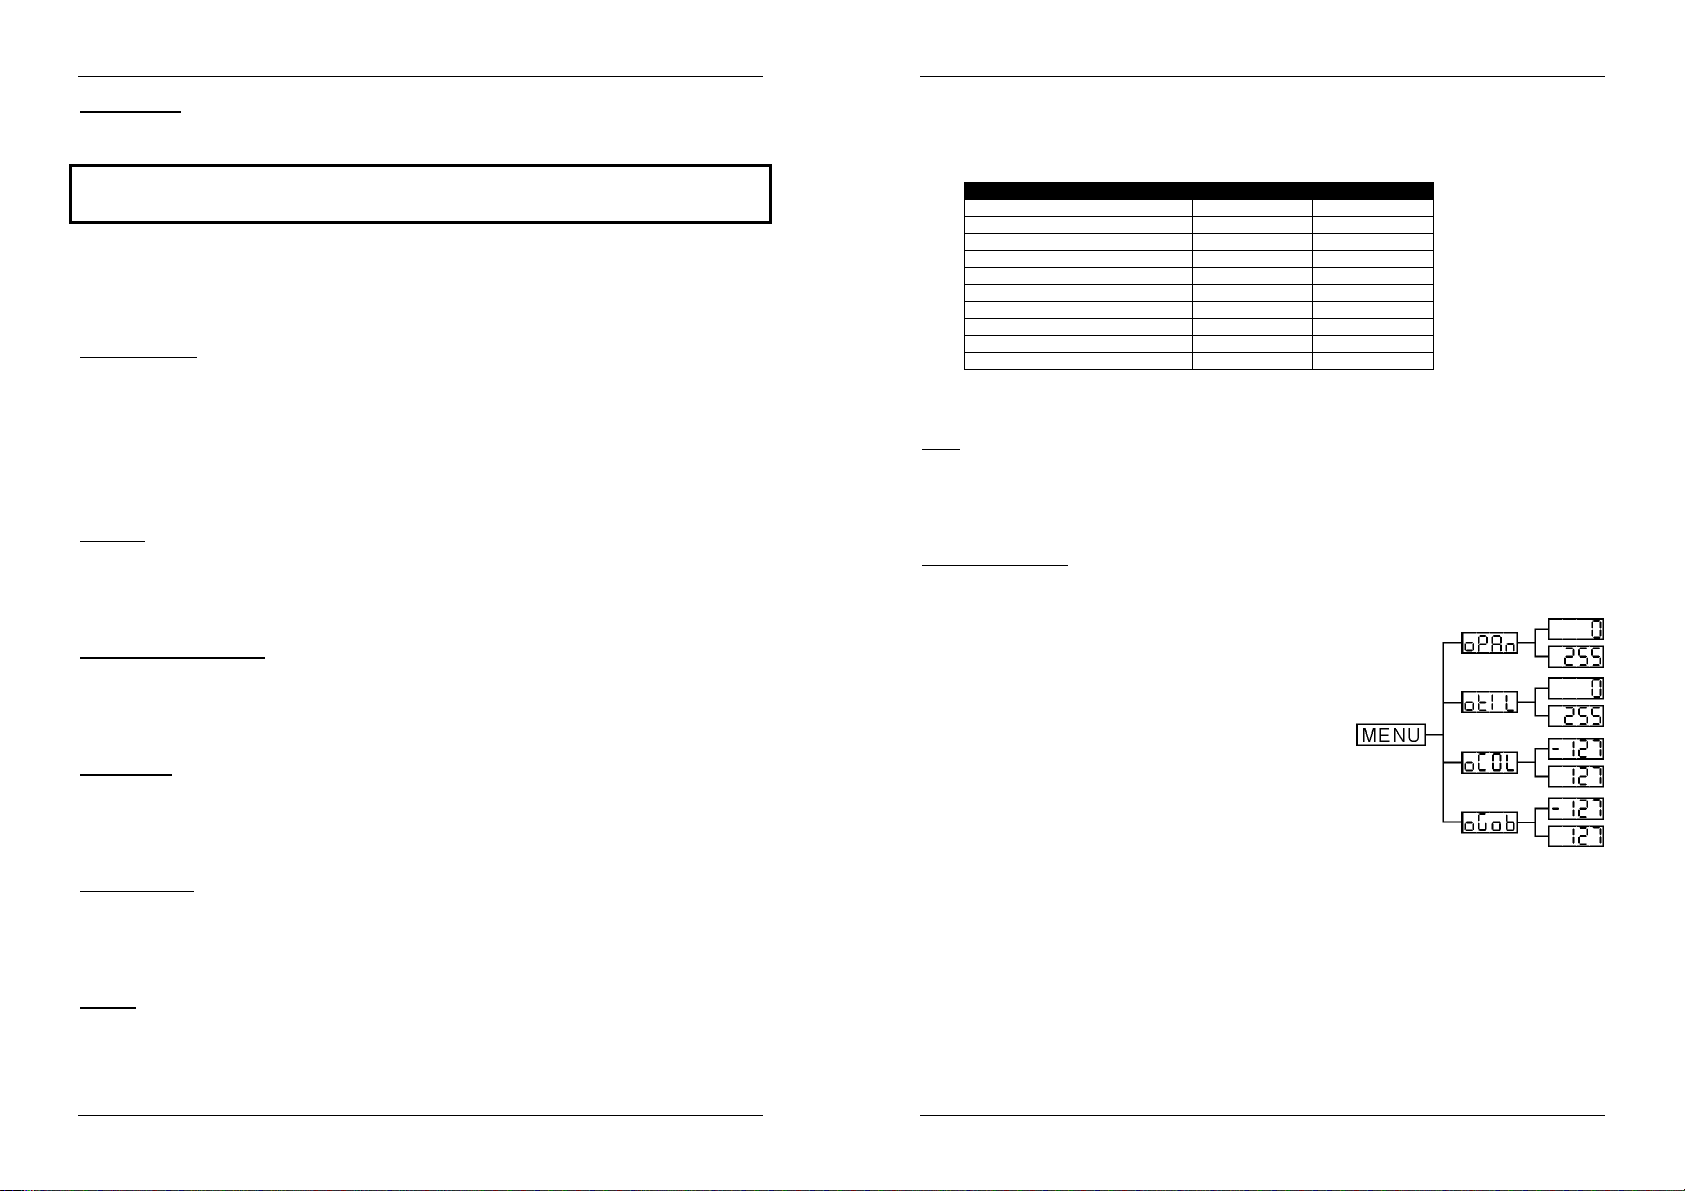
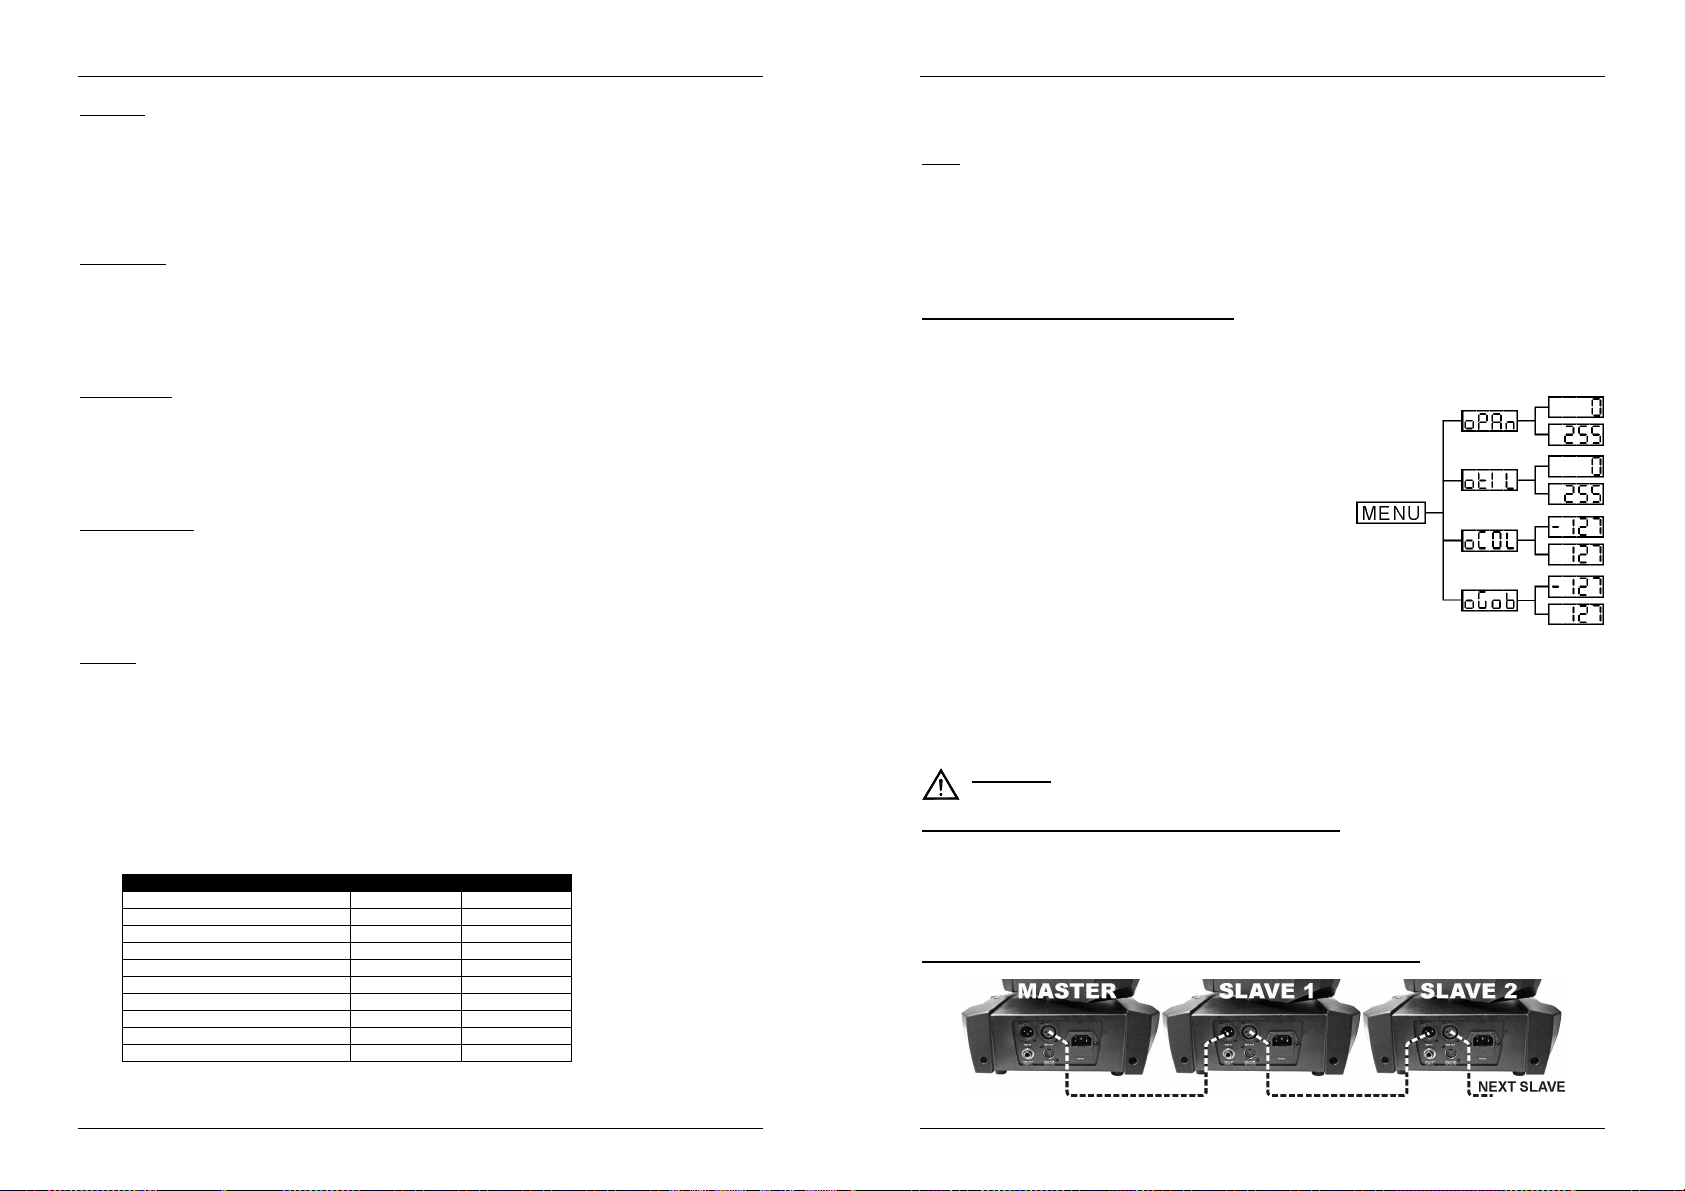
Home Position Adjust
Used to adjust the home position of several functions:
Make sure that the unit is connected to a DMX-controller and set to 11CH channel mode: set ch6 + ch7 to
maximum.
If you’re not already in the setup menu, just press the MENU button
shortly to enter the setup menu (“Addr” is shown on the display)
Now press the ENTER button for at least 5 seconds to go into
offset mode.
Use DOWN and UP buttons to select the function that you want
to adjust:
oPAn: used to set an offset value for the pan function.
otIL: used to set an offset value for the tilt function.
oCoL: used to adjust the positioning of the color wheel.
oGob: used to adjust the positioning of the gobo wheel.
Press the ENTER button, the display starts blinking.
Use DOWN and UP buttons to adjust the home position
Press the ENTER button to confirm your setting
To go back to the functions without any change press the MENU
button again.
If you want to go back to normal running mode: press the MENU button for about 2 seconds, the new offset
parameters for the different functions are preserved in flash memory.
JB SYSTEMS
®
7/85 SIRIUS
JB SYSTEMS
®
8/85 SIRIUS
Page 7
ENGLISH OPERATION MANUAL
ENGLISH OPERATION MANUAL
ELECTRICAL INSTALLATION + ADDRESSING
Important: The electrical installation should be carried out by qualified personal only,
according to the regulations for electrical and mechanical safety in your country.
Electrical installation for 1 standalone unit:
Just insert the mains cable. The unit starts working immediately in stand-alone mode.
Remark1: You can connect a CA-8 or RF-8 remote controller to the unit if you want to have more control.
Refer to “how to operate the unit” to learn how to do this.
Remark2: if there’s no output, please make sure to set the unit in master mode and set the blackout mode
to “NO” and Sound State to “On” (see previous chapter)
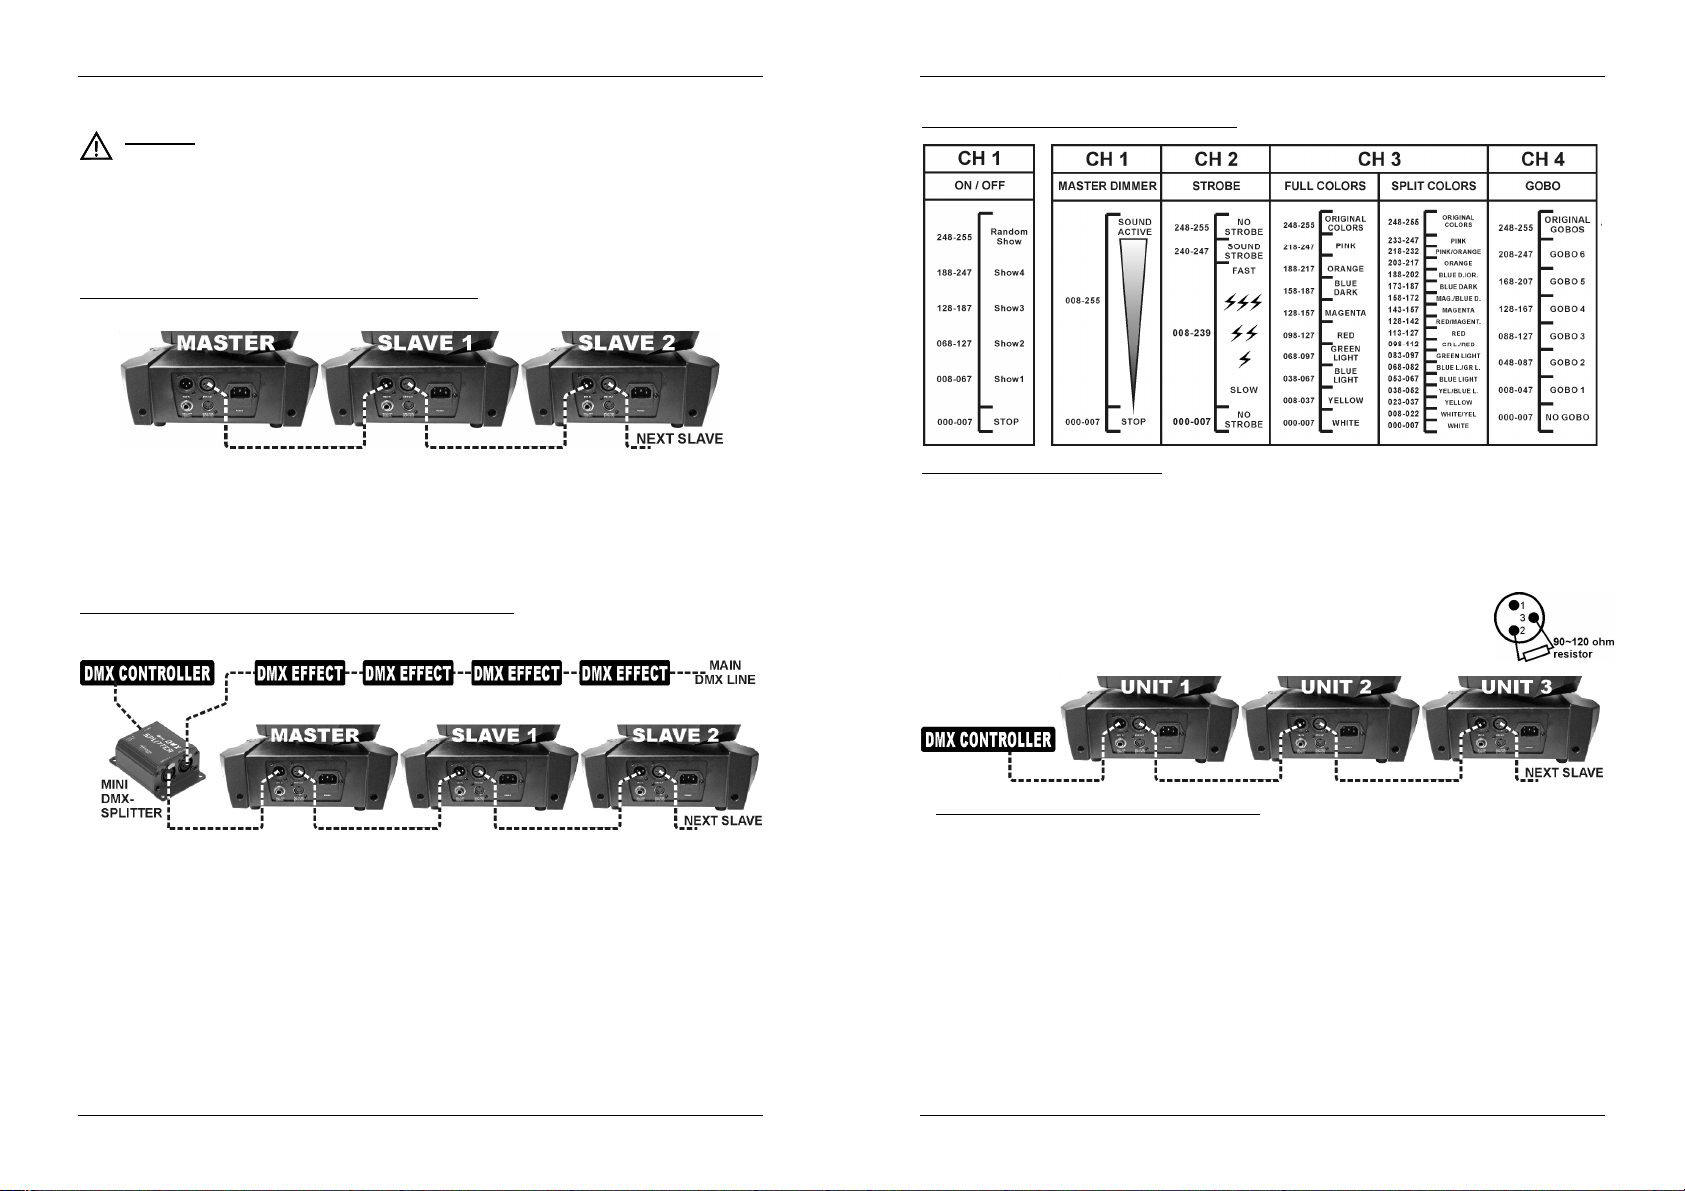
Electrical installation for two or more units in master/slave:
In this mode the units will show a synchronized show, working to the rhythm of the beat.
Connect 2 to maximum 16 units together using good quality balanced microphone cables. The first unit
in the chain will automatically act as the master, the other units will act automatically as slaves.
Make sure that all units are connected to the mains.
Done!
Remark: You can connect a CA-8 or RF-8 remote controller to the master unit if you want to have more
control over the master/slave operation
Remark2: if there’s no output, please make sure to set the first unit in master mode and set the blackout
mode to “NO” and Sound State to “On” (see previous chapter)
Electrical installation for two or more units in DMX-master/slave:
In this mode the units will show a synchronized show, working to the rhythm of the beat but you can still
control some functions on the master by 1 or 4 DMX-channels.
DMX-Chart for 1MSL and 4MSL working modes
1 MSL 4 MSL
Electrical installation in DMX-mode:
The DMX-protocol is a widely used high speed signal to control intelligent light equipment. You need to
“daisy chain” your DMX controller and all the connected units with a good quality balanced cable.
Both XLR-3pin and XLR-5pin connectors are used, however XLR-3pin is more popular because these
cables are compatible with balanced audio cables.
Pin layout XLR-3pin:
Pin layout XLR-5pin:
To prevent strange behavior of the light effects, due to interferences, you must use a 90Ω to 120Ω
terminator at the end of the chain. Never use Y-splitter cables, this simply won’t work!
Make sure that all units are connected to the mains.
Each light effect in the chain needs to have its proper starting address so it knows
which commands from the controller it has to decode. In the next section you will
learn how to set the DMX addresses.
Pin1 = GND ~ Pin2 = Negative signal (-) ~ Pin3 = Positive signal (+)
Pin1 = GND ~ Pin2 = Negative signal (-) ~ Pin3 = Positive signal (+) ~ Pins4+5 not used.
To assure proper operation you need an optional “Mini DMX-SPLITTER” (order code: 4630) to isolate
the master/slave line from the main DMX-line, see drawing.
Connect 2 to maximum 16 units together using good quality balanced microphone cables. The first unit
in the chain will act as the master, the other units will act automatically as slaves.
Set the master to 1MSL or 4MSL channel mode (see previous chapter). Check the DMX-chart below to
see the difference between both channel modes.
For the DMX-controller the master and his slaves can now be considered as 1 virtual effect that needs a
start address so it can be controlled as any other DMX-unit in the DMX chain: see “DMX Address” in the
chapter “Main Menu” to see how you can set the DMX-start address.
Make sure that all units are connected to the mains.
Set the DMX-controller according to the DMX-chart below.
Done!
Remark: in order to work well to the rhythm of the music, make sure that the option “Sound State” on the
master is set to “On” (see previous chapter)
JB SYSTEMS
®
9/85 SIRIUS
HOW TO SET THE RIGHT STARTING ADDRESS:
Refer to the previous chapter (DMX-512 address setting) to learn how to set the starting address on this unit.
The starting address of each unit is very important. Unfortunately it is impossible to tell you in this user
manual which starting addresses you have to set because this completely depends on the controller you will
use… So please refer to the user manual of your DMX-controller to find out which starting addresses you
must set.
JB SYSTEMS
®
10/85 SIRIUS
Page 8
ENGLISH OPERATION MANUAL
ENGLISH OPERATION MANUAL
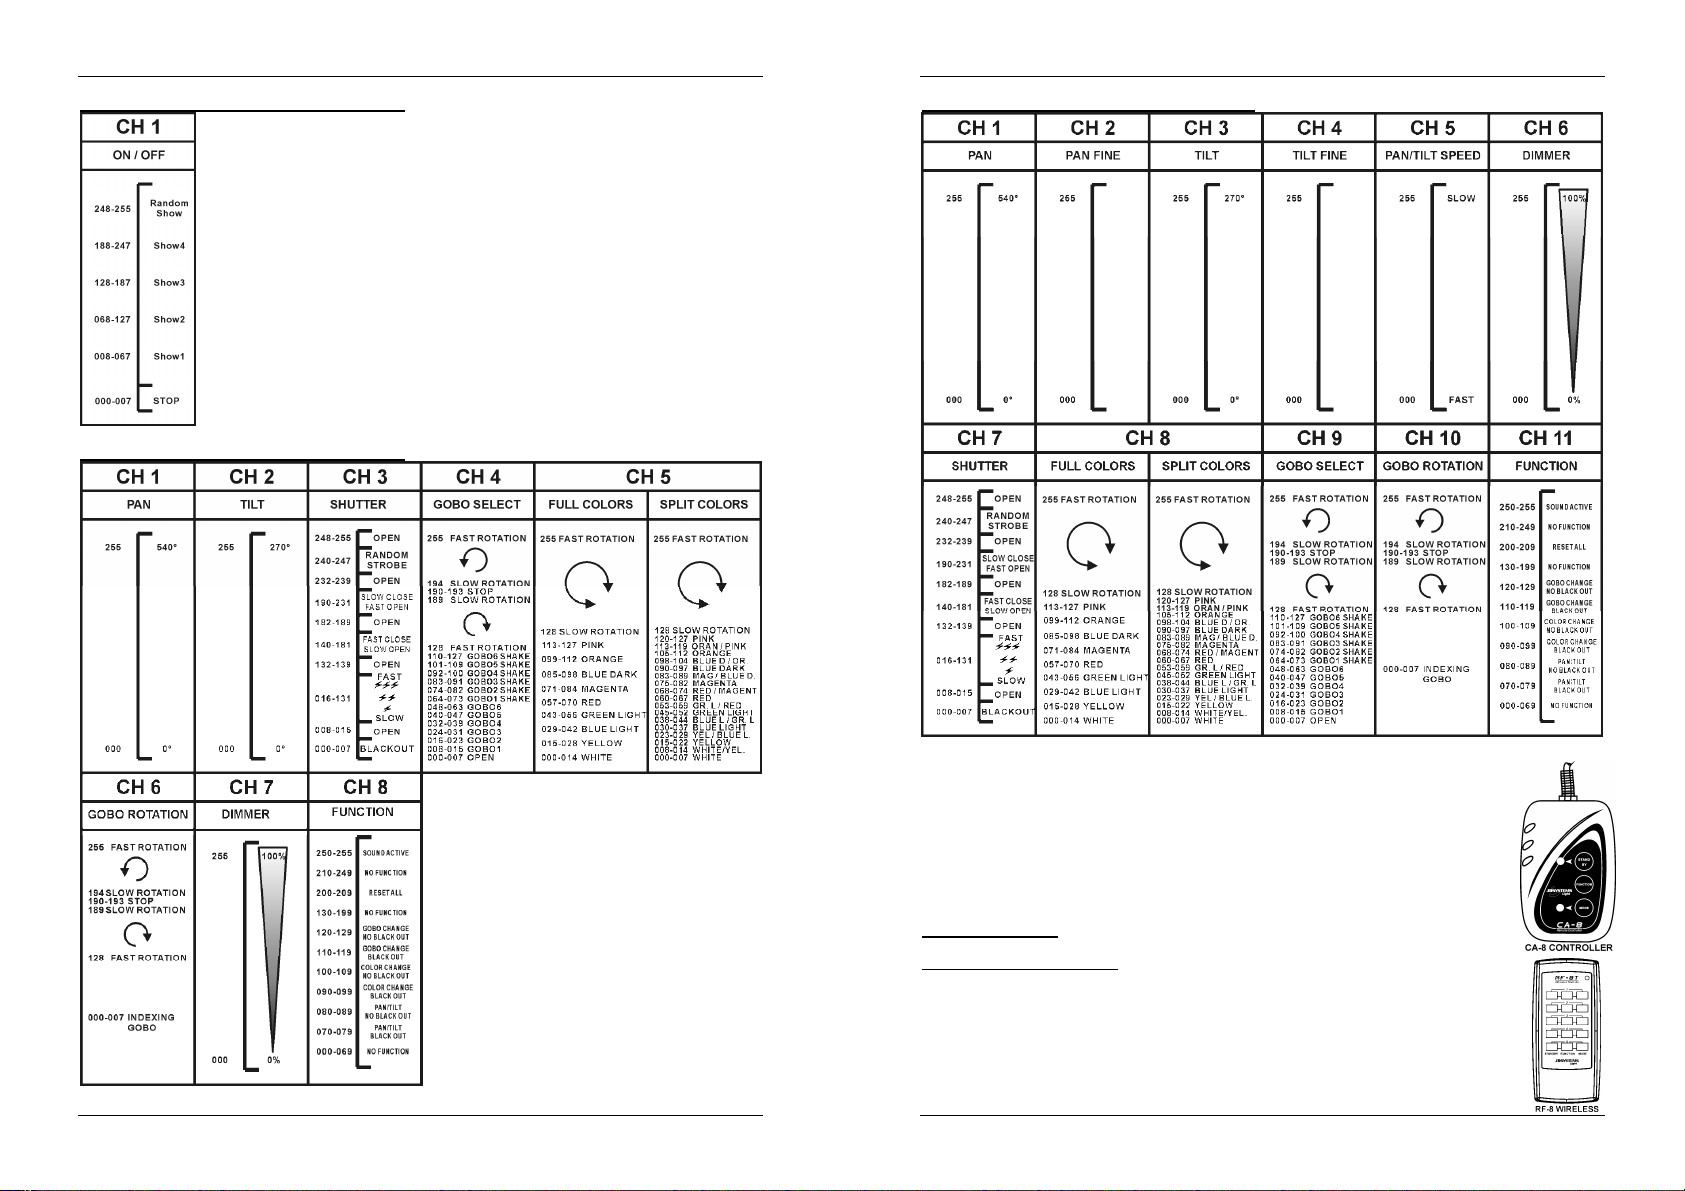
DMX-CONFIGURATION OF SIRIUS – 1CH MODE:
DMX-CONFIGURATION OF SIRIUS – 8CH MODE:
DMX-CONFIGURATION OF SIRIUS – 11CH MODE:
JB SYSTEMS
OPERATE THE UNIT BY CA8 OR RF8SET
When used in standalone or master/slave mode we strongly advise you to use the CA-8
“Wired easy controller” or RF-8SET “Wireless easy controller”.
CA-8 wired remote: Connect the controller to the jack input of the first unit (master).
RF-8SET wireless remote: the wireless remote has two parts:
RF-8T: small RF-transmitter that can control up to 5 effects.
RF-8R: small RF-receiver that should be connected to the DIN 5pin input of the
Now you can control all the connected units:
STANDBY BUTTON:
Press this button to start/stop blackout mode on all connected units.
MODE/FUNCTION BUTTONS:
With the MODE button you can select 3 different modes:
The LED is off: with the FUNCTION button you can select different strobe modes, like “sound
The LED is blinking: with the FUNCTION button you can select different shows.
The LED is on: (music mode is temporarily switched off)
®
11/85 SIRIUS
JB SYSTEMS
SIRIUS. See the installation manual of the receiver for more information.
strobe”.
Press the FUNCTION button shortly: to change the colors
Press the FUNCTION button longer: to change the gobos
®
12/85 SIRIUS
Page 9
ENGLISH OPERATION MANUAL
MAINTENANCE
Make sure the area below the installation place is free from unwanted persons during servicing.
Switch off the unit, unplug the mains cable and wait until the unit is cooled down.
During inspection the following points should be checked:
All screws used for installing the device and any of its parts should be tightly fastened and may not be
corroded.
Housings, fixations and installations spots (ceiling, truss, suspensions) should be totally free from any
deformation.
When an optical lens is visibly damaged due to cracks or deep scratches, it must be replaced.
The mains cables must be in impeccable condition and should be replaced immediately when even a
small problem is detected.
In order to protect the device from overheat the cooling fans (if any) and ventilation openings should be
cleaned monthly.
The interior of the device should be cleaned annually using a vacuum cleaner or air-jet.
The cleaning of internal and external optical lenses and/or mirrors must be carried out periodically to
optimize light output. Cleaning frequency depends on the environment in which the fixture operates: damp,
smoky or particularly dirty surroundings can cause greater accumulation of dirt on the unit’s optics.
Clean with a soft cloth using normal glass cleaning products.
Always dry the parts carefully.
Clean the external optics at least once every 30 days.
Clean the internal optics at least every 90 days.
Attention: We strongly recommend internal cleaning to be carried out by qualified personnel!
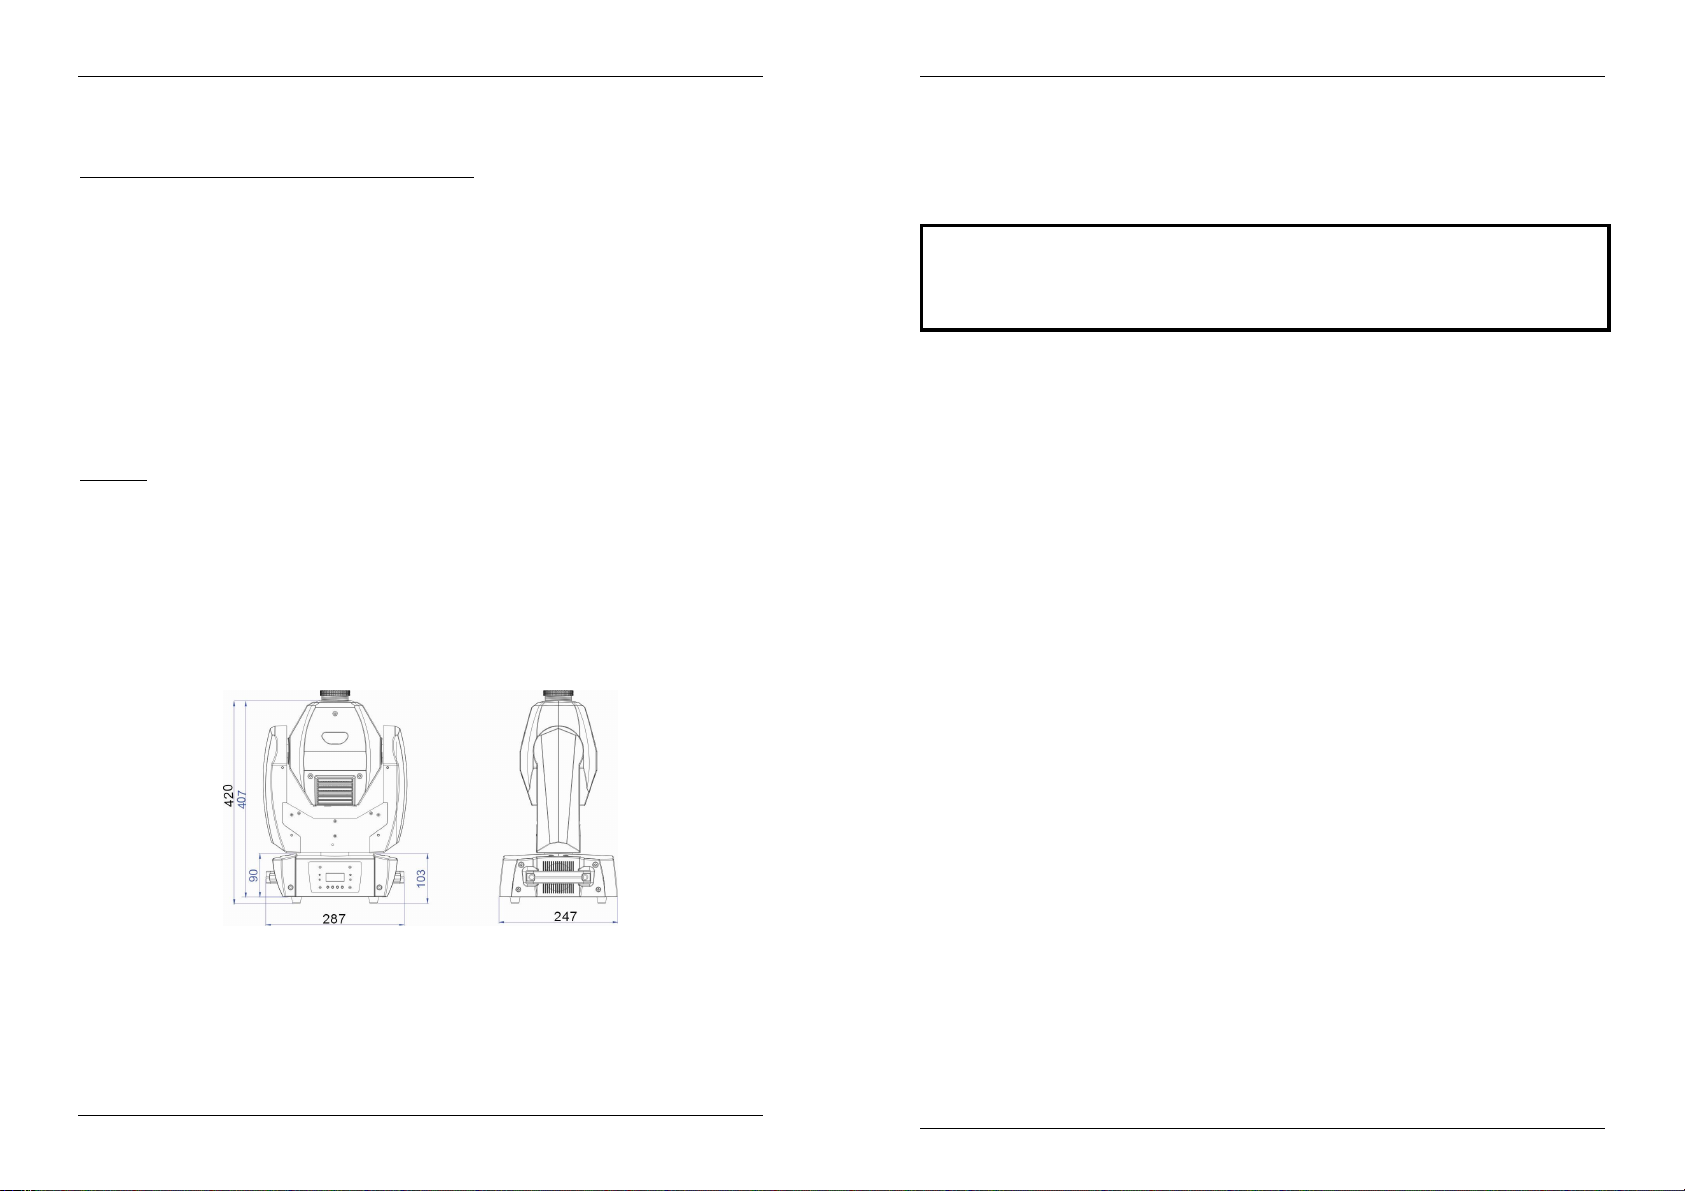
SPECIFICATIONS
Mains Input: AC 100 - 240V, 50/60Hz
Max Power consumption: 115 Watt
Sound Control: Internal microphone
Pan/Tilt: 540° / 270°
Beam angle: 15°
Gobo size (mm): D=23,7 / image = 19mm
DMX connections: 3pin XLR male / female
Leds: 1 White LED 60Watt
Size: See drawing
Weight: 8,80 kg
FRANÇAIS MODE D’EMPLOI
MODE D’EMPLOI
Merci d’avoir choisi ce produit JB Systems®. Pour votre sécurité et pour une utilisation optimale de toutes les
possibilités de l’appareil, lisez attentivement cette notice avant utilisation.
EN VOUS INSCRIVANT POUR LA LETTRE D’INFORMATION VOUS SEREZ TOUJOURS
TENU AU COURANT DES DERNIÈRES NOUVELLES CONCERNANT NOS PRODUITS:
NOUVEAUTÉS, ACTIONS SPÉCIALES, JOURNÉES PORTES OUVERTES, ETC.
SURFEZ SUR: WWW.BEGLEC.COM
CARACTERISTIQUES
Cet appareil ne produit pas d’interférences radio. Il répond aux exigences nationales et européennes. La
conformité a été établie et les déclarations et documents correspondants ont été déposés par le fabricant.
Lyre compact mais très puissante pour les DJ Pro, sociétés de location et discothèques
A base de la toute dernière LED CREE de 60 WATTS:
Puissance lumineuse imposante et gobos très précis grâce à un excellent matériel optique
Consommation de courant extrêmement basse, seulement 115 Watts (que d'argent épargné !)
Couleurs extrêmement brillantes, comparées aux appareils fonctionnant avec des lampes halogènes
Pas de lampes à remplacer!
Pratiquement aucune production de chaleur
Poids plume (aucun transfo pour lampes n'est nécessaire)
6 gobos rotatifs + ouvert, équipé de la fonction 'gobo shaking'
Roue à couleurs indépendante avec fonction ‘split color’ (8 couleurs + le blanc)
Excellents programmes intégrés donnant lieu à de splendides light shows qui changent sans arrêt:
Contrôle via DMX: 1, 8 ou 11 canaux
Mode autonome : activation sonore via micro interne
Mode maître/esclave : magnifiques shows synchronisés autonomes
DMX-master/slave: grâce à cette nouvelle fonction révolutionnaire, plusieurs SIRIUS peuvent
fonctionner de façon maître/exclave, tout en restant contrôlables par 1 ou 4 canaux DMX. (même en
étant connectés dans une chaine DMX; il vous suffit d’intégrer le mini DMX splitter optionnel)
Deux paramètres par défaut différents, facile et très utile pour les sociétés de location:
PRO-defaults: réglage par défaut (ajustable) pour une utilisation avec des contrôleurs DMX
professionnels.
AUTO-defaults: réglage par défaut (ajustable) pour une utilisation facile du mode maitre/esclave.
Repositionnement automatique des repère X/Y
Commandes à distance disponibles en option: CA8 câblé ou RF8-SET sans fil
Mises à jour possibles via un adaptateur optionnel spécial
Écran à LED pour une navigation aisée dans le menu.
Angle = 15°
You can download the latest version of this user manual on our website: www.beglec.com
JB SYSTEMS
Every information is subject to change without prior notice
®
13/85 SIRIUS
AVANT UTILISATION
Avant d’utiliser cet appareil, assurez-vous de l’absence de dommage lié au transport. En cas
d’endommagement, n’utilisez pas l’appareil et contactez le vendeur.
Important: Cet appareil a quitté notre usine en parfaite condition et bien emballé. Il est primordial que
l’utilisateur suive les instructions de sécurité et avertissements inclus dans ce manuel. La garantie ne
s’applique pas en cas de dommage lié à une utilisation incorrecte. Le vendeur ne prend pas la
responsabilité des défauts ou de tout problème résultant du fait de n’avoir pas tenu compte des mises en
garde de ce manuel.
Conservez ce manuel dans un endroit sûr pour toute consultation future. Si vous vendez l’appareil,
assurez-vous d’y joindre ce manuel également.
JB SYSTEMS
®
14/85 SIRIUS
Page 10
FRANÇAIS MODE D’EMPLOI
ATTENTION
:
FRANÇAIS MODE D’EMPLOI
Vérifiez le contenu:
Vérifiez si l’emballage contient les articles suivants:
Mode d'emploi
Appareil SIRIUS
Attelle Omega
Câble d’alimentation IEC
boulon à œillet pour élingue de sécurité optionnelle
INSTRUCTIONS DE SÉCURITÉ:
afin de réduire le risque d’électrocution, n’enlevez
jamais le couvercle de l’appareil. Il n’y a aucune pièce à
l’intérieur de l’appareil que vous puissiez remplacer vous-même.
Confiez l’entretien uniquement à des techniciens qualifiés.
La flèche dans un triangle met l'utilisateur en garde contre la présence de haute tension sans
isolation dans l'appareil, ce qui peut causer un risque d'électrocution.
Un point d'exclamation dans un triangle prévient de la présence d'instructions relatives au
fonctionnement et à la maintenance se trouvant dans le manuel fourni avec l'appareil.
Ce symbole signifie: uniquement pour usage à l'intérieur.
Ce symbole signifie : Lire le mode d’emploi.
Ce symbole signifie: appareil construit selon les normes de sécurité classe I
L’appareil n'est pas adapté pour le montage direct sur des surfaces normalement inflammables.
(Ne convient que pour le montage sur des surfaces non-combustibles)
CAUTION: Ne pas fixer le faisceau du regard.
Peut être dangereux pour les yeux.
Afin de protéger l’environnement, merci de recycler les emballages autant que possible.
Un effet lumière neuf peut provoquer de la fumée et/ou une odeur non souhaitée, qui devrait disparaître
après quelques minutes.
Afin d’éviter tout risque d’incendie ou de décharge électrique, ne pas exposer cet appareil à la pluie ou à
l’humidité.
Pour éviter la formation de condensation à l’intérieur de l’appareil, patientez quelques minutes pour laisser
l’appareil s’adapter à la température ambiante lorsqu’il arrive dans une pièce chauffée après le transport.
La condensation empêche l'appareil de fonctionner manière optimale, et elle peut même causer des
dommages.
Cet appareil est destiné à une utilisation à l’intérieur uniquement.
Ne pas insérer d’objet métallique ou renverser de liquide dans l’appareil. Aucun objet contenant un liquide,
tels que des vases, ne peut être placé sur cet appareil. Cela risquerait de provoquer une décharge
électrique ou un dysfonctionnement. Si un corps étranger est introduit dans l’appareil, déconnectez
immédiatement de la source d’alimentation.
Aucune source de flamme nue, telle que des bougies allumées, ne peut être placée sur l'appareil.
Placez l’appareil dans un endroit bien ventilé, éloigné de tout matériau ou liquide inflammable. L’appareil
doit être fixé à 50cm minimum des murs.
Ne pas couvrir les orifices de ventilation, un risque de surchauffe en résulterait.
Ne pas utiliser l'appareil dans un environnement poussiéreux et le nettoyer régulièrement.
Ne pas laisser l'appareil à portée des enfants.
Les personnes non expérimentées ne doivent pas utiliser cet appareil.
La température ambiante maximale d’utilisation de l’appareil est de 40°C. Ne pas l’utiliser au-delà de cette
température.
Assurez-vous que la zone au-dessous du lieu d’installation ne comporte pas de personnes non
concernées pendant le montage, le démontage et les opérations de maintenance.
Laissez refroidir l’appareil environ 10 minutes avant d’effectuer des réparations.
Débranchez toujours l’appareil si vous ne l’utilisez pas de manière prolongée ou avant d’entreprendre des
réparations.
Les installations électriques ne peuvent être faites que par du personnel qualifié et conformément aux
règlements de sécurité électrique et mécanique en vigueur dans votre pays.
Assurez-vous que la tension d’alimentation de la source d’alimentation de la zone dans laquelle vous vous
trouvez ne dépasse pas celle indiquée à l’arrière de l’appareil.
Le cordon d’alimentation doit toujours être en parfait état. Mettez immédiatement l’unité hors tension si le
cordon devait être écrasé ou endommagé. Pour éviter tout risque de choc électrique, le cordon doit être
remplacé par le constructeur, son agent ou un technicien qualifié.
Ne laissez jamais le cordon d’alimentation entrer en contact avec d’autres câbles !
L’appareil doit être à la masse selon les règles de sécurité.
Ne pas connecter l’unité à un variateur de lumière.
Utilisez toujours des câbles appropriés et certifiés lorsque vous installez l'appareil.
Pour éviter toute décharge électrique, ne pas ouvrir l’appareil. Il n’y a pas de pièces pouvant être
changées par l’utilisateur à l’intérieur.
Ne jamais réparer ou court-circuiter un fusible. Remplacez systématiquement un fusible endommagé par
un fusible de même type et ayant les mêmes spécifications électriques !
En cas de problèmes de fonctionnement sérieux, arrêtez toute utilisation de l’appareil et contactez votre
revendeur immédiatement.
La carrosserie et les lentilles doivent être remplacées si elles sont visiblement endommagées.
Utilisez l’emballage d’origine si l’appareil doit être transporté.
Pour des raisons de sécurité, il est interdit d’apporter une quelconque modification à l’unité non
spécifiquement autorisée par les parties responsables.
Important: Ne jamais fixer directement la source de lumière ! Ne pas utiliser d’effets en présence de
personnes souffrant d’épilepsie.
INSTALLATION EN HAUTEUR
Important: L’installation doit être faite par du personnel qualifié uniquement. Une installation
incorrecte peut causer des blessures sévères et/ou endommager l’appareil. L’installation en
hauteur exige de l’expérience ! Les limites de charge doivent être respectées, du matériel
d’installation certifié doit être utilisé, et l’appareil installé doit subir des inspections de sécurité
régulièrement.
Assurez-vous que la zone au-dessous du lieu d’installation
ne comporte pas de personnes indésirables lors de
l’installation, la désinstallation ou la maintenance.
Placez l’appareil dans un endroit bien ventilé, éloigné de
tout matériau ou liquide inflammable. L’appareil doit être
fixé à 50cm minimum des murs à l’entour.
L’appareil doit être hors de portée du public et en dehors
des zones de passage de personnes ou des zones où le
public est installé.
Avant l’installation assurez-vous que la zone d’installation
supporte un point localisé minimum de 10 fois le poids de
l’appareil.
Utilisez systématiquement un câble de sécurité (n° 3 sur
l’image) qui peut supporter 12 fois le poids de l’appareil
lors de l’installation. Ce câble de sécurité secondaire doit
être installé de manière à ce qu’aucune partie de l’appareil
ne puisse descendre de plus de 20 cm si le support principal tombe.
L’appareil doit être bien fixé, un montage à balancement est dangereux et ne
devrait pas être considéré !
Ne pas couvrir les ouvertures de ventilation pour éviter tout risque de surchauffe.
L’utilisateur doit s’assurer que les installations techniques et de sécurité sont bien
approuvées par un expert avant la première utilisation. Les installations doivent
être inspectées chaque année par du personnel qualifié pour assurer une sécurité
optimale.
1. Collier de serrage rapide, en option
2. Attelle Omega (fourni)
3. Filament pour la fixation du boulon à œillet, livré avec l’appareil.
4. Câble de sécurité, en option
JB SYSTEMS
®
15/85 SIRIUS
JB SYSTEMS
®
16/85 SIRIUS
Page 11

FRANÇAIS MODE D’EMPLOI
FRANÇAIS MODE D’EMPLOI
COMMENT REGLER L’APPAREIL
PANNEAU DE CONTRÔLE:
1. ECRAN affiche les différents menus et les fonctions sélectionnées.
2. LED
DMX Allumé Présence d’un signal DMX
MASTER Allumé Mode maître
SLAVE Allumé Mode esclave
SOUND Clignote Activation musicale
3. TOUCHES
MENU Pour sélectionner les fonctions de programmation
DOWN Pour reculer dans les fonctions sélectionnées
UP Pour avancer dans les fonctions sélectionnées
ENTER Pour confirmer la fonction sélectionnée
4. DMX IN/OUT: est utilisé pour les configurations en DMX512. Utilisez des câbles symétriques XLR M/F
à 3 broches de bonne qualité pour relier les appareils entre eux.
5. ENTRÉE POUR LE CONTRÔLEUR À DISTANCE CA-8: connectez le contrôleur à distance optionnel
(CA-8) via l'entrée jack ¼" afin de contrôler l'appareil au niveau du stand by, de la fonction et du mode.
6. ENTRÉE POUR LE CONTRÔLEUR À DISTANCE SANS FIL RF-8: connectez le contrôleur à distance
optionnel (RF-8) via cette entrée Din afin de contrôler l'appareil au niveau du stand by, de la fonction et
du mode.
7. CONNECTEUR D’ALIMENTATION: prise IEC avec porte-fusible intégré. Branchez ici le câble
d’alimentation qui est fourni avec l’appareil.
MENU PRINCIPAL:
Pour sélectionner une des fonctions pre-set, appuyez sur la touche MENU jusqu’à ce que la fonction que
vous désirez apparaisse à l’écran ou utilisez les touches DOWN et UP afin de parcourir le menu.
Sélectionnez la fonction à l’aide de la touche ENTER. L’écran clignotera.
Utilisez les touches DOWN et UP pour changer de mode.
Dès que vous avez sélectionné le mode requis, appuyez sur la touche ENTER pour confirmer. Pour
retourner au menu principal sans effectuer de changements, appuyez brièvement sur la touche MENU.
(Le le menu principal est affiché sur la page suivante.)
DMX Address
Est utilisé pour régler l’adresse de départ dans une configuration DMX.
Appuyez sur la touche MENU jusqu’à ce que « Addr » soit affiché à l’écran.
Appuyez sur la touche ENTER, l’écran commence à clignoter.
Utilisez les touches DOWN et UP pour changer l’adresse DMX512.
Quand l’adresse désirée est affiché à l’écran, appuyez sur la touche ENTER pour confirmer votre choix.
Pour retourner au menu principal sans effectuer de changements, appuyez brièvement sur la touche MENU.
Pour retourner au mode de fonctionnement normal: appuyez pendant environ 2 secondes sur la touche
MENU.
Channel mode
Est utilisé pour sélectionner le mode de configuration des canaux.
Appuyez sur la touche MENU jusqu’à ce que “ ChMd ” est affiché à l’écran.
Appuyez sur la touche ENTER, l’écran commence à clignoter.
Utilisez les touches DOWN et UP pour sélectionner le mode 1MSL, 4MSL, 1Ch, 8Ch
ou 11Ch.
Dès que le mode de fonctionnement désiré est affiché à l’écran, appuyez sur la
touche ENTER pour confirmer votre choix.
Pour retourner au menu principal sans effectuer de changements, appuyez brièvement
sur la touche MENU.
Pour retourner au mode de fonctionnement normal: appuyez pendant environ 2
secondes sur la touche MENU.
Show mode
Est utilisé pour choisir le Show quand l’appareil fonctionne de façon autonome
ou en maître/esclave.
Appuyez sur la touche MENU jusqu’à ce que « ShMd» est affiché à l’écran.
Appuyez sur la touche ENTER, l’écran commence à clignoter.
Utilisez les touches DOWN et UP pour sélectionner.
Show 1 (Sh 1) : l’appareil est placé parterre. Angle du mouvement tilt : 210°.
Show 2 (Sh 2): l’appareil est fixé au plafond. Angle du mouvement tilt : 90°.
Show 3 (Sh 3): l'appareil est placé sur le podium, face au public.
Le projecteur reste continuellement dirigé vers le public, donc, devant la scène.
Angle du mouvement pan (de gauche à droite à gauche) : 160°. Angle du
mouvement tilt : 90° (60° au dessus de l'horizontale ; 30° en dessous de
l'horizontale).
Show 4 (Sh 4): l'appareil est fixé au plafond. La plupart du temps, le spot
projette son faisceau devant la scène. Angle du mouvement pan (de gauche à
droite à gauche) : 160°. Angle du mouvement tilt : 90° (verticalement, devant
75°; derrière 15 °).
Dès que le mode de fonctionnement est affiché à l’écran, appuyez sur la touche
ENTER pour confirmer votre choix.
Pour retourner au menu principal sans effectuer de changements, appuyez brièvement
sur la touche MENU.
Pour retourner au mode de fonctionnement normal: appuyez pendant environ 2
secondes sur la touche MENU.
Split Color
Vous pouvez déterminer si l’appareil doit montrer uniquement des couleurs
pleines ou si il peut également utiliser des couleurs divisées (plit colors).
Appuyez sur la touche MENU jusqu’à ce que “ SPLC ” s’affiche à l’écran.
Appuyez sur la touche ENTER, l’écran commence à clignoter.
Utilisez les touches DOWN et UP pour sélectionner “Yes” (Split colors) ou “No”
(uniquement des couleurs pleines).
Dès que le mode de fonctionnement est affiché à l’écran, appuyez sur la touche
ENTER pour confirmer votre choix.
Pour retourner au menu principal sans effectuer de changements, appuyez brièvement
sur la touche MENU.
Pour retourner au mode de fonctionnement normal: appuyez pendant environ 2
secondes sur la touche MENU.
Slave Mode
Est utilisé pour que l’appareil esclave fonctionne de façon opposée au maître ou
pour fonctionner de façon complètement synchronisé.
Appuyez sur la touche MENU jusqu’à ce que “SLMd” s’affiche à l’écran.
Appuyez sur la touche ENTER, l’écran commence à clignoter.
Utilisez les touches DOWN et UP pour sélectionner “SL 1” (normal) ou “SL 2” (2
light show).
Dès que le mode de fonctionnement est affiché à l’écran, appuyez sur la touche
ENTER pour confirmer votre choix.
JB SYSTEMS
®
17/85 SIRIUS
JB SYSTEMS
®
18/85 SIRIUS
Page 12
FRANÇAIS MODE D’EMPLOI
FRANÇAIS MODE D’EMPLOI
Pour retourner au menu principal sans effectuer de changements, appuyez brièvement sur la touche MENU.
Pour retourner au mode de fonctionnement normal: appuyez pendant environ 2 secondes sur la touche
MENU.
Mode Black-out
Black-out mode: quand aucun signal DMX est détecté, l’appareil se met en black-out et attends un
signal DMX.
Mode « pas de black-out »: quand aucun signal DMX est détecté, l’appareil se met automatiquement
à fonctionner de façon autonome.
Appuyez sur la touche MENU jusqu’à ce que “ bLMd ” est affiché à l’écran.
Appuyez sur la touche ENTER, l’écran commence à clignoter.
Utilisez les touches DOW N et UP pour sélectionner “Yes” (yes black-out) ou “No” (no black-out).
Dès que le mode de fonctionnement est affiché à l’écran, appuyez sur la touche ENTER pour confirmer
votre choix.
Pour retourner au menu principal sans effectuer de changements, appuyez brièvement sur la touche MENU.
Pour retourner au mode de fonctionnement normal: appuyez pendant environ 2 secondes sur la touche
MENU.
Sound state (mode son):
Ce mode est utilisé pour faire réagir l'appareil au rythme de la musique quand il est utilisé en mode
autonome ou en mode maître/esclave
Appuyez sur la touche MENU jusqu’à ce que “SOUn” s’affiche à l’écran.
Appuyez sur la touche ENTER, l’écran commence à clignoter.
Utilisez les touches DOW N et UP pour sélectionner “On” (activé par le son) ou “Off”.
Dès que le mode de fonctionnement est affiché à l’écran, appuyez sur la touche ENTER pour confirmer
votre choix.
Pour retourner au menu principal sans effectuer de changements, appuyez brièvement sur la touche MENU.
Pour retourner au mode de fonctionnement normal: appuyez pendant environ 2 secondes sur la touche
MENU.
Sound Sense (sensibilité au son):
Est utilisé pour régler la sensibilité du micro intégré
Appuyez sur la touche MENU jusqu’à ce que “SOSe” s’affiche à l’écran.
Appuyez sur la touche ENTER, l’écran commence à clignoter.
Utilisez les touches DOWN et UP pour sélectionner une valeur située entre “0” (très faible sensibilité) et
“100” (haute sensibilité).
Dès que le mode de fonctionnement est affiché à l’écran, appuyez sur la touche ENTER pour confirmer
votre choix.
Pour retourner au menu principal sans effectuer de changements, appuyez brièvement sur la touche MENU.
Pour retourner au mode de fonctionnement normal: appuyez pendant environ 2 secondes sur la touche
MENU.
Pan Inversion
Normal: le mouvement pan n’est pas inversé.
Pan inversion: le mouvement pan est inversé
Appuyez sur la touche MENU jusqu’à ce que “IPAn” est affiché à l’écran.
Appuyez sur la touche ENTER, l’écran commence à clignoter.
Utilisez les touches DOW N et UP pour sélectionner “No” (normal) ou “I” (pan inversion).
Dès que le mode de fonctionnement est affiché à l’écran, appuyez sur la touche ENTER pour confirmer
votre choix.
Pour retourner au menu principal sans effectuer de changements, appuyez brièvement sur la touche MENU.
Pour retourner au mode de fonctionnement normal: appuyez pendant environ 2 secondes sur la touche
MENU.
Tilt Inversion
Normal: le mouvement tilt n’est pas inversé.
Tilt inversion: le mouvement tilt est inversé
Appuyez sur la touche MENU jusqu’à ce que “ItLt” est affiché à l’écran.
Appuyez sur la touche ENTER, l’écran commence à clignoter.
Utilisez les touches DOW N et UP pour sélectionner “No” (normal) ou “I” (tilt inversion).
Dès que le mode de fonctionnement est affiché, appuyez sur la touche ENTER pour confirmer votre choix.
Pour retourner au menu principal sans effectuer de changements, appuyez brièvement sur la touche MENU.
Pour retourner au mode de fonctionnement normal: appuyez pendant environ 2 secondes sur la touche
MENU.
Display on/off
Display on: l’écran est toujours allumé.
Display off: l’écran est éteint quand il n’est pas utilisé.
Appuyez sur la touche MENU jusqu’à ce que l’écran affiche “Led”.
Appuyez sur la touche ENTER, l’écran commence à clignoter.
Utilisez les touches DOW N et UP pour sélectionner “On” (écran toujours allumé) ou “Off” (écran éteint si
pas utilisé).
Dès que le mode de fonctionnement est affiché à l’écran, appuyez sur la touche ENTER pour confirmer
votre choix.
Pour retourner au menu principal sans effectuer de changements, appuyez brièvement sur la touche MENU.
Pour retourner au mode de fonctionnement normal: appuyez pendant environ 2 secondes sur la touche
MENU.
Inversion de l'affichage
Ecran normal : l'écran est lisible quand l'appareil est posé normalement sur une surface.
Inversion de l'affichage : l'écran est lisible quand l'appareil est monté en position renversée.
Appuyez sur la touche MENU jusqu'à ce que “dISP” soit affiché par l'écran. (écran normal)
Appuyez sur la touche ENTER pour passer de (écran normal) à (inversion de l'écran).
Pour retourner au mode de fonctionnement normal: appuyez pendant environ 2 secondes sur la touche
MENU.
Function Delay
Sur le canal des fonctions (canal 8 ou 11) vous pouvez sélectionner quelques fonctions spéciales,
comme par exemple “blackout pendant le changement de gobo” etc. A l’aide de cette option vous
pouvez régler le délai avant qu’une fonction sélectionnée soit activée.
INFORMATION IMPORTANTE: la fonction délai peut être réglée sur zéro secondes (pas de Délai) quand
vous utilisez un contrôleur DMX ou un logiciel DMX qui utilise des présets pour les valeurs DMX des
fonctions spéciales.
N’utilisez jamais “no Delay” (pas de délai) quand vous utilisez un simple contrôleur DMX ou vous utilisez les
curseurs pour régler les fonctions manuellement!
Appuyez sur la touche MENU jusqu’à ce que “Fude” s’affiche à l’écran.
Appuyez sur la touche ENTER, l’écran commence à clignoter.
Utilisez les touches DOWN et UP pour sélectionner une valeur entre “0” (pas de délai) et “3” (délai de 3
secondes)
Dès que le délai est sélectionné : appuyez sur la touche ENTER pour confirmer votre choix.
Pour retourner au menu principal sans effectuer de changements, appuyez brièvement sur la touche MENU.
Pour retourner au mode de fonctionnement normal: appuyez pendant environ 2 secondes sur la touche
MENU.
Dimmer Calibrate
Du aux tolérances dans le processus de fabrication, les LED peuvent avoir des luminosités qui ne
sont pas tout à fait identiques. Vous pouvez utiliser cette option pour mettre à niveau la luminosité
de vos machines.
Appuyez sur la touche MENU jusqu’à ce que “dCAL” s’affiche à l’écran.
Appuyez sur la touche ENTER, l’écran commence à clignoter.
Utilisez les touches DOWN et UP pour sélectionner une valeur entre “50” (luminosité minimale) et “100”
(luminosité maximale).
Dès que la luminosité est sélectionnée : appuyez sur la touche ENTER pour confirmer votre choix.
Pour retourner au menu principal sans effectuer de changements, appuyez brièvement sur la touche MENU.
Pour retourner au mode de fonctionnement normal: appuyez pendant environ 2 secondes sur la touche
MENU.
JB SYSTEMS
®
19/85 SIRIUS
JB SYSTEMS
®
20/85 SIRIUS
Page 13
FRANÇAIS MODE D’EMPLOI
Settings
PRO def
AUTO def
FRANÇAIS MODE D’EMPLOI
Auto Test
Est utilisé pour activer le programme interne “self-test” qui passera en revue toutes les possibilités
de l’appareil.
Appuyez sur la touche MENU jusqu’à ce que l’écran affiche “teSt”.
Appuyez sur la touche ENTER pour démarrer le programme intégré « self-test ».
Pour retourner aux fonctions, appuyez sur la touche MENU.
Pour retourner au mode de fonctionnement normal: appuyez pendant environ 2 secondes sur la touche
MENU.
Température
Affiche la température à l’intérieur de l’appareil.
Appuyez sur le bouton MENU jusqu'à ce que l’écran affiche les lettres “teMP”.
Appuyez sur le bouton ENTER et la température de l’appareil sera affichée sur l'écran.
Pour retourner vers les fonctions, appuyez de nouveau sur le bouton MENU.
Pour retourner au mode de fonctionnement normal: appuyez pendant environ 2 secondes sur la touche
MENU.
Fixture Hours
Vous communique le nombre d’heures de service de l’appareil.
Appuyez sur la touche MENU jusqu’à ce que l’écran affiche “FhrS”.
Appuyez sur la touche ENTER pour que l’appareil affiche le nombre d’heures de service à l’écran.
Pour retourner aux fonctions, appuyez sur la touche MENU.
Pour retourner au mode de fonctionnement normal: appuyez pendant environ 2 secondes sur la touche
MENU.
Software version
Montre quelle est la version du software qui a été installée dans l'appareil
Appuyez sur la touche MENU jusqu’à ce que l’écran affiche “ver”.
Appuyez sur la touche ENTER pour afficher la version du software.
Pour retourner aux fonctions, appuyez sur la touche MENU.
Pour retourner au mode de fonctionnement normal: appuyez pendant environ 2 secondes sur la touche
MENU.
Defaults
Est utilisé pour choisir entre 2 réglages par défaut, souvent utilisé par le sociétés de location:
PRO-defaults: réglage par défaut (ajustable) pour une utilisation avec des contrôleurs DMX
professionnels.
AUTO-defaults: réglage par défaut (ajustable) pour le mode maitre/esclave.
Appuyez sur la touche MENU jusqu’à ce que “deF” s’affiche à l’écran.
Appuyez sur la touche ENTER: pour éviter la perte accidentelle de vos réglages, l’écran clignote et affiche
“no”:
Utilisez les touches DOWN et UP pour sélectionner “Yes” ou “No” et confirmez en appuyant sur la
touche ENTER.
Si vous sélectionnez “Yes”, vous avez le choix entre 2 options, chacune avec ses propres réglages:
Prod le réglage par défaut PRO est chargé
Autd le réglage par défaut AUTO est chargé
Channel mode 11ch 4MSL
Split Colors Yes No
Slave Mode Slave 1 Slave 1
Blackout Mode Yes No
Sound State Off On
Sound Sense 90 90
Pan Inverse No No
Tilt Inverse No No
Backlight No Yes
Function Delay 3s 3s
Vous pouvez facilement faires vos réglages additionnels à partir de ces réglages par défaut. Les
autres paramètres resteront inchangés.
Pour retourner au mode de fonctionnement normal: appuyez pendant environ 2 secondes sur la touche
MENU.
Reset
Pour effectuer une mise à zéro de l’appareil.
Appuyez sur la touche MENU jusqu’à ce que l’écran affiche “rSet”.
Appuyez sur ENTER pour renvoyer tous les canaux à leur position d’origine.
Pour retourner au mode de fonctionnement normal: appuyez pendant environ 2 secondes sur la touche
MENU.
Veuillez également consulter le chapitre concernant la configuration des canaux DMX pour découvrir
comment effectuer une mise à zéro (reset) par commande DMX.
Ajustement de la position de référence
Cette possibilité est utilisée pour ajuster la position de référence de plusieurs fonctions :
Connectez l’appareil à un contrôleur DMX et utilisez le mode 11CH: réglez la valeur du ch6 + ch7 sur la
position maximale.
Si vous n’êtes pas encore dans le menu setup, vous devez brièvement appuyer sur la touche MENU pour
enter le menu setup (“Addr” est affiché)
Appuyez maintenant sur la touche ENTER pendant au moins 5
secondes pour aller vers le mode Offset.
Utilisez les touches DOWN et UP pour sélectionner la fonction
que vous désirez ajuster
oPAn: utilisé pour ajuster la position de référence de la
fonction pan. (mouvement horizontal)
otIL: utilisé pour ajuster la position de référence de la
fonction tilt. (mouvement vertical)
oCoL: utilisé pour ajuster la position de référence de la roue
à couleurs.
oGob: utilisé pour ajuster la position de référence de la roue
à gobos.
Appuyez sur la touche ENTER, ce qui a pour conséquence que
l'écran commence à clignoter.
Utilisez les touches DOWN et UP pour ajuster la position de référence
Appuyez sur la touche ENTER pour confirmer votre choix
Pour retourner vers les fonctions sans effectuer de changements, appuyez de nouveau sur la touche MENU.
Pour retourner au mode de fonctionnement normal: appuyez pendant environ 2 secondes sur la touche
MENU. Les nouveaux paramètres offset pour les différentes fonctions sont préservés dans la mémoire flash.
INSTALLATION ELECTRIQUE + ADRESSAGE
Important : L'installation électrique devrait être effectuée uniquement par du personnel
qualifié, suivant les normes de sécurité relatives à l'électricité et à la mécanique dans votre
pays.
Installation électrique pour 1 appareil en fonctionnement seul:
Installez simplement le câble secteur. L’appareil commencera à fonctionner en mode autonome.
Remarque 1: vous pouvez brancher une commande à distance CA-8 ou RF-8 sur l’appareil si vous
souhaitez avoir plus de possibilités de contrôle. Référez-vous à la section 'Comment utiliser l'appareil' pour
apprendre à effectuer cette procédure correctement.
Remarque 2: s’il n'y a pas de sortie, veuillez vous assurer que l'appareil soit bien réglé en mode 'master'
et réglez le mode blackout sur « NO » et Sound State sur “On” (se reporter au chapitre précédent).
Installation électrique pour deux ou plusieurs appareils en maître/esclave:
Dans ce mode, les appareils effectueront un show synchronisé au rythme de la musique.
JB SYSTEMS
®
21/85 SIRIUS
JB SYSTEMS
®
22/85 SIRIUS
Page 14

FRANÇAIS MODE D’EMPLOI
FRANÇAIS MODE D’EMPLOI
Branchez de 2 à 16 appareils au maximum ensemble en utilisant des câbles symétriques pour micro de
bonne qualité. Le premier appareil dans la chaîne se comportera automatiquement en tant que maître,
les autres appareils se comporteront automatiquement en tant qu'esclaves.
Assurez-vous que les appareils sont tous branchés sur le secteur.
Et c’est terminé!
Remarque 1: vous pouvez brancher une commande à distance CA-8 ou RF-8 sur l’appareil si vous
souhaitez avoir plus de possibilités de contrôle. Référez-vous à la section 'Comment utiliser l'appareil'
pour apprendre à effectuer cette procédure correctement.
Remarque 2: s’il n'y a pas de sortie, veuillez vous assurer que l'appareil soit bien réglé en mode 'master'
et réglez le mode blackout sur « NO » et Sound State sur “On” (se reporter au chapitre précédent).
Installation électrique en mode DMX-Master/Slave :
Dans ce mode, les appareils effectueront un show synchronisé au rythme de la musique, mais vous avez
toujours accès à certaines fonctions du master par 1 ou 4 canaux DMX.
Pour que cette configuration fonctionne parfaitement, vous devez installer un “Mini DMX-SPLITTER”
optionnel pour isoler la ligne maître/esclave de la ligne DMX principale.
Branchez de 2 à 16 appareils au maximum ensemble en utilisant des câbles symétriques pour micro de
bonne qualité. Le premier appareil dans la chaîne se comportera en tant que maître, les autres appareils
se comporteront automatiquement en tant qu'esclaves.
Mettez l’appareil master sur le mode 1MSL ou 4MSL (voir chapitre précédent). Vérifiez le tableau DMX
ci-dessous pour voir les différences entre les deux modes DMX.
Pour le contrôleur DMX, le maître et les esclaves seront considérés comme un seul effet et nécéssite
une adresse de départ pour que le tout puisse être contrôlé comme n’importe quel autre appareil DMX
dans la chaîne: voir “DMX Address” dans le chapitre “Main Menu” (menu principal) pour apprendre
comment régler l’adresse DMX..
Assurez-vous que les appareils sont tous branchés sur le secteur.
Faites vos réglages DMX sur votre contrôleur DMX selon le tableau ci-dessous.
Et c’est terminé!
Remarque: afin d’assurer un fonctionnement au rythme de la musique, vous devez mettre l’option “Sound
State” de l’appareil maître sur “On” (voir chapitre précédent)
Tableau de configuration DMX pour les modes 1MSL et 4MSL
1 MSL 4 MSL
Installation électrique en mode DMX:
Le protocole DMX est un signal à haute vitesse très utilisé pour contrôler des équipements lumineux
intelligents. Vous devez connecter en guirlande (daisy chaining) votre contrôleur DMX et tous les
appareils avec un câble symétrique de bonne qualité.
Les deux types de connecteurs XLR, ceux à 3 broches comme ceux à 5 broches, peuvent être utilisés ;
cependant, les connecteurs à 3 broches se rencontrent plus fréquemment car ils sont compatibles avec
les câbles audio symétriques.
Plan de câblage des XLR à 3 broches :
signal positif (+)
Plan de câblage des XLR à 5 broches :
négatif (-) ~ broche 3 = signal positif (+) ~ broches 4 et 5 : non utilisées.
Pour éviter des comportements étranges des effets lumineux dus aux interférences,
vous devez utiliser une résistance de bouclage de 90 ohms à 120 ohms en fin de
chaîne. Ne jamais utiliser de séparateur de câbles en forme de "Y", cela ne fonctionnera pas !
Assurez-vous que tous les appareils soient bien connectés au secteur.
Chaque effet lumineux de la chaîne doit avoir sa propre adresse de départ afin de savoir à quelle
commande du contrôleur il doit obéir. Dans le chapitre qui suit, vous apprendrez à régler les adresses
DMX.
Broche 1 = prise de terre ~ broche 2 = signal négatif (-) ~ broche 3 =
Broche 1 = prise de terre ~ broche 2 = signal
JB SYSTEMS
COMMENT REGLER L’ADRESSE DE DEMARRAGE EXACTE:
Référez-vous au chapitre précédent (réglage de l’adresse DMX-512) pour apprendre à régler l’adresse de
départ sur cet appareil. L’adresse de départ de chaque appareil est très importante. Malheureusement il est
impossible de vous expliquer dans ce mode d’emploi quel adresse de démarrage vous devez introduire car
cela dépends entièrement du contrôleur que vous utiliserez … veuillez donc vous référer au mode d’emploi
de votre contrôleur DMX pour savoir quelle adresse vous devez utiliser.
®
23/85 SIRIUS
JB SYSTEMS
®
24/85 SIRIUS
Page 15

FRANÇAIS MODE D’EMPLOI
FRANÇAIS MODE D’EMPLOI
CONFIGURATION DMX DU SIRIUS – MODE 1CH:
CONFIGURATION DMX DU SIRIUS – MODE 8CH:
CONFIGURATION DMX DU SIRIUS – MODE 8CH:
JB SYSTEMS
UTILISATION DES COMMANDES CA8 OU RF8SET
quand vous utilisez l’appareil en mode maître/esclave, nous vous recommandons d’utiliser le contrôleur CA8 ou le set de commande sans fil RF-8SET .
Contrôleur câblé CA-8 : Connectez le contrôleur à l'entrée
jack de la première unité (master).
Contrôleur sans fil RF-8SET : le système est composé de 2
éléments:
RF-8T: petit transmetteur RF qui peut contrôler jusqu’à 5
appareils différents.
RF-8R: petit récepteur RF qui doit être raccordé au
connecteur DIN à 5 broches du SIRIUS. Voir le manuel
A présent vous pouvez contrôler toutes les unités connectées:
TOUCHE STANDBY:
Appuyez sur celle-ci afin d'activer/désactiver la fonction black-out de
tous les appareils connectés.
TOUCHES MODE/FUNCTION:
Avec la touche MODE vous pouvez sélectionner 3 modes de
fonctionnement différents:
®
25/85 SIRIUS
JB SYSTEMS
d’installation du récepteur pour plus d’informations.
®
26/85 SIRIUS
Page 16

FRANÇAIS MODE D’EMPLOI
La LED est éteinte: en utilisant la touche FUNCTION vous pouvez sélectionner différentes fonctions
stroboscopiques, comme par exemple la fonction stroboscopique au rythme de la musique.
La LED clignote: en utilisant la touche FUNCTION vous pouvez sélectionner un des shows.
La LED est allumée: (mode sonore desactivé)
Appuyez brièvement sur la touche FUNCTION pour changer les couleurs
Appuyez plus longtemps sur la touche FUNCTION pour changer les gobos
MAINTENANCE
Assurez-vous que la zone au-dessous du lieu d’installation ne comporte pas de personnes indésirables
lors de la maintenance
Mettez l’unité hors tension, débranchez le cordon d’alimentation et attendez que l’appareil ait refroidi.
Pendant l’inspection, les points suivants doivent être vérifiés :
Toutes les vis utilisées pour l’installation de l’appareil ou de chacune de ses pièces doivent être bien
fixées et non corrodées.
Les niches, fixations et structures de support (plafond, poutres, suspensions) doivent être totalement
intactes, sans aucune déformation.
Lorsqu’une lentille optique est visiblement endommagée (fissure ou éraflures profondes), elle doit être
remplacée.
Les câbles doivent être en parfaite condition et doivent être remplacés immédiatement en cas de détection
d’un problème, même bénin.
Pour protéger l’appareil de toute surchauffe, les ventilateurs (si applicable) et les ouvertures de ventilation
doivent être nettoyées mensuellement.
L’intérieur de l’appareil doit être nettoyé annuellement à l’aide d’un aspirateur ou jet d’air.
Le nettoyage des lentilles optiques internes et externes et/ou des miroirs doit être effectué périodiquement
pour optimiser la production de lumière. La fréquence de nettoyage dépend de l’environnement dans
lequel l’appareil fonctionne: des environnements humides, enfumés ou particulièrement sales peuvent
entraîner une accumulation de saleté plus importantes sur les optiques de l’appareil.
Nettoyez à l’aide d’un chiffon doux avec des produits de nettoyage pour verres normaux.
Séchez toujours les parties soigneusement.
Nettoyez les optiques externes ou moins une fois tous les 30 jours.
Nettoyez les optiques internes ou moins une fois tous les 90 jours.
Attention: Nous vous recommandons fortement de faire exécuter le nettoyage interne par du
personnel qualifié !
FRANÇAIS MODE D’EMPLOI
Chacune de ces informations peut être modifiée sans avertissement préalable. Vous pouvez
télécharger la dernière version de ce mode d’emploi de notre site Web: www.beglec.com
SPECIFICATIONS
Alimentation: AC 100 - 240V, 50/60Hz
Consommation maximale: 115 Watt
Contrôle de son: Microphone interne
Mouvements Pan/Tilt: 540° / 270°
Angle du faisceau : 15°
Dimensions du gobo : D=23,7 / image = 19mm
Connexions DMX : connecteur XLR mâle / femelle à 3 broches
Led: 1 LED blanche de 60Watt
Taille: voir dessin
Poids: 8,80 kg
JB SYSTEMS
®
27/85 SIRIUS
JB SYSTEMS
®
28/85 SIRIUS
Page 17

NEDERLANDS HANDLEIDING
WAARSCHUWING:
GEBRUIKSAANWIJZING
Hartelijk dank voor de aankoop van dit JB Systems®product. Om ten volle te kunnen profiteren van alle
mogelijkheden en voor uw eigen veiligheid, gelieve de aanwijzingen zeer zorgvuldig te lezen voor U begint
het apparaat te gebruiken.
DOOR U OP ONZE MAILINGLIJST IN TE SCHRIJVEN ONTVANGT U STEEDS DE
LAATSTE INFORMATIE OVER ONZE PRODUKTEN: NIEUWIGHEDEN, SPECIALE
ACTIES, OPENDEURDAGEN, ENZ.
SURF NAAR: WWW.BEGLEC.COM
KARAKTERISTIEKEN
In dit apparaat is radio-interferentie onderdrukt. Dit product voldoet aan de gangbare Europese en nationale
voorschriften. Het is vastgesteld dat het apparaat er zich aan houdt en de desbetreffende verklaringen en
documenten zijn door de fabrikant afgegeven.
Compacte, doch zeer krachtige moving head voor de Pro DJ, verhuurbedrijven en discotheken.
Op basis van een CREE 60WATT LED:
Krachtige lichtopbrengst en scherpe gobo’s dankzij uitstekende optische elementen
Zeer laag verbruik, slechts 115 Watt (besparing op de energiekosten!)
Zeer heldere kleuren in vergelijking met de traditionele halogeeneffecten
Geen lampen te vervangen!
Zeer lage warmteontwikkeling
Lichtgewicht (geen lamptransformatoren nodig)
0-100% dimmer en uiterst snelle strobe functie
6 roterende gobo’s + open, uitgerust met de gobo shaking functie
Onafhankelijk kleurenwiel met ‘split color’ functie (8 kleuren + wit)
Mooie ingebouwde programma’s voor gevarieerde lichtshows:
DMX controle: 1, 8 of 11 kanalen
Standalone: muziekgestuurd via de ingebouwde microfoon
Master/slave: prachtige synchrone shows in autonome werkmodus
DMX-master/slave: dank zij dit nieuwe revolutionaire systeem kunnen meeredere SIRIUS toestellen in
master/slave werken, terwijl ze toch nog via 1 of 4 DMX kanalen bestuurd worden! (zelfs wanneer ze op
een DMX keten aangesloten zijn. Een optionele mini DMX splitter is wel vereist)
Twee verschillende standaard instellingen: zeer handig voor verhuurbedrijven:
PRO-defaults: basis instelling (regelbaar) voor een gebruik met professionele DMX controllers.
AUTO-defaults: basis instelling (regelbaar) voor een gebruik met de handige master/slave functie.
Automatische X/Y herpositionering
Er zijn 2 optionele afstandbedieningen beschikbaar: de bekabelde CA8 of de draadloze RF8-SET
Eenvoudige software updates zijn mogelijk via een speciale optionele adapter
LED display voor een gemakkelijke navigatie door het menu
Lichtbundel = 15°
VOOR DE IN GEBRUIKNAME
Controleer voor het eerste gebruik van het apparaat of het tijdens het transport beschadigd werd. Mocht er
schade zijn, gebruik het dan niet, maar raadpleeg eerst uw dealer.
Belangrijk: Dit apparaat verliet de fabriek in uitstekende staat en goed verpakt. Het is erg belangrijk dat de
gebruiker de veiligheidsaanwijzingen en raadgevingen in deze gebruiksaanwijzing uiterst nauwkeurig volgt.
Elke schade veroorzaakt door verkeerd gebruik van het apparaat valt niet onder de garantie. De dealer
aanvaardt geen verantwoordelijkheid voor mankementen en problemen die komen door het veronachtzamen
van deze gebruiksaanwijzing.
Bewaar deze brochure op een veilige plaats om hem in de toekomst nogmaals te kunnen raadplegen. Indien
U het apparaat verkoopt, denkt U er wel aan om de gebruiksaanwijzing bij te voegen.
NEDERLANDS HANDLEIDING
Controleer de inhoud:
Controleer of de doos volgende onderdelen bevat:
Handleiding
SIRIUS toestel
1 Omega klem
IEC voedingskabel
Oogbout voor het bevestigen van een optionele veiligheidskabel
VEILIGHEIDSVOORSCHRIFTEN:
Om het risico op elektrocutie zoveel
mogelijk te vermijden mag u nooit de behuizing verwijderen. Er
bevinden zich geen onderdelen in het toestel die u zelf kan
herstellen. Laat de herstellingen enkel uitvoeren door een
bevoegde technicus.
De bliksempijl die zich in een gelijkbenige driehoek bevindt is bedoeld om u te wijzen op het
gebruik of de aanwezigheid van niet-geïsoleerde onderdelen met een “gevaarlijke spanning” in
het toestel die voldoende kracht heeft om een risico van elektrocutie in te houden.
Het uitroepteken binnen de gelijkbenige driehoek is bedoeld om de gebruiker erop te wijzen dat
er in de meegeleverde literatuur belangrijke gebruik en onderhoudsinstructies vermeld staan
betreffende dit onderdeel.
Dit symbool betekent: het apparaat mag enkel binnenhuis worden gebruikt.
Dit symbool betekent: Lees de handleiding!
Dit symbool betekent: Klasse I apparaten
Het apparaat is niet geschikt voor directe montage op normaal brandbare oppervlakken. (Alleen
geschikt voor montage op niet-brandbare oppervlakken)
CAUTION: Niet naar de werken de lamp staren.
Kan gevaarlijk zijn voor de ogen.
Bescherm het milieu, probeer zoveel mogelijk het verpakkingsmateriaal te recycleren.
Een nieuw lichteffect kan soms ongewenste rook en/of reuk veroorzaken. Dit is normaal en verdwijnt na
een paar minuten.
Stel dit apparaat niet bloot aan regen of vocht, dit om het risico op brand en elektrische schokken te
voorkomen.
Om de vorming van condensatie binnenin te voorkomen, laat het apparaat aan de omgevingstemperatuur
wennen wanneer het, na het transport, naar een warm vertrek is overgebracht. Condensatie kan het
toestel soms verhinderen perfect te functioneren. Het kan soms zelfs schade aan het apparaat
toebrengen.
Gebruik dit apparaat uitsluitend binnenshuis.
Plaats geen stukken metaal en mors geen vocht binnen in het toestel om elektrische schokken of storing
te vermijden. Indien een vreemd voorwerp in het apparaat geraakt, moet U het direct van het lichtnet
afkoppelen.
Plaats de installatie op een plaats met goede ventilatie, ver van brandbare materialen en/of vloeistoffen.
De installatie moet op minstens 50 cm van de muren rondom geplaatst worden.
Bedek geen enkele ventilatieopening om oververhitting te vermijden.
Zorg dat het toestel niet in een stoffige omgeving wordt gebruikt en maak het regelmatig schoon.
Houd het apparaat uit de buurt van kinderen.
Dit apparaat mag niet door onervaren personen bediend worden.
De maximum veilige omgevingstemperatuur is 40°C. Gebruik het apparaat dus niet bij hogere
temperaturen.
Verzeker er U van dat er zich onder de plaats waar het toestel wordt geïnstalleerd geen ongewenste
personen bevinden tijdens het bevestigen en losmaken alsook bij het onderhoud.
Laat het toestel ongeveer 10 minuten afkoelen alvorens te starten met de onderhoudsbeurt.
JB SYSTEMS
®
29/85 SIRIUS
JB SYSTEMS
®
30/85 SIRIUS
Page 18

NEDERLANDS HANDLEIDING
NEDERLANDS HANDLEIDING
Trek altijd de stekker uit wanneer het apparaat gedurende langere tijd niet wordt gebruikt of alvorens te
beginnen met de onderhoudsbeurt.
De elektrische installatie behoort uitsluitend uitgevoerd te worden door bevoegd personeel, volgens de in
uw land geldende regels betreffende elektrische en mechanische veiligheid.
Controleer dat de beschikbare spanning niet hoger is dan die aangegeven op de achterzijde van het
toestel.
De elektrische kabel behoort altijd in uitstekende staat te zijn. Zet het apparaat onmiddellijk af als de
elektrische kabel gekneusd of beschadigd is. De kabel moet vervangen worden door de fabrikant zelf, zijn
dealer of vergelijkbare bekwame personen om een brand te voorkomen.
Laat de elektrische draad nooit in contact komen met andere draden.
Volgens de veiligheidsvoorschriften moet deze installatie geaard worden.
Sluit het apparaat niet aan op een elektronische dimmer.
Gebruik altijd een geschikte en gekeurde veiligheidskabel bij het installeren van het toestel.
Om elektrische schokken te voorkomen, moet U de behuizing niet openen. Er zitten geen onderdelen in
die door de gebruiker moeten worden onderhouden.
Herstel nooit een zekering en overbrug de zekeringhouder nooit. Vervang een beschadigde zekering
steeds door een zekering van hetzelfde type en met dezelfde elektrische kenmerken.
In geval van ernstige problemen met het bedienen van het toestel, stopt U onmiddellijk het gebruik ervan.
Contacteer uw dealer voor een eventuele herstelling.
De behuizing en de lenzen moeten vervangen worden als ze zichtbaar beschadigd zijn.
Gebruik best de originele verpakking als het toestel vervoerd moet worden.
Om veiligheidsredenen is het verboden om wijzigingen aan het toestel aan te brengen.
Belangrijk: Kijk nooit rechtstreeks in de lichtbron. Gebruik het lichteffect niet in de tegenwoordigheid van
personen die lijden aan epilepsie.
OPHANGEN VAN HET APPARAAT
Belangrijk: De installatie van het toestel mag uitsluitend door bekwaam onderhoudspersoneel
uitgevoerd worden. Onjuiste plaatsing kan ernstige letsels en/of schade aan eigendommen tot
gevolg hebben. Het ophangen vergt veel ervaring. U behoort de grenzen te respecteren aan de
werklast; erkende installeringmaterialen moeten worden gebruikt; de veiligheid van het
geïnstalleerde toestel moet regelmatig worden gecontroleerd.
Overtuig U ervan dat het gebied onder installatieplaats vrij is van ongewenste personen tijdens het
plaatsen, het weghalen en het onderhoud.
Installeer het toestel op een goed geventileerde plaats, ver
van brandbare stoffen en/of vloeistoffen. Het toestel moet
worden bevestigd op minstens 50 cm van de omringende
muren.
Het toestel moet worden geïnstalleerd buiten het bereik
van iedereen en weg van plaatsen waar men mag lopen en
zitten.
Alvorens tot plaatsen over te gaan, moet men controleren
dat de minimum puntbelasting van de installatieplaats 10
keer het gewicht van het toestel bedraagt.
Gebruik bij het installeren van het toestel altijd een
gewaarmerkte (nummer 3 op de afbeelding)
veiligheidskabel die 12 keer het gewicht van het toestel
kan dragen. Deze bijkomende veiligheidsbevestiging moet
zo worden aangebracht dat geen deel van het toestel meer
dan 20 cm vallen kan als de hoofdbeveiliging faalt.
Het apparaat moet goed worden vastgezet; aan een vrij zwaaiende montage mag zelfs niet gedacht
worden.
Bedek geen ventilatieopeningen, anders zou dit oververhitting tot gevolg kunnen hebben.
De gebruiker moet er zich van verzekeren dat de installaties met betrekking tot de veiligheid en de
technische mechaniek door een expert zijn goedgekeurd alvorens ze voor de eerste keer te gebruiken. Elk
jaar moeten de installaties worden gekeurd door een vakman om te controleren of de veiligheid nog steeds
perfect is.
1. Optionele bevestigingsklem
2. Speciale Omega klem (inbegrepen)
3. Verharde schroefdraad waarin u de meegeleverde oogbout kunt
vastschroeven
4. Optionele veiligheidskabel
INSTELLEN VAN HET TOESTEL
Bedieningspaneel:
1. DISPLAY geeft de verschillende menu’s en de gekozen functies weer.
2. LEDS
DMX Aan DMX signaal aanwezig
MASTER Aan Master mode
SLAVE Aan Slave mode
SOUND Knippert Geluidsactivering
3. TOETSEN
MENU Om programmeringfuncties te selecteren
DOWN Om terug te gaan in de geselecteerde functies
UP Om verder te gaan in de geselecteerde functies
ENTER Om de geselecteerde functies te bevestigen
4. DMX INPUT/OUTPUT: wordt gebruikt voor DMX512 verbinding. Gebruik symmetrische 3pins XLR M/V
kabels van goede kwaliteit om de toestellen met elkaar te verbinden.
5. REMOTE CONTROL INGANG: sluit de optionele CA-8 afstandsbediening aan op de ¼” microfoon jack
om zo de stand by, de functie en de werkmodus van het toestel te controleren
6. DRAADLOZE REMOTE CONTROL INGANG: sluit de ontvanger van de optionele draadloze RF-8
afstandsbediening aan op deze ingang
7. VOEDINGSAANSLUIT ING: IEC stekker met geïntegreerde zekeringhouder. Sluit hier de meegeleverde
voedingskabel aan.
HOOFDMENU:
Druk op de MENU toets om een van de pre-set functies te kiezen. Druk op de toets tot de gewenste
functie op de display verschijnt of gebruik de DOWN en UP toetsen om het menu te doorlopen.
Selecteer de functie met de ENTER toets. De display zal knipperen.
Gebruik de DOWN en UP toetsen om de modus te wijzigen.
Eens u de gewenste modus geselecteerd hebt moet u op de ENTER toets drukken om uw keuze te
bevestigen.
Om naar het hoofdmenu terug te keren zonder iets te wijzigen moet u heel even op de MENU toets drukken.
U kunt het hoofdmenu bekijken op de volgende pagina.
DMX Adres
Wordt gebruikt om het startadres van het toestel in te stellen in een DMX configuratie.
Druk op de MENU toets tot “Addr” op de display weergegeven wordt.
Druk op de ENTER toets, de display begint te knipperen.
Gebruik de DOW N en UP toetsen om het DMX512 adres te wijzigen.
JB SYSTEMS
®
31/85 SIRIUS
JB SYSTEMS
®
32/85 SIRIUS
Page 19
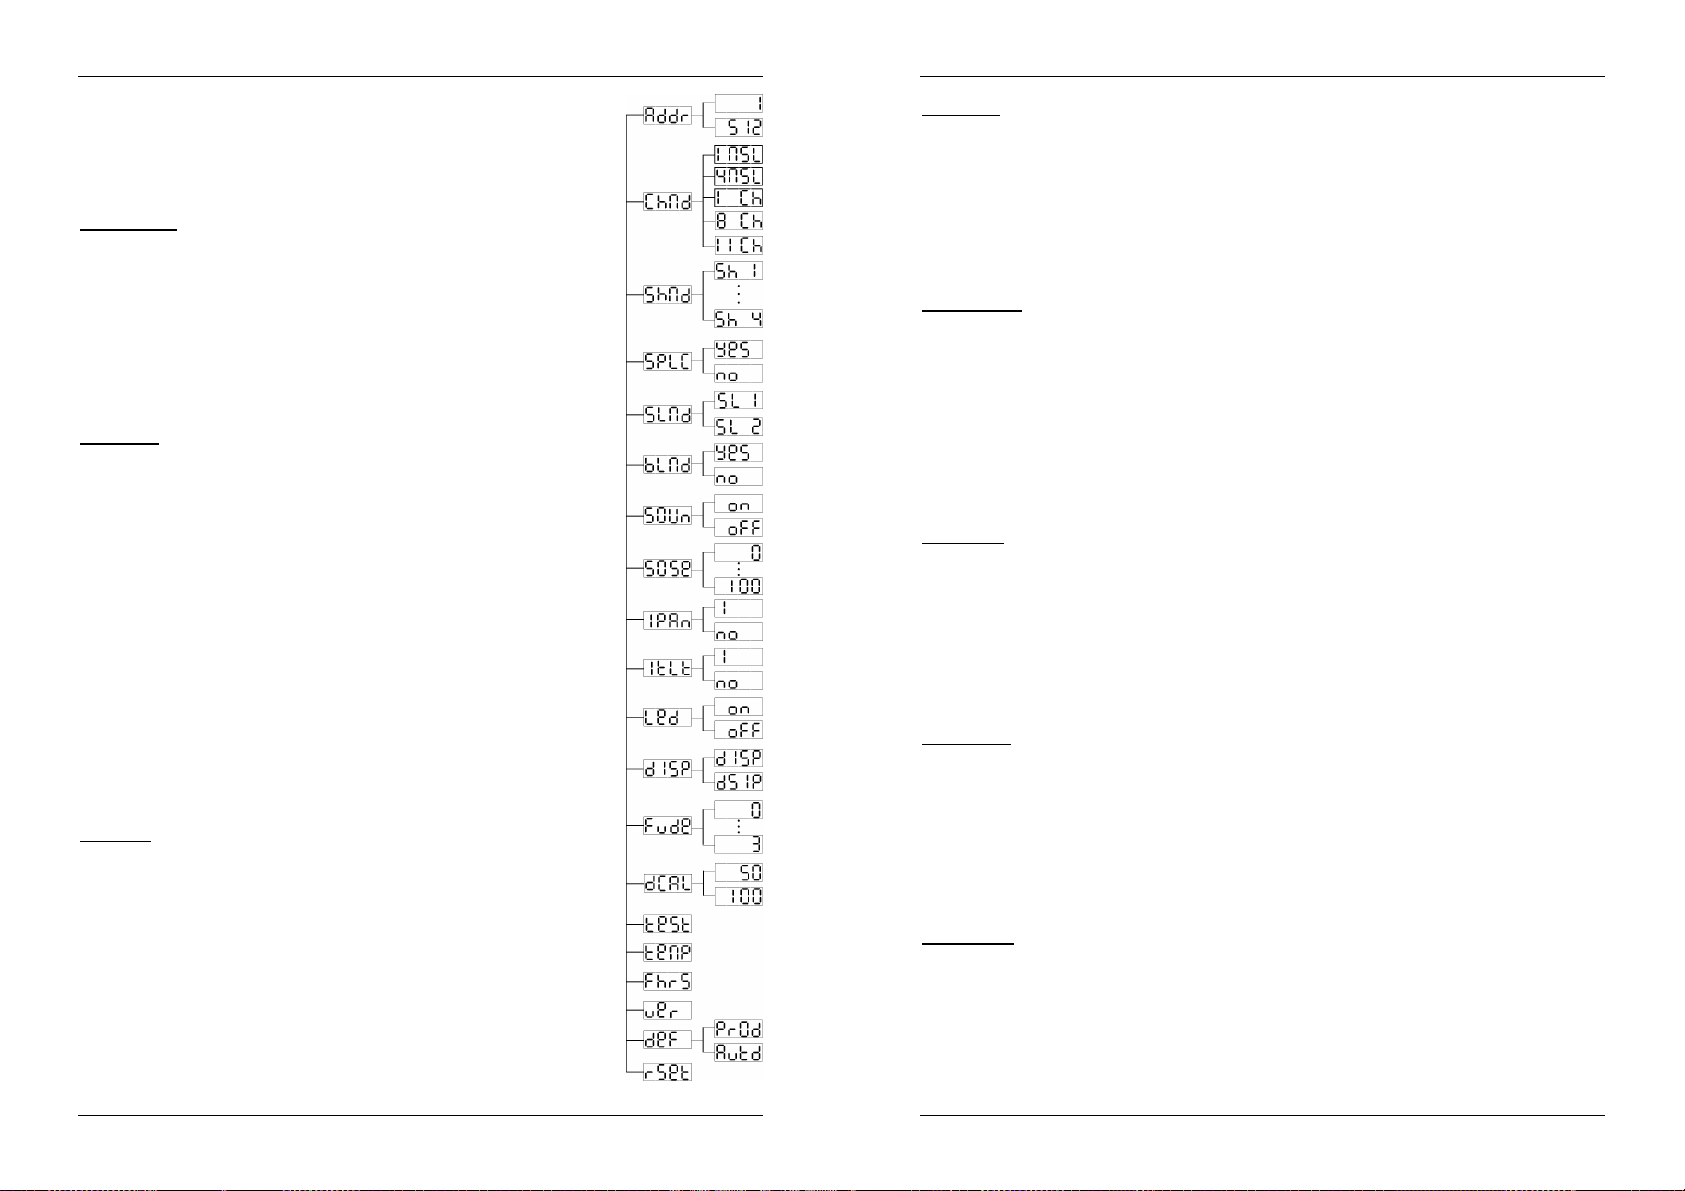
NEDERLANDS HANDLEIDING
NEDERLANDS HANDLEIDING
Wanneer het juiste adres op de display wordt weergegeven, druk dan op de
ENTER toets om uw keuze te bevestigen.
Om naar het hoofdmenu terug te keren zonder iets te wijzigen moet u heel even op
de MENU toets drukken.
Om naar de gewone werkmodus terug te keren moet u gedurende ongeveer 2
seconden op de MENU toets drukken.
Channel mode
Wordt gebruikt om de kanaalcofiguratie te kiezen.
Druk op de MENU toets tot “ChMd” op de display weergegeven wordt.
Druk op de ENTER toets, de display begint te knipperen.
Gebruik de DOWN en UP toetsen om de 1MSL, 4MSL, 1CH, 8CH of de 11CH
modus te kiezen.
Wanneer de gewenste kanaalmodus op het scherm verschijnt moet u op de
ENTER toets drukken om uw keuze te bevestigen.
Om naar het hoofdmenu terug te keren zonder iets te wijzigen moet u heel even op
de MENU toets drukken.
Om naar de gewone werkmodus terug te keren moet u gedurende ongeveer 2
seconden op de MENU toets drukken.
Show Mode
Wordt gebruikt om de Show werkmodus te kiezen wanneer het toestel
standalone of in master/slave configuratie gebruikt wordt.
Druk op de MENU toets tot “ShMd” op de display weergegeven wordt.
Druk op de ENTER toets, de display begint te knipperen.
Gebruik de DOWN en UP toetsen om een van de beschikbare shows te kiezen:
Show 1 (Sh 1): Het toestel staat op de grond. Tilt bewegingshoek 210°.
Show 2 (Sh 2): Het toestel hangt onder het plafond. Tilt bewegingshoek 90°.
Show 3 (Sh 3): Het toestel staat op een podium, tegenover het publiek
De spot projecteert steeds in de richting van het publiek en staat dus aan de
voorkant van het podium. Pan bewegingshoek ( links naar rechts naar rechts
): 160°. Tilt bewegingshoek: 90° ( 60° boven de horizon; 30° onder de
horizon.)
Show 4 (Sh 4): Het toestel hangt onder het plafond.
De spot projecteert vooral aan de voorzijde van het podium. Pan
bewegingshoek ( links naar rechts naar links ): 160°. Tilt bewegingshoek: 90°
( verticaal, voorzijde 75°; achterzijde 15° )
Wanneer de gewenste modus op de display wordt weergegeven, druk dan op de
ENTER toets om uw keuze te bevestigen.
Om naar het hoofdmenu terug te keren zonder iets te wijzigen moet u heel even op
de MENU toets drukken.
Om naar de gewone werkmodus terug te keren moet u gedurende ongeveer 2
seconden op de MENU toets drukken.
Split Color
U kunt instellen of het toestel alleen volle kleuren mag gebruiken of ook
gesplitste kleuren mag weergeven.
Druk op de MENU toets tot “SPLC” op de display weergegeven wordt.
Druk op de ENTER toets, de display begint te knipperen.
Gebruik de DOWN en UP toetsen om “Yes” (gesplitste kleuren) of “No” (alleen
volle kleuren) te kiezen.
Wanneer de gewenste modus op de display wordt weergegeven, druk dan op de
ENTER toets om uw keuze te bevestigen.
Om naar het hoofdmenu terug te keren zonder iets te wijzigen moet u heel even op
de MENU toets drukken.
Om naar de gewone werkmodus terug te keren moet u gedurende ongeveer 2
seconden op de MENU toets drukken.
Slave Mode
Wordt gebruikt om het slave toestel synchroon of tegenovergesteld te laten werken ten opzichte van
de master.
Druk op de MENU toets tot “SLMd” op de display weergegeven wordt.
Druk op de ENTER toets, de display begint te knipperen.
Gebruik de DOWN en UP toetsen om “SL 1” (normal) of “SL 2” (2 light show) te selecteren.
Wanneer de gewenste modus op de display wordt weergegeven, druk dan op de ENTER toets om uw
keuze te bevestigen.
Om naar het hoofdmenu terug te keren zonder iets te wijzigen moet u heel even op de MENU toets drukken.
Om naar de gewone werkmodus terug te keren moet u gedurende ongeveer 2 seconden op de MENU toets
drukken.
Blackout Mode
Black-out mode: wanneer geen enkel DMX signaal gedetecteerd wordt, dan gaat het toestel over naar
de black-out modus en wacht op het volgende DMX signaal.
No blackout mode: wanneer geen enkel DMX signaal gedetecteerd wordt, dan schakelt het toestel
automatisch over naar standalone werking.
Druk op de MENU toets tot “bLMd” op de display weergegeven wordt.
Druk op de ENTER toets, de display begint te knipperen.
Gebruik de DOWN en UP toetsen om “Yes” (yes blackout) of “No” (no blackout) te selecteren.
Wanneer de gewenste modus op de display wordt weergegeven, druk dan op de ENTER toets om uw
keuze te bevestigen.
Om naar het hoofdmenu terug te keren zonder iets te wijzigen moet u heel even op de MENU toets drukken.
Om naar de gewone werkmodus terug te keren moet u gedurende ongeveer 2 seconden op de MENU toets
drukken.
Sound State
Wordt gebruikt in standalone of master/slave modus om de toestellen op het ritme van de muziek te
laten werken
Druk op de MENU toets tot “SOUn” op de display weergegeven wordt.
Druk op de ENTER toets, de display begint te knipperen.
Gebruik de DOWN en UP toetsen om “On” of “Off” te kiezen.
Wanneer de gewenste modus op de display wordt weergegeven, druk dan op de ENTER toets om uw
keuze te bevestigen.
Om naar het hoofdmenu terug te keren zonder iets te wijzigen moet u heel even op de MENU toets drukken.
Om naar de gewone werkmodus terug te keren moet u gedurende ongeveer 2 seconden op de MENU toets
drukken.
Sound Sense
Wordt gebruikt om de gevoeligheid van de ingebouwde microfoon in te stellen
Druk op de MENU toets tot “SOSe” op de display weergegeven wordt.
Druk op de ENTER toets, de display begint te knipperen.
Gebruik de DOWN en UP toetsen en kies een waarde tussen “0” (zeer lage gevoeligheid) en “100” (hoge
gevoeligheid).
Wanneer de gewenste waarde op de display wordt weergegeven, druk dan op de ENTER toets om uw
keuze te bevestigen.
Om naar het hoofdmenu terug te keren zonder iets te wijzigen moet u heel even op de MENU toets drukken.
Om naar de gewone werkmodus terug te keren moet u gedurende ongeveer 2 seconden op de MENU toets
drukken.
Pan Inversion
Normal: Pan beweging wordt niet omgekeerd.
Pan inversion: Pan beweging werkt tegenovergesteld
Druk op de MENU toets tot “IPAn” op de display weergegeven wordt.
Druk op de ENTER toets, de display begint te knipperen.
Gebruik de DOWN en UP toetsen om “No” (normal) of “I” (pan inversion) te selecteren.
Wanneer de gewenste modus op de display wordt weergegeven, druk dan op de ENTER toets om uw
keuze te bevestigen.
Om naar het hoofdmenu terug te keren zonder iets te wijzigen moet u heel even op de MENU toets drukken.
JB SYSTEMS
®
33/85 SIRIUS
JB SYSTEMS
®
34/85 SIRIUS
Page 20
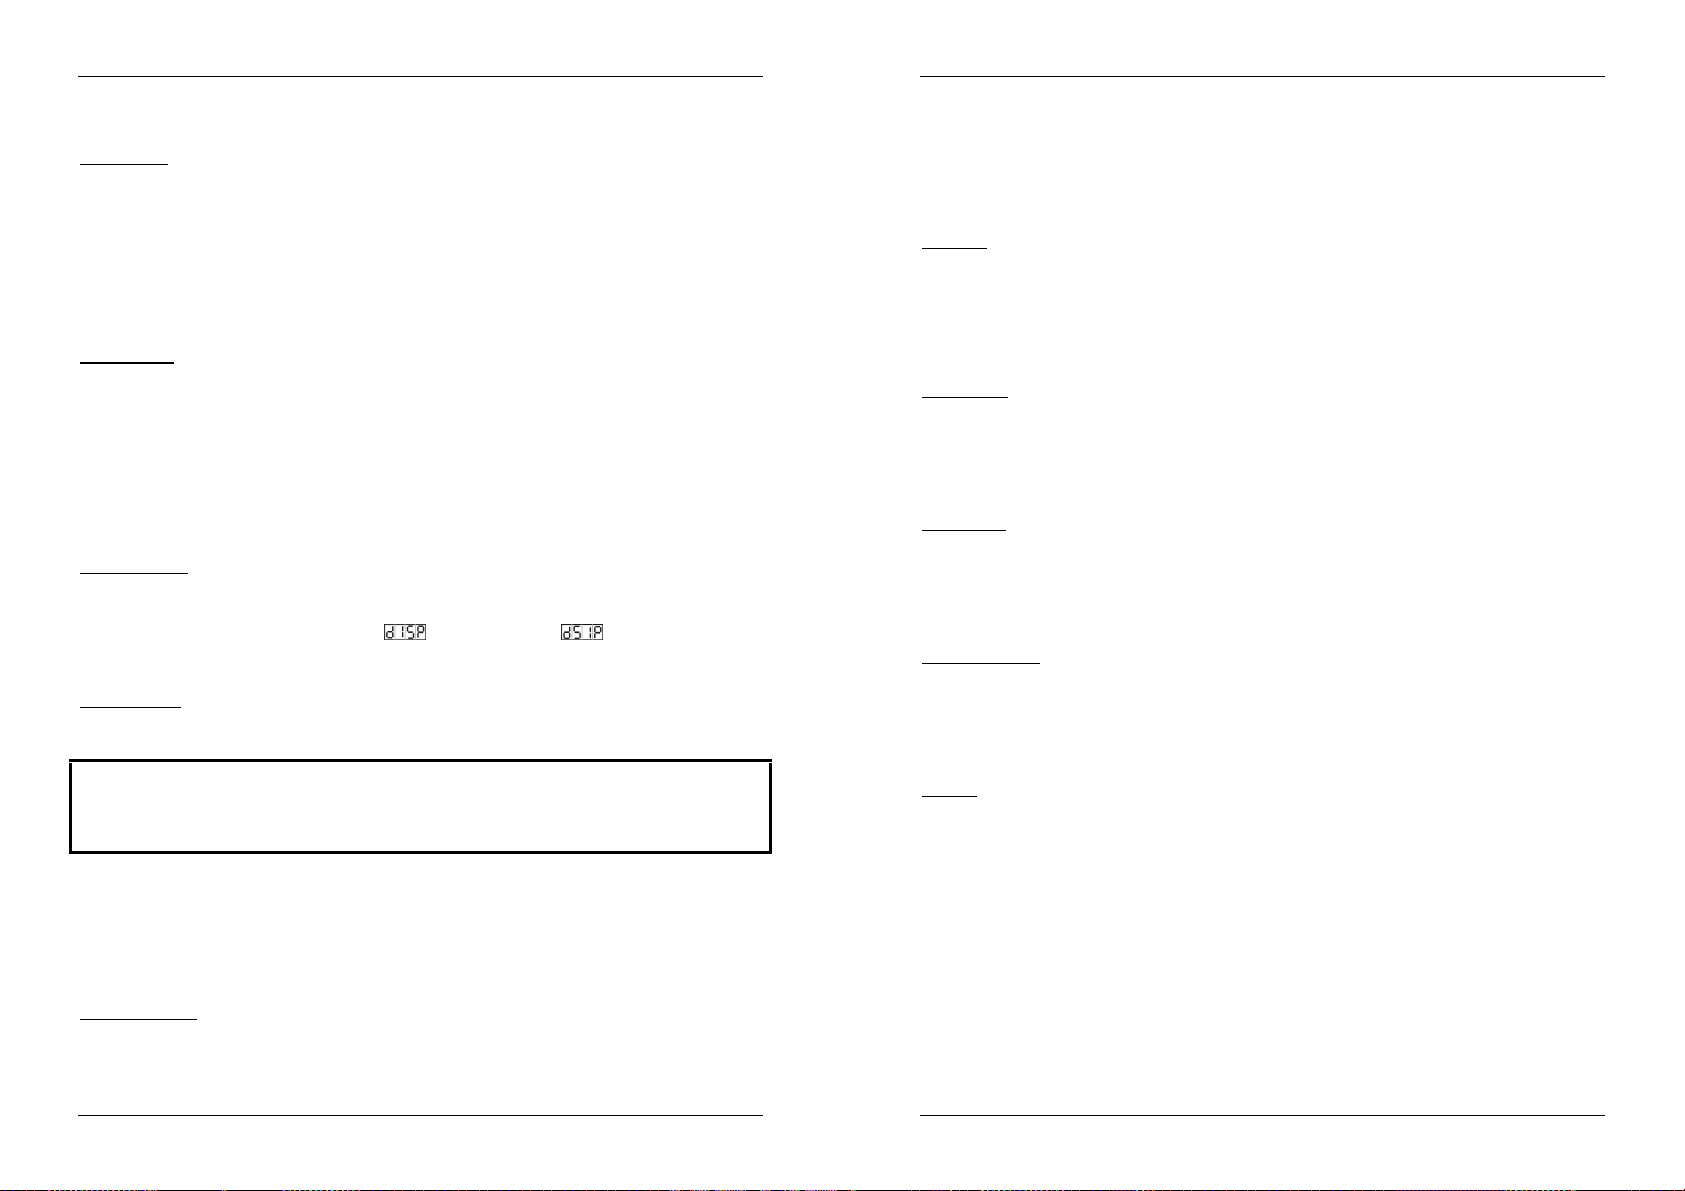
NEDERLANDS HANDLEIDING
NEDERLANDS HANDLEIDING
Om naar de gewone werkmodus terug te keren moet u gedurende ongeveer 2 seconden op de MENU toets
drukken.
Tilt Inversion
Normal: Tilt beweging wordt niet omgekeerd.
Tilt inversion: tilt beweging werkt tegenovergesteld
Druk op de MENU toets tot “ItLt” op de display weergegeven wordt.
Druk op de ENTER toets, de display begint te knipperen.
Gebruik de DOWN en UP toetsen om “No” (normal) of “I” (tilt inversion) te selecteren.
Wanneer de gewenste modus op de display wordt weergegeven, druk dan op de ENTER toets om uw
keuze te bevestigen.
Om naar het hoofdmenu terug te keren zonder iets te wijzigen moet u heel even op de MENU toets drukken.
Om naar de gewone werkmodus terug te keren moet u gedurende ongeveer 2 seconden op de MENU toets
drukken.
Display on/off
Display on: display is steeds aan.
Display off: display is donker wanneer deze niet gebruikt wordt.
Druk op de MENU toets tot “Led” op de display weergegeven wordt.
Druk op de ENTER toets, de display begint te knipperen.
Gebruik de DOWN en UP toetsen om “On” (display steeds aan) of “Off” (display is donker wanneer niet in
gebruik).
Wanneer de gewenste modus op de display wordt weergegeven, druk dan op de ENTER toets om uw
keuze te bevestigen.
Om naar het hoofdmenu terug te keren zonder iets te wijzigen moet u heel even op de MENU toets drukken.
Om naar de gewone werkmodus terug te keren moet u gedurende ongeveer 2 seconden op de MENU toets
drukken.
Display Inversie
Normale Display: display is leesbaar wanneer het toestel op de grond staat.
Omgekeerde Display: display is leesbaar wanneer het toestel ondersteboven hangt.
Druk op de MENU toets tot “dISP” op de display weergegeven wordt. (normale display)
Druk op de ENTER toets om te kiezen tussen (normale display) en (omgekeerde display).
Om naar de gewone werkmodus terug te keren moet u gedurende ongeveer 2 seconden op de MENU toets
drukken.
Function Delay
Op het functiekanaal (CH8 of CH11) kunt u enkele speciale functies kiezen, zoals “blackout tijdens
gobo overgang” en vele andere. Met deze optie kunt u de wachttijd instellen alvorens de gekozen
functie geactiveerd wordt.
BELANGRIJKE INFORMATIE: de functie delay kan alleen op nul ingesteld worden (geen vertraging)
wanneer u een DMX controller of DMX-software gebruikt met presets voor de DMX waarden van de speciale
functies.
Gebruik nooit “no Delay” (geen vertraging) wanneer u een DMX controller gebruikt waarbij u de faders
manueel bedient om de functies in te stellen!
Druk op de MENU toets tot “Fude” op de display weergegeven wordt.
Druk op de ENTER toets: de display begint te knipperen.
Gebruik de DOWN en UP toetsen om een waarde te kiezen tussen “0” (geen vertraging) of “3” (3
seconden vertraging)
Van zodra u de vertraging heeft gekozen moet u op de ENTER toets drukken om uw keuze te bevestigen.
Om zonder wijzigingen naar het menu terug te keren moet u even kort op de MENU toets drukken
Om naar de gewone werkmodus terug te keren moet u gedurende ongeveer 2 seconden op de MENU toets
drukken.
Dimmer Calibrate
Omwille van de toleranties in het productieproces kan het gebeuren dat niet alle LEDs exact dezelfde
helderheid hebben. U kunt deze optie gebruiken om de helderheid van uw verschillende toestellen op
gelijk niveau te in te stellen.
Druk op de MENU toets tot “dCAL” op de display weergegeven wordt.
Druk op de ENTER toets: de display begint te knipperen.
Gebruik de DOWN en UP toetsen om een waarde te kiezen tussen “50” (laag niveau) en “100” (hoog
niveau).
Van zodra u de helderheid heeft gekozen moet u op de ENTER toets drukken om uw keuze te bevestigen.
Om zonder wijzigingen naar het menu terug te keren moet u even kort op de MENU toets drukken
Om naar de gewone werkmodus terug te keren moet u gedurende ongeveer 2 seconden op de MENU toets
drukken.
Auto Test
Wordt gebruikt om het interne “zelftest” programma in te schakelen. Alle mogelijkheden van het
toestel zullen dan automatisch overlopen worden.
Druk op de MENU toets tot “teSt” op de display weergegeven wordt.
Druk op de ENTER toets om het interne self-test programma te starten.
Druk op de MENU toets om naar de functies weer te keren.
Om naar de gewone werkmodus terug te keren moet u gedurende ongeveer 2 seconden op de MENU toets
drukken.
Temperatuur
Geeft de temperatuur in het toestel weer.
Druk op de MENU toets tot “teMP” op de display weergegeven wordt.
Druk op de ENTER toets en de temperatuur van het toestel zal getoond worden op de display.
Druk op de MENU toets om naar de functies weer te keren.
Om naar de gewone werkmodus terug te keren moet u gedurende ongeveer 2 seconden op de MENU toets
drukken.
Fixture Time
Wordt gebruikt om het aantal werkuren van het toestel weer te geven.
Druk op de MENU toets tot “FhrS” op de display weergegeven wordt.
Druk op de ENTER toets om het aantal werkuren van het toestel weer te geven op de display.
Druk op de MENU toets om naar de functies weer te keren.
Om naar de gewone werkmodus terug te keren moet u gedurende ongeveer 2 seconden op de MENU toets
drukken.
Firmware Version
Wordt gebruikt om de softwareversie welke in het toestel is geïnstalleerd te tonen op de display
Druk op de MENU toets tot “ver” op de display weergegeven wordt.
Druk op de ENTER toets om de geïnstalleerde softwareversie te tonen op de display.
Druk op de MENU toets om naar het menu terug te keren.
Om naar de gewone werkmodus terug te keren moet u gedurende ongeveer 2 seconden op de MENU toets
drukken.
Defaults
U heeft de keuze uit 2 basisinstellingen, wat zeer handig is voor verhuurbedrijven:
PRO-defaults: basisinstelling voor het gebruik met professionele DMX controllers.
AUTO-defaults: basisinstelling voor het gebruik in master/slave configuratie.
Druk op de MENU toets tot “deF” op de display weergegeven wordt.
Druk op de ENTER toets: om te vermijden dat u uw instellingen per ongeluk wist knippert en toont de
display “no”:
Gebruik de DOWN en UP toetsen om “Yes” of “No” te kiezen en bevestig uw keuze door op de
ENTER toets te drukken.
Wanneer u “Yes” kiest heeft u de keuze uit 2 opties, elk met hun eigen instellingen:
Prod PRO-defaults worden geladen
Autd AUTO-defaults worden geladen
JB SYSTEMS
®
35/85 SIRIUS
JB SYSTEMS
®
36/85 SIRIUS
Page 21
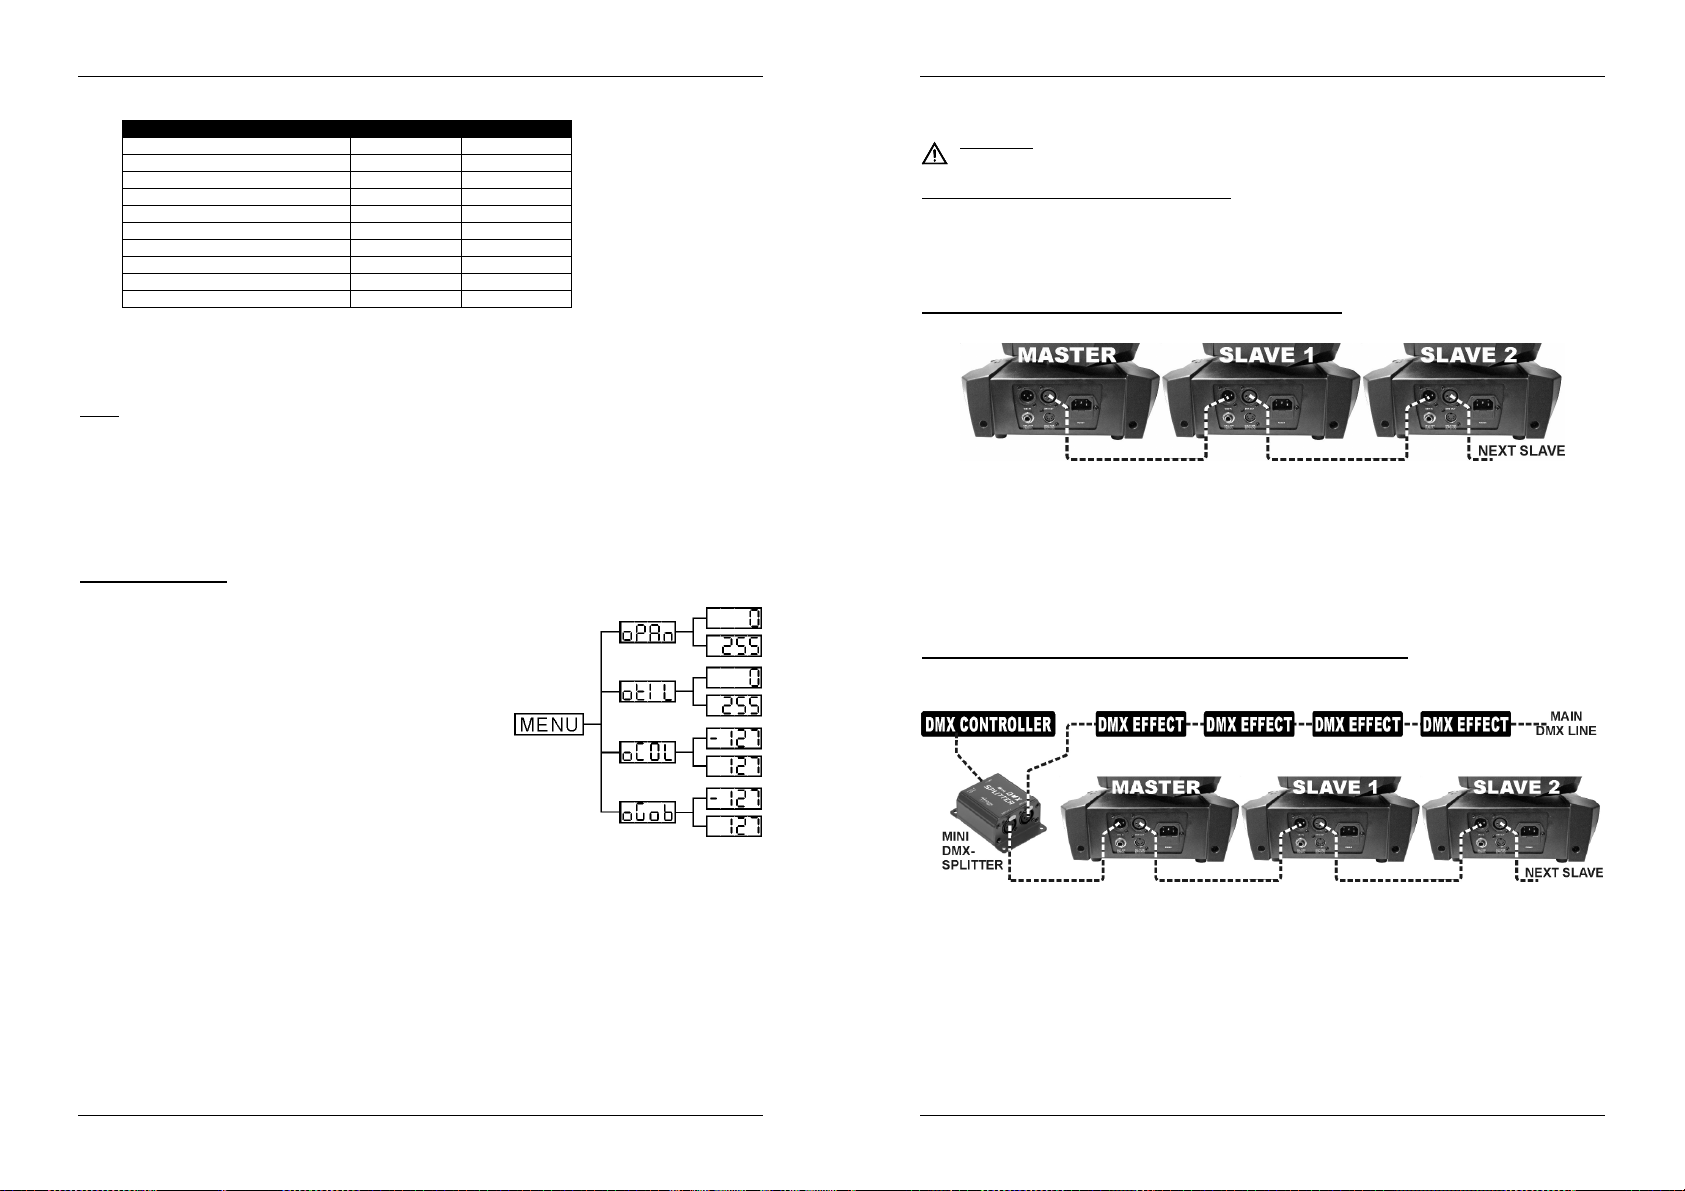
NEDERLANDS HANDLEIDING
PRO def
AUTO def
NEDERLANDS HANDLEIDING
Instellingen
Channel mode 11ch 4MSL
Split Colors Yes No
Slave Mode Slave 1 Slave 1
Blackout Mode Yes No
Sound State Off On
Sound Sense 90 90
Pan Inverse No No
Tilt Inverse No No
Backlight No Yes
Function Delay 3s 3s
Vanuit deze basisinstellingen kunt u steeds uw eigen instellingen toevoegen. De andere instellingen
zullen onveranderd blijven.
Om naar de gewone werkmodus terug te keren moet u gedurende ongeveer 2 seconden op de MENU toets
drukken.
Reset
Wordt gebruikt om een algemene reset van het toestel uit te voeren.
Druk op de MENU toets tot “rSet” op de display weergegeven wordt.
Druk op de ENTER toets om alle kanalen terug in te stellen volgens hun standaardwaarde.
Druk op de MENU toets om naar de functies weer te keren.
Om naar de gewone werkmodus terug te keren moet u gedurende ongeveer 2 seconden op de MENU toets
drukken.
Gelieve ook het hoofdstuk over de DMX kanaalconfiguratie van het toestel om een reset via DMX uit te
voeren.
Home Position Adjust
Wordt gebruikt om de standaard positie van verschillende functies in te stellen.
Sluit het toestel aan op een DMX controller en kies de 11CH
kanaalmodus: stel de kanalen ch6 + ch7 in op hun
maximumwaarde.
Als u nog niet in het setup menu bent, druk dan heel even op de
MENU toets om het setup menu te betreden (“Addr” op de display)
Druk gedurende minimum 5 seconden op de MENU toets om in
offset mode te gaan
Gebruik de DOWN en UP toetsen om de functie welke u wilt
instellen te kiezen
oPAn: Wordt gebruikt om de standaard positie van de pan
functie in te stellen.
otIL: Wordt gebruikt om de standaard positie van de tilt
functie in te stellen.
oCoL: Wordt gebruikt om de standaard positie van het
kleurenwiel in te stellen.
oGob: Wordt gebruikt om de standaard positie van gobowiel in te stellen.
Druk op de ENTER toets, de display begint te knipperen.
Gebruik de DOWN en UP toetsen om de ‘nul’ positie te regelen
Druk op de ENTER toets om uw keuze te bevestigen
Om naar de functies terug te keren zonder iets te wijzigen moet u weer op de MENU toets drukken.
Om naar de gewone werkmodus terug te keren moet u gedurende ongeveer 2 seconden op de MENU toets
drukken, de nieuwe offset parameters voor de verschillende functies worden bewaard in het flash geheugen.
ELEKTRISCHE INSTALLATIE + ADRESSERING
Belangrijk: De elektrische installatie zou alleen uitgevoerd moeten worden door een bekwaam
persoon volgens de voorschriften voor elektrische en mechanische veiligheid in uw land.
Electrishe installatie van 1 standalone toestel:
Verbind gewoon de stroomkabel met het net. Het toestel start onmiddellijk op in stand-alone mode.
Opmerking1: u kunt een CA-8 of een draadloze RF-8 remote controller aansluiten indien u een betere
controle over het toestel wilt hebben. Zie “how to operate the unit”.
Opmerking2: indien er niets gebeurt moet u controleren of het toestel wel degelijk in master mode staaten
dat de black-out functie op “NO” staat en de Sound State op “On” (zie vorig hoofdstuk)
Electrische installatie van 2 of meer toestellen in master/slave:
In deze werkmodus zullen alle toestellen synchroon werken op het ritme van de muziek.
Verbind 2 tot maximum 16 toestellen met elkaar door middel van symmetrische microfoonkabels van
goede kwaliteit. Het eerste toestel in de keten zal werken als master, de andere toestellen zullen
automatisch reageren als slaven.
Controleer of alle toestellen op het stroomnet zijn aangesloten.
Klaar!
Opmerking1: u kunt een CA-8 of een draadloze RF-8 remote controller aansluiten indien u een betere
controle over het toestel wilt hebben. Zie “how to operate the unit”.
Opmerking2: indien er niets gebeurt moet u controleren of het toestel wel degelijk in master mode staaten
dat de black-out functie op “NO” staat en de Sound State op “On” (zie vorig hoofdstuk)
Electrische installatie van 2 of meerdere toestellen in DMX-master/slave:
In deze modus voerend de toestellen een synchrone show uit op het ritme van de muziek, maar u kunt nog
steeds bepaalde functies controleren op de master via 1 of 4 DMX kanalen.
Om een goede werking te verzekeren moet u de optionele “Mini DMX-SPLITTER” gebruiken om de
master/slave lijn te isoleren van de hoofd DMX lijn.
Verbind 2 tot maximum 16 toestellen met elkaar door middel van symmetrische microfoonkabels van
goede kwaliteit. Het eerste toestel in de keten zal werken als master, de andere toestellen zullen
automatisch reageren als slaven.
Stel de master in op kanaalmodus 1MSL of 4MSL (zie vorig hoofdstuk). Zie op onderstaande DMX-chart
het verschil tussen beide DMX modi.
Voor de DMX controller worden de master en zijn slaves nu aanzien als 1 enkel virtueel effect met eigen
start adres zodat het geheel kan gecontroleerd worden als om het even welk ander DMX toestel in de
keten. Zie “DMX Address” in het hoofdstuk “Main Menu” om te leren hoe u het adres moet instellen.
Weet zeker dat alle units op het lichtnet zijn aangesloten.
JB SYSTEMS
®
37/85 SIRIUS
JB SYSTEMS
®
38/85 SIRIUS
Page 22

NEDERLANDS HANDLEIDING
NEDERLANDS HANDLEIDING
Stel de DMX controller in volgens de DMX-chart hieronder.
Klaar!
Opmerking: opdat het geheel perfect op de muziek zou werken moet u controleren of de optie “Sound
State” op de master ingesteld staat op “On” (zie vorig hoofdstuk)
DMX-Chart voor modus 1MSL en 4MSL
1 MSL 4 MSL
DMX AANSLUITINGEN
Het DMX-protocol is een breed gebruikt hogesnelheidssignaal om lichtuitrustingen te bedienen. U moet
uw DMX bediening en alle units met een gebalanceerde kabel van goede kwaliteit doorverbinden.
Zowel de XLR-3pin als XLR-5pin connector worden gebruikt, echter de XLR-3pin is populaider want
deze kabels zijn compatible met gebalanceerde audio kabels.
Pin layout XLR-3pin: Pin1 = GND ~ Pin2 = Negatief signaal (-) ~ Pin3 = Positief signaal (+)
Pin layout XLR-5pin: Pin1 = GND ~ Pin2 = Negatief signaal (-) ~ Pin3 = Positief signaal (+) ~ Pin 4+5
niet in gebruik.
Om vreemd gedrag van de lichteffecten, veroorzaakt door storing, te voorkomen, moet u een
afsluitweerstand van 90Ω tot 120Ω aan het eind van de keten gebruiken. Gebruik nooit een Y-splitkabel,
dit zal eenvoudig niet werken!
Weet zeker dat alle units op het lichtnet zijn aangesloten.
Elk lichteffect in de keten heeft een eigen DMX startadres nodig zodat het weet
welke commando’s van de bediening het moet ontcijferen. In de volgende sectie
zal u leren hoe het DMX adres in te stellen.
DMX-CONFIGURATE VAN DE SIRIUS IN 1CH MODUS
DMX-CONFIGURATE VAN DE SIRIUS IN 8CH MODUS
HOE HET CORRECTE STARTADRES INSTELLEN:
In vorig hoofdstuk wordt beschreven hoe u het adres op dit toestel moet instellen (DMX-512 adres instellen).
Het startadres van elk toestel is zeer belangrijk. Het is echter onmogelijk u mede te delen welk start adres u
zou moeten gebruiken omdat dit volledig afhangt van de controller die u gaat gebruiken Gelieve hiervoor de
handleiding van uw DMX-controller te raadplegen.
JB SYSTEMS
®
39/85 SIRIUS
JB SYSTEMS
®
40/85 SIRIUS
Page 23

NEDERLANDS HANDLEIDING
NEDERLANDS HANDLEIDING
DMX-CONFIGURATE VAN DE SIRIUS IN 11CH MODUS
De LED is uit: met de FUNCTIE toets kunt u verschillende strobe modi kiezen, zoals bvb “sound strobe”.
De LED knippert: met de FUNCTION toets kunt u verschillende shows kiezen.
De LED is aan: (de muziekmodus wordt tijdelijk uitgeschakeld)
Druk even op de FUNCTION toets om de kleuren te veranderen
Druk wat langer op de FUNCTION toets om de gobo’s te veranderen.
ONDERHOUD
Overtuig U ervan dat het gebied onder de installatieplaats vrij is van ongewenste personen tijdens het
onderhoud.
Zet het toestel uit, trek de netstekker uit het stopcontact en wacht tot het toestel is afgekoeld.
Bij inspectie moeten de volgende punten worden gecontroleerd.
Alle schroeven gebruikt om het te toestel te installeren en al zijn onderdelen moeten goed vastgedraaid
zijn en mogen niet verroest zijn.
Behuizingen, vastzetstukken, installeringplaatsen (plafond, spanten, schokbrekers) mogen absoluut niet
verwrongen zijn.
Wanneer een optische lens klaarblijkelijk beschadigd is door barsten of diepe krassen, dan moet deze
vervangen worden.
De stroomkabels moeten in perfecte staat zijn en behoren vervangen te worden, wanneer er zelfs maar
een klein probleem ontdekt werd.
Om het toestel tegen oververhitting te beschermen, behoren de ventilatoren (als die er zijn) en de
ventilatieopeningen elke maand gereinigd te worden.
De binnenkant van het toestel behoort elk jaar gereinigd te worden met een stofzuiger of een luchtspuit.
Het schoonmaken van inwendige en uitwendige optische lenzen en/of spiegels moet regelmatig worden
uitgevoerd om een zo goed mogelijke lichtuitstraling te verkrijgen. Hoe vaak ze schoon moeten worden
gemaakt hangt af van de omgeving waar het toestel wordt gebruikt: een klamme, rokerige of bijzonder
vuile omgeving kan een grotere opeenhoping van vuil veroorzaken op de optische uitrusting.
Reinig met een zachte doek en gebruik normale glasreinigende producten.
Droog de onderdelen altijd zorgvuldig af,
Reinig de uitwendige optische uitrusting minstens één keer per maand.
Reinig de inwendige optische uitrusting minstens om de 3 maanden.
Let op: We bevelen sterk aan dat het schoonmaken van de binnenkant wordt uitgevoerd door
vakbekwaam personeel!!
WERKING VIA DE CA8 OF RF8SET
Wanneer u het toestel gebruikt in autonome of master/slave modus, dan raden wij u ten sterktste aan één
van deze controllers te gebruiken:
CA-8 controller met kabel: Sluit de controller aan op de jack
ingang van het eerste toestel(master).
Draadloze RF-8SET controller: het draadloze systeem
bestaat uit 2 delen:
RF-8T: kleine RF zender waarmee u tot 5 toestellen kunt
bedienen.
RF-8R: kleine RF ontvanger welke op de 5 pins DIN
aansluiting van de SIRIUS moet aangesloten worden. Zie
Nu kan U de toestellen bedienen:
STANDBY TOETS:
Druk op deze toets om de blackout functie van alle aangesloten
toestellen te bedienen.
MODE/FUNCTIE TOETSEN:
Met de MODE toets kunt u uit 3 verschillende modi kiezen:
JB SYSTEMS
de installatiemanual van de ontvanger voor meer info.
®
41/85 SIRIUS
JB SYSTEMS
®
42/85 SIRIUS
Page 24

NEDERLANDS HANDLEIDING
TECHNISCHE KENMERKEN
Netvoeding: AC 100 - 240V, 50/60Hz
Max verbruik: 115 Watt
Geluidscontrole: Ingebouwde microfoon
Pan/Tilt: 540°/270°
Stralingshoek: 15°
Afmetingen Gobo (mm): D=23,7 / afbeelding = 19mm
DMX verbinding: 3 pins XLR mannelijk/ vrouwelijk
Led: 1 witte LED van 60Watt
Afmetingen: zie afbeelding
Gewicht: 8,80 kg
Elke inlichting kan veranderen zonder waarschuwing vooraf
U kunt de laatste versie van deze handleiding downloaden via Onze website: www.beglec.com
DEUTSCH BEDIENUNGSANLEITUNG
BEDIENUNGSANLEITUNG
Vielen Dank, dass Sie sich für den Erwerb dieses JB Systems®-Produkt entschieden haben. Bitte lesen sie
diese Bedienungsanleitung sorgfältig vor der Inbetriebnahme durch, zur vollen Ausschöpfung der
Möglichkeiten, die dieses Gerät bietet sowie, zu Ihrer eigenen Sicherheit.
EIGENSCHAFTEN
Das Gerät ist funkentstört und erfüllt die Anforderungen der europäischen und nationalen Bestimmungen.
Entsprechende Dokumentation liegt beim Hersteller vor.
Kompakter aber kraftvoller Moving-Head für professionelle DJs, Verleihfirmen und Discotheken
Basierend auf der neuesten 60WATT LED Technologie von CREE:
Große Lichtleistung und messerscharfe Gobos dank ausgezeichneter Optik
Sehr geringe Leistungsaufnahme, nur 115W (günstig für die Geldbörse!)
Äußerst leuchtende Farben verglichen mit Geräten mit Halogenlampen
Kein Leuchtenaustausch!
Praktisch keine Wärmeabgabe
Leichtgewichtig (keine Lampentrafos erforderlich)
0-100% Dimmung und ultra schnelle Strobe-Funktion
6 rotierende Gobos + open, ausgestattet mit Gobo-Shaking (Schüttel)-Funktion
Unabhängiges Farbrad mit aufgeteilter Farbfunktion (8 Farben + weiß)
Ausgezeichnete eingebaute Programme für herrliche, abwechslungsreiche Lichtshows:
DMX -Steuerung: 1, 8 oder 11 Kanäle
Standalone: musikgesteuert mit eingebautem Mikro
Master/slave: wundervolle synchronisierte Shows im Standalone-Modus
DMX-master/slave: Dank dieser neuen revolutionären Funktion können mehrere SIRIUS Geräte im
Master/Slave Modus arbeiten, gesteuert über 1 oder 4 DMX-Kanale! Auch während der Verbindung in
einer DMX Kette! (ein optionaler Mini DMX Splitter ist erforderlich)
Zwei unterschiedliche Standardeinstellungen, ideal für Verleihunternehmen:
PRO-Standardwerte: Grundlegende Einstellungen (anpassbar) für die Verwendung mit professionellen
DMX-Controllern.
AUTO-Standardwerte: Grundlegende Einstellungen (anpassbar) für einfache Master/Slave-Anwendung.
Automatische X/Y Rückstellung
2 optionale Steuerungen verfügbar: Kabelgebundene CA8 Steuerung oder Kabellose RF8-SET
Einfache Software-Updates über ein spezielles Software-Upgrade Gerät
LED-Display zur einfachen Menünavigation
Ausstrahlungswinkel = 15°
JB SYSTEMS
VOR DER ERSTBENUTZUNG
Vor der Erstbenutzung bitte das Gerät zuerst auf Transportschäden überprüfen. Sollte das Gerät einen
Schaden aufweisen, Gerät bitte nicht benutzen, sondern unverzüglich mit ihrem Händler in Verbindung
setzen.
Wichtiger Hinweis: Das Gerät hat das Werk unbeschädigt und gut verpackt verlassen. Es ist wichtig,
dass der Benutzer sich streng an die Sicherheitshinweise und Warnungen in der Bedienungsanleitung
hält. Schäden durch unsachgemäße Handhabung sind von der Garantie ausgeschlossen. Der Händler
übernimmt keine Verantwortung für Schäden, die durch Nichtbeachtung der Bedienungsanleitung
hervorgerufen wurden.
Die Bedienungsanleitung, für zukünftiges Nachschlagen, bitte aufbewahren. Bei Verkauf oder sonstiger
Weitergabe des Gerätes, bitte Bedienungsanleitung beifügen.
Packungsinhalt prüfen:
Bitte überprüfen Sie, dass die Packung folgende Einzelteile enthält:
Bedienungsanleitung
SIRIUS Gerät
®
43/85 SIRIUS
JB SYSTEMS® 44/85 SIRIUS
Page 25

DEUTSCH BEDIENUNGSANLEITUNG
befinden sich keine vom Benutzer
DEUTSCH BEDIENUNGSANLEITUNG
Omega-Klemme
IEC- Stromkabel
Ringschraube zur Installation der Sicherheitskabel
SICHERHEITSHINWEISE
ACHTUNG: Um sich nicht der Gefahr eines elektrischen
Schlags auszusetzen, entfernen Sie keines der Gehäuseteile.
Im Geräteinneren
reparierbaren Teile. Überlassen Sie Reparaturen dem
qualifizierten Kundendienst.
Das Blitzsymbol im Dreieck weist den Benutzer darauf hin, dass eine Berührungsgefahr mit
nicht isolierten Teilen im Geräteinneren, die eine gefährliche Spannung führen, besteht. Die
Spannung ist so hoch, das hier die Gefahr eines elektrischen Schlages besteht.
Das Ausrufezeichen im Dreieck weist den Benutzer auf wichtige Bedienungs- und
Wartungshinweise in den Dokumenten hin, die dem Gerät beiliegen.
Dieses Symbol bedeutet: Nur innerhalb von Räumen verwenden.
Dieses Symbol bedeutet: Achtung! Bedienungsanleitung lesen!
Dieses Symbol bedeutet: Klasse I Klassifizierung
Das Gerät eignet sich nicht für die direkte Montage auf normal entflammbaren Oberflächen.
(Geeignet nur für die Montage auf nicht brennbaren Oberflächen)
VORSICHT: Nicht in den LED-Lichtstrahl blinken.
Kann schädlich für die Augen sein.
Aus Umweltschutzgründen, Verpackung bitte wiederverwenden, oder richtig trennen.
Ein neues Gerät kann Geruch oder Rauch entwickeln. Das ist völlig normal und legt sich nach einigen
Minuten.
Zur Vermeidung von Stromschlag oder Feuer, Gerät bitte nicht Regen oder Feuchtigkeit aussetzen.
Zur Vermeidung von Kondensation im Inneren des Geräts, bitte nach Transport in eine warme Umgebung
einige Zeit zum Temperaturausgleich bringen. Kondensation kann zu Leistungsverlust des Gerätes oder
gar Beschädigung führen.
Gerät nicht im Freien und in feuchten Räumen und Umgebungen verwenden.
Keine Metallgegenstände oder Flüssigkeiten ins Innere des Geräts gelangen lassen, Kurzschluß oder
Fehlfunktion können die Folge sein. Falls es doch einmal vorkommen sollte, bitte sofort Netzstecker
ziehen und vom Stromkreis trennen.
Gerät nur in gut belüfteter Position und entfernt von entflammbaren Materialien oder Flüssigkeiten
betreiben. Mindestabstand an allen Seiten soll mindestens 50 cm sein.
Ventilationsöffnungen nicht abdecken, da Überhitzungsgefahr!
Nicht in staubiger Umgebung verwenden und regelmäßig reinigen.
Für Kinder unerreichbar aufbewahren.
Unerfahrene Personen sollen das Gerät nicht bedienen.
Umgebungstemperatur darf 40ºC nicht überschreiten.
Sicherstellen, daß sich während des Auf- und Abbaus keine unbefugten Personen unterhalb des Geräts
befinden.
Stets Netzstecker ziehen, wenn Gerät für längeren Zeitraum nicht genutzt, oder es gewartet wird.
Elektrische Anschlüsse nur durch qualifiziertes Fachpersonal überprüfen lassen.
Sicherstellen, daß Netzspannung mit Geräteaufkleber übereinstimmt.
Gerät nicht mit beschädigtem Netzkabel betreiben. Ist die Zugangsleitung beschädigt, muß diese durch
den Hersteller, seinen Vertrieb oder durch eine Qualifizierte Person ersetzt werden.
Netzkabel nicht mit anderen Kabeln in Berührung kommen lassen!
Zur Einhaltung der Sicherheitsbestimmungen muß das Gerät geerdet sein.
Gerät nicht an einen Dimmer anschließen.
Ausschließlich vorschriftsmäßige Kabel zur Installation verwenden.
Gerät nicht öffnen. Der sind keine zu wartenden Bauteile im Gerät enthalten.
Sicherung niemals reparieren oder überbrücken, sondern immer mit gleichartiger Sicherung ersetzen!
Bei Fehlfunktion, Gerät nicht benutzen und mit Händler in Verbindung setzen.
Bei sichtbaren Beschädigungen müssen Gehäuse und Optik ersetzt werden.
Bei Transport bitte Originalverpackung verwenden, um Schäden am Gerät zu vermeiden.
Aus Sicherheitsgründen dürfen an dem Gerät keine unbefugten Veränderungen vorgenommen werden.
Wichtiger Hinweis: Nicht direkt in die Lichtquelle blicken! Gerät nicht verwenden, wenn sich Personen im
Raum befinden, die unter Epilepsie leiden.
ÜBERKOPF-MONTAGE
Wichtig: Montage ausschließlich durch qualifiziertes Fachpersonal durchführen lassen.
Unvorschriftsmäßiger Einbau kann erhebliche Verletzungen und/oder Schäden verursachen.
Überkopf-Montage verlangt entsprechende Erfahrung! Belastungsgrenzen müssen beachtet
werden, geeignetes Installationsmaterial muß verwendet werden und das installierte Gerät muß in
regelmäßigen Abständen überprüft werden.
Sicherstellen, dass sich keine unbefugten Personen unterhalb des Geräts befinden, während es installiert
oder gewartet wird.
Gerät in gut belüfteter Position installieren, weit entfernt von entflammbaren Materialien und/oder
Flüssigkeiten. Einen Seitenabstand von mindestens 50cm einhalten.
Gerät außerhalb der Reichweite von Personen, und nicht in niedrigen Durchgängen oder in der Nähe von
Sitzgelegenheiten installieren.
Vor Montage sicherstellen, dass die gewählte Position
wenigstens das 10-fache Gerätegewicht aufnehmen kann.
Benutzen Sie stets ein zulässiges Sicherheitskabel (Nummer
3 auf der Abbildung), dass das 12-fache Gerätegewicht
aushalten kann. Eine zweite Sicherungsaufhängung muß
angebracht werden, die ein Absacken des Geräts von mehr
als 20 cm verhindert, sollte die Befestigung brechen.
Gerät gut befestigen. Eine freischwingende Aufhängung ist
gefährlich und sollte auf gar keinen Fall in Betracht gezogen
werden!
Ventilationsöffnungen nicht abdecken, da
Überhitzungsgefahr!
Betreiber muß sicherstellen, dass die sicherheitsrelevanten
und technischen Installationen vor Erstbetrieb fachmännisch
vorgenommen worden sind.
Installationen sollten jährlich durch qualifiziertes Fachpersonal inspiziert werden, um
jederzeit einen sicheren Betrieb zu gewährleisten.
1. Als Zubehör erhältliche Klemme
2. Spezielle Omega Klemme (einbegriffen)
3. Gewindebohrung, zur Installation der mitgelieferten Ringschraube
4. Als Zubehör erhältliches Sicherheitskabel
JB SYSTEMS® 45/85 SIRIUS
JB SYSTEMS® 46/85 SIRIUS
Page 26

DEUTSCH BEDIENUNGSANLEITUNG
DEUTSCH BEDIENUNGSANLEITUNG
EINSTELLEN DES GERÄTS
BEDIENFELD:
1. DISPLAY zeigt die verschiedenen Menüs sowie ausgewählte Funktionen.
2. LEDs
DMX An Gegenwärtig DMX Eingang
HAUPTGERÄT An Hauptgerät in Betrieb
UNTERGERÄT An Untergerät in Betrieb
TON Blinkt Tonsteuerung
3. TASTEN
MENÜ Zur Auswahl der Programmfunktionen
ABWÄRTS Zurück in den gewählten Funktionen
AUFWÄRTS Vorwärts in den gewählten Funktionen
EINGABE Bestätigung der gewählten Funktionen
4. DMX AUSGANG/EINGANG: Zur DMX512 Verbindung der Geräte wird Verwendung qualitativ
hochwertiger 3-Stift XLR M/F abgeglichener Kabel empfohlen.
5. Eingang Fernsteuerung: Schließen Sie die wahlweise CA-8 Fernsteuerung an der 1/4” Mikrofonbuchse
zur Steuerung von Stand-by, Funktion und Modus an.
6. Eingang DRAHTLOSE Fernsteuerung: Schließen Sie die wahlweise RF-8 wireless Fernsteuerung an
der 1/4” Mikrofonbuchse zur Steuerung von Stand-by, Funktion und Modus an.
7. NETZANSCHLUSS: Mit IEC-Buchse und eingebauter Sicherung. Schließen Sie das mitgelieferte
Netzkabel hier.
HAUPTMENÜ:
Zur Auswahl jeglicher voreingestellter Funktion MENÜ-Taste so lange drücken, bis das gewünschte
Display angezeigt wird, oder verwenden Sie die Tasten ABWÄRTS und AUFWÄRTS zum Surfen im
Menü.
Auswahl der Funktion mit EINGABE (ENTER), das Display blinkt.
Mit ABWÄRTS und AUFWÄRTS Betriebsart wählen.
Sobald die gewünschte Betriebsart ausgewählt wurde, mit EINGABE (ENTER) bestätigen.
Zur Rückkehr zu den Hauptmenü ohne Veränderung MENÜ-Taste kurz drücken. Das Hauptmenü ist
rechts abgebildet.
DMX Adresse
Zum Einstellen der Startadresse in DMX Einstellung.
MENU-Taste drücken bis “Addr” im Display angezeigt wird.
EINGABE (ENTER) drücken und das Display beginnt zu blinken.
Mit ABWÄRTS und AUFWÄRTS die DMX512 Adresse verändern.
Sobald die richtige Adresse im Display angezeigt wird, mit EINGABE (ENTER) speichern.
Zur Rückkehr zu den Hauptmenü ohne Veränderung MENÜ-Taste kurz drücken.
Um zu den normalen Betriebsmodus zurückzukehren, halten Sie die MENU Taste ungefähr 2 Sekunden
lang gedrückt.
Channel mode
Wird verwendet um den gewünschten Kanal-Setup-Modus zu wählen.
MENU-Taste drücken bis “ChMd” im Display angezeigt wird.
EINGABE (ENTER) drücken und das Display beginnt zu blinken.
Mit AUFWÄRTS und ABWÄRTS 1MSL, 4MSL, 1CH, 8CH oder 11CH mode
auswählen
Sobald die richtige Kanalmodus im Display angezeigt wird, mit EINGABE
(ENTER) speichern.
Zur Rückkehr zu den Hauptmenü ohne Veränderung MENÜ-Taste kurz drücken.
Um zu den normalen Betriebsmodus zurückzukehren, halten Sie die MENU Taste
ungefähr 2 Sekunden lang gedrückt.
Show Mode
Zur Auswahl des Showbetriebs in Einzel- oder Reihenbetrieb.
MENU-Taste drücken bis “ShMd” im Display erscheint.
Dann EINGABE (ENTER) drücken und Display beginnt zu blinken.
Mit AUFWÄRTS und ABWÄRTS wählen Sie die gewünschte Show-Modus:
Show 1 (Sh 1): Bodenmontage, Neigungswinkel 210°.
Show 2 (Sh 2): Deckenmontage, Neigungswinkel 90°.
Show 3 (Sh 3): Montage auf dem Lautsprecher,
Der Scheinwerfer ist stets auf das Publikum ausgerichtet, beispielsweise vor
der Bühne. Schwenkwinkel (von links nach rechts): 160°. Neigungswinkel:
90° (60° oberhalb des Horizonts, 30° unterhalb des Horizonts)
Show 4 (Sh 4): Montage unter der Decke. Der Scheinwerfer projeziert
hauptsächlich vor der Bühne. Schwenkwinkel (von links nach rechts): 160°.
Neigungswinkel: 90° (vertikal, vorn 75°, hinten 15°)
Sobald die richtige Adresse im Display angezeigt wird, mit EINGABE (ENTER)
speichern.
Zur Rückkehr zu den Hauptmenü ohne Veränderung MENÜ-Taste kurz drücken.
Um zu den normalen Betriebsmodus zurückzukehren, halten Sie die MENU Taste
ungefähr 2 Sekunden lang gedrückt.
Split Color
Sie können wählen, ob die Einheit nur volle Farben anzeigen oder auch Farben
aufteilen kann.
MENÜ-Taste drücken bis “ SPLC ” im Display angezeigt wird.
Dann EINGABE (ENTER) drücken und Display beginnt zu blinken.
Mit AUFWÄRTS und ABWÄRTS “Yes” (aufgeteilter Farbfunktion) oder “No” (nur
volle Farben) auswählen.
Sobald die richtige Modus im Display angezeigt wird, mit EINGABE (ENTER)
speichern.
Zur Rückkehr zu den Hauptmenü ohne Veränderung MENÜ-Taste kurz drücken.
Um zu den normalen Betriebsmodus zurückzukehren, halten Sie die MENU Taste
ungefähr 2 Sekunden lang gedrückt.
Slave Mode
Untergerät arbeitet entgegengesetzt oder synchron mit dem Hauptgerät.
MENÜ-Taste drücken bis “SLMd” im Display angezeigt wird.
Dann EINGABE (ENTER) drücken und Display beginnt zu blinken.
Mit AUFWÄRTS und ABWÄRTS “SL 1” (Normal) oder “SL 2” (2 Lightshow)
auswählen.
Sobald die richtige Modus im Display angezeigt wird, mit EINGABE (ENTER)
speichern.
Zur Rückkehr zu den Hauptmenü ohne Veränderung MENÜ-Taste kurz drücken.
Um zu den normalen Betriebsmodus zurückzukehren, halten Sie die MENU Taste
ungefähr 2 Sekunden lang gedrückt.
JB SYSTEMS® 47/85 SIRIUS
JB SYSTEMS® 48/85 SIRIUS
Page 27

DEUTSCH BEDIENUNGSANLEITUNG
DEUTSCH BEDIENUNGSANLEITUNG
Blackout
Blackout: Wird kein DMX-Signal erkannt, geht das Gerät in Blackout und wartet auf das DMX-Signal.
Kein Blackout: Wird kein DMX-Signal erkannt, schaltet das Gerät automatisch auf Einzelbetrieb um.
MENÜ-Taste drücken bis “bLMd” im Display erscheint.
Dann EINGABE (ENTER) drücken und Display beginnt zu blinken.
Mit AUFWÄRTS und ABWÄRTS “Yes” (Blackout ein) oder “No” (kein Blackout) auswählen.
Sobald die richtige Modus im Display angezeigt wird, mit EINGABE (ENTER) speichern (anderenfalls
nach 8 Sekunden Rückkehr zu den Hauptfunktionen ohne Änderung).
Zur Rückkehr zu den Hauptmenü ohne Veränderung MENÜ-Taste kurz drücken.
Um zu den normalen Betriebsmodus zurückzukehren, halten Sie die MENU Taste ungefähr 2 Sekunden
lang gedrückt.
Sound State (Musikmodus)
Damit das Gerät im Takt der Musik arbeitet bei Verwendung im Standalone- oder Master/SlaveBetrieb
MENÜ-Taste drücken bis “SOUn” im Display angezeigt wird.
Dann EINGABE (ENTER) drücken und Display beginnt zu blinken.
Mit DOWN und UP “On” oder “Off” auswählen.
Sobald die richtige Modus im Display angezeigt wird, mit EINGABE (ENTER) speichern.
Zur Rückkehr zu den Hauptmenü ohne Veränderung MENÜ-Taste kurz drücken.
Um zu den normalen Betriebsmodus zurückzukehren, halten Sie die MENU Taste ungefähr 2 Sekunden
lang gedrückt.
Sound Sense
Zur Einstellung der Empfindlichkeit des Mikrofons
MENÜ-Taste drücken bis “SOSe” im Display angezeigt wird.
Dann EINGABE (ENTER) drücken und Display beginnt zu blinken.
Mit DOWN und UP wählen Sie einen Wert zwischen "0" (sehr geringe Empfindlichkeit) und "100" (hohe
Empfindlichkeit).
Sobald die richtige Modus im Display angezeigt wird, mit EINGABE (ENTER) speichern.
Zur Rückkehr zu den Hauptmenü ohne Veränderung MENÜ-Taste kurz drücken.
Um zu den normalen Betriebsmodus zurückzukehren, halten Sie die MENU Taste ungefähr 2 Sekunden
lang gedrückt.
Pan Inversion
Normal: Schwenkbewegung ist nicht umgekehrt.
Pan inversion: Schwenkbewegung ist umgekehrt.
MENÜ-Taste drücken bis “IPAn” im Display angezeigt wird.
Dann EINGABE (ENTER) drücken und Display beginnt zu blinken.
Mit AUFWÄRTS und ABWÄRTS “No” (Normal) oder “I” (Schwenk Umkehrung) auswählen.
Sobald die richtige Modus im Display angezeigt wird, mit EINGABE (ENTER) speichern.
Zur Rückkehr zu den Hauptmenü ohne Veränderung MENÜ-Taste kurz drücken.
Um zu den normalen Betriebsmodus zurückzukehren, halten Sie die MENU Taste ungefähr 2 Sekunden
lang gedrückt
Tilt Inversion
Normal: Neigungsbewegung ist nicht umgekehrt.
Tilt inversion: Neigungsbewegung ist umgekehrt.
MENÜ-Taste drücken bis “ItLt” im Display erscheint.
Dann EINGABE (ENTER) drücken und Display beginnt zu blinken.
Mit AUFWÄRTS und ABWÄRTS “No” (Normal) oder “I” (Neigung Umkehrung) einstellen.
Sobald die richtige Modus im Display angezeigt wird, mit EINGABE (ENTER) speichern.
Zur Rückkehr zu den Hauptmenü ohne Veränderung MENÜ-Taste kurz drücken.
Um zu den normalen Betriebsmodus zurückzukehren, halten Sie die MENU Taste ungefähr 2 Sekunden
lang gedrückt.
Display on/off
Display on: Display ist ständig eingeschaltet.
Display off: Display ist ausgeschaltet, wenn nicht in Benutzung.
MENÜ-Taste drücken bis “Led” im Display erscheint.
Dann EINGABE (ENTER) drücken und Display beginnt zu blinken.
Mit ABWÄRTS und AUFWÄRTS “On” (Display ist immer beleuchtet) oder “Off” (Display ist dunkel, wenn
nicht in Benutzung) auswählen.
Sobald die richtige Modus im Display angezeigt wird, mit EINGABE (ENTER) speichern.
Zur Rückkehr zu den Hauptmenü ohne Veränderung MENÜ-Taste kurz drücken.
Um zu den normalen Betriebsmodus zurückzukehren, halten Sie die MENU Taste ungefähr 2 Sekunden
lang gedrückt.
Display Inversion (Umkehr)
Display normal: Display ist lesbar, wenn das Gerät auf dem Boden steht.
Display Inversion: Display ist lesbar, wenn das Gerät auf dem Kopf montiert wird.
Drücken Sie die MENU Taste bis “dISP” auf dem Display erscheint. (normales Display)
Drücken Sie die ENTER Taste um zwischen (normales Display) und (Display inversion) hin
und her zu wechseln.
Um zu den normalen Betriebsmodus zurückzukehren, halten Sie die MENU Taste ungefähr 2 Sekunden
lang gedrückt.
Function Delay
Sie können auf dem Funktionskanal (CH8 oder CH11) einige Sonderfunktionen wählen, wie „Blackout
während Gobo-Wechsel“ und weitere. Mit dieser Option können Sie die Verzögerung wählen, bevor
eine gewählte Funktion aktiviert wird.
WICHTIGE INFORMATIONEN: Wenn Sie einen DMX-Controller oder eine DMX-Software verwenden,
welche die Voreinstellungen für die DMX-Werte der Sonderfunktionen benutzen, können Sie die
Funktionsverzögerung nur auf null Sekunden (keine Verzögerung) einstellen.
Verwenden Sie während der Benutzung eines einfachen DMX-Controllers mit Fadern niemals „Keine
Verzögerung“, um die Funktionen manuell einzustellen!
MENÜ-Taste drücken bis “Fude” im Display angezeigt wird.
Dann EINGABE (ENTER) drücken und Display beginnt zu blinken.
Mit DOWN und UP wählen Sie einen Wert zwischen “0” (keine Delay) und “3” (3s Delay)
Drücken Sie nach der Auswahl der Verzögerung zum Speichern die Schaltfläche ENTER.
Zur Rückkehr zu den Hauptmenü ohne Veränderung MENÜ-Taste kurz drücken.
Um zu den normalen Betriebsmodus zurückzukehren, halten Sie die MENU Taste ungefähr 2 Sekunden
lang gedrückt.
Dimmer Calibrate
Auf Grund von Toleranzen während des Produktionsprozesses haben nicht alle LEDS genau die
gleiche Helligkeit. Sie können diese Option zum Anpassen der Helligkeit von verschiedenen
Einheiten verwenden.
MENÜ-Taste drücken bis “dCAL” im Display angezeigt wird.
Dann EINGABE (ENTER) drücken und Display beginnt zu blinken.
Mit DOWN und UP wählen Sie einen W ert zwischen “50” (Die niedrigste Helligkeit) und “100” (Die höchste
Helligkeit).
Drücken Sie nach der Auswahl der Helligkeit die Schaltfläche ENTER zum Speichern.
Zur Rückkehr zu den Hauptmenü ohne Veränderung MENÜ-Taste kurz drücken.
Um zu den normalen Betriebsmodus zurückzukehren, halten Sie die MENU Taste ungefähr 2 Sekunden
lang gedrückt.
Auto Test
Zur Aktivierung des eingebauten Selbsttest-Programms, das alle Möglichkeiten des Geräts
kontrolliert.
MENÜ-Taste drücken bis “teSt” im Display erscheint.
Mit EINGABE (ENTER) Selbsttest starten.
Zur Rückkehr zu den Funktionen MENÜ-Taste drücken.
Um zu den normalen Betriebsmodus zurückzukehren, halten Sie die MENU Taste ungefähr 2 Sekunden
lang gedrückt.
JB SYSTEMS® 49/85 SIRIUS
JB SYSTEMS® 50/85 SIRIUS
Page 28
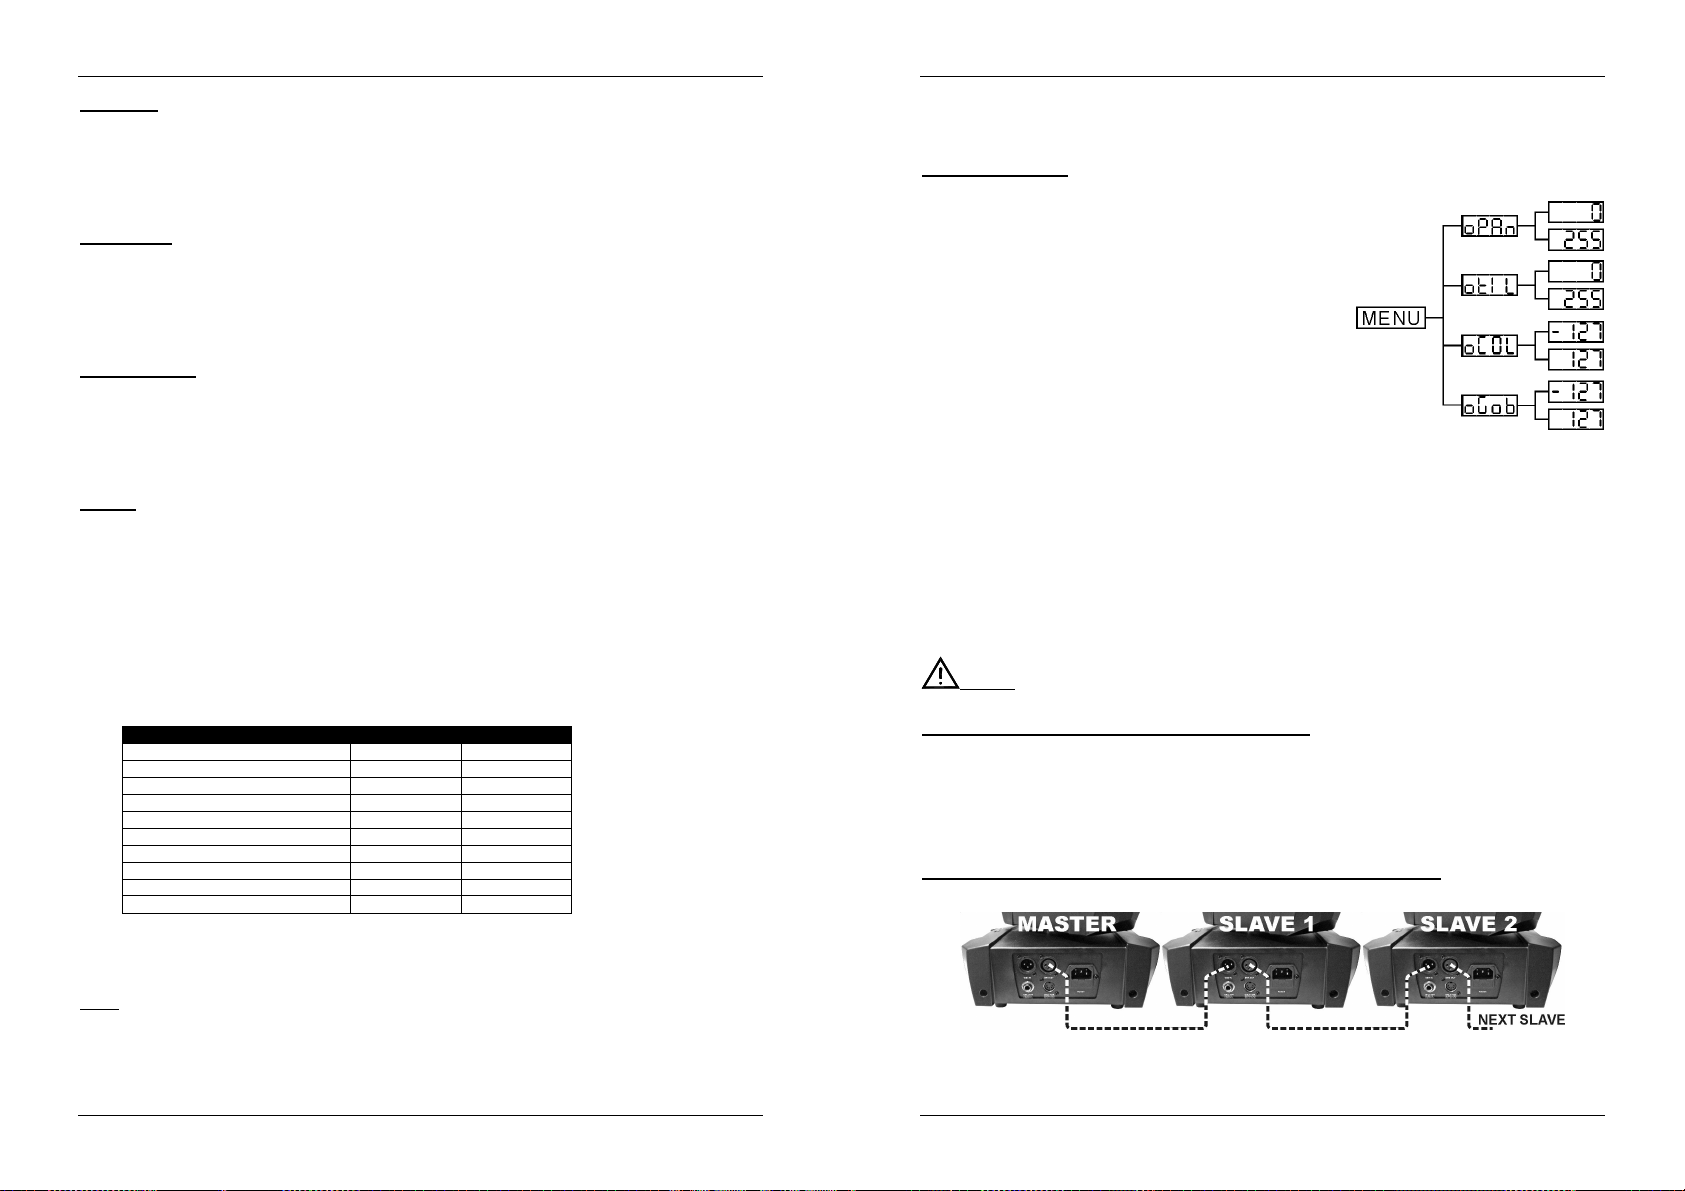
DEUTSCH BEDIENUNGSANLEITUNG
Settings
PRO def
AUTO def
DEUTSCH BEDIENUNGSANLEITUNG
Temperatur
Anzeige der Temperatur im Beleuchtungskörper
Drücken Sie MENU, bis “teMP” im Display erscheint.
Mit ENTER wird die Temperatur im Display angezeigt.
Rückkehr zu den Funktionen mit erneutem Tastendruck auf MENU.
Um zu den normalen Betriebsmodus zurückzukehren, halten Sie die MENU Taste ungefähr 2 Sekunden
lang gedrückt.
Fixture Hours
Zur Anzeige der Arbeitsstunden des Geräts.
MENÜ-Taste drücken bis “FhrS”im Display erscheint.
Mit EINGABE (ENTER) die Arbeitsstunden im Display anzeigen.
Zur Rückkehr zu den Funktionen MENÜ-Taste drücken.
Um zu den normalen Betriebsmodus zurückzukehren, halten Sie die MENU Taste ungefähr 2 Sekunden
lang gedrückt.
Software Version
Zur Anzeige der auf dem Gerät installierten Software Version
Drücken Sie die MENU-Taste bis “ver” auf dem Display erscheint.
Drücken Sie die ENTER-Taste, um die Software Version auf dem Display anzuzeigen.
Um zu den Funktionen zurückzukehren, drücken Sie die MENU-Taste.
Um zu den normalen Betriebsmodus zurückzukehren, halten Sie die MENU Taste ungefähr 2 Sekunden
lang gedrückt.
Defaults
Wird zur Wahl zwischen 2 Standardeinstellungssätzen verwendet. Wird oft von Verleihunternehmen
verwendet:
PRO-Standardwerte: Grundlegende Einstellungen zur Verwendung mit professionellen DMXControllern.
AUTO-Standardwerte: Grundlegende Einstellungen für eine einfache Master/Slave-Anwendungen.
Drücken Sie die MENU-Taste bis “ deF ” auf dem Display erscheint.
Drücken Sie die ENTER-Taste:
Wählen Sie mit den Schaltflächen DOWN (ABWÄRTS) und UP (AUFWÄRTS) die Option Yes” oder
“No” und drücken Sie zum Bestätigen ENTER.
Wenn Sie „Ja“ gewählt haben, können Sie zwischen 2 Optionen wählen. Jede Option hat ihre eigenen
Einstellungen:
Prod PRO-Standardwerte werden geladen
Autd AUTO-Standardwerte werden geladen
Channel mode 11ch 4MSL
Split Colors Yes No
Slave Mode Slave 1 Slave 1
Blackout Mode Yes No
Sound State Off On
Sound Sense 90 90
Pan Inverse No No
Tilt Inverse No No
Backlight No Yes
Function Delay 3s 3s
Beginnend mit diesen Standardwerten können Sie leicht Ihre zusätzlichen Einstellungen vornehmen.
Die anderen Einrichtungsparameter bleiben unverändert.
Um zu den normalen Betriebsmodus zurückzukehren, halten Sie die MENU Taste ungefähr 2 Sekunden
lang gedrückt.
Reset
Zur erzwungenen Rückstellung des Geräts.
MENÜ-Taste drücken bis “rSet” im display erscheint.
Mit EINGABE (ENTER) alle Einstellungen in die Standardeinstellungen zurücksetzen.
Zur Rückkehr zu den Funktionen MENÜ-Taste drücken.
Um zu den normalen Betriebsmodus zurückzukehren, halten Sie die MENU Taste ungefähr 2 Sekunden
lang gedrückt.
Bitte lesen Sie auch im Kapitel DMX-Kanal-Konfiguration über Rückstellung in DMX nach.
Home Position Adjust
Wird benutzt um die Ausgangsposition verschiedener Funktionen einzustellen:
Stellen Sie sicher, dass das Gerät mit einem DMX-Controller
angeschlossen ist und auf 11CH-Channel-Modus: setz ch6 + ch7
auf Maximum.
WennSie nicht bereits im Setup-Menü sind, pressen Sie einfach
den MENU Knopf im dorthin zu gelangen. (Im Display wird “Addr”
angezeigt)
Drücken Sie jetzt die ENTER-Taste ungefähr 5 Sekunden lang,
um in den Offset-Modus zu gelangen.
Benutzen Sie die DOWN- und UP-Knöpfe, um die Funktion
auszuwählen, die Sie anpassen möchten
oPAn: W ird benutzt um die Ausgangsposition für die Pan-
Funktion einzustellen.
otIL: Wird benutzt um die Ausgangsposition für die Tilt-
Funktion einzustellen.
oCoL: Wird benutzt um die Ausgangsposition für das
Farbrad einzustellen.
oGob: Wird benutzt um die Ausgangsposition für das Goborad einzustellen.
Drücken Sie die ENTER-Taste und das Display beginnt zu blinken.
Benutzen Sie die DOWN- und UP-Knöpfe, um die Grundeinstellung anzupassen
Drücken Sie die ENTER-Taste, um Ihre Einstellung zu bestätigen
Um zu den Funktionen zurückzukehren, ohne eine Einstellung zu verändern, drücken Sie wieder die MENUTaste.
Um zu den normalen Betriebsmodus zurückzukehren, halten Sie die MENU Taste ungefähr 2 Sekunden
lang gedrückt. Die neue Offset-Parameter für die verschiedenen Funktionen sind im Flash-Speicher
erhalten.
ELEKTRISCHE INSTALLATION + ADRESSIERUNG
Wichtig: Die Elektroinstallation sollte nur von Fachleuten in Übereinstimmung mit den in Ihrem
Land geltenden Bestimmungen für elektrische und mechanische Sicherheit ausgeführt werden.
Elektrische Installation von einem allein stehenden Gerät:
Stecken Sie einfach das Netzkabel ein. Die Gerät fängt sofort an im allein stehenden Modus zu arbeiten
Anmerkung 1: Sie können einen Fernsteuerungscontroller CA-8 oder RF-8 an das Gerät anschließen,
wenn Sie zusätzliche Steuerungsfunktionen haben möchten. In Abschnitt „Bedienen des Geräts“ erfahren
Sie mehr darüber.
Anmerkung 2: Sollte kein Ausgang vorhanden sein, stellen Sie sicher, dass das Gerät im Master-Modus
eingestellt ist und setzen sie den Blackout Modus auf “NO ” und Sound State auf “On” (siehe
vorangehendes Kapitel)
Elektrische Installation für zwei oder mehrere Geräte im Master/Slave-Modus:
In diesem Modus zeigt das Gerät eine synchronisierte Show, welche auf den Rythmus der Musik reagiert.
Schließen Sie 2 bis max. 16 Geräte mit hochwertig abgeschirmten Mikrofonkabeln an.
Vergewissern Sie sich, dass alle Geräte an die Netzleitung angeschlossen wurden. Das erste Gerät in
JB SYSTEMS® 51/85 SIRIUS
JB SYSTEMS® 52/85 SIRIUS
Page 29

DEUTSCH BEDIENUNGSANLEITUNG
DEUTSCH BEDIENUNGSANLEITUNG
der Kette wird automatisch als Master, die anderen Einheiten werden automatisch reagieren als Sklaven
Fertig!
Anmerkung 1: Sie können einen Fernsteuerungscontroller CA-8 oder RF-8 an das Gerät anschließen,
wenn Sie zusätzliche Steuerungsfunktionen haben möchten.
Anmerkung 2: Sollte kein Ausgang vorhanden sein, stellen Sie sicher, dass das erste Gerät im MasterModus eingestellt ist und setzen sie den Blackout Modus auf “NO” und Sound State auf “On” (siehe
vorangehendes Kapitel)
Elektrische Installation für zwei oder mehrere Geräte im DMX-master/slave-Modus:
In diesem Modus zeigt das Gerät eine synchronisierte Show, welche auf den Rythmus der Musik reagiert.
Sie können jedoch immernoch auf einige Funktionen über den 1 oder 4 Kanal DMX Modus Einfluss nehmen.
Um einen problemlosen Betrieb zu gewährleisten, benötigen Sie einen "Mini DMX-Splitter" der die
Master/Slave-Linie von der Haupt-DMX-Line isoliert. (Siehe Zeichnung).
Schließen Sie 2 bis max. 16 Geräte mit hochwertig abgeschirmten Mikrofonkabeln an. Das erste Gerät
in der Kette wird ist der Master, die anderen Einheiten werden automatisch reagieren als Sklaven.
Stellen Sie den Master auf 1MSL oder 4MSL Kanal-Modus (siehe vorheriges Kapitel). Auf der unten
aufgeführten Tabelle sehen Sie die Unterschiede der beiden Modi.
Für Ihren DMX-Controller sind der Master und seine Slaves nun ein virtueller Effekt, welcher eine
Startadresse benötigt um wie jeder andere Effekt in der DMX-Linie gesteuert zu werden: siehe "DMX
Adesse" im Kapitel "Hauptmenü" um zu erfahren wie man die Startadresse einstellt.
Make sure that all units are connected to the mains.
Stellen Sie den DMX-Controller nach der unten aufgeführten DMX-Tabelle ein.
Done!
Hinweis: um sicherzustellen, dass das Gerät gut zum Rhythmus der Musik arbeitet, sollten Sie darauf
achten, dass die Option “Sound State” bei dem Master auf “On” steht (siehe voriges Kapitel)
DMX-Chart für 1MSL und 4MSL Betriebsmodi
1 MSL 4 MSL
Elektroinstallation im DMX-Modus:
Das DMX-Protokoll ist ein gängiges Hochgeschwindigkeitssignal, um intelligente Lichtsysteme zu
steuern. Sie müssen Ihren DMX-Controller und alle angeschlossenen Geräte mit einem hochwertigen
symmetrischen Kabel hintereinander schalten (daisy chain).
Es werden sowohl XLR-3pin als auch XLR-5pin-Stecker benutzt, allerdings ist der XLR-3pin gängiger,
da diese Kabel mit symmetrischen Audiokabel kompatibel sind.
Stiftanordnung XLR-3pin:
Stiftanordnung XLR-5pin:
nicht benutzt.
Um durch Interferenzen verursachte Fehlfunktionen der Lichteffekte zu vermeiden,
müssen Sie einen 90Ω bis 120Ω Abschlusswiderstand am Ende der Kette einsetzen.
Verwenden Sie niemals Y-Splitter Kabel, das funktioniert nicht!
Stellen Sie sicher, dass alle Geräte an das Netz angeschlossen sind.
EINSTELLEN DER RICHTIGEN STARTADRESSE:
Bitte im vorherigen Kapitel (DMX-512 Adresse einstellen) nachlesen, wie die Startadresse eingestellt wird.
Die Startadresse jedes einzelnen Geräts ist ausgesprochen wichtig. Unglücklicherweise ist es unmöglich,
Ihnen in dieser Bedienungsanleitung zu erklären, welche Startadresse Sie einzustellen haben. Das hängt
vollständig von dem verwandten Controller ab… Also, bitte lesen Sie in der Bedienungsanleitung Ihres DMX
Controllers nach, wie die Startadresse einzustellen ist.
DMX-KONFIGURATION SIRIUS IM 1-KANAL MODUS:
Pin1 = GND ~ Pin2 = Negatives Signal (-) ~ Pin3 = Positives Signal (+)
Pin1 = GND ~ Pin2 = Negatives Signal (-) ~ Pin3 = Positives Signal (+) ~ Pins4+5
JB SYSTEMS® 53/85 SIRIUS
JB SYSTEMS® 54/85 SIRIUS
Page 30

DEUTSCH BEDIENUNGSANLEITUNG
DEUTSCH BEDIENUNGSANLEITUNG
DMX-KONFIGURATION SIRIUS IM 8-KANAL MODUS:
DMX-KONFIGURATION SIRIUS IM 11-KANAL MODUS:
JB SYSTEMS® 55/85 SIRIUS
DAS GERÄT BETREIBEN MIT EINEM CA8 / RF8SET
Wenn das Gerät im Standalone oder Master/Slave Modus genutzt wird, raten wir dazu, den CA-8 “Kabel
Controller” oder das RF-8SET “Funk Controller” zu nutzen.
CA-8 Kabelgebundene Steuerung: Verbinden Sie den
Controller mit dem Klinke Eingang der ersten Geräteeinheit
(master).
RF-8SET Kabellose Steuerung: die kabellose Steuerung
besteht aus 2 Teilen:
RF-8T: kleiner RF-Transmitter welcher bis zu 5 Effekte
steuern kann.
RF-8R: kleiner RF-Empfänger welcher an den DIN-5pin
input des SIRIUS angeschlossen wird. Siehe
Bedienungsanleitung des Empfängers für mehr
Informationen.
Nun können Sie alle angeschlossenen Einheiten kontrollieren:
STANDBY Knopf:
Drücken Sie diesen Knopf um den Blackout Modus an allen
angeschlossenen.
JB SYSTEMS® 56/85 SIRIUS
Page 31

DEUTSCH BEDIENUNGSANLEITUNG
MODE/FUNCTION Knopfe:
Mit dem MODE Knopf können Sie 3 verschiedene Modi wählen:
Die LED ist aus: Mit dem FUNCTION Knopf können Sie verschiedene Stroboskop Funktionen wählen, wie
“sound strobe”.
Die LED blinkt: Mit dem FUNCTION Knopf können Sie verschiedene Shows wählen.
Die LED leuchtet: (Musik-Modus ist vorübergehend abgeschaltet)
Drücken Sie die Taste FUNCTION kurz: die Farben ändern
Drücken Sie die Taste FUNCTION länger: die Gobos wechseln
ESPAÑOL MANUAL DE INSTRUCCIONES
MANUAL DE FUNCIONAMIENTO
Gracias por comprar este producto JB Systems®. Para sacar el máximo rendimiento a sus posibilidades y
por su propia seguridad, lea estas instrucciones de funcionamiento detenidamente antes de comenzar a
utilizar esta unidad.
WARTUNG UND INSTANDHALTUNG
Sicherstellen, dass sich keine Personen unterhalb des Geräts befinden, während es gewartet wird.
Gerät ausschalten, Netzstecker ziehen und warten, bis es sich abgekühlt hat.
Während der Wartung sind folgende Punkte ganz besonders zu beachten:
Sämtliche Schrauben zur Installation und Befestigung jeglicher Teile müssen fest angezogen und rostfrei
sein.
Gehäuse, Befestigungsmaterialien und Aufhängungen (Decke, Balken, abgehängte Decken) dürfen keine
Anzeichen von Verformung zeigen.
Ist die Optik sichtbar beschädigt (Sprünge oder tiefe Kratzer), dann müssen die entsprechenden Teile
ausgewechselt werden.
Netzkabel muß stets in einwandfreiem Zustand sein und selbst bei kleinsten Beschädigungen erneuert
werden.
Zur Vermeidung von Überhitzung müssen die Ventilatoren (sofern vorhanden) und Lüftungsschlitze
monatlich gereinigt werden.
Gerät innen mindestens einmal pro Jahr mit Staubsauger oder Airjet reinigen.
Reinigung der inneren und äußeren optischen Linsen und/oder Spiegel müssen in regelmäßigen
Abständen zur Beibehaltung einer optimalen Lichtausbeute vorgenommen werden. Reinigungsintervalle
hängen stark von der Umgebung ab: feuchte, verrauchte und besonders verschmutzte Umgebung führen
zu größerer Verschmutzung auf den Linsen.
Mit weichem Tuch und gewöhnlichem Glasreiniger säubern.
Alle Teile stets gut abtrocknen.
Achtung: Wir empfehlen dringend, Reinigung im Innern des Geräts nur von qualifiziertem Personal
durchführen zu lassen!
TECHNISCHE EINZELHEITEN
Netzspannung: AC 100 - 240V, 50/60Hz
Max. Leistungsaufnahme: 115 Watt
Klangregler: Eingebautes Mikrofon
Pan/Tilt: 540°/270°
Abstrahlwinkel: 15°
Gobo Abmessungen (mm): D=23,7 / Bild = 19mm
DMX Anschlüsse: 3-pin XLR Stecker/Buchse
Led 1 weiße LED 60Watt
Abmessungen: Siehe Zeichnung
Gewicht: 8,80 kg
Technische Änderungen können auch ohne
Vorankündigung vorgenommen werden!
Sie können sich die neueste Version dieses
Benutzerhandbuches von unserer Website
herunterladen: www.beglec.com
CARACTERÍSTICAS
Esta unidad está a prueba de interferencias de radio. Este producto cumple los requisitos de las directrices
nacionales y europeas actuales. Se ha establecido la conformidad y las instrucciones y documentos
correspondientes han sido depositados por el fabricante.
Cabeza móvil de diseño compacto pero muy potente para DJs profesionales, compañías de alquiler y
discotecas
Sobre la base de la última tecnología CREE LED de 60WATT:
Óptica excelente para gobos bien definidos y gran emisión luminosa
Consumo de energía muy bajo, sólo 115W (Ahorro de dinero!)
Colores muy brillantes en comparación con los efectos de lámparas halógenas
No hay que sustituir las lámparas!
Casi no produce calor
Peso ligero (no necesita transformadores de lámpara)
Regulación de intensidad luminosa 0-100% y función estroboscópica ultra rápida
6 gobos giratorios + abierto, equipado con función de sacudida del gobo
Rueda de color independiente con función de división de colores (8 colores + blanco)
Excelentes programas incorporados para espectáculos de luces maravillosos en constante cambio:
Control DMX: 1, 8 o 11 canales
Independiente: se activa por sonido con micrófono interno
Maestro/esclavo: espectáculos perfectamente sincronizados
DMX-master/slave: gracias a esta nueva característica revolucionaria varias unidades SIRIUS , que
funcionen en maestro / esclavo, podrán ser ontroladas por 1 o 4 canales DMX! Incluso cuando
están conectadas en una cadena DMX! (opcional mini splitter DMX requerido)
Dos configuraciones diferentes preestablecidas, sencillo para las empresas de alquiler:
Configuración PRO: ajustes básicos (ajustable) para el uso en controladores DMX profesionales.
Configuración AUTO: ajustes básicos (ajustable) para un sencillo uso maestro/esclavo.
Reposicionamiento X/Y automático
Disponibilidad opcional de 2 remotos: Control remoto con cable CA8 o remoto inalámbrico RF8-SET
Actualizaciones faciles del software a través de la unidad especial de actualización
Pantalla LED para la navegación fácil del menú
Ángulo del haz = 15°
ANTES DE UTILIZAR EL APARATO
Antes de comenzar a utilizar esta unidad, compruebe que no haya habido daños durante el transporte. Si
observa algún daño, no utilice el dispositivos y consulte primero a su distribuidor.
Importante: Este dispositivo a salido de nuestras instalaciones en perfecto estado y bien embalado. Es
absolutamente necesario que el usuario siga estrictamente estas instrucciones y advertencias de
seguridad que aparecen en este manual de usuario. Cualquier daño producido por un manejo innecesario
queda excluido de la garantía. El distribuidor no asumirá ninguna responsabilidad por cualquier defecto o
problema que surja por no haber seguido el manual de usuario.
Guarde este folleto en un lugar seguro para consultarlo en el futuro. Si vende este aparato más adelante,
asegúrese de incluir este manual de usuario.
Compruebe el contenido:
Compruebe que la caja contiene los siguientes elementos:
Instrucciones de funcionamiento
Unidad SIRIUS
JB SYSTEMS® 57/85 SIRIUS
JB SYSTEMS
®
58/85 SIRIUS
Page 32

ESPAÑOL MANUAL DE INSTRUCCIONES
ESPAÑOL MANUAL DE INSTRUCCIONES
Abrazadera omega
Cable de red IEC
Cáncamo para instalar un cable de seguridad opcional
INSTRUCCIONES DE SEGURIDAD:
PRECAUCIÓN: Para reducir el riesgo de electrocución, no
quite la cubierta superior . Ninguna pieza usable adentro para
el utilizador. Dirijase unicamente a personal cualificado.
El simbolo de un rayo en el interior de un triangulo alerta sobre la presencia o el uso de
elementos no isolados donde un voltaje peligroso constituye un riesgo grande para causar una
eventual electrocución.
El punto de exclamación en el interior de un triangulo alerta al usuario sobre la presencia de
importantes instrucciones de operación y de mantenimiento tenidas en cuenta en el manual de
uso.
Este símbolo significa : uso para el interior solamente.
Este símbolo significa : Lea las instrucciones.
Este símbolo significa: Aplicaciones de la clase I
El dispositivo no es adecuado para el montaje directo sobre superficies normalmente
inflamables. (Apto sólo para el montaje en superficies no inflamables)
PRECAUCIÓN RADIACIÓN POR DIODOS EMISORES DE LUZ (LED)
NO MIRAR FIJAMENTE EL RAYO LUMINOS.
Afín de evitar todo riesgo de incendio o electrocución, no exponer el aparato a la lluvia o ambiente
humedo.
Un nuevo efecto de luz algunas veces causa algún olor y/o humo no deseados. Esto es normal y
desaparece después de algunos minutos.
Para evitar fuego o riesgos de descargas no exponga este aparato a la lluvia o humedad.
Para evitar que se forme condensación en el interior, permita que la unidad se adapte a las temperaturas
circundantes cuando la lleve a una habitación cálida después de transporte. Condensación algunas veces
impide que la unidad funcione a rendimiento pleno o puede incluso causar daños.
Esta unidad es sólo para uso interior.
No coloque objetos metálicos o derrame líquidos dentro de la unidad. Podría resultar descarga eléctrica o
mal funcionamiento. Si un objeto extraño entrara en la unidad, desconecte inmediatamente la fuente de
alimentación.
Coloque la instalación en un lugar bien ventilado, alejado de cualquier material inflamable y/o líquidos. La
instalación debe ser fijada al menos a 50 cm. de distancia de los muros circundantes.
No cubra ninguna apertura de ventilación ya que esto podría resultar en sobrecalentamiento.
Evite su uso en ambientes polvorientos y limpie la unidad regularmente.
Mantenga la unidad alejada de los niños.
Personas sin experiencia no deberían manejar este aparato.
La temperatura máxima de ambiente es 40°C. No use esta unidad a temperaturas más elevadas.
Asegúrese de que el área por debajo del sitio de instalación está libre de personas ajenas durante el
montaje, desmontaje y reparación.
Siempre desenchufe la unidad cuando no la use por un periodo de tiempo largo o comenzar una
reparación.
La instalación eléctrica debería ser llevada a cabo sólo por personal cualificado, acorde a las regulaciones
para seguridad eléctrica y mecánica de su país.
Compruebe que el voltaje disponible no es superior al que aparece en el panel trasero de la unidad.
El cable de alimentación debería estar siempre en perfectas condiciones: apague el aparato
inmediatamente cuando el cable de alimentación esté roto o dañado. Debe ser substituido por el
fabricante, su servicio técnico o otra persona cualificada.
¡Nunca deje el cable de alimentación entrar en contacto con otros cables!
Esta instalación debe ser conectada a tierra para cumplir con las regulaciones de seguridad.
No conecte la unidad a ningún paquete de reducción de luz.
Siempre use un cable de seguridad apropiado y certificado cuando instale la unidad.
Para prevenir descargas eléctricas, no abra la tapa. No hay partes que puedan ser reparadas por el
usuario en su interior.
Nunca repare un fusible o haga un bypass al fusible. ¡Siempre sustituya el fusible dañado por un fusible
del mismo tipo y especificaciones eléctricas!
En el caso de problemas serios de manejo, deje de usar la instalación y contacte con su vendedor
inmediatamente.
La carcasa y las lentes deben ser cambiadas si hay daño visible.
Por favor, use el empaquetado original cuando el aparato deba ser transportado.
Debido a motivos de seguridad está prohibido hacer modificaciones sin autorizar a la unidad.
Importante: ¡Nunca mire directamente a la fuente de luz! No use el efecto en presencia de personas que
sufran de epilepsia.
MONTAJE SUPERIOR
Importante: La instalación sólo debe llevarse a cabo por personal técnico cualificado. Una
instalación incorrecta puede provocar lesiones graves y/o daños en la propiedad. ¡El montaje
superior requiere mucha experiencia! Deben respetarse los límites de carga de funcionamiento,
deben utilizarse materiales de instalación homologados, el dispositivo instalado debe
inspeccionarse regularmente por su seguridad.
Asegúrese de que debajo del área del lugar de instalación no hay personas durante el montaje,
desmontaje o mantenimiento.
Coloque el aparato en un lugar bien ventilado, lejos de materiales y/o líquidos inflamables. El aparato
debe colocarse a al menos 50 cm de las paredes.
El dispositivo debe instalarse lejos del alcance de las
personas y de las áreas exteriores donde éstas puedan
andar o sentarse.
Antes del montaje asegúrese de que el área de la
instalación puede soportar una carga mínima de 10 veces
el peso de la unidad.
Utilice siempre un cable de seguridad (N° 3 en la imagen)
homologado que pueda soportar 12 veces el peso del
dispositivo cuando instale la unidad. Este accesorio de
seguridad secundario debe instalarse de forma que
ninguna pieza de la instalación pueda caerse más 20 cm si
falla el accesorio principal.
El dispositivo debe fijarse correctamente; ¡un montaje con
giro libre es peligroso y no debe considerarse!
No cubra ninguna abertura de ventilación puesto que
podría producirse un sobrecalentamiento de la unidad.
El operario debe asegurarse de que las instalaciones relacionadas con la seguridad
son aprobadas por un experto antes de utilizarlas por primera vez. Las instalaciones
deberán inspeccionarse anualmente por una persona cualificada para asegurar que
la seguridad es óptima.
1. Garra opcional
2. Adaptador Omega especial (incluido)
3. Orificio roscado, que sirve para instalar el Cáncamo suministrado
4. Cable opcional de seguridad
JB SYSTEMS
®
59/85 SIRIUS
JB SYSTEMS
®
60/85 SIRIUS
Page 33
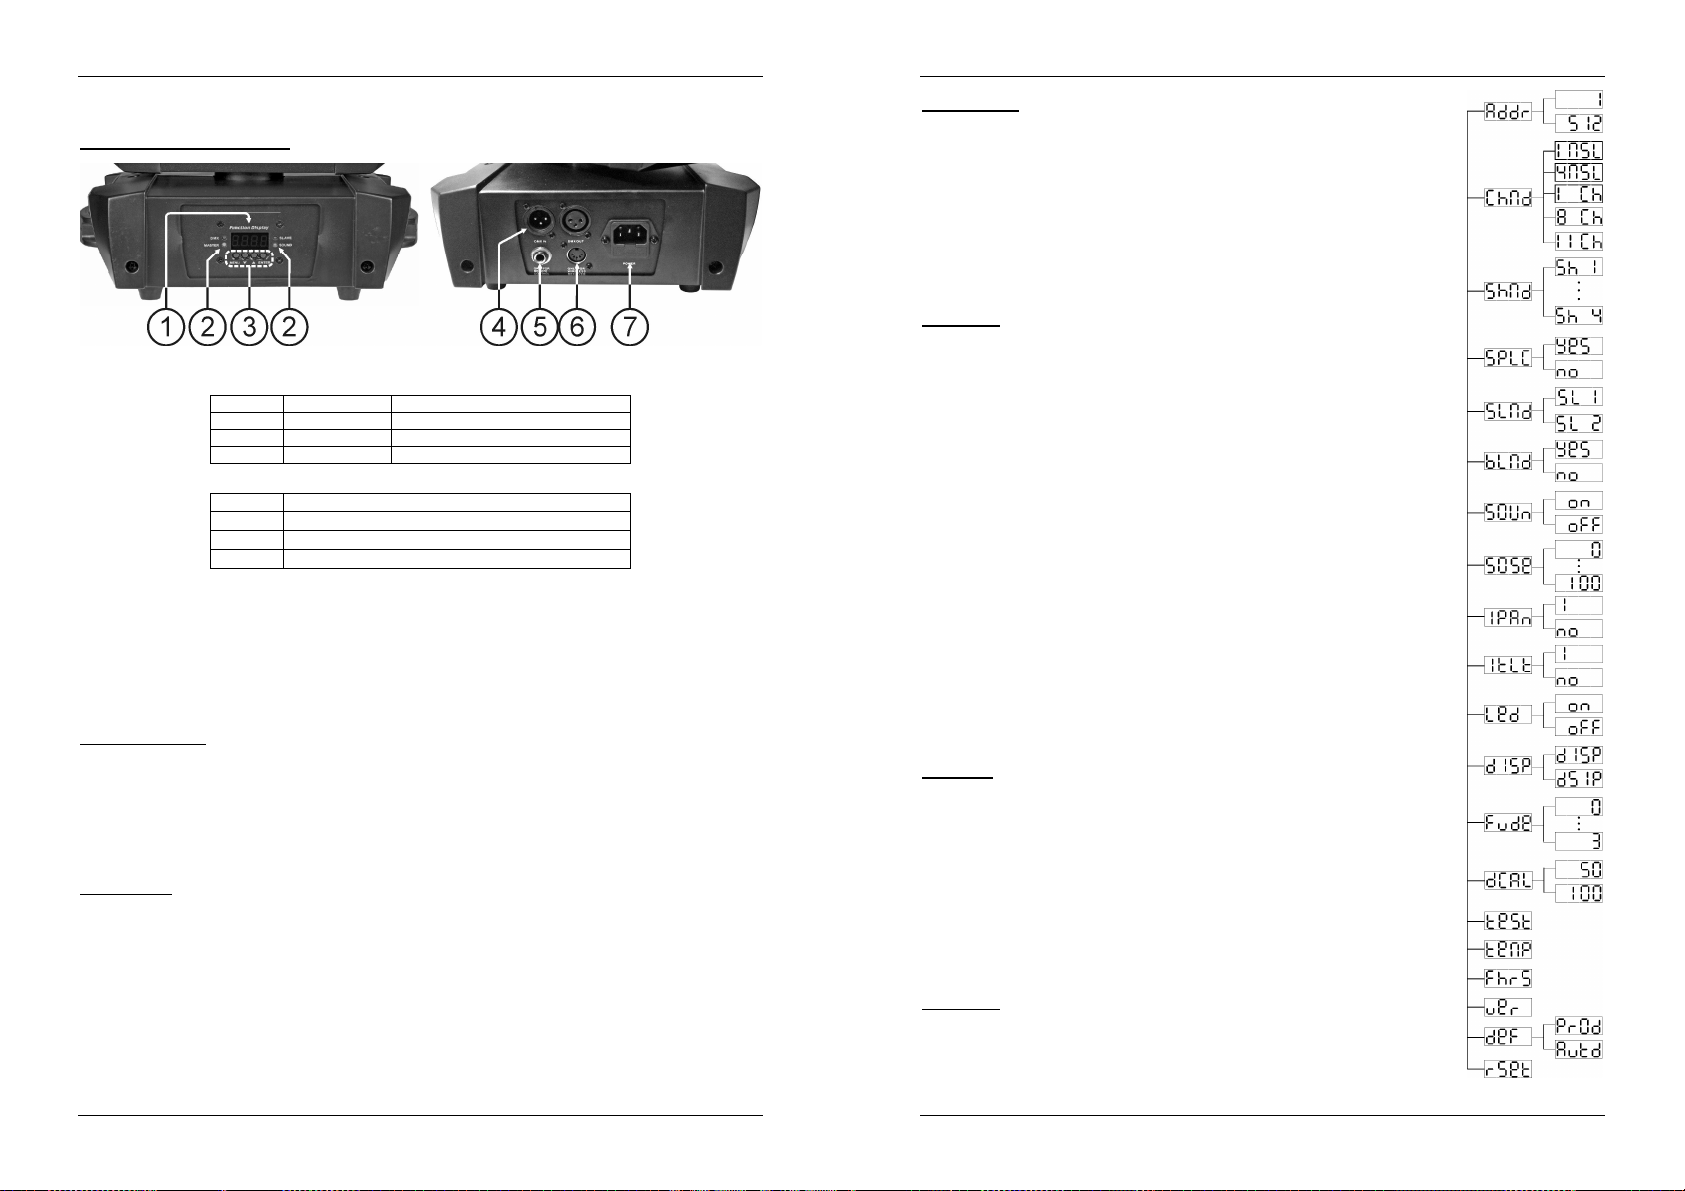
ESPAÑOL MANUAL DE INSTRUCCIONES
ESPAÑOL MANUAL DE INSTRUCCIONES
CONFIGURACIÓN DE LA UNIDAD
PANEL DE CONTROL:
1. DISPLAY muestra los varios menús y las opciones seleccionadas.
2. LEDs
DMX Fijo Entrada DMX presente
MASTER Fijo Modalidad maestra
SLAVE Fijo Modalidad esclava
SOUND Parpadeando Activación de sonido
3. Botones
MENU Para seleccionar las funciones de programación
DOWN Para ir hacia atrás en las funciones seleccionadas
UP Para ir hacia delante en las funciones seleccionadas
ENTER Para confirmar las funciones seleccionadas
4. ENTRADA/SALIDA DMX: Se utiliza para unión DMX512. Utilice un cable XLR equilibrado de 3 clavijas
M/H de buena calidad para unir las unidades.
5. ENTRADA DE CONTROL REMOTO: Se utiliza para conectar un controlador manual CA-8 sencillo
cuando la unidad se utiliza en modalidad independiente o maestra/esclava.
6. ENTRADA DE CONTROL REMOTO: Se utiliza para conectar un controlador manual RF-8 sencillo
cuando la unidad se utiliza en modalidad independiente o maestra/esclava.
7. ENTRADA DE CORRIENTE: con toma IEC y el soporte de fusible integrado. Conecte el cable de red
suministrado aquí.
MENÚ PRINCIPAL:
Para seleccionar cualquiera de las funciones preestablecidas, pulse el botón MENU hasta que aparezca
en pantalla la opción que desee o bien utiliza el DOWN y UP para ver el menú.
Seleccione la función con el botón ENTER. La pantalla parpadeará.
Utilice los botones DOWN y UP para cambiar la modalidad.
Una vez que haya seleccionado la modalidad necesaria, pulse el botón ENTER en breve para
seleccionar.. Para volver a las funciones sin hacer cambios pulse el botón MENU durante unos 2
segundos. El menú principal se muestra en la tabla.
DMX Address
Se utiliza para ajustar la dirección de inicio en una configuración DMX.
Pulse el botón MENU hasta que “Addr” se muestre en la pantalla.
Pulse el botón ENTER, la pantalla comienza a parpadear.
Utilice los botones DOWN y UP para cambiar la dirección DMX512.
Una vez que se muestre la dirección correcta en pantalla, pulse el botón ENTER para guardarla.
Para volver a las funciones sin hacer cambios pulse el botón MENU de nuevo durante unos 2 segundos.
Si desea volver al modo normal de funcionamiento: pulse el botón MENU durante aproximadamente 2
segundos.
Channel mode
Se utiliza para establecer el modo de de configuración de canal deseada.
Pulse el botón MENU hasta que “ChMd” se muestre en la pantalla.
Pulse el botón ENTER, la pantalla comienza a parpadear.
Utilice los botones DOWN y UP para elegir modo 1MSL, 4MSL, 1Ch, 8Ch o
11Ch.
Una vez que el modo de canal de ajuste deseado aparezca en la pantalla, pulse el
botón ENTER para guardar.
Para volver al menú principal sin hacer ningún cambio: pulse el botón MENU en
breve.
Si desea volver al modo normal de funcionamiento: pulse el botón MENU durante
aproximadamente 2 segundos.
Show Mode
Se utiliza para seleccionar la modalidad Espectáculo cuando se utiliza de
forma independiente o en modalidad maestra/esclava.
Pulse el botón MENU hasta que “ShMd” se muestre en la pantalla.
Pulse el botón ENTER, la pantalla comienza a parpadear.
Utilice los botones DOWN y UP para seleccionar las modalidades:
Show 1 (Sh 1): El aparato se coloca en el suelo. Ángulo de movimiento de
inclinación 210°.
Show 2 (Sh 2): El aparato se fija debajo del techo. Ángulo de movimiento de
inclinación 90°.
Show 3 (Sh 3): El aparato se coloca en un podio, delante de los
espectadores.
El foco siempre se proyecta en dirección en la dirección de la audiencia; p.ej.
delante del escenario. Ángulo de movimiento panorámico (de izquierda a
derecha a izquierda): 160°. Ángulo de movimiento de inclinación: 90° ( 60°
por encima del horizonte; 30° por debajo del horizonte.)
Show 4 (Sh 4): El aparato se fija debajo del techo. El foco se proyecta
principalmente delante del escenario. Ángulo de movimiento panorámico
(izquierda a derecha a izquierda) :160°. Ángulo de movimiento de inclinación:
90° ( vertical, frontal 75°; trasero 15°)
Una vez que se muestre la modalidad correcta en pantalla, pulse el botón ENTER
para guardarla.
Para volver al menú principal sin hacer ningún cambio: pulse el botón MENU en
breve.
Si desea volver al modo normal de funcionamiento: pulse el botón MENU durante
aproximadamente 2 segundos.
Split Color
Puede seleccionar si la unidad puede mostrar colores completos o también
colores divididos.
Pulse el botón MENU hasta que “SPLC” se muestre en la pantalla.
Pulse el botón ENTER, la pantalla comienza a parpadear.
Utilice el botón DOWN y UP para seleccionar “Yes” (colores divididos) o “No” (sólo
colores completos).
Una vez que haya seleccionado la modalidad, pulse el botón ENTER para
guardarla.
Para volver al menú principal sin hacer ningún cambio: pulse el botón MENU en
breve.
Si desea volver al modo normal de funcionamiento: pulse el botón MENU durante
aproximadamente 2 segundos.
Slave Mode
Se utiliza para hacer que la unidad esclava funcione de manera opuesta a la
maestra o en total sincronización.
Pulse el botón MENU hasta que “SLMd” se muestre en la pantalla.
Pulse el botón ENTER, la pantalla comienza a parpadear.
JB SYSTEMS
®
61/85 SIRIUS
JB SYSTEMS
®
62/85 SIRIUS
Page 34

ESPAÑOL MANUAL DE INSTRUCCIONES
ESPAÑOL MANUAL DE INSTRUCCIONES
Utilice el botón DOWN y UP para seleccionar entre las modalidades “SL 1” (normal) o “SL 2”
(Espectáculo de 2 luces).
Una vez que haya seleccionado la modalidad, pulse el botón ENTER para guardarla.
Para volver al menú principal sin hacer ningún cambio: pulse el botón MENU en breve.
Si desea volver al modo normal de funcionamiento: pulse el botón MENU durante aproximadamente 2
segundos.
Blackout Mode
Modalidad Oscurecimiento: cuando no se detecta ninguna señal DMX, la unidad entra en modalidad
Oscurecimiento y espera a la señal DMX.
Sin modalidad Oscurecimiento: cuando no se detecta ninguna señal DMX, la unidad pasa
automáticamente a modalidad independiente.
Pulse el botón MENU hasta que “bLMd” se muestre en la pantalla.
Pulse el botón ENTER, la pantalla comienza a parpadear.
Utilice el botón DOWN y UP para seleccionar la modalidad “Yes” (oscurecimiento sí) o “No”
(oscurecimiento no).
Una vez que haya seleccionado la modalidad, pulse el botón ENTER para guardarla.
Para volver al menú principal sin hacer ningún cambio: pulse el botón MENU en breve.
Si desea volver al modo normal de funcionamiento: pulse el botón MENU durante aproximadamente 2
segundos.
Sound State
Se utiliza solo para hacer funcionar la unidad al ritmo de la musica y tambien en modo
maestro/esclavo
Pulse el botón MENU hasta que “SOUn” se muestre en la pantalla.
Pulse el botón ENTER, la pantalla comienza a parpadear.
Utilice el botón DOWN y UP para seleccionar entre las modalidades “On” o “Off”.
Una vez que haya seleccionado la modalidad, pulse el botón ENTER para guardarla.
Para volver al menú principal sin hacer ningún cambio: pulse el botón MENU en breve.
Si desea volver al modo normal de funcionamiento: pulse el botón MENU durante aproximadamente 2
segundos.
Sound Sense
Se utiliza para ajustar la sensibilidad del micrófono interno
Pulse el botón MENU hasta que “SOSe” se muestre en la pantalla.
Pulse el botón ENTER, la pantalla comienza a parpadear.
Utilice el botón DOWN y UP para seleccionar un valor entre "0" (muy baja sensibilidad) y "100" (alta
sensibilidad).
Una vez que haya seleccionado la modalidad, pulse el botón ENTER para guardarla.
Para volver al menú principal sin hacer ningún cambio: pulse el botón MENU en breve.
Si desea volver al modo normal de funcionamiento: pulse el botón MENU durante aproximadamente 2
segundos.
Pan Inversion
Normal: El movimiento panorámico no se invierte.
Inversión panorámica: El movimiento panorámico se invierte.
Pulse el botón MENU hasta que “IPAn” se muestre en la pantalla.
Pulse el botón ENTER, la pantalla comienza a parpadear.
Utilice el botón DOWN y UP para seleccionar la modalidad “No” (normal) o “I” (inversión panorámica).
Una vez que haya seleccionado la modalidad, pulse el botón ENTER para guardarla.
Para volver al menú principal sin hacer ningún cambio: pulse el botón MENU en breve.
Si desea volver al modo normal de funcionamiento: pulse el botón MENU durante aproximadamente 2
segundos.
Tilt Inversion
Normal: El movimiento de inclinación no se invierte.
Inversión de inclinación: El movimiento de inclinación se invierte.
Pulse el botón MENU hasta que “ItLt” se muestre en la pantalla.
Pulse el botón ENTER, la pantalla comienza a parpadear.
Utilice el botón DOWN y UP para seleccionar la modalidad “No” (normal) o “I” (inversión de inclinación).
Una vez que haya seleccionado la modalidad, pulse el botón ENTER para guardarla.
Para volver al menú principal sin hacer ningún cambio: pulse el botón MENU en breve.
Si desea volver al modo normal de funcionamiento: pulse el botón MENU durante aproximadamente 2
segundos.
Display on/off
Display on: la pantalla siempre está encendida.
Display off: la pantalla está apagada cuando no se utiliza.
Pulse el botón MENU hasta que la pantalla muestre “Led”.
Pulse el botón ENTER, la pantalla comienza a parpadear.
Utilice los botones DOWN y UP para seleccionar “On” (pantalla siempre encendida) o “Off” (pantalla
apagada cuando no se utiliza).
Una vez que haya seleccionado la modalidad, pulse el botón ENTER para guardarla.
Para volver al menú principal sin hacer ningún cambio: pulse el botón MENU en breve.
Si desea volver al modo normal de funcionamiento: pulse el botón MENU durante aproximadamente 2
segundos.
Inversión de pantalla
Pantalla normal: la pantalla se puede leer cuando la unidad está en el suelo.
Inversión de pantalla: la pantalla se puede leer cuando la unidad está montada al revés.
Pulse el botón MENU “dISP” hasta que se muestre en la pantalla *. (pantalla normal)
Pulse el botón ENTER para cambiar entre * (pantalla normal) y * (inversión de pantalla).
Si desea volver al modo normal de funcionamiento: pulse el botón MENU durante aproximadamente 2
segundos.
Function Delay
En el canal de Función (CH8 o CH11) puede seleccionar algunas funciones especiales, como
“apagado durante el cambio de gobo” y otras. Con esta opción puede seleccionar el retardo previo a
la activación de una función seleccionada.
INFORMACIÓN IMPORTANTE: El retardo de función sólo puede estar establecido en cero segundos (sin
Retardo) cuando esté utilizando un controlador DMX o software DMX que utilice valores predeterminados de
DMX para funciones especiales.
¡Nunca utilice “sin Retardo” mientras utilice un simple controlador DMX con atenuadores para establecer las
funciones manualmente!
Pulse el botón MENU hasta que “Fude” se muestre en la pantalla.
Pulse el botón ENTER, la pantalla comienza a parpadear.
Utilice los botones DOWN y UP para seleccionar entre “0” (Sin Retardo) y “3” (3 s de Retardo)
Una vez haya seleccionado el retardo, pulse el botón ENTER para guardarlo.
Para volver al menú principal sin hacer ningún cambio: pulse el botón MENU en breve.
Si desea volver al modo normal de funcionamiento: pulse el botón MENU durante aproximadamente 2
segundos.
Calibrado del Atenuador
Debido a tolerancias en el proceso de producción, no todos los LEDs tienen exactamente la misma
luminosidad, por este motivo, usted puede utilizar esta opción para igualar la Luminosidad de
diferentes máquinas.
Pulse el botón MENU hasta que “dCAL” se muestre en la pantalla.
Pulse el botón ENTER, la pantalla comienza a parpadear.
Utilice el botón DOWN y UP para seleccionar un valor entre “50” (luminosidad más baja) y “100”
(luminosidad más alta).
Una vez que haya seleccionado la valor, pulse el botón ENTER para guardarla.
Para volver al menú principal sin hacer ningún cambio: pulse el botón MENU en breve.
Si desea volver al modo normal de funcionamiento: pulse el botón MENU durante aproximadamente 2
segundos.
JB SYSTEMS
®
63/85 SIRIUS
JB SYSTEMS
®
64/85 SIRIUS
Page 35
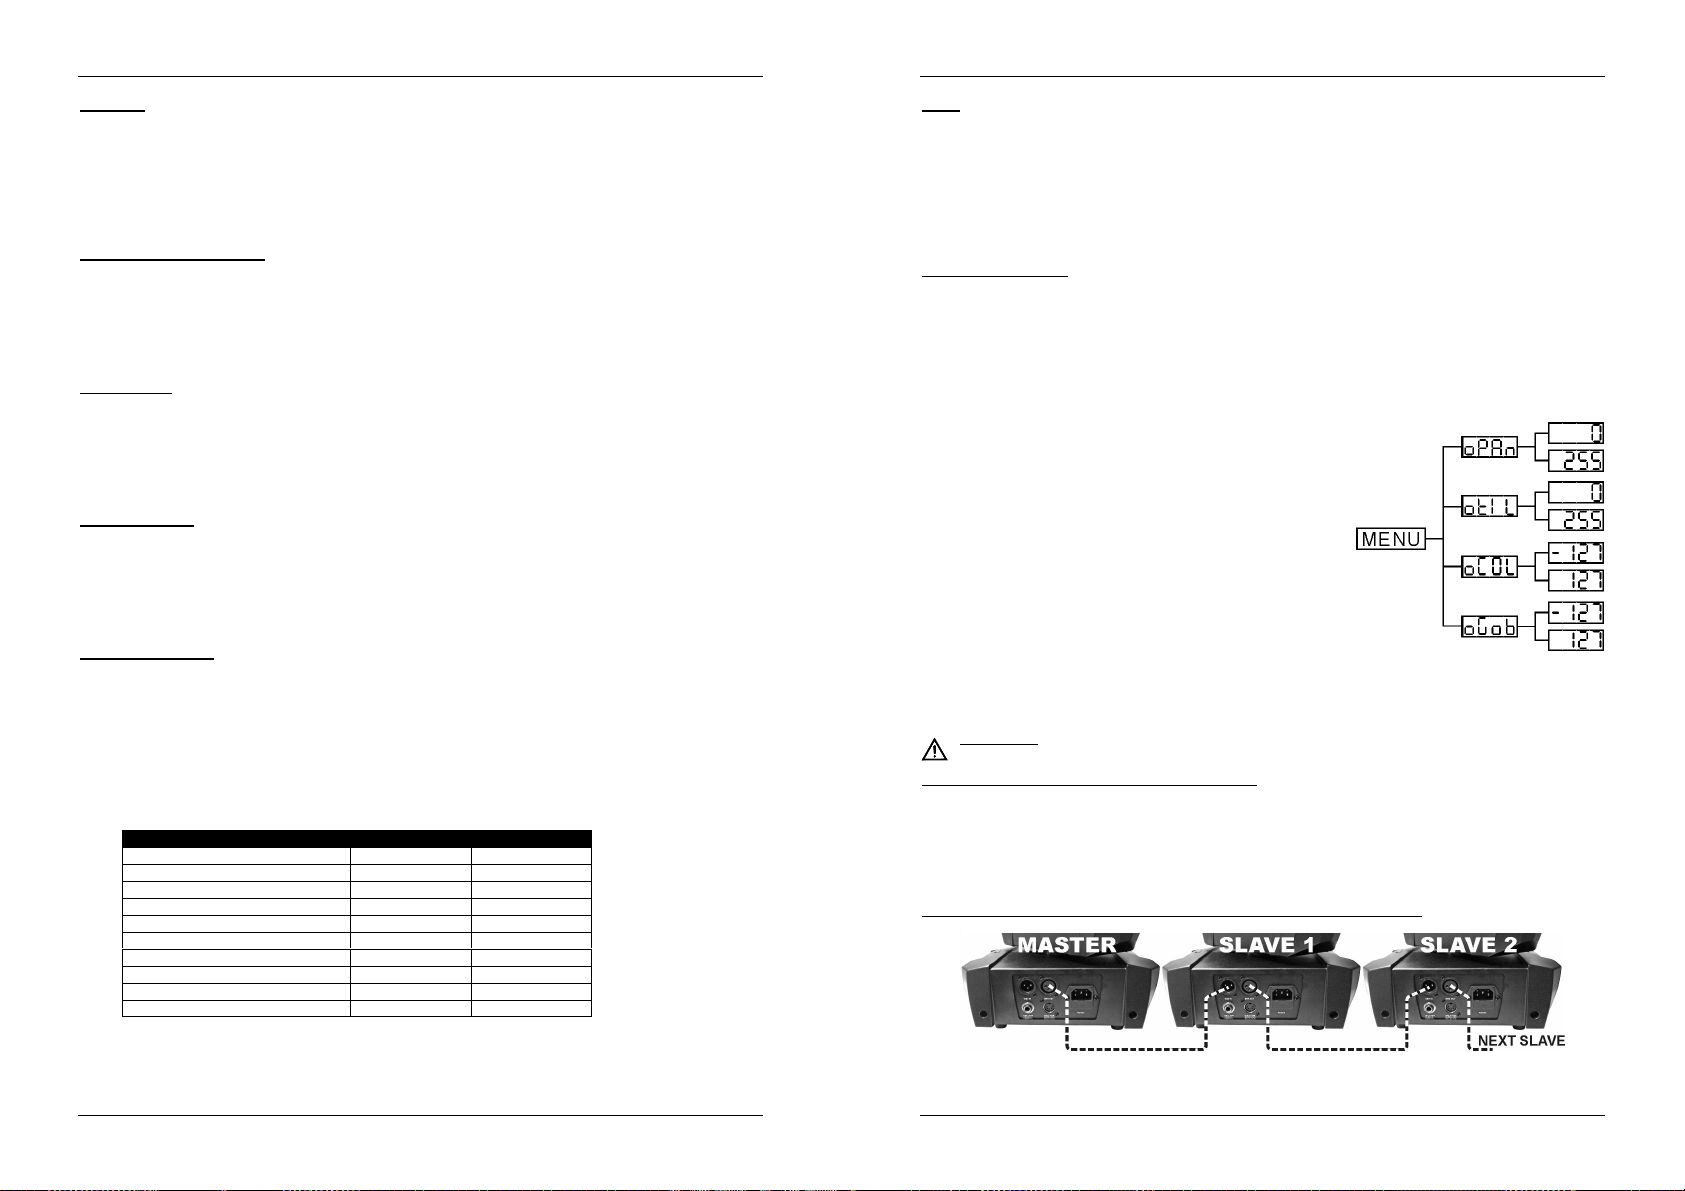
ESPAÑOL MANUAL DE INSTRUCCIONES
ESPAÑOL MANUAL DE INSTRUCCIONES
Auto Test
Se utiliza para activar un programa de “autodiagnóstico” que comprueba todas las posibilidades de
la unidad.
Pulse el botón MENU hasta que “teSt” se muestre en la pantalla.
Pulse el botón ENTER para iniciar el programa de autodiagnóstico interno.
Para volver a las funciones pulse el botón MENU.
Si desea volver al modo normal de funcionamiento: pulse el botón MENU durante aproximadamente 2
segundos.
Temperature inside the unit
Se utiliza para mostrar la temperatura dentro de la unidad
Pulse el botón MENU hasta que “teMP” se muestre en la pantalla.
Pulse el botón ENTER y la temperatura se mostrará en la pantalla.
Para volver a las funciones pulse el botón MENU otra vez.
Si desea volver al modo normal de funcionamiento: pulse el botón MENU durante aproximadamente 2
segundos.
Fixture Hours
Se utiliza para mostrar el número de horas de funcionamiento de la unidad.
Pulse el botón MENU hasta que “FhrS” se muestre en la pantalla.
Pulse el botón ENTER para mostrar el número de horas de funcionamiento en la pantalla.
Para volver a las funciones pulse el botón MENU.
Si desea volver al modo normal de funcionamiento: pulse el botón MENU durante aproximadamente 2
segundos.
Software version
Se utiliza para comprobar la versión de software que lleva la unidad
Pulse el botón MENU hasta que “ver” se muestre en la pantalla.
Pulsar el botón ENTER para mostrar la versión de software en el display.
Para volver a las funciones presionar el botón de MENU.
Si desea volver al modo normal de funcionamiento: pulse el botón MENU durante aproximadamente 2
segundos.
Valores por Defecto
Se utiliza para escoger entre 2 grupos de ajustes por defecto, usados a menudo por las empresas de
alquiler:
Configuración PRO: ajustes básicos para el uso en controladores DMX profesionales.
Configuración AUTO: ajustes básicos para un sencillo uso maestro/esclavo.
Pulse el botón MENU hasta que “deF” se muestre en la pantalla.
Pulse el botón ENTER:
Utilice los botones DOWN y UP para seleccionar “Yes” o “No” y confirme pulsando el botón ENTER.
Cuando seleccione “Yes”, tiene 2 opciones, cada una con sus propios ajustes:
Prod Se carga la configuración PRO por defecto
Autd Se carga la configuración AUTO por defecto
Settings PRO-defaults AUTO-defaults
Channel mode 11ch 4MSL
Split Colors Yes No
Slave Mode Slave 1 Slave 1
Blackout Mode Yes No
Sound State Off On
Sound Sense 90 90
Pan Inverse No No
Tilt Inverse No No
Backlight No Yes
Function Delay 3s 3s
Comenzando desde estos valores por defecto, puede realizar fácilmente sus ajustes adicionales. Los
otros parámetros de configuración permanecen sin cambio.
Si desea volver al modo normal de funcionamiento: pulse el botón MENU durante aproximadamente 2
segundos.
Reset
Se utiliza para restaurar la unidad.
Pulse el botón MENU hasta que “rSet” se muestre en la pantalla.
Pulse ENTER para restaurar todos los canales a su posición estándar.
Para volver a las funciones pulse el botón MENU.
Si desea volver al modo normal de funcionamiento: pulse el botón MENU durante aproximadamente 2
segundos.
Compruebe también el capítulo sobre la configuración del canal DMX de la unidad para saber cómo forzar
una restauración mediante DMX.
Home Position Adjust
Se utiliza para ajustar la posición inicial de varias funciones:
Asegúrese de que la unidad está conectada a un controlador DMX y en modo 11 canales: ajuste el canal 6
+ canal 7 al máximo.
Si no está ya en el menú de configuración, basta con pulsar el botón MENÚ brevemente para entrar al menú
de configuración (“Addr” se muestra en el display)
Ahora presionar el botón ENTER durante al menos 5 segundos para entrar en el modo de compensación.
Utilizar los botones DOWN y UP para seleccionar la función que usted quiere ajustar
oPAn: Se utiliza para ajustar la posición inicial de la función pan.
otIL: Se utiliza para ajustar la posición inicial de la función
tilt.
oCoL: Se utiliza para ajustar la posición inicial de la rueda
de colores.
oGob: Se utiliza para ajustar la posición inicial de la rueda
de gobos.
Pulsar el botón ENTER, el display parpadea.
Utilizar los botones DOWN y UP para ajustar la posición de
arranque
Presionar el botón ENTER para confirmar su ajuste
Para volver a las funciones sin cambios presionar el botón de
MENÚ otra vez.
Si desea volver al modo normal de funcionamiento: pulse el botón
MENU durante aproximadamente 2 segundos. Los nuevos
parámetros de desplazamiento para las distintas funciones se
conservan en la memoria flash.
INSTALACIÓN ELÉCTRICA + DIRECCIONAMIENTO
Importante: La instalación eléctrica sólo debe ser llevada a cabo por personal cualificado, de
acuerdo con la regulaciones sobre seguridad eléctrica y mecánica de su país.
Instalación eléctrica para 1 unidad independiente:
Inserte el cable de red eléctrica. La unidad comienza a funcionar instantáneamente en modalidad
independiente.
Observación 1: Puede conectar un controlador CA-8 o RF-8 remoto a la unidad si desea disponer de
más control. Consulte “Manejo de la unidad” para saber cómo hacerlo.
Observación 2: Si no hay emisión, asegúrese de establecer la unidad en modo maestro y seleccione el
modo blackout en "NO" y Sound State en “On” (consulte el capítulo anterior)
Instalación eléctrica de una o más unidades en modalidad maestra/eslava:
En este modo las unidades mostrará un show sincronizado, trabajando al ritmo del beat.
Conecte de 2 a un máximo de 16 unidades juntas mediante cables de micrófono equilibrados de buena
calidad. La primera unidad en la cadena se comportará como el maestro (master), las otras unidades
JB SYSTEMS
®
65/85 SIRIUS
JB SYSTEMS
®
66/85 SIRIUS
Page 36

ESPAÑOL MANUAL DE INSTRUCCIONES
ESPAÑOL MANUAL DE INSTRUCCIONES
actuarán automáticamente como esclavos (slaves).
Asegúrese de que todas las unidades están conectadas a la red eléctrica.
¡Ya está!
Observación 1: Puede conectar un controlador CA-8 o RF-8 remoto a la unidad maestra si desea
disponer de más control sobre el funcionamiento maestro/esclavo.
Observación 2: Si no hay emisión, asegúrese de establecer la primera unidad en modo maestro y
seleccione el modo blackout en "NO" y Sound State en “On” (consulte el capítulo anterior)
Instalación eléctrica de una o más unidades en modalidad DMX-maestra/eslava:
En este modo las unidades mostrarán un show sincronizado, trabajando al ritmo de los latidos, pero aun se
pueden controlar algunas funciones en el master mediante 1 o 4 canales DMX.
Para garantizar un funcionamiento correcto necesita un opcional "Mini-DMX SPLITTER" para aislar el
maestro / esclavo de la línea principal DMX, vea el dibujo.
Conecte de 2 a un máximo de 16 unidades juntas mediante cables de micrófono equilibrados de buena
calidad. La primera unidad en la cadena se comportará como el maestro (master), las otras unidades
actuarán como esclavos (slaves).
Ajuste el canal master entre 1MSL o 4MSL (ver capítulo anterior). Verificar la table DMX para ver la
diferencia entre ambos modos del canal.
Para el controlador DMX el master y sus esclavos se pueden considerer ahora como un efecto virtual
que necesita una dirección de inicio para que pueda ser controlado como cualquier otra unidad DMX de
la cadena DMX: ver "DMX Address" en el capítulo "Main Menu"para ver cómo se puede establecer la
dirección DMX de inicio.
Asegúrese de que todas las unidades están conectadas a la red eléctrica.
Ajuste el controlador DMX de acuerdo con la tablal DMX de abajo.
¡Ya está!
Nota: para poder trabajar bien al ritmo de la música, asegúrese de que la opción "Sound State" en el
maestro está en "On" (véase el capítulo anterior)
Tabla de valores DMX para trabajar en los modos 1MSL y 4MSL
1 MSL 4 MSL
Instalación eléctrica en modo DMX:
El protocolo DMX es una señal de alta velocidad muy utilizada para controlar equipo de iluminación
inteligente. Necesita conectar en cadena tipo margarita su controlador DMX y todas las unidades
conectadas con un cable equilibrado de buena calidad.
Se utilizan conectores XLR de 3 pines y conectores XLR de 5 pines, no obstante, el conector XLR de 3
pines es más popular porque estos cables son compatibles con los cables de audio equilibrados.
Disposición de pines en el conector XLR de 3 pines:
positiva (+)
Disposición de pines en el conector XLR de 5 pines: Pin1 = GND ~ Pin2 = Señal negativa (-) ~ Pin3 = Señal
positiva (+) ~ Pines4+5 no se utilizan.
Para evitar un comportamiento anómalo de los efectos luminosos, debido a
interferencias, debe utilizar un terminador de 90Ω a 120Ω al final de la cadena.
Nunca utilice cables divisores en Y, ¡No funcionarán!
Asegúrese de que todas las unidades están conectadas a la red eléctrica.
Cada efecto luminoso en la cadena necesita disponer de su propia dirección de inicio de forma que
sepa qué comando del controlador debe descodificar. En la siguiente sección obtendrá información
sobre cómo establecer las direcciones DMX.
AJUSTE DE LA DIRECCIÓN DE INICIO CORRECTA:
Consulte el capítulo anterior (ajuste de dirección DMX-512) para saber cómo ajustar la dirección de inicio en
esta unidad. La dirección de inicio de cada unidad es muy importante. Lamentablemente es imposible
decirle en este manual de usuario qué dirección de inicio debe ajustar porque esto dependerá
completamente del controlador que utilice… Consulte el manual de usuario de su controlador DMX para
saber que direcciones de inicio debe ajustar.
CONFIGURACIÓN DMX DE SIRIUS – MODO 1 KANALE:
Pin1 = GND ~ Pin2 = Señal negativa (-) ~ Pin3 = Señal
JB SYSTEMS
®
67/85 SIRIUS
JB SYSTEMS
®
68/85 SIRIUS
Page 37

ESPAÑOL MANUAL DE INSTRUCCIONES
ESPAÑOL MANUAL DE INSTRUCCIONES
CONFIGURACIÓN DMX DE SIRIUS – MODO 8 KANALES:
CONFIGURACIÓN DMX DE SIRIUS – MODO 11 KANALES:
JB SYSTEMS
CONECTAR EL CONTROLADOR CA-8 O RF8SET
El controlador CA-8 o RF-8SET puede ser utilizado en modo autonomo o master/slave.
CA-8 remoto cableado: Conectar el controlador a la entrada jack de la primera unidad (master).
RF-8SET remoto inalámbrico: el control remoto inalámbrico tiene dos partes:
RF-8T: pequeño transmisor RF que puede controlar hasta 5 efectos.
RF-8R: pequeño receptor RF que debe ser conectado a
la DIN de 5 pines de entrada del SIRIUS. Consulte el
Ahora, todas las unidades pueden ser controladas:
BOTON STANDBY:
Pulsarlo para entrar/salir del modo blackout sobre todas las
unidades conectadas.
TECLAS MODE/FUNCTION:
Con la tecla MODE puede seleccionar 3 modos de funcionamiento
diferentes :
El LED está apagado: con la tecla FUNCTION puede
El LED parpadea: con el botón FUNCTION puede seleccionar
®
69/85 SIRIUS
JB SYSTEMS
manual de instalación del receptor para más información.
seleccionar diferentes modos de flash, como "flash de sonido”.
diferentes espectáculos.
®
70/85 SIRIUS
Page 38

ESPAÑOL MANUAL DE INSTRUCCIONES
El LED encendido: (modo de música está temporalmente desactivado)
Presione el botón FUNCTION poco: para cambiar los colores
Presione el botón FUNCTION más: para cambiar los gobos
MANTENIMIENTO
Asegúrese de que debajo de la zona del lugar de instalación no haya personas durante el mantenimiento.
Apague la unidad, desenchufe el cable de red y espere hasta que la unidad se haya enfriado.
Durante la inspección deberá comprobar los siguientes puntos:
Todos los tornillos utilizados para instalar el dispositivo y cualquiera de sus piezas deberán apretarse
firmemente y no corroerse.
Las carcasas, las fijaciones y los puntos de instalación (techo, suspensiones) no deberán presentar
ninguna deformidad.
Cuando una lente óptica esté visiblemente dañada por grietas o rasguños profundos, deberá ser
reemplazada.
Los cables de red deberán estar en perfecto estado y deberán reemplazarse inmediatamente incluso si el
problema detectado es pequeño.
Para proteger al aparato del sobrecalentamiento, las aletas de refrigeración (si las hubiera) y las aberturas
de ventilación deberán limpiarse mensualmente.
El interior del dispositivo deberá limpiarse anualmente mediante una aspiradora o chorro de aire.
La limpieza de las lentes internas y externas y/o espejos deberá llevarse a cabo periódicamente para
optimizar la emisión luminosa. La frecuencia de limpieza depende del entorno en el que funcione el
aparato: los ambientes húmedos, con humo o especialmente sucios pueden provocar una mayor
acumulación de suciedad en los elementos ópticos del aparato.
Limpie con un paño suave utilizando productos de limpieza de cristales normales.
Seque siempre las piezas con cuidado.
Limpie los elementos ópticos externos al menos una vez cada 30 días.
Limpie los elementos ópticos internos al menos una vez cada 90 días.
Atención: ¡Le recomendamos encarecidamente que la limpieza interna sea llevada a cabo por
personal cualificado!
ESPECIFICACIONES
Entrada de red: AC 100 - 240V, 50/60Hz
Consumo de energía máximo: 115 Watt
Control de sonido: Micrófono interno
Panorámica/inclinación: 540° / 270°
Ángulo de haz: 15°
Tamaño de los Gobos (mm): D=23,7 / imagen = 19mm
Conexiones DMX: 3 clavijas XLR macho / hembra
Led: 1 LED blanco de 60 vatios
Tamaño: Consulte el gráfico
Peso: 8,80 kg
Toda la información está sujeta a
cambios sin previo aviso
Puede descargar la última versión
de este manual de usuario en
nuestra página Web:
www.beglec.com
PORTUGUÊS MANUAL DO UTILIZADOR
MANUAL DO UTILIZADOR
Obrigado por ter adquirido este produto da JB Systems®. De modo a tirar total proveito das possibilidades
deste produto, por favor leia este manual com atenção.
CARACTERÍSTICAS
Esta unidade está protegida contra interferências rádio. Este produto cumpre as exigências impostas pelas
presentes directivas nacionais e europeias. A conformidade deste produto foi comprovada e as declarações
e documentos relevantes foram efectuados pelo fabricante.
Moving Head compacto mas muito potente para DJ profissionais, companhias de aluguer e discotecas
Baseado na tecnologia LED CREE de 60 WATT:
Consumo de potencia muito reduzido, apenas 115W (poupança de dinheiro!)
Cores extremamente brilhantes comparadas com unidades com lâmpadas de halogéneo
Sem substituição de lâmpadas!
Virtualmente sem produção de calor
Peso leve (sem necessidade de transformadores de lâmpada)
Grande potência de saída e gobos definidos graças a ópticas excelentes
Controlo de intensidade de 0-100% e função strobe ultra rápida
6 gobos rotativos + aberto, equipado com função vibração dos gobos
Roda de cores independente com função divisão de cores (8 cores + branco)
Excelentes programas incorporados para espectáculos de luz maravilhosos e sempre diferentes:
Controlo DMX: 11 canais
Autónomo: activado por som com microfone interno
Master/Slave: maravilhos espectáculos sincronizados
DMX-Master/Slave: Graças a esta nova função revolucionária várias unidades SIRIUS a trabalhar em
modo master/slave podem ser ainda controladas por 1 ou 4 canais DMX ! Mesmo quando conectadas
numa sequência DMX (será necessário o mini separador DMX opcional)
Duas configurações predefinidas, fácil para companhias de aluguer:
PRO: configurações básicas (ajustáveis) para usar com controladores DMX profissionais.
AUTO: configurações básicas (ajustáveis) para uso fácil em modo master/slave.
Reposicionamento X/Y automático
2 comandos opcionais disponíveis: comando com fio CA-8 ou comando RF8-SET sem fio
Fácil actualização de software através de unidade de actualização especial
Visor LED para fácil navegação nos menus
Ângulo do feixe = 15°
ANTES DE UTILIZAR
Antes de utilizar esta unidade verifique se existem danos provocados durante o transporte. Caso existam
danos aparentes, não utilize a unidade e contacte o seu revendedor.
Importante: Esta unidade deixou a nossa fábrica em perfeitas condições e devidamente embalada. É
imprescindível que o utilizador siga as instruções de segurança e avisos descritos neste manual.
Quaisquer danos provocados por utilização incorrecta não serão cobertos pela garantia. O revendedor
não será responsável por quaisquer danos ou problemas causados pelo incumprimento das instruções
deste manual.
Guarde este manual num local seguro para consulta futura. Caso venda esta unidade, forneça este
manual.
Verifique o conteúdo:
Certifique-se que a caixa contém os seguintes artigos:
Manual do utilizador
Unidade SIRIUS
Grampo Omega
Cabo de alimentação IEC
Olhal para instalar um cabo de segurança opcional
JB SYSTEMS
®
71/85 SIRIUS
JB SYSTEMS
®
72/85 SIRIUS
Page 39
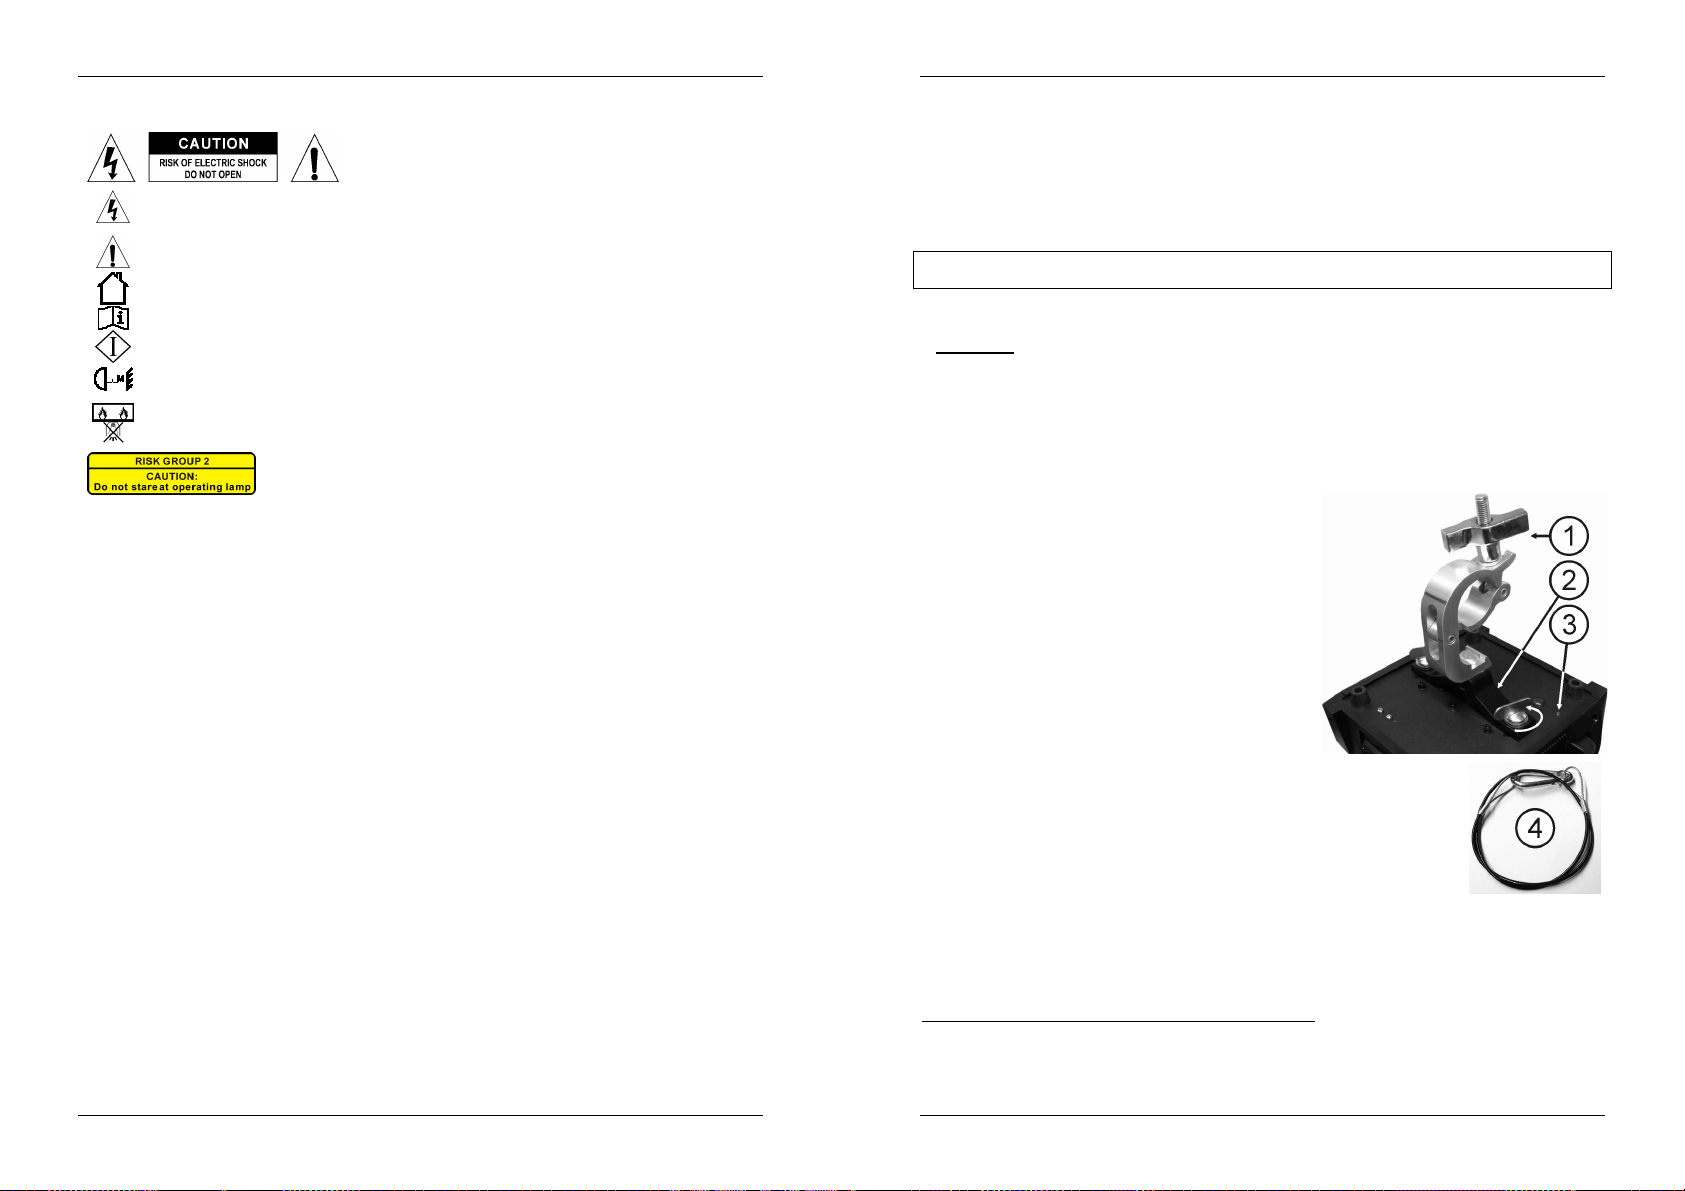
PORTUGUÊS MANUAL DO UTILIZADOR
PORTUGUÊS MANUAL DO UTILIZADOR
INSTRUÇÕES DE SEGURANÇA:
ATENÇÃO: De forma a evitar o risco de choque eléctrico,
não remova peças da unidade. Não tente fazer reparações.
Contacte pessoal qualificado
O símbolo composto por um triângulo equilátero com um relâmpago no interior alerta para a
presença de voltagem perigosa não isolada no interior do produto que poderá constituir risco
de choque eléctrico.
O símbolo composto por um triângulo equilátero com um ponto de exclamação alerta o
utilizador para a presença de instruções importantes de utilização e manutenção do produto.
Este símbolo significa: utilização unicamente em espaços fechados
Este símbolo significa: Leia instruções
Este símbolo significa: Aparelho Classe I
Este símbolo determina: a distância mínima dos objetos iluminados. A distância mínima entre o
projetor e o objeto iluminado deve ser mais de 1 medidor
O dispositivo não é adequado para montagem em superfícies normalmente inflamáveis.
(Indicado apenas para montagem em superfícies não-combustíveis)
ATENÇÃO: Non fissure il fascio di luce.
Pode ser prejudicial para os olhos.
Proteja o ambiente. Recicle o material desta embalagem.
Os efeitos luminosos novos podem por vezes produzir algum fumo e/ou cheiro desagradável. Esta
situação é normal e temporária.
De modo a evitar risco de fogo ou choque eléctrico, não exponha este produto a chuva ou humidade.
De forma a evitar a formação de condensação no interior da unidade, ao transportá-la para ambiente
quente aguarde algum tempo de modo a que haja uma ambientação à temperatura. A condensação
poderá afectar o desempenho da unidade ou até danificá-la.
Esta unidade destina-se unicamente a utilização em espaços fechados.
Não introduza objectos de metal nem verta líquidos no interior do produto, correrá risco de choque
eléctrico ou poderá danificar o produto. Caso algum objecto estranho entre em contacto com o interior da
unidade, desligue-a de imediato da corrente.
Coloque esta unidade num local arejado, afastado de materiais inflamáveis e/ou líquidos. Esta unidade
deverá ser instalada a pelos menos 50cm de distância de paredes circundantes.
Não cubra os orifícios de ventilação ou a unidade poderá sobreaquecer.
Evite locais com poeiras. Limpe a unidade regularmente.
Mantenha esta unidade fora do alcance das crianças.
Esta unidade deverá ser operada unicamente por pessoas experientes.
Temperatura ambiente de funcionamento máxima é de 40ºC. Não utilize esta unidade a temperaturas
ambientes mais elevadas.
Certifique-se de que não irão passar pessoas sob a área de instalação da unidade durante a instalação e
manutenção.
Desligue sempre a unidade da corrente quando não a utilizar durante longos períodos de tempo ou de
efectuar manutenção.
A instalação eléctrica deve ser efectuada unicamente por pessoal qualificado, cumprindo os regulamentos
de segurança em instalações eléctricas e mecânicas do seu país.
Certifique-se que a voltagem a utilizar não é superior à voltagem indicada no painel traseiro da unidade.
O cabo de alimentação deverá estar sempre em perfeitas condições. Desligue a unidade e substitua
imediatamente o cabo caso este apresente algum dano. Deverá ser substituído pelo fabricante, pelo
agente autorizado ou pessoal qualificado de modo a evitar um acidente.
Nunca permita que este cabo entre em contacto com outros cabos!
Esta unidade deverá estar ligada à Terra de forma a respeitar as regras de segurança.
Não ligue a unidade a reguladores de intensidade.
Utilize sempre um cabo de segurança aprovado ao instalar a unidade.
De forma a não correr risco de choque eléctrico não abra a cobertura da unidade. Não existem peças que
possam ser substituídas pelo utilizador.
Nunca repare um fusível nem tente operar a unidade sem fusível. Substitua sempre um fusível danificado
por outro com as mesmas características!
Em caso de problemas sérios de funcionamento, interrompa a utilização da unidade e contacte
imediatamente o seu revendedor.
A cobertura e as lentes deverão ser substituídas caso apresentem danos visíveis.
Caso seja necessário transportar a unidade utilize a embalagem original.
Por motivos de segurança, são proibidas quaisquer alterações não autorizadas à unidade.
Importante: Nunca olhe directamente para a luz! Não utilize este efeito luminoso na presença de pessoas
epilépticas.
INSTALAÇÃO EM SUSPENSÃO
Importante: A instalação deve ser efectuada unicamente por pessoal qualificado. Uma instalação
incorrecta pode resultar em ferimentos graves e/ou danos na sua propriedade. Para efectuar uma
instalação em suspensão é necessária muita experiência! Respeite os limites de carga, utilize
materiais de instalação aprovados e inspeccione a unidade instalada regularmente de forma a
assegurar a segurança.
Certifique-se que sob a área de instalação da unidade não irão passar pessoas durante a instalação e
manutenção.
Coloque esta unidade num local arejado, afastada de materiais inflamáveis e/ou líquidos. Esta unidade
deverá ser instalada a pelos menos 50cm de distância de paredes circundantes.
A unidade deve ser instalada fora do alcance das pessoas;
afastada de áreas onde as pessoas possam passar ou
sentar-se.
Antes de proceder à instalação certifique-se que a área
seleccionada pode suportar uma carga mínima de 10
vezes o peso da unidade.
Na instalação, utilize sempre um cabo de segurança
aprovado (número 3 na imagem) com capacidade para
suportar 12 vezes o peso da unidade. Esta medida de
segurança secundária deverá ser instalada para que
nenhuma parte da instalação possa cair mais de 20cm
caso o ponto de apoio principal ceda.
A unidade deverá ser fixa firmemente. Uma instalação
oscilante pode ser perigosa e não deverá ser efectuada!
Não cubra os orifícios de ventilação ou a unidade poderá
sobreaquecer.
O utilizador da unidade deverá certificar-se que a instalação é aprovada em
termos de segurança e em termos técnicos por uma pessoa qualificada antes de
efectuar a primeira utilização. A instalação deverá ser inspeccionada todos os
anos por um técnico qualificado de forma a certificar-se que a segurança está
assegurada.
1. Grampo opcional
2. Grampo Omega especial (incluído)
3. Rosca buraco, usado para instalar o olhal fornecido
4. Cabo de segurança opcional
MANUTENÇÃO
Certifique-se que sob a área de instalação da unidade não irão passar pessoas durante a manutenção.
Desligue o cabo de alimentação da corrente e aguarde que a unidade arrefeça.
Durante a inspecção deverá verificar os seguintes pontos:
Todos os parafusos utilizados nas peças da unidade e na instalação deverão estar apertados firmemente
e não poderão estar corroídos.
A cobertura da unidade, os pontos de fixação e as áreas de instalação (tecto, armação, etc.) não deverão
apresentar qualquer deformação.
JB SYSTEMS
®
73/85 SIRIUS
JB SYSTEMS
®
74/85 SIRIUS
Page 40
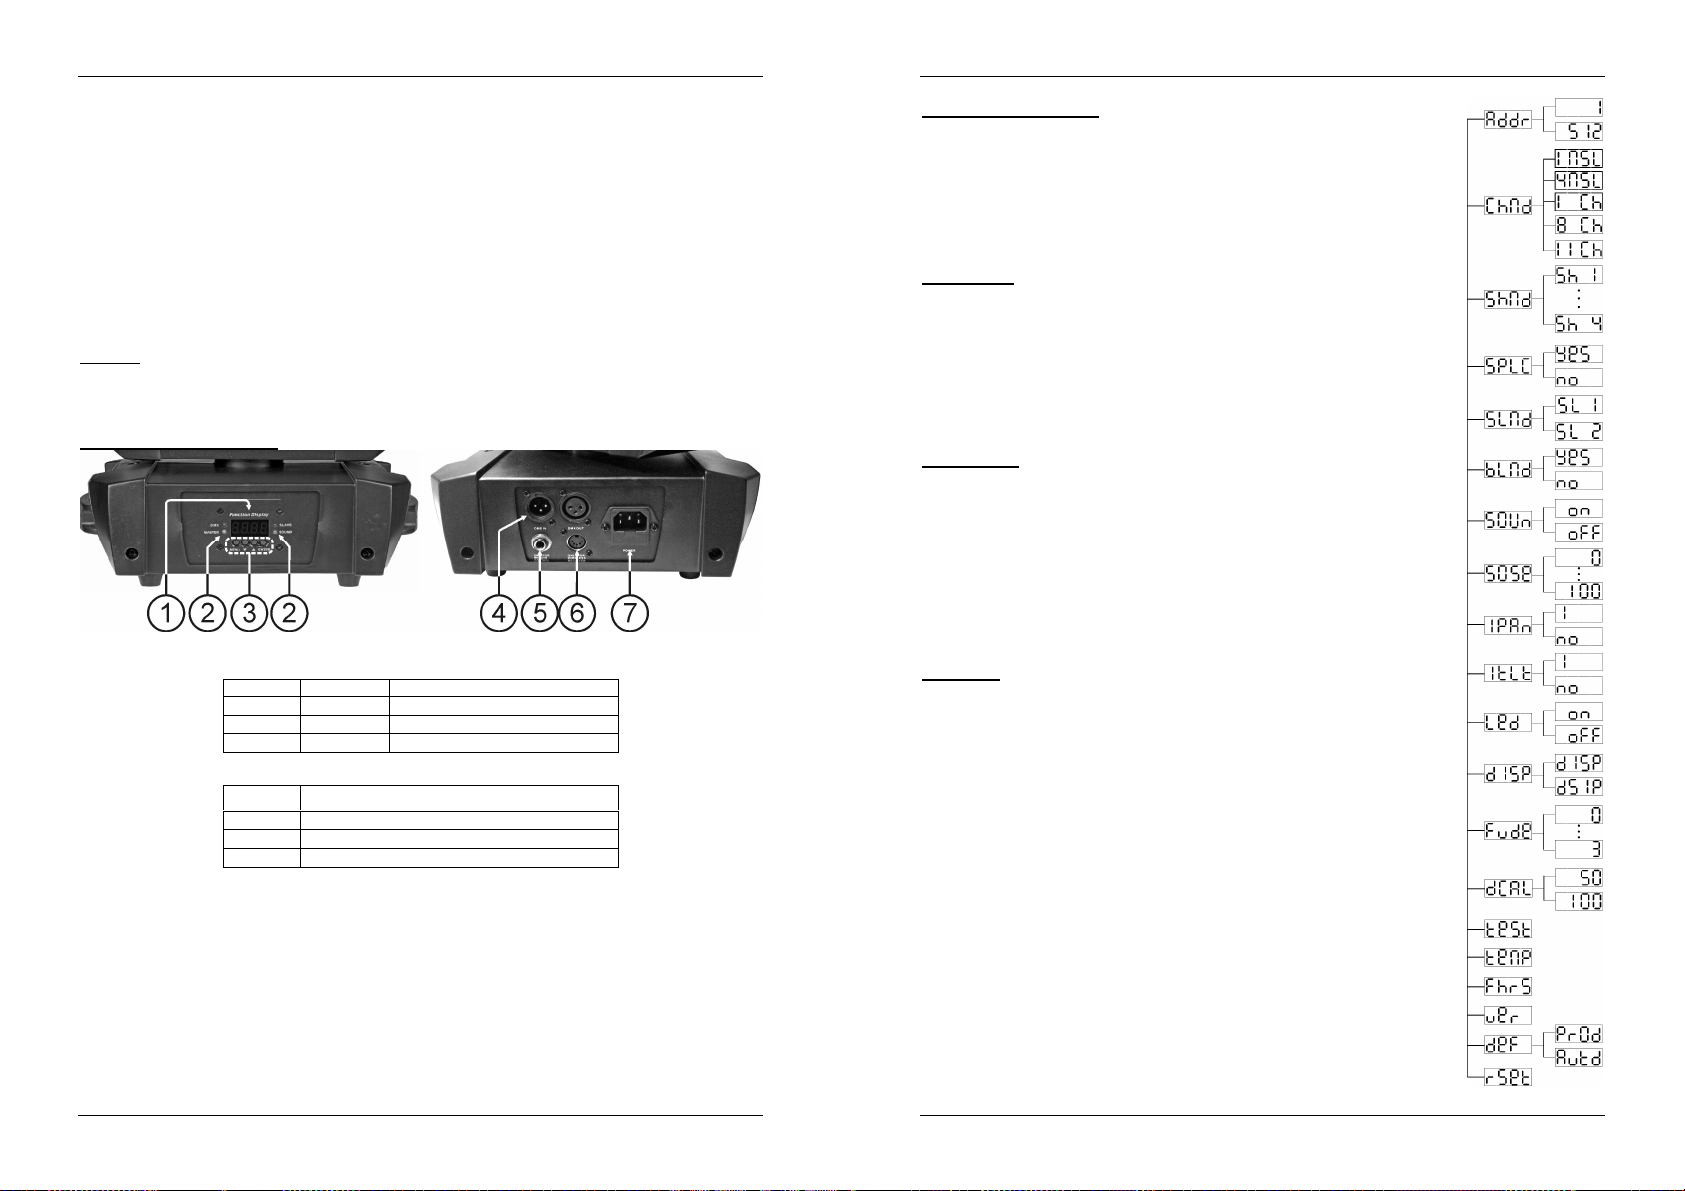
PORTUGUÊS MANUAL DO UTILIZADOR
PORTUGUÊS MANUAL DO UTILIZADOR
Caso uma lente apresente danos visíveis como fendas ou riscos profundos, deverá ser substituída
imediatamente.
O cabo de alimentação deverá estar em perfeitas condições e deverá ser substituído assim que for
detectado o mais pequeno dano.
As ventoinhas de arrefecimento (caso existam) e os orifícios de ventilação deverão ser limpos todos os
meses de modo a evitar que unidade sobreaqueça.
Utilize um aspirador ou um compressor de ar para limpar o interior da unidade uma vez por ano.
De forma a optimizar a projecção de luz, limpe as lentes ópticas internas e externas e/ou espelhos
periodicamente. A regularidade das limpezas depende do ambiente em que está instalada a unidade: um
ambiente húmido, com fumo ou poeirento dará origem a uma maior acumulação de impurezas nas
ópticas da unidade.
Utilize um pano macio e um limpa-vidros normal na limpeza da unidade.
Seque sempre as peças cuidadosamente.
Limpe as ópticas externas pelo menos uma vez em cada 30 dias.
Limpe as ópticas internas pelo menos uma vez em cada 90 dias.
Atenção: Recomendamos vivamente que a limpeza do interior da unidade seja efectuada por pessoal
qualificado!
CONFIGURAÇÃO DA UNIDADE:
PAINEL DE CONTROLO:
1. VISOR: Para mostrar os vários menus e as funções seleccionadas:
2. LEDs
3. Botões
4. Entrada/Saída DMX: Para ligação DMX512, utilize uma ficha XLR de 3 pinos (cabo) para ligar a
unidade em conjunto.
5. ENTRADA CONTROLO REMOTO COM FIO: Usado para conectar um simples comando de mão CA-8
enquanto a unidade é usada em modo autónomo ou modo Master/Slave.
6. ENTRADA CONTROLO REMOTO SEM FIO: Usado para conectar um simples comando de mão sem
fio RF-8 enquanto a unidade é usada em modo autónomo ou modo Master/Slave.
7. FONTE DE ALIMENTAÇÃO: com tomada IEC e suporte de fusível integrado, conecte o cabo de
alimentação aqui.
DMX Ligado Sinal DMX presente
MASTER Ligado Modo Master
SLAVE Ligado Modo Slave
SOUND A piscar Activação por som
MENU
DOWN Para recuar nas funções seleccionadas
UP
ENTER
Para seleccionar as funções de programação
Para avançar nas funções seleccionadas
Para confirmar as funções seleccionadas
MENU PRINCIPAL:
Para seleccionar qualquer uma das funções existentes, pressione o botão MENU
até que a função pretendida surja no visor ou usar o botões UP e DOWN para
navegar no menu.
Confirme a função com o botão ENTER. O visor irá piscar.
Utilize os botões UP e DOWN para mudar o modo.
Após seleccionar o modo, pressione o botão ENTER para confirmar. Para voltar
ao menu principal sem efectuar alterações: pressione o botão MENU
rapidamente. O menu principal é mostrada no gráfico.
DMX Address
Usado para definir o endereço inicial numa configuração DMX.
Pressione o botão MENU até que “Addr” seja mostrado no visor.
Pressione ENTER e o visor irá piscar.
Utilize os botões UP e DOWN para alterar o endereço DMX512.
Após seleccionar o endereço, pressione ENTER para confirmar o endereço DMX.
Para voltar ao menu principal sem efectuar alterações: pressione o botão MENU
rapidamente.
Para voltar ao modo normal de funcionamento: pressione o botão MENU por 2
segundos.
Channel mode
Usado para definir o modo de canal desejado.
Pressione o botão MENU até que “ChMd” seja mostrado no visor.
Pressione ENTER e o visor irá piscar.
Utilize os botões UP e DOWN para escolher modo 1MSL, 4MSL, 1Ch, 8Ch ou
11Ch.
Quando o modo desejado de configuração do canal é mostrada no visor,
pressione a tecla ENTER para confirmar
Para voltar ao menu principal sem efectuar alterações: pressione o botão MENU
rapidamente.
Para voltar ao modo normal de funcionamento: pressione o botão MENU por 2
segundos.
Show Mode
Usado para escolher o modo Show quando usado em modo individual ou
master/slave.
Pressione o botão MENU até que “ShMd” seja mostrado no visor.
Pressione ENTER e o visor irá começar a piscar.
Utilize os botões UP e DOWN para seleccionar o modo :
Show 1 (Sh 1): Unidade fixa no solo. Movimento “Tilt” ângulo de 210°.
Show 2 (Sh 1): Unidade fixa no tecto. Movimento “Tilt” ângulo de 90°.
Show 3 (Sh 1): Unidade colocada numa coluna. Ex: na frente do palco.
Movimento “Pan” (da esquerda para a direita para esquerda) ângulo de
160º. Movimento “Tilt” ângulo de 90º (60º acima do horizonte; 30º abaixo
do horizonte.)
Show 4 (Sh 1): Unidade fixa no tecto. Feixe projectado principalmente na
frente do palco. Movimento “Pan” (da esquerda para a direita para
esquerda) ângulo de 160º. Movimento “Tilt” ângulo de 90º (verticalmente, à
frente 75º; atrás 15º)
Após seleccionar o modo, pressione ENTER para confirmar.
Para voltar ao menu principal sem efectuar alterações: pressione o botão MENU
rapidamente.
Para voltar ao modo normal de funcionamento: pressione o botão MENU por 2
segundos.
JB SYSTEMS
®
75/85 SIRIUS
JB SYSTEMS
®
76/85 SIRIUS
Page 41

PORTUGUÊS MANUAL DO UTILIZADOR
PORTUGUÊS MANUAL DO UTILIZADOR
Split Color
Pode escolher se a unidade apenas mostra cores completas ou também cores divididas.
Pressione o botão MENU até que “SPLC” seja mostrado no visor.
Pressione ENTER e o visor irá piscar.
Utilize os botões UP e DOWN para seleccionar “Yes” (cores divididas) ou “No” (apenas cores completas).
Once the mode is selected, press the ENTER button to save it.
Para voltar ao menu principal sem efectuar alterações: pressione o botão MENU rapidamente.
Para voltar ao modo normal de funcionamento: pressione o botão MENU por 2 segundos.
Slave Mode
Usado para fazer a unidade secundária trabalhar em oposto á principal ou trabalhar em sintonia.
Pressione o botão MENU até que seja “SLMd” mostrado no visor.
Pressione o botão ENTER, o visor irá começar a piscar.
Utilize os botões UP e DOWN para seleccionar “SL 1” (normal) ou “SL 2” (modo espectáculo de 2 luzes)
Após seleccionar o modo, pressione ENTER para confirmar.
Para voltar ao menu principal sem efectuar alterações: pressione o botão MENU rapidamente.
Para voltar ao modo normal de funcionamento: pressione o botão MENU por 2 segundos.
Blackout Mode
Modo Blackout: Quando o sinal DMX não é detectado, a unidade entra em blackout e espera pelo
sinal DMX
Sem modo blackout: Quando o sinal DMX não é detectado, a unidade automaticamente muda para o
modo individual.
Pressione o botão MENU até que “bLMd” seja mostrado no visor.
Pressione o botão ENTER, o visor irá começar a piscar.
Utilize os botões UP e DOWN para seleccionar “Yes” (com blackout) ou “No”(sem blackout).
Após seleccionar o modo, pressione ENTER para confirmar.
Para voltar ao menu principal sem efectuar alterações: pressione o botão MENU rapidamente.
Para voltar ao modo normal de funcionamento: pressione o botão MENU por 2 segundos.
Sound State
A unidade funciona ao ritmo da batida quando usada em modo autónomo ou master/slave
Pressione o botão MENU até que seja “SOUn” mostrado no visor.
Pressione o botão ENTER, o visor irá começar a piscar.
Utilize os botões UP e DOWN para seleccionar “On” ou“Off”.
Após seleccionar o modo, pressione ENTER para confirmar.
Para voltar ao menu principal sem efectuar alterações: pressione o botão MENU rapidamente.
Para voltar ao modo normal de funcionamento: pressione o botão MENU por 2 segundos.
Sound Sense
Usado para definir a sensibilidade do microfone interno
Pressione o botão MENU até que seja “SOSe” mostrado no visor.
Pressione o botão ENTER, o visor irá começar a piscar.
Utilize os botões UP e DOWN para seleccionar um valor entre "0" (sensibilidade muito baixa) e "100" (de
alta sensibilidade).
Após seleccionar o modo, pressione ENTER para confirmar.
Para voltar ao menu principal sem efectuar alterações: pressione o botão MENU rapidamente.
Para voltar ao modo normal de funcionamento: pressione o botão MENU por 2 segundos.
Pan Inversion
Normal: O movimento horizontal não é invertido
Inversão do Pan: O movimento horizontal é invertido
Pressione o botão MENU até que “IPAn” seja mostrado no visor.
Pressione o botão ENTER, o visor irá começar a piscar.
Utilize os botões UP e DOWN para seleccionar “No” (normal) ou “I” (pan inversion).
Após seleccionar o modo, pressione ENTER para confirmar.
Para voltar ao menu principal sem efectuar alterações: pressione o botão MENU rapidamente.
Para voltar ao modo normal de funcionamento: pressione o botão MENU por 2 segundos.
Tilt Inversion
Normal: movimento Tilt não é invertido
Inversão do Tilt: movimento tilt é invertido.
Pressione o botão MENU até que “ItLt” seja mostrado no visor
Pressione o botão ENTER, o visor irá começar a piscar.
Utilize os botões UP e DOWN para seleccionar “No” (normal) ou “I” (tilt inversion)
Após seleccionar o modo, pressione ENTER para confirmar.
Para voltar ao menu principal sem efectuar alterações: pressione o botão MENU rapidamente.
Para voltar ao modo normal de funcionamento: pressione o botão MENU por 2 segundos.
Display on/off
Display on: visor está sempre ligado
Display off: visor está desligado quando não está a ser usado
Pressione o botão MENU até que “Led” seja mostrado no visor
Pressione o botão ENTER, o visor irá começar a piscar.
Utilize os botões UP e DOWN para seleccionar “On” (LEDs acesos) ou “Off” (LEDs apagados).
Após seleccionar o modo, pressione ENTER para confirmar.
Para voltar ao menu principal sem efectuar alterações: pressione o botão MENU rapidamente.
Para voltar ao modo normal de funcionamento: pressione o botão MENU por 2 segundos.
Inversão do Visor
Normal display: o visor é legível quando a unidade está no chão.
Dsiplay inversion: o visor é legível quando a unidade está montada de pernas para o ar.
Pressione o botão MENU até que “dISP” seja mostrado no visor (normal display)
Pressione o botão ENTER para alternar entre (normal display) and (display inversion).
Para voltar ao modo normal de funcionamento: pressione o botão MENU por 2 segundos.
Function Delay
No canal de Função (CH8 ou CH11) pode seleccionar algumas funções especiais, como fazer
blackout durante a mudança de gobo e outras. Com esta opção pode seleccionar o atraso antes de
um função seleccionada ficar activa.
INFORMAÇÃO IMPORTANTE: A função delay apenas pode ser definida para zero segundos (No Delay)
quando estiver a usar um controlador DMX ou software DMX usando predefinições para os valores DMX
das funções especiais.
Nunca utilize “No Delay” enquanto estiver a usar um controlador DMX simples com faders para definir as
funções manualmente!
Pressione o botão MENU até que “Fude” seja mostrado no visor.
Pressione o botão ENTER, o visor começa a piscar.
Use os botões DOW N e UP para seleccionar um valor entre “0” (no Delay) and “3” (3s Delay)
Assim que o delay estiver seleccionado, pressione o botão para guardá-lo
Para voltar ás funções pressione o botão MENU.
Para voltar ao modo normal de funcionamento: pressione o botão MENU por 2 segundos.
Calibração do Dimmer
Devido a tolerâncias no processo de produção, nem todos os LEDS tem exactamente a mesma
intensidade, portanto deverá usar esta opção para igualar a intensidade de diferentes máquinas.
Pressione o botão MENU até que “dCAL” seja mostrado no visor.
Pressione o botão ENTER, o visor irá começar a piscar.
Use os botões DOWN e UP para seleccionar um valor entre “50” (intensidade mais baixa) e “100”
(intensidade mais baixa)
Assim que a intensidade estiver seleccionada, pressione o botão ENTER para guardá-la.
Para voltar ás funções pressione o botão MENU.
Para voltar ao modo normal de funcionamento: pressione o botão MENU por 2 segundos.
Auto Test
Usado para activar o programa “auto teste” interno que verifica todas as possibilidades da unidade.
Pressione o botão MENU até que “teSt” seja mostrado no visor.
Pressione o botão ENTER para iniciar o programa “auto teste” interno
Para voltar às funções pressione o botão MENU novamente.
JB SYSTEMS
®
77/85 SIRIUS
JB SYSTEMS
®
78/85 SIRIUS
Page 42
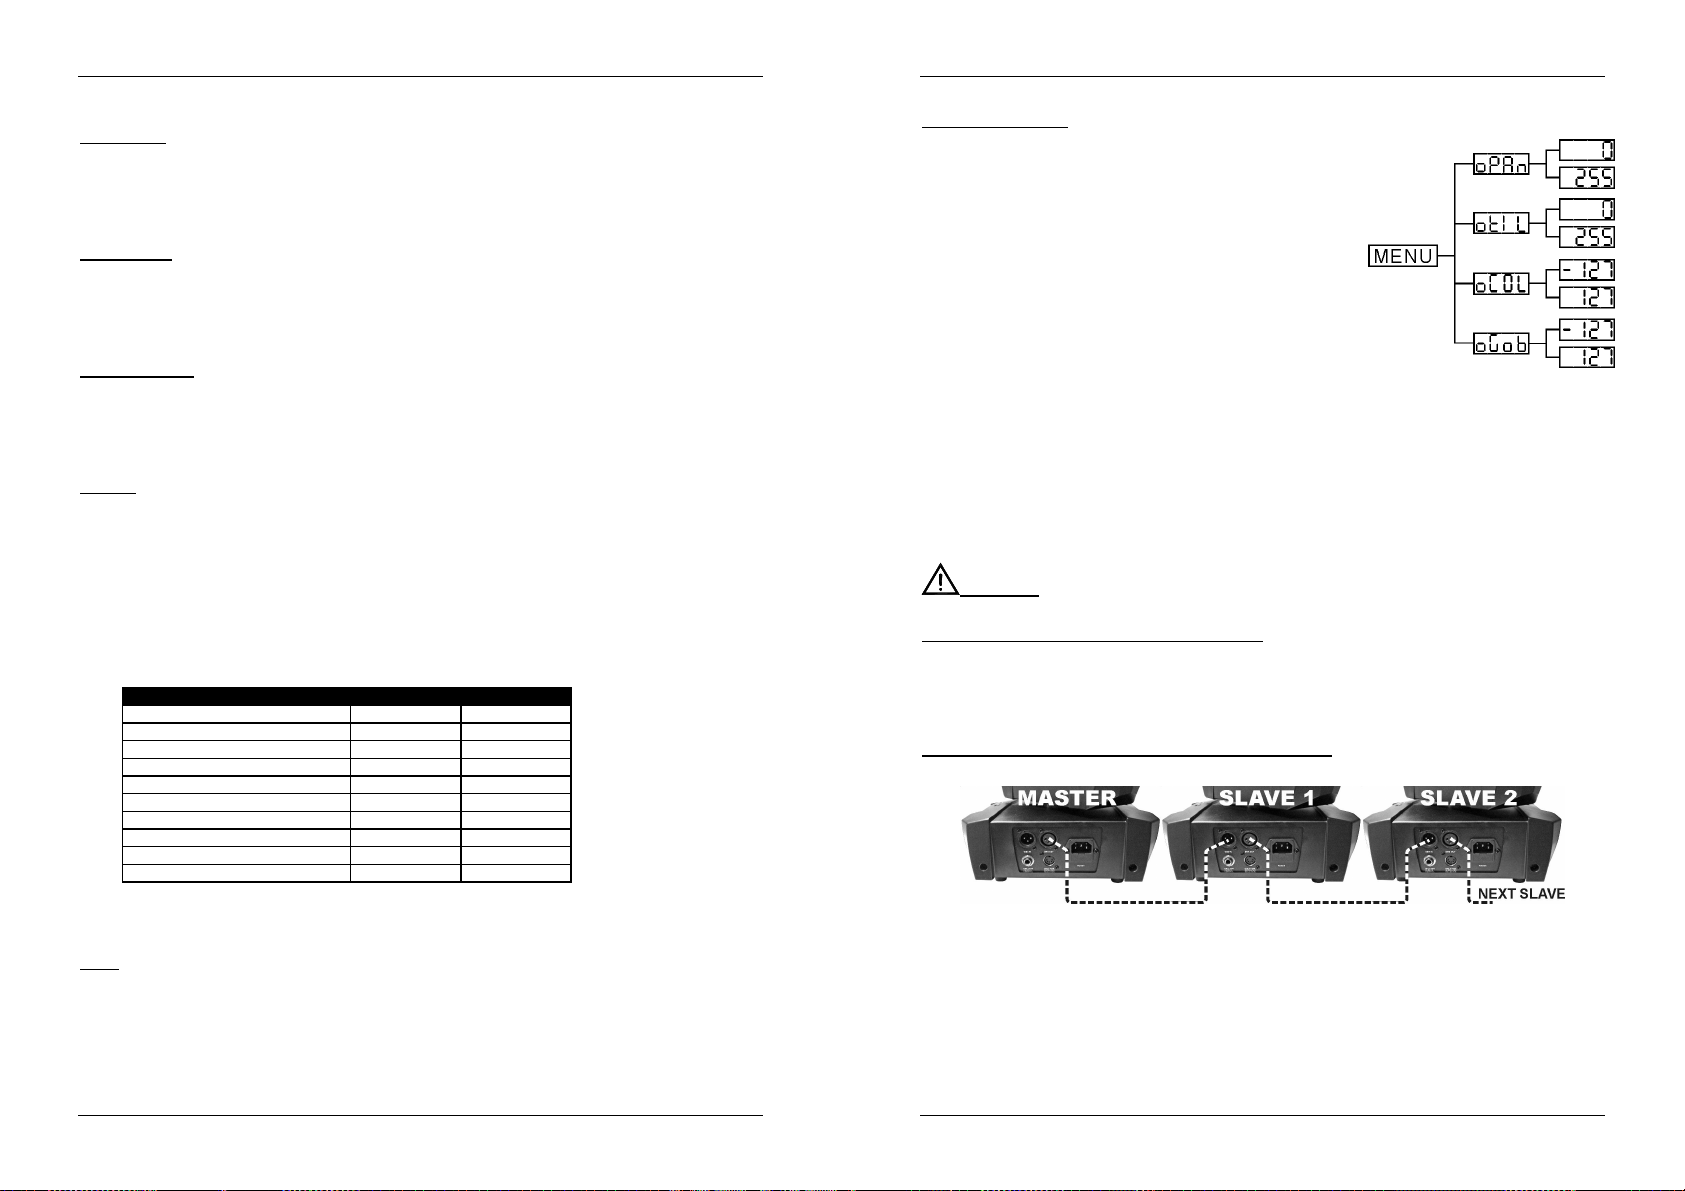
PORTUGUÊS MANUAL DO UTILIZADOR
Configurações
PRO def
AUTO def
PORTUGUÊS MANUAL DO UTILIZADOR
Para voltar ao modo normal de funcionamento: pressione o botão MENU por 2 segundos.
Temperature
Temperatura no interiror da unidade
Pressione o botão MENU até que “teMP” seja mostrado no visor.
Pressione o botão ENTER e a temperatura da unidade irá ser mostrada no visor
Para voltar ás funções pressione o botão MENU outra vez.
Para voltar ao modo normal de funcionamento: pressione o botão MENU por 2 segundos.
Fixture Hours
Usado para mostrar o numero de horas de trabalho da unidade
Pressione o botão MENU até que “FhrS” seja mostrado no visor.
Pressione o botão ENTER e a unidade irá mostrar o número de horas de funcionamento.
Para voltar às funções pressione o botão MENU novamente.
Para voltar ao modo normal de funcionamento: pressione o botão MENU por 2 segundos.
Software version
Usado para mostrar a versão do software que está instalada na unidade.
Pressione o botão MENU até que “ver”seja mostrado no visor.
Pressione o botão ENTER para mostrar a versão do software no visor.
Para voltar às funções pressione o botão MENU novamente.
Para voltar ao modo normal de funcionamento: pressione o botão MENU por 2 segundos.
Defaults
Usado para escolher entre as 2 configurações predefinidas, geralmente usadas por companhias de
aluguer:
PRO-defaults: configurações básicas (ajustáveis) para usar com controladores DMX profissionais
AUTO-defaults: configurações básicas (ajustáveis) para uso fácil em modo master/slave
Pressione o botão MENU até que o display mostre “Defaults”.
Pressione o ENTER: para evitar perda acidental das suas configurações, o visor começa a piscar e
mostra “no”:
Use os botões DOWN e UP para escolher “Yes” ou “No” e confirme pressione o botão ENTER
Quando escolher “Yes”, terá escolha entre 2 opções, cada uma com as suas configurações próprias:
Prod PRO-defaults são carregados
Autd AUTO-defaults são carregados
Channel mode 11ch 4MSL
Split Colors Yes No
Slave Mode Slave 1 Slave 1
Blackout Mode Yes No
Sound State Off On
Sound Sense 90 90
Pan Inverse No No
Tilt Inverse No No
Backlight No Yes
Function Delay 3s 3s
A partir destas configurações pode facilmente fazer as suas configurações adicionais. Os outros
parâmetros continuam inalterados.
Se desejar voltar ao modo de funcionamento normal pressione o botão MENU cerca de 2 segundos.
Reset
Usado para forçar um reinicio da unidade.
Pressione o botão MENU até que “rSet” seja mostrado no visor.
Pressione o botão ENTER para reiniciar todos os canais á sua posição standard.
Para voltar às funções pressione o botão MENU novamente.
Para voltar ao modo normal de funcionamento: pressione o botão MENU por 2 segundos.
Consulte também o capítulo sobre a configuração dos canais DMX da unidade para saber como pode forçar
um reinício através de DMX.
Home Position Adjust
Usado para ajustar a posição inicial de várias funções:
Certifique-se que a unidade está conectada a um controlador DMX e
colocada no modo de canal 11CH. Coloque o Canal 6 e 7 no
máximo.
Se ainda não estiver no menu de configuração, simplesmente
pressione o botão MENU por breves momentos para entrar no menu
de configuração (“Addr” é mostrado no visor)
Agora pressione o botão ENTER pelo menos 5 segundos para
entrar no modo Offset.
Use os botões DOWN e UP para seleccionar a função que deseja
ajustar
oPAn: Usado para ajustar el posicionamiento de la función
pan.
otIL: Usado para ajustar el posicionamiento de la función tilt.
oCoL: Usado para ajustar el posicionamiento de la rueda de
colores.
oGob: Usado para ajustar el posicionamiento de la rueda de gobos.
Pressione o botão ENTER, o visor irá começar a piscar.
Use os botões DOWN e UP para ajustar a posição inicial dessa função
Pressione o botão ENTER para confirmar a sua definição
Para voltar às funções pressione o botão MENU novamente.
Para voltar ao modo normal de funcionamento: pressione o botão MENU por 2 segundos. Os novos
parâmetros para as diferentes funções são preservados na memória flash.
INSTALAÇÃO ELÉCTRICA + CONFIGURAÇÃO
Importante: A instalação eléctrica deverá ser efectuada apenas por pessoal qualificado, de
acordo com as regulações para segurança eléctrica e mecânica no seu país.
Instalação eléctrica para 1 unidade em standalone:
Insira o cabo de alimentação. A unidade começa a trabalhar imediatamente em modo standalone
Nota 1:Pode conectar um comando remoto CA-8 ou RF-8 á unidade se desejar ter mais controlo.
Consulte a secção “Como utilizar a unidade” para aprender como fazer isto.
Nota 2: Se não existir saída, por favor verifique se a unidade está em modo Master Master e defina o
modo blackout para “NO” e Sound State para “On” (ver capitulo anterior)
Instalação eléctrica para 2 ou mais unidade em master/slave:
Neste modo, as unidades vão mostrar um show sincronizados, trabalhando ao ritmo da batida.
Conecte de 2 a um máximo de 16 unidades juntas usando cabos de microfone balanceados de boa
qualidade. A primeira unidade irá agir automaticamente como Master. As outras unidades irão agir
automaticamente como Slaves.
Verifique se todas as unidades estão ligadas á corrente.
Pronto!
Nota 1: Pode conectar um comando remoto CA-8 ou RF-8 á unidade master se desejar ter mais controlo
sobre a operação master/slave.
Nota 2: Se não existir saída, por favor verifique se a primeira unidade está em modo Master Master e
defina o modo blackout para “NO” e Sound State para “On” (ver capitulo anterior)
JB SYSTEMS
®
79/85 SIRIUS
JB SYSTEMS
®
80/85 SIRIUS
Page 43

PORTUGUÊS MANUAL DO UTILIZADOR
PORTUGUÊS MANUAL DO UTILIZADOR
Instalação eléctrica para 2 ou mais unidade em DMX-master/slave:
Neste modo as unidades irão mostrar um espectáculo sincronizado, trabalhando ao ritmo da batida mas
pode ainda controlar algumas funções na unidade Master através de 1 ou 4 canais DMX.
Para assegurar uma operação correcta precisa de uma unidade opcional “Mini DMX-SPLITTER” para
isolar a linha master/slave da linha DMX principal, ver desenho.
Conecte de 2 a um máximo de 16 unidades juntas usando cabos de microfone balanceados de boa
qualidade. A primeira unidade irá agir como Master. As outras unidades irão agir automaticamente como
Slaves.
Coloque o master no modo de canal 1MSL ou 4MSL (ver capitulo anterior). Verifique a tabela DMX em
baixo para ver as diferenças entre ambos os modos de canal.
Para o controlador DMX a unidade Master e os slaves podem ser agora considerados como 1 efeito
virtual que precisa de um endereço de início para que possa ser controlado como outra qualquer
unidade DMX na cadeia DMX: ver “DMX Address” no capítulo “Main Menu” para ver como pode definir o
endereço inicial DMX.
Verifique se todas as unidades estão ligadas á corrente.
Defina o controlador DMX de acordo com a tabela DMX embaixo.
Pronto!
Nota: de forma a trabalhar bem ao ritmo da música, certifique-se que a opção “Sound State” na unidade
master está definida para “On” (ver capitulo anterior)
Tabela DMX para modos de funcionamento 1MLSL e 4MSL
1 MSL 4 MSL
balanceados.
Ligação XLR-3pinos:
Ligação XLR-5pinos: Pino1 = Terra ~ Pino2 = Sinal Negativo ( -) ~ Pin3 = Sinal Positivo (+) ~ Pins4+5 não
usados.
Para prevenir comportamentos estranhos dos efeitos de luz, devido a interferências, pode usar um
terminador de 90Ω a 120Ω no final da série. Nunca use cabos divisores Y, isto simplesmente não
funciona!
Certifique-se que todas as unidades estão ligadas á corrente.
COMO DEFINIR O ENDEREÇO INICIAL CORRECTO:
Consulte o capítulo anterior (Configuração endereços DMX) para aprender como definir o endereço inicial
desta unidade. O endereço inicial de cada unidade é muito importante. Infelizmente é impossível indicar
neste manual qual o endereço inicial que deve utilizar porque depende completamente do controlador que
irá utilizar… Por isso consulte o manual do seu controlador DMX para descobrir qual o endereço inicial que
deverá utilizar.
CONFIGURAÇÃO DMX DO SIRIUS EM MODO 1CH:
Pino1 = Terra ~ Pino2 = Sinal Negativo (-) ~ Pino3 = Sinal Positivo (+)
Instalação eléctrica em modo DMX:
O protocolo DMX é um sinal de alta velocidade muito usado para controlar equipamento de luz
inteligente. Precisa de ligar em série o seu controlador DMX e todas as unidades conectadas com um
cabo balanceado de boa qualidade.
Ambos os conectores XLR-3 pinos e XLR-5 pinos são usados, mas os de XLR-3
pinos são mais populares porque estes cabos são compatíveis com cabos áudio
JB SYSTEMS
®
81/85 SIRIUS
JB SYSTEMS
®
82/85 SIRIUS
Page 44
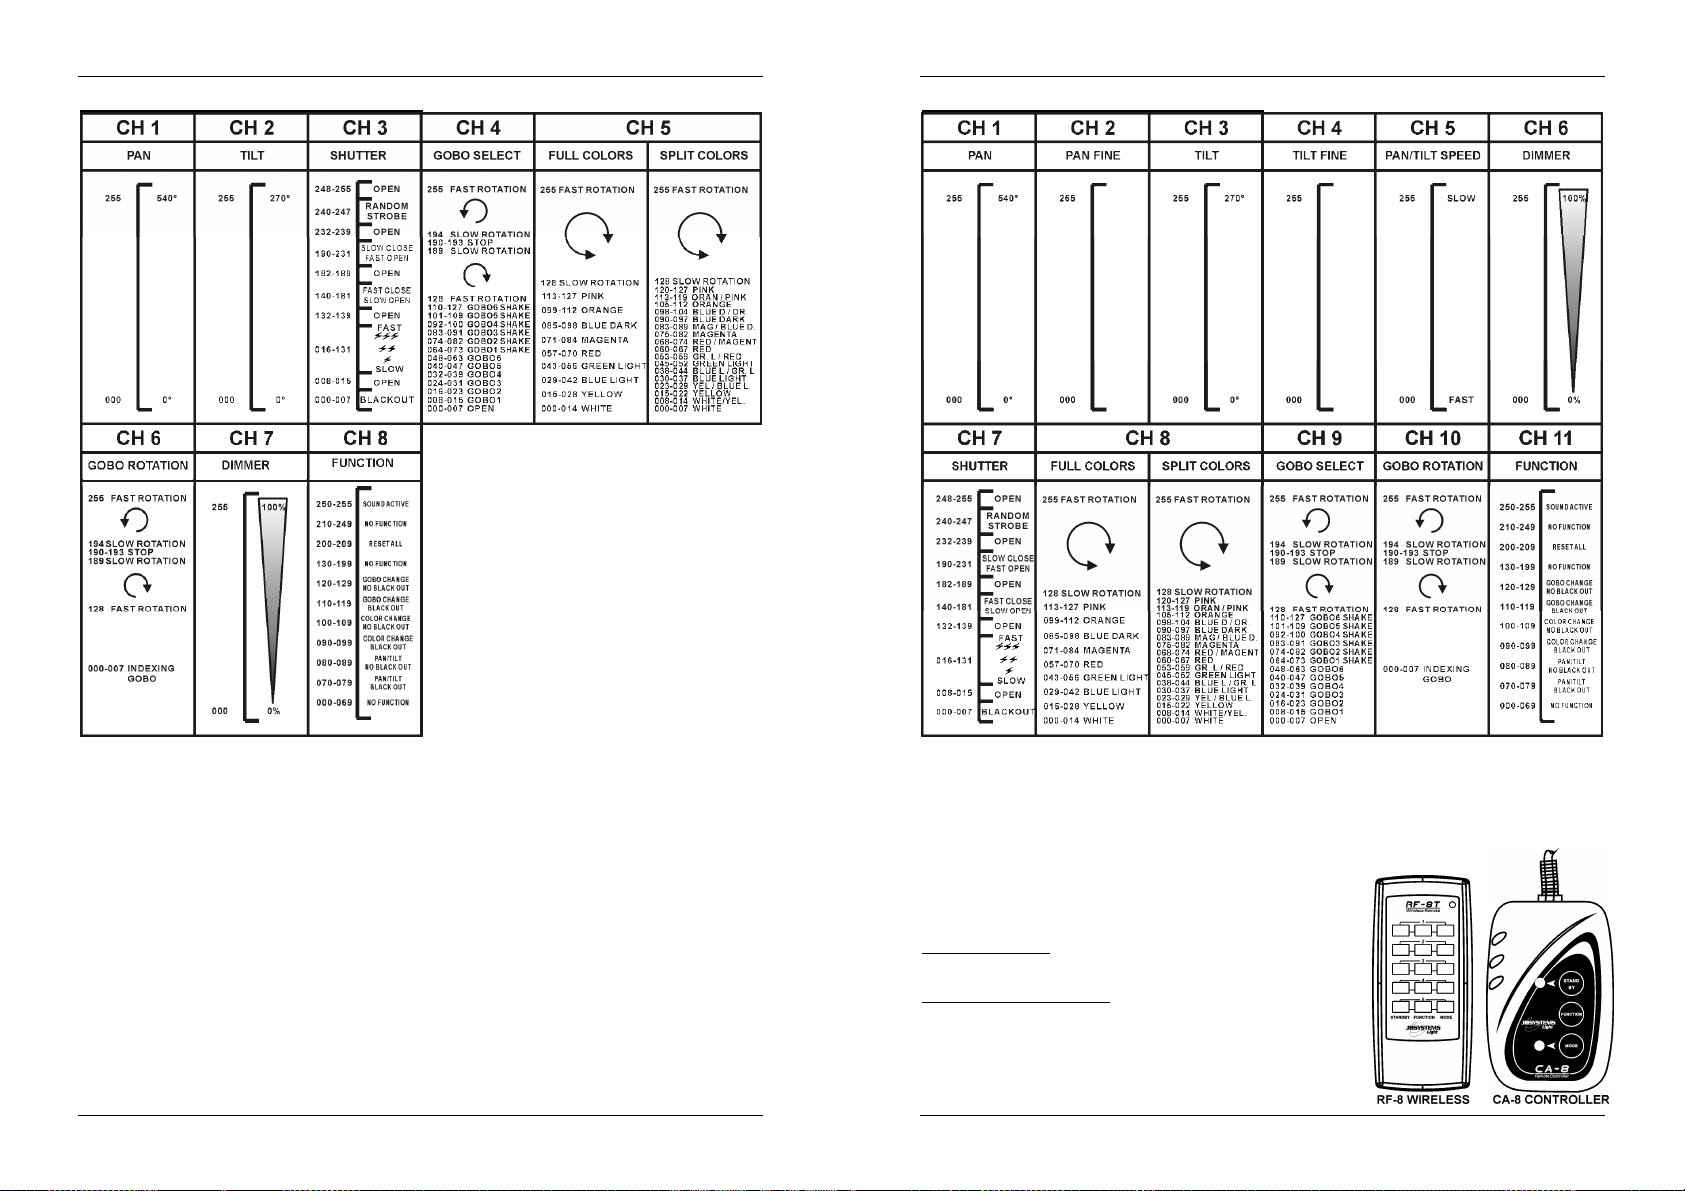
PORTUGUÊS MANUAL DO UTILIZADOR
PORTUGUÊS MANUAL DO UTILIZADOR
CONFIGURAÇÃO DMX DO SIRIUS EM MODO 8CH:
CONFIGURAÇÃO DMX DO SIRIUS EM MODO 8CH:
JB SYSTEMS
UTILIZAR A UNIDADE ATRAVÉS DE CA8 OU RF8SET
Quando utilizado em modo autonomo ou master/slave nós recomendamos que utilize o CA-8 "comando com
fio" ou RF-8SET "comando sem fio”.
Comando com fio CA-8: Ligue o controlador à entrada jack da primeira unidade (master).
RF-8SET comando sem fio: o comando sem fio tem 2 partes:
RF-8T: pequeno transmissor RF que pode controlar até 5 efeitos.
RF-8R: pequeno receptor RF que deverá ser conectado
através da entrada de 5 pinos do SIRIUS. Ver o manual de
Em seguida poderá controlar todas as unidades ligadas:
BOTÃO STANDBY:
Pressione este botão para activar/desactivar o modo blackout em
todas as unidades ligadas.
BOTÕES MODE/FUNCTION:
Com o botão MODE é possível seleccionar 3 modos diferentes:
O LED está desligado: com o botão FUNCTION você pode
O LED está a piscar: com o botão FUNCTION você pode
®
83/85 SIRIUS
JB SYSTEMS
instalação do receptor para mais informação.
selecionar diferentes modos de flash, como "strobe som”.
selecionar diferentes espectáculos.
®
84/85 SIRIUS
Page 45

PORTUGUÊS MANUAL DO UTILIZADOR
O LED está ligada: (modo de música está temporariamente desligada)
Pressione o botão FUNCTION breve: para alterar as cores
Pressione o botão FUNCTION mais: para alterar o gobos
ESPECIFICAÇÕES
Fonte de Alimentação: AC 100 - 240V, 50/60Hz
Consumo máximo de potência: 115 Watt
Controlo de som: Microfone interno
Mov. Horizontal/Vertical: 540° / 270°
Ângulo do feixe: 15°
Tamanho dos Gobos (mm): D=23,7 / imagem = 19mm
Ligações DMX: XLR 3 pinos macho / fêmea
Led: 1 LED Branco 60Watt
Dimensões: Ver diagrama
Peso: 8,80 kg
Pode fazer download da versão mais recente deste manual no nosso site: www.beglec.com
JB SYSTEMS
Estas informações estão sujeitas a alterações sem aviso prévio
®
85/85 SIRIUS
 Loading...