

Page 1
WWW.BEGLEC.COM
Operation Manual
Mode d'emploi
Gebruiksaanwijzing
Bedienungsanleitung
Manual de instrucciones
Manual do utilizador
EN
FR
NL
DU
ES
PT
Reproduction or publication of the content in any manner, without express permission of the publisher, is prohibited.
Copyright © 2005 - 2006 by BEGLEC cva.
Version: 1.1
The Power Source for DJ’s
Page 2

EN - DISPOSAL OF THE DEVICE
Dispose of the unit and used batteries in an environment friendly manner
according to your country regulations.
FR - DÉCLASSER L’APPAREIL
Débarrassez-vous de l’appareil et des piles usagées de manière écologique
Conformément aux dispositions légales de votre pays.
NL - VERWIJDEREN VAN HET APPARAAT
Verwijder het toestel en de gebruikte batterijen op een milieuvriendelijke
manier conform de in uw land geldende voorschriften.
DU - ENTSORGUNG DES GERÄTS
Entsorgen Sie das Gerät und die Batterien auf umweltfreundliche Art und
Weise gemäß den Vorschriften Ihres Landes.
ES - DESHACERSE DEL APARATO
Reciclar el aparato y pilas usadas de forma ecologica conforme a las
disposiciones legales de su pais.
PT - COMO DESFAZER-SE DA UNIDADE
Tente reciclar a unidade e as pilhas usadas respeitando o ambiente e em
conformidade com as normas vigentes no seu país.
Page 3
ENGLISH OPERATION MANUAL
ENGLISH OPERATION MANUAL
SAFETY INSTRUCTIONS:
OPERATION MANUAL
Thank you for buying this JB Systems product. To take full advantage of all possibilities,
please read these operating instructions very carefully.
FEATURES
• High Torque direct drive motor
• Fast start / stop
• 3 speeds: 33, 45, 78 rpm with quartz lock
• 2 Pitch adjustment ranges: +/-10% ; +/-20%
• Forward / reverse play
• Selectable phono/line output
• Retractable target light
• Audio Technica cartridge included
• All metal S-shaped tone arm assembly with:
• Counterweight
• Anti-skating adjustment
• Lever lift with height adjustment
• Adjustable large feet for perfect leveling
BEFORE USE
Check the contents:
Check that the carton contains the following items:
• Turntable platter
• Slip mat
• 45-rpm adapter
• Counterweight
• Head shell
• Operating instructions
• Cartridge
• Mains power cable.
To prevent fire or shock hazard, do not expose this appliance to rain or moisture. Do not
place metal objects or spill liquid inside the turntable. Electric shock or malfunction may
result.
INSTALLATION GUIDELINES:
• Install the turntable in a well-ventilated location where it will not be exposed to high
temperatures or humidity.
• Placing and using the turntable for long periods near heat-generating sources such as
amplifiers, spotlights, etc. will affect its performance.
• When the turntable is used in a loud-sound environment, for example near speakers,
sound skip and feedback may occur.
• Install the unit on a perfectly horizontal and very stable surface. A concrete or marble
surface is perfect. A wooden surface is a bad choice while it amplifies vibrations.
• Be sure the turntable, including its audio and mains cords, does not touch any vibrating
materials. Take special care when using the unit while it is installed in a carrying case.
CLEANING THE TURNTABLE:
Clean by wiping with a cloth slightly dipped with water. Avoid getting water inside the unit.
Do not use volatile liquids such as benzene or thinner which will damage the unit.
CAUTION
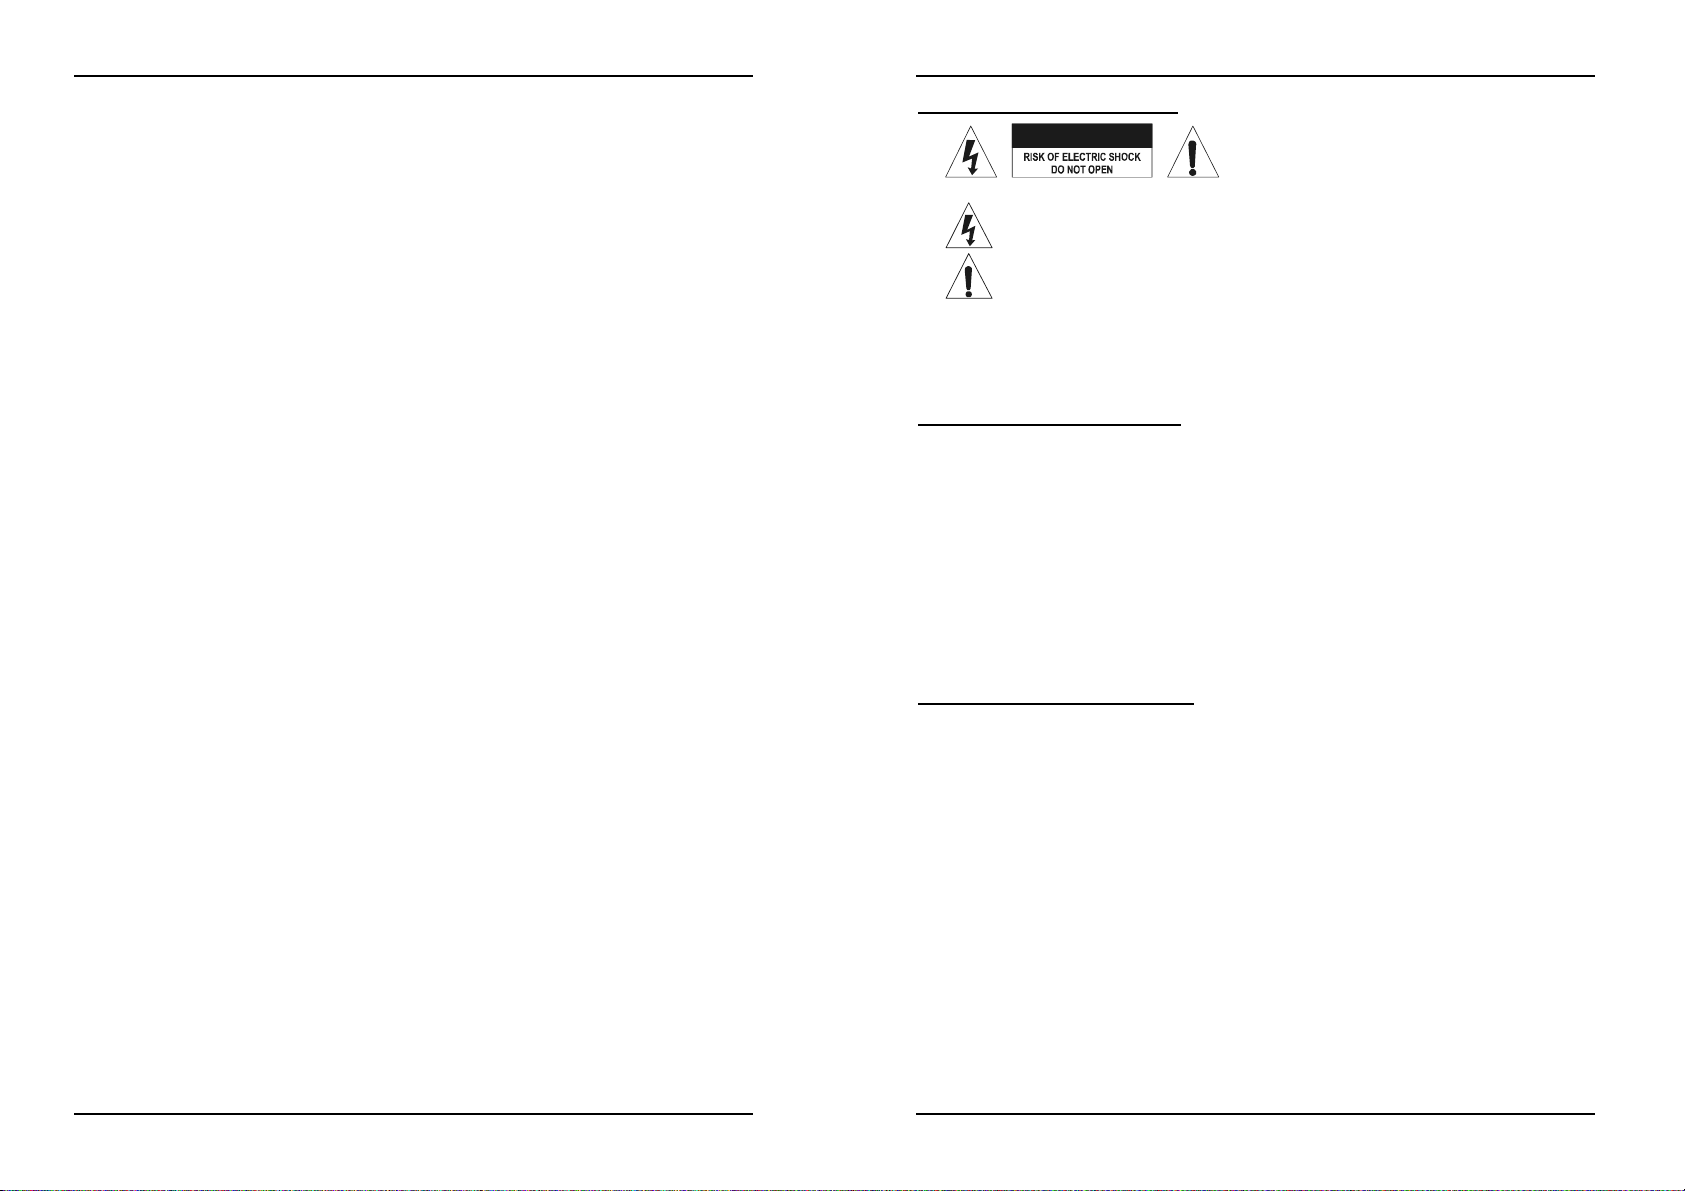
The lightning flash with arrowhead symbol within the equilateral triangle is
intended to alert the use or the presence of un-insulated “dangerous voltage”
within the product’s enclosure that may be of sufficient magnitude to constitute
a risk of electric shock.
The exclamation point within the equilateral triangle is intended to alert the
user to the presence of important operation and maintenance (servicing)
instructions in the literature accompanying this appliance.
CAUTION: To reduce the risk of electric shock,
do not remove any cover. No user-serviceable
parts inside. Refer servicing to qualified service
personnel only.
JB SYSTEMS® 1/30 HIGH Q30D Mk2 TURNTABLE
JB SYSTEMS® 2/30 HIGH Q30D Mk2 TURNTABLE
Page 4
ENGLISH OPERATION MANUAL
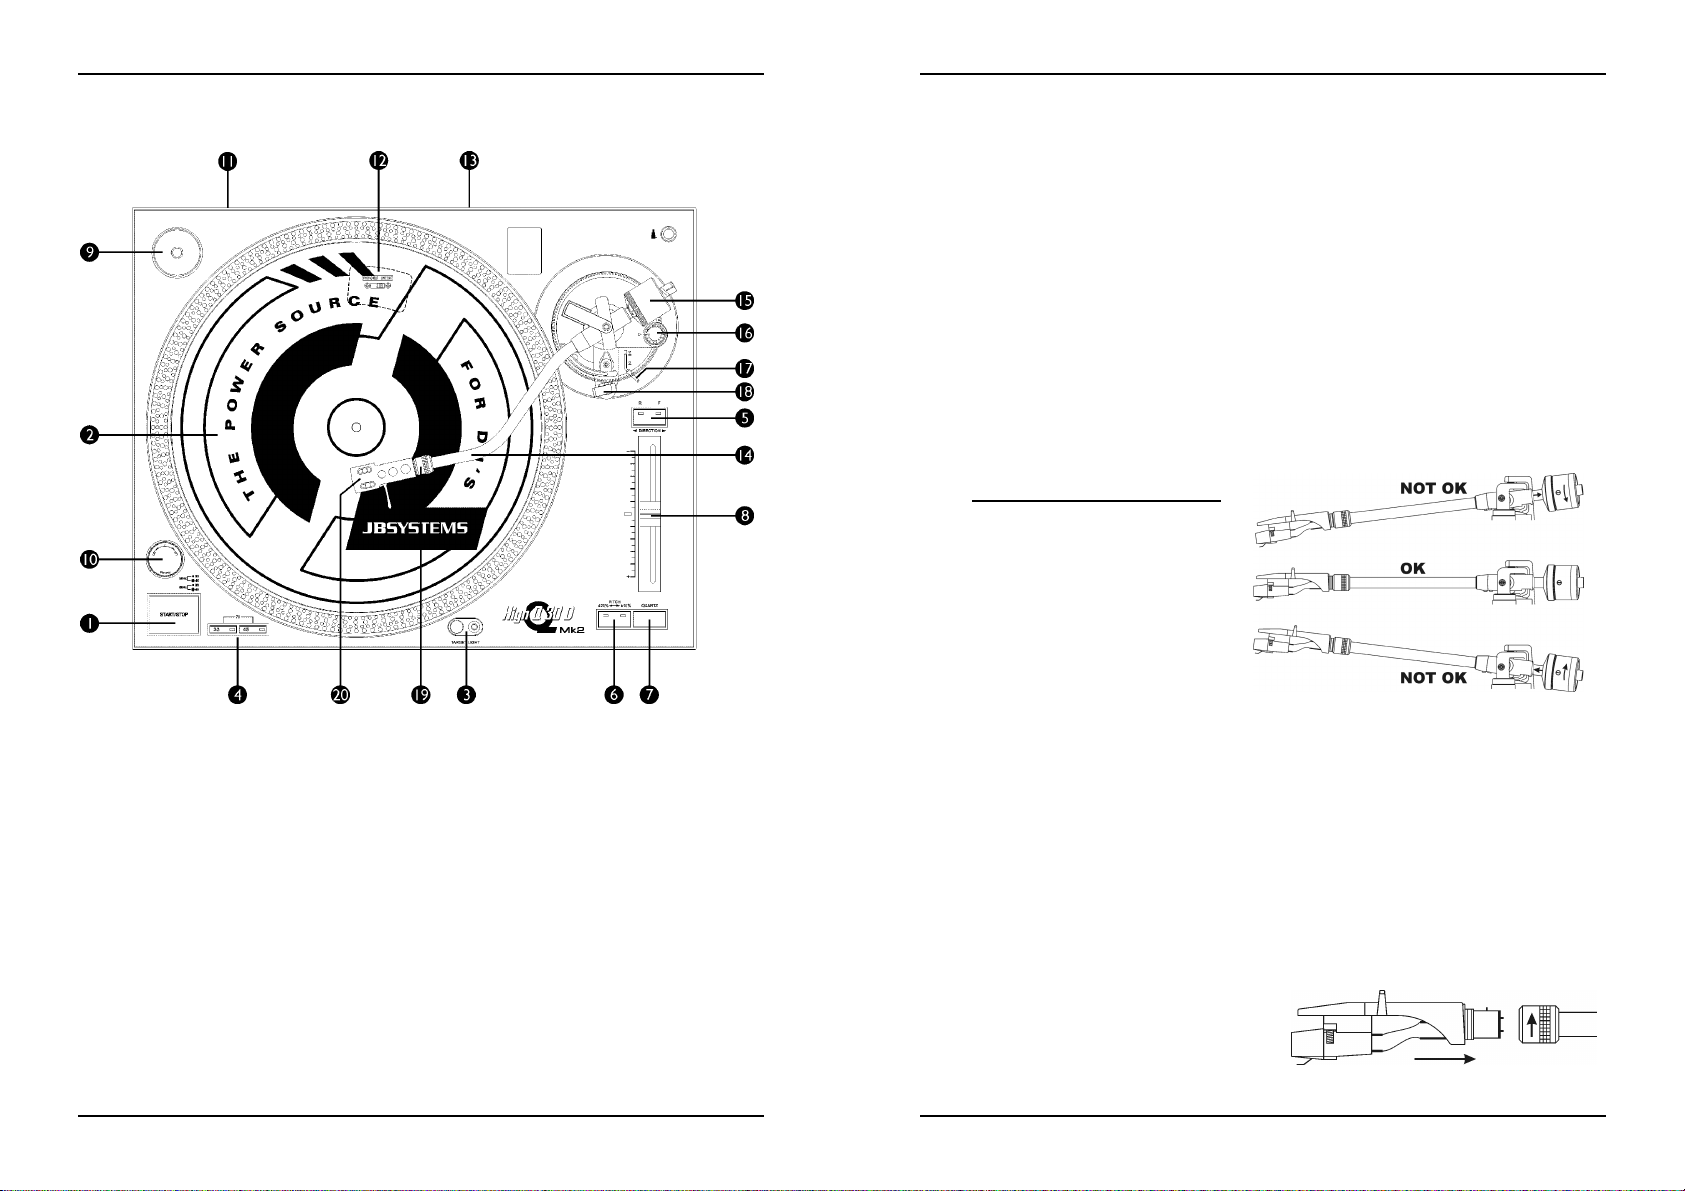
CONTROLS AND FUNCTIONS
1. START / STOP BUTTON: Press this button to start or stop the platter.
2. PLATTER: The platter is equipped with a slip mat. This makes it easier to manipulate
the record for scratch performances.
3. TARGET LIGHT: Target light used to locate the exact place on your record when used
in a dark place.
4. SPEED SELECT BUTTONS: Used to select the desired speed.
• Press the “33” button to select the 33rpm speed.
• Press the “45” button to select the 45rpm speed.
• Press “33” and “45” buttons simultaneously to select the 78rpm speed.
5. REVERSE BUTTON: Press this button to reverse the platter rotation, press this button
again to end the reverse mode.
6. PITCH RANGE BUTTON: Press this button to adjust the range of the pitch slider.
• Press ones for +/-10% speed range. (normally used for beat mixing)
• Press again for +/-20% speed range.
7. QUARTZ LOCK BUTTON: When the QUARTZ Button is pressed, the exact center
speed (0%) is enforced, even when the pitch slider is not in the middle. The led in the
center of the pitch slider will be green.
ENGLISH OPERATION MANUAL
8. PITCH SLIDER: Use the pitch slider to change the actual speed of the platter. The
Range depends on the Pitch Range button. When the slider is in its middle position, the
led next to the pitch slider will turn green to indicate that the turntable is locked to the
exact center speed. When the slider is not in the middle the led turns red. Attention:
take care that the Quartz lock button is switched off.
9. SINGLE ADAPTER: Place this adapter on the platter for playing 7” records with large
center holes.
10. POWER ON/OFF SWITCH: Used to turn the turntable on an off.
11. POWER CORD CONNECTOR: Used to connect to the mains, using the supplied
power cord.
12. PHONO/LINE SWITCH: Depending on the position of the phono/line switch, you can
connect the turntable to any phono or line level input.
13. PHONO/LINE OUTPUT: Connect the turntable to any phono or line level input. Be sure
to put the phono/line switch in the correct position.
14. TONE ARM: This is a fully manual S-shaped tone arm. To start playback, gently place
the stylus on the record using the head shell finger support. Do not drop the stylus onto
the record as this may cause damage to the diamond tip and to the record.
15. COUNTERWEIGHT: Use the counterweight to balance the tone arm and to adjust the
stylus pressure. For the correct stylus pressure, please refer to the user manual of your
cartridge.
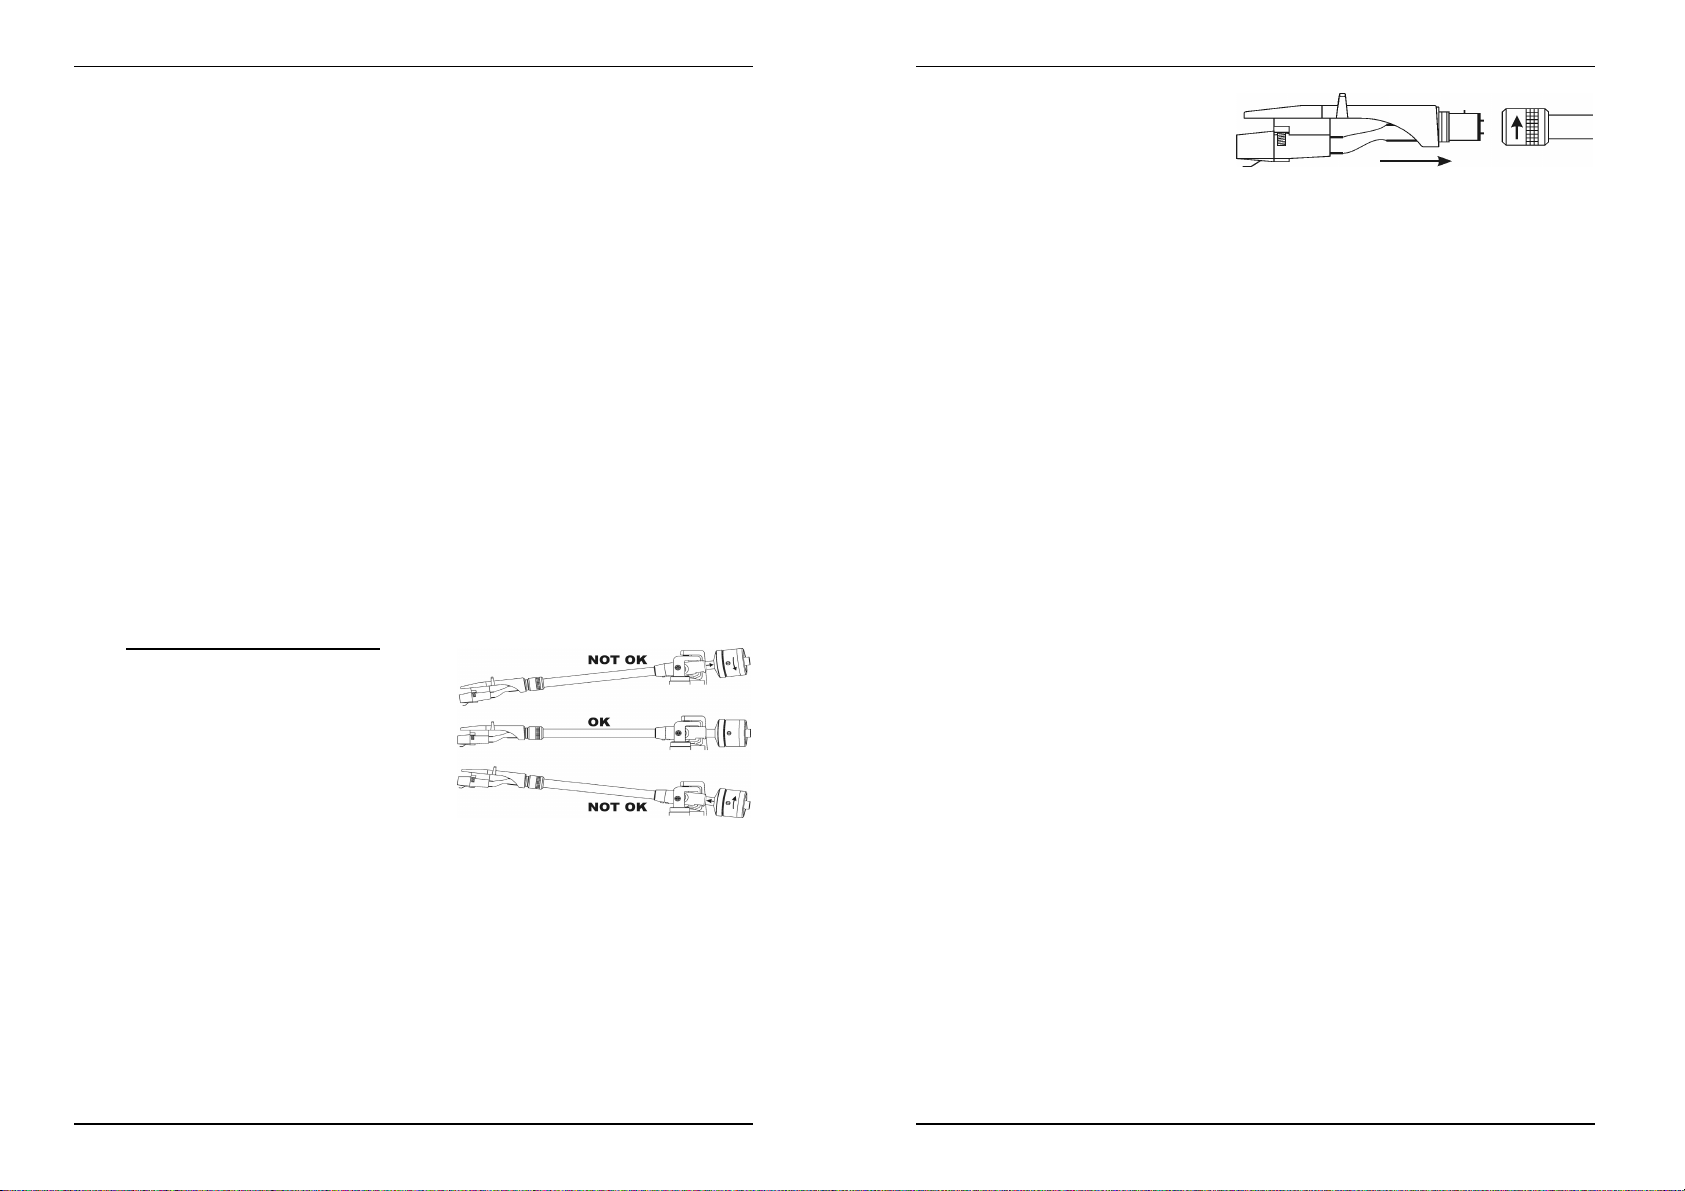
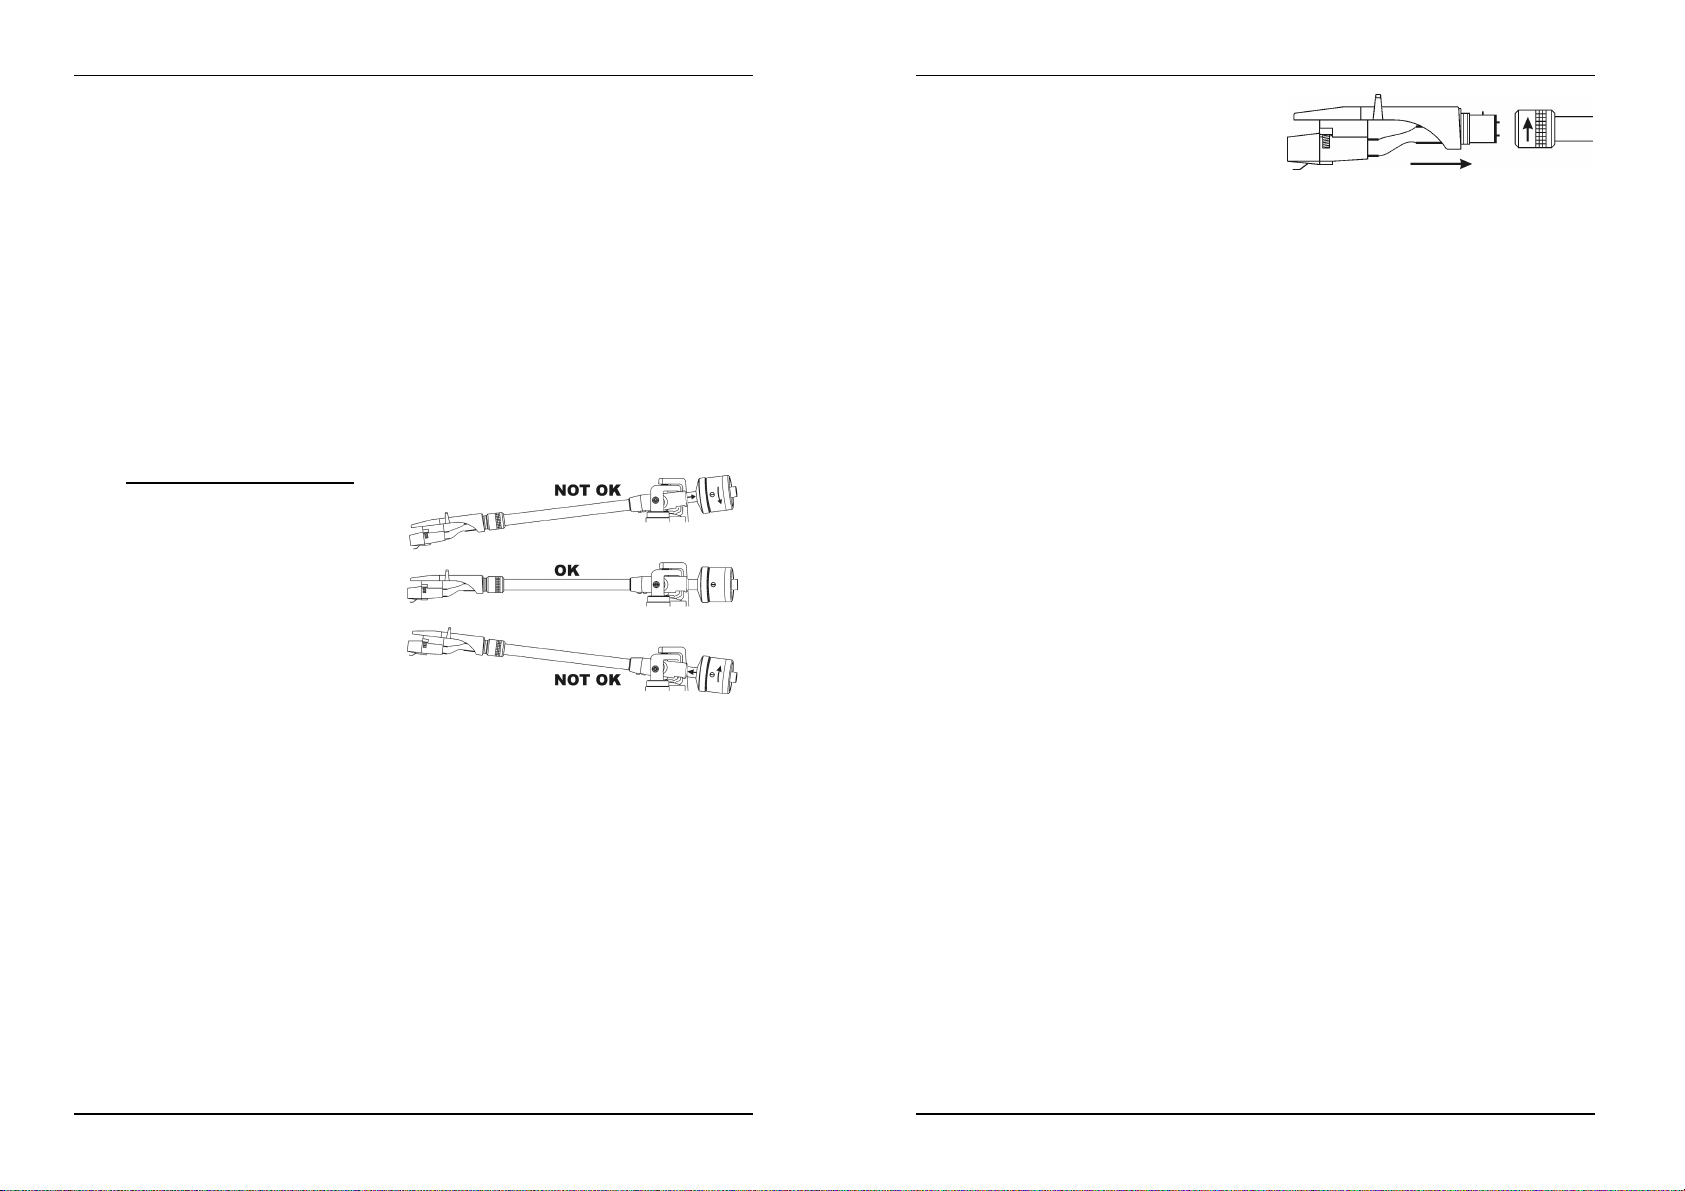
Setting up the stylus pressure:
Make sure the cartridge is well
fitted and its needle protector is
removed. Put a record on the
platter and make sure the antiskate is set to zero. Put the tone
arm lever in “down” position. Take
the tone arm and turn the counterweight until the tone arm is in
perfect balance Æ It floats
horizontally above the record
surface, see “OK” picture at the right. Now set the “stylus pressure ring” (front
section of the counterweight with markings) to zero by turning the ring while you
take care that the counterweight doesn’t move. Next, turn the complete
counterweight clockwise until the “stylus pressure ring” indicates the correct needle
pressure. Don’t forget to put the anti-skate back in place.
16. ANTI-SKATE KNOB: When a record is playing, side forces are generated, pushing the
stylus towards the center or the outside of the record. You can use the anti-skate knob
to offset this force and keep the needle centered in the groove. For standard playback
simply turn the anti-skate knob to the same number as the stylus pressure reads in
grams. (Stylus pressure = 3gr. Æ anti-skate = 3)
17. TONE ARM LIFT: Controls the up and down action of the tone arm.
18. TONE ARM CLAMP & REST: Use this rest for the tone arm while changing a record.
Attach the tone arm to the rest using the clamp when the turntable is not used or when
it is transported. This prevents the tone arm from accidentally turning towards the
platter and damaging the needle of the cartridge.
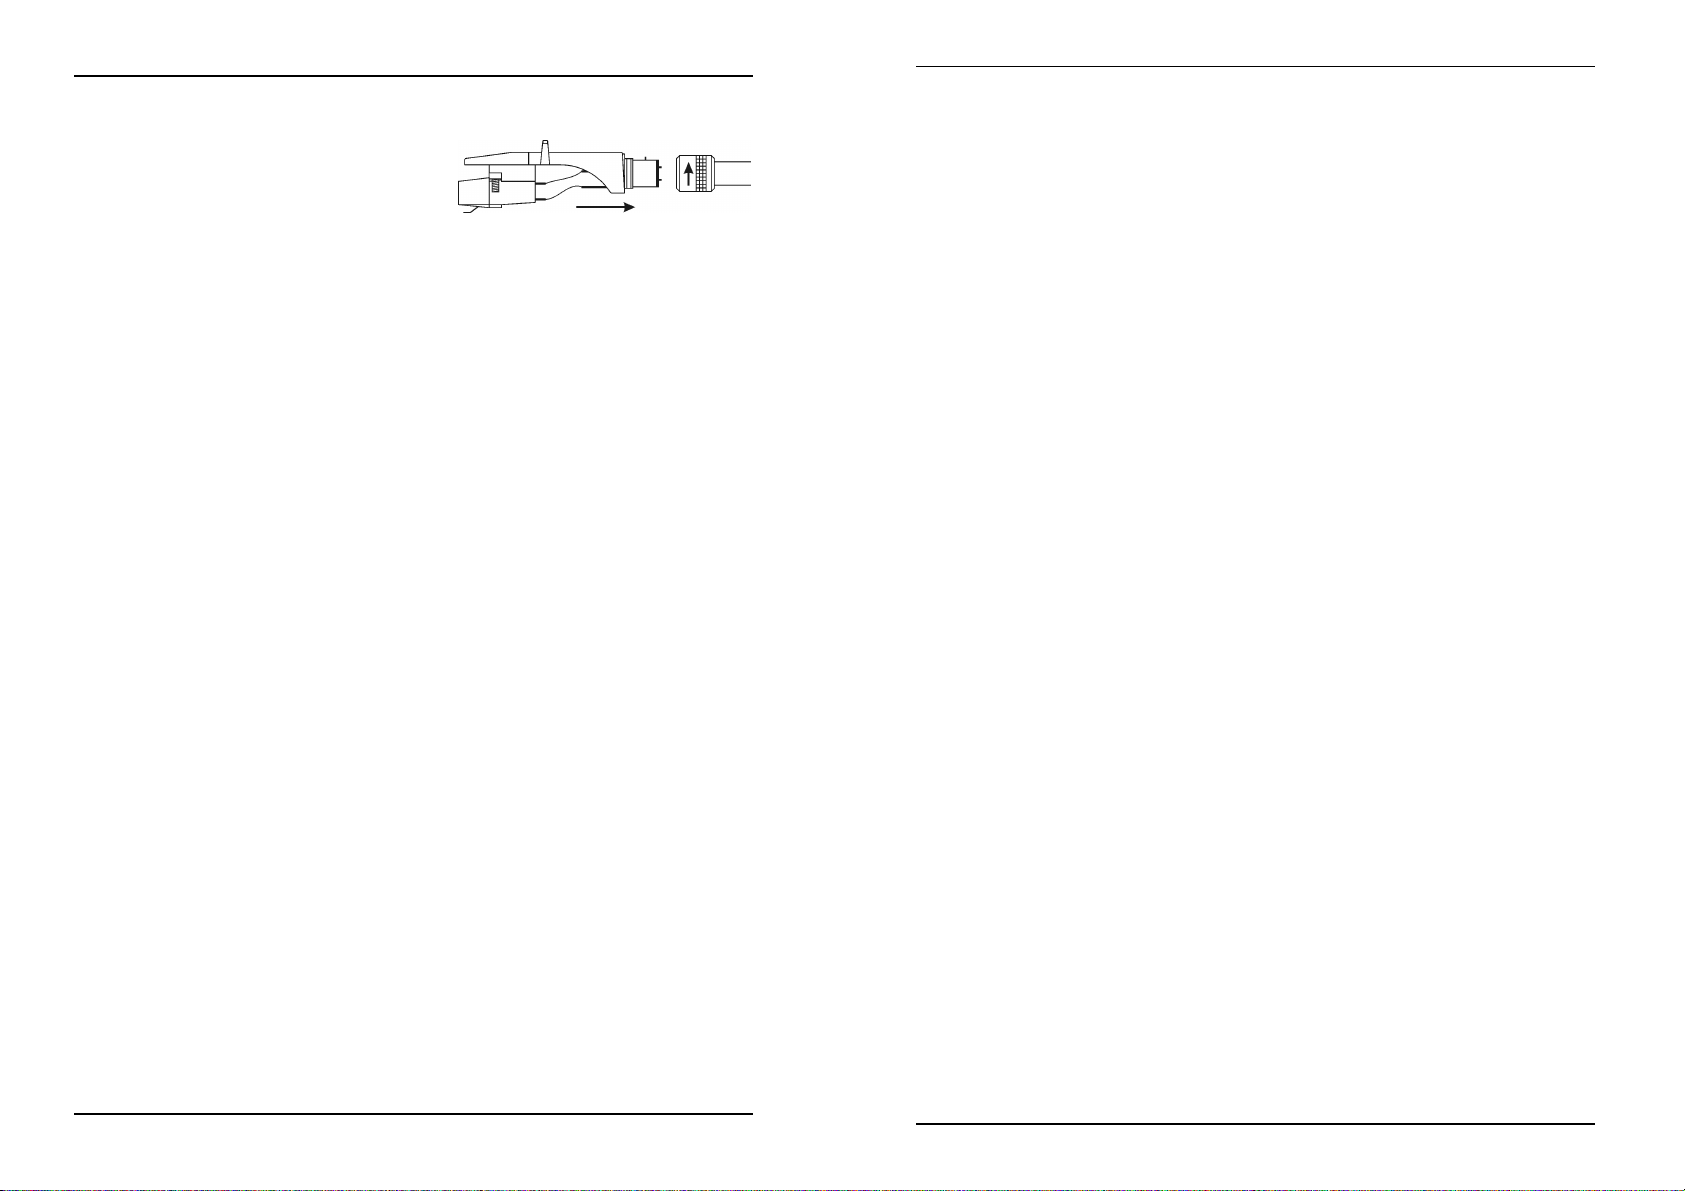
19. HEAD SHELL LOCKING NUT: Attach the
head shell by inserting it into the front end
of the tone arm and then turn the locking
nut clockwise.
JB SYSTEMS® 3/30 HIGH Q30D Mk2 TURNTABLE
JB SYSTEMS® 4/30 HIGH Q30D Mk2 TURNTABLE
Page 5

ENGLISH OPERATION MANUAL
20. HEAD SHELL: Install the cartridge here. When installing a cartridge, refer to the
installation instructions supplied by the manufacturer of that cartridge. During
installation, attach the stylus protector to guard the stylus tip from damage.
Attach wires as follows: White (L+) Left channel +
Blue (L-) Left channel Red (R+) Right channel +
Green (R-) Right channel -
SPECIFICATIONS
Motor: 8 pole, 3phase, brushless DC motor
Driving Method: Direct Drive
Starting Torque: More than 1.6kgf / cm
Starting Time: less than 1sec second
Braking Time: less than 1sec second
Speed selection: 33
Speed adjustment: +/-10% ~ +/-20%
Wow & Flutter: less than 0,2% WRMS (JIS WTD)
Tone arm type: Static balanced S-shaped tone arm.
Tracking Error angle: Less than 3°
Cartridge weight: 6~10g.
Anti-skate range: 0~7g.
Power supply: 230V~ 50Hz.
Power consumption: 13Watts
Dimensions: 450 x 352 x 157mm (WxDxH)
Weight : 10,6kg.
1/3
~ 45 ~ 78 RPM
MODE D'EMPLOI FRANCAIS
MODE D’EMPLOI
Nous vous remercions et félicitons pour l'achat de ce produit JB SYSTEMS. Nous vous
prions de lire ce mode d'emploi afin d'utiliser cet appareil convenablement. Après l'avoir lu
gardez-le pour une éventuelle future consultation.
CARACTERISTIQUES
• Moteur à entraînement direct sur couple haut
• Démarrage / arrêt rapide
• 3 vitesses: 33, 45, 78 rpm avec verrou quartz
• 2 gammes de vitesse possibles: +/-10% ; +/-20%
• Lecture des disques inversée
• Eclairage blanc de la cellule
• Cellule Audio Technica incluse
• Bras métallique en forme de 'S' assemblé avec :
• Contrepoids
• Contrôle Anti-skating
• Lève-bras
• Pieds de support réglables pour mettre la platine à niveau
JB SYSTEMS® 5/30 HIGH Q30D Mk2 TURNTABLE
AVANT L’UTILISATION
Vérifier la présence des composants suivants:
• Plateau
• Feutrine
• Adaptateur 45 tours
• Contrepoids
• Porte cellule
• Mode d'emploi
• Cellule
• Câble secteur
JB SYSTEMS® 6/30 HIGH Q30D MK2 TURNTABLE
Page 6
MODE D'EMPLOI FRANCAIS
CONSEILS DE SECURITE:
CAUTION
Cette flèche dans un triangle met l'utilisateur en garde de la présence dans
l'appareil de haut voltage sans isolation qui peut causer un risque
d'électrocution.
Un point d'exclamation dans un triangle prévient de la présence d'instructions
Afin d'éviter tout risque d'électrocution ou d'incendie, n'exposez pas la platine aux
intempéries ou à l'humidité.
Ne pas insérer d'objets métalliques et ne pas laisser couler de liquide dans l'appareil. Des
électrocutions ou disfonctionnements peuvent s'en suivre.
INSTALLATION:
• Installer la platine dans un endroit bien ventilé afin de ne pas l'exposer à des
• Utiliser la platine pendant une longue période dans un endroit chaud (à coté
• Evitez les vibrations sonores (haut-parleurs,…) pour ne pas avoir d'effet de feed-back.
• Installer la platine sur une surface stable et horizontale. Préférer des surfaces en
• S'assurer que ni la platine, ni ses câbles n'entrent en contact avec des sources
NETTOYAGE DE LA PLATINE:
Nettoyer avec un tissu légèrement humide. Ne pas renverser d'eau à l'intérieur de la
platine. Ne pas utiliser de produits abrasifs (alcool,…) qui puissent endommager la
platine.
JB SYSTEMS® 7/30 HIGH Q30D MK2 TURNTABLE
de fonctionnement et de maintenance fournies avec l'appareil.
températures trop élevées ou a de l'humidité.
d'amplificateurs, spots,…) peut diminuer son rendement.
béton ou en marbre plutôt que le bois qui amplifierait les vibrations.
provocant des vibrations. Soyez particulièrement prudent lors de l'utilisation avec un
flight case.
ATTENTION: Afin d'éviter tout risque
d'électrocution, ne pas ouvrir l'appareil. En cas
de problème, mettez-vous en contact avec votre
revendeur.
MODE D'EMPLOI FRANCAIS
CONTROLES ET FONCTIONS
1. BOUTON START / STOP: Pousser pour démarrer ou arrêter le plateau.
2. LE PLATEAU: Le plateau est équipé d'une feutrine. Cela facilite la manipulation du
disque pour scratcher.
3. ECLAIRAGE DE LA CELLULE: Lumière blanche très utile pour localiser un endroit
précis sur le disque dans un environnement sombre.
4. BOUTONS DE SELECTION DE VITESSE: Sélection de la vitesse souhaitée.
• Pousser sur le bouton “33” pour sélectionner la vitesse de 33 tours.
• Pousser sur le bouton “45” pour sélectionner la vitesse de 45 tours.
• Pousser sur les boutons “33” et “45” en même temps pour sélectionner la vitesse
de 78 tours.
5. BOUTON DE LECTURE INVERSEE: Pousser pour inverser le sens de rotation du
plateau. Pousser une deuxième fois pour revenir en mode de lecture normal.
6. BOUTON PITCH RANGE: Pousser pour ajuster la gamme de vitesse du curseur:
• Appuyez sur le bouton pour sélectionner +/-10%
• Appuyez sur le bouton encore une fois pour sélectionner +/-20%
7. BOUTON QUARTZ LOCK: Le bouton QUARTZ permet de mettre la platine a vitesse
exacte même si le curseur n'est pas centré. (le LED au centre du curseur s'allume en
couleur verte pour indiquer que la vitesse est juste)
JB SYSTEMS® 8/30 HIGH Q30D MK2 TURNTABLE
Page 7

MODE D'EMPLOI FRANCAIS
8. CURSEUR PITCH: Le curseur permet d'ajuster la vitesse du plateau. La gamme
dépend du bouton «pitch range». Quand le curseur est positionné au centre, le LED
s'allume en couleur verte pour indiquer que la vitesse est juste, sinon il s’allume en
rouge.
9. ADAPTATEUR DE SIMPLES: Placez cet adaptateur sur le plateau pour écouter des
disques 7" ayant de larges trous centraux.
10. INTERRUPTEUR ON/OFF: Allumer / éteindre la platine.
11. CABLE SECTEUR: brancher sur du 220V AC avec le câble fourni.
12. INTERRUPTEUR PHONO/LINE: Suivant la position de l'interrupteur phono/line, vous
pouvez connecter la platine sur un niveau d'entrée phono ou line.
13. SORTIE P HONO: Connecter la platine sur une entrée phono avec le câble cinch.
Assurez-vous de placer l'interrupteur phono/line sur la bonne position.
14. BRAS: Bras en forme de 'S', totalement manuel. Pour démarre la lecture, positionner
l'aiguille sur le disque en se servant du support du porte capsule. Manipuler la cellule
prudemment afin de n'abîmer ni le diamant, ni le disque.
15. CONTREPOIDS: Permet de régler la pression nécessaire à la cellule. Pour connaître
la pression idéale, il faut se référer aux instructions du fabricant de la cellule.
Installation de la cellule:
S'assurer que la cellule est bien
installée dans le bras. Mettre un
disque et positionner l'anti-skating sur
zéro. Abaisser le lève-bras. Tourner le
contrepoids jusqu'à ce que le bras
flotte en équilibre (OK sur le dessin).
Mettre l'anneau gradué en position
zéro en faisant attention de ne pas
bouger le contrepoids. Tourner le
contrepoids complet jusqu'à obtention
de la pression adéquate. Ne pas
oublier de remettre l'anti-skating à la position correspondante.
16. BOUTON ANTI-SKATING: Pendant la lecture d'un disque, la force centrifuge tend à
déporter la cellule vers le centre du disque. Ce bouton permet d'éliminer ce problème
en maintenant l'aiguille au centre du sillon. Pour les lectures simples, régler ce bouton
sur la valeur équivalente a la pression de la cellule (Pression de la cellule = 3gr. Æ
anti-skating = 3).
17. LEVIER LEVE-BRAS: Permet de lever ou descendre le bras.
18. BRAS ET POTENCE DE REPOS: Utiliser cette potence lors du changement d'un
disque. Verrouiller le bras si la platine n'est pas utilisée ou si elle doit être transportée.
Ceci évite d'endommager accidentellement le plateau ou l'aiguille.
19. VERROU DU PORTE CELLULE: Insérer le
porte cellule dans le bras et tourner le
verrou comme indiqué ci-dessous.
20. PORTE CELLULE: Se référer aux
instructions du fabricant de la capsule.
Laisser la protection sur la cellule pendant la manipulation.
Connecter les fils comme suit:
Blanc (L+) Canal gauche+
Bleu (L-) Canal gaucheRouge (R+) Canal droit+
Vert (R-) Canal droit-
JB SYSTEMS® 9/30 HIGH Q30D MK2 TURNTABLE
MODE D'EMPLOI FRANCAIS
SPECIFICATIONS
Moteur: 8 pole, 3phase, brushless DC motor
Driving Method: Direct Drive
Puissance du moteur: Plus de 1,6kgf / cm
Durée de démarrage: moins d' 1 seconde
Durée de freinage: moins d' 1 seconde
Sélection de vitesse: 33
Réglage de vitesse: ~ +/-10% ~ +/-20%
Wow & Flutter: Moins de 0,2% WRMS (JIS WTD)
Type de bras: Static balanced S-shaped tone arm.
Tracking Error angle: Moins de 3°
Poids de la cellule: 6~10g.
Valeur Ant-skating: 0~7g.
Allimentation: 230V~ 50Hz.
Consommation: 13Watts
Dimensions: 450 x 352 x 157mm (WxDxH)
Poids: 10,6kg.
JB SYSTEMS® 10/30 HIGH Q30D MK2 TURNTABLE
1/3
~ 45 ~ 78 tours
Page 8
HANDLEIDING NEDERLANDS
HANDLEIDING NEDERLANDS
VEILIGHEIDSVOORSCHRIFTEN:
HANDLEIDING
Hartelijke dank en gefeliciteerd met de aankoop van dit JB SYSTEMS product. Gelieve
deze handleiding aandachtig te lezen zodat U dit product perfect kan bedienen. Wij raden
U aan om deze handleiding nadien veilig op te bergen zodat U ze later nog kan
raadplegen.
KENMERKEN
• Motor met hoog aandrijfkoppel
• Snelle start en stop.
• 3 snelheden: 33, 45, 78 rpm met kwarts stabilisatie
• 2 instelschalen voor snelheidsregeling: +/-10% ; +/-20%
• Voorwaarts / achterwaarts afspelen van de plaat
• Omschakelbare phono/line uitgang op de achterzijde
• Uitschuifbare naaldverlichting
• Audio Technica cel inbegrepen
• Metalen S-vormige toonarm met:
• Tegengewicht
• Anti-skate regeling
• Toonarm lift met hendeltje
• Grote, regelbare voeten voor een perfecte stabiliteit
VOOR GEBRUIK
Kijk even na of, naast de basis, onderstaande onderdelen in de verpakking aanwezig zijn:
• Draai plateau
• Slipmat
• 45-toeren adapter
• Tegengewicht van de toonarm
• Celhouder
• Handleiding
• Bijgeleverde Cel + naald
• Stroomkabel
Om elektrische schokken te voorkomen mag dit apparaat niet aan regen en vocht worden
blootgesteld. Breng geen metalen voorwerpen in de draaitafel en zorg ervoor dat er geen
vloeistoffen in het apparaat terecht kunnen komen. Elektrische schokken of slechte
werking kunnen het gevolg zijn.
INSTALLATIEVOORSCHRIFTEN:
• Plaats de draaitafel in een goed geventileerde ruimte waar zij niet blootgesteld is aan
• Het plaatsen en het gebruik van de draaitafel gedurende een lange periode in de
• Wanneer de draaitafel gebruikt wordt in een zeer lawaaierige omgeving, bijvoorbeeld
• Plaats het toestel op een perfect horizontale en stabiele ondergrond. Een harde of
• Vermijd dat de audiokabels en voedingskabel in contact komen met trillende
REINIGING VAN DE DRAAITAFEL:
Reinig de draaitafel met een vochtig doek. Vermijd dat er water in het toestel komt.
Gebruik nooit vluchtige vloeistoffen zoals benzeen of thinner welke het toestel kunnen
beschadigen.
CAUTION
reparaties doet U best uitsluitend beroep op degelijk opgeleid personeel.
De driehoek met bliksem symbool waarschuwt U dat er in dit apparaat
ongeïsoleerde spanning aanwezig is die bij aanraking een elektrische schok
kan veroorzaken.
De driehoek voorzien van een uitroepteken waarschuwt U dat er belangrijke
gebruikersinstructies in de bijbehorende handleiding te vinden zijn.
hoge temperaturen of vocht.
nabijheid warmtebronnen zoals versterkers, spots, enz. zal zijn werking beïnvloeden.
naast klankkasten, kan de naald verspringen en kan er terugkoppeling ontstaan.
marmeren ondergrond is perfect. Een houten oppervlak is een slechte keuze daar dit
de trillingen versterkt.
voorwerpen. In een draagkoffer kan de draaitafel best niet direct in contact staan met
de wanden van de koffer.
OPGELET: Gelieve, om het risico van
elektrische schokken te vermijden, het apparaat
niet zelf te openen. Binnenin vindt U geen
onderdelen die U zelf kan vervangen. Voor
JB SYSTEMS® 11/30 HIGH Q30D MK2 TURNTABLE
JB SYSTEMS® 12/30 HIGH Q30D MK2 TURNTABLE
Page 9

HANDLEIDING NEDERLANDS
BEDIENINGEN EN FUNCTIES
1. START / STOP TOETS: Druk op deze toets om het draaien van het draaiplateau te
starten of te stoppen.
2. DRAAIPLATEAU: Deze is voorzien van een slipmat die gemakkelijker maakt om de
vinylplaat te manipuleren tijdens het scratchen.
3. NAALDVERLICHTING: De witte naaldverlichting kan gebruikt worden om de juiste
plaats op de plaat te vinden bij het gebruik in een donkere ruimte.
4. SNELHEIDSKEUZE TOETSEN: Gebruik deze toetsen om de snelheid in te stellen.
• Druk op “33” om een snelheid van 33tpm in te stellen.
• Druk op “45” om een snelheid van 45tpm in te stellen.
• Druk gelijktijdig op “33” en “45” om een snelheid van 78tpm in te stellen.
5. REVERSE TOETS: Druk op deze toets om de rotatie van het draaiplateau om te
keren, druk nogmaals op deze toets om het omgekeerd draaien te annuleren.
6. PITCH RANGE TOETS: Druk op deze toets om het bereik van de Pitch schuifregelaar
in te stellen.
• Druk 1maal voor een +/-10% schaal. (gebruikt bij beat mixen)
• Druk een 2
Als U de toets nogmaals indrukt dan komt U terug bij +/-10% enz.
de
maal voor een +/-20% schaal.
HANDLEIDING NEDERLANDS
7. QUARTZ LOCK TOETS: Bij het indrukken van de QUARTZ LOCK toets wordt de
8. PITCH REGELAAR: Gebruik de Pitch schuifregelaar om de snelheid van de
9. SINGLE ADAPTER: gebruik deze adapter voor het afspelen van 7” singles.
10. VOEDINGSSCHAKELAAR: Gebruik deze knop om het toestel aan of uit te zetten.
11. VOEDINGSKABEL AANSLUITING: gebruik deze om de meegeleverde
12. PHONO/LINE SCHAKELAAR: Afhankelijk van de stand van de keuzeschakelaar kan
13. PHONO/LINE OUTPUT: Sluit de draaitafel aan door middel van de cinch kabel. Let
14. TOONARM: Dit is een volledig S-vormige toonarm. Om de weergave te starten: plaats
15. TEGENGEWICHT: Gebruik het tegengewicht om de neerwaartse naalddruk in te
16. ANTI-SKATE KNOP: Bij het afspelen van een plaat worden er zijdelingse krachten
17. TOONARM HEFBOOM: Hiermee kan men de opwaartse en neerwaartse toonarm
18. TOONARM STEUN: Leg de toonarm telkens op deze steun als U een vinylplaat wil
juiste gemiddelde snelheid (0%) afgedwongen, zelfs al staat de schuifregelaar niet in
zijn middenpositie. De led naast de pitch regelaar wordt groen.
draaiplateau in te stellen. Het bereik hiervan hangt af van de “Pitch Range” toets.
Wanneer de schuifregelaar in zijn middenpositie staat kleurt de led naast de pitch
regelaar groen om aan te tonen dat de snelheid is vergrendeld op de juiste
gemiddelde snelheid, in andere posities van de schuifregelaar kleurt de led rood.
Opgelet: de Quartz lock toets moet uitgeschakeld zijn.
voedingskabel aan te sluiten.
U deze draaitafel op een phono of line ingang van de mengtafel aansluiten.
op de stand van de phono/line keuzeschakelaar.
de naald voorzichtig op de plaat door middel van de vingersteun op de celhouder.
Laat de naald niet op de plaat vallen, dit kan zowel de diamant van de naald alsook de
vinylplaat beschadigen.
stellen. Raadpleeg hiervoor de gebruiksaanwijzing van de naaldconstructeur.
Instellen van de naalddruk:
Controleer of de cel goed vast op
de celhouder staat en dat de naald
beschermingskap verwijderd is.
Leg een vinylplaat op de draaitafel
en zorg ervoor dat de anti-skate op
nul staat. Zet de toonarm hefboom
in de benedenstand. Neem de
toonarm en draai aan het tegengewicht tot de toonarm perfect in
balans is Æ Hij zweeft horizontaal
boven het draaiplateau (zie “OK”
afbeelding rechts) Zet nu de drukring (voorkant van het tegengewicht met
markeringen) op de nul positie terwijl U het tegengewicht goed vast houdt zodat
het niet beweegt. Draai vervolgens het geheel tegelijkertijd (tegengewicht + ring
met markeringen) tot men de gewenste naalddruk afleest op de ring met
markeringen. Vergeet niet de anti-skate knop terug juist in te stellen.
ontwikkeld die de naald naar de binnenkant of naar de buitenkant drukken. Men kan
de anti-skate knop gebruiken om deze krachten tegen te werken en zo de naald in het
midden van de groef houden. Voor een gewone weergave zet men meestal de antiskate knop op dezelfde waarde als de neerwaartse druk die men op de naald geeft (in
gr.) vb. (Naalddruk = 3gr. Æ anti-skate = 3)
bewegingen controleren om de naald op de vinylplaat te zetten.
wisselen. Vergrendel de toonarm op zijn steun als U de draaitafel een tijd niet gebruikt
JB SYSTEMS® 13/30 HIGH Q30D MK2 TURNTABLE
JB SYSTEMS® 14/30 HIGH Q30D MK2 TURNTABLE
Page 10
HANDLEIDING NEDERLANDS
of deze moet transporteren. Dit verkomt dat de arm plotseling uitwijkt waarbij de naald
beschadigd wordt.
19. CELHOUDER VERGRENDELING: Breng de
celhouder in de toonarm en draai de ring aan
om de celhouder te vergrendelen.
20. CELHOUDER: Installeer de cel hierop. Let
hiervoor op de aanwijzingen van de Celconstructeur. Laat tijdens het monteren de
naaldbescherming op de cel, dit om de beschadiging van de naald te voorkomen.
Verbind de draden als volgt:
Wit (L+) Linkerkanaal +
Blauw (L-) Linkerkanaal Rood (R+) Rechterkanaal +
Groen (R-) Rechterkanaal -
EIGENSCHAPPEN
Motor: 8-polige, 3fase, DC motor
Aandrijving: Direct Drive
Aandrijfkoppel: Meer dan 1.6kgf / cm
Starttijd: minder dan 1 seconde
Braking Time: minder dan 1 seconde
Snelheidskeuze: 33
Snelheidsregeling: +/-10% ~ +/-20%
Wow & Flutter: minder dan 0,2% WRMS (JIS WTD)
Toonarm type: Statisch gebalanceerde S-vormige toonarm.
Tracking Error angle: Minder dan 3°
Gewicht v/d cel: 6~10g.
Anti-skate draagwijdte: 0~7g.
Voeding: 230V~ 50Hz.
Verbruik: 13 Watt
Afmetingen: 450 x 352 x 157mm (BxDxH)
Gewicht: 10,6kg.
1/3
~ 45 ~ 78 RPM
BEDIENUNGSANLEITUNG DEUTSCH
BEDIENUNGSANLEITUNG
Danke, das Sie sich für ein JB SYSTEMS-Produkt entschieden haben. Bitte lesen Sie
sich diese Bedienungsanleitung durch, um dieses Produkt richtig bedienen und
handhaben zu können. Wenn Sie sich die Anleitung durchgelesen haben, bewahren Sie
diese an einem sicheren Ort auf, um jederzeit nachschlagen zu können.
FUNKTIONEN
• High Torque Direct Drive Motor
• Schneller Start und Stop
• 3 Geschwindigkeiten: 33, 45, 78 rpm mit Quartz Lock-Funktion
• 2 Pitch-Bereiche: +/-10%, +/-20%
• Vorwärts/Rückwärts Abspielmöglichkeit
• Robustes weisses Target Light
• Audio Technica Tonabnehmersystem inkludiert
• Metallischer S-förmiger Tonarm mit:
• Einstellbare Tonarmabsenkung für ideale Einpegelung
VOR INBETRIEBNAHME
Kontrollieren Sie, ob folgende Teile im Karton enthalten sind:
• Plattenteller
• Slipmat
• 45-rpm Adapter
• Tonarmgewicht
• Headshell
• Bedienungsanleitung
• Tonabnehmersystem
• Stromkabel
• Kontergewicht
• Anti-skating Einstellung
• Tonarmlift mit Höheneinstellung
JB SYSTEMS® 15/30 HIGH Q30D MK2 TURNTABLE
JB SYSTEMS® 16/30 HIGH Q30D MK2 TURNTABLE
Page 11

BEDIENUNGSANLEITUNG DEUTSCH
SICHERHEITSVORSCHRIFTEN:
CAUTION
reparierbaren Teile. Überlassen Sie Reparaturen dem qualifizierten
Kundendienst!
Das Blitzsymbol im Dreieck weist den Benutzer darauf hin, das eine
Berührungsgefahr mit nicht isolierten Teilen im Geräteinneren, welche eine
gefährliche Spannung führen, besteht. Die Spannung ist so hoch, das hier die
Gefahr eines elektrischen Schlags besteht.
Das Ausrufezeichen im Dreieck weist den Benutzer auf wichtige Bedienungs-
Um Feuer oder elektrische Schläge vorzubeugen, setzen Sie dieses Gerät niemals Nässe
und Feuchtigkeit aus! Stellen Sie keine Behälter mit Flüssigkeiten in die Nähe des
Gerätes, es ist nicht wasserdicht und könnte beschädigt werden.
INSTALLATIONSANLEITUNG:
• Stellen Sie den Plattenspieler in einem gut belüfteten Raum auf, wo er nicht hohen
Temperaturen und Feuchtigkeit ausgesetzt ist.
• Platzieren und benutzen Sie den Plattenspieler für längere Zeiten neben sehr warmen
Geräten wie Verstärker, Lampen, etc., könnte es die Funktion des Gerätes
beeinträchtigen.
• Wenn der Plattenspieler in der Nähe von Lautsprechern oder bestimmten anderen
Geräten steht, kann es zu akustischen Beeinträchtigungen kommen (Rückkopplung).
• Stellen Sie den Plattenspieler auf einer ebenen und sehr stabilen Oberfläche auf. Eine
rein hölzerne Oberfläche ist keine gute Wahl, da hier Vibrationen entstehen können.
• Seien Sie sicher, das der Plattenspieler mit den Netz- und Audioanschlüssen nicht
irgendwelche vibrierende Oberflächen berührt. Passen Sie besonders auf, wenn das
Gerät in einem Plattenspieler-Case eingebaut ist.
REINIGUNG UND PFLEGE DES GERÄTES:
Reinigen Sie das Gerät mit einem feuchten Tuch. Vermeiden Sie Wassereintritt in das
Geräteinnere. Verwenden Sie keine scharfen Reinigungsmittel wie Reinigungsbenzin
oder ähnliches, Sie könnten sonst das Gerät zerstören.
und Wartungshinweise in den Dokumenten hin, die dem Gerät beiliegen.
ACHTUNG: Um sich nicht der Gefahr eines
elektrischen Schlags auszusetzen, entfernen
Sie keines der Gehäuseteile. Im Geräteinneren
befinden sich keine vom Benutzer
BEDIENUNGSANLEITUNG DEUTSCH
FUNKTIONEN UND ANZEIGEN
1. START/STOP TASTE: Drücken Sie diese Taste zum Starten oder Stoppen des
Plattentellers.
2. PLATTENTELLER: Der Plattenspieler ist mit einer Slipmat ausgestattet. Diese macht
es einfacher die Platte zu manipulieren. Z.B.: für scratching.
3. TARGET LIGHT: Dieses weisse Target Light dient dazu, um einen genauen Punkt auf
der Schallplatte auch an dunklen Orten zu lokalisieren.
4. GESCHWINDIGKEITSAUSWAHL-TASTEN: Wählen Sie aus:
• Drücken Sie “33” für Auswahl 33rpm.
• Drücken Sie “45” für Auswahl 45rpm.
• Drücken Sie “33” und “45” gleichzeitig für Auswahl 78rpm.
5. REVERSE TASTE: Drücken Sie diese Taste, um die Abspielrichtung umzudrehen.
Durch nochmaliges Drücken kommen Sie wieder in den normalen Abspielmodus
zurück.
6. PITCH BEREICH TASTE: Drücken Sie diese Taste, um den Pitch-Bereich
einzustellen:
• Drücken Sie einmal für +/- 10% Geschwindigkeitsbereich ( Normalerweise
verwendet zum Mixing)
• Drücken Sie nochmals für +/- 20% Geschwindigkeitsbereich
JB SYSTEMS® 17/30 HIGH Q30D MK2 TURNTABLE
JB SYSTEMS® 18/30 HIGH Q30D MK2 TURNTABLE
Page 12
BEDIENUNGSANLEITUNG DEUTSCH
Das nächste mal wenn Sie diese Taste drücken schalten Sie wieder auf +/- 10%
zurück.
7. QUARTZ LOCK TASTE: Wenn die Quartz-Taste gedrückt wird, geht das Gerät
wieder auf die exakte Mittel-Geschwindigkeit zurück, auch wenn sich der Pitch-Fader
nicht in der Mittenstellung befindet. Das LED in der Mitte des Pitch-Fader leuchtet
grün.
8. PITCH FADER: Verwenden Sie den Pitch-Fader, um die Geschwindigkeit zu
verändern. Der Pitch-Bereich basiert auf die Pitch-Bereich-Taste. Wenn der Regler in
der Mittelposition steht, beginnt das LED beim Pitchregler Grün zu Leuchten. Das
zeigt an das der Plattenteller in Normalgeschwindigkeit läuft. Vorsicht: Gehen Sie
sicher das der Quartz lock Schalter abgeschaltet ist.
9. SINGLE ADAPTER: Platzieren Sie diesen Adapter auf dem Plattenteller wenn Sie
eine 7” Platte mit großem Loch abspielen wollen.
10. POWER ON/OFF TASTE: Schalten Sie den Plattenspieler hier ein und aus.
11. POWER CORD ANSCHLUSS: Dieser Anschluss ist der Netzanschluss (Strom),
achten Sie auf die Spannungsangabe beim Netzanschluss.
12. PHONO/LINE SCHALTER: Abhängig von der Position des Phono/Line Schalters,
können Sie den Plattenspieler an jeden Phono oder Line Eingang anschließen.
13. PHONO Ausgang: Schließen Sie den Plattenspieler an jeden Phono oder Line
Anschluss an. Versichern Sie sich das der phono/line Schalter in der richtigen Position
steht.
14. TONARM: Dieser ist ein manueller s-förmiger Tonarm. Um die Wiedergabe zu
starten, platzieren Sie den Tonarm vorsichtig mit dem Finger am Hebearm des
Headshells auf die Schallplatte, andernfalls können Sie die Schallplatte zerkratzen
oder die Nadel beschädigen.
15. KONTERGEWICHT: Benutzen Sie das Kontergewicht (Tonarmgewicht), um die
Balance des Tonarmes und somit auch den Auflagedruck zu verstellen. Für den
korrekten Auflagedruck lesen Sie sich die Herstellerangaben des Systems durch.
Einstellung des Auflagedrucks:
Vergewissern Sie sich, das das System in
Ordnung ist und die Schutzabdeckung der
Nadel entfernt wurde. Legen Sie eine
Platte auf und stellen Sie das Anti Skate
auf Null. Stellen Sie den Tonarmhebel
hinunter. Jetzt stellen Sie das
Kontergewicht so ein, bis der Tonarm
perfekt balanciert. Nun stellen Sie den
Ring auf dem Kontergewicht auf Null
zurück. Jetzt können Sie das Gewicht des Systems nach Herstellerangabe
einstellen. Vergessen Sie nicht, den Anti-Skate wieder dementsprechend
einzustellen.
16. ANTI-SKATE RAD: Wenn eine Schallplatte spielt, wirken verschiedene Kräfte auf den
Tonarm Richtung Platteninneres oder Richtung ausserhalb. Das Anti-Skate Rad dient
dazu, diese Kräfte konstant zu halten, egal wo der Tonarm sich gerade auf der
Schallplatte bewegt. Stellen Sie einfach Anti Skate gleich wie den Auflagedruck der
Systemnadel ein (zB. Gewicht 3gr – Anti Skate auf 3 stellen).
17. TONARMHEBEL: Kontrolliert die Auf- und Abwärtsbewegung des Tonarmes.
18. TONE ARM CLAMP & REST: Benutzen Sie diese Ablage für den Tonarm während
Sie die Platte wechseln. Fixieren Sie den Tonarm mit der Klammer auf seiner Auflage,
wenn Sie den Plattenspieler nicht mehr benötigen oder ihn Transportieren. Somit
verhindern Sie das der Tonarm von seiner Ablage rutscht, auf den Plattenteller fällt
und dadurch die Nadel beschädigt wird.
JB SYSTEMS® 19/30 HIGH Q30D MK2 TURNTABLE
BEDIENUNGSANLEITUNG DEUTSCH
19. HEADSHELL VERSCHLUSS:
Montieren Sie das System, indem
Sie es auf das vordere Ende des
Tonarmes stecken und den
Bajonettverschluss im Uhrzeigersinn
verriegeln.
20. HEADSHELL: Installieren Sie hier das Tonabnehmersystem, achten Sie aber bei der
Installation auf die Herstellerangaben dieses Tonabnehmersystems. Lassen Sie die
Nadelschutzabdeckung während der Montage auf dem System. Folgende Anschlüsse
sind gegeben:
Weiss (L+) Linker Kanal +
Blau (L-) Linker Kanal Rot (R+) Rechter Kanal +
Grün (R-) Rechter Kanal -
TECHNISCHE DATEN
Motor: 8Pole, 3Phasen, DC Motor
Antriebsmethode: Direktgetrieben
Start Drehmoment: Mehr als 1,6 kgf/cm
Startzeit: weniger als 1 Sekunde
Stopzeit: weniger als 1 Sekunde
Geschwindigkeiten: 33
Pitch-Bereiche: +/-10% ~ +/-20%
Klirrfaktor: Weniger als 0,2% WRMS (JIS WTD)
Tonarmtyp: Fester ausbalancierter S-förmiger Tonarm
Tracking Fehler: Weniger als 3°
Systemgewicht: 6~10 g
Anti-Skate Bereich: 0~7 g
Netzanspeisung: 230V~ 50Hz
Leistungsaufnahme: 13 Watt
Dimensionen: 450 x 352 x 157mm (BxTxH)
Gewicht: 10,6kg
JB SYSTEMS® 20/30 HIGH Q30D MK2 TURNTABLE
1/3
~ 45 ~ 78 RPM
Page 13
MANUAL DE INSTRUCCIONES ESPAÑOL
MANUAL DE INSTRUCCIONES
Le felicitamos y le agradecemos por la adquisicion de este producto JB SYSTEMS. Leá
atentamente las siguientes instrucciones para saver como utilizar este producto de
manera correcta. Recoja este manual en un sitio seguro para volver a consultarlo
ulteriormente.
CARACTERISTICAS
• Motor a tracción directa de par alto
• Arranque rápido
• Frenado rápido
• 3 velocidades: 33, 45, 78 rpm con cerrojo quartz
• 2 gamas de velocidad posibles: +/-10% ; +/-20%
• Lectúra inversada
• Iluminación de capsula de color blanco
• Capsula Audio Technica incluida
• Brazo metalico en forma de 'S' incorporando :
• Contra peso
• Control anti deslizante (Anti-skating)
• Elevación hydraulica
• Pies de soporte regulables para poner la unidad a nivel
ANTES DEL USO
Comprobar que los componentes siguientes estén presentes:
• Platillo
• Patinador
• Adaptador 45 rpm
• Contrapeso
• Porta capsula
• Instrucciones de funcionamiento
• Capsula
• Cable de enchufe
MANUAL DE INSTRUCCIONES ESPAÑOL
INSTRUCCIONES DE SEGURIDAD:
CAUTION
Esta flecha en un triangulo suele avisar de la presencia en el tape de "voltaje
peligroso" sin isolación que puede ser sufciente para causar un riesgo de
electrocución.
El punto de exclamación en un triangulo suele avisar al usuario de la
presencia de instrucciones de funcionamiento y de mantenimiento
Para evitar riesgos de electrocución o incendio, evitar la exposición a la lluvia o
humedad.
No introducir objetos metalicos ni derramar liquido en la platina. Esto puede producir
disfuncionamientos.
INSTALACION:
• Instalar la platina en un sitio con buena ventilación para no exponerla a altas
temperaturas o humedad.
• Colocar y utilizar la platina mucho tiempo en sitios calientes (al lado de
amplificadores, focos,…) puede afectar sus prestaciones.
• Evitar las vibraciones sonoras, por ejemplo de altavoces, porque puede producirse
zumbido.
• Colocar la platina de manera estable y horizontal. Colocar de preferencia sobre un
zócalo de hormigón o de marbol y evitar la madera que amplificará las vibraciones.
• Asegurese que ni la platina ni sus cables estén en contacto directo con una fuente de
vibraciones. Tener cuidado al usar la platina con un flying case.
LIMPIEZA DE LA PLATINA:
Límpiar con un trapo lijeramente humedo. No derramar agua en el interior de la unidad.
No utilizar productos abrasivos (alcohol,…) que puedan dañar la platina.
importantes en el manual que acompaña este producto.
ATENCIÓN: Para evitar todo riesgo de
electrocución, no abrir el tape. En caso de
problema, pongase en contacto con su
vendedor.
JB SYSTEMS® 21/30 HIGH Q30D MK2 TURNTABLE
JB SYSTEMS® 22/30 HIGH Q30D MK2 TURNTABLE
Page 14

MANUAL DE INSTRUCCIONES ESPAÑOL
CONTROLES Y FUNCIONES
1. BOTON START / STOP: Pulsar para arrancar o parar el platillo.
2. PLATO GIRATORIO: Acompañado de un patinador. Este es idoneo para las azañas
del "scratch".
3. ILUMINACIÓN DE LA CAPSULA: Luz blanca muy util para utilización de la platina en
sitios oscuros.
4. BOTONES DE SELECCIÓN DE VELOCIDAD: Selección de le velocidad deseada.
• Pulsar el botón “33” para seleccionár la velocidad 33rpm.
• Pulsar el botón “45” para seleccionár la velocidad 45rpm.
• Pulsár los botones “33” y “45” al miso tiempo para seleccionár la velocidad
78rpm.
5. BOTÓN DE INVERSIÓN: Pulsar para poner el platillo en modo inversado. Pulsar de
nuevo para volver al modo de lectura normal.
6. BOTÓN PITCH RANGE: Pulsar para ajustar la gama de velocidad del deslizante.
• Pulse el botón "33" para seleccionar la velovidad de 33rpm
• Pulse el botón "45" para seleccionar la velovidad de 45rpm
• Pulse simultáneamente los botones "33" y "45" para seleccionar la velocidad
de 78rpm
7. BOTÓN QUARTZ: Pulsando el botón QUARTZ, la platina se pone en velocidad
exacta mismo si el deslizante no está centrado.
JB SYSTEMS® 23/30 HIGH Q30D MK2 TURNTABLE
MANUAL DE INSTRUCCIONES ESPAÑOL
8. DESLIZANTE PITCH: El deslizante permite cambiar la velocidad del platillo. La gama
depende del botón “pitch range”. Con el deslizante en su posición media, un testigo
se enciende para indicar que la velocidad está en posición exacta.
9. ADAPTADOR DE SIMPLES: Colocar éste para discos de 7" con un gran agujero
central.
10. INTERRUPTOR DE ENCENDIDO ON/OFF: Encender / apagar la platina.
11. CABLE DE ALIMENTACIÓN: conectar a una fuente 220V AC con el cable de
alimentacíon.
12. CONMUTADOR PHONO/LINE: Según la posición del interruptor phono/line se
conectara el plato a una entrada de nivel phono o line.
13. SALIDA PHONO: Conectar la platina sobre una entrada phono con el cable cinch. Be
sure to put the phono/line switch in the right position. Asegurese que el interruptor
esté en la posición adecuada.
14. BRAZO: Brazo de forma 'S' totalmente manual. Para empezar la lectura, colacar la
capsula sobre el disco usando el soporte del porta capsula. Colocar la capsula
cuidadosamente de manera a no dañar el diamante y el disco.
15. CONTRA PESO: Permite ajustar la presión necesaria a la capsula. Para saber
exactamente la presión ideal, referirse a las instrucciones de su capsula.
Instalación de la capsula:
Asegurese que la capsula esté
bien colocada sobre el brazo.
Poner un disco y asegurarse quel
anti deslizante esté en cero. Poner
la palanca de elevación en posición
baja. Girar el contrapeso hasta
quel brazo esté perfectamente
equilibrado Æ el brazo flota como
en la posición “OK” del dibujo.
Poner la graduación del anillo de
presión sobre cero cuidando no
mover el contrapeso. Girar el contrapeso completo hasta que la graduación se
quedé sobre la presión deseada. Volver a poner el anti deslizante en la
posición corespondiente.
16. BOTÓN ANTI DESLIZANTE: Durante la lectura de un disco, fuerzas centrífugas
empuján la aguja hacia el centro del disco. Este boton permite eliminar esas fuerzas.
Para lecturas simples, ajustar este control de equivalente valor a la presión de la
capsula (Pressión de capsula = 3gr. Æ anti deslizante = 3).
17. PALANCA DE ELEVACIÓN DEL BRAZO: Permite subir y bajar el brazo.
18. TONE ARM CLAMP & REST: Se utilizará siempre que se cambie de disco.Se atará
siempre el brazo en caso de transporte o de no utilización del mismo.Evitaremos así
que se estropee la aguja o se dañe el plato.
19. CERROJO DE PORTA CAPSULA:
Insertar el porta capsula en el brazo y girar
el cerrojo como indicado en este dibujo.
20. PORTA CAPSULA: Referirse a las instrucciones del fabricante de la capsula. Dejar la
protección sobre la capsula durante la instalación para evitar daños. Conectar los
hilos de esta manera:
Blanco (L+) Canal izquierdo+
Azúl (L-) Canal izquierdoRojo (R+) Canal derecho+
Verde (R-) Canal derecho-
JB SYSTEMS® 24/30 HIGH Q30D MK2 TURNTABLE
Page 15

MANUAL DE INSTRUCCIONES ESPAÑOL
ESPECIFICACIONES
Motor: 8 pole, 3phase, brushless DC motor
Driving Method: Direct Drive
Starting Torque: Mas de 1.6kg / cm
Tiempo de arranque: menos de 1segundo
Tiempo de freno: menos de 1segundo
Selección de velocidad: 33
Ajuste de velocidad: +/-10% ~ +/-20%
Wow & Flutter: Menos de 0,2% WRMS (JIS WTD)
Tipo de brazo: Static balanced S-shaped tone arm.
Tracking Error angle: Menos de 3°
Peso de capsula: 6~10g.
Valor Anti deslizante: 0~7g.
Alimentación: 230V~ 50Hz.
Consumición: 13Watts
Dimensiones: 450 x 352 x 157mm (WxDxH)
Peso : 10,6kg.
1/3
~ 45 ~ 78 RPM
MANUAL DO UTILIZADOR PORTUGUÊS
MANUAL DO UTILIZADOR
Obrigado por ter adquirido este produto da JB Systems. De modo a tirar total proveito
das possibilidades deste produto, por favor leia este manual com atenção.
CARACTERÍSTICAS
• Motor de transmissão directa de alta torção
• Função Início / paragem rápida
• 3 velocidades: 33, 45, 78 rpm (rotações por minuto) com trinco de quartzo
• 2 escalas de ajuste de pitch: +/-10% ; +/-20%
• Reprodução sentido normal / inverso
• Saída seleccionável phono/line
• Luz alvo retráctil
• Cabeça Audio Technica incluída
• Braço de metal em forma de S instalado com:
• Contrapeso
• Ajuste anti-deslizamento
• Elevador de alavanca com ajuste em altura
• Pés grandes ajustáveis para nivelamento perfeito
JB SYSTEMS® 25/30 HIGH Q30D MK2 TURNTABLE
ANTES DE UTILIZAR
Verifique o conteúdo:
Certifique-se que a caixa contém os seguintes artigos:
• Prato gira-discos
• Tapete deslizante
• Adaptador 45-rpm
• Contrapeso
• Suporte
• Manual do utilizador
• Cabeça
• Cabo de alimentação.
JB SYSTEMS® 26/30 HIGH Q30D MK2 TURNTABLE
Page 16

MANUAL DO UTILIZADOR PORTUGUÊS
INSTRUÇÕES DE SEGURANÇA:
CAUTION
O símbolo composto por um triângulo equilátero com um relâmpago no
interior alerta para a presença de voltagem perigosa não isolada no interior
do produto que poderá constituir risco de choque eléctrico.
O símbolo composto por um triângulo equilátero com um ponto de
exclamação alerta o utilizador para a presença de instruções importantes de
utilização e manutenção do produto.
De modo a evitar risco de fogo ou choque eléctrico, não exponha este produto a chuva
ou humidade. Não introduza objectos de metal ou verta líquidos no interior do produto,
correrá risco de choque eléctrico ou poderá danificar o produto.
GUIA DE INSTALAÇÃO:
• Instale o gira-discos num local bem ventilado onde não esteja exposta a altas
temperaturas ou humidade.
• Colocar ou utilizar o gira-discos durante longos períodos de tempo perto de fontes de
calor, tais como amplificadores, holofotes, etc., irá afectar o desempenho da unidade.
• Quando o gira-discos é utilizado num ambiente com som elevado, por exemplo perto
de colunas, podem ocorrer falhas de som e feedback.
• Instale a unidade numa superfície perfeitamente horizontal e estável. Uma superfície
de cimento ou mármore será perfeita. Uma superfície de madeira será uma má
escolha visto que amplifica vibrações.
• Certifique-se que o gira-discos, bem como os cabos áudio e de alimentação não
estão em contacto com materiais que emitam vibrações. Tenha especial cuidado
quando utilizar a unidade instalada numa mala de transporte.
LIMPEZA DO GIRA-DISCOS:
Utilize um pano limpo ligeiramente humedecido em água. Evite introduzir água dentro da
unidade. Não utilize líquidos voláteis como benzeno ou diluente, irá danificar a unidade.
JB SYSTEMS® 27/30 HIGH Q30D MK2 TURNTABLE
ATENÇÃO: De forma a evitar o risco de
choque eléctrico, não remova peças da
unidade. Não tente fazer reparações. Contacte
pessoal qualificado.
MANUAL DO UTILIZADOR PORTUGUÊS
CONTROLOS E FUNÇÕES
1. BOTÃO START / STOP: Pressione este botão para ligar ou desligar o prato.
2. PRATO: O prato está equipado com um tapete deslizante. Isto torna mais fácil
manipular o disco durante a execução de scratch.
3. TARGET LIGHT: Luz alvo utilizada para situar um ponto preciso no disco quando a
unidade é utilizada num local escuro.
4. BOTÕES SELECÇÃO VELOCIDADE: Permitem seleccionar a velocidade pretendida.
• Pressione o botão “33” para seleccionar 33rpm.
• Pressione o botão “45” para seleccionar 45rpm.
• Pressione o botão “33” e “45” simultaneamente para seleccionar 78rpm.
5. BOTÃO REVERSE: Pressione este botão para inverter a rotação do prato, pressione
novamente o botão para voltar à rotação no sentido normal.
6. BOTÃO PITCH RANGE: Pressione este botão para ajustar a escala do cursor pitch.
• Pressione uma vez para escala +/-10%. (normalmente utilizado em mistura de
batidas)
• Volte a pressionar para uma escala de +/-20%.
7. BOTÃO QUARTZ: Quando este botão é pressionado, é utilizada a velocidade central
exacta (0%), mesmo que o cursor pitch não se encontre no meio. O LED no centro do
cursor pitch irá acender-se com a cor verde.
JB SYSTEMS® 28/30 HIGH Q30D MK2 TURNTABLE
Page 17
MANUAL DO UTILIZADOR PORTUGUÊS
8. CURSOR PITCH: Este cursor permite alterar a velocidade da reprodução. A escala
depende do botão Pitch Range. Quando o cursor está na posição central, o LED
próximo do cursor pitch irá acender-se na cor verde indicando que o gira-discos está
fixo na velocidade central. Quando o cursor não está no centro o LED fica vermelho.
Atenção: certifique-se que o botão Quartz lock está desligado.
9. ADAPTADOR SINGLE: Coloque este adaptador no prato para reproduzir discos de
7” com orifícios centrais mais largos.
10. INTERRUPTOR ON/OFF: Utilizado para ligar e desligar o gira-discos.
11. CONECTOR CABO ALIMENTAÇÃO: Utilizado para ligar a unidade à corrente
através do cabo da alimentação fornecido.
12. SELECTOR PHONO/LINE: Dependendo da posição deste selector, pode ligar o giradiscos a qualquer entrada do tipo line ou phono.
13. SAÍDA PHONO/LINE: Ligue o gira-discos a qualquer entrada do tipo line ou phono.
Certifique-se que o selector phono/line está na posição correcta.
14. BRAÇO: Este é um braço em forma de S totalmente manual. Para dar inicio à
reprodução, coloque com cuidado a agulha no disco utilizando o suporte para dedos.
Não deixe cair a agulha no disco pois poderá danificar a ponta de diamante e o disco.
15. CONTRAPESO: Utilize o contrapeso para equilibrar o braço e para ajustar a pressão
da agulha. Para ver qual a pressão correcta, consulte o manual da cabeça.
Definir a pressão da agulha:
Certifique-se que o a cabeça está
bem colocada e que o protector da
agulha foi retirado. Coloque um
disco no prato e certifique-se que o
anti-deslizamento foi definido para
zero. Coloque a alavanca do braço
na posição “down” (em baixo).
Segure no braço e gire o
contrapeso até que o braço esteja
em equilíbrio perfeito Æ flutua
horizontalmente por cima da
superfície do disco, veja a imagem “OK” à direita. Agora coloque o “stylus pressure
ring” (anel de pressão da agulha situado na secção da frente do contrapeso com
marcas) na posição zero, girando o anel e assegurando-se que o contrapeso não
se move. Em seguida, gire o contrapeso na sua totalidade no sentido dos
ponteiros do relógio até que o anel indique a pressão certa da agulha. Não se
esqueça de voltar a colocar o anti-deslizamento no lugar.
16. CONTROLO ANTI-DESLIZAMENTO: Quando um disco está a ser reproduzido são
produzidas forças laterais, que empurram a agulha para o centro ou para fora do
disco. Pode usar o botão anti-deslizamento para compensar esta força e manter a
agulha centrada. Para reprodução normal gire o botão anti-deslizamento para o
mesmo número lido em gramas na pressão da agulha. (pressão do agulha = 3gr. Æ
anti-deslizamento = 3)
17. ELEVADOR DO BRAÇO: Permite fazer subir e descer o braço.
18. GANCHO E APOIO DO BRAÇO: Utilize este apoio para o braço enquanto muda um
disco. Prenda o braço à restante unidade através do gancho quando o gira-discos
não estiver a ser utilizado ou durante o transporte. Desta forma evita que o braço se
vire acidentalmente para o prato e danifique a agulha da cabeça.
MANUAL DO UTILIZADOR PORTUGUÊS
19. CONTRAPORCA DO SUPORTE: Prenda
o suporte introduzindo-o na extremidade do
braço, girando em seguida a contraporca
na direcção dos ponteiros do relógio.
20. SUPORTE: Instale a cabeça aqui. Ao executar esta operação consulte as instruções
de instalação fornecidas pelo fabricante da cabeça. Durante a instalação, coloque o
protector da agulha para que o diamante não se danifique.
Ligue os fios da seguinte forma:
Branco (L+) Canal Esquerdo +
Azul (L-) Canal Esquerdo Vermelho (R+) Canal Direito +
Verde (R-) Canal Direito -
ESPECIFICAÇÕES
Motor: 8 pólos, 3 fases, motor brushless DC
Transmissão: Transmissão directa
Torção inicial: Mais de 1.6kgf / cm
Tempo arranque: Menos de 1 segundo
Tempo travagem: Menos de 1 segundo
Selecção velocidade: 33
Ajuste velocidade: +/-10% ~ +/-20%
Wow & Flutter: Menos que 0,2% WRMS (JIS WTD)
Tipo de braço: Braço estático equilibrado forma de S.
Ângulo erro de tracção: Menos de 3°
Peso Cabeça: 6~10g.
Anti-deslizamento: 0~7g.
Fonte de Alimentação: 230V~ 50Hz.
Consumo de energia: 13Watts
Dimensões: 450 x 352 x 157mm (LxDxA)
Peso: 10,6kg.
1/3
~ 45 ~ 78 RPM
JB SYSTEMS® 29/30 HIGH Q30D MK2 TURNTABLE
JB SYSTEMS® 30/30 HIGH Q30D MK2 TURNTABLE
 Loading...