

Page 1
Page 2
Page 3

ENGLISH OPERATION MANUAL
OPERATION MANUAL
Thank you for buying this JB Systems® product. To take full advantage of all possibilities, please read these
operating instructions very carefully.
FEATURES
Compact, battery powered portable PA-system
Perfect for schools, business presentations, …
Bluetooth for use with all kinds of portable devices like smart phones.
2 wireless microphones: 1 handmic + 1 beltpack with headset included.
USB player with support for MP3 and WMA
FM radio with presets
The IR-remote (Radio/USB-player) can also be used while you stand in front of the speaker.
Internal mixer with:
1 wired microphone input
1 line/aux input: XLR + RCA + mini jack 3.5mm
2band equalizers on all input channels
Balanced link output to connect additional active speakers.
Class-D 50W amplifier
Excellent sound quality thanks to separate woofer/tweeter 2way speaker combination.
Easy transportable thanks to the telescopic handle and wheels!
Compartment to range cables and wireless microphones.
Internal charger for the (optional) rechargeable battery.
230Vac mains input
12Vdc input for use on car battery, cable included
Can be put on top of any speaker stand with 35mm mast
BEFORE USE
Before you start using this unit, please check if there’s no transportation damage. Should there be any, do
not use the device and consult your dealer first.
Important: This device left our factory in perfect condition and well packaged. It is absolutely necessary
for the user to strictly follow the safety instructions and warnings in this user manual. Any damage caused
by mishandling is not subject to warranty. The dealer will not accept responsibility for any resulting
defects or problems caused by disregarding this user manual.
Keep this booklet in a safe place for future consultation. If you sell the fixture, be sure to add this user
manual.
To protect the environment, please try to recycle the packing material as much as possible.
Check the contents:
Check that the carton contains the following items:
User manual
PPA-101
IR remote
1 Wireless hand mic
1 Wireless beltpack with headset mic.
2 Antennas for wireless receivers
1 FM-antenna
1 Power cable for 12Vdc car connector
JB SYSTEMS® 1/39 PPA-101
Page 4

ENGLISH OPERATION MANUAL
CAUTION: To reduce the risk of electric shock, do not open. No
user-serviceable parts inside. Refer servicing to qualified service
personnel only.
The lightning flash with arrowhead symbol within the equilateral triangle is intended to alert the
use or the presence of un-insulated “dangerous voltage” within the product’s enclosure that may
be of sufficient magnitude to constitute a risk of electric shock.
The exclamation point within the equilateral triangle is intended to alert the user to the presence
of important operation and maintenance (servicing) instructions in the literature accompanying
this appliance.
This symbol means: indoor use only
This symbol means: Read instructions
This speaker can easily reproduce sound pressure levels (SPL) sufficient enough to
cause severe and permanent hearing damage. Always protect your ears when you are
exposed for a longer period to SPL in excess of 85dB!
SAFETY INSTRUCTIONS:
Even if the speaker cabinet is made of water resistant material, the woofer and tweeter are not protected
against humid and rain. Therefore this speaker is intended for indoor use only, use of this product
outdoors, in humid conditions, voids all warranties.
Always mount this speaker in safe and stable matter.
Take special care when the cabinets are suspended. This is potentially dangerous and should only be
carried out by technicians who have knowledge of the techniques and regulations of rigging speakers!
To prevent fire or shock hazard, do not expose this appliance to rain or moisture.
To avoid condensation to be formed inside, allow the unit to adapt to the surrounding temperatures when
bringing it into a warm room after transport. Condense sometimes prevents the unit from working at full
performance or may even cause damages.
Don’t place metal objects or spill liquid inside the unit. No objects filled with liquids, such as vases, shall
be placed on this appliance. Electric shock or malfunction may result. If a foreign object enters the unit,
immediately disconnect the mains power.
No naked flame sources, such as lighted candles, should be placed on the appliance.
Don’t cover any ventilation openings as this may result in overheating.
Prevent use in dusty environments and clean the unit regularly.
Keep the unit away from children.
Inexperienced persons should not operate this device.
Maximum save ambient temperature is 40°C. Don’t use this unit at higher ambient temperatures.
Always unplug the unit when it is not used for a longer time or before you start servicing.
The electrical installation should be carried out by qualified personal only, according to the regulations for
electrical and mechanical safety in your country.
Check that the available voltage is not higher than the one stated on the rear panel of the unit.
The socket inlet shall remain operable for disconnection from the mains.
The power cord should always be in perfect condition. Switch the unit immediately off when the power
cord is squashed or damaged. It must be replaced by the manufacturer, its service agent or similarly
qualified persons in order to avoid a hazard.
Never let the power-cord come into contact with other cables!
When the power switch is in OFF position, this unit is not completely disconnected from the mains!
This appliance must be earthed to in order comply with safety regulations.
In order to prevent electric shock, do not open. There are no user serviceable parts inside.
Never repair a fuse or bypass the fuse holder. Always replace a damaged fuse with a fuse of the same
type and electrical specifications!
In the event of serious operating problems, stop using the appliance and contact your dealer immediately.
Please use the original packing when the device is to be transported.
Due to safety reasons it is prohibited to make unauthorized modifications to the unit.
JB SYSTEMS® 2/39 PPA-101
Page 5
ENGLISH OPERATION MANUAL
FUNCTIONS
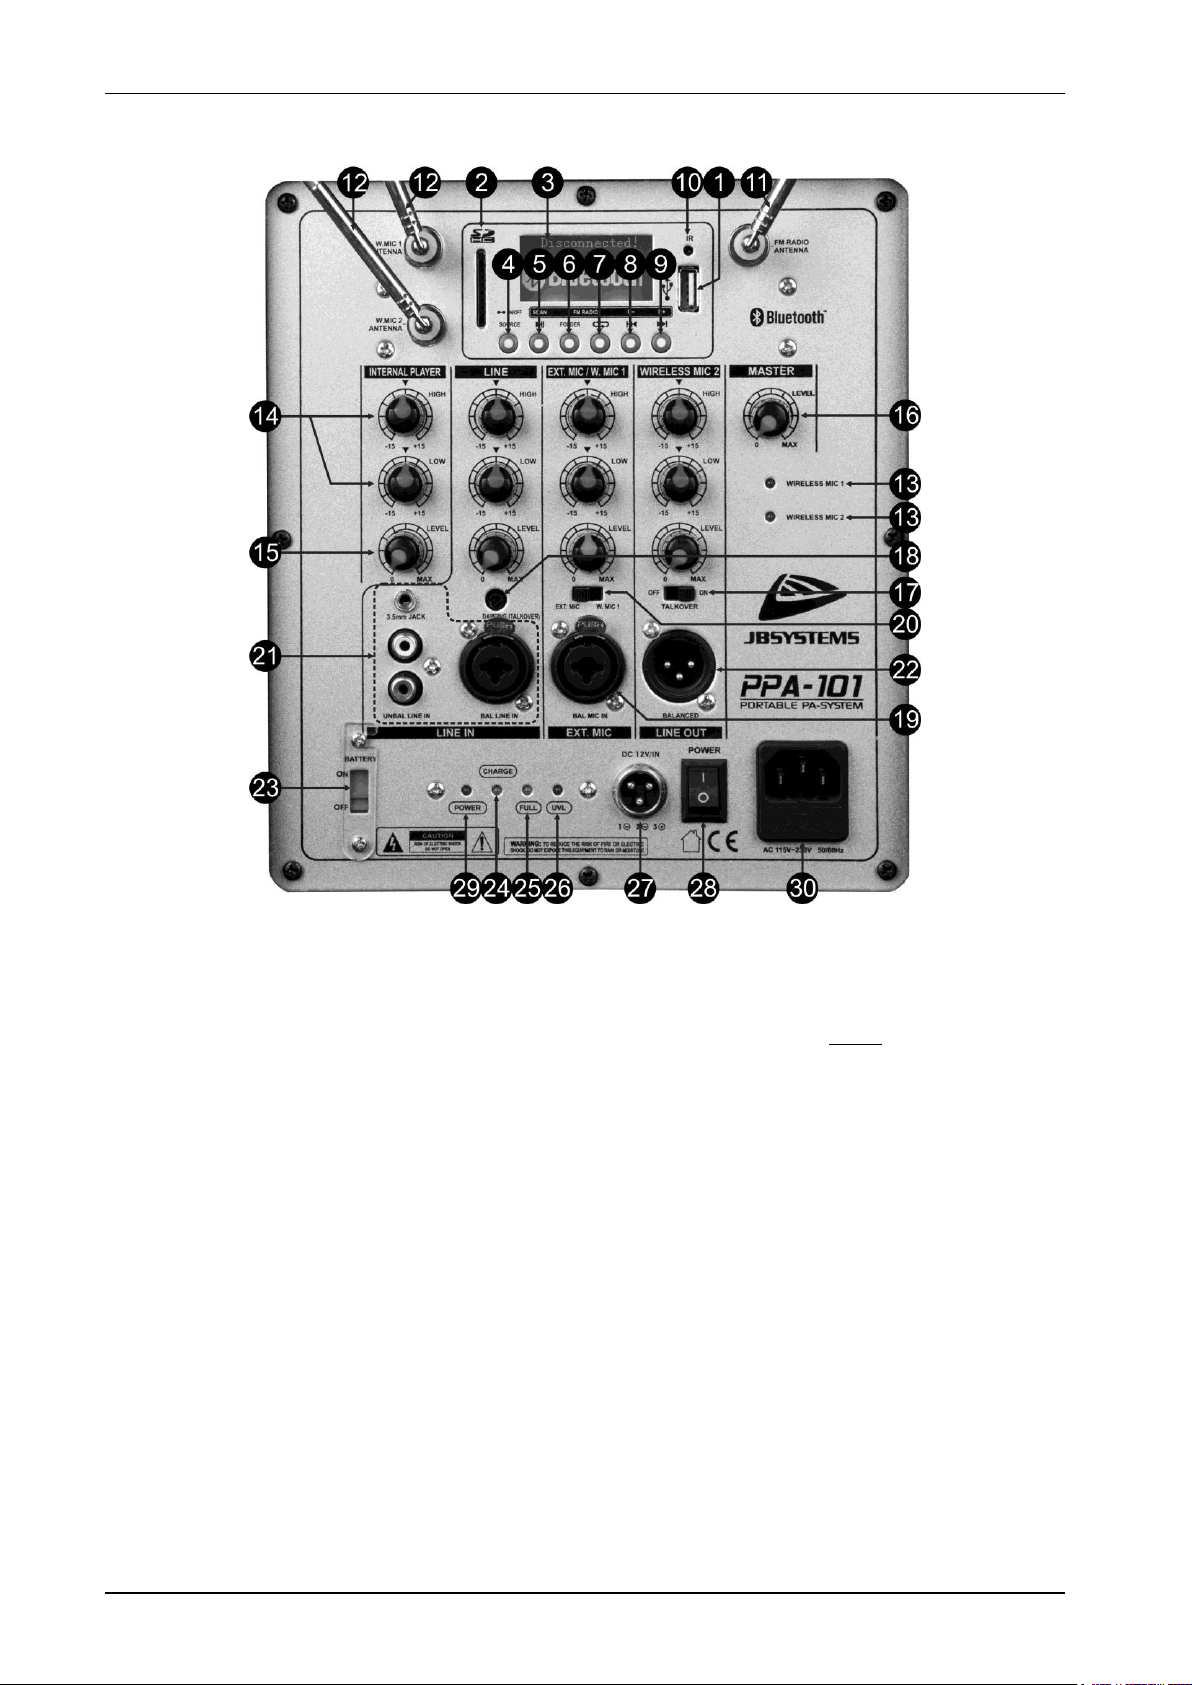
1. USB-input: here you can connect a USB-stick. As soon as the memory device is inserted, the display
shows “Read Device”, followed by immediate playback of the last played song.
Important note: the USB-memory should be formatted in FAT16 or FAT32. If a new USB-stick is not
detected, please format it first using a Windows PC.
2. SD-CARD input: here you can insert an SD or SDHC-card. Insert the card gently with the upper side
(printed side) facing to the left. As soon as the memory device is inserted, the display shows “Read
Device”, followed by immediate playback of the last played song.
Important note: the SD-card should be formatted in FAT16 or FAT32. If a new SD-card is not detected,
please format it first using a Windows PC.
3. LCD DISPLAY: shows valuable information about the played music or radio stations.
4. [SOURCE] button: press this button to select MP3-player, Bluetooth and FM-tuner (radio).
5. PLAY/PAUSE button:
Player operation: to start/pause the current audio track.
Bluetooth operation: to start/pause the current audio track.
Radio mode: tuner scans the FM-band and programs the FM-preset stations automatically. Press
again to stop scanning.
6. [FOLDER] button: only used while the audio player is active. Used to put the display in folder mode.
Use the TRACK buttons to browse the folders and tracks. Press the [FOLDER]-button again to select
the desired folder or track.
7. REPEAT button: only used while the audio player is active. Press this button to choose one of the
different random modes:
[REPEAT ONE]: repeat the current track.
[REPEAT FOLDER]: repeat current folder.
[REPEAT ALL]: repeat all tracks on the USB-memory. This is the “standard” playback mode.
[REPEAT RANDOM]: play all tracks in random order.
JB SYSTEMS® 3/39 PPA-101
Page 6

ENGLISH OPERATION MANUAL
8. PREVIOUS TRACK button:
Player operation:
Press shortly:
Normal playback: select previous track.
Folder select: select previous folder.
Press longer: you can search at higher speed inside the track.
Bluetooth operation:
Press shortly: select previous track.
Press longer: reduce the volume of player. Standard the volume is set to maximum: we advice
to keep it at maximum and use the rotary knob to change the volume.
Radio mode:
Press shortly: select the previous preset.
Press longer: reduce the volume of player. Standard the volume is set to maximum: we advice
to keep it at maximum and use the rotary knob to change the volume.
9. NEXT TRACK button:
Player operation:
Press shortly:
Normal playback: select next track.
Folder select: select next folder.
Press longer: you can search at higher speed inside the track.
Bluetooth operation:
Press shortly: select the next rack.
Press longer: increase the volume of player. Standard the volume is set to maximum: we
advice to keep it at maximum and use the rotary knob to change the volume.
Radio mode:
Press shortly: select the next preset.
Press longer: increase the volume of player. Standard the volume is set to maximum: we
advice to keep it at maximum and use the rotary knob to change the volume.
10. IR-RECEIVER: receives IR-signals from the remote control. For optimal use of the IR-remote a second
IR-receiver is located on the front side of the unit.
11. ANTENNA FM-RADIO: connect the FM-antenna here for good radio reception. Not needed when the
radio is not used.
12. ANTENNAS WIRELESS MICS: The PPA-101 has 2 wireless microphones, each with their own
receiver antenna. Both antennas should be stored in the compartment on the back of the unit during
transport.
13. RF-SIGNAL LED: is lit while the signal from the wireless mic is received. If this LED is off while the
wireless mic is switched on, there could be 3 reasons:
The wireless mic and receiver use a different channel: set both to the same channel!
The batteries in the wireless mic are weak: change the batteries.
The wireless mic is out of range: bring the wireless mic closer to the receiver.
14. [HIGH/LOW] TONE CONTROLS: separate 2band equalizers on all inputs. Control range is +/-15dB for
both high and low freqs.
15. INPUT LEVELS: separate level controls for the different input channels. Make sure to put the level
knob to zero before connecting a new audio source. After connection, slowly turn up the level.
16. [MASTER] LEVEL: master volume for all audio inputs.
17. MIC PRIORITY / [TALKOVER]: use this button to automatically reduce the music from the internal
player and line input while talking in the microphone(s). You don’t have to fade down the music
manually while talking to the audience.
18. [TALKOVER DAMPING]: used to adjust how much the music is reduced while talking in the
microphone.
19. EXTERNAL MIC INPUT: This input accepts both balanced and unbalanced microphones. You can use
both ¼”jack and male 3pin-XLR connectors. First always set the volume knob to zero, after that turn it
slowly up to the desired level.
20. [EXT. MIC / W.MIC1] SELECT: used to select which microphone you want to use. In the left position
you can use an external microphone, in the right position the wireless mic is used.
21. [LINE] INPUT: This input accepts both balanced (3pin-XLR) and unbalanced (RCA, cinch or 3.5mm
stereo mini jack) line level audio signals like for example: CD-player, tuner, MP3-player, ... First always
set the volume knob to zero, after that turn it slowly up to the desired level.
22. [LINE] OUTPUT: This balanced output (3pin-XLR) makes it possible to connect several speaker
cabinets together.
JB SYSTEMS® 4/39 PPA-101
Page 7
ENGLISH OPERATION MANUAL
23. [BATTERY] SWITCH: to comply with regulations the batteries may not be connected during long
transports. To avoid that you have to open the battery compartment to connect the batteries, we
installed a battery switch.
IMPORTANT: while unpacking the PPA-101 this switch is set to OFF and no battery is installed.
For battery operated use: first install a battery (optional, see further) and put the battery switch
in ON-position, otherwise you will not be able to use and/or charge the battery!
24. [CHARGE] LED: indicates that the internal battery is charging.
25. [FULL] LED: indicates that the internal battery is fully charged.
26. [UVL] LED: [(UnderVoltage Led)] indicates that the voltage of the internal battery has dropped under
the minimum level, in other words: the battery is empty and needs to be recharged. When the [UVL]-led
is lit the unit cannot be switched on.
!!! NEVER STORE THE UNIT WITH EMPTY BATTERIES: FIRST CHARGE THE BATTERY !!!
27. 12V CAR BATTERY INPUT: you can also connect the PPA-101 to the 12Vdc output of your car. Use
the supplied 12V cable to connect the unit to the cigarette lighter connection of your car.
28. [POWER] ON/OFF SWITCH: switches the unit on/off.
29. [POWER] LED: indicates that the unit is switched on.
30. MAINS INPUT: Mains input with IEC socket and integrated fuse holder, connect the supplied mains
cable here.
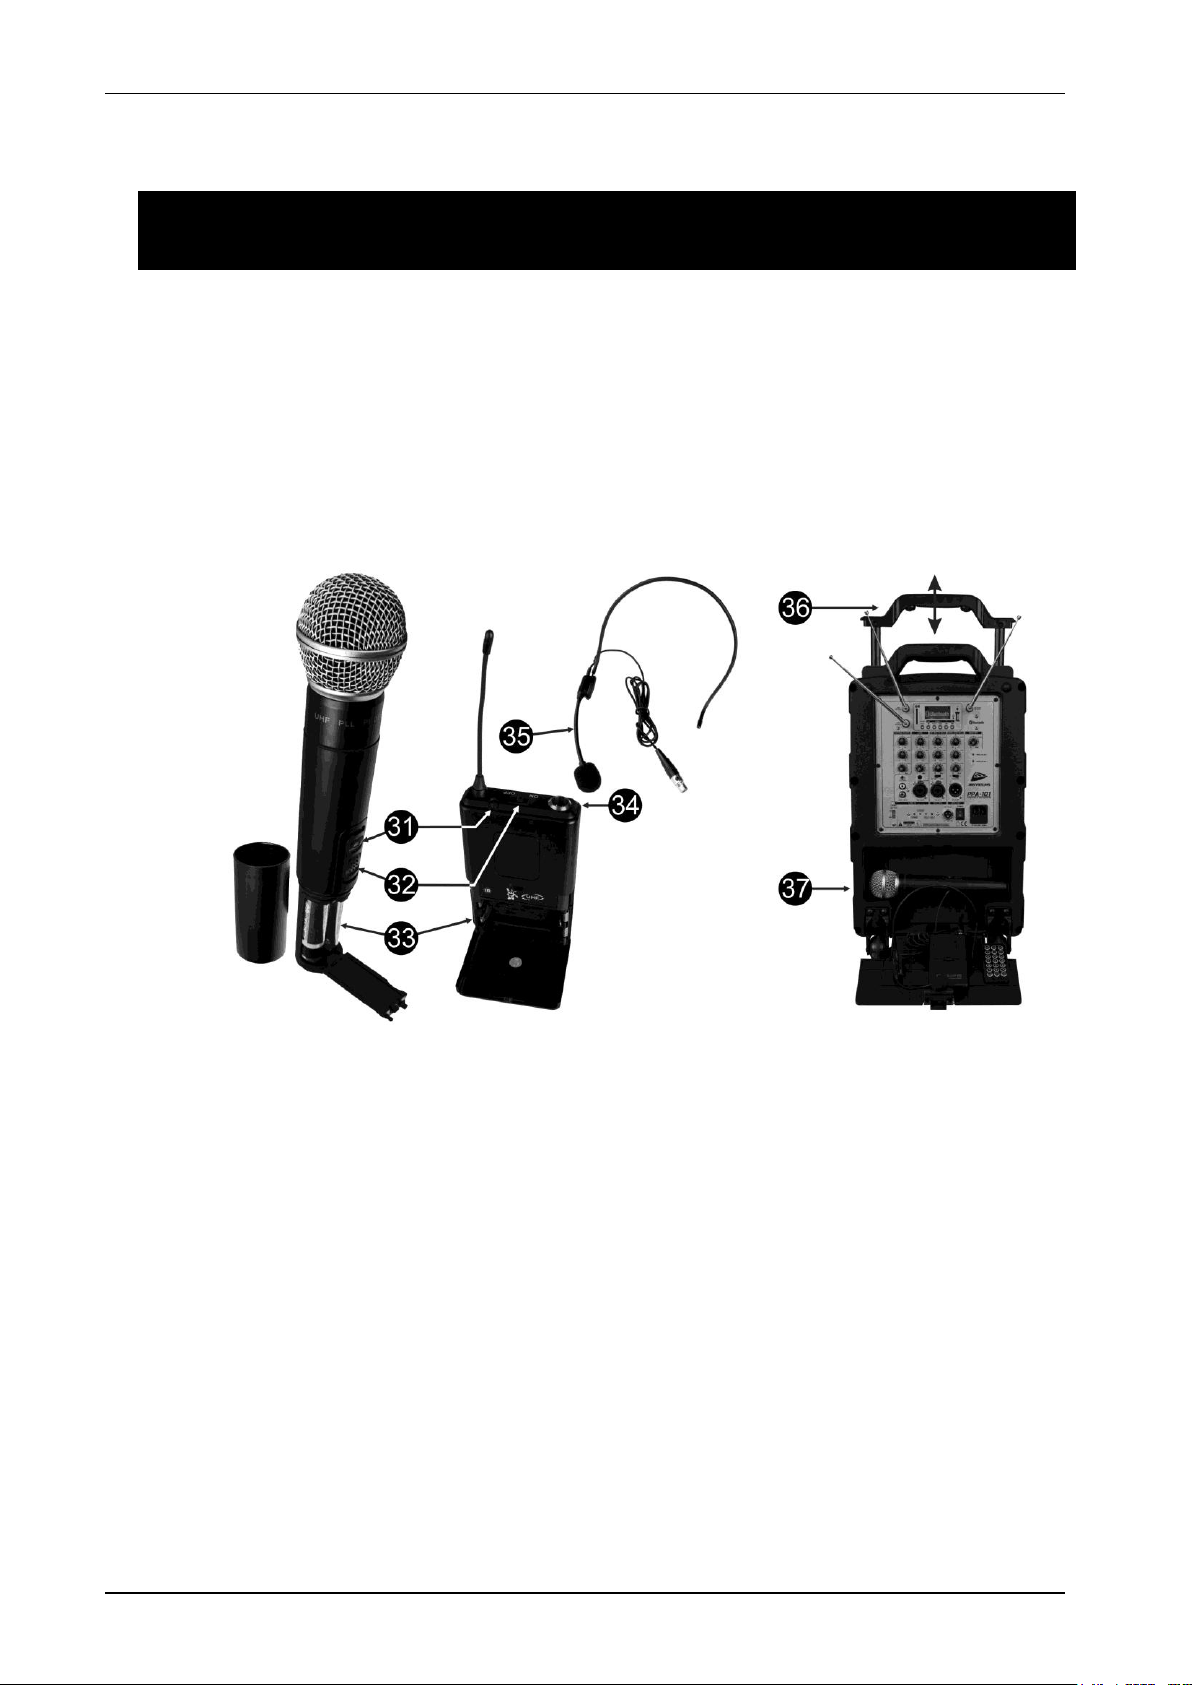
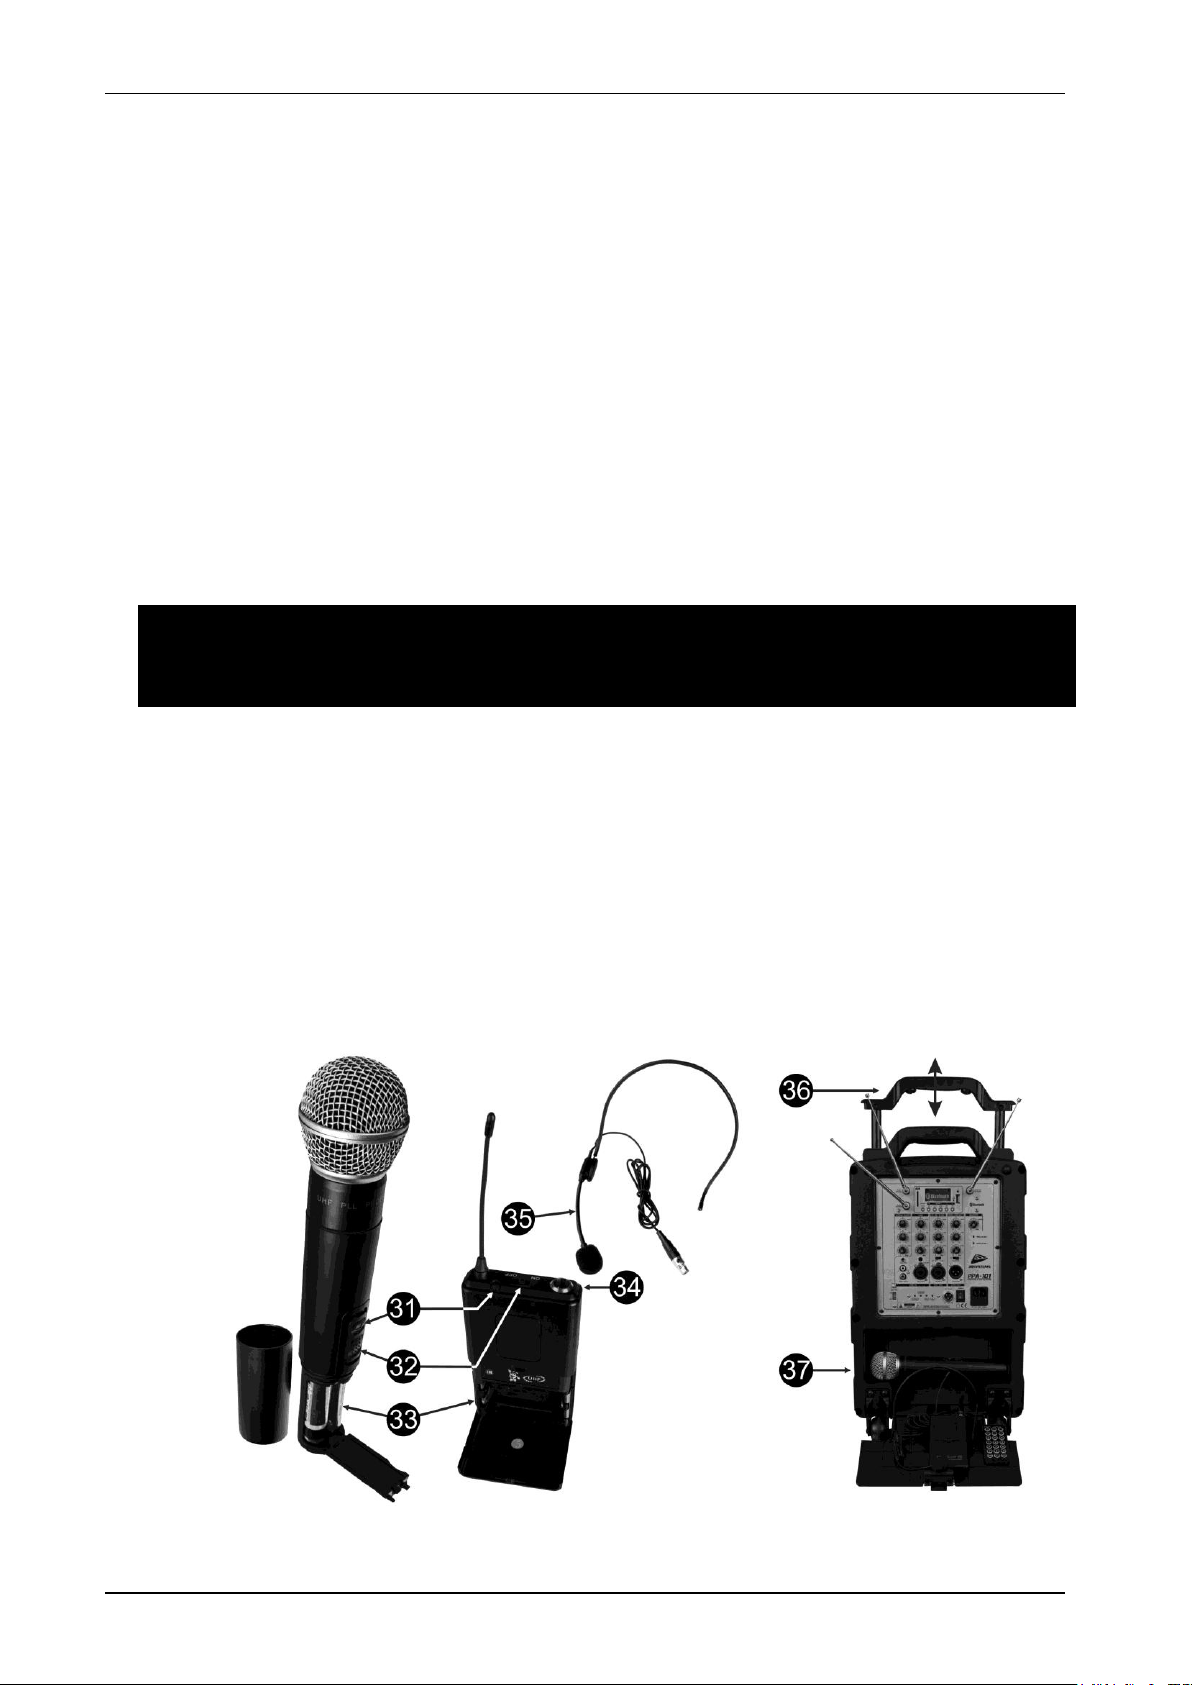
31. WMIC BATTERY INDICATOR: the wireless mics (wmic) work on 2pcs AA-batteries. While the batteries
are in good condition (full), the LOW-indicator is off. Once the indicator is lit the batteries are becoming
weak and should be changed. The POW-indicator is lit while the mic is switched on.
32. WMIC SWITCH: this wireless handmic has 2 positions:
OFF: position to be used when the mic is not used.
ON: the mic is fully functional (sending RF-signal + audio)
33. WMIC – BATTERIES: the wireless mics have a small battery compartment. Slide it carefully open to
gain access: inside you can put 2pcs AA-battery (Alcaline or NiMH rechargeable batteries) See the
battery indicator to check the condition of the batteries.
34. 3PIN MINI XLR: used to connect the supplied headset microphone.
35. HEADSET MICROPHONE: included with the PPA-101. You can also use a second hand microphone
instead of the supplied headset/beltpack combination. (optional available)
36. CARRYING HANDLE: a retractable handle, easy to take the PPA-101 with you!
37. STORAGE COMPARTMENT: small compartment on top of the PPA-101. You can easily store the
wireless mics, antennas, IR-remote, small cable, …
JB SYSTEMS® 5/39 PPA-101
Page 8
ENGLISH OPERATION MANUAL
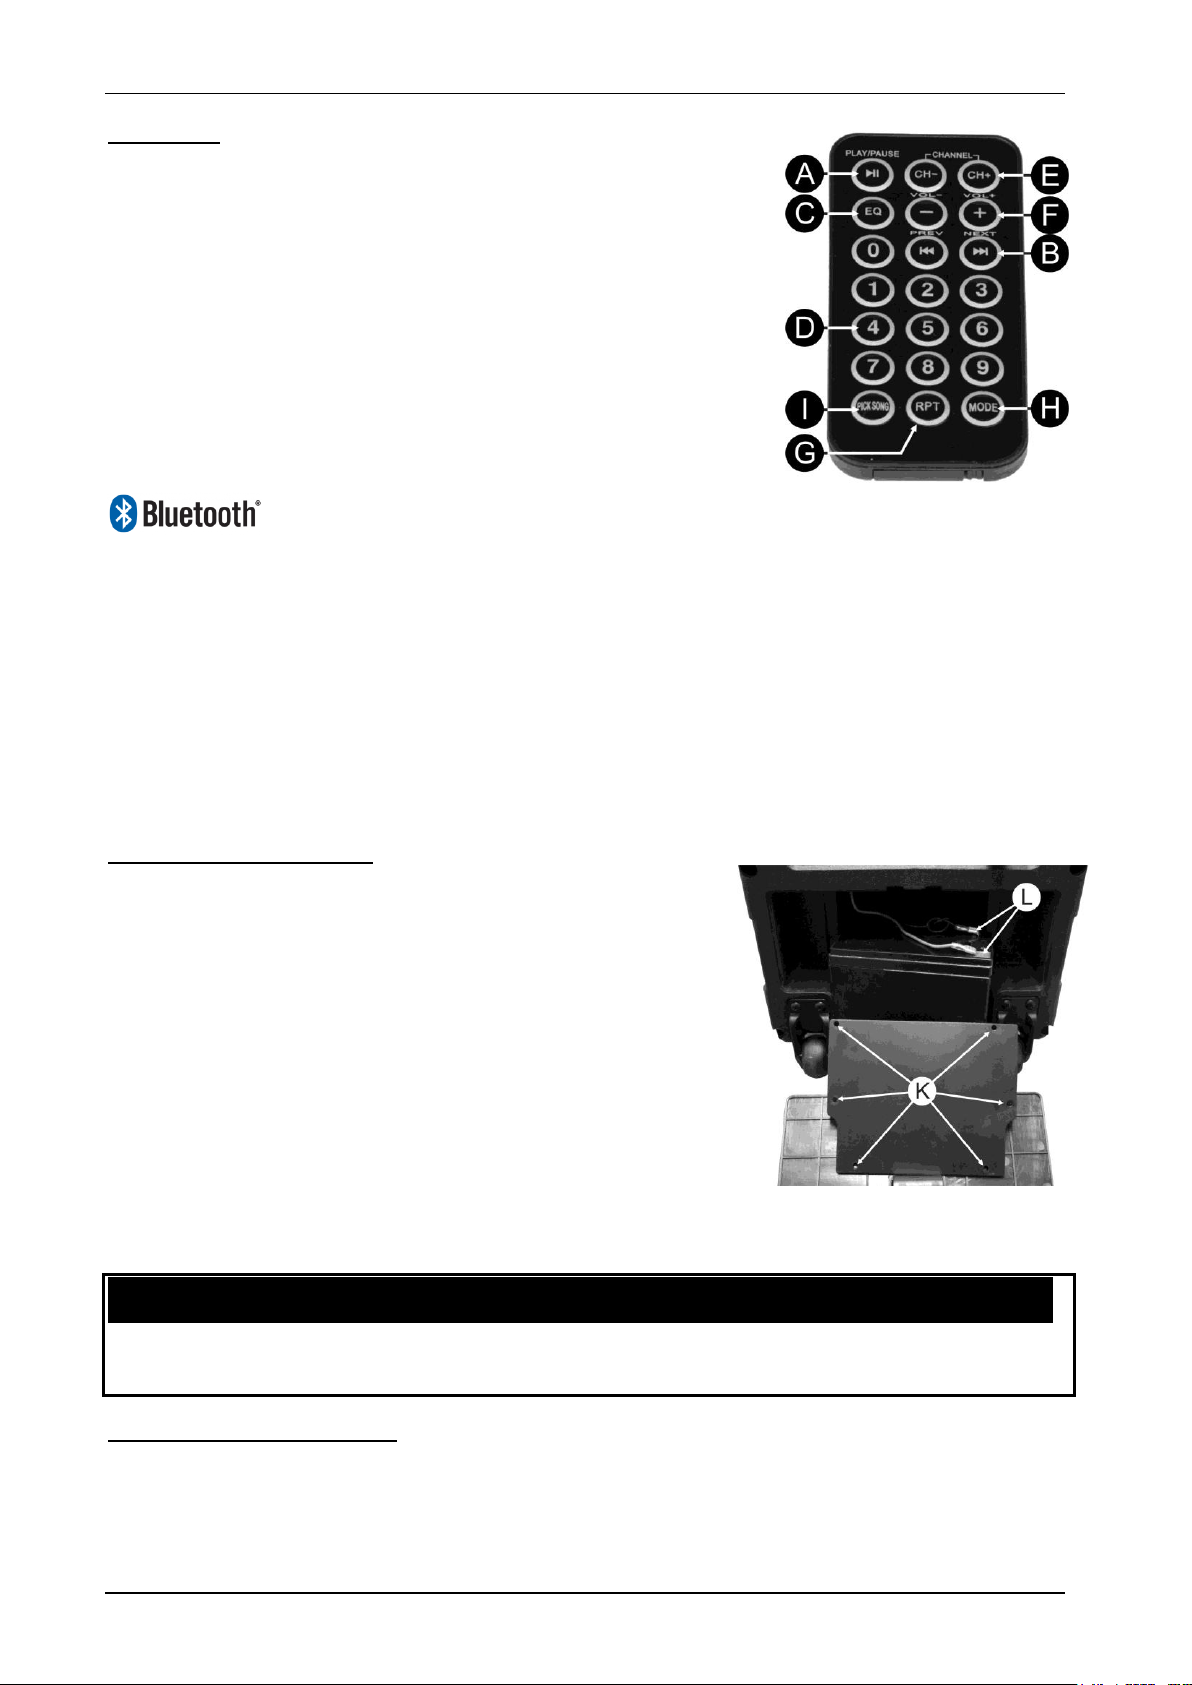
IR-REMOTE
A. PLAY/PAUSE: press to start/pause playback, same as button (5).
B. PREVIOUS/NEXT TRACK: same as buttons (8) and (9)
C. EQ button: used to select one of the EQ presets [Normal, Rock, Pop,
Classic, Country] on the player module. We recommend to always use
the Normal setting!
D. NUMBER keys: you can use these for direct track access while using
the internal MP3-player.
E. [CHANNEL] ± buttons: in tuner mode you can manually search for
radio stations.
F. VOLUME buttons: used to change the output volume of the player
module. We recommend to keep the volume at maximum (vol = 32)
and use the level knob on the mixer instead.
G. [RPT]-button: REPEAT-button, same as button (7)
H. [MODE]-button: same function as the SOURCE-button (4)
Press the [SOURCE]-button (4) until the display shows the [BLUETOOTH® ] logo
The display (3) shows [“Not Connected !”]
Activate the [Bluetooth] function on your smartphone/tablet and search for [Bluetooth] devices.
The PPA-101 will show up with the name [“Bluetooth”]:
Connect to the PPA-101: the display (3) on the PPA-101 will show [“Connected !”]
Ready for use !
RECHARGEABLE BATTERY
The PPA-101 can work using an optional rechargeable lead/acid battery. This lead/acid battery can be
ordered separately from JB Systems or you can buy it from your local store.
BATTERY SIZE / CAPACITY: (LxWxH) 150x65x95mm ~ 12Vdc / 7Ah
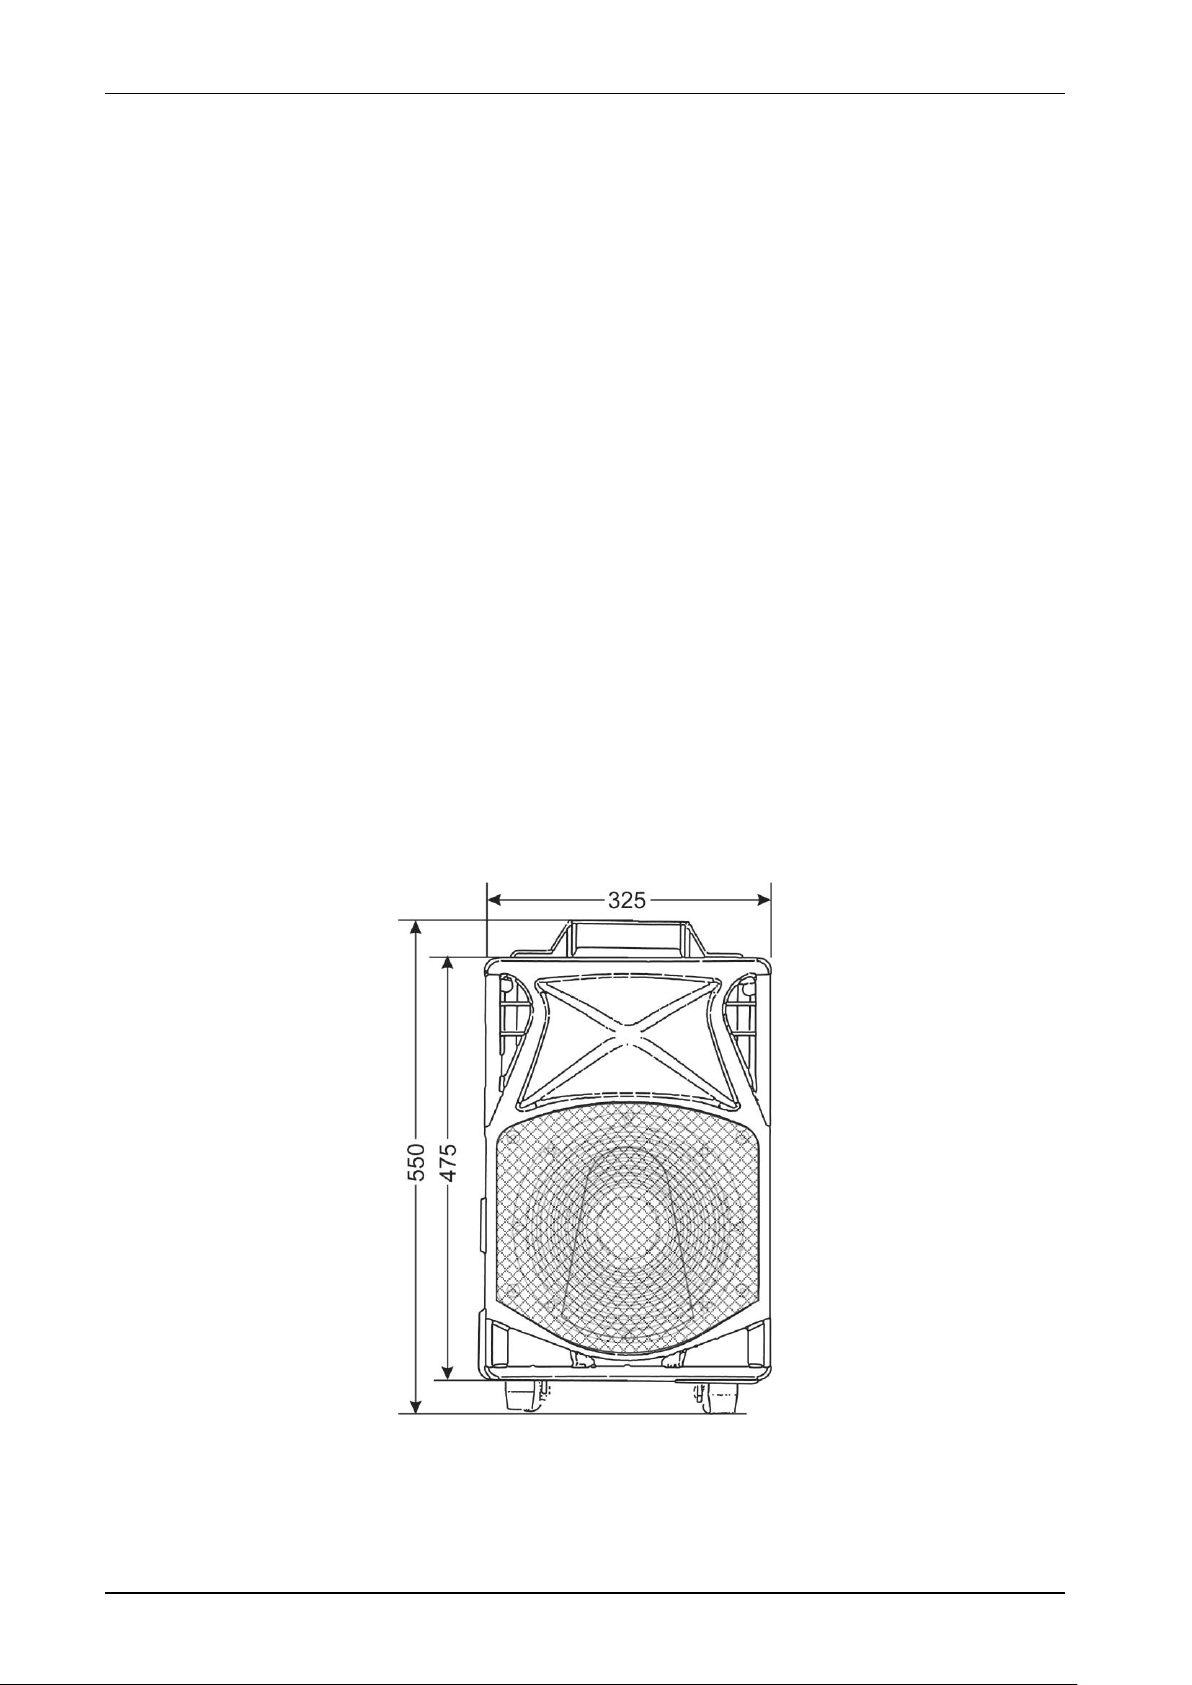
INSTALLING THE BATTERY
Make sure that the PPA-101 is not connected to the mains.
Open the storage compartment (37): on the back you will see a
plastic panel.
Remove the 6 screws (K) and remove the plastic panel.
Inside you will see 2 wires: 1 black wire + 1red wire.
Install the lead/acid battery in the compartment with the 2 contacts
facing to the right.
Connect the RED wire to the RED-contact (sometime marked “+”)
on the battery (L).
Connect the BLACK wire to the BLACK-contact (sometime marked
“-”) on the battery (L).
Put the plastic panel with its 6 screws back in place.
Close the storage compartment
Put the battery switch (23) in the ON-position
Connect the PPA-101 to the mains to charge the battery: the [CHARGE]-indicator (24) is lit.
When the [FULL]-indicator (25) is lit, the battery is full and ready to be used.
VERY IMPORTANT: RECHARGING THE BATTERY -
To extend the lifetime of the battery it is very important to NEVER store the unit with an empty
battery! So keep in mind to ALWAYS store the unit with a fully charged battery. If the unit is stored
for a long time, recharge it every 3 months! NO guarantee is offered on the rechargeable battery!
RECHARGING THE BATTERY:
Put the battery switch (23) in the ON-position
Connect the PPA-101 to the mains to charge the battery: the [CHARGE]-indicator (24) is lit.
When the [FULL]-indicator (25) is lit, the battery is full and ready to be used.
Note: charging goes faster when the power switch (28) is in the OFF-position.
JB SYSTEMS® 6/39 PPA-101
Page 9
ENGLISH OPERATION MANUAL
SPECIFICATIONS
This unit is radio-interference suppressed. This appliance meets the requirements of the current European
and national guidelines. Conformity has been established and the relevant statements and documents have
been deposited by the manufacturer.
USB-memory: <32GB – formatted FAT16 / FAT32
SD-card: SD + SDHC <32GB – formatted FAT16 / FAT32
Accepted audio files: WMA, MP3 (different sample rates, up to 320kbps)
FM Radio freq range: 87,5 to 108MHz
FM Radio tuning steps: 0,1MHz
IR-Remote replacement battery: CR2025 3V battery (included)
Wireless Mics – HF freq: UHF, 863-865MHz
Freq. wireless MIC1 (hand mic) 863.35 MHz
Freq. wireless MIC2 (belt pack) 864.80 MHz
Amplifier Power 50Wrms
Freq. Resp. (+/-3dB) 50 – 20.000Hz
THD (1kHz / 1W) 0,2%
Input Sensitivity line 1V
Input Sensitivity micro 15mV
Input impedance 20kohm
S/R ratio (mic off) >85dB
Cooling natural air cooling
Microphone input Bal/unbal XLR/Jack
Line input Bal/unbal XLR 3pin + 3.5mm stereo jack
Line output Bal/unbal XLR 3pin
Fuse (5x20mm) F5A / 250V
Power supply 115Vac ~ 230Vac 50/60Hz
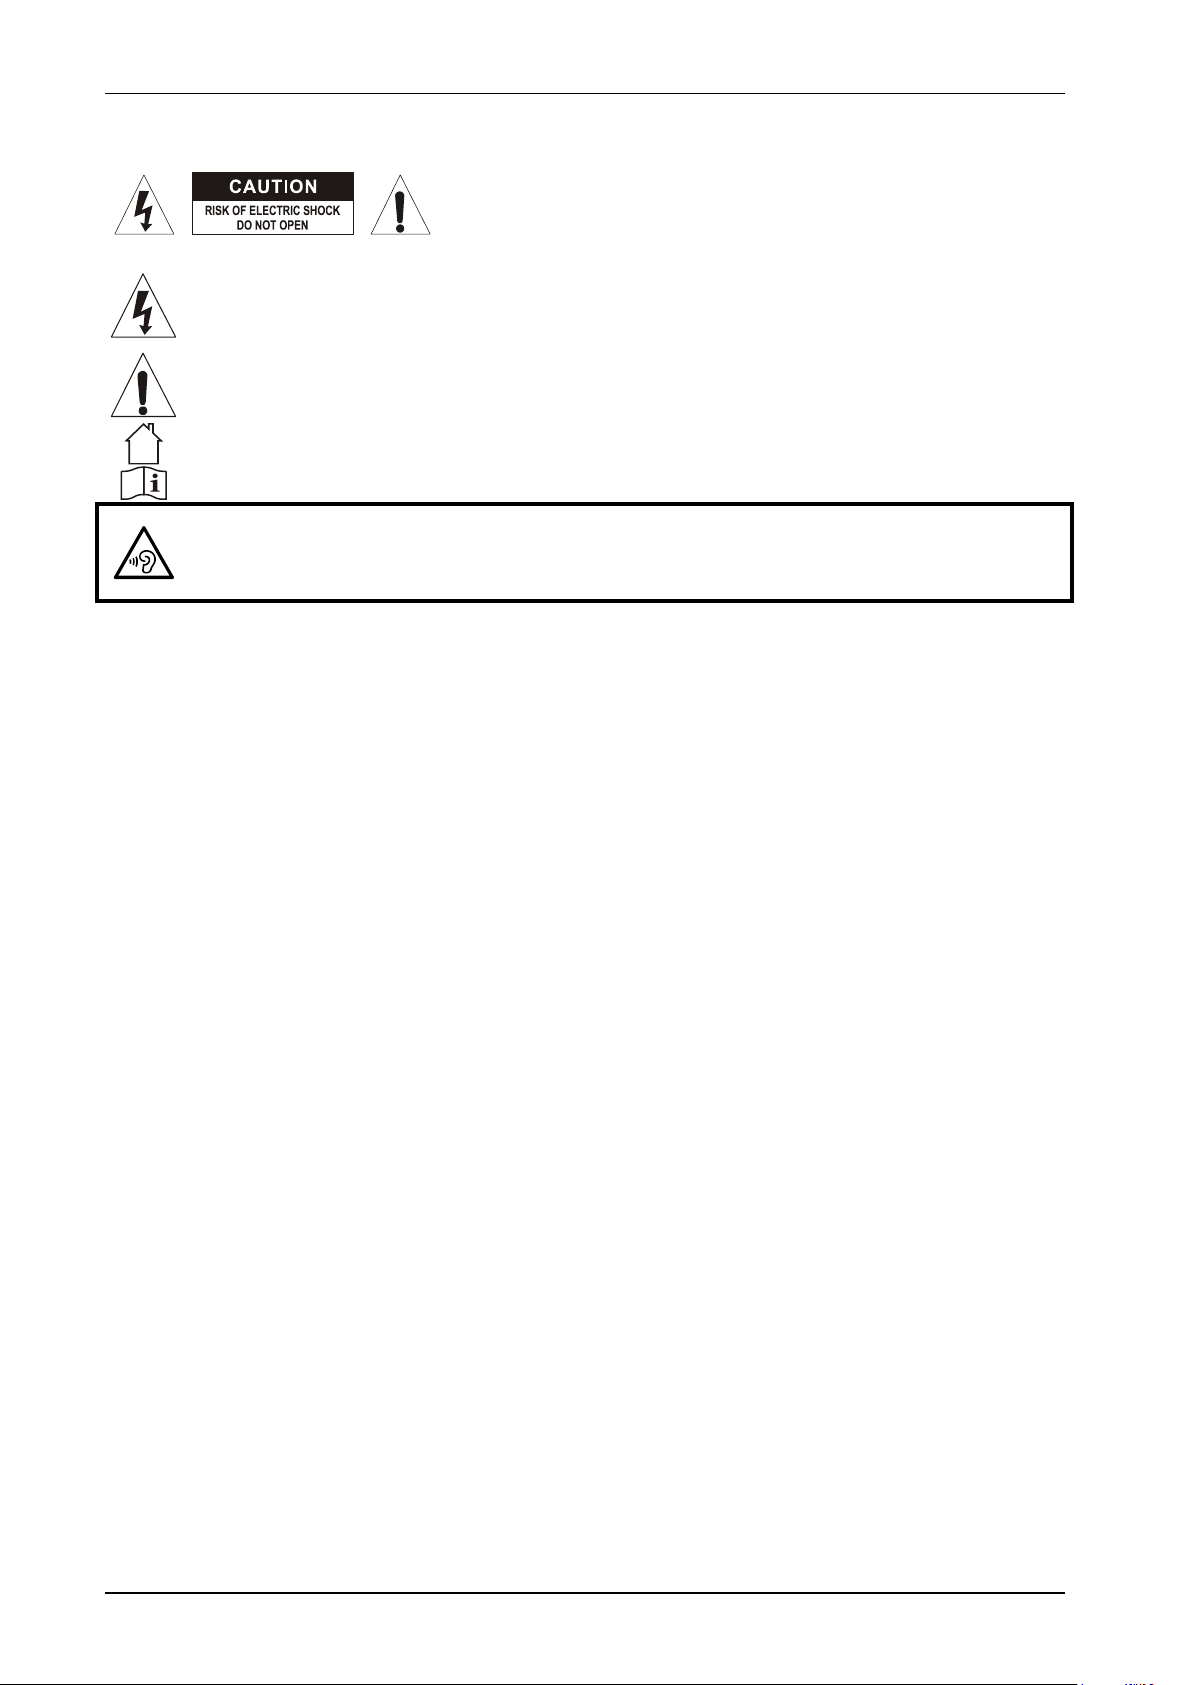
Dimensions HxWxD 550 x 325 x 280 mm
Weight 15,5 kg
Every information is subject to change without prior notice
You can download the latest version of this user manual on our website: www.jb-systems.eu
JB SYSTEMS® 7/39 PPA-101
Page 10

FRANCAIS GUIDE D’UTILISATION
GUIDE D’UTILISATION
Nous vous remercions d’avoir acheté ce produit JB Systems
instructions d’utilisation pour tirer profit de toutes les possibilités du produit.
®
. Lisez attentivement les présentes
CARACTÉRISTIQUES
Système de sonorisation portable, compact et alimenté par batterie
Parfait pour les écoles, les présentations commerciales, etc.
Technologie Bluetooth pour toutes sortes de dispositifs portables comme les téléphones intelligents.
2 microphones sans fil : 1 microphone à main + 1 émetteur-ceinture avec casque fourni.
Lecteur USB prenant en charge les formats MP3 et WMA
Radio FM avec préréglages des stations
La télécommande infrarouge (radio/lecteur USB) peut aussi être utilisée alors que vous êtes devant le
haut-parleur.
Console de mixage avec :
1 entrée de microphone filaire
1 entrée de ligne/auxiliaire : prise XLR + RCA + mini jack 3,5 mm
égaliseurs 2 bandes sur toutes les voies d’entrée
sortie de ligne symétrique pour connecter d’autres enceintes actives.
Amplificateur de classe D 50 W
Excellente qualité sonore grâce à un ensemble d’enceintes 2 voies à haut-parleur de graves/haut-parleur
d’aigus séparés.
Transport aisé grâce à la poignée télescopique et aux roulettes !
Compartiment de rangement des câbles et des microphones sans fil.
Chargeur interne pour la batterie rechargeable (en option).
Entrée d’alimentation secteur 230 V CA
Entrée d’alimentation 12 V CC pour une utilisation sur un véhicule, câble fourni
Possibilité de montage sur tout support d’enceinte avec un mât de 35 mm
AVANT UTILISATION
Avant d’utiliser cet appareil, vérifiez s’il n’a pas été endommagé durant le transport. En cas de
dommages, n’utilisez pas l’appareil et consultez immédiatement votre revendeur.
Important : Cet appareil est expédié de notre usine en parfait état et bien emballé. Il est absolument
nécessaire que l’utilisateur suive strictement les instructions et les avertissements de sécurité se trouvant
dans ce manuel. Tout dommage dû à une mauvaise manipulation n’est pas garanti. Le revendeur
n’accepte aucune responsabilité pour tous les défauts et problèmes dus au non-respect de ce manuel.
Conservez ce manuel dans un endroit sûr pour toute consultation future. Si vous vendez l’appareil,
assurez-vous de joindre ce manuel.
Pour protéger l’environnement, essayez de recycler autant que possible les matériaux d’emballage.
Vérifiez le contenu :
Vérifiez que le carton contient les éléments suivants :
Guide d’utilisation
PPA-101
Télécommande infrarouge
1 microphone à main sans fil
1 émetteur-ceinture sans fil avec microphone de casque.
2 antennes pour les récepteurs sans fil
1 antenne FM
1 câble d’alimentation pour connecteur de voiture 12 V CC
JB SYSTEMS® 8/39 PPA-101
Page 11
FRANCAIS GUIDE D’UTILISATION
ATTENTION : pour minimiser le risque de choc électrique, ne pas
ouvrir ! L’appareil ne contient aucun composant réparable par
l’utilisateur. Confiez toute réparation à un personnel qualifié
uniquement.
Le symbole de l’éclair à l’intérieur d’un triangle équilatéral est destiné à alerter l’utilisateur de la
présence de « tensions dangereuses » non isolées à l’intérieur de l’appareil, d’une magnitude
pouvant constituer un risque d’électrocution.
Le symbole du point d’exclamation dans un triangle équilatéral sert à avertir l’utilisateur que
d’importants conseils d’utilisation et de maintenance sont fournis dans la documentation
accompagnant l’appareil.
Ce symbole signifie : pour un usage intérieur uniquement
Ce symbole signifie : lisez les instructions
Cette enceinte peur facilement reproduire des niveaux de pression acoustique (NPA)
susceptibles de provoquer des troubles d’audition graves et permanents. Protégez
toujours vos oreilles lorsque vous êtes exposé(e) pendant une longue période à un NPA
supérieur à 85 dB !
INSTRUCTIONS DE SÉCURITÉ :
Même si l’enceinte est fabriquée avec un matériau résistant à l’eau, le haut-parleur de graves et le haut-
parleur d’aigus ne sont pas protégés contre l’humidité et la pluie. De ce fait, cette enceinte est
uniquement conçue pour une utilisation à l’intérieur. L’utilisation dans des conditions humides en plein-air
annule toutes les garanties.
Installez toujours cette enceinte dans des conditions de sécurité et de stabilité optimales.
Soyez très prudents si les enceintes doivent être suspendues. Cette installation est potentiellement
dangereuse et ne doit être réalisée que par des techniciens qui maîtrisent les techniques et les
réglementations de la suspension d’enceintes !
Pour éviter tout incendie ou électrocution, n’exposez pas cet appareil à la pluie ou à l’humidité.
Pour éviter une formation de condensation interne, laissez l’appareil s’adapter à la température ambiante
quand vous le mettez dans une pièce chaude après le transport. La condensation empêche parfois
l’appareil de fonctionner à plein rendement ou peut même causer des dommages.
Ne placez pas d’objets métalliques et ne renversez pas de liquides à l’intérieur de l’appareil. Aucun objet
rempli de liquide, tel que des vases, ne doit être placé au-dessus de l’appareil. Un choc électrique ou un
dysfonctionnement peut en résulter. Si un corps étranger pénètre dans l’appareil, débranchez
immédiatement le cordon d’alimentation de la prise secteur.
Aucune source de flamme nue, telle que des bougies allumées, ne doit être placée au-dessus de
l’appareil.
Ne couvrez pas les ouvertures de ventilation, cela pourrait entraîner une surchauffe.
Évitez une utilisation dans des environnements poussiéreux et nettoyez l’appareil régulièrement.
Gardez l’appareil loin de la portée des enfants.
Les personnes inexpérimentées ne doivent pas utiliser cet appareil.
La température ambiante de fonctionnement maximale est de 40 °C. N’utilisez pas cet appareil à des
températures ambiantes plus élevées.
Débranchez toujours l’appareil lorsqu’il ne va pas être utilisé pendant une longue période et avant chaque
entretien.
L’installation électrique doit être effectuée par du personnel qualifié, conformément à la réglementation en
matière de sécurité électrique et mécanique dans votre pays.
Vérifiez que votre tension n’est pas supérieure à celle indiquée sur le panneau arrière de l’appareil.
La prise d’entrée doit rester accessible pour le débranchement du secteur.
Le cordon d’alimentation doit toujours être en parfait état. Éteignez immédiatement l’appareil dès que le
cordon d’alimentation est écrasé ou endommagé. Il doit être remplacé par le fabricant, son agent de
service ou une personne de même qualification afin d’éviter tout danger.
Ne laissez jamais le cordon d’alimentation entrer en contact avec d’autres câbles !
Même lorsque l’interrupteur d’alimentation est positionné sur OFF, l’appareil n’est pas complètement
débranché du secteur !
Cet appareil doit être mis à la terre pour être conforme à la réglementation en matière de sécurité.
Pour éviter un choc électrique, n’ouvrez pas l’appareil. L’appareil ne contient aucun composant réparable
par l’utilisateur.
JB SYSTEMS® 9/39 PPA-101
Page 12

FRANCAIS GUIDE D’UTILISATION
Ne réparez jamais un fusible et ne court-circuitez jamais le porte-fusible. Remplacez toujours un fusible
endommagé par un fusible du même type ayant les mêmes spécifications électriques !
En cas de sérieux problèmes de fonctionnement, cessez d’utiliser l’appareil et contactez immédiatement
votre revendeur.
Utilisez l’emballage d’origine pour transporter l’appareil.
Pour des raisons de sécurité, il est interdit d’apporter des modifications non autorisées à l’appareil.
FONCTIONS
1. Entrée USB : connectez ici une clé mémoire USB. Dès que le dispositif de mémoire est inséré, l’écran
indique « Read Device », suivi immédiatement de la lecture du dernier titre lu.
Remarque importante : la mémoire USB doit être formatée avec le système de fichier FAT16 ou
FAT32. Si une nouvelle mémoire USB n’est pas détectée, veuillez d’abord la formater à l’aide d’un
ordinateur personnel.
2. Entrée de carte SD : insérez ici une carte mémoire SD ou SDHC. Insérez la carte doucement avec le
côté supérieur (côté imprimé) dirigé à gauche. Dès que le dispositif de mémoire est inséré, l’écran
indique « Read Device », suivi immédiatement de la lecture du dernier titre lu.
Remarque importante : la carte mémoire SD doit être formatée avec le système de fichier FAT16 ou
FAT32. Si une nouvelle carte SD n’est pas détectée, veuillez d’abord la formater à l’aide d’un
ordinateur personnel.
3. ÉCRAN LCD : Affiche des informations précieuses sur la musique reproduite ou les stations radio.
4. Touche [SOURCE] : appuyez sur cette touche pour sélectionner le lecteur MP3, le mode Bluetooth et
le syntoniseur FM (radio).
5. Touche « LECTURE/PAUSE » :
Mode lecteur : démarrer/mettre en pause la piste audio actuelle.
Mode Bluetooth : démarrer/mettre en pause la piste audio actuelle.
Mode radio : Le syntoniseur recherche la bande FM et permet de programmer automatiquement
des stations FM préréglées. Appuyez de nouveau sur cette toucher pour arrêter la recherche.
JB SYSTEMS® 10/39 PPA-101
Page 13

FRANCAIS GUIDE D’UTILISATION
6. Touche [FOLDER] : utilisée uniquement alors que le lecteur audio est actif. Il permet de faire basculer
l’affichage en mode dossier. Utilisez les touches de navigation des pistes pour parcourir les dossiers et
les pistes. Appuyez de nouveau sur la touche [FOLDER] pour sélectionner un dossier ou une piste.
7. Touche « RÉPÉTER » : utilisée uniquement alors que le lecteur audio est actif. Appuyez sur cette
touche pour choisir un des modes de lecture aléatoire :
[REPEAT ONE] : répéter la lecture de la piste actuelle.
[REPEAT FOLDER] : répéter la lecture du dossier actuel.
[REPEAT ALL] : Répéter toutes les pistes sur la mémoire USB. C’est le mode de lecture
« standard ».
[REPEAT RANDOM] : lire toutes les pistes dans un ordre aléatoire.
8. Touche PISTE PRÉCÉDENTE :
Mode lecteur :
Appui bref :
Lecture normale : sélection de la piste précédente.
Sélection du dossier : sélection du dossier précédent.
Appui prolongé : vous permet de parcourir la piste à une vitesse plus rapide.
Mode Bluetooth :
Appui bref : sélection de la piste précédente.
Appui prolongé : diminution du volume du lecteur. Le volume standard est réglé au maximum :
nous vous conseillons de le garder au maximum et d’utiliser le bouton rotatif pour régler le
volume.
Mode radio :
Appui bref : sélection de la station préréglée précédente.
Appui prolongé : diminution du volume du lecteur. Le volume standard est réglé au maximum :
nous vous conseillons de le garder au maximum et d’utiliser le bouton rotatif pour régler le
volume.
9. Touche PISTE SUIVANTE :
Mode lecteur :
Appui bref :
Lecture normale : sélection de la piste suivante.
Sélection du dossier : sélection du dossier suivant.
Appui prolongé : vous permet de parcourir la piste à une vitesse plus rapide.
Mode Bluetooth :
Appui bref : sélection de la piste suivante.
Appui prolongé : augmentation du volume du lecteur. Le volume standard est réglé au
maximum : nous vous conseillons de le garder au maximum et d’utiliser le bouton rotatif pour
régler le volume.
Mode radio :
Appui bref : sélection de la station préréglée suivante.
Appui prolongé : augmentation du volume du lecteur. Le volume standard est réglé au
maximum : nous vous conseillons de le garder au maximum et d’utiliser le bouton rotatif pour
régler le volume.
10. RÉCEPTEUR INFRAROUGE : reçoit les signaux infrarouges de la télécommande. Pour utiliser de
façon optimale la télécommande infrarouge, un second récepteur infrarouge est situé sur la façade de
l’appareil.
11. ANTENNE RADIO FM : connectez ici l’antenne FM pour obtenir une bonne réception radio. Si la radio
n’est pas utilisée, elle n’est pas nécessaire.
12. ANTENNES DES MICROPHONES SANS FIL : Le système de sonorisation PPA-101 est doté de
2 microphones sans fil, chacun avec sa propre antenne de réception. Les deux antennes doivent être
rangées dans le compartiment à l’arrière de l’appareil pendant son transport.
13. TÉMOIN LED DE SIGNAL RF : allumé lors de la réception du signal d’un microphone sans fil. Si ce
témoin LED est éteint alors que le microphone est allumé, 3 raisons sont possibles :
Le microphone sans fil et le récepteur utilise un canal différent : réglez les deux appareils sur le
même canal !
Les piles du microphone sans fil sont épuisées : remplacez les piles.
Le microphone sans fil est hors de portée : rapprochez le microphone sans fil du récepteur.
14. RÉGLAGES DE LA TONALITÉ [HIGH/LOW] : sur chaque égaliseur à 2 bandes de chaque voie
d’entrée. La plage de réglage est de +/-15 dB pour les fréquences basses et les fréquences hautes.
15. RÉGLAGE DU NIVEAU D’ENTRÉE : sur la commande de niveau de chaque voie d’entrée. Veillez à
régler le bouton rotatif de niveau à zéro avant de connecter une nouvelle source audio. Après
connexion, tournez lentement le bouton rotatif de niveau.
JB SYSTEMS® 11/39 PPA-101
Page 14
FRANCAIS GUIDE D’UTILISATION
16. RÉGLAGE DE NIVEAU [MASTER] : volume principale pour toutes les entrées audio.
17. MIC PRIORITY/[TALKOVER] : utilisez ce sélecteur pour réduire automatiquement la musique du
lecteur interne et de l’entrée de ligne lorsque vous parlez dans le(s) microphone(s). Il ne sera pas
nécessaire de réduire manuellement le volume de la musique alors que vous parlez au public.
18. [TALKOVER DAMPING] : la commande est utilisée pour régler le gain de réduction du volume de la
musique alors que vous parlez dans un microphone.
19. ENTRÉE DE MICROPHONE EXTERNE : Cette entrée accepte en même temps les microphones
symétriques et asymétriques. Vous pouvez utiliser la prise de ¼" et les connecteurs mâles XLR à 3
broches. Réglez toujours d’abord le bouton rotatif du volume à zéro, puis tournez-le jusqu’au niveau de
volume souhaité.
20. SÉLECTEUR [EXT. MIC/W.MIC1] : sélectionner le microphone à utiliser. Sur la position gauche, le
microphone externe est utilisé. Sur la position droite, le microphone sans fil est utilisé.
21. ENTRÉE [LINE] : Cette entrée accepte en même temps les signaux audio de niveau de ligne
symétrique (XLR à 3 broches) et asymétrique (prise RCA, cinch ou mini-jack 3,5 mm) tels que : un
lecteur CD, une radio, un lecteur MP3... Réglez toujours d’abord le bouton rotatif du volume à zéro,
puis tournez-le jusqu’au niveau de volume souhaité.
22. SORTIE [LINE] : Cette sortie symétrique (XLR à 3 broches) permet de connecter ensemble plusieurs
caissons de haut-parleur.
23. COMMUTATEUR [BATTERY] : il permet de se conformer à la règlementation qui prévoit que les
batteries ne doivent pas être branchées pendant un long transport. Afin de vous éviter d’ouvrir le
compartiment de la batterie pour la débrancher, nous avons installé ce commutateur.
IMPORTANT : au moment du déballage du système de sonorisation PPA-101, ce commutateur
est sur la position « OFF » et aucune batterie n’est installée. Pour alimenter l’appareil par
batterie : installez d’abord une batterie (en option, voir plus loin) et placez le commutateur de la
batterie sur la position « ON », sinon il ne sera pas possible d’utiliser et/ou charger la batterie !
24. TÉMOIN LED [CHARGE] : il indique que la batterie interne est en charge.
25. TÉMOIN LED [FULL] : il indique que la batterie interne est entièrement chargée.
26. TÉMOIN LED [UVL] : [(UnderVoltage Led) ou (témoin LED de tension basse)] indique que la tension
de la batterie interne est inférieure au niveau minimum, en d’autres termes : la batterie est épuisée et
doit être rechargée. Lorsque le témoin LED [UVL] est allumé, l’appareil ne peut pas être allumé.
!!! NE JAMAIS RANGER L’APPAREIL AVEC LA BATTERIE ÉPUISÉE : CHARGER D’ABORD LA
BATTERIE !!!
27. ENTRÉE DE BATTERIE DE VOITURE 12 V : il est possible de brancher le système de sonorisation
PPA-101 à la sortie 12 V CC de votre voiture. Utilisez le câble 12 V fourni pour brancher l’appareil à la
prise d’allume-cigare de votre voiture.
28. COMMUTATEUR MARCHE/ARRÊT [POWER] : il permet d’allumer ou d’éteindre l’appareil.
29. TÉMOIN LED [POWER] : il indique que l’appareil est allumé.
30. ENTRÉE SECTEUR : Entrée secteur avec prise CEI et porte-fusible intégré. Branchez le câble secteur
ici.
JB SYSTEMS® 12/39 PPA-101
Page 15

FRANCAIS GUIDE D’UTILISATION
31. INDICATEUR DES PILES - MICRO SANS FIL : les microphones sans fil fonctionnent avec 2 piles AA.
Lorsque les piles sont neuves (pleines), l’indicateur « LOW » est éteint. Si l’indicateur s’allume, les piles
sont presque épuisées et doivent être remplacées. L’indicateur « POW » est allumé lorsque le
microphone est allumé.
32. COMMUTATEUR D’ALIMENTATION - MICRO SANS FIL : ce microphone à main sans fil prévoit
2 positions :
OFF : cette position est utilisé lorsque le microphone n’est pas employé.
ON : le microphone est entièrement opérationnel (envoi du signal RF + audio)
33. PILES - MICRO SANS FIL : les microphones sans fil dispose d’un petit compartiment des piles. Faite-
le glisser avec soin pour y accéder : insérez à l’intérieur 2 piles AA (alcaline ou piles rechargeables
NiMH). Contrôlez l’indicateur des piles pour vérifier leurs états.
34. MINI XLR À 3 BROCHES : connexion du microphone de casque fourni.
35. MICROPHONE DE CASQUE : fourni avec le système de sonorisation PPA-101. Il est possible d’utiliser
un second microphone à main plutôt que l’ensemble émetteur-ceinture/casque fourni. (disponible en
option)
36. POIGNÉE DE TRANSPORT : une poignée rétractable qui permet d’emporter le système de
sonorisation PPA-101 avec vous !
37. COMPARTIMENT DE RANGEMENT : petit compartiment situé dans la partie supérieure du système
de sonorisation PPA-101. Il permet de ranger facilement microphones sans fil, antennes,
télécommande infrarouge, câble de faible de dimension, etc.
TÉLÉCOMMANDE INFRAROUGE
A. LECTURE/PAUSE : appuyez ici pour mettre en lecture/pause,
fonction identique à la touche (5).
B. PISTE PRÉCÉDENTE/SUIVANTE : fonctions identiques aux touches
(8) et (9)
C. Touche EQ : choisir un des préréglages de l’égaliseur [Normal, Rock,
Pop, Classic, Country] du module lecteur. Nous vous recommandons
d’utiliser toujours le préréglage Normal !
D. Touches numérotées : accéder directement à une piste lors de
l’utilisation du lecteur MP3 interne.
E. Touches [CHANNEL] ± : en mode radio, elles vous permettent de
rechercher manuellement les stations radio.
F. Touches de volume : elle vous permettent de régler le volume de
sortie du module lecteur. Nous vous recommandons de régler le
volume au maximum (vol = 32) et d’agir plutôt sur le bouton rotatif de
niveau du mélangeur.
G. Touche [RPT] : Touche de réglage du mode de répétition, fonction
identique à la touche (7)
H. Touche [MODE] : fonction identique à la touche SOURCE (4)
Appuyez sur la touche [SOURCE] (4) jusqu’à ce que l’écran affiche le logo [BLUETOOTH®]
L’écran (3) affiche [« Not Connected ! »]
Activez la fonction [Bluetooth] de votre téléphone intelligent/tablette et recherchez les dispositifs
[Bluetooth].
Le système de sonorisation PPA-101 se présentera avec le nom [« Bluetooth »] :
Connectez-vous au système de sonorisation PPA-101 : l’écran (3) du PPA-01 affichera [« Connected ! »]
Le système est prêt à l’emploi !
JB SYSTEMS® 13/39 PPA-101
Page 16

FRANCAIS GUIDE D’UTILISATION
BATTERIE RECHARGEABLE
Il est possible d’alimenter le système de sonorisation PPA-101 avec une batterie rechargeable plomb/acide
en option. Cette batterie plomb/acide peut être commandée séparément auprès de JB Systems ou il est
possible de l’acheter dans votre magasin local.
DIMENSIONS, CAPACITÉ DE LA BATTERIE : (L x l x H) 150 x 65 x 95 mm, 12 V CC/7 Ah
INSTALLATION DE LA BATTERIE
Veillez à ce que le système de sonorisation PPA-101 ne soit pas
branché au secteur.
Ouvrez le compartiment de rangement (37) : vous trouverez sur
l’arrière un panneau plastique.
Desserrez les 6 vis (K) et retirez le panneau plastique.
2 fils sont disposés à l’intérieur : 1 fil noir + 1 fil rouge.
Installez la batterie plomb/acide dans le compartiment avec les
deux contacts dirigés vers la droite.
Connectez le fil ROUGE au contact ROUGE (parfois indiqué par
« + ») à la batterie (L).
Connectez le fil NOIR au contact NOIR (parfois indiqué par « - ») à
la batterie (L).
Remontez le panneau plastique et resserrez les 6 vis.
Fermez le compartiment de rangement
Placez le commutateur de la batterie (23) sur la position « ON »
Branchez le système de sonorisation PPA-101 au secteur pour charger la batterie : l’indicateur
[CHARGE] (24) s’allume.
Lorsque l’indicateur [FULL] (25) s’allume, la batterie est entièrement chargée et prête à l’emploi.
TRÈS IMPORTANT : RECHARGER LA BATTERIE
Afin de prolonger la durée de vie de la batterie, il est très important de ne JAMAIS ranger l’appareil
avec une batterie épuisée ! Rappelez-vous de ranger TOUJOURS l’appareil avec une batterie
entièrement chargée. Si l’appareil reste inutilisé de façon prolongée, rechargez-la tous les 3 mois !
AUCUNE garantie n’est offerte sur la batterie rechargeable !
RECHARGER LA BATTERIE :
Placez le commutateur de la batterie (23) sur la position « ON »
Branchez le système de sonorisation PPA-101 au secteur pour charger la batterie : l’indicateur
[CHARGE] (24) s’allume.
Lorsque l’indicateur [FULL] (25) s’allume, la batterie est entièrement chargée et prête à l’emploi.
Remarque : la charge sera plus rapide si le commutateur d’alimentation (28) est sur la position « OFF ».
JB SYSTEMS® 14/39 PPA-101
Page 17

FRANCAIS GUIDE D’UTILISATION
Mémoire USB :
< 32 Go : au format FAT16/FAT32
Carte SD :
SD + SDHC < 32 Go : au format FAT16/FAT32
Fichiers audio pris en charge :
WMA, MP3 (à différents taux d’échantillonnage,
jusqu’à 320 kbit/s)
Plage de fréquence radio FM :
de 87,5 à 108 MHz
Incréments de syntonisation radio FM :
0,1 MHz
Pile de rechange pour la télécommande
infrarouge :
Pile CR2025 3 V (incluse)
Microphones sans fil - Fréquence RF :
UHF, 863-865 MHz
Fréquence sans fil MIC1
(microphone à main)
863,35 MHz
Fréquence sans fil MIC2
(émetteur-ceinture)
864,80 MHz
Puissance de l’amplificateur
50 W rms
Réponse en fréquence (+/-3 dB)
de 50 à 20 000 Hz
THD (1 kHz/1 W)
0,2 %
Sensibilité d’entrée de ligne
1V
Sensibilité d’entrée de microphone
15mV
Impédance d’entrée
20 kΩ
Ratio S/B (microphone désactivé)
> 85 dB
Refroidissement
Refroidissement par air naturel
Entrée de microphone
XLR/jack symétrique/asymétrique
Entrée de ligne
Prise XLR symétrique/asymétrique à 3 broches +
jack stéréo 3,5 mm
Sortie de ligne
XLR symétrique/asymétrique à 3 broches
Fusible (5 x 20 mm)
F 5 A/250 V
Alimentation
115 - 230 V CA 50/60 Hz
Dimensions H x L x P
550 x 325 x 280 mm
Poids
15,5 kg
SPÉCIFICATIONS
Cet appareil ne produit pas d’interférences radio. Cet appareil répond aux exigences des directives
européennes et nationales en vigueur. La conformité a été établie et les déclarations et documents
correspondants ont été déposés par le fabricant.
Toutes les informations peuvent être modifiées sans préavis
Vous pouvez télécharger la dernière version de ce manuel sur notre site web : www.jb-systems.eu
JB SYSTEMS® 15/39 PPA-101
Page 18

NEDERLANDS GEBRUIKSAANWIJZING
GEBRUIKSAANWIJZING
Hartelijk dank voor de aankoop van dit product van JB Systems®. Lees deze gebruiksaanwijzing zeer
zorgvuldig door, om volledig van alle mogelijkheden te kunnen profiteren.
EIGENSCHAPPEN
Compact, accugevoed, draagbaar PA-systeem.
Perfect voor scholen, zakelijke presentaties, …
Bluetooth voor gebruik met allerlei soorten draagbare apparatuur, zoals smartphones.
2 draadloze microfoons: 1 handmicrofoon + 1 riempack met hoofdtelefoon met microfoon inbegrepen.
USB-speler met ondersteuning voor MP3 en WMA.
FM-radio met voorkeuzestations.
De IR-afstandsbediening (radio/USB-speler) kan ook worden gebruikt als u voor de luidspreker staat.
Geïntegreerd mengpaneel met:
1 bekabelde microfooningang
1 lijn-/AUX-ingang: XLR + RCA + miniklinkstekker 3,5 mm.
2-bands equalizers op alle ingangskanalen.
Gebalanceerd uitgang om extra actieve luidsprekers aan te kunnen sluiten.
Klasse D versterker, 50 W.
Uitstekende geluidskwaliteit dankzij aparte woofer/tweeter 2-weg luidsprekercombinatie.
Gemakkelijk te transporteren dankzij de telescopische handgreep en wielen!
Vak voor het opbergen van kabels en draadloze microfoons.
Geïntegreerde oplader voor de (optionele) herlaadbare accu.
230 V wisselspanning lichtnetaansluiting.
Ingang 12 V gelijkspanning voor gebruik op een autoaccu; kabel inbegrepen.
Kan bovenop iedere luidsprekerstandaard met een staander van 35 mm worden geplaatst.
VOOR HET GEBRUIK
Controleer het apparaat voordat u het in gebruik neemt op transportschade. Als er schade is, gebruik het
apparaat dan niet en raadpleeg eerst uw dealer.
Belangrijk: Dit apparaat verliet de fabriek in perfecte staat en goed verpakt. Het is absoluut noodzakelijk
dat de gebruiker de veiligheidsinstructies en waarschuwingen in deze gebruiksaanwijzing strikt opvolgt.
Enige schade als gevolg van verkeerde behandeling valt niet onder de garantie. De dealer accepteert
geen verantwoording voor eventuele fouten of problemen die worden veroorzaakt door het niet naleven
van deze gebruiksaanwijzing.
Bewaar dit boekje op een veilige plaats om het in de toekomst te kunnen raadplegen. Als u het apparaat
verkoopt, voeg dan deze gebruiksaanwijzing bij.
Probeer ter bescherming van het milieu het verpakkingsmateriaal zoveel mogelijk te recyclen.
Controleer de inhoud:
Controleer of de doos de volgende artikelen bevat:
Gebruiksaanwijzing
PPA-101
IR-afstandsbediening
1 draadloze handmicrofoon;
1 draadloos riempack met hoofdtelefoon met microfoon;
2 antennes voor draadloze ontvangers;
1 FM-antenne;
1 netsnoer voor sigarettenaansteker in de auto voor 12 V gelijkspanning;
JB SYSTEMS® 16/39 PPA-101
Page 19

NEDERLANDS GEBRUIKSAANWIJZING
LET OP: Open het apparaat niet, om het risico op elektrische
schokken te verminderen. Er bevinden zich geen door de gebruiker
te repareren onderdelen in het apparaat. Laat het onderhoud alleen
door gekwalificeerd onderhoudspersoneel uitvoeren.
De bliksemschicht met pijlpunt in een gelijkzijdige driehoek is bedoeld om de gebruiker te
waarschuwen voor de aanwezigheid van ongeïsoleerde “gevaarlijke spanning” binnen de
behuizing van het apparaat, die van voldoende omvang kan zijn om een risico op elektrische
schokken te vormen.
Het uitroepteken in een gelijkzijdige driehoek is bedoeld om de gebruiker te waarschuwen voor
de aanwezigheid van belangrijke gebruiks- en onderhouds- (reparatie) aanwijzingen in de
documentatie die bij dit apparaat is gevoegd.
Dit symbool betekent: alleen gebruik binnenshuis
Dit symbool betekent: Lees de instructies
Deze luidspreker kan zeer eenvoudig geluidsdrukniveaus (SPL) reproduceren, die
krachtig genoeg zijn om ernstige en permanente gehoorbeschadiging te veroorzaken.
Bescherm altijd uw oren wanneer u langdurig wordt blootgesteld aan SPL van meer dan
85 dB!
VEILIGHEIDSINSTRUCTIES:
Ook al is de luidsprekerkast gemaakt van waterbestendig materiaal, de woofer en tweeter zijn niet
beschermd tegen vocht en regen. Daarom is deze luidspreker uitsluitend bestemd voor gebruik
binnenshuis; het gebruik van dit product buitenshuis of in vochtige omstandigheden maakt alle garanties
ongeldig.
Monteer deze luidspreker altijd op een veilige en stabiele wijze.
Wees extra voorzichtig wanneer de de kasten worden opgehangen. Dit kan gevaarlijk zijn en moet
uitsluitend worden uitgevoerd door elektromonteurs die kennis hebben van de technieken en
voorschriften m.b.t. het hijsen van luidsprekers!
Stel dit apparaat niet bloot aan regen of vocht, om risico op brand of elektrische schokken te voorkomen.
Als het apparaat na transport in een warme ruimte wordt gebracht, wacht dan tot het aan de
omgevingstemperatuur is aangepast, om te voorkomen dat er binnen het apparaat condens wordt
gevormd. Condens kan soms verhinderen dat het apparaat op volle capaciteit werkt of kan zelfs schade
veroorzaken.
Zorg ervoor dat er geen metalen voorwerpen of vloeistoffen in het apparaat terechtkomen. Er mogen
geen met vloeistoffen gevulde voorwerpen, zoals vazen, op dit apparaat worden geplaatst. Dit kan
elektrische schokken of storing veroorzaken. Als er voorwerpen van buitenaf in het apparaat
terechtkomen, haal dan onmiddellijk de stekker uit het stopcontact.
Plaats geen voorwerpen met open vuur, zoals brandende kaarsen, op het apparaat.
Bedek geen ventilatieopeningen, omdat dit tot oververhitting kan leiden.
Voorkom het gebruik in stoffige omgevingen en maak het apparaat regelmatig schoon.
Houd het apparaat buiten het bereik van kinderen.
Onervaren personen mogen dit apparaat niet bedienen.
De maximale veilige omgevingstemperatuur is 40 °C. Gebruik dit apparaat niet bij hogere
omgevingstemperaturen.
Haal de stekker van het apparaat altijd uit het stopcontact wanneer het voor langere tijd niet wordt
gebruikt of voordat u er onderhoud aan pleegt.
De elektrische installatie dient alleen door gekwalificeerd personeel en in overeenstemming met de
voorschriften voor elektrische en mechanische veiligheid in uw land te worden uitgevoerd.
Controleer dat de beschikbare spanning niet hoger is dan aangegeven op het achterpaneel van het
apparaat.
Het stopcontact dient bereikbaar te blijven om het apparaat van het lichtnet te kunnen ontkoppelen.
Het netsnoer dient altijd in perfecte staat te zijn. Schakel het apparaat onmiddellijk uit als het netsnoer is
geplet of beschadigd. Het moet door de fabrikant, zijn vertegenwoordiger, of door een vergelijkbaar
bevoegde persoon worden vervangen, om gevaar te vermijden.
Laat het netsnoer nooit met andere kabels in contact komen!
Wanneer de aan-uitschakelaar in de stand OFF (UIT) staat, is dit apparaat niet volledig van het lichtnet
afgesloten!
Dit apparaat moet worden geaard om aan de veiligheidsvoorschriften te voldoen.
Open het apparaat niet, om elektrische schokken te voorkomen. Er bevinden zich geen door de gebruiker
te repareren onderdelen in het apparaat.
JB SYSTEMS® 17/39 PPA-101
Page 20

NEDERLANDS GEBRUIKSAANWIJZING
Repareer nooit een zekering en overbrug nooit de zekeringhouder. Vervang een kapotte zekering altijd
door een zekering van hetzelfde type en met dezelfde elektrische specificaties!
Als er zich ernstige problemen voordoen met de werking van het apparaat, gebruik het dan niet en neem
onmiddellijk contact op met uw dealer.
Gebruik de originele verpakking als het apparaat moet worden vervoerd.
Het is om veiligheidsredenen verboden om onbevoegde modificaties aan het apparaat aan te brengen.
FUNCTIES
1. USB-ingang: hier kunt u een USB-stick op aansluiten. Zodra het opslagmedium is geplaatst, geeft het
scherm “Read Device (Lezen apparaat)” weer. Daarna wordt gelijk het laatst afgespeelde nummer
afgespeeld.
Belangrijke opmerking: het USB-geheugen moet in FAT16 of FAT32 zijn geformatteerd. Als de
nieuwe USB-stick niet wordt gedetecteerd, formatteer hem dan eerst op een Windows PC.
2. Ingang voor SD-kaart: hier kunt u een SD- of SDHC-kaart plaatsen. Voer de kaart voorzichtig in met
de bovenkant (bedrukte kan) naar links. Zodra het opslagmedium is geplaatst, geeft het scherm “Read
Device (Lezen apparaat)” weer. Daarna wordt gelijk het laatst afgespeelde nummer afgespeeld.
Belangrijke opmerking: De SD-kaart moet in FAT16 or FAT32 zijn geformatteerd. Als de nieuwe SDkaart niet wordt gedetecteerd, formatteer hem dan eerst op een Windows PC.
3. LCD-SCHERM: Geeft nuttige informatie over de muziek of radiostations die worden weergegeven.
4. [SOURCE]-toets: druk op deze toets om MP3-speler, Bluetooth of FM-tuner (radio) te selecteren.
5. AFSPELEN/PAUZE-toets:
Bediening van de speler: om het huidige nummer te starten/pauzeren.
Bediening Bluetooth: om het huidige nummer te starten/pauzeren.
Radiostand: De tuner scant de FM-band en programmeert de FM-voorkeuzestations automatisch.
Druk nogmaals om het scannen te stoppen.
6. [FOLDER]-toets: wordt alleen gebruikt als de audiospeler actief is. Wordt gebruikt om het scherm in de
mapmodus te zetten. Gebruik de NUMMER-toetsen om door de mappen en nummers te bladeren.
Gebruik de [FOLDER]-toets weer om de gewenste map of het gewenste nummer te selecteren.
JB SYSTEMS® 18/39 PPA-101
Page 21

NEDERLANDS GEBRUIKSAANWIJZING
7. HERHAAL-toets: wordt alleen gebruikt als de audiospeler actief is. Druk deze toets om één van de
verschillende willekeurige modi te selecteren:
[REPEAT ONE]: herhaal het huidige nummer.
[REPEAT FOLDER]: herhaal de huidige map.
[REPEAT ALL]: Herhaal alle nummers in het USB-geheugen. Dit is de “standaard” afspeelmodus.
[REPEAT RANDOM]: speel alle nummers in willekeurige volgorde af.
8. Toets VORIG NUMMER:
Bediening speler:
Druk kort:
Normale weergave: Selecteer het vorige nummer.
Selecteer de map: Selecteer de vorige map.
Druk langer: u kunt in het nummer op hogere snelheid zoeken.
Bediening Bluetooth:
Druk kort: selecteer het vorige nummer.
Druk langer: verlaag het volume van de speler. Het volume is standaard ingesteld op het
maximum: wij bevelen aan om het volume op het maximum te houden en de draaiknop te
gebruiken om het volume te regelen.
Radiostand:
Druk kort: selecteer het vorige voorkeuzestation.
Druk langer: verlaag het volume van de speler. Het volume is standaard ingesteld op het
maximum: wij bevelen aan om het volume op het maximum te houden en de draaiknop te
gebruiken om het volume te regelen.
9. Toets VOLGEND NUMMER:
Bediening speler:
Druk kort:
Normale weergave: Selecteer het volgende nummer.
Selecteer de map: Selecteer de volgende map.
Druk langer: u kunt in het nummer op hogere snelheid zoeken.
Bediening Bluetooth:
Druk kort: selecteer het volgende nummer.
Druk langer: verhoog het volume van de speler. Het volume is standaard ingesteld op het
maximum: wij bevelen aan om het volume op het maximum te houden en de draaiknop te
gebruiken om het volume te regelen.
Radiostand:
Druk kort: selecteer het volgende voorkeuzestation.
Druk langer: verhoog het volume van de speler. Het volume is standaard ingesteld op het
maximum: wij bevelen aan om het volume op het maximum te houden en de draaiknop te
gebruiken om het volume te regelen.
10. IR-ONTVANGER: Ontvangt de IR-signalen van de afstandsbediening. Voor optimaal gebruik van de
IR-afstandsbediening bevindt er zich een tweede IR-ontvanger aan de voorkant van het apparaat.
11. ANTENNE FM-RADIO: sluit de FM-antenne hier aan voor goede radio-ontvangst. Niet nodig als de
radio niet wordt gebruikt.
12. ANTENNES VOOR DRAADLOZE MICROFOONS: De PPA-101 is voorzien van 2 draadloze
microfoons, ieder met zijn eigen ontvangstantenne. Beide antennes dienen tijdens het transport in het
vak aan de achterkant van het apparaat te worden opgeborgen.
13. RF-SIGNAAL-LED: brandt wanneer er een signaal van de draadloze microfoon wordt ontvangen. Als
deze LED uit is wanneer de draadloze microfoon wordt ingeschakeld, kan dit 3 oorzaken hebben:
De draadloze microfoon en de ontvanger gebruiken verschillende kanalen: stel ze allebei op
hetzelfde kanaal in!
De batterijen in de draadloze microfoon zijn bijna leeg: vervang de batterijen.
De draadloze microfoon is buiten bereik: breng de draadloze microfoon dichter bij de ontvanger.
14. [HIGH/LOW] TOONREGELING: aparte 2-bands equalizers op alle ingangen. Het regelbereik is +/-15
dB voor zowel de hoge als de lage frequenties.
15. INGANGSNIVEAUS: aparte niveauregelaars voorde verschillende ingangskanalen. Zorg ervoor om de
niveauknop op nul te zetten voordat een nieuwe geluidsbron wordt aangesloten. Verhoog na het
aansluiten langzaam het niveau.
16. [MASTER]-NIVEAU: mastervolume voor alle audioingangen.
17. PRIORITEIT MICROFOON/[TALKOVER]:gebruik deze toets om de muziek van de interne speler en
lijningang automatisch te reduceren wanneer er door de microfoon(s) wordt gesproken. U hoeft de
muziek niet handmatig uit te faden wanneer u tegen het publiek praat.
JB SYSTEMS® 19/39 PPA-101
Page 22

NEDERLANDS GEBRUIKSAANWIJZING
18. [TALKOVER DAMPING]: wordt gebruikt om te regelen hoeveel het volume van de muziek wordt
gereduceerd als er in de microfoon wordt gesproken.
19. INGANG VOOR EXTERNE MICROFOON: Deze ingang is geschikt voor zowel gebalanceerde als
ongebalanceerde microfoons. U kunt zowel 6,35 mm (¼ inch) klinkstekkers als mannelijke 3-polige
XLR-connectors gebruiken. Draai de volumeknop altijd eerst op nul; draai hem daarna langzaam naar
het gewenste niveau.
20. [EXT. MIC/W.MIC1] SELECTIE: wordt gebruikt om te selecteren welke microfoon u wilt gebruiken. In
de linker stand kunt u een externe microfoon gebruiken; in de rechter stand wordt de draadloze
microfoon gebruikt.
21. [LINE]-INGANG: Deze ingang is zowel geschikt voor gebalanceerde (3-pens-XLR) en
ongebalanceerde (tulp of 3,5 mm stereo miniklinkstekkers) audiosignalen van lijnniveau, zoals: CDspeler, tuner, MP3-speler, ... Draai de volumeknop altijd eerst op nul; draai hem daarna langzaam naar
het gewenste niveau.
22. [LINE]-UITGANG: Met deze gebalanceerde uitgang (3-pins-XLR) is het mogelijk om verschillende
luidsprekerkasten op elkaar aan te sluiten.
23. [BATTERY]-SCHAKELAAR: om aan de voorschriften te voldoen, mogen de accu's tijdens vervoer
over lange afstanden niet zijn aangesloten. Om te voorkomen dat u het accuvak moet openen om de
accu's aan te sluiten, hebben wij een accuschakelaar geïnstalleerd.
BELANGRIJK: bij het uitpakken van de PPA-101 staat deze schakelaar op OFF (UIT) en is er
geen accu geïnstalleerd. Voor gebruik met accu: plaats eerst een accu (optioneel; zie verder)
en zet de accuschakelaar in de stand ON (AAN), anders kunt u de accu niet gebruiken en/of
opladen!
24. [CHARGE]-LED: geeft aan dat de interne accu wordt opgeladen.
25. [FULL]-LED: geeft aan dat de interne accu volledig is opgeladen.
26. [UVL]-LED: [(UnderVoltage LED)] geeft aan dat de spanning van de interne accu onder het minimum
niveau terecht is gekomen; met andere woorden: de accu is leeg en moet worden opgeladen. Als de
[UVL]-LED aan is, kan het apparaat niet worden ingeschakeld.
!!! BERG HET APPARAAT NOOIT OP MET LEGE ACCU'S: LAAD DE ACCU EERST OP!!!
27. INGANG VOOR 12 V AUTOACCU: u kunt de PPA-101 ook aansluiten op de 12 V gelijkspanning
sigarettenaansteker van uw auto. Gebruik de meegeleverde 12 V kabel om het apparaat aan te sluiten
op de aansluiting voor de sigarettenaansteker van uw auto.
28. [POWER] AAN-/UITSCHAKELAAR: schakelt het apparaat in/uit.
29. [POWER]-LED: geeft aan dat het apparaat is ingeschakeld.
30. LICHTNETAANSLUITING: Lichtnetaansluiting met IEC-aansluiting en geïntegreerde zekeringhouder;
sluit hier het meegeleverde netsnoer op aan.
31. WMIC BATTERIJ-INDICATOR: de draadloze microfoons (dmic) werkt op 2 AA-batterijen. Als de
batterijen in goede staat (vol) zijn, is de LOW-indicator uit. Zodra het indicatielampje brandt, raken de
batterijen leeg en moeten ze worden vervangen. Als de microfoon is ingeschakeld, brandt de POWERindicator.
32. DMIC-SCHAKELAAR: deze draadloze handmicrofoon is voorzien van 2 standen:
OFF (UIT): de stand die moet worden gebruikt wanneer de microfoon niet wordt gebruikt.
AAN: de microfoon is volledig functioneel (zendt een RF-signaal + audio).
JB SYSTEMS® 20/39 PPA-101
Page 23

NEDERLANDS GEBRUIKSAANWIJZING
33. DMIC – BATTERIJEN: de draadloze microfoons zijn voorzien van een klein batterijvak. Schuif het
voorzichtig open om toegang te krijgen: u kunt 2 AA-batterijen plaatsen (Alkaline of NiMH herlaadbare
batterijen). Zie het indicatielampje voor de batterijen om de toestand van de batterijen te controleren.
34. 3-PENS MINI XLR: wordt gebruikt om de microfoon van de meegeleverde hoofdtelefoon aan te sluiten.
35. HOOFDTELEFOON MET MICROFOON: is inbegrepen bij de PPA-101. U kunt in plaats van de
meegeleverde combinatie van hoofdtelefoon met microfoon/riempack ook een tweede handmicrofoon
gebruiken. (leverbaar als optie)
36. DRAAGHANDGREEP: een uitschuifbare handgreep, waardoor de PPA-101 gemakkelijk mee kan
worden genomen!
37. OPBERGVAK: een klein vak bovenop de PPA-101. Voor het gemakkelijk opbergen van de draadloze
microfoons, antenne, IR-afstandsbediening, kleine kabels, …
IR-AFSTANDSBEDIENING
A. AFSPELEN/PAUZE: druk om de weergave te starten/pauzeren;
hetzelfde als toets (5).
B. VORIGE/VOLGENDE NUMMER: hetzelfde als toetsen (8) en (9)
C. EQ-toets: wordt gebruikt om één van de EQ-voorinstellingen op de
afspeelmodule te selecteren: [Normal, Rock, Pop, Classic, Country].
Wij bevelen aan om altijd de instelling Normal te gebruiken!
D. NUMERIEKE toetsen: u kunt deze gebruiken om bij gebruik van de
geïntegreerde MP3-speler directe toegang tot bepaalde nummers te
krijgen.
E. [CHANNEL] ±-toetsen: in de tunermodus kunt u handmatig naar
radiostations zoeken.
F. VOLUME-toetsen: worden gebruikt het uitgangsvolume van de
spelermodule aan te passen. Wij bevelen aan om het volume op het
maximale niveau (vol = 32) te houden, en in plaats hiervan de
niveauknop op het mengpaneel te gebruiken.
G. [RPT]-toets: REPEAT-toets, hetzelfde als toets (7).
H. [MODE]--toets: dezelfde functie als de SOURCE-toets (4)
Druk de [SOURCE]-toets (4) totdat het scherm het [BLUETOOTH® ] logo weergeeft.
Het scherm (3) geeft [“Not Connected!”] aan.
Activeer de [Bluetooth]-functie op uw smartphone/tablet en zoek naar [Bluetooth]-toestellen.
De PPA-101 verschijnt met de naam [“Bluetooth”]:
Maak een verbinding met de PPA-101: het scherm (3) op de PPA-101 geeft [“Connected!”] aan.
Gereed voor gebruik!
JB SYSTEMS® 21/39 PPA-101
Page 24

NEDERLANDS GEBRUIKSAANWIJZING
HERLAADBARE ACCU
De PPA-101 kan werken door gebruik te maken van een optionele herlaadbare zuur-loodaccu. Dez zuurloodaccu kan apart bij JB Systems worden besteld of u kent hem bij uw lokale leverancier kopen.
AFMETINGEN/CAPACITEIT VAN DE ACCU: (L x B x H) 150 x 65 x 95 mm ~ 12 V gelijkspanning/7 Ah.
HET INSTALLEREN VAN DE ACCU
Zorg ervoor dat de PPA-101 niet op het lichtnet is aangesloten.
Open het opbergvak (37): aan de achterkant ziet u een kunststof
paneel.
Verwijder de 6 schroeven (K) en verwijder het kunststof paneel.
Aan de binnenkant ziet u 2 draden: 1 zwarte draad + 1 rode draad.
Plaats de zuur-loodaccu in het vak, waarbij de 2 contacten naar
rechts wijzen.
Sluit de RODE draad aan op het RODE contact (soms gemarkeerd
met “+”) op de accu (L).
Sluit de ZWARTE draad aan op het ZWARTE contact (soms
gemarkeerd met “-”) op de accu (L).
Breng het kunststof paneel weer aan met de 6 schroeven.
Sluit het opbergvak.
Zet de accuschakelaar (23) in de stand ON (AAN).
Sluit de PPA-101 aan op het lichtnet om de accu op te laden: de [CHARGE]-indicator (24) brandt.
Als de [FULL]-indicator (25) aan gaat, is de accu vol en gereed voor gebruik.
ZEER BELANGRIJK: HET HERLADEN VAN DE ACCU.
Om de levensduur van de accu te verlengen, is het erg belangrijk om het apparaat NOOIT met een
lege accu op te slaan! Dus onthoudt om het apparaat ALTIJD met een volledig opgeladen accu op te
slaan. Herlaad de accu iedere 3 maanden als het apparaat voor langere tijd wordt opgeslagen! Er is
geen garantie op de herlaadbare accu!
HET HERLADEN VAN DE ACCU:
Zet de accuschakelaar (23) in de stand ON (AAN).
Sluit de PPA-101 aan op het lichtnet om de accu op te laden: de [CHARGE]-indicator (24) brandt.
Als de [FULL]-indicator (25) aan gaat, is de accu vol en gereed voor gebruik.
Opmerking: het opladen gaat sneller wanneer de aan-/uitschakelaar (28) in de stand OFF (UIT) staat.
JB SYSTEMS® 22/39 PPA-101
Page 25

NEDERLANDS GEBRUIKSAANWIJZING
USB-geheugen:
< 32GB – geformatteerd in FAT16/FAT32
SD-kaart:
SD + SDHC < 32GB – geformatteerd in FAT16/FAT32
Ondersteunde audiobestanden:
WMA, MP3 (verschillende samplefrequenties tot
maximaal 320 kbps)
Frequentiebereik FM-radio:
87,5 tot 108 MHz
Afstemstappen FM-radio:
0,1 MHz
Vervangingsbatterij IR-afstandsbediening:
CR2025 3V batterij (meegeleverd)
Draadloze microfoons – HF-frequentie:
UHF, 863-865 MHz
Frequentie draadloze microfoon 1
(handmicrofoon).
863,35 MHz
Frequentie draadloze microfoon 2 (riempack).
864,80 MHz
Vermogen versterker
50 W RMS
Frequentie bereik (+/-3 dB)
50 – 20.000 Hz
THD (1 kHz/1 W)
0,2%
Ingangsgevoeligheid lijn
1V
Ingangsgevoeligheid microfoon
15mV
Ingangsimpedantie
20 kOhm
Signaal/ruisverhouding (microfoon uit)
> 85 dB
Koeling
natuurlijke luchtkoeling
Microfooningang
Gebalanceerde/ongebalanceerde XLR/klinkstekker
Lijningang
Gebalanceerd/ongebalanceerde 3-pens XLR/3,5 mm
stereo klinkstekker.
Lijnuitgang
Gebalanceerd/ongebal anceerd XLR 3-pens
Zekering (5 x 20 mm)
F5 A/250 V
Stroomvoorziening
115 ~ 230 V wisselspanning 50/60 Hz
Afmetingen H x B x D
550 x 325 x 280 mm
Gewicht
15,5 kg
SPECIFICATIES
Dit apparaat is ontstoord. Dit apparaat voldoet aan de eisen van de huidige Europese en nationale
richtlijnen. De conformiteit werd vastgesteld en de desbetreffende verklaringen en documenten zijn door de
fabrikant gedeponeerd.
Alle informatie is onderhevig aan wijzigingen zonder voorafgaande kennisgeving.
U kunt de nieuwste versie van deze handleiding van onze website downloaden: www.jb-systems.eu
JB SYSTEMS® 23/39 PPA-101
Page 26

DEUTSCH BEDIENUNGSANLEITUNG
BEDIENUNGSANLEITUNG
Vielen Dank, dass Sie sich für dieses Produkt von JB Systems® entschieden haben. Bitte lesen Sie diese
Bedienungsanleitung aufmerksam durch, um alle Möglichkeiten des Geräts voll ausnutzen zu können.
EIGENSCHAFTEN
Kompaktes, batteriebetriebenes und tragbares Beschallungssystem.
Ideal für Schulen, Geschäftspräsentationen usw.
Bluetooth für den Einsatz mit allen Arten von tragbaren Geräten wie z. B. Smartphones.
2 drahtlose Mikrofone: 1 Handmikrofon + 1 Taschensender mit Headset im Lieferumfang enthalten.
USB-Player mit Unterstützung von MP3 und WMA.
UKW Radio mit Senderspeichern.
Die IR-Fernbedienung (Radio/USB-Player) kann auch verwendet werden, wenn Sie vor dem Lautsprecher
stehen.
Internes Mischpult mit:
1 kabelgebundenen Mikrofoneingang.
1 Line/AUX Eingang. XLR + RCA + Mini-Klinkenstecker 3,5 mm.
2 Bandequalizer für alle Eingangskanäle.
Symmetrischer Verbindungsausgang zum Anschluss zusätzlicher Aktivlautsprecher.
Klasse-D 50 W Verstärker.
Ausgezeichnete Tonqualität dank separater 2-Wege Tief-/Hochton-Lautsprecherkombination.
Leicht transportierbar dank Teleskophandgriff und Rädern!
Fach zur Aufnahme von Kabeln und drahtlosen Mikrofonen.
Internes Ladegerät für die (optionale) wiederaufladbare Batterie.
230 VAC Netzeingang.
12 VDC-Eingang zum Anschloss an die Autobatterie. Kabel im Lieferumfang enthalten.
Kann auf einen beliebigen Lautsprecherständer mit 35 mm Mast gestellt werden.
VOR GEBRAUCH
Vor der Erstbenutzung bitte das Gerät zuerst auf Transportschäden überprüfen. Sollte das Gerät einen
Schaden aufweisen, benutzen Sie es nicht, sondern wenden Sie sich unverzüglich an Ihren Händler.
Wichtiger Hinweis: Dieses Gerät hat das Werk unbeschädigt und gut verpackt verlassen. Es ist wichtig,
dass der Benutzer sich streng an die Sicherheitshinweise und Warnungen in der Bedienungsanleitung
hält. Schäden durch unsachgemäße Handhabung sind von der Garantie ausgeschlossen. Der Händler
übernimmt keine Verantwortung für Schäden, die durch Nichtbeachtung der Bedienungsanleitung
entstanden sind.
Die Bedienungsanleitung zum zukünftigen Nachschlagen bitte an einem sicheren Ort aufbewahren. Bei
Verkauf oder sonstiger Weitergabe des Geräts bitte die Bedienungsanleitung beifügen.
Aus Umweltschutzgründen die Verpackung bitte wiederverwenden oder richtig trennen.
Packungsinhalt prüfen:
Bitte überprüfen Sie, ob die Verpackung folgende Artikel enthält:
Bedienungsanleitung
PPA-101
IR-Fernbedienung
1 drahtloses Handmikrofon
1 drahtlosen Taschensender mit Headset-Mikrofon.
2 Antennen für drahtlose Empfänger
1 UKW-Antenne
1 Versorgungskabel für 12 VDC Autoanschluss
JB SYSTEMS® 24/39 PPA-101
Page 27

DEUTSCH BEDIENUNGSANLEITUNG
ACHTUNG: Um die Gefahr eines elektrischen Schlages zu
verringern, öffnen Sie nicht das Gehäuse. Im Geräteinneren
befinden sich keine vom Benutzer wartbaren Teile. Überlassen Sie
Reparatur- und Wartungsarbeiten dem qualifizierten Kundendienst.
Das Blitzsymbol innerhalb eines gleichseitigen Dreiecks warnt den Benutzer vor nicht isolierter
„gefährlicher Spannung“ im Innern des Produktgehäuses, die so stark sein kann, dass für
Personen die Gefahr von Stromschlägen besteht.
Das Ausrufezeichen im Dreieck weist den Benutzer auf wichtige Bedienungs- und
Wartungshinweise in den Dokumenten hin, die dem Gerät beiliegen.
Dieses Symbol bedeutet: Nur zur Benutzung in geschlossenen Räumen.
Dieses Symbol bedeutet: Die Bedienungsanleitung lesen.
Dieser Lautsprecher kann leicht Schalldruckpegel (SPL) erzeugen, die ausreichen, um zu
schweren und dauerhaften Gehörschäden zu führen. Schützen Sie stets Ihre Ohren, wenn
Sie für einen längeren Zeitraum Schalldruckpegeln von mehr als 85 dB ausgesetzt sind!
SICHERHEITSHINWEISE:
Auch wenn die Lautsprecherbox aus wasserdichtem Material besteht, sind der Subwoofer und Hochtöner
nicht gegen Feuchtigkeit und Regen geschützt. Aus diesem Grund ist dieser Lautsprecher nur zur
Verwendung in Innenräumen vorgesehen. Der Gebrauch dieses Produkts im Freien und in feuchten
Umgebungen lässt alle Gewährleistungen erlöschen.
Diesen Lautsprecher stets sicher und stabil befestigen.
Seien Sie besonders vorsichtig, wenn die Boxen aufgehängt werden. Das ist potenziell gefährlich und
sollte nur von Technikern durchgeführt werden, die Erfahrung mit den Techniken und Regeln der
Lautsprechermontage haben!
Zur Vermeidung von Feuer und Stromschlag das Gerät weder Regen noch Feuchtigkeit aussetzen.
Zur Vermeidung von Kondensation im Inneren des Geräts bitte nach dem Transport in eine warme
Umgebung einige Zeit zum Temperaturausgleich ausgeschaltet stehen lassen. Kondensation kann zu
Leistungsverlust des Geräts oder gar Beschädigungen führen.
Keine Metallgegenstände oder Flüssigkeiten ins Innere des Geräts gelangen lassen. Stellen Sie keine mit
Flüssigkeiten gefüllten Gegenstände (wie Vasen) auf dem Gerät ab. Ein Kurzschluss oder eine
Fehlfunktion können die Folge sein. Falls es doch einmal vorkommen sollte, bitte sofort den Netzstecker
ziehen und vom Stromkreis trennen.
Stellen Sie keine offenen Flammen (wie brennende Kerzen) auf dem Gerät ab.
Die Ventilationsöffnungen nicht abdecken, da Überhitzungsgefahr.
Nicht in staubiger Umgebung verwenden und regelmäßig reinigen.
Für Kinder unerreichbar aufbewahren.
Unerfahrene Personen dürfen das Gerät nicht bedienen.
Die Umgebungstemperatur darf 40°C nicht überschreiten. Das Gerät bei höheren Raumtemperaturen
nicht verwenden.
Stets den Netzstecker ziehen, wenn das Gerät für einen längeren Zeitraum nicht genutzt oder es
gewartet wird.
Die elektrische Installation darf nur von qualifiziertem Personal, unter Beachtung der Vorschriften zur
elektrischen und mechanischen Sicherheit in Ihrem Land durchgeführt werden.
Vergewissern Sie sich, dass die Netzspannung nicht höher ist, als auf dem Typenschild auf der
Geräterückseite angegeben.
Die Netzsteckdose soll immer für die Trennung vom Netz betriebsbereit sein.
Das Gerät nicht mit einem beschädigten Netzkabel in Betrieb nehmen. Wenn das Netzkabel gequetscht
oder beschädigt wurde, schalten Sie das Gerät sofort aus. Im Falle von Beschädigungen muss das
Netzkabel vom Hersteller, einem autorisierten Kundendienstmitarbeiter oder einer ähnlich qualifizierten
Person ersetzt werden, um Gefährdungen zu vermeiden.
Lassen Sie das Netzkabel niemals mit anderen Kabeln in Berührung kommen!
Wenn sich der Netzschalter in der Stellung OFF (Aus) befindet, ist dieses Gerät nicht vollständig vom
Netz getrennt!
Zur Einhaltung der Sicherheitsbestimmungen muss das Gerät geerdet sein.
Zur Vermeidung eines elektrischen Schlages nicht das Gehäuse öffnen. Im Geräteinneren befinden sich
keine zu wartenden Teile.
JB SYSTEMS® 25/39 PPA-101
Page 28

DEUTSCH BEDIENUNGSANLEITUNG
Eine Sicherung niemals reparieren oder überbrücken. Eine durchgebrannte Sicherung stets durch eine
Sicherung gleichen Typs und mit gleichen Spezifikationen ersetzen!
Bei erheblichen Problemen mit dem Gerät stellen Sie die Benutzung ein und wenden Sie sich an Ihren
Fachhändler.
Bei Transport bitte die Originalverpackung verwenden, um Schäden am Gerät zu vermeiden.
Aus Sicherheitsgründen dürfen an dem Gerät keine unbefugten Veränderungen vorgenommen werden.
FUNKTIONEN
1. USB-Eingang: Hier kann ein USB-Stick angeschlossen werden. Sobald das Speichergerät eingesteckt
wurde, zeigt das Display „Read Device“ an. Anschließend wird der zuletzt abgespielte Titel
wiedergegeben.
Wichtiger Hinweis: Das USB-Speichergerät sollte mit FAT16 oder FAT32 formatiert sein. Wenn ein
neuer USB-Stick nicht erkannt wurde, formatieren Sie ihn zunächst auf einem Windows-PC.
2. SD-CARD-Eingang: Hier kann eine SD- oder SDHC-Karte eingesteckt werden. Stecken Sie die Karte
vorsichtig mit der Oberseite (bedruckte Seite) nach links ein. Sobald das Speichergerät eingesteckt
wurde, zeigt das Display „Read Device“ an. Anschließend wird der zuletzt abgespielte Titel
wiedergegeben.
Wichtiger Hinweis: Die SD-Karte sollte mit FAT16 oder FAT32 formatiert sein. Wenn eine neue SDKarte nicht erkannt wird, formatieren Sie sie zunächst auf einem Windows-PC.
3. LCD-DISPLAY: Zeigt nützliche Informationen über die wiedergegebene Musik oder über die
Radiosender an.
4. Taste [SOURCE]: Wählen Sie mit dieser Taste den MP3-Player, Bluetooth oder UKW-Tuner (Radio)
aus.
5. Taste WIEDERGABE/PAUSE:
Player-Betrieb: Ein Audiotitel wird wiedergegeben oder die Wiedergabe wird vorübergehend
angehalten.
Bluetooth-Betrieb: Ein Audiotitel wird wiedergegeben oder die Wiedergabe wird vorübergehend
angehalten.
JB SYSTEMS® 26/39 PPA-101
Page 29

DEUTSCH BEDIENUNGSANLEITUNG
Radio-Modus: Der Tuner durchsucht das UKW-Frequenzband und programmiert automatisch die
voreingestellten UKW-Radiosender. Um das Scannen zu beenden, erneut drücken.
6. Taste [FOLDER]: Kann nur genutzt werden, während der Audioplayer aktiv ist. Versetzt das Display in
den Ordnermodus. Blättern Sie mit den TITEL-Tasten in den Ordnern und Titeln. Drücken Sie die Taste
[FOLDER] erneut, um den gewünschten Ordner oder Titel auszuwählen.
7. Taste WIEDERHOLEN: Kann nur genutzt werden, während der Audioplayer aktiv ist. Wählen Sie mit
dieser Taste einen der unterschiedlichen Zufallsmodi:
[REPEAT ONE]: Wiederholt den aktuellen Titel.
[REPEAT FOLDER]: Wiederholt den aktuellen Ordner.
[REPEAT ALL]: Wiederholt alle Titel auf dem USB-Speichergerät. Dies ist der „Standard“-
Wiedergabemodus.
[REPEAT RANDOM]: Gibt alle Titel in zufälliger Reihenfolge wieder.
8. Taste VORHERIGER TITEL:
Playerbetrieb:
Kurz drücken:
Normale Wiedergabe: Wählt den vorigen Titel aus.
Ordner auswählen: Wählt den vorigen Ordner aus.
Länger drücken: Durchsucht den Titel mit höherer Geschwindigkeit.
Bluetoothbetrieb:
Kurz drücken: Wählt den vorigen Titel aus.
Länger drücken: Verringert die Lautstärke des Players. Standardmäßig ist die Lautstärke auf
Maximum eingestellt: Wir empfehlen, die Lautstärke in der maximalen Einstellung zu belassen
und sie mithilfe des Drehknopfs zu ändern.
Radio-Modus:
Kurz drücken: Wählt den vorigen Senderspeicher aus.
Länger drücken: Verringert die Lautstärke des Players. Standardmäßig ist die Lautstärke auf
Maximum eingestellt: Wir empfehlen, die Lautstärke in der maximalen Einstellung zu belassen
und sie mithilfe des Drehknopfs zu ändern.
9. Taste NÄCHSTER TITEL:
Playerbetrieb:
Kurz drücken:
Normale Wiedergabe: Wählt den nächsten Titel aus.
Ordner auswählen: Wählt den nächsten Ordner aus.
Länger drücken: Durchsucht den Titel mit höherer Geschwindigkeit.
Bluetoothbetrieb:
Kurz drücken: Wählt den nächsten Titel aus.
Länger drücken: Erhöht die Lautstärke des Players. Standardmäßig ist die Lautstärke auf
Maximum eingestellt: Wir empfehlen, die Lautstärke in der maximalen Einstellung zu belassen
und sie mithilfe des Drehknopfs zu ändern.
Radio-Modus:
Kurz drücken: Wählt den nächsten Senderspeicher aus.
Länger drücken: Erhöht die Lautstärke des Players. Standardmäßig ist die Lautstärke auf
Maximum eingestellt: Wir empfehlen, die Lautstärke in der maximalen Einstellung zu belassen
und sie mithilfe des Drehknopfs zu ändern.
10. IR-EMPFÄNGER: Empfängt die IR-Signale von der Fernbedienung. Für den optimalen Einsatz der IR-
Fernbedienung befindet sich auf der Vorderseite des Geräts ein zweiter IR-Empfänger.
11. ANTENNE UKW-RADIO: Hier wird für guten Radioempfang die UKW-Antenne angeschlossen. Nicht
erforderlich, falls das Radio nicht benutzt wird.
12. ANTENNEN DRAHTLOSE MIKROFONE: Das PPA-101 besitzt 2 drahtlose Mikrofone, jedes mit seiner
eigenen Empfangsantenne. Beide Antennen sollten während eines Transports in dem Fach auf der
Rückseite des Geräts aufbewahrt werden.
13. EMPFANGSSIGNAL-LED: Leuchtet bei Empfang des Signals vom drahtlosen Mikrofon auf. Wenn das
drahtlose Mikrofon eingeschaltet ist und die LED nicht leuchtet, kann das folgende 3 Gründe haben:
Das drahtlose Mikrofon und der Empfänger benutzen einen unterschiedlichen Kanal: Stellen Sie
beide auf den gleichen Kanal ein!
Die Batterien im drahtlosen Mikrofon sind schwach: Wechseln Sie die Batterien.
Das drahtlose Mikrofon befindet sich außerhalb des Arbeitsbereichs: Bringen Sie das drahtlose
Mikrofon näher zum Empfänger.
14. [HIGH/LOW] KLANGREGLER: Separater 2 Bandequalizer für alle Eingänge. Der Regelbereich beträgt
+/- 15 dB für hohe und tiefe Frequenzen.
JB SYSTEMS® 27/39 PPA-101
Page 30

DEUTSCH BEDIENUNGSANLEITUNG
15. EINGANGSPEGEL: Separate Pegelregler für die verschiedenen Eingangskanäle. Vergewissern Sie
sich, dass Sie den Pegelregler auf Null zu stellen, bevor eine neue Audioquelle anschließen. Erhöhen
Sie nach dem Anschluss langsam den Pegel.
16. [MASTER]-PEGEL: Hauptlautstärke für alle Audioeingänge.
17. MIKROFONPRIORITÄT/[TALKOVER]: Mit dieser Taste verringern Sie beim Sprechen in das(die)
Mikrofon(e) automatisch die Lautstärke der Musik vom internen Player und dem Line-Eingang. Sie
müssen beim Sprechen zum Publikum die Musik nicht manuell herunterregeln.
18. [TALKOVER DAMPING]: Legt fest, um stark die Musik beim Sprechen in das Mikrofon verringert wird.
19. EXTERNER MIKROFONEINGANG: Dieser Eingang akzeptiert symmetrische und asymmetrische
Mikrofone. Sie können sowohl 6,3 mm Klinkenstecker als auch 3-polige XLR-Stecker verwenden.
Stellen Sie zuerst den Lautstärkeregler stets auf Null, bevor Sie ihn langsam auf das gewünschte
Niveau drehen.
20. AUSWAHL [EXT. MIC/W.MIC1]: Wählt das benutzte Mikrofon aus. Auf der linken Seite kann ein
externes Mikrofon und auf der rechten Seite kann das drahtlose Mikrofon verwendet werden.
21. [LINE]-EINGANG: An diesen Eingang können sowohl symmetrische (3-poliger XLR) als auch
asymmetrische (RCA, Cinch oder 3,5 mm Stereo-Ministecker) Audiosignale mit Line-Pegel
angeschlossen werden, wie zum Beispiel: CD-Player, Tuner, MP3-Player usw. Stellen Sie zuerst den
Lautstärkeregler stets auf Null, bevor Sie ihn langsam auf das gewünschte Niveau drehen.
22. [LINE]-AUSGANG: Diese symmetrische Ausgang (3-poliger XLR) ermöglicht den gemeinsamen
Anschluss mehrerer Lautsprecherboxen.
23. [BATTERY]-SCHALTER: Zur Einhaltung der Vorschriften darf die Batterie während langer Transporte
nicht angeschlossen werden. Damit Sie das Batteriefach nicht öffnen müssen, haben wir zum
Verbinden mit der Batterie einen Batterieschalter installiert.
WICHTIG: Beim Auspacken des PPA-101 ist dieser Schalter auf OFF (AUS) eingestellt und es
wurde keine Batterie installiert. Für den Batteriebetrieb installierien Sie zuerst eine Batterie
(optional, siehe unten) und stellen Sie den Batterieschalter auf die Stellung ON (EIN).
Andernfalls können Sie die Batterie nicht verwenden bzw. aufladen!
24. [CHARGE]-LED: Zeigt an, dass die interne Batterie aufgeladen wird.
25. [FULL]-LED: Zeigt an, dass die interne Batterie vollständig aufgeladen wurde.
26. [UVL]-LED: [(UnderVoltage Led)] zeigt an, dass die Spannung der internen Batterie unter den
minimalen Batteriestand gefallen ist. Mit anderen Worten: Die Batterie ist leer und sie muss aufgeladen
werden. Wenn die [UVL]-LED leuchtet, kann das Gerät nicht eingeschaltet werden.
!!! BEWAHREN SIE DAS GERÄT NIEMALS MIT LEERER BATTERIE AUF: LADEN SIE ZUERST
DIE BATTERIE AUF!!!
27. 12 V AUTOBATTERIE-EINGANG: Sie können das PPA-101 auch an den 12 VDC Ausgang Ihres Autos
anschließen. Schließen Sie das Gerät mit dem mitgelieferten 12 V Kabel an den Zigarettenanzünder
Ihres Autos an.
28. [POWER] EIN-/AUSSCHALTER: Schaltet das Gerät ein/aus.
29. [POWER]-LED: Zeigt an, dass das Gerät eingeschaltet wurde.
30. NETZEINGANG: Netzeingang mit IEC-Buchse und eingebauter Sicherung, schließen Sie hier das
mitgelieferte Netzkabel an.
JB SYSTEMS® 28/39 PPA-101
Page 31

DEUTSCH BEDIENUNGSANLEITUNG
31. WMIC-BATTERIEANZEIGE: Die drahtlosen Mikrofone (wmic) funktionieren mit 2 AA-Batterien. Wenn
die Batterien in gutem Zustand (voll) sind, leuchtet die LOW-Anzeige nicht. Sobald die Anzeige
aufleuchtet, sind die Batterien erschöpft und sollten gewechselt werden. Wenn das Mikrofon
eingeschaltet ist, leuchtet die POW-Anzeige.
32. WMIC-SCHALTER: Dieser Schalter des drahtlosen Handmikrofons hat 2 Stellungen:
OFF: Das Mikrofon wird nicht verwendet.
ON: Das Mikrofon ist voll betriebsbereit (Es sendet ein Funksignal + Audio).
33. WMIC – BATTERIEN: Die drahtlosen Mikrofone besitzen ein kleines Batteriefach. Zum Öffnen
vorsichtig aufschieben: Sie können 2 AA-Batterien (Alkali- oder wiederaufladbare NiMH-Batterien)
einlegen. Siehe Batterieanzeige, um den Zustand der Batterien zu überprüfen.
34. 3-POLIGER MINI-XLR: Anschluss des mitgelieferten Headset-Mikrofons.
35. HEADSET-MIKROFON: Mit dem PPA-101 mitgeliefert. Sie können auch ein zweites Handmikrofon
statt der mitgelieferten Headset-/Taschensender-Kombination verwenden. (optional erhältlich)
36. TRAGEGRIFF: Ein herausziehbarer Griff, um das PPA-101 einfacher zu transportieren!
37. AUFBEWAHRUNGSFACH: Ein kleines Fach auf der Oberseite des PPA-101. Sie können darin die
drahtlosen Mikrofone, Antennen, IR-Fernbedienung, kleine Kabel usw. ohne Probleme aufbewahren.
IR-FERNBEDIENUNG
A. WIEDERGABE/PAUSE: Startet die Wiedergabe oder hält sie
vorübergehend an. Gleiche Funktion wie Taste (5).
B. VORIGER/NÄCHSTER TITEL: Gleiche Funktion wie die Tasten (8)
und (9).
C. Taste EQ: Wählt einen der voreingestellten EQ-Klangmodi [Normal,
Rock, Pop, Classic, Country] auf dem Playermodul aus. Wir
empfehlen stets die Einstellung Normal zu verwenden!
D. ZIFFERNTASTEN: Direkte Auswahl von Titeln bei Verwendung des
internen MP3-Players.
E. Tasten [CHANNEL] ±: Manuelle Suche nach Radiosendern im
Tunermodus.
F. Tasten VOL (Lautstärke) Ändern die Ausgabelautstärke des
Playermoduls. Wir empfehlen die Lautstärke auf den maximalen Pegel
(Vol = 32) einzustellen und stattdessen die Pegelregler am Mischpult
zu verwenden.
G. Taste [RPT]: WIEDERHOLUNG-Taste, gleiche Funktion wie Taste
(7).
H. Taste [MODE]: Gleiche Funktion wie die Taste SOURCE (4).
Drücken Sie die Taste [SOURCE] (4), bis das Display das [BLUETOOTH®] Logo anzeigt.
Das Display (3) zeigt [„Not Connected!“] an.
Aktivieren Sie die [Bluetooth]-Funktion Ihres Smartphones/Tablets und suchen Sie nach [Bluetooth]-
Geräten.
Das PPA-101 zeigt den Namen [„Bluetooth“] an:
Verbinden Sie sich mit dem PPA-101: Das Display (3) des PPA-101 zeigt [„Connected!“] an.
Betriebsbereit!
JB SYSTEMS® 29/39 PPA-101
Page 32

DEUTSCH BEDIENUNGSANLEITUNG
WIEDERAUFLADBARE BATTERIE
Das PPA-101 funktioniert mit einer optionalen wiederaufladbaren Blei/Säure-Batterie. Diese Blei/SäureBatterie kann separat bei JB Systems bestellt werden oder Sie können sie im örtlichen Fachhandel kaufen.
BATTERIEGRÖSSE/-KAPAZITÄT: (L x B x H) 150 x 65 x 95 mm ~ 12 VDC/7 Ah
EINSETZEN DER BATTERIE
Achten Sie darauf, dass das PPA-101 nicht an eine Steckdose
angeschlossen ist.
Öffnen Sie das Aufbewahrungsfach (37): Auf der Rückseite sehen
Sie eine Kunststoffplatte.
Entfernen Sie die 6 Schrauben (K) und nehmen Sie die
Kunststoffplatte heraus.
Im Inneren sehen Sie 2 Kabel: 1 schwarzes + 1 rotes Kabel.
Setzen Sie die Blei/Säure-Batterie mit den 2 Kontakten nach
rechts in das Fach ein.
Verbinden Sie das ROTE Kabel mit dem ROTEN Kontakt
(manchmal mit „+“ gekennzeichnet) an der Batterie (L).
Verbinden Sie das SCHWARZE Kabel mit dem SCHWARZEN
Kontakt (manchmal mit „-“ gekennzeichnet) an der Batterie (L).
Sichern Sie die Kunststoffplatte mit den 6 Schrauben wieder an
der richtigen Position.
Schließen Sie das Aufbewahrungsfach.
Stellen Sie den Batterieschalter (23) in die Stellung ON.
Schließen Sie das PPA-101 an eine Steckdose an, um die Batterie aufzuladen: Die [CHARGE]-Anzeige
(24) leuchtet auf.
Wenn die [FULL]-Anzeige (25) leuchtet, ist die Batterie voll und betriebsbereit.
SEHR WICHTIG: AUFLADEN DER BATTERIE
Die Lebensdauer der Batterie zu verlängern, ist sehr wichtig, das Gerät NIEMALS mit einer leeren
Batterie aufzubewahren! Vergessen Sie nicht, das Gerät STETS mit einer vollständig aufgeladenen
Batterie aufzubewahren. Wenn das Gerät längere Zeit aufbewahrt wird, laden Sie es alle 3 Monate
auf! Für die wiederaufladbare Batterie wird KEINE Garantie übernommen!
AUFLADEN DER BATTERIE:
Stellen Sie den Batterieschalter (23) in die Stellung ON.
Schließen Sie das PPA-101 an eine Steckdose an, um die Batterie aufzuladen: Die [CHARGE]-
Anzeige (24) leuchtet auf.
Wenn die [FULL]-Anzeige (25) leuchtet, ist die Batterie voll und betriebsbereit.
Hinweis: Der Ladevorgang ist kürzer, wenn der Ein-/Ausschalter (28) auf die Stellung OFF gestellt ist.
JB SYSTEMS® 30/39 PPA-101
Page 33

DEUTSCH BEDIENUNGSANLEITUNG
USB-Speichergerät:
< 32 GB - mit FAT16/FAT32 formatiert
SD-Karte:
SD u. SDHC < 32 GB - mit FAT16/FAT32 formatiert
Unterstützte Audiodateien:
WMA, MP3 (unterschiedliche Abtastraten, bis zu 320 Kbps/s)
UKW-Radio Freq.-Bereich:
87,5 bis 108 MHz
UKW-Radio Abstimmschritte:
0,1 MHz
Ersatzbatterie für die IR-Fernbedienung:
CR2025, 3 V Batterie (im Lieferumfang enthalten)
Drahtlose Mikrofone – Funkfrequenz:
UHF 863 bis 865 MHz
Frequenz des drahtlosen Mikrofons MIC1
(Handmikrofon)
863,35 MHz
Frequenz des drahtlosen Mikrofons MIC2
(Taschensender)
864,80 MHz
Verstärkerleistung
50 Wrms
Frequenz- gang (+/-3 dB)
50 – 20.000 Hz
TDH (1 kHz/1 W)
0,2 %
Line-Eingangsempfindlichkeit
1V
Mikrofon-Eingangsempfindlichkeit
15mV
Eingangsimpedanz
20 kOhm
Rauschabstand (Mikrofon ausgeschaltet)
> 85 dB
Kühlung
Natürliche Luftzirkulation
Mikrofoneingang
Sym./Unsym. XLR/Buchse
Line-Eingang
Sym./Unsym. XLR 3-polig + 3,5 mm Stereobuchse
Line-Ausgang
Sym./Unsym. XLR 3-polig
Sicherung (5 x 20 mm)
F5A/250 V
Stromversorgung
115 VAC bis 230 VAC, 50/60 Hz
Abmessungen H x B x T
550 x 325 x 280 mm
Gewicht
15,5 kg
TECHNISCHE DATEN
Dieses Gerät ist funkentstört. Das Gerät entspricht den aktuellen europäischen Anforderungen und
nationalen Richtlinien. Die Konformität wurde nachgewiesen und die entsprechenden Erklärungen und
Unterlagen liegen beim Hersteller vor.
Diese Angaben können sich ohne gesonderten Hinweis ändern.
Sie können die neueste Version dieser Bedienungsanleitung von unserer Website
www.jb-systems.eu
JB SYSTEMS® 31/39 PPA-101
Page 34

ESPAÑOL MANUAL DE INSTRUCCIONES
MANUAL DE INSTRUCCIONES
Gracias por comprar este producto de JB Systems®. Para aprovechar todas sus posibilidades, por favor lea
muy detenidamente estas instrucciones de uso.
CARACTERISTICAS
Sistema PA compacto, portátil alimentado por batería
Perfecto para escuelas, presentaciones de negocios, ...
Bluetooth para poder utilizarlo con cualquier dispositivo portátil como los smartphones.
2 micrófonos inalámbricos: 1 micrófono de mano + 1 micrófono de diadema incluidos.
Reproductor USB que soporta archivos MP3 y WMA
Radio FM con memorias para emisoras presintonizadas
El mando a distancia inalámbrico (Radio/Reproductor USB) también se puede utilizar delante del altavoz.
Mezclador interno con:
1 entrada para micro con cable
1 entrada LINE/AUX: XLR + RCA + mini clavija de 3,5 mm
Ecualizadores de 2 bandas en todos los canales de entrada
Salida de enlace balanceada para conectar altavoces activos adicionales.
Amplificador de 50 W clase D
Excelente calidad de sonido gracias a su combinación de altavoces de 2 vías con woofer/tweeter
separados.
¡Fácil de transportar gracias a sus ruedas y su asa telescópica!
Compartimiento para recoger los cables y los micrófonos inalámbricos.
Cargador interno para la batería recargable (opcional).
Entrada de alimentación de 230 V CA
entrada de 12 V CC para usarlo con la batería del auto, cable incluido
Se puede colocar encima de cualquier soporte para altavoces con un mástil de 35 mm
ANTES DE USAR
Antes de comenzar a utilizar esta unidad, compruebe si no ha sufrido daños durante el transporte. Si
hubiera alguno, no utilice el dispositivo y consulte primero con su distribuidor.
Importante: Este dispositivo salió de nuestra fábrica en perfectas condiciones y bien embalado. Es
absolutamente necesario que se obedezcan al pie de la letra las instrucciones y advertencias de
seguridad que aparecen en este manual de usuario. Cualquier daño causado por una mala manipulación
no estará cubierto por la garantía. El distribuidor no aceptará ninguna responsabilidad por defectos o
problemas causados por no obedecer lo indicado en este manual de usuario.
Mantenga este folleto en un lugar seguro para futuras consultas. Si vende este equipo, asegúrese de
incluir este manual de usuario.
Para proteger el medio ambiente, intente reciclar el material del embalaje en la mayor medida posible.
Compruebe el contenido:
Verifique que la caja contenga los elementos siguientes:
Manual del usuario
PPA-101
Mando a distancia IR
1 micrófono inalámbrico de mano
1 micrófono diadema con petaca.
2 antenas para los receptores inalámbricos
1 antena FM
1 cable de alimentación para la salida de corriente del auto (12 V CC)
JB SYSTEMS® 32/39 PPA-101
Page 35

ESPAÑOL MANUAL DE INSTRUCCIONES
PRECAUCIÓN: Para reducir el riesgo de descarga eléctrica, no lo
abra. Dentro no hay componentes que puedan ser reparados por el
usuario. Dirija cualquier reparación o mantenimiento solamente a
personal cualificado.
El símbolo de relámpago con punta de flecha dentro de un triángulo equilátero advierte al
usuario de la presencia de “tensiones peligrosas” no aisladas dentro de la carcasa del producto
que pueden ser de una magnitud suficiente como para constituir un riesgo de descarga eléctrica.
El signo de admiración dentro de un triángulo equilátero advierte al usuario de la presencia de
instrucciones importantes relacionadas con la operación y el mantenimiento (reparación) en la
literatura que se entrega junto con el equipo.
Este símbolo significa: sólo para uso en interiores
Este símbolo significa: lea las instrucciones
Este altavoz puede reproducir con facilidad niveles de presión Sonora (SPL) lo
suficientemente fuertes para causar problemas auditivos severos y permanentes. ¡Proteja
siempre sus oídos cuando esté expuesto a niveles SPL superiores a 85dB durante largos
periodos de tiempo!
INSTRUCCIONES DE SEGURIDAD:
Aunque la carcasa estructural es impermeable, el woofer y el tweeter no están protegidos contra la lluvia
y la humedad. Por tanto, este altavoz está diseñado para usarlo solamente en interiores. El uso de este
producto en exteriores invalidará todas las garantías.
Monte siempre este altavoz de modo seguro y estable.
Tenga cuidado especial cuando los altavoces quedan suspendidos. ¡Esto es potencialmente peligroso y
debería llevarlo a cabo técnicos que conozcan las técnicas y las normativas para altavoces en altura
(suspendidos)!
Para evitar el riesgo de incendio o de descarga eléctrica, no exponga este aparato a la lluvia ni a la
humedad.
Para evitar que se forme condensación en el interior del equipo, permita que la unidad se adapte a la
temperatura del entorno cuando se lleve a una habitación cálida después del transporte. La
condensación impide a veces que la unidad trabaje a plena capacidad e incluso puede causar averías.
No coloque objetos metálicos ni derrame líquidos dentro de la unidad. No deben colocarse objetos llenos
de líquido, como jarrones, sobre este aparato. Puede provocar una descarga eléctrica o un mal
funcionamiento. Si un objeto extraño se introduce dentro de la unidad, desconecte de inmediato la
alimentación eléctrica.
No deben colocarse fuentes con llamas desprotegidas, como velas encendidas, sobre este aparato.
No tape ninguna abertura de ventilación ya que esto puede provocar sobrecalentamiento.
Evite emplear la unidad en ambientes polvorientos y límpiela con regularidad.
Mantenga la unidad lejos de los niños.
Este equipo no debe ser utilizado personas inexpertas.
La temperatura ambiente máxima segura es de 40°C. No utilice esta unidad a temperatura ambiente
mayor que ésta.
Siempre desenchufe la unidad cuando no se vaya a utilizar durante un período de tiempo prolongado o
cuando se le vaya a realizar mantenimiento/reparación.
La instalación eléctrica debe realizarla solamente personal cualificado, de acuerdo con la normativa
sobre seguridad eléctrica y mecánica de su país.
Compruebe que la tensión disponible no sea superior a la que se indica en el panel posterior de la
unidad.
El conector de entrada debe permanecer accesible para la desconexión de la alimentación.
El cable de alimentación debe estar siempre en perfectas condiciones. Apague de inmediato la unidad
cuando el cable de alimentación esté aplastado o dañado. Para evitar riesgos, debe ser sustituido por el
fabricante, por su representante de servicio técnico o por una persona de cualificación similar.
¡Nunca permita que el cable de alimentación haga contacto con otros cables!
Cuando el interruptor de alimentación se encuentre en la posición OFF, esta unidad ¡no está
desconectada por completo de la corriente!
Este aparato debe tener conexión a tierra para cumplir las normativas de seguridad.
Para evitar descargas eléctricas, no lo abra. Dentro no hay componentes que puedan ser reparados por
el usuario.
JB SYSTEMS® 33/39 PPA-101
Page 36

ESPAÑOL MANUAL DE INSTRUCCIONES
Nunca repare un fusible o puentee el soporte del fusible. ¡Siempresustituya un fusible dañado con otro
del mismo tipo y las mismas especificaciones eléctricas!
En el caso de que haya serios problemas de funcionamiento, deje de usar el aparato y contacte
inmediatamente con su distribuidor/vendedor.
Utilice el embalaje original cuando tenga que transportar el dispositivo.
Por razones de seguridad, está prohibido realizar modificaciones no autorizadas a la unidad.
FUNCIONES
1. Entrada USB: aquí puede conectar un lápiz de memoria USB. Tan pronto como conecte el dispositivo
de memoria, en la pantalla aparecerá “Read Device” y, a continuación, reproducirá la última canción
que estuvo reproduciendo.
Nota importante: el lápiz de memoria USB debe estar formateado en FAT16 o FAT32. Si el sistema
no detecta un lápiz USB nuevo, formatéelo primero usando un PC con Windows.
2. Entrada TAJETA-SD: aquí puede introducir una tarjeta SD o SDHC. Introduzca una tarjeta con
suavidad con su lado superior (cara impresa) hacia la izquierda. Tan pronto como conecte el
dispositivo de memoria, en la pantalla aparecerá “Read Device” y, a continuación, reproducirá la última
canción que estuvo reproduciendo.
Nota importante: la tarjeta SD debe estar formateada en FAT16 o FAT32. Si el sistema no detecta
una tarjeta SD nueva, formatéelo primero usando un PC con Windows.
3. Pantalla LCD: Presenta la información importante de la música o de las emisoras radio reproducidas.
4. Botón [SOURCE]: pulse este botón para seleccionar el reproductor MP3, Bluetooth y la radio FM.
5. Botón REPRODUCIR/PAUSA:
Funcionamiento del reproductor: para iniciar/pausar la pista de audio actual.
Funcionamiento del Bluetooth: para iniciar/pausar la pista de audio actual.
Modo radio: la sintonizadora de radio busca en la banda FM y programa automáticamente las
emisoras FM presintonizadas. Vuélvalo a pulsar para dejar de buscar emisoras.
JB SYSTEMS® 34/39 PPA-101
Page 37

ESPAÑOL MANUAL DE INSTRUCCIONES
6. Botón [FOLDER]: solo se usa si el reproductor de audio está activo. Se utiliza para navegar por las
carpetas desde la pantalla. Use los botones de navegación para desplazarse por las carpetas y pistas
de audio. Pulse otra vez el botón [FOLDER] para seleccionar la carpeta o pista deseada.
7. Botón REPETIR: solo se usa si el reproductor de audio está activo. Pulse este botón para elegir uno
de los modos de reproducción aleatoria:
[REPEAT ONE]: repite la pista de audio actual.
[REPEAT FOLDER]: repite la carpeta actual.
[REPEAT ALL]: Repite todas las pistas de audio de la memoria USB. Este es el modo 'normal' de
reproducción.
[REPEAT RANDOM]: reproduce todas las pistas de audio aleatoriamente.
8. Botón PISTA PREVIA:
Funcionamiento del reproductor:
Pulsación breve:
Reproducción normal: Selecciona la pista de audio previa.
Selección de carpeta: Selecciona la carpeta previa.
Pulsación larga: puede buscar a mayor velocidad dentro de la pista.
Funcionamiento del Bluetooth:
Pulsación breve: selecciona la pista de audio previa.
Pulsación larga: baja el volumen del reproductor. Lo normal es ajustar el volumen al máximo:
le aconsejamos que lo mantenga al máximo y utilice el control giratorio para cambiar el
volumen.
Modo radio:
Pulsación breve: selecciona la emisora presintonizada previa.
Pulsación larga: baja el volumen del reproductor. Lo normal es ajustar el volumen al máximo:
le aconsejamos que lo mantenga al máximo y utilice el control giratorio para cambiar el
volumen.
9. BOTÓN PISTA SIGUIENTE:
Funcionamiento del reproductor:
Pulsación breve:
Reproducción normal: selecciona la pista de audio siguiente.
Selección de carpeta: selecciona la carpeta siguiente.
Pulsación larga: puede buscar a mayor velocidad dentro de la pista.
Funcionamiento del Bluetooth:
Pulsación breve: selecciona la pista de audio siguiente.
Pulsación larga: sube el volumen del reproductor. Lo normal es ajustar el volumen al máximo:
le aconsejamos que lo mantenga al máximo y utilice el control giratorio para cambiar el
volumen.
Modo radio:
Pulsación breve: selecciona la emisora presintonizada siguiente.
Pulsación larga: sube el volumen del reproductor. Lo normal es ajustar el volumen al máximo:
le aconsejamos que lo mantenga al máximo y utilice el control giratorio para cambiar el
volumen.
10. RECEPTOR IR: Recibe las señales IR del mando a distancia. Para un funcionamiento óptimo del
mando a distancia hay un segundo receptor IR en la parte delantera de la unidad.
11. ANTENA radio FM: conecte aquí la antena FM para obtener una buena recepción de la radio. Sin
función cuando no está en modo radio.
12. ANTENAS DE LOS MICRÓFONOS INALÁMBRICOS: El PPA-101 tiene dos micrófonos inalámbricos,
caca unos con su propia antena de recepción. Ambas antenas se pueden guardar en el
compartimiento trasero de la unidad durante el transporte.
13. LED DE SEÑAL RF: se ilumina cuando recibe la señal procedente del micrófono inalámbrico. Si este
LED está apagado con el micrófono encendido, puede deberse a una de estas 3 razones:
El micrófono inalámbrico y el receptor están usando canales diferentes: ¡configúrelos en el
mismo canal!
La batería del micrófono inalámbrico está descargada: cárguela.
El micrófono inalámbrico está fuera del alcance del receptor: acerque el micrófono al receptor.
14. CONTOLES DEL TONO [HIGH/LOW]: separa los ecualizadores de 2 bandas en todas las entradas. El
rango de control es de +/-15 db tanto para los agudos como para los graves.
15. NIVELES DE ENTRADA: separa los controles de nivel para los diferentes canales de entrada.
Asegúrese de que el control de nivel está en cero antes de conectar una nueva fuente de audio.
Después de conectarla, suba el nivel lentamente.
16. NIVEL [MASTER]: volumen maestro para todas las entradas de audio.
JB SYSTEMS® 35/39 PPA-101
Page 38

ESPAÑOL MANUAL DE INSTRUCCIONES
17. PRIORIDAD DEL MICRO/[TALKOVER]: use este botón para bajar automáticamente el volumen de la
música del reproductor interno cuando hable por el (los) micrófono(s). No tendrá que bajar el nivel de la
música manualmente cuando hable a la audiencia.
18. [TALKOVER DAMPING]: se usa para ajustar cuánto bajará el nivel de la música cuando se hable por
el micrófono.
19. ENTRADA MICRO EXTERNO: Esta entrada acepta tanto micrófonos balanceados como
desbalanceados. Puede usar tanto la clavija de ¼" como el conector XLR macho de 3 pines. Ajuste
siempre el control de volumen a cero, después de conectarlo podrá subir lentamente al nivel deseado.
20. SELECCIÓN [EXT. MIC/W.MIC1]: se usa para seleccionar el micrófono que desea usar. En la posición
de la izquierda podrá usar un micrófono externo y en la posición de la derecha usará el micrófono
inalámbrico.
21. ENTRADA [LINE]: Esta entrada acepta tanto señales balanceadas (XLR de 3 pines) como
desbalanceadas (RCA, cinch o mini clavijas de 3,5 mm) de nivel de línea, como por ejemplo:
reproductor de CDs, radio, reproductor de MP3, ... Ajuste siempre el control de volumen a cero,
después de conectarlo podrá subir lentamente al nivel deseado.
22. SALIDA [LINE]: Esta salida balanceada (XLR de 3 pines) permite conectar varios altavoces juntos.
23. INTERRUPTOR [BATTERY]: para cumplir con la normativa, las baterías no pueden permanecer
conectadas durante transportes largos. Para no tener que abrir el compartimiento de la batería para
conectar y desconectar la batería, hemos instalado este interruptor.
IMPORTANTE: cuando desembale el PPA-101 este interruptor estará en OFF y la batería no
estará instalada. Cuando quiera que funcione con la batería: primero instala la batería (opcional,
vea más adelante) y coloque el interruptor de la batería en la posición ON, ¡de lo contrario no
podrá usar/cargar la batería!
24. LED [CHARGE]: indica que la batería interna se está cargando.
25. LED [FULL]: indica que la batería interna está completamente cargada.
26. LED [UVL]: [(UnderVoltage Led, Led de Bajo Voltaje por sus siglas en inglés] indica que el voltaje de
la batería interna ha caído por debajo del nivel mínimo, en otras palabras: la batería está descargada y
necesita recargarla. Cuando el LED [UVL] está iluminado no podrá encender la unidad.
¡¡¡ NUNCA GUARDE LA UNIDAD CON LA BATERÍA DESCARGADA: CARGUE PRIMERO LA
BATERÍA!!!
27. ENTRADA DE LA BATERÍA DE 12V DEL AUTO: también puede conectar el PPA-101 a la salida de
12 V CC de su auto. Use el cable de 12 V suministrado para conectar la unidad a la conexión del
mechero de su auto.
28. INTERRUPTOR DE ENCENDIDO [POWER]: enciende/apaga la unidad.
29. LED [POWER]: indica que la unidad está encendida.
30. ENTRADA DE ALIMENTACIÓN: Entrada de alimentación con receptáculo IEC y portafusibles
integrado; conecte aquí el cable de alimentación que se suministra.
31. INDICADOR BATERÍA MIC INALAM (WMIC): los micrófonos inalámbricos (wmic) usando 2 pilas AA.
Mientras que las baterías están bien (cargadas) el indicador de batería baja (LOW) está apagado. Este
indicador se ilumina cuando las pilas están descargadas y es necesario cambiarlas. El indicador de
ACTIVACIÓN estará iluminado mientras que el micrófono esté encendido.
JB SYSTEMS® 36/39 PPA-101
Page 39

ESPAÑOL MANUAL DE INSTRUCCIONES
32. INTERRUPTOR WMIC: el micrófono inalámbrico de mano tiene 2 posiciones:
OFF: esta posición se utiliza cuando se no está usando el micrófono.
ON: el micrófono se encuentra activado (enviando señal RF + audio)
33. PILAS DEL WMIC: los micrófonos inalámbricos (wmic) tienen un pequeño compartimiento para las
pilas. Deslice la tapa cuidadosamente para abrirlo: dentro puede colocar 2 pilas AA (alcalinas o
recargables NiMH). Fíjese en el indicador para comprobar la condición de las pilas.
34. MINI XLR DE 3 PINES: se usa para conectar el micrófono diadema suministrado.
35. MICRÓFONO DE DIADEMA: incluido con el PPA-101. También puede usar un segundo micrófono de
mano en vez de la combinación micrófono diadema/petaca. (disponible como opción)
36. ASA DE TRANSPORTE: ¡asa plegable, para llevar contigo el PPA-101 cómodamente!
37. COMPARTIMIENTO DE ALMACENAMIENTO: pequeño compartimiento en la parte superior del PPA-
101. Puede guardar fácilmente los micrófonos inalámbricos, las antenas, el mando a distancia, cables
pequeños, ...
MANDO A DISTANCIA IR
A. REPRODUCIR/PAUSA: pulsar para iniciar/pausar la reproducción,
igual que el botón (5).
B. PISTA PREVIA/SIGUIENTE: igual que los botones (8) y (9)
C. Botón EQ: se usa para seleccionar uno de los ecualizadores
predeterminados [Normal, Rock, Pop, Classic, Country] en el módulo
del reproductor. ¡Recomendamos usar siempre la configuración
Normal!
D. Teclas NUMÉRICAS: puede usarlas para acceder directamente a
una pista de audio usando el reproductor MP3 interno.
E. Botones [CHANNEL] ±: en modo radio se usa para buscar las
emisoras manualmente.
F. Botones de VOLUMEN: se usan para cambiar el volumen de salida
del módulo del reproductor. Le recomendamos mantener el volumen
al máximo (vol = 32) y usar el control giratorio del mezclador en su
lugar.
G. Botón [RPT]-: Botón REPETIR, igual que el botón (7)
H. Botón [MODE]: la misma función que el botón SOURCE (4)
Pulse el botón [SOURCE] (4) hasta que aparezca el logo [BLUETOOTH® ] en la pantalla
La pantalla (3) mostrará [“Not Connected!”]
Active la función [Bluetooth] en su smartphone/tablet y busque dispositivos [Bluetooth].
El PPA-101 aparecerá en la lista con el nombre [“Bluetooth”]:
Conéctese al PPA-101: en la pantalla (3) del PPA-101 aparecerá [“Connected!”]
¡Listo para usar!
JB SYSTEMS® 37/39 PPA-101
Page 40

ESPAÑOL MANUAL DE INSTRUCCIONES
BATERÍA RECARGABLE
El PPA-101 puede funcionar con una batería de ácido plomo recargable opcional. Esta batería de ácido
plomo se puede pedir por separado a JB Systems o puede comprarla a su distribuidor local.
TAMAÑO/CAPACIDAD DE LA BATERÍA: (L x An x Al) 150 x 65 x 95 mm ~ 12 V CC/7 Ah
INSTALAR LA BATERÍA
Asegúrese de que el PPA-101 no está enchufado a la corriente.
Abra el compartimiento de almacenamiento (37): en el fondo verá
un panel de plástico.
Quite los 6 tornillo (K) y saque el panel de plástico .
En el interior verá 2 cables: 1 cable negro y 1 cable rojo.
Instale la batería de ácido plomo con sus 2 bornes de contacto
hacia la derecha.
Conecte el cable ROJO al borne ROJO (a veces con la marca “+”)
de la batería (L).
Conecte el cable NEGRO al borne NEGRO (a veces con la marca
“-”) de la batería (L).
Vuelva a colocar en su lugar el panel de plástico con sus 6
tornillos.
Cierre el compartimiento de almacenamiento.
Coloque el interruptor de la batería (23) en la posición ON.
Enchufe el PPA-101 a la red eléctrica para cargar la batería: el indicador [CHARGE] (24) se iluminará.
Cuando el indicador [FULL] (25) se ilumine, la batería estará completamente cargada y lista para usar.
MUY IMPORTANTE: RECARGAR LA BATERÍA
¡Para extender la vida útil de la batería es muy importante no guardar NUNCA la unidad con la
batería totalmente descargada! Así que recuerde guardar la unidad SIEMPRE con la batería
completamente cargada. Si la unida llega guardada mucho tiempo, ¡recárguela cada 3 meses! ¡NO
se ofrece garantía para la batería recargable!
RECARGAR LA BATERÍA:
Coloque el interruptor de la batería (23) en la posición ON.
Enchufe el PPA-101 a la red eléctrica para cargar la batería: el indicador [CHARGE] (24) se iluminará.
Cuando el indicador [FULL] (25) se ilumine, la batería estará completamente cargada y lista para usar.
Nota: la carga es más rápida si el interruptor de encendido (28) está en la posición OFF.
JB SYSTEMS® 38/39 PPA-101
Page 41

ESPAÑOL MANUAL DE INSTRUCCIONES
Memoria USB:
< 32 GB – formateada FAT16/FAT32
Tarjeta SD:
SD + SDHC < 32 GB – formateada FAT16/FAT32
Archivos de audio aceptados:
WMA, MP3 (diferentes tasas de muestreo, hasta 320 kbps)
Margen de frecuencias radio FM:
87,5 a 108 MHz
Intervalos de sintonía Radio FM:
0,1 MHz
Batería de sustitución mando distancia IR:
1 pila botón CR2025 3V (incluida)
Micrófono inalámbricos - Freq. HF:
UHF, 863 - 865 MHz
Freq. MIC1 inalámbrico
(micrófono de mano)
863,35 MHz
Freq. MIC2 inalámbrico
(micrófono diadema)
864,80 MHz
Potencia del amplificador
50 Wrms
Resp. Freq. (+/- 3 dB)
50 – 20.000 Hz
THD (1 kHz/1 W)
0,2%
Sensibilidad de entrada, Línea
1V
Sensibilidad de entrada, Micro
15mV
Impedancia de entrada
20 kohm
Relación Señal/Ruido (mic. apagado)
> 85 dB
Refrigeración
natural por aire
Entrada de micrófono
Bal/Desbal XLR/Clavija
Entrada de línea
Bal/Desbal XLR 3 pines + clavija estéreo de 3,5 mm
Salida de línea
Bal/Desbal XLR 3 pines
Fusible (5 x 20 mm)
F5A/250V
Fuente de alimentación
115 V CA ~ 230 V CA 50/60Hz
Dimensiones Al x An x P
550 x 325 x 280 mm
Peso
15,5 kg
ESPECIFICACIONES
Esta unidad tiene supresión de interferencias de radio. Este aparato cumple los requisitos de las directivas
europeas y nacionales vigentes. Dicha conformidad ha sido establecida y las declaraciones y documentos
pertinentes han sido depositados por el fabricante.
Esta información está sujeta a cambios sin notificación previa
Puede descargar la versión más reciente de este manual de usuario en nuestro sitio Web:
www.jb-systems.eu
JB SYSTEMS® 39/39 PPA-101
Page 42

Page 43

Page 44

 Loading...