

Page 1

Lichtanlagentechnik GmbH, Sallersteigweg 15, 89134 Blaustein
Tel.: +49 (0) 7304 9617-0, Fax. +49 (0) 7304 9617-99, Internet: http://www.jb-lighting.de
J
B
-
l
i
g
h
t
i
n
g
User Manual
Version 1.2
Page 2

JB-lighting Lichtanlagen GmbH Sallersteigweg 15 D-89134 Blaustein phone: +49 7304 9617-0
www.jb-lighting.de - 2 -
Page 3

JB-lighting Lichtanlagen GmbH Sallersteigweg 15 D-89134 Blaustein phone: +49 7304 9617-0
www.jb-lighting.de - 3 -
General remarks
The JB-lighting Licon1 was designed to control fixtures and dimming channels in a fast and effective way.
It is capable of control of a maximum of 32 fixtures with 25 control channels and 7 fixed value channel each.
Additional control on 96 dimming channels.
The Licon1 allows direct access to fixtures and parameters. Each key is labelled to make it easier to use the
desk even for untrained operators.
Sequences and chases are programmed by means of presets, which allows fast and effective programming.
The Licon1 offers the opportunity to work with an effect generator, to create chases at a fraction of time,
normally required.
Selection of fixtures and change of parameters or time limits even when a show is active.
The desk can be synchronized via MIDI, SMPTE or run music animated. It is possible to link several desks if
a larger number of DMX-channels is required.
The Licon1 offers an integrated CD-Rom drive for music cds. Programming of a music synchronized show
without the use of other devices such as timecode clock ect.
Software upgrades via PC. Get the latest software from your dealer or load it down from our home page
www.jb-lighting.de
Page 4

JB-lighting Lichtanlagen GmbH Sallersteigweg 15 D-89134 Blaustein phone: +49 7304 9617-0
www.jb-lighting.de - 4 -
INDEX
General remarks...............................................................................................................................................3
INDEX.................................................................................................................................................................4
1 First steps ......................................................................................................................................................7
1.1 Unpacking and powering up ....................................................................................................................7
1.2 Changing voltage setting .........................................................................................................................7
1.3 DMX-Outputs ...........................................................................................................................................7
2 Configuration (Setup) ...................................................................................................................................8
2.1 L-USER / Configuration of a self-defined fixture setup............................................................................8
2.2 SELECT / CONFIG-set configuration by means of library.....................................................................11
2.2.1 Delete one fixture from list..............................................................................................................11
2.2.2 Delete all fixtures from list ..............................................................................................................11
2.3 PATCH / Assignment of fixtures start addresses ..................................................................................11
2.3.1 Enter start addresses for fixtures ...................................................................................................12
2.3.2 Delete start address from one fixture.............................................................................................12
2.3.3 Delete all start addresses...............................................................................................................13
2.4 PATCH Assignment of DMX channels to dimmer/PAR section ............................................................13
2.4.1 Enter start addresses for dimmer channels....................................................................................13
2.4.2 Delete one DMX address ...............................................................................................................14
2.4.3 Delete all DMX addresses..............................................................................................................14
2.4.4 Enter dimming curve.......................................................................................................................14
2.4.5 Enter DMX addresses for AUX keys ..............................................................................................15
2.5 P-COPY Copy Presets...........................................................................................................................15
2.6 PANTIL / Inversion of pan and tilt channels...........................................................................................15
2.6.1 Revocation of pan and/or tilt inversion...........................................................................................15
2.6.2 Swap pan and tilt channels.............................................................................................................16
2.7 The MIDI function...................................................................................................................................16
2.7.1 Activate the MIDI function...............................................................................................................16
2.7.2 Deactivate the MIDI function ..........................................................................................................16
2.7.3 Connect a MIDI device...................................................................................................................16
2.7.4 Assign the MIDI channel.................................................................................................................17
2.7.5 Assign MIDI notes ..........................................................................................................................17
2.7.6 Assign softkeys...............................................................................................................................17
2.7.7 BEATSYNC ....................................................................................................................................18
2.8 ACCESS / Passwords............................................................................................................................18
2.8.1 Enter master password...................................................................................................................18
2.8.2 Enter User passwords....................................................................................................................19
2.8.3 Checkback of passwords................................................................................................................19
2.8.4 Changing passwords......................................................................................................................19
3 Programming the fixtures and dimmers in combi-section.....................................................................20
3.1 Direct access to fixtures.........................................................................................................................20
3.2 To program and recall of fixture groups.................................................................................................21
3.2.1 Storage of fixture groups................................................................................................................21
3.2.2 Recall of fixture groups ...................................................................................................................21
3.2.3 Switching banks of fixture group faders .........................................................................................22
3.3 The Highlight function............................................................................................................................22
3.4 How to program fixtures by means of encoder wheels..........................................................................22
3.4.1 Postitioning in 16bit ........................................................................................................................22
4 Presets .........................................................................................................................................................23
4.1 Programming and storing presets..........................................................................................................23
4.2 Name a preset .......................................................................................................................................23
4.3 Recall Presets........................................................................................................................................24
4.4 Fading Presets.......................................................................................................................................24
5 Preprogrammed moving patterns .............................................................................................................25
Page 5

JB-lighting Lichtanlagen GmbH Sallersteigweg 15 D-89134 Blaustein phone: +49 7304 9617-0
www.jb-lighting.de - 5 -
5.1 Phase function .......................................................................................................................................26
6 Cues (combi-section) ..................................................................................................................................27
6.1 Programming and storage of cues.........................................................................................................27
6.1.1 The storage matrix..........................................................................................................................28
6.1.2 Selection of the features.................................................................................................................28
6.1.3 The cue, bank and page keys ........................................................................................................29
6.1.4 Name cues......................................................................................................................................30
6.1.5 Enter fade time...............................................................................................................................30
6.1.8 Work with the release link function.................................................................................................31
6.1.9 The flash function ...........................................................................................................................32
7 Edit cues ......................................................................................................................................................33
7.1 Editing the name....................................................................................................................................33
7.2 Edit fixture parameter.............................................................................................................................34
7.3 Copy one cue to another cue key..........................................................................................................34
7.4 Enter release link function (R-Link)........................................................................................................34
7.5 Change fade time...................................................................................................................................35
7.6 Change trigpoint.....................................................................................................................................35
7.8 Manual cue fading..................................................................................................................................35
8 Freeze function............................................................................................................................................36
8.1 Enter freeze function..............................................................................................................................36
8.2 Delete Freeze function...........................................................................................................................36
9 Fixture chases .............................................................................................................................................38
9.1 Programming chases cue-by-cue..........................................................................................................38
9.2 The chase menu....................................................................................................................................39
9.3 Enter chase name..................................................................................................................................39
9.4 Enter duration and speed of chase steps..............................................................................................39
9.5 Insert a chase step.................................................................................................................................41
9.6 Overwrite a chase step..........................................................................................................................41
9.7 Delete all chase data .............................................................................................................................41
9.8 Delete a single step ...............................................................................................................................41
9.9 Double one chase step..........................................................................................................................42
9.10 Stop a chase / r-link.............................................................................................................................42
9.11 Loop function .......................................................................................................................................42
9.12 Block function.......................................................................................................................................42
10 Chase generator........................................................................................................................................44
10.1 Programming with the chase generator, first steps .............................................................................44
10.1.1 The matrix of the chase generator ...............................................................................................45
10.2 Parameters of the chase generator .....................................................................................................46
10.2.1 Page no. 1 of the chase generator (Preset selection)..................................................................46
10.2.2 Page no. 2 of the chase generator (the order of fixtures) ............................................................47
10.2.3 Page no. 3 and 4 of the chase generator (chase patterns)..........................................................49
10.2.4 Page no. 5 of the chase generator...............................................................................................50
10.2.5 Page no. 6 of the chase generator (modification of the chase patterns) .....................................51
11 Merge function...........................................................................................................................................53
11.1 Enter the merge-function .....................................................................................................................53
11.2 Delete the merge-function....................................................................................................................53
11.3 The speed groups................................................................................................................................54
11.3.1 Integrate cases to speed groups..................................................................................................54
11.3.2 Delete a chase from a speed goup ..............................................................................................54
11.4 The sychronized start/Sync-start function............................................................................................55
11.4.1 Enter sync start function...............................................................................................................55
9.15.2 Delete sync start function.............................................................................................................55
11.5 The sound function/beat count ............................................................................................................55
12 The chase control section........................................................................................................................56
12.1 Selection of chase................................................................................................................................56
12.2 Speed change by means of encoder wheel.........................................................................................56
12.3 Speed change by means of the learn key ...........................................................................................57
Page 6

JB-lighting Lichtanlagen GmbH Sallersteigweg 15 D-89134 Blaustein phone: +49 7304 9617-0
www.jb-lighting.de - 6 -
12.4 Manual stepping (Go keys)..................................................................................................................57
12.5 Change of direction..............................................................................................................................57
12.6 The restart function..............................................................................................................................57
12.7 The sync function.................................................................................................................................58
12.8 The sound function ..............................................................................................................................58
13 Edit a chase ...............................................................................................................................................59
14 Sequences .................................................................................................................................................60
14.1 Enter step of a sequence.....................................................................................................................60
14.2 Name sequence...................................................................................................................................61
14.3 Enter duration ......................................................................................................................................61
15 The list function.........................................................................................................................................63
16 PAR section ...............................................................................................................................................64
16.1 Direct access .......................................................................................................................................66
16.2 Encode mode.......................................................................................................................................66
16.3 Block mode..........................................................................................................................................67
16.4 Hilite mode...........................................................................................................................................68
16.5 Parout mode ........................................................................................................................................68
16.6 The numeric block................................................................................................................................69
16.7 Name PAR channels............................................................................................................................71
16.8 Store PAR presets ...............................................................................................................................71
16.8.1 Recall PAR presets ......................................................................................................................72
16.8.2 Fade PAR presets ........................................................................................................................72
17 Data storage...............................................................................................................................................73
17.1 Format floppy disc................................................................................................................................73
17.2 Selective data storage .........................................................................................................................73
17.2.1 Selective storage of presets.........................................................................................................74
17.3 Selective re-load of data into the desk.................................................................................................74
17.3.1 Selective re-load of Preset data ...................................................................................................75
18 Timeline programming (music synchronized) .......................................................................................76
18.1 Enter a music CD.................................................................................................................................76
18.2 Basic of timeline programming: LOOP ................................................................................................76
18.3 Simple timeline programming ..............................................................................................................77
18.3.1 Assign cues and chases (Events)................................................................................................78
18.3.2 Move cues and chases.................................................................................................................78
19 The CD-Player ............................................................................................................................................79
20 Trackball.....................................................................................................................................................80
21 Delete all data............................................................................................................................................81
Page 7

JB-lighting Lichtanlagen GmbH Sallersteigweg 15 D-89134 Blaustein phone: +49 7304 9617-0
www.jb-lighting.de - 7 -
1 First steps
1.1 Unpacking and powering up
The package contains:
Lighting control desk
connecting cable
user manual
0-modem cable
optional available are the following items:
desk lights
flightcase
dustcover
trackball
The factory setting of the transformer is 230V / 50Hz.
1.2 Changing voltage setting
Use the red switch located underneath the mains plug on the backside of the desk to change voltage
settings. Make sure to change voltage settings before switching on the desk.
1.3 DMX-Outputs
Four DMX-output sockets are located on the backside of desk
The output-sockets are 5pin with the following occupation:
Pin 1 à shield
Pin 2 à data –
Pin 3 à data +
Pin 4 à not occupied
Pin 5 à not occupied
Output A1 and A2: DMX channel 1 – 512
Output B1 and B2: DMX channel 1 – 512
No DMX merger or booster are required.
Page 8
JB-lighting Lichtanlagen GmbH Sallersteigweg 15 D-89134 Blaustein phone: +49 7304 9617-0
www.jb-lighting.de - 8 -
2 Configuration (Setup)
To control any lighting equipment the configuration of the desk has to be set first.
There is a number of fixture setups available in the library. If the required data is not available a configuration
can be self defined.
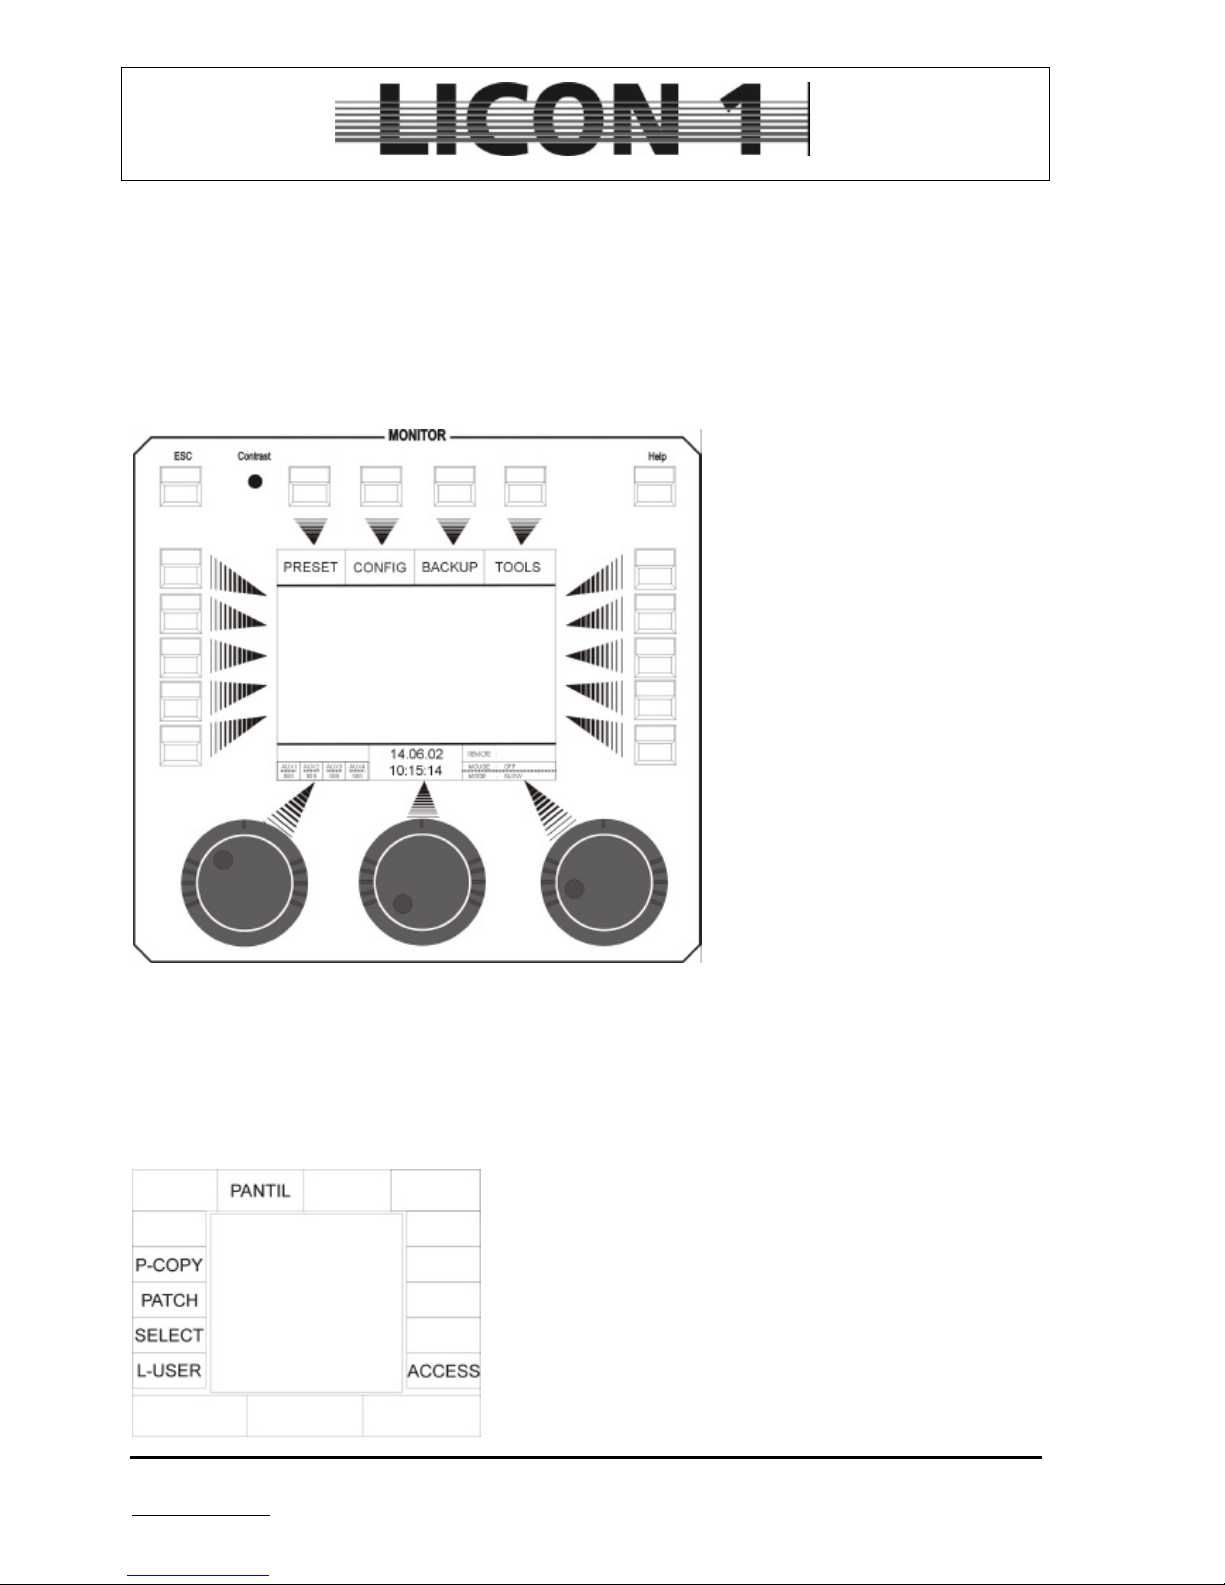
Press softkey CONFIG to enter configuration menu.
à chapter 2.1 L-User
2.1 L-USER / Configuration of a self-defined fixture setup
Enter menu by pressing softkey L-USER.
There are 20 different fixture setups available.
Page 9
JB-lighting Lichtanlagen GmbH Sallersteigweg 15 D-89134 Blaustein phone: +49 7304 9617-0
www.jb-lighting.de - 9 -
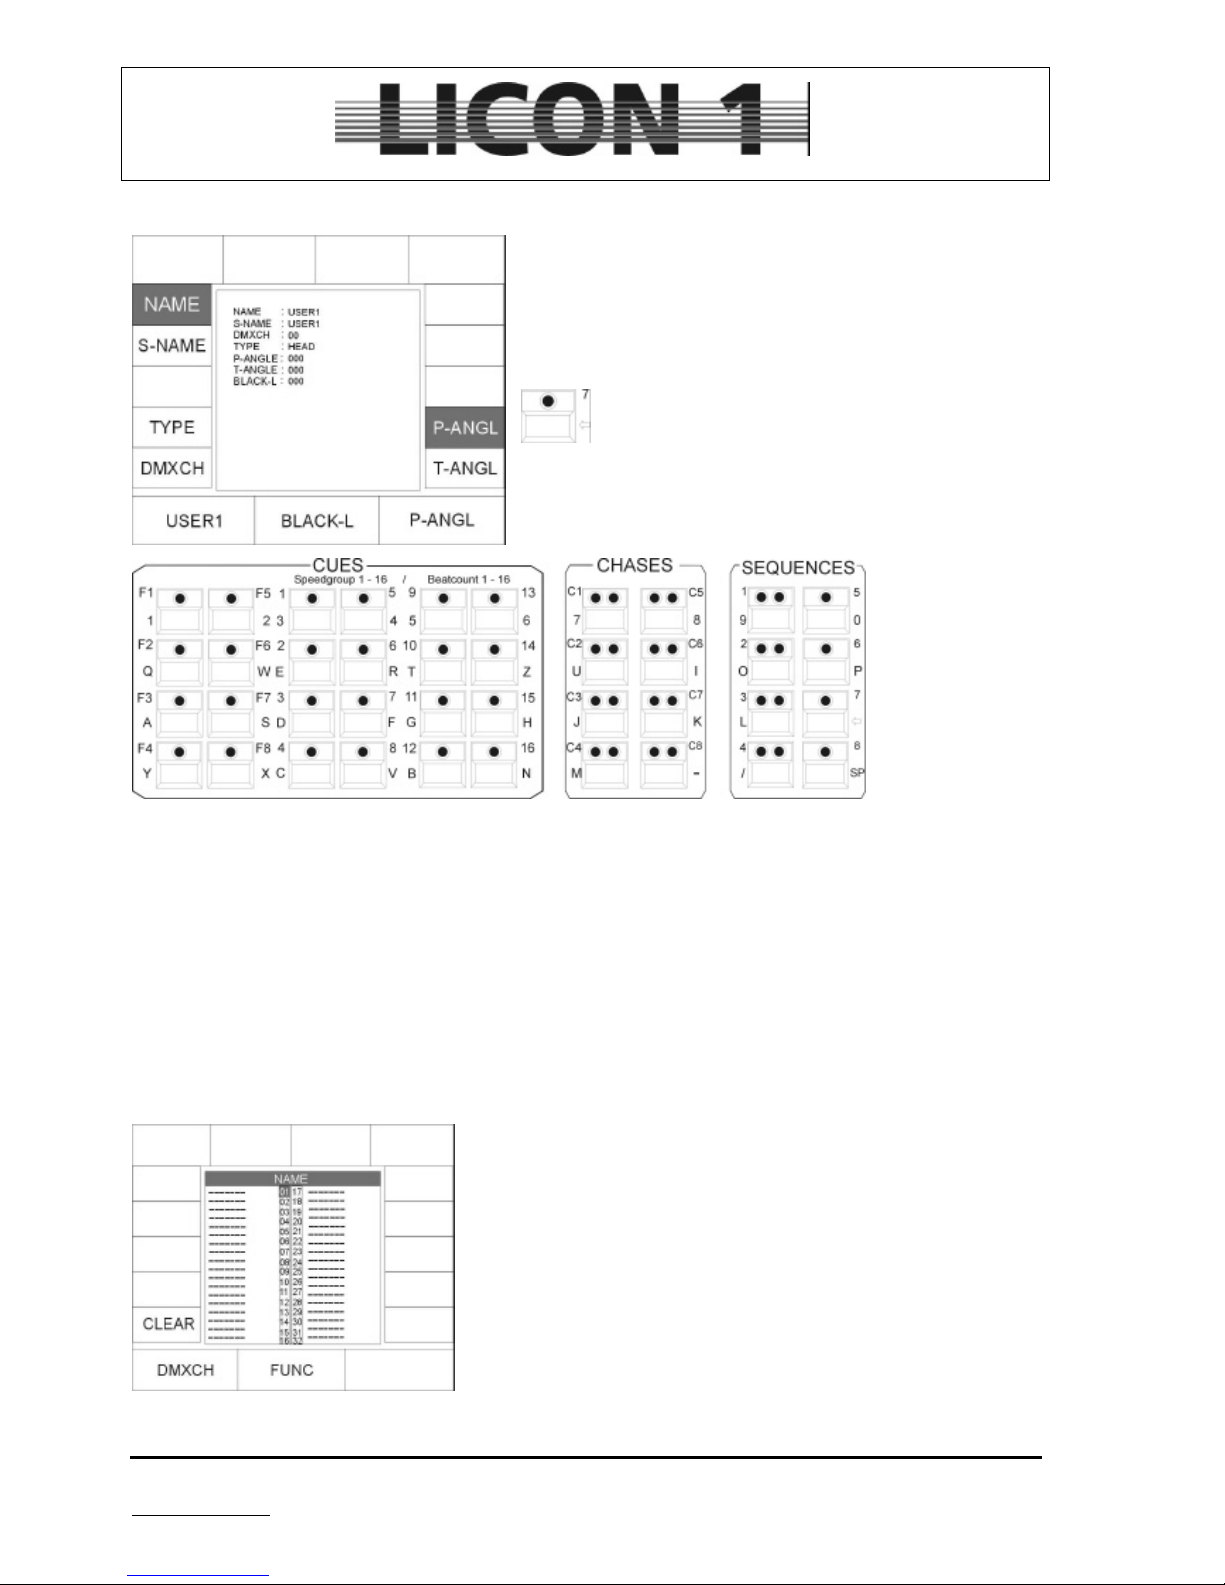
Use softkeys to activate the required paramteter
Insert fixture data by using the keys in the Cues/Chases
/Sequence section.
Use arrow key to clear field first.
NAME: Name of moving-light (up to 20 characters)
S-Name: Short name. Will be displayed later on ( up to 6 characters)
TYPE: Choose type of fixture
à Mirror: scan
à Head: moving head
Press TYPE, until desired type is displayed.
DMXCH: Enter dmx protocol of fixture.
For each fixture 25 control channels and 7 fixed channels are available.
Control channels: standard dmx channels
Fixed channels : dmx channels which are set at a certain dmx value. Can not be adjusted
later on (lamp on/off for instance).
After choosign DMXCH the display looks like this
Use the encoder wheel which is located in the middle to enter the
functions of the fixture.
Use the encoder wheel located on the left hand side to switch to
next DMX channel.
The name of the functions displayed match the name of the keys in
the feature-selection block.
Channels with no function have to be entered as fixted channels
with a DMX value at 000.
To invert a DMX channel press softkey INVERT. (Not for pan and
tilt movement
Page 10

JB-lighting Lichtanlagen GmbH Sallersteigweg 15 D-89134 Blaustein phone: +49 7304 9617-0
www.jb-lighting.de - 10 -
Then enter assignment of shutter and dimmer as they are administered separately
• Adjustment of fixtures with shutter and dimmer one one channel
Assign feature shutter to the DMX channel. Press softkey BRIGHT and BLACKO to assign dimmer and
shutter (blackout) function to the same DMX channel. For confirmation please check display. There will be a
“B” and an “O” shown for brightness (dimmer) and blackOut (shutter)
• Fixtures with separat DMX channels for dimmer and shutter:
Assign dimmer and shutter to the required DMX channels. Assign blackout function to shutter channel by
pressing softkey BLACKO. An “O” will be displayed.
Assign dimmer function to dimmer channel by pressing softkey BRIGHT. A “B” will be displayed.
• Fixed channels:
Fixed channels are required for two different applications. First use fixed channels, when the dmx-value
stays the same all the time and is not going to be changed during the process of programming.
Second use fixed channels when the DMX protocol of the fixture has some not occupied channels.
To enter DMX value of a fixed channel use encoder wheel located on the right hand side.
INVERS Use softkey invers to invert all functionas exept pan and tilt movement.
Use function if a channel works contrary to all other, for instant if the iris is open fully at a
DMX-value of “0” and closed at “255”.
After the inversion it will be closed at a DMX-value of 0 and open at 255.
CLEAR Use softkey CLEAR to delete inversion
P-ANGL: Maximum of pan movement amplitude. Use encoder wheel to enter data. If this value is
entered wrongly it might cause problems when working with preprogrammed moving
patterns later on.
T-ANGL: Maximum of tilt movement amplitude. Use encoder wheel to enter data. If this value is
entered wrongly it might cause problems when working with preprogrammed moving
patterns later on.
BLACK-L: Enter DMX value to adjust the level at which a black-out will be activated when shifting a
fader later on. (Blackout-Level) A DMX-value of 5 will serve most applications quite well.
à press ESCAPE to leave menu
Page 11
JB-lighting Lichtanlagen GmbH Sallersteigweg 15 D-89134 Blaustein phone: +49 7304 9617-0
www.jb-lighting.de - 11 -
2.2 SELECT / CONFIG-set configuration by means of library
Enter select menu by pressing softkey CONFIG/SELCT:
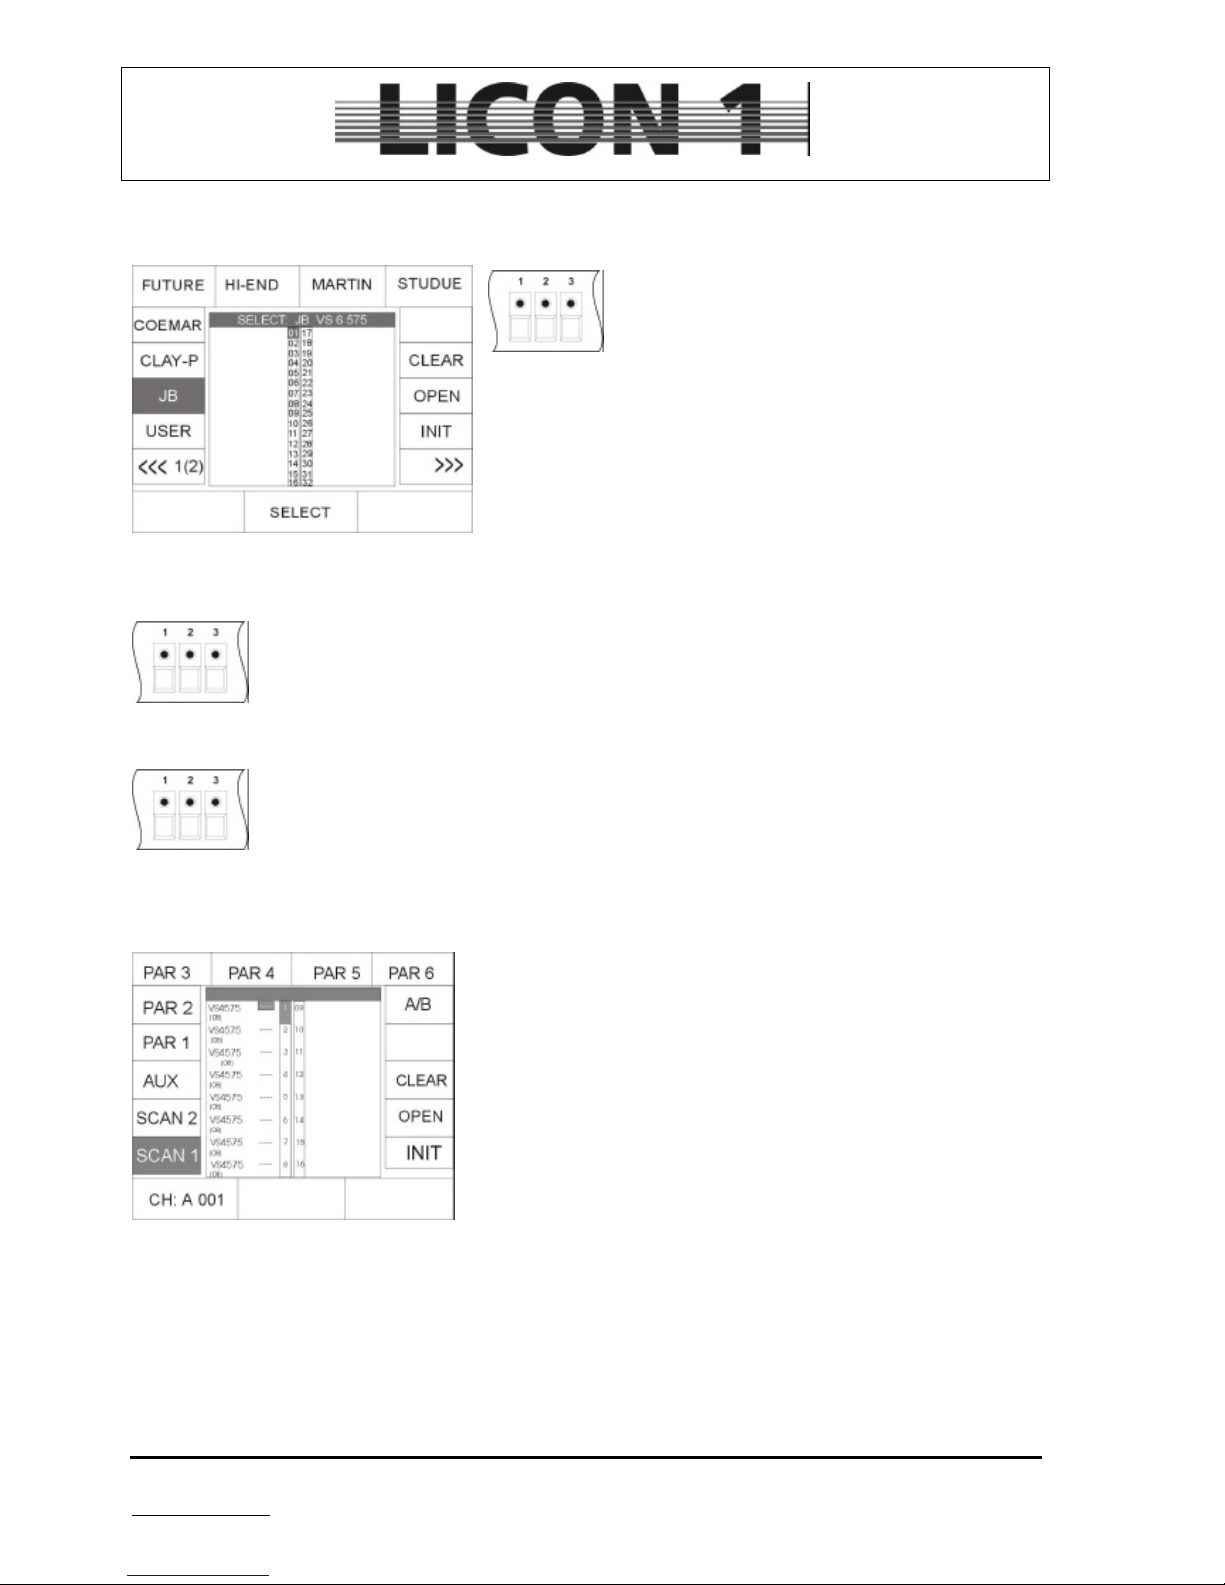
Press keys of fixture/par-selection block to
choose the number of fixtures which are going to
be entered to fixture list. (Only one type of fixture
can be entered in the fixture list at the same time).
Press softkeys to choose brand name from library. Use encoder
wheel to select type of fixture.
Press softkey INIT to insert fixture to list.
For each different type of fixture repeat procedure.
à press ESCAPE to leave menu
2.2.1 Delete one fixture from list
To delete one or more fixtures from list select them first by pressing the keys in the
Fixture/Par selection block. Confirm process by pressing softkey OPEN.
2.2.2 Delete all fixtures from list
To clear the whole fixture list press softkey CLEAR and confirm by pressing softkey YES .
2.3 PATCH / Assignment of fixtures start addresses
After setting the fixture list, enter the start addresses of the fixtures.
To enter the start addresse activate patch menu by pressing
softkeys CONFIG/PATCH
The display will show the fixture list, which has been entered before.
Each fixture is displayed by its short name. The number of required
DMX channels is listed below the fixture in brackets. There is two
pages for fixtures (scan 1 and scan 2), four pages for dimmer (par 1
– par 4) and one page for the aux keys.
The activated pages is displayed in an inverted way.
The softkeys:
SCAN 1. DMX addresses for fixture no. 1 to fixture no. 16
SCAN 2: DMX addresses for fixture no. 17 to fixture no. 32
AUX: DMX addresses for the aux keys
PAR 1. DMX addresses for dimmer channel no. 1 to 16
PAR 2. DMX addresses for dimmer channel no. 17 to 32
PAR 3. DMX addresses for dimmer channel no. 33 to 48
PAR 4. DMX addresses for dimmer channel no. 49 to 64
Page 12

JB-lighting Lichtanlagen GmbH Sallersteigweg 15 D-89134 Blaustein phone: +49 7304 9617-0
www.jb-lighting.de - 12 -
PAR 5. DMX addresses for dimmer channel no. 65 to 80
PAR 6. DMX addresses for dimmer channel no. 81 to 96
A/B: Selection of DMX line
CLEAR. Delete all DMX addresses
OPEN: Delete DMX address from selected unit only
PATCH. Confirm DMX address
Left encoder wheel: Select DMX address
Encoder wheel in the middle: move cursor up and down
Right encoder wheel: move curor left and right
2.3.1 Enter start addresses for fixtures
Select PATCH menu first.
The first fixture will be automatically activated and DMX address no. 1 or the first not occupied DMX address
will be suggested. If you find the suggested DMX address to your satisfaction, confirm by pressing softkey
PATCH. If you need any other DMX address use the encoder wheel with is located in the middle to change
the address.
Select the required page (it will displayed inverted)
Select starting address for first fixture by turning the encoder wheel.
Confirm starting address by pressing softkey PATCH.
Fixtures can be selected by turning the encoder wheel located in the middle.
Press softkey A/B if you want to change DMX line
à to leave this menu press ESCAPE
2.3.2 Delete start address from one fixture
Enter patch menu by pressing softkey CONFIG/PATCH
Select one fixture by turning the encoder wheel located in the middle. Press softkey OPEN
à to leave this menu press ESCAPE
Page 13
JB-lighting Lichtanlagen GmbH Sallersteigweg 15 D-89134 Blaustein phone: +49 7304 9617-0
www.jb-lighting.de - 13 -
2.3.3 Delete all start addresses
Enter patch menu by pressing softkeys CONFIG/PATCH.
Press softkey CLEAR. Choose from display to delete either fixture (scan), aux, par or all start addresses
à to leave this menu press ESCAPE
2.4 PATCH Assignment of DMX channels to dimmer/PAR section
Enter config menu by pressing softkey CONFIG.
Select PATCH menu by pressing softkey.
SCAN 1: DMX addresses of fixtures No. 1 – 16
SCAN 2: DMX addresses of fixtures No. 17 – 32
AUX: DMX addresses of AUX keys
PAR1: DMX addresses of dimmer channels
1 - 16
PAR2: DMX addresses of dimmer channels
17-32
PAR3: DMX addresses of dimmer channels
33-48
PAR4: DMX addresses of dimmer channels
49-64
PAR5: DMX addresses of dimmer channels
65-80
PAR6: DMX addresses of dimmer channels 81-96
A/B: Selection of DMX output
CURVE: Selection of dimmer curve
CLEAR: Delete all DMX addresses
OPEN: Delete DMX addresses selective
PATCH: Confirmation of data input
left encoder wheel: Enter DMX addresses
encoder wheel in the middle: Moves cursor up and down
right encoder wheel: Moves cursor to the left and to the right
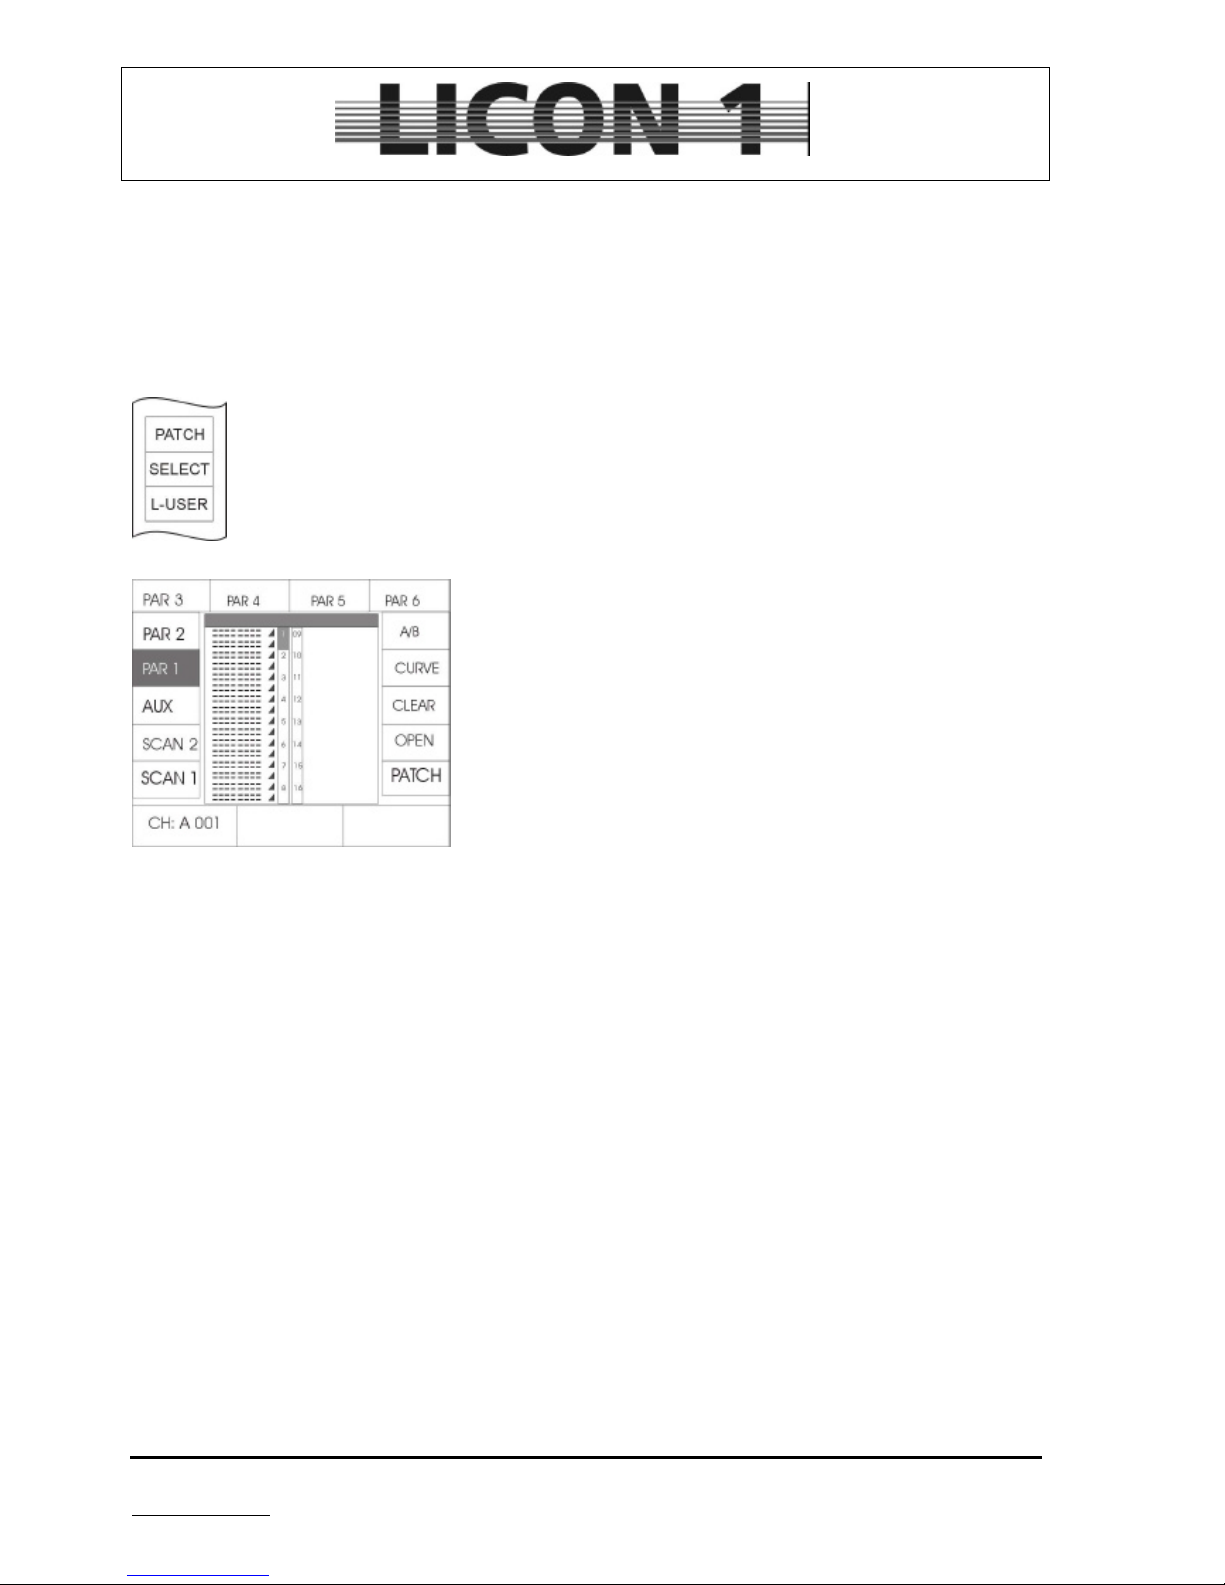
2.4.1 Enter start addresses for dimmer channels
Up to four different DMX addresses can be assigned to each par key.
Select PAR list page one, by pressing the softkey PAR 1.
Use encoder wheels to move cursor up and down and to select the required position.
Select DMX output by pressing softkey A/B
Choose DMX address by turning the left encoder wheel.
Confirm input by pressing softkey PATCH.
Page 14
JB-lighting Lichtanlagen GmbH Sallersteigweg 15 D-89134 Blaustein phone: +49 7304 9617-0
www.jb-lighting.de - 14 -
2.4.2 Delete one DMX address
Enter config menu by pressing softkey CONFIG.
Select PATCH menu by pressing softkey.
To delete one DMX address move cursor by turning the encoder wheel located in the middle.
Press softkey OPEN to confirm process.
2.4.3 Delete all DMX addresses
Enter config menu by pressing softkey CONFIG.
Select PATCH menu by pressing softkey.
To delete all DMX addresses press softkey CLEAR and the
corresponding softkey either for:
ALL: all DMX addresses
SCAN: only fixtures DMX.addresses
AUX: only AUX-key DMX addresses
PAR: only dimmer channels DMX addresses
2.4.4 Enter dimming curve
Dimmer/Par and aux channels can work in different modes (linear, exoponetioa and switch)
The assignment is made in the patch menu.
Enter config menu by pressing softkey CONFIG.
Select PATCH menu by pressing softkey.
Select from:
linear mode
exponential mode
switch mode
Press softkey CURVE to select the desired mode.
à to leave menu press ESCAPE
Page 15
JB-lighting Lichtanlagen GmbH Sallersteigweg 15 D-89134 Blaustein phone: +49 7304 9617-0
www.jb-lighting.de - 15 -
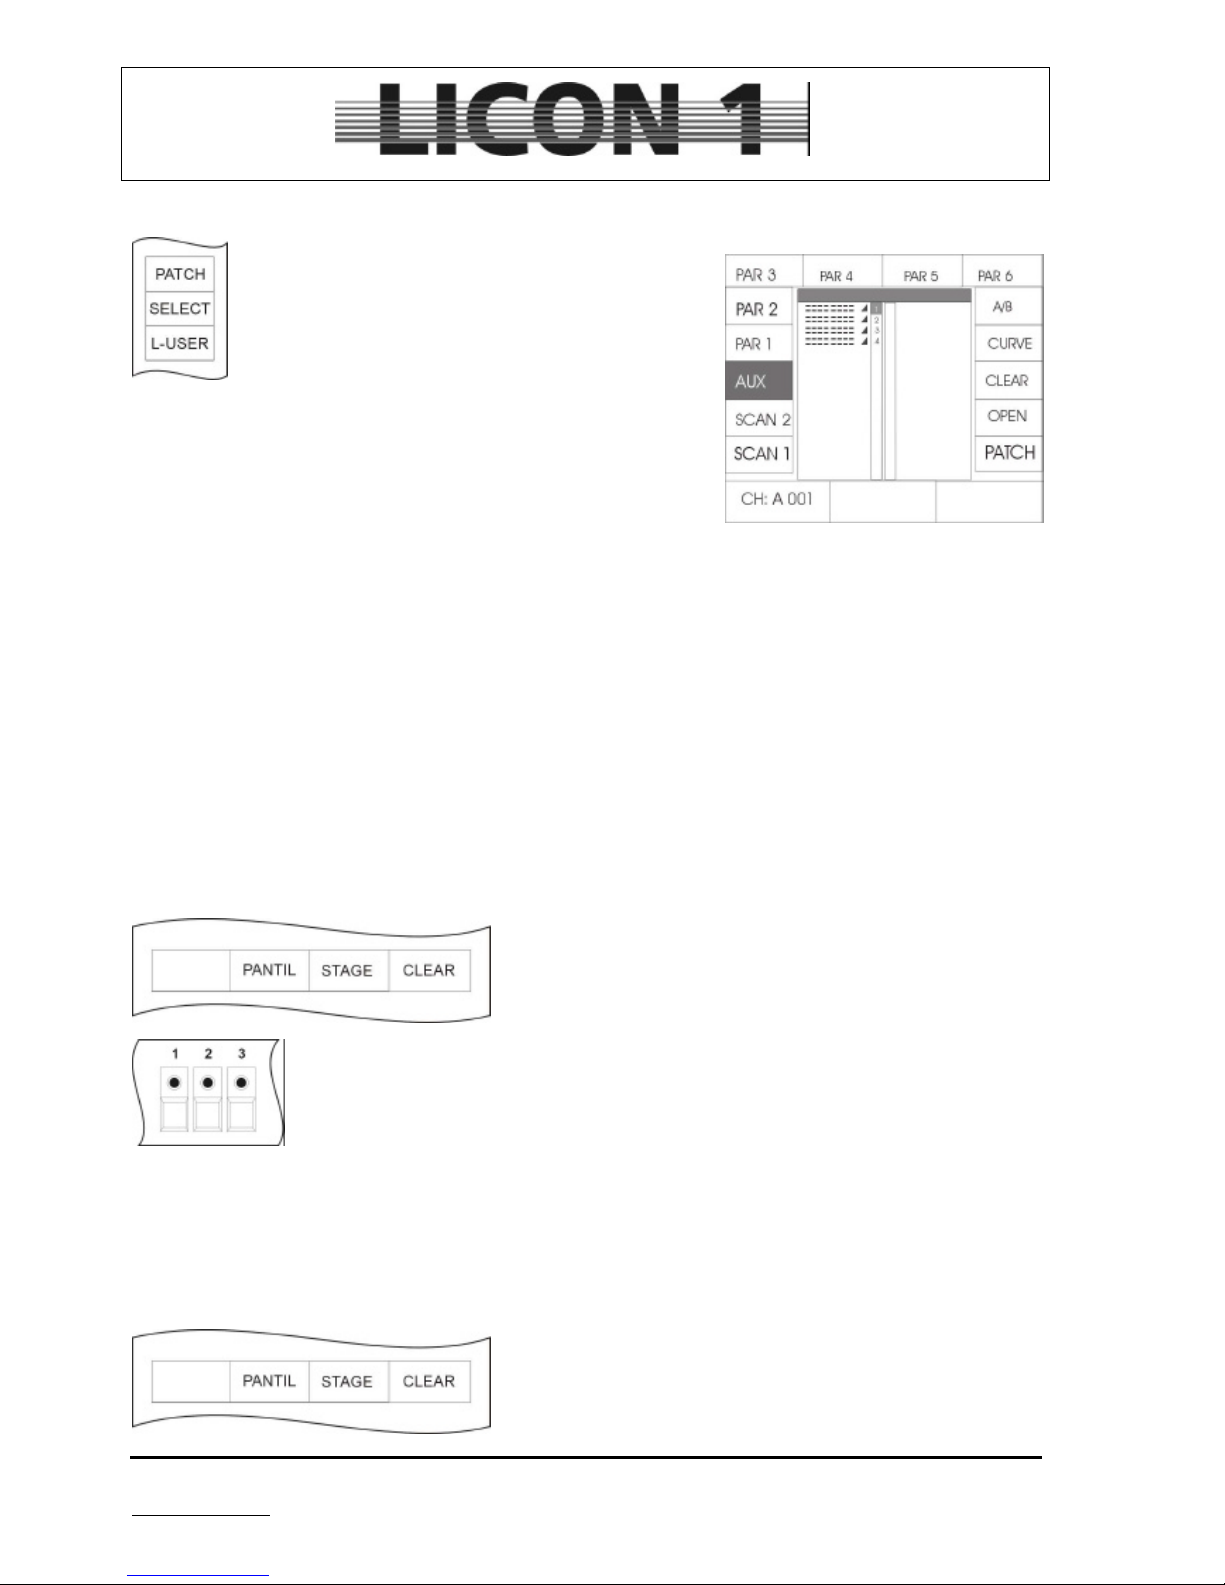
2.4.5 Enter DMX addresses for AUX keys
Enter config menu by pressing softkey CONFIG.
Select PATCH menu by pressing softkey.
AUX keys are designed to control DMX devices such
like fog machines ect.
A maximum of four DMX channels can be assigned to
each AUX key.
Select DMX address by turning the left encoder wheel.
Confirm by pressing softkey PATCH
To delete input please see chapter 2:4.3
à Press escape to leave menu
2.5 P-COPY Copy Presets
The copy function enables the operator to copy Presets from one L-User fixture to others, e.g. after change
of fixture list.
The copy function will effect every parameter except PAR-Presets, Pan/Tilt Presets and moving patterns.
Enter menu by pressing softkey P-COPY.
Select fixture by turning the encoder wheel located in the middle. Use PAR-/Fixture selection keys to select
destination and press softkey EXEC (execute).
The presets will be copied to every activated fixture. (LED is lit)
2.6 PANTIL / Inversion of pan and tilt channels
Enter config menu by pressing softkey CONFIG.
Select pantil menu by pressing softkey PANTIL
Select fixtures by pressing fixture keys.
Press softkey INVPAN to invert pan movement
Press softkey INVTIL to invert tilt movement
à to leave this menue press ESCAPE
2.6.1 Revocation of pan and/or tilt inversion
Enter config menu by pressing softkey CONFIG.
Press softkey PANTIL to enter menu
Page 16
JB-lighting Lichtanlagen GmbH Sallersteigweg 15 D-89134 Blaustein phone: +49 7304 9617-0
www.jb-lighting.de - 16 -
Select fixtures by pressing fixture keys.
The fixture is activated when its number is displayed in an inverted way.
Press softkey INVPAN to revoke inversion of pan movement
Press softkey INVTIL to revoke inversion on tilt movement
à to leave this menu press ESCAPE
2.6.2 Swap pan and tilt channels
Enter config menu by pressing softkey CONFIG.
Press softkey PANTIL to enter menu
Select fixtures by pressing fixture keys.
The fixture is activated when its number is displayed in an inverted way.
Press softkey X-CHG to swap pan and tilt channels.
2.7 The MIDI function
The Licon1 can be completely remote controlled by means of a MIDI-keyboard or MIDI-Sequencer. Every
single key of the Licon1 can be assigned to a MIDI note.
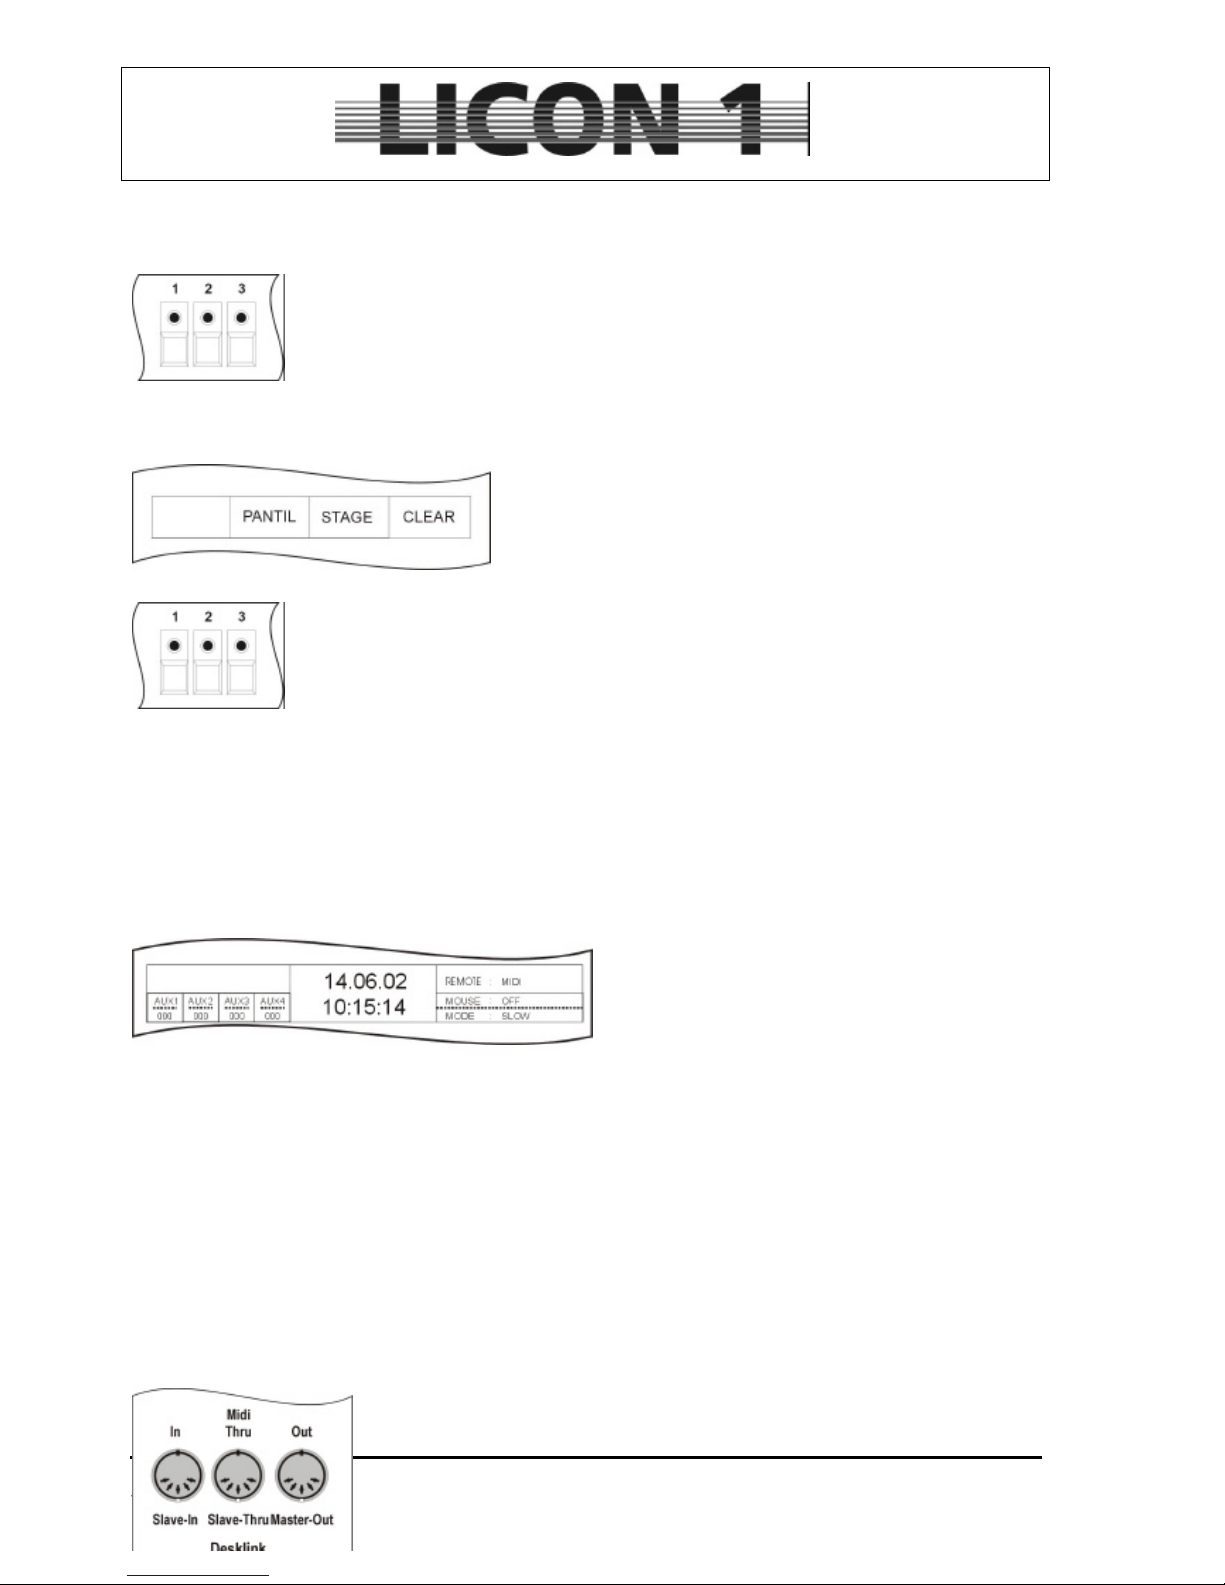
The first step is to activate the MIDI-mode. The actuall state of the MIDI-mode is shown on the display:
REMOTE : MIDI à MIDI active
REMOTE : OFF à MIDI off
2.7.1 Activate the MIDI function
To activate the MIDI function enter TOOLS menu by pressing softkey TOOL. Then press softkey REMOTE
to enter the remote menu. To activate MIDI press softkey MIDI.
à Press escape to leave menu
2.7.2 Deactivate the MIDI function
To deactivate the MIDI function enter TOOLS menu by pressing softkey TOOL. Then press softkey
REMOTE to enter the remote menu. To deactivate MIDI press softkey OFF
à Press escape to leave menu
2.7.3 Connect a MIDI device
Page 17
JB-lighting Lichtanlagen GmbH Sallersteigweg 15 D-89134 Blaustein phone: +49 7304 9617-0
www.jb-lighting.de - 17 -
To connect the Licon1 to a MIDI device use a standard 5pin MIDI-cable.
You will find the MIDI-sockets on the back panel of the lighting control consol.
Connect the MIDI-cable to the MIDI-in socket of the Licon1. and to the MIDI-out socket of your MIDI device.
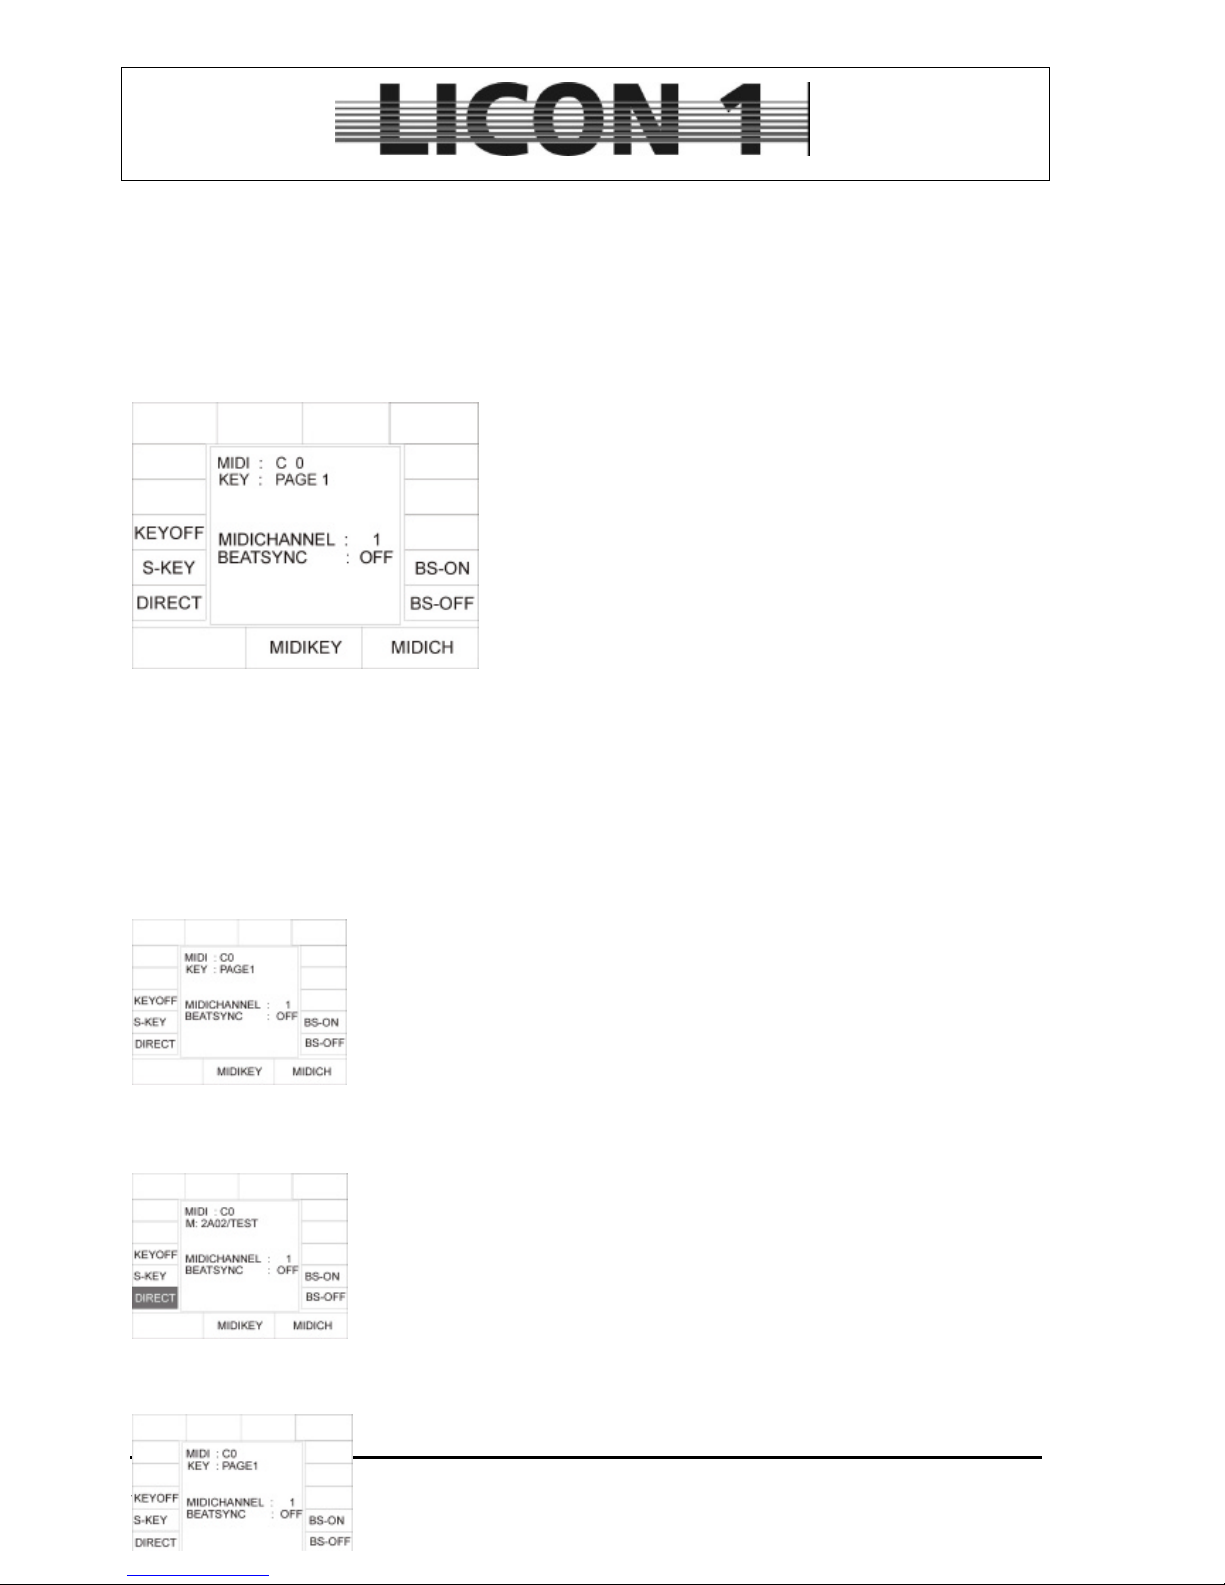
2.7.4 Assign the MIDI channel
MIDI can be send on 16 different channels. Set the Licon1
configuration to the desired channel first.
Enter menu by pressing softkeys CONIFG/MIDI.
Use encoder wheel situated on the right hand side (MIDIDH) to
enter midi channel. The adjusted midi-channel will be shown on
the display.
2.7.5 Assign MIDI notes
Midi-notes can be assigned with a midi-device linked or without one.
It is very important to press softkey DIRECT first. If this softkey is displayed inverted access to all levels of
cues, chases and sequences is obtained. If it is not displayed inverted access only to cue page 1 and bank A
is obtained.
• Assign midi-notes with a linked midi-device (e.g. keyboard)
Enter midi-menu by pressing softkey CONFIG/MIDI. Then press one of the midi-
keyboards keys. The midi-note will be shown on the display (e.g. G5). Then
press key of the cue/chase or sequence section to assign it to the midi-note.
If softkey DIRECT is displayed inverted access to page 1 to 3, bank A to D is
obtained
There are some midi-notes preoccupied with different cues or chases. If you
want to assign any other key to one of the midi-notes, simply press the desired
key.
• Assign midi-notes without a linked midi-device
Enter midi-menu by pressing softkey CONFIG/MIDI.
Use encoder wheel which is situated in the middle to recall the midi-notes. Press
one of the keys in cues/chases and sequence section to assign it to the midinote
2.7.6 Assign softkeys
Page 18
JB-lighting Lichtanlagen GmbH Sallersteigweg 15 D-89134 Blaustein phone: +49 7304 9617-0
www.jb-lighting.de - 18 -
The softkeys are named DISP. Partially they can be assigned like described in chapter: Assign midi-notes
with a linked midi-device.
Only the softkeys DISP1, DISP2, DISP3, DISP13, DISP14 and the escape key have to be assigned
differently.
Enter midi-menu by pressing softkey CONFIG/MIDI. Then press one of the midi-keyboards keys. The midinote will be shown on the display (e.g. G5). Then press softkey S-KEY to recall the above mentioned keys.
2.7.7 BEATSYNC
Chases and sequences can run on sound-input. If a sequencer is linked to the
Licon1 which is able to send a beatsync signal, they chases and sequences can
run on the beatsync signal instead of the sound signal.
To enter the menu press softkey CONFIG/MIDI. Press softkey BS-ON to
activate beatsync function.
To deactivate beatsync function press softkey BS-OFF.
The display will show the actuall state of the beatsync function.
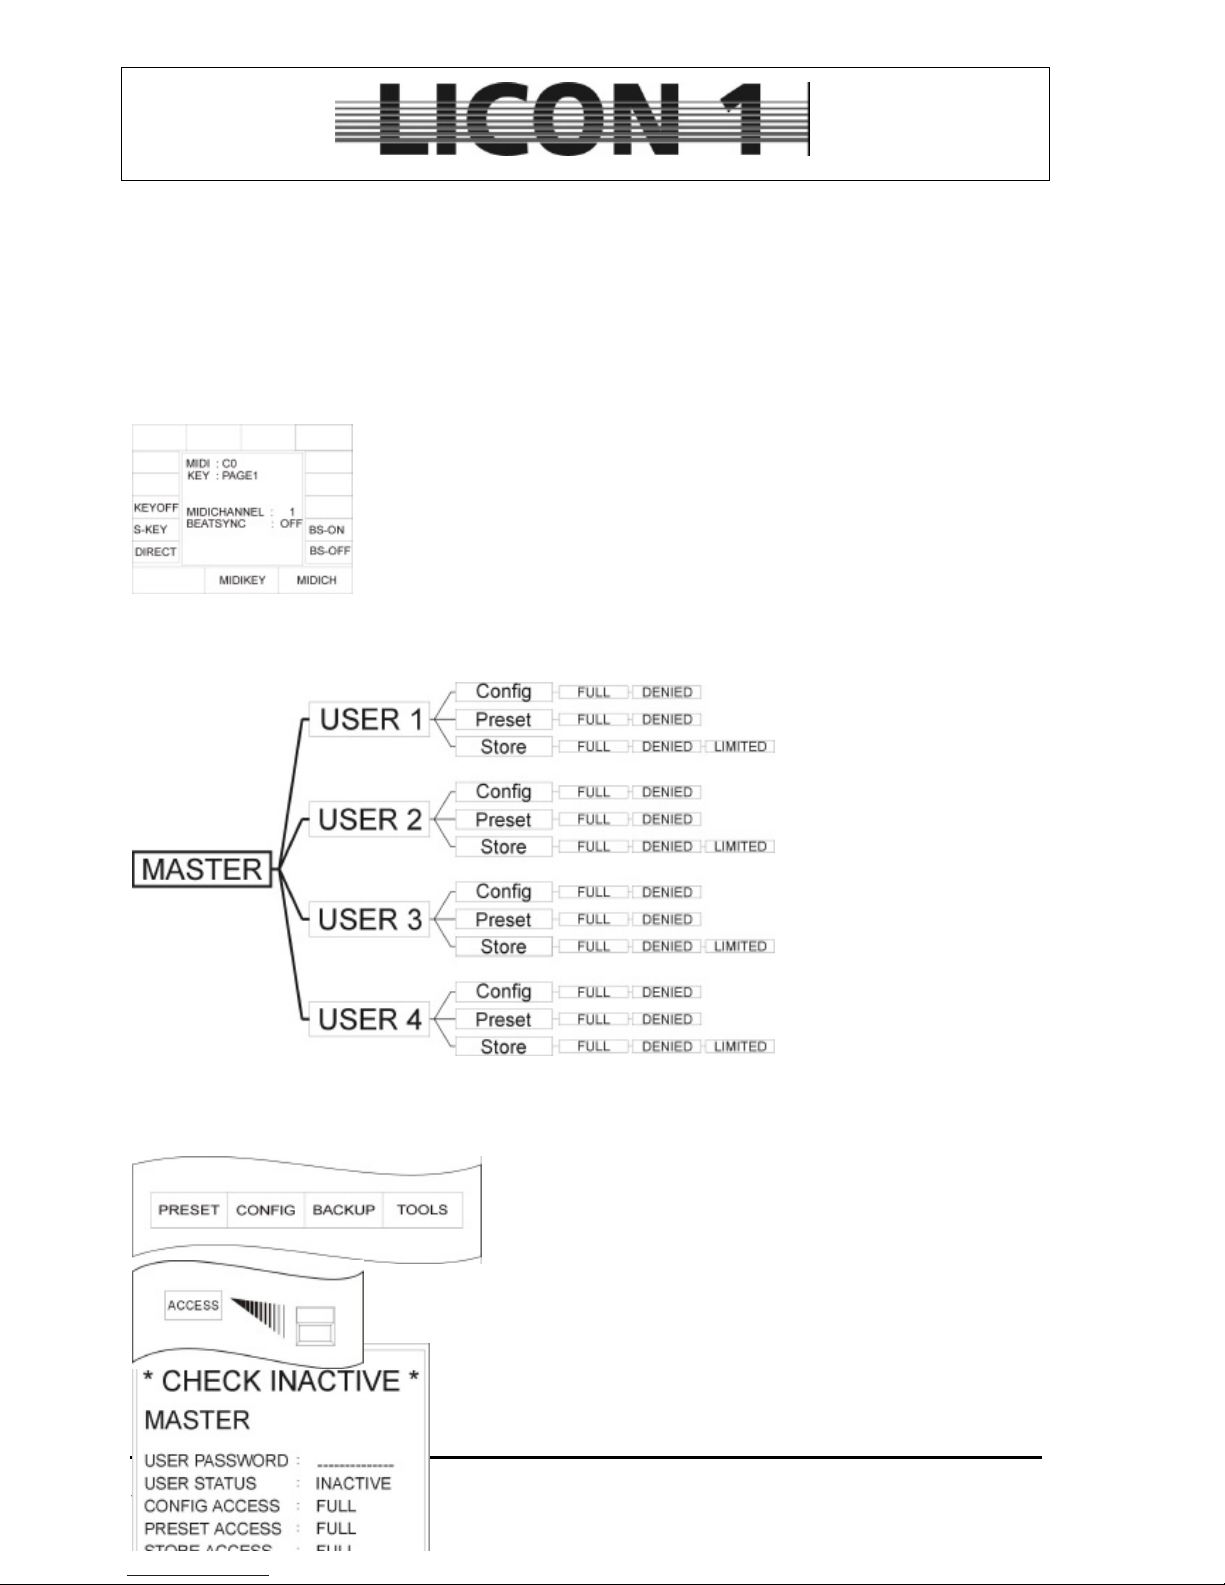
2.8 ACCESS / Passwords
One master password and
four user passwords with
different authorization can be
activated. First a master
password has to be entered.
Then different profiles can be
assigned to the different
users.
2.8.1 Enter master password
Enter config menu by pressing softkey CONFIG.
Press softkey ACCESS to enter password menu
Enter master passwort first.
Use keys from Cue/Chase/Sequence block.
Page 19
JB-lighting Lichtanlagen GmbH Sallersteigweg 15 D-89134 Blaustein phone: +49 7304 9617-0
www.jb-lighting.de - 19 -
Activate password by pressing softkey CHECK. The confimation on the display will show CHECK ACTIVE
à Press escape to leave menu
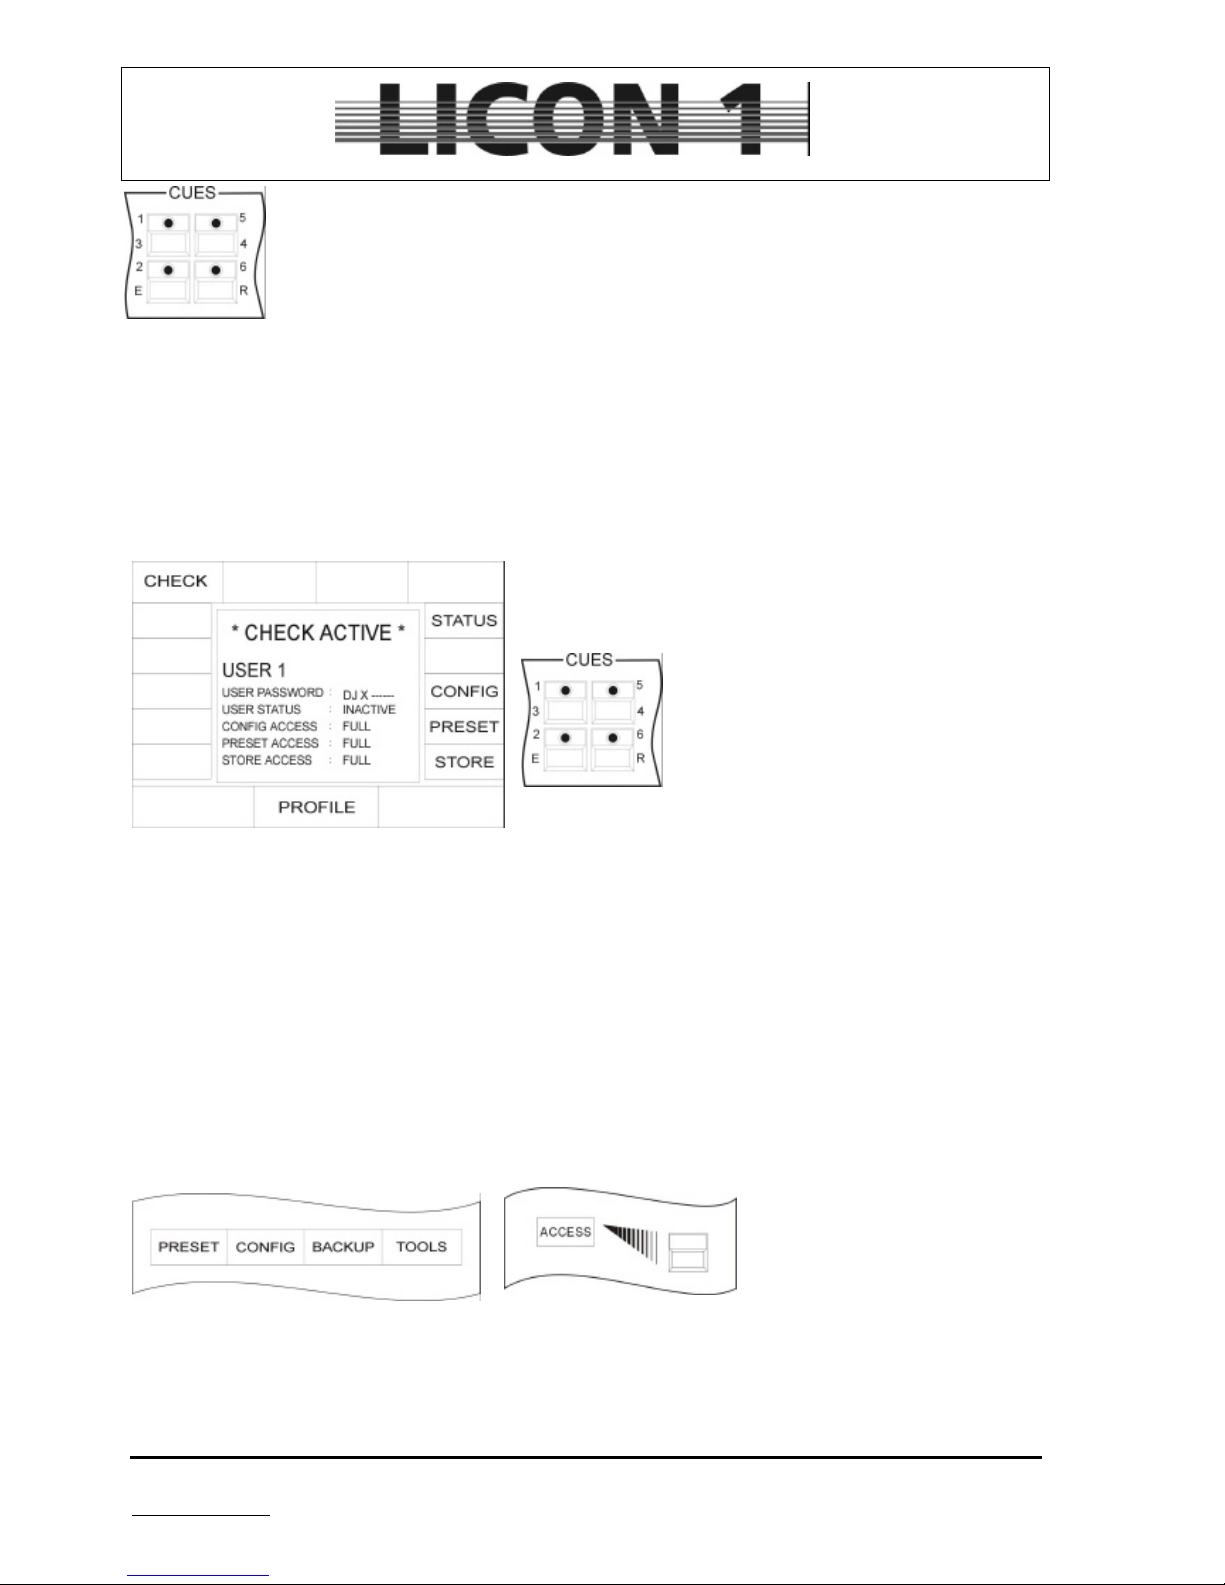
2.8.2 Enter User passwords
After activating a master password, four different user passwords can be activates.
Each user password can provide a different profile.
Example: USER 1
First enter USER 1 password by means of keys in the
cue/chase/sequence block.
Confirm and activate password by pressing softkey STATUS.
Define user profile by pressing the softkeys.
CONFIG: access to config menu, select full or denied
PRESET: access to preset menu, select full or denied
STORE: access to store functions, select full, denied or limited
à limited: Cues and chases can be stored on page 3 / bank 4
à Press escape to leave menu
2.8.3 Checkback of passwords
Checkback of password will occur when desk is switched on. Enter password and press softkey OK.
In case of forgetting the password, call your local JB-lighting dealer.
2.8.4 Changing passwords
Enter config menu by pressing softkey CONFIG.
Press softkey ACCESS to enter
password menu
Enter new password like described in chapter 2.8.1 and 2.8 2
à Press escape to leave menu.
Page 20

JB-lighting Lichtanlagen GmbH Sallersteigweg 15 D-89134 Blaustein phone: +49 7304 9617-0
www.jb-lighting.de - 20 -
3 Programming the fixtures and dimmers in combi-section
Cues/Chases /Sequence programmed in combi-section can either contain fixture or par-data.
All Cues/Chases /Sequence will work LTP. The latest DMX value works on priority.
Although fixture and par values can be stored in combination in the combi-mode, we will describe process
with fixture data only. If par data has to be stored in combination with fixture data, first adjust par values, then
press store in combi-section and store both, par and fixture data on the same key.
The masterfader which is located in the middle be scale the DMX-values of the par-section, stored in combimode.
Field of application for data stored in combi-section are:
• Timeline edited shows
• Complete sequences (for. Theater application)
• Combined Cues in touring/stage use
• MIDI shows
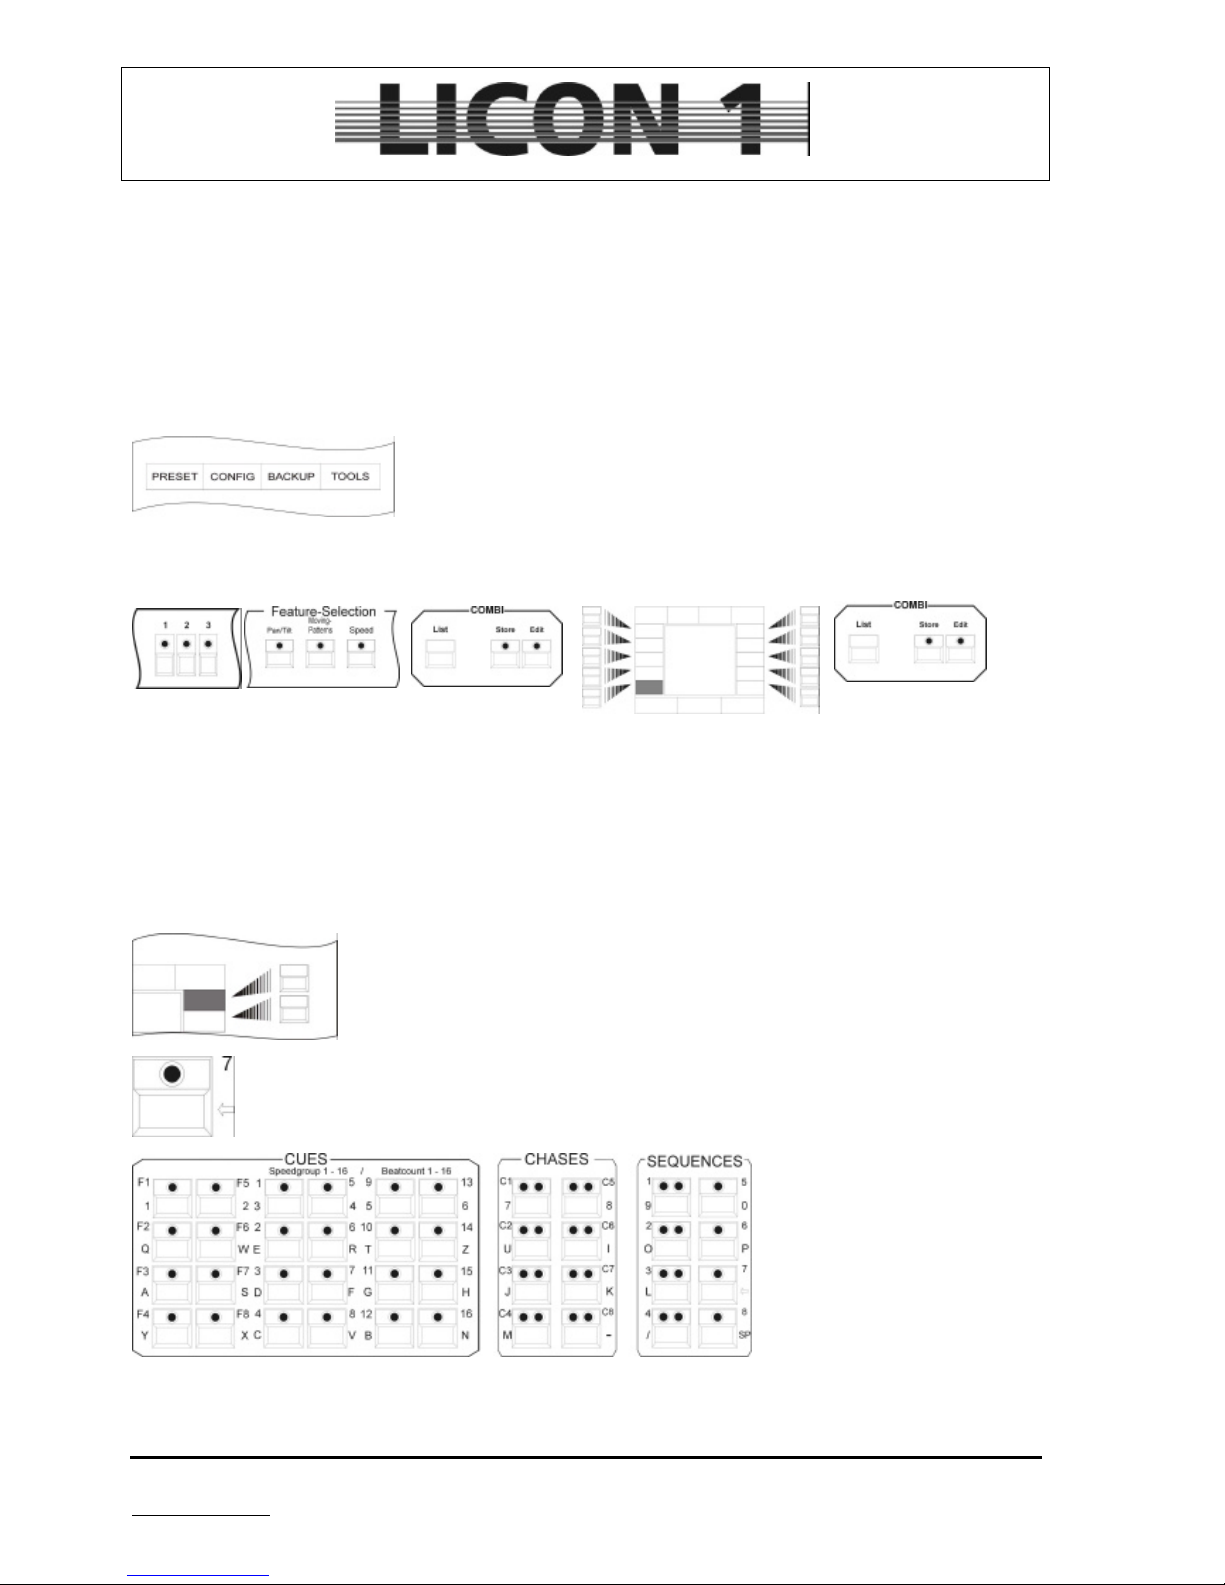
3.1 Direct access to fixtures
Activate fixtures by pressing the Fixture-/PAR-Selection keys.
Fixture is activated, when LED is lit. After fixture is activated use keys
in Feature selection to select a feature and enter dmx-values by means
of the encoder wheels or the preprogrammed presets.
For programming and recall of Cues/Chases /Sequence, the
fixtures have to be assigned to at least one fixture group.
Lightbeams are only visible after shifting master fader and fixture
group fader!!
à see chapter 3.2.1 Programming and recall of fixture groups.
Below the Fiture-/PAR-Selection, the following keys are located:
Recall fixture groups; Highlight function to locate fixtures
Deactivate moving-lights
Inversion of activated moving-lights
Page 21
JB-lighting Lichtanlagen GmbH Sallersteigweg 15 D-89134 Blaustein phone: +49 7304 9617-0
www.jb-lighting.de - 21 -
3.2 To program and recall of fixture groups
Before actually starting to program cues, chases or sequences, the fixtures have to be addressed to fixture
groups and the master fader and the group fader have to be positioned at full.
8 different fixture group fader are available and can be switched four times. To store a group of fixtures on a
group fader proceed as follows:
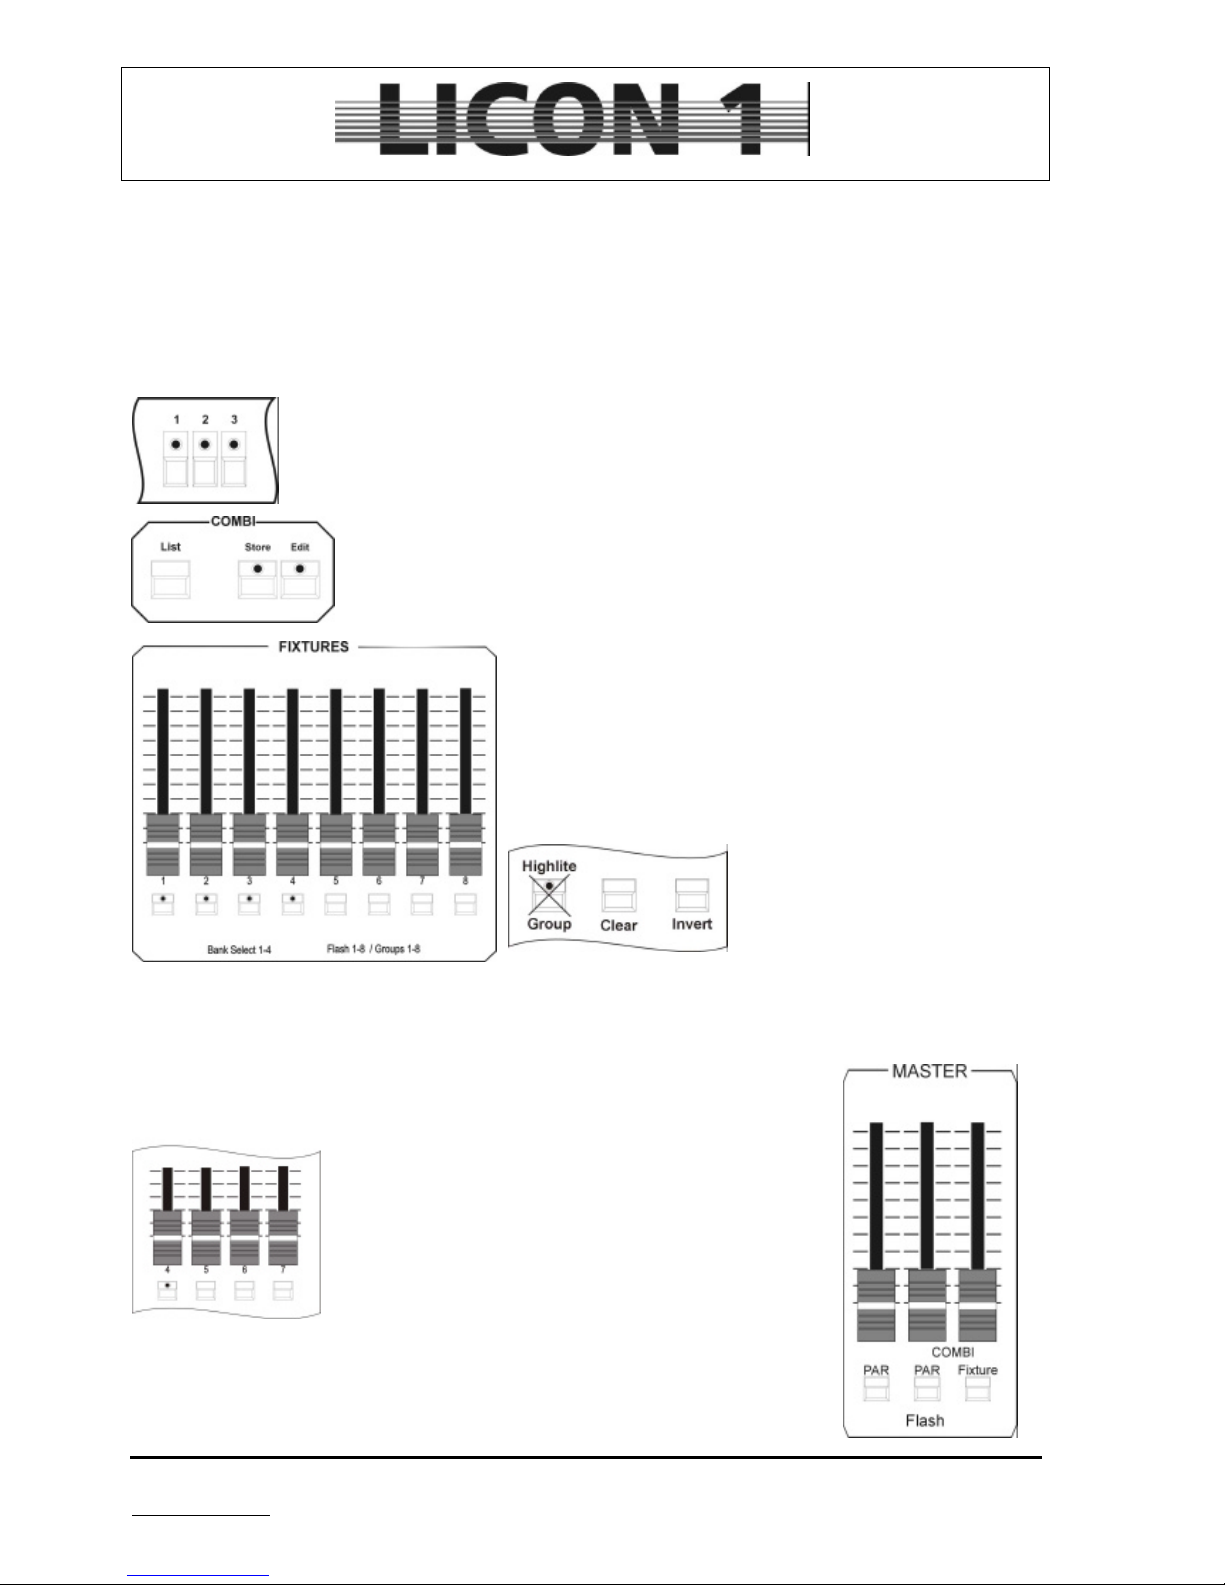
3.2.1 Storage of fixture groups
Select fixtures by pressing fixture keys (LED is lit)
Press combi-sections store key and hold it.
Select one of the fixture group flash keys and press it
simultaneously.
Release both fixture group flash key and store key.
During process of assigning a fixture group to a group
fader, make sure group key is not lit!!!
You find 8 flashkeys located underneath the groupfaders. Flashkey no. 1 to no. 4 is equipped with an LED.
These LEDs mark the activated bank. To switch banks use flashkey in combination with the SHIFT key.
3.2.2 Recall of fixture groups
Select the required fixture group fader and press the
corresponding flash key (which is located underneath). If
you want to activate different groups, press flash keys
simultaneously.
Use master fader and fixture group faders to control light
output of the fixtures.
For program functions and control of the light output while
operating in combi-section use the master located on the
right (fixtures) and the master fader located in the middle
(PARs/Dimmers).
Page 22
JB-lighting Lichtanlagen GmbH Sallersteigweg 15 D-89134 Blaustein phone: +49 7304 9617-0
www.jb-lighting.de - 22 -
3.2.3 Switching banks of fixture group faders
There are 8 fixture group faders available. They can be switched four times. To select one of the
four banks press shift key and simultaneously one of the flash keys located below the fixture
faders. The LED will mark the activated bank
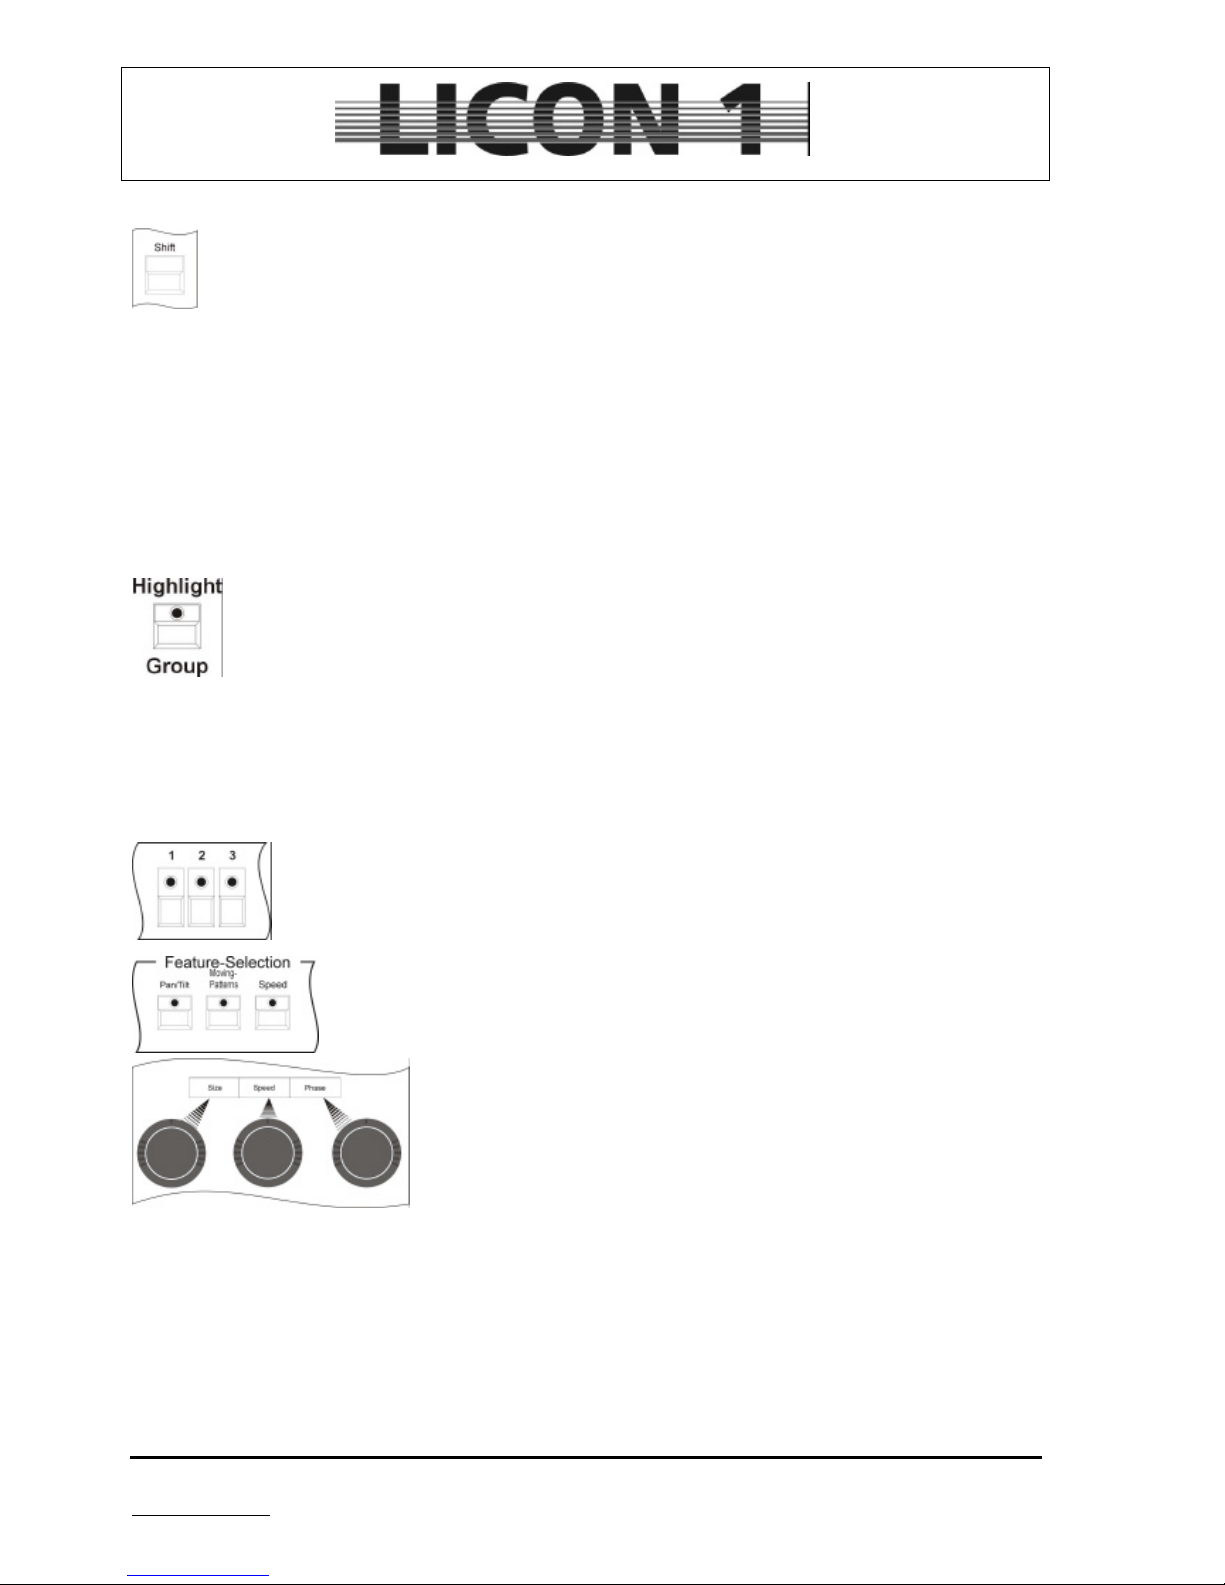
3.3 The Highlight function
The Highlight/Group key has two functions. It helps locating fixtures and it is used to activate fixture groups
To activate fixture goups press the highlight key once. The LED must be lit. Then use the flashkeys which
are located underneath the fixture fader to activate on of the groups. Make sure that the masterfader and the
groupfader is positioned at full.
To locate fixtures:
Press simultaneously Group/Highlight key and one of the keys in Fixture/Par-Selection
The fixture will open shutter and show a white beam.
To switch off the highlight function press the flashing LED of the fixture-key twice
Caution:
A beam is only visible when the fixture is assigned to a fixture group and the fixture group fader is positioned
full.
3.4 How to program fixtures by means of encoder wheels
Activate fixtures by pressing fixture keys (LED has to be lit). Or use group key and fixture
group flash keys. Make sure master fader and fixture group faders are positioned at
100%.
Select parameter from the Feature-Selection section.
Use encoder wheels to enter DMX values.
For visible control always place master fader and fixture group fader at full!!!!
3.4.1 Postitioning in 16bit
If the configuration of the fixtures allows 8bit and 16bit mode adjustment can be done like this: Activate
fixture first. Recall feature PAN/TILT and use the encoder wheel which is located in the middle to adjust 8bit
or 16bit mode.
8bit: FINE OFF (000-255)
16bit FINE ON (000-65535)
Page 23
JB-lighting Lichtanlagen GmbH Sallersteigweg 15 D-89134 Blaustein phone: +49 7304 9617-0
www.jb-lighting.de - 23 -
4 Presets
Presets are the most important tools for programming and should be programmed for each feature before
storing cues, chases or sequences.
Presets access only one feature, like colour or gobo or iris.
Presets are always stored in the preset-menu which is entered by pressing the softkey PRESET.
4.1 Programming and storing presets
To program presets enter PRESET menu first by pressing the softkey
PRESET.
Use this combination of key to enter Preset data
1. 2. 3. 4. 5.
1. select fixture
2. select feature and enter DMX data by means of the encoder wheels
3. press store key in combi section
4. select softkey to store Preset (name Preset)
5. confirm by pressing store key again
4.2 Name a preset
Presets can either be named during process of storage or later on.
To name a preset later on recall it by pressing the according softkey.
Clear field by means of the arrow key
Enter new name. Input has not
to be confirmed by any key. Just
press the softkey of the preset
key again.
à press escape to leave menu
Page 24
JB-lighting Lichtanlagen GmbH Sallersteigweg 15 D-89134 Blaustein phone: +49 7304 9617-0
www.jb-lighting.de - 24 -
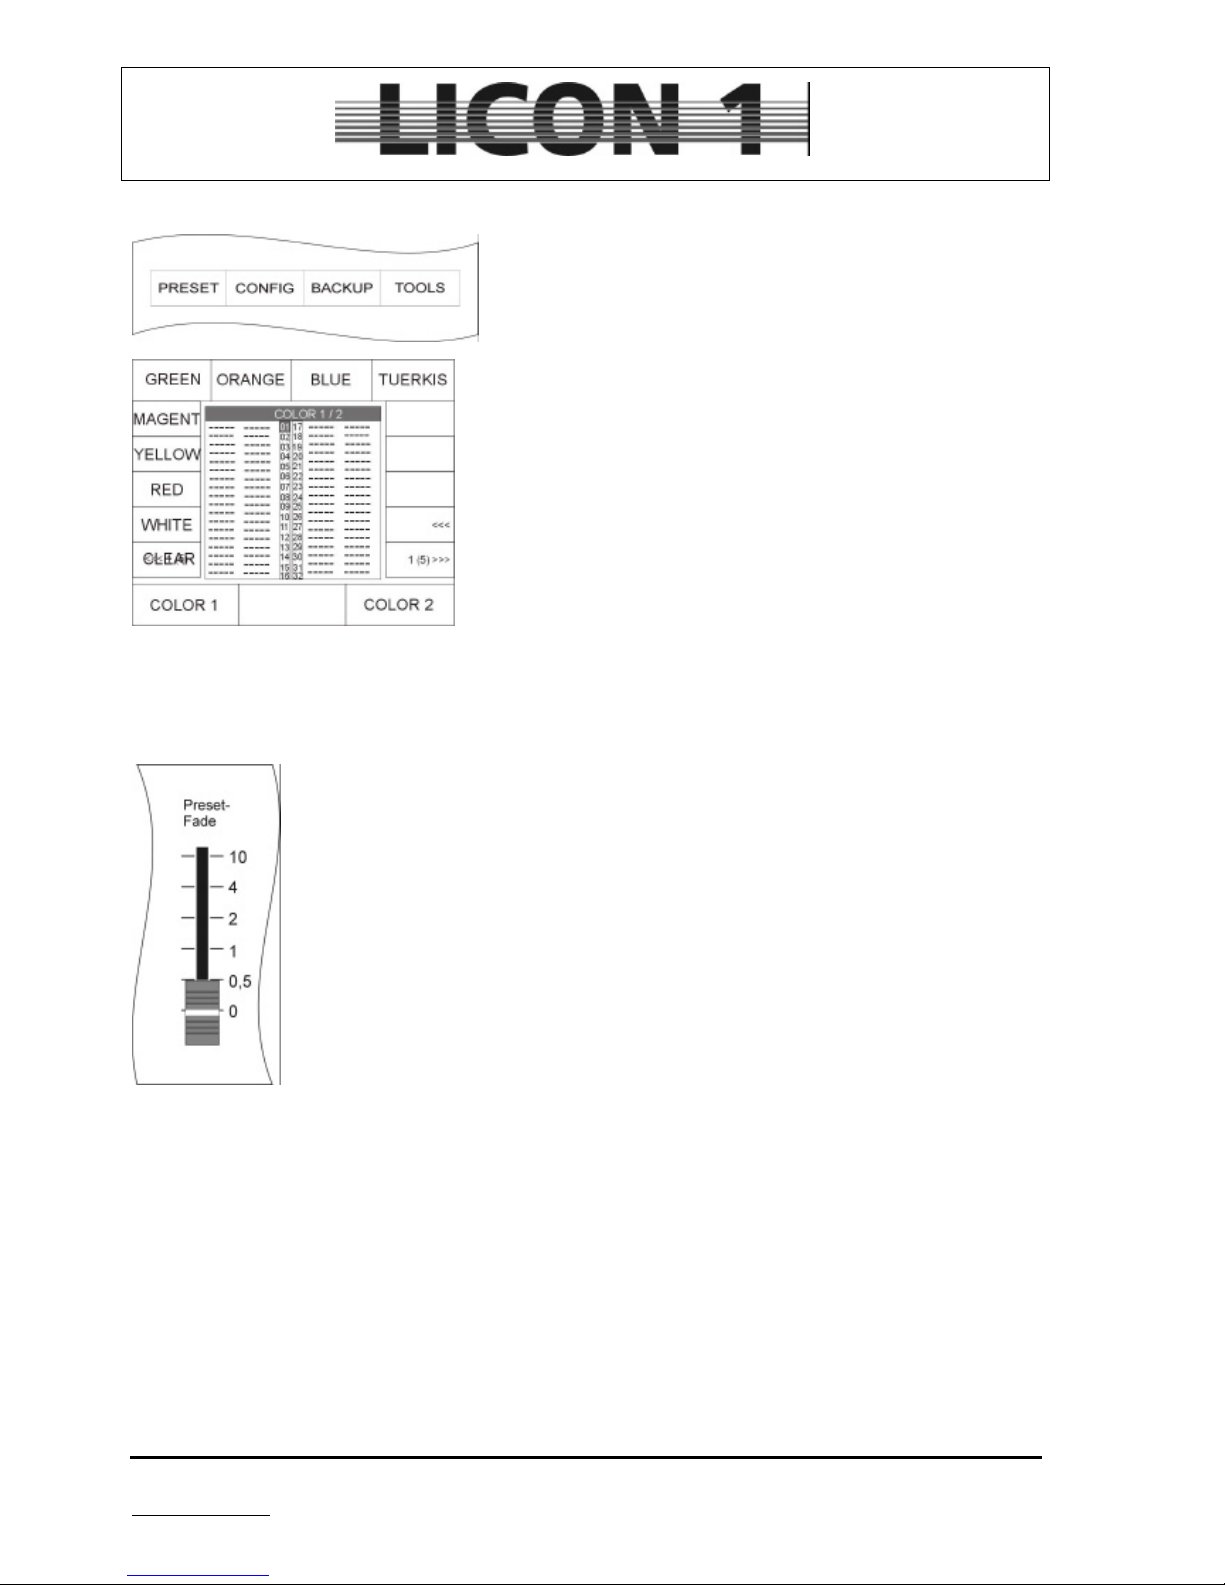
4.3 Recall Presets
Presets can be recalled by pressing one of the feature-selection
keys, when main display is visible.
The Presets will appear according to the selected feature.
They can be recalled by pressing the softkey.
(Master fader and fixture group fader have to be positioned at
100%).
4.4 Fading Presets
Recall Presets like described in chapter 4.3
Use Preset-Fade fader to enter fade time.
Select steps from 0,5 seconds to 10 seconds.
Some features can only be switched not faded.
Features which are usually faded are:
Dimmer, Iris, CMY-colourmixing, focus and zoom
Features which are usually switched:
Colour wheel, gobo wheel, shutter, prism
(Master fader and fixture group fader have to be positioned at 100%).
Page 25
JB-lighting Lichtanlagen GmbH Sallersteigweg 15 D-89134 Blaustein phone: +49 7304 9617-0
www.jb-lighting.de - 25 -
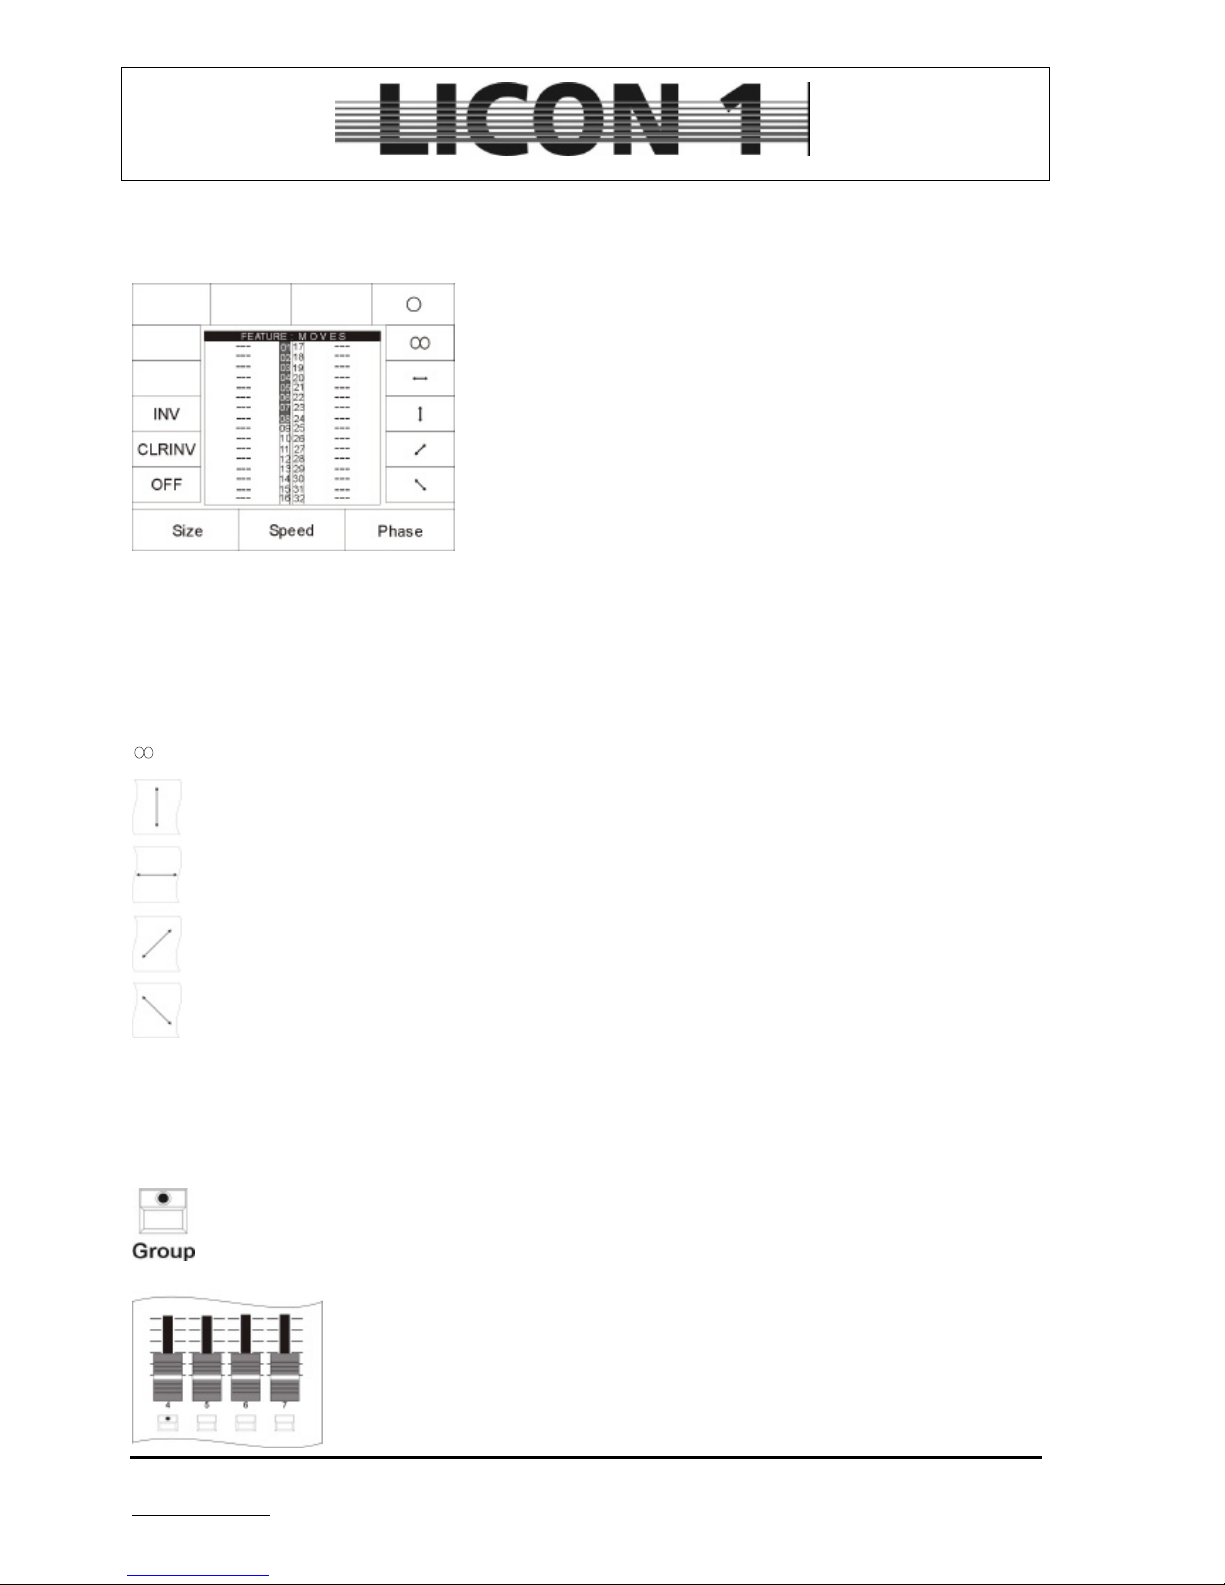
5 Preprogrammed moving patterns
To enter menu press key „moving patterns“.
After the key “moving patterns” is pressed once the display will
show the stored presets.
After the key is pressed twice the display will show the selection of
moving patterns available:
Off: Stop of movement
CLRINV: clears inversion of the movement
INV: Inversion of movement
O: circle
: lissajou
: sweep left/right
: sweep up/down
: sweep diagonal (left down/right up)
: sweep diagonal (linft up/right down)
Size: size of pre-programmed moving pattern
Speed: speed of pre-programmed moving pattern
Phase: phase
To use the preprogrammed moving patterns activate fixtures first:
Activate fixtures by pressing group key and fixture flash key.
Position Master fader and fixture group fader at 100%.
Press Feature-Selection key „Moving patterns“ twice and select one of the patterns
by pressing softkey.
Enter speed and size by means of encoder wheels.
Press storekey of combi section to store the moving pattern as Preset.
Page 26

JB-lighting Lichtanlagen GmbH Sallersteigweg 15 D-89134 Blaustein phone: +49 7304 9617-0
www.jb-lighting.de - 26 -
5.1 Phase function
The phase function enables the operator to program different start positions
for each fixture.
This feature is used to program waves, e.g.
A maximum of 31 phases is available.
To program a phase function select fixtures first.
Activate desired moving pattern and enter size and speed by means of
encoder wheels.
To assign each fixture to a different phase switch off all fixtures with
exception of fixture no. 2. Assign fixture no. 2 to phase one. Switch
off fixture no. 2 and activate fixture no. 3. Assign fixture no. 3 to
phase no. 2. Proceed with every other fixture the same way. If the
selected moving patterns was a up/down sweep, the result will be a
wave.
Page 27

JB-lighting Lichtanlagen GmbH Sallersteigweg 15 D-89134 Blaustein phone: +49 7304 9617-0
www.jb-lighting.de - 27 -
6 Cues (combi-section)
Cues are scenes which contain DMX values for one or more parameters. They are stored and recalled by
use of the keys in the cue section.
The cues can contain presets as well as manually entered DMX values.
If presets are stored in a cue, the cue will change automatically whenever the preset is modified later on.
Cues can contain DMX values for all parameters or DMX values for just some of the features.
The output principal of cues is “LTP”, which means that the data of the latest activated cue are of the highest
priority.
The output of a cue can be overwritten by a cue with the same parameters, only.
If, for instance one cue is activated with DMX values for pan and tilt plus DMX values for gobo 1 and the next
cue contains only DMX values for pan and tilt, the position of pan and tilt will be changed but the gobo stays
the same.
6.1 Programming and storage of cues
To program and store a cues proceed as follows:
Select fixtures by means of keys fo the fixture/PAR section.
Select feature and enter DMX values by means of presets or encoder wheels.
Press store key in combi section
Select parameter from storage matrix
Select cue key and press it.
Press store key again to confirm
There is a number of options available for each cue, like fade time, trigpoint ect. All options will be described
in the up-coming chapter.
Page 28

JB-lighting Lichtanlagen GmbH Sallersteigweg 15 D-89134 Blaustein phone: +49 7304 9617-0
www.jb-lighting.de - 28 -
6.1.1 The storage matrix
The storage matrix is most important when programming cues, chases or sequences. Each feature
has to be activated in the store matrix if it should be stored in a cue, chases or sequence.
This storage matrix will show up anytime the store keys are pressed during the process of programming
cues, chases and sequences.
The display of the storage matrix will contain:
Number of fixtures/PAR channels patched
Number of parameters available
Marks for the features which can be faded
There are different markers to display the following functions:
A small triangle in front of the parameter display the cursor. It can be moved by means of the left
encoder wheel (SEL FADE).
A ramp displayed marks a parameter which can be faded. To activate/deactivate fade function use
encoder wheel positioned in the middle. (First you have to move the cursor to the parameter)
Features maked with a „P“ have been programmed by means of a preset. The cues contain preset
data will be changed automatically to new DMX values whenever the preset is changed later on.
A dark square makes DMX values which have been entered by means of encoder wheels.
- A hyphen marks fixtures/PAR channels which haven´t been patched or the lack of a fixtures feature.
6.1.2 Selection of the features
Each cue can contain a variety of features. Before actually storing a cue the desired features have to be
selected.
• Selection of all features available
Make sure the desired fixtures are activated (LED is lit).
Press clear key (located in the feature selection block) to select all features available. (The store
matrix will display all features inverted)
Page 29

JB-lighting Lichtanlagen GmbH Sallersteigweg 15 D-89134 Blaustein phone: +49 7304 9617-0
www.jb-lighting.de - 29 -
• Selection of certain features
Make sure the desired fixtures are activated (LED is lit).
Press clear key three times (the clear key is located in the feature selection block). The display will
show only the squares for the feature which is active at this time. Press feature keys of those
features which DMX values should be stored in the cue.
After selection the desired features press cue key and confirm the process by pressing the store key of
combi-section again.
6.1.3 The cue, bank and page keys
There are 24 keys available for cues. They are devided in three blocks of 8.
The cue keys of the first block are named F1 to F8. Only one cue can be stored on each of this cue keys.
The cue keys no. F1 to F8 can not be switched by means of page or bank keys.
Only most important cues are stored on these cue keys
The cue keys of block 2 and 3 are named no. 1 to no. 16.
They can be switched by means of page and bank keys. There are three pages
(1-3) and four banks (A – D) available for each cue. A maximum of 192 cue can
be obtained by using all pages and banks.
The additional 8 cues F1 to F8 make a total of 200 cues which can be accessed
directly.
The activated page / bank is shown by a red LED lit.
To switch pages/banks just press the page/bank key. The red LED will start
flashing to show that a different page/bank has been selected. The LED will stop
flashing after a cue key has been pressed.
The latest recalled or stored cue will be shown in the display. In
this case the cue key no. 5 on page 3 bank D was activated
lately.
Page 30

JB-lighting Lichtanlagen GmbH Sallersteigweg 15 D-89134 Blaustein phone: +49 7304 9617-0
www.jb-lighting.de - 30 -
6.1.4 Name cues
A cue should be named before actually storing it. There are thirteen characters available for naming the cue.
Press softkey NAME until it is displayed in an inverted way. Use keys of the cues, chase and sequence
section to name cue.
In case of renaming the cue, use arrow key no. 7 to clear before entering the new name of the
cue.
6.1.5 Enter fade time
A fade time can be assigned to each cue. All features which
have been stored with a fade ramp (see store matrix) will be
affected by the fade time.
To enter fade time use left encoder wheel. The maximum of
fade time is 1638,3 seconds.
Behind the abbreviation FT the fade time will be displayed.
6.1.6 Enter trigpoint
All features which are switched can be assigned with a trigpoint.
Trigpoint means the point of time when a feature is switched
from one DMX value to another. It is used for gobos, prism ect.
To enter the trigpoint use the encoder wheel which is located on
the right side.
The trigpoint is dependable on the fade time and it is shown in
percent.
Behind the abbreviation TP the trigpoint be displayed.
6.1.7 Enter release link function (R-Link)
Cues can not be switched off just by pressing the cue key again. They have to be switched off by a separate
cue. This cue is called stop-cue and it contains DMX values for all features available. A standard stop-cue
usually features open white for colour, gobo, prism and frost, as well as iris, dimmer and shutter open and
pan and tilt at a mid position.
The stop-cue can be linked to every cue. The release link function offers the possibility not only to recall a
cue, but also it´s stop-cue by means of the same cue key.
First of all program and store a stop-cue. à 6.1 Programming and storage of cues.
After that program and store a standard cue.
Page 31

JB-lighting Lichtanlagen GmbH Sallersteigweg 15 D-89134 Blaustein phone: +49 7304 9617-0
www.jb-lighting.de - 31 -
Press softkey R-LINK and simultaneously the cue key on which the stopcue was stored previously.
The release link function will be displayed after the abbreviation RLM
and the position of the cue which was linked.
To delete the release-link function:
Press edit key of the combi section and recall the desired cue by pressing the
cue key.
Press softkey R-LINK and a second function called RL-off will appear on the
display.
Press softkey RL-off to delete release link.
6.1.8 Work with the release link function
To work with the release-link function the release-link key is
required. It is located in the Flash-Release-Enable-block on
the right hand side of the sequence block.
By entering a release link two separate cues have been
assigned to one cue key.
Press the cue key to recall the first cue.
To recall the stop-cue:
Press release key and hold it. In addition press the cue key
again. Release the release key first and afterwards the cue key.
Step no. 1 step no. 2 step no. 3
Page 32

JB-lighting Lichtanlagen GmbH Sallersteigweg 15 D-89134 Blaustein phone: +49 7304 9617-0
www.jb-lighting.de - 32 -
6.1.9 The flash function
All cue keys work in a switch mode.
If a cue has to be recalled in a flash-mode style (for strobsequences) a release-link has to be assigned before.
The flash-key is situated in the Enable-Release-Flash block
which is next to the sequence block.
Enter the release-linke like described in chapter 6.1.7 and
6.1.8
To work with the flash mode proceed as follows:
Create a cue and store it on one of the cue keys. Store a release-link afterwards.
Press the flash key and simultaneously press the cue key to recall the cue in a flash-mode style.
Release both keys to deactivate function.
Page 33

JB-lighting Lichtanlagen GmbH Sallersteigweg 15 D-89134 Blaustein phone: +49 7304 9617-0
www.jb-lighting.de - 33 -
7 Edit cues
Each feature of a cue can be edited without the necessity of rewriting the whole cue. Basically these steps
have to be done to edit the cue:
To enter edit menu press edit key of the combi section
Recall cue by pressing the cue key
The diagram of the store matrix will show whether features have
been stored or not.
Features have been stored
No features have been stored
The features name, fade time, trigpoint and release link can be directly accessed by means of softkeys and
encoder wheels. Changes of the parameters mentioned will be stored simply by pressing the edit key again.
à See chapter 6.2.1 to 6.2.6
DMX values of the parameters such as pan movement, tilt movement, colours and gobos can be accessed
after pressing the softkey MODIFY and one of the feature selection keys.
After changing dmx-values press store key of combi section to store new data.
7.1 Editing the name
Press edit key of combi section.
Recall cue by pressing cue key.
Press softkey until function NAME is displayed in an inverted way.
To clear square press arrow key no. 7
Enter new name by means of keys of cue, chases and sequence block.
Store new name either by pressing softkey again or by leaving menu. (Press edit key)
Page 34

JB-lighting Lichtanlagen GmbH Sallersteigweg 15 D-89134 Blaustein phone: +49 7304 9617-0
www.jb-lighting.de - 34 -
7.2 Edit fixture parameter
Press edit key of combi section to enter edit menu.
Recall cue by pressing cue key.
To change DMX values press softkey MODIFY
Activate fixtures by pressing keys of fixture/PAR selection
Select features by pressing keys of the feature selection block.
Enter new DMX values by means of presets or encoder wheels.
To store new DMX values proceed as follows:
Press store key of combi section one time
Select features in store matrix
Press store key of combi section again.
à To leave edit menu press edit key of combi section
7.3 Copy one cue to another cue key
Press edit key of combi section.
Recall cue by pressing cue key.
Press softkey COPY and hold it. Simultaneously press cue key to which the
cue should be copied to.
Release both keys.
à Press edit key again to leave menu
7.4 Enter release link function (R-Link)
Press edit key of combi section to enter edit menu.
Recall cue by pressing cue key.
Press softkey R-LINK and hold it. Simultaneously press cue key of the stopcue. Release both keys. The display will show the release link by the
abbreviation: RLM + cue
à Press edit key again to leave menu
Page 35

JB-lighting Lichtanlagen GmbH Sallersteigweg 15 D-89134 Blaustein phone: +49 7304 9617-0
www.jb-lighting.de - 35 -
à see chapter 6.1.7 Enter release-link
7.5 Change fade time
Press edit key of combi section to enter edit menu.
Recall cue by pressing cue key.
Change fade time by turning the encoder wheel located on the right side
Store data by leaving the menu.
à Press edit key of combi-section to leave menu
7.6 Change trigpoint
Press edit key of combi section to enter edit menu.
Recall cue by pressing cue key.
Change trigpoint by turning the encoder wheel located on the right side
Store data by leaving the menu.
à Press edit key of combi-section to leave menu
7.8 Manual cue fading
A fade ramp has to be assigned to enable features to the fade function.
Cues can be faded depending on the fade time assigned, the position of the fade-mode fader
or manually. The fade-mode fader is of highest priority.
To activate fade-mode fader press the key which is located underneath.
Red LED lit: Cues will be faded depending on the position of the fader. Maximum fade time:
10 seconds.
Green LED lit: Cues will be faded manually. The fade-in/fade-out process will contiue for the
time the fader is shifted from 0 to 100% position.
Page 36

JB-lighting Lichtanlagen GmbH Sallersteigweg 15 D-89134 Blaustein phone: +49 7304 9617-0
www.jb-lighting.de - 36 -
8 Freeze function
The freeze function can be assigned to each fixture. After freezing one
parameter, it will not be affected by recalling new DMX value by cues,
chases or sequences.
The freeze key is located in the feature-selection block on the left hand
side.
A parameter with the freeze function assigned can be overwritten by a
preset.
8.1 Enter freeze function
Activate fixtures by pressing keys of the fixture/PAR selection block
Press freeze key and simultaneously the feature key of the desired parameter.
The store matrix will display the frozen feature by showing dark squares.
Example: Freeze function for Gobo 1
1. 2. 3. 4.
The freeze function can be assigned to each feature available.
After activating the freeze function LED of the key will be lit.
8.2 Delete Freeze function
The freeze function can be deleted selectively for one parameter only or for all parameters at the same time.
• Delete freeze function completely
Activate fixtures by pressing fixture/PAR selection keys
Page 37

JB-lighting Lichtanlagen GmbH Sallersteigweg 15 D-89134 Blaustein phone: +49 7304 9617-0
www.jb-lighting.de - 37 -
Press key freeze and simultaneously press key clear.
LEDs will be switched off.
• Delete freeze function selectively
Deactivate fixtures by pressing fixture/PAR selection keys
(LEDs are not lit)
Press freeze key and hold it.
Press one of the feature selection key.
The store matrix will display no dark squares for the parameter anymore.
Page 38

JB-lighting Lichtanlagen GmbH Sallersteigweg 15 D-89134 Blaustein phone: +49 7304 9617-0
www.jb-lighting.de - 38 -
9 Fixture chases
Chases are cue lists which ususally run constantly. The difference between chases and
sequences is that cues in chases run in same speed with the same fadetime and
trigpoint whereas each cue in a sequence can have different speeds.
Chases can be programmed in two different ways either in a cue-by-cue fashion or –
faster and much more effectively by means of the effect generator.
96 chases can be stored altogether and 32 can run simultaneously.
Chases can not be switched off. It is necessary to store and recall a stop-cue to stop the
chase.
All chases are recalled by means of the eight keys in the chase section. The keys can
be switched by means of the shift key.
9.1 Programming chases cue-by-cue
Prorgam a chase by means of cues
Program a cue like described in chapter à 6.1 Programming and storage of cues.
To create a chase cue-by-cue proceed like this:
Select desired cue by means of the cue key
Press store key of combi section (LED is lit)
.
Select desired features from store matrix
Press one of the keys of chase section(LED of store key starts flashing)
Enter name of the chase by means of the keys in cue/chase/sequence section.
Enter fadetime and trigoint.
Confirm by pressing store again
Page 39

JB-lighting Lichtanlagen GmbH Sallersteigweg 15 D-89134 Blaustein phone: +49 7304 9617-0
www.jb-lighting.de - 39 -
9.2 The chase menu
During the process of programming chases this program combi chase matrix will be visible.
LINK F:
inverted: fade time in %
not inverted: fade time absolute
SINGLE:
inverted: chase run only for one time
not inverted: chase runs infinitely
CLEAR: deletes all chase data
DEL ST: deletes one step
DUP ST: doubles one step
NAME: name of chase
BLOCK: creates a block of steps
R-LINK: links a release step (stop-cue)
MERGE: merging of chases
SGROUP: builds a speed group of different chases
CREATE: recall of the effect generator
FADETIME: enter fade time data for the whole chase
STEP: recall of chase steps
TRIGPOINT: enter trigpoint (point of time for switch function)
Store data and leave menu by pressing store key again
Create next cue and add it to the chase by pressing the store key and chase key.
The displayed diagram of the store matrix will show if and what kind of features have been stored in the
previous step
Features stored
No features stored
9.3 Enter chase name
Press softkey NAME until it is displayed in an inverted way
Enter name of chase by means of the keys of cue, chase and
sequence section
Store name by pressing softkey NAME again
9.4 Enter duration and speed of chase steps
There are three different values to enter duration and speed of a chase Stepp:
SP : speed duration of a step
FT : fadetime duration of fade-in/fade-out
TP : trigpoint switch time for all features which will not be faded
Page 40

JB-lighting Lichtanlagen GmbH Sallersteigweg 15 D-89134 Blaustein phone: +49 7304 9617-0
www.jb-lighting.de - 40 -
The values for the fadetime and trigpoint can
be entered in percent, depending on the
actuall speed (duration) of the step.
The main advantage is that fadetime and
trigpoint readjust themselfes if the speed is
changed.
If fadetime and trigpoint are entered in
fractions of a second they will not adjust
themselves if the speed is changed manually
later on.
The speed of a chase can be modified by
means of the keys in the chase-control section.
à see chapter 12. Chase Control Section
• Duration of a step (speed)
The duration of a step is entered by means of the encoder wheel which is located in the
chase-control-section
The duration can be modified manually later on by means of the keys and the encoder
wheel in the chase-control section.
• Duration of the fadetime/percent
The fadetime accesses all features which have been marked with a fade-rape in the store-matrix.
(à see 6.1.1 The store-matrix)
If the fadetime is entered in percent, it will depend on the speed/duration of each cue.
For example:
If a chase-step lasts 5 seconds and fadetime is adjusted on 50 % all features will be faded in in
2,5 seconds.
The softkey LINK F has to be displayed inverted to enter fadetime in
percent.
The values will be entered by means of the left encoder wheel.
• Duration of the fadetime/fraction of a second
The duration of the fadetime can be entered in factions of a second. If it is done this way it will not depend on
the duration of the step itself.
To enter the duration of the fadetime in faction of a second make sure that the softkey LINK F is not
displayed in an inverted way.
The values will be entered by means of the left encoder wheel. The values will be entered in steps of 0,0250
seconds.
Please remember if the speed/duration of a chase step is modified manually, the fadetime will not be readjusted automaticall. If the fadetime needs to be re-adjusted it has to be done manually.
In general a fadetime is supposed not be last longer than the chase step itself.
Page 41

JB-lighting Lichtanlagen GmbH Sallersteigweg 15 D-89134 Blaustein phone: +49 7304 9617-0
www.jb-lighting.de - 41 -
• Trigpoint
Trigpoint describes the moment were all features which are not faded, will be switched. The features which
will be faded are marked with a fade-ramp in the store-matrix (à see 6.1.1 The store-matrix).
The trigpoint is entered in percent depending
on the duration/speed of the chase-step.
For example:
If the chase-steps duration is 5 seconds and
the trigpoint is 75% all features (which are not
marked with a fade-ramp) will be switched
after 3,75 seconds.
9.5 Insert a chase step
New chase steps are usually added to the list of steps.
If a step should be stored at a certain position uses encoder wheel which is located in the middle (STEP) to
scroll the cursor to the desired position.
As soon as the encoder wheel is turned a new function called INSERT will appear on the display.
Press softkey INSERT to insert step in list and to store values.
9.6 Overwrite a chase step
Select chase step by shifting cursor up and down. Press store key of combi-section to store the dmx-values
in the activated step.
9.7 Delete all chase data
If you want to delete all chase-steps press softkey CLEAR.
Press escape to leave menu. Don´t press store!
9.8 Delete a single step
If you want to delete a single chase-step use encoder wheel which is located in the middle to move cursor to
the desired step. Press softkey DEL ST. The step will be deleted immediately, the remaining steps will be renumbered.
Page 42

JB-lighting Lichtanlagen GmbH Sallersteigweg 15 D-89134 Blaustein phone: +49 7304 9617-0
www.jb-lighting.de - 42 -
9.9 Double one chase step
If you want to doube one chase-step use encoder wheel which is located in the middle to move cursor to the
desired step. Press softkey DUP ST. The step will be doubled immediately and inserted directly after the
source-step, the remaining steps will be re-numbered.
9.10 Stop a chase / r-link
Chases can not be switched off just by pressing the chase key again. They have to be switched off by a
separate cue. This cue is called stop-cue and it contains DMX values for all features available. A standard
stop-cue usually features open white for colour, gobo, prism and frost, as well as iris, dimmer and shutter
open and pan and tilt at a mid position.
The stop-cue can be linked to every chase. The release link function offers the possibility not only to recall a
chase, but also it´s stop-cue by means of the same chase key
First of all program and store a stop-cue. à 6.1 Programming and storage of cues.
To assign or link the stop cue to the chase press softkey R-LINK during the process of programming a
chase. Then press the cue key on which the stop cue was stored before. The number of the stop-cue will be
displayed behind the abbreviation RLM
9.11 Loop function
Chases run constantly in a loop. If they are supposed to run for only one time the adjustment
can be made during the process of storing a chase. Enter program chase menu and press
softkey SINGLE to program a chase which will stop automatically after the last step.
9.12 Block function
A number of steps can be assigned to a block. This block can be moved, copied or deleted.
1. Define a block
A block contains a number of steps which have to be numbered consecutively.
Move the cursor by means of the encoder wheel located in the middle to the first step which should be
assigned to the block. Press softkey BLOCK and hold it. Move the cursor to the last step in block. Release
softkey BLOCK.
All steps assigned to the block will be marked with a “B”.
In addition the number of steps will be visible on the display.
In this case the block consists of four steps from step no. 2 to step no. 5
2. Copy a block
Define a block first à see 1. Define a block
Move cursor by means of the encoder wheel loacted in the middle to the position where the block should be
copied to. The block will be inserted before the activated step.
Press softkey B-COPY to execute process.
à Press escape to leave the menu
Page 43

JB-lighting Lichtanlagen GmbH Sallersteigweg 15 D-89134 Blaustein phone: +49 7304 9617-0
www.jb-lighting.de - 43 -
3. Delete a block
Define a block first à see 1. Define a block
Press softkey B-DEL to delete the block
à Press escape to leave the menu
4. Move a block
Define a block first à see 1. Define a block
If a block is moved it will not be doubled, but shifted from one place to another.
Move cursor to the position where the block should be moved to.
The block is always insert before the actual cursor position.
See drawing:
1: enter chase
2: define a block
3: position cursor
(the block can be moved to every position
marked with an arrow)
4: Execute process by pressing softkey BMOVE
5: The numbers of the chase steps will be
rearranged.
Page 44

JB-lighting Lichtanlagen GmbH Sallersteigweg 15 D-89134 Blaustein phone: +49 7304 9617-0
www.jb-lighting.de - 44 -
10 Chase generator
Chases can be programmed either step by step or by means of the chase generator which is much quicker
and more efficient.
There is a number of pre-rogrammed chase-patterns which can be assigned to a group of fixtures and a
fixture feature.
Chases made by means of the chase generator can be assigned with one fixture parameter only, so a chase
can be created for either colour, or gobo, or pan and tilt movement but not for a combination. If a
combination of different features is required, several chases have to be created and merged afterwards.
There are pre-rogrammend chase-patterns for different stage applications. On the first page there a chases
for fixtures hung in a line next to each other. The following pages show pre-rogrammend chase-patterns for
symmetrical stage setting and double symmetrical stage setting.
10.1 Programming with the chase generator, first steps
Recall the chase generator like this:
Press the store key in combi section.
Then press the chase-key on which the chases is going to be stored.
The programm combi chase menu will be shown on the display.
Recall the chase generator program by pressing the softkey
CREATE.
The monitor of the chase-generator looks like this:
In this example the feature Color 1 was recalled.
The monitor changes depending on the feature chosen.
According to the selected feature, different Presets can be recalled
by means of the softkeys.
There is a short manual for programming the chase generator
visible in the middle of the menu.
The steps are discribed in this order:
Page 45

JB-lighting Lichtanlagen GmbH Sallersteigweg 15 D-89134 Blaustein phone: +49 7304 9617-0
www.jb-lighting.de - 45 -
1. SELECT FEATURE (press key of feature selection block)
2. SELECT ON AND OFF VALUES
Enter DMX values for „ON“ and „OFF“.
Use softkeys for Presets, or encoder wheels.
To enter “ON” value press softkey on until it is displayed inverted, then enter DMX value
To enter “OFF” value press softkey off and proceed the same.
3. SELECT DIRECT MODE ON PAGE 2 AND CHOOSE DESIRED UNITS OR SELECT ANY USER
SEQUENCE ON PAGE 2
Switch to page 2 of the chase generator by means of the softkeys „<<<“ or „>>>“.
Activate “DIRECT” mode by pressing the according softkey.
Select the desired fixtures or par-channels by means of the keys in the fixture/par selection block.
4. SELECT PATTERN ON PAGE 3 OR PAGE 4
Switch to page 3 or page 4 to select one of the pre-programmed chase patterns.
Use softkeys to activate pattern.
This small diagramm marks the activated fixtures or par-channels
5. PRESS FLASHING STORE BUTTON FOR CALCULATION
To start the creation of the chase press store-key.
After the chase has been created the LED of the chase key will start blinking, the LED of the store key will
start flashing.
The display will show the PROG COMB MENU and not the chase generator.
To confirm the process press the store-key of combi-section again.
The red LED of the store key will switch off.
10.1.1 The matrix of the chase generator
Each different pattern of the chase generator is displayed in form of a matrix on page 3 and 4 of the chase
generator. The matrix visualizes the „ON“ and „OFF“ values.
An empty square „£“ symbolizes the „OFF“ value.
A black square „¢“ symbolizes the „On“ value.
The chase step switch from the „Off“ to the „On“ values according to the matrix.
Die hier dargestellte Ablauf-Grafik ist also folgendermaßen zu entschlüsseln:
Example:
For this chase we assume 6 fixtures to be involved.
Page 46

JB-lighting Lichtanlagen GmbH Sallersteigweg 15 D-89134 Blaustein phone: +49 7304 9617-0
www.jb-lighting.de - 46 -
Shutter chase:
„On“ value: shutter open
“Off” value: shutter closed
First step of the chase:
Fixture no. 1: shutter open
Fixture no 2 – no. 6: shutter closed
Second step of the chase:
Fixture no. 1: shutter closed
Fixture no. 2: shutter open
Fixture no. 3 – no. 6: shutter closed
Third step of the chase:
Fixture no. 1 – no. 2: shutter closed
Fixture no. 3: shutter open
Fixture no. 4 _ no. 6: shutter closed
And so on.
10.2 Parameters of the chase generator
The following chapters will explain detailed the function of the different parameters of the chase generator.
To make following the description more easy we decided to explain the different pages of the chase
generator from page no. 1 to page no. 6.
After the chase generator has been recalled like described in chapter 10.1 the pages can be switched by
means of the softkeys „>>>“ and „<<<“.
The number of the active page is marked in the squares next to the “>>>” and “<<<” sign, e.g. „ 2 (6)“ means
second page of six.
10.2.1 Page no. 1 of the chase generator (Preset selection)
On page no. 1 of the chase generator you will find the short
manual which was described in chapter 10.1 before.
Additionally there will be Presets visible which were stored for the
activated feature before. In this expample you see the Presets for
colour wheel no. 1 and colour wheel no. 2.
To change feature selection press one of the keys in the features
selection block.
To recall the desired Presets press the according softkey. If there
are other Presets than those which can be actually displayed use
softkey „<<<“ to switch to the other Preset-pages.
The chase steps switch from the „On“ values to the „Off“ values according to the selected chase pattern.
To enter “On” value proceed as follows:
Press softkey “On” until the square is displayed inverted.
Press on of the softkeys with a Preset stored or use one of the encoder wheels to enter DMX data.
To enter “Off” value proceed as follows:
Press softkey “Offuntil the square is displayed inverted.
Press on of the softkeys with a Preset stored or use one of the encoder wheels to enter DMX data.
Page 47

JB-lighting Lichtanlagen GmbH Sallersteigweg 15 D-89134 Blaustein phone: +49 7304 9617-0
www.jb-lighting.de - 47 -
10.2.2 Page no. 2 of the chase generator (the order of fixtures)
If a chase pattern is programmed in DIRECT mode, the fixtures will be
recalled in order of the keys in the fixture/par selection area. (see
sketch no. 1, left)-
However, the fixtures are often hung in a different order.
This might result in a very uncoordinated replay of the chase.
(see sketch no. 2)
To change the order use options on the second page of the chase generator.
A number of eight different orders (or sequences) can be
programmed. They are stored and recalled by means of the
softkeys SEQ 1 – SEQ 8 (names can be altered).
To program a order select on softkey (SEQ1-SEQ8). If it is
displayed inverted the softkey EDIT will appear.
Press the softkey EDIT to enter the menu.
The softkeys have the following meanings:
CLEAR: Deletes the programmed order.
DEL ST Deletes the active step which was activated by
means of the encoder wheel situated in the middle before
NAME: To name the order/sequence by means of the
keys in cues/chases/sequence block.
INSERT: Insert one step
STORE: Store one step
To store a order/sequence proceed like this.
1. Select page no. 2 of the chase generator and press softkey EDIT
2. Select one of the softkeys SEQ1 – SEQ 8
Page 48

JB-lighting Lichtanlagen GmbH Sallersteigweg 15 D-89134 Blaustein phone: +49 7304 9617-0
www.jb-lighting.de - 48 -
3. Press the key of the fixture/par selection block on which the fixture is recalled which
should be first in order. If more than one fixture needs to be activated in the first step of
the chase, press the desired fixture keys simultaneously.
4. To store the step press softkey STORE.
Each new step is added to the steps before.
The number of steps programmed is show on the display (LENGTH: X)
STEP marks the active step.
(LENGH: 2, STEP: 3 means 2 steps already programmed, step 3 is about to be
programmed.)
To insert a step proceed like this:
1. Select the desired fixture/s (LEDs must be lit)
2. Use the encoder wheel (step) to select the step which is going to be next after the newly
inserted step.
3. Confirm by pressing softkey INSERT
To delete a step proceed as follows:
1. Select the desired step by means of the encoder wheel (step), situated in the middle.
2. Confirm by pressing softkey DEL ST
To name the order/ sequence proceed like this. vor:
1. Press softkey NAME
2. Delete SEQ by means of the arrow-key
3. Enter name by means of the keys in cues/chase/sequence section
To escape press softkey „ 2 ( 6) >>>“.
Page 49

JB-lighting Lichtanlagen GmbH Sallersteigweg 15 D-89134 Blaustein phone: +49 7304 9617-0
www.jb-lighting.de - 49 -
10.2.3 Page no. 3 and 4 of the chase generator (chase patterns)
The chase patterns can be recalled on page no. 3 and 4 of the
chase generator.
There are 24 different patterns available, which can be
combined with the order/sequences programmed before.
Each different pattern of the chase generator is displayed in form of a matrix on page 3 and 4 of the chase
generator. The matrix visualizes the „ON“ and „OFF“ values.
An empty square „£“ symbolizes the „OFF“ value.
A black square „¢“ symbolizes the „On“ value.
The chase step switch from the „Off“ to the „On“ values according to the matrix.
Die hier dargestellte Ablauf-Grafik ist also folgendermaßen zu entschlüsseln:
Example:
For this chase we assume 6 fixtures to be involved.
Shutter chase:
„On“ value: shutter open
“Off” value: shutter closed
First step of the chase:
Fixture no. 1: shutter open
Fixture no 2 – no. 6: shutter closed
Second step of the chase:
Fixture no. 1: shutter closed
Fixture no. 2: shutter open
Fixture no. 3 – no. 6: shutter closed
Third step of the chase:
Fixture no. 1 – no. 2: shutter closed
Fixture no. 3: shutter open
Fixture no. 4 - no. 6: shutter closed
Patterns marked with two arrows run from the first step to the last and back again.
Patterns not marked with arrows run from the first to the last step and start again from the
first step (loop).
Page 50

JB-lighting Lichtanlagen GmbH Sallersteigweg 15 D-89134 Blaustein phone: +49 7304 9617-0
www.jb-lighting.de - 50 -
After selecting the desired fixtures and programming the desired
order/sequence first, the “On” and “Off” values have to be entered.
Then the desired pattern is activated by pressing the according
softkey.
The number of steps of the whole chase will be show immediately
on the display. There will also be information on the DMX values of
the steps..
All other parameters of the chase are displayed, too in the square
marked with OPTIONS. These parameters can be altered by means
of the softkeys with the according name.
To confirm and store data press store-key of combi section.
The display will get back to the menu: PROG COMB CHASE
10.2.4 Page no. 5 of the chase generator
A standard chase usually switches between the “on” and “off”
value. If more parameter are required, page no. 5 of the chase
generator is needed. On page no. 5 a number of additional
parameters can be assigned to a chase. For instance a third
value.
In this case we use a colour chase as example:
The sketch shows a chase which contains six steps. The fixtures
switch from red to blue. (The colours are preprogrammed as
Presets).
Step no. 1: Fixture no. 1: red
Fixture no. 2 – 6: blue
Step no. 2: Fixture no. 1 and 3-6: blue
Fixture no. 2: red
The colour changes in each step of the chase.
To program a third colour use these softkeys:
LIST - : recall previous step in list
LIST+ : recall next stepin list
COPY : Copy data from one step to another
Use softkey LIST- and LIST+ to select the chase step which should be altered
The step parameter can be changed when it is displayed inverted.
Use preprogrammed Presets (softkeys) or encoder wheels to enter desired DMX data.
The colour green has been added to the second step of the chase in our example.
After the change the chase would run like this:
Page 51

JB-lighting Lichtanlagen GmbH Sallersteigweg 15 D-89134 Blaustein phone: +49 7304 9617-0
www.jb-lighting.de - 51 -
Step no. 1:
Fixture no. 1 : colour red
Fixture no. 2 : colour green
Fixture no. 3-6: colour blue
Step no. 2
Fixture no. 1 : colour blue
Fixture no. 2 : colour red
Fixture no. 3 : colour green
Fixture no. 4-6: colour blue
Copy the parameter of one step:
Select the desired step by means of the softkeys LIST- or LIST+ .
Press softkey COPY and hold it.
While holding the softkey COPY select one of the chase steps by means of the softkeys LIST – or LIST+.
Release the softkey COPY and the values of the selected step will be overwritten immediately and shown on
the display.
à To confirm the process press the store key of combi-section.
After a short period of time the display will show the PROG COMB CHASE menu.
10.2.5 Page no. 6 of the chase generator (modification of the chase patterns)
On page no. 6 of the chase generator the pre-programmed chase patterns can be modified.
To start modification press softkey OPTIONS. You will find the following function displayed.
CH:COMB 1/D04 : name of the chase key
(in this example: PAGE 1, BANK D; CHASE-KEY NO. 4)
TYPE : >------------- way the chase runs
(symmetrical, asymmetrical, double symmetrical)
LENGTH : number of chase steps
(6 steps in this example)
FADE : ON/OFF
Fade on means the parameter can be faded, because it was
addressed with a faderamp in the store-matrix. Fade off means
the parameter can be switched only.
DIR : ----> direction of the pattern (in this example from left to right)
FLIPLINE :1
STEPSIZE :
STARTPOS:
LINEBUF :
LINE OFS :
TESTUNIT :
TYPE : The softkey TYPE enable to switch type of the chase. Choose between: symmetrical, double
symmetrical, unsymmetrical, double unsymmetrical, four times symmetrical and four times unsymmetrical.
>----------- ; >-----------< ; >------>------ ; >---< >---< ; >---->---<-----< ; >--->--->--->
LENGTH: LENGTH means the number of steps one chase contains.
The LENGTH can be varied by means of the encoder wheel situated in the middle.
Page 52

JB-lighting Lichtanlagen GmbH Sallersteigweg 15 D-89134 Blaustein phone: +49 7304 9617-0
www.jb-lighting.de - 52 -
FADE: If the softkey FADE is displayed inverted, a fadetime can be assigend to the chase.
If the softkey FADE is not displayed inverted the parameters will be switched.
There will be a short message Fade: OFF in the display.
DIR: Direction shows in which direction the chase will run. If softkey DIR is displayed inverted, the chase
will run in one direction only. After pressing the softkey DIR (softkey is not displayed inverted
anymore) the cahse will run in the opposite direction.
FLIPLINE
STEPSIZE
STARTPOS
LINE BUF
LINE OFS
OFS LINE
TESTUNIT
Confirm the process and leave menu by pressing the store key of the comib-section.
Page 53

JB-lighting Lichtanlagen GmbH Sallersteigweg 15 D-89134 Blaustein phone: +49 7304 9617-0
www.jb-lighting.de - 53 -
11 Merge function
The merge-function is used to link two chases (with dmx-data for different features).
This diagram shows the merge-function for
a gobo- and a prism-chase. After merging
both chases together on new chase is
created. With this chase there is not only a
gobo-change in each step, but also a prism
change.
Basic for using the merge-function is that
both chases consist of the same stepnumber.
11.1 Enter the merge-function
Programm first chase and store it on a chase key.
Programm the second chase (must consist of the same number of chase steps). During the process of
programming press softkey MERGE and hold it. Now press the chase key of the first chase and release both
– the softkey MERGE and the chase key.
Press store key again to confirm process.
There is a small diagram of the store-matrix shown in the display. It will show if the merging was
successfully.
If a chase consits only of DMX-values for one fixture the diagram of the store-matrix might
look like this.
If the chase was merged from two chases the diagram of the store-matrix might look like this.
If the first of both chases is recalled after the merging, both chases will run simultaneously.
The speed of both chases will be the speed of the first one.
If the second of both chases is recalled it will run on its own.
11.2 Delete the merge-function
There is no function to the delete the merge-function.
The chase steps have to be recalled manually, changed and stored again.
Use edit key of combi section to enter chase-edit menu. Press chase key of the first chase and use softkey
MODIFY to enter modify menu. Now recall each single step by means of the encoder wheel, change dmxvalue, select the features from store-matrix and store each step again.
Page 54

JB-lighting Lichtanlagen GmbH Sallersteigweg 15 D-89134 Blaustein phone: +49 7304 9617-0
www.jb-lighting.de - 54 -
11.3 The speed groups
There are 16 speed groups available to assign either combi or PAR chases.
All chases which have been assigned to the same speed group will run with the same speed.
Whenever speed of one chase in a group is changed, the rest of this speed groups chases will rearrange
their speed automatically.
The advantage of a speed group compared to the merge-function is, each chase can be recalled and run
separately
11.3.1 Integrate cases to speed groups
The speed-groups are assigned to the cue key no. 1 to no. 16.
Chases can be assigned to speed-groups either in program combi chase
or edit combi chase menu.
First create a chase and store it on a chase key.
In the chase matrix the softkey SGROUP will be visible.
Press this softkey and hold it. Then press the cue of the speed-group to which you want to
assign this chase to.
The assingment to a speed-group will be shown on the display:
The speed-group is shown by the abbreviation: G
In this chase the chase was assigned to speed-group no. 1 (G1)
Additionally to the speed-group a special function will appear on the display.
The function is the synchronized start function and it is called SYNCHST.
à see chapter 9.15 Speed-grou/Sync start
The speed of the chase can be modified by means of the key and encoder wheel in the chase-control
section
11.3.2 Delete a chase from a speed goup
If you want to delete on chase from a speed-group proceed like this:
Press edit key of combi section. Recall the desired chase by means of the chase key. Press softkey
SGROUP. The assignment of the chase to the speed-group will be deleted immediately.
The speed of the chase will be shown in seconds and not as a speed-group (e.g. G1).
In addition the softkey SYNCHST will disappear.
Page 55

JB-lighting Lichtanlagen GmbH Sallersteigweg 15 D-89134 Blaustein phone: +49 7304 9617-0
www.jb-lighting.de - 55 -
11.4 The sychronized start/Sync-start function
The SYNCST function enables the user to start
different chases at the same time. All chases assigned
to one speed group with sync start will start at the
same time, whenever on chases of this group is
activated.
The function sync start is similar to the function merge.
But while the function merge links two or more chases
sync start only effects the simultaneous start of the
chases and other parameters will not be influenced.
11.4.1 Enter sync start function
After assigning a chase to a speed group an new function called SYNCST will be displayed.
Press softkey SYNCST to activate function. The function is active as long as it is displayed in an
inverted way.
9.15.2 Delete sync start function
The function is active as long as it is displayed in an inverted way. Press softkey SYNCST to
delete function.
11.5 The sound function/beat count
Chases can run by sound signal. That means that the trigger for stepping the chase one more step further is
obtained by the bass beat of a sound signal connected to the desk.
The female jack plug is on the backpanel of the Licon1.
The bass fequency is factory set and can not be changed.
The number of bass beats on which the chase will be stepped further can be adjusted.
à see chapter 12.8 Soundfunction and beat count
Page 56

JB-lighting Lichtanlagen GmbH Sallersteigweg 15 D-89134 Blaustein phone: +49 7304 9617-0
www.jb-lighting.de - 56 -
12 The chase control section
The chase control section enables direct access to running chases and speed groups.
The speed and direction of the chases and speed groups can be changed
independent from the programmed data.
encoder wheel: for manual speed regulation
restart key: starts running chase from first step (in combination with chase key)
Select-Taste: zur Chase-Anwahl
Learn key: speed regulation and adaptation to beat by tapping key.
Sync key
Direction key: changes direction of chase
Sound-Taste:
Go - key: manual chase stepping opposite to the actual direction of the chase
Go + key: manual chase stepping in direction of the chase
Go key: stops chase and activates Go – and Go + keys.
12.1 Selection of chase
Press key select and simultaniously press chase key.
To change speed or direction following options are
available:
12.2 Speed change by means of encoder wheel
Select chase (à see chapter 11.1)
Change speed by turning the chase control sections encoder wheel.
Page 57

JB-lighting Lichtanlagen GmbH Sallersteigweg 15 D-89134 Blaustein phone: +49 7304 9617-0
www.jb-lighting.de - 57 -
12.3 Speed change by means of the learn key
Select chase (à see chapter 11.1)
Press learn key one twice.
The period of time that passes while LED is flickering, represent the duration of
one chase step.
12.4 Manual stepping (Go keys)
Select chase (à see chapter 11.1)
Press Go key until LED is lit.
Use Go + and Go – keys to step chase manually.
12.5 Change of direction
The direction of a chase can be changed while chase is running.
Select chase (à see chapter 12.1)
Three different functions are available
Function 1:
No LED is lit. Chase runs according to the programmed direction.
Function 2:
The red LED is lit.
Chase changes direction and runs in opposite to the programmed direction.
Function 3:
The red and the green LEDs are lit
Chase runs in opposite to the programmed direction till it reaches the first step. Then chase changes
direction and runs according to the programmed direction till it reaches the last step. Chase will change
direction again.
12.6 The restart function
Select chase (à see chapter 12.1)
To start the selected chase from first step simply press the restart key.
Page 58

JB-lighting Lichtanlagen GmbH Sallersteigweg 15 D-89134 Blaustein phone: +49 7304 9617-0
www.jb-lighting.de - 58 -
12.7 The sync function
12.8 The sound function
Chases and sequences can be controlled by bass-beat, thanks to the sound function. The steps are not any
longer controlled by time or manually, but by the bass beats of the music. A sound signal has to be
connected to the sound input (stereo jack). The green LED will start flashing after a sound signal has be
connected.
The configuration of the bass frequency can not be changed. It is pre-programmed.
But the number of bass beats which will be counted until the next step will be recalled can be entered.
There is a choice from one to sixteen beats.
To activate the sound function press the sound key (LED is lit)
The sign shows after which number of bass-beats the next step will be recalled. In this
case the next step will be switch on after every single beat.
To change the number of beats enter Prog chase menu and press simultaneously the sound key (Chase
Control Section) and on of the Beat-Count keys (cue section).
The cue keys no. 1 to no. 16 are according to the
bass beats 1 to 16.
If the chase or sequence steps should be recalled
after 4 bass beats, press cue key 4/C
Usually a bass beat varies during the duration of
a track. There are passages with very fast bass
beats sequences. For this case a gate time can
be entered. For the period of the gate time bassbeats are not counted.
Enter TOOLS menu to enter the gate time. Choose function SOUND and enter gate time by means of the
encoder wheel situated int the middle. A gate time of 0,30 seconds will fit most tracks.
Page 59

JB-lighting Lichtanlagen GmbH Sallersteigweg 15 D-89134 Blaustein phone: +49 7304 9617-0
www.jb-lighting.de - 59 -
13 Edit a chase
Every parameter of a chase can be edited in edit-menu only, except the speed which is edited in the chase
control section
To recall the edit menu press edit key of combi section and select the desired chase.
The edit chase menu looks like this:
To edit one step select the desired step by means of the encoder wheel located in the middle.
Press softkey MODIFY to recall the step.
Press one of the features key to recall a parameter.
Enter new DMX value by means of Preset keys or the encoder wheels.
To store data press store key of combi section and select the desired features and fixtures in storeage
matrix.
Confirm by pressing store key again
After the confirmation the MODIFY key is not displayed inverted anymore.
If you want to alter any other step repeat process.
Page 60

JB-lighting Lichtanlagen GmbH Sallersteigweg 15 D-89134 Blaustein phone: +49 7304 9617-0
www.jb-lighting.de - 60 -
14 Sequences
A sequence is a program containing par and fixture data. Each
step of a sequence can feature different parameters, like control
mode, number of fixtures or par channels, ect.
There are 8 keys to store and recall sequences. The keys can be
switched by means of the shift key.
Press shift key and hold it. Then press one of the
bank keys to choose the desired bank. The green
LED will start flashing to confirm
the choice. It will stop flashing after one sequence is
activated.
14.1 Enter step of a sequence
Programming of squences takes place in combi section. Sequences can contain preprogrammed cues or cues which haven´t been pre-programmed.
Select fixtures by pressing the keys ind Feature-/Par-Selection
Select the desired parameters and enter DMX values by means of Presets or encoder
wheels
Press store key in combi section
Choose parameters from store matrix
Select a sequence key and press it
Press store key to confirm again
After recalling the sequence by pressing the sequence key the following monitor will appear:
Page 61

JB-lighting Lichtanlagen GmbH Sallersteigweg 15 D-89134 Blaustein phone: +49 7304 9617-0
www.jb-lighting.de - 61 -
NAME: name of sequence
DUP ST: double active step
DEL ST: delete active step
CLEAR: delete whole sequence
SINGLE: displayed inverted: sequence runs only one time
Displayed not inverted: sequence runs as loop and never
stops
LINK F: displayed inverted: fade time in %
Displayed not inverted: fade time in seconds
FADETIME: enter data by means of the left encoder wheel
STEP: choose step by means of the encoder wheel situated in the middle
NEXTTIME: enter data by means of the right encoder wheel
BLOCK: enter block of a number of steps
LINK:
RENUM: Re-numbering of the whole sequence after steps have been inserted
ID: Number half steps
TRIGP: enter trigpoint data by means of the right encoder wheel
14.2 Name sequence
The sequence can be named during the process of storing it.
Press softkey NAME and use keys in Cues/Chases /Sequence section to enter name. To store and leave
function press softkey NAME again.
14.3 Enter duration
Each step can contain data for :
FADETIME: fade in of a step
TRIGPOINT: point at which parameters are going to be switched (only valid for parameters which are not
faded)
NEXTTIME: duration of the whole step
The values can be entered either in seconds or in percents relaying on the nexttime.
It makes sence to enter the values in percent if the sequence runs by manual controlled speed.
Duration of each step
Page 62

JB-lighting Lichtanlagen GmbH Sallersteigweg 15 D-89134 Blaustein phone: +49 7304 9617-0
www.jb-lighting.de - 62 -
The next time (duration of each step) is entered by means of the encoder wheel situated on the right hand
side. Press softkey NEXTT to activate function.
Length of the fade time / seconds
Use encoder wheel situated on the left side to enter fade time. The value will be displayed in seconds if the
function LINK F is displayed not in an inverted way.
Length of the fade time / percent
Use encoder wheel situated on the left side to enter fade time. The value will be displayed in seconds if the
function LINK F is displayed in an inverted way.
Trigpoint
Trigpoint is the time when all parameters which are switch (only for parameters which are not faded) To
enter data press softkey TRIGP and enter value by means of the encoder wheel situated on the right.
Page 63

JB-lighting Lichtanlagen GmbH Sallersteigweg 15 D-89134 Blaustein phone: +49 7304 9617-0
www.jb-lighting.de - 63 -
15 The list function
The list of the cues/chases and sequences can be displayed. The list is recalled by pressing the list key in
combi or par section
The diplay will show the following configuration:
CUES F:
Fix cue key which can not be
switched by bank/page function
Cue keys F1 to F8
CUES 1A:
Cues which can be switched by
page/bank function
Cue keys 1 to 16
CHASES 1 A:
Chases depending on active page/
bank
SEQ A: Sequences depending on active page/ bank
List function in par section (key pressed only one time)
List function in par section (key pressed twice)
The upper list shows the assignment of the cue faders, the list
below the assignment of the cue faders.
Page 64

JB-lighting Lichtanlagen GmbH Sallersteigweg 15 D-89134 Blaustein phone: +49 7304 9617-0
www.jb-lighting.de - 64 -
16 PAR section
Access to PAR/dimmer section is divided in two options.
Combi Section:
Access to PAR/dimmer channels in combination with fixture channels. Cues, sequences
and chases can contain fixture data as well as PAR/dimmer data.
DMX output of the combi section works on the priciple of LTP .
Brightness is controlled by means of the Master fader located in the middle of the master
section.
Programming and storage for cues, sequences and chases containing fixture data
as well as PAR/dimmer data is carried out by means of the keys of the combi
section.
Field of application for dimmers in combi-section are:
• music synchronized shows programmed by means of the timeline editor
• complete sequences for theatre applications
• combined cues for live perfomance
• MIDI shows
PAR Section:
Access to storage functions for cues, chases and sequences containing only PAR/dimmer
data.
DMX output of the par section works on the principle of HTP.
Brightness is controlled by means of the Master fader located on the left of the master
section.
Recall of cues and chases is carried out by means of keys and faders of the par section on
the left side of the desk.
Programming and storage for cues, sequences and chases containing only
PAR/dimmer data is carried out by means of the keys of the par section.
Field of application for dimmers in par-section are:
• manually controlled sequences, mainly in during a live performance
• effects, like aircrafts or audience blinders
• in general whenever an operator is in need of direct access to dimmers
Caution!!!
Direct access to PAR channels as well as programming and editting of Presets, cues, chases und
sequenzen for Combi and Par Section take place in combi section only.
For visual control of all proceedings:
Page 65

JB-lighting Lichtanlagen GmbH Sallersteigweg 15 D-89134 Blaustein phone: +49 7304 9617-0
www.jb-lighting.de - 65 -
Activate Master fader (C-Par)
Deactivate Master Fader (Par) on the left side of Master section
To store PAR cues always proceed as follows:
Press store key of PAR section
Press flash key which is located underneath one PAR fader
Confirm by pressing store again
Page 66

JB-lighting Lichtanlagen GmbH Sallersteigweg 15 D-89134 Blaustein phone: +49 7304 9617-0
www.jb-lighting.de - 66 -
16.1 Direct access
To get direct access to the edit functions of the dimmer section press one of the
PAR keys.
After pressing one of the PAR keys twice the display will show the following configuration:
If Presets have been stored, they can be recalled using this
display configuration.
To enter DMX values select the channels by
means of the keys in the Fixture- /PAR
selection block. Enter value by means of the
encoder wheel situated in the middle.
Caution: The DMX values are entered for all active channels.
If there are channels selected from number 33 to 96 there
values are changed, too even if they are not shown on the
display.
This way of programming is very time consuming. Faster and more efficient ways of programming PAR
channels are described in the chapters 16.2 to 16.8
16.2 Encode mode
To enter encode-mode press one of the PAR keys twice.
Then press softkey ENCODE.
The activated state of the encode-mode is shown by inversion of
the display.
The encode-mode offers the possibility to enter data for PAR
channels similar to the fixture features.
Activate channels by pressing the fixture/par selection keys
Page 67

JB-lighting Lichtanlagen GmbH Sallersteigweg 15 D-89134 Blaustein phone: +49 7304 9617-0
www.jb-lighting.de - 67 -
Enter DMX values by means of encoder wheels or pre-programmed presets.
This mode is used mainly to adjust PAR channels exactly or edit cues, chases and
sequences.
Caution!!!
If DMX values are entered by means of the encoder wheel, changes will only access the PAR
channels activated by means of the fixture/PAR selection keys.
If DMX values are entered by means of a preset, changes will not only access the PAR channels
activated by means of the fixture/PAR selection keys. All channels will be changes, which have been
active while programming the preset.
16.3 Block mode
To enter block-mode:
Press one of the PAR keys located in the fixture section twice
Then press softkey BLOCK. The activated state of the blockmode is shown by inversion of the display.
In block-mode blocks of different sizes containing PAR channels
can be defined.
The DMX values of the PAR channels can be entered by means
of the silders in PAR section.
Field of application:
• Quick programming of Presets, cues and steps of
chases and sequences.
Use the encoder wheel located on the right hand side to define
the size of the block. (A maximum of 12 PAR channels can be assigned to one block).
The LEDs of the fixture/par selection keys will be lit, when a PAR channel is activate by block function.
The block can be moved or positioned by means of the encoder wheel located on the left hand side.
DMX values are changed by
shifting the PAR faders.
Caution !!!
The actual position of the faders
marks the DMX values. No
matter whether the faders have
been shifted or not (no
grabbing).
Page 68

JB-lighting Lichtanlagen GmbH Sallersteigweg 15 D-89134 Blaustein phone: +49 7304 9617-0
www.jb-lighting.de - 68 -
For chages in DMX values later on use either encode-mode or hilite function.
16.4 Hilite mode
To enter hilite-mode press one of the PAR keys located in the fixture section twice.
Then press softkey HILITE. The activated state of the hilite-mode
is shown by inversion of the display.
In hilite-mode the activated PAR channels will be switched on
and off one after the other.
The DMX value of the channel which is actually switched on can
be changed by means of the encoder wheels or the first fader
located in PAR section.
Field of application:
• Comfortable change of DMX values from pre-
programmed presets, cues, chases and sequences.
This mode is used to locate a certain PAR channel.
After activating the hilite-mode, the first PAR channel will be
switched on and off.
Select PAR channel by means of left encoder wheel.
To enter DMX values use first fader in the PAR section or the
encoder wheel which is located in the middle.
After entering the DMX value of the active channel use encoder
wheel to select next DMX channel. Then use first PAR fader
again to enter the DMX value of the activated DMX channel.
16.5 Parout mode
To enter parout-mode press one of the PAR keys located in the fixture section
twice.
Then press softkey PAROUT. The activated state of the
PAROUT-mode is shown by inversion of the display.
The PAROUT-mode is used to take over the actual DMX values
of PAR section into combi section (without scaling the light
output by means of the left Master PAR fader).
Page 69

JB-lighting Lichtanlagen GmbH Sallersteigweg 15 D-89134 Blaustein phone: +49 7304 9617-0
www.jb-lighting.de - 69 -
Field of application:
• Check-up of PAR sections´ cues and chases by means of the display à very important when
programming in blackout (no visual control by light output but by DMX values shown on the display).
• Utilization of in PAR section programmed cues to edit a cue containing a variety of different cues.
• Utilization of in PAR section programmed cues to edit PAR chases.
The parout mode is activated after the softkey PAROUT has been pressed and it has been displayed in an
inverted way.
Recall an already programmed cue by shifting its PAR fader. You will see the change in DMX-values shown
on the display. Then press store key in PAR-section and afterwards on of the flashkeys which is located
underneath one of the PAR faders.
16.6 The numeric block
To enter the numeric block press one of the PAR keys located in the fixture section
twice.
The numeric block can be used to recall combinations of PAR channels. To activate it
press softkey NUM-
The display will show the following selection:
To enter a combination of PAR channels the softkeys SEL + , SEL - und SELà are used in combination
with the keys of the CUES/CHASES/SEQUENCES section.
SEL + : to confirm the enter a channel number
SEL - : to confirm the deletion of a channel number
SELà: to confirm a selected block of channels
%: to enter DMX values in percent for the activated channels.
Page 70

JB-lighting Lichtanlagen GmbH Sallersteigweg 15 D-89134 Blaustein phone: +49 7304 9617-0
www.jb-lighting.de - 70 -
Example for the enter a channel combination by means of the numeric block:
The desired block should consist from the channels number: 1, 7 and 32 to 46 with a DMX value of 50%
Enter data in the following order
Press cue key 1
Confirm by pressing softkey SEL+
Press cue key 7
Confirm by pressing softkey SEL+
Press cue key 3 and cue key 2
Confirm by pressing softkey SEL+
Press cue key 4 and cue key 6
Confrim by pressing softkey SELà
Press cue key 5 and cue key 0
Confirm DMX value by pressing funcition key SEL%
The display will show the following configuration after all data have been entered:
display PAR 1-32 display PAR 33-64
Page 71

JB-lighting Lichtanlagen GmbH Sallersteigweg 15 D-89134 Blaustein phone: +49 7304 9617-0
www.jb-lighting.de - 71 -
16.7 Name PAR channels
Each of the 96 PAR channels can be named. To enter the name of a PAR channel proceed as follows:
Select the PAR channels by means of the keys in the Feature-/PAR Selektion block. (LED must be lit)
Press softkey NAME and use the keys in CUE/CHASE/SEQUENCE section to enter the name of the PAR
channel.
If the name should be deleted press softkey CLRNAME.
16.8 Store PAR presets
Caution:
PAR presets are stored in the combi-mode! Always use keys of the combi block
when storing presets, no matter if fixture or par presets.
Enter PRESET menu by pressing softkey PRESET.
Press one of the PAR keys located in the fixture section.
Enter DMX values like described in 16.2 à
Press key store in combi section
(Store LED will be lit).
Select one of the PRESET
fields by means of softkeys.
(Store LED starts flashing).
Page 72

JB-lighting Lichtanlagen GmbH Sallersteigweg 15 D-89134 Blaustein phone: +49 7304 9617-0
www.jb-lighting.de - 72 -
Enter the name of the preset by means of keys in the cue, chase and sequence section.
To execute procedure press
store key again.
16.8.1 Recall PAR presets
Press one of the PAR keys located in the fixture section.
Use softkey to recall one of the programmed presets.
16.8.2 Fade PAR presets
Press one of the PAR keys located in the fixture section.
Use softkey to recall presets.
Fade time will be entered by means of Preset-Fade fader
located on the left of the PAR section. Select fade time from
0,5 seconds to 10 seconds.
Page 73

JB-lighting Lichtanlagen GmbH Sallersteigweg 15 D-89134 Blaustein phone: +49 7304 9617-0
www.jb-lighting.de - 73 -
17 Data storage
Data backup is performed on a formatted 3,5” floppy disc. .
17.1 Format floppy disc
Insert the floppy disc into the disc drive
Press softkey BACKUP and select the funciton FORMAT.
Confirm process by pressing the softkey YES.
The desk will count from 0 to 99 and confirm the end of the process by displaying the word: COMPLETE.
17.2 Selective data storage
Several groups of data can be stored selectively:
TILINE: Timeline data
MEMORY: Cues/Chases /Sequence Daten in Fixture- and PAR-
section
PRESET: programmed PRESETS of Fixtures
CONFIG: Config data
L-USER: data of self-defined fixtures
ALL: all data stored in the desk
The process of backup data is executed in the same way no matter if data is stored selectively or completely.
Insert a fromatted floppy disc into the disc drive.
Press funciton-key SAVE and chose which kind/group of data
should be stored on disc.
Before the process of data storage can be executed a name for
the file has to be enterde. Use the keys of the Cues/Chases
/Sequence
section.
Page 74

JB-lighting Lichtanlagen GmbH Sallersteigweg 15 D-89134 Blaustein phone: +49 7304 9617-0
www.jb-lighting.de - 74 -
After the name was entered the storage process can be confirmed by pressing the softkey EXEC.
During the process of data storage the message: Writing data.... will be displayed.
Data storage has been successful when status COMPLETE is displayed.
17.2.1 Selective storage of presets
Presets which have been stored for a user defined fixture can be stored selectively on a floppy disc.
Chose from the BACKUP/SAVE menu the function PRESET. Afterwards select softkey SINGLE. Then use
the encoder wheel on the left hand side to selectthe desired fixture. Name the file and execute process by
pressing the softkey EXEC.
17.3 Selective re-load of data into the desk
Data from floppy disc back up can be re-loaded into the desk according to the data groups descibed in
chapter 16.2.
Select the menu by prssing the softkey BACKUP and chose function LOAD.
Select which kind of data you want to re-load into the desk by pressing theaccording softkey.
TILINE: Timeline data
MEMORY: Cues/Chases /Sequence Daten in Fixture- and PAR-
section
PRESET: programmed PRESETS of Fixtures
CONFIG: Config data
L-USER: data of self-defined fixtures
ALL: all data stored in the desk
After selection the display will show the directory of the stored data.
Use the encoderwheel situated in the middle to select the desired file.
If you want to check the complete list of files stored on the floppy disc, press softkey DIR (Directory). The
files attachments will provide you with information on which kind of data is stored.
.LDA all/complete data of the desk
.LDT Timeline data
.LDM Memory/ cue data
.LDP Preset data
.LDC Config data
.LDU User scan data
Page 75

JB-lighting Lichtanlagen GmbH Sallersteigweg 15 D-89134 Blaustein phone: +49 7304 9617-0
www.jb-lighting.de - 75 -
Start process by pressing softkey EXEC.
During the process of re-loading READING DATA... will be displayed.
Successful execution will be confirmed by: COMPLETE .
17.3.1 Selective re-load of Preset data
Select menu BACKUP/LOAD/PRESET. There will be a selection of ALL and SINGLE displayed. Press
softkey SINDGLE and select by means of the encoder wheel situated in the middle the desired file.
Start process by pressing softkey EXEC.
If you want to re-load the name and the value of the PRESET press softkey +NAMES.
Otherwise only the values will be changed.
Page 76

JB-lighting Lichtanlagen GmbH Sallersteigweg 15 D-89134 Blaustein phone: +49 7304 9617-0
www.jb-lighting.de - 76 -
18 Timeline programming (music synchronized)
Timeline programming is used to program a show which runs synchronized to a music CD played by the
integrated CD-Rom drive.
Each music CD has its own music timecode. The music timecode on CD is divided in 74 frames per second.
To enter the timeline menu press softkeys TOOLS and TILINE.
The timeline screen looks like displayed on the left side.
You can see the track on which the events will be displayed later
on. 4 cues and 32 chases can be assigned to each frame.
The softkeys of the timeline menu:
CDPLAY: Enter menu of the CD-player
PARAM: Enter the loop menu.
PLAY: Start and stop of timeline show
Press one time: show starts from „ 00:00:00 „ (the softkey will be
displayed inverted)
Press again: show will Stopp. (the softkey isn´t displayed
inverted anymore).
-->PLAY: Starts the timeline show from a certain frame which can be chosen before.
A-Play: Plays only a defined part of the music.
RECORD: Enter programming level of the timeline menu
EDIT: Enter edit l evel
BLOCK: define blocks
18.1 Enter a music CD
Timeline menu is activated. The timeline menu is displayed.
Press softkey CDPLAY to enter CD-player menu
Unlock the CD-Rom drive by pressing softkey UNLOCK.
(Display shows: LOCK INACTIVE)
Open the CD-Rom drive and put in a music CD.
Close it again an lock the CD-Rom drive to make sure it will not
be opened accidentally during a show. Use funktion-key LOCK.
Display will show: LOCK ACTIV
Press ESCAPE one time to leave the CD-player menu
18.2 Basic of timeline programming: LOOP
Put in a music CD like described in 22.1
Recall the timeline mainmenu and press softkey PARAM
The PARAM menu will be opened and the basic data for the
programming loop can be entered.
Within a loop a cue or chase can be moved forward an
backwards
Page 77

JB-lighting Lichtanlagen GmbH Sallersteigweg 15 D-89134 Blaustein phone: +49 7304 9617-0
www.jb-lighting.de - 77 -
This diagram should help to clarify the way a loop works:
During programming
a PRE time and
POST time will be
automatically
assigned to every cue or chase.
The duration of this two times will be defined in the PARAM menu.
PRE and POST time will define the length of the loop.
The loop will either start with a defined startcue, which can be any preprogrammed cue. Or it will start with
the last cue which was programmed before the loop starts.
The basics of the PARAM menu are:
AS-PRE: The loop will start using the last cue which was programmed before the loop has been set. .
Will be activated by pressing the softkey AS-PRE.
You can define a certain cue to be the start cue anytime. Programm the cue first and store it
on one of the cue keys. Assign it simply by pressing the cue key.
AS-OFF Loop runs without using a defined start cue.
PRE-/+: Enter duration of time running before the cue is activated.
POST-/+: Enter duration of time running after the cue is activated..
While programming a timeline show this basics are always active.
This is the factory setting of the loop programm:
AS-PRE: active
PRE time: 1 second
POST time: 3 seconds
18.3 Simple timeline programming
This chapter describles the most simple way to programm a timeline show.
If you want to go futher into detailx see chapter 22.4 Complex timeline programming.
Before starting the actual process of programming a timeline show enter the basics of the loop first
(described in chapter Vor dem eigentlichen Timeline-Programmieren muss zuerst die Grundeinstellung der
Loops erfolgen.à Vgl.: 22.2)
The timeline programming is realized in the RECORD menu
Enter record menu by pressing the softkeys: TOOLS, TILINE and RECORD.
The display will look like this:
Page 78

JB-lighting Lichtanlagen GmbH Sallersteigweg 15 D-89134 Blaustein phone: +49 7304 9617-0
www.jb-lighting.de - 78 -
The softkey have the following functions:
M-CLR: delete a marker
M-ADD: enter a marker
PLAY: play the show from begin
à PLAY: play the show from a certain moment
A-PLAY: play only a loop
FADE: enter fadetime
LOOP: activate the loop function
TRACK-/+: search for a track
FRAME -/+: move the time axis
ZOOM-/+: zoom in and out of the time rate
Timeline programming means that cues and chases which have
been programmed before will be assigned to a certain point of time within a music track.
During the process of programming the timeline cues and chases will be called EVENTS.
18.3.1 Assign cues and chases (Events)
Put in the music CD and start the desired track. (softkey PLAY)
Press the desired cue keys or chase keys to assign cues and chases while the track runs.
(cues and chases have to be pre-programmed!)
18.3.2 Move cues and chases
To move an event to the right position within a music track activate LOOP function while programming.
Press softkey LOOP to activate LOOP function.
If LOOP function is activate a loop will be placed automatically during the process of programming an event.
This loop will be displayed by two small marks on the display. (See track “M” on the display).
The event can now be moved within this loop:
Us the encoder-wheel which is located in the middle to enter the time the event should be moved forward or
backward.. You can check the time on the displayà OFS: 00:00:00
The event will be moved after confirming the time by pressing softkey MOVE
The softkey MOVE will only be displayed after the encoder-wheel has been turned.
Dieser Vorgang kann beliebig oft ausgeführt werden.
This process can be repeated as often as necessary.
To leave this loop and go on with programming press softkey à PLAY.
The track will run from the loop.
To enter a new event press cue key or chase key.
If an event should be moved later on use the function EDIT
Page 79

JB-lighting Lichtanlagen GmbH Sallersteigweg 15 D-89134 Blaustein phone: +49 7304 9617-0
www.jb-lighting.de - 79 -
19 The CD-Player
To activate CD-Player use menu TOOLS/CD.
Unlock the CD-Player to put in a CD.
Use softkey UNLOCK. After a CD was put into the drive lock the
CD-Player again.
Use softkey PLAY to start CD
Use softkeys --> and <-- to choose the desired track.
A headset or PC boxes can be connected to the sound out of
the CD-drive (3,5mm jack plug).
Also a sound system can be connected to the LICON1 (use
sound output 6,3mm jack plug situated on the backside of the
desk.
Page 80

JB-lighting Lichtanlagen GmbH Sallersteigweg 15 D-89134 Blaustein phone: +49 7304 9617-0
www.jb-lighting.de - 80 -
20 Trackball
To work in the most convenient way a trackball is required to do the positioning of the fixtures.
The trackball which is sold by JB-lighting is already set up to the desks requirements. All trackballs are
marked with a sticker next to the dip switches. If the sticker is missing with your trackball, please call JBlighting or your local dealer.
Connect the trackball to the RS-232 interface on the backside of the desk.
Choose the desired fixtures by pressing the keys of the Fixture-/PAR selection
Press simultaneously the Group/Highlight key and the first key of the active fixtures in the
Fixture-/PAR selection. The fixture keys LED starts flashing the the fixture will be on
OPEN/WHITE . (Make sure the group fader is positioned at full).
After that proceeding the fixtures can be positioned by
means of the trackball
Trackball keys
Small keys left and right: no function
Big keys:
Press left key and hold it. Press right key to switch to
next fixture
Press only right key to activate slow mode. Press it
again to activate fast mode.
The complete group of fixtures which was defined first
will be activated one after another.
To switch off Highliht function press Group/Highlight key
Taste and the flashing Fixture/Par key at the same time.
Page 81

JB-lighting Lichtanlagen GmbH Sallersteigweg 15 D-89134 Blaustein phone: +49 7304 9617-0
www.jb-lighting.de - 81 -
21 Delete all data
Data can be deleted either complete or selectively. To enter the required menu switch of the Licon1. Press
the four softkeys which are situated above the display and hold them. Switch on the desk by means of the
on/off key.
The display will show the following menus:
To delete data select one of the menus, press softkey and
confirm by pressing softkey YES.
One the first page you can select the data of the L-USER menu
or the ACCESS (password) menu to be deleted.
Any other data can be deleted after pressing softkey MORE.
The display will show the following configuration:
After the MORE menu was entered the following options can be
taken:
CONFIG: delete data from CONFIG/setup section
COMBI: delete data stored in combi section
PAR: delete data stored in PAR section
TILINE: delete timeline edited data
MIDI: delete MIDI data
ALL: delete all data except passwords.
Always backup data on floppy before clearing the desk.
 Loading...