

Page 1
USer’S GUide
SRX812 P SRX815 P SRX835P SRX818 S P SRX828SP
Page 2

2
Page 3

CONTENTS
Safety Instructions .................................................................................................................................... 4
Declaration Of Conformity ......................................................................................................................... 5
Quick Setup Guide ..................................................................................................................................... 6
SRX812P, SRX815P, SRX835P Back Panel ................................................................................................. 8
SRX828SP, SRX818SP Back Panel ........................................................................................................... 10
Overview - SRX800 Family ...................................................................................................................... 12
SRX812P, SRX815P - Block Diagram ....................................................................................................... 13
SRX835P - Block Diagram ....................................................................................................................... 14
SRX818SP - Block Diagram ..................................................................................................................... 15
SRX828SP - Block Diagram ..................................................................................................................... 16
SRX812P Specifications ......................................................................................................................... 17
SRX815P Specifications ......................................................................................................................... 18
SRX835P Specifications ......................................................................................................................... 19
SRX818SP Specifications ....................................................................................................................... 20
SRX828SP Specifications ....................................................................................................................... 21
Purposeful Product Design...................................................................................................................... 22
Component Elements ............................................................................................................................... 23
Back Panel LCD ........................................................................................................................................ 25
SRX Presets ............................................................................................................................................. 27
Premium DSP Technology ....................................................................................................................... 29
Networking .............................................................................................................................................. 30
Smart Device App .................................................................................................................................... 32
Loudspeaker Placement and Suspension .............................................................................................. 33
TroubleShooting ....................................................................................................................................... 34
Warranty Information .............................................................................................................................. 35
Contact Information ................................................................................................................................. 36
3
Page 4

SAFETY INSTRUCTIONS
Before You Begin - Important Safety Information
Before using your SRX800® speaker system please review the following for important
information on safety and protection of your investment in quality loudspeakers.
1. Read these instructions.
2. Keep these instructions.
3. Follow all instructions.
4. Heed all warnings.
5. Do not use this apparatus near water.
6. Clean only with dry cloth.
7. Do not block any ventilation openings. Install in accordance with the manufacturer’s instructions.
8. Do not install near any heat sources such as radiators, heat registers, stoves, or other apparatus
(including amplifiers) that produce heat.
9. Do not defeat the safety purpose of the polarized or grounding-type plug. A polarized plug has two blades with one wider than
the other. A grounding-type plug has two blades and a third grounding prong. The wide blade or the third prong is provided
for your safety. If the provided plug does not fit into your outlet, consult an electrician for replacement of the obsolete outlet.
10. Protect the power cord from being walked on or pinched, particularly at plugs, convenience receptacles, and the point where
they exit from the apparatus.
11. Only use attachments/accessories specified by the manufacturer.
12. Use only with the cart, stand, tripod, bracket, or table specified by the manufacturer, or sold with the
apparatus. When a cart is used, use caution when moving the cart/apparatus combination to avoid injury
from tip-over.
13. Unplug this apparatus during lightning storms or when unused for long periods of time.
14. Refer all servicing to qualified service personnel. Servicing is required when the apparatus has been
damaged in any way, such as power supply cord or plug is damaged, liquid has been spilled or objects
have fallen into the apparatus, the apparatus has been exposed to rain or moisture, does not operate normally,
or has been dropped.
15. CAUTION - DO NOT PERFORM ANY SERVICING UNLESS YOU ARE QUALIFIED TO DO SO.
16. To completely disconnect this apparatus from the AC mains, disconnect the power supply cord plug from
the AC receptacle.
17. WARNING – TO REDUCE THE RISK OF FIRE OR ELECTRIC – SHOCK, DO NOT EXPOSE THIS APPARATUS TO RAIN
OR MOISTURE.
18. Do not expose this equipment to dripping or splashing and ensure that no objects filled with liquids, such as vases, are
placed on the equipment.
19. THE MAINS PLUG OF THE POWER SUPPLY CORD SHALL REMAIN READILY OPERABLE.
4
Page 5

DECLARATION OF CONFORMITY
Safety And EMC Compliance Specifications
Report No. Description
EN 55103-1:2009 +A1:2012 EMC Compatibility – Product Family Standard for Audio, Video, Audio-Visual and Entertainment Lighting Control
Apparatus for Professional Use, Part 1: Emissions
EN 55103-1:2009 +A1:2012 Magnetic Field Emissions – Annex A @ 10cm and 20cm
EN 61000-3-2:2006 +A1:2008 +A2:2009 Limits for Harmonic Current Emissions (equipment input current less than or equal to 16A
EN 61000-3-3:2013 Limitation of Voltage Fluctuations and Flicker in Low-Voltage Supply systems Rated Current less than
or equal to 16A
EN 55022:2010 Limits and Methods of Measurement of Radio Disturbance Characteristics of ITE: Radiated, Class B Limits;
Conducted, Class A
EN 55103-2:2009 EMC Compatibility – Product Family Standard for Audio, Video, Audio-Visual and Entertainment Lighting Control
Apparatus for Professional Use, Part 2: Immunity
EN 61000-4-2:2008 Ed 2.0 Electrostatic Discharge Immunity (Environment E2-Criteria B, 4k V Contact, 8k V Air Discharge)
EN 61000-4-3:2010 Ed 3.2 Radiated, Radio-Frequency, EMC Immunity (Environment E2, Criteria A)
EN 61000-4-4:2007 Electrical Fast Transient/Burst Immunity (Criteria B)
EN 61000-4-5:2006 Surge Immunity (Criteria B)
EN 61000-4-6:2006 Immunity to Conducted Disturbances Induced by Radio-Frequency Fields (Criteria A)
EN 61000-4-11:2004 Voltage Dips, Short Interruptions and Voltage Variation
Safety Standard:
EN60065:2002 +A12:2011, Safety Requirements – Audio, Video, and Similar Electronic Apparatus
IEC 60065:2001 Ed 7
+A1:2005 +A2:2010
CAN/CSA 60065-03 incl. A1 Safety Requirements – Audio, Video, and Similar Electronic Apparatus
UL Std No. 60065-2007 Safety Requirements – Audio, Video, and Similar Electronic Apparatus
UL Compliance Specifications
UL 60065 7th Ed. CAN/CSA 22.2 No.60065_2003
FCC Statement
1. This device complies with Part 15 of the FCC Rules.
Operation is subject to the following two conditions:
(1) This device may not cause harmful interference.
(2) This device must accept any interference received,
including interference that may cause undesired operation.
2. Changes or modifications not expressly approved by the party responsible
for compliance could void the user’s authority to operate the equipment.
NOTE: This equipment has been tested and found to comply with the limits
for a Class B digital device, pursuant to Part 15 of the FCC Rules. These limits
are designed to provide reasonable protection against harmful interference in
a residential installation.
This equipment generates uses and can radiate radio frequency energy and,
if not installed and used in accordance with the instructions, may cause
harmful interference to radio communications. However, there is no guarantee
that interference will not occur in a particular installation. If this equipment
does cause harmful interference to radio or television reception, which can be
determined by turning the equipment off and on, the user is encouraged to
try to correct the interference by one or more of the following measures:
•Reorientorrelocatethereceivingantenna.
•Increasetheseparationbetweentheequipmentandreceiver.
•Connecttheequipmentintoanoutletonacircuitdifferentfrom
that to which the receiver is connected.
•Consultthedealeroranexperiencedradio/TVtechnicianforhelp.
FCC Radiation Exposure Statement
This equipment complies with FCC radiation exposure limits set forth for an
uncontrolled environment. This equipment should be installed and operated with
minimum distance 20cm between the radiator & your body.
IC Warning
1. This device complies with Industry Canada licence-exempt RSS
standard(s). Operation is subject to the following two conditions:
(1) this device may not cause interference, and
(2) this device must accept any interference,
including interference that may cause undesired
operation of the device.
2. Changes or modifications not expressly approved by the party responsible
for compliance could void the user’s authority to operate
the equipment.
Le présent appareil est conforme aux CNR d’Industrie Canada applicables
aux appareils radio exempts de licence. L’exploitation est autorisée aux deux
conditions suivantes :
(1) l’appareil ne doit pas produire de brouillage, et
(2) l’utilisateur de l’appareil doit accepter tout brouillage
radioélectrique subi, même si le brouillage est susceptible
d’en compromettre le fonctionnement.”
5
Page 6
QUICK SETUP GUIDE
OUTIN
CH
2
CH
1
OUT
NETWORK
LINK
MASTER LEVEL
BACK
POWER
DATA
IN
A HARMAN INTERNATIONAL COMPANY
DESIGNED AND ENGINEERED IN THE USA
MADE IN MEXICO
SERIAL NO.JBL PROFESSIONAL NORTHRIDGE, CA USA
MAIN MENU
PRESET
AUTO DIM
AUTO SLEEP
METERS
? FILTERS
ON
OFF
OUTIN
CH
2
CH
1
OUT
NETWORK
LINK
MASTER LEVEL
BACK
POWER
DATA
IN
A HARMAN INTERNATIONAL COMPANY
DESIGNED AND ENGINEERED IN THE USA
MADE IN MEXICO
SERIAL NO.JBL PROFESSIONAL NORTHRIDGE, CA USA
MAIN MENU
PRESET
AUTO DIM
AUTO SLEEP
METERS
? FILTERS
ON
OFF
OUTIN
CH
2
CH
1
OUT
NETWORK
LINK
MASTER LEVEL
BACK
POWER
DATA
IN
A HARMAN INTERNATIONAL COMPANY
DESIGNED AND ENGINEERED IN THE USA
MADE IN MEXICO
SERIAL NO.JBL PROFESSIONAL NORTHRIDGE, CA USA
MAIN MENU
PRESET
AUTO DIM
AUTO SLEEP
METERS
? FILTERS
ON
OFF
OUTIN
CH
2
CH
1
OUT
NETWORK
LINK
MASTER LEVEL
BACK
POWER
DATA
IN
A HARMAN INTERNATIONAL COMPANY
DESIGNED AND ENGINEERED IN THE USA
MADE IN MEXICO
SERIAL NO.JBL PROFESSIONAL NORTHRIDGE, CA USA
MAIN MENU
PRESET
AUTO DIM
AUTO SLEEP
METERS
? FILTERS
ON
OFF
OUTIN
CH
2
CH
1
OUT
NETWORK
LINK
MASTER LEVEL
BACK
POWER
DATA
IN
A HARMAN INTERNATIONAL COMPANY
DESIGNED AND ENGINEERED IN THE USA
MADE IN MEXICO
SERIAL NO.JBL PROFESSIONAL NORTHRIDGE, CA USA
MAIN MENU
PRESET
AUTO DIM
AUTO SLEEP
METERS
? FILTERS
ON
OFF
OUTIN
CH
2
CH
1
OUT
NETWORK
LINK
MASTER LEVEL
BACK
POWER
DATA
IN
A HARMAN INTERNATIONAL COMPANY
DESIGNED AND ENGINEERED IN THE USA
MADE IN MEXICO
SERIAL NO.JBL PROFESSIONAL NORTHRIDGE, CA USA
MAIN MENU
PRESET
AUTO DIM
AUTO SLEEP
METERS
? FILTERS
ON
OFF
OUTIN
CH
2
CH
1
OUT
NETWORK
LINK
MASTER LEVEL
BACK
POWER
DATA
IN
A HARMAN INTERNATIONAL COMPANY
DESIGNED AND ENGINEERED IN THE USA
MADE IN MEXICO
SERIAL NO.JBL PROFESSIONAL NORTHRIDGE, CA USA
MAIN MENU
PRESET
AUTO DIM
AUTO SLEEP
METERS
? FILTERS
ON
OFF
OUTIN
CH
2
CH
1
OUT
NETWORK
LINK
MASTER LEVEL
BACK
POWER
DATA
IN
A HARMAN INTERNATIONAL COMPANY
DESIGNED AND ENGINEERED IN THE USA
MADE IN MEXICO
SERIAL NO.JBL PROFESSIONAL NORTHRIDGE, CA USA
MAIN MENU
PRESET
AUTO DIM
AUTO SLEEP
METERS
? FILTERS
ON
OFF
OUTIN
CH
2
CH
1
OUT
NETWORK
LINK
MASTER LEVEL
BACK
POWER
DATA
IN
A HARMAN INTERNATIONAL COMPANY
DESIGNED AND ENGINEERED IN THE USA
MADE IN MEXICO
SERIAL NO.JBL PROFESSIONAL NORTHRIDGE, CA USA
MAIN MENU
PRESET
AUTO DIM
AUTO SLEEP
METERS
? FILTERS
ON
OFF
OUTIN
CH
2
CH
1
OUT
NETWORK
LINK
MASTER LEVEL
BACK
POWER
DATA
IN
A HARMAN INTERNATIONAL COMPANY
DESIGNED AND ENGINEERED IN THE USA
MADE IN MEXICO
SERIAL NO.JBL PROFESSIONAL NORTHRIDGE, CA USA
MAIN MENU
PRESET
AUTO DIM
AUTO SLEEP
METERS
? FILTERS
ON
OFF
OUTIN
CH
2
CH
1
OUT
NETWORK
LINK
MASTER LEVEL
BACK
POWER
DATA
IN
A HARMAN INTERNATIONAL COMPANY
DESIGNED AND ENGINEERED IN THE USA
MADE IN MEXICO
SERIAL NO.JBL PROFESSIONAL NORTHRIDGE, CA USA
MAIN MENU
PRESET
AUTO DIM
AUTO SLEEP
METERS
? FILTERS
ON
OFF
OUTIN
CH
2
CH
1
OUT
NETWORK
LINK
MASTER LEVEL
BACK
POWER
DATA
IN
A HARMAN INTERNATIONAL COMPANY
DESIGNED AND ENGINEERED IN THE USA
MADE IN MEXICO
SERIAL NO.JBL PROFESSIONAL NORTHRIDGE, CA USA
MAIN MENU
PRESET
AUTO DIM
AUTO SLEEP
METERS
? FILTERS
ON
OFF
OUTIN
CH
2
CH
1
OUT
NETWORK
LINK
MASTER LEVEL
BACK
POWER
DATA
IN
A HARMAN INTERNATIONAL COMPANY
DESIGNED AND ENGINEERED IN THE USA
MADE IN MEXICO
SERIAL NO.JBL PROFESSIONAL NORTHRIDGE, CA USA
MAIN MENU
PRESET
AUTO DIM
AUTO SLEEP
METERS
? FILTERS
ON
OFF
OUTIN
CH
2
CH
1
OUT
NETWORK
LINK
MASTER LEVEL
BACK
POWER
DATA
IN
A HARMAN INTERNATIONAL COMPANY
DESIGNED AND ENGINEERED IN THE USA
MADE IN MEXICO
SERIAL NO.JBL PROFESSIONAL NORTHRIDGE, CA USA
MAIN MENU
PRESET
AUTO DIM
AUTO SLEEP
METERS
? FILTERS
ON
OFF
OUTIN
CH
2
CH
1
OUT
NETWORK
LINK
MASTER LEVEL
BACK
POWER
DATA
IN
A HARMAN INTERNATIONAL COMPANY
DESIGNED AND ENGINEERED IN THE USA
MADE IN MEXICO
SERIAL NO.JBL PROFESSIONAL NORTHRIDGE, CA USA
MAIN MENU
PRESET
AUTO DIM
AUTO SLEEP
METERS
? FILTERS
ON
OFF
OUTIN
CH
2
CH
1
OUT
NETWORK
LINK
MASTER LEVEL
BACK
POWER
DATA
IN
A HARMAN INTERNATIONAL COMPANY
DESIGNED AND ENGINEERED IN THE USA
MADE IN MEXICO
SERIAL NO.JBL PROFESSIONAL NORTHRIDGE, CA USA
MAIN MENU
PRESET
AUTO DIM
AUTO SLEEP
METERS
? FILTERS
ON
OFF
OUTIN
CH
2
CH
1
OUT
NETWORK
LINK
MASTER LEVEL
BACK
POWER
DATA
IN
A HARMAN INTERNATIONAL COMPANY
DESIGNED AND ENGINEERED IN THE USA
MADE IN MEXICO
SERIAL NO.JBL PROFESSIONAL NORTHRIDGE, CA USA
MAIN MENU
PRESET
AUTO DIM
AUTO SLEEP
METERS
? FILTERS
ON
OFF
OUTIN
CH
2
CH
1
OUT
NETWORK
LINK
MASTER LEVEL
BACK
POWER
DATA
IN
A HARMAN INTERNATIONAL COMPANY
DESIGNED AND ENGINEERED IN THE USA
MADE IN MEXICO
SERIAL NO.JBL PROFESSIONAL NORTHRIDGE, CA USA
MAIN MENU
PRESET
AUTO DIM
AUTO SLEEP
METERS
? FILTERS
ON
OFF
OUTIN
CH
2
CH
1
OUT
NETWORK
LINK
MASTER LEVEL
BACK
POWER
DATA
IN
A HARMAN INTERNATIONAL COMPANY
DESIGNED AND ENGINEERED IN THE USA
MADE IN MEXICO
SERIAL NO.JBL PROFESSIONAL NORTHRIDGE, CA USA
MAIN MENU
PRESET
AUTO DIM
AUTO SLEEP
METERS
? FILTERS
ON
OFF
OUTIN
CH
2
CH
1
OUT
NETWORK
LINK
MASTER LEVEL
BACK
POWER
DATA
IN
A HARMAN INTERNATIONAL COMPANY
DESIGNED AND ENGINEERED IN THE USA
MADE IN MEXICO
SERIAL NO.JBL PROFESSIONAL NORTHRIDGE, CA USA
MAIN MENU
PRESET
AUTO DIM
AUTO SLEEP
METERS
? FILTERS
ON
OFF
OUTIN
CH
2
CH
1
OUT
NETWORK
LINK
MASTER LEVEL
BACK
POWER
DATA
IN
A HARMAN INTERNATIONAL COMPANY
DESIGNED AND ENGINEERED IN THE USA
MADE IN MEXICO
SERIAL NO.JBL PROFESSIONAL NORTHRIDGE, CA USA
MAIN MENU
PRESET
AUTO DIM
AUTO SLEEP
METERS
? FILTERS
ON
OFF
OUTIN
CH
2
CH
1
OUT
NETWORK
LINK
MASTER LEVEL
BACK
POWER
DATA
IN
A HARMAN INTERNATIONAL COMPANY
DESIGNED AND ENGINEERED IN THE USA
MADE IN MEXICO
SERIAL NO.JBL PROFESSIONAL NORTHRIDGE, CA USA
MAIN MENU
PRESET
AUTO DIM
AUTO SLEEP
METERS
? FILTERS
ON
OFF
OUTIN
CH
2
CH
1
OUT
NETWORK
LINK
MASTER LEVEL
BACK
POWER
DATA
IN
A HARMAN INTERNATIONAL COMPANY
DESIGNED AND ENGINEERED IN THE USA
MADE IN MEXICO
SERIAL NO.JBL PROFESSIONAL NORTHRIDGE, CA USA
MAIN MENU
PRESET
AUTO DIM
AUTO SLEEP
METERS
? FILTERS
ON
OFF
OUTIN
CH
2
CH
1
OUT
NETWORK
LINK
MASTER LEVEL
BACK
POWER
DATA
IN
A HARMAN INTERNATIONAL COMPANY
DESIGNED AND ENGINEERED IN THE USA
MADE IN MEXICO
SERIAL NO.JBL PROFESSIONAL NORTHRIDGE, CA USA
MAIN MENU
PRESET
AUTO DIM
AUTO SLEEP
METERS
? FILTERS
ON
OFF
Congratulations on your purchase of JBL Professional SRX800 Series loudspeakers! We know you are anxious to get up and
running as fast as possible, which is why you are reading this section. The following will help you get set up as soon as possible.
Packaging Contents
Your SRX800 system should include the following:
1 x SRX800 speaker
1 x 10'(3m) IEC Power Cable
1 x Quick Start Guide
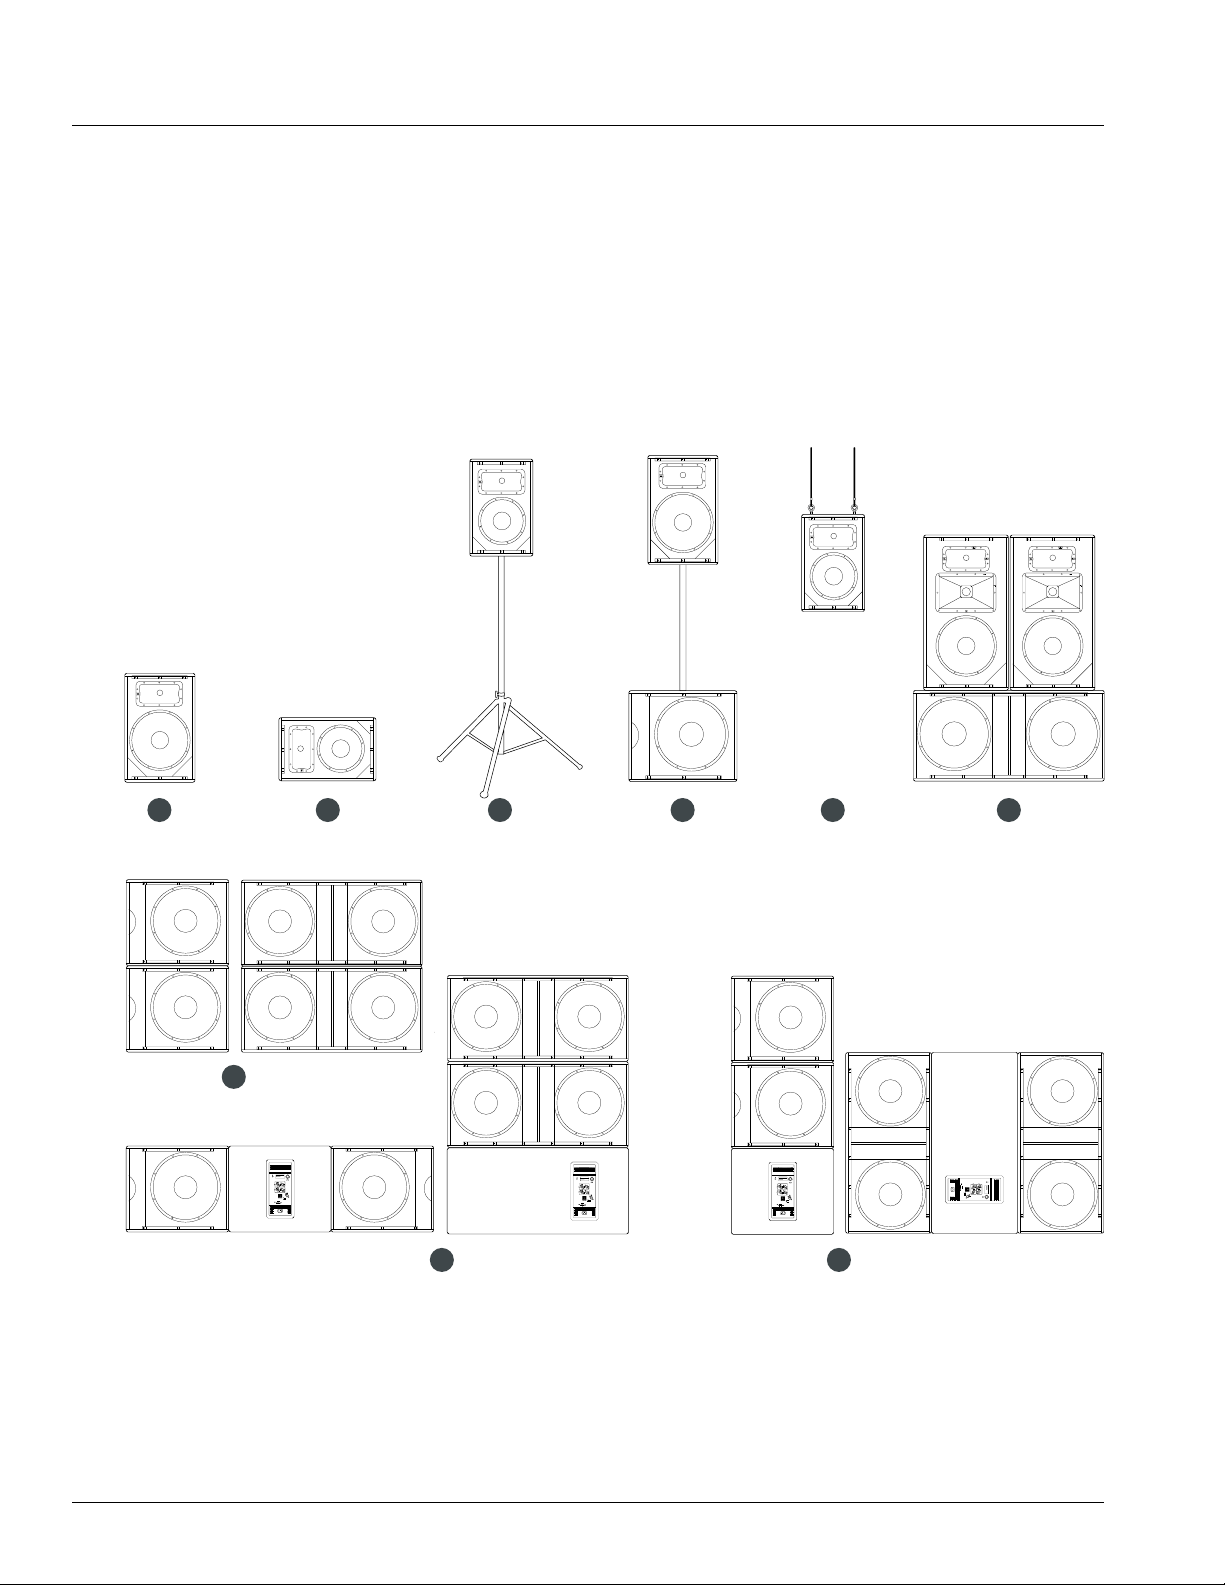
Configuration Options
1
2
3 4 5 6
7
MAIN MENU
? FILTERS
PRESET
ON
AUTO DIM
OFF
AUTO SLEEP
POWER
METERS
MASTER LEVEL
BACK
OUTIN
CH
1
CH
2
NETWORK
OUT
IN
LINK
DATA
SERIAL NO.JBL PROFESSIONAL NORTHRIDGE, CA USA
A HARMAN INTERNATIONAL COMPANY
DESIGNED AND ENGINEERED IN THE USA
MADE IN MEXICO
MAIN MENU
PRESET
? FILTERS
AUTO DIM
ON
AUTO SLEEP
OFF
POWER
METERS
MASTER LEVEL
BACK
OUTIN
CH
1
CH
2
NETWORK
OUT
IN
LINK
DATA
SERIAL NO.JBL PROFESSIONAL NORTHRIDGE, CA USA
A HARMAN INTERNATIONAL COMPANY
DESIGNED AND ENGINEERED IN THE USA
MADE IN MEXICO
MAIN MENU
? FILTERS
PRESET
ON
AUTO DIM
OFF
AUTO SLEEP
POWER
METERS
MASTER LEVEL
BACK
OUTIN
CH
1
CH
2
NETWORK
OUT
IN
LINK
DATA
SERIAL NO.JBL PROFESSIONAL NORTHRIDGE, CA USA
A HARMAN INTERNATIONAL COMPANY
DESIGNED AND ENGINEERED IN THE USA
MADE IN MEXICO
POWER
CH
CH
SERIAL NO.JBL PROFESSIONAL NORTHRIDGE, CA USA
2
1
A HARMAN INTERNATIONAL COMPANY
PRESET
AUTO DIM
AUTO SLEEP
METERS
IN
MAIN MENU
DESIGNED AND ENGINEERED IN THE USA
? FILTERS
OUTIN
OUT
MADE IN MEXICO
OFF
ON
NETWORK
MASTER LEVEL
DATA
LINK
BACK
8 9
1. Floor Standing
2. Monitor
3. Pole Mounted
6. Subs with 3-way splayed
7. Stacked Subs
8. Cardiod Subs
4. Sub Mounted
9. Cardiod Subs Vertical
5. Suspended
6
Page 7
LCD Screen
Power LED
QUICK SETUP GUIDE
Power Button
CH1 Direct Out
CH1 Encoder
CH2 Encoder
CH2 Direct Out
Locking IEC Inlet
Power it on
CH1 Input
CH2 Input
MAIN MENU
PRESET
2 MAIN
AUTO DIM
AUTO SLEEP
POWER
METERS
CH
1
OFF
ON
MASTER LEVEL
BACK
OUTIN
MIX OUT
Master Encoder
Back Button
Mix Out
CH
2
NETWORK
OUT
IN
Ethercon Connector
SERIAL NO. JBL PROFESSIONAL NORTHRIDGE, CA USA
A HARMAN INTERNATIONAL COMPANY
DESIGNED AND ENGINEERED IN THE USA
MADE IN MEXICO
DATA
LINK
Link LED
Data LED
way before plugging in your audio source. Turn CH1 and/or
CH2 Encoders to the left until the level reads “- 100” on
the LCD.
1. Connect the supplied power cord to the Blue IEC inlet on
the rear of the speaker
2. Connect the power cord to an available power outlet.
Once the power cord is plugged into the power source,
the Green Power LED will illuminate.
3. Once the Green Power LED illuminates, press the Power
Button. After several seconds, you will notice the LCD
Screen boot and you will now be on the main screen.
Plug in the inputs
1. The CH1 and CH2 Input levels and Master Level default
to -20dB. It’s a good idea to turn the inputs down all the
2. Connect XLR or TRS cable from audio source to CH1 and/or
CH2 Inputs.
3. Select LINE, CONSUMER or MIC gain setting by pushing the
correct CHANNEL ENCODER twice. You will see a rectangle
highlighting the sensitivity setting. Simply roll the encoder
left or right to select the correct setting. Once the correct
setting is shown, push the encoder one more time to make
your selection.
Set output levels
1. Set the gain level for each input using the CH1 and/or CH2
ENCODER. The input level meter on the LCD will allow you to
monitor your input level.
2. Once the input level is set, user the MASTER ENCODER to
turn up (Right) or turn down (Left) the overall level until the
desired volume is reached.
7
Page 8
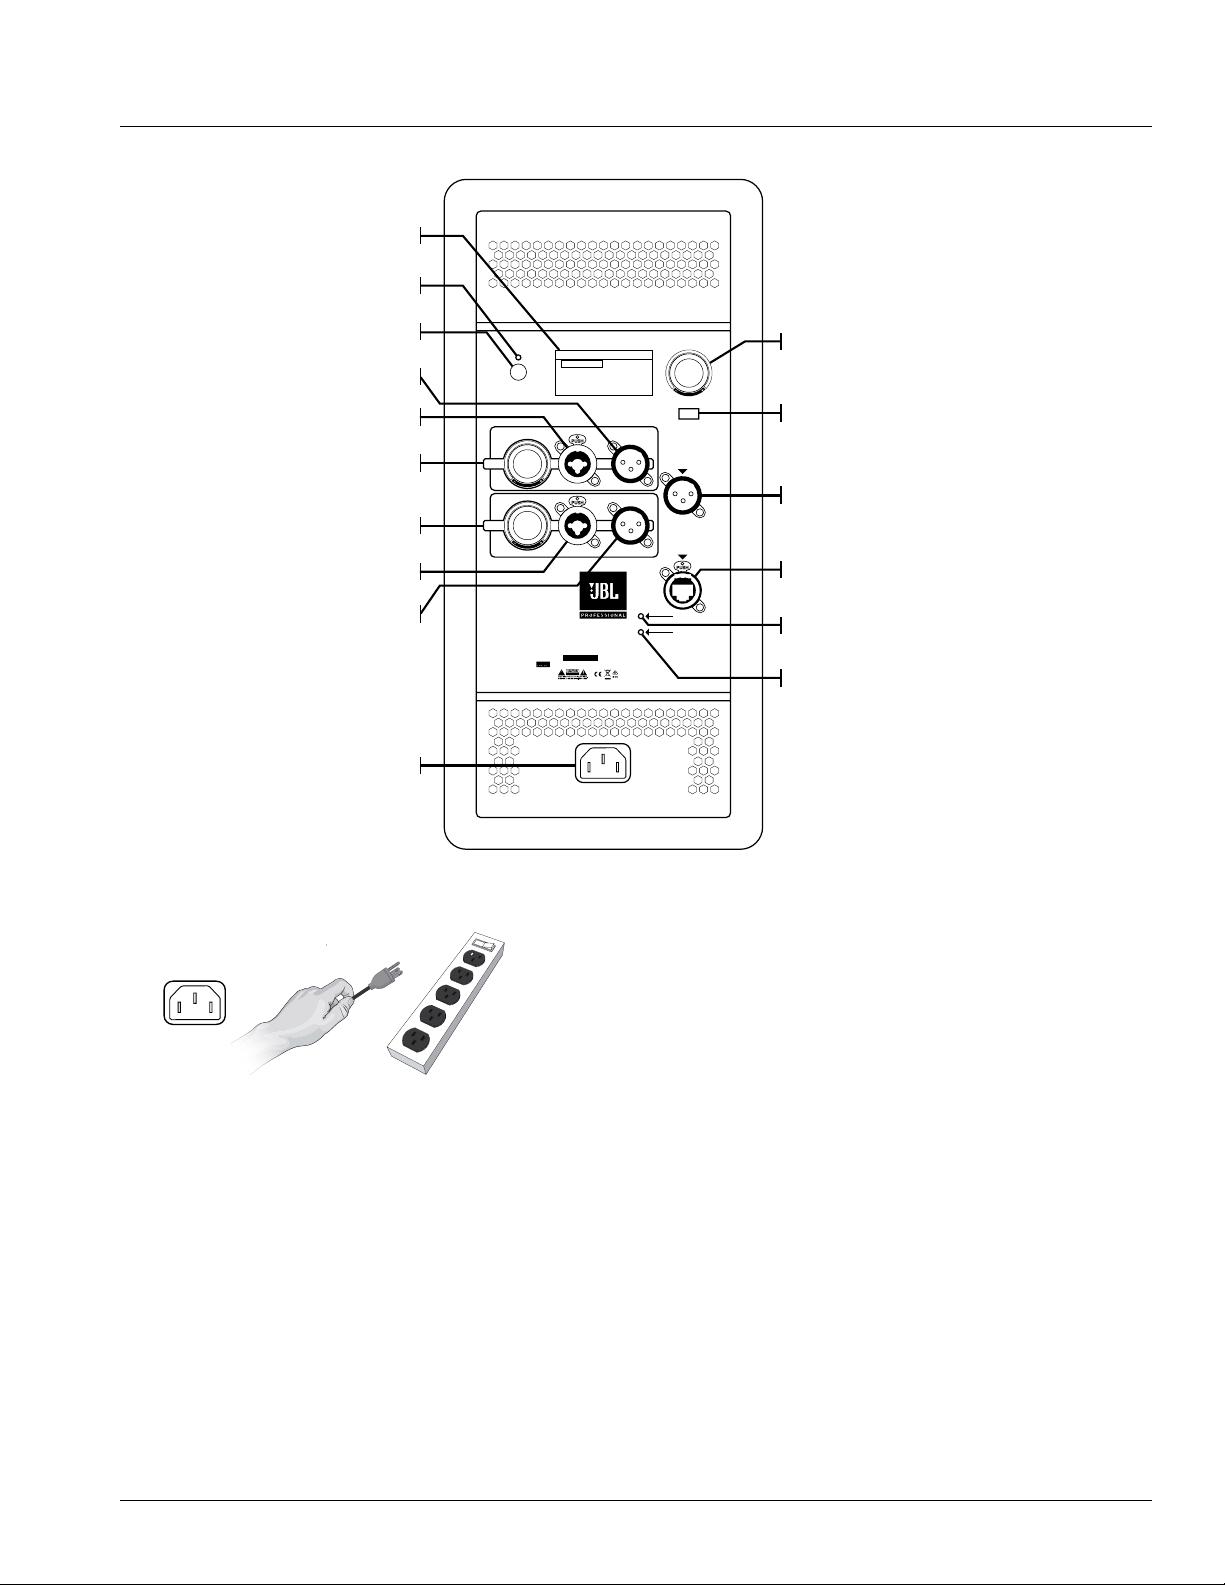
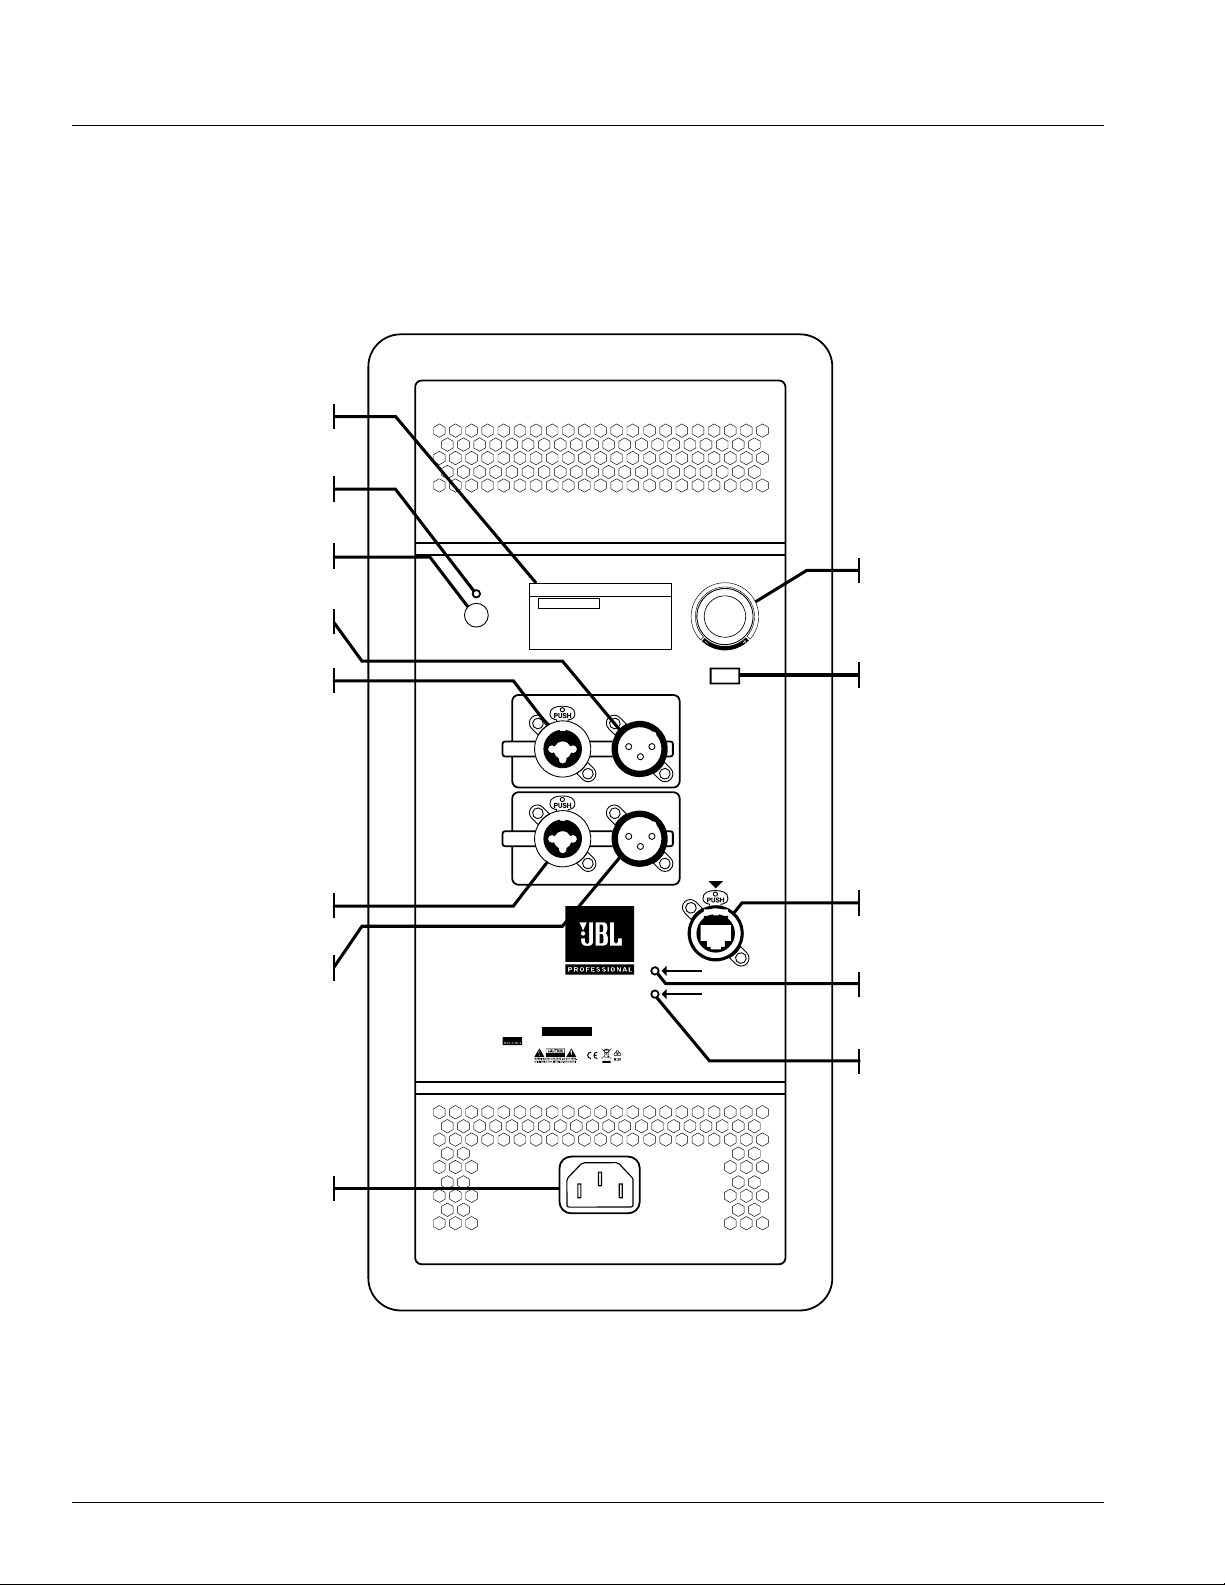
SRX812P, SRX815P, SRX835P BACK PANEL
LCD Screen
Power LED
Power Button
CH1 Direct Out
CH1 Input
CH1 Encoder
CH2 Encoder
CH2 Input
CH2 Direct Out
CH
CH
MAIN MENU
1
POWER
PRESET
AUTO DIM
AUTO SLEEP
METERS
2 MAIN
OUTIN
OFF
ON
MASTER LEVEL
BACK
MIX OUT
Back Button
Mix Out
Master Encoder
2
NETWORK
IN
OUT
Ethercon Connector
SERIAL NO. JBL PROFESSIONAL NORTHRIDGE, CA USA
A HARMAN INTERNATIONAL COMPANY
DESIGNED AND ENGINEERED IN THE USA
MADE IN MEXICO
LINK
DATA
Link LED
Data LED
Locking IEC Inlet
8
Page 9

SRX812P, SRX815P, SRX835P BACK PANEL
LCD Screen
Allows users to access presets and basic controls for the system without a
network connection. Controlled with the Master Encoder and the Back Button.
Power LED
This LED (Green) lights to indicate that the speaker is plugged in and
that power is going to the speaker. .
Power Button
Turns the power on.
CH1 Input
These balanced inputs accepts a standard XLR (female) connector and also
a 1/4” TRS phone plug. A broad range of signals from microphones, audio
mixing consoles and electronic musical instruments may be connected here.
CH1 Direct Out
Male balanced XLR output connector. Passes signal directly from the input
to the output, bypassing DSP for zero latency. This connector provides a full-
range signal which can be daisy chained to another speaker.
CH1 Encoder
Controls the gain of CH1. By turning the signal counter-clockwise you will be
lowering the gain of your source material. By turning the control clockwise you
will be increasing the gain.
Master Encoder
Controls the master volume of the unit. By turning the knob counter-clockwise
you will be lowering the overall volume of the speaker. By turning the control
clockwise you will be increasing the overall volume of the speaker. See page
25 for instructions on using the Master Encoder to control LCD screen.
Back Button
Used in conjunction with the Master Encoder to control the LCD Screen.
Mix Out
This XLR (male) output connector provides a method of sending audio
out to an external source. Passes signal based on the input levels of channels
1 and 2 post DSP, adding some latency (approx. 2 milliseconds) to the signal.
Ethercon Connector
Allows network connection with a standard Ethernet cable for networking
multiple units and controlling the system. This connector is not to be
connected to a LAN line.
Link LED
This LED lights to indicate that the speaker is connected to a network.
Data LED
This LED blinks to indicate that data is being sent and received by the system.
CH2 Input
These balanced inputs accepts a standard XLR (female) connector and also
a 1/4” TRS phone plug. A broad range of signals from microphones, audio
mixing consoles and electronic musical instruments may be connected here.
CH2 Direct Out
Male balanced XLR output connector. Passes signal directly from the input
to the output, bypassing DSP for zero latency. This connector provides a full-
range signal which can be daisy chained to another speaker.
CH2 Encoder
Controls the gain of CH2. By turning the signal counter-clockwise you will be
lowering the gain of your source material. By turning the control clockwise you
will be increasing the gain.
Locking IEC Inlet
Standard IEC AC mains input connector.
9
Page 10
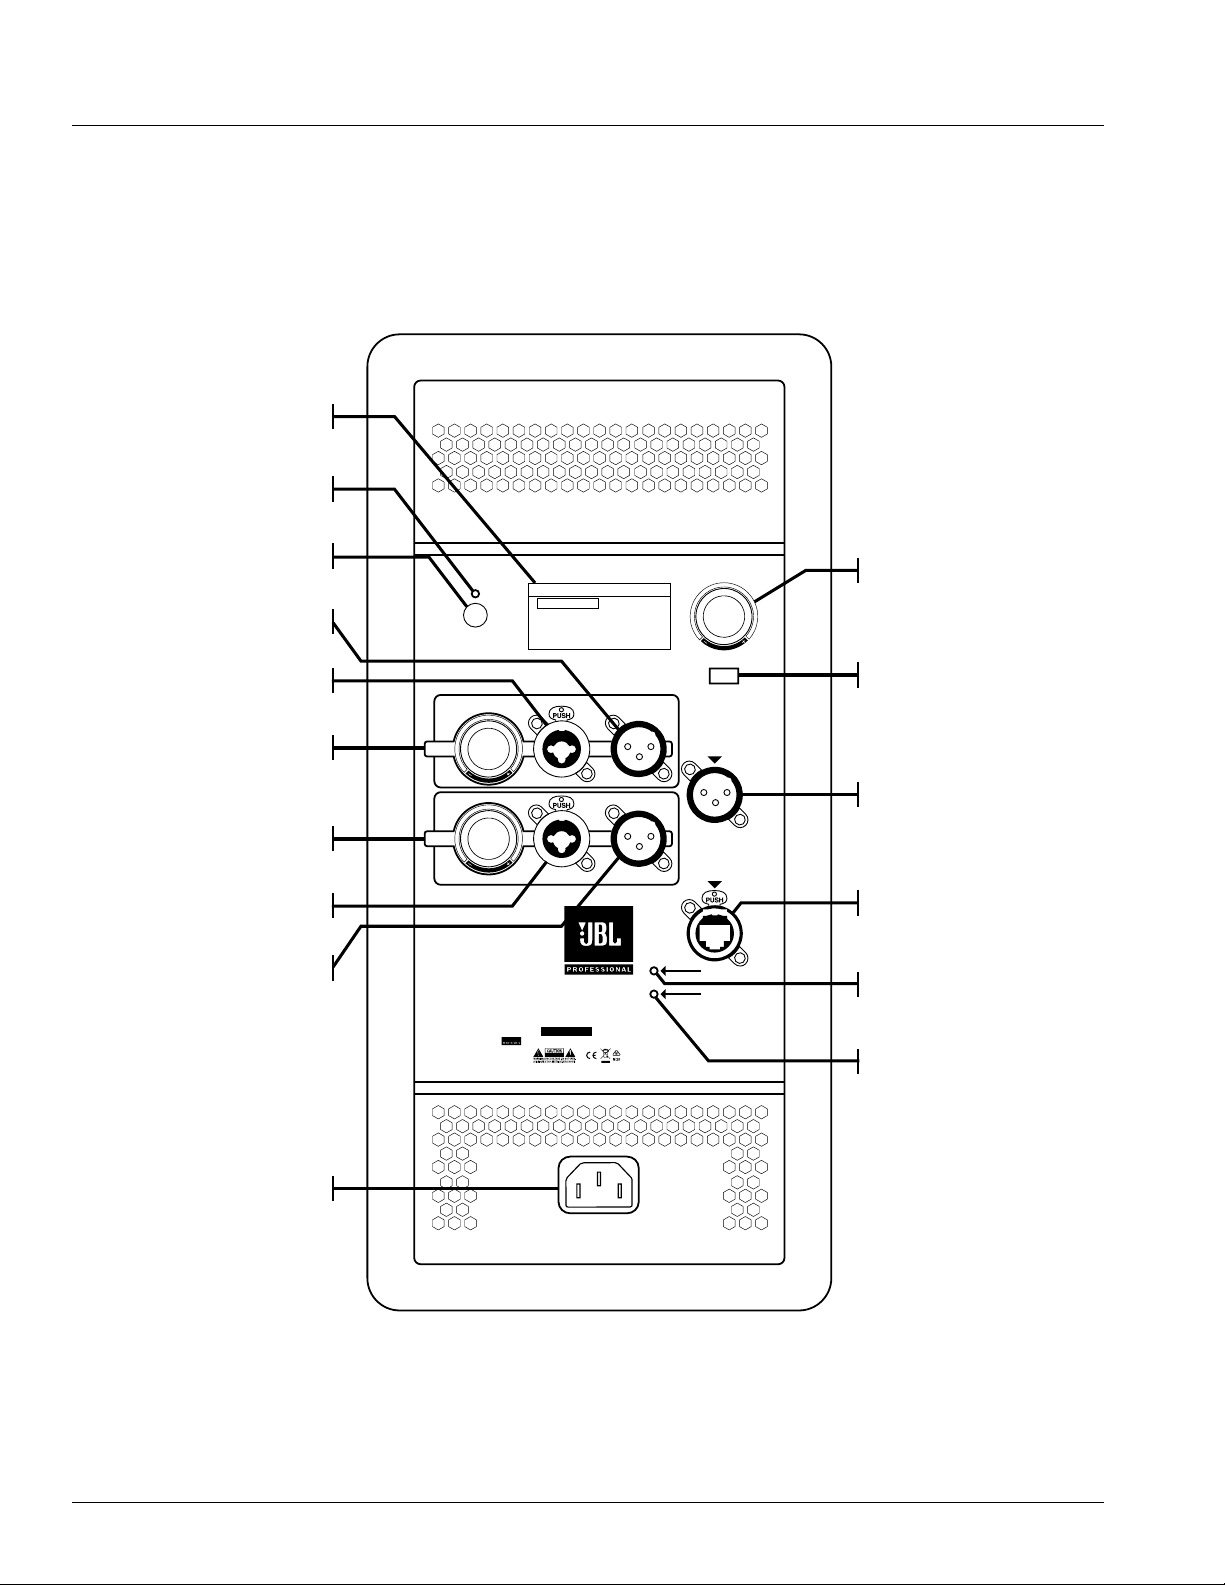
SRX828SP, SRX818SP BACK PANEL
LCD Screen
Power LED
Power Button
CH1 Direct Out
CH1 Input
CH2 Input
CH2 Direct Out
PRESET
AUTO DIM
POWER
AUTO SLEEP
METERS
1
CH
CH
2
SERIAL NO. JBL PROFESSIONAL NORTHRIDGE, CA USA
A HARMAN INTERNATIONAL COMPANY
IN
MAIN MENU
2 MAIN
OFF
ON
OUTIN
OUT
DESIGNED AND ENGINEERED IN THE USA
MADE IN MEXICO
MASTER LEVEL
BACK
NETWORK
LINK
DATA
Master
Encoder
Back Button
Ethercon Connector
Link LED
Data LED
Locking IEC Inlet
10
Page 11

SRX828SP, SRX818SP BACK PANEL
LCD Screen
Allows users to access presets and basic controls for the system without a
network connection. Controlled with the Master Encoder and the Back Button.
Power LED
This LED (Green) lights to indicate that the speaker is plugged in and
that power is going to the speaker.
Power Button
Turns the power on.
CH1 Input
These balanced inputs accepts a standard XLR (female) connector and also
a 1/4” TRS phone plug. A broad range of signals from microphones, audio
mixing consoles and electronic musical instruments may be connected here.
CH1 Direct Out
Male balanced XLR output connector. Passes signal directly from the input
to the output, bypassing DSP for zero latency. This connector provides a full-
range signal which can be daisy chained to another speaker.
Master Encoder
Controls the master volume of the unit. By turning the knob counter-clockwise
you will be lowering the overall volume of the speaker. By turning the control
clockwise you will be increasing the overall volume of the speaker. See page
25 for instructions on using the Master Encoder to control LCD screen.
Back Button
Used in conjunction with the Master Encoder to control the LCD Screen.
Ethercon Connector
Allows network connection with a standard Ethernet cable for networking
multiple units and controlling the system. This connector is not to be
connected to a LAN line.
Link LED
This LED lights to indicate that the speaker is connected to a network.
Data LED
This LED blinks to indicate that data is being sent and received by the system.
CH2 Input
These balanced inputs accepts a standard XLR (female) connector and also
a 1/4” TRS phone plug. A broad range of signals from microphones, audio
mixing consoles and electronic musical instruments may be connected here.
CH2 Direct Out
Male balanced XLR output connector. Passes signal directly from the input
to the output, bypassing DSP for zero latency. This connector provides a full-
range signal which can be daisy chained to another speaker.
Locking IEC Inlet
Standard IEC AC mains input connector.
11
Page 12
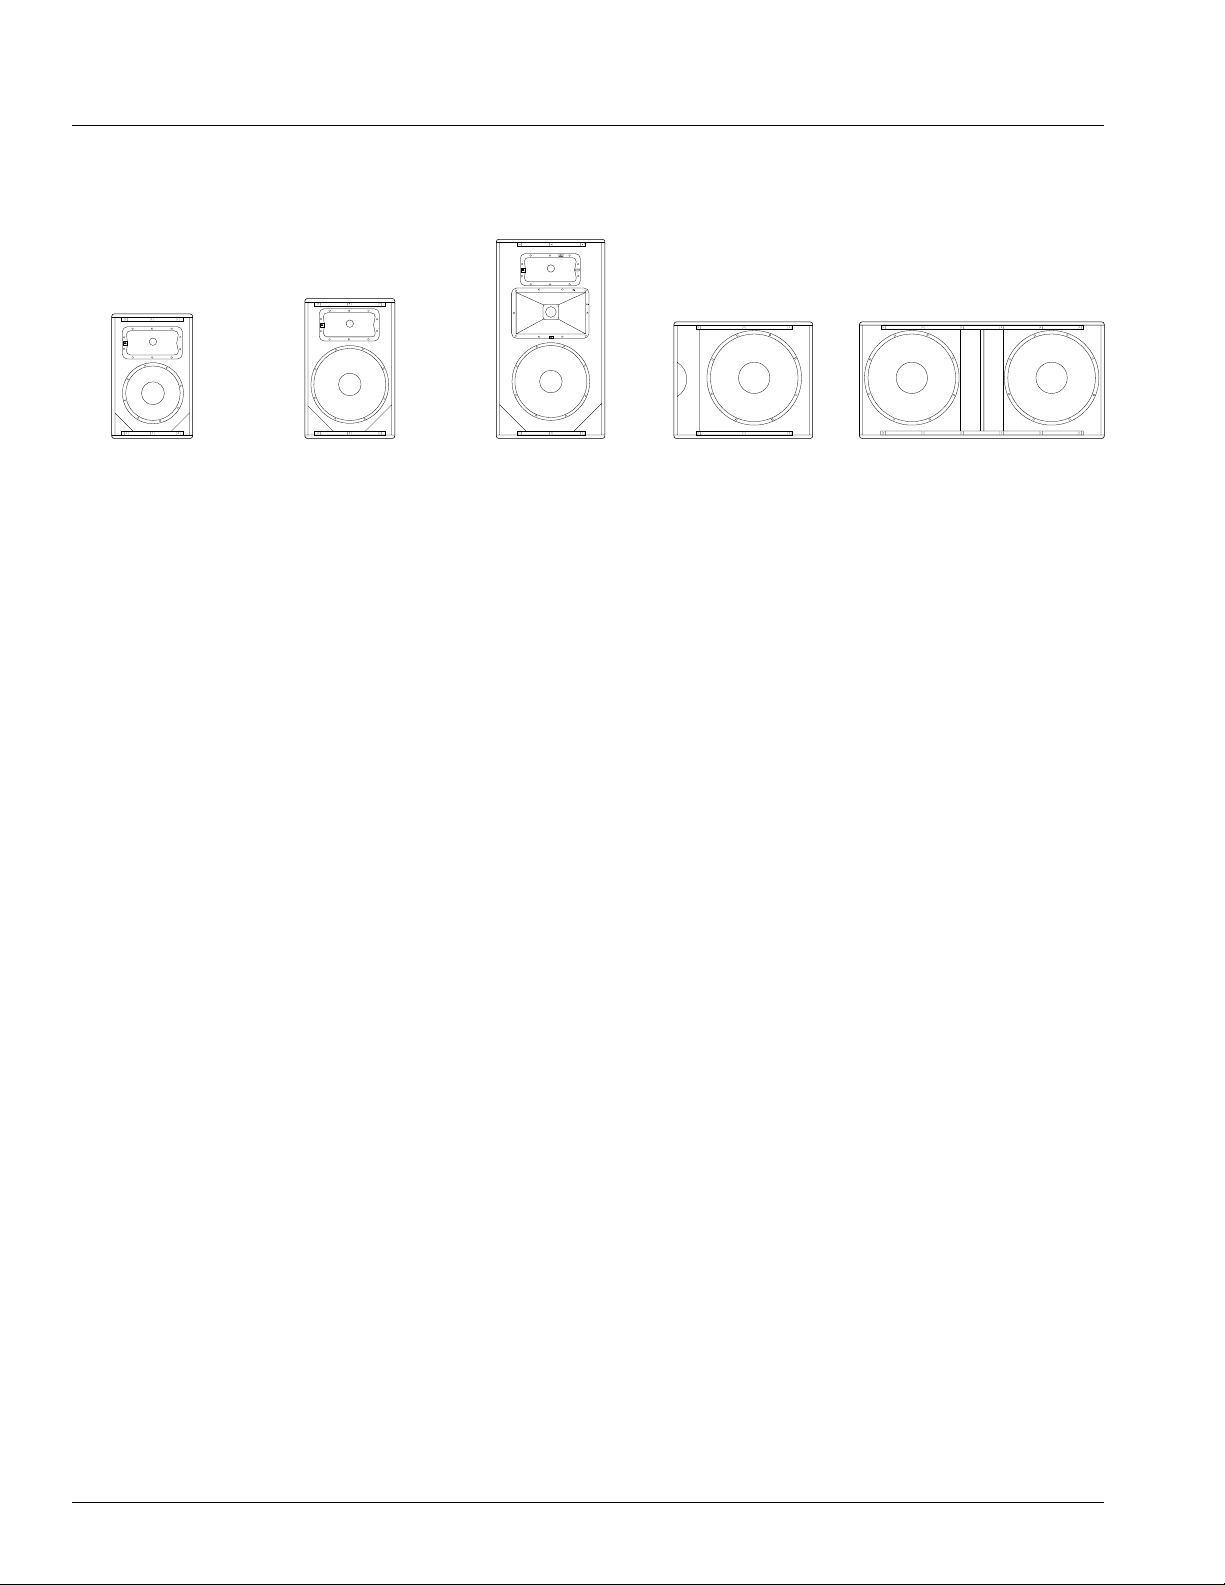
OVERVIEW - SRX800 FAMILY
SRX812P SRX815P SRX835P SRX818SP SRX828SP
Thank you for purchasing the new JBL SRX800!
The SRX800 Series is the next generation high performance powered loudspeaker system from JBL Professional. Comprising
three full range and two subwoofers, the SRX800 boasts an array of premium features that make it the very best system in
its class. Drawing on JBL’s long history of groundbreaking technology and innovative loudspeaker design, the SRX800 Series
meets the needs of the most demanding applications where high performance, comprehensive control and legendary JBL sound
are required. Each component in the SRX800 Series was purposefully designed and thought through with full consideration for
its intended use, each component carefully matched to achieve a perfectly tuned system that is both powerful and easy to use.
The full range 12” two-way, 15” two-way and 15” three-way systems are powered by proprietary 2,000 Watt Crown
amplification. The 18” subwoofer and 18” dual subwoofer feature 1,000 and 2,000 Watt Crown amplifiers. All models integrate
Crown’s Proprietary Front-End DriveCore Technology, premium JBL user-configurable DSP, including V5 Tunings compatible
with our flagship Vertec and VTX touring systems, and full HiQnet Network control with Mac and PC software and standalone
applications for iOS and Android. Now, local touring houses and smaller to medium installations can deploy a no-compromise,
all-in-one solution configurable as a full range system with monitors and subs, either floor standing, tripod mounted, stacked, or
pole mounted, and fully flyable with the SRX800’s integrated suspension points.
12
Page 13

SRX812P, SRX815P - BLOCK DIAGRAM
13
Page 14

SRX835P - BLOCK DIAGRAM
LIMIT
MASTER
PRESETS
LEVEL 1
HF
MR
CROSSOVER
CH1
HPF
DSP
LF
CH2
LPF
SIGNAL
GAIN
EQ LIMADC
∑
IN
SIGNAL 1
MIC
LINE
CONSUMER
CH1
OUT
IN
MIC
LINE
CONSUMER
CH2
SIGNAL 2 LEVEL 2
DAC
OUT
MIX
14
Page 15

SRX818SP - BLOCK DIAGRAM
15
Page 16

SRX828SP - BLOCK DIAGRAM
16
Page 17

SRX812P SPECIFICATIONS
System Specification
System Type: Self powered 12”, two-way, bass-reflex
Maximum SPL Output: 136dB
Frequency Range (-10dB): 40Hz - 21kHz
Frequency Response (-3dB): 48Hz - 20kHz
Amplification
System Power Rating: 2000W Peak, 1500W Continuous
Input Impedance: 40k balanced, 20k unbalanced
Line Input Gain: 21 dB
Consumer Input Gain: 33 dB
Mic Input Gain: 45 dB
Maximum Input Level:
•
Line: 20dBu
•
Consumer: 8dBu
•
Mic: -4dBu
Connectors: Neutrik 1/4 - XLR input; Neutrik XLR Output
LED Indicators: Power LED (Green), Network Link (Green), Network Data (Yellow)
Cooling: On-Demand variable speed fan
AC Power Input: 100 - 240V~ 50/60Hz
AC Power Consumption (120V~): 2.2A (1/8th Power), 5.6A (1/3rd Power)
Speaker Specification
LF Driver: 2272F
HF Driver: 2432H
Coverage Pattern: 90 x 50
Crossover Frequency: 1.9kHz
Enclosure
Material: 18mm plywood
Monitor Angle: Yes
Suspension/Mounting: Dual 36mm pole socket, 12 x M10 Suspension points
Handles: 3
Finish: Obsidian Duraflex™ finish
Grille: Powder coated, Obsidian, 14-gauge perforated steel with acoustically transparent black cloth backing
Dimensions: (L x W x H): 16.87” x 16.31” x 25.11” (429mm x 415mm x 638mm)
Weight: 58.0 lbs (26.4kg)
Shipping Weight: 67 lbs (30.5kg)
*For exact specifications including precise placement of suspension points and frequency response curves for JBL presets, find spec sheets at
http://www.jblpro.com/www/products/portable-market/srx800-series
428 mm
16.87 in
414 mm
16.31 in
638 mm
25.11 in
Bottom View Front View Left View Rear View
17
Page 18

SRX815P SPECIFICATIONS
SRX812P
638 mm
25.11 in
428 mm
16.87 in
414 mm
16.31 in
System Specification
System Type: Self powered 15”, two-way, bass-reflex
Maximum SPL Output: 137dB
Frequency Range (-10dB): 36Hz - 21kHz
Frequency Response (-3dB): 44Hz - 20kHz
Amplification
System Power Rating: 2000W Peak, 1500W Continuous
Input Impedance: 40k balanced, 20k unbalanced
Line Input Gain: 21 dB
Consumer Input Gain: 33 dB
Mic Input Gain: 45 dB
Maximum Input Level:
•
Line: 20dBu
•
Consumer: 8dBu
•
Mic: -4dBu
Connectors: Neutrik 1/4 - XLR input; Neutrik XLR Output
LED Indicators: Power LED (Green), Network Link (Green), Network Data (Yellow)
Cooling: On-Demand variable speed fan
AC Power Input: 100 - 240V~ 50/60Hz
AC Power Consumption (120V~): 2.2A (1/8th Power), 5.6A (1/3rd Power)
Speaker Specification
LF Driver: 2275F
HF Driver: 2432H
Coverage Pattern: 90 x 50
Crossover Frequency: 3kHz
Enclosure
Material: 18mm plywood
Monitor Angle: Yes
Suspension/Mounting: Dual 36mm pole socket, 12 x M10 Suspension points
Handles: 3
Finish: Obsidian Duraflex™ finish
Grille: Powder coated, Obsidian, 14-gauge perforated steel with acoustically transparent black cloth backing
Dimensions (L x W x H): 18.82” x 18.03” x 27.20” (478mm x 458mm x 691mm)
Weight: 63.0 lbs (28.6kg)
Shipping Weight: 73.0 lbs (33.2kg)
*For exact specifications including precise placement of suspension points and frequency response curves for JBL presets, find spec sheets at
http://www.jblpro.com/www/products/portable-market/srx800-series
458 mm
18.03 in
479 mm
18.82 in
18
691 mm
27.20 in
Bottom View Front View Left View Rear View
Page 19

SRX835P SPECIFICATIONS
SRX812P
SRX815P
691 mm
27.20 in
638 mm
25.11 in
479 mm
18.82 in
458 mm
18.03 in
428 mm
16.87 in
414 mm
16.31 in
System Specification
System Type: Self powered 15”, three-way, bass-reflex
Maximum SPL Output: 137dB
Frequency Range (-10dB): 33Hz - 21kHz
Frequency Response (-3dB): 41Hz - 20kHz
Amplification
System Power Rating: 2000W Peak, 1500W Continuous
Input Impedance: 40k balanced, 20k unbalanced
Line Input Gain: 21 dB
Consumer Input Gain: 33 dB
Mic Input Gain: 45 dB
Maximum Input Level:
•
Line: 20dBu
•
Consumer: 8dBu
•
Mic: -4dBu
Connectors: Neutrik 1/4 - XLR input; Neutrik XLR Output
LED Indicators: Power LED (Green), Network Link (Green), Network Data (Yellow)
Cooling: On-Demand variable speed fan
AC Power Input: 100 - 240V~ 50/60Hz
AC Power Consumption (120V~): 2.2A (1/8th Power), 5.6A (1/3rd Power)
Speaker Specification
LF Driver: 2275F
MF Driver: 2107H
HF Driver: 2432H
Coverage Pattern: 60 x 40
Crossover Frequency: 330Hz & 2.4kHz
Enclosure
Material: 18mm plywood
Suspension/Mounting: Single 36mm pole socket, 12 x M10 Suspension points
Handles: 2
Finish: Obsidian Duraflex™ finish
Grille: Powder coated, Obsidian, 14-gauge perforated steel with acoustically transparent black cloth backing
Dimensions (L x W x H): 18.74” x 21.4” x 38.74” (476mm x 544mm x 984mm)
Weight: 85.0 lbs (38.6kg)
Shipping Weight: 97.0 lbs (44.0kg)
*For exact specifications including precise placement of suspension points and frequency response curves for JBL presets, find spec sheets at
http://www.jblpro.com/www/products/portable-market/srx800-series
544 mm
21.40 in
476 mm
18.74 in
984 mm
38.74 in
Bottom View Front View Left View Rear View
19
Page 20

SRX818SP SPECIFICATIONS
SRX812P
SRX815P
SRX835P
984 mm
38.74 in
691 mm
27.20 in
638 mm
25.11 in
476 mm
18.74 in
479 mm
18.82 in
544 mm
21.40 in
458 mm
18.03 in
428 mm
16.87 in
414 mm
16.31 in
System Specification
System Type: Self powered 18”, subwoofer system
Maximum SPL Output: 135dB
Frequency Range (-10dB): 29Hz - 150Hz
Frequency Response (-3dB): 35Hz - 120Hz
Amplification
System Power Rating: 1000W Peak , 750W Continuous
Input Impedance: 40k balanced, 20k unbalanced
Line Input Gain: 21 dB
Consumer Input Gain: 33 dB
Maximum Input Level:
•
Line: 20dBu
•
Consumer: 8dBu
Connectors: Neutrik 1/4 - XLR input; Neutrik XLR Output
LED Indicators: Power LED (Green), Network Link (Green), Network Data (Yellow)
Cooling: On-Demand variable speed fan
AC Power Input: 100 - 240V~ 50/60Hz
AC Power Consumption (120V~): 2.2A (1/8th Power), 5.6A (1/3rd Power)
Speaker Specification
LF Driver: 2279F
Crossover Frequency: 80Hz
Enclosure
Material: 18mm plywood
Suspension/Mounting: M20 Threaded Pole Mount
Handles: 4
Finish: Obsidian Duraflex™ finish
Grille: Powder coated, Obsidian, 14-gauge perforated steel with acoustically transparent black cloth backing
Dimensions (L x W x H): 26.89” x 26.92” x 22.62” (683mm x 684mm x 575mm)
Weight: 87.0 lbs (39.5kg)
Shipping Weight: 103 lbs (46.8kg)
*For exact specifications including precise placement of suspension points and frequency response curves for JBL presets, find spec sheets at
http://www.jblpro.com/www/products/portable-market/srx800-series
684 mm
26.92 in
683 mm
26.89 in
20
575 mm
22.62 in
Bottom View Front View Left View Rear View
Page 21

SRX828SP SPECIFICATIONS
SRX812P
SRX815P
SRX835P
SRX818SP
683 mm
26.89 in
575 mm
22.62 in
984 mm
38.74 in
691 mm
27.20 in
638 mm
25.11 in
684 mm
26.92 in
476 mm
18.74 in
479 mm
18.82 in
544 mm
21.40 in
458 mm
18.03 in
428 mm
16.87 in
414 mm
16.31 in
System Specification
System Type: Self powered dual 18”, subwoofer system
Maximum SPL Output: 141dB
Frequency Range (-10dB): 29Hz - 150Hz
Frequency Response (-3dB): 35Hz - 120Hz
Amplification
System Power Rating: 2000W Peak (1000W x 2), 1500W continuous (750W x 2)
Input Impedance: 40k balanced, 20k unbalanced
Line Input Gain: 21 dB
Consumer Input Gain: 33 dB
Maximum Input Level:
•
Line: 20dBu
•
Consumer: 8dBu
Connectors: Neutrik 1/4 - XLR input; Neutrik XLR Output
LED Indicators: Power LED (Green), Network Link (Green), Network Data (Yellow)
Cooling: On-Demand variable speed fan
AC Power Input: 100 - 240V~ 50/60Hz
AC Power Consumption (120V~): 2.2A (1/8th Power), 5.6A (1/3rd Power)
Speaker Specification
LF Driver: (2x) 2279F
Crossover Frequency: 80Hz
Enclosure
Material: 18mm plywood
Handles: 8
Finish: Obsidian Duraflex™ finish
Grille: Powder coated, Obsidian, 14-gauge perforated steel with acoustically transparent black cloth backing
Dimensions (L x W x H): 26.79” x 47.42” x 22.57” (681mm x 1205mm x 574mm)
Weight: 145.0 lbs (65.9kg)
Shipping Weight: 165.0 (75.0kg)
*For exact specifications including precise placement of suspension points and frequency response curves for JBL presets, find spec sheets at
http://www.jblpro.com/www/products/portable-market/srx800-series
1204 mm
47.42 in
573 mm
22.57 in
680 mm
26.79 in
Bottom View Front View Left View Rear View
21
Page 22

PURPOSEFUL PRODUCT DESIGN
Portability made easy
The SRX800 series was designed as a versatile all-in-one solution for a variety of applications including touring and permanent
installations. Special attention was given to the needs of consumers who require a high level of ruggedness, reliability, and
portability. To those ends, these systems feature 14 gauge steel grilles with “L” beam indents on either side for increased
structural rigidity. The speakers are constructed from 18mm plywood to withstand drops, bumps and whatever else will be
thrown at them. All models feature our patented DuraFlex coating which is made to survive years of abuse.
To make sure the speakers are easy to move around and comfortable to use, engineers developed an ergonomic handle cup that
allows users to pick the speakers up without cutting off circulation to their hands. Also included are multiple M10 suspension
points and rubber feet for the monitor angle so that whether the speakers are suspended, used as stage monitors, mounted
to a pole or tripod, or stood on the floor or a shelf, they will stay securely in place and deliver sound wherever it’s needed. The
subwoofers have indexing feet for stacking in both standard and cardioid configurations. The back panel features glow in the
dark ink and an LED screen so that users can connect and control the speaker in darker areas without having to turn on lights or
reach for a control device.
Pole Mount M10 Suspension Points Multiple Handles & Indexed Feet
Side Handle Secure Stacking Monitor Position
22
Page 23

COMPONENT ELEMENTS
High Performance Without Compromise
From the brand new transducers to the 14-guage steel grilles, each component in the SRX800 Series was specifically designed
for optimal performance in these systems. Featuring a purpose-built Crown amplifier and a full suite of user configurable DSP,
these systems deliver the latest technologies from Harman Professional in one easy to use, high performing platform.
2432H HF Driver
High frequencies are handled by the JBL 2432H 3” voice-coil Compression
Driver - the only 3” voice coil in this class. In addition to the weight reduction
provided by neodymium, the large voice coils and diaphragms in these drivers
are capable of handling very high power levels with reduced distortion and
increased phase coherence resulting in smooth, crystal clear high frequencies.
Low Frequency Drivers
JBL’s patented Differential Drive® Technology ferrite drivers incorporate
3” voice coils with lower mass ferrite magnets for reduced weight while
maximizing power amp efficiency with greater heat dissipation and increased
power handling resulting in exceptionally low distortion and extended low
frequency response.
Mid Frequency Drivers
SRX835’s midrange driver is derived from the midrange transducer on the
VTX 20 touring line array system. The outside cast aluminum frame acts as
the structural support, acoustic cavity, and heat sink for the driver, optimizing
both space in the speaker cabinet and the performance of the system at the
same time.
Patented (PT) Waveguides
High frequency drivers use JBL’s patented Progressive Transition Waveguides
which offer dramatically improved constant beamwidth and directivity, lower
distortion, and overall smooth frequency response free of high-Q peaks. Wide
coverage angles are achieved without compromise and harmonic distortion
is minimized to allow maximum SPL capability of the compression drivers
without harshness.
23
Page 24

COMPONENT ELEMENTS
HiQnet Network Control
With full HiQnet Network Integration,configuring an SRX800 system is
dramatically simplified, saving time while fully automating the control interface
configuration.Simple wired control is provided via Ethercon connector and
third party wireless router capability is included. Control options include Audio
Architect,HiQnet Motion Control™iOS app, andSRX Connect, a standalone
app for iOS and Android.
Premium DSP Technology
A full suite of User configurable DSP driven by the SRX800 series’ powerful
onboard 400mHz Sharc DSP includes20 PEQs,up to 2 seconds of delay,
signal generators,input mixing,amplifier monitoring, and50 User Presets.
In addition, the system features 96kHZ FIR filters, LevelMax™ Limiting, and
is compatible with V5 JBL Tunings, providing compatibility with our flagship
Vertec and VTX touring systems.
Crown DriveCore Technology Amplification
Each model is powered by Crown Proprietary Front-End DriveCore technology
featuring a massive2000W Power Rating, the highest power rating in this
class of loudspeakers. With an outstandingly high 103dB signal-to-noise
ratio, the SRX800 Series is capable of massive sound pressure levels with
exceptional headroom, very low distortion and absolute clarity throughout its
frequency range.A true universal power supply w/ PFC and lockingIEC power
cords ensure quick and secure connection for easy setups.
24
Page 25

IP address
subnet
HiQnet address
DHCP
information
INTRO
IP address
subnet
HiQnet address
DHCP
information
JBL SRX815P
MAIN
0.0
INTRO
IP address
subnet
HiQnet address
DHCP
information
JBL SRX815P
MAIN
0.0
channel 1
sensitivitY line
INTRO
INPUT SCREEN
0.0
IP address
subnet
HiQnet address
DHCP
information
MAIN MENU
PRESET
AUTO DIM
AUTO SLEEP
METERS
1 MAIN
OFF
ON
JBL SRX815P
MAIN
0.0
channel 1
sensitivitY line
INTRO
INPUT SCREEN
MAIN MENU
0.0
IP address
subnet
HiQnet address
DHCP
information
MAIN MENU
PRESET
AUTO DIM
AUTO SLEEP
METERS
1 MAIN
OFF
ON
JBL SRX815P
MAIN
0.0
channel 1
sensitivitY line
MAIN MENU
PRESET
AUTO DIM
AUTO SLEEP
METERS
1 MAIN
OFF
ON
INTRO
INPUT SCREEN
MAIN MENU
PRESETS
0.0
MAIN MENU
PRESET
AUTO DIM
AUTO SLEEP
METERS
1 MAIN
OFF
ON
JBL SRX815P
MAIN
0.0
channel 1
sensitivitY line
MAIN MENU
PRESET
AUTO DIM
AUTO SLEEP
METERS
1 MAIN
OFF
ON
MAIN MENU
PRESET
AUTO DIM
AUTO SLEEP
METERS
2 MONITOR
OFF
OFF
INTRO
INPUT SCREEN
MAIN MENU
PRESETS
AUTO DIM
0.0
1
JBL SRX815P
BACK PANEL LCD
2
Introduction
The LCD Screen on the back panel of the speaker allows basic control of the system, as well as
access to presets and network settings.
MAIN
4
1
channel 1
sensitivitY line
4
PRESET
AUTO DIM
AUTO SLEEP
METERS
PRESET
AUTO DIM
AUTO SLEEP
METERS
PRESET
AUTO DIM
AUTO SLEEP
METERS
PRESET
AUTO DIM
AUTO SLEEP
METERS
MAIN MENU
MAIN MENU
MAIN MENU
MAIN MENU
3
3
INPUT SCREEN
1 MAIN
1 MAIN
2 MONITOR
1 MAIN
0.0
0.0
2
MAIN MENU
OFF
ON
PRESETS
OFF
ON
AUTO DIM
OFF
OFF
AUTO SLEEP
OFF
OFF
Plug in the system and power it on. Once the amp boots up, this screen will be displayed. This
screen will also be displayed after one minute of inactivity. It can also be accessed by pressing
the Back Button 5 times to exit all menus.
1. Speaker Model Name
2. Master Attenuator Level. Turn the Master Encoder to adjust between -100 and +12
3. Main Output Meter
4. Preset Indicator
Input Screen
From the Home Screen, press either one of the Channel Encoders to access the Input Screen for
the channel. Press the Back Button or wait one minute to return to the Home Screen.
1. Channel Indicator. Press the other Channel Encoder to switch channels.
2. Input Attenuator Level. Turn the Channel encoder to adjust from -80 to +12.
3. Channel Input Meter
4. Sensitivity Setting Indicator. Press the Channel Encoder to highlight the setting, then turn to
adjust between Line (default,) Consumer, and Mic. Once the desired level is selected, press
the Channel Encoder down again to set it.
Main Menu
From the Home Screen, press the Master Encoder to access the Main Menu. Loudspeaker
Settings and Presets are accessed from the Main Menu
Presets
From the Main Menu, turn the Master Encoder until “Preset” is highlighted. Press the Master
Encoder to access Presets. Turn the Master Encoder to scroll through Presets and then press the
Master Encoder to select the desired Preset. Once the Preset is selected, you will be returned to
the Main Menu. Hitting the Back Button at any time will also return you to the Main Menu.
Auto Dim
Toggling the Auto Dim on and off will determine whether or not the LCD panel on the speaker
dims after a minute of not being used.
From the Main Menu, turn the Master Encoder until “Auto Dim” is highlighted. Press the Master
Encoder to access Auto Dim. Turn the Master Encoder to toggle between “On” and “Off.”Once the
desired setting is displayed, press the master encoder to select that setting; you will be returned
to the Main Menu. Hitting the Back Button at any time will also return you to the Main Menu.
Auto Sleep
Toggling the Auto Sleep on or off will determine whether or not the speaker goes into Sleep
Mode after a period of time. In Sleep Mode, the outputs will be completely turned off so that any
spurious outside noise such as radio signals will not be passed through the system. The speaker
will come out of sleep mode as soon as audio is passed through the system again.
From the Main Menu, turn the Master Encoder until “Auto Sleep” is highlighted. Press the Master
Encoder to access Auto Sleep. Turn the Master Encoder to toggle between “On” and “Off.”Once
the desired setting is displayed, press the master encoder to select that setting; you will be
returned to the Main Menu. Hitting the Back Button at any time will also return you to the
Main Menu.
25
Page 26

MAIN MENU
PRESET
AUTO DIM
AUTO SLEEP
METERS
1 MAIN
OFF
ON
sensitivitY line
MAIN MENU
PRESET
AUTO DIM
AUTO SLEEP
METERS
1 MAIN
OFF
ON
MAIN MENU
PRESET
AUTO DIM
AUTO SLEEP
METERS
2 MONITOR
OFF
OFF
MAIN MENU
PRESET
AUTO DIM
AUTO SLEEP
METERS
1 MAIN
OFF
OFF
network MENU
IP
SUBNET
HIQNET
DHCP
169.254.155.248
255.255.0.0
1
ON
input MEters
CH1
CH2
MAIN MENU
PRESETS
AUTO DIM
AUTO SLEEP
NETWORK MENU 1 - IP
NETWORK MENU 2 - SUBNET
INPUT METERS
METERS
MAIN MENU
PRESET
AUTO DIM
AUTO SLEEP
METERS
1 MAIN
OFF
ON
MAIN MENU
PRESET
AUTO DIM
AUTO SLEEP
METERS
2 MONITOR
OFF
OFF
MAIN MENU
PRESET
AUTO DIM
AUTO SLEEP
METERS
1 MAIN
OFF
OFF
network MENU
IP
SUBNET
HIQNET
DHCP
169.254.155.248
255.255.0.0
1
ON
network MENU
IP
SUBNET
HIQNET
DHCP
169.254.155.248
255.255.0.0
1
ON
input MEters
CH1
CH2
PRESETS
AUTO DIM
AUTO SLEEP
NETWORK MENU 1 - IP
NETWORK MENU 2 - SUBNET
INPUT METERS
AUTO SLEEP
METERS
ON
MAIN MENU
PRESET
AUTO DIM
AUTO SLEEP
METERS
2 MONITOR
OFF
OFF
MAIN MENU
PRESET
AUTO DIM
AUTO SLEEP
METERS
1 MAIN
OFF
OFF
network MENU
IP
SUBNET
HIQNET
DHCP
169.254.155.248
255.255.0.0
1
ON
network MENU
IP
SUBNET
HIQNET
DHCP
169.254.155.248
255.255.0.0
1
ON
network MENU
IP
SUBNET
HIQNET
DHCP
169.254.155.248
255.255.0.0
1
ON
input MEters
CH1
CH2
AUTO DIM
AUTO SLEEP
NETWORK MENU 1 - IP
NETWORK MENU 2 - SUBNET
NETWORK MENU 3 - HIQNET
INPUT METERS
MAIN MENU
PRESET
AUTO DIM
AUTO SLEEP
METERS
1 MAIN
OFF
ON
JBL SRX815P
MAIN
0.0
channel 1
sensitivitY line
MAIN MENU
PRESET
AUTO DIM
AUTO SLEEP
METERS
1 MAIN
OFF
ON
MAIN MENU
PRESET
AUTO DIM
AUTO SLEEP
METERS
2 MONITOR
OFF
OFF
MAIN MENU
PRESET
AUTO DIM
AUTO SLEEP
METERS
1 MAIN
OFF
OFF
INTRO
INPUT SCREEN
MAIN MENU
PRESETS
AUTO DIM
AUTO SLEEP
0.0
AUTO SLEEP
METERS
OFF
MAIN MENU
PRESET
AUTO DIM
AUTO SLEEP
METERS
1 MAIN
OFF
OFF
network MENU
IP
SUBNET
HIQNET
DHCP
169.254.155.248
255.255.0.0
1
ON
network MENU
IP
SUBNET
HIQNET
DHCP
169.254.155.248
255.255.0.0
1
ON
network MENU
IP
SUBNET
HIQNET
DHCP
169.254.155.248
255.255.0.0
1
ON
network MENU
IP
SUBNET
HIQNET
DHCP
169.254.155.248
255.255.0.0
1
ON
input MEters
CH1
CH2
AUTO SLEEP
NETWORK MENU 1 - IP
NETWORK MENU 2 - SUBNET
NETWORK MENU 3 - HIQNET
NETWORK MENU 4 - DHCP
INPUT METERS
MAIN MENU
PRESET
AUTO DIM
AUTO SLEEP
METERS
1 MAIN
OFF
ON
channel 1
sensitivitY line
MAIN MENU
PRESET
AUTO DIM
AUTO SLEEP
METERS
1 MAIN
OFF
ON
MAIN MENU
PRESET
AUTO DIM
AUTO SLEEP
METERS
2 MONITOR
OFF
OFF
MAIN MENU
PRESET
AUTO DIM
AUTO SLEEP
METERS
1 MAIN
OFF
OFF
input MEters
CH1
CH2
INPUT SCREEN
MAIN MENU
PRESETS
AUTO DIM
AUTO SLEEP
NETWORK MENU 1 - IP
INPUT METERS
0.0
BACK PANEL LCD
input MEters
CH1
CH2
IP
SUBNET
HIQNET
network MENU
169.254.155.248
DHCP
IP
SUBNET
HIQNET
DHCP
IP
SUBNET
HIQNET
DHCP
IP
SUBNET
HIQNET
DHCP
MODEL
network MENU
169.254.155.248
NETWORK MENU 3 - HIQNET
network MENU
169.254.155.248
NETWORK MENU 4 - DHCP
network MENU
169.254.155.248
INFORMATION
JBL SRX815P
VERSION
MAC
00:0A:40:10:05:C5
INPUT METERS
255.255.0.0
255.255.0.0
255.255.0.0
255.255.0.0
INFORMATION
0.0.3.4
ON
ON
ON
ON
Meters
From the Main Menu, turn the Master Encoder until “Meters” is highlighted. Press the
Master Encoder to access Meters. Input Meters for both channels will be displayed. Press
the Back Button to return to the Main Menu or wait one minute to be returned to the
Home Screen.
Network Menu
From the Main Menu, turn the Master Encoder until “Network Menu” is highlighted. Press
the Master Encoder to access the Network Menu.
Adjustments to the systems IP address, Subnet Address, and HiQNet Address can be
made from the Network Menu. Please note that “DHCP” must be set to “Off,” in order to
manually adjust the IP or Subnet addresses.
1
1. I P.
In the Network Menu, turn the Master Encoder until “IP” is highlighted. Press the
Master Encoder to access the IP address. Turn the Master Encoder to adjust each
digit string of the IP address. Once a digit string is set to its desired value, press the
Master Encoder to move to the next string. Once the entire IP address is set, press
the Master Encoder to save changes. Pressing the Back Button at any time will
cancel changes and return you to the Network Menu.
1
2. SUBNET.
In the Network Menu, turn the Master Encoder until “SUBNET” is highlighted. Press
the Master Encoder to access the SUBNET address. Turn the Master Encoder to
adjust each digit string of the SUBNET address. Once a digit string is set to its
desired value, press the Master Encoder to move to the next string . Once the entire
SUBNET address is set, press the Master Encoder to save changes. Pressing the
Back Button at any time will cancel changes and return you to the Network Menu.
1
3. HiQNet
In the Network Menu, turn the Master Encoder until “HiQNet” is highlighted. Press
the master encoder to access the HiQNet address. Turn the Master Encoder to scroll
to the desired HiQNet address. Once the desired HiQNet address is displayed, press
the Master Encoder to select that address and return to the Network Menu.
1
4. DHCP
In the Network Menu, turn the Master Encoder until “DHCP” is highlighted. Press the
Master Encoder to access DHCP. Turn the Master Encoder to toggle between “On”
and “Off.”Once the desired setting is displayed, press the master encoder to select
that setting; you will be returned to the Network Menu. Hitting the Back Button at any
time will also return you to the Network Menu. NOTE: “DHCP” must be set to “Off,”
in order to manually adjust the IP or Subnet addresses.
Information
From the Main Menu, turn the Master Encoder until “Information” is highlighted. Press
the Master Encoder to access Information. The Model Number of the system, software
version, and MAC address are displayed in this screen. Press the Back Button to return to
the Main Menu.
26
Page 27

SRX PRESETS
Main
This is the standard tuning for SRX812P, SRX815P, and
SRX835P for use without a subwoofer.
Monitor
Monitor tuning can be used for both SRX812P and SRX815P
when they are deployed in the monitor position.
Speech
This is an ideal preset for speech intelligibility on the SRX812P,
SRX815P, and SRX835P
SRX Sub
This is the preset to use in the SRX812P, SRX815P, and
SRX835P when they are used with either the SRX818SP or the
SRX828SP. This preset matches the performance of the SRX
full range systems to the SRX subwoofers precisely, making for
an ideal subwoofer/satellite system.
SRX Top
This is the preset to use in the SRX818SP and SRX828SP when
they are used with the SRX812P, SRX815P, or SRX835P. This
preset matches the performance of the SRX full range systems
to the SRX subwoofers precisely, making for an ideal subwoofer/
satellite system.
60Hz Sub, 80Hz Sub, 100Hz Sub, 120Hz Sub
These are the tunings to use with the SRX812P, SRX815P,
and SRX835P when they are used with a subwoofer other
than SRX818SP or SRX828SP. Depending on the range and
specifications of the subwoofer, different crossover points are
provided to make an ideal match.
60Hz , 80Hz , 100Hz , 120Hz
These are the tunings to use with the SRX818SP and
SRX828SP when they are used with full range systems other
than the SRX812P, SRX815P, and SRX835P. Depending on the
range and specifications of the full range speakers, different
crossover points are provided to make an ideal match.
Cardioid 60, Cardioid 80
These tunings are to be used in the rear-facing subwoofers
only in cardioid systems. Select the desired frequency for the
crossover based on what the tunings used in the front-facing
subwoofers. Use Cardioid 80 if the other subwoofers are set to
SRX Top.
27
Page 28

SRX PRESETS
Preset Crossovers
Presets are included to use SRX with a variety of different full range speakers and subwoofers. This chart details which presets to
use in which systems to achieve optimal performance.
SRX 818
SRX 828
Generic
Subs
Normal
Cardioid 80Hz
Cardioid 60Hz
Normal
Cardioid 80Hz
Cardioid 60Hz
60Hz
80Hz
100Hz
120Hz
SRX 812/815
SRX Sub
SRX Top
SRX Sub
Cardioid 80Hz*
SRX Sub
SRX Top
SRX Sub
Cardioid 80Hz*
80Hz Sub
80Hz LoPass
100Hz Sub
100Hz LoPass
120Hz Sub
120Hz LoPass
SRX 835
SRX Top
Cardioid 80Hz*
60Hz Sub
Cardioid 60Hz*
SRX Top
Cardioid 80Hz*
60Hz Sub
Cardioid 60Hz*
60Hz Sub
60Hz LoPass
80Hz Sub
80Hz LoPass
100Hz Sub
100Hz LoPass
120Hz Sub
120Hz LoPass
SRX Sub
SRX Sub
SRX Sub
SRX Sub
Generic Top Box
60Hz Sub Crossover
60Hz HiPass
60Hz
60Hz HiPass
Cardioid 60Hz*
60Hz HiPass
60Hz
60Hz HiPass
Cardioid 60Hz*
Generic Top Box
80Hz Sub Crossover
80Hz HiPass
80Hz
80Hz HiPass
Cardioid 80Hz*
80Hz HiPass
80Hz
80Hz HiPass
Cardioid 80Hz*
Generic Top Box
100Hz Sub Crossover
100Hz HiPass
100Hz
100Hz HiPass
100Hz
Generic Top Box
120Hz Sub Crossover
120Hz HiPass
120Hz
120Hz HiPass
120Hz
*The Cardioid Preset is always selected only on the rear-facing box. The two front facing boxes should be set to your selected crossover frequency, eg. 60Hz or 80Hz.
28
Page 29

PREMIUM DSP TECHNOLOGY
Introduction
The onboard suite of user controllable DSP featured in SRX800
allows users to set up and fine tune their systems with an extremely
high degree of ease and precision. In addition to the JBL engineered
application presets, users can define and recall their own presets for
use in a variety of settings and applications.
DSP
Controller
Networking
V5 Compatible JBL Tunings
• 96kHz FIR Filters
• LevelMax™ Limiting
Full Suite of User Controllable DSP
• 20 PEQs with a full suite of filters
• 2 sec of delay
• Signal Generator: Pink Noise, White Noise, and Sine Waves
• Input mixing
• Amplifier Monitoring: Input Voltage, Thermal Errors, Clip
• 50 User Presets
SRX Connect App
Basic control over the system is provided through the SRX Control
App, available for iOS, and android devices. Typical setups are easily
achieved and controlled via this app.
Audio Architect
For more advanced configurations, users can control the system
using Audio Architect. Audio Architect provides incredible flexibility
with the same components scaling from an 80,000 seat stadium
down to a small performing arts center. Here it seamlessly continues
to act as the vehicle for artistic expression by delivering the highest
quality sound reproduction and enabling the artists to convey a
dazzling performance. Whether a theater of 200 or 2,000, the
HARMAN solution raises the roof.
29
Page 30

NETWORKING
SRX800 Speakers feature an Ethernet connector so that they can be controlled via Audio Architect (version 1.60 or later) or SRX
Connect. The latest versions of both of these programs can be found at http://www.jblpro.com/www/products/portable-market/
srx800-series.
When a connection is established, the LINK LED on the back panel of the speaker will illuminate. The DATA LED will also light to
indicate that the speaker is sending and receiving information via the network.
There are several options for connecting the speakers to a network:
1. Direct Connection
Simply plug an Ethernet cable into both the SRX speaker and your computer. You can now control this individual speaker.
2. Wired connection
Connect any number of SRX speakers to a wired network router, either directly or via a switcher, and connect your
computer to that same network. You can now control all speakers on the network.
3. Wireless connection
Connect any number of SRX speakers to a wireless router either directly or via a switcher, and connect your computer or
tablet to that same network. You can now control all speakers on the network. Wireless connection is the only option for
tablet control via the SRX Connect app for iPad and Android tablets.
30
Page 31

NETWORKING
SRX800 Speakers can be used in Audio Architect version 1.60 and later. Audio Architect can be used to control all DSP parameters
of SRX800. Some functions, such as building and saving DSP presets in the speakers themselves, are only available through
Audio Architect. To download Audio Architect, visit http://www.jblpro.com/www/products/portable-market/srx800-series and select
the latest version of Audio Architect.
See the networking section above for instructions on connecting speakers to a network.
Some users will not see every speaker on the network the first time they connect new speakers. The most probable cause for this is
that two or more speakers are automatically set to the same HiQnet address when they are brand new. Each speaker must have its
own unique HiQnet address in order for the system to recognize them. If you aren’t seeing connected speakers on your network, you
can use HiQnet NetSetter to reset the HiQnet addresses of speakers on the system. NetSetter can be downloaded at
http://www.jblpro.com/www/products/portable-market/srx800-series.
Once your speakers are networked, they will show up in
the left hand panel on audio architect. A full list of Audio
Architect compatible Harman devices is also available for
creating shows while offline.
Double-click the speaker to bring up its control panel.
More in-depth instructions on using SRX with Audio Architect can be found at http://www.jblpro.com/www/products/portablemarket/srx800-series
Drag speakers from the left hand panel into the room to start
working with them.
Double-click any of the DSP parameters to adjust those.
31
Page 32

SMART DEVICE APP
Introduction
For ease of use, SRX800 can be controlled via a proprietary app, SRX Connect, which is available for Android and iOS devices. It may
be found at http://www.jblpro.com/www/products/portable-market/srx800-series. Once the speakers are online and connected to the
network, connect your device to that same network and the app will find the speakers.
Drag and Drop speakers from the network into their configuration to get started.
Levels can be set directly from the configuration screen.
Selecting a group of speakers will allow users to adjust control
DSP and tune the system.
A full user’s guide for the app can be found online at http://www.jblpro.com/www/products/portable-market/srx800-series/app
32
Page 33

LOUDSPEAKER PLACEMENT AND SUSPENSION
OUTIN
CH
2
CH
1
OUT
NETWORK
LINK
MASTER LEVEL
BACK
POWER
DATA
IN
A HARMAN INTERNATIONAL COMPANY
DESIGNED AND ENGINEERED IN THE USA
MADE IN MEXICO
SERIAL NO.JBL PROFESSIONAL NORTHRIDGE, CA USA
MAIN MENU
PRESET
AUTO DIM
AUTO SLEEP
METERS
? FILTERS
ON
OFF
OUTIN
CH
2
CH
1
OUT
NETWORK
LINK
MASTER LEVEL
BACK
POWER
DATA
IN
A HARMAN INTERNATIONAL COMPANY
DESIGNED AND ENGINEERED IN THE USA
MADE IN MEXICO
SERIAL NO.JBL PROFESSIONAL NORTHRIDGE, CA USA
MAIN MENU
PRESET
AUTO DIM
AUTO SLEEP
METERS
? FILTERS
ON
OFF
OUTIN
CH
2
CH
1
OUT
NETWORK
LINK
MASTER LEVEL
BACK
POWER
DATA
IN
A HARMAN INTERNATIONAL COMPANY
DESIGNED AND ENGINEERED IN THE USA
MADE IN MEXICO
SERIAL NO.JBL PROFESSIONAL NORTHRIDGE, CA USA
MAIN MENU
PRESET
AUTO DIM
AUTO SLEEP
METERS
? FILTERS
ON
OFF
OUTIN
CH
2
CH
1
OUT
NETWORK
LINK
MASTER LEVEL
BACK
POWER
DATA
IN
A HARMAN INTERNATIONAL COMPANY
DESIGNED AND ENGINEERED IN THE USA
MADE IN MEXICO
SERIAL NO.JBL PROFESSIONAL NORTHRIDGE, CA USA
MAIN MENU
PRESET
AUTO DIM
AUTO SLEEP
METERS
? FILTERS
ON
OFF
OUTIN
CH
2
CH
1
OUT
NETWORK
LINK
MASTER LEVEL
BACK
POWER
DATA
IN
A HARMAN INTERNATIONAL COMPANY
DESIGNED AND ENGINEERED IN THE USA
MADE IN MEXICO
SERIAL NO.JBL PROFESSIONAL NORTHRIDGE, CA USA
MAIN MENU
PRESET
AUTO DIM
AUTO SLEEP
METERS
? FILTERS
ON
OFF
OUTIN
CH
2
CH
1
OUT
NETWORK
LINK
MASTER LEVEL
BACK
POWER
DATA
IN
A HARMAN INTERNATIONAL COMPANY
DESIGNED AND ENGINEERED IN THE USA
MADE IN MEXICO
SERIAL NO.JBL PROFESSIONAL NORTHRIDGE, CA USA
MAIN MENU
PRESET
AUTO DIM
AUTO SLEEP
METERS
? FILTERS
ON
OFF
OUTIN
CH
2
CH
1
OUT
NETWORK
LINK
MASTER LEVEL
BACK
POWER
DATA
IN
A HARMAN INTERNATIONAL COMPANY
DESIGNED AND ENGINEERED IN THE USA
MADE IN MEXICO
SERIAL NO.JBL PROFESSIONAL NORTHRIDGE, CA USA
MAIN MENU
PRESET
AUTO DIM
AUTO SLEEP
METERS
? FILTERS
ON
OFF
OUTIN
CH
2
CH
1
OUT
NETWORK
LINK
MASTER LEVEL
BACK
POWER
DATA
IN
A HARMAN INTERNATIONAL COMPANY
DESIGNED AND ENGINEERED IN THE USA
MADE IN MEXICO
SERIAL NO.JBL PROFESSIONAL NORTHRIDGE, CA USA
MAIN MENU
PRESET
AUTO DIM
AUTO SLEEP
METERS
? FILTERS
ON
OFF
OUTIN
CH
2
CH
1
OUT
NETWORK
LINK
MASTER LEVEL
BACK
POWER
DATA
IN
A HARMAN INTERNATIONAL COMPANY
DESIGNED AND ENGINEERED IN THE USA
MADE IN MEXICO
SERIAL NO.JBL PROFESSIONAL NORTHRIDGE, CA USA
MAIN MENU
PRESET
AUTO DIM
AUTO SLEEP
METERS
? FILTERS
ON
OFF
OUTIN
CH
2
CH
1
OUT
NETWORK
LINK
MASTER LEVEL
BACK
POWER
DATA
IN
A HARMAN INTERNATIONAL COMPANY
DESIGNED AND ENGINEERED IN THE USA
MADE IN MEXICO
SERIAL NO.JBL PROFESSIONAL NORTHRIDGE, CA USA
MAIN MENU
PRESET
AUTO DIM
AUTO SLEEP
METERS
? FILTERS
ON
OFF
OUTIN
CH
2
CH
1
OUT
NETWORK
LINK
MASTER LEVEL
BACK
POWER
DATA
IN
A HARMAN INTERNATIONAL COMPANY
DESIGNED AND ENGINEERED IN THE USA
MADE IN MEXICO
SERIAL NO.JBL PROFESSIONAL NORTHRIDGE, CA USA
MAIN MENU
PRESET
AUTO DIM
AUTO SLEEP
METERS
? FILTERS
ON
OFF
OUTIN
CH
2
CH
1
OUT
NETWORK
LINK
MASTER LEVEL
BACK
POWER
DATA
IN
A HARMAN INTERNATIONAL COMPANY
DESIGNED AND ENGINEERED IN THE USA
MADE IN MEXICO
SERIAL NO.JBL PROFESSIONAL NORTHRIDGE, CA USA
MAIN MENU
PRESET
AUTO DIM
AUTO SLEEP
METERS
? FILTERS
ON
OFF
OUTIN
CH
2
CH
1
OUT
NETWORK
LINK
MASTER LEVEL
BACK
POWER
DATA
IN
A HARMAN INTERNATIONAL COMPANY
DESIGNED AND ENGINEERED IN THE USA
MADE IN MEXICO
SERIAL NO.JBL PROFESSIONAL NORTHRIDGE, CA USA
MAIN MENU
PRESET
AUTO DIM
AUTO SLEEP
METERS
? FILTERS
ON
OFF
OUTIN
CH
2
CH
1
OUT
NETWORK
LINK
MASTER LEVEL
BACK
POWER
DATA
IN
A HARMAN INTERNATIONAL COMPANY
DESIGNED AND ENGINEERED IN THE USA
MADE IN MEXICO
SERIAL NO.JBL PROFESSIONAL NORTHRIDGE, CA USA
MAIN MENU
PRESET
AUTO DIM
AUTO SLEEP
METERS
? FILTERS
ON
OFF
OUTIN
CH
2
CH
1
OUT
NETWORK
LINK
MASTER LEVEL
BACK
POWER
DATA
IN
A HARMAN INTERNATIONAL COMPANY
DESIGNED AND ENGINEERED IN THE USA
MADE IN MEXICO
SERIAL NO.JBL PROFESSIONAL NORTHRIDGE, CA USA
MAIN MENU
PRESET
AUTO DIM
AUTO SLEEP
METERS
? FILTERS
ON
OFF
OUTIN
CH
2
CH
1
OUT
NETWORK
LINK
MASTER LEVEL
BACK
POWER
DATA
IN
A HARMAN INTERNATIONAL COMPANY
DESIGNED AND ENGINEERED IN THE USA
MADE IN MEXICO
SERIAL NO.JBL PROFESSIONAL NORTHRIDGE, CA USA
MAIN MENU
PRESET
AUTO DIM
AUTO SLEEP
METERS
? FILTERS
ON
OFF
OUTIN
CH
2
CH
1
OUT
NETWORK
LINK
MASTER LEVEL
BACK
POWER
DATA
IN
A HARMAN INTERNATIONAL COMPANY
DESIGNED AND ENGINEERED IN THE USA
MADE IN MEXICO
SERIAL NO.JBL PROFESSIONAL NORTHRIDGE, CA USA
MAIN MENU
PRESET
AUTO DIM
AUTO SLEEP
METERS
? FILTERS
ON
OFF
OUTIN
CH
2
CH
1
OUT
NETWORK
LINK
MASTER LEVEL
BACK
POWER
DATA
IN
A HARMAN INTERNATIONAL COMPANY
DESIGNED AND ENGINEERED IN THE USA
MADE IN MEXICO
SERIAL NO.JBL PROFESSIONAL NORTHRIDGE, CA USA
MAIN MENU
PRESET
AUTO DIM
AUTO SLEEP
METERS
? FILTERS
ON
OFF
OUTIN
CH
2
CH
1
OUT
NETWORK
LINK
MASTER LEVEL
BACK
POWER
DATA
IN
A HARMAN INTERNATIONAL COMPANY
DESIGNED AND ENGINEERED IN THE USA
MADE IN MEXICO
SERIAL NO.JBL PROFESSIONAL NORTHRIDGE, CA USA
MAIN MENU
PRESET
AUTO DIM
AUTO SLEEP
METERS
? FILTERS
ON
OFF
OUTIN
CH
2
CH
1
OUT
NETWORK
LINK
MASTER LEVEL
BACK
POWER
DATA
IN
A HARMAN INTERNATIONAL COMPANY
DESIGNED AND ENGINEERED IN THE USA
MADE IN MEXICO
SERIAL NO.JBL PROFESSIONAL NORTHRIDGE, CA USA
MAIN MENU
PRESET
AUTO DIM
AUTO SLEEP
METERS
? FILTERS
ON
OFF
OUTIN
CH
2
CH
1
OUT
NETWORK
LINK
MASTER LEVEL
BACK
POWER
DATA
IN
A HARMAN INTERNATIONAL COMPANY
DESIGNED AND ENGINEERED IN THE USA
MADE IN MEXICO
SERIAL NO.JBL PROFESSIONAL NORTHRIDGE, CA USA
MAIN MENU
PRESET
AUTO DIM
AUTO SLEEP
METERS
? FILTERS
ON
OFF
OUTIN
CH
2
CH
1
OUT
NETWORK
LINK
MASTER LEVEL
BACK
POWER
DATA
IN
A HARMAN INTERNATIONAL COMPANY
DESIGNED AND ENGINEERED IN THE USA
MADE IN MEXICO
SERIAL NO.JBL PROFESSIONAL NORTHRIDGE, CA USA
MAIN MENU
PRESET
AUTO DIM
AUTO SLEEP
METERS
? FILTERS
ON
OFF
OUTIN
CH
2
CH
1
OUT
NETWORK
LINK
MASTER LEVEL
BACK
POWER
DATA
IN
A HARMAN INTERNATIONAL COMPANY
DESIGNED AND ENGINEERED IN THE USA
MADE IN MEXICO
SERIAL NO.JBL PROFESSIONAL NORTHRIDGE, CA USA
MAIN MENU
PRESET
AUTO DIM
AUTO SLEEP
METERS
? FILTERS
ON
OFF
OUTIN
CH
2
CH
1
OUT
NETWORK
LINK
MASTER LEVEL
BACK
POWER
DATA
IN
A HARMAN INTERNATIONAL COMPANY
DESIGNED AND ENGINEERED IN THE USA
MADE IN MEXICO
SERIAL NO.JBL PROFESSIONAL NORTHRIDGE, CA USA
MAIN MENU
PRESET
AUTO DIM
AUTO SLEEP
METERS
? FILTERS
ON
OFF
OUTIN
CH
2
CH
1
OUT
NETWORK
LINK
MASTER LEVEL
BACK
POWER
DATA
IN
A HARMAN INTERNATIONAL COMPANY
DESIGNED AND ENGINEERED IN THE USA
MADE IN MEXICO
SERIAL NO.JBL PROFESSIONAL NORTHRIDGE, CA USA
MAIN MENU
PRESET
AUTO DIM
AUTO SLEEP
METERS
? FILTERS
ON
OFF
OUTIN
CH
2
CH
1
OUT
NETWORK
LINK
MASTER LEVEL
BACK
POWER
DATA
IN
A HARMAN INTERNATIONAL COMPANY
DESIGNED AND ENGINEERED IN THE USA
MADE IN MEXICO
SERIAL NO.JBL PROFESSIONAL NORTHRIDGE, CA USA
MAIN MENU
PRESET
AUTO DIM
AUTO SLEEP
METERS
? FILTERS
ON
OFF
OUTIN
CH
2
CH
1
OUT
NETWORK
LINK
MASTER LEVEL
BACK
POWER
DATA
IN
A HARMAN INTERNATIONAL COMPANY
DESIGNED AND ENGINEERED IN THE USA
MADE IN MEXICO
SERIAL NO.JBL PROFESSIONAL NORTHRIDGE, CA USA
MAIN MENU
PRESET
AUTO DIM
AUTO SLEEP
METERS
? FILTERS
ON
OFF
OUTIN
CH
2
CH
1
OUT
NETWORK
LINK
MASTER LEVEL
BACK
POWER
DATA
IN
A HARMAN INTERNATIONAL COMPANY
DESIGNED AND ENGINEERED IN THE USA
MADE IN MEXICO
SERIAL NO.JBL PROFESSIONAL NORTHRIDGE, CA USA
MAIN MENU
PRESET
AUTO DIM
AUTO SLEEP
METERS
? FILTERS
ON
OFF
OUTIN
CH
2
CH
1
OUT
NETWORK
LINK
MASTER LEVEL
BACK
POWER
DATA
IN
A HARMAN INTERNATIONAL COMPANY
DESIGNED AND ENGINEERED IN THE USA
MADE IN MEXICO
SERIAL NO.JBL PROFESSIONAL NORTHRIDGE, CA USA
MAIN MENU
PRESET
AUTO DIM
AUTO SLEEP
METERS
? FILTERS
ON
OFF
OUTIN
CH
2
CH
1
OUT
NETWORK
LINK
MASTER LEVEL
BACK
POWER
DATA
IN
A HARMAN INTERNATIONAL COMPANY
DESIGNED AND ENGINEERED IN THE USA
MADE IN MEXICO
SERIAL NO.JBL PROFESSIONAL NORTHRIDGE, CA USA
MAIN MENU
PRESET
AUTO DIM
AUTO SLEEP
METERS
? FILTERS
ON
OFF
OUTIN
CH
2
CH
1
OUT
NETWORK
LINK
MASTER LEVEL
BACK
POWER
DATA
IN
A HARMAN INTERNATIONAL COMPANY
DESIGNED AND ENGINEERED IN THE USA
MADE IN MEXICO
SERIAL NO.JBL PROFESSIONAL NORTHRIDGE, CA USA
MAIN MENU
PRESET
AUTO DIM
AUTO SLEEP
METERS
? FILTERS
ON
OFF
OUTIN
CH
2
CH
1
OUT
NETWORK
LINK
MASTER LEVEL
BACK
POWER
DATA
IN
A HARMAN INTERNATIONAL COMPANY
DESIGNED AND ENGINEERED IN THE USA
MADE IN MEXICO
SERIAL NO.JBL PROFESSIONAL NORTHRIDGE, CA USA
MAIN MENU
PRESET
AUTO DIM
AUTO SLEEP
METERS
? FILTERS
ON
OFF
Suspended
Pole MountTripod StandMonitorFloor Standing Subs with 3-way splayed
MAIN MENU
? FILTERS
PRESET
ON
AUTO DIM
OFF
AUTO SLEEP
POWER
METERS
MASTER LEVEL
BACK
OUTIN
CH
1
CH
2
NETWORK
OUT
IN
LINK
DATA
SERIAL NO.JBL PROFESSIONAL NORTHRIDGE, CA USA
A HARMAN INTERNATIONAL COMPANY
DESIGNED AND ENGINEERED IN THE USA
MADE IN MEXICO
Stacked Subs Cardiod Subs Cardiod Subs Vertical
MAIN MENU
PRESET
? FILTERS
AUTO DIM
ON
AUTO SLEEP
OFF
POWER
METERS
MASTER LEVEL
BACK
OUTIN
CH
1
CH
2
NETWORK
OUT
IN
LINK
DATA
SERIAL NO.JBL PROFESSIONAL NORTHRIDGE, CA USA
A HARMAN INTERNATIONAL COMPANY
DESIGNED AND ENGINEERED IN THE USA
MADE IN MEXICO
MAIN MENU
? FILTERS
PRESET
ON
AUTO DIM
OFF
AUTO SLEEP
POWER
METERS
MASTER LEVEL
BACK
OUTIN
CH
1
CH
2
NETWORK
OUT
IN
LINK
DATA
SERIAL NO.JBL PROFESSIONAL NORTHRIDGE, CA USA
A HARMAN INTERNATIONAL COMPANY
DESIGNED AND ENGINEERED IN THE USA
MADE IN MEXICO
POWER
CH
CH
SERIAL NO.JBL PROFESSIONAL NORTHRIDGE, CA USA
2
1
A HARMAN INTERNATIONAL COMPANY
PRESET
AUTO DIM
AUTO SLEEP
METERS
IN
MAIN MENU
DESIGNED AND ENGINEERED IN THE USA
? FILTERS
OUTIN
OUT
MADE IN MEXICO
OFF
ON
NETWORK
MASTER LEVEL
DATA
LINK
BACK
The following guidelines will help you achieve optimum sound wherever you use your SRX800 loudspeakers. Only experienced professionals
should attempt to suspend the speakers. For permanent installation applications utilizing the M10 suspension points, JBL Professional
recommends the use of M10 x 1.5 thread pitch forged shoulder steel eyebolts with an 18-20mm threaded shaft, along with fender washers, rated
for overhead suspension. USERS UNFAMILIAR WITH SAFE RIGGING PRACTICES SHOULD NOT ATTEMPT TO SUSPEND LOUDSPEAKERS. Please
see https://www.jblpro.com/pub/technote/tn_v1n14.pdf for more information.
Aim the speakers to cover the whole audience
For best results try to get the high frequency horn at least 2 to 4 feet above the heads of the audience. If the speakers are too low, the people in
the back of the audience will not receive the best quality sound. If the speakers are too high, people in the front of the audience will not receive
the best quality sound. Pay attention to the coverage pattern of each speaker and aim them so that the entire audience is within the coverage
pattern of the system. Utilize the downward angle pole cup on the SRX812P and SRX815P for closer audiences in smaller spaces.
Place the speakers between the microphones and the audience.
Feedback occurs when the microphones pick up sound from the speakers and “feed” the sound back through the sound system. If space is
limited, point the speakers away from the microphones to reduce feedback.
Locate the speakers away from turntables.
Low-frequency feedback occurs when the output of the speaker is picked up by the tone arm of the turntable and is re-amplified. A heavy, solid
turntable base and shock mounting can also reduce this type of feedback in DJ applications.
Use more speakers in large or highly reverberant spaces.
Spreading speakers throughout these spaces will produce much better sound than trying to compensate with loudness level or equalization. For
very long distances, the use of another set of speakers with time delay is recommended.
Stand speakers upright for PA - Lay speakers on their side for stage monitoring.
Use the full range speakers in upright stance for even coverage over a wide area. SRX815P and SRX812P speakers are also designed with a
slanted position for stage monitoring applications. Rest the speaker on the side with rubber feet for use as a stage monitor. Two SRX835Ps can
be splayed side by side for wide coverage for large audiences. Simply stand them so that their inside side panels meet. This configuration is ideal
atop an SRX828SP subwoofer.
33
Page 34

TROUBLESHOOTING
Symptom Likely Cause What to do
No sound
Speaker not connected
to active AC power
Power not switched on Switch on power and verify that power LED is on
Verify that speaker is connected and that the circuit is on
No sound, speaker is connected
to working AC power but won’t
come on.
No sound. Speaker comes on.
No sound with microphone
connected directly to the input.
Signal sounds distorted and
very loud, PEAK light is lit
most of the time.
Signal sounds distorted even at
moderate volumes, LIMIT light
is not lit.
Lots of hiss in the sound,
the mixer controls are at
very low settings.
Noise or hiss heard at output. Noisy source device
Hum or Buzz that increases or
decreases when the mixer level
controls are moved.
Speaker power cable is faulty
or improperly connected.
Signal source
(mixer, instrument, etc.)
is not sending.
Faulty cables and
connections
Microphone requires
phantom power
Excessive input signal, trying
to exceed the capabilities of
the speakers
Mixer or other source
is overdriven
Improper gain structure
Improper A/C ground or
faulty equipment connected
to mixer input
Faulty cable between source
equipment and mixer
• Re-seat the power cable at both ends.
• Substitute a known-good power cable
• Check VU meters on the source mixer
• Verify that the tape or CD is playing.
• Use headphones to verify that the instrument is actually
sending an audio signal
• Disconnect and re-seat signal cables.
• Replace suspected cable with a known-good cable
The SRX800 does not supply phantom power. Switch to a dynamic
microphone, use a battery powered microphone (if possible),
use an external phantom power supply for condenser type microphones.
• Reduce the output level of the source.
• Turn down the level controls on the speaker.
• Use additional SRX800 speakers.
Review the Owner’s Manual for your mixer and adjust controls as needed.
• Input sensitivity (gain)
• Channel faders
• Master faders Once this is done, review the instructions in the Quick
Start section of this guide.
• Make sure that the MIC/LINE switch is in the LINE (disengaged) position.
• Reduce the level settings at speaker. Review the Owner’s Manual for
your mixer and adjust controls as needed.
• Input sensitivity (gain)
• Channel faders
• Master faders
Disconnect the devices that are connected to your speaker one at a time.
If the noise goes away, the problem is with the source or the
connecting cable.
Disconnect or mute channels one at a time to isolate the problem. Refer to
the owner’s manual of the faulty equipment for troubleshooting help.
Substitute a known-good cable for the suspected faulty cable.
34
Hum or Buzz
Improper A/C grounding,
ground loops
Excessively long
unbalanced cable run
Improper system gain
structure
• ‘Lift’ the audio ground by using an XLR/F to XLR/M adapter on one end.
• Re-route audio cables away from AC power and lighting cables.
• Use the balanced outputs (if available) of your mixer or source
equipment to drive your SRX800 speakers.
• Use a “DI” (direct injection) box to convert your unbalanced equipment
output to a balanced output.
Reduce the INPUT level controls and increase the output level of your
source devices.
Page 35

WARRANTY INFORMATION
The JBL Limited Warranty on professional loudspeaker products (except for enclosures) remains in effect for five years from the
date of the first consumer purchase. JBL amplifiers are warranted for three years from thedate of original purchase. Enclosures
and all other JBL products are warranted for two years from the date of original purchase.
Who Is Protected By This Warranty?
Your JBL Warranty protects the original owner and all subsequent owners so long as: A.) Your JBL product has been purchased
in the Continental United States, Hawaii or Alaska. (This Warranty does not apply to JBL products purchased elsewhere except
for purchases by military outlets. Other purchasers should contact the local JBL distributor for warranty information.); and B.)
The original dated bill of sale is presented whenever warranty service is required.
What Does The JBL Warranty Cover?
Except as specified below, your JBL Warranty covers all defects in material and workmanship. The following are not covered:
Damage caused by accident, misuse, abuse, product modification or neglect; damage occurring during shipment; damage
resulting from failure to follow instructions contained in your Instruction Manual; damage resulting from the performance of
repairs by some SRX800 not authorized by JBL; claims based upon any misrepresentations by the seller; any JBL product on
which the serial number has been defaced, modified or removed.
Who Pays For What?
JBL will pay all labor and material expenses for all repairs covered by this warranty. Please be sure to save the original shipping
cartons because a charge will be made if replacement cartons are requested. Payment of shipping charges is discussed in the
next section of this warranty.
How To Obtain Warranty Performance
If your JBL product ever needs service, write or telephone us at JBL Incorporated (Attn: Customer Service Department), 8500
Balboa Boulevard, PO. Box 2200, Northridge, California 91329 (818/893-8411). We may direct you to an authorized JBL
Service Agency or ask you to send your unit to the factory for repair. Either way, you’ll need to present the original bill of sale to
establish the date of purchase. Please do not ship your JBL product to the factory without prior authorization. If transportation
of your JBL product presents any unusual difficulties, please advise us and we may make special arrangements with you.
Otherwise, you are responsible for transporting your product for repair or arranging for its transportation and for payment of any
initial shipping charges. However, we will pay the return shipping charges if repairs are covered by the warranty.
Limitation of Implied Warranties
ALL IMPLIED WARRANTIES, INCLUDING WARRANTIES OF MERCHANTABILITY AND FITNESS FOR PARTICULAR PURPOSE, ARE
LIMITED IN DURATION TO THE LENGTH OF THIS WARRANTY.
EXCLUSION OF CERTAIN DAMAGES
JBL’S LIABILITY IS LIMITED TO THE REPAIR OR REPLACEMENT, AT OUR OPTION, OF ANY DEFECTIVE PRODUCT AND SHALL
NOT INCLUDE INCIDENTAL OR CONSEQUENTIAL DAMAGES OF ANY KIND. SOME STATES DO NOT ALLOW LIMITATIONS ON
HOW LONG AN IMPLIED WARRANTY LASTS AND/OR DO NOT ALLOW THE EXCLUSION OF INCIDENTAL OR CONSEQUENTIAL
DAMAGES, SO THE ABOVE LIMITATIONS AND EXCLUSIONS MAY NOT APPLY TO YOU. THIS WARRANTY GIVES YOU SPECIFIC
LEGAL RIGHTS, AND YOU MAY ALSO HAVE OTHER RIGHTS, WHICH VARY, FROM STATE TO STATE.
JBL Professional
8500 Balboa Blvd. Northridge, CA 91329 USA
35
Page 36

CONTACT INFORMATION
Mailing Address:
JBL Professional
8500 Balboa Blvd.
Northridge, CA 91329
Shipping Address:
JBL Professional
8500 Balboa Blvd., Dock 15
Northridge, CA 91329
(Do not return product to this address without first obtaining prior authorization from JBL)
Customer Service:
Monday through Friday
8:00am -5:00pm
Pacific Coast Time in the U.S.A.
(800) 8JBLPRO (800.852.5776)
www.jblproservice.com
On The World Wide Web:
www.jblpro.com
Professional Contacts, Outside the USA:
Contact the JBL Professional Distributor in your area.
A complete list of JBL Professional international distributors is provided at our U.S.A. website: www.jblpro.com
36
Page 37

37
Page 38

Part Number: 5032132 03/15 8500 Balboa Boulevard Northridge, CA 91329 USA www.jblpro.com
 Loading...