

Page 1
OR300
Page 2
OR300
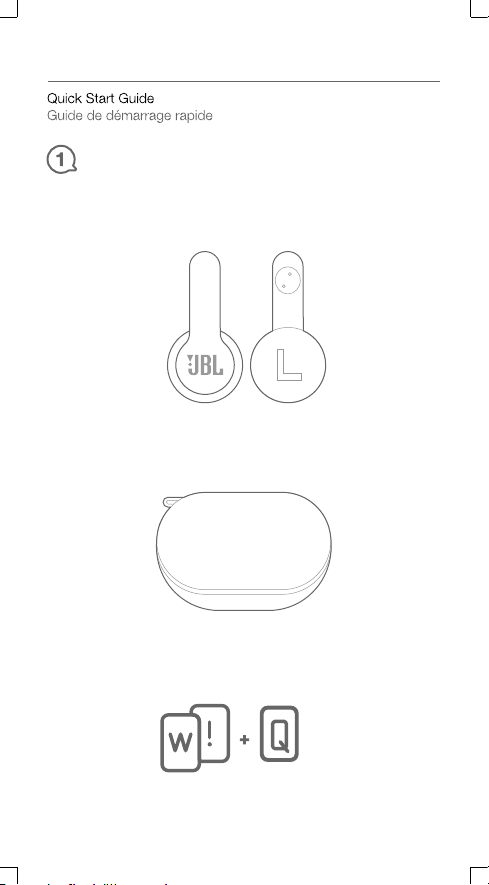
What’s in the box
OR300 Headphones
Carrying case
x1
x1
Warranty card, Warning card, QSG
x1
Page 3
OR300
Installation
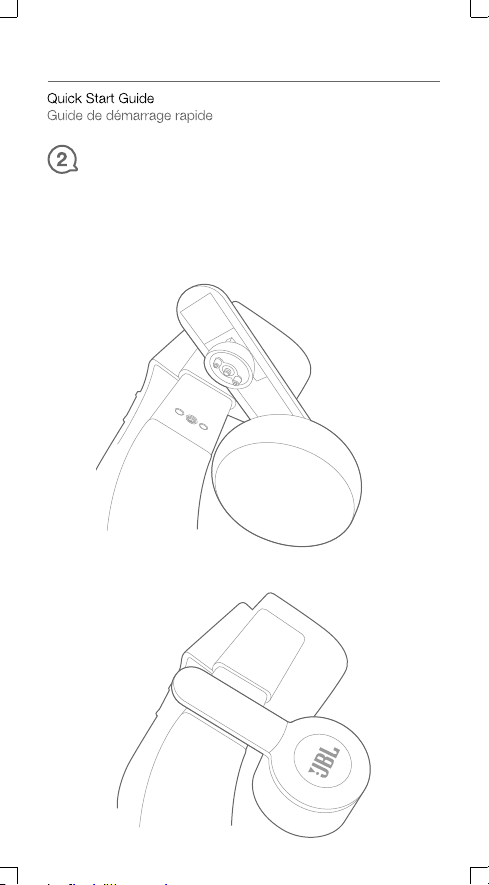
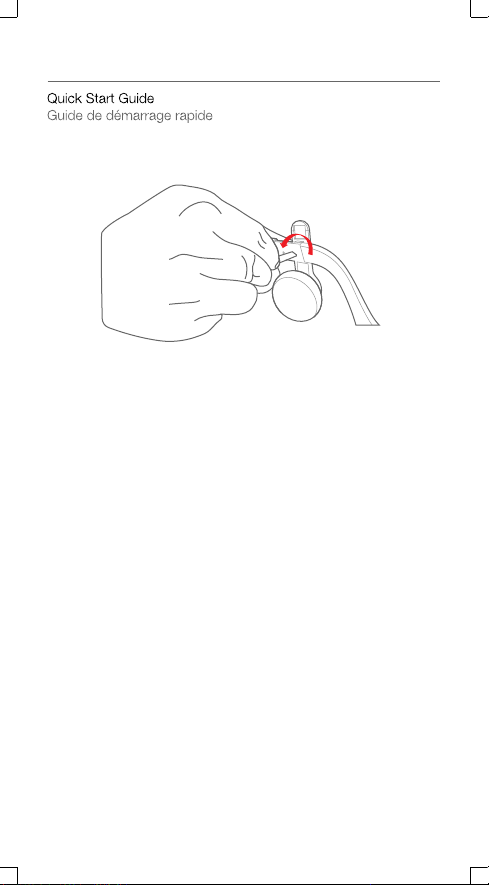
A. To attach the audio arm
1. Locate the screw on the inside of the strap that is used to attach the
OR300 headphone.
2. Place the head of the audio arm into the screw and hold it in place.
Page 4
OR300
3. Insert the audio tool* into the slot of the screw.
4. Turn the audio tool clockwise (to the right) to tighten the screw until
it is secure.
*Note: The Audio Tool is a small black tool included in the Oculus Rift
accessories box. A flathead screwdriver can also be used instead.
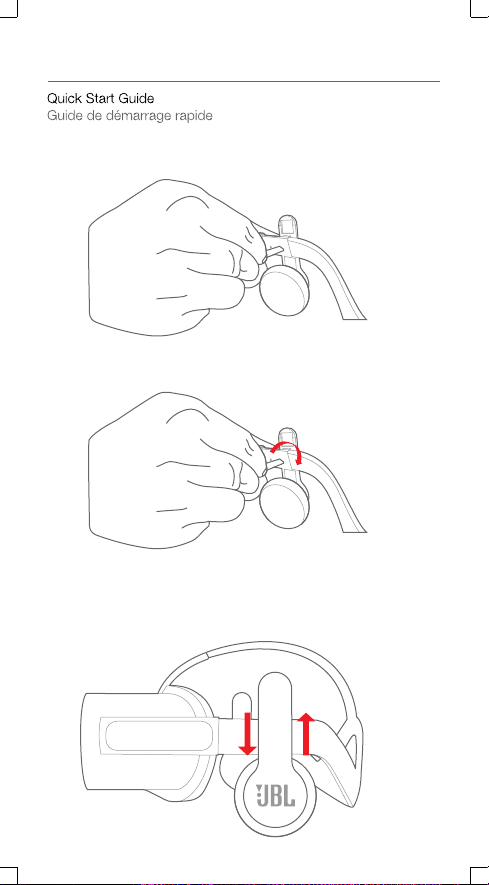
B. How to adjust
1. Adjust by sliding up and down.
Page 5

OR300
2. Adjust by moving the headphone on its axes.
3. Adjust by moving it right and left.
C. To remove the audio arm
1. Insert the audio tool* into the slot of the screw.
Page 6
OR300
2. Turn the audio tool counter clockwise (to the left) to loosen the screw.
FR
Installation
A. Fixation de la tige audio
1. Trouvez la vis à l'intérieur de la trappe utilisée pour attacher les oreillettes
OR300 JBL.
Placez l'extrémité de la tige audio dans la vis et maintenez-la en position.
2.
3. Insérez l'outil audio* dans la fente de la vis.
4. Tournez l'outil audio dans le sens des aiguilles d'une montre (vers la droite)
pour serrer la vis jusqu'à son blocage.
*Remarque : L'outil audio est un petit outil noir inclus dans la boîte des
B. Réglages
1. Ajuster en faisant glisser vers le haut ou le bas.
2. Ajustez en déplaçant le casque sur ses axes.
3. Ajustez en le déplaçant vers la droite ou la gauche.
C. Pour retirer la tige audio
1. Insérez l'outil audio* dans la fente de la vis.
2.
ES
Instalación
A. Para montar el brazalete de audio
1. Busque el tornillo en el interior del enganche que se utiliza para sujetar
2. Coloque el cabezal del brazalete de audio en el tornillo y sujételo.
3. Inserte la herramienta de audio* en la ranura del tornillo.
4. Gire la herramienta de audio hacia la derecha para apretar el tornillo hasta
accessoires de l'Oculus Rift. Vous pouvez également utiliser
un tournevis plat.
Tournez l'outil audio dans l'autre sens (vers la gauche) pour dévisser la vis.
los auriculares OR300.
que esté sujeto.
Page 7

OR300
*Nota: La herramienta de audio es una pequeña herramienta negra incluida en la
caja de accesorios de Oculus Rift. En su lugar, también se puede utilizar
un destornillador plano.
B. Cómo ajustar
1. Ajustar desalizando hacia arriba y hacia abajo.
2. Ajustar moviendo los auriculares en sus ejes.
3. Ajuste moviéndolo hacia la derecha y hacia la izquierda.
C. Para quitar el brazalete de audio
1. Inserte la herramienta de audio* en la ranura del tornillo.
2. Gire la herramienta de audio hacia la izquierda para aflojar el tornillo.
DE
Installation
A. Befestigung des Audio-Halters
1. Finde die Schraube an der Innenseite der Schnalle, mit welcher der
OR300 Kopfhörer befestigt wird.
2.
Lege den oberen Teil des Audio-Halters in die Schraube und halte ihn in Position.
3. Führe das Audio-Tool* in den Schlitz der Schraube ein.
4.
Drehe das Audio-Tool im Uhrzeigersinn (nach rechts), bis die Schraube fest sitzt.
*Hinweis: Das Audio-Tool ist ein kleines schwarzes Werkzeug in der Oculus
Rift-Zubehörbox.
verwendet werden.
B. Anpassungsmöglichkeiten
1. Durch Verschieben nach oben und unten anpassen.
2. Durch Bewegen des Kopfhörers auf seinen Achsen anpassen.
3. Durch Bewegen nach rechts und links anpassen.
C. Entfernen des Audio-Halters
1. Führe das Audio-Tool* in den Schlitz der Schraube ein.
2. Drehe das Audio-Tool gegen den Uhrzeigersinn (nach links), um die Schraube
zu lösen.
IT
Installazione
Per ssare il braccetto audio
A.
1. Individuare la vite all'interno del fermo utilizzato per fissare la cuffia OR300.
2. Posizionare la testa del braccio audio nella vite e tenerla in posizione.
3. Inserire lo strumento audio* nel vano della vite.
4. Girare lo strumento audio in senso orario (verso destra) per serrare la vite fino a
quando è ben salda.
*Nota: Lo Strumento Audio è un piccolo atrezzo nero incluso nella scatola degli
accessori di Oculus Rift. In alternativa si può anche utilizzare un
cacciavite a taglio.
B. Come regolare
1. Regolare facendo scorrere su e giù.
Ein Schlitz-Schraubendreher kann auch stattdessen
Page 8

OR300
2. Regolare muovendo la cuffia sul suo asse.
3. Regolare muovendola a destra e sinistra.
C. Per rimuovere il braccetto audio
1. Inserire lo strumento audio* nel vano della vite.
2.
Girare lo strumento audio in senso anti-orario (verso sinistra) per allentare la vite.
NL
Installatie
A. De audio-arm bevestigen.
1. Zoek de schroef aan de binnenkant van de houder die wordt gebruikt om de
OR300 hoofdtelefoon te bevestigen.
2. Plaats het hoofd van de audio-arm in de schroef en houd deze op zijn plaats.
3. Plaats de audio tool* in de schroefopening.
4. Draai de audio tool met de klok mee (naar rechts) om de schroef aan te draaien
totdat deze vastzit.
*Opmerking: De Audio Tool is een klein zwart instrument meegeleverd in de
B. Instellingen aanpassen
1. Aanpassen door naar boven of beneden te schuiven.
2. Aanpassen door de assen van de hoofdtelefoon te verstellen.
3. Aanpassen door naar links en rechts te bewegen.
C. De audio-arm verwijderen
1. Plaats de audio tool* in de schroefopening.
2. Draai de audio tool tegen de klokrichting in (naar links) om de schroef los
NO
Installering
A. For å feste lydarmen
1. Lokaliser skruen på innsiden av festet som brukes til å feste OR300-
2. Fest hodet på lydarmen inn på skruen og hold den på plass.
3. Sett det medfølgende verktøyet* inn på sporet til skruen.
4. Skru verktøyet med klokken (til høyre) for å feste skruen til den sitter fast.
*Merk: Verktøyet er et lite svart verktøy inkludert i esken med tilbehør fra
B. Hvordan justere
1. Justervedåskyveoppogned.
2. Juster ved å bevege hodetelefonene på sine akser.
3. Juster ved å bevege den til høyre og venstre.
C. For å fjerne lydarmen
1. Sett det medfølgende verktøyet* inn på sporet til skruen.
2. Skru verktøyet mot klokken (til venstre) for å løsne skruen.
Oculus Rift doos met accessoires.
ook worden gebruikt.
te draaien.
hodetelefonene.
Oculus Rift. En flat skrutrekker kan også brukes i stedet.
Een platte schroevendraaier kan
Page 9

OR300
FI
Asennus
Liittääksesi äänivarren
A.
1. Paikanna hihnan sisäpuolella oleva ruuvi, jota käytetään liittämään
OR300 -kuuloke.
2. Aseta äänivarren pää ruuviin ja pidä sitä paikallaan.
3. Aseta äänityökalu* paikalleen ruuvin uraan.
4. Käännä äänityökalua myötäpäivään (oikealle) kiristääksesi ruuvia, kunnes se
on kireä.
*Huomautus: Äänityökalu on pieni musta työkalu, joka sisältyy Oculus Rift -
B. Miten säätää
1. Säädä liu’uttamalla ylös ja alas.
2. Säädä siirtämällä kuulokkeita sen akseleilla.
3. Säädä siirtämällä sitä oikealle ja vasemmalle.
C. Irrottaaksesi äänivarren
1. Aseta äänityökalu* paikalleen ruuvin uraan.
2. Käännä äänityökalua vastapäivään (vasemmalle) löysentääksesi ruuvia.
SV
Montering
A. Fästa ljudarmen
1. Lokalisera skruven på insidan av spärren som används för att fästa hörlurarna
2. Placera ljudarmens huvud i skruven och håll den på plats.
3. Sättinljudverktyget*ispåretpåskruven.
4. Vrid ljudverktyget medurs (till höger) för att dra åt skruven tills den är säkrad.
*OBS! Ljudverktyget är ett litet svart verktyg som är inkluderat i tillbehörsboxen
B. Justera
1. Justeragenomattdrauppochner.
2. Justera genom att flytta hörlurarna på dess axlar.
3. Justera genom att flytta den till höger och vänster.
C. Ta bort ljudarmen
1. Sättinljudverktyget*ispåretpåskruven.
2. Vrid ljudverktyget moturs (till vänster) för att lossa skruven.
DA
Installation
A. Sådan fastgør du lydarmen
1. Find skruen på indersiden af klemmen, som bruges til at fastgøre OR300
2. Indsæt hovedet af lydarmen i skruen og hold den på plads.
lisävarustelaatikkoon. Lattapääruuvitalttaa voidaan myös käyttää
sen sijasta.
OR300.
för Oculus Rift. En skruvmejsel kan också användas.
hovedtelefonen.
Page 10

OR300
3. Indsæt det medfølgende værktøj* i rillen på skruen.
4. Drej værktøjet med uret (til højre) for at spænde skruen, indtil den er spændt
sikkert fast.
*Bemærk: Værktøjet er et lille sort værktøj, som medfølger i æsken med tilbehør
fra Oculus Rift. Du kan også bruge en fladhovedet skruetrækker.
B. Sådan justerer du
1. Juster ved at skyde op og ned.
2. Juster ved at bevæge hovedtelefonen på dens akser.
3. Juster ved at bevæge den til højre og venstre.
C. Sådan fjerner du lydarmen
1. Indsæt det medfølgende værktøj* i rillen på skruen.
2. Drej værktøjet mod uret (til venstre) for at løsne skruen.
PL
Instalacja
A. Aby podłączyć pałąk audio
1. Zlokalizuj wkręt znajdujący się wewnątrz panelu używanego do podłączania
słuchawek OR300.
2. Umieść główną część pałąka audio we wkręcie i przymocuj.
3. Wsuń narzędzie audio* do gniazda wkrętu.
4. Obróć narzędzie audio w prawo, aby docisnąć wkręt.
*Uwaga: Narzędzie audio to mały, czarny przyrząd dołączony do zestawu z
akcesoriami Oculus Rift. Zamiast niego można użyć płaskiego wkrętaka.
B. Jak dostosować słuchawki
1. Dostosuj położenie, przesuwając słuchawki do góry lub do dołu.
2. Poruszaj słuchawkami wzdłuż ich osi.
3. Przesuń słuchawki w prawo lub w lewo.
C. Aby odłączyć pałąk audio
1. Wsuń narzędzie audio* do gniazda wkrętu.
2. Obróć narzędzie audio w lewo, aby poluzować wkręt.
HU
Telepítés
A. A hangkar rögzítése
1. Keresse meg a belső oldalon lévő csavart, amely a OR300 fejhallgató
rögzítésére szolgál.
2. Helyezze a hangkar fejét a csavarba, és tartsa meg a helyén.
3. Helyezze be a hangeszközt* a csavar nyílásába.
4. Forgassa el a hangeszközt az óramutató járásával megegyező irányba (jobbra)
a csavar erős meghúzásához.
*
Megjegyzés: A hangeszköz egy kis fekete eszköz, amely a Oculus Rift tartozékok
B. A beállítás menete
1. Fel- és lefelé csúsztatva lehet beállítani.
dobozában található.
Ehelyett használhat laposfejű csavarhúzót is.
Page 11

OR300
2. A fejhallgatót a tengelyei mentén mozgatva állíthatja be.
3. Jobbra, illetve balra mozgatva állíthatja be.
C. A hangkar eltávolítása
1. Helyezze be a hangeszközt* a csavar nyílásába.
2. Forgassa el a hangeszközt az óramutató járásával ellentétes irányba (balra) a
csavar meglazításához.
RU
Установка
A. Как присоединить аудио насадку
1. Найдите винт на внутренней поверхности паза, который используется для
присоединения наушников OR300.
2. Поместите головку в винт и удерживайте его там.
3. Вставьте инструмент для аудио* в паз на винте.
4. Поворачивайте инструмент для аудио по часовой стрелке (направо), чтобы
затянуть винт.
*Примечание.
B. Регулировка
1. Выполняйте регулировку, сдвигая гарнитуру вверх-вниз.
2. Выполняйте регулировку, перемещая гарнитуру по осям.
3. Выполняйте регулировку, перемещая наушники вправо-влево.
C. Как отсоединить аудио насадку
1. Вставьте инструмент для аудио* в паз на винте.
2. Поворачивайте инструмент для аудио по часовой стрелке (влево), чтобы
PT
Instalação
A. Para xar o braço
1.
2. Coloque o cabeçote do braço no parafuso e fixe-o no lugar.
3. Introduza a ferramenta de instalação* na fenda do parafuso.
4. Gire a ferramenta em sentido horário (para a direita) para apertar e fixar o
*Obs: A Ferramenta de Instalação é uma ferramenta pequena de cor preta
B. Modo de ajustar
1. Ajuste deslizando para cima e para baixo.
2. Ajuste movendo o fone sobre seu eixo.
3. Ajuste movendo o fone para a direita e para a esquerda.
C. Para retirar o braço
1. Introduza a ferramenta de instalação* na fenda do parafuso.
2.
Инструмент для аудио – это небольшой черный инструмент,
входящий в состав коробки с принадлежностями Oculus Rift.
Вместо него также можно использовать отвертку с плоской головкой.
ослабить винт.
Identifique o parafuso no lado interno do suporte de fixação do fone OR300.
parafuso.
incluída na caixa de acessórios do Oculus Rift. Se preferir, use uma chave
de fenda plana.
Gire a ferramenta em sentido anti-horário (para a esquerda) para retirar o parafuso.
Page 12

OR300
ID
Pemasangan
A. Cara memasang lengan audio
1. Cari sekrup di bagian dalam lekukan yang dipakai untuk memasang
headphone OR300.
2. Letakkan kepala lengan audio ke dalam sekrup tersebut dan tahan di posisinya.
3. Masukkan alat audio* ke dalam slot sekrup.
4. Putar alat audio searah jarum jam (ke kanan) untuk mengencangkan sekrup.
*Catatan:
Alat Audio adalah alat kecil berwarna hitam yang disertakan dalam kotak
aksesori Oculus Rift. Obeng minus juga dapat digunakan sebagai alternatif.
B. Cara penyesuaian
1. Sesuaikan dengan menggeser naik dan turun.
2. Sesuaikan dengan menggerakkan headphone pada sumbunya.
3. Sesuaikan dengan menggerakkannya ke kanan dan kiri.
C. Cara melepas lengan audio
1. Masukkan alat audio* ke dalam slot sekrup.
2.
Putar alat audio berlawanan arah jarum jam (ke kiri) untuk melonggarkan sekrup.
JP
取り付け方法
A. オーディオアームを取り付けます
1. OR300ヘッドホンを取り付けるのに使用するストラップの内側にねじが
来るようにします
2. オーディオ・アームのヘッドをねじに合わせて置き、定位置に固定します。
3. ねじのスロットにオーディオ・ツール*を差し込みます。
4.
オーディオ・ツールを時計回り(右)に回して、固定されるまでねじを締めます。
*注意:オーディオ・ツールはOculus Rift付属品ボックスの中に同梱されている小さ
な黒い道具です。代わりに、頭部の平らなねじ回しを使用することもできます。
B. 調節方法
1. 上下にスライドさせて調節します。
2. 軸上でヘッドホンを動かして調節します。
3. 左右に動かして調節します。
C. オーディオアームを外します
1. ねじのスロットにオーディオ・ツール*を差し込みます。
2. オーディオ・ツールを反時計回り(左)に回して、ねじを緩めます。
KO
설치
A. 오디오암부착
1. OR300 헤드폰 장착에 사용되는 트랩 내부에 나사를 찾습니다.
2. 오디오 암 헤드를 나사에 넣고 제자리에 고정합니다.
3. 오디오 툴*을 나사의 슬롯에 삽입합니다.
4. 오디오 툴을 시계 방향(오른쪽)으로 돌려 고정될 때까지 나사를 조입니다.
Page 13

OR300
*참고: 오디오 툴은 Oculus Rift 부속품 상자에 포함된 검은색 소형 공구입니다. 대신
일자 스크루드라이버를 사용할 수도 있습니다.
B. 조절 방법
1. 위아래로 밀어 조절하십시오.
2. 헤드폰 축을 움직여 조절하십시오.
3. 좌우로 움직여 조절하십시오.
C. 오디오 암 제거
1. 오디오 툴*을 나사의 슬롯에 삽입합니다.
2. 오디오 툴을 시계 반대 방향(왼쪽)으로 돌려 나사를 풉니다.
CHS
安装
A. 安装耳机支架
1. 将螺丝放入安装 OR300 耳机的凹槽内部。
2. 将耳机支架头部放入螺丝并调整至正确位置。
3. 将音频工具*插入螺丝槽中。
4. 顺时针转动音频工具(朝右方)拧紧螺丝。
*注意:音频工具是 Oculus Rift 配件箱中随附的一个小型黑色工具。 也可以使用
扁平头螺 丝刀替代。
B. 如何调整
1. 上下滑动来调整。
2. 按轴线移动耳机来调整。
3. 左右移动来调整。
C. 拆卸耳机支架
1. 将音频工具*插入螺丝槽中。
2. 逆时针转动音频工具(朝左方)卸掉螺丝。
CHT
安裝
A. 安裝音訊臂的步驟
1. 找到隨附用於安裝 OR300 耳機的螺絲。
2. 將音訊臂的頭部插入螺絲並固定到位。
3. 將音訊工具*插入螺絲的插槽中。
4. 順時針(向右)旋轉音訊工具,擰緊螺絲,直到其固定。
*附註: 附註:音訊工具是 Oculus Rift 配件盒中包含的一個小黑色工具。也可以
使用平頭螺絲刀 來代替。
B. 調節方法
1. 上下滑動進行調節。
2. 沿軸移動耳機進行調節。
3. 左右移動進行調節。
C. 卸下音訊臂的步驟
1. 將音訊工具*插入螺絲的插槽中。
2. 逆時針(向左)旋轉音訊工具以鬆開螺絲。
Page 14

OR300
תוינזואה רוביחל שמשמה קלחה לש ימינפה קלחה לע אצמנה גרובה תא רתאל שי .1
.ומוקמב ותוא וקיזחהו גרובה ךותב לוקה עורז שאר תא וחינה .2
.אלמ קודיה גרובה תא קדהל ידכ (הנימי) ןועשה ןוויכב קודיהה ילכ תא ובבוס .4
.Oculus Rift לש םירזיבאה תספוקב לולכה רוחש ןטק ילכ אוה קודיהה ילכ ׃הרעה*
.הטמלו הלעמל הזזה ידי לע םיאתהל ןתינ .1
.ןהלש ריצה לע תוינזואה תזזה ידי לע ומיאתה .2
.הלאמשו הנימי תוינזואה תזזה ידי לע םיאתהל ןתינ .3
.גרובה תא ררחשל ידכ (הלאמש) ןועשה ןוויכ דגנ קודיהה ילכ תא ובבוס .2
.لإ ﻲﺟ ﺔﻛﴍ ﻦﻣ OR300 نذﻷا ﺔﻋﺳ ﺖﻴﺒﺜﺗ ﰲ مﺪﺨﺘﺴﳌا ﺲﺒﺤﳌا ﻞﺧاد ﻲﻏﱪﻟا ﻊﻗﻮﻣ دﺪﺣ .1
.ﻪﻄﺑر مﺎﻜﺣإ ﻰﺘﺣ ﻲﻏﱪﻟا ﻂﺑﺮﻟ (ﻤﻴﻟا ﱃإ) ﺔﻋﺎﺴﻟا برﺎﻘﻋ هﺎﺠﺗﺎﺑ تﻮﺼﻟا ةادأ ردأ .4
."Oculus Ri" زﺎﻬﺟ تﺎﻘﺤﻠﻣ قوﺪﻨﺻ ﰲ ﺔﻘﻓﺮﻣ نﻮﻠﻟا ءادﻮﺳ ةﻐﺻ ةادأ ﻲﻫ تﻮﺼﻟا ةادأ :ﺔﻈﺣﻼﻣ*
.ﻲﻏاﱪﻟا ﻚﻔﻟ (رﺎﺴﻴﻟا ﱃإ) ﺔﻋﺎﺴﻟا برﺎﻘﻋ هﺎﺠﺗا ﺲﻜﻋ ﰲ تﻮﺼﻟا ةادأ ردأ .2
לוקה עורז תא רבחל ידכ .A
OR300 JBL
.גרובה ץירחל *קודיהה ילכ תא וסינכה .3
.ילכה םוקמב חוטש גרבמב
.גרובה ץירחל *קודיהה ילכ תא וסינכה .1
םיאתהל דציכ .B
לוקה עורז תא ריסהל ידכ .C
تﻮﺼﻟا عارذ ﺖﻴﺒﺜﺘﻟ
.ﻪﺘﺒ
ﺛو ﻲﻏﱪﻟا ﰲ تﻮﺼﻟا عارذ سأر ﻊﺿ .2
.ﻲﻏﱪﻟا ﺔﺤﺘﻓ ﰲ *تﻮﺼﻟا ةادأ ﻞﺧدأ .3
.ﻚﻟذ ﻦﻣ ًﻻﺪﺑ سأﺮﻟا
.ﻞﻔﺳﻷو ﲆﻋﻷ ﺔﺣازﻹﺎﺑ ﻂﺒﺿا .1
.ﺎﻫروﺎﺤﻣ ﲆﻋ نذﻷا ﺔﻋﺳ ﻚﻳﺮﺤﺘﺑ ﻂﺒﺿا .2
.اًرﺎﺴﻳو ﺎًﻨﻴ
تﻮﺼﻟا عارذ ﺔﻟازﻹ .C
.ﻲﻏﱪﻟا ﺔﺤﺘﻓ ﰲ *تﻮﺼﻟا ةادأ ﻞﺧدأ .1
HE
הנקתה
AR
ﺐﻴﻛﱰﻟا
ﻂﺒﻀﻟا ﺔﻴﻔﻴﻛ .B
ﻚﻳﺮﺤﺘﻟﺎﺑ ﻂﺒﺿا .3
Page 15

OR300
EN
• Driver:40mm dynamic driver
• Impedance:32Ω
• Sensitivity:99dbSPL @1k Hz 1mW
• Frequency response:10-20kHz
ES
• Unidad: unidad dinámica de 40mm
• Impedancia: 32Ω
• Sensibilidad: 99dBSPL a 1kHz 1mW
• Intervalo de frecuencias: 10-20kHz
IT
• Driver: driver dinamico da 40mm
• Impedenza: 32Ω
• Sensibilità: 99dbSPL @1k Hz 1mW
• Risposta in frequenza: 10-20kHz
NO
• Driver: 40mm dynamisk driver
• Impedans: 32Ω
• Følsomhet: 99 dBSPL/V @1kHz 1mW
• Frekvensrespons: 10 – 20kHz
SV
• Element :40 mm dynamiskt element
• Impedans: 32Ω
• Känslighet: 99 dBSPL/V @1kHz 1mW
• Frekvensåtergivning: 10 Hz–20 kHz
FR
• Haut-parleur : haut-parleur dynamique de 40mm
• Impédance: 32Ω
• Sensibilité : 99 dB SPL à 1 kHz, 1 mW
• Réponse en fréquence: 10-20kHz
DE
• Treiber: 40 mm dynamischer Treiber
• Impedanz:32Ω
• Empfindlichkeit: 99 dBSPL bei 1 kHz 1 mW
• Frequenzgang: 10-20 kHz
NL
• Driver: 40mm dynamische driver
• Impedantie:32Ω
• Gevoeligheid:99 dBSPL bij 1 kHz 1mW
• Frequentiebereik: 10Hz – 20kHz
FI
• Elementti: 40mm dynaaminen elementti
• Impedanssi: 32Ω
• Herkkyys: 99 dB SPL @ 1 kHz 1mW
• Taajuusvaste: 10 Hz–20 kHz
DA
• Enhed: 40mm Dynamisk enhed
• Impedans:32 Ω
• Følsomhed:99 dB SPL/V ved 1 kHz 1mW
• FREKVENSOMRÅDE: 10 Hz - 20 kHz
PL
•Głośnik: 40mm Głośnik dynamiczny
• Impedancja: 32Ω
• Czułość: 99 dB SPL/V przy 1 kHz 1mW
• PASMO PRZENOSZENIA: 10Hz – 20KHz
HU
• Meghajtó: 40 mm-es dinamikus meghajtó
• Impedancia: 32 Ω
• Érzékenység: 99 dbSPL 1 kHz és 1 mW mellett
• Frekvenciaátvitel: 10–20 kHz
Page 16

OR300
RU
• Динамик: 40 мм
• Импеданс: 32Ω
• Чувствительность: 99 дБ SPL/V при 1 кГц 1mW
• Эффективный рабочий диапазон частот: 10 Гц-20 кГц
ID
• Penggerak: 40mm Penggerak dinamis
• Impedansi: 32Ω
• Sensitivitas: 99dbSPL @1k Hz 1mW
• Respons Frekuensi: 10Hz – 20kHz
KO
• 드라이버: 40mm 다이내믹 드라이버
• 임피던스: 32Ω
• 민감도: 99dbSPL @1k Hz 1mW
• 주파수 응답성: 10~20kHz
CHT
• 驅動單體:40mm 動圈式揚聲器
• 阻 抗:3 2 Ω
• 靈敏度:99dbSPL @1k Hz 1mW
• 頻率響應:10-20kHz
ﻢﻣ 40 ﻴﻣﺎﻨﻳد كﺮﺤﻣ:كﺮﺤﳌا
1mW ﺰﺗﺮﻫﻮﻠﻴﻛ1 ﺪﻨﻋ ﻂﻟﻮﻓ/تﻮﺼﻟا ﻂﻐﺿ ىﻮﺘﺴﻣ ﻞﺒﻴﺴﻳد99 :ﺔﻴﺳﺎﺴﺤﻟا
ﺰﺗﺮﻫﻮﻠﻴﻛ20 – ﺰﺗﺮﻫ10 :ﺔﻳددﱰﻟا ﺔﺑﺎﺠﺘﺳﻻا
AR
موأ 32 :ﺔﻴﺋﺎﺑﺮﻬﻜﻟاﺔﻗوﺎﻌﳌا
PT
• Driver: Driver dinâmico de 40 mm
• Impedância: 32Ω
• Sensibilidade99dBSPLa1kHze1mW
• Resposta de frequência: 10 Hz a 20 kHz
JP
• ドライバー:40mmダイナミックドライバー
• インピー ダンス:3 2 Ω
• 感度: 99dbSPL @1k Hz 1mW
• 周波数特性:10Hz~20KHz
CHS
• 驱动单元:40mm 动圈单元
• 阻抗:32Ω
• 灵敏度:99dbSPL @1k Hz 1mW
• 频率响应:10-20kHz
99DB SPL/V@1kHz 1mW :תושיגר
•
•
•
•
מ"מ 40ימניד רביירד:רביירד
Ω 32 :הבכע
10Hz – 20kHz :רדת תבוגת
HE
•
•
•
•
Page 17

OR300
Торговаямарка : JBL
Назначение товара : Пользовательские наушники
Изготовитель : Харман Интернешнл Индастриз Инкорпорейтед, США, 06901
Страна происхождения: Китай
Импортер в Россию : OOO“ХАРМАН РУС СиАйЭс“, Россия, 127018, г.Москва, ул.
Гарантийныйпериод : 1 год
Информация о
сервисных центрах : www.harman.com/ru тел. +7-800-700-0467
Срок службы : 2 года
Дата производства : Дата изготовления устройства определяется по двум буквенным
Коннектикут, г.Стэмфорд, Атлантик Стрит400, офис 1500
Двинцев, д.12, к 1
Товарне подлежит об язательнойсертификации
обозначениям из второй группы символов серийного номера
изделия, следующих после разделительного знака «-». Кодировка
соответствует порядку букв латинского алфавита, начиная с января
2010 года: 000000-MY0000000, где «M» - месяц производства
(А - январь, B - февраль, C - март и т.д.) и «Y»- год производства
(A - 2010, B - 2011, C - 2012 и т.д.).
TR03751_D
Page 18

Page 19

Page 20

 Loading...