

Page 1

TM
™
thankyoufor choosing JBL. For over 50 years, JBL
has been involved in every aspect of musical and film recording
and reproduction, from live performances to monitoring the
recordings you play in your home, car, or office.
We’re confident that the
JBL systemyou have chosen will
provide every note of enjoyment that you expected – and that
when you think about purchasing additional audio equipment for
your home, car, or office, you will once again choose JBL.
JBL Consumer Products
ESC300
(
230V
)
simple
set-up guide
Page 2
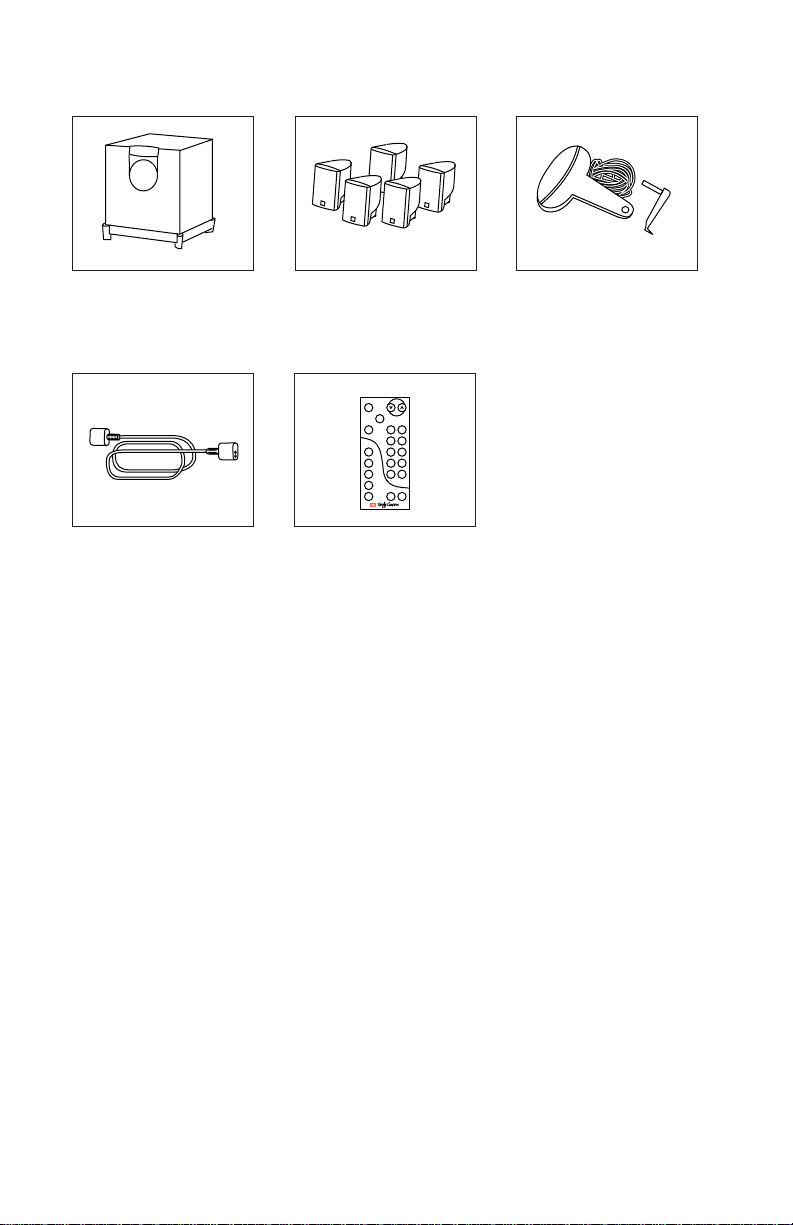
Five satellites for left, right,
center and surrounds.
“Smart”powered
subwoofer/controller.
included
JBL “error free” speaker
cables. Extension cable XC300
available in 10-ft. length in
either white or black.
• Dolby* Pro Logic* processor
with additional Phantom,
Simulated, 3-Stereo, and Stereo
Surround modes.
• Six channels of amplification for
all speakers and subwoofer.
• Five identical, 2-way
micro-satellites with titanium
tweeters.
• Full-function remote control.
• Remote sensor with
connection wire for easy
placement.
features
Foot for horizontal placement of
center speaker. Versatile remote
sensor, and double-sided tape
provided.
Remote control.
TM
TREBLE
BASS
INPUT
CENTER
SURROUND
BALANCE
TEST
MUTE
0dB
Video Aux
Pro
Logic
Music
Simulated
3 Stereo
Stereo
SURROUND
MODES
–
+
–
+
L
R
–
+
–
+
VOLUME
Page 3
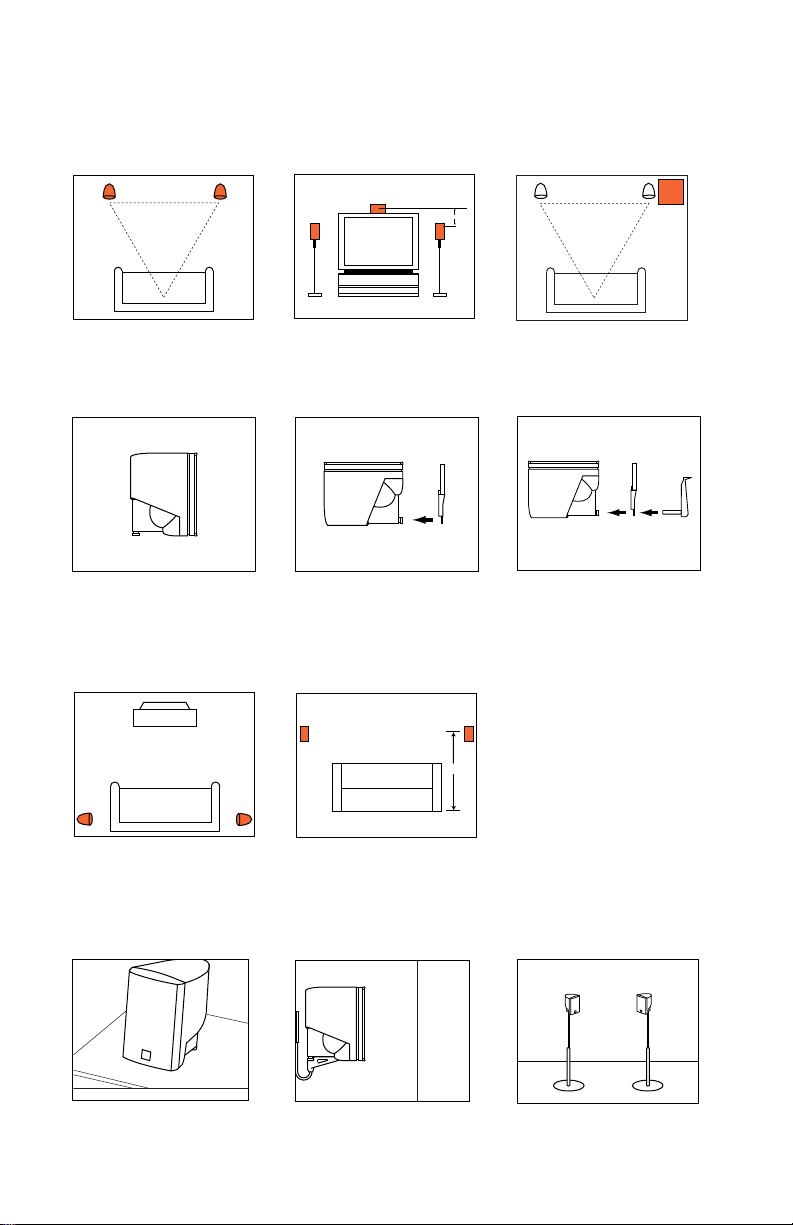
On shelves. On the wall. Optional bracket.
WB300 or WB300WHT (white).
Mounting Options
On optional stands. FS300 or
FS300WHT (white).
Subwoofer
Surround Speakers
5
– 6 ft.
Satellites and Surrounds
one.Speaker Placement
Satellites
0-2 ft.
Mounting Remote Sensor to Center Speaker.
If desired, the remote sensor may be placed anywhere using the supplied double-sided tape.
Place remote sensor at bottom
of center speaker.
Insert support leg through
remote sensor and into
speaker.
Center speaker.
Page 4

two.Speaker Connections (rear panel of subwoofer)
Speaker and Amplifier Connection
Left Front
TV or VCR
Audio Output
Right Left
Center
Right Front
Remote Sensor
TM
SUB300
INPUTS
AUX
VIDEO
OUTPUTS
Right Surround
Left Surround
FRONT
SPEAKERS
SURROUND
SPEAKERS
RIGHT
CENTER
LEFT
RIGHT
LEFT
WARNING
RISK OF ELECTRIC SHOCK
DO NOT OPEN
AC POWER
ON / STANDBY
OFF
AC
230V
˜
50Hz
REMOTE SENSOR
INPUT
RIGHT LEFT
AVISI RISQUE DE CHOC ELECTRIQUE NE PAS OUVRIR
CAUTION: REPLACE WITH
SAME TYPE FUSE.
ATTENTION: UTILISER UN
FUSIBLE DE RECHANGE
DE MÊME TYPE.
For use with
ESC300 System
JBL, Incorporated, Northridge, CA A Harman International Company
Manufactured under license from Dolby Laboratories Licensing
Corporation. “Dolby,” “Pro Logic” and the double-D symbol are
trademarks of Dolby Laboratories Licensing Corporation.
Additional Audio Source
Audio Output
Right Left
Page 5

three.Operation
1. Mute
From either the front panel
or the remote control, press
(Mute) to lower the volume
completely. The mute symbol
indicator (27) will begin to flash.
When you press either
of the mute buttons again, the
volume will return to its previous
setting. Note: The mute function
can also be turned
off by pressing either of the
volume buttons on the front
panel or the remote control.
2. 0dB
Press this button to reset the
Center, Surround, Balance,
Treble, and Bass controls to
their default positions.
3. Test
Press this button to activate
the Test Tone mode (see “Test
Tone” section).
4. Volume
Press ( ) on the remote
control or the front panel
to raise the system’s volume.
Press ( ) on the remote
control or the front panel to
lower the system’s volume.
5. Center
Press (+) on the remote control
to increase the relative volume
of the center channel. Press (–)
on the remote control to
decrease the relative volume of
the center channel.
Master On/Off Switch
To operate unit, place this switch in the On/Standby
position. The system will go into standby when no
signal has been received for approximately five
minutes.
TM
TREBLE
BASS
INPUT
CENTER
SURROUND
BALANCE
TEST
MUTE
0dB
Video Aux
Pro
Logic
Phantom
Simulated
3 Stereo
Stereo
SURROUND
MODES
–
+
–
+
L
R
–
+
–
+
VOLUME
1
2
3
10
11
12
13
14 15
16
8
9
7
6
5
4
Remote Control
Rear Panel Control
AC
230V
˜
50Hz
<
<
Remote Control Battery Installation.
Push small tab towards
battery slot and pull battery
drawer out.
Remove old battery. Insert new battery with “+” side
up, and slide battery
drawer back into remote.
+
+
+
Page 6

17–18. Input
Either Video or Aux will
illuminate, depending on which
input is chosen.
19–23. Surround
One of these will illuminate,
depending on which surround
mode is chosen.
24. Status Bar Indicators
These LEDs show the relative
setting of volume, balance,
center level, surround level,
bass and treble controls
(see “Status Bar Indicators”
section).
25. On
This will illuminate when
the Master On/Off is switched
to On/Standby and a signal
is present.
26. Standby
This will illuminate when the
Master On/Off is switched to
On/Standby and a signal is not
present.
27. Mute Symbol
This will flash whenever the
Mute feature is engaged.
INPUT SURROUND MODE VOLUME MUTE
AUX
VIDEO
Pro Logic
Phantom
Simulated
3 Stereo
Stereo
ON
STANDBY
15/16 1
25
27
26
10
4
2423222120 191817
Front Panel Indicators
6. Surround
Press (+) on the remote control
to increase the relative volume
of the surround channels. Press
(–) on the remote control to
decrease the relative volume of
the surround channels.
7. Balance
Press (R) on the remote control
to decrease the volume
of the left channel. Press (L) on
the remote control to decrease
the volume of the right
channel.
8. Treble
Press (+) to increase the level of
high-frequency information.
Press (–) to decrease the level
of high-frequency information.
9. Bass
Press (+) to increase the level
of low-frequency information.
Press (–) to decrease the level
of low-frequency information.
10–14. Surround Modes
From the remote, press one
of these buttons to directly
choose the desired surround
mode (see “Surround Modes”
section). From the front panel,
press (Surround Mode) to cycle
between the surround modes.
15–16. Input Selector
From the remote, press either
(Aux) or (Video) to select the
desired input. From the front
panel, press (Input) to select
the desired input.
Page 7

LED Bar Indicators illuminate in
response to adjustments in
volume, balance, center level,
surround level, bass, and
treble controls.
Status Bar Indicators
Increase Decrease
Volume
0dB
0dB
Increase Decrease
Bass, Treble, Center Level, and Surround Level
0dB
0dB
Left Right
Balance
Page 8

Dolby Pro Logic
Use this mode for films
recorded using Dolby Pro Logic
Surround. The surround
channels have a 20-ms delay.
Phantom
This mode creates surround
sound from stereo recordings.
The center channel is not used
and the surround channels
have a 20-ms delay.
Simulated
This mode provides surround
sound with no delay for the
surround speakers. This is not a
Dolby mode.
3-Stereo Mode
Use this mode to play back Pro
Logic-encoded films when you
do not want the surround
channels to play.
Stereo
This mode plays a recording in
traditional two-channel stereo.
Surround Modes
The test tone is used to
calibrate the volume settings of
the speakers. A static noise will
be heard cycling, in order, from
the front left, center, right, and
both surround speakers.
Using the remote control,
adjust the Center and Surround
levels until the volume of all
the speakers is the same during
the test.
Note: The test tone is used to
calibrate the performance of
the system. When listening to
an actual recording, the volume
level of the surround channels
is generally much lower than
that of the front channels. In
fact, when listening to a movie,
virtually all of the dialogue and
a substantial amount of the
effects are reproduced through
the center channel.
Test Tone
Page 9

If there is no sound from any
of the speakers, check the
following:
• Make sure the subwoofer is
plugged into an active AC wall
outlet.
• Make sure the Master Power
Switch, located on the rear of
the subwoofer, is in the
“On/Standby” position.
• Make sure there is a
source – for example, a VCR or
television hooked up to the
video or auxiliary input jacks.
• Make sure that the program
material is playing.
• Recheck the hookup
connections in the “Speaker
Connections” section.
If there is no sound from the
surround speakers or
it is very low, check the
following:
• Check all connections
between processor/amplifier
and each of the speakers.
• Raise the surround volume
from the remote control (see
“Operation” section).
• Make sure the TV show or
movie you are watching is
recorded in Dolby Surround.
If it is not, try the Phantom or
Simulated surround mode.
If there is no sound from the
center speaker, check the
following:
• Make sure that the processor
is in the Pro Logic,
3 Stereo, or Simulated mode. If
it is in Phantom or Stereo
mode, the center speaker
will not play.
• Check the connections
between the subwoofer and the
center speaker.
If you have low bass output,
check the following:
• Experiment with placement
of the subwoofer. Remember,
place the subwoofer in a
corner to get maximum bass
output from the system.
• Increase the level of bass,
using the remote control.
Troubleshooting
Specifications
ESC300 System
Amplifier
200 watts total
system output;
front channels:
35 watts x 3 @ .1% THD;
surround channels:
15 watts x 2 @ .1% THD;
subwoofer:
65 watts x 1 @ 1% THD
Signal-to-Noise Ratio
90dB
Input Impedance
20k ohms
Input Sensitivity
400mV
Auto Turn-on Sensitivity
2mV/channel
System Frequency
Response (–6dB)
35Hz – 20kHz
Subwoofer
Dimensions (HxWxD)
15-1/8 x 13 x 14-1/2 inches
384 x 330 x 368mm
Weight
34.5 lbs/15.7 kg
Satellites (each)
Dimensions (HxWxD)
4-3/8 x 3-3/16 x 3-3/4 inche
s
111 x 81 x 95mm
Weight
.8 lbs/.4 kg
Occasional refinements may be
made to existing products
without notice, but will always
meet or exceed original
specifications unless otherwise
stated.
Page 10

JBL Consumer Products
80 Crossways Park West, Woodbury, NY 11797
8500 Balboa Boulevard, Northridge, CA 91329
1-800-336-4JBL (4525) (USA only)
http://www.jbl.com
©
1996 JBL, Incorporated. JBL and Simply Cinema are
registered trademarks of JBL, Incorporated.
*Trademarks of Dolby Laboratories.
Printed in 3/97 Part No. ESC300/230 OM
C
E
L
E
B
R
A
T
I
N
G
5
0
Y
E
A
R
S
A Harman International Company
Declaration of Conformity
We, JBL Europe A/S
Kongevejen 194B
DK-3460 Birkerød
DENMARK
declare in own responsibility, that the products described
in this owner's manual are in compliance with technical
standards:
EN 55 013/6.1990
EN 55 020/6.1988
EN 55 022/6.1993
EN 60 065/1994
EN 60 555-2-3/1987/88
Steen Michaelsen
JBL Europe A/S
Birkerød. DENMARK. 1/97
 Loading...