

Page 1
Automatic Solder Feeder
Ref. SF-110VB/SF-210VB
www.jbctools.com
Page 2
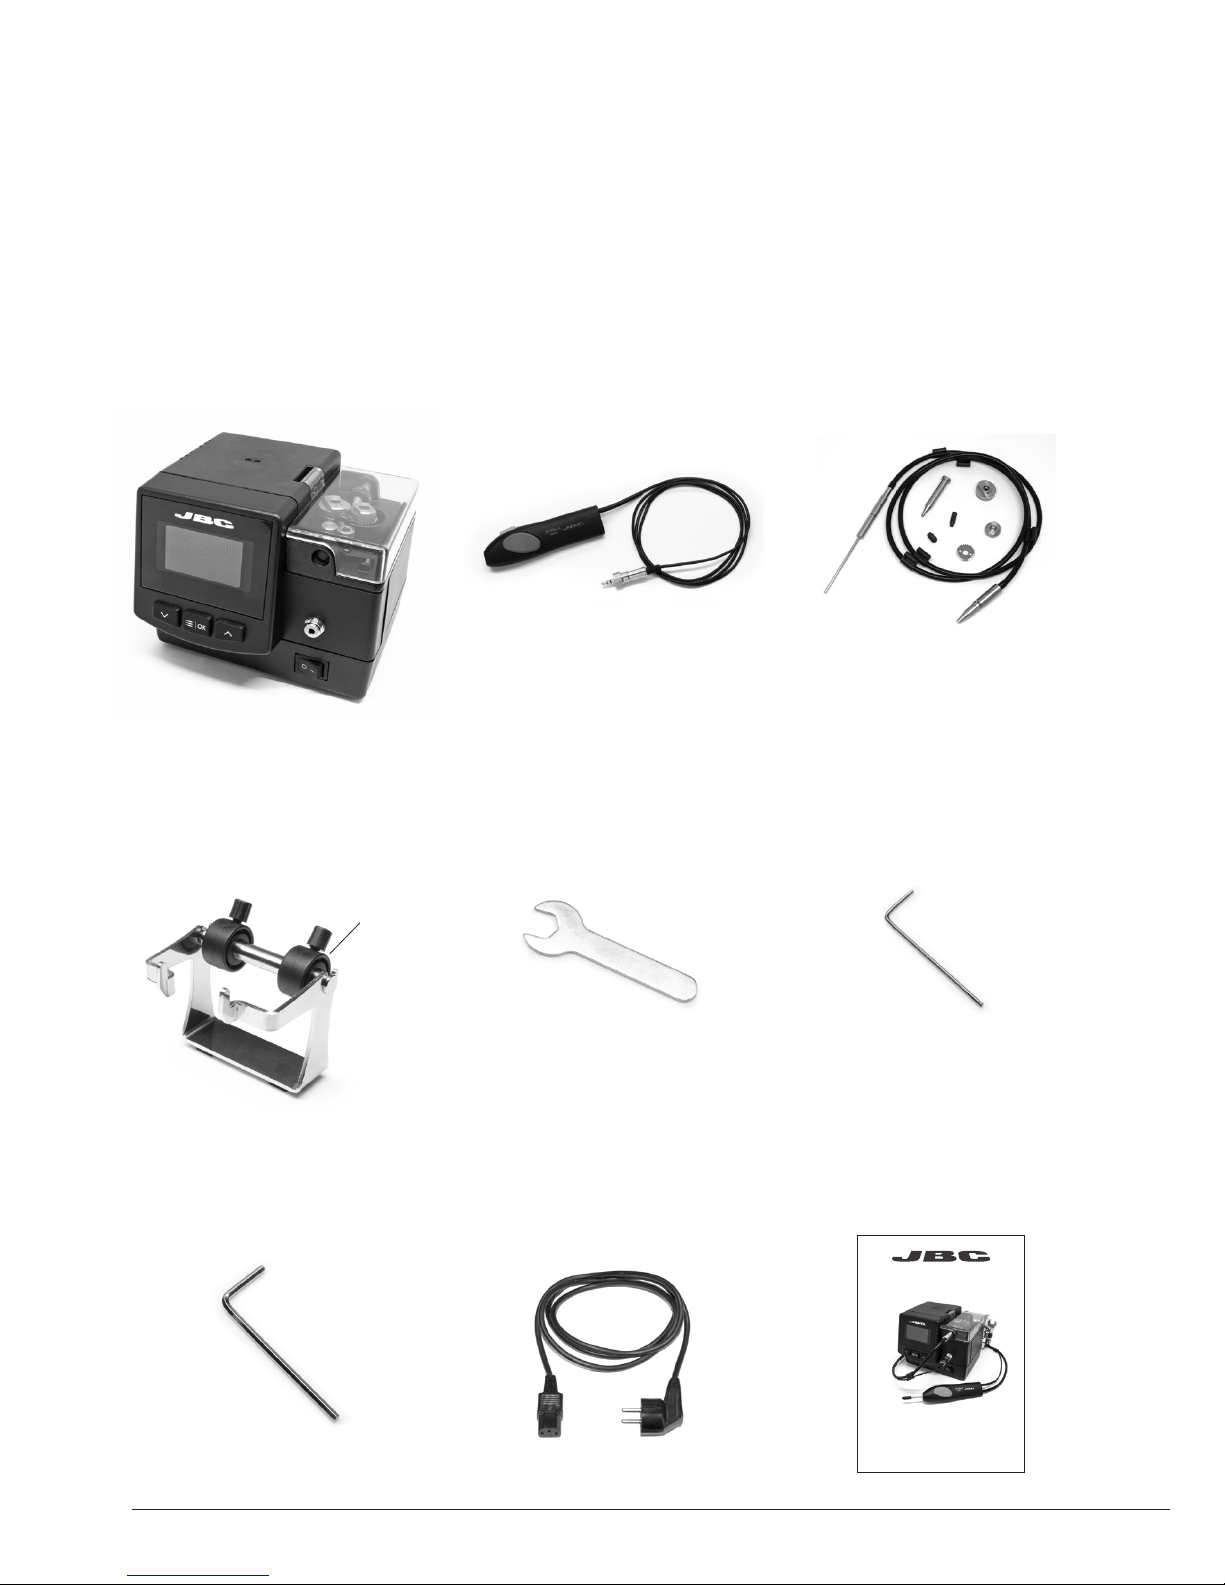
Packing List
The following items should be included:
Manual ............................... 1 unit
Ref. 001633
Allen key Ø 1,5 ................ 1 unit
Ref. 0741610
SF Control Unit ............. 1 unit
Ref. SF-1B (100-120V)
SF-2B (230V)
Allen key Ø 2,5 ................ 1 unit
Ref. 0012574
Reel support ................ 1 unit
Ref. 0019301(x1)
0018033 (x1)
0003412 (x2)
Power cable .................... 1 unit
Ref. 0009417 (100V/120V)
0009401 (230V)
Spanner ............................ 1 unit
Ref. 0017631
Guide Set ........................ 1 unit
Ref. GSF10V-B
Automatic Solder Feeder
Ref. SF-B
lock rings
Solder Feed
Handle .............................. 1 unit
Ref. SF280-A
2
www.jbctools.com
Page 3
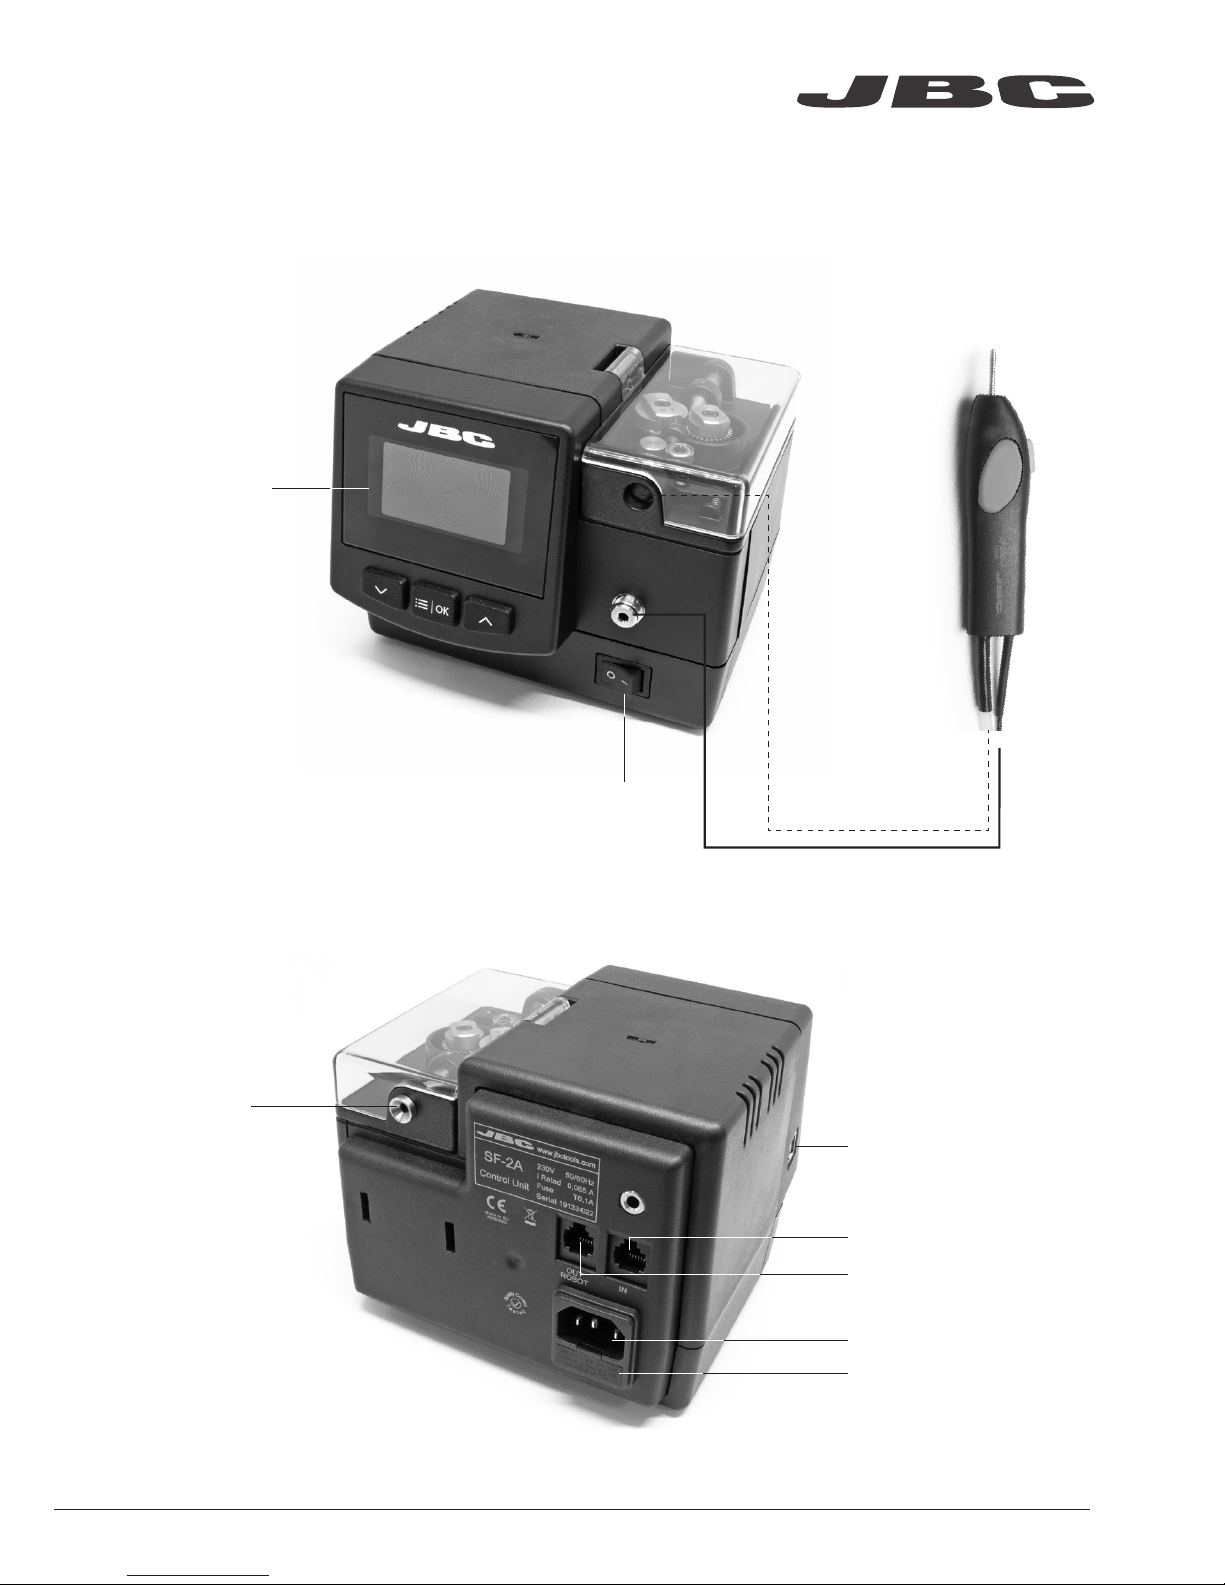
Power Socket
Fuse
RJ12 connection
for Robot System
RJ12 connection for Station
USB-B connector
Tin wire inlet
Features
Solder
Feed Handle
Ref. SF280-A
Control Unit
Main Switch
Control Screen
www.jbctools.com
3
Page 4
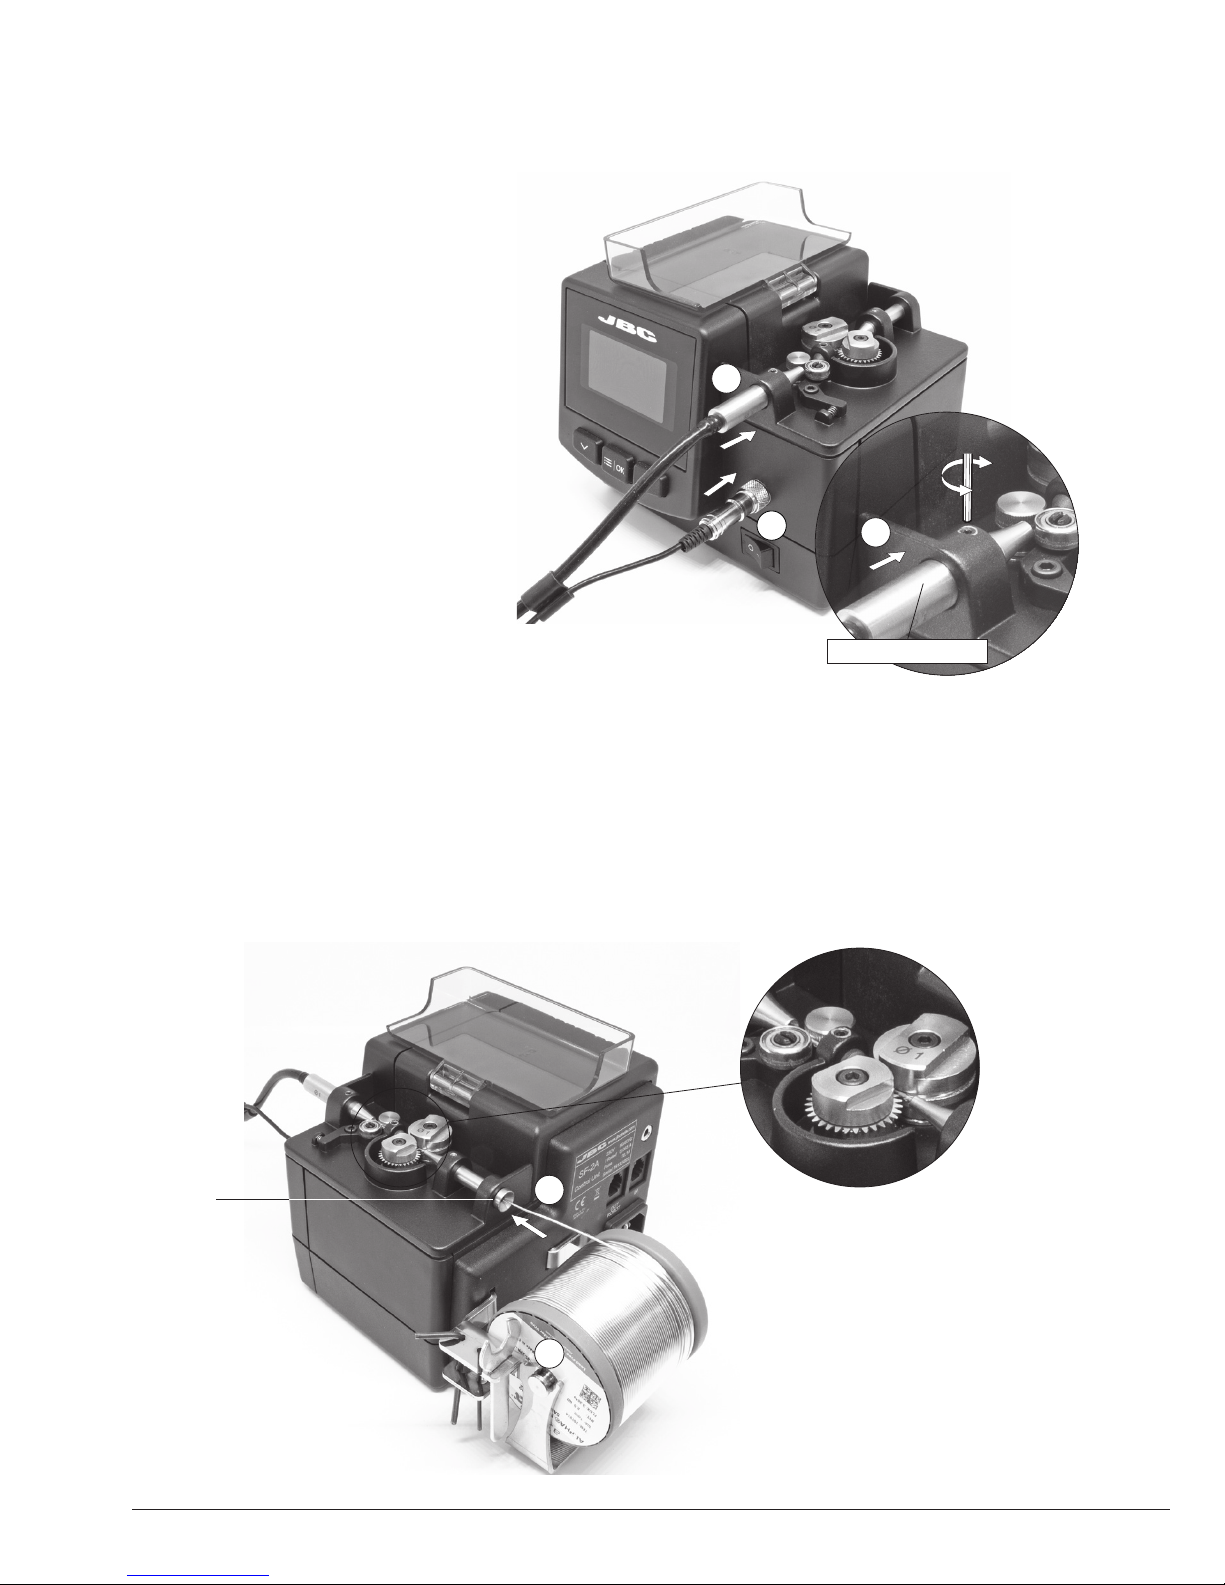
Tool assembly
Connect the tool to the control unit.
1. Push the guide tube to the end
and tighten the screw.
2. Connect the jack.
Load the solder wire
1. Put the reel into its support.
2. Feed the wire into the input nozzle (2) until it reaches the wheels.
1
1
2
Input
nozzle
1
2
3. Use the Tin Reload Process
in Main Menu by pressing
the tool button.
4. Make sure the wire passes
through the nozzle.
inser t to the end
4
Page 5

Changing the wheels and the blade
1. Use the a llen key and the spanner to loosen
the screws.
2. Replace the guide wheel and the blade for
the new ones.
Guide
wheel
Blade
clamp
Blade
For this operation, disconnect the unit.
* Handle with care to avoid any cuts with the
blade because it is sharp.
2. You can easily adjust the length of the tube by opening the tube clamp.
Replacing the guide tube
1. Open the guide clamp, take off the guide tube and insert the new one.
For this operation, disconnect the tool from the control unit.
www.jbctools.com
5
Page 6

Back
Setting Program 35
Continuous Mode Discontinuous Mode Program 35
Speed
Length
Length
STEP1 STEP2
Speed
Speed
Supplied: 2.0mm 0:05
40% 40%
mm/s mm
mm
mm/s
mm/s
40.0
1.5
1.5
20.0
20.0
STEP3
Length Speed
mm mm/s
5.0
20.0
STEP 1
STEP 2
STEP 3
Back
Edit Program
mm
mm/s
STEP 1 STEP 2 STEP 3
35
5.0 3.0 1.5
20.0 24.5 20.0
FACTORY 1
1 Program 35
FACTORY 1
2 Program 22
LAB 2
3 Program 35
FACTORY 1
Program Concatenation
Back
Work Screen
Control Process
Choose between continuous, discontinuous and program mode:
Program mode
With the SF you can define up to 35 dynamic programs. In each one you can configure up to 3
steps with different lenght wire and dispensing speed.
Execute them sequentially and cyclically with the ‘Edit Concatenation List’ option.
6
Page 7

Main Menu
5 Tin Reload Process
6 Counters
7 Software Version
1 Reset settings
2
Station settings
3
Tool settings
4 Programs Settings
Exit
1 Length units*
mm
2
Beep Off
3 PIN On
4 Change PIN
1 Mode
Discontinuous
2
Backward Off
Tool Settings
Station Settings
Back
Back
1 Edit Program
2
Delete Program
3
Edit Concatenation List
Program Settings
Ba
ckward Forward
Reload Process
1 Plugged hours
7605
2
Working hours 350
3 Supplied mm 560
4 Work Cycles 75830
Counters
Back
5 Reset partial counters
Press Enter to toggle*
Press enter when finished
Back
5 Station Locket
Off
6
Robot Mode Off
Screen Menu
Original PIN: 0105
Control Process
*switch total and partial
counters
*switch mm and inches
www.jbctools.com
7
Page 8

Solder Wire Ø (mm) With Solder Wire Perforation Solder Wire Ø (mm) Without Solder Wire Perforation
- - 0.5-0.6 GSF05D-B
0.8 GSF08V-B 0.7-0.8 GSF08D-B
1.0 GSF10V-B 0.9 -1.0 GSF10D-B
1.5 GS F15V-B 1. 2-1. 5 GSF15D-B
Accesories
Solder Feed Handle Stand
Ref. SF-SE
It prevents the SF280-A Solder Feed Handle
from rolling away while working.
Different guide sets are available depending on the solder wire used:
8
Page 9

Before carrying out maintenance, always allow
the equipment to cool down.
- Clean the station screen with a glass cleaner
or a damp cloth.
- Use a damp cloth to clean the casing and the
tool. Alcohol can only be used to clean the
metal parts.
- Periodically check all cables and tubes.
Clean periodically
Maintenance
1. Pull off the fuse holder and remove the
fuse. If necessary use a tool to lever it off.
2. Insert the new fuse into the fuse holder
and return it to the station.
- Replace a blown fuse as follows:
- Replace any defective or damaged parts. Use original JBC spare parts only.
- Repairs should only be performed by a JBC authorized technical service.
www.jbctools.com
9
Page 10

- Do not use the units for any purpose other than soldering or rework. Incorrect use may cause fire.
- The power cord must be plugged into approved bases. Make sure that it is properly grounded
before use. When unplugging it, hold the plug, not the wire.
- Do not work on electrically live parts.
- The tool should be placed in the stand when not in use.
Handle with care, including when adjusting the stand position.
- Do not leave the appliance unattended when it is on.
- Do not cover the ventilation grills. Heat can cause inflamable products to ignite.
- Avoid the contact of flux with skin or eyes to prevent irritation.
- Be careful with the fumes produced while soldering.
- Keep your workplace clean and tidy. Wear appropriate protection glasses and gloves when
working to avoid personal harm.
- Utmost care must be taken with liquid tin waste which can cause burns.
- This appliance can be used by children over the age of eight as well as persons with reduced
physical, sensory or mental capabilities or lacking experience provided that they have been given
adequate supervision or instruction concerning use of the appliance and understand the hazards
involved. Children must not play with the appliance.
- Maintenance must not be carried out by children unless supervised.
Safety
It is imperative to follow safety guidelines to prevent electric
shock, injury, fire or explosion.
10
Page 11

产品中有害物质的名称及含量
有害物质含量表
部件名称
有害物质
铅(Pb) 汞(Hg) 镉(Cd)
六价铬
(Cr(VI))
多溴联苯
(PBB)
多溴二苯醚
(PBDE)
烙铁头 O O O O O O
手柄 O O O O O O
电源线 O O O O O O
主机 O O O O O O
电源插座 O O O O O O
保险丝 O O O O O O
主开关 O O O O O O
电位连接 X O O O O O
变压器 O O O O O O
线路板 X O O O O O
O 表示该有害物质在该部件所有均质材料中的含量均在GB/T 26572 规定的限量要求以下。
X 表示该有害物质至少在该部件的某一均质材料中的含量超出GB/T 26572 规定的限量要求。
www.jbctools.com
11
Page 12

Exploded View
12
Page 13

www.jbctools.com
13
Page 14

Notes
14
Page 15

www.jbctools.com
15
Page 16

0021633-0818-V02
Specifications
SF-110VB 100-120V 50/60Hz. Input fuse: 0.2A.
SF-210VB 230V 50/60Hz. Input fuse: 0.125A.
- Net Weight: 1,9 Kg (4.2 lb)
- Dimensions: 150 x 120 x 115 mm (5.9 x 4.8 x 4.6 in)
- Spool capacity up to 1 kg (2.2 Ib)
- Solder diameter Ø0,5-1,5 mm (Ø0.02-0.059 in)
- Max. Wire lenght 250 mm (9.84 in)
- Max. Forward speed 120 mm/s (4.72 in/s)
- Max. Reverse speed 120 mm/s (4.72 in/s)
- Ambient operating temp: 10 - 40 ºC (50 - 104 ºF)
- USB connector station-PC
- Robot connector
Complies with CE standards.
ESD protected.
This product should not be thrown in the garbage.
In accordance with the European directive 2002/96/EC, electronic equipment at the end of their life
must be collected and returned to an authorized recycling facility.
Manual in other languages available on our website
www.jbctools.com
Warranty
JBC’s two-year warranty covers this equipment
against all manufacturing defects, including the
replacement of defective parts and labour.
Warranty does not cover product wear or misuse.
In case of any manufacturing defect, the equipment
must be returned, postage paid, to the dealer where
it was purchased. Please, register your product
within 30 days of purchase in www.jbctools.com/
productregistration.
 Loading...