

Page 1
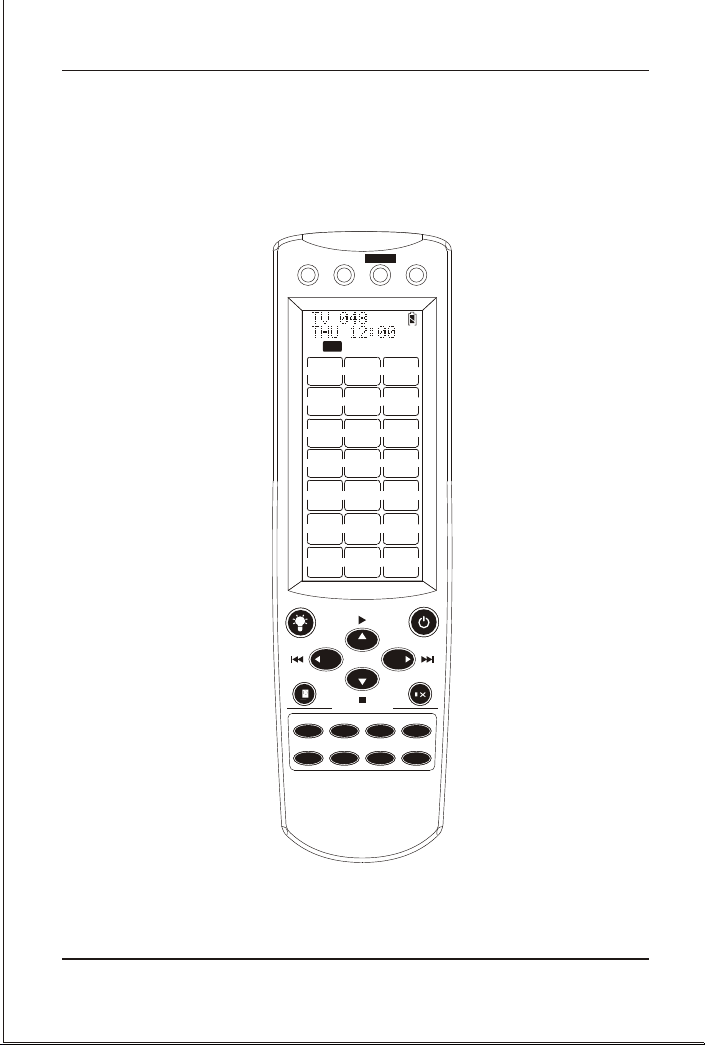
User Manual
DEVICE LEARN SET
PA GE 1
MACRO
1
2
5
7
8
+10
ANT/CA TV
PIP
MTS
DATE
TV
CD TAPE
ENTER
0
TV/VIDEO
ZOOM
SW AP
FREEZE
JUMP
TIME/DISP
CH
VOLVOL
CH
T OUCH SCREEN
VCR DVB DVD
TUNER
AM
3
64
9
AUX
Learning Remote Control
Page 2

Contents
Introduction
Device Code Assignment
Key Functions
Battery Installation
Device Edit
Adding a device
Deleting a device
Device Set-up
Direct Set-Up by Brand and Code
Set-Up by Auto Search
Set-Up by Enter code
Learning
Learning a Command
Deleting learnt a key
Deleting all learnt Command for a device
Deleting learnt all
Changing T ouch Screen Layout
Macro Function
Setting up Macro
Operating the Macro
Deleting Macro
1
1
3
5
5
5
6
6
7
8
9
10
11
12
13
14
14
15
15
16
16
Other Set-up
A. Clock Set-up
B. Volume Lock
C. Device Lock
D. Back light
E. Contrast Adjust
F. LCD Delay
G. Beep
H. Clear All
17
17
18
19
20
21
21
22
23
Page 3

Introduction
Thank you for your purchasing Learning Digital Touch Screen Universal Remote
Control. You have selected a new designed
Control with latest concept and
easiest and fastest
LCD screen even if without the manual book later
way to set up directly by the brand name and code no. on its
technology. Based on our creative design, it has the
Digital Touch Screen Universal Remote
.
This digital touch screen universal remote control can work
Televisions (TV), DVD-players and DVR-players
Satellite receivers and Cable box
receivers (TAPE), CD-players (CD), Audio amplifiers and LD (TUNER), Tape.
and other Audio (AUX). You can control 8 devices and add 8 new devices.players
You can use Auto Search to scan the code library in case that you can not find
your device brand in the code list.
And it also can learn a new code from an original remote control to supplement the
codes in case of its shortage.
The touch screen universal remote control can operate all main functions of your
selected devices. It supports
original remote control.
Macro function makes several sequent operations with one button for
.
theater
Volume lock can fix VOL+/VOL- button to control Amplifier only for your home
theater
.
Device lock can fix the device against changing by a new set up until you unlock it.
(DVB), Video Recorders (VCR), Tuner receivers
TV TEXT and Menu
(DVD), DVB receivers and (digital)
function of your TV as your
with almost all brands of
your home
1
Page 4
All the set up data will be stored in
to worry about data loss when you replace battery
back up memory
permanently, you don'
.
need
This remote has also real
And It will show you when batteries become low.
Please enjoy the time with this new intelligent touch screen universal
remote control.
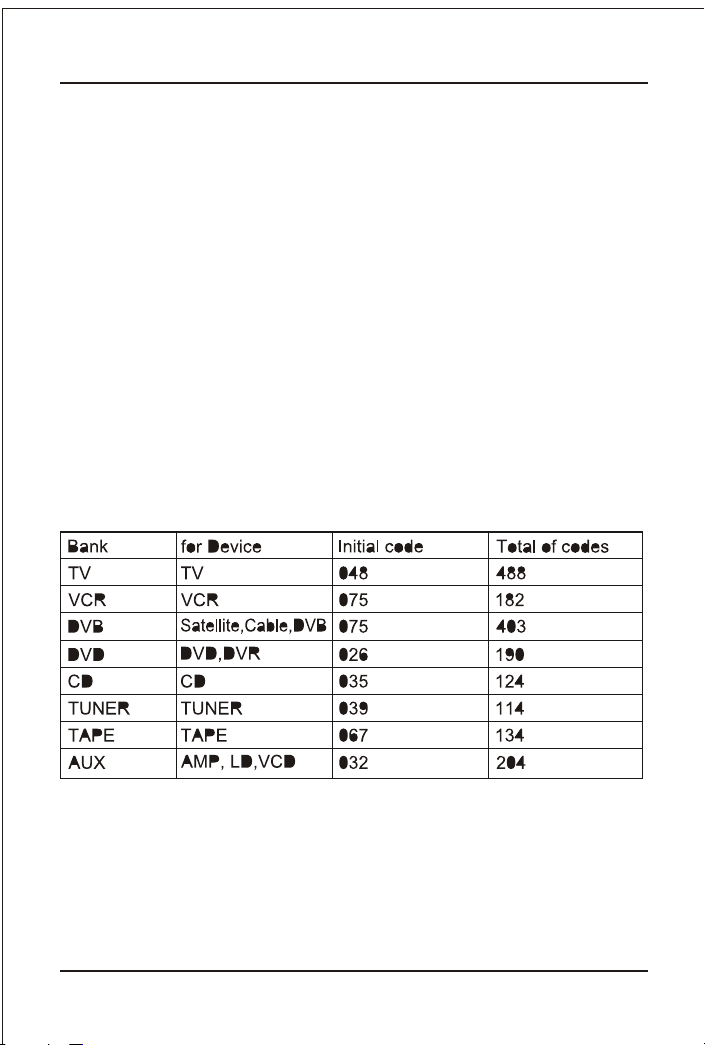
Device Code Assignment
Total codes: 1839
time clock to show you week , date, time and AM or PM.
2
Page 5

Key Functions
SET
Starting to set up (program) the remote control or
show you the status of the LCD screen.
LEARN
Setting up learning functions.
MACRO
Sequent operation for your home theater.
DEVICE
Making devices TV and TV1(VCR and VCR1,....)
PA GE
Switching between Page1 and Page2 of touch
screen buttons.If you hold down for 3 seconds,
you will see the date and year on LCD screen.
LIGHT
Controling the touch screen back light.
POWER
Turning the device on and off. Press the power
button to show all available LCD choice for all
buttons under LCD layout mode.
TV ,VCR,DVB,DVD,CD,T APE,TUNER,AUX
Selecting the device which you want to control.
CH
Working like the Channel Up and Down key on
your original remote control.
VOL and MUTE
Controling the volume, like the Volume Up and
Down and Mute key on your original remote
control.
0-9
The number keys operate the same function as
on your original remote
control.
3
Page 6

ENTER
Using after direct channel number entry to immediately change the
selected channel.
MENU
Works like the Menu (to adjust some features of your device) or OSD
(on-screen display) or Memory key on your original remote control.
REW Fast Reverse
PLAY (Operate your DVD or CD)
FFWD (Fast Forward)
REC (Record)
STOP (Terminate your operation)
PAUSE
(Terminate the operation for a moment and standby)
OK . EXIT Works like the UP . DOWN . LEFT ,
RIGHT . OK . EXIT Keys on your original remote control for
menu function. But during set up mode, they are used for
cursor, confirm and exit to program your remote control only.
T
elevision video
TV and text mixed
T
eletext mode
Page hold
R,G,Y , and B Red Green Yellow and Blue for TV Fast Text.
Note:
Before your setting up any functions, you must activate
this Remote on
first by touching the screen or pressing any key onthe remote control.
Battery Installation
This remote control needs 4 batteries to work with, please refer to the
marks inside the battery compartment and put four AAA batteries inside.
Alkaline batteries are recommended since the larger LCD screen consumes
more power than the common universal remote control.
direction
4
Page 7
Battery Installation
To install the batteries:
1. Turn the remote over, pull up on the tap and lift the cover off.
2. Insert the batteries matching the batteries to the (+) and (-) marks
battery case.
3. Slide the battery cover back into the place.
Note:
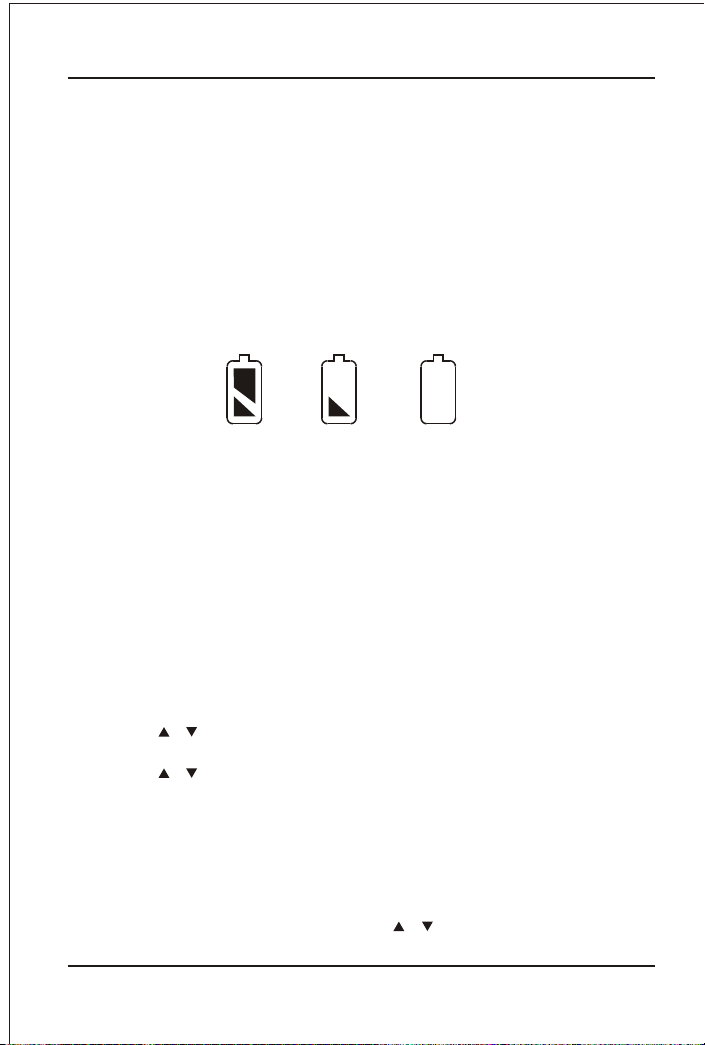
Whenever the batteries need replacement, the LCD remote will indicate with
battery low message. Please replace them with new batteries now. All settings
you have programmed into the new remote control will be stored in memory
even if you take out the batteries (but you may need to reset the clock).
inside the
Battery
full
Battery half
full
Battery
low
Device Edit
Adding a Device
If you want to operate the second TV (or second VCR, DVB, DVD, CD,
TAPE, TUNER etc.), you can add a new device. Please just operate the steps as
following:
1. Press the SET key on your remote control for more than 3 seconds, then
release it.
2. Press the or keys to select to Device on LCD menu, and press OK key
3. Press the or keys to select to Add New on the LCD menu, and press the OK
key, the LCD shows SelectDEV, then please press device key to select your
desired adding device (e.g. TV or DVD ...). If you add more than 8 new devices,
the LCD will shows Full.
4. Press OK key to save it and LCD shows Success!.
5. If you add other devices, please repeat steps 3~5. You can press device
key(e.g. TV) again to finish SET UP or use or to select other set-up.
.
5
Page 8

TV 048
SUN 11:59 AM
Select DEV
Add New
Delete
SET 3S OK OK
Device
SetupCode
TV OK 1S
Select DEV
TV1
Add New
Delete
Success!
Deleting a Device
1. Press the SET key on your remote control for more than 3 seconds,
it.
2. Press the or keys to select Device on LCD menu, and press OK key.
then release
3. Press the or keys to select Delete on the LCD menu, and press the OK key
, then you press device key to LCD shows DeleteDEV
select your desired delete device(e.g. TV,DVD... ). If no new added device, LCD
shows EMPT.
4. Press the OK key to save it and LCD shows Success!
5. If you delete other devices, please repeat steps 3~4. You can press
device key (e.g. TV) again to finish SET UP or use or to select other
set up.
TV 048
SUN 11:59AM
Add New
Delete
Success!
SET 3S OK
Device
SetupCode
DeleteDEV
1S
Add New
Delete
Add New
Delete
DeleteDEV
TV1
OR
OKTVOK
6
Page 9
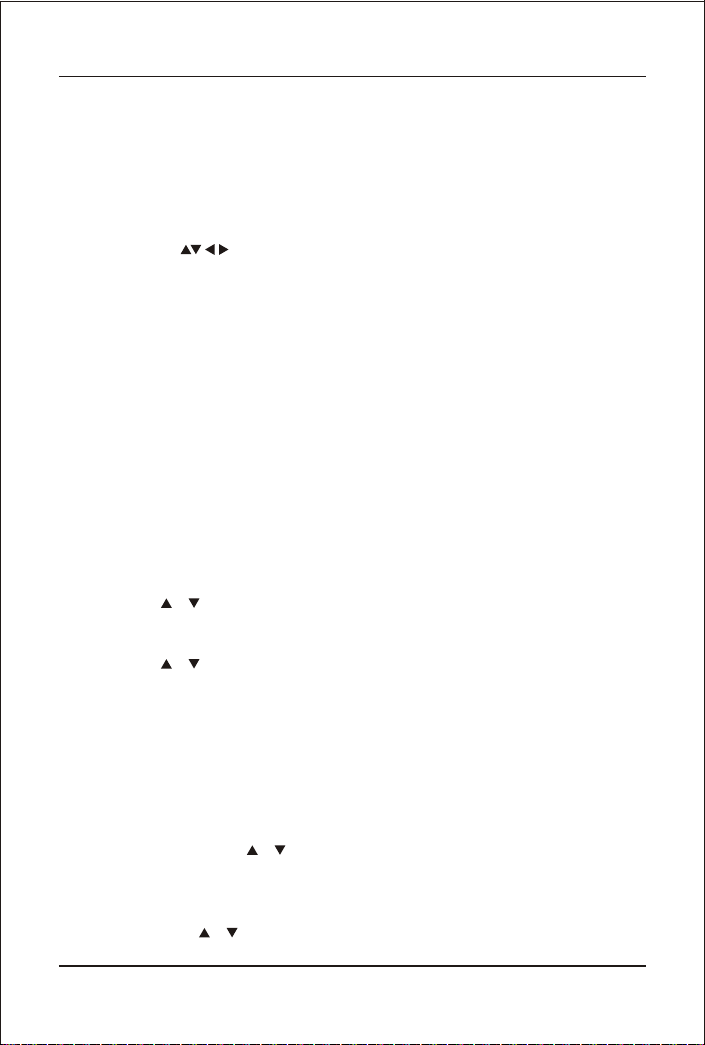
Device Setup
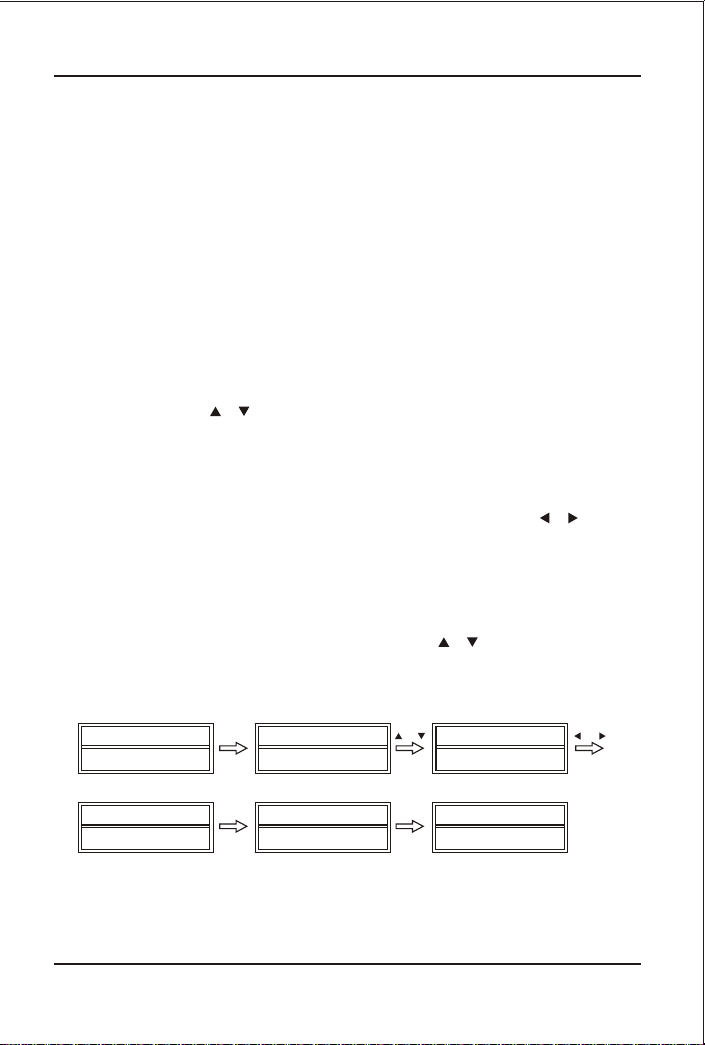
Direct Set-Up (by Brand and Code)
If you know the device's brand name, you can set up by Direct Set-up
(search on screen by brand name directly and choose the code).
1. Turn on the device (e.g. TV, DVD...) that you would like to operate. If it is a
VCR, Please insert a tape.
2. Press and hold the SET key on your remote control. Then press
(simultaneously) one of the device keys (e.g. TV, DVD...).
3. Then release them, the Brand will be displayed on the screen.
4. You can press the or key to select the brand of your device (e.g.
your TV brand: Life).
5. Check the function of the keys (e.g. POWER CH+ CH- VOL+ VOL MUTE). If none of the keys of your new remote control can work, or
most of the keys work improperly, please try another code by the or
key, until all basic functions operate properly
6. If you are satisfied with the code, please just press the OK key to save
it. LCD shows Success!, then it finishes the set-up. You can press
device key (e.g. TV) again to finish SET UP or use or to select other
set-up.
TV 048
SUN 11:59 AM
Life
169
SET+TV
Accent
023
OK 1S
Success!
Life
003
TV 169
SUN 11:59
OROR
AM
7
Page 10
Note:
1. To return to beginning status, please press the EXIT key or the device
key (e.g. TV, or VCR...)
2. You must point your remote control to the device what you wanted to
control when you test the keys.
3. The keys of OK, EXIT are only used to set-up your new remote
control You can't control your device as normal menu function at this moment
until you quit from set up.
4. If the device is locked, you must first unlock the device then setting up.
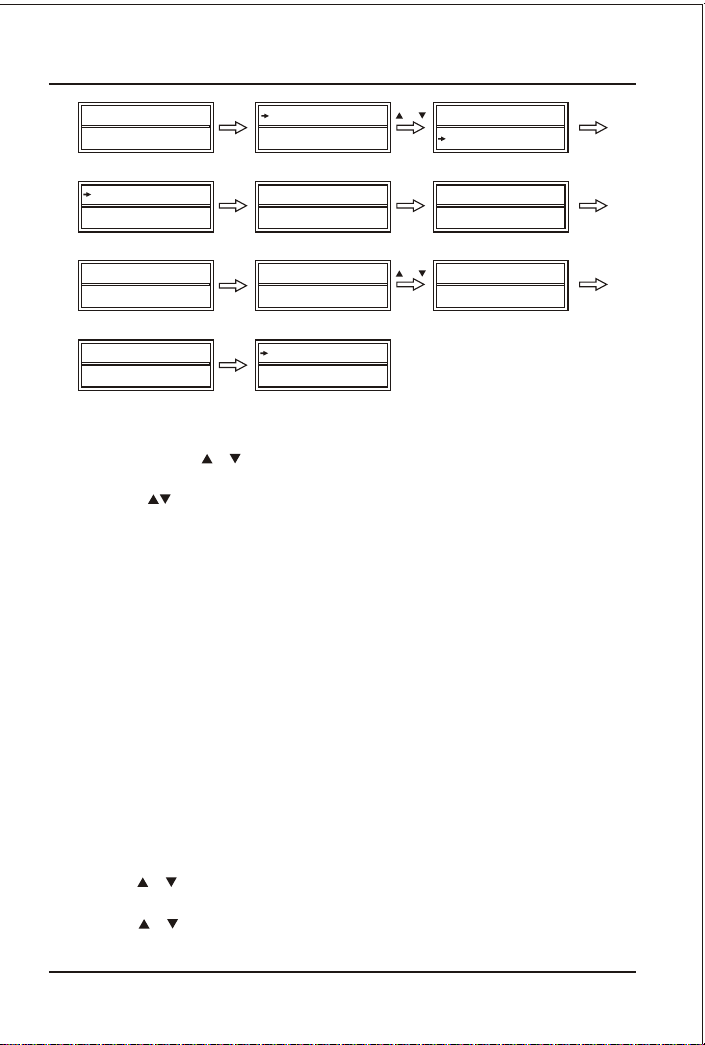
Set-up by Auto Search
If the set-up by brand and code failed or you cannot find the brand
name in your remote control screen, you may use the Auto Search to
find the correct code to operate your device.
1. Turn on the device (e.g. TV, DVD...) you would like to operate. If it is a
VCR, Please insert a tape.
2. Press the SET key on your new remote control for more than 3 seconds,
then release it.
3. Press the or keys to select to SetupCode on LCD menu, and press
OK key.
4. Press the or keys to select to Auto Srch on the LCD menu, and press
the OK key, then you press device key to select your desired operation
device(e.g. DVD) and then press the OK key to start the Auto Search.
(You must point your remote control to your device at this moment).
5. See if the device reacts or not, once the device reacts,please press
any key to stop the search.
6. Test if most of keys work well or not. If most of keys work not very
well, please press the or keys to select other code.
7. If you find one satisfied code ,please press the OK key to save it and
LCD shows Success!. You can press device key (e.g. TV) again to finish
SET UP or use or to select other set up.
8
Page 11
TV 048
SUN 11:59
SET 3S OK
Device
AM
SetupCode
OR
Device
SetupCode
Auto Srch
EnterCode
DVD 048
Searching
Success!
OK OK
TV 048
Search
OK
DVD 048
Search
1S
Auto Srch
EnterCode
DVD
OR
DVD 026
Search
DVD 045
Search
Note:
1. In case that you did not stop the search in time when device reacted,
you may press the or key to turn back to find the passed code.
2.The keys of OK, EXIT are only used to set-up your new remote
control during the Auto Search, you can't control your device for menu
function at the moment until you quit from the set up.
3. When remote control searches through all codes, the remote control
will stop at the beginning code of the search.
4. If the device is locked, you must first unlock the device then set up.
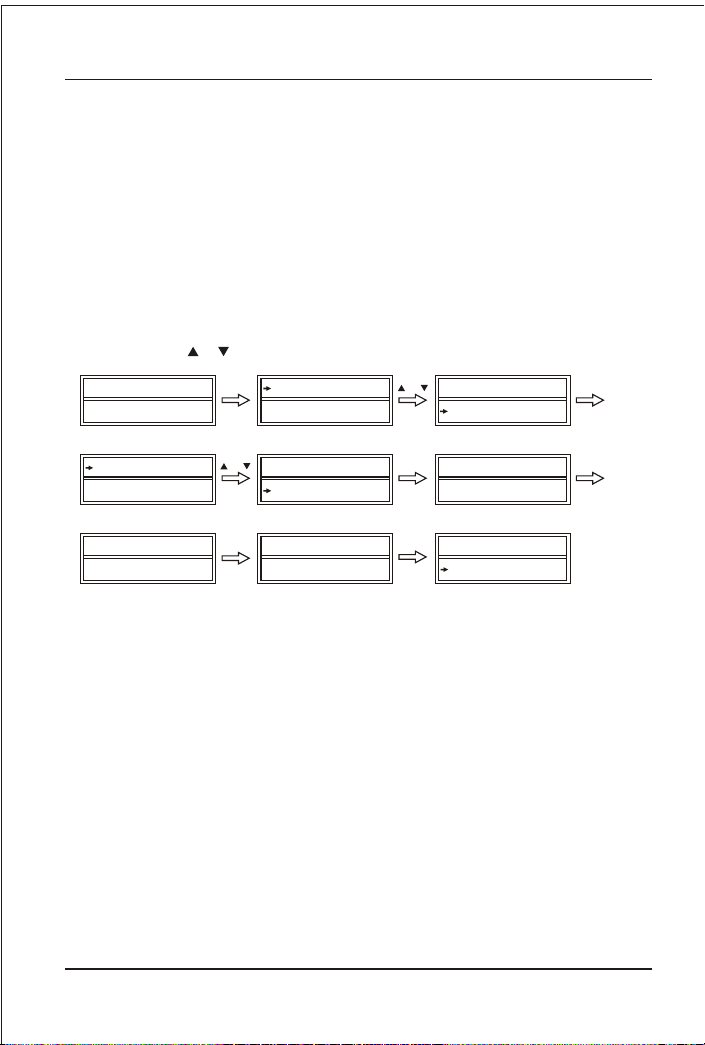
Set-up by Enter Code
1. Switch on the device, which you would like to control (e.g. TV, DVD...).
2. In the back section of this manual, please find the brand name and
code no of your device brand (e.g. Lifetec 003,010,062,).
OK
3. Press the SET key on your new remote control for more than 3
seconds, then release it.
4. Press the or keys to select to SetupCode in LCD menu, and press OK key.
5. Press the or keys to select to EnterCode in LCD menu, and press OK key.
9
Page 12
Learning
6. Then you press device key to select your desired operation device
(e.g. TV, DVD...) and then press the OK key, you must now enter the
3-digit device code (e.g. 003 for Lifetec TV).
7. Press the OK key to save it and LCD shows Success!, and press
EXIT key two times to exit the SETUP mode.
8. Please check the function of the keys on remote control. If most
of keys on your new remote control do not function correctly, please
try another 3-digit device code (e.g. 010...) from the code list under
the same brand. Then repeat steps 3 to 7 until all the basic functions
operate correctly. You can press device key (e.g. TV) again to finish
SET UP or use or to select other set up.
TV 048
SUN 11:59
Auto Srch
EnterCode
TV 003
SET 3S OK
Device
AM
SetupCode
OR
Auto Srch
EnterCode
OK 1S
Success!
OR
Device
SetupCode
OK TV 003
TV
Auto Srch
EnterCode
Learning
The LEARN feature is used to supplement the preprogrammed code list. The
standard code list may provide most of the functions needed, but you can add a
small number of additional functions for your remote control. Or you can add a
new code from a new original remote control which in the code list.
Under learning mode you need to prepare another original remote control
that you will take the codes into your this universal remote control. .
You can select Learn Key to learn commands, or Delete Key to
delete learnt commands, or choose Delete DEV to delete all commands
under a device, or Delete All for all learnt commands under all devices in
learning category.
You can enter into the learning mode by pressing and holding LEARN key for more
than 3 seconds.
10
Page 13
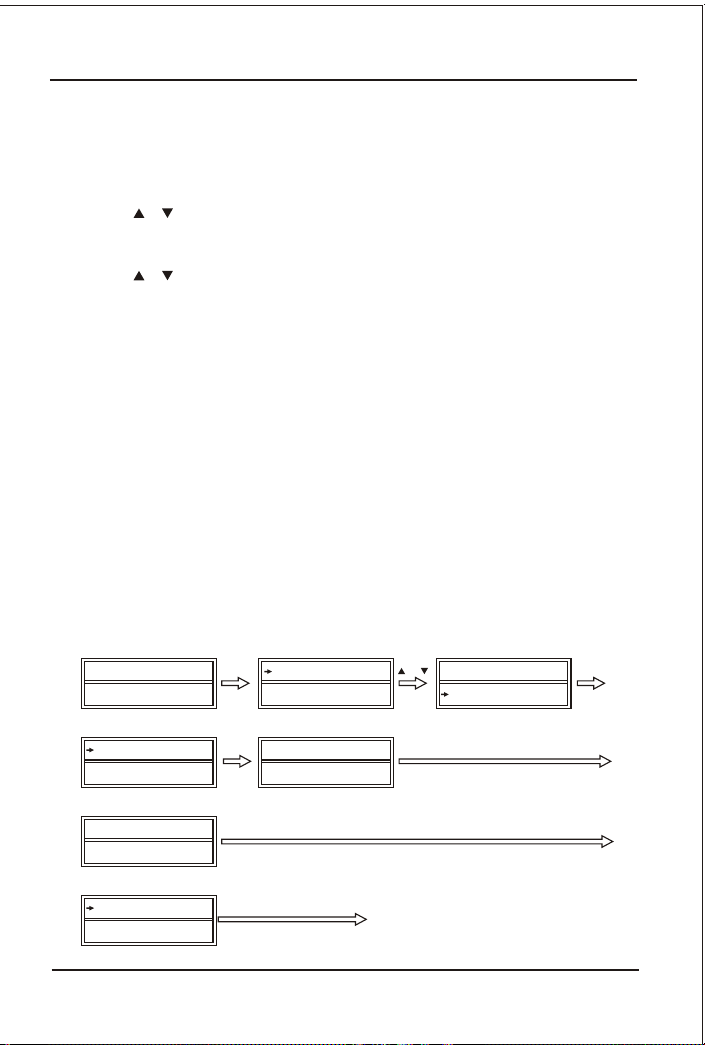
Learn a Command
1. Press a device key (e.g. TV) which you want to learn.
2. Press and hold the SET key for more than 3 seconds, then release it.
3. Press the or key to Learning in LCD menu, and then press the
OK key.
4. Press the or key to Learn Key in LCD menu and then press the
OK key LCD shows Select Key, if you exit learning mode ,please
press the device key.
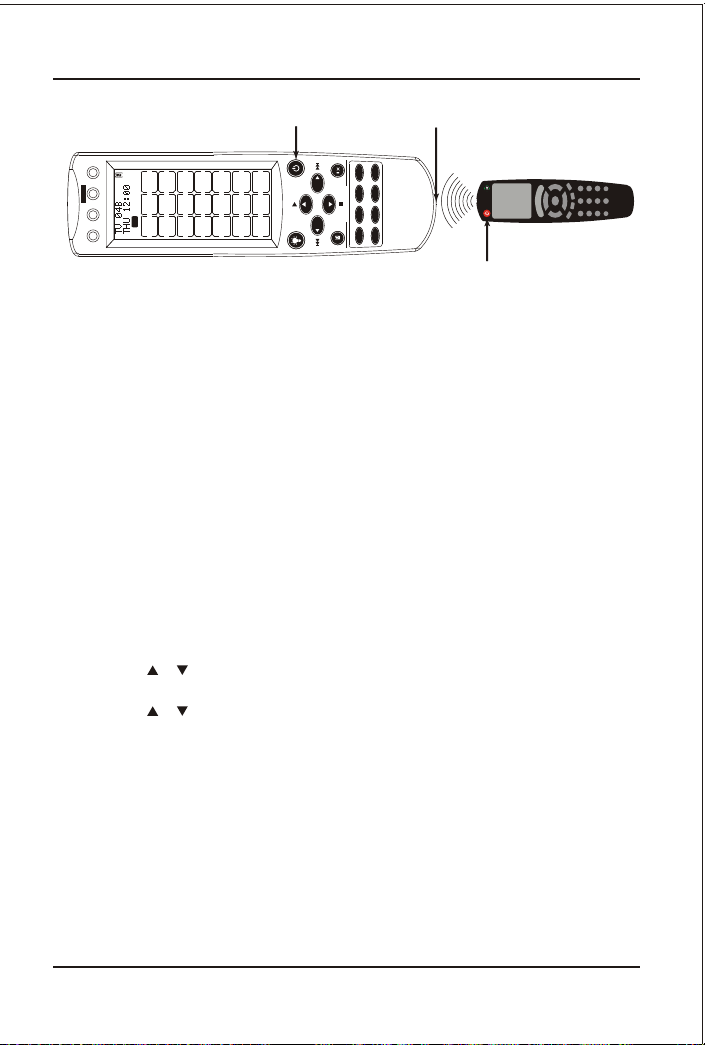
5. Select the target key you wanted to learn (e.g. Power). The LCD
display PLS Send Signal in.
6. Point the transmitter of the original remote control remotes face to the
receiver window of this universal remote control by approximately 50mm apart.
7. Press and hold the original remote key (e.g. Power) until the LCD
display Success! for 1 second. If LCD display Failed, please Repeat
Steps 4-6.
8. Repeat Steps 4-6 to learn some more keys.
9. Press a device key (e.g. TV ) to quit the learn operation when all
desired remote commands are learnt.
TV 048
SUN 11:59 AM
LearnKey
Delete Key
PLS Send
Signal in
Success!
SET 3S OK
Device
SetupCode
OK
SelectKey
Press a source key from original remote
To learn next key
OR
TimeSet
Learning
Press a target key e.g. Power
11
Page 14
T arget Key
Receiver window
64
3
AM
MACRO
DEVICE LEARN SET
9
ENTER
JUMP
FREEZE
2
1
PAGE1
ZOOM
5
0
8
SWAP
TV/VIDEO
7
+10
PIP
ANT/CATV
VOLVOL
CH
CH
TIME/DISP
MTS
VCR DVB DVD
TOUCH SCREEN
TV
CD T APE TUNER AUX
DATE
Original Remote Control
Source Key
Note:
1. A selected target key can be multi learnt from different sources key, it
will store the final learnt signal only..
2. All usual function keys can be learnt.
3. Some code form may not be learnt by this remote control.
4. You can learn about 100 key totally for 8 devices and 8 new devices.
Delete the Learnt Key
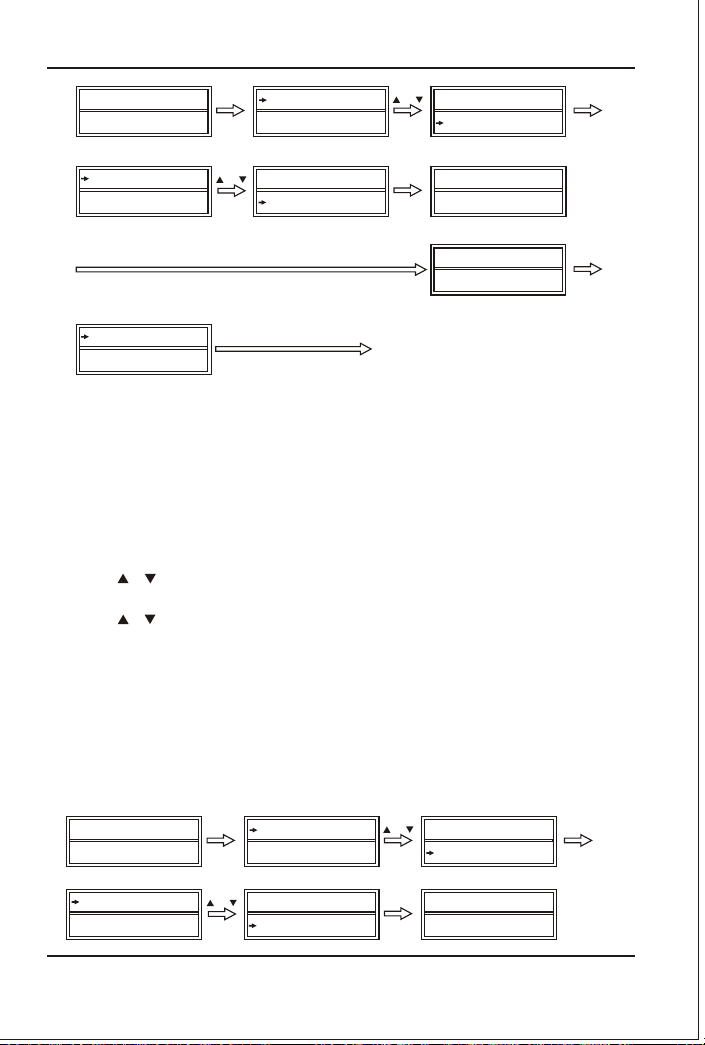
If you like to delete a learnt command, you can follow the steps as below:
1. Press the device key (e.g. TV ) which the command you like to delete from.
2. Press and hold the SET key for more than 3 seconds, then release it.
3. Press the or key to Learning on LCD menu, then press OK key.
4. Press the or key to Delete Key on LCD menu and then press OK key.
5. Press the key that you want to delete, the LCD shows
Sure Delete and then press the OK key to confirm, the LCD will show
Success!.
6. Repeat Step 4 ~5 to delete next keys you wanted.
7. Press a device key (e.g. TV ) to quit the delete operation when all
desired remote commands are deleted.
12
Page 15
TV 048
SUN 11:59
SET 3S OK
Device
AM
SetupCode
OR
TimeSet
Learning
Learn Key
Delete Key
Select a key you want to delete
Success!
OR
Learn Key
Delete Key
delete next key
OK
OK
SelectKey
Sure Delet
OK
Delete All Learnt Command of a Device
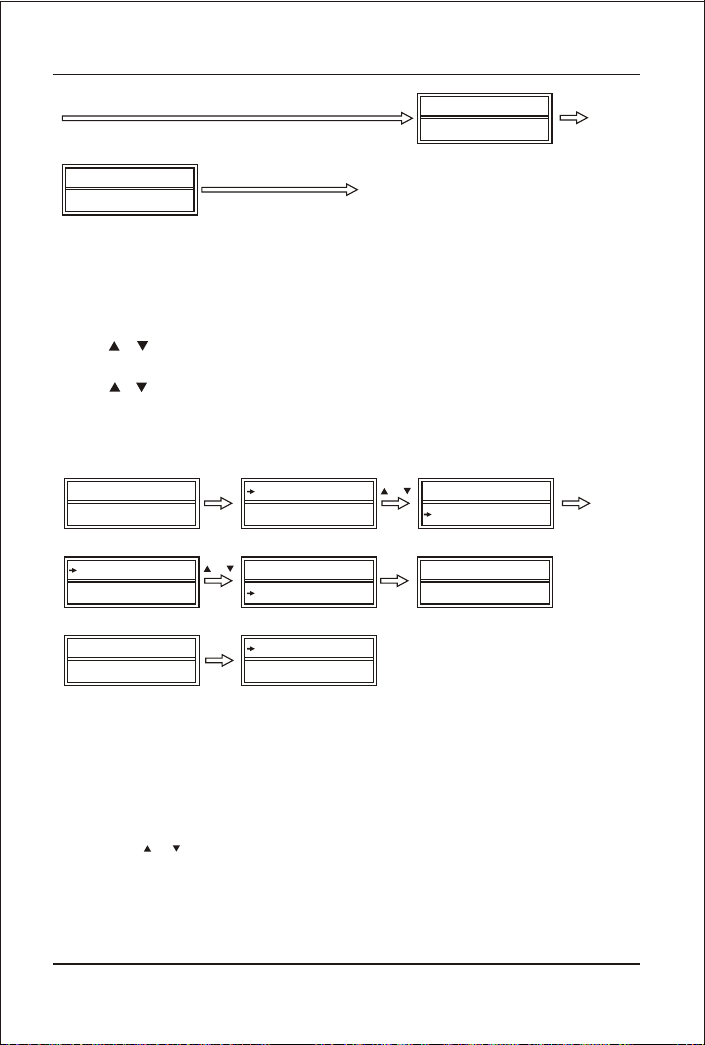
If you like to delete all learnt commands in a device once, instead of
deleting every key one by one, please follow the below steps:
1. Press a device key (e.g. TV ) which you want to delete commands from.
2. Press and hold the SET key for more than 3 seconds, then release it.
3. Scroll or key to Learning in LCD menu, and then press OK key.
4. Scroll or key to Delete DEV on LCD menu and then press OK key.
5. Select the device you want to delete, and then press OK key.
6. The LCD shows Sure Delet and then press the OK key, the LCD shows Success!
7. Repeat step 5 to delete commands in other device key.
8. Press EXIT key to quit deletes operation.
TV 048
SUN 11:59 AM
Learn Key
Delete Key
SET 3S OK
Device
SetupCode
OR
Delete Key
Delete DVE
OR
OK
TimeSet
Learning
SelectDVE
TV
13
Page 16
Select a key you want to delete
OK
Sure Delet
OK
Success!
delete next device
Delete All Learnt Keys
If you like to delete all learnt commands in the unit, please follow the below steps:
1. Press and hold the SET key for more than 3 seconds, then release it.
2. Scroll or key to Learning on LCD menu, then press the OK key.
3. Scroll or key to Delete All on LCD menu and then press the OK key.
4. The LCD shows Sure Delet, then press the OK, LCD shows Success! to finish
the deletion.
TV 048
SUN 11:59 AM
Learn Key
Delete Key
Success!
SET 3S OK
Device
SetupCode
OR
DeleteDVE
DeleteAll
1S
TV 048
SUN 11:59 AM
OR
OK
TimeSet
Learning
Sure Delet
Changing Touch Screen Layout
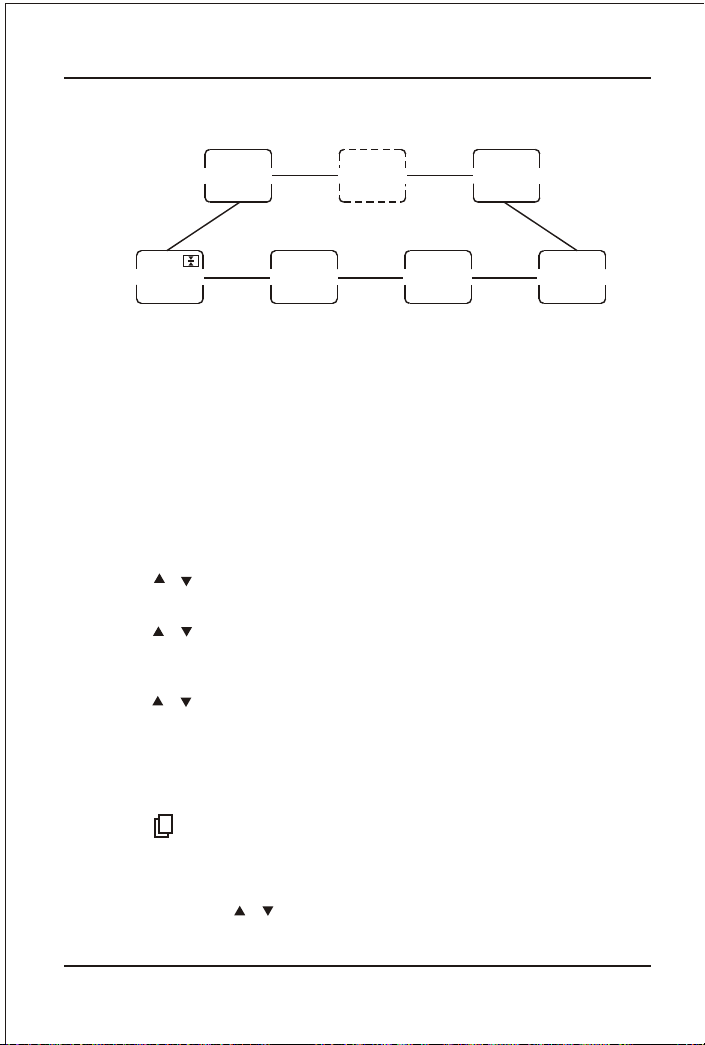
The layout edit mode enables you to customize
to match your existing remote controls. Please follow the below steps:
Touch Screen display
1. Press and hold the SET key for more than 3 seconds, then release it.
2. Press the or key to select Layout on LCD menu, and then press the OK key.
3. Press the device keys to select modification.(ex. Press TV)Press the Page key
to change to the Touch Screen page that you want to modify. Press the power
button to show all available LCD choice for all buttons.
14
Page 17
Macro Function
4. Touch the button that you wish to change(you may change as many
button as you wish.
1
MODE
5. As long as you touch the button every time, its appearance will be changed.
6. Press the SET key to save the setting, LCD shows Success! then exit to
current setup state.
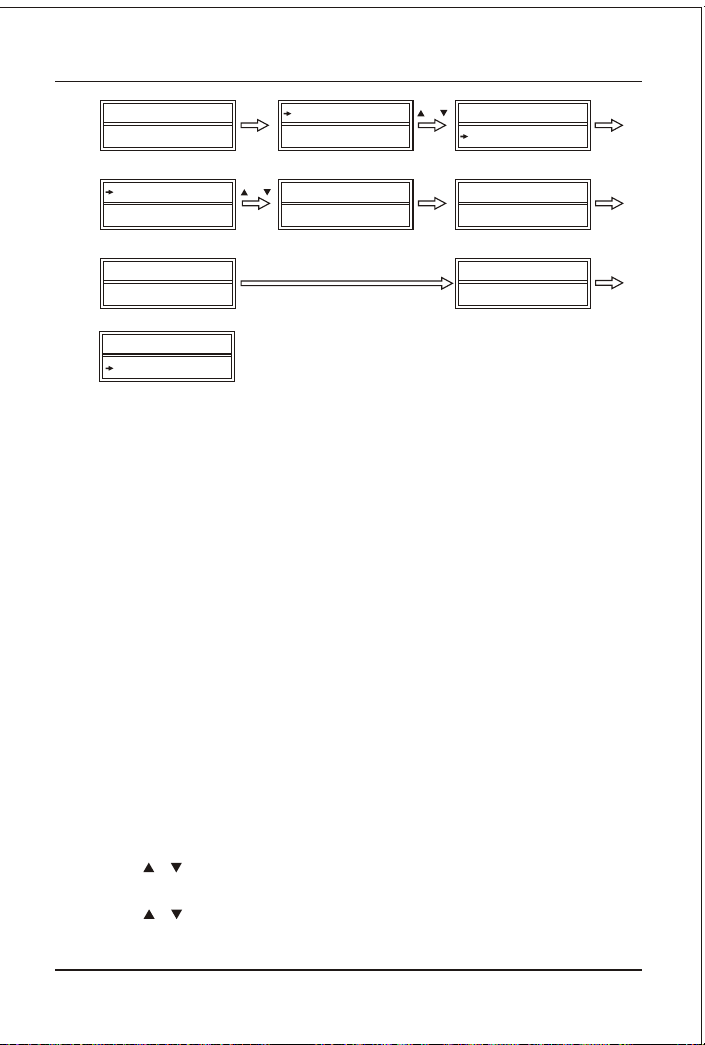
Set up Macro
Macro functions let you make sequent operation for you home theater.You can
set up a Macro by following below steps:
1. Press and hold the SET key for more than 3 seconds, then release it.
2. Press the or key to select MacroSet on LCD menu, and then press OK key.
3. Press the or key to select the Macro1(or Macro2 or Macro3) on LCD menu,
then press the OK key.
4. Press the or key to select the Set Up on LCD menu, and then press OK key.
5. Press the device then the function in a sequence (e.g. TV+POWER+AV,
DVD+POWER, etc). This means you want to turn the TV(Device) power
on(function), input to AV(function) and DVD(Device) power on(function).
6. Press the button for page two and on the LCD screen press OK key to save
the setting. LCD shows Success! then exit
P
Macro Function
SLEEP
TUNER
7. You can press any device key to finish setting up or press the EXIT key
to last state and use or to select other set-up.
15
Page 18
TV 048
SUN 11:59
SET 3S OK
Device
AM
SetupCode
OR
Layout
MacroSet
Macro1
Macro2
Select Key
Macro2
Macro3
OR
Macro2
Macro3
Select keys you want to
OK OK
Set Up
Delete
OK
Success!
OK
Note:
1. You can set up to maximum 10 commands in a MACRO.
2.Make sure all the keys can send out signals, otherwise even if you programmed
these keys into the MACRO, it still won ’t work properly when you operate MACRO
function. You can check those keys by pressing them to see the relative Device
buttons is flashing or not before you set up MACRO.
3. Make sure the device must have relative conditions when you operate MACRO
function. For example the disc must be inserted into the DVD player and a video
tape must be inseted into the VCR when you like to play the DVD or make a record
by your VCR.
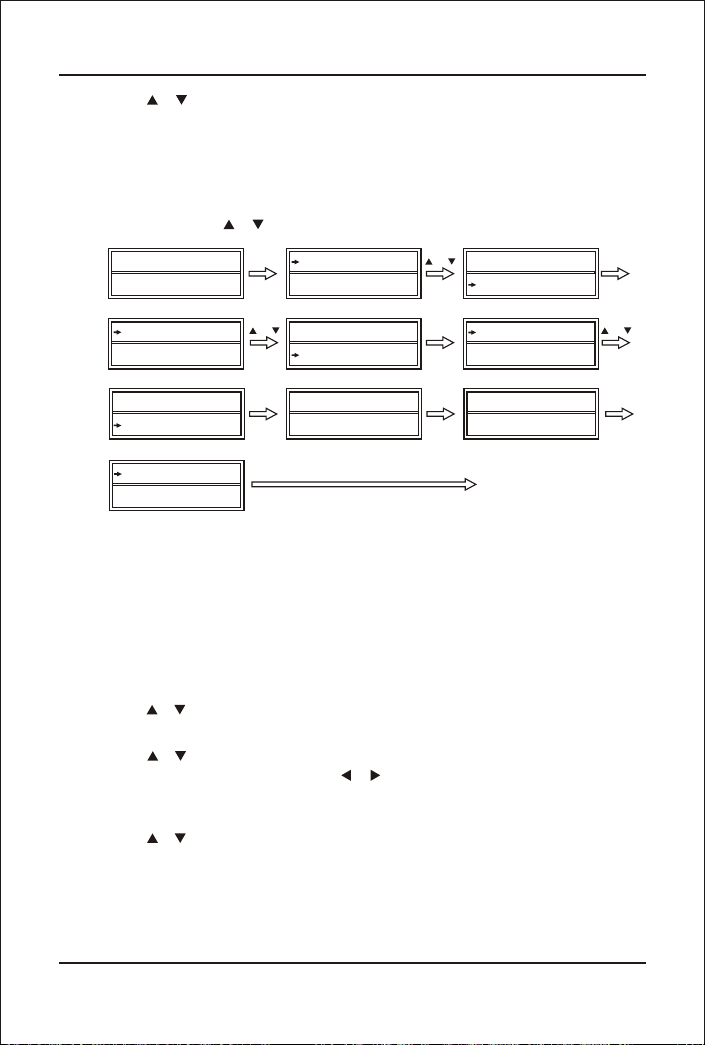
Operate Macro
Press and hold the MACRO key and 1 key ( or 2,3 key), and then release them.
The remote control will send out a sequent IR commands that you programmed
before.
Delete Macro
1. Press and hold the SET key for more than 3 seconds, then release it.
2. Press the or key to select the Macro on LCD menu, and then press the OK
key.
3. Press the or key to select the Macro2 on LCD menu, and then press the OK
key.
16
Page 19
Other Setup Functions
4. Press the or key to select the Delete on LCD menu, and then press OK key.
5. The LCD shows Sure Delete, Press the OK key to confirm the delete and LCD
display Success! then back to last state.
6. You can press any device key to finish the delete operation or press the EXIT key
to last state and use or to select other set up.
TV 048
SUN 11:59 AM
Macro1
Macro2
Set Up
Delete
Macro1
Macro2
SET 3S
Device
SetupCode
OR OR
Macro2
Macro23
OK 1S
Sure Delet Success!
Select next you want to delete
OR OK
Layout
MacroSet
OK
Set Up
Delete
OK
Other Setup Functions
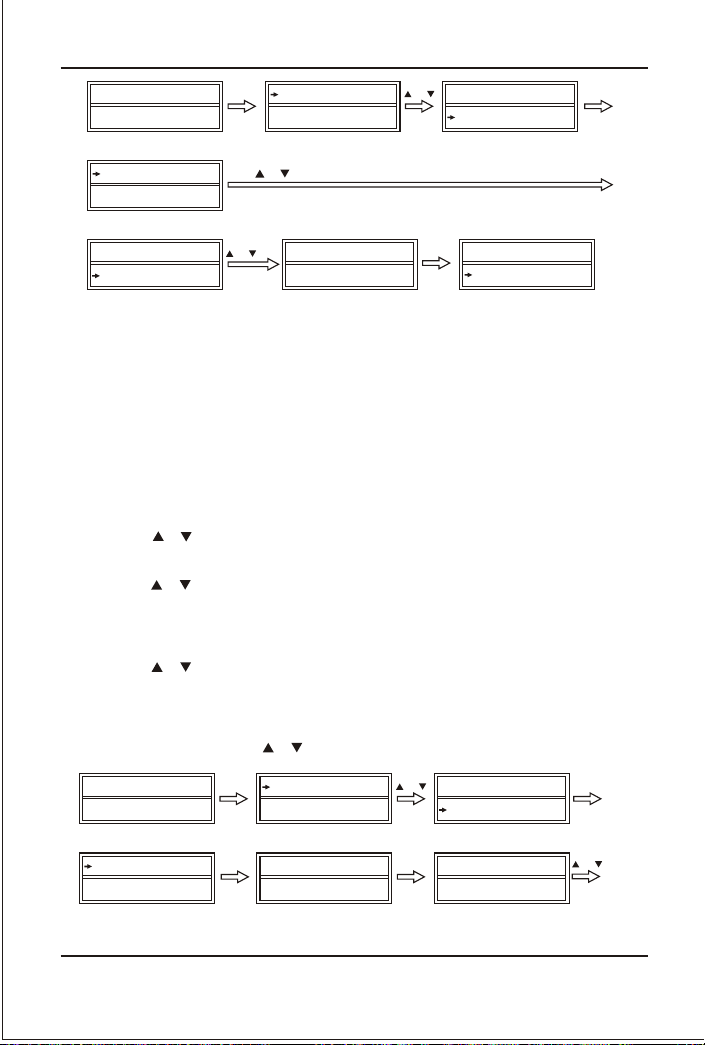
A. Set up Clock
You can set up the clock on your remote control and the clock will be displayed
on the screen.
1. Press and hold the SET key for more than 3 seconds, then release it.
2. Press the or key to select the TimeSet on LCD menu, and then press OK key.
3. Press the or key to select desired setup items such as Year, Month, Date,
Day, Hour and Minute, then press the or key to change the year, month ,date,
day ,hour and minute.
4. Press the or key to select AM or PM.
5. Press the OK key to save the setting and LCD display Success! for 1 second
then exit to current setup state, if you enter errors, the LCD screen shows Error
for 1 second.You can press any device key to finish set up or press EXIT key to
return to the last state.
17
Page 20
TV 048
SUN 11:59 AM
Year: 06
Month:01
SET 3S OK
Device
SetupCode
Use select year month date clock you want to change
or
OR
SetupCode
TimeSet
Hour:01
Minute:01
OK
OR
Success!
1S
SetupCode
TimeSet
B. V olume Lock
This function makes it very convenient when you only use one device to adjust
volume. For example, you may use your amplifier as your main volume control,
then you can use this function to fix the volume and mute key of AUX, no matter
which device you will use (even you will use TV, DVD, VCR etc), the volume and
mute key on remote control still control the volume and mute of your amplifier.
1. Press and hold the SET key for more than 3 seconds, then release it.
2. Press the or key to select the OtherSet on LCD menu, and then press OK key.
3. Press the or key to select the VOL Lock on LCD menu, and then press OK key.
4. Press the device key to select the device you want to fix, such as AUX.
5. Press the or key to change to the Locked or Unlock mode.
6. Press the OK key to save the setting and LCD display Success! then to current
setup state, You can press any device key to finish set up or press the EXIT key to
last state, or you can use or to select other set up.
TV 048
SUN 11:59 AM
SET 3S OK
Device
SetupCode
OR
TimeSet
OtherSet
VOL Lock
DEV Lock
TV
Unlock
AUXOK
AUX
OR
Unlock
18
Page 21
AUX
Locked
Success!
VOL Lock
DEV Lock
OK 1S
Note:
You can only lock one device for the volume and mute of your new remote
control. The locked device will be unlocked when you lock on the other device
automatically.
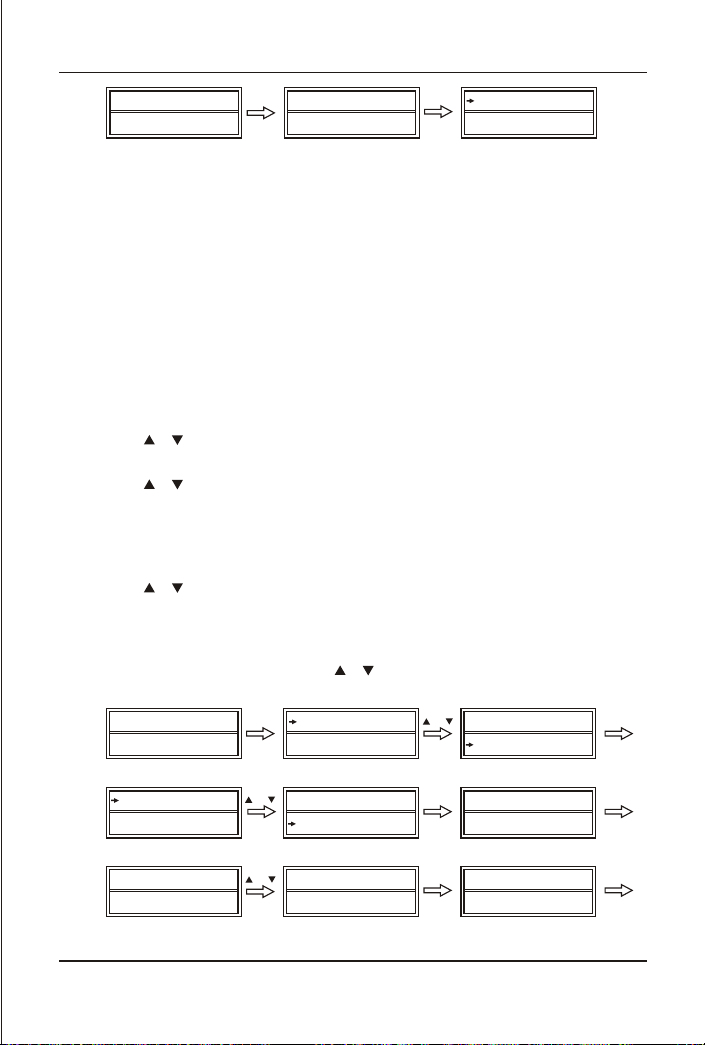
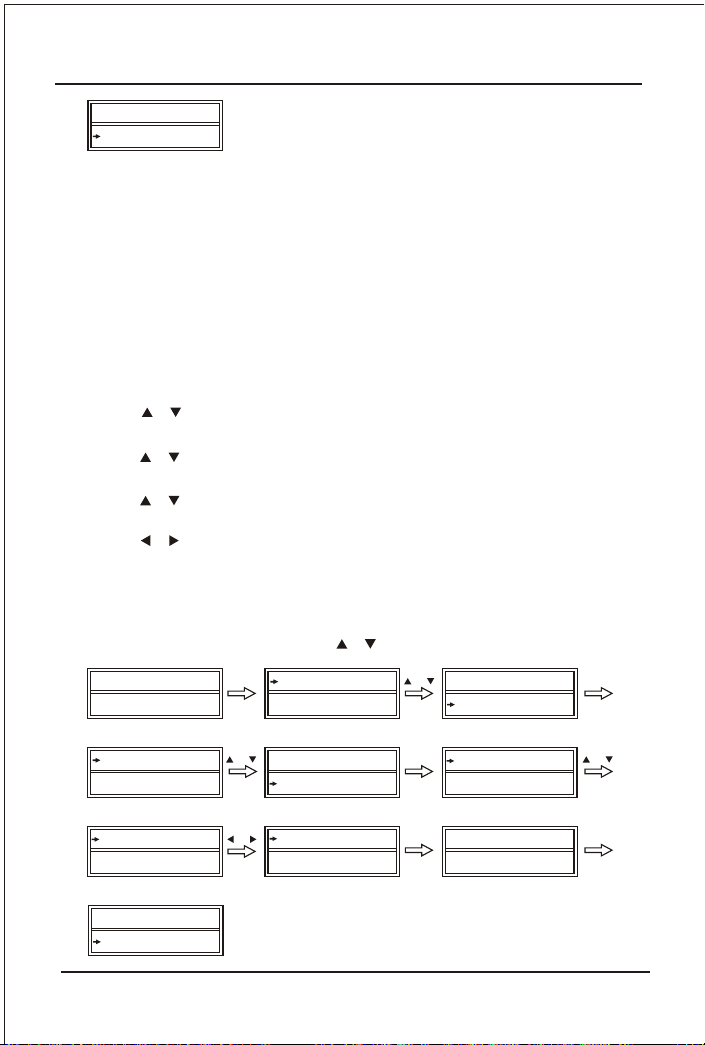
C.Device Lock
You can use Device lock function to fix current device code and this device code
cannot be changed by brand and code set up or auto search. You can set it to the
f to quit from this function.
Of
1. Press and hold the SET key for more than 3 seconds, then release it.
2. Press the or key to select the OtherSet on LCD menu, then press OK key.
3. Press the or key to select the DEV Lock on LCD menu, and then press OK key.
4. Press the device key to select the device that you want to fix, such
as TV
(or DVD, or DVB...)
5. Press the or key to change to the Locked or Unlock mode.
6. Press the OK key to save the setting and LCD display Success! then exit to
current setup state. You can press any device key to finish set up or press the
EXIT key to last state or you can use or to select other set up.
TV 048
SUN 11:59 AM
VOL Lock
DEV Lock
AUX
Unlock
SET 3S OK
Device
SetupCode
OR
VOL Lock
DEV Lock
OR
AUX
Locked
OR
TimeSet
OtherSet
OK AUX
TV
Unlock
OK
Success!
1S
19
Page 22
VOL Lock
DEV Lock
Remark:
You can fix all device codes but these device codes cannot be changed by neither
Auto Search nor Brand Code Set up.
D. Backlight
If the background light is on, the background light will be lighted up
any key.
1. Press and hold the SET key for more than 3 seconds, then release it.
2. Press the or key to select the OtherSet on LCD menu, and then press OK key.
3. Press the or key to select the BackLight on LCD menu, and then press OK key.
4. Press the or key to change to the On or Off mode.
5. Press the or key to select Back Light on time (change length of Back Light
on-time from 5-30 seconds and 5 seconds as a step.).
6. Press the OK key to save setting and LCD shows Success! then exit to
current setup state, You can press any device key to finish set up or press the
EXIT key to last state, or you can use or to select other set-up.
when you press
TV 048
SUN 11:59 AM
VOL Lock
DEV Lock
On 10SEC
Off
DEV Lock
Backlight
SET 3S OK
Device
SetupCode
DEV Lock
BackLight
OR
On 30SEC
Off
OR
OK
OK
TimeSet
OtherSet
On 10SEC
Off
Success!
OROR
1S
20
Page 23
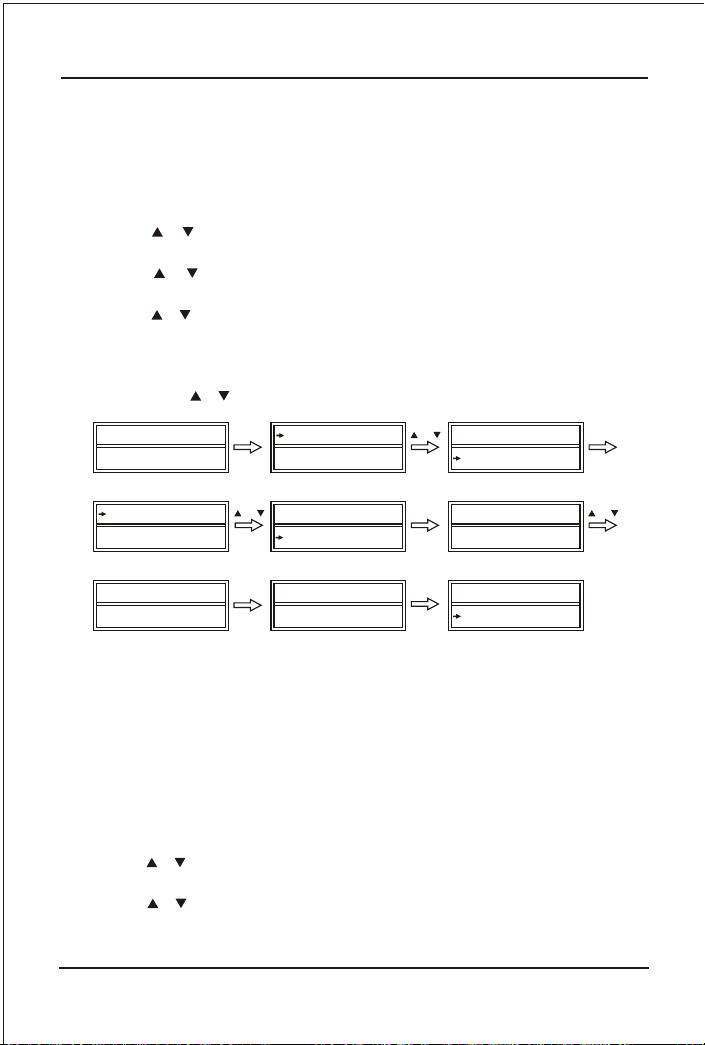
E. Contrast Adjust
If you are not satisfied the screen contrast of your remote control, you can use
below steps to change it:
1. Press and hold the SET key for more than 3 seconds, then release it.
2. Press the or key to select the OtherSet on LCD menu, then press the OK key.
3. Press the or key to select the Contrast on LCD menu, then press the OK key.
4. Press the or key to adjust contrast level, and then press the OK key when you
satisfied the LCD shows Success!.
5. You can press any device key to finish set-up or press the EXIT key to last state,
or you can use or to select other set up.
OK
OR
1SOK
TimeSet
OtherSet
Contrast
08
Delay
Contrast
TV 048
SUN 11:59
VOL Lock
DEV Lock
Contrast
07
SET 3S OK
Device
AM
SetupCode
OR OR
Delay
Contrast
Success!
F LCD
If you set the Delay to On, that means the LCD screen is always on (It is
convenient to see the status but it is bigger power consumption). If you set up
Delay to Off, the LCD screen will be on for some time and then be off after any
operation on your remote control and you can change the length of on time as
below steps.
1. Press and hold the SET key for more than 3 seconds, then release it.
2. Press the or key to select the OtherSet on LCD menu, and then press OK key.
3. Press the or key to select the Delay on LCD menu, and then press OK key.
21
Page 24
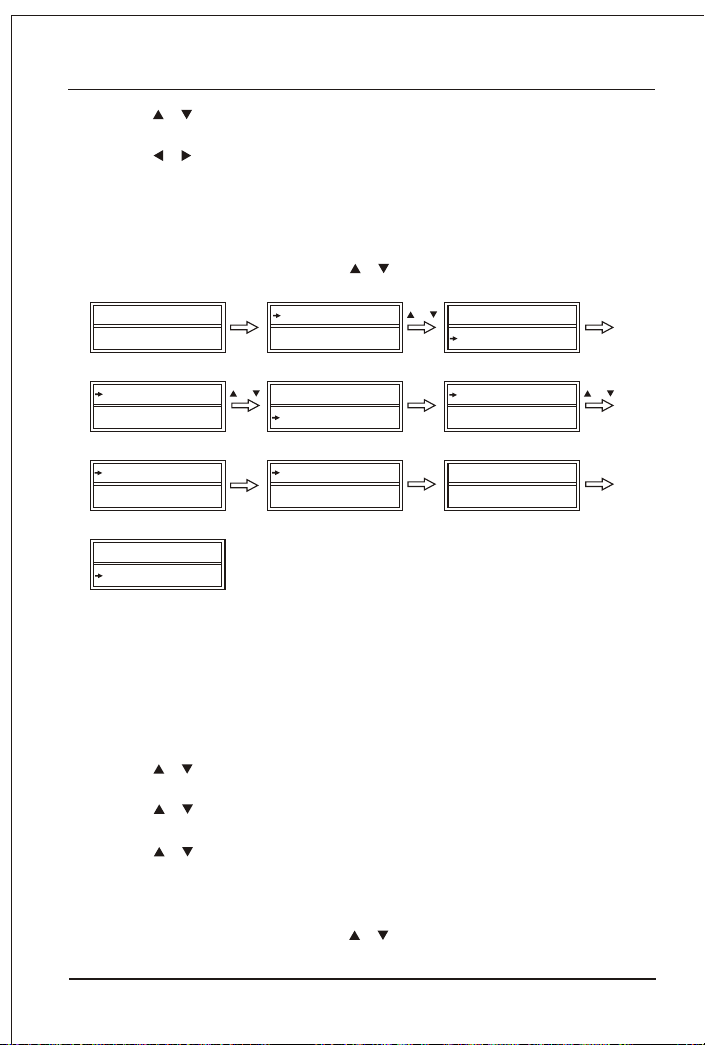
4. Press the or key to select On:xxSEC or All on.
5. Press the or key to select LCD on time (change length of LCD
on-time from 5-60
seconds and 5 seconds as a step.).
6. Press the OK key to save setting and LCD display Success! for 1
second. You can press any device key to finish set-up or press the
EXIT key to last state, or you can use or to select other set up.
TV 048
SUN 11:59 AM
VOL Lock
DeviceLock
On 10SEC
All On
BackLight
Delay
SET 3S
OK
OR
Device
SetupCode
BackLight
Delay
On 10SEC
All On
OR
OK
TimeSet
OtherSet
On 10SEC
All On
Success!
Note:
Change length of LCD on time from 5-60 seconds and 5 seconds as a step.
G. Beep
If the Beep is on, the Beep will be beep when you press any key
1. Press and hold the SET key for more than 3 seconds, then release it.
.
OK
OR
1S
2. Press the or key to select the OtherSet on LCD menu, and then press OK
3. Press the or key to select the Beep on LCD menu, and then press OK
key.
4. Press the or key to change to the On or Off mode.
5. Press the OK key to save the setting, and LCD shows Success! then exit to
current setup state, You can press any device key to finish set up or press the
EXIT key to last state, or you can use or to select other set up.
key.
22
Page 25

H. Clear All
Erase all the setting up data, and go back to the factory default settings.
1. Press and hold the SET key for more than 3 seconds, then release it.
2. Press the or key to select the OtherSet on LCD menu, and then press OK
3. Press the or key to select the Clear All on LCD menu, and then press OK
key and LCD shows Sure Clear.
4. Then press the OK key to clear all settings and go back to original default
settings.
key.
23
Page 26

 Loading...