

Page 1

1
ВАЖНЫЕ ИНСТРУКЦИИ ПО БЕЗОПАСНОСТИ
При использовании швейной машины следует выполнять основные правила техники безопасности,
которые заключаются в следующих разделах.
Перед началом работы внимательно прочитайте инструкцию.
ОПАСНО – Во избежание риска удара электрическим током:
1. Никогда не оставляйте включенную в сеть машину без присмотра. Всегда отключайте
прибор от сети после работы и перед началом чистки.
2. Всегда отключайте от сети при замене лампочки. Вставляйте лампочку такого же типа на
15 Ватт.
ВНИМАНИЕ – Во избежание ожогов, пожара, удара электрическим током или
нанесения повреждений пользователю:
1. Не позволяйте играть с машиной. Будьте внимательны при работе, если в помещении
находятся дети.
2. Используйте прибор только по его прямому назначению, описанному в этой инструкции.
Используйте приспособления, только рекомендуемые производителем и описанные в
инструкции.
3. Не используйте машину, если у нее поврежденный шнур или вилка, в случае, если она падала,
была повреждена, попала в воду или работает неправильно. Отнесите машину к ближайшему
авторизированному дилеру для ремонта или наладки.
4. Машина должна работать только с открытыми вентиляционными отверстиями. Периодически
чистите вентиляционные области машины и ножную педаль от пыли, грязи и остатков
материи.
5. Ничего не кидайте и не вставляйте в вентиляционные отверстия.
6. Работайте на машине только в помещении.
7. Не работайте в помещении, где распылялись аэрозоли или использовался кислород.
8. Чтобы отключить питание, поставьте все выключатели в положение ВЫКЛ.(«0»). Затем
вытащите вилку из розетки.
9. Не тяните вилку из розетки за шнур, берите вилку за корпус.
10. Будьте осторожны при работе с движущимися частями машины. Особое внимание уделяйте
рабочей области вокруг иглы.
11. Используйте только оригинальную игольную пластину. Из-за неправильной пластины может
сломаться игла.
12. Не используйте гнутые иглы.
13. Не тяните и не толкайте ткань при шитье, может сломаться игла.
14. Всегда отключайте машину и ставьте выключатель на «0» при регулировке или замене
деталей в области работы иглы: заправке нити в иглу, смене иглы, заправке нижней нити,
смене прижимной лапки и т.д.
15. Всегда отключайте машину от электрической розетки при проведении профилактических
работ, снятии панелей и других процедур, описанных в этой инструкции.
СОХРАНЯЙТЕ ЭТИ ИНСТРУКЦИИ
Дизайн и спецификация машины могут быть изменены
Page 2

2
СОДЕРЖАНИЕ
РАЗДЕЛ l. НАИМЕНОВАНИЕ ЧАСТЕЙ
Наименование частей ............................................................................................................3
• Как установить катушечный стержень ...............................................................................3
Стандартные аксессуары .......................................................................................................4
• Свободный рукав .............................................................................................................4
РАЗДЕЛ ll. ПОДГОТОВКА К ШИТЬЮ
Подключение питания к машине .............................................................................................5
Контроль скорости шитья .......................................................................................................5
• Педаль ............................................................................................................................5
Смена игл .............................................................................................................................6
• Смена игл ........................................................................................................................6
• Проверка качества иглы ...................................................................................................6
Выбор игл и ниток .................................................................................................................6
Выбор строчек ......................................................................................................................7
Рычаг подъема прижимной лапки ...........................................................................................7
Прижимная лапка ..................................................................................................................7
Реверс ..................................................................................................................................7
Отключение транспортера ткани ............................................................................................7
Подготовка шпульной нити ....................................................................................................8
• Удаление шпульки ...........................................................................................................8
• Установка катушки ...........................................................................................................8
• Намотка шпульки .............................................................................................................9
• Установка шпульки ........................................................................................................10
Заправка нити в машину ......................................................................................................11
• Заправка верхней нити ..................................................................................................11
• Нитевдеватель ............................................................................................................... 12
• Вытягивание нижней нити ..............................................................................................13
РАЗДЕЛ
lll
. ОСНОВНЫЕ ШВЕЙНЫЕ ТЕХНИКИ
Прямая строчка ................................................................................................................... 14
• Начало строчки ..............................................................................................................14
• Смена направления строчки ...........................................................................................14
• Завершение строчки ......................................................................................................14
• Направительные линии игольной пластины ...................................................................... 15
• Обработка углов ............................................................................................................ 15
Прямой тройной стежок .......................................................................................................15
Баланс натяжения верхней нити ........................................................................................... 16
• Выбор правильного натяжения ........................................................................................16
• Натяжение слишком сильное ..........................................................................................16
• Натяжение слишком слабое ............................................................................................16
РАЗДЕЛ lV. ДОПОЛНИТЕЛЬНЫЕ СТРОЧКИ
Зигзаг ................................................................................................................................17
Обработка края ...................................................................................................................17
Трикотажный стежок ...........................................................................................................17
РАЗДЕЛ V. ДЕКОРАТИВНЫЕ СТРОЧКИ
Шов-ракушка ......................................................................................................................18
Потайная строчка ................................................................................................................18
Изготовление петли ............................................................................................................. 19
• Зажгутованная петля ......................................................................................................19
Вышивка ............................................................................................................................20
РАЗДЕЛ Vl. УХОД ЗА МАШИНОЙ
Меры предосторожности ...................................................................................................... 21
• Чистка челнока и тканенаправителей ..............................................................................21
• Замена шпуледержателя .................................................................................................22
• Замена лампочки ...........................................................................................................22
НЕИСПРАВНОСТИ МАШИНЫ .............................................................................................23
q
w
er
!3
t
y
u
i
o
!1
!2
!4
!5
!6
!7
!8
!0
Names of Parts
• How to attach the spool pin
q Spool pin
w Setting hole
* Insert the spool pin into the hole as shown.
(The spool pin is in the accessory bag.)
e Bobbin winder spindle
r Thread take-up lever
t Thread tension dial
y Thread cutter
u Needle threader
i Needle plate
o Extension table (Accessory storage box)
!0 Hook cover plate
!1 Hook cover plate release button
!2 Reverse stitch lever
!3 Pattern indication window
!4 Carrying handle
!5 Handwheel
!6 Pattern selector dial
!7 Power switch
!8 Machine socket
!9 Presser foot lifter
Drop feed dog lever
SECTION I NAME OF PARTS
!9
20
20
Page 3
3
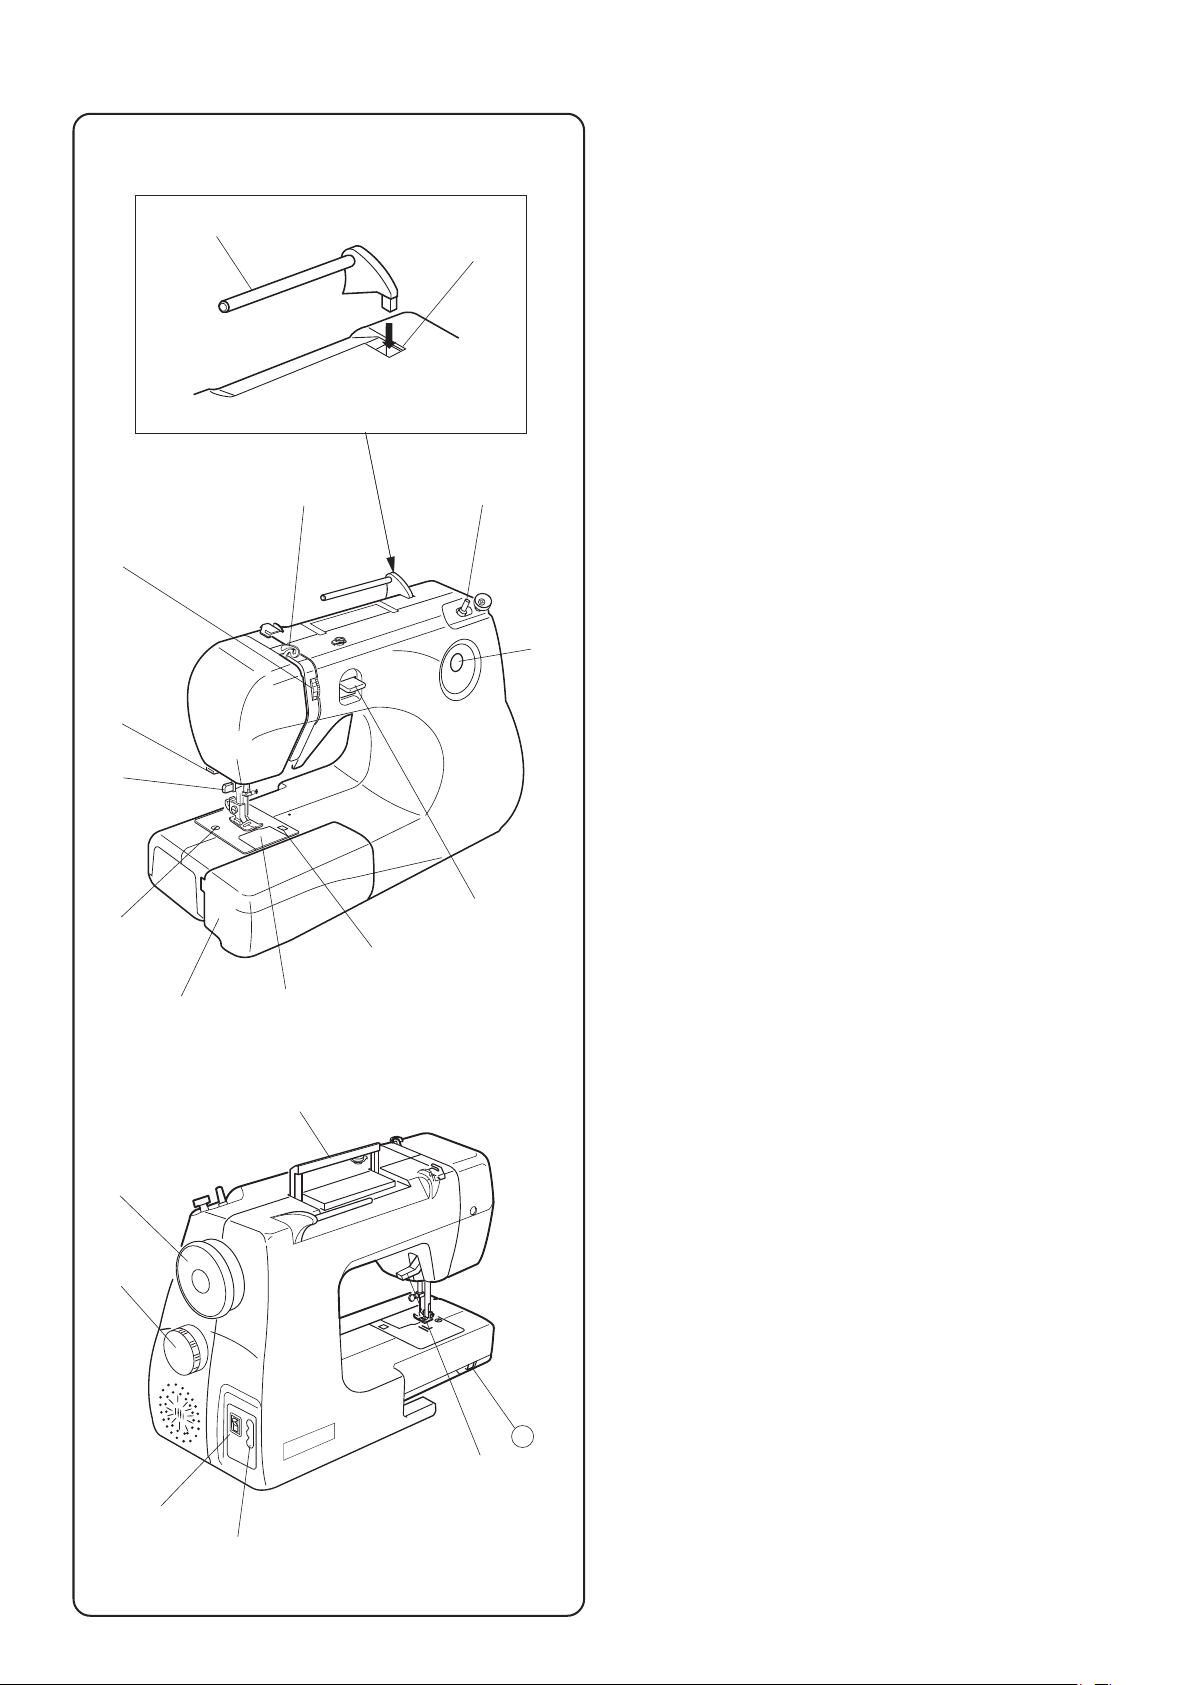
Наименование частей
• Как установить катушечный стержень
1 Катушечный стержень
2 Установочное отверстие
*
Вставьте катушечный стержень в
отверстие как показано на рисунке.
(Катушечный стержень находится в
коробке с аксессуарами.)
3 Шпиндель намотки шпульки
4 Рычаг нитепритягивателя
5 Регулятор натяжения нити
6 Нитеобрезатель
7 Нитевдеватель
8 Игольная пластина
9 Выдвижной столик (ящик с аксессуарами)
!0 Крышка челночного отсека
!1 Кнопка снятия крышки челночного отсека
!2 Реверс
!3 Окошко выбора строчек
!4 Ручка для переноски
!5 Маховое колесо
!6 Ручка выбора строчек
!7 Выключатель питания
!8 Электрический разъем машины
!9 Рычаг подъема прижимной лапки
@0 Рычаг отключения транспортера ткани
q
w
er
!3
t
y
u
i
o
!1
!2
!4
!5
!6
!7
!8
!0
Names of Parts
• How to attach the spool pin
q Spool pin
w Setting hole
* Insert the spool pin into the hole as shown.
(The spool pin is in the accessory bag.)
e Bobbin winder spindle
r Thread take-up lever
t Thread tension dial
y Thread cutter
u Needle threader
i Needle plate
o Extension table (Accessory storage box)
!0 Hook cover plate
!1 Hook cover plate release button
!2 Reverse stitch lever
!3 Pattern indication window
!4 Carrying handle
!5 Handwheel
!6 Pattern selector dial
!7 Power switch
!8 Machine socket
!9 Presser foot lifter
Drop feed dog lever
SECTION I NAME OF PARTS
!9
20
20
РАЗДЕЛ l. НАИМЕНОВАНИЕ ЧАСТЕЙ
Page 4
4
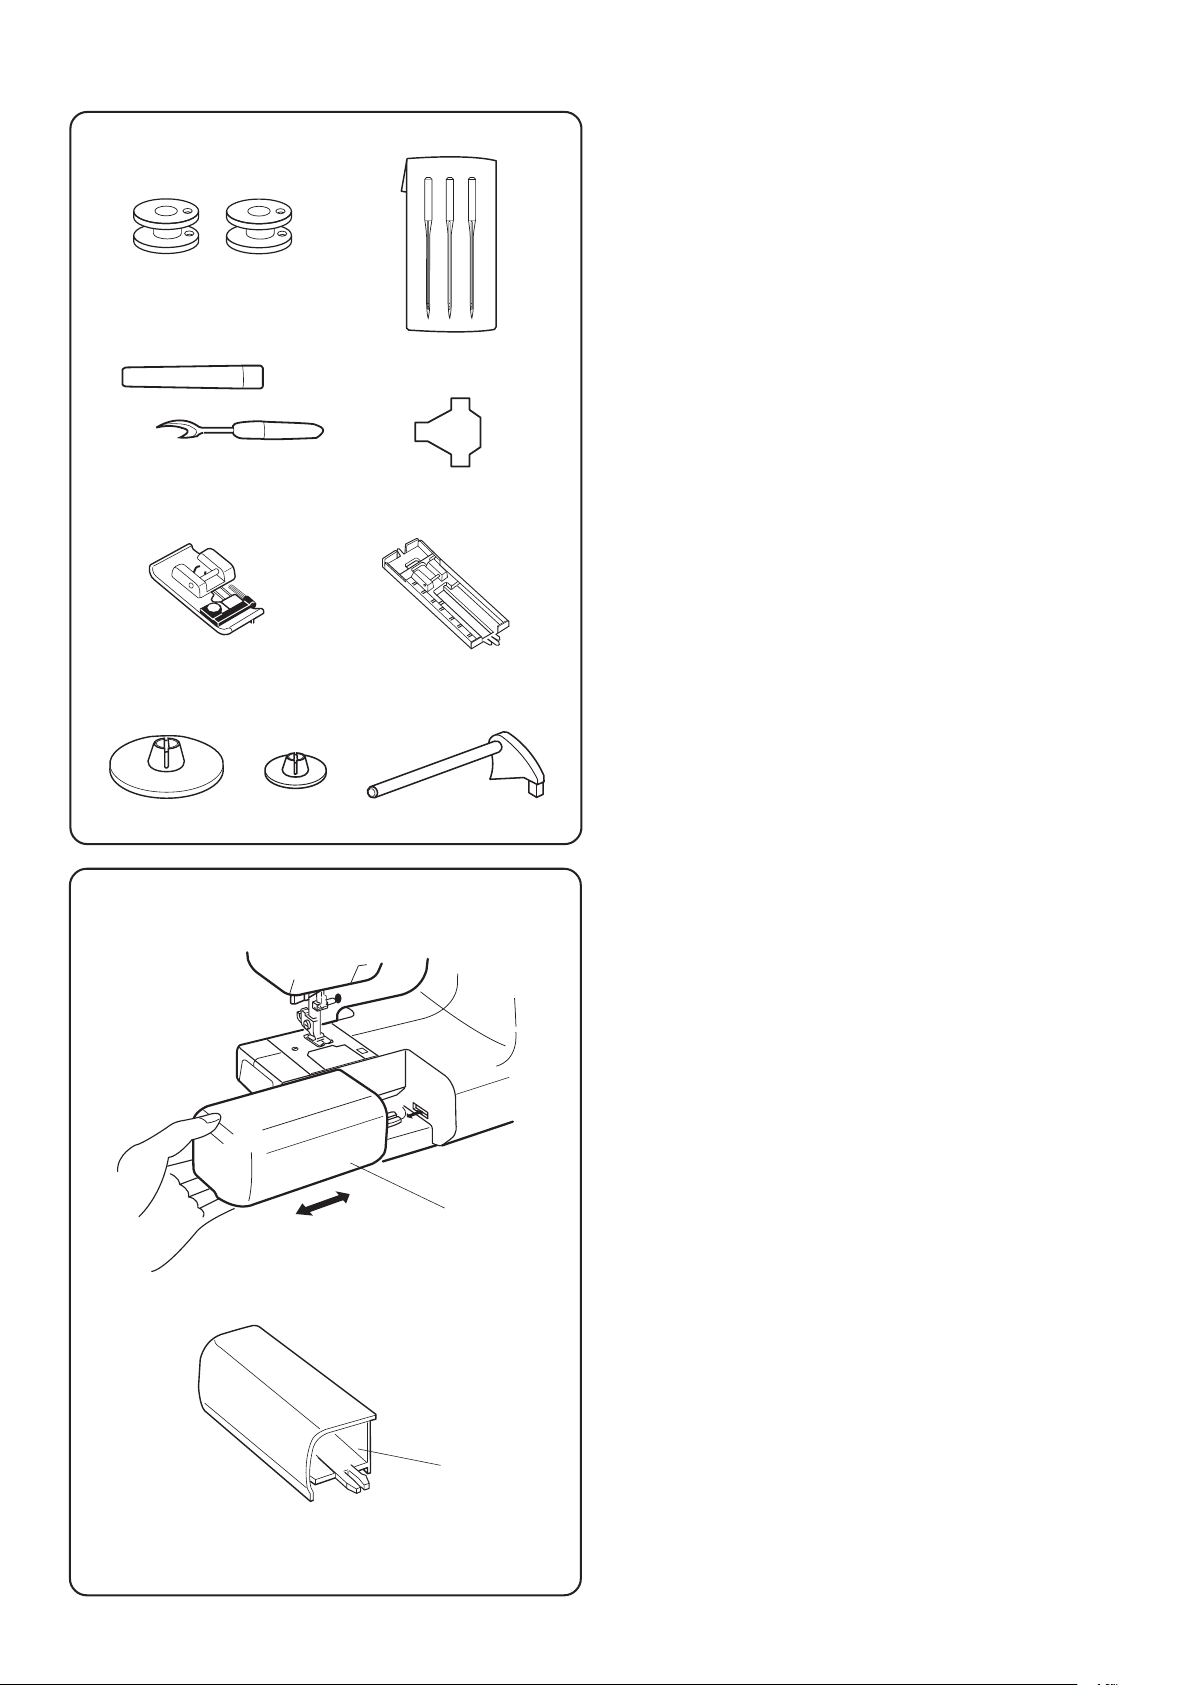
Стандартные аксессуары
Аксессуары хранятся в выдвижном столике.
1 Шпульки
2 Иглы
3 Вспарыватель
4 Отвертка
5 Оверлочная лапка
6 Рамка для петли
7 Держатель катушки (большой)
8 Держатель катушки (малый)
9 Катушечный стержень
• Свободный рукав
Съемный столик увеличивает рабочую
поверхность и легко снимается для шитья
по кругу.
Снятие столика:
Вытяните столик из машины, как показано
на рисунке.
Установка столика:
Задвиньте столик обратно, слегка нажимая
на него, чтобы столик пристегнулся к машине.
1 Съемный столик
2 Ящик для мелких аксессуаров
q
e
t
u
w
r
y
i
q
w
o
Standard Accessories and Storage Place
The following accessories are stored in the extension
table.
q Bobbins
w Needles
e Seam ripper
r Screwdriver
t Overedge foot
y Buttonhole foot
u Spool holder (large)
i Spool holder (small)
o Spool pin
• Free arm
The extension table provides an extended sewing area
and can be easily removed for free arm sewing.
Detaching the table:
Pull the table away from the machine, as illustrated.
Attaching the table:
Push the extension table until it snaps into the
machine.
q
Extension table
w Accessory storage box ( for small parts)
5
Connecting Machine to Power Supply
Before connecting the power cord, make sure the voltage
and frequency shown on the machine conform to your
electrical power.
q
Machine plug
w Machine socket
e Power supply plug
r Electrical outlet
t Power switch
z Turn off the power switch t.
x Insert the machine plug q into the machine
socket
w .
c Insert the power supply plug e into the
electrical outlet
r .
v Turn the power switch t to turn on the power and
sewing light.
Controlling Sewing Speed
• Foot control
Sewing speed can be varied by the foot control.
The harder you press on the control, the faster the
machine runs.
q
Foot control for 120V
w Foot control for 240V
x
c
v
t
r
e
q
w
q
w
SECTION II GETTING READY TO SEW
z
Operating Instructions:
Foot Controller Model YC-482J or TJC-150 is used
with Sewing Machine Model 661.
This appliance has a polarized plug (one blade wider
than the other). To reduce the risk of electric shock, this
plug is intended to fit in a polarized outlet only one
way. If the plug does not fit in the outlet, reverse the
plug. If it still does not fit, contact a qualified electrician
to install the proper outlet. Do not modify the plug in
any way.
Page 5

5
Подключение питания к машине
Перед подключением шнура, убедитесь,
что напряжение и частота Вашей сети
соответствуют напряжению и частоте,
указанным на машине.
1 Вилка педали
2 Гнездо машины
3 Электрическая вилка
4 Электрическая розетка
5 Выключатель питания
1 Выключите питание 5.
2 Вставьте вилку педали 1 в гнездо 2.
3 Вставьте электрическую вилку 3
в электрическую розетку 4.
4 Нажмите на выключатель 5: включите
питание и свет.
Контроль скорости шитья
• Педаль
Скорость шитья можно регулировать педалью.
Чем сильнее нажимать на педаль, тем быстрее
шьет машина.
1 Педаль 120 В
2 Педаль 220-240 В
5
Connecting Machine to Power Supply
Before connecting the power cord, make sure the voltage
and frequency shown on the machine conform to your
electrical power.
q
Machine plug
w Machine socket
e Power supply plug
r Electrical outlet
t Power switch
z Turn off the power switch t.
x Insert the machine plug q into the machine
socket
w .
c Insert the power supply plug e into the
electrical outlet
r .
v Turn the power switch t to turn on the power and
sewing light.
Controlling Sewing Speed
• Foot control
Sewing speed can be varied by the foot control.
The harder you press on the control, the faster the
machine runs.
q
Foot control for 120V
w Foot control for 240V
x
c
v
t
r
e
q
w
q
w
SECTION II GETTING READY TO SEW
z
Operating Instructions:
Foot Controller Model YC-482J or TJC-150 is used
with Sewing Machine Model 661.
This appliance has a polarized plug (one blade wider
than the other). To reduce the risk of electric shock, this
plug is intended to fit in a polarized outlet only one
way. If the plug does not fit in the outlet, reverse the
plug. If it still does not fit, contact a qualified electrician
to install the proper outlet. Do not modify the plug in
any way.
РАЗДЕЛ ll. ПОДГОТОВКА К ШИТЬЮ
Page 6

6
Смена игл
• Смена игл
1 Отключите питание машины.
2 Поверните на себя маховое колесо и
поднимите иглу. Опустите прижимную
лапку.
Ослабьте винт зажима иглы 1, повернув
его против часовой стрелки. Выньте иглу
из зажима.
3 Вставьте новую иглу в зажим плоской
стороной 2 назад. Подтолкните ее наверх
до упора. Крепко затяните винт по часовой
стрелке.
z x
q
Changing Needles
• Changing needles
z Turn off the power switch.
Raise the needle by turning the handwheel
towards you and lower the presser foot.
Loosen the needle clamp screw
q by turning it
counterclockwise. Remove the needle from the
clamp.
x Insert the new needle into the needle clamp with
the flat side
w to the rear. When inserting the needle
into the clamp, push it up as far as it will go.
w
z x
q
Changing Needles
• Changing needles
z Turn off the power switch.
Raise the needle by turning the handwheel
towards you and lower the presser foot.
Loosen the needle clamp screw
q by turning it
counterclockwise. Remove the needle from the
clamp.
x Insert the new needle into the needle clamp with
the flat side
w to the rear. When inserting the needle
into the clamp, push it up as far as it will go.
Tighten the clamp screw firmly by turning it
clockwise.
• To check for a good needle
Put the flat side of the needle onto something flat (needle
plate, glass etc.).
The gap between the needle and the flat surface
e should
be consistent.
Never use a bent or blunt needle.
Not e: Check your needles frequently for barbed or
blunted points. A damaged needle can cause
w
q Needle clamp screw
w Flat side of needle
e
w
1 Винт игольного стержня
2 Плоская сторона иглы
• Проверка качества иглы
Положите иглу плоской стороной на ровную
поверхность (игольную пластину, стекло и т.д.).
Зазор между иглой и плоской поверхностью
должен быть одинаковым.
Не используйте гнутые или тупые иглы.
Примечание: Периодически проверяйте иглы.
Погнутые иглы, иглы с заусенцами и иглы
низкого качества могут испортить трикотаж,
легкие ткани или шёлк.
3 Ровная поверхность
ТКАНИ
ЛЕГКИЕ ТКАНИ
СРЕДНИЕ ТКАНИ
ТЯЖЕЛЫЕ ТКАНИ
Крепдешин, вуаль, органза,
батист, жоржет, трико
Лен, хлопок, двойной трикотаж,
пике, перкаль, сарж
Джинса, твид, габардин, репс,
пальтовая, драпировочная,
парусина
НИТКИ
Тонкий шелк 80–100
Тонкий хлопок 80-100
Тонкий полиэстер 80-100
Шелк 50
Хлопок 60-80
Синтетика 50-80
Хлопок с полиэстером
Хлопок 50
Шелк 50
Хлопок 40-50
Синтетика 40-50
Хлопок с полиэстером
Шелк 30
Хлопок 30
ИГЛЫ
№9 или №11
№11 или №14
№14
№14 или №16
№16
ПРИМЕЧАНИЕ:
*
Обычно, тонкие нити и иглы используются для тонких тканей, толстые для тяжелых тканей.
*
Перед началом работы всегда пробуйте иглу и нить на отдельном кусочке ткани.
*
Верхняя и нижняя нити должны быть одинаковыми по свойствам.
*
При работе с очень тонкими, синтетическими и растягивающимися тканями используйте иглы
с голубым наконечником.
*
Игла с голубым наконечником эффективно предотвращает пропуски стежков.
q
w
w
q
w
q
e
q
e
w
z
x
Pattern Selection
Raise the needle, turn the pattern selector dial to select
the desired pattern.
Note: Do not turn the pattern selector dial while the
needle is in the fabric, otherwise the needle may
bend or break.
q
Pattern indication window
w Pattern selector dial
Presser Foot Lifter
The presser foot lifter raises and lowers the presser foot.
You can raise it about 0.6 cm (1/4˝) higher than the
normal up position for easy removal of the presser foot or
to help you place heavy fabric under the foot.
q
Normal up position
w High position
e Presser foot lifter
To Attach and Remove the Presser Foot
z Raise the presser foot. Press the lever on the back of
the foot holder.
The presser foot will drop off.
q
Lever
x Place the selected presser foot so the pin on the
foot lies just under the groove of the foot holder.
Lower the presser bar to lock the foot in place.
w
Groove
e Pin
q
w
w
q
w
q
e
q
e
w
z
x
Pattern Selection
Raise the needle, turn the pattern selector dial to select
the desired pattern.
Note: Do not turn the pattern selector dial while the
needle is in the fabric, otherwise the needle may
bend or break.
q
Pattern indication window
w Pattern selector dial
Presser Foot Lifter
The presser foot lifter raises and lowers the presser foot.
You can raise it about 0.6 cm (1/4˝) higher than the
normal up position for easy removal of the presser foot or
to help you place heavy fabric under the foot.
q
Normal up position
w High position
e Presser foot lifter
To Attach and Remove the Presser Foot
z Raise the presser foot. Press the lever on the back of
the foot holder.
The presser foot will drop off.
q
Lever
x Place the selected presser foot so the pin on the
foot lies just under the groove of the foot holder.
Lower the presser bar to lock the foot in place.
w
Groove
e Pin
Reverse Stitch Lever
The machine will sew in reverse while the reverse stitch
lever is depressed.
How to Drop the Feed Dog
The drop feed dog lever is located underneath the free
arm bed on the back side of the machine.
To drop the feed dog, slide the drop feed dog lever to the
right
q.
To raise the feed dog, slide the drop feed dog lever to the
left w, and turn the handwheel toward you.
The feed dog must be up for normal sewing.
q
w
q
w
Выбор игл и ниток
Page 7

7
Выбор строчек
Поднимите иглу, установите нужную строчку
вращая ручку выбора строчек.
Примечание: Не поворачивайте ручку выбора
строчек, если игла находится в ткани. Иначе
игла может погнуться или сломаться.
1 Окошко выбора строчки
2 Регулятор выбора строчек
Рычаг подъема прижимной лапки
Рычаг подъема поднимает и опускает
прижимную лапку.
Рычаг дает возможность поднять лапку выше
обычного положения на 0.6 см, чтобы заменить
лапку или подложить тяжелую ткань.
1 Обычное поднятое положение
2 Верхнее положение
3 Рычаг подъема лапки
Прижимная лапка
Как установить и снять прижимную лапку
1 Поднимите прижимную лапку. Нажмите на
рычаг позади держателя лапки.
Прижимная лапка отскочит.
1 Рычаг
2 Расположите лапку, чтобы перекладина
лапки находилась под выемкой держателя.
Опустите лапку и пристегните ее.
2 Выемка
3 Перекладина
Реверс
При удержании кнопки реверса машина шьет
в обратную сторону.
Отключение транспортера ткани
Рычаг транспортера ткани находится под
свободным рукавом позади машины.
Передвиньте рычаг отключения транспортера
ткани вправо 1 и отключите его.
Чтобы поднять зубчатую рейку, передвиньте
рычаг влево 2 и поверните на себя маховое
колесо. При обычном шитье транспортер ткани
должен быть поднят.
q
w
w
q
w
q
e
q
e
w
z
x
Pattern Selection
Raise the needle, turn the pattern selector dial to select
the desired pattern.
Note: Do not turn the pattern selector dial while the
needle is in the fabric, otherwise the needle may
bend or break.
q
Pattern indication window
w Pattern selector dial
Presser Foot Lifter
The presser foot lifter raises and lowers the presser foot.
You can raise it about 0.6 cm (1/4˝) higher than the
normal up position for easy removal of the presser foot or
to help you place heavy fabric under the foot.
q
Normal up position
w High position
e Presser foot lifter
To Attach and Remove the Presser Foot
z Raise the presser foot. Press the lever on the back of
the foot holder.
The presser foot will drop off.
q
Lever
x Place the selected presser foot so the pin on the
foot lies just under the groove of the foot holder.
Lower the presser bar to lock the foot in place.
w
Groove
e Pin
q
w
w
q
w
q
e
q
e
w
z
x
Pattern Selection
Raise the needle, turn the pattern selector dial to select
the desired pattern.
Note: Do not turn the pattern selector dial while the
needle is in the fabric, otherwise the needle may
bend or break.
q
Pattern indication window
w Pattern selector dial
Presser Foot Lifter
The presser foot lifter raises and lowers the presser foot.
You can raise it about 0.6 cm (1/4˝) higher than the
normal up position for easy removal of the presser foot or
to help you place heavy fabric under the foot.
q
Normal up position
w High position
e Presser foot lifter
To Attach and Remove the Presser Foot
z Raise the presser foot. Press the lever on the back of
the foot holder.
The presser foot will drop off.
q
Lever
x Place the selected presser foot so the pin on the
foot lies just under the groove of the foot holder.
Lower the presser bar to lock the foot in place.
w
Groove
e Pin
Reverse Stitch Lever
The machine will sew in reverse while the reverse stitch
lever is depressed.
How to Drop the Feed Dog
The drop feed dog lever is located underneath the free
arm bed on the back side of the machine.
To drop the feed dog, slide the drop feed dog lever to the
right
q.
To raise the feed dog, slide the drop feed dog lever to the
left w, and turn the handwheel toward you.
The feed dog must be up for normal sewing.
q
w
q
w
Page 8

8
Подготовка шпульной нити
• Удаление шпульки
Осторожно отодвиньте вправо фиксатор 1
крышки челночного отсека 2 и снимите ее.
Вытащите шпульку 3.
1 Фиксатор крышки челночного отсека
2 Крышка челночного отсека
3 Шпулька
• Установка катушки
Установите катушку на катушечный стержень
так, чтобы нить разматывалась в соответствии
с рисунком.
Наденьте на катушку большой держатель 1.
1 Держатель катушки большой
2 Конец нити
Для маленьких катушек
3 Держатель катушки малый
q
e
q
w
e
w
Preparation of the Bobbin Thread
• Removing the bobbin
Gently slide the hook cover plate release button
q to the
right and remove the cover plate
w.
Lift out the bobbin
e.
q Hook cover plate release button
w Hook cover plate
e Bobbin
• Set the spool
Place the spool of thread on the spool pin with the thread
coming off the spool as illustrated.
Press the large spool holder q firmly against the spool of
thread.
q
Large spool holder
w End of thread
For small spool
e
Small spool holder
w
9
x
c v
b
n
m
q
w
e
• Winding the bobbin
z Pull the handwheel away from the machine to
disengage the clutch.
x Guide the thread around the thread guide q and
bobbin winder thread guide
w in order as illustrated.
q
Thread guide
w Bobbin winder thread guide
c Thread through the hole in the bobbin from the
inside to the outside.
v Put the bobbin on the bobbin winder spindle e with
the free end of the thread coming out at the top.
e
Bobbin winder spindle
b Push the bobbin to the right.
n With the free end of the thread held in your hand,
depress the foot control. Stop the machine when
the bobbin has made a few turns, and cut the thread
close to the bobbin.
m Depress the foot control again. When the bobbin
is fully wound, it will stop automatically.
Return the bobbin winder to its original position
by moving the spindle to the left, and cut the
thread as illustrated.
, To engage the clutch, push the handwheel in.
z
,
Page 9

9
• Намотка шпульки
1 Потяните за маховое колесо в
противоположную сторону от машины как
показано на рисунке.
2 Пропустите нить в нитенаправитель 1 и
через направитель 2 как на рисунке.
1 Нитенаправитель
2 Направитель намотки
3 Проденьте нить через отверстие в шпульке
изнутри наружу.
4 Наденьте шпульку на шпиндель 3. Кончик
нити должен смотреть вверх.
3 Шпиндель намотки
5 Подтолкните и отодвиньте шпульку вправо.
6 Удерживая свободный конец нити в руке,
нажмите на педаль. Остановите машину
после нескольких оборотов и обрежьте
свободный конец близко к шпульке.
7 Снова нажмите на педаль. Когда шпулька
будет полностью намотана, машина
остановится автоматически. Верните
шпульку в первоначальное положение,
отодвинув влево, и обрежьте нить как
показано на рисунке.
8 Надавите на маховое колесо и верните его
в обычное рабочее положение.
9
x
c v
b
n
m
q
w
e
• Winding the bobbin
z Pull the handwheel away from the machine to
disengage the clutch.
x Guide the thread around the thread guide q and
bobbin winder thread guide
w in order as illustrated.
q
Thread guide
w Bobbin winder thread guide
c Thread through the hole in the bobbin from the
inside to the outside.
v Put the bobbin on the bobbin winder spindle e with
the free end of the thread coming out at the top.
e
Bobbin winder spindle
b Push the bobbin to the right.
n With the free end of the thread held in your hand,
depress the foot control. Stop the machine when
the bobbin has made a few turns, and cut the thread
close to the bobbin.
m Depress the foot control again. When the bobbin
is fully wound, it will stop automatically.
Return the bobbin winder to its original position
by moving the spindle to the left, and cut the
thread as illustrated.
, To engage the clutch, push the handwheel in.
z
,
Page 10

10
• Установка шпульки
1 Поместите шпульку 1 в шпуледержатель
2, нить должна отматываться так, как
показано на рисунке.
1 Шпулька
2 Шпуледержатель
3 Конец нити
2 Пропустите нить 4 в паз (А) в передней
части шпуледержателя. Проведите нить
влево между пружинами натяжения.
4 Зазор (А)
5 Пружина
3 Продолжайте осторожно вытягивать нить 6,
пока она не соскользнет в паз (В). Вытяните
около 15 см нити.
6 Паз (В)
4 Закройте крышку челночного отсека 8.
Сравните с подсказкой 9 на крышке 8,
правильно ли Вы заправили нить 7.
7 Нижняя нить
8 Крышка челночного отсека
9 Подсказка
z
x
c
v
e
w
• Inserting the bobbin
z Place the bobbin q in the bobbin holder w with the
thread running off as illustrated.
q Bobbin
w Bobbin holder
e End of thread
x Guide the thread into the notch (A) r on the front
side of the bobbin holder. Draw the thread to the
left, sliding it between the tension spring blades.
r
Notch (A)
t Spring
c Continue to draw the thread lightly until the
thread slips into notch (B)
y. Pull out about 15 cm
(6˝) of thread.
y Notch (B)
v Attach the hook cover plate i. Check the threading
by referring to the chart
o shown on the hook cover
plate
i.
u
Bobbin thread
i Hook cover plate
o Threading chart
q
r
t
y
u
i
o
q
w
e
r
y
t
c
z
x
v
b
z
x
c
v
b
Threading the Machine
• To set the needle thread
z Raise the presser foot with the presser foot lifter q.
Lead the thread from the spool and pass it
through the thread guide
w. Then draw it down
along the right slot.
q
Presser foot lifter
w Thread guide
x Then, down around the thread guide plate e.
e
Thread guide plate
c Raise the take-up lever to its highest position by
turning the handwheel towards you.
Firmly draw the thread from right to left over the
take-up lever
r and down into the take-up lever
eye.
r
Thread take-up lever
v Draw the thread down and slide the thread
behind the needle bar thread guide t from the left.
t
Needle bar thread guide
b Use the needle threader to thread the needle.
y
Needle
(see page 12).
Page 11

11
Заправка нити в машину
• Заправка верхней нити
1 Поднимите прижимную лапку при помощи
рычага подъема лапки 1. Отмотайте
нить с катушки и пропустите ее через
нитенаправитель 2. Затем направьте ее
вниз вдоль правого паза.
1 Рычаг подъема прижимной лапки
2 Нитенаправитель
2 Затем ведите нить вниз вокруг
нитенаправительной пластины 3.
3 Нитенаправительная пластина
3 Поднимите нитеводитель в наивысшее
положение, повернув на себя маховое
колесо. Пропустите нить справа налево и
через ушко нитеводителя.
4 Нитеводитель
4 Затем направьте нить вниз и пропустите ее
через нижний нитенаправитель игольного
стержня с левой стороны.
5 Нитенаправитель игольного стержня
5 Воспользуйтесь нитевдевателем для
вдевания нити в иглу.
6 Игла
(Страница 12)
q
w
e
r
y
t
c
z
x
v
b
z
x
c
v
b
Threading the Machine
• To set the needle thread
z Raise the presser foot with the presser foot lifter q.
Lead the thread from the spool and pass it
through the thread guide
w. Then draw it down
along the right slot.
q
Presser foot lifter
w Thread guide
x Then, down around the thread guide plate e.
e
Thread guide plate
c Raise the take-up lever to its highest position by
turning the handwheel towards you.
Firmly draw the thread from right to left over the
take-up lever
r and down into the take-up lever
eye.
r
Thread take-up lever
v Draw the thread down and slide the thread
behind the needle bar thread guide t from the left.
t
Needle bar thread guide
b Use the needle threader to thread the needle.
y
Needle
(see page 12).
Page 12

12
• Нитевдеватель
1 Поверните на себя маховое колесо и
поднимите иглу в наивысшее положение.
Удерживая рычаг нитевдевателя 1,
опустите его вниз до конца.
1 Рычаг нитевдевателя
2 Отведите рычаг нитевдевателя назад
так, чтобы крючок 3 прошел с обратной
стороны в игольное ушко.
Слева накиньте нить на направитель 2.
Пропустите нить под рычагом нитевдевателя
3 и выведите направо.
2 Направитель
3 Крючок нитевдевателя
3 Потяните на себя рычаг нитевдевателя
1, чтобы вытянуть игольную нить, как
показано на рисунке. Затем подтолкните
рычаг нитевдевателя вверх и вытяните нить
как показано на рисунке.
4 Вытяните нить через игольное ушко.
z
x
c
v
q
w
e
• Using the needle threader
z Turn the handwheel toward you to raise the
needle to its highest position. Hold the needle
threader knob
q and pull it down to its lowest
position.
q
Needle threader knob
x Push the needle threader knob q to the back so
that the hook
e is coming out from the backside of
the needle eye.
Hook the thread around the guide
w from the left.
Pass the thread under the threader hook
e and draw
the thread to the right.
w
Guide
e Needle threader hook
c Push the needle threader knob q towards you to
pull out the needle thread as illustrated. Then push the
knob q up to pull the needle thread as illustrated.
v Pull the needle thread through the needle eye.
13
z
x
c
q
w
• Drawing up the bobbin thread
z Raise the presser foot and hold the needle thread
lightly with your left hand.
q Needle thread
x Turn the handwheel slowly towards you one
complete turn.
Bring the bobbin thread up by pulling the needle
thread as illustrated.
w Bobbin thread
c Pull 10 to 15 cm (4˝ to 6˝) of both threads back
and under the presser foot.
q
Page 13

13
• Вытягивание нижней нити
1 Поднимите прижимную лапку и слегка
удерживайте левой рукой верхнюю нить.
1 Верхняя нить
2 Медленно поверните на себя маховое
колесо (полный оборот).
Подхватите нижнюю нить, вытянув верхнюю
нить, как показано на рисунке.
2 Нижняя нить
3 Вытяните назад 10 – 15 см обеих нитей и
пропустите их под лапку.
13
z
x
c
q
w
• Drawing up the bobbin thread
z Raise the presser foot and hold the needle thread
lightly with your left hand.
q Needle thread
x Turn the handwheel slowly towards you one
complete turn.
Bring the bobbin thread up by pulling the needle
thread as illustrated.
w Bobbin thread
c Pull 10 to 15 cm (4˝ to 6˝) of both threads back
and under the presser foot.
q
Page 14

14
Прямая строчка
Установки машины
1 Выбор строчки:
2 Прижимная лапка: Лапка А для зигзага
3 Натяжение нити: 2 – 6
Примечание: можно выбрать 3 стежка разной
длины.
• Начало строчки
Поднимите прижимную лапку и расположите
ткань рядом с направляющими линиями на
игольной пластине.
Опустите иглу в ткань. Опустите прижимную
лапку и отведите нити назад. Нажмите на
педаль.
Чтобы закрепить начало строчки, нажмите
кнопку реверса и прошейте несколько стежков
назад.
Осторожно направляйте ткань по линиям, давая
возможность ей естественно продвигаться.
• Смена направления строчки
Остановите машину, поверните маховое колесо
на себя и опустите иглу в ткань.
Поднимите прижимную лапку.
Поверните ткань вокруг иглы и смените
направление строчки. Опустите прижимную
лапку и продолжайте шить.
• Завершение строчки
1. Чтобы закрепить конец строчки, нажмите
кнопку реверса и сделайте несколько
стежков в обратном направлении 1.
1 Кнопка реверса
2. Поднимите прижимную лапку. Уберите
ткань и вытяните нити назад.
3. Обрежьте нити нитеобрезателем
2.
2 Нитеобрезатель
*
Нити обрезаются на достаточную длину
для начала нового шва.
q w
e
q
w
Straight Stitch Sewing
Machine setting
q Stitch selector:
w Presser foot: Zigzag foot A
e Thread tension dial: 2-6
Note: There are 3 types of stitch length selection.
• Starting to sew
Raise the presser foot and position the fabric with its edge
next to a stitching guide line on the needle plate.
Lower the needle into the fabric.
Lower the presser foot and smooth the threads toward the
back. Depress the foot control.
To fasten the beginning of the seam, press the reverse
stitch lever and sew several reverse stitches.
Gently guide the fabric along the guide line letting the
fabric feed naturally.
• Changing s ewing direc tion
Stop the machine and turn the handwheel toward you to
bring the needle down into the fabric.
Raise the presser foot.
Pivot the fabric around the needle to change the sewing
direction as desired. Lower the presser foot and continue
sewing.
• Finish ing sewing
1. To fasten the end of the seam, press the reverse
stitch lever and sew several reverse stitches
q.
q
Reverse stitch lever
2. Raise the presser foot. Remove the fabric, draw the
threads to the back.
3. Cut the threads using the thread cutter
w.
w
Thread cutter
* The threads are cut the proper length for starting
the next seam.
SECTION III BASIC SEWING
15
q
w
r
e
t
w
q w e
• Using the seam guides on the needle plate
The seam guides on the needle plate and hook cover plate
help you to measure seam width.
* The numbers indicate the distance between the
center needle position and the guide line.
Numbers on the needle plate 15 20 4/8˝ 5/8˝ 6/8˝
Distance in centimeters 1.5 2.0 1.3 1.6 1.9
q Guide lines
w Cornering guide
e Needle plate
r Needle plate hole
t Seam width from the center needle position
• Turning square corners
To turn a square corner 1.6 cm (5/8˝) from the fabric
edge:
When the fabric edge facing you lines up with the
cornering guide as illustrated, stop stitching and
lower the needle by turning the handwheel towards you.
Raise the presser foot and turn the fabric to line
the edge with the 1.6 cm (5/8˝) seam guide.
Lower the presser foot and begin stitching in the new
direction.
w
Cornering guides
Triple Straight Stitch
Machine setting:
q Stitch selector:
w Presser foot: Zigzag foot (A)
e Thread tension dial: 2-6
* It is not necessary to adjust the stitch length.
This strong, durable pattern is recommended where both
elasticity and strength are needed to insure comfort and
durability. Use it to reinforce areas such as crotch and
armhole seams. Also, use when constructing items such
as backpacks for extra strength.
The pattern is sewn with two stitches forward and one
stitch backward, forming a seam that does not rip easily.
Garments should be basted for fitting before seaming.
РАЗДЕЛ
lll
. ОСНОВНЫЕ ШВЕЙНЫЕ ТЕХНИКИ
Page 15

15
• Направительные линии игольной пластины
Направительные линии на игольной пластине
и пластине челночного механизма помогут Вам
измерять ширину швов.
*
Цифры определяют расстояние между
центральной позицией иглы и направительной
линией.
Цифры на пластине 15 20 4/8” 5/8” 6/8”
Расстояние в см 1,5 2,0 1,3 1,6 1,9
1 Направительные линии
2 Ограничитель углов
3 Игольная пластина
4 Отверстие в игольной пластине
5 Расстояние от центральной позиции
иглы до края ткани
• Обработка углов
Как создать прямой угол на 1,6 см от края ткани:
Когда край ткани дойдет до линии,
ограничивающей углы, как показано на рисунке,
остановите машину и опустите иглу в ткань,
повернув на себя маховое колесо.
Поднимите прижимную лапку и поверните ткань
по линии, указывающей 1,6 см от края ткани.
Опустите прижимную лапку и начинайте строчить
в новом направлении.
2 Ограничители углов
Прямой тройной стежок
Установки машины
1 Выбор строчки:
2 Прижимная лапка: Лапка А для зигзага
3 Натяжение нити: 2 – 6
*
Необязательно изменять длину стежка.
Этот крепкий и прочный стежок рекомендуется
для придания шву большей эластичности и
прочности. Используйте его в области проймы
и швов на брюках. Также применяйте его для
большей крепости на рюкзаках.
Этот шов создается двумя стежками вперёд
и одним назад, его нелегко разорвать. Перед
началом строчки изделие следует наметать.
15
q
w
r
e
t
w
q w e
• Using the seam guides on the needle plate
The seam guides on the needle plate and hook cover plate
help you to measure seam width.
* The numbers indicate the distance between the
center needle position and the guide line.
Numbers on the needle plate 15 20 4/8˝ 5/8˝ 6/8˝
Distance in centimeters 1.5 2.0 1.3 1.6 1.9
q Guide lines
w Cornering guide
e Needle plate
r Needle plate hole
t Seam width from the center needle position
• Turning square corners
To turn a square corner 1.6 cm (5/8˝) from the fabric
edge:
When the fabric edge facing you lines up with the
cornering guide as illustrated, stop stitching and
lower the needle by turning the handwheel towards you.
Raise the presser foot and turn the fabric to line
the edge with the 1.6 cm (5/8˝) seam guide.
Lower the presser foot and begin stitching in the new
direction.
w
Cornering guides
Triple Straight Stitch
Machine setting:
q Stitch selector:
w Presser foot: Zigzag foot (A)
e Thread tension dial: 2-6
* It is not necessary to adjust the stitch length.
This strong, durable pattern is recommended where both
elasticity and strength are needed to insure comfort and
durability. Use it to reinforce areas such as crotch and
armhole seams. Also, use when constructing items such
as backpacks for extra strength.
The pattern is sewn with two stitches forward and one
stitch backward, forming a seam that does not rip easily.
Garments should be basted for fitting before seaming.
Page 16

16
Баланс натяжения верхней нити
• Выбор правильного натяжения
Для прямой строчки:
У идеальной прямой строчки нити переплетены
между двумя слоями ткани как показано на
рисунке.
Если посмотреть сверху и снизу на шов, все
стежки ровные и четкие, нет пропусков.
При регулировке натяжения верхней нити, чем
больше цифра, тем сильнее натяжение.
Результат зависит от:
*
структуры и толщины ткани
*
количества слоев ткани
*
типа строчки
1 Игольная нить (верхняя нить)
2 Шпульная нить (нижняя нить)
3 Изнаночная сторона ткани
4 Лицевая сторона
• Натяжение слишком сильное
1 Шпульная нить видна на лицевой стороне и
ткань стянута.
Поверните регулятор натяжения нити
(к меньшей цифре) и ослабьте натяжение
верхней нити.
5 Регулятор натяжения нити
• Натяжение слишком слабое
2 Игольная нить видна на изнаночной стороне
и ткань собирается.
Поверните регулятор натяжения (к большей
цифре) и увеличьте натяжение верхней
нити.
z
x
q
e
w
r
r
t
e
t
Balancing Needle Thread Tension
• Choose the correct tension
For straight stitch:
The ideal straight stitch will have threads locked between
the two layers of the fabric, as illustrated (magnified to
show detail).
If you look at the top and bottom of the seam, you will
notice that there are no gaps. Each stitch is smooth and
even.
Turn the dial to alter the needle thread tension. The higher
the number, the tighter the tension.
Results depend on:
* stiffness and thickness of the fabric
* number of fabric layers
* type of stitch
q
Needle thread (Top thread)
w Bobbin thread (Bottom thread)
e Wrong side of fabric
r Right side of fabric
• Tension is too tight
z The bobbin thread shows through on the right
side of the fabric and it feels bumpy.
Turn the thread tension dial upwards (to a smaller
number) to loosen the needle thread tension.
t Thread tension dial
• Tension is too loose
x The needle thread shows through on the wrong side
of the fabric and it feels bumpy.
Turn the thread tension dial downwards (to a
larger number) to tighten the needle thread tension.
17
r
q w e
q w e
q w e
Zigzag Stitching
Machine setting:
q Stitch selector:
w Presser foot: Zigzag foot A
e Thread tension dial: 2-5
The zigzag stitch is one of the most versatile stitches on
your machine. It can be a utility stitch for sewing on
buttons, buttonholing, hemming, overcasting, mending
and darning.
It can also be used to decorate with trims, appliques and
cutwork or as a decorative stitch.
Overcasting
Machine setting:
q Stitch selector:
w Presser foot: Overedge foot C
e Thread tension dial: 3-6
Overcasting is used on the seam allowance to prevent
fabrics from raveling at raw edges. It can be used to
finish a hem edge. Place the edge of the fabric next to the
black ridge of foot C.
r
Black ridge
Tricot Stitch
Machine setting:
q Stitch selector:
w Presser foot: Zigzag foot A
e Thread tension dial: 3-6
This stitch is used to finish the seam allowance on
synthetics and other fabrics that tend to pucker.
The stitch is excellent for darning and mending tears.
Place your fabric to allow a 1.6 cm (5/8˝) seam.
Trim the extra seam allowance after sewing as illustrated.
Note: Be careful not to cut the stitches.
SECTION IV UTILITY STITCHES
or
Page 17

17
Зигзаг
Установки машины
1 Выбор строчки:
2 Прижимная лапка: Лапка А для зигзага
3 Натяжение нити: 2 – 5
Стежок зигзаг можно использовать для
пришивания пуговиц, создания петель,
оверлочивания, штопки и т.д.
Также он применяется для декоративной
отделки и аппликаций.
Обработка края
Установки машины
1 Выбор строчки:
or
или
2 Прижимная лапка: Лапка С оверлочная
3 Натяжение нити: 3 – 6
Этот стежок используется на припусках швов
для предотвращения обсыпания краев. Также
рекомендуется для завершения края. Поместите
край ткани рядом с черным направителем лапки
С.
4 Черный направитель
Трикотажный стежок
Установки машины
1 Выбор строчки:
or
2 Прижимная лапка: Лапка А для зигзага
3 Натяжение нити: 3 – 6
Этот стежок используется для завершения швов
на синтетических и других тканях, склонных
образовывать сборки.
Он идеально подходит для штопки.
Расположите ткань, чтобы шов получился
от среза на расстоянии 1,6 см.
Отрежьте излишек ткани как показано
на рисунке.
Примечание: будьте осторожны, не разрежьте
стежки.
17
r
q w e
q w e
q w e
Zigzag Stitching
Machine setting:
q Stitch selector:
w Presser foot: Zigzag foot A
e Thread tension dial: 2-5
The zigzag stitch is one of the most versatile stitches on
your machine. It can be a utility stitch for sewing on
buttons, buttonholing, hemming, overcasting, mending
and darning.
It can also be used to decorate with trims, appliques and
cutwork or as a decorative stitch.
Overcasting
Machine setting:
q Stitch selector:
w Presser foot: Overedge foot C
e Thread tension dial: 3-6
Overcasting is used on the seam allowance to prevent
fabrics from raveling at raw edges. It can be used to
finish a hem edge. Place the edge of the fabric next to the
black ridge of foot C.
r
Black ridge
Tricot Stitch
Machine setting:
q Stitch selector:
w Presser foot: Zigzag foot A
e Thread tension dial: 3-6
This stitch is used to finish the seam allowance on
synthetics and other fabrics that tend to pucker.
The stitch is excellent for darning and mending tears.
Place your fabric to allow a 1.6 cm (5/8˝) seam.
Trim the extra seam allowance after sewing as illustrated.
Note: Be careful not to cut the stitches.
SECTION IV UTILITY STITCHES
or
РАЗДЕЛ lV. ДОПОЛНИТЕЛЬНЫЕ СТРОЧКИ
Page 18

18
Шов-ракушка
Установки машины
1 Выбор строчки:
2 Прижимная лапка: Лапка А для зигзага
3 Натяжение нити: 6 – 8
Возьмите легкую ткань (например, трикотаж).
Сложите ткань и строчите по кромке. Игла
должна только обозначать сложенный край,
создавая ракушки. Возможно, потребуется
увеличить натяжение нити.
Если шить ряды ракушек, располагайте их на
расстоянии 1.5 см друг от друга. Можно также
шить ракушки на вязаном трикотаже или мягких
шелковых тканях в любом направлении.
1 Сложите ткань и прошейте по кромке.
2 Когда игла идет вправо, стежок зигзаг
должен едва захватывать складку. Затем
раскройте ткань и пригладьте складки на
одну сторону.
*
Если натяжение ослаблено, складки не
получатся. Поэтому увеличьте натяжение и
установите его в пределах от 6 до 8.
Потайная строчка
Установки машины
1 Выбор строчки:
2 Прижимная лапка: Лапка А для зигзага
3 Натяжение нити: 1 – 4
Как сложить ткань
У тяжелых тканей сначала необходимо
оверлочить срез. Затем сделайте складку как
показано на рисунке.
1 Изнаночная сторона
2 0,4 – 0,7 см
3 Оверлочный стежок
Как выполнить строчку
1 Расположите ткань на машине так, чтобы
игла в крайнем левом положении только
едва захватывала заложенную часть.
Опустите прижимную лапку.
Выполните строчку, направляя сложенный
край вдоль лапки.
2 Если игла заходит слишком далеко влево,
стежки будут видны на лицевой стороне
ткани.
4 Изнанка
5 Лицо
q w e
q w e
q
w
e
r
t
z
x
z
x
Shell Tuck
Machine setting:
q Stitch selector:
w Presser foot: Zigzag foot A
e Thread tension dial: 6-8
Use a lightweight fabric (tricot, for example). Fold the
fabric on the bias and stitch on the fold. Allow the needle
to just clear the folded edge to create a shelled edge. You
may need to increase the needle thread tension slightly.
If you sew rows of shell stitches, space the rows at least
5/8˝ (1.5 cm) apart. You can also sew shell stitches on
knits or soft silky woven fabrics, in any direction.
z Fold and stitch on the bias.
x When the needle swings to the right, allow the
needle to just clear the folded edge of the fabric
when it zigzags. After stitching, open the fabric
and iron to press the tacks flat to one side.
* If thread tension is too loose, tuck will not be
formed. Therefore, increase the tension and set it
between 6 to 8.
Blind Stitch Hemming
Machine setting:
q Stitch selector:
w Presser foot: Zigzag foot A
e Thread tension dial: 1-4
How to fold the fabric
On heavyweight fabrics that ravel, the raw edge should be
overcast first. Then fold the hem as illustrated.
q
Wrong side of fabric
w
0.4-0.7 cm (1/4˝-7/16˝)
e
Overcasting stitch
How to sew
z Position the fabric on the machine so that the
needle just pierces the folded part of the fabric
when the needle comes over to the extreme left
side. Lower the presser foot.
Sew, while guiding the fabric so that the needle
catches the folded edge.
x If the needle drops on the left side too far, the
stitches appear on the right side of the fabric.
r
Wrong side of fabric
t
Right side of fabric
SECTION V DECORATIVE STITCHING
3
2
1
q w e
r
t
y
u
z
x c v
b
n
m
Buttonhole
Machine setting:
q Stitch selector:
w Presser foot: Buttonhole foot
e Thread tension dial: 1-5
* Before you sew the actual buttonholes on the
actual garment, make several trial buttonholes on
a fabric sample.
* Use interfacing on stretch fabrics.
z Select BH 1( ). Pull the slider so the top mark on
the slider aligns with the start mark. Draw both
threads to the left under the foot.
Insert the garment under the foot.
r
Start mark
x Lower the needle at the starting point. Then
lower the buttonhole foot.
Sew the required length of the left side of the button-
hole and stop the machine.
c Raise the needle to its highest position by turning
the handwheel, then select the BH 2,4( ).
Sew five bartack stitches and stop the machine.
v Raise the needle to its highest position and select
BH 3( ), sew the right side of buttonhole the
same length as the left side and stop the machine.
b Raise the needle and select the BH 2,4( ), and
sew five bartack stitches.
n Raise the needle and presser foot. Remove the fabric
from the machine. Cut both needle and bobbin threads
leaving approximately 10 cm (4˝) of thread ends
loose.
Draw the needle thread to the wrong side of the
fabric by pulling the bobbin thread. Then, knot the
threads.
m Place a pin just before the bartack to prevent cutting
bartack. Cut the opening with the seam ripper.
t
Seam ripper
• Corded buttonhole
1. With the buttonhole foot raised, hook the filler
cord on the spur
y at the back of the buttonhole
foot. Bring the ends toward you under the
buttonhole foot, clearing the front end.
Hook the filler cord into the forks
u on the front of
the buttonhole foot to hold them tight. Lower the
needle into the garment where the buttonhole
will start and lower the foot.
y
Spur
u Forks
2. Depress the foot control and sew the buttonhole over
the filler cord in the same way as described above.
3. Pull the left end of the filler cord to tighten it.
Thread the end of the cord through a darning
needle, draw it to the wrong side of the fabric and
cut.
РАЗДЕЛ V. ДЕКОРАТИВНЫЕ СТРОЧКИ
Page 19

19
Изготовление петли
Установки машины
1 Выбор строчки:
2 Прижимная лапка: Рамка для петли
3 Натяжение нити: 1 – 5
*
Перед тем как выполнять петли, попробуйте
на кусочке аналогичного материала.
*
При работе с тканями стреч используйте
прокладочную ткань.
1 Выберите BH1 (
).
Отведите ползунок назад, чтобы верхняя
отметка на ползунке совпадала с точкой
начала. Отведите обе нити влево под лапку.
Расположите под лапкой изделие.
4 Начальная отметка
2 Опустите иглу в точку начала. Затем
опустите лапку. Прострочите нужную длину
левой стороны петли и остановите машину.
3 Поднимите иглу в верхнее положение,
повернув маховое колесо. Затем выберите
BH2,4 (
). Сделайте пять поперечных
стежков и остановите машину.
4 Поднимите иглу в верхнее положение и
установите BH3 (
). Сделайте правую
сторону петли такой же длины, как и левую
и остановите машину.
5 Поднимите иглу и установите BH2,4 (
).
Сделайте пять поперечных стежков.
6 Поднимите иглу и прижимную лапку,
отведите материал в сторону, обрежьте обе
нити, оставив около 10 см от конца.
Выведите игольную нить на изнанку,
потянув за шпульную нить. Затем завяжите
обе нити.
7 Вставьте булавку перед поперечными
стежками.Затем прорежьте петлю.
5 Вспарыватель
• Зажгутованная петля
1. Поднимите рамку для петли, набросьте
шнур на крючок 6 сзади лапки. Переведите
концы шнура вперед, заправив под лапку.
Зацепите шнур в вилке 7 впереди лапки,
чтобы натянуть его. Опустите иглу в ткань
в точке начала петли и опустите лапку.
6 Крючок
7 Вилка
2. Нажмите на педаль и выполните петлю
в соответствии с выше приведенными
инструкциями.
3. Потяните за левый конец шнура и затяните.
Вденьте концы шнура в штопательную иглу,
выведите их на изнанку и обрежьте.
q w e
r
t
y
u
z
x c v
b
n
m
Buttonhole
Machine setting:
q Stitch selector:
w Presser foot: Buttonhole foot
e Thread tension dial: 1-5
* Before you sew the actual buttonholes on the
actual garment, make several trial buttonholes on
a fabric sample.
* Use interfacing on stretch fabrics.
z Select BH 1( ). Pull the slider so the top mark on
the slider aligns with the start mark. Draw both
threads to the left under the foot.
Insert the garment under the foot.
r
Start mark
x Lower the needle at the starting point. Then
lower the buttonhole foot.
Sew the required length of the left side of the button-
hole and stop the machine.
c Raise the needle to its highest position by turning
the handwheel, then select the BH 2,4( ).
Sew five bartack stitches and stop the machine.
v Raise the needle to its highest position and select
BH 3( ), sew the right side of buttonhole the
same length as the left side and stop the machine.
b Raise the needle and select the BH 2,4( ), and
sew five bartack stitches.
n Raise the needle and presser foot. Remove the fabric
from the machine. Cut both needle and bobbin threads
leaving approximately 10 cm (4˝) of thread ends
loose.
Draw the needle thread to the wrong side of the
fabric by pulling the bobbin thread. Then, knot the
threads.
m Place a pin just before the bartack to prevent cutting
bartack. Cut the opening with the seam ripper.
t
Seam ripper
• Corded buttonhole
1. With the buttonhole foot raised, hook the filler
cord on the spur
y at the back of the buttonhole
foot. Bring the ends toward you under the
buttonhole foot, clearing the front end.
Hook the filler cord into the forks
u on the front of
the buttonhole foot to hold them tight. Lower the
needle into the garment where the buttonhole
will start and lower the foot.
y
Spur
u Forks
2. Depress the foot control and sew the buttonhole over
the filler cord in the same way as described above.
3. Pull the left end of the filler cord to tighten it.
Thread the end of the cord through a darning
needle, draw it to the wrong side of the fabric and
cut.
Page 20

20
Вышивка
Установки машины
1 Выбор строчки:
2 Прижимная лапка: снимите лапку
3 Натяжение нити: 2 – 6
4 Транспортер ткани: отключен
Примечание: можно выбрать 3 стежка разной
длины.
Отключите транспортер ткани и снимите
держатель лапки.
Переведите желаемый рисунок на ткань
портновским мелом.
Запяльте ткань в вышивальные пяльцы и
положите их под иглу.
Опустите рычаг прижимной лапки для
натяжения нити. Удерживая игольную нить
левой рукой, поверните на себя маховое колесо
(полный оборот).
Потяните за верхнюю нить и вытяните нижнюю
нить на лицевую сторону ткани. На средней
скорости начните строчить вдоль отмеченных
линий, осторожно направляя ткань рукой.
По завершении работы подключите транспортер
ткани для обычных работ.
q w
e
Embroidery
Machine setting
q Stitch selector:
w Presser foot: Remove
e Thread tension dial: 2-6
r Feed dogs Dropped
Note: There are 3 types of stitch length selection.
Drop the feed dogs and remove the foot holder.
Draw a design on the fabric with tailor's chalk.
Stretch the fabric between embroidery hoops, and place
the hoops under the needle.
Lower the presser foot lifter to engage the needle thread
tension. Holding the needle thread in your left hand,
rotate the handwheel towards you one complete turn.
Pull the needle thread to draw the bobbin thread to the
right side of the fabric. At medium speed, stitch along the
marked outline, guiding the fabric carefully by hand.
After embroidery is completed, raise the feed dogs for
normal sewing.
r
z
x
c
v
b
Caution
Before performing cleaning or maintenance, make sure
that the sewing machine is unplugged from the power
source.
* Turn the handwheel towards you to raise the
needle before cleaning.
* Do not dismantle the machine other than
explained on this page.
* Do not store the machine in a high-humidity area,
near a heat radiator or in direct sunlight.
* Clean the outside of the machine with a soft cloth
and neutral soap.
• Cleaning the hook race and feed dogs
z Remove the presser foot and needle. Remove
screw
w on the left side of the needle plate e with
the screwdriver
q supplied with the machine.
Remove the needle plate and take out the bobbin.
q
Screw driver
w Screw
e Needle plate
x Lift up the bobbin holder r and remove it.
r
Bobbin holder
c Brush out dust and lint.
v Clean the feed dogs y and hook race u with a small
brush t.
t
Brush
y Feed dogs
u Hook race
b Wipe the hook race gently with a soft, dry cloth i.
i
Dry cloth
* You may also use a vacuum cleaner.
SECTION VI CARE OF YOUR MACHINE
q
w
e
r
t
r
y
t
u
q
i
Page 21

21
Меры предосторожности
Перед проведением чистки или разборки
убедитесь, что машина выключена из розетки.
*
Поверните на себя маховое колесо и перед
чисткой поднимите иглу.
*
Не разбирайте машину иначе, чем описано
на этой странице.
*
Не храните машину во влажном помещении,
у источников тепла и под прямыми
солнечными лучами.
*
Чистите внешнюю поверхность машины
мягкой тряпочкой и нейтральным мыльным
раствором.
• Чистка челнока и тканенаправителей
1 Снимите прижимную лапку и иглу.
Отверткой 1, открутите винт 2 с левой
стороны игольной пластины 3.
Снимите игольную пластину и шпульку.
1 Отвертка
2 Винт
3 Игольная пластина
2 Снимите шпуледержатель 4.
4 Шпуледержатель
3 Вычистите пыль и остатки материала.
4 Маленькой кисточкой прочистите
тканенаправители 6 и челночный механизм
7.
5 Щеточка
6 Тканенаправители
7 Челночный механизм
5 Протрите всё осторожно мягкой сухой
тряпочкой 8.
8 Сухая тряпка
z
x
c
v
b
Caution
Before performing cleaning or maintenance, make sure
that the sewing machine is unplugged from the power
source.
* Turn the handwheel towards you to raise the
needle before cleaning.
* Do not dismantle the machine other than
explained on this page.
* Do not store the machine in a high-humidity area,
near a heat radiator or in direct sunlight.
* Clean the outside of the machine with a soft cloth
and neutral soap.
• Cleaning the hook race and feed dogs
z Remove the presser foot and needle. Remove
screw
w on the left side of the needle plate e with
the screwdriver
q supplied with the machine.
Remove the needle plate and take out the bobbin.
q
Screw driver
w Screw
e Needle plate
x Lift up the bobbin holder r and remove it.
r
Bobbin holder
c Brush out dust and lint.
v Clean the feed dogs y and hook race u with a small
brush t.
t
Brush
y Feed dogs
u Hook race
b Wipe the hook race gently with a soft, dry cloth i.
i
Dry cloth
* You may also use a vacuum cleaner.
SECTION VI CARE OF YOUR MACHINE
q
w
e
r
t
r
y
t
u
q
i
РАЗДЕЛ Vl. УХОД ЗА МАШИНОЙ
Page 22

22
• Замена шпуледержателя
1 Вставьте шпуледержатель так, чтобы паз
занял место рядом со стопором в рабочем
пространстве челнока. Вставьте шпульку.
1 Паз
2 Стопор
2 Поставьте игольную пластину, установив
в отверстия две кнопки направителя
пластины. Отверткой затяните винты.
3 Отверстия направителя
4 Отвертка
• Замена лампочки
Лампочка находится за передней панелью.
Примечание: Перед заменой отключите
машину от сети.
Осторожно: Подождите, пока лампочка
остынет.
Ослабьте винт и снимите переднюю панель.
1 Передняя панель
2 Винт
(А):
*
Чтобы вывернуть: поверните лампочку
против часовой стрелки.
*
Чтобы ввернуть: поверните лампочку
по часовой стрелке.
(В):
*
Чтобы снять: подтолкните лампочку вверх
и поверните против часовой стрелки.
*
Чтобы установить: подтолкните лампочку
и поверните по часовой стрелке.
Replacing the Light Bulb
The sewing light is located behind the face plate.
Note: When replacing the bulb, unplug the machine.
Caution: Wait for the light bulb to cool down before
touching it.
Loosen the screw and remove the face plate.
q
Face plate
w Set screw
(A):
* To remove: Turn the bulb counterclockwise.
* To replace: Turn the bulb clockwise.
(B):
* To remove: Push and turn counterclockwise.
* To replace: Push and turn clockwise.
z
x
q
w
e
• Replacing the bobbin holder
z Insert the bobbin holder so that the knob fits next
to the stopper in the race.
Insert the bobbin.
q
Knob
w Stopper
x Replace the needle plate, inserting the two needle
plate guide pins into the holes in the needle plate.
Tighten the screw firmly with the screwdriver.
e
Guide holes
r Screwdriver
r
q
w
(A)
(B)
Page 23

23
Неисправность
Рвется верхняя нить
Рвется нижняя нить
Ломается игла
Пропускаются стежки
Волнистая строчка
Машина не работает
Вероятная причина
1. Верхняя нить неверно заправлена.
2. Верхняя нить слишком сильно натянута.
3. Погнута или затуплена игла.
4. Неправильно установлена игла.
5. Верхняя и нижняя нити неправильно
расположены под лапкой в начале шитья.
6. Номера нити и иглы не соответствуют.
1. Ошибка заправки нити в шпульном колпачке.
2. Засорился шпульный колпачок.
3. Повреждена шпулька, затруднено ее вращение.
1. Игла неверно установлена.
2. Игла недостаточно закреплена.
3. Регулятор строчки был переключен, когда игла
находилась в материале.
4. Игла слишком тонкая для выбранной ткани.
1. Неверно установлена игла.
2. Игла затуплена или погнута.
3. Игла и нить не подходят для выбранной ткани.
4. Н
е использована игла с голубым наконечником
для синтетическимих, тонких и стреч тканей.
5. Игольная нить неверно заправлена.
1. Натяжение игольной нити слишком велико.
2. Игольная нить неверно заправлена.
3. Игла слишком толстая для выбранной ткани.
1. К машине неправильно подсоединен провод.
2. В шпульном отсеке накопилась грязь.
3. Шпиндель моталки остался в положении
намотки.
Примечание
Страница 11
Страница 16
Страница 6
Страница 6
Страницы 13, 14
Страница 6
Страница 10
Страница 21
Смените шпульку
Страница 6
Страница 6
Страница 7
Страница 6
Страница 6
Страница 6
Страница 6
Страница 6
Страница 11
Страница 16
Страница 11
Страница 6
Страница 5
Страница 21
Страница 9
Неисправности машины
Page 24

24
Page 25

25
661-800-038
Отпечатано на Тайване
 Loading...