


Operation Data
Owner's Manual
OneTouchTM
Control Systems
Sheet #6593, Rev. J
For use with Pool/Spa Combination,
Pool Only/Spa Only, and Dual Equipment
AquaLink® RS Systems.
 WARNING
FOR YOUR SAFETY - This product must be installed and serviced by a professional pool/ spa service technician. The procedures in this manual must be followed exactly. Failure to follow warning notices and instructions may result in property damage, serious injury, or death.

Page
Table of Contents
NOTE Some of the features described in this Manual DO NOT apply to all AquaLink® RS models.
Section 1. Important Safety Instructions............ |
5 |
Section 2. Overview of the OneTouch™ |
|
Control Panel.................................... |
7 |
Section 3. Using the Equipment On/Off |
|
Menu................................................. |
8 |
Equipment On/Off............................ |
8 |
Filter Pump........................................ |
8 |
Spa..................................................... |
9 |
Pool Heat........................................... |
9 |
Spa Heat............................................ |
10 |
Solar Heat.......................................... |
10 |
Auxiliary Equipment......................... |
11 |
Heat Pump......................................... |
11 |
Chiller............................................... |
12 |
Laminar Light Pulse Control............ |
12 |
Set Light Colors................................ |
13 |
Section 4. Using the Equipment On/Off |
|
Model Specific Menus...................... |
14 |
TEMP1 (Pool or Spa Only) .............. |
14 |
TEMP2 (Pool or Spa Only) .............. |
14 |
Filter Pump (Dual Equipment).......... |
14 |
Spa (Dual Equipment) ...................... |
15 |
Two Speed Operation........................ |
15 |
Section 5. Using the OneTouch Menu............... |
16 |
Section 6. Using the Help Menu........................ |
17 |
Keys Menu ...................................... |
17 |
Service Menu.................................... |
17 |
Diagnostics Menu............................. |
17 |
Program Menu.................................. |
18 |
Set Temperature Menu...................... |
19 |
Set Time Menu.................................. |
20 |
AquaPure Menu................................ |
20 |
Display Light Menu ......................... |
20 |
Lockout Menu................................... |
21 |
Program Group Menu....................... |
21 |
System Setup Menu.......................... |
22 |
Boost Menu....................................... |
22 |
Section 7. Using the System Setup Menu.......... |
23 |
OneTouch Menu................................ |
23 |
Label Auxiliary Menu....................... |
24 |
Boost Setup Menu............................. |
24 |
Freeze Protection Menu.................... |
25 |
Air Temperature Menu...................... |
25 |
Degrees C/F Menu............................ |
26 |
Daylight Savings Menu..................... |
26 |
Temp Calibration Menu.................... |
26 |
In Floor Cleaning Menu.................... |
27 |
Solar Priority/Heat Pump Menu........ |
27 |
Pump Lockout Menu......................... |
27 |
Assign JVA Menu............................. |
28 |
Set Dimmers Menu........................... |
28 |
Spa Side Switch Menu...................... |
29 |
SpaLink Menu................................... |
30 |
Dusk Setup Menu.............................. |
31 |
All Off Time Menu........................... |
32 |
Product Info Menu............................ |
32 |
Clear Memory Menu......................... |
32 |
Set Color Lights Menu...................... |
33 |
Device Runtime Menu...................... |
33 |
Heat Pump Menu.............................. |
34 |
Laminar Light Menu......................... |
34 |
Section 8. Glossaries.......................................... |
35 |
Section 9. OneTouch Menu Flow Chart............ |
37 |
Warranty ........................................................... |
40 |

Page
Page
Section 1. Important Safety Instructions
READ AND FOLLOW ALL INSTRUCTIONS Lire la notice technique.
All electrical work must be performed by a licensed electrician and conform to all national, state, and local codes. When installing and using this electrical equipment, basic safety precautions should always be followed, including the following:
DANGER
To reduce the risk of injury, do not remove the suction fittings of your spa or hot tub. Never operate a spa or hot tub if the suction fittings are broken or missing. Never replace a suction fitting with one rated less than the flow rate
marked on the equipment assembly.
 WARNING
Prolonged immersion in hot water may induce hyperthermia. Hyperthermia occurs when the internal temperature of the body reaches a level several degrees above the normal body temperature of 98.6° F. The symptoms of hyperthermia include dizziness, fainting, drowsiness, lethargy, and an increase in the internal temperature of the body. The effects of hyperthermia include: 1) unawareness of impending danger; 2) failure to perceive heat; 3) failure to recognize the need to exit spa; 4) physical inability to exit spa; 5) fetal damage in pregnant women; 6) unconsciousness resulting in a danger of drowning.
 WARNING
To Reduce the Risk of Injury -
a)The water in a spa should never exceed 104°F (40°C). Water temperatures between 100°F (38°C) and 104°F (40°C) are considered safe for a healthy adult. Lower water temperatures are recommended for young children and when spa use exceeds 10 minutes.
b)Since excessive water temperatures have a high potential for causing fetal damage during the early months of pregnancy, pregnant or possibly pregnant women should limit spa water temperatures to 100°F (38°C).
c)Before entering a spa or hot tub, the user should measure the water temperature with an accurate thermometer since the tolerance of water temperature-regulating devices varies.
d)The use of alcohol, drugs, or medication before or during spa or hot tub use may lead to unconsciousness with the possibility of drowning.
e)Obese persons and persons with a history of heart disease, low or high blood pressure, circulatory system problems, or diabetes should consult a physician before using a spa.
f)Persons using medication should consult a physician before using a spa or hot tub since some medication may induce drowsines while other medication may affect heart rate, blood pressure, and circulation.
 WARNING
Risk of electric shock - Install the power center at least five (5) feet (152.4cm) from the inside wall of the pool and/or hot tub using non-metallic plumbing. Canadian installations must be at least three (3) meters from the water.
Children should not use spas or hot tubs without adult supervision.
Do not use spas or hot tubs unless all suction guards are installed to prevent body and hair entrapment.
People using medications and/or having an adverse medical history should consult a physician before using a spa or hot tub.
 AVERTISSEMENT
Danger d'electrocution - Les installations canadiennes doivent se trouver à au moins trois (3) mètres de l’eau. Ne pas laisser les enfants utiliser une cuve de relaxation sans surveillance.
Pour éviter que les cheveux ou une partie du corps puissent être aspirés, ne pas utiliser une cuve de relaxation si les grilles de prise d'aspiration ne sont pas toutes en place.
Les personnes qui prennent des médicaments ou ont des problèmes de santé devraient consulter un médecin avant d’utiliser une cuve de relaxation.
Page
 WARNING
People with infectious diseases should not use a spa or hot tub.
To avoid injury, exercise care when entering or exiting the spa or hot tub.
Do not use drugs or alcohol before or during the use of a spa or hot tub to avoid unconsciousness and possible drowning.
Pregnant or possibly pregnant women should consult a physician before using a spa or hot tub. Water temperature in excess of 100°F/38°C may be injurious to your health.
Before entering a spa or hot tub measure the water temperature with an accurate thermometer. Do not use a spa or hot tub immediately following strenuous exercise.
Prolonged immersion in a spa or hot tub may be injurious to your health.
Do not permit any electric appliance (such as a light, telephone, radio, or television) within 5 feet (1.5 m) of a spa or hot tub.
The use of alcohol, drugs or medication can greatly increase the risk of fatal hyperthermia in hot tubs and spas. Water temperature in excess of 100°F/38°C may be hazardous to your health.
 AVERTISSEMENT
Les personnes atteintes de maladies infectieuses ne devraient pas utiliser une cuve de relaxation. Pour éviter des blessures, user de prudence en entrant dans une cuve de relaxation et en sortant.
Pour éviter l’évanouissement et la noyade éventuelle, ne prendre ni drougue ni alcool avant d’utiliser une cuve de relaxation ni quand on s’y trouve.
Les femmes enceintes, que leur grossesse soit confirmée ou non, devraient consulter un médecin avant d’utiliser une cuve de relaxation.
Il peut être dangereux pour la santé de se plonger dans de l’eau à plus de 38°C/100°F.
Avant d’utiliser une cuve de relaxation mesurer la témperature de l’eau à l’aide d’un thermomètre précis. Ne pas utiliser une cuve de relaxation immédiatement après un exercice fatigant.
L’utilisation prolongée d’une cuve de relaxation peut être dangereuse pur la santé.
Ne pas placer d'appareil électrique (luminaire, téléphone, radio, téléviseur, etc) à moins de 1.5m de cette cuve de relaxation.
La consommation d’alcool ou de drogue augmente considérablement les risques d’hyperthermie mortelle dans une cuve de relaxation.
Il peut etrê dangereux pour la santé de se plonger dans de l’eau à plus de 38°C/100°F.
WARNING
To avoid injury ensure that you use this control system to control only packaged pool/spa heaters which have builtin operating and high limit controls to limit water temperature for pool/spa applications. This device should not be relied upon as a safety limit control.
 CAUTION
A terminal bar marked "GROUND" is provided within the power center. To reduce the risk of electrical shock, connect this terminal bar to the grounding terminal of your electric service or supply panel with a continuous copper conductor having green insulation and one that is equivalent in size to the circuit conductors supplying this equipment, but no smaller than no. 12 AWG (3.3mm). In addition, a second wire connector should be bonded with a no. 8 AWG (4.115mm) copper wire to any metal ladders, water pipes, or other metal within five (5) feet (1.52m)
of the tub.
 CAUTION
A ground-fault circuit-interrupter must be provided if this device is used to control underwater lighting fixtures. The conductors on the load side of the ground-fault circuit-interrupter shall not occupy conduit, boxes, or enclosures containing other conductors unless the additional conductors are also protected by a ground-fault circuitinterrupter. Refer to local codes for complete details.
Attention installer: Install to provide drainage of compartment for electrical components.
SAVE THESE INSTRUCTIONS
Page
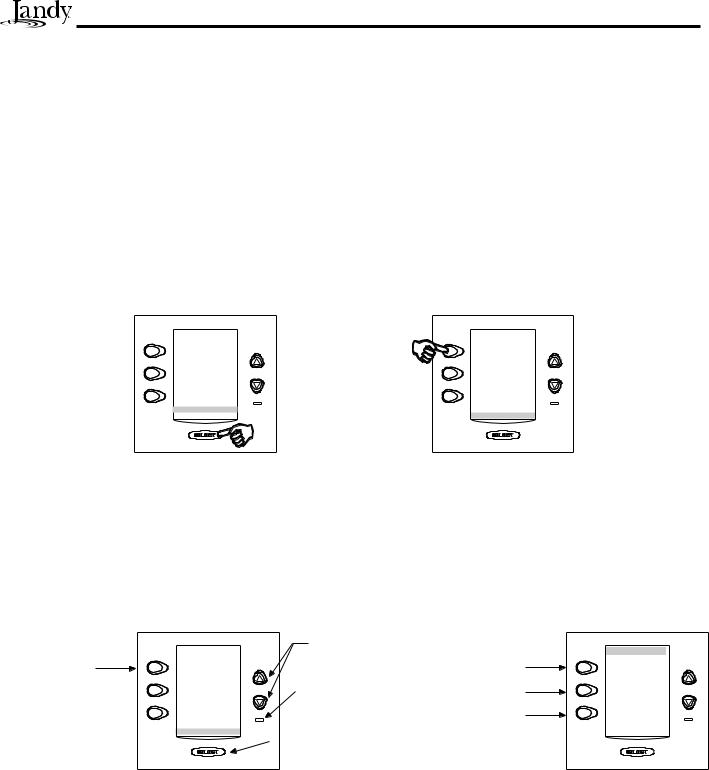
Section 2. Overview of the OneTouch™ Control Panel
This document gives instructions for operating the Jandy AquaLink® RS OneTouch Indoor Control Panel. The instructions must be followed exactly. Read through the instructions completely before operating the equipment.
2.1Basic Functions
The AquaLink® RS OneTouch™ can turn your pool/spa equipment on and off in any of the following three ways:
1.Activate the equipment manually through the EQUIPMENT ON/OFF menu.
2.Program the equipment to turn on and off at specific times. See page 18 for a detailed explanation of how to program equipment for automatic operation.
3.Use the OneTouch buttons to create scene settings with just "one touch" of a button. For example, you can program the spa heater to heat to 101 degrees, spa light on, jets on, water features on, and then name the result Romantic Scene.
JANDY AquaLink RS |
|
06/02/03MON |
SPA MODE ON |
6:00 PM |
|
FILTER PUMP OFF |
CLEAN MODE OFF |
AIR 79° |
|
EQUIPMENT ON/OFF |
ONETOUCH 3 OFF |
|
|
ONETOUCH ON/OFF |
SYSTEM |
MENU / HELP |
Default screen 1 Default screen 2
Note The AquaLink® RS OneTouch™ has two default screens; the date/time/temp screen or the OneTouch quick operation screen. The OneTouch will return to the last screen used after a 30 second delay.
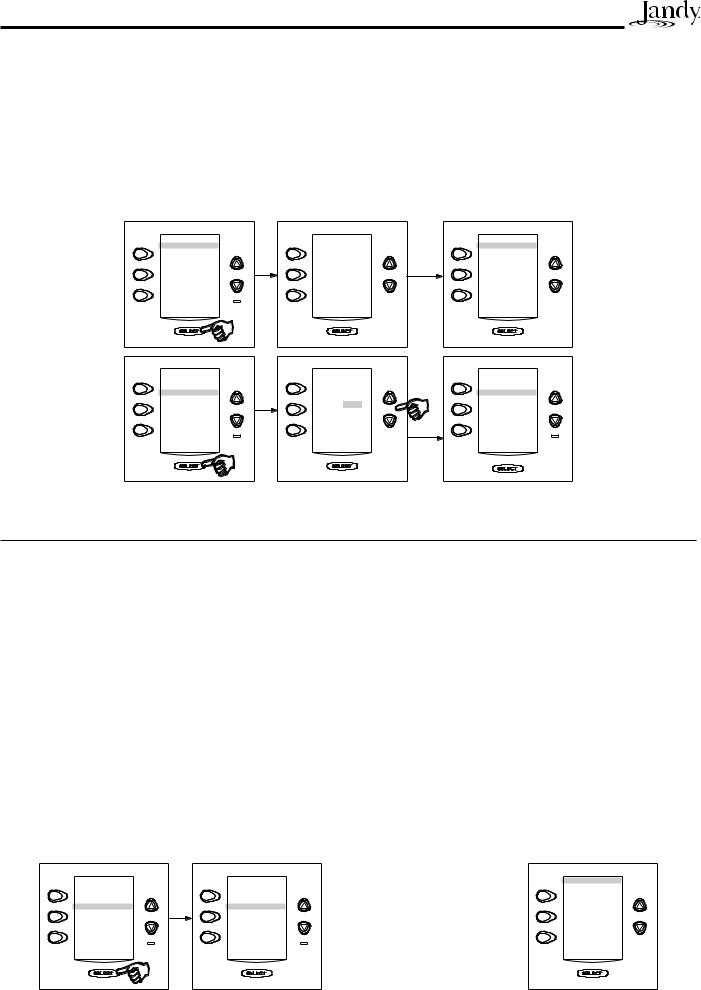
2.2Using the Buttons
Use the buttons as explained in the diagram below. For an on-screen description of the buttons, select MENU/HELP, HELP, KEYS. When moving through the screens, you will have about 15 seconds before the controller will return to the previous screen. If you keep the Up or Down arrow button depressed, it will automatically step through the menu items in that direction.
Spa Mode
Clean Mode 
OneTouch3 
SPA MODE |
ON |
CLEAN MODE OFF
ONETOUCH3 OFF
SYSTEM
Up/Down Arrow
(Scroll) Keys
|
|
|
|
Page-up |
|
|
Heater LED |
Back |
|
|
|
|||
|
|
|
|
Page-down |
|
|
|
Selects |
|
|
|
|
|
|
|
Highlighted Item |
|
||
ALL OFF
FILTER PUMP ON
SPA |
OFF |
POOL HEAT |
ON |
SPA HEAT |
OFF |
SOLAR HEAT |
OFF |
AUX 1 |
ON |
AUX 2 |
OFF |
AUX 3 |
ON |
AUX 4 |
OFF |
AUX 5 |
OFF |
AUX 6 |
OFF |
2.3Battery Back-Up
In the event of a power failure, Date and Time will be backed-up by the 9-volt battery located in the Power Center enclosure. All other programs and menu setups do not require battery to store information. To determine if battery is low, highlight MENU/HELP press SELECT, highlight HELP press SELECT, highlight DIAGNOSTICS and press SELECT.
The battery is located behind the small door on the right side of the Power Center panel and should be checked, if necessary replaced, once a year.
2.4Power Interruption
In the event there is a power interruption, and the AquaLink RS system is in Service or Time Out mode, the system will default to Auto. In previous firmware versions, the system would default to last mode of operation.
Page
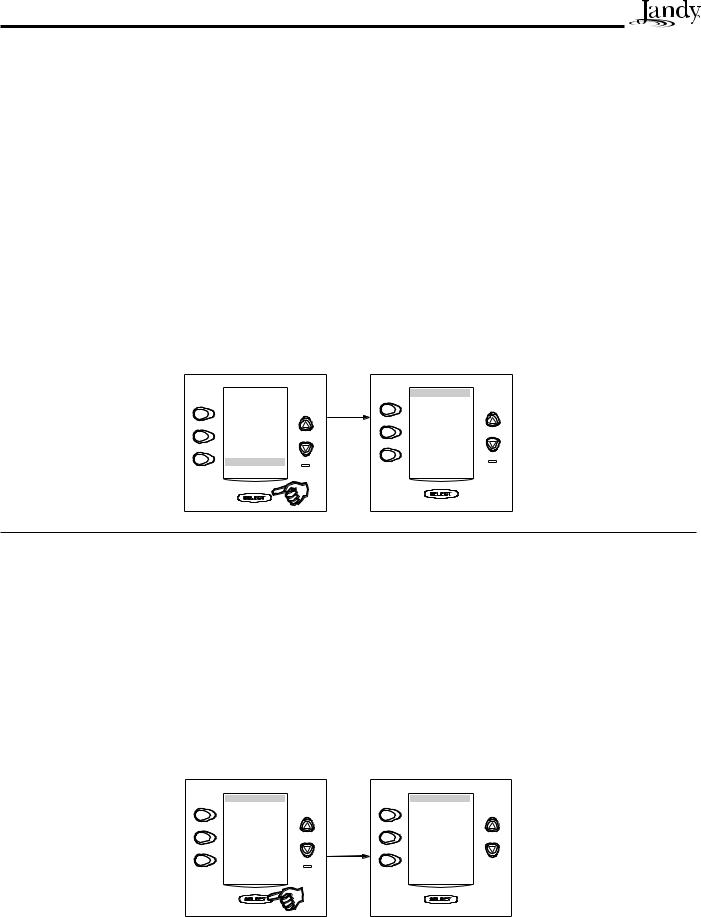
Section 3. Using the Equipment On/Off Menu
Equipment On/Off
Use this menu to manually turn a piece of equipment on or off. The ALL OFF mode will turn off equipment that has been turned on by any means (manual or pre-programmed). This includes any of the heater enables that were on (unless in use by the Maintain function).
To use Equipment On/Off
1.Highlight EQUIPMENT ON/OFF and press SELECT. To highlight an item, use the UP/DOWN arrow keys. Use the SELECT button to turn the equipment on or off. Return to the main menu by using the BACK button, or use the UP/DOWN arrow keys to highlight another device.
2.Highlight ALL OFF and press SELECT. After using ALL OFF, return to the main menu by using the BACK button.
Note When a piece of equipment is on, the LCD Screen will switch between the main menu and an equipment status screen that tells you what equipment is on.
JANDY AquaLink RS |
ALL OFF |
|
|
FILTER PUMP OFF |
|||
|
|||
01/31/03 MON |
SPA |
OFF |
|
POOL HEAT |
OFF |
||
6:00 PM |
SPA HEAT |
OFF |
|
|
SOLAR HEAT |
OFF |
|
FILTER PUMP OFF |
AUX 1 |
OFF |
|
AIR 79°F |
AUX 2 |
OFF |
|
|
AUX 3 |
OFF |
|
EQUIPMENT ON/OFF |
AUX 4 |
OFF |
|
AUX 5 |
OFF |
||
ONETOUCH ON/OFF |
|||
AUX 6 |
OFF |
||
MENU / HELP |
|||
|
|
||
Filter Pump
The FILTER PUMP selection turns the main filtration pump on or off for circulation to the pool. The filter pump also activates if the spa is turned on, if the pool cleaner is turned on, or if the spa spill-over effect is activated. The main filtration pump circulates the pool or spa water through the filter and heater. The pump must be on if you want to display the pool temperature, or if you want to heat the pool.
For 2-speed operation, see page 15.
To use Filter Pump
Highlight FILTER PUMP and press SELECT. Use the SELECT button to turn the equipment on or off.
FILTER PUMP OFF |
FILTER PUMP ON |
||
SPA |
OFF |
SPA |
OFF |
POOL HEAT |
OFF |
POOL HEAT |
OFF |
SPA HEAT |
OFF |
SPA HEAT |
OFF |
SOLAR HEAT |
OFF |
SOLAR HEAT |
OFF |
AUX 1 |
OFF |
AUX 1 |
OFF |
AUX 2 |
OFF |
AUX 2 |
OFF |
AUX 3 |
OFF |
AUX 3 |
OFF |
AUX 4 |
OFF |
AUX 4 |
OFF |
AUX 5 |
OFF |
AUX 5 |
OFF |
AUX 6 |
OFF |
AUX 6 |
OFF |
AUX 7 |
OFF |
AUX 7 |
OFF |

Page
Spa
The SPA mode switches water circulation from the pool to spa (pool/spa combination models only). Turning on the spa also activates the filter pump (after a delay for valve rotation) and deactivates the pool cleaner if it is on. The SPA mode must be on to display the spa temperature and/or to heat the spa. Activation takes place after a thirty second delay (while valves are turning).
To use Spa
Highlight SPA and press SELECT. Use the SELECT button to turn the spa on or off.
FILTER PUMP OFF
SPA |
OFF |
POOL HEAT |
OFF |
SPA HEAT |
OFF |
SOLAR HEAT |
OFF |
AUX 1 |
OFF |
AUX 2 |
OFF |
AUX 3 |
OFF |
AUX 4 |
OFF |
AUX 5 |
OFF |
AUX 6 |
OFF |
AUX 7 |
OFF |
SPA WILL
TURN ON
AFTER DELAY
FILTER PUMP * * *
SPA |
ON |
POOL HEAT |
OFF |
SPA HEAT |
OFF |
SOLAR HEAT |
OFF |
AUX 1 |
OFF |
AUX 2 |
OFF |
AUX 3 |
OFF |
AUX 4 |
OFF |
AUX 5 |
OFF |
AUX 6 |
OFF |
AUX 7 |
OFF |
Pool Heat
The POOL HEAT selection enables the heater for the pool. When the LED is green, the heater is enabled. When the LED is red, the heater is on and firing. It uses the setting from SET TEMP menu, or you can increase/decrease when enabling.
To use Pool Heat
Highlight FILTER PUMP and press SELECT. Highlight POOL HEAT and press SELECT. Use the UP/DOWN arrow keys to set the desired temperature and press SELECT.
FILTER PUMP OFF |
FILTER PUMP ON |
FILTER PUMP OFF |
|||
SPA |
OFF |
SPA |
OFF |
SPA |
OFF |
POOL HEAT |
OFF |
POOL HEAT |
OFF |
POOL HEAT |
OFF |
SPA HEAT |
OFF |
SPA HEAT |
OFF |
SPA HEAT |
OFF |
SOLAR HEAT |
OFF |
SOLAR HEAT |
OFF |
SOLAR HEAT |
OFF |
AUX 1 |
OFF |
AUX 1 |
OFF |
AUX 1 |
OFF |
AUX 2 |
OFF |
AUX 2 |
OFF |
AUX 2 |
OFF |
AUX 3 |
OFF |
AUX 3 |
OFF |
AUX 3 |
OFF |
AUX 4 |
OFF |
AUX 4 |
OFF |
AUX 4 |
OFF |
AUX 5 |
OFF |
AUX 5 |
OFF |
AUX 5 |
OFF |
AUX 6 |
OFF |
AUX 6 |
OFF |
AUX 6 |
OFF |
AUX 7 |
OFF |
AUX 7 |
OFF |
AUX 7 |
OFF |
|
FILTER PUMP ON |
JANDY AquaLink RS |
|||
|
SPA |
OFF |
|
|
|
POOL HEAT |
POOL HEAT |
ON |
01/31/00 MON |
||
ENABLED |
SPA HEAT |
OFF |
|||
6:00 PM |
|||||
|
SOLAR HEAT |
OFF |
|||
SET TO 80°F |
|
|
|||
AUX 1 |
OFF |
POOL |
65°F |
||
|
AUX 2 |
OFF |
|||
|
AIR |
79°F |
|||
|
AUX 3 |
OFF |
|||
Use ARROW KEYS |
|
|
|||
AUX 4 |
OFF |
|
|
||
to set value. |
AUX 5 |
OFF |
EQUIPMENT ON/OFF |
||
Press SELECT |
AUX 6 |
OFF |
|||
to continue. |
AUX 7 |
OFF |
ONETOUCH ON/OFF |
||
MENU / HELP |
|||||
|
|
|
|||
Page 10
Spa Heat
The SPA HEAT enables the heater for the spa. When the LED is green, the heater is enabled. When the LED is red, the heater is on and firing. It uses the settings from SET TEMP menu, or you can increase/decrease when enabling.
To use Spa Heat
Highlight SPA and press SELECT. The spa will come on after a short delay. Highlight SPA HEAT and press SELECT. Use the UP/DOWN arrow keys to set the desired temperature and press SELECT.
FILTER PUMP OFF |
|
FILTER PUMP * * * |
|||
SPA |
OFF |
|
SPA |
ON |
|
POOL HEAT |
OFF |
|
POOL HEAT |
OFF |
|
SPA HEAT |
OFF |
|
SPA HEAT |
OFF |
|
SOLAR HEAT |
OFF |
SPA WILL |
SOLAR HEAT |
OFF |
|
AUX 1 |
OFF |
AUX 1 |
OFF |
||
TURN ON |
|||||
AUX 2 |
OFF |
AUX 2 |
OFF |
||
AFTER DELAY |
|||||
AUX 3 |
OFF |
AUX 3 |
OFF |
||
|
|||||
AUX 4 |
OFF |
|
AUX 4 |
OFF |
|
AUX 5 |
OFF |
|
AUX 5 |
OFF |
|
AUX 6 |
OFF |
|
AUX 6 |
OFF |
|
AUX 7 |
OFF |
|
AUX 7 |
OFF |
|
FILTER PUMP ON |
|
FILTER PUMP ON |
||
SPA |
ON |
|
SPA |
ON |
POOL HEAT |
OFF |
SPA HEAT |
POOL HEAT |
OFF |
SPA HEAT |
OFF |
ENABLED |
SPA HEAT |
ON |
SOLAR HEAT |
OFF |
SET TO 102°F |
SOLAR HEAT |
OFF |
AUX 1 |
OFF |
AUX 1 |
OFF |
|
AUX 2 |
OFF |
|
AUX 2 |
OFF |
AUX 3 |
OFF |
Use ARROW KEYS |
AUX 3 |
OFF |
AUX 4 |
OFF |
AUX 4 |
OFF |
|
AUX 5 |
OFF |
to set value. |
AUX 5 |
OFF |
AUX 6 |
OFF |
Press SELECT |
AUX 6 |
OFF |
AUX 7 |
OFF |
to continue. |
AUX 7 |
OFF |
Solar Heat
The SOLAR HEAT selection controls solar heating. A solar heating system and optional solar sensor are required for SOLAR HEAT selection to operate.
To use Solar Heat
Highlight SOLAR HEAT and press SELECT. Use the SELECT button to turn SOLAR HEAT on or off.
HEAT PUMP: If a Heat Pump is properly connected to this system, HEAT PUMP will appear on the screen in place of SOLAR HEAT.
If a solar sensor is not installed, EXTRA AUX replaces SOLAR HEAT and may be used to control an auxiliary (see "Auxiliary Equipment" to turn on or off EXTRA AUX).
For solar heating to take place, the SOLAR HEAT (in EQUIPMENT ON/OFF) must be enabled, also the filter pump must be on. Solar temperature must be at least 5° F above the water temperature and the water must be cooler than the thermostat setting.
FILTER PUMP ON |
FILTER PUMP ON |
||
SPA |
OFF |
SPA |
OFF |
POOL HEAT |
OFF |
POOL HEAT |
OFF |
SPA HEAT |
OFF |
SPA HEAT |
OFF |
SOLAR HEAT |
OFF |
SOLAR HEAT |
ENA |
AUX 1 |
OFF |
AUX 1 |
OFF |
AUX 2 |
OFF |
AUX 2 |
OFF |
AUX 3 |
OFF |
AUX 3 |
OFF |
AUX 4 |
OFF |
AUX 4 |
OFF |
AUX 5 |
OFF |
AUX 5 |
OFF |
AUX 6 |
OFF |
AUX 6 |
OFF |
AUX 7 |
OFF |
AUX 7 |
OFF |
If no Solar Sensor is installed, EXTRA AUX will appear as a menu item.
FILTER PUMP ON
SPA |
OFF |
POOL HEAT |
OFF |
SPA HEAT |
OFF |
AUX 1 |
OFF |
AUX 2 |
OFF |
AUX 3 |
OFF |
AUX 4 |
OFF |
AUX 5 |
OFF |
AUX 6 |
OFF |
AUX 7 |
OFF |
EXTRA AUX |
OFF |
Page 11
Auxiliary Equipment
The AUX modes control each of the auxiliary devices plus an extra AUX. To assign a different name to an auxiliary device, use the SYSTEM SETUP and LABEL AUX menus.
To turn an Auxiliary on or off
Highlight an AUX and press SELECT. Use the SELECT button to turn the equipment on or off.
FILTER PUMP ON |
FILTER PUMP ON |
||
SPA |
OFF |
SPA |
OFF |
POOL HEAT |
OFF |
POOL HEAT |
OFF |
SPA HEAT |
OFF |
SPA HEAT |
OFF |
SOLAR HEAT |
OFF |
SOLAR HEAT |
OFF |
AUX 1 |
OFF |
AUX 1 |
ON |
AUX 2 |
OFF |
AUX 2 |
OFF |
AUX 3 |
OFF |
AUX 3 |
OFF |
AUX 4 |
OFF |
AUX 4 |
OFF |
AUX 5 |
OFF |
AUX 5 |
OFF |
AUX 6 |
OFF |
AUX 6 |
OFF |
AUX 7 |
OFF |
AUX 7 |
OFF |
Heat Pump
NOTE This equipment may not be part of your system. Please check with your installer.
The HEAT PUMP selection controls the heat pump operation. In order to use the heat pump, the filter pump must be turned on and the heat pump must be in HEAT MODE (see page 23, Using the System Setup Menu), and the switch on the heat pump on the equipment pad must also be set to HEAT MODE.
NOTE HEAT PUMP takes the place of EXTRA AUX or SOLAR HEAT. It is not possible to have any two of these on the EQUIPMENT ON/OFF menu at the same time.
To use Heat Pump
Highlight HEAT PUMP and press SELECT. Press the SELECT button to enable/disable the HEAT PUMP. The HEAT PUMP uses the heater temperature set point.
FILTER PUMP ON |
FILTER PUMP ON |
||
SPA |
OFF |
SPA |
OFF |
POOL HEAT |
OFF |
POOL HEAT |
OFF |
SPA HEAT |
OFF |
SPA HEAT |
OFF |
HEAT PUMP |
OFF |
HEAT PUMP |
ENA |
AUX 1 |
OFF |
AUX 1 |
OFF |
AUX 2 |
OFF |
AUX 2 |
OFF |
AUX 3 |
OFF |
AUX 3 |
OFF |
AUX 4 |
OFF |
AUX 4 |
OFF |
AUX 5 |
OFF |
AUX 5 |
OFF |
AUX 6 |
OFF |
AUX 6 |
OFF |
AUX 7 |
OFF |
AUX 7 |
OFF |

Page 12
Chiller
NOTE This equipment may not be part of your system. Please check with your installer.
The CHILLER selection controls the chilling operation of the heat pump. In order to use the chiller, the filter pump must be turned on and the heat pump must be in CHILL MODE (see page 23, Using the System Setup Menu), and the switch on the heat pump on the equipment pad must also be set to CHILL MODE.
NOTE CHILLER takes the place of EXTRA AUX or SOLAR HEAT. It is not possible to have any two of these on the EQUIPMENT ON/OFF menu at the same time.
To use Chiller
Highlight CHILLER and press SELECT. Press the SELECT button to enable/disable the CHILLER. The CHILLER uses the desired chilling temperature set point. Press SELECT to accept the value.
Important Information on Chiller
You must manually change the setting at your heat pump from Heat to Chiller.
FILTER PUMP ON |
FILTER PUMP ON |
||
SPA |
OFF |
SPA |
OFF |
POOL HEAT |
OFF |
POOL HEAT |
OFF |
SPA HEAT |
OFF |
SPA HEAT |
OFF |
CHILLER |
OFF |
CHILLER |
ENA |
AUX 1 |
OFF |
AUX 1 |
OFF |
AUX 2 |
OFF |
AUX 2 |
OFF |
AUX 3 |
OFF |
AUX 3 |
OFF |
AUX 4 |
OFF |
AUX 4 |
OFF |
AUX 5 |
OFF |
AUX 5 |
OFF |
AUX 6 |
OFF |
AUX 6 |
OFF |
AUX 7 |
OFF |
AUX 7 |
OFF |
note The system will force the Chiller set point to always be at least 5 degrees Fahrenheit higher than the Heater set point.
Laminar Light Pulse Control
NOTE This equipment may not be part of your system. Please check with your installer.
The LAMINAR PULSE CONTROL menu is used to set the pulse rate of the Laminar Jets.
NOTE Prior to operating this feature, the Laminar Pulse Control must be labeled to an auxiliary (for example, AUX 2). See "Using System Setup - Label Aux Menu" to label the laminar pulse control to an auxiliary control.
To use Laminar Light Pulse Control
Highlight AUX 2 (or auxiliary assigned to laminar light) and press SELECT. The most recently selected pulse control function will be displayed. Use the UP/DOWN arrow keys to highlight the desired selection and press SELECT.
NOTE If the BACK key is pressed when on this screen, then the most recently selected pulse control function will be selected again. If the SELECT key or the BACK key is not pressed, and if it has been 15 seconds since the UP/DOWN keys have been pressed, then the most recently selected LPC4 function will be selected again.
Note From the EQUIPMENT ON/OFF menu, you can turn the item ON or OFF or change the current setting. If you turn the Laminar Pulser (LAMINAR PLSR) ON, you have the option to change the current setting or it will come on using that setting.
Important Information
Do not activate this feature unless you are certain that a Laminar Pulse Control (LPC4) is installed on your system
 Loading...