

Jackson Puritan PA-1, Puritan PA-1V, Puritan PA-2, Puritan PA-2CDR, Puritan PA-2CDL Installation & Operation Manual
Page 1

INSTALLATION & OPERATION MANUAL
FOR PURITAN MODELS:
PA-1
PA-1V
PA-2
PA-2CDL
PA-2CDR
An Company
CHEMICAL SANITIZING, DOOR TYPE,
SINGLE AND DUAL RACK DISHMACHINES
October 29, 2007
P/N 7610-002-24-11 (Revision J)
Manufactured in the United States by:
Page 2

Page 3

REVISION/
PAGE
REVISION
DATE
MADEBYAPPLICABLE
ECN
DETAILS
H 03-18-04 MAW N/A Added Part #96582747. Converted to the new layout.
6935 Added Viton Pump Seal 05330-002-87-16.
I 07-13-04 MAW N/A Added Vapor Vent Option.
J 11-02-05 MAW
7293, 7107
7152, 7368
7239
Removed PA-2 door numbers 05700-002-38-62, 05700-002-3840, 05700-002-38-34 replaced with 05700-003-02-98, 05700-00304-64, 05700-003-02-71. Replace reed switch 05930-111-41-70
with 05930-002-36-80. Add the following components to the PA1V: Plumbing bracket - 05700-002-28-95, frame weldment 05700-002-97-85, accumulator weldment - 05700-002-19-05,
spring rod - 05700-002-10-52. Removed interlock solenoid
assembly 05700-002-75-85 added 05700-002-66-17. Added PA2CD schematic 09905-003-00-67.
65 10-29-07 MAW PROCESS Upated PA-1 115V schematic to revision D.
i
Page 4
ii
Model:
Serial No.:
Installation Date:
Service Rep. Name:
Phone No.:
NOMENCLATURE FOR THE MODELS COVERED IN THIS MANUAL:
PA-1V
PA = Puritan series, chemical sanitizing, door type dishmachines
PA-1 = Single rack dishmachine
PA-2 = Dual rack dishmachine
V = Vapor Vent
CDL = Corner model with left hand entry
CDR = Corner model with right hand entry
Page 5

iii
SECTION DESCRIPTION PAGE
I. SPECIFICATION INFORMATION
Specifications of the PA-1 & PA-2 Series Models 2
Dimensions (PA-1) 3
Dimensions (PA-2) 4
Dimensions (PA-2CDL) 5
Dimensions (PA-2CDR) 6
Table Dimensions 7
II. INSTALLATION & OPERATION INSTRUCTIONS
Installation Instructions 9
Electrical Installation Instructions 10
Chemical Dispensing Equipment 11
Operation Instructions 12
Cam Timer Operation 14
Timing Chart 16
Timing Sequence 17
III. PREVENTATIVE MAINTENANCE
Preventative Maintenance 19
IV. TROUBLESHOOTING SECTION
Common Problems 21
V. SERVICE PROCEDURES
Rinse Solenoid Valve Repair Parts Kit 26
Vacuum Breaker Repair Parts Kit 30
VI. PARTS SECTION
Standard Parts 34
Chemical Feeder Pump Assembly 37
Solenoid Valve Assembly 38
Vacuum Breaker Assembly 39
Control Box Assembly 40
Hood Assemblies (PA-1) 42
Hood Assembly (PA-2) 43
Cantilever Arm Assembly (PA-1 & PA-2 Double Bracket Mount) 44
Cantilever Arm Assembly (PA-1 & PA-2 Single Bracket Mount) 46
Tub Assembly (PA-1) 47
Tub Assembly (PA-2) (Left Front View) 48
Tub Assembly (PA-2) (Right Front View) 49
Frame Assemblies (PA-1 & PA-2) 50
Scrap Accumulator Assemblies (PA-1 & PA-2) 51
Incoming Plumbing Assembly (PA-1 & PA-2) 52
Wash Manifold & Wash Arm Assemblies (PA-1 & PA-2) 54
Pump & Motor Assemblies (PA-1 & PA-2) 55
Miscellaneous Parts (PA-1 & PA-2) 56
PA-1/PA-2 Series Installation & Operation Manual
7610-002-24-11 Rev. J (11/02/2005)
TABLE OF CONTENTS
Page 6

iv
TABLE OF CONTENTS (CONTINUED)
SECTION DESCRIPTION PAGE
VI. PARTS SECTION
Door Assemblies (PA-1) 57
Door Assemblies (PA-2) 58
PA-2CDL Assembly Options 59
PA-2CDR Assembly Options 61
PA-1 Vapor Vent Option Assembly 63
VII. SCHEMATICS
PA-1 (115 Volt, 60 Hz, single phase) 65
PA-1V (115 Volt, 60 Hz, single phase) 66
PA-2 (115 Volt, 60 Hz, single phase) 67
PA-2CDL/PA-2CDR (115 Volt, 60 Hz, single phase) 68
PA-1/PA-2 Series Installation & Operation Manual
7610-002-24-11 Rev. J (11/02/2005)
Page 7

1
SECTION 1:
SPECIFICATION INFORMATION
Page 8

2
PERFORMANCE/CAPABILITIES
OPERATING CAPACITY (PA-1) (RACKS/HOUR)
RACKS PER HOUR 40
RACKS PER HOUR (OPTION) 48
DISHES PER HOUR 1000
GLASSES PER HOUR 1000
OPERATING CAPACITY ( PA-1V) (RACKS/HOUR)
RACK PER HOUR 28
DISHES PER HOUR 700
GLASSES PER HOUR 700
OPERATING CAPACITY (PA-2’s) (RACKS/HOUR)
RACKS PER HOUR 80
RACKS PER HOUR (OPTION) 96
DISHES PER HOUR 2000
GLASSES PER HOUR 2000
OPERATING CYCLE (PA-1) (SECONDS)
WASH TIME 40
RINSE TIME 15
TOTAL CYCLE TIME 90
TOTAL CYCLE TIME (OPTION) 72
OPERATING CYCLE (PA-1V) (SECONDS)
WASH TIME 40
RINSE TIME 15
TOTAL CYCLE TIME 120
OPERATING CYCLE (PA-2’s) (SECONDS)
WASH TIME 35
RINSE TIME 20
TOTAL CYCLE TIME 90
TOTAL CYCLE TIME (OPTION) 72
TUB CAPACITY (GALLONS)
WASH TUB (MINIMUM) (PA-1’s) 1.7
WASH TUB (MINIMUM) (PA-2’s) 3.1
WASH PUMP CAPACITY
GALLONS PER MINUTE 61
TEMPERATURES
WASH---°F (MINIMUM) 120
WASH---°F (RECOMMENDED) 140
RINSE---°F 120
RINSE---°F (RECOMMENDED) 140
ELECTRICAL REQUIREMENTS
WASH PUMP MOTOR HORSEPOWER (PA-1) 3/4
(2) WASH PUMP MOTOR HORSEPOWER (PA-2’s) 3/4 ea.
NOTE: Typical Electrical Circuit is based upon (1) 125% of
the full amperage load of the machine and (2) typical
fixed-trip circuit breaker sizes as listed in the NEC 2002
Edition. Local codes may require more stringent protection than what is displayed here. Always verify with your
electrical service contractor that your circuit protection is
adequate and meets all applicable national and local
codes. These numbers are provided in this manual simply for reference and may change without notice at any
given time.
TYPICAL
TOTAL ELECTRICAL
VOLTS HERTZ PHASE AMPS CIRCUIT
PA-1’s 115 60 1 12.0 15 AMP
PA-2’s 115 60 1 23.0 30 AMP
WATER REQUIREMENTS
INLET TEMPERATURE (Minimum) 120°F
INLET TEMPERATURE (Recommended) 140°F
GALLONS PER HOUR (PA-1’s) 68
GALLONS PER HOUR (PA-2’s) 160
GALLONS PER HOUR (PA-2’s) (OPTION) 192
WATER LINE SIZE NPT (Minimum) 3/4”
DRAIN LINE SIZE NPT (Minimum) 2”
FLOW PRESSURE P.S.I. 20±5
MINIMUM CHLORINE REQUIRED (PPM) 50
NOTE: Always refer to the machine data plate for specific
electrical and water requirements. The material provided
on this page is for reference only and may be subject to
change without notice.
SECTION 1: SPECIFICATION INFORMATION
SPECIFICATIONS
PA-1/PA-2 Series Installation & Operation Manual
7610-002-24-11 Rev. J (11/02/2005)
Page 9

3
PA-1/PA-2 Series Installation & Operation Manual
7610-002-24-11 Rev. J (11/02/2005)
SECTION 1: SPECIFICATION INFORMATION
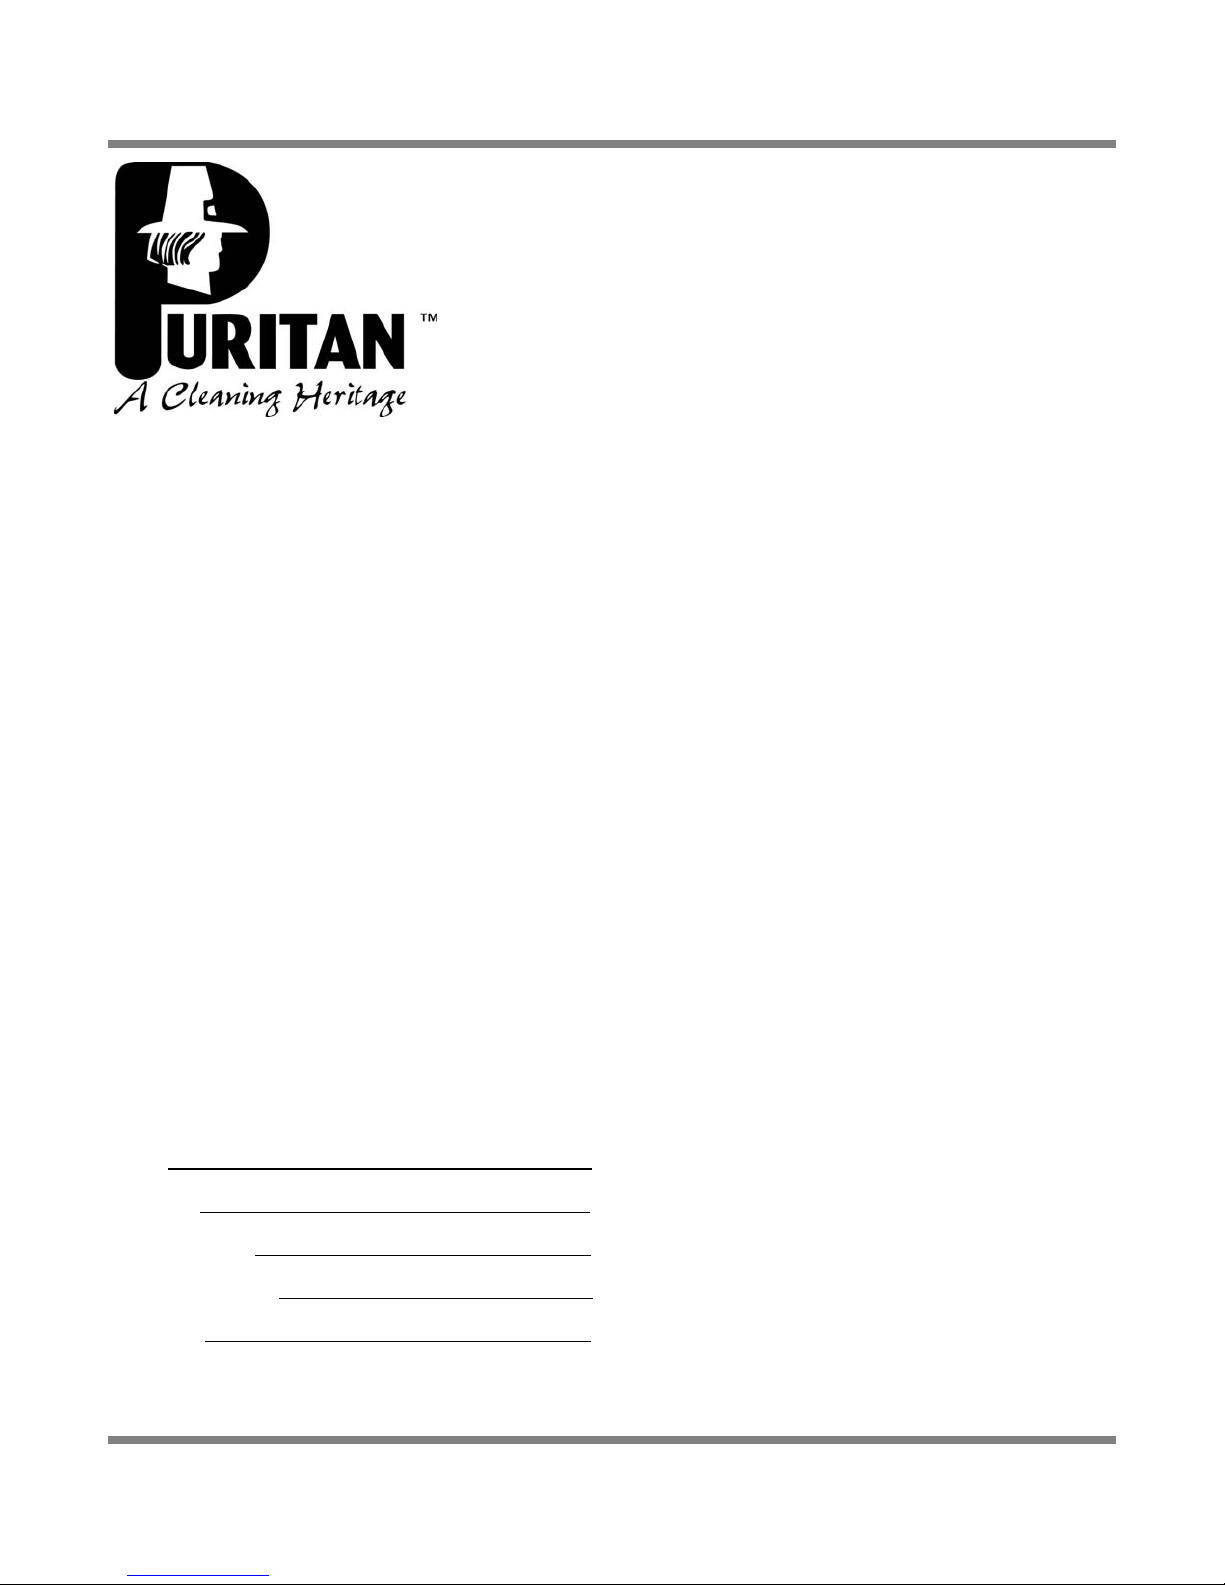
DIMENSIONS PA-1
00000000
4” MIN.
TOP VIEW
RACK GUIDES IN STRAIGHT
THROUGH CONFIGURATION
5” MIN
TOP VIEW
RACK GUIDES IN CORNER
CONFIGURATION
24 1/4”
DOORS
19” MAX
CLEARANCE
34”
TABLE HEIGHT
1”
1”
RIGHT SIDE
NOTE: DRAIN IS ON FAR
SIDE OF ACCUMULATOR
4” MIN.
12 1/2”
B
B
A
C
61”
62”
A- Drain Connection 2” NPT
B- Electrical Connection 3/4” Conduit
C- Water Inlet 3/4” NPT
ALL DIMENSION FROM FLOOR ARE ADJUSTABLE +/1/2” DUE TO BULLET FEET.
32 1/4”
6”
FRONT
34”
TABLE HEIGHT
11 1/2”
A
25 1/4”
25 1/4”
12”
Page 10

4
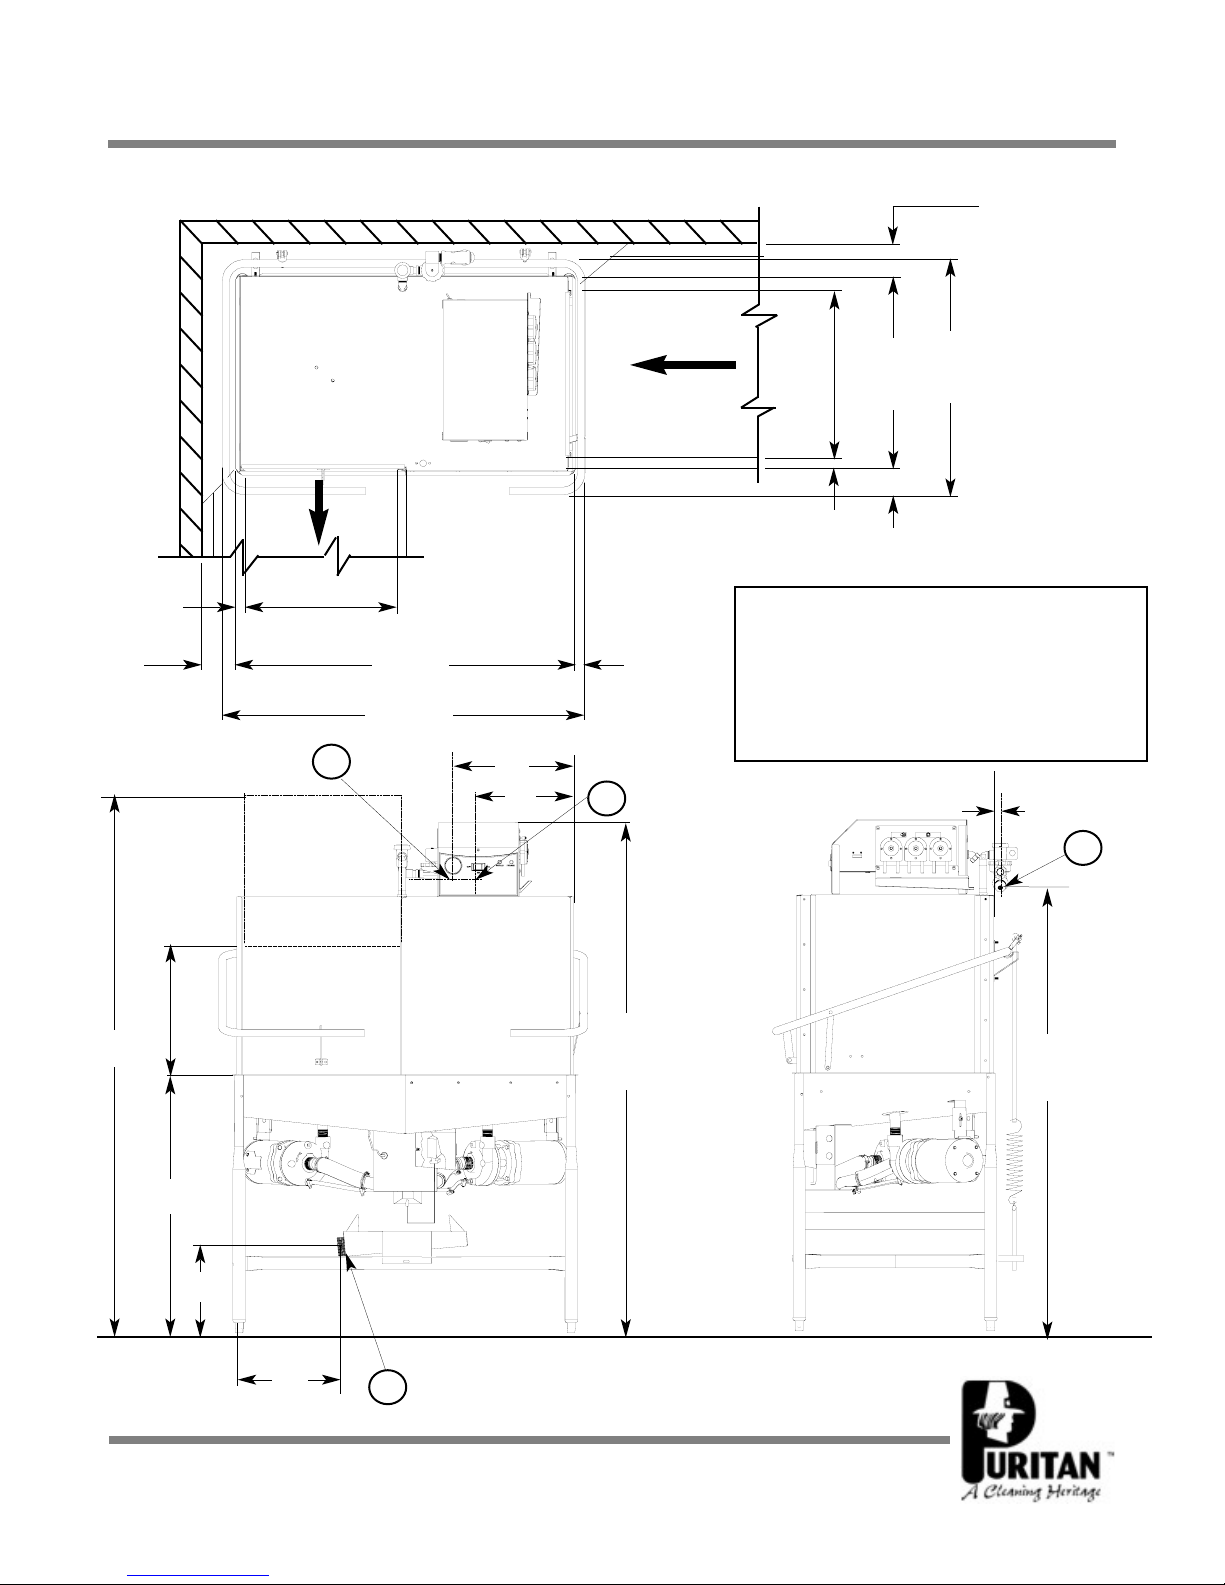
SECTION 1: SPECIFICATION INFORMATION
DIMENSIONS PA-2
PA-1/PA-2 Series Installation & Operation Manual
7610-002-24-11 Rev. J (11/02/2005)
00000000
TOP VIEW
FRONT VIEW
RIGHT SIDE VIEW
A - WATER INLET - 3/4” NPT
B - DRAIN CONNECTION - 2” NPT
C - ELECTRICAL CONNECTION
ALL DIMENSION FROM FLOOR ARE
ADJUSTABLE +/- 1/2” DUE TO BULLET
FEET.
25 7/8”
1”
66”
59”
56 1/2”
61”
10 5/8”
75 3/4”
44 1/8”
4 1/2” min.
4 3/4”
15 3/4”
13 1/8”
A
A
C
C
B
B
A
34”
TABLE HEIGHT
17 1/2”
MAX
CLEARANCE
Page 11
5
PA-1/PA-2 Series Installation & Operation Manual
7610-002-24-11 Rev. J (11/02/2005)
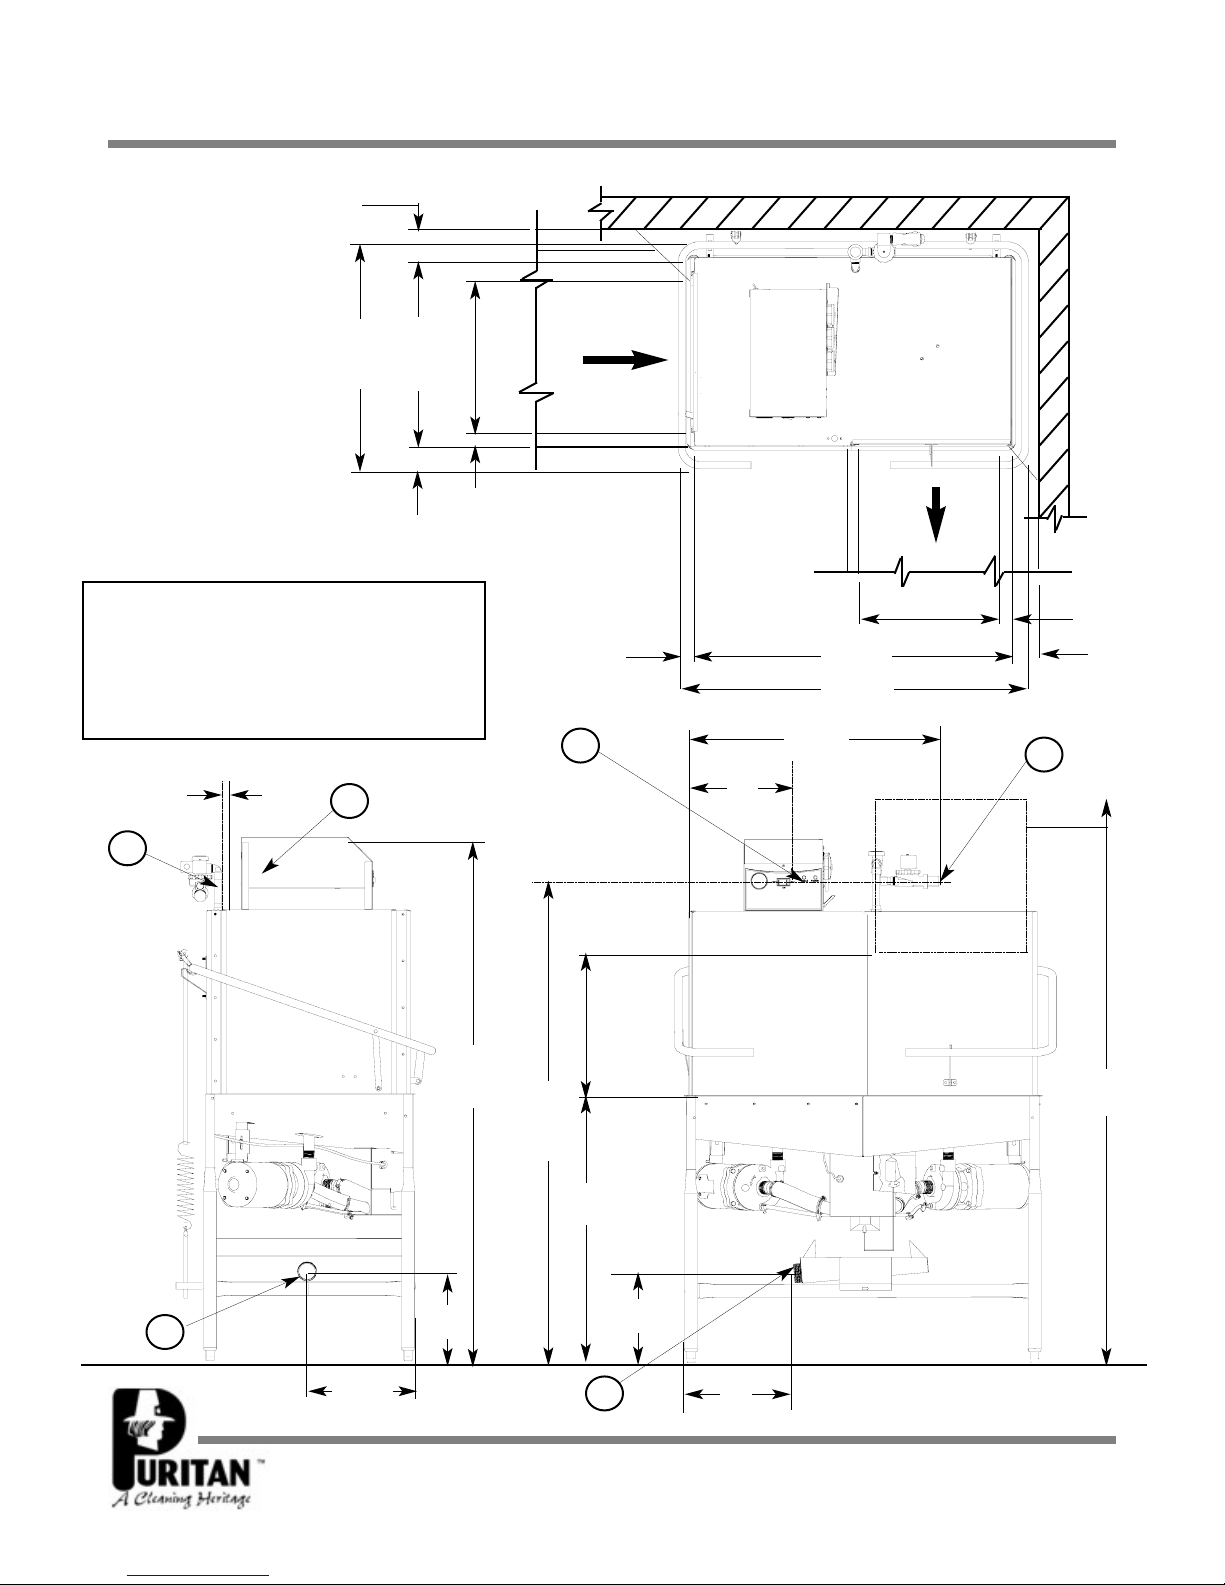
SECTION 1: SPECIFICATION INFORMATION
DIMENSIONS PA-2CDL
00000000
20 3/4”
OPENING
4 1/2”
MINIMUM
2 1/2”
1 1/2”
19”
OPENING
20 3/4”
OPENING
2 1/2”
3 1/2”
4”
MINIMUM
2 1/2 “
A - DRAIN-GRAVITY 2” NPT
B - WATER INLET 3/4” NPT
C - ELECTRICAL CONNECTION 3/4”
ALL DIMENSION FROM FLOOR ARE
ADJUSTABLE +/- 1/2” DUE TO BULLET FEET.
32 3/4”
25 3/4”
43 1/2 “
46 1/2”
A
C
B
B
16”
13”
66 1/4”
60 3/4”
12”
34”
77”
14”
Page 12
6
SECTION 1: SPECIFICATION INFORMATION
DIMENSIONS PA-2 CDR
PA-1/PA-2 Series Installation & Operation Manual
7610-002-24-11 Rev. J (11/02/2005)
19”
OPENING
12 3/8”
2 1/2”
2 1/2”
20 3/4”
OPENING
4 1/2”
MINIMUM
1 1/2”
20 3/4”
OPENING
2 1/2”
4” MINIMUM
3 1/2”
A.- DRAIN-GRAVITY 2” NPT
B.- WATER INLET 3/4” NPT
C.- ELECTRICAL CONNECTION
ALL DIMENSION FROM FLOOR ARE
ADJUSTABLE +/- 1/2” DUE TO BULLET FEET.
32 3/4”
25 3/4”
43 1/2”
46 1/2”
30 1/2”
16”
C
C
B
B
A
A
77”
60 3/4”
66 1/4”
34”
12”
12”
14”
Page 13
7
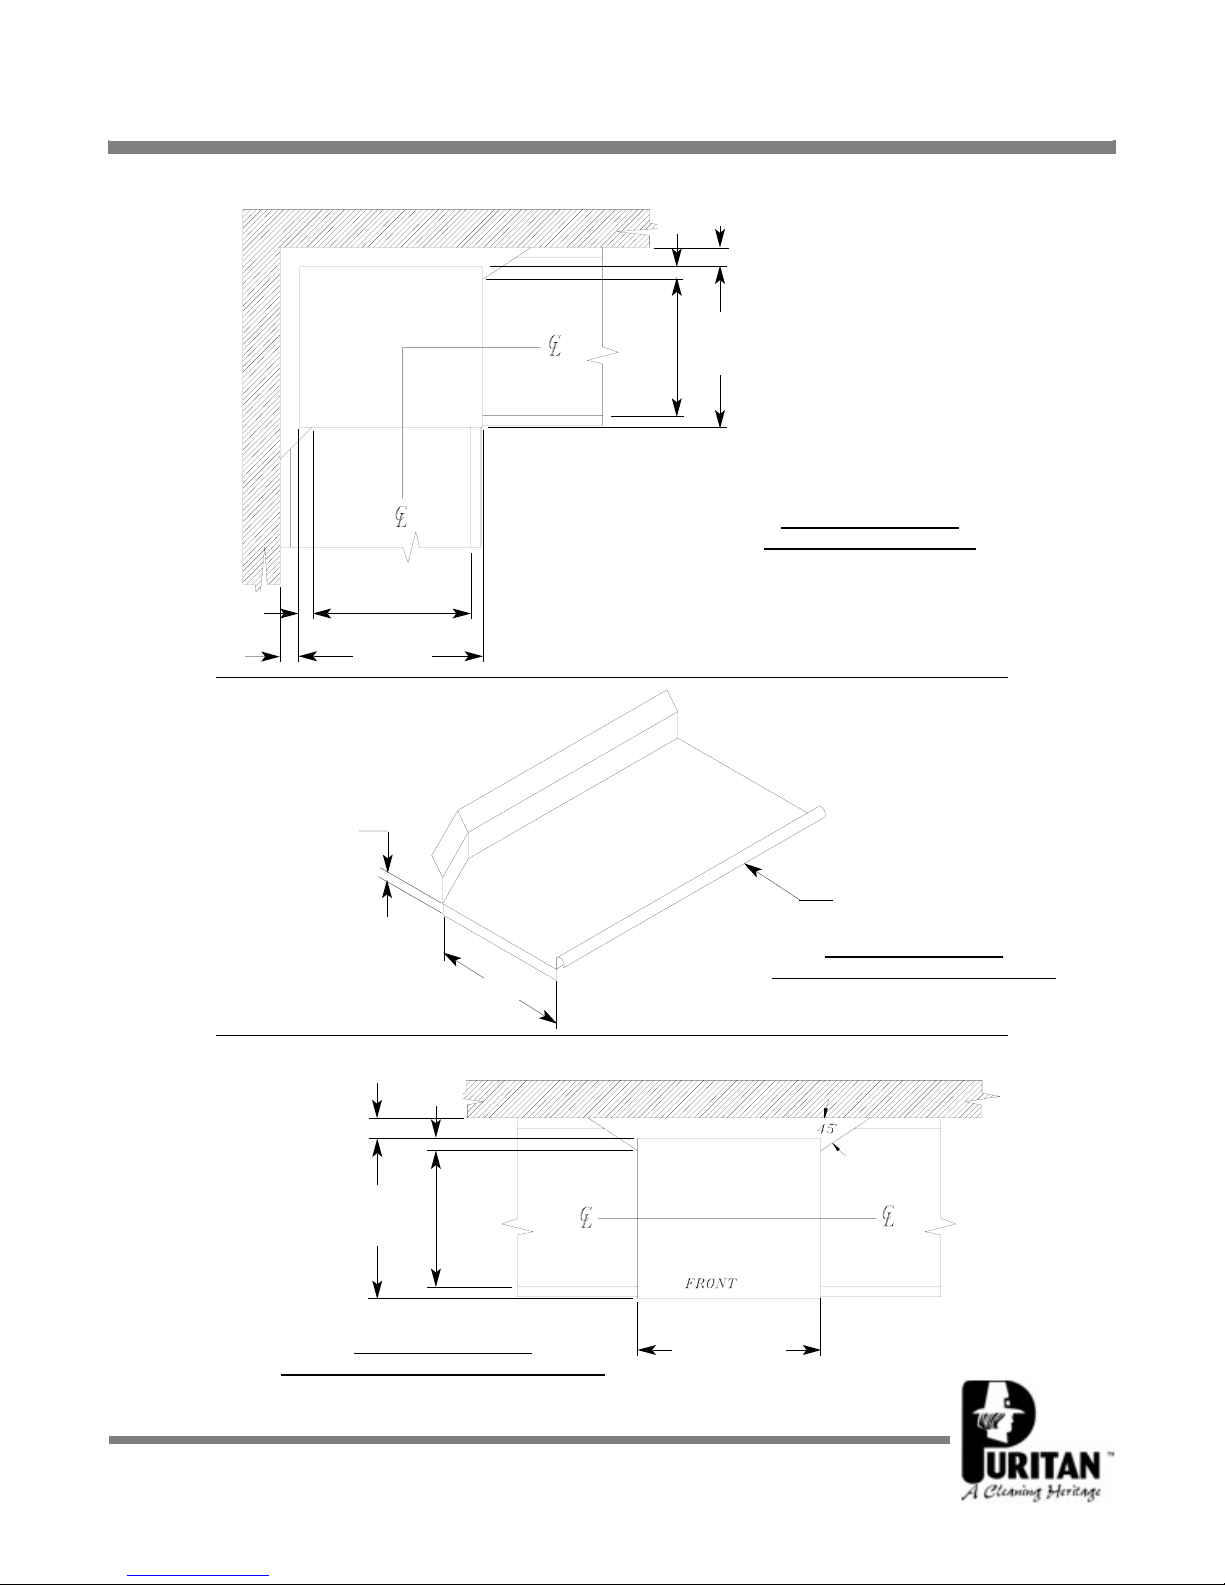
SECTION 1: SPECIFICATION INFORMATION
TABLE DIMENSIONS
TABLE DIMENSIONS
CORNER INST
ALLATION
T
ABLE DIMENSIONS
CONNECTION TO DISHMACHINE
T
ABLE DIMENSIONS
STRAIGHT THROUGH INSTALLATION
20 1/2”
OPENING
25 1/4”
2 1/4”
4” MIN.
2 1/2”
4”
MIN.
20 1/2”
OPENING
25 1/4”
20 1/2”
3/4”
1 1/2” ROLL
4”
MIN
2 1/2”
25 1/4”
20 1/2”
OPENING
25 1/4” PA-1
44” PA-2
PA-1/PA-2 Series Installation & Operation Manual
7610-002-24-11 Rev. J (11/02/2005)
Page 14

SECTION 2:
INSTALLATION/OPERATION
INSTRUCTIONS
8
Page 15
9
VISUAL INSPECTION: Before installing the unit, check the container and machine for damage. A damaged container is an indicator that there may be some damage to the machine. If there is damage to both the container and machine, do not throw away
the container. The dishmachine has been inspected and packed at the factory and is expected to arrive to you in new, undamaged condition. However, rough handling by carriers or others may result in there being damage to the unit while in transit. If
such a situation occurs, do not return the unit to Puritan; instead, contact the carrier and ask them to send a representative to
the site to inspect the damage to the unit and to complete an inspection report. You must contact the carrier within 48 hours of
receiving the machine. Also, contact the dealer through which you purchased the unit.
UNPACKING THE DISHMACHINE: Once the machine has been removed from the container, ensure that there are no missing parts from the machine. This may not be obvious at first. If it is discovered that an item is missing, contact Puritan immediately to have the missing item shipped to you.
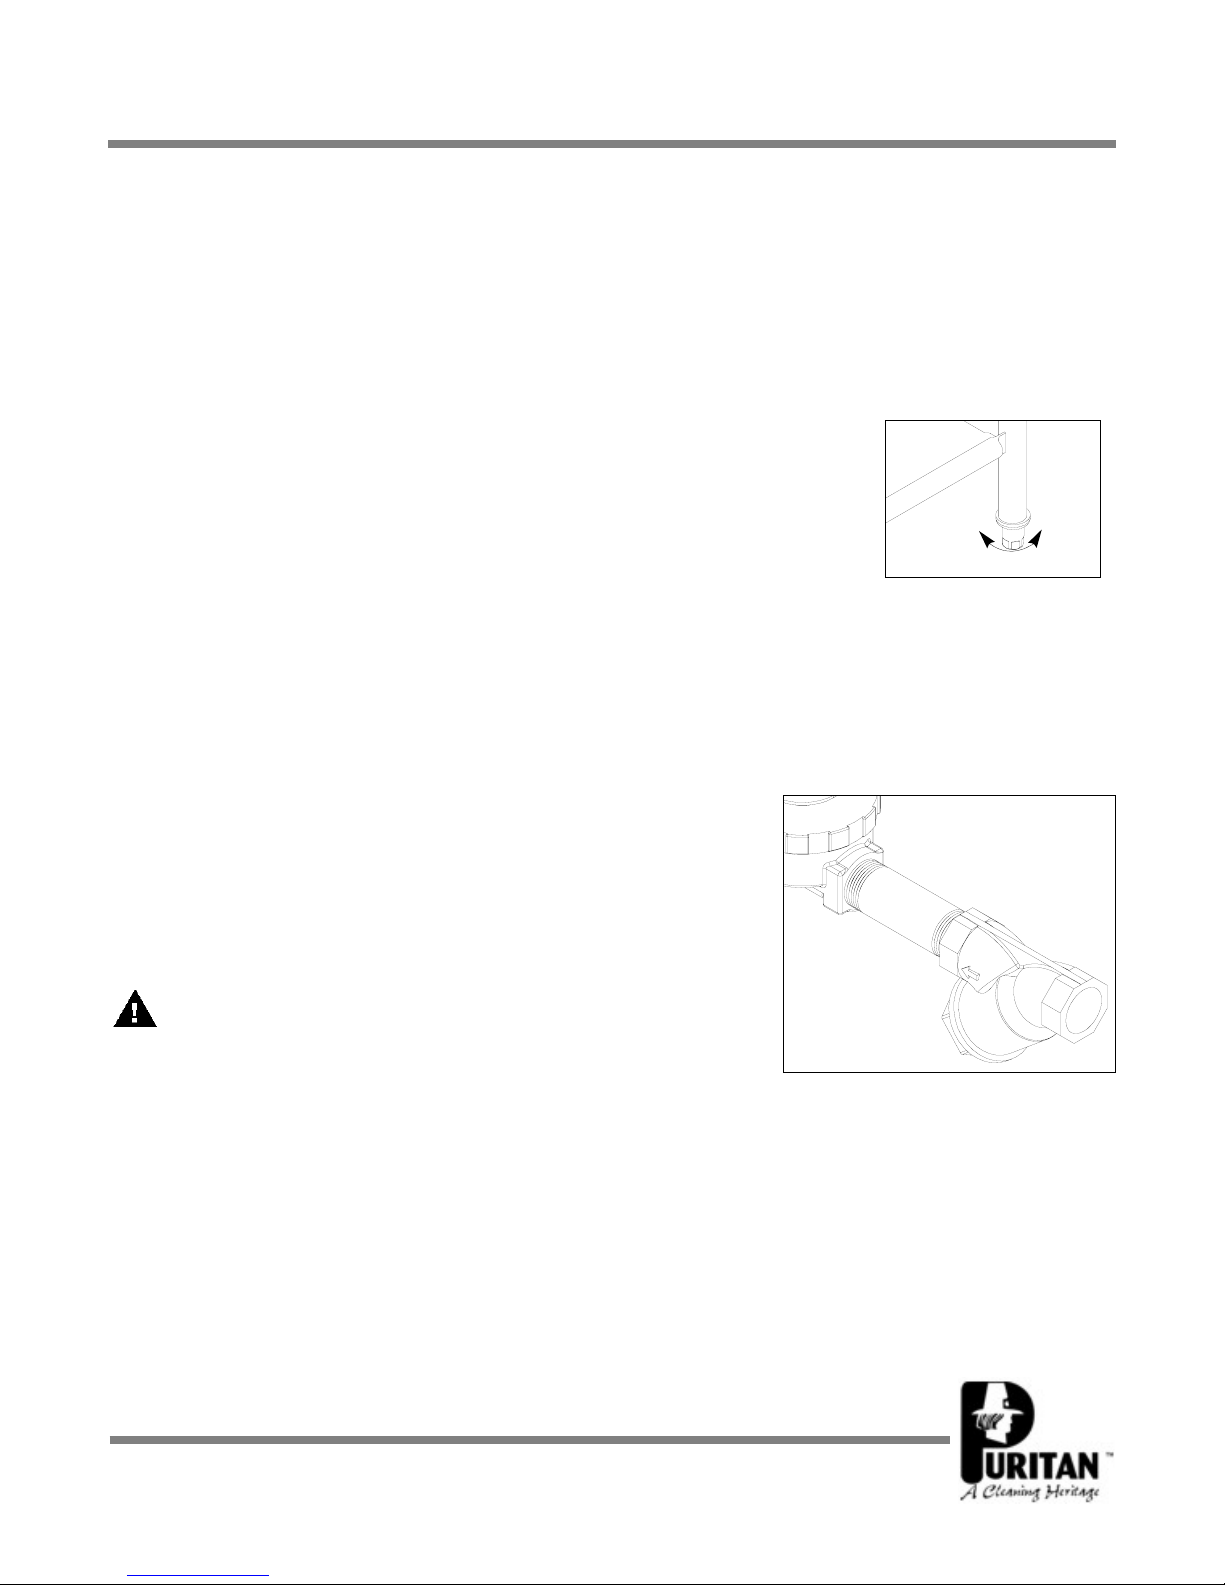
LEVEL THE DISHMACHINE: The dishmachine is designed to operate while being level. This is
important to prevent any damage to the machine during operation and to ensure the best results
when washing ware. The unit comes with adjustable bullet feet, which can be turned using a pair
of channel locks or by hand if the unit can be raised safely. Ensure that the unit is level from side
to side and from front to back before making any connections.
PLUMBING THE DISHMACHINE: All plumbing connections must comply with all applicable local, state, and national plumbing codes. The plumber is responsible for ensuring that the incoming water line is thoroughly flushed prior to connecting it to
any component of the dishmachine. It is necessary to remove all foreign debris from the water line that may potentially get
trapped in the valves or cause an obstruction. Any valves that are fouled as a result of foreign matter left in the water line, and
any expenses resulting from this fouling, are not the responsibility of the manufacturer.
CONNECTING THE DRAIN LINE: The drain is a gravity discharge drain. All piping from the 2” MNPT connection on the waste
accumulator must be pitched 1/4” per foot to the floor or sink drain. All piping from the machine to the drain must be a minimum
2” NPT and shall not be reduced. There must also be an air gap between the machine drain line and the floor sink or drain. If
a grease trap is required by code, it should have a flow capacity of 5 gallons per minute.
WATER SUPPLY CONNECTION: Ensure that you have read the section entitled
“PLUMBING THE DISHMACHINE” above before proceeding. Install the water supply
line (3/4” pipe size minimum) to the dishmachine line strainer using copper pipe. It is
recommended that a water shut-off valve be installed in the water line between the
main supply and the machine to allow access for service. The water supply line is to
be capable of 20 ± 5 PSI “flow” pressure at the recommended temperature indicated on the data plate.
VAPOR VENT OPTION: The optional Vapor Vent system must be connected
to the COLD water line. Run several cycles to confirm that the vapor vent is
functioning properly. At the end of the VENTING sequence, there should be only a
small amount of vapor released from the machine when the door interlock retracts
and the machine doors are opened.
In areas where the water pressure fluctuates or is greater than the recommended pressure, it is suggested that a water pressure regulator be installed.
Do not confuse static pressure with flow pressure. Static pressure is the line pressure in a “no flow” condition (all valves and
services are closed). Flow pressure is the pressure in the fill line when the fill valve is opened during the cycle.
It is also recommended that a shock absorber (not supplied with the PA-1 & PA-2 models) be installed in the incoming water
line. This prevents line hammer (hydraulic shock), induced by the solenoid valve as it operates, from causing damage to the
equipment.
PLUMBING CHECK: Slowly turn on the water supply to the machine after the incoming fill line and the drain line have been
installed. Check for any leaks and repair as required. All leaks must be repaired prior to placing the machine
in operation.
PA-1/PA-2 Series Installation & Operation Manual
7610-002-24-11 Rev. J (11/02/2005)
SECTION 2: INSTALLATION/OPERATION INSTRUCTIONS
INSTALLATION INSTRUCTIONS
Frame with Adjustable Foot
Raise
Lower
Incoming Plumbing Y-strainer Connection
Page 16
10
ELECTRICAL POWER CONNECTION: Electrical and grounding connections must comply with the applicable portions of the
National Electrical Code ANSI/NFPA 70 (latest edition) and/or other electrical codes.
Disconnect electrical power supply and place a tag at the disconnect switch to indicate that you are working on the circuit.
The dishmachine data plate is located on the right side and to the front of the
machine. Refer to the data plate for machine operating requirements, machine
voltage, total amperage load and serial number.
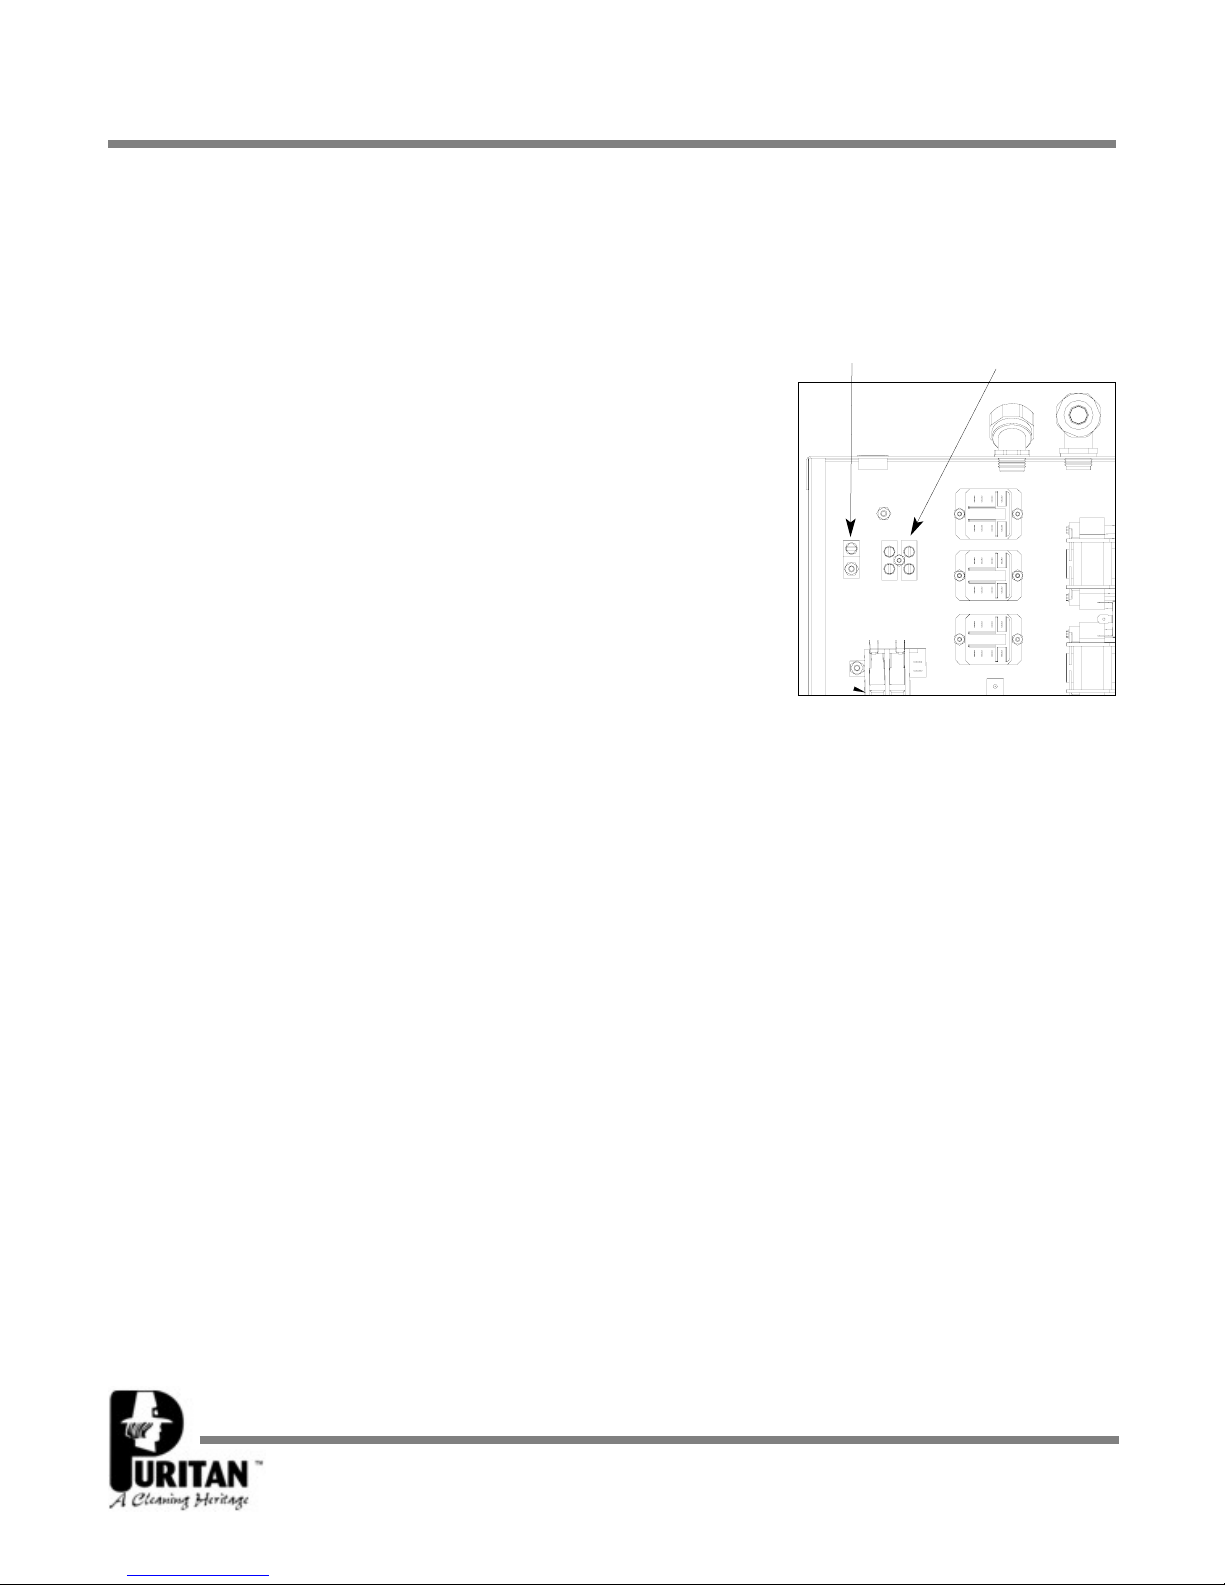
To install the incoming power lines, open the control box. This will require unlocking the control box cover. While unpacking the unit, the keys will be located on
the back of the unit tie-wrapped to the plumbing. Install 3/4” conduit into the prepunched holes in the back of the control box. Route power wires and connect to
power block and grounding lug. Install the service wires (L1 & L2) to the appropriate terminals as they are marked on the terminal block. Install the grounding
wire into the lug provided. Tighten the connections. It is recommended that “DEOX” or another similar anti-oxidation agent be used on all power connections.
VOLTAGE CHECK: Ensure that the power switch is in the OFF position and
apply power to the dishmachine. Check the incoming power at the terminal block
and ensure it corresponds to the voltage listed on the data plate. If not, contact a
qualified service agency to examine the problem. Do not run the dishmachine if
the voltage is too high or too low. Shut off the service breaker and mark it as being
for the dishmachine. Advise all proper personnel of any problems and of the location of the service breaker. Close and lock the control box cover.
PA-1/PA-2 Series Installation & Operation Manual
7610-002-24-11 Rev. J (11/02/2005)
SECTION 2: INSTALLATION/OPERATION INSTRUCTIONS
ELECTRICAL INSTALLATION INSTRUCTIONS
Lower Control Box - Incoming Power Connection
Power Block
Ground Lug
Page 17

11
TO PREPARE PUMPS FOR OPERATION
The PA-1/PA-2 dishmachines are supplied with detergent, rinse additive and sanitizer dispensing chemical feeder pumps.
Locate the open ends of the chemical tubes with the tube stiffeners and place each one in the appropriate container.
A. Red Tubing = Detergent
B. Blue Tubing = Rinse Aid
C. White Tubing = Sanitizer
PRIMING CHEMICAL FEEDER PUMPS
Chemical feeder pumps need priming when the machine is first installed or if for some reason the chemical lines have been
removed and air is allowed to enter.
CAUTION: Water must be in the sump and wash tank prior to the dispensing of chemicals. Sanitizer in con-
centration is caustic and may cause damage without dilution.
1. Verify that the proper chemical tube stiffener inlet is in the proper container.
2. Use the toggle switches on the right side of control box to prime each pump. There are two (2) switches mounted by the
chemical feeder pumps. One will prime the sanitizer pump only, and the second will prime either the detergent or rinse aid
pump, depending upon which way it is depressed.
3. To prime the pumps, hold the switch in the momentary position until chemical can be observed entering the sump.
4. Detergent is dispensed as required during the wash cycle by the cam timer. The amount of detergent may need to be
increased or decreased depending on water quality and type of detergent. It is adjusted by changing Cam 6 on the cam timer.
5. Rinse additive is dispensed as required into the final rinse. The amount of rinse aid may need to be adjusted depending on
water hardness and results. It can be changed by changing Cam 7 on the cam timer.
6. Sanitizer either chlorine or iodine is dispensed into the final rinse. The amount of sanitizer may need to be adjusted depending on the concentration and type of sanitizer used. It is adjusted by changing Cam 5 on the cam timer.
Warning: Some of the chemicals used in dishwashing may cause chemical burns if they come in contact with
your skin. Wear appropriate protective gear when handling these chemicals. If you do come in contact with
these chemicals, flush the area with fresh water.
PA-1/PA-2 Series Installation & Operation Manual
7610-002-24-11 Rev. J (11/02/2005)
SECTION 2: INSTALLATION/OPERATION INSCTRUCTIONS
CHEMICAL DISPENSING EQUIPMENT
Page 18

PREPARATION: Before proceeding with start-up verify the following:
A. Sump strainer is in place.
B. Drain stopper is installed.
C. Check that the wash arms are securely screwed into the stationary bases and rotate freely. Also check that the end plugs
are securely screwed into the ends of all wash arms.
POWER UP: To energize electrically, proceed as follows:
A. Turn on electrical power supply at the circuit breaker.
B. Check voltage at incoming terminals L1& L2. The voltage measured at these points should match data plate voltage.
C. If voltages are in required range, close the control box cover.
TO FILL WASH TUB: For the initial fill, the unit must run through three (3) cycles. To start depress the “ON/OFF/FILL” rocker
switch to the “FILL” position. Once the circuit is energized the doors should be opened then closed. This will start a cycle and
when it is completed the procedure should repeated two (2) more times. After the third cycle the unit will be filled to the correct
level.
NOTE: Water must be in the sump while the machine is running to avoid running the pump dry and causing damage
to the pump seal.
The water level was set at the factory. If the water level is not at the level noted above it will require adjustment. Check to ensure
that the recommended water pressure is being supplied to the machine (20±5 PSI is required). If the water pressure is correct
then the fill valve cam will need adjustment. Use the following steps to adjust the cam.
A. Turn power off at the machine circuit breaker.
B. Open control box cover
C. Locate the timer fill valve cam (Cam 4 from the timer motor)
D. Locate the spanner wrench taped to the electrical panel. The spanner wrench is used to adjust the cam.
E. To increase the water level, open the notch of the adjustable cam. To decrease the water level, close the notch. Care must
be taken that the set point does not extend into the home position of the timer. Do not move the side of the cam that starts the
fill; this will change the sequence of cycle operation.
F. With the door closed turn the power circuit breaker on. Open and close the door to run a cycle, then check the water level.
Adjust as necessary then close the control box cover.
Refer to the page “Cam Timer Operation” for adjustment to the cam timer.
NOTE: The machine must run a complete cycle to drain and fill. If the machine is not allowed to drain, the water will build up
inside the tub. After the initial fill, the rinse water for the current cycle will become the wash water for the next cycle.
The dishmachine is now ready to proceed with the washing of dishes.
WARNING: Certain materials, including silver, silver plate, aluminum and pewter, are attacked by sodium hypochlorite
sanitizers (bleach).
PA-1/PA-2 Series Installation & Operation Manual
7610-002-24-11 Rev. J (11/02/2005)
OPERATING INSTRUCTIONS
SECTION 2: INSTALLATION/OPERATION INSCTRUCTIONS
12
Page 19

13
PREPARING DISHES: Preparation of the ware will help ensure good results and less re-washes. If not done properly the dishes will not be clean and will reduce the efficiency of the dishmachine.
The following steps should be followed to ensure good results:
A. Remove all scraps and gross soil into a garbage can.
B. Separate and pre-soak silverware.
C. Separate and pre-soak the egg and casserole dishes.
D. Scrape all ware with a brush or spatula.
E. Flush cups, bowls and glasses with running water.
F. Prewash dishware by soaking or spraying with a pre-rinse hose.
G. Place dishes and cups in dish rack. Cups should be upside down (so they don’t hold water).
H. Place glasses and flatware in combination glass/flatware rack. Scatter flatware loosely on the rack bottom. Do not put glasses on top of flatware. Note: For optimal results flatware should be washed vertically in a special rack.
DAILY MACHINE PREPARATION: Before proceeding with start-up, verify the following:
A. Open door and verify that the sump strainer is in place in the sump.
B. Verify that the drain stopper is in position.
C. Check that the plugs are securely screwed into the ends of all wash arms.
D. Check that the wash arms are securely screwed into the stationary bases and rotate freely.
E. Check levels in all chemical containers and replace if empty.
F. For initial fill, close doors then depress the “OFF/ON/FILL” rocker switch to the “FILL” position.
WASHING A RACK OF WARE: A. Open doors, place a full rack into the machine, and close doors. Unit will start automatically.
B. After cycle is completed open doors and remove rack.
C. Place another full rack into the dishmachine, and close doors.
D. Dishmachine will repeat cycle.
SHUT DOWN AND CLEANING:
A. At the end of mealtime, move the “OFF/ON/FILL” switch to the “OFF” position. Unit will automatically shut down.
B. Open doors and manually remove drain stopper to drain the unit.
C. Remove and clean upper and lower wash arms.
D. Remove and clean the sump strainer.
PA-1/PA-2 Series Installation & Operation Manual
7610-002-24-11 Rev. J (11/02/2005)
SECTION 2: INSTALLATION/OPERATION INSCTRUCTIONS
OPERATING INSTRUCTIONS (CONTINUED)
Page 20

14
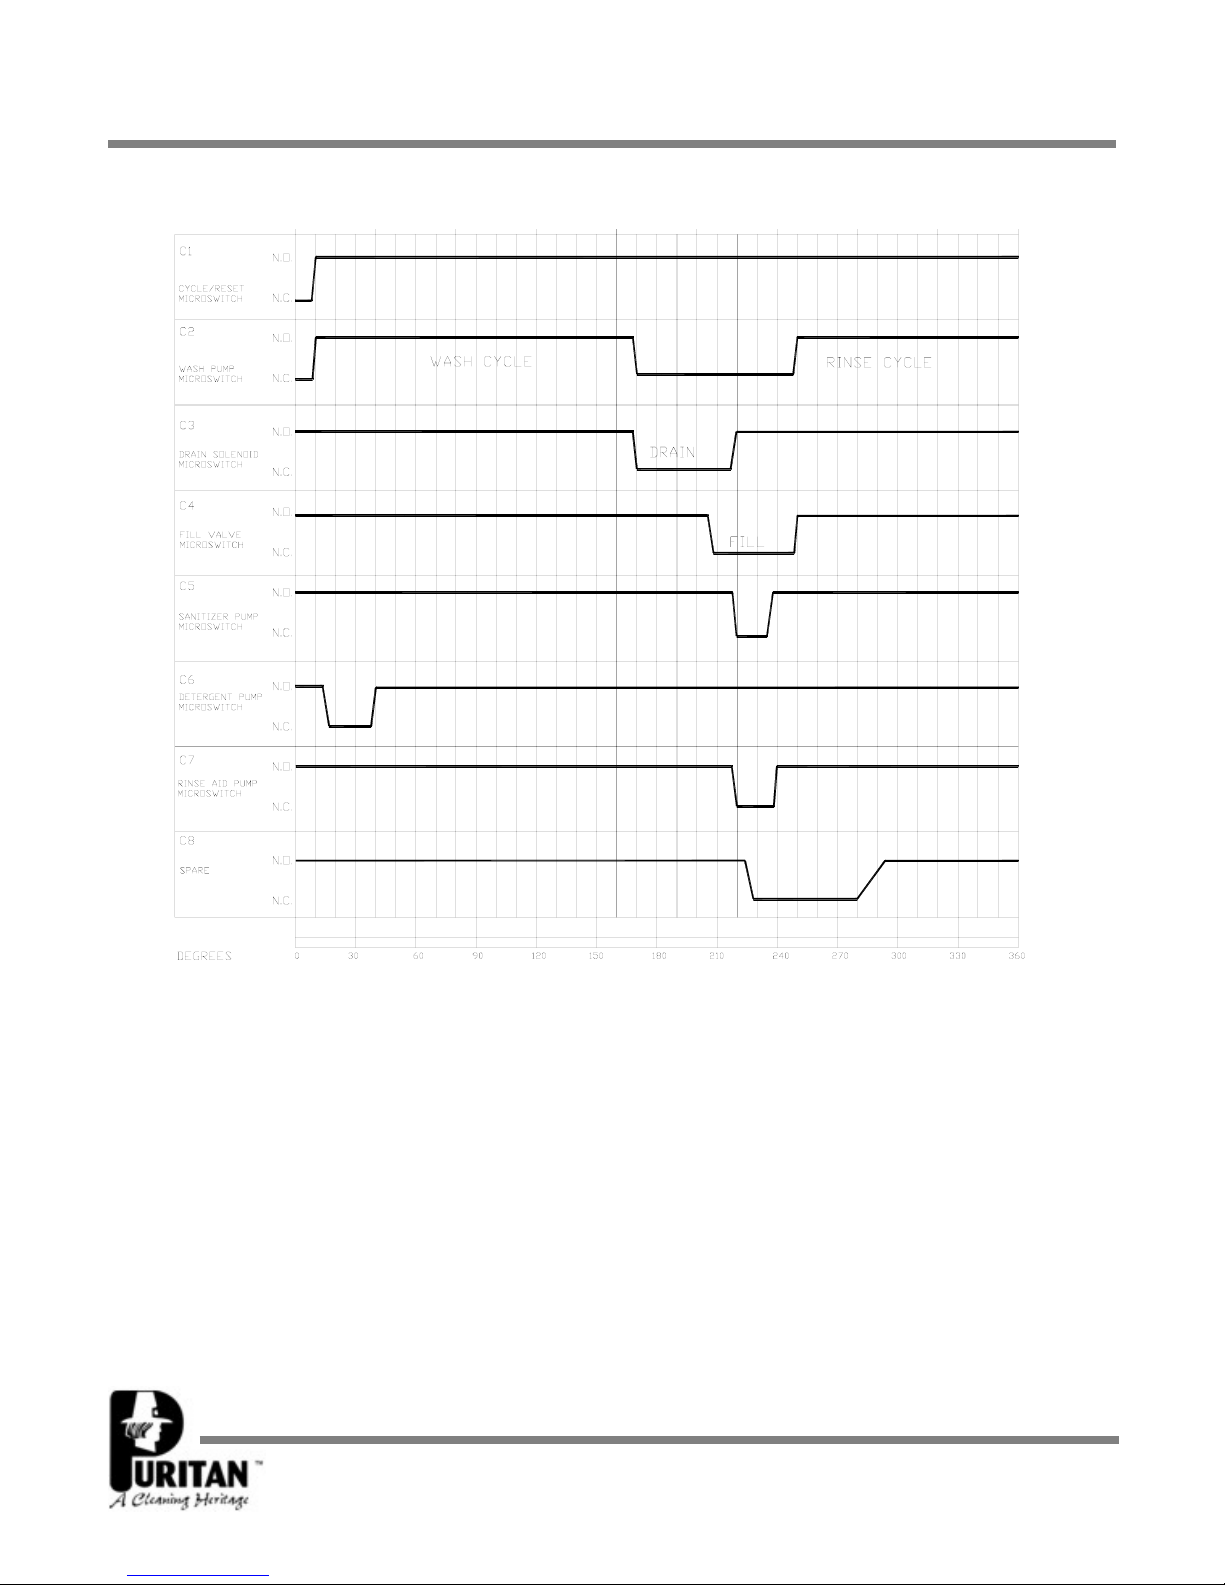
The PA-1/PA-2 cam timer is a 1 minute, 30 second, 8-cam timer that controls the operation of the dishmachine. The following is
a description of the set points for each cam and the function of each switch.
CAM 1: Cam 1 is a cut cam with a single notch and serves as the cycle/reset control.
FUNCTION: When the machine is in the operation mode the notch is the home position. The machine will remain idle until the door
is opened, then cam 1 moves to the start position and holds until the door is closed. The closing of the door will start the next cycle.
The cam will rotate a complete cycle, and return to the home position and hold.
CAM 2: Cam 2 is a cut cam and provides the wash cycle timing.
FUNCTION: The wash cam works off the normally open contacts of cam 2. This requires the switch be held closed by the cam.
It will close and energize the wash pump 2 seconds after the cycle switch is activated. The pump will operate through the wash
cycle (40 seconds) then shut down for the dwell period (20 seconds). As the cam rotates it energizes the pump for the rinse cycle
(25 seconds). When cam 1 reaches it’s home position it will de-energize cam 2, shutting down the wash pump.
NOTE: The last 6 cams are adjustable. The following instructions will require that the timer position have the cams to the
front and the motor to the left.
CAM 3: Cam 3 is an adjustable cam and controls the drain solenoid.
FUNCTION: The drain solenoid works off the normally closed contacts of cam 3. When the cycle is initiated, the micro switch will
be held open until it is allowed to drop into the notch of the cam. This energizes the energizes the drain solenoid which drains the
machine. After a 12 second delay the cam reverses the micro switch, de-energizing the drain solenoid. This cam may require
adjusting due to varying water pressure. The drain solenoid must remain open long enough to remove whatever water the fill valve
solenoid allows in the machine. This could vary due to the water supply line pressure.
SETTINGS: The right side of cam 3 must be set to pick up the switch arm just before the wash/rinse cycle cam switch drops. It
will hold the drain solenoid open to drain all the water in the tank from the unit during the dwell period. Any adjustment made to
the drain should be made to the left side of cam 3. The cam must be moved back into the wash time until all of the water is drained
from the machine.
CAM 4: Cam 4 is an adjustable cam and controls the fill valve and therefore the rinse cycle.
FUNCTION: The fill valve cam works off the normally closed contacts of cam 4. This requires the switch to be held open by the
cam and allowed to drop into the notch to operate the fill valve. This energizes the fill solenoid which opens to start filling the
machine with fresh water. After a 10 second delay, the cam reverses the micro switch, de-energizing the fill solenoid. The fill cam
may require adjustment due to varying water pressure. The fill solenoid must remain open a sufficient length of time to fill the
machine to the correct level.
SETTINGS: The right side of cam 4 must be set to allow the switch arm to drop 2 seconds before the drain solenoid is de-energized which flushes the detergent residue from the unit. It will hold the fill solenoid open until the cam switch arm is raised. At that
time the fill solenoid is de-energized, shutting off the incoming water. The tub will be filled to the correct level to rinse the rack.
Any adjustment made to the timing of the fill solenoid should be made with the left side of cam 4. To increase the water level, open
the notch of the cam and for decreasing the level of the notch should be closed.
CAM 5: Cam 5 is an adjustable cam and controls the sanitizer pump.
FUNCTION: The sanitizer pump cam works off the normally closed contacts of cam 5. This requires the switch arm to be held
open by the cam and allowed to drop into the notch to operate the pump. The time that the sanitizer pump will remain energized
must be determined in the field to suit the chemical used and water conditions.
SETTINGS: The left side of cam 5 must be set to allow the switch arm to drop in past the starting point of the fill cam and after
the drain solenoid has closed. The adjustment for sanitizer volume must be made with the right side of the cam. To increase the
volume the notch should be increased or to decrease the amount of sanitizer the notch should be closed slightly in increments until
the correct level is reached.
PA-1/PA-2 Series Installation & Operation Manual
7610-002-24-11 Rev. J (11/02/2005)
SECTION 2: INSTALLATION/OPERATION INSCTRUCTIONS
CAM TIMER OPERATION (PA-1/PA-2)
Page 21

15
CAM 6: Cam 6 is an adjustable can and controls the detergent pump.
FUNCTION: The detergent pump cam works off the normally closed contacts of cam 6. This requires the switch arm to be held
open by the cam and allowed to drop into the notch to operate the pump. The time that the detergent pump will remain energized
must be determined in the field to suit the chemical used and water conditions.
SETTINGS: The left side of cam 6 must be set to drop in past the starting point of the wash pump cam. The adjustment for detergent volume must be made with the right side of the cam. To increase the volume, the notch should be increased or to decrease
the amount of detergent the notch should be closed slightly in increments until the correct level is reached.
CAM 7: Cam 7 is an adjustable cam and controls the rinse aid pump.
FUNCTION: The rinse aid pump cam works off the normally closed contacts of cam 7. This requires the switch arm to be held
open by the cam and allowed to drop into the notch to operate the pump. The time that the rinse aid pump will remain energized
must be determined in the field to suit the chemical used and water conditions.
SETTINGS: The left side of cam 7 must be set to drop in past the starting point of the fill cam and after the drain solenoid has
closed. The adjustment for rinse aid volume must be made with the right side of the cam. To increase the volume the notch should
be increased or to decrease the amount of detergent the notch should be closed slightly in increments until the correct level is
reached.
CAM 8: Cam 8 is an adjustable cam and is not used.
PA-1/PA-2 Series Installation & Operation Manual
7610-002-24-11 Rev. J (11/02/2005)
SECTION 2: INSTALLATION/OPERATION INSCTRUCTIONS
CAM TIMER OPERATION (PA-1/PA-2) (CONTINUED)
Page 22
16
SECTION 2: INSTALLATION/OPERATION INSCTRUCTIONS
TIMING CHART (PA-1/PA-2 MODELS)
PA-1/PA-2 Series Installation & Operation Manual
7610-002-24-11 Rev. J (11/02/2005)
Page 23

2 SECONDS INTO CYCLE
*Wash pump starts, runs for 40 seconds, then shuts down. Controlled by C2 cam.
4 SECONDS INT
O CYCLE
*Detergent feed pump is energized. The length of time will be field determined. Time will depend on the detergent used and
water conditions. Controlled by C6 cam.
10 SECONDS INTO CYCLE
* Detergent feed pump shuts down. Controlled by C6 cam.
42 SECONDS INTO CYCLE
* Wash pump shuts down. Controlled by C2 cam.
* Drain solenoid is energized (opens). Wash water drains from the unit. Controlled by C3 cam.
51 SECONDS INTO CYCLE
* Fill solenoid valve is energized (opened) starting to fill unit. Controlled by C4 cam.
53 SECONDS INT
O CYCLE
* Drain solenoid is de-energized (closed). Controlled by C3 cam.
54 SECONDS INTO CYCLE
* Sanitizer pump is energized, injecting sanitizer into wash tank. Controlled by C5 cam.
* Rinse aid pump is energized, injecting rinse aid into wash tank. Controlled by C7 cam.
58 SECONDS INT
O CYCLE
* Sanitizer pump is de-energized. The length of time that the sanitizer pump is activated will be determined in the field.
Timing will depend on the chemical used and water conditions. Controlled by C5 cam.
60 SECONDS INT
O CYCLE
* Rinse aid pump is de-energized. The length of time that the rinse aid pump is activated will be determined in the field.
Timing will depend on the chemical used and water conditions. Controlled by C7 cam.
62 SECONDS INTO CYCLE
* Wash pump is energized for the rinse cycle.
* Fill solenoid valve is de-energized.
87 SECONDS INT
O CYCLE
* Wash pump is de-energized.
* End of cycle.
PA-1/PA-2 Series Installation & Operation Manual
7610-002-24-11 Rev. J (11/02/2005)
HELPFUL HINT:
Each notch on the cam timer is
equal to 10 degrees or 2-1/2
seconds. For timer adjustment,
use the tool provided which is
taped to the inside of the control box!
17
SECTION 2: INSTALLATION/OPERATION INSCTRUCTIONS
TIMING SEQUENCE (PA-1/PA-2 MODELS)
Page 24

18
SECTION 3:
PREVENTATIVE MAINTENANCE
Page 25

SECTION 3: PREVENTATIVE MAINTENANCE
PREVENTATIVE MAINTENANCE
The dishmachines covered in this manual are designed to operate with a minimum of interaction with the operator. However,
this does not mean that some items will not wear out in time.
There are many things that operators can do to prevent catastrophic damage to the dishmachine. One of the major causes of
component failure has to do with prescrapping procedures. A dishmachine is not a garbage disposal; any large pieces of material that are put into the machine shall remain in the machine until they are either broken up (after spreading out on your ware!)
or physically removed. Strainers are installed to help catch debris, but they do no good of they are clogged. Have operators
regularly inspect the pan strainers to ensure (1) that they are free of soil and debris and (2) they are laying flat in the tub.
When cleaning out strainers, do NOT beat them on waste cans. The strainers are made of metal and can be forgiving; but once
severe damage is done, it is next to impossible for the strainer to work in the way it was designed to. Wipe out strainers with
a rag and rinse under a faucet if necessary. For stubborn debris, a toothpick should be able to dislodge any obstructions from
the perforations. Always ensure that strainers are placed back in the machine before operation and that they lay flat in the tub.
You may wish to contact your Puritan representative in order to learn more about how your water hardness will effect the performance of your machine. Hard water makes dishmachines work harder and decreases efficiency.
Again, it is important to remind operators that trying to perform corrective maintenance on the dishmachine could lead to larger problems or even cause harm to the operator. If a problem is discovered; secure the dishmachine using proper shut down
procedures as listed in this manual and contact your Puritan representative.
Some problems, however, may having nothing to do with the machine itself and no amount of preventative maintanence is
going to help. A common problem has to do with temperatures being too low. Verify that the water temperatures coming to your
dishmachine match the requirements listed on the machine data plate. There can be a variety of reasons why your water temperature could be too low and you should discuss it with your Puritan representative to determine what can be done.
By following the operating and cleaning instructions in this manual, you should get the most efficient results from your machine.
As a reminder, here are some steps to take to ensure that you are using the dishmachine the way it was designed to work:
1. Ensure that the water temperatures match those listed on the machine data plate.
2. Ensure that all strainers are in place before operating the machine.
3. Ensure that all wash and/or rinse arms are secure in the machine before operating.
4. Ensure that drains are closed/sealed before operating.
5. Remove as much soil from dishes by hand as possible before loading into racks.
6. Do not overfill racks.
7. Ensure that glasses are placed upside down in the rack.
8. Ensure that all chemicals being injected to machine have been verified as being at the correct concentrations.
9. Clean out the machine at the end of every workday as per the instructions in the manual.
10. Always contact your Puritan representative whenever a serious problem arises.
11. Follow all safety procedures, whether listed in this manual or put forth by local, state or national codes/regulations.
19
PA-1/PA-2 Series Installation & Operation Manual
7610-002-24-11 Rev. J (11/02/2005)
Page 26

20
SECTION 4:
TROUBLESHOOTING
Page 27

SECTION 4: TROUBLESHOOTING SECTION
COMMON PROBLEMS
21
WARNING: inspection, testing and repair of electrical equipment should be performed only by qualified service personnel. Certain procedures in this section require electrical tests or measurements while power is applied to the
machine. Exercise extreme caution at all times. If test points are not easily accessible, disconnect power, attach
test equipment and re-apply power to test. When replacing electrical parts, disconnect power at source circuit breaker.
Problem: Dishmachine will not run, no voltage at relay terminals L1 and T1.
1. Service disconnect switch is turned off or is faulty. Turn the disconnect back on or replace.
2. Branch circuit breaker tripped/fuse blow. Reset or replace as required.
3. Loose or broken connection to the dishmachine. Tighten or replace connections as required.
Problem: Dishmachine will not run with power switch in the “ON” position unless the cam timer is moved off of the
“home” position.
1. The door switch is shorted out. With the door open, check for the voltage between the ORANGE/WHITE door switch wire
and neutral. If it reads 120 volts, replace the shorted door switch.
2. Faulty control relay. With the door open, check for voltage between connections #9 and #3 on control relay. If it reads 120
volts, replace the control relay.
3. Misadjusted or faulty “cycle reset” cam microswitch. Adjust the cam or replace the switch.
Problem: Dishmachine will not cycle with power switch in the “ON” position, works only in Delime Mode.
1. Faulty “cycle reset” cam microswitch. Rotate the cams manually off of the “home” position. Check the voltage between the
ORANGE and BLACK/WHITE wires on the cycle reset switch. If it reads 120 volts, then the switch is open and should be
replaced.
2. Faulty cam timer motor. If the cam timer is not rotating, check the voltage to the motor. If voltage is present when the door
is closed, replace the timer motor.
3. Faulty control relay. Check the voltage across relay contacts #9 and #6. If 120 volts when the doors is closed, replace the
relay.
4. Faulty NORMAL/DELIME switch. In the “NORMAL” position, check the voltage between the WHITE/BLACK and WHITE/RED
wires to the NORMAL/DELIME switch. If it reads 120 volts, replace the switch.
Problem: Dishmachine will not run. The wash pump motor will run if the wash motor relay is depressed manually.
1. Open side door switch. With the door closed, measure the voltage between the BLUE and WHITE/BLACK wires on the door
switch. If it reads 120 volts, replace the switch.
2. Faulty side door safety switch relay. Measure the voltage between the black wires on terminals #6 and #9 of the relay. If you
measure 120 volts, replace the relay; or measure between the WHITE/BLACK wire on terminal 4 and the ORANGE/WHITE
wire on terminal 7 of the relay. If you read 120 volts, replace the relay.
Problem: Dishmachine will not run with the power switch in the “ON” position or in the Delime Mode.
1. Faulty door switch. With the door closed, check for voltage between the WHITE/BLACK and ORANGE/WHITE wires to the
door switch. If it reads 120 volts, replace the open switch or reposition the magnet or magnet bracket.
2. Faulty ON/FILL-OFF/DRAIN switch. With the switch in the “ON” position, check the voltage between the BLACK and
WHITE/BLACK wires on the switch. If it reads 120 volts, replace the switch.
3. Faulty NORMAL/DELIME switch. In the “NORMAL” position, check the voltage between the WHITE/BLACK and WHITE/RED
wires to the NORMAL/DELIME switch. If it reads 120 volts, replace the switch; or in the “DELIME” position, check the voltage
between the two BLACK/ORANGE wires leading to the NORMAL/DELIME switch (not the BLACK/ORANGE jumper). If it reads
120 volts, replace the switch.
PA-1/PA-2 Series Installation & Operation Manual
7610-002-24-11 Rev. J (11/02/2005)
Page 28

22
Problem: Dishmachine cycles continuously.
1. “Cycle reset” switch is loose. Reposition the switch assembly, bend the metal lever if necessary.
2. Faulty “cycle reset” switch. Measure between the BLACK/YELLOW and ORANGE wires on the “cycle reset” switch while
the timer is rotating. As the switch lever drops into the “home” position, you should measure 120 volts. If not, replace the switch.
3. Dishmachine is in Delime Mode. Put the NORMAL/DELIME switch in the “NORMAL” position.
Problem: Dishmachine runs with the door open.
1. The door switch may be shorted out. With the machine off, open the doors, and with both wires to the door switch unplugged,
measure the continuity between the wires on the switch. If there is continuity, replace the switch.
2. Faulty wash relay. Turn the machine off. If the wash relay does not release, replace it.
3. Faulty control relay. With the power off, remove the WHITE/RED and BLACK/YELLOW wires form the control relay terminals #9 and #6. Measure the continuity between the terminals. If there is continuity, replace the relay.
Problem: Dishmachine will not fill, though other functions work.
1. Y-strainer on incoming water line plugged or clogged. Remove strainer and clean out.
2. Water supply valve(s) turned off. Turn the valve(s) on.
3. Faulty solenoid valve diaphragm. Replace diaphragm, clean foreign material out of valve body and orifices.
4. Faulty solenoid coil. If the coil has voltage, but no continuity, replace the coil (continuity is measured across coil connectors
with wires removed).
5. Faulty fill microswitch. During fill, measure the voltage between the ORANGE and WHITE/GREEN wires. If it reads 120 volts,
adjust or replace the switch.
Problem: Dishmachine fills continuously, even without power applied to the machine.
1. Solenoid valve dirty or faulty. Clean valve or replace faulty parts as required.
Problem: Dishmachine fills continuously, only when power is supplied to the machine.
1. Faulty fill microswitch. Repair or replace switch as necessary.
2. Cam timer stalled in fill position. If the cam timer is not rotating, check the voltage to the timer motor. If it measures as 120
volts when the door is closed, replace the timer motor.
3. Shorted ON/FILL-OFF/DRAIN switch. Check the voltage between the BLACK and WHITE/GREEN connections on the
ON/FILL - OFF/DRAIN switch in the “ON” position. If it does not read 120 volts, replace the switch.
Problem: The wash motor does not run, other functions work. Wash motor only runs when the wash relay is manually pushed down.
1. Loose wire connection to microswitch, relay, or contactor. Tighten wires as required.
2. Faulty wash cam microswitch. During a wash cycle, check the voltage between the ORANGE and BLACK/ORANGE wires
on the wash microswitch. If it reads 120 volts, the switch is open and should be replaced.
3. Faulty NORMAL/DELIME switch. During the wash cycle, check the voltage between the two BLACK/ORANGE wires (not the
jumper). If it reads 120 volts, replace the NORMAL/DELIME switch.
4. Faulty control relay. Check the voltage across relay contacts #7 and #4. If it measures 120 volts during the wash cycle,
replace the relay.
5. Faulty wash relay. Check the voltage at the relay coil between the ORANGE/BLACK and WHITE wires. If you read 120 volts,
then the coil is faulty. Replace the wash relay.
PA-1/PA-2 Series Installation & Operation Manual
7610-002-24-11 Rev. J (11/02/2005)
SECTION 4: TROUBLESHOOTING SECTION
COMMON PROBLEMS
Page 29

23
SECTION 4: TROUBLESHOOTING SECTION
COMMON PROBLEMS
Problem: The wash motor does not run even when the wash relay is manually depressed; other functions work.
1. Loose wire connections to motor, delime switch, or from contactors. Tighten wires as necessary.
2. Mechanical binding in pump. If the motor has the correct incoming voltage, and its overload is tripping, repair or replace the
pump.
3. Faulty wash motor. If the motor has the correct incoming voltage, and the pump is alright, replace the motor.
4. Faulty wash relay. With the wash relay pushed in, check the voltage between T1 and L1 of relay. If it measures 120 volts,
replace the relay.
5. High or low voltage problem. Check voltage at the wash motor and at the incoming power terminal block. Compare to electrical specifications.
Problem: Wash motor runs continuously.
1. NORMAL/DELIME switch is in “DELIME” position. Place the switch in the “NORMAL” position.
2. Wash relay welded closed. Turn the machine off. If the wash relay doesn’t release, replace contactor.
3. Cam timer stalled in the wash or rinse cycle. If the cam timer is not rotating, check the voltage to the timer motor. If there is
no voltage when the door is closed, check the wires and/or replace the timer motor.
4. Wash motor microswitch is faulty. Tighten the connections, ensuring that the switch makes contact, replace if necessary.
Problem: Dishmachine keeps tripping the service breaker.
1. The power supply may be shorting to ground. Check for loose wires or burned connections.
2. Faulty door switch or detergent safety switch. Check for a loose or wet connection at the switch and wire connectors. Bypass
the switch to verify that it is indeed the problem. Replace the switch if necessary.
3. Pump impeller jammed. Clear the impeller.
4. Wash motor faulty. Check the motor voltage and amperage draw. If amperage draw is over 12 amps, replace the motor.
Problem: Low wash water pressure.
1. Water level is too low. Increase the fill time, or decrease the drain time, and verify that incoming water pressure is 20 PSI.
2. Sump strainer clogged. Clean and re-install.
3. Obstruction in either the wash pump housing or the wash manifold. Disassemble and clear obstruction.
4. Clogged wash arm nozzles. Remove the wash arms, clean the nozzles, then re-install.
Problem: Dishmachine will not drain.
1. Loose wire connection. Verify that all wire connections are tight.
2. Drain hole may be obstructed. Remove the obstruction.
3. Not enough time for unit to drain. Adjust the drain cam on the timer.
4. Drain rod bent or binding. Repair the rod, or replace as necessary.
5. Faulty drain microswitch on the cam timer. With the power off and the drain cam in the “home” position, remove the
WHITE/YELLOW wire from the microswitch. Measure the continuity between the ORANGE wire on the microswitch and the tab
that the WHITE/YELLOW wire was connected to. If there is no continuity, replace the switch.
Problem: Dishmachine will not hold water.
1. Faulty drain ball. Replace as necessary.
2. Drain hole may be obstructed. Remove the obstruction.
3. Drain rod bent or binding. Repair the rod, or replace as necessary.
PA-1/PA-2 Series Installation & Operation Manual
7610-002-24-11 Rev. J (11/02/2005)
Page 30

PA-1/PA-2 Series Installation & Operation Manual
7610-002-24-11 Rev. J (11/02/2005)
Problem: Sanitizer pump runs continuously.
1. Shorted prime switch. If there is not 120 volts between the GREY and WHITE/RED wires to the prime switch, replace it.
2. Shorted sanitizer microswitch on the cam timer. If there is not 120 volts between the ORANGE and GREY wires on the sanitizer microswitch when the switch is out of the “home” position, replace the switch.
Problem: Sanitizer pump does not run during the cycle, but does run when primed.
1. Loose or broken wire. Verify that all wires are whole and that their connections are tight.
2. Faulty sanitizer microswitch on the cam timer. With the sanitizer cam in the “home” position, measure the voltage between
the ORANGE and GREY wires on the microswitch. If it reads 120 volts, replace the microswitch.
Problem: Prime switch does not activate the sanitizer pump.
1. Faulty prime switch. With the prime switch in the prime position, check for voltage between the GREY and the WHITE/RED
wires to the prime switch. If it reads 120 volts, replace the switch.
2. Faulty delime switch. With the delime switch in the DELIME position, check for voltage between the WHITE/BLACK and
WHITE/RED wires to the delime switch. If it reads 120 volts, replace the switch.
Problem: Sanitizer pump doesn’t run during the cycle or through the prime switch.
1. Loose sanitizer pump motor wire. Verify and tighten connections to the motor.
2. Faulty sanitizer pump motor. If you read 120 volts at the sanitizer motor terminals during the sanitizer feed cycle, replace
motor.
Problem: Detergent not feeding, rinse aid feeds correctly.
1. Misadjusted cam. Adjust the detergent cam on the timer.
2. Faulty detergent microswitch on the cam timer. With the detergent cam in the “home” position, measure voltage between
ORANGE and GREY/WHITE wires. If it reads 120 volts, replace the microswitch.
Problem: Rinse aid not feeding, detergent feeds correctly.
1. Misadjusted cam. Adjust the rinse aid cam on the timer.
2. Faulty rinse aid microswitch on the cam timer. With the rinse aid cam in the “home” position, measure the voltage between
the ORANGE and ORANGE/YELLOW wires. If it reads 120 volts, replace the microswitch.
SECTION 4: TROUBLESHOOTING SECTION
COMMON PROBLEMS
24
Page 31

25
SECTION 5:
SERVICE PROCEDURES
Page 32

26
These dishmachines are equipped with electrical
solenoid valves to allow for automatic fill and rinse. These
valves are designed to specific tolerances and design aspects
that must be met in order to function properly.
Puritan offers repair kits for replacing some of the
wear items associated with solenoid valves which will allow
you to save money in that replacement of these parts can take
place without removing the solenoid valve from the plumbing
assembly.
The instructions provided here are for maintenance
personnel only. Unauthorized persons should not attempt any
of the steps contained in these instructions.
Warning: many of the instructions and steps
within this document require the use of tools. Only authorized personnel should ever perform any maintenance
procedure on the dishmachine!
PREPARATION
1. Power must be secured to the unit at the service
breaker. Tag or lock out the service breaker to prevent accidental or unauthorized energizing of the machine.
2. Ensure that incoming water to the machine is
secured either by use of a shut-off valve or disconnecting the
incoming water line.
TOOLS REQUIRED
The following tools will be needed to perform this
maintenance evolution:
1. Small flathead screwdriver
2. Medium flathead screwdriver
2. Needle nose pliers
3. 5/16” nutdriver
4. Channel locks
5. 12” pipe wrench
TIME REQUIRED
It is estimated that it will take (1) person twenty minutes to perform this task, not including all of the items indicated in the section entitled “PREPARATION”.
IMPORTANT NOTES
1. Read these instructions thoroughly before
attempting this maintenance evolution. Become familiar with
the parts and what actions need to be taken. This will save
time in the long run!
2. The procedures demonstrated in this manual are
shown being performed on an ES-4400 rack conveyor dishmachine. The actual maintenance steps, however, apply to
any Parker style solenoid valve found on a Puritan dishmachine.
STEPS
1. Remove the top screw with the 5/16” nutdriver. Remove the
screw and the data plate and set to the side.
2. With the top screw and data plate removed, grasp the solenoid coil and gently pull up. The coil should slide up, allowing
you to remove it from the valve bonnet. If you are wanting to
replace the coil, continue on with Step 3. If you are wanting to
replace some of the internal components of the valve, proceed to step 12.
3. NOTE: Replacing the solenoid coil requires working with
the wiring of your machine. It is important that all wiring maintenance be performed by qualified personnel. Always verify
the wiring steps presented in this instruction with the schematic that shipped with the unit. A current schematic can also be
found in the unit’s installation manual. Before beginning any
step that involves working with wiring, ensure that the steps
located in the section entitled “Preparation” have been performed. Power must be secured to the machine at the service
breaker. Failure to do so could result in severe injury to maintenance personnel.
PA-1/PA-2 Series Installation & Operation Manual
7610-002-24-11 Rev. J (11/02/2005)
SECTION 5: SERVICE PROCEDURES
RINSE SOLENOID VALVE REPAIR PARTS KIT
Removing the top screw
Removing the coil
Page 33

27
4. When replacing the coil, ensure that when removing the coil
wire cover that care is taken not to damage the wires inside.
Using the medium flathead screwdriver, gently use it to open
the cover enough to where it could be pulled off.
5. Once the coil wire cover has been removed and set to the
side, take the internal wires and pull them out straight.
6. Remove the wire nuts from the wires and separate them.
7. Using a pair of channel locks, gently loosen the conduit
retaining ring for the conduit nut. Once it is loosened, use your
fingers to unscrew and remove it.
8. Pull the conduit away and discard the bad coil. Take the
new coil and attach the conduit, reinstall & tighten the conduit
nut, and pull the wires through so that you will be able to wire
the valve back up.
9. Reconnect the wires from the conduit to the wires from the
solenoid as they had been connected previously. Ensure that
the wire nuts are on tight.
10. Slide the coil wire cover back on, taking care not to damage the wires.
11. If you are done performing maintenance on the valve, continue on to step 23. Otherwise, please go on to step 12.L
12. To remove the valve bonnet, grasp it with the jaws of the
pipe wrench and turn to the left. Note: on some models you
may have to remove the valve in order to perform this and any
further steps. Be careful not to damage the plumbing assembly. Only use the pipe wrench enough to where you can spin
the valve bonnet off with your hand.
PA-1/PA-2 Series Installation & Operation Manual
7610-002-24-11 Rev. J (11/02/2005)
SECTION 5: SERVICE PROCEDURES
RINSE SOLENOID VALVE REPAIR PARTS KIT (CONTINUED)
Prying open the coil wire cover
Straightening the wires
Loosening the conduit nut
Removing the wire nuts
Loosening the valve bonnet
Page 34

28
13. Slowly remove the valve bonnet. Note: The spring for the
plunger is located directly under the bonnet and may come
free if you are not careful. Remove the plunger, spring and
valve bonnet and place to the side.
14. Remove the O-ring and inspect it. If it has any tears or cuts
or excessive flat spaces, it should be replaced.
15. Examine the threads for the valve bonnet. Check them for
scoring or signs of damage. Take a cloth and clean them out
to remove any foreign particles that might get lodged in the
threads and cause a leak. Severely damage threads should
not be repaired; instead it is recommended that the entire
valve should be replaced. These instructions do not provide
information on replacing the solenoid valve.
16. Note: Even though an O-ring may not appear damaged, it
is a good idea to go ahead and replace it if you have a new
one. This will help ensure that your valve remains leak-free in
the future!
17. Remove the diaphragm retainer and then the diaphragm
itself. Many problems associated with a solenoid valve can be
traced to a clogged pilot port in the diaphragm.
18. As indicated in the photo above, the extension hole can
become clogged. If it is difficult to clean out, you can use a
heated straight pin to push through the hole. The center hole,
the pilot port, must also be clear. If the diaphragm is torn or
bent in any way, it must be replaced.
PA-1/PA-2 Series Installation & Operation Manual
7610-002-24-11 Rev. J (11/02/2005)
SECTION 5: SERVICE PROCEDURES
RINSE SOLENOID VALVE REPAIR PARTS KIT (CONTINUED)
Removing the valve bonnet
Removing the O-ring
Removing the diaphragm
Pointing out the extension hole
2
1
Diaphragm showing (1) pilot port and (2) extension hole
Page 35

29
19. Using the small flathead screwdriver, lift out the screen
retainer. Verify that the holes in it are free of clogs and debris.
20. Again using the small flathead screwdriver, carefully
remove the mesh screen from inside the valve body. The
screen should be taken and rinsed out to remove any debris
fouling it.
21. With the mesh screen removed, look down into the valve
and verify it is not clogged. Remove any foreign objects from
the valve body that would obstruct flow.
22. Reassemble the valve, reversing the steps needed to take
it apart. Replace defective replacement parts with new parts
from ordered kits. Ensure that components are sufficiently
tightened to prevent leakage.
AFTER MAINTENANCE ACTIONS
Reconnect the incoming water (if disconnected) and
turn on. Then restore power to the unit. Run the unit for at
least 10 minutes to ensure there are no leaks. If any problems
arise please contact your Puritan representative.
SPECIAL PARTS
Repair kit includes: Plunger, Spring, O-ring, and
Diaphragm.
1/2” Repair Kit
Part No.: 85283489
Mfg. No.: N/A
3/4” Repair Kit
Part No.: 85283406
Mfg. No.: N/A
110/240 Volt Coil & Housing Only
Part No.: 85289411
Mfg. No.: N/A
1/2” 110/240 Volt Solenoid Valve
Complete Assembly
Part No.: 96580683
Mfg. No.: N/A
3/4” 110/240 Volt Solenoid Valve
Complete Assembly
Part No.: 85260511
Mfg. No.: N/A
PA-1/PA-2 Series Installation & Operation Manual
7610-002-24-11 Rev. J (11/02/2005)
SECTION 5: SERVICE PROCEDURES
RINSE SOLENOID VALVE REPAIR PARTS KIT (CONTINUED)
Removing the screen retainer
Removing the mesh strainer screen
View inside the solenoid valve body
Page 36

30
These dishmachines are equipped with vacuum
breakers to serve as back-flow prevention devices. ASSE
requirements specify what type of back-flow prevention is necessary on dishmachines. Vacuum breakers, unlike air gaps,
have certain parts that have specific tolerances and design
aspects that must be met in order to function properly.
Puritan offers repair kits for replacing some of the
wear items associated with vacuum breakers which will allow
you to save money in that replacement of these parts can take
place without removing the vacuum breaker from the plumbing assembly.
The instructions provided here are for maintenance
personnel only. Unauthorized persons should not attempt any
of the steps contained in these instructions.
Warning: many of the instructions and steps
within this document require the use of tools. Only authorized personnel should ever perform any maintenance
procedure on the dishmachine!
PREPARATION
1. Power must be secured to the unit at the service
breaker. Tag or lock out the service breaker to prevent accidental or unauthorized energizing of the machine.
2. Ensure that incoming water to the machine is
secured either by use of a shut-off valve or disconnecting the
incoming water line.
T
OOLS REQUIRED
The following tools will be needed to perform this
maintenance evolution:
1. Small flathead screwdriver
2. Needle nose pliers
TIME REQUIRED
It is estimated that it will take (1) person twenty minutes to perform this task, not including all of the items indicated in the section entitled “PREPARATION”.
IMPORTANT NOTES
1. Read these instructions thoroughly before
attempting this maintenance evolution. Become familiar with
the parts and what actions need to be taken. This will save
time in the long run!
STEPS
1. Note: These instructions only apply to vacuum breakers
(1/2” NPT and 3/4” NPT) as pictured below. The repair kits
indicated in these instructions will only work on those style of
back-flow preventers. If you have a machine with a different
style of vacuum breaker, contact your Puritan representative
about replacement components.
2. Note: Even though the photos in these instructions show a
vacuum breaker that has been removed from the plumbing
assembly, these maintenance steps could be performed with
it installed so long as the requirements in the section entitled
“PREPARATION” have been met.
3. Remove the top cap by gripping firmly and turning to the
left. The cap should come off after a few turns.
4. Set the cap to the side.
5. Using the needle nose pliers, gently lift out the plunger and
set to the side. Examine the brass seating surface inside the
vacuum breaker. The plunger is required to sit flat on this surface so it must be free of defects, imperfections and the like.
If there is debris, remove it. If it is chipped or cracked then the
vacuum breaker must be replaced. Failure to do so may result
in the vacuum breaker not working according to its design and
could result in damage to the dishmachine.
PA-1/PA-2 Series Installation & Operation Manual
7610-002-24-11 Rev. J (11/02/2005)
SECTION 5: SERVICE PROCEDURES
VACUUM BREAKER REPAIR PARTS KIT
Vacuum breaker
Removing the cap
Page 37

31
6. Your repair kit comes with a new plunger. Examine the old
one and ensure that the mating surface is not damaged or cut.
Also inspect the rubber seal on the top of the plunger to
ensure it is in good condition and not torn.
7. If any of these conditions are present, replace the old
plunger with the new one from your kit. Verify that the new
plunger is also free from defects. If it is not, contact your
Puritan representative immediately.
8. The plunger should drop into the vacuum breaker and seat.
Ensure it is not flipped upside down (the orange seal ring
should be up towards the top of the vacuum breaker).
9. Pick up the cap and examine it. With a soft towel, remove
any grit, grime or debris that may have gotten caught in the
threads of both the cap retainer or the vacuum breaker body.
There is an O-ring that should be present on the cap retainer
as well. Regardless of the condition of the plunger, this O-ring
should be replaced once the cap is removed. Using a small
flathead screwdriver, remove the old O-ring.
10. With the new O-ring in place, screw the cap back on the
vacuum breaker body. The cap needs to only be hand tight
(snug).
AFTER MAINTENANCE ACTIONS
1. Reconnect the incoming water (if disconnected)
and turn on. Then restore power to the unit. Run the unit for
at least 10 minutes to ensure there are no leaks. If any problems arise please contact your Puritan representative.
SPECIAL PARTS
To order the kit with components and instructions:
Components of 1/2” Repair Kit
Part No.: 85284156
Mfg. No.: 06401-003-06-23
Components of 3/4” Repair Kit
Part No.: 85284164
Mfg. No.: 06401-003-06-24
PA-1/PA-2 Series Installation & Operation Manual
7610-002-24-11 Rev. J (11/02/2005)
SECTION 5: SERVICE PROCEDURES
VACUUM BREAKER REPAIR PARTS KIT (CONTINUED)
Removing the plunger
Examining the seal ring on the plunger
Examining the plunger seating surface
Replacing the O-ring
Page 38

THIS PAGE IS INTENTIONALLY LEFT BLANK.
32
Page 39

33
SECTION 5:
PARTS SECTION
Page 40

34
PA-1/PA-2 Series Installation & Operation Manual
7610-002-24-11 Rev. J (11/02/2005)
HARDWARE- Stainless Steel
Part No. Description Jackson No.
96023832 SCREW 4-40X1/4" 05305-002-32-38
96584354 SCREW 4-40X3/8" N/A
88120365 SCREW 4-40X1/2" N/A
96570478 SCREW 4-40X3/4" N/A
96028436 SCREW 4-40 X 1" N/A
88125554 SCREW 6-32X3/8" N/A
88120068 SCREW 6-32X1/2" N/A
96025010 SCREW 6-32X3/4" 05305-011-37-05
96032883 SCREW 6-32X1-1/2" N/A
88120639 SCREW 8-32X3/8" 05305-172-02-00
88123740 SCREW 8-32X1/2" 05305-172-07-00
88120175 SCREW 8-32X5/8" N/A
88122254 SCREW 8-32X3/4" 05305-172-06-00
88120878 SCREW 10-32X3/8" 05305-173-12-00
88120142 SCREW 10-32X1/2" N/A
88120217 SCREW 10-32X3/4" 05305-011-62-17
88120282 SCREW 10-32X1" N/A
88120936 SCREW 10-32X1-1/2" N/A
88120753 SCREW 10-24X3/8" 05305-173-03-00
88120746 SCREW 10-24X1/2" N/A
88120191 SCREW 10-24X3/4" N/A
88120019 SCREW 10-24X1" N/A
88120000 SCREW 10-24X6" N/A
88220007 SCREW SOCKET 1/4-20X3/8" N/A
88020433 SCREW 1/4-20X1/2" 05305-274-02-00
88000013 SCREW 1/4-20X5/8" 05305-274-24-00
88020458 SCREW 1/4-20X3/4" 05305-274-04-00
88030069 SCREW 1/4-20X1-1/2" 05305-274-23-00
88000104 SCREW 1/4-20X2-1/2" 05305-274-13-00
88021027 SCREW 3/8-16X3/4" 05306-011-71-60
88021050 SCREW 3/8-16X1-1/4" 05305-276-10-00
88926002 SCREW SOCKET 3/8-16X1-1/2" N/A
88021076 SCREW 3/8-16X1-3/4" 05306-011-36-94
88420047 NUT HEX 4-40 N/A
88420062 NUT HEX 6-32 N/A
88420070 NUT HEX 8-32 N/A
88420088 NUT HEX 10-32 N/A
88420120 NUT HEX 10-24 N/A
88420104 NUT HEX 1/4-20 05310-274-01-00
88422043 NUT HEX 5/16-18 05310-275-01-00
88422068 NUT HEX 3/8-16 05310-276-01-00
88429121 NUT LOCK 4-40 N/A
88460050 NUT LOCK 6-32 05310-373-03-00
88429105 NUT LOCK 8-32 05310-272-02-00
SECTION 6: PARTS SECTION
STANDARD PARTS
Page 41

35
PA-1/PA-2 Series Installation & Operation Manual
7610-002-24-11 Rev. J (11/02/2005)
88460068 NUT LOCK 10-32 05310-373-02-00
88429063 NUT LOCK 10-24 05310-373-01-00
88429113 NUT LOCK 1/4-20 05310-374-01-00
88419056 NUT LOCK 5/16-18 N/A
88419007 NUT LOCK 3/8-16 05310-011-72-55
88520000 WASHER FLAT 1/4 05311-002-78-93
880530597 WASHER FLAT 5/16 05311-175-01-00
880530605 WASHER FLAT 3/8 05311-176-01-00
88521059 WASHER LOCK #8 05311-272-01-00
88521075 WASHER LOCK #10 N/A
88521083 WASHER LOCK 1/4 05311-274-01-00
88521117 WASHER LOCK 5/16 05311-275-01-00
88521109 WASHER LOCK 3/8 05311-276-01-00
88520069 WASHER LOCK 1/2 05311-011-71-93
88500000 WASHER BEV 3/8 SQUARE 05311-011-35-36
88900733 PIN COTTER 1/16X1/2" 05315-011-68-56
96027495 PIN COTTER 3/32X3/4" 05315-207-01-00
88900501 PIN COTTER 1/8X3/4" 05315-011-60-09
88930581 PIN COTTER 1/8X1-1/2" 05315-002-05-86
88920087 PIN COTTER 3/16X1-3/4" N/A
HARDWARE MISC.
83109041 CABLE TIE 7" 05975-602-05-16
83109199 CABLE TIE 15" 100PK N/A
83109025 CABLE TIE W/SCREW HOLE N/A
89990121 GREASE SILICONE 3OZ TUBE N/A
89992176 SILICONE CAULK WHITE 3OZ TUBE N/A
89991996 TEFLON TAPE ROLL N/A
83109125 ELECTRICAL TAPE N/A
96022447 ENDCAP, DOOR HANDLE 05340-011-35-00
96552336 DOOR GUIDE, PLASTIC, 23 1/2” Long 05700-111-33-59
ELECTRICAL
83300541 CONDUIT 1/2" 05975-111-46-57
83312017 NUT, CONDUIT 1/2" N/A
83311506 CONNECTOR, CONDUIT 1/2" 05975-011-45-13
83311753 ELBOW, 90DEG, CONDUIT 1/2" 05975-111-01-00
83311852 ELBOW 45DEG, CONDUIT 1/2" 05975-011-45-23
83115003 PLUG, PLASTIC 1/2" N/A
96540067 PLUG, METAL 1/2" N/A
83199570 PLUG, RUBBER 1/2" N/A
83116814 PLUG, METAL 1-1/2" N/A
87301412 HANGER, CONDUIT METAL N/A
96203153 TERMINAL FEMALE 1/4" W/PIGGY BACK N/A
83100002 TERMINAL FEMALE 1/4" 14-8GA N/A
83102269 TERMINAL FEMALE 1/4" 16-14GA N/A
83102244 TERMINAL FEMALE 1/4" 22-18GA N/A
83101022 CONNECTOR BUTT SPLICE 16-14GA N/A
83101014 CONNECTOR BUTT SPLICE 22-18GA N/A
83102152 TERMINAL SPADE #8HOLE 16-14GA N/A
SECTION 6: PARTS SECTION
STANDARD PARTS (CONTINUED)
Page 42

36
PA-1/PA-2 Series Installation & Operation Manual
7610-002-24-11 Rev. J (11/02/2005)
83102129 TERMINAL SPADE #8HOLE 22-16GA N/A
96570221 TERMINAL SPADE #10HOLE 14-16GA N/A
96032271 TERMINAL SPADE .25HOLE 12-10GA N/A
96032701 TERMINAL SPADE .25HOLE 16-14GA N/A
83100073 TERMINAL EYELET #8HOLE 16-14GA N/A
83100339 TERMINAL EYELET #10HOLE 16-14GA N/A
83101113 WIRE NUT 18-12GA N/A
83101089 WIRE NUT 14-10GA CRIMP N/A
PLUMBING
89009138 THERMOMETER, SCREW-IN, ES2000/4000 06685-111-35-30
96021316 THERMOMETER, 96"LEAD, CONVEYOR 06685-111-68-49
85390193 GAUGE PRESSURE 0-30PSI, BOTTOM MOUNT 06685-011-64-29
96582086 GAUGE PRESSURE 0-100PSI, BOTTOM MOUNT 06685-111-88-34
85390417 GAUGE PRESSURE 0-100PSI, BACK MOUNT 06685-011-48-32
96022421 WASH ARM PRESSURE TEST KIT N/A
85230191 NEEDLE VALVE, 1/4" PIPE N/A
85250587 VALVE BALL 1/2"PIPE N/A
85200269 VALVE GLOBE 1/2"PIPE 04820-100-15-00
85250595 VALVE BALL 3/4"PIPE N/A
85221018 REGULATOR WATER 1/4"PIPE, 180F 04820-011-69-05
85220077 REGULATOR WATER 1/2"PIPE, 140F 04820-100-04-07
85220010 REGULATOR WATER 3/4"PIPE, 180F 04820-100-01-06
85284214 REPAIR KIT 3/4" WATER REGULATOR N/A
96027024 STRAINER Y 1/2" PIPE 04730-217-01-10
85300325 STRAINER Y 3/4" PIPE 04730-717-02-06
85300301 SCREEN, COARSE 3/4” N/A
85300333 SCREEN, FINE 3/4” N/A
TUBING
85015105 TUBING 1/4" CLEAR 05700-011-37-12
85015097 TUBING 1/4" RED 05700-011-37-14
85015089 TUBING 1/4" BLUE 05700-011-37-16
92661024 COPPER TUBE 1/4" 50 FT N/A
92661016 COPPER TUBE 3/8" 25 FT N/A
92661032 COPPER TUBE 1/2" 50 FT N/A
TUBING MISC.
92630000 WASH TANK CONNECTOR, 45DEG 1/2" HOSE 04730-002-69-80
92002008 WASH TANK CONNECTOR, 18DEG 5/8" HOSE 04820-111-51-14
92002019 WASH TANK CONNECTOR, 45DEG 5/8" HOSE 04730-011-45-21
96581475 CHECK VALVE, ELBOW, RINSE LINE N/A
92171271 RINSE INJECTOR CHECK VALVE KIT N/A
96572573 PICK-UP TUBE STIFFENER 05700-002-66-49
87301149 CLAMP, HOSE 7/32-5/8" 05700-000-35-06
87301131 CLAMP, HOSE 5/16-7/8" 04730-011-36-05
96020078 CLAMP, HOSE 11/16-1.5" N/A
87301362 CLAMP, HOSE 7/8-2.75" 04730-719-01-37
87301503 CLAMP, HOSE 4.75-6.5" 04730-011-34-90
SECTION 6: PARTS SECTION
STANDARD PARTS (CONTINUED)
Page 43

37
PA-1/PA-2 Series Installation & Operation Manual
7610-002-24-11 Rev. J (11/02/2005)
SECTION 6: PARTS SECTION
CHEMICAL FEEDER PUMP ASSEMBLY
Roller, Red (Detergent/Sanitizer)
Part No.: 96037924
Mfg. No.: 04320-111-36-70
Roller, White (Rinse Aid)
Part No.: 84800041
Mfg. No.: 04320-002-82-28
Roller, Black
Part No.: 96029533
Mfg. No.: 04320-111-65-27
Housing Kit (Red roller)
Part No.: 96562871
Mfg. No.: 04320-121-37-10
1/4” Sight Tube Part No.: 92001017 Mfg. No.: N/A
3/8” Sight Tube Part No.: 96569496 Mfg. No.: 05700-111-35-33
Squeeze Tube Lubricant
Part No.: 89990121
Squeeze Tube, Detergent/Sanitizer
(Use with the red roller.)
Part No.: 96562673
Mfg. No.: 05700-111-35-29
Clear Squeeze Tube, Rinse Aid
(Use with the white roller.)
Part No.: 85017119
Mfg. No.: 05700-011-76-41
Tube, Small 7/32””
(Use with the black roller.)
Part No.: 85016079
Mfg. No.: 05700-011-65-21
Motor, 36 RPM 115V
Detergent/Sanitizer Feeder Pump
Part No.: 83740209
Mfg. No.: 004320-111-35-14
Motor, 14 RPM 115V
Rinse Aid Feeder Pump
Part No.: 83740282
Mfg. No.: 04320-111-35-13
Motor, 36 RPM 240V
Detergent/Sanitizer Feeder Pump
Part No.: 96029293
Mfg. No.: 04320-111-47-47
Motor, 14 RPM 240V
Rinse Aid Feeder Pump
Part No.: 96029897
Mfg. No.: 04320-111-47-46
Motor, 14 RPM 24V
Rinse Aid Feeder Pump
Part No.: 96030317
Mfg. No.: 04320-011-63-33
Page 44

38
PA-1/PA-2 Series Installation & Operation Manual
7610-002-24-11 Rev. J (11/02/2005)
SECTION 6: PARTS SECTION
SOLENOID VALVE
Screw
Data Plate
110/240 Volt Coil & Housing Only
Part No.: 85289411
Mfg. No.: N/A
Valve Bonnet
Diaphragm
Retainer
Diaphragm
O-Ring
Plunger
Spring
Screen
Retainer
Mesh Screen
Valve Body
1/2” 110/240 Volt Solenoid Valve
Complete Assembly
Part No.: 96580683
Mfg. No.: 04810-100-12-18
3/4” 110/240 Volt Solenoid Valve
Complete Assembly
Part No.: 85260511
Mfg. No.: 04810-100-53-00
Repair kit includes: Plunger, Spring, Oring, and Diaphragm.
1/2” Repair Kit
Part No.: 85283489
Mfg. No.: N/A
3/4” Repair Kit
Part No.: 85283406
Mfg. No.: N/A
Page 45

39
PA-1/PA-2 Series Installation & Operation Manual
7610-002-24-11 Rev. J (11/02/2005)
SECTION 6: PARTS SECTION
VACUUM BREAKER REPAIR PARTS KITS
1/2” Complete Vacuum Breaker Assembly
Part No.: 85242543
Mfg. No.: 04820-003-06-13
3/4” Complete Vacuum Breaker Assembly
Part No.: 85242626
Mfg. No.: 04820-002-53-77
1/4” Complete Vacuum Breaker Assembly
Part No.: 85242501
Mfg. No.: 04810-011-51-62
1/4” Complete Vacuum Breaker Assembly
Bottom Inlet & Outlet
Part No.: 85242000
Mfg. No.: N/A
3/8” Complete Vacuum Breaker Assembly
Part No.: 85242527
Mfg. No.: 04820-002-75-73
Components of 1/2” Repair Kit
Part No.: 85284156
Mfg. No.: 04820-001-60-56
Components of 3/4” Repair Kit
Part No.: 85284164
Mfg. No.: 04820-001-60-57
Data Plate (3/4”)
Part No.: 96850342
Mfg. No.: N/A
1/2” Cap
Part No.: 85284065
Mfg. No.: N/A
3/4” Cap
Part No.: 96560230
Mfg. No.: N/A
O-Ring
Plunger
Body
1/2” Brass Bonnet
Part No.: 85284073
Mfg. No.: N/A
3/4” Brass Bonnet
Part No.: 85280063
Mfg. No.: N/A
3/4” Plastic Bonnet
Part No.: 96560222
Mfg. No.: N/A
Page 46

40
PA-1/PA-2 Series Installation & Operation Manual
7610-002-24-11 Rev. J (11/02/2005)
SECTION 5: PARTS SECTION
CONTROL BOX ASSEMBLY (PA-1 & PA-2 MODELS)
00000000
1
*40, *41,
*42
2
3, 2
13, 2
14, 2
15, 16
17, 18, 2
5, 6, 7
8, 9
10, 2
4
11
12
19, 20
23 24 25
31
30
30
28, 29
*40, *41
*43
26, 27
21 22
33, 34
39433938
35, 36
32
37
42
Page 47

41
PA-1/PA-2 Series Installation & Operation Manual
7610-002-24-11 Rev. J (11/02/2005)
ITEM QTY DESCRIPTION Part No. Mfg. No.
1 1 Control Box Weldment PA-1 96582166 05700-002-04-57
1 1 Control Box Weldment PA-2 96582171 05700-002-21-56
2 16 Locknut, 10-24, S/S, Hex, with Nylon Insert 88429063 05310-373-01-00
3 1 Ground Wire Lug 83118000 05940-200-76-00
4 1 Bushing, Injection Tube 96031745 05340-011-46-79
5 1 Locknut, 6-32, S/S, Hex, with Nylon Insert 88460050 05310-373-03-00
6 1 Terminal Block 96025119 05940-500-09-61
7 1 Terminal Block Spacer 96025127 05700-011-40-05
8 1 Decal, Power Connections 96028402 09905-011-47-64
9 1 Decal, Copper Conductors 96021365 09905-011-47-35
10 1 Control Relay (PA-1) 96582895 05945-111-35-19
10 3 Control Relay (PA-2) 96582895 05945-111-35-19
11 1 Fitting, 1/2", 45° Plastic 83311852 05975-011-45-23
12 1 Fitting, 1/2", 90° Plastic 83311548 05975-011-45-14
13 1 Contactor 83008250 05945-109-05-69
14 1 Terminal Board 96584693 05940-021-94-85
15 1 Timer Mounting Bracket 96030408 05700-021-82-26
16 1 8 Cam Timer 83010785 05945-111-35-32
17 4 Screw, 6-32 x 3/8" Pan Head 88125497 05305-002-25-91
18 1 Decal, Cam Timer 96584594 09905-011-37-21
19 1 Switch, Delime 83020149 05930-301-21-18
20 1 Decal, Delime/Normal 96850300 09905-011-34-96
21 1 Thermometer, 96” Lead 96021316 06685-111-68-49
22 1 Decal, Control Box Front, PA-1 96582158 09905-002-24-48
22 1 Decal, Control Box Front, PA-2 96582157 09905-002-24-53
23 1 Power Switch 83020461 05930-111-38-79
24 1 Cycle Light 96581814 05945-504-08-18
25 1 Power Light 83630392 05945-504-07-18
26 1 Cycle Counter 83650044 05990-111-35-38
27 2 Screw, 4/40 x 1/4" Phillips Pan Head 96023832 05305-002-32-38
28 1 Hole Plug, 1/2" 83115003 04730-011-60-22
29 1 Hole Plug (PA-1 only) 96024567 05975-011-47-81
30 2 Motor, Chemical Feeder Pump, 36 RPM, 115V 83740209 04320-111-35-14
31 1 Motor, Chemical Feeder Pump, 14 RPM, 115V 83740282 04320-111-35-13
32 1 Peri-Pump Mounting Plate N/A 05700-021-82-55
33 1 Switch, On/Off, SPST 83020164 05930-111-38-21
34 1 Decal, Sanitizer Prime 96583455 09905-011-34-98
35 1 Switch, Detergent/Rinse Aid Toggle 83020271 05930-011-35-27
36 1 Decal, DET/RINSE Prime 96583448 09905-011-34-95
37 4 Screw, 10-32 x 3/8" Long 88120878 05305-173-12-00
38 1 Drip Shield 96031454 05700-031-34-80
39 2 Refer to Page 36 N/A N/A
*40 2 Grommet (1 for PA-1) 96030341 05325-011-46-73
*41 2 Switch, Reed (1 for PA-1) 96039102 05930-002-36-80
*42 1 Hose, Drip Through Drain 96550199 05700-011-35-04
*43 1 Refer to Page 36 N/A N/A
*44 2 Cotter Pin, 3/32” x 3/4" 96027495 05315-207-01-00
*45 1 Decal, Warning-Disconnect Power 96039821 09905-100-75-93
*46 1 Cover, Control Box 96582164 05700-002-04-62
*47 1 Conduit Fitting, 1/2" x 90° 83311753 05975-111-01-00
*48 1 Fitting, 1/2", Straight Plastic 83311506 05975-011-45-13
*49 3 Tube Stiffener 96572573 05700-002-66-49
* Represents an item not shown.
SECTION 5: PARTS SECTION
CONTROL BOX ASSEMBLY (PA-1 & PA-2 MODELS) (CONTINUED)
Page 48

42
PA-1/PA-2 Series Installation & Operation Manual
7610-002-24-11 Rev. J (11/02/2005)
SECTION 5: PARTS SECTION
HOOD ASSEMBLIES (PA-1)
Arm Support Weldment
Part No.: 96582804
Mfg. No.: 05700-011-43-52
Hood Support, Left Front
Part No.: 96580444
Mfg. No.: 05700-021-33-18
Hood Weldment
Part No.: N/A
Mfg. No.: 05700-002-25-33
Hood Support, Right Front
Part No.: 96550330
Mfg. No.: 05700-021-33-17
Double Door Guide, Right Front
Part No.: 96550173
Mfg. No.: 05700-021-33-19
Door Guide, Left Rear
Part No.: 96550264
Mfg. No.: 05700-021-33-16
Door Guide, Right Rear
Part No.: 96550272
Mfg. No.: 05700-021-33-15
Double Door Guide, Left Front
Part No.: 96550181
Mfg. No.: 05700-021-33-20
Arm Support Weldment Gasket
Part No.: 965053151
Mfg. No.: 05700-111-36-01
Bracket, Cantilever Support
2 per machine
Part No.: 96581244
Mfg. No.: 05700-031-88-00
Wear Button
3 per bracket
Part No.: 96027743
Mfg. No.: 05700-011-88-01
Hood, Single Piece Weldment
Part No.: N/A
Mfg. No.: 05700-002-60-54
Hood, Single Piece Weldment, Vapor Vent
Part No.: N/A
Mfg. No.: 05700-002-95-11
Page 49

43
PA-1/PA-2 Series Installation & Operation Manual
7610-002-24-11 Rev. J (11/02/2005)
SECTION 5: PARTS SECTION
ITEM QTY DESCRIPTION PART No. Mfg. No.
1 1 Hood Weldment, PA-2 Old Style 96550389 05700-041-45-37
1 1 Hood Weldment, PA-2 New Style 96626060 05700-002-60-60
2 4 Door Guide, PA-2 96583570 05700-021-44-94
3 1 Door Guide, Left Rear 96550264 05700-021-33-16
4 1 Door Guide, Right Rear 96550272 05700-021-33-15
5 2 Arm Support Weldment 96582804 05700-011-43-52
6 2 Arm Support Weldment Gasket 96553151 05700-111-36-01
7* 1 Front Door Stop (Not Shown) 96041165 05700-021-60-27
8* 1 Stiffener, Hood Support (Not Shown) 96041074 05700-002-47-39
9 2 Manifold L-Bracket 96582986 05700-011-34-63
10 1 Door Catch 96580998 05700-011-46-50
11 1 Hood Stiffener 96585609 05700-002-08-24
12* 2 Bracket, Cantilever Support 96581244 05700-031-88-00
13* 6 Wear Button 96027743 05700-011-88-01
14 1 Door Guide, Left Rear, New Style 96030457 05700-021-84-71
15 1 Door Guide, Right Rear, New Style 96030432 05700-021-84-70
HOOD ASSEMBLY PA-2
1
2
3
6
4
5
11
10
9
OLD STYLE: If your unit uses items 5 and 6, it is the old style hood weldment. Items 3 thru 6 are
used only with the old style Hood Weldment. The hood will have the proper mounting holes in the
rear door guides and in the hood itself.
NEW STYLE: If your unit does not use items 5 and 6, then it is the new style hood weldment. Items
12 thru 15 are used only with the new style Hood Weldment. The hood will have two places on the
back of the hood to attach the cantilever support bracket assembly shown to the right.
12, 13*
Page 50

44
PA-1/PA-2 Series Installation & Operation Manual
7610-002-24-11 Rev. J (11/02/2005)
SECTION 5: PARTS SECTION
CANTILEVER ARM (DOUBLE BRACKET MOUNT)
3
5
2
1
6
9
15, 16
17, 18
19, 11, 12
2021, 25
22
23, 18
7
8
4
24, 18
14
1310, 11, 12
Page 51

45
PA-1/PA-2 Series Installation & Operation Manual
7610-002-24-11 Rev. J (11/02/2005)
SECTION 5: PARTS SECTION
CANTILEVER ARM (DOUBLE BRACKET MOUNT) (CONTINUED)
ITEM QTY DESCRIPTION PART No. Mfg. No.
1 1 Arm, Cantilever PA-1 96581277 05700-031-50-67
1 1 Arm, Cantilever PA-2 96626065 05700-002-60-65
2 1 Spring Pin, 1/4” Dia. x 1 1/8” Long 96039185 05315-407-06-00
3 2 Yoke Assembly 96586615 05700-000-75-77
2 Locknut, 3/8”-16 S/S Hex Center 96581384 05310-256-04-00
4 2 Rod, Spring (PA-1) 96582022 05700-002-29-38
4 2 Rod, Spring (PA-1V) N/A 05700-002-10-52
4 2 Rod, Spring (PA-2) 96584313 05700-001-28-18
5 2 Spring, Cantilever 96581285 05340-109-02-00
6 2 Bolt, Hanger Eye 3/8"-16 96582762 05306-956-05-00
7 2 Washer, Impeller 3/8” I.D. x 7/8” O.D. 96581376 05311-176-02-00
8 4 Nut, 3/8”-16 S/S Hex 88422068 05310-276-01-00
9 2 Cantilever Arm Connector 96582754 05700-011-90-99
10 2 Screw, 1/4"-20 x 1 1/2" Long S/S 88030069 05305-274-23-00
11 2 Washer, 1/4" ID S/S 880530589 05311-174-01-00
12 2 Locknut, 1/4”-20 S/S Hex with Nylon Insert, Low Profile 96026455 05310-374-02-00
13 2 Sleeve, Cantilever Arm 96582770 05700-000-85-69
14 2 Plug, Cantilever Arm 96022447 05340-011-35-00
15 1 Magnet, Reed Switch 96025200 05930-111-51-68
16 2 Locknut, 8-32 S/S Hex with Nylon Insert 88429105 05310-272-02-00
17** 1 Right Door Assembly N/A N/A
18 6 Door, Guides 96552336 05700-111-33-59
19 2 Screw, 1/4"-20 x 1/2" Long S/S 88020433 05305-274-02-00
20 2 Spacer, PB Bolt 96582788 05700-000-29-40
21 4 Locknut, 1/4”-20 S/S Hex with Nylon Insert 88429113 05310-374-01-00
22 2 Door Connector Bracket 96582820 05700-021-33-39
23** 1 Front Door Assembly N/A N/A
24** 1 Left Door Assembly N/A N/A
25* 2 Bracket, Cantilever Arm Support 96581244 05700-031-88-00
26* 6 Wear Button, 1/2" Dia. UHMW 96027743 05700-011-88-01
* Represents an item not shown.
** Please refer to the pages entitled PA-1 & PA-2 for their door assemblies.
Page 52

46
SECTION 5: PARTS SECTION
CANTILEVER ARM ASSEMBLY (SINGLE BRACKET MOUNT)
ITEM QTY DESCRIPTION PART No. Mfg. No.
1 1 Hex Nut, 1/4”-20 with Nylon Insert 88429113 05310-374-01-00
2 1 Wear Strip, UHMW 96582945 05700-011-34-50
3 1 Sleeve 96584891 05700-000-01-53
4 1 Bolt, 1/4”-20 x 1-3/4”, S/S N/A 05305-274-01-00
5 1 Link, Spring to Cantilever Arm 96586037 05700-021-34-49
6 1 Cantilever Spring 96552526 05340-111-35-22
7 1 Cantilever Eye Bolt, PA-1 96582762 05305-956-05-00
7 1 Cantilever Eye Bolt, PA-2 96558705 05700-011-45-99
8 1 Washer, Impeller 96581376 05311-176-02-00
9 2 Nut, 3/8”-16, Hex, S/S 88422068 05310-276-01-00
10 1 Cantilever Arm, PA-1 96582879 05700-031-34-35
10 1 Cantilever Arm, PA-2 96584297 05700-031-45-38
11 2 Hex Head Bolt, 1/4”-20 x 1-1/2”, S/S 88030069 05305-274-23-00
12 4 Washer, Flat, 1/4”, S/S 88530589 05311-174-01-00
13 2 Cantilever Arm Sleeve 96582770 05700-000-85-69
14 2 Hex Head Bolt, 1/4”-20 x 1/2”, S/S 88020433 05305-274-02-00
15 2 Endcap, Cantilever Arm 96022447 05340-011-35-00
16 2 Bolt Spacer 96582788 05700-000-29-40
17 2 Cantilever Arm Lever 96582754 05700-011-90-99
18 2 U-Bracket Assembly 96582838 05700-021-43-54
19* 2 Retaining Ring 96582812 05340-011-33-62
11
10
12
13
14
12
15
16
23
17
23
18
U Bracket Assembly
19*
1
2
3
4
5
6
7
8
9
* Represents an item not shown.
PA-1/PA-2 Series Installation & Operation Manual
7610-002-24-11 Rev. J (11/02/2005)
Page 53

47
SECTION 5: PARTS SECTION
TUB ASSEMBLY PA-1
ITEM QTY DESCRIPTION PART No. Mfg. No.
1 1 Wash Motor 83710418 06105-121-35-18
2 1 Fitting, 3/8” Barbed x 1/8” Male NPT 85196004 04730-111-35-02
3 2 Hose Clamp, Mini, 7/16” - 25/32” 87301131 04730-011-36-05
4 1 Hose, Clear PVC, 3/8” ID x 5/8” OD, 8” Long 96550439 05700-111-33-53
5 1 Pump Support Bracket Assembly 96042775 05700-021-66-48
6 1 Lower Wash Manifold Weldment 96582705 05700-031-34-65
7 1 Wash Tub Weldment, PA-1 96582165 05700-002-25-48
8 1 Pump Outlet Nipple 96580923 05700-021-33-50
9 2 Hose Clamp, 1-5/16” - 2-1/4” 87301362 04730-719-01-37
10 1 Hose, Clear Reinforced PVC, 8-1/2” Long 96583018 05700-111-33-52
11 1 Washer, 1/4”-20 ID, Flat 88530589 05311-174-01-00
12 1 Drain Solenoid Box 96581954 05700-021-37-53
13 1 Drain Solenoid Box Cover 96580634 05700-031-33-27
14 1 Drain Solenoid 83999078 04810-200-11-00
15 8 Locknut, 10-24 with Nylon Insert 88429063 05310-373-01-00
16 1 Hair Pin, 1/2” to 3/4” N/A 05315-002-15-39
* 1 Drain Link Assembly N/A 05700-002-38-20
17* 1 Nut, Hex, 5/16”-18 88422043 05310-275-01-00
18* 1 Drain Link Connector 96028261 05700-002-38-10
19 1 Drain Solenoid Link 96582994 05700-031-34-45
20 1 Spillway Weldment 96583000 05700-031-37-86
21 2 Spillway Gasket 96582903 05700-111-34-52
22 1 Drain Seat Insert 96582929 05700-021-34-38
23 1 Clamp, 5 5/8” - 6” 87301503 04730-011-34-90
24* 1 Thermometer, Screw-In Type 89009138 06685-111-35-30
25 1 Locknut, 1/4”-20 with Nylon Insert 88429113 05310-374-01-00
26* 1 Solenoid Stop 96570189 05700-000-66-40
1 232
3
4
5, 25
6
7
8
9
10
24*
13
19
15
18*
21
22
21
17*
16
1511
20
15
NOTE: THIS DRAWING SHOWS A
CUTAWAY VIEW OF THE PA-1 TUB.
14, 26*
12
PA-1/PA-2 Series Installation & Operation Manual
7610-002-24-11 Rev. J (11/02/2005)
Page 54

48
SECTION 5: PARTS SECTION
TUB ASSEMBLY (LEFT FRONT VIEW) PA-2
* Represents an item not shown.
ITEM QTY DESCRIPTION PART No. Mfg. No.
1 2 Lower Wash Manifold Weldment 96583596 05700-031-46-00
2 2 Casting, Manifold Wedge 96583497 09515-011-46-61
3 4 Manifold Gasket 96552864 05700-111-35-03
4 1 Wash Tub Weldment 96583331 05700-041-45-24
5 2 Wash Motor Support Assembly 96042775 05700-021-66-48
6 2 Wash Motor 83710418 06105-121-35-18
7 2 Fitting, 3/8” Barbed x 1/8” Male NPT 85196004 04730-111-35-02
8 2 Pump Inlet Nipple 96581202 05700-021-46-84
9 4 Hose Clamp, Regular, 1-5/16” - 2-1/4” 87301362 04730-719-01-37
10 4 Hose Clamp, Mini, 7/16” - 25/32” 87301131 04730-011-36-05
11 2 Hose, 3/8” ID x 8-1/2” Long 96550439 05700-011-45-30
12 2 Hose, 1-1/2” ID x 8-3/4” Long 96583018 05700-011-45-28
13 2 Hose Clamp, Regular, 5-5/8” - 6” 87301503 04730-011-34-90
14* 1 Thermometer, Screw-In Type 89009138 06685-111-35-30
1
2
3
4
5
13
6
7
8
9
10 11
12 10
9 14*
PA-1/PA-2 Series Installation & Operation Manual
7610-002-24-11 Rev. J (11/02/2005)
Page 55

49
SECTION 5: PARTS SECTION
TUB ASSEMBLY (RIGHT FRONT VIEW) PA-2
ITEM QTY DESCRIPTION PART No. Mfg. No.
1 7 Locknut, 10-24 S/S Hex with Nylon Insert 88429063 05310-373-01-00
2 1 Drain Solenoid 83999078 04810-200-11-00
3 1 Drain Solenoid Box 96581954 05700-021-37-53
4 1 Drain Solenoid Box Cover 96580634 05700-031-33-27
5 1 Locknut, 1/4”-20 S/S Hex with Nylon Insert 88429113 05310-374-01-00
* 1 Drain Link Assembly N/A 05700-002-38-21
6 1 Drain Link 96580188 05700-031-46-52
7 1 Drain Link Connector 96028261 05700-002-38-10
8 1 Hex Nut, 5/16”-18 88422043 05310-275-01-00
9 2 Spillway Gasket 96582903 05700-111-34-52
10 1 Drain Seat Insert (Stainless Ring) 96582929 05700-021-34-38
11 1 Spillway Weldment 96583000 05700-031-37-86
12 1 Hair Pin, 1/2” to 3/4” N/A 05315-002-15-39
2
1
4
5
9
10
9
11
1
6
7
8
12
3
PA-1/PA-2 Series Installation & Operation Manual
7610-002-24-11 Rev. J (11/02/2005)
Page 56

50
SECTION 5: PARTS SECTION
FRAME ASSEMBLIES PA-1 & PA-2
PA-1 Frame Weldment
Part No.: 96550595
Mfg. No.: 05700-021-36-71
PA-1 Frame Weldment
Double Bracket
Part No.: 96034715
Mfg. No.: 05700-002-60-41
PA-1V Frame Weldment
Double Bracket
Part No.: N/A
Mfg. No.: 05700-002-97-85
Bullet Feet
Part No.: 96552666
Mfg. No.: 05340-108-01-03
PA-2 Frame Weldment
Part No.: 96583588
Mfg. No.: 05700-031-45-16
Bullet Feet
Part No.: 96552666
Mfg. No.: 05340-108-01-03
PA-2 Frame Weldment
Double Bracket
Part No.: N/A
Mfg. No.: 05700-002-61-22
PA-1/PA-2 Series Installation & Operation Manual
7610-002-24-11 Rev. J (11/02/2005)
Page 57

51
PA-1/PA-2 Series Installation & Operation Manual
7610-002-24-11 Rev. J (11/02/2005)
SECTION 5: PARTS SECTION
ACCUMULATOR ASSEMBLIES PA-1 & PA-2
Accumulator Strainer
PA-1 & PA-2
Part No.: 96582861
Mfg. No.: 05700-021-47-14
PA-1 Accumulator Weldment
Part No.: 96580600
Mfg. No.: 05700-031-62-90
PA-1V Accumulator Weldment
Part No.: 96028717
Mfg. No.: 05700-002-19-05
NOTE: This is a rear view of the accumulator as it would appear installed on the dishmachine.
PA-2 Accumulator Weldment
Part No.: 96021977
Mfg. No.: 05700-031-66-24
Locknut, 10-24 S/S Hex with Nylon Insert
Part No.: 88429063
Mfg. No.: 05310-373-01-00
PA-2 Accumulator Stop Clip
Part No.: 96042001
Mfg. No.: 05700-011-49-11
Page 58

52
PA-1/PA-2 Series Installation & Operation Manual
7610-002-24-11 Rev. J (11/02/2005)
SECTION 5: PARTS SECTION
INCOMING PLUMBING ASSEMBLY PA-1 & PA-2 SERIES
1
2
3
4**
6
7
8
9
4** NOTE: Depending on how
old your PA-2 unit may be, the
soldered piece above may be
turned in this configuration.
Overall, this will make the
plumbing shorter in length and
taller in height.
4
5
* Represents an item not shown.
Page 59

53
ITEM QTY DESCRIPTION PART No. Mfg. No.
1 1 3/4” NPT Bulkhead Locknut 86545050 04730-208-04-00
2 1 3/4” Male NPT x Female Slip Adapter 86185030 04730-401-11-01
3 1 3/4” x 6” Copper Tube Buy Locally 05700-011-37-55
3 1 3/4” x 9” Copper Tube (PA-1V) Buy Locally 05700-000-75-61
4 2 3/4” NPT x 90° Elbow 86055092 04730-406-42-01
5 1 3/4” Vacuum Breaker 85242626 04820-002-53-77
6 1 3/4” Male NPT x Male Slip Adapter 86559044 04730-401-10-01
7 1 3/4” Solenoid Valve 85260511 04810-100-53-00
8 1 3/4” NPT x 3” Nipple 85141638 04730-011-38-29
9 1 3/4” NPT Y-Strainer 85300325 04730-717-02-06
10* 1 Bracket, Incoming Plumbing Support 96582937 05700-021-34-02
10* 1 Bracket, Incoming Plumbing Support (PA-1V) 96028816 05700-002-28-95
11* 1 Diverter End Cap 96582172 05700-021-45-32
PA-1/PA-2 Series Installation & Operation Manual
7610-002-24-11 Rev. J (11/02/2005)
SECTION 5: PARTS SECTION
INCOMING PLUMBING ASSEMBLY PA-1 & PA-2 SERIES (CONTINUED)
Page 60

54
PA-1/PA-2 Series Installation & Operation Manual
7610-002-24-11 Rev. J (11/02/2005)
SECTION 5: PARTS SECTION
WASH MANIFOLD ASSEMBLY PA-1 & PA-2
Gasket, Wash Manifold
1 per PA-1 Assembly
2 per PA-2 Assembly
Part No.: 96552864
Mfg. No.: 05700-111-35-03
Weldment, Lower Wash Manifold (PA-1)
Part No.: 96582705
Mfg. No.: 05700-031-34-65
Weldment, Lower Wash Manifold (PA-2)
Part No.: 96583596
Mfg. No.: 05700-031-46-00
Bolt, 3/8”-16 x 1-3/4” Long (PA-2)
Part No.: 88021076
Mfg. No.: 05306-011-36-94
Bolt, 3/8”-16 x 1-1/4” Long (PA-1)
Part No.: 88021050
Mfg. No.: 05305-276-10-00
Bolt, 3/8”-16 x 2-1/4” Long (PA-2)
Part No.: 88031109
Mfg. No.: 05306-011-95-12
Bolt, 3/8”-16 x 1-3/4” Long (PA-1)
Part No.: 88021076
Mfg. No.: 05306-011-36-94
3/8” Hex Nut, S/S
4 per assembly
Part No.: 88422068
Mfg. No.: 05310-276-01-00
3/8” Lockwasher
4 per assembly
Part No.: 88521109
Mfg. No.: 05311-276-01-00
Casting, Upper Wash Manifold
Part No.: 96583620
Mfg. No.: 05700-031-34-82
Wedge, Manifold Casting
(Used on the PA-2 units only)
Part No.: 96583497
Mfg. No.: 09515-011-46-61
Washer, 3/8”, Bevel, Square
2 per assembly
Part No.: 88500000
Mfg. No.: 05311-011-35-36
O-Ring
2 per assembly
Part No.: 87203154
Mfg. No.: 05330-111-35-15
Manifold Tube
Part No.: 96550338
Mfg. No.: 05700-031-34-59
Manifold Positioning Tube Bracket
Part No.: 96582986
Mfg. No.: 05700-011-34-63
Wash Arm End Cap
2 per Wash Arm
Part No.: 96552542
Mfg. No.: 05700-011-35-92
Wash Arm Bearing
1 per Wash Arm
Part No.: 96552567
Mfg. No.: 05700-021-35-97
Wash Arm O-Ring
1 per Wash Arm
Part No.: 87200013
Mfg. No.: 05330-002-60-69
Wash Arm Weldment, PA-1
2 per unit
Part No.: 96582064
Mfg. No.: 05700-021-63-42
Wash Arm Weldment, PA-2
4 per unit
Part No.: 96581194
Mfg. No.: 05700-021-50-96
Complete Manifold Assembly
(1 for PA-1 and 2 for PA-2)
Bolt, 3/8”-16 x 7/8”, Hex Head, S/S
2 per assembly
Part No.: 96034111
Mfg. No.: 05306-011-36-95
Page 61

55
PA-1/PA-2 Series Installation & Operation Manual
7610-002-24-11 Rev. J (11/02/2005)
SECTION 5: PARTS SECTION
PUMP & MOTOR ASSEMBLY PA-1 & PA-2
ITEM QTY DESCRIPTION ECOLAB No. Mfg. No.
1 2 Pipe Plug, 1/4” NPT, Brass 86135019 04730-209-01-00
2 1 Volute (only available as an assembly, see item 15) N/A N/A
3 1 Hex Head Bolt, 1/4”-20 x 3/8” N/A 05305-274-01-00
4 1 Flat Washer, 1/4”, S/S 88530589 05311-174-01-00
5 1 Impeller, Stainless 96557780 N/A
6 1 Gasket 84805944 05330-011-95-18
7 1 Pump Seal 84804723 05330-002-06-21
8 4 Hex Head Bolt, 3/8”-16 x 3/4”, S/S 88021027 N/A
9 4 Hex Head Bolt, 3/8”-16 x 1-1/4”, S/S 88021050 N/A
10 1 Bracket, Motor to Pump, ECL-9 96583810 N/A
11 1 Slinger, Pump Shaft 96031059 N/A
12 1 Shaft Adapter/Connector, ECL-6 96562764 N/A
13 2 Allen Head Setscrew, 1/4”-20 x 1/4” 88220007 N/A
14 1 Pump Motor 83710418 06105-121-35-18
15 1 Pump Assembly (Items 1-13) 96562715 N/A
- 4 Pump Volute Studs Part No.: 88926002 (Should be installed with Loc-Tite (Red) and 3/16" allen wrench)
- 4 NUT HEX 3/8-16 SST Part No.: 88422068 (Screws onto above studs)
1
2
3
4
5
7
6
8
9
10
11
12
13
14
Page 62

56
PA-1/PA-2 Series Installation & Operation Manual
7610-002-24-11 Rev. J (11/02/2005)
SECTION 5: PARTS SECTION
MISCELLANEOUS PARTS PA-1 & PA-2
Stand Pipe Weldment
Part No.: 96582747
Mfg. No.: 05700-021-33-29
PA-2
Intake Pump Strainer Weldment
Part No.: 96580170
Mfg. No.: 05700-031-45-26
PA-1 Intake Pump Strainer
Weldment
Part No.: 96582853
Mfg. No.: 05700-002-56-45
Stand Pipe Stopper
Part No.: 96557475
Mfg. No.: 05700-121-35-54
PA-1 Rack Guide Assembly
Part No.: 96582887
Mfg. No.: 05700-031-36-76
PA-2 Injection Tube Weldment
Part No.: 96550371
Mfg. No.: 05700-031-46-78
PA-2 Injection Tube Gasket
Part No.: 96562954
Mfg. No.: 05700-011-45-36
PA-2 Injection Tube Bushing
Part No.: 96033063
Mfg. No.: 05975-002-47-54
PA-1 Intake Pump Strainer
Weldment
Part No.: 96582029
Mfg. No.: 05700-002-60-50
Reed Switch
1 per machine
Part No.: 96039102
Mfg. No.: 05930-002-36-80
PA-2 Retrofit Kit
Sump Strainer Assembly
Part No.: N/A
Mfg. No.: 05700-002-79-46
PA-2 Rack Guide Weldment
Part No.: 96550363
Mfg. No.: 05700-031-45-92
Page 63

57
PA-1/PA-2 Series Installation & Operation Manual
7610-002-24-11 Rev. J (11/02/2005)
SECTION 5: PARTS SECTION
PA-1 SERIES DOOR ASSEMBLIES
PA-1
Left Door Weldment
Part No.: 96582167
Mfg. No.: 05700-002-67-68
PA-1 Front Door
Part No.: 96582170
Mfg. No.: 05700-002-67-71
PA-1
Right Door
Part No.: 96582169
Mfg. No.: 05700-002-38-91
PA-1V
Right Door
Part No.: N/A
Mfg. No.: 05700-003-13-03
Locknut, 8-32 S/S Hex with Nylon Inset
Part No.: 88429105
Mfg. No.: 05310-272-02-00
Door Guides
Part No.: 96552336
Mfg. No.: 05700-111-33-59
Magnet
Part No.: 96025200
Mfg. No.: 05930-111-51-68
PA-1 Optional Front Door Handle
(Service Only)
Part No.: 96041132
Mfg. No.: 05700-002-51-56
Door Connector Bracket
Part No.: 96582820
Mfg. No.: 05700-021-33-39
Page 64

58
PA-1/PA-2 Series Installation & Operation Manual
7610-002-24-11 Rev. J (11/02/2005)
SECTION 5: PARTS SECTION
PA-2 DOOR ASSEMBLIES
Left Door Weldment
Part No.: N/A
Mfg. No.: 05700-003-02-98
Front Door Weldment
Part No.: N/A
Mfg. No.: 05700-003-04-64
Right Door
Part No.: N/A
Mfg. No.: 05700-003-02-71
Locknut, 8-32 S/S Hex with Nylon Inset
Part No.: 88429105
Mfg. No.: 05310-272-02-00
Door Guides
Part No.: 96552336
Mfg. No.: 05700-111-33-59
Magnet
Part No.: 96025200
Mfg. No.: 05930-111-51-68
PA-2 Door Stop
Part No.: 96558671
Mfg. No.: 05700-011-46-30
Door Connector Bracket
Part No.: 96582820
Mfg. No.: 05700-021-33-39
Page 65

59
SECTION 5: PARTS SECTION
PA-2CDL ASSEMBLY OPTIONS
1
*2 *10
6
00000000
9
12
21
22
13
19
20
3
11
7
10
3
A
4
5
A
8
15
16
17
18
14
PA-1/PA-2 Series Installation & Operation Manual
7610-002-24-11 Rev. J (11/02/2005)
Page 66

60
* Represents an item not shown.
ITEM QTY DESCRIPTION Part No. Mfg. No.
1 1 Front Door N/A 05700-003-01-61
2 Door Glides UHMW 96552336 05700-111-33-59
2* 1 Inner Door Guide 96583570 05700-021-44-94
3 1 Cantilever Arm Assembly 96032438 05700-002-07-69
1 Cantilever Arm Weldment N/A 05700-002-09-14
2 Plug 96022447 05340-011-35-00
2 Spring Pin, 1/4" Dia. X 1 1/8" Long 96039185 05315-407-06-00
2 Yoke Assembly 96586615 05700-000-75-77
2 Nut, 3/8"-16 S/S, Center Locknut 96581384 05310-256-04-00
4 1 Hinge, Slotted 96033618 05700-002-07-39
5 2 Front Door Bracket 96033030 05700-002-07-37
6 1 Tub Weldment N/A 05700-002-59-74
7 1 Hood Weldment N/A 05700-002-55-62
8 1 Frame Weldment N/A 05700-002-07-51
9 1 Right Door Weldment N/A 05700-003-02-44
2 Door Glides UHMW 96552336 05700-111-33-59
1 Magnet, Reed Switch 96025200 05930-111-51-68
2 Locknut, 8-32 Hex, with Nylon Insert 88429105 05310-272-02-00
10* 2 Front Door Guide 96583570 05700-021-44-94
11 1 Bracket, Side Door Connecting 96033626 05700-002-07-33
12 1 Right Rear Door Guide 96030432 05700-021-84-70
13 2 Bolt, Hanger Eye 96582762 05306-956-05-00
14 1 Chemical Feed Tube Weldment 96041066 05700-002-08-14
1 Gasket, Chemical Feed Tube 96562954 05700-011-45-36
1 Bushing, 3/4” Hole Snap 96033063 05975-002-47-54
Rack Rail Assembly N/A 05700-002-08-64
15 1 Rack Rail Weldment 96041017 05700-002-07-65
16 3 Locknut, 10-24 Hex, S/S, with Nylon Insert 88429063 05310-373-01-00
17 3 Screw, 10-24 x 1/2" Long S/S 88120746 05305-173-18-00
18 1 Guard, Front Track N/A 05700-002-07-44
19 2 Washer, Impeller 96581376 05311-176-02-00
20 4 Nut, Hex 3/8"-16 S/S 88422068 05310-276-01-00
21 2 Spring Rod 96584313 05700-001-28-18
22 2 Spring 96581285 05340-109-02-00
SECTION 5: PARTS SECTION
PA-2 CDL ASSEMBLY OPTIONS (CONTINUED)
PA-1/PA-2 Series Installation & Operation Manual
7610-002-24-11 Rev. J (11/02/2005)
Page 67

61
PA-1/PA-2 Series Installation & Operation Manual
7610-002-24-11 Rev. J (11/02/2005)
SECTION 5: PARTS SECTION
PA-2 CDR ASSEMBLY OPTIONS
1
3
19
17
16
9
20
21
22
18
5
*24
*4
10
2
A
6
7
B
8
15
16
17
18
14
Page 68

62
* Represents an item not shown.
ITEM QTY DESCRIPTION Part No. Mfg. No.
1 1 Hood Weldment N/A 05700-002-59-77
2 1 Cantilever Arm Assembly N/A 05700-002-07-70
1 Cantilever Arm Weldment N/AF 05700-002-09-13
2 Plug 96022447 05340-011-35-00
2 Spring Pin, 1/4" Dia. X 1 1/8" Long 96039185 05315-407-06-00
2 Yoke Assembly 96586615 05700-000-75-77
2 Nut, 3/8"-16 S/S, Center Locknut 96581384 05310-256-04-00
3 1 Tub Weldment N/A 05700-002-59-75
4* 1 Inner Door Guide 96583570 05700-021-44-94
5 1 Front Door N/A 05700-003-01-61
2 Door Glides UHMW 96552336 05700-111-33-59
6 1 Hinge, Slotted 96033618 05700-002-07-39
7 2 Front Door Bracket 96033030 05700-002-07-37
8 1 Frame Weldment N/A 05700-002-07-51
9 1 Left Rear Door Guide 96030457 05700-021-84-71
10 1 Left Door Weldment N/A 05700-003-02-53
2 Door Glides UHMW 96552336 05700-111-33-59
1 Magnet, Reed Switch 96025200 05930-111-51-68
2 Locknut, 8-32 Hex, with Nylon Insert 88429105 05310-272-02-00
11 1 Chemical Feed Tube Weldment 96041066 05700-002-08-14
1 Gasket, Chemical Feed Tube 96562954 05700-011-45-36
1 Bushing, 3/4” Hole Snap 96033063 05975-002-47-54
Rack Rail Assembly 96041009 05700-002-08-85
12 1 Rack Rail Weldment N/A 05700-002-07-64
13 3 Locknut, 10-24 Hex, S/S, with Nylon Insert 88429063 05310-373-01-00
14 3 Screw, 10-24 x 1/2" Long S/S 88120746 05305-173-18-00
15 1 Guard, Front Track N/A 05700-002-07-44
16* 2 Front Door Guide 96583570 05700-021-44-94
17 1 Bracket, Side Door Connecting 96033626 05700-002-07-33
18 2 Spring Rod 96584313 05700-001-28-18
19 2 Spring 96581285 05340-109-02-00
20 2 Bolt, Hanger Eye 96582762 05306-956-05-00
21 2 Washer, Impeller 96581376 05311-176-02-00
22 4 Nut, Hex 3/8"-16 S/S 88422068 05310-276-01-00
SECTION 5: PARTS SECTION
PA-2CDR ASSEMBLY OPTIONS (CONTINUED)
PA-1/PA-2 Series Installation & Operation Manual
7610-002-24-11 Rev. J (11/02/2005)
Page 69

63
SECTION 5: PARTS SECTION
VAPOR VENT OPTION ASSEMBLY
Nut, Wing, Nylon, 1/4”-20
2 per assembly
Part No.: 96024005
Mfg. No.: 05310-994-01-00
Vapor Vent Assembly
1 per assembly
Part No.: 96629321
Mfg. No.: 05700-002-93-21
Bracket, Stand Off
1 per assembly
Part No.: 96627216
Mfg. No.: 05700-002-72-16
Vapor Vent Complete Assembly, 115V
1 per assembly
Part No.: 96627582
Mfg. No.: 05700-002-75-82
Vapor Vent Top Weldment
1 per assembly
Part No.: 96629202
Mfg. No.: 05700-002-92-02
Jet, Full 1/8”, HHSS6HQ
2 Per Assembly
Part No.: 96034681
Mfg. No.: 04730-216-06-05
Gasket, Vapor Vent
1 per assembly
Part No.: 96627506
Mfg. No.: 05330-002-75-06
Vapor Vent Incoming Plumbing Assembly
1 per assembly
Part No.: 96627752
Mfg. No.: 05700-002-77-52
Solenoid Valve, 3/8”, 115V
1 per assembly
Part No.: N/A
Mfg. No.: 04730-002-75-48
Nipple, 3/8” Close NPT
1 per assembly
Part No.: 85140804
Mfg. No.: 04730-002-18-00
Elbow, 3/8” 90° Street
1 per assembly
Part No.: 86078052
Mfg. No.: 04730-002-15-36
Vacuum Breaker, 3/8”
1 per assembly
Part No.: 85284002
Mfg. No.: 04820-002-75-53
Solenoid, Interlock, 115V
Part No.: 96582087
Mfg. No.: 04810-002-55-65
Solenoid Interlock Box
Part No.: N/A
Mfg. No.: 05700-002-64-59
Solenoid Interlock Box Cover
Not Shown
Part No.: N/A
Mfg. No.: 05700-002-64-88
Solenoid Interlock Timer
Part No.: N/A
Mfg. No.: 05700-002-34-29
PA-1/PA-2 Series Installation & Operation Manual
7610-002-24-11 Rev. J (11/02/2005)
Page 70

SECTION 6:
ELECTRICAL SCHEMATICS
64
Page 71

65
PA-1/PA-2 Series Installation & Operation Manual
7610-002-24-11 Rev. J (11/02/2005) Revised: October 29, 2007
SECTION 6: ELECTRICAL SCHEMATICS
PA-1 (115 VOLT, 60HZ, SINGLE PHASE)
Page 72

66
PA-1/PA-2 Series Installation & Operation Manual
7610-002-24-11 Rev. J (11/02/2005)
SECTION 6: ELECTRICAL SCHEMATICS
PA-1V (115 VOLT, 60HZ, SINGLE PHASE)
Page 73

67
SECTION 6: ELECTRICAL SCHEMATICS
PA-2 (115 VOLT, 60HZ, SINGLE PHASE)
PA-1/PA-2 Series Installation & Operation Manual
7610-002-24-11 Rev. J (11/02/2005)
Page 74

68
SECTION 6: ELECTRICAL SCHEMATICS
PA-2CDL & PA-2CDR (115 VOLT, 60HZ, SINGLE PHASE)
PA-1/PA-2 Series Installation & Operation Manual
7610-002-24-11 Rev. J (11/02/2005)
Page 75

 Loading...