

Page 1
by
USER MANUAL
Page 2

INDEX
Section 1
Box Content ......................................................................................................................................... 3
Section 2
Product Overview ......................................................................................................................... 4 - 10
Section 3
Instructions ................................................................................................................................. 11 - 15
Section 4
Features ......................................................................................................................................16 - 17
Section 5
Specications .................................................................................................................................... 18
Section 6
Caring for Buoy ................................................................................................................................ 19
2
Page 3

SECTION
1
•
Wireless Waterproof Speaker
• Leather Strap
• USB Charging Cable: MicroUSB to USB-A
• Auxiliary Audio Cable: 3.5mm Jack to 3.5mm Jack
• User Manual
BOX CONTENT
3
Page 4
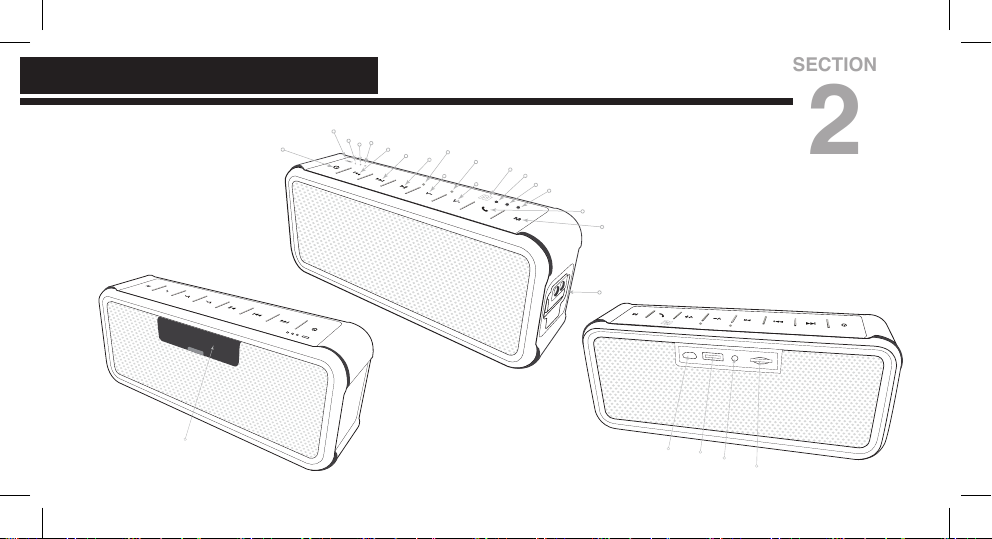
PRODUCT OVERVIEW
SECTION
2
4
Page 5

PRODUCT OVERVIEW
Power Button/Indicator
• Press and hold for 3 seconds to power on/off
• If necessary, press and hold for 8 seconds to force a system restart
Previous
• Use button to navigate to the previous track
Next
• Use button to navigate to the next track
Play/Pause/Pairing
• When in Bluetooth Mode, press and hold to Disconnect and re-initiate Bluetooth pairing
• Press button to play / pause
5
Page 6

PRODUCT OVERVIEWPRODUCT OVERVIEW
V(olume)–
• Decrease Volume
V(olume)+
• Increase Volume
• A beeping sound will alert you when maximum volume is reached
Phone Button
• Press once to answer/end call; Press and hold to reject call. While in Bluetooth mode, press and hold
to activate Siri or S-Voice. Press again to disable.
M(ode) Button
• Use button to toggle between Bluetooth/AUX/Micro SD Modes
• Press and hold button for 4 seconds to disable 20-minute idle time auto shut-off. Buoy will remain ON
and will Not auto shutoff. To enable auto shut-off again, simply press the ‘M’ button for 4 seconds or
turn the device Off and back On again.
• If there is no AUX Cable or MicroSD card inserted, these modes will be skipped when toggling
6
between modes, and speaker will automatically enter default Bluetooth Mode.
Page 7

Battery-Level Indicator
• Green when battery is charged, ashing red when battery is low
• These lights indicate your device’s remaining charge level:
30% Battery
60% Battery
100% Battery
PRODUCT OVERVIEW
7
Page 8

PRODUCT OVERVIEWPRODUCT OVERVIEW
Thermal Sensor
• Detects pre-touch thermal heat and illuminates LED backlights of top buttons
Microphone
• For best results, keep within 3 feet of the Mic while speaking
Bluetooth Indicator Light
•
When device is in “Bluetooth” mode, indicator light intermittently ashes in blue.
•
When device enters “PAIRING” mode, the Bluetooth indicator light ashes blue & red
8
Page 9

PRODUCT OVERVIEW
Micro SD Indicator Light
• In TF mode, indicator light displays in yellow
AUX IN Indicator
• In AUX mode, indicator light displays in green
Hang Buckle
• For placement of provided leather strap
2) Waterproof Interface Door
• Keep door sealed when near water to maintain waterproong integrity
• Open door for access to Micro USB Charging Port; AUX-IN Port; USB Power-Out Port; Micro SD Slot
9
Page 10

PRODUCT OVERVIEW
PRODUCT OVERVIEW
PRODUCT OVERVIEW
2 Micro USB Port
• Connect provided cable to any powered USB source such as Charger, adapter or computer.
• Connect to computer to charge speaker or to read & write to SD card
2 DC 5V/1A Output Charging Port
• Charge any USB device such as phone or tablet
2 AUX IN Port
• Use to connect to external Devices with 3.5mm Audio Output Port without using Bluetooth by using
provided AUX cable
2$ Micro SD Slot Port
• Insert a Micro SD card into this slot to play stored media
• Micro SD card must be formatted as FAT32 and not NTFS
• Manage media on micro SD card when speaker is powered OFF and connected to your computer via
Micro USB cable
10
Page 11

SECTION
3
INSTRUCTIONS
Power On/Off
• Press & hold for 3 seconds to power ON/OFF speaker. A startup and shutdown tone will
sound
Reset
• Should the speaker become unresponsive or you need to reset the speaker, press and hold
the power button for 8 seconds then release; the speaker will reset itself then shutdown.
Press the power button again to turn speaker ON
11
Page 12

PRODUCT OVERVIEW
INSTRUCTIONS
PRODUCT OVERVIEW
Charging
• Insert the provided USB cable into the MicroUSB 2 port of the device and connect the USB-A into an
USB power source. Charging begins automatically even if the device is powered off
• When speaker is powered ON, the battery level 1)11 are displayed as follows:
100% Battery
60% Battery
30% Battery
Low Battery
• When the battery is charged, the symbol light is green. In low battery, the symbol is ashing red
12
Page 13

INSTRUCTIONS
Bluetooth
• To connect your speaker to a Bluetooth enabled device for the rst time, power ON your speaker with
your Bluetooth device within 3 feet of the speaker; Press & hold Play/Pause button for 2 seconds for
the speaker to enter pairing mode signaled by a voice prompt “PAIRING” and Bluetooth indicator
light ashing blue & red. In your device Bluetooth settings, locate and select ‘Buoy’ from the
available Bluetooth devices list and when pairing is successful you will be signaled by a voice prompt
“Connected” and the Bluetooth symbol on the speaker intermittently ashing in blue light
• The User Interface is designed to be super smart and intuitive so as soon as you turn Buoy on, it will
immediately start looking for any device that Buoy was previously paired with, from most recent on, and
make a connection signaled by a voice prompt “Connected”. The Bluetooth symbol on the speaker will
ash intermittently in blue light. If nothing is visible, it goes into pairing mode. To disconnect a paired
device and re-initiate pairing mode, press & hold Play/Pause button for 2 seconds.
13
Page 14

PRODUCT OVERVIEW
INSTRUCTIONS
PRODUCT OVERVIEW
AUX Mode
• To connect devices without Bluetooth, Power-ON speaker, insert provided audio cable between the AUX
port 2 behind the waterproof door & your media source with a 3.5mm Audio Out Port. Buoy will automatically
detect and switch to AUX mode and AUX indicator light 1* will illuminate in green.
Micro SD Card Mode
• Use only SD cards formated as FAT32 and not NTFS with capacity up to 32GB
• You can manage SD card media without needing any additional hardware such as a card reader
• To manage your music or transfer to an SD card from your computer, plug the provided micro USB cable
between your computer and powered-off speaker2
• To play music from your Micro SD card, simply insert the SD card, label down into the SD card slot 2$
Buoy will automatically detect and switch to SD mode and SD indicator light 1& will illuminate in yellow. If
required you can also toggle to the SD Mode 1& using the 'M'(ode) button ; If there is no card inserted,
the Micro SD mode will be skipped when toggling between modes.
All tracks/folders on the SD card will play in alphabetical order
14
• With a Bluetooth connection to Buoy, connect an AUX IN and an SD Card and toggle between all 3 modes
Page 15

INSTRUCTIONS
Hand Free Calls
• When Buoy is paired to your phone with an incoming call, short press the phone button to answer the
call; short press the phone button again to end the call; Press and hold the phone button to reject a call;
press once to answer/end a call
Siri / S-Voice Function
• In Bluetooth mode, when there is no incoming call, short press the phone symbol to enter the Siri or
S-Voice function. Press again to exit the Siri or S-Voice function
Auto Idle Shutoff
• Buoy will power-off after 20 minutes of idle time. To disable idle-time auto shut-off, press and hold the ‘M’
button for 4 seconds. Buoy will remain ON and will Not auto shutoff. To enable auto shut-off again, simply
press the ‘M’ button for 4 seconds. Buoy will return to auto-20-minute-shutoff after restarting.
15
Page 16

FEATURES
SECTION
4
Output charging function
• When your speaker is charged, you can use Buoy as a power bank to charge any external
USB device such as your phone, tablet, headphones and other USB chargeable devices via
the 5V output–1 Ampere USB charging port 2
• To charge an external device, Buoy must be powered on, press and hold the 'M' button
for 4-seconds. This will illuminate the Power Symbol in solid red and disable idle-time auto
shut-off while charging.
16
Page 17

FEATURES
Features Highlights
• Bluetooth Version 4.0
• IP7 Waterproof/Dust Proof Rating
• Speaker Battery status on iPhone/iPod/iPad
• When Fully Charged, playtime up to 24 hours
• Incoming Call Handling/Hands-free Call Function
• Stiff Passive Radiator for Extra Deep Bass
• Robust Hardware Technology for Rich 360º Music
• Extremely low distortion level
• AUX IN Function
• Management/Support Micro SD Card
• Power Bank Output Charge Function
• Illuminated 8-button Control Panel
• Detachable Leather Carrying Strap
• Personal Settings Memory
• Quick & Smart Pairing
• Auto Idle Shutoff
• 1-Year Warranty
17
Page 18

SPECIFICATIONS
SECTION
5
Technical Specications
1. Lithium Battery Voltage: 3.7V
2. Lithium Battery Capacity: 4400mAh
3. Charging Voltage: 5V
4. Output Power: 10 Watts total Power
5. Speaker Spec.: 45mm 2-4Ω7W
6. Frequency Response: 60HZ~18KHZ
7. THD: ≤1%
8. SNR: ≥90dB
9. Dimensions: 189mm X 80mm X 50mm
18
Page 19

SECTION
6
CARING FOR BUOY
How to Care for Buoy
1. To prevent damage and risk of electrical shock, do not expose this device to extreme weather
2. Always place your device on level, at, stable surface and not in close proximity to open ames
or extreme heat
3. Avoid placing items on top of speakers
4. Do not use excessive force when pressing buttons or handling your device
5. Use only a dry soft cloth or slightly damp cloth to clean Buoy and never use any device solvent
or cleaning agents
Copyright © 2016 Magtunes, All rights reserved.
19
Page 20

FCC Statement
This equipment has been tested and found to comply with the limits for a Class B
digital device, pursuant to part 15 of the FCC rules. These limits are designed to
provide reasonable protection against harmful interference in a residential installation.
This equipment generates, uses and can radiate radio frequency energy and, if not
installed and used in accordance with the instructions, may cause harmful interference
to radio communications. However, there is no guarantee that interference will not
occur in a particular installation. If this equipment does cause harmful interference to
radio or television reception, which can be determined by turning the equipment off
and on, the user is encouraged to try to correct the interference by one or more of the
following measures:
-Reorient or relocate the receiving antenna.
-Increase the separation between the equipment and receiver.
-Connect the equipment into an outlet on a circuit different from that to which the
receiver is connected.
-Consult the dealer or an experienced radio/TV technician for help.
To assure continued compliance, any changes or modifications not expressly
approved by the party.
Responsible for compliance could void the user’s authority to operate this
equipment. (Example- use only shielded interface cables when connecting to
computer or peripheral devices).
This equipment complies with Part 15 of the FCC Rules. Operation is subject to
the following two conditions:
(1) This device may not cause harmful interference, and
(2) This device must accept any interference received, including interference that
may cause undesired operation.
RF warning statement:
The device has been evaluated to meet general RF exposure requirement. The
device can be used in portable exposure condition without restriction.
Page 21

by
www.MagTunes.com.au
Copyright © 2016 MagTunes.com.au. All rights reserved.
 Loading...