

Page 1

Page 2

PRODUCT MANUAL
TABLE OF CONTENTS
+ What’s in the Box.....................................................1
+ Product Overview......................................................2
+ Basic Operation........................................................3
+ Setup.........................................................................3
+ Playback/Transferring Files........................................4
+ Changing Lenses......................................................5
+ LED Indicator............................................................6
+ Troubleshooting........................................................7
+ Technical Specications...........................................8
+ Safety and Warning.................................................9
+ Notice......................................................................10
WHAT’S IN THE BOX
+ iVUE Crossre Camera Glasses
+ Hard Case
+ Carrying Bag
+ Retaining Lanyard
+ Cleaning Cloth
+ Micro USB2.0 HS Cable
+ USB2.0 HS Card Reader
+ Warranty Card
+ User Manual
1
Page 3

PRODUCT OVERVIEW
FEATURES & ADVANTAGES
Unique Design
• Slim, sporty and lightweight design.
• Made of high quality materials for comfort and durability.
• Higher curve and exible design suits dierent faces - smaller
and bigger.
Grilamid® TR90TM High Quality Frames
• Extremely lightweight, comfortable and durable.
• Impact & temperature resistant
• Non allergenic matte black armor nish
Start/Stop Recording With Only One Button
• The specially designed, user-friendly start/stop button blends
into the design of the glasses. Simply press to start recording
video & press is again to stop. Recording is indicated by a
ashing green light on the inner frame.
Weather Resistant Frame
• Designed to withstand extreme weather conditions – moisture
from perspiration or wet weather.
1.8mm Polarized Impact Resistant Lenses
• The quality polarized lenses are 1.8mm thick and are built
extremely tough.
• Blocks out 100% of all UVA, UVC and harmful blue light.
Lightweight, shatter-resistant and impact-resistant tough
material.
• DISCLAIMER: For outdoor general purpose only, not
intended to be used for industrial eye protection.
140° Wide Angle HD Video Camera
• High end sunglasses with a built-in 720P HD Camcorder.
• 5 mega pixels quality CMOS camera for clear digital video
recording.
Fashionable Soft Sleeves and Nose Pads
• Soft sleeves and nose pads are designed to t snug and not
slide o.
Record While Charging
• You can record videos while charging your device. Great to
use with a power bank while on the go.
Vibration Alerts
• Your glasses can alert you with small vibrations when you
begin recording, powering o, full memory or low battery.
Removable & Interchangeable Micro SD Memory
• You can easily remove and change the micro SD memory
cards when you need more memory or need to transfer les
onto your computer. For best results, use a HD Class 4 or
higher Micro SD Card.
2
Page 4

BASIC OPERATION
Charging
Before using your device it is recommended that you fully
charge it using the supplied charging cable. Initial charging
will take up to 8-12 hours (do not charge past twelve hours).
Complete a full charge on your second and third charge as
well. Additional charges should last around three hours.
• Charging is indicated by the red LED light on the glasses.
• Charging is complete when the red light is no longer
illuminated
• For proper charging, please only use the cable provided.
• If unused for long periods of time, make sure to charge the
device fully before using again.
• Device will charge faster when turned o.
• Turn o the device, connect the charging cable to the device,
and plug the charging cable into the charging port.
Recording
• To record, press the button located on the left temple for
(1 second ON/OFF button). The green LED will illuminate,
followed by a vibration alert (2 short buzzes) and then a slow
blinking green LED light to indicate recording has begun (on
left temple).
• To stop recording, press the button again (this will also turn
the device o). The glasses will automatically save the video,
vibrate for about 3 seconds and then turn o.
• Each time you stop and start recording, a new video le is
created.
NOTE: To limit the le size, the glasses will automatically save
the le every 30 minutes and then start with a new le.
Recording While Charging
This device can record while wall charging or power bank
charging. The recording process is the same as above.
Note: Glasses will not record while connected to a computer.
Auto Shuto
If the battery is low or there is no free storage, the device
will save the current le being recorded and power down
automatically. The green LED will blink very fast and the
vibration alert will start and last approximately 3 seconds.
SETUP
Adjusting Date/Time
1. Connect the device to the computer while turned o (make
sure memory card is inserted)
2. Turn the device on and verify the drive shows up on the
computer
3. Open Notepad (Windows) or TextEdit (Mac) and create a
new le.
4. Activate Time/Date - Input the date and time in the following
3
Page 5

format: yyyy.mm.dd hh.mm.ss Y (make sure the “Y” is capitol)
5. De-activate Time/Date - put a capitol “N” in place of the
capitol “Y”
5. Example: 2015.12.01 12:05:00 Y (Dec. 01, 2015 12:05pm showing)
6. Note: the time is setup in 24hr time (military time)
7. Name the le “time.txt” and save the le in the “time.setting”
folder located on the glasses (storage drive).
8. Disconnect and exit the storage disk.
9. Time is set and ready for recording.
Micro SD Memory
The device supports up to a 32GB micro SD card. For best
results we recommend using a class 4 micro SD card or higher.
Note: In order to avoid damaging the glasses or SD card, make
sure to turn the glasses are o before removing the SD card.
PLAYBACK/TRANSFERRING FILES
To playback or transfer les to your computer you can plug the
glasses directly into the computer, or remove the SD card and
insert the card into your computer (using a card reader)
System Requirements
• CPU 500MHz or higher
• Operating system: Minimum Windows XP or Mac OS
• USB2.0HS port
• Minimum 1GB of free hard disk space
• Minimum 512MB RAM
Connecting Glasses to Computer (MAC/PC)
1. Make sure the glasses are turned o
2. Connect the charging/data cable to the glasses & plug into
computer
3. Turn the glasses on
4. Green LED will illuminate and glass will vibrate 3 times.
6. Files will be accessible on the removable drive under the
DCIM folder (similar to how a ash drive would appear on your
computer)
6. Files can be played, moved, or deleted.
7. Make sure to turn the device o before disconnecting.
Connecting SD Card to Computer
1. Make sure the device is turned o
2. Removed the SD card by pushing the card inward.
3. The SD card will pop out.
4. Insert the SD card into the card adapter and insert into port.
5. Files will be accessible on the removable drive under the
DCIM folder (similar to how a ash drive would appear on your
computer).
6. Files can be played, moved, or deleted.
4
Page 6
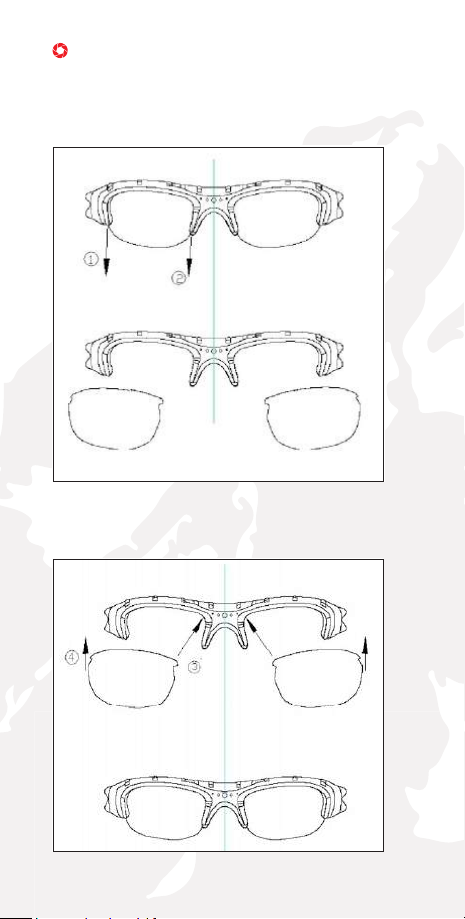
CHANGING LENSES
Removing Lenses
Hold the temple of the end you are removing with one hand,
and gently pull the lens down and away from the temple, then
down and away from the nose bridge.
Inserting Lenses
Hold the temple of the end you are inserting with one hand,
and insert the lens in beginning on the side next to the nose
bridge, then nish by pushing in the other end.
5
Page 7

LED INDICATOR & VIBRATE ALERT
No. Operation Mode LED Indicator Status
1 Turn ON Green LED illuminates, after 2-5
2 Turn OFF The vibrating alert will buzz for 3
3 Video Recording Green LED ashes slowly while
4 Memory Full Green LED blinks and the
5 Low Battery Green LED blinks fast and the
Charging Red LED on
Full Charge Red LED o
6 USB Storage Mode Green LED illuminates, the
seconds, the vibrating alert will
buzz 2 times and the green LED
starts to ash slowly. Recording
then begins.
seconds.
video is recording.
vibrating alert will buzz for 3
seconds and then turn o.
vibrating alert will buzz for 3
seconds and then shut o.
vibrating alert will buzz 2 times.
Green LED and Red LED will
both be illuminated.
6
Page 8

TROUBLESHOOTING
Symptom Possible
Won’t start
recording
Auto shut-o Low battery Recharge battery
Auto shut-o
immediately
after start
Green LED on,
no blinking
Can’t recognize
device when
connected to
computer
Recordings not
saved
Glasses won’t
respond/record
Reason
Dead battery Recharge battery
Frozen device Hit reset button (pin hole)
Memory full Remove les from SD
Low battery Recharge battery
Memory full Remove les from SD
No SD card is
loaded or SD
card needs to
be reformatted
Glasses are
turned on when
you plug them
into a computer
USB cable is
defective
PC BIOS
disabled
Main board
does not
support USB
port
PC system jam Reset/reboot computer
Memory full Remove les from SD
Reboot needed Reset the glasses (pin
Solution
card or insert a new
SD card
card or insert a new
SD card
Load SD card or
reformat SD card
Make sure glasses are
turned o before you
plug them in, and then
turn them on after they
are plugged in
Replace cable
Set USB enabled
Update main board
driver
card or insert a new
SD card
hole)
7
Page 9
Note: Some Mac users have experienced premature storage
loss. If this occurs (e.g. the device acts as if the battery is dead,
even on a full charge) then please try the following:
1. Connect your device
2. Right click the drive and select “get info”
3. Note the storage available (if there is little-to no space
available, even with no les on the drive, then this is the cause
of the premature shutdown)
4. You will need to empty your trash can, disconnect the
device, then reconnect.
5. Check the available storage again (space should be free
now)
6. If this did not x the issue, the device may need to be
formatted (contact customer support for this step).
TECHNICAL SPECIFICATIONS
Dimensions 152*60*42mm (Folded)
Physical Weight 23g
Video Resolution 1280*720P, 30fps
Video Format AV I
Aspect Ratio 16:10
Audio 16 Bit Data Sample
Interface Micro USB2.0 HS
Storage Memory External Micro SD (32GB Max)
Power Supply 3.7V High-Capacity Lithium
Power Adapter 5V DC/500mAH
Battery Life Around 2 hours
Operating Temperature 32º - 161º Fahrenheit
Storage Temperature 0º - 176º Fahrenheit
Media Player Common media players, or
Operating System Mac & Windows (plug-n-play)
Polymer Battery (rechargeable)
mainstream audio and video media
playing software
8
Page 10

SAFETY AND WARNING
Application
Abide strictly to relevant
regulations and laws. This
product should not be used
for any illegal purposes. The
user is fully responsible for its
operational use.
Warning
Do not attempt to dismantle
the device. Any attempt to
alter or repair the unit, except
by the original manufacturer,
will void the limited warranty
Proper use of eyewear
This eyewear is not designed
to protect the wearer from
injury in the event of impact
with hard objects. Sunglasses
must not be used for night
driving. To avoid damage to
optical devices do not expose
the camera directly to strong
light, such as the sun or
strong articial light sources.
Recycling
Please contact your local
corporate oce for recycling/
disposal information for this
product. Do not dispose with
household waste.
File Security
This product is not a storage
device. It does not guarantee
the integrity and security of
saved les. Please back up
your important documents on
the computer or other storage
device.
Operating Temperature
0—70°C. To extend the
lifespan of the device,
it is best used at room
temperature.
Battery
Do not attempt to remove
the battery. (Note: Battery
disposal must be in
accordance with local
environmental regulations) If
the recording function has not
been used for lengthy period,
charge it fully before using.
Don’t Expose To Moisture
Although the device features
a water resistant design,
operation can be aected
in excessively humid
environments – it is not
completely waterproof.
Other Matters
The product is a sophisticated
electronic product – protect
against impact and strong
vibration. Do not use it close
to magnetic or high electric
currents.
Cleaning
Avoid using it in excessively
dusty environments. Use a
normal lens cleaning cloth to
clean the lens.
9
Page 11

NOTICE
We reserve the rights to upgrade or change the product without
any prior notice, the content of which can be obtained from our
website notice or salesperson. Normally a generous transitional
period is oered but we cannot guarantee to inform everybody
simultaneously. The product design, conguration and or
specications mentioned are protected by pertinent copyright
and patent laws. Any unauthorized copy or reproduction is
strictly prohibited and trespassers will be prosecuted. We
reserve the rights to claim for any direct or indirect losses
incurred.
HAPPY? NOT HAPPY?
We’re only happy when you’re happy. Our friendly and
hassle-free customer service team will work hard to put
a smile on your face. Give us a call or shoot us an email.
iVUE and their respective logos are trademarks of Teton Brands, LLC in the
United States and other countries. Copyright © 2014. All rights reserved .
10
Page 12

Page 13

Page 14

 Loading...