


 Loading...
®
Security System
Owner’s Manual
®
Interactive Technologies Inc.
2266 North 2nd Street
North St. Paul, MN 55109
FCC Notices
FCC Part 15 Information to the User
Changes or modifications not expressly approved by Interactive Technologies, Inc. can void the user’s authority to operate the equipment.
FCC Part 15 Class B
This equipment has been tested and found to comply with the limits for a Class B digital device, pursuant to part 15 of the FCC Rules. These limits are designed to provide reasonable protection against harmful interference in a residential installation.
This equipment generates, uses and can radiate radio frequency energy and, if not installed and used in accordance with the instructions, may cause harmful interference to radio communications. However, there is no guarantee that interference will not occur in a particular installation.
If this equipment does cause harmful interference to radio or television reception, which can be determined by turning the equipment off and on, the user is encouraged to try to correct the interference by one or more of the following measures:
Reorient or relocate the receiving antenna.
Increase the separation between the equipment and receiver.
Connect the affected equipment and the Panel receiver to separate outlets, on different branch circuits.
Consult the dealer or an experienced radio/TV technician for help.
Commander and ITI are registered trademarks of Interactive Technologies, Inc.
Magic Key is a trademark of Interactive Technologies, Inc.
Energizer is a registered trademark of Eveready, Inc.
Ultralife is a registered trademark of Ultralife Batteries, Inc.
X-10 is a registered trademark of X-10 (USA) Inc.
For reprints order: 46-585-01-ITI Rev. D
Cover 46-702-ITI
Text: 46-701-ITI Rev. B
Copyright ITI 1998

 TABLE OF CONTENTS
SECTION 1–
INTRODUCTION. . . . . . . . . . . . . . . . . . . . . . . . . . . . . . . . . . . . . . . . . 5
How the System Works . . . . . . . . . . . . . . . . . . . . . . . . . . . . . . . . . . . . . . . . . . . . . . . . . . . 5
Typical System Components . . . . . . . . . . . . . . . . . . . . . . . . . . . . . . . . . . . . . . . . . . . . . . . 5
Panel . . . . . . . . . . . . . . . . . . . . . . . . . . . . . . . . . . . . . . . . . . . . . . . . . . . . . . . . . . . . . . 8
Wireless Sensors . . . . . . . . . . . . . . . . . . . . . . . . . . . . . . . . . . . . . . . . . . . . . . . . . . . . . 8
Wireless Touchpads . . . . . . . . . . . . . . . . . . . . . . . . . . . . . . . . . . . . . . . . . . . . . . . . . . 9
Sirens . . . . . . . . . . . . . . . . . . . . . . . . . . . . . . . . . . . . . . . . . . . . . . . . . . . . . . . . . . . . . 9
SECTION 2–
HOW THE SYSTEM COMMUNICATES TO YOU. . . . . . . . . . . . . . . . . 11
Panel Indicator Lights . . . . . . . . . . . . . . . . . . . . . . . . . . . . . . . . . . . . . . . . . . . . . . . . . . . |
11 |
Alarm Sounds. . . . . . . . . . . . . . . . . . . . . . . . . . . . . . . . . . . . . . . . . . . . . . . . . . . . . . . . . . |
12 |
System Status Beeps . . . . . . . . . . . . . . . . . . . . . . . . . . . . . . . . . . . . . . . . . . . . . . . . . . . . |
13 |
Voice Messages . . . . . . . . . . . . . . . . . . . . . . . . . . . . . . . . . . . . . . . . . . . . . . . . . . . . . . . . 14
SECTION 3–
BASIC SYSTEM OPERATIONS . . . . . . . . . . . . . . . . . . . . . . . . . . . . . 15
Using Access Codes. . . . . . . . . . . . . . . . . . . . . . . . . . . . . . . . . . . . . . . . . . . . . . . . . . . . . 15
Primary Access Code . . . . . . . . . . . . . . . . . . . . . . . . . . . . . . . . . . . . . . . . . . . . . . . . 15
Temporary Access Code . . . . . . . . . . . . . . . . . . . . . . . . . . . . . . . . . . . . . . . . . . . . . . 16
Secondary Access Codes . . . . . . . . . . . . . . . . . . . . . . . . . . . . . . . . . . . . . . . . . . . . . 16
Entering and Exiting Premises . . . . . . . . . . . . . . . . . . . . . . . . . . . . . . . . . . . . . . . . . . . . . 17
Entering the Premises . . . . . . . . . . . . . . . . . . . . . . . . . . . . . . . . . . . . . . . . . . . . . . . . 17
Exiting the Premises . . . . . . . . . . . . . . . . . . . . . . . . . . . . . . . . . . . . . . . . . . . . . . . . . 17
Arming and Disarming Your System. . . . . . . . . . . . . . . . . . . . . . . . . . . . . . . . . . . . . . . . 18 Turning System Off . . . . . . . . . . . . . . . . . . . . . . . . . . . . . . . . . . . . . . . . . . . . . . . . . 18 Turning System On (STAY and AWAY). . . . . . . . . . . . . . . . . . . . . . . . . . . . . . . . . 20
Activating Emergency Alarms. . . . . . . . . . . . . . . . . . . . . . . . . . . . . . . . . . . . . . . . . . . . . 22
Police, Fire, and Auxiliary/Medical Alarms . . . . . . . . . . . . . . . . . . . . . . . . . . . . . . . 23
Silent Duress Alarm . . . . . . . . . . . . . . . . . . . . . . . . . . . . . . . . . . . . . . . . . . . . . . . . . 25
iii
SECTION 4–
ADVANCED SYSTEM OPERATIONS . . . . . . . . . . . . . . . . . . . . . . . . . 27
Arming with No Alarm Delay (NO DELAY) . . . . . . . . . . . . . . . . . . . . . . . . . . . . . . . . . 27
Bypassing Normally Armed Sensors (BYPASS) . . . . . . . . . . . . . . . . . . . . . . . . . . . . . . 28
Using the Chime Feature (CHIME) . . . . . . . . . . . . . . . . . . . . . . . . . . . . . . . . . . . . . . . . . 29
Controlling Lights (LIGHTS) . . . . . . . . . . . . . . . . . . . . . . . . . . . . . . . . . . . . . . . . . . . . . 30
Panel Light Control. . . . . . . . . . . . . . . . . . . . . . . . . . . . . . . . . . . . . . . . . . . . . . . . . . 30
User Light Control . . . . . . . . . . . . . . . . . . . . . . . . . . . . . . . . . . . . . . . . . . . . . . . . . . 30
Using and Programming the Magic Key . . . . . . . . . . . . . . . . . . . . . . . . . . . . . . . . . . . . . 31 Magic Key Voice Messages . . . . . . . . . . . . . . . . . . . . . . . . . . . . . . . . . . . . . . . . . . . 32
Using the Keychain Touchpad . . . . . . . . . . . . . . . . . . . . . . . . . . . . . . . . . . . . . . . . . . . . . 32
Checking the System Status (STATUS) . . . . . . . . . . . . . . . . . . . . . . . . . . . . . . . . . . . . . |
35 |
Checking for Alarms . . . . . . . . . . . . . . . . . . . . . . . . . . . . . . . . . . . . . . . . . . . . . . . . . . . . 36
Adjusting Panel Speaker Volume . . . . . . . . . . . . . . . . . . . . . . . . . . . . . . . . . . . . . . . . . . |
37 |
SECTION 5–
MAINTAINING YOUR SYSTEM . . . . . . . . . . . . . . . . . . . . . . . . . . . . 39
Required System Tests. . . . . . . . . . . . . . . . . . . . . . . . . . . . . . . . . . . . . . . . . . . . . . . . . . . 39
Replacing Panel Backup Batteries . . . . . . . . . . . . . . . . . . . . . . . . . . . . . . . . . . . . . . . . . . 41
Replacing Smoke Sensor Batteries . . . . . . . . . . . . . . . . . . . . . . . . . . . . . . . . . . . . . . . . . |
44 |
Replacing Other Sensor Batteries . . . . . . . . . . . . . . . . . . . . . . . . . . . . . . . . . . . . . . . . . . |
44 |
SECTION 6–
TROUBLESHOOTING YOUR SYSTEM . . . . . . . . . . . . . . . . . . . . . . . . 45
SECTION 7–
PLANNING FOR EMERGENCIES . . . . . . . . . . . . . . . . . . . . . . . . . . . . 49
Floor Plan . . . . . . . . . . . . . . . . . . . . . . . . . . . . . . . . . . . . . . . . . . . . . . . . . . . . . . . . . . . . . 51
APPENDIX A–
ALARM SYSTEM NOTICE 53
GLOSSARY 55
INDEX 57
iv

 S E C T I O N 1 –
 INTRODUCTION
Congratulations on your selection of the Commander 2000 security system! This system is designed to provide you with years of dependable service.
This manual includes step-by-step instructions for the proper use of your security system. Read this manual before you begin using your system.
How the System Works
The Commander 2000 security system is a wireless, supervised system. Wireless means that most sensors use radio waves instead of wires to communicate with the Control Panel (panel). With a supervised system, the wireless sensors communicate with the panel on a regular basis. There are three features that are unique to supervised security systems:
Automatic Sensor Communication Testing
The system receives a signal from each sensor every 64 minutes. This signal tracks sensor communication.
User Friendly Arming
The system tracks the status of each sensor and sounds protest beeps if sensors are open or have a trouble condition when you attempt to arm. If you ignore these protest beeps, the panel automatically bypasses the protesting sensor(s) and arms the system to the desired level.
Sensor Battery Monitoring
The system notifies you of sensors with low batteries.
These three features help ensure that your Commander 2000 system handles alarm conditions in the appropriate manner.
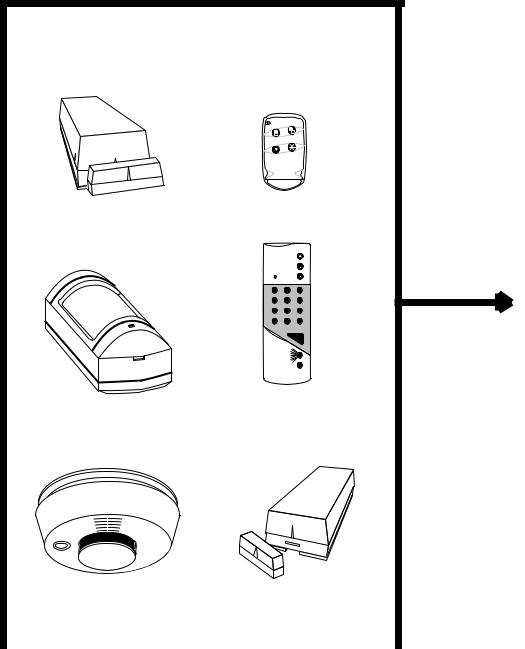
Typical System Components
Figure 1 shows a typical system configuration, highlighting the devices that communicate with the panel and the devices that the panel controls in response to system conditions.
A description of typical system components begins on page 8.
5
T H E S E D E V I C E S R E P O R T T O T H E P A N E L .
D O O R / W I N D O W S4ENB SU OT TR O N K E Y C H A I N T O U C H P A D I T I P A R T N O . 6 0 -I6T8I6 -P4A3R T N O . 6 0 - 6 0 6
O F F S T A Y |
A W A Y |
|
1 |
2 |
3 |
N O D E L A Y |
|
|
4 |
5 |
6 |
C H I M E |
|
|
7 |
8 |
9 |
S T A T U S |
B Y P A S S |
|
S T |
0 |
B Y |
C O M M A N D
P I R |
M O T I O N D E T EHCiTOT ER C H H A N D H E L D T O U C |
H P A D |
|
I T I |
P A R T N O . 6 0 - 6I3T9I4P3A R T N O . 6 0 - 6 8 7 - 4 |
3 |
|
|
|
|
|
|
|
|
|
S M O K E S E N S O R |
S H O C K S E N S O R * |
||
I T I P A R T N O . 6 0 - 6I6T8I4P 3A R T |
N O . 6 0 - 7 0 6 - 4 3 |
||
|
|
|
|
|
|
|
|
* N O T I N V E S T I G A T E D B Y U L . |
|
8 3 3 3 G 4 9 B . D S F |
|
Figure 1. Typical System Components
6

T H E S E C O M P O N E N T S R E S
C O M M A N D S F R O M T H E P A
S L I M L I N E H A R D W I R E
I N T E R I O R S I R E N A N D P I
I T I P A R T N O . 6 0 - 4 8 3 - 0
Q U I C K R E F E R E N C E C A R D
PO W E R 1 2 3 4 5 |
P O L I C E |
|
|
|
RE A D Y |
|
|
|
|
ST A Y 6 7 8 9 0 |
F I R E |
|
|
|
AW A Y |
|
|
|
|
NO EDL ASYT A BT YU PS A S S C O M M A N DA U X I L I A R Y |
|
|
|
|
TR O U B L E |
|
E X T E R I O R S I R E N |
||
|
|
|||
|
|
I T I P A R T N O . 1 3 - 0 4 6 |
||
|
T E L E P H O N E L I N E |
|
|
|
C O N T R O L P A N E L |
X - 1 0 |
P O W E R H O U S E |
||
|
1 51 3 |
|||
I T I P A R T N O . |
|
1 3 |
5 |
|
6 0 - 6 7 6 - 4 3 - 8 Z |
|
1 19 7 |
||
6 0 - 6 7 6 - 4 3 - 1 7 Z |
|
O |
A C |
|
|
|
|
|
U N I T |
|
|
|
M |
E |
P R O C E S S E S I N F O R M A T I O N R E C E I V E D F R O M |
||||
S O M E S E N S O R S A N D C O N T R O L S O T H E R |
K |
I G |
||
H O U S E |
||||
S E N S O R S A N D C O M P O N E N T S I N R E S PLOa m pN MSo dEu le |
||||
T O I N F O R M A T I O N R E C E I V E D . |
|
|
|
|
U S E R C O N T R O L S S Y S T E M F R O M H E RXE-.1 0 L A M P M O D U L E |
||||
I N S T A L L E R P R O G R A M S P A N E L F R O MI THIE RP EA .R T N O . 1 3 - 2 0 4 |
||||
C E N T R A L S T A T I O N
8 3 3 3 G 3 3 B . D S F
7
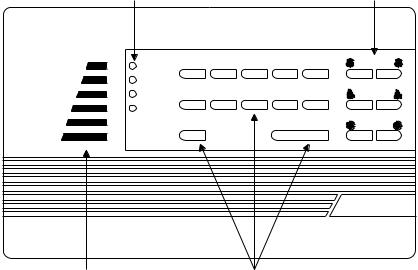
Panel
The panel is your security system’s most vital component (see Figure 2). It performs four main functions:
■Lets you operate the system and set system options.
■Provides you with feedback from the system through indicator lights, voice messages, and status and alarm beeps.
■Receives signals from wireless sensors and wireless touchpads throughout the premises.
■Responds to alarm and trouble conditions by reporting with voice and alarm sounds; controlling output devices, including sirens and X-10® Lamp Modules; and if necessary, contacting your monitoring service over the phone line.
I N D I C A T O R L I G H T S E M E R G
PO W E R |
1 |
2 |
3 |
4 |
5 |
RE A D Y |
|
|
|
|
|
ST A Y |
6 |
7 |
8 |
9 |
0 |
AW A Y |
|
|
|
|
|
P O L I C E
F I R E
 NO EDL ASYT A BT YU PS A S S C O M M A N AD U X I L I A R Y
 TR O U B L E
8 3 3 3 G 0 6 A . D S F
B U I L T - I N S P EOA PKEERRA T I O N B U T T O N S
Figure 2. Panel Lights, Buttons, and Speaker
Wireless Sensors
Wireless sensors are your security system’s detection devices. They perform two functions:
■Notifies the panel if a change in the normal state of a sensor occurs. For example, if the system is armed and you open a protected door, the sensor reports to the panel and an intrusion siren sounds.
8
■Checks in with the panel approximately every hour to indicate proper operation. If a sensor fails to report to the panel within a specified time (programmed by your security consultant), a communication failure is reported to the monitoring service and the system sounds trouble beeps (see Section 6, "Troubleshooting Your System").
Wireless Touchpads
Wireless touchpads let you operate the system inside or outside the premises. A wireless touchpad’s range will vary, depending on the conditions of the premises and the location of the panel relative to the wireless touchpad.
NOTE: |
The Energy Saver option, shown on button 5 of the Hand- |
|
held and Wall-Mount Wireless Touchpads, is not available |
|
with the Commander 2000. |
Sirens
Sirens create two types of sounds, which alert you to the following:
■Alarm conditions
■System status
9
10
 S E C T I O N 2 –
 HOW THE SYSTEM COMMUNICATES TO YOU
This section describes how your security system uses indicator lights, alarm sounds, status beeps, and voice messages to communicate system information to you.
Panel Indicator Lights
The indicator lights on the panel provide system status information. Table 1 describes what each light means.
Table 1. Panel Indicator Lights
Indicator Light † |
ON ‡ |
OFF |
Blinking |
|
|
|
|
|
|
|
|
POWER |
AC power is on, |
AC power is OFF, |
AC power is on, and backup |
|
and backup bat- |
and backup bat- |
batteries are bad. |
|
teries are good. |
teries are okay. |
|
|
|
|
|
READY |
System is ready |
Perimeter or inte- |
Perimeter sensors are ready to |
|
to arm. |
rior sensors are |
arm, but interior sensors are |
|
|
open, not ready to |
open and system can only |
|
|
arm. |
arm to level 2. |
|
|
|
|
STAY |
System is armed |
____ |
System is armed to level 2, |
|
to level 2. |
with sensors bypassed. |
|
|
|
||
|
|
|
|
AWAY |
System is armed |
____ |
System is armed to level 3, |
|
to level 3. |
with sensors bypassed. |
|
|
|
||
|
|
|
|
NO DELAY |
Delay is off. |
Delay is on. |
____ |
|
|
|
|
TROUBLE |
|
System operating |
System is not operating prop- |
|
____ |
normally. |
erly. Press STATUS for a voice |
|
|
|
message of the problem. |
|
|
|
|
†All lights scrolling indicates either a phone test or sensor test is on, or an armed sensor is activated. Press STATUS for a description of the condition.
‡All lights on steady indicates that the panel has lost its memory. Contact your security consultant immediately.
All lights blinking indicates that the system is in program mode. Contact your security consultant immediately.
11

Alarm Sounds
Exterior and interior sirens make three alarm sounds on the premises (see Table 2). Fire alarms take precedence over auxiliary/medical alarms, which in turn take precedence over police alarms.
Table 2. Siren Alarm Sounds
Siren Type |
Description of Siren Sounds |
Fire Alarm |
Steady tone |
|
|
|
|
|
|
|
|
|
|
|
|
|
||
|
|
|
|
|
|
|
|
|
|
|||||||
|
|
|
|
|
|
|
|
|
|
|
|
|
|
|
|
|
Police Alarm |
Slow ON-OFF-ON-OFF |
|
|
|
|
|
|
|
|
|
|
|
|
|||
|
|
|
|
|
|
|
|
|
|
|
|
|
||||
|
|
|
|
|
|
|
|
|
|
|
|
|
|
|
|
|
Auxiliary/Medical Alarm* |
Fast ON-OFF-ON-OFF |
|
|
|
|
|
|
|
|
|
||||||
|
|
|
|
|
|
|
|
|
|
|
|
|
|
|||
|
|
|
|
|
|
|
|
|
|
|
|
|
|
|
|
|
* Interior sirens only |
|
|
|
|
|
|
|
|
|
|
|
|
|
|
|
|
12
System Status Beeps
The panel speaker and interior sirens provide system feedback by sounding status beeps. Table 3 describes the status beeps you may hear from your panel.
Table 3. Understanding Status Beeps
Type |
Pattern |
|
Indicates |
|
|
|
|
||
|
|
|
||
|
1 beep |
System disarmed to level 1. |
||
|
|
|
||
Arm- |
2 beeps |
System armed to level 2, or armed to level 2 and exit delay |
||
ing |
has expired. |
|||
|
||||
Level |
|
|
|
|
3 beeps |
System armed to level 3, or armed to level 3 and exit delay |
|||
|
||||
|
has expired. |
|||
|
|
|||
|
|
|
||
|
2-beep continuous |
System armed to level 2 and entry delay is in progress. |
||
Entry |
sequence * |
|
|
|
|
|
|
||
Delay |
3-beep continuous |
System armed to level 3 and entry delay is in progress. |
||
|
||||
|
sequence * |
|
|
|
|
|
|
||
Chime |
2-beep (1 long, 1 |
System disarmed to level 1 with chime feature on while an |
||
short) |
exterior sensor opened. |
|||
|
||||
|
|
|
||
|
|
1. System disarmed after an alarm from a wireless touchpad, |
||
|
|
|
including Keychain Touchpad. |
|
|
2-beep continuous |
2. |
Attempt to arm to level 2 while the READY light is OFF, |
|
Protest |
sequence (1 long, |
|
indicating an exterior sensor is open. |
|
|
1 short) |
3. |
Attempt to arm to level 3 while the READY light is OFF |
|
|
|
|
(indicating an exterior sensor is open), or blinking (indicat- |
|
|
|
|
ing an interior sensor is open). |
|
|
|
|
|
|
|
|
1. |
System has AC power failure. |
|
|
|
2. |
System has low sensor battery. |
|
|
|
3. |
System has failure to communicate. |
|
|
6-beep sequence, |
4. |
System has sensor failure. |
|
Trouble |
5. |
System has low battery. |
||
once every minute |
||||
|
6. |
System’s memory is clear. |
||
|
|
|||
|
|
Press STATUS for a voice message of the problem (see Section |
||
|
|
6, "Troubleshooting Your System"), or contact your security |
||
|
|
consultant. |
||
|
|
|
|
|
*Entry delay beeps sound at a more rapid pace if an alarm has occurred. Exit the premises immediately and call for emergency help from a neighbor’s phone.
13
Voice Messages
The panel speaker announces voice messages of system and sensor information. These messages are described as they are encountered throughout this manual.
14

 S E C T I O N 3 –
 BASIC SYSTEM OPERATIONS
This section describes how to perform the basic system operations, including: using access codes, entering and exiting the premises, turning the system on and off, and activating emergency alarms.
Using Access Codes
An access code is a four-digit number that lets you operate the system and prevents unauthorized use of the system. An access code is required for most system commands (unless you are using the Magic Key™).
WARNING: Select access codes you and other system users will remember. If you forget your primary access code, contact your security consultant.
Primary Access Code
The primary access code allows you to perform all system commands. The system allows you to have one primary access code. The default primary access code is 1234. You should change your primary access code from the default to a number that you can remember.
■To change your primary access code:
1.Enter primary ACCESS CODE + STATUS + 8.
The panel beeps once.
2.Enter the new primary ACCESS CODE.
After five seconds, the panel announces, [new primary access code] OK, indicating that the primary access code was changed.
NOTE: |
Because the first two digits of your duress code are the |
|
same as the first two digits of the primary access code, |
|
when you change the primary access code, the duress |
|
code also changes (see "Silent Duress Alarm" on page 25). |
NOTE: |
If your temporary access code is disabled, then changing |
|
your primary access code will automatically make your |
|
old primary access code the new temporary access |
|
code. If you want the temporary access code to remain |
|
disabled, you must disable it again using your new primary |
15
access code each time you change your primary access code.
Temporary Access Code
The temporary access code allows you to perform all system commands except changing access codes and bypassing sensors directly. The system allows you to have one temporary access code. You might give the temporary access code to a babysitter or other service personnel.
■To add or change the temporary access code:
1.Enter primary ACCESS CODE + STATUS + 7.
The panel beeps once.
2.Enter the temporary ACCESS CODE.
After five seconds, the panel announces, [temporary access code] OK, indicating that the temporary access code was changed.
■To disable the temporary access code:
1.Enter primary ACCESS CODE + STATUS + 7.
The panel beeps once.
2.Enter the primary ACCESS CODE.
After five seconds, the panel announces, [primary access code] OK, indicating that the temporary access code was deleted.
NOTE: |
If your temporary access code is disabled, then changing |
|
your primary access code will automatically make your |
|
old primary access code the new temporary access |
|
code. If you want the temporary access code to remain |
|
disabled, you must disable it again using your new primary |
|
access code each time you change your primary access |
|
code. |
Secondary Access Codes
Secondary access codes allow you to perform all system commands, except changing access codes and bypassing sensors directly. You can have up to four secondary access codes. The secondary access codes can be used in the same way as the temporary access code, except the secondary access codes can only be set and changed by your security consultant.
16
Entering and Exiting Premises
While the system is armed, delay times let you enter or exit through designated delay doors without causing an alarm. A delay door is any door that is assigned a delay time. If you activate any sensor before you open the delay door, an instant alarm sounds. When entering the armed premises, you must disarm the system within the entry delay time. After arming the system, you must exit the premises before the exit delay time expires.
There are two types of delays: standard and extended. Your security consultant will set up and explain your system’s delays. Contact your security consultant to have your delay times changed.
Entering the Premises
To prevent an alarm when entering the armed premises, you must:
■Enter the extended delay door and disarm the system within the extended delay time.
or– Enter the standard delay door and disarm the system within the standard entry delay time.
or– Enter the extended delay door, then enter the standard delay door and disarm the system within the standard entry delay time or within the time remaining for the extended delay, whichever is less.
Example: The extended delay is set to 4 minutes, and the standard entry delay is set to 32 seconds. If you enter the extended delay door and then open the standard delay door after 3 minutes and 50 seconds, you have 10 seconds to disarm the system.
If you enter the extended delay door and open the standard delay door after 2 minutes, the extended delay is canceled and you have 32 seconds to disarm the system.
Exiting the Premises
To prevent an alarm when exiting the armed premises, you must:
■Exit the standard delay door within the standard exit delay time.
or– Exit the extended delay door within the standard exit delay and the remaining extended delay.
Example: The standard exit delay is set to 32 seconds, and the extended delay is set to 4 minutes. If you arm your system and exit the standard delay door in 22 seconds, then you must exit the extended delay door within 4 minutes and 10 seconds.
17

Arming and Disarming Your System
This section describes levels of security and how to arm and disarm the system.
|
1 |
Turning System Off |
|
Use level 1 (OFF) to turn the system off when entering the premises with the sys- |
|
|
|
|
OFF |
|
tem armed to level 2 or 3 and when canceling an accidental alarm. Level 1 dis- |
|
arms your perimeter and interior sensors. The 24-hour sensors (such as smoke, |
heat, freeze, emergency buttons, and fire pull stations) always remain armed.
CAUTION: Do not enter the premises if you hear sirens. Call for emergency help from a neighbor’s phone.
■To disarm the system from the panel or a Handheld Touchpad:
1.Enter the premises through a delay door when the system is armed to level 2 or 3.
The panel and interior sirens sound entry delay beeps for the entire delay or until you disarm the panel. You must disarm the system before the delay time expires, or an alarm occurs.
CAUTION: Exit the premises immediately if the entry delay beeps sound at a more rapid pace. This indicates an alarm has occurred. Call for emergency help from a neighbor’s phone.
2.Enter ACCESS CODE + 1.
The AWAY or STAY light turns off, and the panel and interior sirens sound an arming level beep, and the panel announces, Alarm system is OFF, if you disarmed from the panel.
CAUTION: If you disarm the system before entering the premises, do not enter the premises if you hear protest beeps. This indicates an alarm has occurred. Call for emergency help from a neighbor’s phone. For more information on this feature, contact your security consultant.
3.Press STATUS to learn if there are any system problems.
18

■To disarm the system from a Keychain Touchpad:
1.Enter the premises through a delay door when the system is armed to level 2 or 3.
The panel and interior sirens sound entry delay beeps for the entire delay or until you disarm the panel. You must disarm the system before the delay time expires or an alarm occurs.
CAUTION: Exit the premises immediately if the twoor threebeep sequence sounds at a more rapid pace. This indicates an alarm has occurred. Call for emergency help from a neighbor’s phone.
2.Press the Disarm button on the Keychain Touchpad.
The AWAY or STAY light turns off, and the panel and interior sirens sound one short beep.
NOTE: |
Pressing the Disarm button will not disarm the system if an |
|
alarm was generated by simultaneously pressing the arm |
|
and disarm buttons. |
CAUTION: |
If you disarm the system before entering the |
|
premises, do not enter the premises if you hear a |
|
two-beep continuous sequence (1 long, 1 short). |
|
This indicates an alarm has occurred. Call for |
|
emergency help from a neighbor’s phone. For |
|
more information on this feature, contact your |
|
security consultant. |
3.Press the STATUS button to learn if there are any system problems.
■To disarm the system using a Magic Key:
1.Enter the premises through a delay door when the system is armed to level 2 or 3.
The panel and interior sirens sound entry delay beeps for the entire delay or until you disarm the panel. You must disarm the system before the delay time expires or an alarm occurs.
CAUTION: Exit the premises immediately if the entry delay beeps sound at a more rapid pace. This indicates an alarm has occurred. Call for emergency help from a neighbor’s phone.
2.Insert the Magic Key into the panel key slot (see Figure 3).
19
Loading...