

Page 1
USB 3.0 Dual Docking Station
User’s guide Gebrauchsanweisung Uživatelská příručka
Instrukcje obsługi Užívateľská príručka Vartotojo vadovas
Manuel de l’utilisateur
Page 2
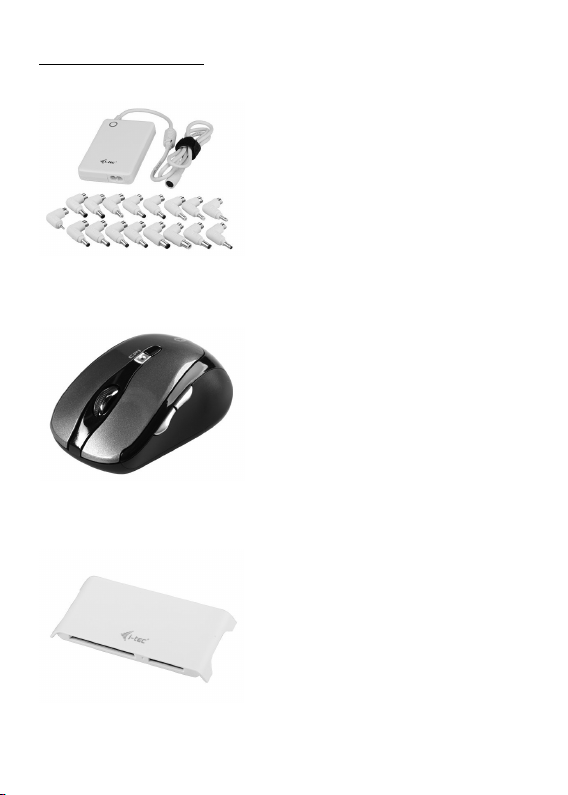
RECOMMENDED PRODUCTS:
i-tec Universal Slim Laptop Adapter Advance 90 W
- ideal choice for the power supply of almost any
notebook or other equipment requiring the voltage in
5 – 24 VDC range
- output voltage is set automatically b y tips (17 connectors included in the package)
- USB & LCD cable showing working voltage
- additional USB port of A type to power most of the
equipment with USB power pack (e.g. MP3 players,
Bluetooth hands -free, digital frames, some mobile
phones, car navigation units etc.)
- order code: ULPASLIM
i-tec Bluetooth Optical Mouse BlueTouch 243
- 6-button wireless laser mouse without Bluetooth
- adjustable 800/1200/1600 DPI scanning reso -
lution
- working distance up to 10 m
- powered by: 2 x AAA battery
- low-voltage alarm function
- order code: MW243-BLACK
i-tec USB 3.0 Speed Card Reader Advance - white
- ideal way to fast transfer data from memory cards to
PC or notebook
- data transfer rate - up to 5 Gbps
- installation free and friendly using
- direct support of microSD/SDHC
- SDHC and SDXC compatible
- available in a black colour too
- order code: USB3READ-W
Page 3

Recommended products ........................................................................................................ 2
Table of contents ..................................................................................................................... 3
Description of USB 3.0 Dual Docking Station ..................................................................... 4
ENGLISH ................................................................................................................................ 5-7
DEUTSCH ............................................................................................................................. 8-10
ČESKY ................................................................................................................................ 11-13
POLSKI ............................................................................................................................... 14-16
SLOVENSKY ...................................................................................................................... 17-19
LIETUVOS .......................................................................................................................... 20-22
FRANÇAIS ......................................................................................................................... 23-25
Declaration of Conformity .................................................................................................... 26
WEEE ....................................................................................................................................... 27
TABLE OF CONTENTS:
Page 4
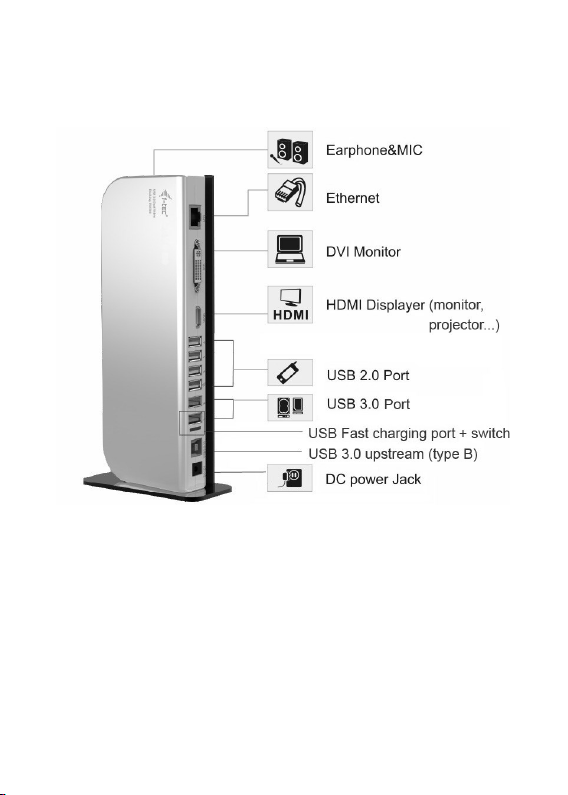
Description of USB 3.0 Dual Docking Station
(note: the picture is only illustrative – for the description of connectors; a base plate
is not included in the package):
Page 5

Important!
We recommend you to check and update USB 3.0 drivers and firmware of your computer
before docking station installation. You can encounter problems with installation or usage if
your computer uses old drivers for USB interface. You should install driver first before
you connect the docking station to your NB/PC. You can install the driver from CD or
you can download latest driver from www.i-tec-europe.eu.
INTRODUCTION
i-tec USB 3.0 DUAL HD Video Docking Station with USB 3.0 HUB, GigaLan, SoundCard is
a unique expansion unit designed for computers that have extra connectivity demands. Just
with one USB port on the computer, its connection can be extended not only to USB peripherals, Ethernet network, speaker, microphone but also two additional monitors. It also
offers desktop computer users the convenience of accessing the peripherals within the
reach, eliminating the hassle of connect or disconnect the peripherals from the rear of a
computer.
With two video port (DVI-I and HDMI) your computer can be connected to two more monitors, LCD or projector. The connected monitors can be configured to either mirror your
primary screen, or extend the W indows desktop allowing visibility of more applications at
the same time. No more stacking windows within the confines of a single display. Graphic
chipset supports FullHD+ (up 2048 x 1152 pixels).
PACKAGE CONTENTS
USB 3.0 Docking Station with Video
Power Adapter
USB 3.0 Cable (type A –B; 100 cm) – for connection to PC/NB
DVI to VGA Adapter
CD (Driver and User’s Manual)
Quick Installation Guide
SPECIFICATIONS
USB 3.0 (max. 5 Gb/s), USB 2.0 (max. 480 Mb/s) – we recommend PC/NB with USB 3.0
ports
Usable ports on USB 3.0 Docking Station:
1x HDMI port
1x DVI-I port (it is possible to connect even VGA monitor with an enclosed DVI-VGA
adapter)
2x USB 3.0 port type A – for connection of USB peripherals
4x USB 2.0 port type A – for connection of USB peripherals
1x USB 3.0 port type B- for connection to USB port of PC/NB
1x Ethernet 10/100/1000 Mb/s GigaLAN RJ-45 port
1x 3,5mm audio output for earphone – 2-channel output 8-48 kHz/16bit
1x 3,5mm input for microphone – 2-channel input 8-48 kHz/16bit
Power adapter: input ~100-240 V/50-60 Hz/1,6 A; output = 12 V/2,0 A
working temperature: 0-40°C
storage temperature: -10 up to +80 °C
moisture of environment: up to 85 %
DESCRIPTION OF DOCKING STATION
Front panel: LED Power (Blue)
Back panel – from left to right:
Quick Start
ENGLISH
EN
05
Page 6

i-tec USB 3.0 Dual Docking Station
1xpower connector, 1x USB 3.0 port type B, 2x USB 3.0 + 4x USB 2.0 port type A,
1x HDMI port, 1xDVI-I port, 1x RJ45 Ethernet 10/100/1000 Mb/s port
SYSTEM REQUIREMENTS
1) Hardware requirements: PC / Laptop with available USB 3.0 port. Transfer rate will be
restricted, if you have USB 2.0/1.1. Processor Intel Pentium 1.2 GHz or higher, 512 MB
RAM.
ENGLISH
2) Operating system: Windows XPSP3/ Vista/ Win 7/ Win 8 32_64 bit
3) To play DVD on the add-on monitor, following requirements should also be met: dual
core CPU at 2.0 GHz processor clock, the adapter screen resolution be set to 800x600
with 16bit color.
Note:
a) Audio port installation and USB Hub (for USB 2.0 port type A) installation will be com-
pleted automatically from the Windows built-in drivers, the other ports have to be in-
stalled from provided CD.
b) 10/100Mb/s LAN port and Video (Display) port must be installed from the provided CD
first, before you connect Docking Station to PC or laptop.
INSTALLATION IN WINDOWS XPSP3/ VISTA/ W7/W8 32_64 BIT
Please install the Ethernet Drivers and Video Drivers first (from the provided Driver
CD), before connecting Docking Station to your PC or laptop. Driver installation is
needed only for the first time of using the Docking Station.
Insert provided CD into your disc drive and start the installation. Follow the on-screen
instructions:
For Ethernet and Video (Display) port – double-click the Setup.exe file under CD:/Driver LAN is shown as „USB 3.0 to Gigabit“ and Display is shown as „DisplayLink Display
Adapter“ and „USB 3.0 Dual Head Display Adapter“.
Note for installation of Video (Display) port: the installation will follow in few steps.
For Vista/7/8 OS install like user Administrator and after the installation restart PC/NB;
a) Monitor can blink during the driver installation, this is a standard process.
b) We recommend repeated restart after the finishing of driver installation.
HARDWARE INSTALLATION
1) Turn on PC/laptop and connect the power adaptor into DC-IN jack on the back of the
USB 3.0 docking station.
2) Plug the USB 3.0 cable to USB type B port on the back of the USB 3.0 docking station.
3) Plug the power adapter to a working electrical outlet (230 V).
4) Plug the USB cable into available USB 3.0/2.0 port (or USB 1.1) of your PC or laptop.
5) Upon the USB connection, your computer will automatically complete the remaining
installation.
6) Restart PC/laptop.
EN
06
Page 7

NOTE!
Fastcharging USB port: This port is primarly determined for charging of products, which
need charging up to 2,1 A. For the other devices the charging from a common USB port
can be sufficient. It is possible to charge these devices in another available USB port.
Apple tablet charging: You can also charge Apple iPad tablets with this device. However,
for charging it is necessary to disconnect USB cable from PC and let connected power
adapter to the Docking Station.
FAQ
Question: The Samsung tablet is not charged.
Answer: Some companies protect their products and so it is possible to charge them with
the original/licensed power adapter only.
For more information please refer to the User´s Manual on the provided CD.
Quick Start
ENGLISH
EN
07
Page 8

i-tec USB 3.0 Dual Docking Station
Wichtig!
Vor der eigenen Installation an den USB 3.0 Port überzeugen Sie sich, dass Sie für ihn (für
den USB 3.0 Controller im NB/PC) die neusten Treiber installiert haben. Im Falle nicht
aktueller USB 3.0 Treiber für Ihren Notebook könnten Sie bei der Installation oder Verwendung auf Probleme stoßen. Bevor Sie die Docking Station das erste Mal verwenden,
müssen die mitgelieferten Treiber von der CD (die Treiber sind auch unter www.i-teceurope.eu zu finden) installieren w erden. Nach der erfolgreichen Installation kann die
Docking Station an Ihren PC oder Ihr Notebook angeschlossen werden.
DEUTSCH
EINLEITUNG
Wir bedanken uns für den Ankauf der i-tec USB 3.0 DUAL HD Video Docking Station mit USB
3.0 HUB, GigaLan, SoundCard. Es handelt sich um eine einfache Docking-Station mit der
Möglichkeit, alle Ihre beliebten Peripherien wie z.B. eine vollwertige Tastatur, Hi -FiAudiosystem, Internetmodem / Ethernet, zwei Tischbildschirme, usw. anzuschließen. Alle
erwähnten Produkte können Sie dann an Ihren Laptop schnell mit einem einzigen USB 3.0
Kabel anschließen. Als Abbildungsanlage können Sie dann praktisch einen beliebigen Bildschirm nutzen, weil die Docking-Station mit einem DVI-Anschluss (mit Adaptern für VGA) und
einem HDMI-Anschluss für moderne LCD - und Plasmabildschirme und Fernseher ausgestattet
ist. Der graphische Chip unterstützt sogar die FullHD+ Auflösung (2048 x 1152 Pixel).
LIEFERUMFANG
USB 3.0 Docking Station
Netzteil
USB 3.0 Kabel (ein Ende Anschluss Typ A, anderes Ende Typ B; 100 cm) – für den An-
schluss an PC/NB
DVI to VGA Adapter
CD mit Treibern und Gebrauchsanweisung
Quick Start
SPEZIFIKATION
Unterstützung von USB 3.0 (Max. 5 Gbps), USB 2.0 (Max. 480 Mbps) – wir empfehlen die
Verwendung von PC/NB mit USB 3.0 Steckern
Verwendbare Stecker für die USB 3.0 Docking Station:
1x HDMI Stecker
1x DVI-I Stecker (mit mitgeliefertem DVI-VGA Adapter kann auch ein VGA Bildschirm
angeschlossen werden)
2x USB 3.0 Stecker Typ A – Anschluss von USB-Peripherien
4x USB 2.0 Stecker Typ A – Anschluss von USB-Peripherien
1x USB 3.0 Stecker Typ B – bestimmt für den Anschluss an einen USB Stecker von PC/
NB
1x Ethernet 10/100/1000 Mbps GigaLAN RJ-45 Stecker
1x 3,5mm Audio Ausgang für Kopfhörer – 2-Kanal-Ausgang 8-48kHz für 16bit
1x 3,5mm Eingang für Mikrofon – 2-Kanal-Eingang 8-48 kHz für 16bit
Netzteil: Eingang ~100 -240 V/50-60 Hz/1,6 A; Ausgang = 12V/4,0 A
Betriebstemperatur: 0-40°C
Lagerungstemperatur: - 10 bis zu + 80 °C
Umgebungsfeuchtigkeit: bis zu 85 %
DE
08
Page 9

BESCHREIBUNG VON DOCKING-STATION
Vorderpaneel: LED Power
Hinterpaneel – von links nach rechts:
1x Aufladungsanschluss, 1x USB 3.0 Stecker Typ B, 2x USB 3.0 + 4x USB 2.0 Stecker Typ
A, 1x HDMI Stecker, 1x DVI-I Stecker, 1x RJ45 Ethernet 10/100/1000 Mbps Stecker
SYSTEMANFORDERUNGEN
1) Hardwareanforderungen: PC, Notebook mit einem freien USB 3.0 Stecker. Falls Sie
USB 2.0/1.1 haben, wird die Übertragungsgeschwindigkeit beschränkt. Prozessor Intel
Pentium 1.2GHz und höher, 512MB RAM.
2) Betriebssystem: Windows XPSP3 / Vista 32_64 bit/ Win7/8 32_64 bit
3) Wenn Sie DVD an einem Zusatzbildschirm abspielen möchten, ist es erforderlich,
mindestens Prozessor Intel Pentium 2.0 und höher, 1 GB RAM und die Bildschirmauflö-
sung 800x600 und 16 Farben eingestellt zu haben.
Bemerkung:
a) Die Installation von Audio Stecker und USB Hubs (für USB 2.0 Stecker Typ A) erfolgt
systemautomatisch, andere Geräte – Stecker sind von der mitgelieferten CD zu installie-
ren
b) 10/100Mbps LAN Stecker sowie Video (Display) Stecker sind zuerst vor dem eigenen.
Anschluss der Docking-Station an den PC/NB von der mitgelieferten CD (oder Sie
können die Treiber von der Internetseite www.i-tec-europe.eu herunterladen) zu instal-
lieren und erst dann kann die Docking-Station angeschlossen werden.
INSTALATION IN WINDOWS XPSP3 / VISTA / 7 / 8 (VERSION 32_64BIT)
Schließen Sie die Docking-Station an PC/NB vor ihrer ersten Anwendung nicht an,
solange Sie die entsprechenden Treiber für den LAN und Video (Display) Stecker von
der mitgelieferten CD nicht installiert haben.
Die Gerätetreiber sind nur bei der ersten Verwendung zu installieren.
Legen Sie die CD mit Treibern ins Laufwerk ein (oder Sie können die Treiber von der
Internetseite www.i-tec-europe.eu herunterladen) und installieren Sie sie – setzten Sie
folgendermaßen fort:
Für LAN und Video (Display) Stecker – wählen Sie Installation von der CD, die Datei
Setup.exe aus dem Verzeichnis CD:/ – im System - Systemsteuerung-Netzadapter - wird
dann LAN als „USB 3.0 to Gigabit“ und Display: Systemsteuerung-USB Display Adapter als „DisplayLink Display Adapter“ und „USB Dual Head Display Adapter“ angezeigt.
Hinweis für die Installation von Video (Display) Stecker: Die Installation erfolgt in mehreren
Schritten.
Für Vista/7/8 BS führen Sie die Installation als Benutzer: Administrator durch und nach der
Installation starten Sie den PC/NB neu;
a) Der Bildschirm kann im Laufe der Treiberinstallation blinken, es ist ein Normalfall
b) Wir empfehlen nach dem Beenden der Treiberinstallation den Computer wieder neu zu
starten
Quick Start
DEUTSCH
DE
09
Page 10

i-tec USB 3.0 Dual Docking Station
HARDWARE-INSTALLATION
1) Schalten Sie den PC/NB ein und schließen Sie das Netzteil an die USB 3.0 Docking-
Station an – am Hinterpaneel der USB 3.0 Docking-Station.
2) Schließen Sie das USB 3.0 Kabel an den USB Stecker Typ B an – am Vorderpanel der
USB 3.0 Docking-Station.
3) Stecken Sie das Netzteil in die Steckdose von 230 V.
4) Schließen Sie das USB 3.0 Kabel an einen freien USB 3.0/2.0 Stecker von PC/NB an.
5) Danach wird die automatische Installation von Steckern in einzelnen Systemen gestar-
DEUTSCH
tet.
6) Starten Sie den PC/NB neu.
BEMERKUNG!
USB-Port zur Schnellaufladung: Dieser Port dient vor allem zur Aufladung von Geräten,
die eine Versorgung bis zu 2,1 A benötigen. Für andere Geräte sollte die Aufladung über
den Standard-USB-Anschluss reichen. Diese Geräte können über andere freie USB Porte
aufgeladen werden.
Apple iPad laden: Um das iPad laden zu können, müssen Sie das USB-Kabel vom PC
trennen und die DockingStation anschliessen.
FAQ
Frage: Das Tablett von Samsung wird nicht geladen.
Antwort: Einige Marken von Tablets werden von ihren Herstellern so geschützt, dass sie
nur mit Hilfe von originalen/lizenzierten Netzteilen aufgeladen werden können.
Weitere Informationen sind dem CD-Handbuch zu entnehmen.
DE
10
Page 11

Důležité!
Před samotnou instalací na USB 3.0 port se přesvědčte, že pro něj (pro USB 3.0 řadič
v NB/PC) máte nainstalovány poslední ovladače. V případě neaktuálních USB 3.0 ovladačů na Vašem notebooku se můžete setkat s problémy při instalaci nebo použití. Před
prvním připojením dokovací stanice k NB/PC je nutno ji nejprve nainstalovat
z přiloženého CD (ovladače naleznete také na www.i-tec.cz) a pak až připojit zařízení.
ÚVOD
Děkujeme za zakoupení i-tec USB 3.0 DUAL HD Video Docking Station with USB 3.0 HUB,
GigaLan, SoundCard. Jde o jednoduchou dokovací stanici s možností připojit veškeré Vaše
oblíbené periferie, jako např. plnohodnotnou klávesnici, hi-fi audio systém, internetový
modem/Ethernet, dva stolní displeje, atd. Všechny zmíněné produkty pak připojíte
k Vašemu notebooku v okamžiku jediným USB 3.0 kabelem. Jako zobrazovací zařízení
pak můžete využít prakticky jakýkoli displej, protože dokovací stanice je vybavena DVI-I
konektorem (s adaptérem na VGA) a HDMI pro moderní LCD a plazmové displeje a televizory. Grafický čip podporuje dokonce Full HD+ rozlišení (2048 x 1152 pixelů).
OBSAH BALENÍ
USB 3.0 Docking Station
Napájecí zdroj
USB 3.0 kabel (jeden konec konektor typ A, druhý konec typ B; 100 cm) – pro připojení
k PC/NB
DVI to VGA adaptér
CD s ovladači a manuálem
Quick Start
SPECIFIKACE
podpora USB 3.0 (max. 5 Gb/s), USB 2.0 (max 480 Mb/s) - doporučujeme použití PC/
NB s USB 3.0 porty
využitelné porty na USB 3.0 Docking Station:
1x HDMI port
1x DVI-I port (s přiloženým adaptérem DVI-VGA lze připojit i VGA monitor)
2x USB 3.0 port typ A – připojení USB periférií
4x USB 2.0 port typ A – připojení USB periférií
1x USB 3.0 port typ B- určen pro připojení k USB portu PC/NB
1x Ethernet 10/100/1000 Mb/s GigaLAN RJ-45 port
1x 3,5mm Audio výstup pro sluchátka – 2 kanál výstup 8-48 kHz na 16bit
1x 3,5mm vstup pro mikrofon – 2 kanál vstup 8-48 kHz na 16bit
napájecí adaptér: vstup ~100-240 V/50-60 Hz/1,6 A; výstup = 12 V/2,0 A
pracovní teplota: 0-40°C
skladovací teplota: -10 až +80 °C
vlhkost prostředí: do 85 %
POPIS DOCKING STATION
Přední panel: LED Power (Blue)
Zadní panel – zleva doprava:
Quick Start
ČESKY
CZ
11
Page 12

i-tec USB 3.0 Dual Docking Station
1x konektor pro napájení, 1x USB 3.0 port typ B, 2x USB 3.0 + 4x USB 2.0 port typ A, 1x
HDMI port, 1xDVI-I port, 1x RJ45 Ethernet 10/100/1000 Mb/s port
SYSTÉMOVÉ POŽADAVKY
1) Hardwarové požadavky: PC, Notebook s volným portem USB 3.0. Pokud máte USB
2.0/1.1 bude rychlost přenosů omezena. Procesor Intel Pentium 1.2 GHz a vyšší, 512
ČESKY
MB RAM
2) Operační systém: Windows XPSP3 / Vista 32_64 bit/ Win7 / 8 32_64 bit
3) Pro přehrávání DVD na přídavném monitoru je třeba mít minimálně procesor Intel Penti-
um 2.0 a vyšší, 1GB RAM a nastaveno rozlišení obrazovky 800 x 600 a 16 barev
Poznámka:
1) Instalace audio portů a USB hubu (pro USB 2.0 porty typ A) je automatická ze systému,
ostatní zařízení - porty se instalují z dodaného CD.
2) 10/100/1000Mb/s LAN port i Video (Display) porty je nutno poprvé instalovat před
vlastním připojením Docking Station k PC/NB z přiloženého CD (nebo si můžete stáh-
nout ovladače z webové stránky www.i-tec-europe.eu) a pak až připojit Docking station.
INSTALACE VE WINDOWS XPSP3 / VISTA / 7 / 8 (32_64BIT VERZE)
Nepřipojujte dokovací stanici před prvním použitím k PC/NB, dokud nenainstalujete
příslušné ovladače pro LAN a Video (Display) port z přiloženého CD.
Ovladače zařízení je třeba nainstalovat pouze při prvním použití.
Vložte CD s ovladači do mechaniky (nebo si stáhněte ovladače z webové stránky www.itec-europe.eu) a instalujte ovladače - postupujte následovně:
pro LAN i Video (Display) port – volte instalaci z CD soubor Setup.exe z adresáře na CD:/ v systému je pak LAN zobrazen ve Správce zařízení-Síťové adaptéry jako „USB 3.0 to
Gigabit“ a pro display: ve Správce zařízení-USB Display Adapters jako „DisplayLink
Display Adapter“ a „USB Dual Head Display Adapter“.
Poznámka pro instalaci Video (Display) portu: instalace bude následovat v několika krocích.
Pro Vista/7/8 OS instalujte jako uživatel Administrator a po instalaci restartujte PC/NB;
a) obrazovka může v průběhu instalace ovladačů problikávat, to je standardní proces
b) doporučujeme opětovný restart po dokončení instalace ovladačů
HARDWAROVÁ INSTALACE
1) Zapněte PC/NB a připojte napájecí adaptér k USB 3.0 Docking Station – zadní panel
USB 3.0 Docking Station.
2) Zapojte USB 3.0 kabel do portu USB typ B - na zadním panelu USB 3.0 Docking Stati-
on.
3) Zapojte napájecí zdroj do sítě 230 V.
4) Připojte USB 3.0 kabel k PC/NB do volného portu USB 3.0/2.0.
5) Následně se zahájí automatická instalace portů v jednotlivých systémech.
6) Restartujte PC/NB.
CZ
12
Page 13

UPOZORNĚNÍ!
Rychlonabíjecí USB port: Tento port je určen především pro nabíjení produktů, které
potřebují napájení až 2,1 A. Pro ostatní zařízení může být dostačující napájení z běžného
USB portu. Zařízení lze nabíjet v jiném volném USB portu.
Napájení tabletů Apple: U tohoto zařízení můžete nabíjet i Apple iPad tablety. Pro nabíjení je nutno odpojit USB kabel od PC a nechat zapojený napájecí zdroj k Docking Station.
FAQ
Otázka: Nenabíjí Samsung tablet.
Odpověď: Některé firmy chrání své značkové tablety tak, že se dají nabíjet jen originálním/
licencovaným napájecím zdrojem.
Další informace naleznete v manuálu na CD.
Quick Start
ČESKY
CZ
13
Page 14

i-tec USB 3.0 Dual Docking Station
Ważne!
Zalecamy sprawdzenie i zaktualizowanie sterowników USB 3.0. oraz firmware komputera
przed instalacją Dual Docking station. W przeciwnym razie można napotkać trudności z
prawidłowym zainstalowaniem sterowników lub funkcjonalnością urządzenia, wynikającą z
potencjalną możliwością wystąpienia niezgodności ze starszymi wersjami sterowników
USB 3.0 jakie mogą być zainstalowane w Twoim komputerze. Przed pierwszym
POLSKI
podłączeniem stacji dokującej do komputera / notebooka należy zainstalować sterowniki z dołączonej do opakowania płyty CD i dopiero wtedy podłączyć urządzenie.
Sterowniki można także znaleźć na www.i-tec.pl.
WSTĘP
Dziękujemy za wybór urządzenia „i-tec USB 3.0 DUAL HD Video Docking Station with USB
3.0 HUB, GigaLan, SoundCard“. Stacja dokująca pozwala w prosty sposób, za pomocą
jednego przewodu USB 3.0, podłączyć do laptopa większość potrzebnych urządzeń
peryferyjnych, jak na przykład dodatkową klawiaturę, zestaw głośników hi-fi, modem lub
przewód stałego łącza internetowego, zewnętrzny monitor itp. Dzięki zastosowanemu
złączu DVI oraz dodatkowym adapterom VGA oraz HDMI urządzenie pozwala na
podłączenie każdego monitora lub nowoczesnego telewizora plazmowego lub LCD, także
w technologii Full HD+, dzięki obsłudze rozdzielczości 2048x1152 pikseli.
ZAWARTOŚĆ OPAKOWANIA
USB 3.0 Docking Station Video
Zasilacz sieciowy
Przewód USB 3.0 (typ A –B; 100 cm)
Adapter DVI do VGA
CD (Sterownik i instrukcja)
Krótki podręcznik instalacji
SPECYFIKACJA
USB 3.0 (max. 5 Gb/s), USB 2.0 (max. 480 Mb/s) – zalecamy użycie PC/NB z portami
USB 3.0
użyteczne porty USB 3.0 Docking Station:
1x port HDMI
1x port DVI (z załączonym adapterem DVI-VGA- możiwość użycia monitora VGA)
2x porty USB 3.0 typu A – podłączanie urządzeń peryferyjnych USB
4x port USB 2.0 typu A- podłączanie urządzeń peryferyjnych USB
1x port USB 3.0 typu B - przeznaczony do podłączenia do PC/NB
1x Ethernet 10/100/1000 Mb/s GigaLAN RJ-45 port
1x wyjście 3,5mm Audio dla słuchawek – 2 kanały wejście 8-48 kHz na 16bit
1x wejście 3,5mm dla mikrofonu – 2 kanały wejście 8-48 kHz na 16bit
zasilacz: wejście ~100-240V/50-60Hz/1,6 A ; wyjście = 12 V/2,0 A
temperatura pracy: 0-40°C
temperatura przechowywania: -10 do +80°C
wilgotność: do 85 %
OPIS URZĄDZENIA
Panel Frontowy: Dioda LED zasilanie (niebieska)
Panel tylny – od lewej do prawej:
PL
14
Page 15

1x konektor zasilania, 1x USB 3.0 port typ B, 2x USB 3.0 + 4x USB 2.0 port typ A, 1x port
HDMI, 1x port DVI-I, 1x port RJ45 Ethernet 10/100/1000 Mb/s
WYMAGANIA SPRZĘTOWE
1) Wymagania sprzętowe: PC, Notebook z wolnym portem USB 3.0. Jeśli dostępny jest
port USB 2.0/1.1 prędkość przesyłu będzie niższa. Procesor Intel Pentium 1.2 GHz lub
szybszy, 512 MB RAM.
2) System operacyjny: Windows XPSP3/ Vista/ Win 7/Win 8 32_64 bit2
3) Aby odtwarzać DVD na dołączanym monitorze spełnione muszą zostać następujące
wymagania: CPU Dual-Core z zegarem 2 GHz, rozdzielczość wyświetlacza ustawiona na
800x600 z 16bitową paletą barw.
Uwaga:
a) Instalacja portu audio oraz koncentratora USB (dla portów USB 2.0 typu A) jest
przeprowadzana automatycznie przez system, inne porty urządzeń instaluje się z
dołączonego CD.
b) Instalację portu 10/100/1000 Mb/s LAN oraz portu Video (Wyświetlacz) należy
przeprowadzić przed podłączeniem Docking Station do PC/NB, korzystając z
dołączonego CD.
INSTALACJA W WINDOWS XPSP3/ VISTA/ W7/W8 32_64 BIT
Nie podłączaj docking station do PC/NB przed wcześniejszą instalacją odpowiednich
sterowników portów LAN oraz Video (Display) z dołączonej płyty CD.
Sterowniki należy zainstalować tylko przed pierwszym użyciem.
Włożyć dołączoną płytę CD do czytnika (lub pobrać je ze strony www.i-tec-europe.eu).,i
postępować jak niżej:
Instalacja LAN i VIDEO — Włożyć dołączoną płytę CD do czytnika, uruchomić program
Setup.exe znajdujący się w folderze \Driver następnie kliknąć NEXT aby kontynuować
instalację. W systemie Karta sieciowa LAN ukaże się jako „ USB 3.0 to Gigabit“ a Karta
grafiki jako „DisplayLink Display Adapter“ i następnie „USB Dual Head Display
Adapter“.
Informacja dot. instalacji VIDEO: instalacja będzie postępować w kilku krokach.
Dla Systemów Windows Vista/7/8 instalować jako administrator, a po instalacji wykonać
ponowne uruchomienie komputera;
a) ekran monitora może migać w trakcie instalacji sterownika, jest to standardowy proces
b) zalecamy ponowny restart po zakończeniu instalacji sterownika
PODŁĄCZENIE DO KOMPUTERA
1) Włącz PC/NB oraz podłącz zasilacz do tylnej części USB 3.0 Docking Station.
2) Podłącz kabel USB 3.0 do porty USB typu B w tylnej części USB 3.0 Docking Station.
3) Podłącz zasilacz do gniazda sieciowego 230 V.
4) Podłącz przewód USB 3.0 do komputera PC/NB do portu USB 3.0/2.0.
5) Nastąpi automatyczne kończenie instalacji sterowników.
6) Uruchom ponownie komputer.
Quick Start
POLSKI
PL
15
Page 16

i-tec USB 3.0 Dual Docking Station
UWAGA!
Port USB szybkiego ładowania: Ten port jest dedykowany do ładowania urządzeń
wymagających prądu 2,1 A. Dla innych urządzeń wystarczające są pozostałe porty.
Ładowanie tabletu Apple: Za pomocą urządzenia można ładować również tablety Apple,
należy w tym celu odłączyć od komputera kabel USB natomiast pozostawić podłączony
kabel zasilający Docking Station.
POLSKI
FAQ
Pytanie: Tablet Samsung się nie ładuje
Odpowiedź: Niektóre firmy chroniąc swoje markowe tablety umożliwiają ich ładowanie
jedynie za pomocą oryginalnych/licencjonowanych zasilaczy.
Dalsze informacje znaleźć można w instrukcji zamieszczonej na CD.
PL
16
Page 17

Dôležité!
Pred samotnou inštaláciou na USB 3.0 port sa presvedčte, že pre neho (pre USB 3.0 radič
v NB/PC) máte nainštalované posledné ovládače. V prípade neaktuálnych USB 3.0 ovládačov na Vašom notebooku sa môžete stretnúť s problémami pri inštalácii alebo použití. Pred
prvým pripojením dokovacej stanice k PC/NB je nutné ju najprv nainštalovať z priloženého CD (ovládače nájdete tiež na www.i-tec-europe.eu) a potom až pripojiť zariadenie.
ÚVOD
Ďakujeme za zakúpenie i-tec USB 3.0 DUAL HD Video Docking Station with USB 3.0 HUB,
GigaLan, SoundCard. Ide o jednoduchú dokovaciu stanicu s možnosťou pripojiť všetky
Vaše obľúbené periférie, ako napr plnohodnotnú klávesnicu, hi-fi audio systém, internetový
modem / Ethernet, dva stolové displeje, atď. Všetky spomínané produkty potom pripojíte k
Vášmu notebooku v okamihu jediným USB 3.0 káblom . Ako zobrazovacie zariadenie
potom môžete využiť prakticky akýkoľvek displej, pretože dokovacia stanica je vybavená
DVI-I konektorom (s adaptérom na VGA) a HDMI pre moderné LCD a plazmové displeje a
televízory. Grafický čip podporuje dokonca Full HD + rozlíšenie (2048 x 1152 pixelov).
OBSAH BALENIA
USB 3.0 Docking Station
Napájací zdroj
USB 3.0 kábel (jeden koniec konektor typ A, druhý koniec typ B; 100 cm) – pre pripoje-
nie k PC/NB
DVI to VGA adaptér
CD s ovládačmi a manuálom
Quick Start
ŠPECIFIKÁCIE
podpora USB 3.0 (max. 5 Gb/s), USB 2.0 (max. 480 Mb/s) - doporučujeme použitie PC/
NB s USB 3.0 porty
využiteľné porty na USB 3.0 Docking Station:
1x HDMI port
1x DVI-I port (s priloženým adaptérom DVI-VGA môžete pripojiť i VGA monitor)
2x USB 3.0 port typ A – pripojenie USB periférií
4x USB 2.0 port typ A – pripojenie USB periférií
1x USB 3.0 port typ B- určený pre pripojenie k USB portu PC/NB
1x Ethernet 10/100/1000 Mb/s GigaLAN RJ-45 port
1x 3,5mm Audio výstup pre slúchadlá – 2 kanál výstup 8-48 kHz na 16bit
1x 3,5mm vstup pre mikrofón – 2 kanál vstup 8-48 kHz na 16bit
napájací adaptér: vstup ~100-240 V/50-60 Hz/1,6 A; výstup = 12 V/2,0 A
pracovná teplota: 0-40°C
skladovacia teplota: -10 až +80 °C
vlhkosť prostredia: do 85 %
POPIS DOCKING STATION
Predný panel: LED Power
Zadný panel – zľava doprava:
Quick Start
SLOVENSKY
SK
17
Page 18

i-tec USB 3.0 Dual Docking Station
1x konektor pre napájanie, 1x USB 3.0 port typ B, 2x USB 3.0 + 4x USB 2.0 port typ A, 1x
HDMI port, 1xDVI-I port, 1x RJ45 Ethernet 10/100/1000 Mb/s port
SYSTÉMOVÉ POŽIADAVKY
1) Hardwarové požiadavky: PC, Notebook s voľným portom USB 3.0. Pokiaľ máte USB
2.0/1.1 bude rýchlosť prenosov obmedzená. Procesor Intel Pentium 1.2 GHz a vyšší,
512 MB RAM
2) Operačný systém: Windows XPSP3 / Vista 32_64 bit/ Win7 / 8 32_64 bit
3) Pre prehrávanie DVD na prídavnom monitore je treba mať minimálne procesor Intel
Pentium 2.0 a vyšší, 1GB RAM a nastavené rozlíšenie obrazovky 800 x 600 a 16 farieb
SLOVENSKY
Poznámka:
1) Inštalácia audio portov a USB hubu (pre USB 2.0 porty typ A) je automatická zo systé-
mu, ostatné zariadenia - porty sa inštalujú z dodaného CD.
2) 10/100/1000Mb/s LAN port i Video (Display) porty je nutné prvý krát inštalovať pred
vlastným pripojením Docking Station k PC/NB z priloženého CD (alebo si môžete
stiahnuť ovládače z webovej stránky www.i-tec-europe.eu) a až potom pripojiť Docking
station.
INŠTALÁCIA VO WINDOWS XPSP3 / VISTA / 7 / 8 (32_64BIT VERZIA)
Nepripájajte dokovaciu stanicu pred prvým použitím k PC/NB, dokiaľ nenainštalujete
príslušné ovládače pre LAN a Video (Display) port z priloženého CD.
Ovládače zariadenia je treba nainštalovať iba pri prvom použití.
Vložte CD s ovládačmi do mechaniky (alebo si stiahnite ovládače z webovej stránky www.itec-europe.eu) a inštalujte ovládače - postupujte nasledovne:
pre LAN i Video (Display) port – voľte inštaláciu z CD súbor Setup.exe z adresára na CD:/
- v systéme je potom LAN zobrazený v Správcovi zariadení-Sieťové adaptéry ako „USB 3.0
to Gigabit“ a pre display: v Správcovi zariadení-USB Display Adapters ako „DisplayLink
Display Adapter“ a „USB Dual Head Display Adapter“.
Poznámka pre inštaláciu Video (Display) portu: inštalácia bude nasledovať v niekoľkých
krokoch.
Pre Vista/7/8 OS inštalujte ako užívateľ Administrátor a po inštalácii reštartujte PC/NB;
a) obrazovka môže v priebehu inštalácie ovládačov preblikávať, to je štandardný proces
b) doporučujeme opätovný reštart po dokončení inštalácie ovládačov
HARDWAROVÁ INŠTÁLACIA
1) Zapnite PC/NB a pripojte napájací adaptér k USB 3.0 Docking Station – zadný panel
USB 3.0 Docking Station
2) Zapojte USB 3.0 kábel do portu USB typ B - na zadnom panely USB 3.0 Docking Station
3) Zapojte napájací zdroj do siete 230 V
4) Pripojte USB 3.0 kábel k PC/NB do voľného portu USB 3.0/2.0
5) Následne sa zaháji automatická inštalácia portov v jednotlivých systémoch
6) Reštartujte PC/NB.
SK
18
Page 19

UPOZORNENIE!
Rýchlonabíjací USB port: Tento port je určený predovšetkým pre nabíjanie produktov,
ktoré potrebujú napájanie až 2,1 A. Pre ostatné zariadenia môže byť dostačujúce napájanie
z bežného USB portu. Zariadenia môžete nabíjať v inom voľnom USB porte.
Napájenie Apple iPad tabletu: Pre nabíjanie Apple iPad tabletu je nutné odpojiť USB
kábel od PC a nechať zapojený napájací zdroj k Docking Station.
FAQ
Otázka: HUB nenabíja Samsung tablet.
Odpoveď: Niektoré firmy chránia svoje značkové tablety tak, že sa dajú nabíjať len
originálnym/licencovaným napájacím zdrojom.
Ďaľšie informácie, manuál nájdete na CD.
Quick Start
SLOVENSKY
SK
19
Page 20

i-tec USB 3.0 Dual Docking Station
Svarbus!
Prieš instaliaciją USB 3.0 porte įsitikinkite, kad jam (USB 3.0 perjungėjui NB/PC) turite
instaliuotus paskutinius valdiklius. Jeigu USB 3.0 valdikliai yra neaktualūs Jūsų nešiojamame kompiuteryje gali kirstis instaliacijos ir naudojimo programos. Prieš pirmąjį doc-
king stoties prijungimą prie kompiuterio/nešiojamo kompiuterio pirmiausia yra
būtina ją instaliuoti iš pridedamo CD (valdiklius rasite tinklalapyje www.i-teceurope.eu) ir tik po to prijungti įrenginį.
LIETUVOS
ĮVADAS
Dėkojame, kad įsigijote paprastą stotį „i-tec USB 3.0 DUAL HD Video Docking Station with
USB 3.0 HUB, GigaLan, SoundCard“. Tai paprasta dokingo stotis su bet kurių jūsų mėgiamiausių periferijų prijungimo galimybe, tokių kaip pilnavertės klaviatūros, hi -fi audio systemos, interneto modemo / Etherneto, stalo displėjaus ir pan. Visu paminėtus produktus
prijungsite prie savo nešiojamo kompiuterio nedelsiant vieninteliu USB 3.0 kabeliu. Kaip
ekraną po to galite naudoti bet kokį displėjų, kadangi dokingo stotis yra aprūpinta DVI
konektoriumi su adapteriu, kuris yra VGA ir HDMI ir skirtas moderniems LCD ir plazminiams displėjams bei televizoriams. Grafinis daviklis palaiko Full HD+ raišką (2048 x 1152
pikselių).
ĮPAKAVIME YRA
USB 3.0 Docking Station stotis
Maitinimo šaltinis
USB 3.0 kabelis (vienas galas konektorius tipo A, kitas tipo B; 100 cm) – prijungimui prie
PC/NB
DVI to VGA adapteris
CD su valdikliais ir vadovu
Quick Start
SPECIFIKACIJA
parama USB 3.0 (maks. 4 Gb/s), USB 2.0 (maks. 480 Mb/s) – rekomenduojame naudoti
PC/NB su USB 3.0portais
portai, kuriuos galima naudoti yra USB 3.0 Docking Station:
1x HDMI portas
1x DVI portas ( su pridėtu adapteriu DVI-VGA galima prijungti ir VGA monitorių)
4x USB 2.0 portas tipas A – prijungimas USB periferijų
2x USB 3.0 portas tipas A - prijungimas USB periferijų
1x USB 3.0 portas tipas B - skirtas prijungti prie USB porto PC/NB
1x Ethernet 10/100/1000 Mb/s LAN RJ-45 portas
1x 3,5mm Audio išeitis ausinėms– 2 kanalas išeitis 8-48kHz kai yra 16bitų
1x 3,5mm mikrofono įėjimas – 2 kanalas, įėjimas 8-48kHz kai yra 16bit
Maitinimo adapteris : įėjimas ~100-240V/50-60Hz/1,6 A; išeitis = 12 V/2,0 A
darbinė temperatūra: nuo 0 iki 40°C
laikymo temperatūra: nuo -10 iki +80°C
aplinkos drėgmė: iki 85 %
DOCKING STATION APIBŪDINIMAS
Priekinis panelis: LED Power
Užpakalinis panelis – iš viršaus į apačią:
LT
20
Page 21

1x konektorius maitinimui, 1x USB 3.0 portas tipas B, 2x USB 3.0 + 4x USB 2.0 portas tipas
A, 1x HDMI portas, 1xDVI-I portas, 1x RJ45 Ethernet 10/100/1000 Mb/s portas
SISTEMOS REIKALAVIMAI
1) Hardware reikalavimai: PC, nešiojamas kompiuteris su laisvu portu USB 3.0. Jeigu turite
USB 2.0/1.1 perdavimo greitis bus ribotas. Procesorius Intel Pentium 1.2GHz ir
aukštesnės versijos, 512 MB RAM
2) Operacinė sistema: Windows XPSP3 / Vista 32_64 bitų/ Win 7/ Win 8 32_64 bitų
3) DVD paleidimui papildomame monitoriuje yra būtina turėti bent Intel Pentium 2.0
procesorių arba aukštesnės versijos, 1GB RAM ir nustatytą ekrano raišką 800x600 ir 16
spalvų.
Pastaba:
a) Audio portų ir USB koncentratoriaus (USB 2.0. portams tipo A) instaliacija vyksta iš
sistemos automatiškai, kiti įrengimo portai instaliuojami iš pridėto CD
b) 10/100/1000Mb/s LAN portą ir Video (Display) portą yra būtina pirmą kartą instaliuoti
prieš Docking Station prijungimą prie PC/NB su pridėta CD (arba galite atsisiųsti
valdiklius iš tinklalapio: www.i-tec-europe.eu) ir tik po to prijungti Docking station
INSTALIACIJA PROGRAMOJE WINDOWS XPSP3/VISTA/WIN 7/WIN 8 (32_64BIT
VERSIJA)
Nejunkite docking station prie PC/NB prieš pirmajį naudojimą, iki tol, kol
nesuinstaliuosite atitinkamų valdiklių, skirtų LAN ir Video (Display) portui iš pridėto
CD.
Įrengimo valdiklius yra būtina instaliuoti tik prieš pirmajį naudojimą.
Įdėkite CD su valdikliais į mechaniką (arba atsisiųskite valdiklius iš tinklalapio: www.i-teceurope.eu) ir valdiklius instaliuokite – veikite taip:
dėl LAN i Video (Display) port – pasirinkite instaliaciją iš CD bylą Setup.exe iš adresyno
esančio CD:/ - po to sistemoje yra rodomas LAN Įrenginio administratorius- Tinklo
adapteriai, kaip „USB 3.0 to Gigabit“ o displėjui: ve Įrenginio administratorius -USB Display
Adapters, kaip „DisplayLink Display Adapter“ ir „USB Dual Head Display Adapter“.
Pastaba dėl Video (Display) porto instaliacijos – instaliacija atliekama keliais žingsniais.
Esančiai Vista/7/8 OS instaliuokite, kaip vartotojo Aministratorius, po instaliacijos
perkraukite kompiuterį PC/NB;
a) ekranas valdiklių instaliavimo metu gali blyksėti, tai yra standartinis procesas.
b) užbaigus valdiklių instaliaciją rekomenduojame perkrauti
HARDWAR INSTALIACIJA
1) Įjunkite kompiuterį PC/NB ir prijunkite maitinimo adapterį prie USB 3.0 Docking Station
– užpakalinio panelio USB 3.0 Docking Station
2) Prijunkite USB 3.0 kabelį į portą USB tipas B – užpakaliniame panelyje USB 3.0
Docking Station
3) Įjunkite maitinimo šaltinį į tinklą 230 V
4) Prijunkite USB 3.0 kabelį prie kompiuterio PC/NB laisvo porto USB 3.0/2.0
5) Po to atskiruose sistemose automatiškai prasidės portų instaliacija
6) Perkraukite kompiuterį PC/NB
Quick Start
LIETUVOS
LT
21
Page 22

i-tec USB 3.0 Dual Docking Station
PASTABA!
Greito įkrovimo USB portas: Šis portas, visų pirma, yra skirtas įkrovimui produktų,
kuriems reikalingas įkrovimas iki 2,1 A. Kitus įrengimus pakanka įkreuti iš įprasto USB
porto. Įrengimą galima įkrauti kitame laisvame USB porte.
Dėl Apple iPad planšetės įkrovimo yra būtina atjungti nuo PC USB kabelį ir palikti įjungtą
maitinimo šaltinį prie Docking Station.
FAQ
LIETUVOS
Klausimas: Neįkrauna Samsung planšetės.
Atsakymas: Kai kurios firmos saugo savo prekybinio ženklo planšetes taip, kad jas galima
įkrauti tik originaliame/su licencija maitinimo šaltinyje.
Išsamesnė informacija pateikta vadove, kurį rasite CD.
LT
22
Page 23

Important!
Avant l’installation même sur le port USB 3.0 port, vérifiez que vous avez déjà installé les
pilotes les plus récents (pour le contrôleur USB 3.0 dans l’ordinateur/portable). Au cas où
les pilotes USB 3.0 de votre ordinateur portable ne seraient pas mis à jour, vous pourriez
rencontrer des problèmes lors de l’installation ou lors de l’utilisation. Avant le premier
branchement de la station d’accueil sur l’ordinateur personnel ou l’ordinateur
portable, il faut, tout d’abord, l’installer du CD joint (à part cela, veuillez trouver
aussi les pilotes informatiques sur la page http://www.i-tec-europe.eu). Il ne faut que
brancher le dispositif après cela.
INTRODUCTION
Nous vous remercions d’avoir acheté la station d’accueil i-tec USB 3.0 DUAL HD Vidéo
avec USB 3.0 HUB, GigaLan, SoundCard. Il s’agit d’une station d’accueil simple, offrant la
possibilité de connecter tous vos périphériques préférés tels que par exemple clavier de
pleine valeur, système hi-fi audio, modem/Ethernet pour l’accès à l’Internet, deux écrans de
table, etc. Vous pouvez connecter tous les produits mentionnés à votre portable dans un
instant par l’intermédiaire d’un seul câble USB 3.0. Comme dispositif de visualisation, vous
pouvez utiliser n’importe quel écran, car la station d’accueil est munie d’un connecteur DVII (avec l’adaptateur pour VGA) et HDMI pour les écrans et les téléviseurs LCD et plasma
modernes.
CONTENU DE L’EMBALLAGE
Station d’accueil USB 3.0
Source d’alimentation
Câble USB 3.0 (une extrémité avec le connecteur du type A, l’autre extrémité avec le
connecteur du type B; 100 cm) – pour le raccordement à l’ordinateur/portable
Adaptateur DVI to VGA
CD pilotes et manuel
Quick Start
SPÉCIFICATION
support USB 3.0 (max. 5 Gb/s), USB 2.0 (max. 480 Mb/s) – nous recommandons
d’utiliser l’ordinateur/portable avec les ports USB 3.0
ports utilisables avec la station d’accueil USB 3.0:
1x port HDMI
1x port DVI-I (par l’intermédiaire de l’adaptateur DVI-VGA il est possible de
connecter le moniteur VGA)
2x ports USB 3.0 du type A – connexion des périphériques USB
4x ports USB 2.0 du type A – connexion des périphériques USB
1x port USB 3.0 du type B – destiné à la connexion au port USB de l’ordinateur/
portable
1x port Ethernet 10/100/1000 Mb/s GigaLAN RJ-45
1x 3,5 mm sortie Audio pour les casques – sortie à 2 canaux 8-48 kHz - 16bit
1x 3,5 mm entrée pour le microphone – entrée à 2 canaux 8-48 kHz - 16bit
Adaptateur d’alimentation: entrée ~100-240 V/50-60 Hz/1,6 A; sortie = 12 V/2,0 A
Température de travail: 0-40°C
Température de stockage: -10 jusqu’à +80 °C
Humidité du milieu: jusqu’à 85 %
Quick Start
FRANÇAIS
FR
23
Page 24

DESCRIPTION DE LA STATION D’ACCUEIL
Tableau antérieur: LED Power
Tableau postérieur – de la gauche vers la droite:
1x connecteur d’alimentation, 1x port USB 3.0 type B, 2x USB 3.0 + 4x ports USB 2.0 type
A, 1x port HDMI, 1x port DVI-I, 1x port RJ45 Ethernet 10/100/1000 Mb/s
EXIGENCES DU SYSTÈME
FRANÇAIS
1) Exigences Hardware: ordinateur, portable avec un port USB 3.0 libre. Si vous disposez
d’un port USB 2.0/1.1, la vitesse du transfert sera limitée. Processeur Intel Pentium 1.2
GHz et supérieur, 512 MB RAM
2) Système opérationnel : Windows XPSP3 / Vista 32_64 bit/ Win7 / 8 32_64 bit
3) Pour la lecture des DVD sur un moniteur secondaire, il faut disposer d’un processeur
Intel Pentium 2.0 au minimum ou supérieur, 1GB RAM et régler la résolution d’écran à
800 x 600 et 16 couleurs.
Note:
a) L’installation des ports audio et des concentrateurs HUB USB (pour les ports USB 2.0 du
type A) se fait automatiquement à partir du système ; les autres dispositifs – ports sont à
installer à partir du CD fourni.
b) Le port 10/100/1000Mb/s LAN et les ports Vidéo (Display) sont à installer pour la
première fois avant le raccordement même de la station d’accueil à l’ordinateur/portable
à partir du CD fourni (ou bien il est possible de télécharger les pilotes du site www.i-teceurope.eu) et après connecter la station d’accueil.
INSTALLATION SOUS WINDOWS XPSP3 / VISTA / 7 / 8 (VERSION 32_64BIT)
Lors de la première utilisation, ne pas connecter la station d’accueil à l’ordinateur/
portable avant d’installer les pilotes correspondants pour le port LAN et Vidéo
(Display) à partir du CD fourni. Les pilotes doivent être installés uniquement lors de
la première utilisation.
Insérer le CD pilotes dans le lecteur (ou bien télécharger les pilotes du site www.i-teceurope.eu) et installer les pilotes. Procéder de manière suivante:
Pour le port LAN et Vidéo (Display) – sélectionner l’installation à partir du CD, fichier
Setup.exe du dossier disponible sur le CD:/ - dans le système, LAN est visualisé sous
Administrateur de l’équipement - Adaptateurs de réseau comme «USB 3.0 to Gigabit» et
pour l’écran sous Administrateur de l’équipement - USB Display Adapters comme
«DisplayLink Display Adapter» et «USB Dual Head Display Adapter».
Note pour installation du port Vidéo (Display): l’installation se réalisera en plusieurs étapes.
Pour le système opérationnel Vista/7/8 procéder à l’installation en qualité d’utilisateur
Administrateur et après l’installation redémarrer l’ordinateur/portable;
a) au cours de l’installation des pilotes, l’écran peut clignoter ; il s’agit d’un processus
normal.
b) nous recommandons de redémarrer l’ordinateur après avoir terminé l’installation de
pilotes.
FR
24
Page 25

INSTALLATION HARDWARE
1) Allumer l’ordinateur/portable et connecter l’adaptateur d’alimentation au port USB 3.0 de
la station d’accueil – tableau postérieur USB 3.0 de la station d’accueil.
2) Brancher le câble USB 3.0 au port USB du type B – situé au tableau postérieur du port
USB 3.0 de la station d’accueil.
3) Brancher la source d’alimentation au réseau 230 V.
4) Brancher le câble USB 3.0 sur l’ordinateur/portable dans un port USB 3.0/2.0 libre.
5) Successivement, l’installation automatique des ports dans des systèmes singuliers
démarre.
6) Redémarrer l’ordinateur/portable.
REMARQUER
Le port USB de chargement rapide: Ce port se destine, avant tout, au chargement des
produits qui ont besoin d’une alimentation électrique jusqu’à 2,1 A. En ce qui concerne
d’autres dispositifs, il se peut qu’une alimentation en provenance d’un port USB habituel
suffise, en étant possible de charger le dispositif branché sur l’autre port USB qui soit libre.
Afin de charger la tablette iPad d’Apple, il faut débrancher le câble USB de l’ordinateur
personnel, en laissant la source d’alimentation branchée sur le Docking Station.
FAQ
Question: Mon concentrateur Ethernet ne fait pas charger la tablette Samsung.
Réponse: Malheureusement, en dépit de l’existence de la norme européenne relative à
l’unification des sources d’alimentation, il y a des entreprises qui protègent leurs produits
de marque de telle façon que on ne les puisse charger que par l’intermédiaire d’une source
d’alimentation d’origine/sous licence.
Vous trouverez d’autres informations dans le manuel sur le CD.
Quick Start
FRANÇAIS
FR
25
Page 26

Výrobce, Výrobca, Producent, Manufacturer: ComDis s.r.o., Kalvodova 2,
709 00 Ostrava - Mariánské Hory, Czech republic
tímto prohlašuje, že výrobek
Název, Názov, Nazwa, Product: i-tec USB 3.0 DUAL HD Video Docking Station with
USB 3.0 HUB GigaLan, SoundCard
Model, Model, Model, Model: U3DUALDOCKING / WS-UG39DK1
Určení, Určenie, opcje, determination:
Výrobek je určen pro přístrojové vybavení a jako příslušenství do počítačů.
Výrobok je určený pre prístrojové vybavenie a jako príslušenstvo do počítačov.
Produkt jest przeznaczony do współpracy z komputerem jako akcesorium.
Product is determined for using in PC as equipment.
splňuje tyto požadavky Directive 2004/108/EC; Directive 2006/95/EC:
spĺňa tieto požadavky Directive 2004/108/EC; Directive 2006/95/EC:
spełnia następujace wymagania: Directive 2004/108/EC; Directive 2006/95/EC:
meets the essential requirements according to Directive 2004/108/EC; Directive 2006/95/EC:
Pro Rádiové parametry, pre Rádiové parametre, dla parametrów Radiowych, for Radio
parameters:
EN 55022:2010; EN 61000-3-2:2006+A1:2009+A2:2009; EN 61000-3-3:2008
Pro EMC, pre EMC, dla Kompatybilności elektromagnetycznej, for EMC:
EN 55024:2010
Pro Elektrickou bezpečnost, pre Elektrickú bezpečnost´, dla Bezpieczeństwa, for Safety:
EN 60950-1:2006 + A11:2009
a že je bezpečný za podmínek obvyklého použití.
a že je bezpečný za podmienok obvyklého použitia.
oraz że jest produktem bezpiecznym przy standardowym wykorzystywaniu.
and that it is safety under conditions of standard application.
Doplňující informace, Doplňujúce informácie, Dodatkowe informacje, Additional information:
Identifikační značka, Identifikačná značka, Znak identyfikacyjny, Identification Mark:
Ostrava 31.1. 2013
Jednatel Ing.Lumír Kraina
Konatel Ing. Lumír Kraina
Nazwisko osoby upowaznionej
Name and Signature
CE
26
Prohlášení o shodě
Prehlásenie o zhode
Declaracja zgodności
Declaration of Conformity
týmto prehlasuje, že výrobok
deklaruje, że produkt
declares that this product
Page 27

Note: Marking is in compliance with EU Directive 2002/96/EC and EN50419
English
This equipment is marked with the above recycling symbol. It means that at the end of the
life of the equipment you must dispose of it separately at an appropriate collection point
and not place it in the normal domestic unsorted waste stream. This wil benefit the environment for all. (European Union only)
Deutsch
Dieses Produkt trägt das Recycling-Symbol gemäß der EU-Richtinie 2002/96/EC. Das
bedeutet, dass das Gerät am Ende der Nutzungszeit bei einer kommunalen Sammelstelle
zum recyceln abgegeben werden muss, (kostenloss). Eine Entsorgung űber den Haus-/
Restműll ist nicht gestattet. Dies ist ein aktiver Beitrag zum Umweltschutz. (Nur innerhalb
der EU)
Čeština
Toto zařízení je označeno výše uvedeným recyklačním symbolem. To znamená, že na
konci doby života zařízení musíte zajistit, aby bylo uloženo odděleně na sběrném místě,
zřízeném pro tento účel a ne na místech určených pro ukládání běžného netříděného
komunálního odpadu. Přispěje to ke zlepšení stavu životního prostředí nás všech. (Pouze
pro Evropskou unii)
Polski
To urządzenie oznakowane jest specjalnym symbolem odzysku. Pookresie użytkowania
trzeba je zwrócic do odpowiedniego punktu zbiörki i nie wolno umiestczać go razem z
nieposortowanymi odpadami. Takie dzialanie przyniese korzyść dla środowiska. (Tylko w
Unii Europejskiej)
Lietuvių
Šis gaminys yra pažymėtas specialiu atliekų tvarkymo ženklu. Baigus eksploataciją, gaminys turi būti atiduotas į atitinkamą surinkimo punktą ir negali būti šalinamas kartu su
nerūšiuojamomis atliekomis. Tokie Jūsų veiksmai prisidės prie aplinkos apsaugos. (Tiktai
Europos Sąjungoje)
Français
Ce dispositif est revêtu du marquage avec le symbole de recyclage indiqué ci-dessus. Ça
veut dire, qu'une fois découlée la vie utile dudit dispositif, vous vous voyez dans l'obligation
d'assurer, que le dispositif se trouve déposé en un respectif centre de collecte, dûment
établi à cette fin, et non en d'autres centres de ramassage qui soient destinés à déposer de
courants déchets municipaux non triés. De cette manière, on contribue considérablement à
une amélioration en matière d'environnement où nous vivons tous. (Seulement pour l'Union
Européenne).
European Union Only
WEEE
27
Page 28

ww.i-tec.cz www.i-tec.pl www.i-tec-europe.eu
 Loading...