

Page 1
PCI-E 2x M.2 Card
User guide • Gebrau chsanweisung • Mode d’emploi
Manual de instruc ciones • Manuale • Uživatels ká příručka
Instrukcje obsługi • U žívateľská príručka • Var totojo vadovas
Handleiding
P/N : PC E2M2
Page 2

EN Please read the entire instruction manual carefully. Detailed manual is
available on our website ww w.i-tec.cz/en/ in the tab „Manuals, drivers“. In case
of any iss ues, please c ontact our te chnical sup port at: suppor t@itecpr oduct.com
DE Bitte lesen Sie das gesamte Handbuch sorgfältig durc h. Die ausführliche
Gebrauchsanweisung ist auch auf unserer Webseite www.i-tec.cz/de/ unter
„Benutzerhandbücher, Treiber“ bei diesem Produkt zu finden. Wenn Sie Probleme
habe n, kontaktiere n Sie bitte uns er Suppor t-Tea m unter: sup port@ite cproduc t.com
FR Veuil lez lir e atten tiveme nt le ma nuel da ns son in tégralité . Un man uel dét aillé
est disponible sur notre site www.i-tec.cz/fr/ sous l'onglet " Manuels, pilotes". Si
vous avez des pro blèmes, veu illez contacter notre équipe suppor t à
support@itecproduct.com
ES Por favor, lea atentamente todo el manual. El manual detallado está
disponible en nuestro sitio web, www.i-tec.cz /es/ bajo la pestaña "Manuales y
controladores" de este producto. Si tiene algún problema, póngase en contacto
con nuestro equipo de soporte e n support@itecproduct.com
IT Leggere atte ntamente tut to il Libretto d’uso. Il Libretto d’uso è a disposizione
anche sulla scheda “Manuali e strumenti” del nostro sito web: www.i- tec.cz/it/.
In caso di problemi rivolgersi al supporto tecnico: support@ite cproduct.com
CZ Prosíme o pečlivé přečtení celého manuálu. Podrobný manuál je k dispozici na
našem w ebu ww w.i-tec. cz v záložc e „Manuál y, ovladače “ u tohoto pro duktu . V případě
problémů se můžete obrát it na naši tech nickou pod poru: supp ort@ite cproduc t.com
PL Upewnij się, że uważnie przeczytałeś instrukcji obsługi. Szczegółowy podręcznik
jest dostępny na naszej stronie internetowej w ww.i -tec.cz/pl/ w zak ładce
"Instrukcje, sterowniki". W razie jakichkolwiek problemów, skontaktuj się
z naszy m serwisem p od adresem: su pport@itecproduc t.com
SK Prosíme o dôkladné prečítanie celého manuálu. Podrobný manuál je k dis-
pozíci i tiež na našo m webe www.i -tec.cz v z áložke „Man uály, ovlada če“ pri tomto
produkte. V prípade problémov sa môžete obrátiť na našu technickú podporu:
support@itecproduct.com
LT Prašome įdėmiai perskaityti visą vadovą. Išsamų vadovą galite rasti mūsų
svetainėje www.i-tec.cz/en/ šio produk to skyrelyje „Manuals, drivers“. Iškilus
problemoms galite susisiekti su mūsų technine pagalba: support@itecproduct.com
NL Wij vrag en u vriend elijk om de vol ledige han dleiding zo rgvuldig d oor te lezen.
Een gedetailleerde handleiding van dit product is beschik baar op onze website
www.i -tec.cz/nl/ onder het tabblad "Handleidingen en drivers". Moc hten er
zich problemen voordoen kunt u contact opnemen met ons supportcenter via
support@itecproduct.com.
Page 3

PCI-E 2x M.2 Card
ENGLISH..................................................... 04–05
DEUTSCH.................................................... 06–07
FRANÇAIS................................................... 08–10
ESPAÑOL..................................................... 11–12
ITALIANO..................................................... 13–14
ČESKY..........................................................15–16
POLSKI.........................................................17–18
SLOVENSKY.................................................19–20
LIETUVOS.....................................................21–22
NEDERLANDS............................................. .23–24
WEEE............................................................25–26
Declaration of Conformity................................. 27
FCC..................................................................... 28
www.i-tec.cz/en
Page 4

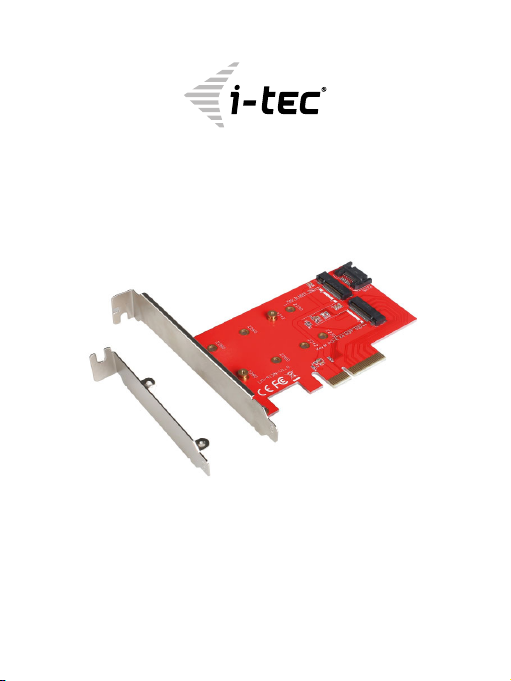
PCI-E 2x M.2 Card
INTRODUCTION
Internal PCI-E card for your desktop computer. Add fast SSD disk format M.2
to your system. The card has one slot for M.2 SATA discs and one slot for M.2
PCI-E discs.
SPECIFICATION
• Allows simultaneous connec tion of M.2 SSD, 1x B key and 1x M key NGFF
SSD via P CI-E 4X inter face
• Complies with PCI E xpress M.2 Specification 1.0.
• Complies with SATA 3.0 specification for the B key
• Complies with PCI -E 4X 3.0 specification for M key
• Support fo r data transfer speeds of up to 6 Gbps
• Support fo r SATA-based B key and PCI-E 4X-based M key NGFF SSD
• Support fo r sizes 2230, 2242, 2260, 2280 NGFF SSD
• Support fo r booting
• Support for Windows 7 32/64bit, Windows 8 32/64bit, Windows 8.1
32/64bit, Windows 10 32/64bit, Linux
CONNECTORS
• 1x connector for SATA-based B key NGFF SSD
• 1x SATA connector to the mother board
• 1x connector for PCI- E 4X-based M key NGFF SSD
PACKAGE CONTENTS
• i-tec PCI-E 2x M.2 Card
• Low profile backplate
• SATA cable
• Mount kit
• Manual
SYSTEM REQUIREMENTS
• Pentium compatible PC with a free PCIe 4X slot
• OS Windows 7 32/64bit, Windows 8 32/64bit, Windows 8.1 32/64bit,
Windows 10 32/64bit, Linux
DESCRIPTION OF THE DEVICE
PCIe card enabling connection to M.2 SSD. SATA-based B key and PCI-E
4X-based M key NGFF SSD, both individually and simultaneously.
HARDWARE INSTALLATION
1.
Turn off your PC and conn ected devices.
2.
Disco nnect power from the PC.
3.
Remove the cover of the PC.
4.
Remove the cover of the free PCIe slot.
|
4
ENGLISH
Page 5

Quick Start
5.
Inser t the appropriate M.2 SSD into the appropriate slot.
6.
Inser t the PCIe card into the appropriate slot.
7.
In case SATA-based B key NGFF SSD is inser ted, also connect SATA cable
to the SATA connector on the PCIe card and the other end to a free SATA
connector o n the motherboard.
8.
Attach the PCIe card with the screw.
INSTALLATION
Card is i nstalled to th e operating s ystem automatical ly. Connecte d M.2 SSD are
displayed as additional units. In case a new, unformatted M.2 SSD is inserted,
you must first format it in the D isk Administrator.
FORMATING NEW M.2 SSD
1.
Right-click on "My Compute r".
2.
Select "Manage".
3.
Click o n "Disk Management”
4.
Select the "Unassigned" SSD with stated c apacity of the inserted disc
(shown by several o rders less).
5.
Right -click on t he area of the d isk and sele ct "New Simp le Volume", cli ck "Next ".
6.
Keep the volume size to ma ximum and click "Next".
7.
Select "Assign a drive letter" and click "Next".
8.
Select "Format this volume with the followin g settings" ( leave the default).
Click " Next" and " Finish".
9.
The SSD will be formatted. Formatting time depends on the size of the SSD,
the SSD is then visible in the system.
USING M.2 SSD AS A BOOT DISK
M.2 SSD can be used to install the operating system. In this case, follow the
instructions of the installer of the appropriate operating system. Also set the
appropriate disk as a boot in the motherb oard BIOS.
SAFETY INSTRUCTIONS
• Do not expose to extre me temperatures and air humidity.
• Use the device on flat surfaces – you will prevent it from slipping and
falling to the ground.
• Save the user manual for a possible use later.
In coop eration with the service department:
• Check functionality after falling to water or to the ground.
• Check functionality when the cover is broken.
• Send the device back if it does not work in ac cordance with the user
manual.
FREQUENTLY ASKED QUESTIONS
Available on our website ww w.i-tec.cz /e n/ on the "FAQ" tab of this product.
ENGLISH
|
5
Page 6

PCI-E 2x M.2 Card
EINLEITUNG
Inter ne PCI- E Karte fü r Ihren Des ktop- PC. Erw eitern Si e Ihr Syste m um eine sc hnelle
SSD Fes tplatte im For mat M.2. Die Ka rte verfügt übe r nur einen Steckp latz für M.2
SATA Festpla tten und ein en Steckplatz fü r M.2 PCI-E F estplatte n.
SPEZIFIKATION
• Ermöglicht gleichzeitigen Anschluss von M.2 SSD, 1x B key und 1x M key
NGFF SSD über P CI-E 4x Schnittstelle
• Entspricht PCI Express M.2 Spezifi kation 1.0
• Entspricht SATA 3.0 Spezifikation für B key
• Entspricht PCI-E 4x 3.0 Spezifikation für M key
• Unterstützung von Datenübertragung bis zu 6 Gbps
• Unterstützung von SATA-based B key und PCI-E 4x- based M key NGFF S SD
• Unterstützung von NGFF SSD- Größen 2230, 2242 , 2260, 2280
• Bootunterstützung
• Unterstützung von Windows 7 /8 / 8.1/10 32/64bit, L inux
STECKER
• 1x Stecker für SATA-based B key NGFF SSD
• 1x SATA Stecker für den Anschluss an Motherboard SATA
• 1x Stecker für PCI-E 4x-based M key NGFF SSD
LIEFERUMFANG
• i-tec PCI-E 2x M.2 Card
• Stopfe n für flache Gehäusen
• SATA Kabel
• Montageset
• Gebrauchsanweisung
SYSTEMANFORDERUNGEN
• Pentium kompatibel PC mit freiem PCIe 4x Steckplatz
• BS Windows 7 / 8 / 8.1 / 10 32/64bit, Linux
GERÄTEBESCHREIBUNG
Die PC Ie Karte er möglicht d en Anschl uss von M.2 SSD. S owohl SATA-bas ed B key
als auc h PCI-E 4x- based M key NGFF S SD. Sowohl einzeln als auch gleichzeitig.
HARDWAREINSTALLATION
1.
Schalten Sie den PC und die angeschlossenen Geräte aus.
2.
Schalten Sie die PC Versorgung ab.
3.
Demontieren Sie den PC Deckel.
4.
Beseitigen Sie den Deckel vom freien PCIe Steckplatz.
5.
Lege n Sie die betr effende M .2 SSD Festp latte in de n entsprec henden S teckpla tz ein.
6.
Legen Sie die P CIe Karte in den entsprechenden Steckplatz e in.
7.
Falls SATA- based B key NGFF S SD eingele gt ist, schl ießen Sie das SATA-Kab el
|
6
DEUTSCH
Page 7

Quick Start
an den SATA-Stecker von der PCIe-Karte und das andere Ende an freien
SATA-Stec kplatz des Mother boards an.
8.
Befestigen Sie die P CIe Karte mit Hilfe von Schraube n.
INSTALLATION
Die Karte wird vom Betriebssystem automatisch installier t. Die
angeschlossenen M.2 SSD Festplatten sind als weitere Einheiten angezeigt.
Falls eine neue unformatierte M.2 SSD Festplatte eingelegt ist, ist es nötig, sie
zuerst zu formatieren, und zwar mit Hilfe von Festplatten-Manager.
FORMATIERUNG EINER NEUEN M.2 SSD FESTPLATTE
1.
Klicken Sie mit der rechten Maustaste auf „Mein Computer“.
2.
Wählen Sie „B earbeiten“.
3.
Klicken Sie auf „Festplatten-Manager“.
4.
Wähle n Sie die S SD Festp latte , bei der „ Nicht z ugeor dnet “ und die a ngege bene K apazit ät
der ei ngelegte n Festplatt e (es wird u m ein paar Reih en wenige r angezeigt) s teht.
5.
Klicken Sie mit der rechten Maustaste auf den Bereich der Festplatte und
wählen Sie „Neuer einfacher Verbund“, klicken Sie auf „Weiter“.
6.
Die Verbundgröße lasse n Sie auf Maximum und k licken Sie auf „Weiter “.
7.
Wählen Sie „Buchs tabe der Einheit zu ordnen“ und klicken Sie auf „Weiter“.
8.
Wählen Sie „Verbund mit folgenden Einstellungen formatieren“ (lassen Sie
die Werkseinstellunge n). Klicken Sie auf „Weiter“ und „Beenden“.
9.
SSD wir d formatier t. Die For matierun gszeit ist von d er SSD- Größe abhä ngig,
danach ist SSD im Sys tem sichtbar.
VERWENDUNG VON M.2 SSD ALS BOOTFESTPLATTE
M.2 SSD k ann für Be triebssy steminst allation v erwend et werden . In diesem Fa lle
gehen Sie nach Installationsanweisungen des betreffenden Betriebssystems
vor. Im BIOS des Motherboards ist auch die entsprechende Festplatte als
Bootfestplatte einzustellen.
SICHERHEITSHINWEISE
• Setze n Sie das Gerät keinen extremen Temperaturen und Feuchtigkeit aus.
• Verwenden Sie das Gerät auf flachem Untergrund, um zu verhindern, dass
es rutscht und auf de n Boden fällt .
• Bewahren Sie das Handbuch zur späteren Verwendun g auf.
In Zusammenarbeit mit der Serviceabteilung:
• Überprüfen Sie die Funk tionalität, nachdem das Gerät ins Wasser oder auf
den Boden gefalle n ist.
• Überprüfen Sie die Funk tionalität bei Beschädigung der A bdeckung .
• Rekl amieren Si e Geräte, di e nicht so fu nktioni eren wie im H andbuch s beschri eben.
HÄUFIG GESTELLTE FRAGEN
Verfügbar auf unserer Webseite www.i-tec.cz/de/ auf der Registerkarte „FAQ“
dieses Produkts.
DEUTSCH
|
7
Page 8

PCI-E 2x M.2 Card
L’ENTRÉE EN MATIÈRE
Carte PCI-E inte rne pour votr e ordinateur de bure au. Ajoutez à votre sys tème un
disqu e SSD haute vite sse dans le for mat M.2. La ca rte dispose d ’une fente po ur
disques M.2 SATA et d’une fente pour disqu es M.2 PCI-E .
SPÉCIFICATION
• Possibilité de brancher en même temps M.2 SSD, 1x B key et 1x M key NGFF
SSD à travers l’interface PCI-E 4X
• Tout en remplissant la spéci fication PCI E xpress M.2 1.0.
• Tout en remplissant la spéci fication SATA 3.0 pour B key
• Tout en remplissant la spéci fication PCI -E 4X 3.0 pour M key
• Support de la transmission des données jusqu’à 6 Gbps
• Support de SATA-based B key et P CI-E 4X-based M key NGFF SSD
• Support des tailles 2230, 2242, 226 0, 2280 NGFF SSD
• Support de l’amorçage (boot)
• Support de Windows 7 / 8 / 8.1 / 10 32/64bit, Linux
CONNECTEURS
• 1x connecteur pour SATA-based B key NGFF S SD
• 1x connecteur SATA pour connexion à la carte mère
• 1x connecteur pour PCI-E 4X-based M key NGFF SSD
CONTENU DE L’EMBALLAGE
• i-tec PCI-E 2x M.2 Card
• Bouchon d’aveuglement pour d es tours à bas profil
• Câble SATA
• Jeu pour montage
• Guide d ’instructions e t mode d’emploi
EXIGENCES EN MATIÈRE DU SYSTÈME
Pentium compatible PC ave c la fente PCIe 4X désocc upée
OS Windows 7 / 8 / 8.1 / 10 32/64bit, Linux
DESCRIPTION DU DISPOSITIF
La carte PCIe rend possible le branchement du M.2 SSD. C’est-à-dire du SATAbased B key, ainsi que du PCI-E 4X-based M key NGFF SSD. Individuellement,
aussi bien que simultanément.
L’INSTALLATION DU MATÉRIEL (HARDWARE)
1.
Tout d’abord, il faut procéder à la mise de votre ordinateur de bureau (PC),
ainsi que des périphériques branc hés, hors service.
2.
Dans la suite, il est nécessaire de procéder à la déconnexion de votre
ordinateur de bureau (PC) de l’alimentation .
3.
Aussitôt après, il faut procéder au démontage du couvercle de votre
ordinateur de bureau (PC).
|
8
FRANÇAIS
Page 9

Quick Start
4.
Ensuite, il es t nécessaire d’enlever la paupière de la fente PCIe qui soit libre.
5.
Dans la s uite, il fa ut insér er le resp ectif M. 2 SSD dans l a fente cor respo ndante.
6.
Après, il est nécessaire d’insérer votre carte PCIe dans la fente
correspondante.
7.
Dans l’hypothèse où aurait été inséré le SATA-based B key NGFF SSD, il
faudra aussi branc her le câble SATA sur le connecteur SATA sur votre carte
PCIe et l’autre bout sur le connecteur SATA qui se trouve désoccupé sur la
carte mère.
8.
Finalement, il faut fixer votre carte PCIe par l ’intermédiaire de vis.
L’INSTALLATION
C’est que la carte s’installera automatiquement au système d’exploitation.
Les disques M.2 SSD branchés seront affichés en tant que d’autres unités. En
cas d’insertion d’un nouveau M.2 SSD encore non formaté, tout d’abord, il est
inévitable de le for mater dans le Gestionnaire de disques.
FORMATAGE DE VOTRE NOUVEAU M.2 SSD
1.
Avec le bouton-poussoir à droite, veuillez cliquer sur « Mon ordinateur », s’il
vous plaît.
2.
Veuillez choisir « Gé rer », s’il vous plaît.
3.
Veuillez cliquer, s’il vous plaît, sur « Gestionnaire de disques ».
4.
Veu ill ez c hoi sir, s’i l vou s pl aît , le SSD, che z le que l on t rou ve l ’in dic ati on « N on
alloué » et la capacité indiquée du disque inséré (d’habitude, il s’affiche de
quelques ordres de moins).
5.
Avec le bouton-poussoir à droite, veuillez cliquer, s’il vous plaît, sur la
partition du disque et choisissez « Nouveau volume simple », et après,
veuillez cliquer, sur « Suivant ».
6.
Veuillez laisser la taille du volume au maximum et veuillez cliquer, sur «
Suivant », s’il vous plaît.
7.
Veuillez cho isir, s’il vous plaît, « All ouer la le ttre de l ’unité » et après, v euillez
cliquer sur « Suivant ».
8.
Veuillez choisir, s’il vous plaît, « Formater le volume avec la configuration
suivante » (veuillez laisser la configuration initiale, s’il vous plaît). Veuillez
cliquer sur « Suivant » et sur « Terminer ».
9.
Il se produira le formatage du SSD. La duration du formatage varie en
fonction de la taille du SSD. Une fois le formatage achevé, le SSD est visible
dans le système.
L’UTILISATION DU M.2 SSD EN TANT QUE D’UN DISQUE D’AMORÇAGE
Il est po ssible d’ut iliser le M.2 SSD pour l’install ation du systè me d’exploi tation.
Si tel est le cas, veuillez suivre, s’il vous plaît, les instructions d’installation du
respectif système d’exploitation. Dans le BIOS de la carte mère , veuillez aussi
configurer le respectif disque comme un disque d ’amorçage.
FRANÇAIS
|
9
Page 10

PCI-E 2x M.2 Card
INSTRUCTIONS DE SÛRETÉ
• Ne pas exposer aux températures extrêmes ni à l’humidité d’air.
• Veuillez utiliser, s’il vous plaît, des dessous (fonds) plats p our y poser le
dispositif – pour éviter so n glissement et tombée à terre.
• Veuillez gard er, s’il vous plaît, le prése nt Guide d’instructions et mode
d’emploi pour son éventuelle utilisation postérieure.
Veuillez collaborer, s’il vous plaît, avec le Département de Service :
• Pour vérifier le bon et co rrect fonctionnement du dispositif après une
tombée à l’eau ou à terre.
• Pour vérifier le bon et co rrect fonctionnement quand le couvercle montre
une rupture.
• Pour procéd er à une réclamation du dispositif qui ne fonctionne pas
conformément au p résent Guide d’instructions et mode d’emploi.
RÉPONSES AUX QUESTIONS FRÉQUEMMENT POSÉES
À votre disposition sur notre page web www.i-tec.cz/fr/, où se trouvent sous
l’onglet de « FAQ » qui correspondent au respectif pro duit.
10
|
FRANÇAIS
Page 11

Quick Start
INTRODUCCIÓN
La tarjeta PCI-E interna para tu computadora de escritorio. Agrega a tu sistema
un disc o rápido SSD e n el formato M .2. La tarje ta dispone d e una ranura p ara los
discos M.2 SATA y de una otra ranura para los discos M.2 PCI-E.
ESPECIFICACIÓN
• Hace posible la conexión simultánea de M.2 SSD, 1x B key y 1x M key NGFF
SSD a través de la interfaz PCI -E 4X
• Cumple con la especificación PCI Express M.2 1.0.
• Cumple con la especificación SATA 3.0 para B key
• Cumple con la especificación PCI-E 4X 3.0 para M key
• Soporte de la transmisión de los datos hasta 6 Gbps
• Soporte de SATA-based B key igual que de PCI-E 4X-based M key NGFF SSD
• Soporte de los tamaños 2230, 2242, 226 0, 2280 NGFF SSD
• Soporte del arranque ( booting)
• Soporte de Windows 7 / 8 / 8.1 / 10 32/64bit, Linux
CONECTORES
• 1x conector para SATA-based B key NGFF SSD
• 1x conector SATA para la conexión a la placa base
• 1x conector para PCI- E 4X-based M key NGFF SSD
CONTENIDO DEL EMBALAJE
• i-tec PCI-E 2x M.2 Card
• Brida c iega para cajas-torres tipo desktop slim de per fil bajo
• Cable SATA
• Juego para el montaje
• Manual de instrucciones y modo de empleo
REQUISITOS RELATIVOS AL SISTEMA
Ordenador (PC) Pentium c ompatible con una ranura PCIe 4X que esté libre
Sistema operacio nal Windows 7 / 8 / 8.1 / 10 32/64bit, Linux
DESCRIPCIÓN DEL PRODUCTO
Se trata de una tarjeta PCIe que facilita la conexión de M.2 SSD. Tanto de SATA-based B key, como de PCI-E 4X-based M key NGFF SSD. Y tanto individualmente como simultáneamente.
INSTALACIÓN DE HARDWARE
1.
Primero procede, por favor, a la puesta fuera de marcha de tu computadora
personal (P C) igual que de todos los dispositivos periféricos conectados.
2.
Luego hay que cortar la alimentación de tu PC.
3.
Segu idamente de spués hac e falta desmo ntar la tapa d e cubier ta de tu ordena dor.
4.
Lueg o es necesario quit ar la tapa de cub ierta de la respe ctiva ranura P CIe libre.
5.
Seguidamente después se debe insertar el respectivo M.2 SSD en la ranura
correspondiente.
ESPAÑOL
|
11
Page 12

PCI-E 2x M.2 Card
6.
Después se de be meter también la tarjeta PCIe e n la respectiva ranura.
7.
En el caso de que e l SATA-based B key NGFF SSD esté metido, se rá necesario
con ecta r tamb ién e l cabl e SATA al c onec tor SATA e n la ta rjeta PCIe y c onec tar
su otra extremidad al conector S ATA que quede libre e n la placa base.
8.
Finalmente se debe fijar la tarjeta P CIe por medio del tor nillo.
INSTALACIÓN
Es que la tarjeta se instala automáticamente en el sistema operacional. Los M.2 SSD se
visua lizan como o tras unidad es. En el caso d e que quede in sertado u n nuevo M.2 SSD to davía no f ormate ado, ante to do es inev itable f ormate arlo, y es o en el Admi nistra dor de dis cos.
COMO FORMATEAR UN NUEVO M.2 SSD
1.
Prime ro hay que cliquear con el botón derecho e n “Mi PC”.
2.
Luego es necesario seleccionar “Administrar ”.
3.
Seguidame nte después se debe hacer u n clic en el “Admin istrador de discos ”
4.
Se debe elegir el respectivo SSD, en el que está indicado “No asignado” e indicada la
respe ctiva cap acidad de l disco ins erido (se su ele visu alizar de al gunos or denes me nos).
5.
Luego se debe cliquear por el pulsador derecho en la par tición del disco y
seleccionar “Nuevo volumen simple” y hacer un clic en “Siguiente”.
6.
Es nec esario dej ar el tamañ o del volume n en el máxim o y clicar en “ Siguient e“.
7.
Segu idamente d espués, se leccio na “Asignar la l etra a la unid ad“ y haz un cl ic
en “Siguiente“, por favor.
8.
Después es necesario elegir “Formatear el volumen con la configuración
predeterminada” (deja la confi guración inicial, por favor). Luego haz un clic
en “Siguiente“ y “Terminar”.
9.
Tu SSD va formateándose. La duración del formateado depende del tamaño
de tu SSD. U na vez acabado el for mateado, tu S SD será visib le en el sistem a.
UTILIZACIÓN DE TU M.2 SSD EN CALIDAD DE DISCO DE ARRANQUE
Se pu ede usa r tu M.2 SS D para in stalar e l siste ma oper ativo. E n este cas o proce de, po r
favor, si guiendo l as respect ivas instru cciones p ara tu sistem a operativ o. En el BIOS de
la plac a base tambi én ajusta , por favor, el respecti vo disco com o un disco de a rranque .
INSTRUCCIONES DE SEGURIDAD
• No expo nga el dispositivo a temperaturas extremas y a la hume dad del aire.
• Utili ce el dispo sitivo en su perficie s planas, e vite que pue da desliz arse y caer a l suelo.
• Conse rve el manual para un eventual uso en el futuro.
En colaboración con el depar tamento de servicio técnico:
• Verifi que el funcionamiento tras una caída al agua o al suelo.
• Compruebe el funcionamiento en caso de que la cubier ta esté agrietada.
• Formule una reclamación del dispositivo según lo indicado en el manual.
FAQ
Dispo nible en nu estra pági na web www. i-tec.cz /es/, en la pesta ña "FAQ" de este p roducto.
12
|
ESPAÑOL
Page 13

INTRODUZIONE
Sche da PCI- E per arr icchi re compu ter da tavo lo di altr i dischi r igidi e vel oci SSD d i formato
M.2. La s cheda di spone di un o slot per di schi M.2 SATA e di uno s lot per dis chi M.2 PCI -E.
SPECIFICAZIONI TECNICHE
• La scheda permette il collegamento contemporaneo dei dischi rigidi M.2
SSD, 1 B key e 1 M key NGFF SSD, tramite l’interfaccia PCI-E x4.
• Soddisfa PCI Express M.2, specifi ca 1.0.
• Soddisfa SATA 3.0, specifica per B key.
• Soddisfa PCI-E x4 3.0, specifi ca per M key.
• Supporta la trasmissione di dati fino a 6 Gbps.
• Supporta B key basato su SATA e M key NGFF SSD basato su PCI-E x4.
• Supporta le seguenti lunghezze NGFF SSD: 2230, 2242, 2260 e 2280.
• Supporta il booting.
• Supporta Windows 7 / 8 / 8.1 / 10 32/64bit e Linux
CONNETTORI
• 1x connettore B key NGFF SSD basato su SATA
• 1x connettore SATA per collegare la sche da madre
• 1x connettore M key NGFF SSD basato su x4 PCI-E
CONTENUTO DELLA CONFEZIONE
• i-tec PCI-E 2x M.2 Card
• Piastra di chiusura per case PC a basso profilo
• Cavo SATA
• Kit di montaggio
• Libretto
REQUISITI DI SISTEMA
PC compatibile con Pentium e avente uno slot x4 PCI-E libero
SO Windows 7 / 8 / 8.1 / 10 32/64bit e Linux
DESCRIZIONE DEL DISPOSITIVO
Ques ta scheda P CI-E faci lita il coll egament o disgiunto o c ongiunto d ei dischi S SD
di tipo M.2 con B key basato su SATA o con M key NGFF SSD basato su x4 PCI- E
INSTALLAZIONE DELL’HARDWARE
1.
Spegnere il computer e i dispositivi connessi.
2.
Scollegare il cavo di alime ntazione del PC.
3.
Togliere il telaio del PC.
4.
Eliminare la piastra di chiusura dallo slot PCI-E libero.
5.
Inserire il rispettivo hard disc M.2 SSD nel suo slot.
6.
Inserire la scheda PCI- E nel suo slot.
7.
Dopo av er installato il disc o rigido con B key NGFF S SD basato su SATA,
inser ire un’estre mità del cavo SATA nello slot SATA della sc heda PCI- E e l’altra
estre mità nello sl ot SATA libero dell a scheda madre.
8.
Fissare la scheda PCI-E con le rispettive viti.
Quick Start
ITALIANO
|
13
Page 14

PCI-E 2x M.2 Card
INSTALLAZIONE
La scheda viene installata automaticame nte nel sistema operativo. I dischi
M.2 SSD connessi vengono visualizzati come altre unità del computer. Qualora
venga inserito un nuovo disco M.2 SSD non formattato, occor re entrare nella
Gestione dischi e format tarlo.
FORMATTAZIONE DI UN NUOVO DISCO M.2 SSD
1.
Cliccare con il pulsante destro del mouse sull’icona “Computer”.
2.
Cliccare sulla voce “Gestione computer”.
3.
Cliccare sulla voce “Gestione dischi”.
4.
Selezionare il disco rigido SSD che ripor ta la scritta “Non inizializzato”
assieme all’informazione sulla sua capacità (può essere visualizzato un
valore molto inferiore).
5.
Cliccare con il pulsante destro del mouse sul campo del disco e scegliere la
voce “Nuovo volume se mplice” e poi su “Altro”.
6.
Lasciare il volume al valore massimo e cliccare su “Altro”.
7.
Selezionare la voce “Abbinare la lettera dell ’unità” e cliccare su “Altro”.
8.
Selezionare la voce “For mattare l’unità con seguente impostazione”
(lasciare l’impostazione di partenza) e c liccare su “Altro” e su “F inire”.
9.
A questo punto si avvia la formattazione del disco rigido SSD. La durata
della formattazione dipende dalla dimensione del disco rigido, dopo diché
sarà visibile nel sistema operativo.
USO DEL DISCO M.2 SSD COME DISCO DI AVVIO (BOOT DISK)
Il disco M.2 SSD può essere usato per avviare il sistema operativo, in tal caso
procedere secondo le istruzioni relative all’installazione del determinato
sistema operativo. Impostare il rispettivo disco come disco di avvio nel BIOS
della scheda madre.
ISTRUZIONI DI SICUREZZA PER L’USO DELLA STAZIONE DOCK
• Evitare i valori estremi della temperatura e dell’umidità.
• Usar e il dispositi vo su un suppo rto orizzo ntale per evi tare la cadut a per terra
a causa del suo scivolamento.
• Conse rvare gli strumenti e anche il Libretto d’uso.
In collaborazione con il Centro di assistenza tecnica
• cont rollare il f unziona mento del d isposit ivo dopo la s ua caduta p er terra o n ell’acq ua
• verificare il funzionamento del dispositivo in caso di rot tura dell’involucro
• sporg ere il reclamo se il dispositivo non funziona secondo il Lib retto d’uso.
DOMANDE FREQUENTI
Si v ed a la s che da “ FAQ ” di que sto pro dot to s ull e no str e pa gin e we b www.i-tec.cz/it.
14
|
ITALIANO
Page 15

ÚVOD
Inter ní PCI- E karta do v ašeho sto lního p očítače. Přidejt e do svého sys tému ryc hlý SSD di sk
ve form átu M.2. Kar ta má jede n slot pro dis ky M.2 SATA a jede n slot pro dis ky M.2 PCI -E.
SPECIFIKACE
• Umožňuje současné připojení M.2 SSD, 1x B key a 1x M key NGFF SSD přes
PCI- E 4X rozhraní
• Vyhov uje PCI Express M.2 specifikaci 1.0.
• Vyhov uje SATA 3.0 specifikaci pro B key
• Vyhov uje PCI-E 4X 3.0 specifikaci pro M key
• Podpora přenosu dat až 6 Gbps
• Podpora SATA-based B key a PCI- E 4X-based M key NGFF SSD
• Podpora velikostí 2 230, 2242, 2260, 2280 NGFF SSD
• Podpora bootování
• Podpora Windows 7 / 8 / 8.1 / 10 32/64bit , Linux
KONEKTORY
• 1x konektor pro SATA-based B key NGFF SSD
• 1x SATA konektor pro připojení k základní desce
• 1x konektor pro PCI-E 4X-based M key NGFF SSD
OBSAH BALENÍ
• i-tec PCI-E 2x M.2 Card
• Záslepka do nízkoprofilových skříní
• SATA kabel
• Sada pro montáž
• Manuál
SYSTÉMOVÉ POŽADAVKY
• Pentium kompatibilní PC s volným PCIe 4X slotem
• OS Windows 7 / 8 / 8.1 / 10 32/64bit, Linux
POPIS ZAŘÍZENÍ
PCIe karta umožňující zapojení M.2 SSD. Jak SATA-based B key, tak PCI-E
4X-based M key NGFF SSD. A to jak jed notlivě, tak současně.
HARDWAROVÁ INSTALACE
1.
Vypněte PC a př ipojená zařízení.
2.
Odpojte napájení PC.
3.
Odmontujte k ryt PC.
4.
Odstraňte kry t u volného PCIe slotu.
5.
Vložte příslušný M.2 SSD do o dpovídajícího slotu.
6.
Vložte PCIe kartu do příslušného slotu.
7.
V případě, že je vložen SATA-based B key NGFF SSD, zapojte také SATA
kabel do SATA konek toru na PCIe kartě a dr uhý konec do volného SATA
konek toru na základní desce.
8.
Upevněte PCIe kartu pomocí šroubku.
Quick Start
ČESKY
|
15
Page 16

PCI-E 2x M.2 Card
INSTALACE
Karta se do op eračníh o systému instaluj e automatick y. Připojené M.2 SSD jsou
zobrazovány ja ko další jednotky. V případě, že je vlože n nový, nenaformátovaný
M.2 SSD, je nutné jej nejprve naformátovat, a to ve správci disků.
FORMÁTOVÁNÍ NOVÉHO M.2 SSD
1. Kli kněte pravým tlačítkem na „Tento počítač“.
2. Zvolte „Spravovat“.
3. Klikněte na „Správa disků“
4. Zvolte SSD, u kterého je uvedeno „Nepřiřazeno“ a udaná kapacita vloženého
disku (zo brazeno bývá o několik řádů míň).
5. Pravým tlačítk em klikněte na obl ast disku a zv olte „Nový j ednoduc hý svazek“,
klikněte na „Další“.
6. Velikost svazku ponechejte na ma ximu a klikněte na „Další“.
7. Zvo lte „Přiřadit písmeno jednotky“ a klik něte na „Další “.
8. Zvolte „Naformátovat svazek s následujícím nastavením“ (ponechejte
výchozí nastavení). Klikn ěte na „Další “ a „Dokončit“.
9. Proběhne naformátování SSD. Doba formátování je závislá na velikosti SSD,
poté je SSD v systému viditelný.
POUŽITÍ M.2 SSD JAKO BOOTOVACÍHO DISKU
M.2 SSD lze použít pro instalaci operač ního systému. V tomto případě
postupujte dle pokynů instalátoru příslušného operačního systému. V BIOSU
základní desky si také nastavte příslušný disk jako bootovací.
BEZPEČNOSTNÍ POKYNY
• Nevystavujte extrémním teplotám a vlhkos ti vzduchu.
• Používejte zařízen í na plochých p odložkách – v yvarujete se tím s klouznutí a
pádu na zem.
• Uschovejte manuál pro pozdější možné použití.
V součinnosti se servisním oddělením:
• Ověřte funkčnost po pádu do vody nebo na zem.
• Ověřte funkčnost při prasknutí kry tu.
• Reklamujte zařízení nefungující dle manuálu.
ČASTO KLADENÉ OTÁZKY
K dispozici na našem we bu www.i-tec.cz v záložce „FAQ“ u tohoto produktu.
16
|
ČESKY
Page 17

Quick Start
WSTĘP
Wewnętrzna k arta PCI- E. Umożliwia podłączenie szybkich dysków SSD M.2. Karta
posia da jedno złącze na d yski M.2 SATA oraz je dno złącze na dysk i M.2 PCI-E .
SPECYFIKACJA
• Allows simultaneous connec tion of M.2 SSD, 1x B key and 1x M key NGFF
SSD via P CI-E 4X inter face
• Zgodność z PCI Express M.2 1.0.
• Zgodność z SATA 3.0 do B key
• Zgodność z PCI-E 4X 3.0 do M key
• Szybkość transferu danych aż do 6 Gbps
• Wsparcie dla SATA-based B key i PCI -E 4X-based M key NGFF S SD
• Obsługa formatów 2230, 2242, 2 260, 2280 NGFF SSD
• Wsparcie przy ładowaniu systemu
• Support for Windows 7 32/64bit, Windows 8 32/64bit, Windows 8.1
32/64bit, Windows 10 32/64bit, Linux
ZŁĄCZA
• 1x connector for SATA-based B key NGFF SSD
• 1x złącze SATA do płyty głównej
• 1x connector for PCI- E 4X-based M key NGFF SSD
ZAWARTOŚĆ OPAKOWANIA
• Karta i-tec PCI -E 2x M.2
• Zaśle pka Low profile
• Kabel SATA
• Zestaw montażowy
• Instrukcja
WYMAGANIA SYSTEMOWE
• Pentium PC z wolnym slotem PCIe 4X
• OS Windows 7 32/64bit, Windows 8 32/64bit, Windows 8.1 32/64bit,
Windows 10 32/64bit, Linux
OPIS
Karta PCIe u możliwia jed noczesne lub oddzi elne podłącze nie dysków M.2 SSD.
SATA-based B key and PCI-E 4X-based M key NGFF SSD.
INSTALACJA SPRZĘTU
1.
Wyłącz komputer i podłączone urz ądzenia.
2.
Odłącz komputer od zasilania.
3.
Zdejmij obudowę komputera.
4.
Zdejmij pokrywę dowolnego slotu PCIe.
5.
Włóż odpowiednio M.2 SSD do odpowiednieg o slotu.
6.
Włóż kartę PCIe do odpowiedniego slotu.
POLSKI
|
17
Page 18

PCI-E 2x M.2 Card
7.
W sytuacji kiedy SATA-based B key NGFF SSD jest włożony, również należy
podłączyć kabel SATA do konek tora SATA w karcie PCIe a drugi koniec
podłączyć do woln ego konektora SATA na płycie głównej.
8.
Zamocuj kartę PCIe za pomocą śrubek.
INSTALACJA
Kar ta insta luje si ę w s y s t e mi e a u t o m at y cz n i e . P o d łączone dy ski M.2 S SD wid oczne s ą
jako dodatkowe urządzenia . W przypad ku podłączenia nowego, niesformatowanego
dysku M .2 SSD należy g o najpier w sformatowa ć w admin istratorz e dysku.
FORMATOWANE NOWEGO M.2 SSD
1.
Kliknij prawym p rzyciskiem mysz y na "Mój komputer".
2.
Wybierz "Zarządzaj".
3.
Kliknij "Zarządzanie dyskiem”
4.
Wybierz "Nieprzypisane" SSD z podanej pojemności włożonej płyty
(pokazane kilka rzędów niżej).
5.
Kliknij prawym p rzyciskiem mysz y na obszar dysku i wybier z "Nowy
wolumen prosty", klik nij "Dalej".
6.
Ustaw rozmiar wolumenu na maksimum, a następnie kliknij "Dalej".
7.
Wybierz "Przypisz literę dysku" i kliknij "Dalej".
8.
Wybierz "Format wolumenu z następującymi ustawieniami" ( pozostaw
ustawienie domyślne). Kliknij "Dalej" i "Zakończ".
9.
SSD zostanie sformatowany. Czas formatowania zależny jest od
pojemności SSD. Po sformatowaniu SSD będzie widoczny w systemie.
WYKORZYSTANIE M.2 SSD JAKO DYSKU DO BOOTOWANIA
M.2 SSD może być wykorzystany przy instalacji systemu operacyjnego.
W tym pr zypadku należy postępować zgodnie z instrukcją instalatora systemu
operacyjnego. Należy również zaznaczyć odpowi edni dysk w ustawie niach BIOSu .
INSTRUCKJE BEZPIECZEŃSTWA
• Nie narażać na działanie wysoki ch temperatur i wysokiej wilg otności.
• Używać urządzenia na powierzchniach płaskich w celu uniknięcia upadku.
• Zachować instrukcję do ewentualnego późniejszego użycia.
We współpracy z dzia łem serwisu:
• Sprawdzić funkcjonalność po upadk u do wody lub na twarda powier zchnię
• Sprawdzić funkcjonalność gdy obudowa uległa uszkodzeniu
• Odesłać urządzenie gdy nie pracuje zgo dnie z instrukcją.
CZĘSTO ZADAWANE PYTANIA
Dostępne na naszych stronach www.i -tec.cz/pl/ w zakładce „FAQ“ przy
niniejszym produkcie.
18
|
POLSKI
Page 19

Quick Start
ÚVOD
Interná PCI-E karta do vášho stolného počítača. Pridajte do svojho systému
rých ly SSD disk vo formáte M. 2. Karta má je den slot pre disky M.2 SATA a jeden
slot pre disk y M.2 PCI-E.
ŠPECIFIKÁCIE
• Umožňuje súčasné pripojenie M.2 SSD, 1x B key a 1x M key NGFF S SD cez
PCI- E 4X rozhranie
• Vyhov uje PCI Express M.2 špecifikácii 1.0.
• Vyhov uje SATA 3.0 špecifi kácii pre B key
• Vyhov uje PCI-E 4X 3.0 špecifikácii pre M key
• Podpora prenosu dát až 6 Gbps
• Podpora SATA-based B key a PCI- E 4X-based M key NGFF SSD
• Podpora veľkostí 2230, 2242 , 2260, 2280 NGFF SSD
• Podpora bootovania
• Podpora Windows 7 / 8 / 8.1 / 10 32/64bit , Linux
KONEKTORY
• 1x konektor pre SATA-based B key NGFF SSD
• 1x SATA konektor pre pripoje nie k základn ej doske
• 1x konektor pre PCI-E 4X-based M key NGFF SSD
OBSAH BALENÍA
• i-tec PCI-E 2x M.2 Card
• Záslepka do nízkoprofilových skríň
• SATA kábel
• Sada pre montáž
• Manuál
SYSTÉMOVÉ POŽIADAVKY
• Pentium kompatibilné PC s voľným PCIe 4X slotom
• OS Windows 7 / 8 / 8.1 / 10 32/64bit, Linux
POPIS ZARIADENIA
PCIe karta umožňujúca zapojenie M.2 SSD. ako SATA-based B key, tak PCI-E
4X-based M key NGFF SSD. A to jednotlivo i súčasne.
HARDWAROVÁ INŠTALÁCIA
1.
Vypnite PC a pripojené zariadenia .
2.
Odpoj te napájanie PC.
3.
Odmontujte k ryt PC.
4.
Odstráňte kry t na voľnom PCIe slote.
5.
Vložte príslušný M.2 SSD do odpovedajúceho slotu.
6.
Vložte PCIe kartu do príslušného slotu.
SLOVENSKY
|
19
Page 20

PCI-E 2x M.2 Card
7.
V prípade, že je vlože ný SATA-based B key NGFF SSD, zapojte tiež SATA
kábel do SATA konek tora na PCIe karte a druhý koniec do voľného SATA
konektora na základnej doske.
8.
Upevnite PCIe kar tu pomocou skrutky.
INŠTALÁCIA
Karta sa do operač ného systému inštaluje automaticky. Pripojené M.2 SSD sú
zobra zované ako ďa lšie jed notky. V pr ípade , že je vlože ný nový, ne naform átovaný
M.2 SSD, je nutné ho najprv naformátovať, a to v správcovi diskov.
FORMÁTOVANIE NOVÉHO M.2 SSD
1.
Kliknite pravým tlačidlom na „Tento počítač“.
2.
Zvoľte „Spravovať“.
3.
Kliknite na „Správa diskov “
4.
Zvoľte SSD, pri k torom je uvedené „Nepriradené“ a udaná kapacita
vloženého disku (zobrazená býva o niečo nižšia).
5.
Pravým tlačidlom kliknite na oblasť disk u a zvoľte „Nový jednoduchý
zväzok“, kliknite na „Ďalší“.
6.
Veľkosť zväzku ponechajte na maxime a kliknite na „Ďalší“.
7.
Zvoľte „Priradiť písmeno jednotky“ a k liknite na „Ďalší“.
8.
Zvoľte „Naformátovať zväzok s nasledujúcim nastavením“ (ponechajte
základné nastavenie). Kliknite na „Ďalší“ a „Dokončiť“.
9.
Prebe hne naformátovanie SSD. Doba formátovania je závislá na veľkosti
SSD, potom je SSD v systéme viditeľný.
POUŽITIE M.2 SSD AKO BOOTOVACIEHO DISKU
M.2 SSD môžete použiť pre inštaláciu operačného systému. V tomto prípade
postupujte podľa pokynov inštalátora príslušného operačného systému.
V BIOSe základnej dosky si tiež nastav te príslušný disk ako bootovací.
BEZPEČNOSTNÉ POKYNY
• Nevystavujte extrémnym teplotám a vlhkosti vzduchu.
• Používajte za riadenie na plochých podložkách – vyvarujete sa tým
skĺznutiu a pádu na zem.
• Uschovajte manuál pre neskoršie možné p oužitie.
V súčinnosti so ser visným oddelením:
• Overte funkčnosť po páde do vody alebo na zem.
• Overte funkčnosť pri prasknutí kr ytu.
• Reklamujte zariadenie nefu ngujúce podľa manuálu.
ČASTO KLADENÉ OTÁZKY
K dispozícii na našom webe www.i-tec.cz v záložke „FAQ“ pri tomto produkte.
|
SLOVENSKY
20
SLOVENSKY
Page 21

Quick Start
ĮVADAS
Vidinė PCI-E korta Jūsų kompiuteriui. Įdėkite į sistemą formate M.2. greitą SSD
diską. Korta turi tik vieną lizdą diskams M.2 SATA ir vieną lizdą diskams M.2
PCI-E.
SPECIFIKACIJA
• Per PCI -E 4X sąsają vienu metu galima p rijungti M.2 SSD, 1x B key ir 1x
• M key NGFF S SD
• Atitinka PCI E xpress M.2 specifikaciją 1.0.
• Atitinka SATA 3.0 specifikaciją skirtą B key
• Atitinka PCI -E 4X 3.0 specifikaciją skirtą M key
• Palaiko duomenų perdavimo spartą iki 6 Gbps
• Palaiko SATA-based B key ir P CI-E 4X-based M key NGFF SSD
• Leidžia prijungti NGFF S SD formatą 2230, 2242, 2260, 2280
• Palaiko bootinimą
• Palaiko Windows 7 / 8 / 8.1 / 10 32/64bit, L inux
JUNGTYS
• 1x jungtis SATA-based B key NGF F SSD
• 1x SATA jungtis pr ijungimui prie pagrindinės plokštės
• 1x jungtis PCI- E 4X-based M key NGFF SSD
PAKUOTĖJE
• i-tec PCI-E 2x M.2 Card
• Užaklinimas žemojo profilio skirstomajai dėžutei
• SATA kabelis
• Montavimo komplektas
• Vartotojo vadovas
SISTEMOS REIKALAVIMAI
• Pentium suderinamas kompiuteris su laisvu PCIe 4X lizdu
• OS Windows 7 / 8 / 8.1 / 10 32/64bit, Linux
ĮRENGINIO APRAŠYMAS
PCIe ko rta leidž ia prijung ti M.2 SSD. Gali ma prijung ti SATA-based B ke y, taip pat ir
PCI- E 4X-based M key N GFF SSD. Galima prijungti i ndividual iai arba vienu metu .
HARDWARE INSTALIACIJA
1.
Išjunkite PC ir prijungtus įrenginius.
2.
Išjunkite PC maitinimą.
3.
Nuimk ite PC dangtį.
4.
Nuimkite laisvo PCIe lizdo dangtį.
5.
Įdėkite M.2 SSD į atitinkamą lizdą.
6.
Įdėkite PCIe kortą į atitinkamą lizdą.
LIETUVOS
|
21
Page 22

PCI-E 2x M.2 Card
7.
Jeigu yra įdėtas SATA-based B key NGFF S SD, įjunkite taip pat SATA kabelį
į SATA jungtį esanč ią PCIe kar toje, o kitą galą prijunkite pr ie laisvos SATA
jungties pagrindinėje plokštėje.
8.
PCIe kortą pritvir tinkite var žtais.
INSTALIACIJA
Korta į operacinę sistemą instaliuosis automatiškai. Prijungti M.2 SSD yra
rodom i kaip kiti di skai. Tuo atvej u, jeigu yr a įdėtas nauj as, nesufo rmatuotas M .2
SSD, pirmiausia jį reikia suformatuoti disko administratoriuje.
NAUJO M.2 SSD FORMATAVIMAS
1.
Spustelėkite dešinįjį mygtuką ties „Šis kompiuteris“.
2.
Pasirinkite „Valdyti“.
3.
Spustelėkite ties „Disko valdymas“
4.
Pasirinkite SSD, prie kurio yra pažymėta „Nepriskirtas“ ir nurodyta įdėto
disko talpa (įprastai būna rodoma keliomis eilutėmis mažesnė).
5.
Dešiniuoju pelės mygtuku spustelėkite ties disk u ir pasirinkite „Naujas
paprastas skaidinys“, ir paspauskite ties „Kitas“.
6.
Palikite maksimalų skaidinio dydį ir spustelėkite ties „Kitas“.
7.
Pasirinkite „Priskirti vieneto raidę“ ir spustelėkite ties „Kitas“.
8.
Pasirinkite „Suformatuoti skaidinį su šiuo nus tatymu“ (palik ite pradinį
nustatymą). Spustelėkite ties „Kitas “ ir „Užbaigti“.
9.
Bus suformatuotas SSD. Formatavimo laikas priklauso nuo SSD dydžio, po
to SSD bus sistemoje matomas.
M.2 SSD NAUDOJIMAS KAIP BOOTINIMO DISKAS
M.2 SSD galima naudoti operacinės sistemos instaliavimui. Tokiu atveju
vadovaukitės atitinkamos operacinės sistemos instaliavimo instrukcija.
Pagrindinės pl okštės skyriuje BIOS atitinkamą diską nustatyk ite kaip bootinimo diską.
NAUDOJIMO SAUGOS TAISYKLĖS
• Saugoti nuo aukštos temperatūros ir drėgmės.
• Įrenginį naudoti ant lygių neslidžių paklotų – išvengsite slydimo ir k ritimo
ant žemės.
• Vadovą saugokite vėlesniam naudojimui.
Bendradar biaudami su servisu:
• Patikrinkite veikimą po įkritimo į vandenį arba nukritimo ant žemės.
• Įskilus dangčiui patikrinkite veikimą.
• Jeigu įrenginys neveikia pateik ite pretenzijas vadovaudamiesi įrenginio
vadovu.
DAŽNAI UŽDUODAMI KLAUSIMAI
Rasite mūsų svetainėje: www.i-tec.cz/en/ skiltyje „FAQ“ prie šio produkto.
|
LIETUVOS
22
Page 23

Quick Start
INLEIDING
Inter ne PCI-E ka art voor uw c omputer. Hie rmee kunt u e en snelle M .2 SSD-sc hijf
in uw computer installeren. De kaart heeft een slot voor M.2 SATA schijven en
een slot voor M.2 PCI-E schijven.
SPECIFICATIES
• M.2 SSD, 1x B key en 1x M key NGFF SSD tegelijk aangesloten via PCI-E 4X
• Voldoet aan de PCI Express M.2 specifi catie 1.0.
• Voldoet aan de SATA 3.0 specificatie voor B key
• Voldoet aan de PCI-E 4X 3.0 specifi catie voor M key
• Gegevensove rdracht van wel 6 Gbps
• SATA-based B key en PCI-E 4X-based M key NGFF SSD ondersteund
• Ondersteunde afmetingen 2230, 2242, 2260, 2280 NGF F SSD
• Booting ondersteund
• Windows Windows 7 / 8 / 8.1 / 10 32/64bit, Linux
CONNECTORS
• 1x connector voor SATA-based B key NGFF SSD
• 1x SATA connector voor koppelen aan moederbord
• 1x connector voor PCI-E 4X-based M key NGFF SSD
INHOUD VAN DE VERPAKKING
• i-tec PCI-E 2x M.2 Card
• Low Profile flens
• SATA kabel
• Installatieset
• Gebruikershandleiding
SYSTEEMVEREISTEN
• PC compatibel met Pentium met een vrije PCIe 4X slot
• Windows 7 / 8 / 8.1 / 10 32/64bit, Linux
BESCHRIJVING VAN HET APPARAAT
PCIe ka art voor het aansluiten van een M.2 SSD -schijf, zowel ee n SATA-based B
key als een PCI-E 4X-based M key NGFF SSD, he t kan apart of tegelijk.
HARDWARE INSTALLATIE
1.
Schakel de PC e n aangesloten apparaten uit.
2.
Koppel de PC voeding los.
3.
Haal de PC behuizing af.
4.
Verwijder de cover van de vrije PCIe slot.
5.
Steek de M.2 SSD-schijf in de daarvoor bestemde slot.
6.
Steek de PCIe kaart in de daarvoor bes temde slot.
7.
Indien er een SATA-based B key NGFF SSD geplaatst werd, steek ook de
NEDERLANDS
|
23
Page 24

SATA kabel in de SATA connector op de PCIe kaar t en de andere kant in de
vrije S ATA con nector op moe derbord.
8.
Schroef de PCIe kaart vas t.
INSTALLATIE
De kaar t wordt in het besturingssysteem automatisch geïnstalleerd. De
aangesloten M.2 SSD schijven worden als nieuwe schijven weergegeven. Indien
er een nieuwe, niet-geformatteerde M.2 SSD schijf geïnstalleerd werd, moet
deze eerst geformatteerd worden in „ Schijfbeheer“.
FORMATTEREN VAN EEN NIEUWE M.2 SSD SCHIJF
1.
Klik met de rechtermuisknop o p „Deze pc“
2.
Kies „Beheer“.
3.
Klik op „Schijfbeheer“
4.
Selecteer de SSD met de tekst „Niet toegeweze n“ en met de weergegeven
capac iteit van de geplaatste schijf (min der capaciteit wordt weergeg even).
5.
Klik met de rechtermuisknop o p het schijf en selecteer „Nieuw eenvoudig
volume“, klik op „Volgende“.
6.
Laat de volume op maximaal staan en klik op „Volgende“.
7.
Selecteer „Een stationsletter toewijzen“ en klik op „Volgende“.
8.
Kies „Volume formatteren met de volgende inste llingen“ (gebruik de
standaardinstelling). Klik op „Volgende“ en „Voltooien“.
9.
De SSD schijf wordt geformatteerd. De formatteringstijd is afhankelijk van
de grootte van de SSD schijf. Daarna is de SSD zichtbaar in h et systeem.
GEBRUIK VAN DE M.2 SSD ALS BOOTSCHIJF
M.2 SSD kan worden gebruikt om een besturingssysteem te installeren. In dat
geval vo lg de instr ucties voo r installat ie van het bes turings systeem. I n BIOS van
het moederbord stel de schijf ook als bootschijf in.
VEILIGHEIDSINSTRUCTIES VOOR HET GEBRUIK VAN HET DOCKING STATION
• Stel he t product niet bloot aan ex terne temperaturen en lucht vochtigheid.
• Gebruik het product op v lakke ondergrond – u voorkomt op die manier dat
het product wegglijdt e n op de grond valt.
• Bewaar de drivers en de handleiding voor event. later gebr uik.
In samenwerking met de serviceafdeling:
• Contro leer de fun ctionali teit na het val len van het pr oduct in wat er of op de gron d.
• Controlee r de functionaliteit als het product barsten ver toont.
• Reclameer dit product als het niet werkt in overeenstemming met de
handleiding.
VEELGESTELDE VRAGEN
Besch ikbaar op o nze website w ww.i-tec .cz/nl/ op he t tabblad "FA Q" bij dit pro duct.
|
24
NEDERLANDS
Page 25

EUROPEAN U NION ONLY
NOTE: M ARKING IS IN COMPLIANCE WITH EU WEEE DIRECTIVE
ENGLISH
This equipment is marked with the above recycling symbol. It means that at
the end of the life of the equipment you must dispose of it separately at an
appropriate collection point and not place it in the normal domestic unsorted
waste stream. T his wil benefit the environment for all. (European Union only)
DEUTSCH
Dieses Produkt trägt das Recycling -Symbol gemäß der EU-Richtinie. Das
bedeutet, dass das Gerät am Ende der Nutzungszeit bei einer kommunalen
Sammelstelle zum recyceln abgegeben werden muss, (koste nloss). Eine
Entsorgung űber den Haus-/Restműll ist nicht gestattet. Dies ist ein aktiver
Beitrag zum Umweltschutz. (Nur innerhalb der E U)
FRANÇAIS
Ce dispositif est revêtu du marquage avec le symbole de recyclage indiqué
ci-dessus. Ça veut dire, qu'une fois découlée la vie utile dudit dispositif, vous
vous voyez dans l'obligation d'assurer, que le dispositif se trouve déposé en un
respe ctif centre d e collecte , dûment éta bli à cette fin , et non e n d'au tres ce ntres
de ramassage qui soient destinés à déposer de courants déchets municipaux
non triés. De cette manière, on contribue considérablement à une amélioration
en matière d'environnement où nous vivons tous. (Seulement pour l'Union
Européenne).
ESPAÑOL
El dispositivo está indicado por el símbolo de reciclaje. Esto significa que
al final de la vida útil de la instalación, debe asegurarse de que se almacene
por separado en un punto de recolección establecido para este fin y no en los
lugares designados para la eliminación de desechos municipales ordinarios
sin clasificar. Contribuirá a mejorar el medio am biente de todos nosotros. (S ólo
para la Unión Europea).
ITALIANO
Questo dispositivo è contrassegnato con il seguente simbolo di riciclaggio.
Si chiede di consegnarlo alla fine del suo ciclo di vita a un Centro di raccolta
dei rifiuti differenziati istituita per questo scopo e non in altri centri indicati
per depositare rifiuti urbani normali non differenziati. In questo modo si
contribuisce al miglioramento della qualità dell’ambiente (valido soltanto per
l’Unione Europea).
|
25
Page 26

ČEŠTINA
Toto z ařízení je označeno výše uvedeným recyklačním symbolem. To znamená,
že na konci doby života zařízení musíte zajistit, aby bylo uloženo odděleně na
sběrném místě, zřízeném pro tento účel a ne na místech určených pro ukládání
běžného netříděného komunálního odpadu. Přispěje to ke zlepšení stavu
životního prostředí nás všech. (Pouze pro Evropskou unii)
POLSKI
To urządzenie oznakowane jest specjalnym symbolem odzysku. Pookresie
użytkowania trzeba je zwrócic do odpowiedniego punktu zbiörki i nie wolno
umiestczać go razem z nieposortowanymi odpadami . Tak ie dzialanie p rzyniese
korzyść dla ś rodowiska. (Tylko w Unii Eu ropejskiej)
SLOVENSKY
Toto zariadenie je označené vyššie uvedeným recyklačným symbolom. To
znamená, že na konci doby života zariadenia musíte zaistiť, aby bolo uložené
oddelene na zbernom mieste, zriadenom pre tento účel a nie na miestach
určených pre ukladanie bežného netriedeného komunálneho odpadu. Prispeje
to k zlepš eniu životného prostredia nás všetkých. (Iba pre Európsku úniu).
LIETUVOS
Šis gaminys yra pažymetas specialiu atlieku tvarkymo ženklu. Baigus
eksploataciją, gaminys turi buti atiduotas i atitinkamą surinkimo punktą
ir negali buti šalinamas kartu su nerušiuojamomis atliekomis. Tokie Jusu
veiksmai prisides prie aplinkos apsaugos. (Tiktai Europos Są jungoje)
NEDERLANDS
Dit apparaa t is voorzien van het b ovenvermelde recyclin gsymbool. D it betekent
dat u aan het einde van de levensduur van het apparaat er voor dient te zorgen
dat het afzonderlijk wordt opgeslagen op een ver zamelpunt dat hiervoor is
ingericht en niet op plaatsen die zijn aangewezen voor de verwijdering van
gewoon ongesorteerd gemeentelijk afval. Dit zal bijdragen aan de verbetering
van de leefomgeving van ons allemaal. (Alleen voor de Euro pese Unie)
26
|
Page 27

EU Decl aration of Co nformity / EU Ko nformitäts erklärun g / Déclarati on EU de confor mité /
Decla ración UE de Co nformidad / D ichiarazi one di conform ità UE / EU Prohl ášení o shod ě
EU Preh lásenie o zhod e / EU Declara cja zgodnośc i / ES atitikti es deklarac ija /
Manuf acturer, De r Herstell er, Le fabric ant, Fabri cante, Pro duttore , Výrobce , Výrobca , Produce nt,
Gamintojas, De fabrikant: i-tec Techno logies s. r.o., Kalvod ova 2, 709 00 O strava - Mar iánské Ho ry, CZ
decla res that thi s produc t / erklär t hierm it, dass da s Produk t / déclar e que ce prod uit / decl ara que
este pro ducto / di chiara ch e il segue nte prodo tto / tímto pr ohlašuj e, že výr obek / tý mto prehla suje,
že výr obok / dekl aruje, że pro dukt / šiu o pareišk ia, kad gam inys / verkl aart hie rbij dat he t product
Produ ct, Bezeich nung, Le pré nom, Produc to, Prodotto , Název, Názov, Nazwa , Gaminys,
Naam: i-tec PCI-E 2x M. 2 Card (PCI-E/SATA) with Low Profile Backplate
Model, Modell, Modèle, Modelo, Model, Model, Model: PCE2M2 / PCE2M2
Determina tion, Bestimmung, la dé termination, Determ inación, Určení, Určenie , Opcje, Doe l:
Produ ct is determ ined for usi ng in PC as equi pment.Das P rodukt is t für Austat tung und
als Zubehör von Computern bestimmt. Le produit est dé terminé pou r une utilisation
sur PC co mme équipement. El prod ucto se d etermina para usar e n PC como equipo.
Destinato per essere usato come attrezzatura informatica o come accessorio per
computer. Výrobek je urče n pro př ístrojové vybaven í a jako př íslušenství do počítačů.
Výrobok je určený pr e prístrojo vé vybaven ie a jako prísl ušenstvo d o počítačov. Prod ukt
jest p rzezna czony do wsp ółpracy z k omputerem ja ko akcesori um. Gaminys yr a skirtas
įrang ai papildy ti ir naudoj amas kaip pr iedas kompi uteriams . Het produc t is bedoeld a ls
uitru sting voor app araten en als co mputeracc essoire.
Meets the essential requirements according to / Es entspricht den A nforderun gen de r
Richtlinien / Répond aux exigences essentie lles selon / Cumple los requisitos es enciales
según / S oddisfa i requisiti essenziali se cond o / Splňuje tyto požadavky / Spĺňa tieto
požadavky / Spełnia następujace wy magania / Atit inka esmini us reikalavi mus pagal / Het
voldoet aan de volgende vereisten: EC Dire ctive 2014/30/ EU, 2011/65/EU
EMS ( For EMC , Für EMC , Pour l a CEM, Pa ra EMC, Per la co mpatib ilità e lettr omagne tica,
Pro EMC, Pre EMC, Dla Kompatybilnoś ci elektromagnetycznej, Skirtas EMC, Voor
EMC): EN 55022:2010 ; EN 5 5024:2010
RoHS: 2011/65/EU; IEC 62321: 2013
and it is s afety und er conditi ons of stand ard applic ation / und is t sicher b ei standar dmäßiger
Nuttzung / et c 'est la sécurité dans des conditions d'application standard / y es seg uridad
bajo condiciones de aplic ación están dar / ed è sicuro in condizioni d’uso normali / a je
bezpečný za podmínek obvy kléh o použití / a je bezpečný za podmienok obvyklého použitia
/ oraz jest prod ukte m bezpiecznym prz y standardowym w ykor zyst ywaniu / ir naudojant
įprastomis sąlygomis yra s augus /en is ve ilig onde r de omstan dighede n van norma al gebru ik.
Additional information, Ergänzende Angaben, Information additionnelle, Información Adicional,
Informazioni integrative, Doplňující informace, Doplňujúce informácie, Dodatkowe info rmacje,
Papildoma informacija, Aanvullende informatie: Identification Mark, Identifikationskennzeichen,
La marque d'identification, Marca de ide ntificación, Segno di ide ntificazione, Identifikační
značka, Identifikačná značka, Znak identyfikacyjny, Identifikavimo ženklas, Identificatiemerk:
EU-Conformiteitsverklaring
|
27
Ostrava 26. 7. 2016
Execut ive Name and Sig nature, Gesc häftsführer, E xécutif
et signa ture, Nombre y fir ma del gerente , Jednatel, Ko natel,
Ing. Lumír Kraina
Nazwisk o osoby upowazni onej, Zaakv oerder
|
27
Page 28

FCC COMPLIANCE STATEMENT
This e quipment h as been teste d and found to co mply withi n the limits
of a Class B d igital devi ce pursuan t to Part 15 of the FCC Ru les. These
limits are designed to provide reasonable protection against harmful
inter ference in a residential installation.
|
28
|
28
 Loading...