

Page 1
PCIE TO 2S1P ADAPTER
2 X SERIAL + 1 X PARALLEL
User guide • Gebrauchsanweisung • Mode d’em ploi
Manual de instrucciones • Manuale • Uži vatelská př íručka
Instrukcje obsługi • U žívateľská príruč ka • Vartotoj o vadovas
Handleiding
P/N : P CE 2S1P
Page 2

EN
Please read the entire instruction manual carefully. Detailed manual
is available on our website www.i-tec.cz/en/ in the tab „Manuals,
drivers“. In case of any issues , please contact our technical support at:
support@itecproduct.com
DE
Bitte lesen Sie das gesamte Handbuch sorgfältig durch. Die
ausführliche Gebrauchsanweisung ist auch auf unserer Webseite
www.i-tec.cz/de/ unter „Benutzerhandbücher, Treiber “ bei diesem
Produkt zu finden.
unser Support-Team unter:
support@itecproduct.com
FR
Veuillez lire attentivement le manuel dans son intégralité. Un manuel
détaillé est disponible sur notre site www.i-tec.cz/fr/ sous l'onglet
"Manuels, pilotes". Si vous avez des problèmes, veuillez contacter
notre équipe suppor t à support@itecproduct.com
ES
Por favor, lea atentamente todo el manual. El manual detallado está
disponible en nuestro sitio web, www.i-tec.cz/es/ bajo la pestaña
"Manuales y co ntroladores" de es te producto. Si tiene a lgún probl ema,
póngase en contacto con nuestro equipo de soporte en
support@itecproduct.com
IT
Leggere atte ntame nte tutto il Libretto d’uso. Il Libretto d’uso è a
disposizione anche sulla scheda “Manuali e strumenti” del nostro sito
web: www.i-tec.cz/it/. In c aso di pro
support@itecproduct.com
Wenn Sie Probleme haben, kontaktieren Sie bitte
blemi rivolgersi al supporto tecnico:
Page 3

CZ
Prosíme o pečlivé přečtení celého manuálu. Podrobný manuál je
k dis pozici na našem webu www.i-tec.cz v záložce „Manuály,
ovladače“ u toho to produktu . V pří padě problémů se můžete
na naši technickou podporu: support@itecproduct.com
PL
Upewnij się, że uważnie przeczytałeś instrukcji obsługi.
podręcznik jest dostępny na naszej s tronie inter netowej
www.i-tec.cz/pl/ w zakładce "Instrukcje, ste
jakichkolwiek problemów, skontaktuj się
adresem: support@itecproduct.com
SK
Prosíme o dôkladné prečítanie celého manuálu. Podrobný manuál je
k dis pozícii tiež na našom webe www.i-tec.cz v záložke „Manuály,
ovladače“ pri tomto produkte. V prípade problémov sa môžete obrátiť
na našu technickú pod poru: support@itecproduct.com
LT
Prašome įdėmiai perskaityti visą vadovą. Išsamų
rasti
mūs ų svetainėje www.i-tec.cz/en/ šio produkto skyrelyje
„Manuals,
technine pagalba: support@itecproduct.com
NL
Wij vra gen u vriendelijk o m de volledige handleiding zorgv uldig door te
lezen. Een gedetailleerde handleiding van dit product is beschikbaar
op onze website www.i-tec.cz/nl/
en drivers". Mochten
opnemen met o ns supportcenter via support@itecproduct.com.
drivers“. Iškilus problemoms galite susisiekti su mūsų
onder het tabblad "Handleidingen
er zich problemen voordoen kunt u contact
rowniki". W razie
z naszym serwisem pod
obrátit
Szczegółowy
vadovą galite
Page 4

Page 5

PCIe to 2S Adapter
2x Serial 1x Parallel(PCE2S1P)
ENGLISH................................................... 06–07
DEUTSCH.................................................. 08–10
FRANÇAIS................................................. 11–13
ESPAÑOL................................................... 14–15
ITALIANO................................................... 16–18
ČESKY........................................................ 19–20
POLSKI...................................................... 21–22
SLOVENSKY.............................................. 23–24
LIETUVOS................................................. 25–27
NEDERLANDS........................................... 28–30
WEEE......................................................... 31–32
Declaration of Conformity........................ 33–34
FCC................................................................... 35
Page 6

EN
INTRODUCTION
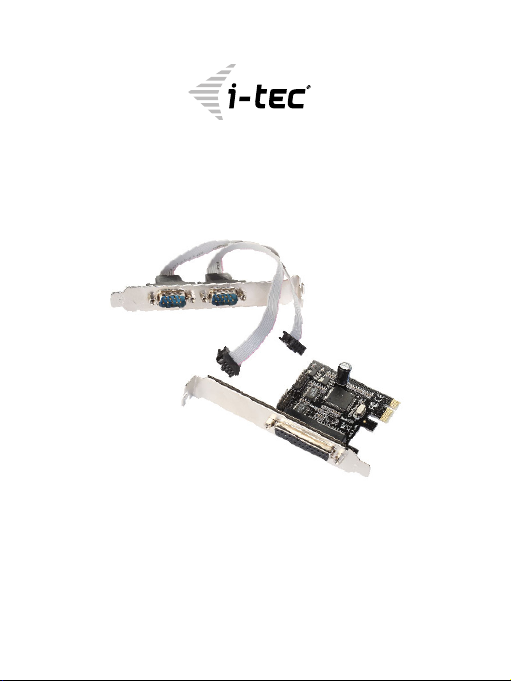
PCI e to 2S1P ad apter i s card to PCI e slot i n PC type PC I expr ess. Af ter in stala tion
of drivers this adapter is as standard 2xCOM ports and 1xLPT-parallel port.
This card offers output RS232 type DB9 Male for asynchronous connection of
I/O devices, e.g. external modem, GSM modem, printer with serial por t, barcode
reader etc. and also standard parallel (LPT) port for connection e.g. printers.
Baud rate on serial port enables using in applications in automatization,
monitoring and control of industrial processes.
SPECIFICATION
• Interface: PCI express specification 1.1
• Ports: 2x Serial RS232 type DB9 (Male) and 1x parallel type DB25 (Female)
• UART: Support UART types by 450 to 550 (fully programmable)
• Speed data rates up to 1,5Mbps
• FIFO receiver/transmitter works with data size up 256 by te
• Support Standard Parallel Por t (SPP), Enhanced Parallel (EPP) & Enhanced
Capability Port (ECP)
• Data rate on Serial por t up 230400 bps and on Parallel port up 1,5Mbps
• Support Plug&Play and Hot S wap
• Operation system: Win 7/8/10 32+64bit, Linux, DOS
PACKAGE
• 1x PCIe to 2S1P adapter
• 1x Panel with cables for 2xDB9 serial
• 3x Low Profile Backplate
• Manual
DRIVER INSTALLATION:
(Note: Drivers are available here: www.i-tec.cz/en/)
For Windows® 7/8/10 32 _64 bit
1.
Don't inser t the PCIe card into PCIe slot.
2.
Download cor responding drivers and unpack (unzip) them to HDD from
www.i-tec.cz/en/.
3.
Click o n the “StnSetup.exe” button for the installation of drivers from a
corresponding directory for the OS and “Exit ” to finish installation.
4.
Shutd own the PC. Pla ce the PCIe c ard into PCIe s lot and then p ower on the sys tem.
5.
Once the system gets booted the Windows will automatically start installing
the device driver software. If it is necessary, restart the PC.
HARDWARE INSTALLATION
(Warning: at fi rst read instructio ns of driver ins tallation)
Note: Connecti on of the COM connector- a re d core in th e cable from DB-9
belon gs to the sign ∆ on the PCE card
6
Quick Start / PCIe to 2S Adapter 2x Serial 1x Parallel(PCE2S1P)
Page 7

Quick Start / PCIe to 2S Adapter 2x Serial 1x Parallel(PCE2S1P)
1.
Turn off the computer and disconnect it from the power supply of 230V.
2.
Unplug the power cord a nd remove your c omputer's cover. Rem ove the slot
bracket from a n available PC Ie slot and rem ove the bracke t from seria l port, too.
3.
To install the card , carefully a lign the card's bus co nnector wi th the selected
PCIe sl ot on the mothe rboard. Pu sh the board down firmly. Replac e the slot
bracket's ho lding screw to secur e the card and sc rew the seria l port card a lso.
4.
Repla ce the compu ter cover and re connect the power c ord.
To Verify Windows® Driver Installation
Go to the D evice Mana ger (for exam ple, in Win10: the ri ght mouse b utton on Sta rtDevice Manager).
You can see n ew devices under (COM & L PT).
2x PCIe to High Speed Serial Por t (COMx)
1x PCIe ECP Paralle l Port (LPTx)
NOTE
1.
Set communication properties on „PCIe to High Speed Serial Port (COMx)“
as follows (by the right mouse button -Properties):
• on list Proper ties -Por t Settings set proper Bit pe r second and other
parameters; you can change number of COM por t also
• next click on list Properties -Advanced – choose type of port RS232 . Click
on „DMA settings“ button and choose required settings of DMA access OK; next click on „Adv Baudrates..“ button and choose either „Use default
baud rate“ or „Use custom baud rate“ for settings by your requirements. All
settings confirm OK or with help Defaults you return to default settings.
2.
On PCIe ECP parallel port (LPTx)” you can change numbe r of LPT port as
follow (r ight button of mouse -Proper ties)::
• on list Proper ties-Port Settings choose required changes for this por tw
Installation for othe r OS: Drivers are available here: www.i-tec.cz/en/.
Follow the advices in several driver folders (DOS, Linux) for PCIe (PCE2S1P).
SAFETY INSTRUCTIONS
• Do not expose to ex treme tempe ratures and air humidity.
• Use the device on flat sur faces – you will prevent it from slipping and falling
to the ground.
• Save the user manual for a possible use later.
In coop eration with the ser vice depar tment:
• Check functionality after falling to water or to the ground.
• Check functionality when the cover is broken.
• Send the device back if i t does not work in accordance with the user manual.
FREQUENTLY ASKED QUESTIONS
Availab le on our websi te www.i-tec.cz/en on the “FAQ” tab of this product .
EN
7
Page 8

DE
EINLEITUNG
PCIe to 2S1P Adapter stellt eine Karte in den PCIe-Slot im PC des Typs PCI-Express. Nach der Installation von Treibern verhält sich die Karte als ein Standard 2xCOM-Port und 1xLPT-Parallelport. Die Karte bietet einen Ausgang RS232
des Typs DB9 Male für einen asynchronen Anschluss von I/O-Anlage wie zum
Beispiel externes Modem, GSM-Modem, Drucker mit Serialport, Leser von Barcodes usw., sowie einen Standard- Parallelport (LPT) für den Anschluss von z.B.
Druckern. Die erreichte Geschwindigkeit für den Serialport beträgt bis zu 560 00
Baud im asynchronen Betrieb und ermöglicht auch die Verwendung mit Appli kationen in Bereich der Automatik , Monitoring und Steuerung von industriellen
Prozessen.
SPEZIFIKATION
• Schnittstelle: PCI Express Spezifikation 1.1
• UART: Unterstütz t alle UART-Typen von 450 bis zu 55 0 (voll programmierbar)
• Datenübertragungsgeschwindigkeit: bis zu 1,5Mb/s
• FIFO-Empfänger/Sende r arbeitet mit Datengrößen bis zu 256 Byte
• Unterstützung von Standard-Parallelport (SPP), Enhanced Parallel (EPP) &
Enhanced Capability Port (ECP)
• Geschwindigkeit beim Parallelport bis zu 1,5Mb/s, Serialport bis zu
230400b/s
• Unterstützung von Plug&Play und Hot Swap
• Betriebssystem: Win 7/8/10 32+64bit, Linux, DOS
LIEFERUMFANG
• 1x PCIe to 2S1P Adapter
• 1x Panel mit Kabeln für 2xDB9 Serial
• 3x Low Profile Schild
• Handbuch
INSTALLATION VON TREIBERN:
(Bemerkung: Die Treiber sind unter www.i-tec.cz/de/herunterzuladen.)
Für Windows® 7/8/10 32 _64 bit
1.
Installieren Sie die PCIe-Kar te in den PC NICHT vor der Installation von entsprechenden Treibern.
2.
Laden Sie die entsprechenden Treiber von www.i-tec.cz/de/ herunter und
entpacken Sie sie auf der Festplatte.
3.
Klicken Sie auf die Schaltfl äche "StnSetup.exe", um die Treiber aus dem
entsprechenden Betriebssystemver zeichnis zu installieren , und klicken Sie
anschließend auf "Exit"..
4.
Schalten Sie den PC aus und führen Sie die Montage der PCIe- Karte in den
PC nach den unte n genannten A nweisungen durch.
5.
Nach de m PC-Star t erkennt das BS eine neue Hardware und beendet die
Installation der Treiber. Nach Bedarf starten Sie de n PC neu.
8
Quick Start / PCIe to 2S Adapter 2x Serial 1x Parallel(PCE2S1P)
Page 9

Quick Start / PCIe to 2S Adapter 2x Serial 1x Parallel(PCE2S1P)
MONTAGE DER PCIE-KARTE IN DEN PC:
(Vorsicht: Lesen Sie zuerst die Vorgehensweise der Treiberinstallation im BS
und erst dann setzen Sie fort)
Hinweis: Der CO M-Anschluss – die rote Mar kierung auf de m DB-9-Kabel gehört
zur ∆ Markierung auf der PCE-Karte.
1.
Schalten Sie Ihren Computer aus und trenne n Sie das 230V-Netzteil von der
Stromversorgung.
2.
Nehmen Sie die Abdeckung des Rech ners ab, entferne n Sie die Kappe für
den entsprechenden PCIe-Slot und eine andere Kappe für de n Serialport.
3.
Setze n Sie sorgfältig die PCIe-Kar te in einen freien PCIe-Slot ein und schrauben Sie diese an . Nebenan schrauben Sie dann auch die Serialport-Karte a n.
4.
Schrauben Sie die PC -Abdeckung zurück und schließen Sie den PC ans
230V-Netz an. Schalten Sie den PC ein.
Überprüfung der Richtigkeit der Installation im OS Windows
Gehen Sie in den Verwal ter der Anlag e (z. B. in Win10: rechte Ma ustaste auf Start
- Geräte -Manager).
Unter der Position Por ts (COM&LPT) sollten Sie die neue n Anlagen sehen:
2x PCIe zu High Speed Serial Por t (COMx)
1x PCIe ECP Paralle l Port (LPTx)
BEMERKUNG
1.
Legen Sie für "PCIe zu High Speed Serial Por t (COMx)" die Kommunikationseigenschaften wie folgt fest (rechte Maustaste - Eigensc haften):
• auf der Leiste Eigenschaften-Port Settings (Por t-Einstellung) stelle n Sie die
entsprechenden Bits- per-Second und we itere Parameter ein; man kann auch
die Nummer des COM-Portes ändern.
• danach wählen Sie die Leiste Eigensc haften-Advanced (erweiter te Einstellung) – wählen Sie den Porttyp RS232. Nach der Wahl der Taste „DMA Settings“ konkretisie ren Sie die Einstellung des DMA-Zutritts und dann wählen
Sie „Adv Baudrates..“ und bestimmen Sie ent weder „Use default baud rate“
oder „Use custom baud rate“ für die Wahl nach Ihrer Anforderungen. Bestätigen Sie OK oder ke hren Sie mittels Defaults zur ursprünglichen Einstellung.
2.
Stellen Sie be i dem „PCIe ECP Parallelport (LPTx)“ die Kommunikations eigenschaften nachfolgend ein (mit rechter Maustaste - Eigenschaften):
• auf der Leiste Eigenschaften - Port Settings (Port-Einstellung) kreuzen Sie
die geforder ten Parameter für den genannten Port an; man kann auch die
Numme r des LPT-Por tes ändern.
®
DE
9
Page 10

DE
Installation für andere BS: Die Treiber sind unter www.i-tec.cz/de/ herunterzuladen. Folgend Sie den Anweisungen in einzelnen Dateiverzeichnissen von Treibern (DOS, Linux) für die PCIe-Karte (PCE2S1P).
SICHERHEITSHINWEISE
• Setzen Sie das Gerät keinen ex tremen Temperaturen und Feuchtigkeit aus.
• Verwenden Sie das Gerät auf flachem Untergrund, um zu verhindern, dass es
rutsc ht und auf den Boden fällt.
• Bewahren Sie das Handbuch zur spätere n Verwe ndung auf.
In Zusammenarbeit mit der Serviceabteilung:
• Überprüfen Sie die Funktionalität, nachdem das Gerät ins Wasser oder auf
den Boden gefallen ist.
• Überprüfen Sie die Funktionalität bei Beschädigung der Ab deckung.
• Reklamiere n Sie Geräte, die nicht so funk tionieren wie im Han dbuchs
beschrieben.
HÄUFIG GESTELLTE FRAGEN – Verfü gbar auf unserer Webseite
www.i-tec.cz/de auf der Registerkarte “FAQ ” dieses Produkts
Quick Start / PCIe to 2S Adapter 2x Serial 1x Parallel(PCE2S1P)
10
Page 11

Quick Start / PCIe to 2S Adapter 2x Serial 1x Parallel(PCE2S1P)
L’ENTRÉE EN MATIÈRE
PCIe to 2S 1P adapte r est une ca rte pour l a fente PCIe à P C type PCI e xpress. A près
l’in stallatio n des pilotes in formatiqu es, la car te se compor te comme 2x COM port
standard et 1xLPT-paralel port. La carte vous offre la sor tie RS232 type DB9
Mâle afin de fac iliter le bra nchemen t asynchro ne pour des pé riphéri ques I/O, tels
que modem externe, modem GSM, imprimante avec le port en série, lecteur de
codes de barre, etc., et, en plus, un port parallèle (LPT) standard afin de s’occuper du branchement des imprimantes, par exemple. En ce qui concerne le port
en série, la vitesse at teint jusqu’à 56000 baud dans le régime asynchrone, ce
qui rend possible aussi l’utilisation avec des applications dans l’automatisation,
monitoring et commande et contrôle des processus indus triels.
SPÉCIFICATION
• L’interface : PCI express spécificatio n 1.1
• Port : 2 x Serial RS232 typ DB9 (Mâle) et 1x paralel typ DB25 (Femelle)
• UART : Suppor t de tous les typ es d’UART, de 450 à 550 (complètement
programmables)
• Vitesse de transmission des données : jusqu’à 1,5Mb/s
• Récepteur / émetteu r FIFO travaille avec des données dont la taille es t
jusqu’à 256 byte
• Support de S tandard Paralel Port (SPP), Enhanced Paralel (E PP) & Enhanced
Capability Port(ECP)
• Vitesse sur le Paralel port jusqu’à 1,5Mb/s, sur le Serial port jusqu’à
230400b/s
• Support de Plug&Play et Hot Swap
• Système d’exp loitation : Windows Win 7/8/10 32+64bit, Linux, DOS
L’EMBALLAGE
• 1x PCIe to 2S1P adapter
• 1x plaque passe-câbles avec câbles pour 2xDB9 Serial
• 3 x bouchon d’aveuglement Low Profile
• Guide d ’instructions et mode d’emploi
L’INSTALLATION DES PILOTES INFORMATIQUES:
(Remarque: Les pilotes informatiques sont mis à votre disposition sur la page:
www.i-tec.cz/fr/pour les d’y télécharger)
Pour Windows® 7/8/10 32 _64 bit
1.
Ne pas procéde r à l’installation de la car te PCIe à votre ordinateur de bureau
(PC) avant l’installation des respectifs pilotes informatiques, s’il vous plaî t.
2.
Veuillez procéder au téléchargement des pilotes informatiques correspon dants de la page www.i-tec.cz/fr/, s’il vous plaît. Dans la suite, veuillez les
décompresser (dézipper) sur le HDD.
3.
Ensuite, il fau t cliquer sur le bouton « StnSetup.exe » pour procéder à
l’installation des pilotes informatiques dès le respectif fichier- répertoire qui
FR
11
Page 12

FR
dûment corresponde à votre S ystème d’exploitation (OS). Finalement, il est
nécessaire appuye r sur l’« Exit » afi n d’achever l’installation.
4.
Aussitôt après, il faut procéder à la mise hors service de votre ordinateur
de bureau (PC) et procé der au montage de la car te PCIe à votre PC, tout en
suivant les instructions mentionnées ci-dessous.
5.
Une fois votre ordinateur de bureau (PC) démarré, le système d’exploitation
détectera le nouveau matériel (hardware) et achève ra l’installation des
pilotes informatiques. Selon besoin, veuillez procéder au redémar rage
(restart) de votre ordinateur de bureau (PC), s’il vous plaît.
MONTAGE DE PCIE À VOTRE PC:
(attention, tout d’abord, veuillez lire, s’il vous plaît, le mode d’installation des
pilotes informatiques sous votre système d’exploitation et, bien après, veuillez
continuer)
Remar que: Le branchem ent du co nnecteur COM – l’âme rouge du câble se trouvant au câble dès DB-9 corre spond a u marquage ∆ sur l a carte PCE.
1.
Il faut procéder à la mise hors service de votre ordinateur. Il est nécessaire
de le déconnecter de l ’alimentation du réseau 230 V.
2.
Dans la suite, il est nécessaire d’ôter le couvercle de votre ordinateur de
bureau (PC), ainsi qu’il est né cessaire d’enlever la paupière correspondant à
la respective fente PCIe et une autre paupière pour les Serial ports.
3.
Aussitôt après, il faut mettre et ajuster très soigneusement la carte PCIe à la
fente PCIe libre et la visser bien. À côté, veuillez visser, s’il vo us plaît, aussi
la car te correspondant au Serial port.
4.
Ensuite, il fau t visser de nouveau le couvercle de PC et procéder à la
connexion de votre PC au réseau 230 V. Dans la suite, il es t nécessaire de
procéder à la mise de votre ordinateur de bureau (PC) en marche.
Vérification de l’ins tallation correcte sous le système d’exploitation Windows
Veuillez aller au Gestionnaire de périphériques, s’il vous plaît (par exemple sous
Win10 : avec le bou ton-pou ssoir à droite d e votre souris , veuillez aller à Démarrer
– Gestionnaire de périphériques).
Sous l’onglet Ports (COM&LPT), vous verrez les nouveaux périphériques :
2x PCIe to High Speed Serial Por t (COMx)
1x PCIe ECP Paralle l Port (LPTx)
REMARQUE
1.
En ce qui concerne « PCIe to High Speed Serial Port (COMx) », veuillez
procéder, s’il vous plaît, à la configuration des propriétés de communication
conformément aux instructions mentionnées ci-dessous (avec le bouton-poussoir à droite de votre souris-Propriétés) :
• sur la Barre d’outils-Por t Settings (Configuration du por t), veuillez ajuster, s’il
vous plaît, Bit per second co rrespondant, ainsi que d’autres paramètres ; il
Quick Start / PCIe to 2S Adapter 2x Serial 1x Parallel(PCE2S1P)
®
12
Page 13

Quick Start / PCIe to 2S Adapter 2x Serial 1x Parallel(PCE2S1P)
est possible c hanger même le numéro du por t COM
• dans la suite, veuillez choisir, s’il vous plaî t, la barre d’outils Propriétés-Advanced (Confi guration avancée) – veuillez choisir le type du port RS232.
Après, il faut choisir le bou ton « DMA settings » pou r préciser l’ajustement de
l’accès DMA et , dans la suite, il est nécessaire de choisir « Adv Baudrates.. »,
soit « Use default baud rate », soit « Use custom baud rate », pour votre choix
conformément à vos exigences. Veuillez confirmer avec OK , s’il vous plaît,
ou veuillez revenir sur la confi guration initiale par l’intermédiaire de Defaults.
2.
En ce qui concerne « PCIe ECP paralel port (LPTx) », veuillez procéder, s’il
vous plaît, à la configuration des propriétés de communication conformément au x instructions mentionnées ci -dessous (avec le bouton- poussoir à
droite d e votre souris -Proprié tés) :
• sur la Barre d’outils-Por t Settings (Configuration du port), veuillez cocher les
paramètres désirés pour le port mentionné ; il est possible de changer même
le numé ro du port LPT.
L’installation pour d’autres systèmes d’exploitation (OS) : Les pilotes informatiques sont mis à votre disposition sur la page : www.i-tec.cz/fr/ afi n d’être d’y
téléchargés. Veuillez suivre, s’il vous plaît, les instructions indiquées aux différents fichiers-répertoires concernant les pilotes informatiques (DOS, Linux) qui
sont destinés à PCIe (PCE2S ).
INSTRUCTIONS DE SÛRETÉ
• Ne pas exposer aux températures extrêmes ni à l’humidité d’air.
• Veuillez utiliser, s’il vous plaît, des dessous (fonds) plats pour y poser le
dispositif – pour éviter son glissement et tombée à terre.
• Veuillez garder, s’il vous plaît, le présent Guide d’instructions et mode
d’emploi pour son éventuelle utilisation postérieure.
Veuillez collaborer, s’il vous plaît, avec le D éparteme nt de Service :
• Pour vérifier le bon et c orrect fonctionnement du disp ositif après une
tombée à l’eau ou à te rre.
• Pour vérifier le bon et c orrect fonctionnement quand le couve rcle montre
une rupture.
• Pour procéder à une réclamation du dispositif qui ne fonctionne pas
conformément au présent Guide d’instructio ns et mode d’emploi.
RÉPONSES AUX QUESTIONS FRÉQUEMMENT P OSÉES
À votre disposition sur notre page web www.i-tec.cz/fr, où se trouvent sous
l’onglet de « FAQ » qui correspondent au respectif produit.
FR
13
Page 14

ES
INTRODUCCIÓN
La tarjeta adaptadora PCIe a 2S1P es una tarjeta para ranura PCIe de tarjeta
PCI express en su PC. Después de instalar los controladores, la tarjeta funciona
como un puerto 2xCOM estándar y un puerto paralelo 1xLPT. La tarjeta ofrece
salida RS232 tipo DB9 Macho para conectar dispositivos I/O como un módem
externo, un módem GSM, una impresora de puerto serie, un lector de código de
barra s, etc., así como un pu erto paral elo estánda r (LPT) pa ra conecta r, por ejemplo, impresoras. La velocidad para el puerto serie es de hasta 56000 baudios en
modo asíncrono y también permite su uso con aplicaciones en automatización,
monitoreo y control de procesos industriales.
ESPECIFICACIONES
• Interfaz: PCI Express Especifi caciones 1.1
• Puer to: 2x RS232 tipo DB9 serie (macho) y 1x tipo paralelo DB25 (hembra)
• UA RT: admite to dos los tipos de UART de 4 50 a 550 (totalmente pro gramables)
• Velocidad de transferencia d e datos: hasta 1.5Mbps
• El rece ptor/transmisor FIFO funciona con datos de tamaño hasta 256 by tes
• Soporte para Standard Paralel Port (SPP), Enhan ced Paralel (EPP) y Enhanced Capability Por t(ECP)
• Veloci dad de puer to paralel o de hasta 1.5Mbps , hasta 2304 00bps en pu erto seri al
• Soporte de Plug & Play y Hot Swap
• Sistema operativo: Windows Win 7/8/10 32 + 64bit, Linux, DOS
EMBALAJE
• 1x Adaptador PCIe a 2S1P
• 1x Panel con cables para 2xDB9 serie
• 3 x manta de perfil bajo (Low Profi le)
• Manual
INSTALACIÓN DE CONTROLADORES:
(Nota: los controladores se pueden descargar aquí: www.i-tec.cz/es/)
Para Windows® 7/8/10 32 _64 bit
1.
No inst ale la tarje ta PCIe en su PC a ntes de insta lar los cont roladore s apropiad os.
2.
Descargue los controladores adecuados desde www.i-tec.com/es/ y des-
comprímalos en el disco.
3.
Haga cl ic en el botón "S tnSetup.e xe" para insta lar los contr oladores de sde el directo rio del siste ma operativ o correspondien te y "Exit" c uando haya ter minado.
4.
Apag ue la PC e instal e la tarjeta P CIe en su PC com o se describ e a continua ción.
5.
Después de que se inicie la PC, el sistema operativo detecta un nuevo hardware e ins tala los controladores. Reinicie su PC según sea ne cesario.
Quick Start / PCIe to 2S Adapter 2x Serial 1x Parallel(PCE2S1P)
14
Page 15

Quick Start / PCIe to 2S Adapter 2x Serial 1x Parallel(PCE2S1P)
INSTALE PCIE EN LA PC:
(asegúrese de leer primero la instalación del controlador del sistema operativo
y luego continuar)
Nota: Instalac ión de CO M conec tor: el ca ble rojo d el cable DB-9 per tenece a la
marca ∆ en la tarjeta PCE
1.
Apague la computad ora y desenchúfela d e la fuente de ali mentación de 230V.
2.
Quita la cubie rta de la PC y la cu bierta de la ranura P CIe correspondie nte y
una cubierta del puerto serie.
3.
Encaje cuidadosamente la ta rjeta PCIe en la ranura libre del PCIe y atorní llela. Al lado atornille la tarjeta del puerto serie.
4.
Vuelva la cubierta de la PC y conecte la PC a la red eléctrica de 230V.
Enciende tu PC.
Verifique que la instalación sea correcta en el sistema operativo Windows
Vaya al Adm inistrador de disp ositivos (p or ejemplo, en Win10: botón derecho del
ratón para iniciar el Administrador de dispositivos).
En Puertos (COM y LPT), verás nuevos dispositivos:
2x PCIe to High Speed Serial Por t (COMx)
1x PCIe ECP Paralle l Port (LPTx)
NOTA
1.
Establezca las propiedades de com unicación de „PCIe to High Speed Se rial
Port (C OMx)“ de la siguiente manera ( botón derec ho del ratón - Propiedades):
• Establezca el bit por segundo correspondiente y otros parámetros en la
barra d e herramientas Propiedades- Port Settings (configuración del puerto).
También puede ca mbiar el número de puerto COM
• selec cione la barra Propiedades- Advanced (Configuración avanzada)
- elija el tipo de puerto RS232. Después de seleccionar el botón „DMA
settings“, especificará la configuración de acceso DM A y seleccionará "
„Adv Baudrates..“ y selecciona „Use default baud rate“ o „Use custom baud
rate“ pa ra seleccionar su opción. Acepta con “OK ” o con “Default” volver a la
configuración original.
2.
En el „P CIe ECP paralel port (LPTx)“ configure las propiedades de comunicación de la siguiente manera (botón derecho del rató -Propiedades):
• en la bar ra de herramientas Propie dades-Port Settings (configuración del
puerto), verifique los parámetros reque ridos para ese puer to; También puede
cambiar el número de puerto LPT
Insta lación par a otros siste mas operat ivos: Los cont roladore s se pueden d escargar aqu í: www.i-tec. cz/es/. Siga las in struccio nes en cada di rectorio de c ontroladores (DOS, Linux) para PCIe (PCE2S1P).
ES
®
15
Page 16

IT
INSTRUCCIONES DE SEGURIDAD
• No exponga el dispositivo a temperaturas extremas y a la humedad del aire.
• Utilice el dispositivo e n superficies planas, evite que pueda deslizarse y caer
al suelo.
• Conse rve el manual para un eventual uso en el futuro.
En colaboración con el departamento de servicio técnico:
• Verifi que el funcionamiento tras una caída al agua o al suelo.
• Compruebe el funcionamiento en caso de que la cubierta esté agrietada.
• Fo rmule una re clamación d el dispositivo seg ún lo indicad o en el manual .
PREGUNTAS FRECUENTES - disponible en nues tra página web
www.i-tec.cz/es, en la pestaña “FAQ” de este producto.
INTRODUZIONE
L’adattatore PCIe to 2S1P è una scheda di tipo PCI-E xpress che viene inserita
nello slot PCIe del computer. Una volta installati gli strumenti, la scheda si comporta come una dopp ia porta COM seriale standard e una porta LPT par allela. La
scheda offre non soltanto l’uscita RS232 di tipo DB9 Male per il collegamento
asinc ronico di un d ispositi vo I/O ad es. mode m esterno, m odem GSM, s tampante
con porta seriale , lettore di co dici a barre ecc., ma anche una porta LPT pa rallela
standard per collegare altri dispositivi, ad es. stampanti. La velocità della porta
seriale raggiunge fino a 56.000 baud nella modalità asincronica e può essere
usata assieme ad altre applicazioni per au tomatizzare, monitorare o gestire processi industriali.
SPECIFICAZIONI TECNICHE
• Interfaccia: PCI-Exp ress con spec ifica 1.1
• Porte: 2 porte seriali RS232 di tipo DB9 (Male) e 1 porta parallela di tip o
DB25 (Female)
• UART: supporta tutti i tipi dell’interfaccia UART da 450 a 550 (completamente programmabili)
• Velocità di trasmissione dati: fino a 1,5 Mb/s
• Ricevitore/trasmettitore FIFO che riesce a trasferire f ino a 256 byte
• Supporta le seguenti por te parallele: Standard Parallel Port (SPP), Enhanced
Parallel Por t (EPP) e Capability E nhanced Port (ECP)
• Velocità della porta seriale fino a 230400 b/s e della porta parallela fino a
1,5 M b/s
• Supporta Plug&Play e Hot Swap
• Strumenti suppor tati: Win 7/8/10 32/64 bit, Linux e DOS
16
Quick Start / PCIe to 2S Adapter 2x Serial 1x Parallel(PCE2S1P)
Page 17

Quick Start / PCIe to 2S Adapter 2x Serial 1x Parallel(PCE2S1P)
CONFEZIONE
• 1 adattatore PCIe to 2S1P
• 1 pannello con cavi per 2 porte seriali DB9
• 3 chiusure a basso profilo
• Libretto d’uso
INSTALLAZIONE STRUMENTI
Nota: Gli strumenti possono essere scaricati qui: www.i-tec.cz/it/.
Per Windows® 7/8/10 32/6 4 bit
1.
Non installare la scheda PCIe nel computer prima di installare i rispettivi
strumenti.
2.
Scaricare i rispet tivi strume nti dalle seguenti pagine web www.i-tec.cz/it/
ed estrarli sul disco rigido.
3.
Cliccare sul tasto “StnSetup.exe” per installare gli strumenti dall’agenda del
rispe ttivo sistema operativo e pre mere il tasto “E xit”.
4.
Spegnere il computer e procedere al montaggio de lla scheda PCIe seco ndo
le indicate istruzioni.
5.
Dopo l’avviamento del comp uter il sistema operativo rileva un nuovo
hardware e termina l’installazione degli strumenti. Se occorre, riavviare il
computer.
MONTAGGIO DELLA SCHEDA PCIE NEL COMPUTER
(Attenzione! Prima di procedere al montaggio della scheda, leggere le istruzioni
per l’installazione degli strumenti nel computer.)
No ta pe r il c olle gam ent o del conn ett ore C OM: I l filo rosso d el cavo proven iente da
DB-9 deve essere ab binato al simbolo ∆ della scheda PCE.
1.
Spegnere il computer e staccare la spina dalla presa 230 V.
2.
Smontare l’involuc ro esterno del PC e togliere la chiusura del rispettivo slot
PCIe e un’altra chiusura per le porte se riali.
3.
Inserire accuratamente la scheda PCIe nello slot P CIe libero e fissarla con le
rispe ttive viti. Allo stesso modo f issare anche la porta seriale della sche da.
4.
Rimontare l’involucro esterno del PC e fissarlo con le rispettive viti. Collegare il computer alla presa elettrica 230 V e accenderlo.
Controllo dell’installazione corretta nel sistema operativo Windows
Passare alla gestione del computer (ad es. nel sistema operativo Win10 cliccare
con il pulsante destro del mouse sul tasto Star t – Gestione dispositivi).
Sotto la voce Por te (COM&LPT ) si troveranno dispositivi nuovi:
2 PCIe to High Speed Serial Port (COMx)
1 PCIe ECP parallel por t (LPTx)
®
IT
17
Page 18

IT
ANNOTAZIONI
1.
Impostare le specif icazioni tecniche della comunicazione e relative alla
porta seriale “PCIe to High Speed Serial Port (COMx)” nel seguente modo:
• preme re con il pulsante destro del mouse il tasto Proprietà;
• impostare il corrispondente valore Bit per secondo e altri parametri sulla
barra Proprietà – Port Set tings (impostazione della por ta); ev. cambiare
anche il numero della porta COM;
• dopodiché selezionare la barra Proprietà – Advanced (impostazione
avanzata) e selezionare il tipo della porta RS232. Agendo sul pulsante “DMA
settings”, precisare l’im postazione dell’accesso DMA e cliccando su “Adv
Baudrates” se lezionare “Use default baud rate” oppure “ Use custom bau d
rate” a se conda della vostra preferenza. Confermare tut to premendo il tasto
OK o tornare all’impostazione precedente agendo sul tasto Defaults.
2.
Impostare le specif icazioni tecniche della comunicazione e relative alla
porta parallela “P CIe ECP parallel por t (LPTx) nel seguente modo:
• preme re con il pulsante destro del mouse il tasto Proprietà;
• impostare i parametri richiesti per la determinata por ta sulla barra Proprietà
Port Settings (impostazione della porta); ev. cambiare anche il numero della
porta LPT.
Nota per l’installazione con altri sistemi operativi: Gli strumenti possono essere
scaricati qui: www.i-tec.cz/ it/. Procedere second o le istruzioni relative ai rispettivi strumenti (DOS, Linux) e PCIe (PCE2S) e indicate nelle singole agende.
ISTRUZIONI DI SICUREZZA PER L’USO DELLA STAZIONE DOCK
• Evitare i valori estremi della temperatura e dell’umidità.
• Usare il dispositivo su un supporto or izzontale pe r evitare la caduta per terra
a causa del suo sc ivolamento.
• Conse rvare gli str umenti e anche il Libretto d’uso.
In collaborazione con il Centro di assistenza tecnica
• controllare il funzionamento del dispositivo dopo la sua caduta per terra o
nell’acqua
• verificare il funzionamento del dispositivo in caso di rottura dell’involucro
• sporgere il reclamo se il dispositivo non funziona se condo il Libretto d’uso.
DOMANDE FREQUENTI: Si veda la scheda “FAQ” di questo prodotto sulle nostre
pagine web www.i-tec.cz/it.
Quick Start / PCIe to 2S Adapter 2x Serial 1x Parallel(PCE2S1P)
18
Page 19

Quick Start / PCIe to 2S Adapter 2x Serial 1x Parallel(PCE2S1P) CZ
ÚVOD
PCIe to 2S1P adapter je karta do PCIe slotu v PC typu PCI express. Po instalaci
ovladačů se karta chová jak standardní 2xCOM por t a 1xLPT-paralel port. Karta
nabízí výstup RS232 typu DB9 Male pro asynchronní připojení I/O zařízení jako
externí modem, GSM modem, tiskárna se serial portem , čtečka čárov ých kódů,
atd. a tak é standard ní paralel ( LPT) po rt pro při pojení na př. tiskáren . Dosahovan á
rychlost pro seriál port je až 56000 baud v asynchronním režimu a umožňuje také
použi tí s aplikace mi v automatizaci, mo nitorování a řízení průmyslov ých procesů.
SPECIFIKACE
• Rozhraní: PCI express specifikace 1.1
• Port: 2x Serial RS232 typ DB9 (Male) a 1x paralel t yp DB25 (Female)
• UART: Podporuje všechny UART typy od 450 do 550 (plně programovatelné)
• Rychlost přenosu dat: až do 1,5Mb/s
• FIFO přijímač/vysílač pracuje s daty velikos ti až 256 byte
• Podpora Standard Paralel Port (SPP), Enhanced Paralel (EPP) & Enhanced
Capability Port(ECP)
• Rychlost na Paralel portu až 1,5Mb/s, na Serial portu až 2304 00b/s
• Podpora Plug&Play a Hot Swap
• Operační systém: Windows Win 7/8/10 32+64bit, Linux, DOS
BALENÍ
• 1x PCIe to 2S1P adapter
• 1x Panel s kabely pro 2xDB9 Serial
• 3 x Low Profi le záslepka
• Manuál
INSTALACE OVLADAČŮ:
(Poznámka: Ovladače jsou ke stažení zde: www.i-tec.cz)
Pro Windows® 7/8/10 32 _64 bit
1.
Neinstalujte PCIe kartu do P C před instalací odpovídajících ovladačů.
2.
Stáhněte si odpovídající ovladače a rozbal te (odzipujte) je n a HDD z www.i-tec.cz
3.
Klikněte na tlačítko “StnSetup.exe” p ro instalaci ovladačů z odpovídajícího
adresáře pro OS a “Exit” po dokončení.
4.
Vypněte PC a proveďte montáž PCIe kar ty do PC dle pokynů níže.
5.
Po star tu PC OS detekuje nový hardware a doinstaluje ovladače. Podle
potřeby restartujte PC.
MONTÁŽ PCIE DO PC
(pozor, přečtěte si nejprve způsob instalace ovladačů v OS a až poté pokračujte)
Poznámk a: Zapojení COM ko nekto ru- červená žíla na kabelu od DB-9 patří ke
značce ∆ na PCE kar tě
1.
Vypněte počítač a vypojte od napájení 2 30V.
19
Page 20

CZ
2.
Sejměte kr yt PC a odstraňte kr ytku pro odpovídající PCIe slot a je dnu další
kry tku pro Serial por ty.
3.
Pečlivě usaďte kartu PCIe do volného PCIe slotu a přišroubujte ji. Vedle pak
přiš roubujte i Serial port kar tu.
4.
Kry t PC přišroubujte zpět a PC př ipojte do sítě 230V. Zapněte PC.
Ověření správnosti instalace v OS Windows
Přejděte do Správce zařízení (nap ř. ve Win10: pravé tla čítko myši na St art Spr ávce zařízení ).
Pod položkou Porty (COM&LP T) uvidíte nová zařízení:
2x PCIe to High Speed Serial Por t (COMx)
1x PCIe ECP Paralle l Port (LPTx)
POZNÁMKA
1.
Na „PCIe to High Speed Se rial Port (COMx)“ nas tavte komunikační vlastnosti
následovně (pravým tlačítkem myši-Vlastnosti):
• na liště Vlastnosti-Port Settings (Nastavení portu) nastavte odpovídající Bit
per second a další parametr y; lze změnit i číslo COM portu
• dále zvolte lištu Vlastnosti -Advanced (Rozší řené nastavení) – zvolte t yp
portu RS232 . Po zvolení tlačítka „DMA set tings“ si upřesníte nastavení DMA
přístupu a dále zvolte „Adv Baudrates..“ a určete si bu ď „Use default baud
rate“ nebo zvolte „Use custom baud rate“ pro volbu dle vašich požadavků.
Potrvďte OK nebo pomoci Defaults se vrátíte na původní nastavení.
2.
Na „PCIe ECP paralel port (LPTx)“ nastavte komunikační vlastnosti následovně (prav ým tlačítkem myši-Vlastnosti):
• na liště Vlastnosti-Port Settings (Nastavení portu) zaškrtněte požadované
parametry p ro uvedený port; lze změnit i číslo LPT portu.
Insta lace pro jiné O S: Ovladače jsou ke st ažení zde: ww w.i-tec.cz. Po stupujte dle
pokynů v jed notlivýc h adresáří ch pro ovlad ače (DOS, L inux) pro PCI e (PCE2S1P ).
BEZPEČNOSTNÍ POKYNY
• Nevystavujte extrémním te plotám a vlhkosti vzduchu.
• Používejte zařízení na plochých podložkách – vy varujete se tím sklouznutí
a pádu na zem.
• Uschovejte manuál pro pozdější možné použití.
V součinnosti se ser visním oddělením:
• Ověřte funkčnost po pádu do vody nebo na zem.
• Ověřte funkčnost při prasknutí krytu.
• Reklamujte zařízení nefungující dle manuálu.
ČASTO KLADENÉ OTÁZKY
K dispozici na našem webu www.i-tec.cz v záložce „ FAQ“ u tohoto produktu.
Quick Start / PCIe to 2S Adapter 2x Serial 1x Parallel(PCE2S1P)
®
20
Page 21

Quick Start / PCIe to 2S Adapter 2x Serial 1x Parallel(PCE2S1P)
WSTĘP
P C I e t o 2 S 1P a d a p t e r j e s t k a r t ą rozszerzeń sta ndard u PCI Ex press. P o podłączeniu
kar ty do komput era i zainsta lowaniu ste rowników sys tem rozpozna je urządzenie
jako 2 standardowe por ty COM i jeden port LPT. Karta wyposażona jest
w męskie porty RS-232 DB9 pozwalające podłączyć urządzenia zewn ętrzne ty pu
modem lub czy tnik kodów kreskowych oraz żeński port równoległy IEEE 1284
do podłączenia na przykład drukark i. Maksymalny transfer danych, który może
wynosić w przypadku złącza szeregowego w trybie asynchronicznym 56000
bodów, kwalifikuje kartę do profesjonalnego uż ycia z aplikacjami sterującymi
i monitorującymi procesy przemysłowe.
SPECYFIKACJA
• Złącze: PCI express 1.1
• Port y: 2x port szeregowy RS232 męsk i DB9 i 1x port równoległy żeński DB25
• UART: obsługa wsz ystkich ty pów UART od 45 0 do 550 (w pełni programowalne)
• Transfer danych: do 1,5Mb/s
• Kolejkowanie danych FIFO dla danych o rozmiarze 256 bajtów
• Obsługa standardów Standard Paralel Port (SPP), Enhanced Paralel (EPP) i
Enhanced Capability Port (ECP)
• Trans fer danych p rzez : por t szeregow y: do 2304 00b/s i por t równoleg ły: do 1,5Mb/s
• Obsługa Plu g&Play i Hot Swap
• System operacyjny: Win 7/8/10 32+6 4bit, Linux, DOS
ZAWARTOŚĆ OPAKOWANIA
• 1x PCIe to 2S1P adapter
• 1x Panel z pr zewodami 2xDB9 Serial
• 3x Low Profile tarcza
• 1x Instrukcja obs ługi
INSTALACJA STEROWNIKÓW:
(Aktualne sterowniki do pobrania można znaleźć na www.i-tec.cz/pl/.)
Windows® /8/10 32_64bit
1.
Nie montować karty PCIe w komputerze przed instalacją sterowników.
2.
Pobierz odpowiednie sterownik i z www.i-tec.cz/pl/ i rozpakuj pliki (unzip).
3.
Klik nij i urucho m plik "StnS etup.exe", aby z ainstalowa ć sterow niki z katalogu
odpow iedniego d la Twojego systemu opera cyjnego i "Z akończ", aby zakończyć.
4.
Wyłączyć komputer i pod łączyć kartę zgodnie z instrukcją.
5.
Po uruchomieniu komputera system wykr yje sprzęt i zainstaluje
odpowiednie sterowniki. Jeśli będzie to konieczne należy uruchomić
ponownie komputer.
MONTAŻ KARTY PCIE W KOMPUTERZE:
(uwaga, przeprowadzić proces po zapoznaniu się z opisem instalacji sterowników
w systemie operacyjnym)
PL
21
Page 22

PL
Uwaga: Podłączenie złącza COM - czerwony rdzeń na kablu DB-9 należy do
oznaczenia ∆ na karcie PC E.
1.
Wyłącz komputer i odłącz od zasilania 230V.
2.
Otworzyć obudowę komputera; przygotować 2 miejsca z tyłu obudowy – dla
karty (pr zy wybranym slocie PCIe) i dla portu szere gowego.
3.
Zamocować kartę w slocie i przykręcić do obudowy. W razie potrzeby
zamocować również szynę portu szeregowego.
4.
Zamknąć obudowę, podłączyć zasilanie i uru chomić komputer.
Sprawdzenie poprawności instalacji w systemie Windows
Uruchomić Menedżer urządzeń. W pozycj i Porty (C OM i LPT ) powinny zn ajdować się wpisy:
2x PCIe do szybkiego portu szeregowego (COMx)
1x PCIe ECP Paralle l Port (LPTx)
UWAGA
1.
W "PCIe to High Speed Serial Port (COMx)", ustaw Właściwości komunikacji
w następujący sposób (prawym przyciskiem myszy - Właściwości):
• kliknąć prawym przyciskiem mysz y i wybrać Właściwości - ustawić
prawidłowe war tości w zakładce Ustawienia por tu w tym numer portu COM
• kliknąć Zaawansowane i w zakładce „Zaawansowane ustawenia“ wybrać
odpowiedni typ portu oraz ustawić parametr y DMA.
• Wprowadzone zmiany zaakceptować klikając OK. Klikając „Przywró ć
domyślne“ można przywrócić domyślne ustawienia portu.
2.
Port „ PCIe ECP paralel por t (LPTx)“ powinien zostać odpowiednio
skonfigurowany (kliknąć prawym pr zyciskiem myszy i w ybrać Właściwości)
• ustawić prawidłowe wartości w zak ładce Ustaw ienia por tu w tym nume r portu LP T
Instalacja w innych systemach operacyjnych: Aktualne sterowniki do pobrania
można znaleźć na www.i-tec.cz/pl/. Postępuj zgodnie z instrukcjami zawar tymi
w odpowiednich katalogach ze sterownikami (DOS, linux) dla PCIe (PCE2S1P).
INSTRUCKJE BEZPIECZEŃSTWA
• Nie narażać na działanie wysokich temperatur i w ysokiej wil gotności.
• Używać urządzenia na powierzchniach płaskic h w celu uniknięcia upadku.
• Zachować instrukcję do ewentualnego późniejszego użycia.
We współpracy z działem serwisu:
• Sprawdzić funkcjonalność po upadk u do wody lub na twarda powierzchnię
• Sprawdzić funkcjonalność gdy obudowa uległa uszkodzeniu
• Odesłać urządzenie gdy nie pracuje zgodnie z instrukcją.
CZĘSTO ZADAWANE PYTANIA
dostępne na naszych stronach www.i-tec.cz/pl w zakładce „FAQ“ przy
niniejszym produkcie
Quick Start / PCIe to 2S Adapter 2x Serial 1x Parallel(PCE2S1P)
®
22
Page 23

Quick Start / PCIe to 2S Adapter 2x Serial 1x Parallel(PCE2S1P)
ÚVOD
PCIe to 2S1P adaptér je karta do PCIe slotu v PC typu PCI express. Po inštalácii
ovládačov sa karta chová ako štandardný 2xCOM port a 1xLPT-paralel por t. Karta
ponúka výstup RS232 typu DB9 Male pre asynchrónne pripojenie I/O zariadení ako
externý modem, GSM modem, tlačiareň so seriál portom, čítačka čiarových kódov,
atď. a tiež štandardný paralel (LPT ) por t pre pripojenie napr. tlačiarní. Dosahovaná
rýchlosť pre seriál port až 56000 baud v asynchrónnom režime umožňuje tiež pou-
žitie s a plikáciam i v automatizá cii, monito rovaní a riade ní priemyselných p rocesov.
ŠPECIFIKÁCIE
• Rozhranie: PCI express špecifikácia 1.1
• Port: 2x Serial RS232 typ DB9 (Male) a 1x paralel t yp DB25 (Female)
• UART: Podporuje všetky UART ty py od 450 do 550 (plne programovateľné)
• Rychlost přenosu dat: až do 1,5Mb/s
• FIFO prijímač/vysielač pracuje s dátami veľkosti až 256 by te
• Podpora Standard Paralel Port (SPP), Enhanced Paralel (EPP) & Enhanced
Capability Port (ECP)
• Rýchlosť na Paralel portu až 1,5Mb/s, na Serial portu až 230400b/s
• Podpora Plug&Play a Hot Swap
• Operačný sys tém: Win 7/8/10 32+64bit, Linux, DOS
BALENIE
• 1x PCIe to 2S1P adaptér
• 1x Panel s káblami pre 2xDB9 Serial
• 3x Low Profile záslepka
• Manuál
INŠTALÁCIA OVLÁDAČOV:
(Poznámka: Ovládače sú k stiahnutiu tu: www.i-tec.cz)
Pre Windows® 7/8/10 32 _64 bit
1.
Neinš talujte PCIe kartu do PC pred inštaláciou odpovedajúcich ovládačov.
2.
Stiahnite si odpovedajúce ovládače a rozbaľte (odzipujte) ich na HDD.
3.
Kliknite na tlačidlo “StnSetup.exe” pre inštaláciu ovládačov z odpovedajúceho adresára pre OS a “Exit” po dokončení.
4.
Vypnite PC a vykonajte montáž PCIe karty do PC podľa pokynov nižšie.
5.
Po štar te PC OS detekuje nový hardware a doinštaluje ovládače. Podľa
potreby rešta rtujte PC.
MONTÁŽ PCIE DO PC:
(pozor, prečítajte si n ajprv s pôsob inš taláci e ovládačov v O S a až potom pok račujte)
Poznámk a: Zapojenie COM konektora- červená žila na káble od DB-9 patrí
k značke ∆ na PCE karte.
1.
Vypnite počítač a odpojte od napájania 230V.
2.
Zložte k ryt PC a odstráňte krytku pre odpovedajúci PCIe slot a jednu ďalšiu
kry tku pre Serial port.
SK
23
Page 24

SK
3.
Usaďte kar tu PCIe do voľného PCIe slotu a priskrutkujte ju. Vedľa potom
prisk rutkujte i Se rial port kartu.
4.
Kry t PC priskrutkujte späť a PC pripojte do siete 230V. Zapnite PC.
Overenie správnosti inštalácie v OS Windows®
Prejdite do Správca zariadení (napr. vo Win10: pravé tlačidlo myši na Štart Správca zariadení ).
Pod položkou Porty (COM&LP T) uvidíte nové zariadenia:
2x PCIe to High Speed Serial Por t (COMx)
1x PCIe ECP Paralle l Port (LPTx)
POZNÁMKA
1.
Na „PCIe to High Speed Se rial Port (COMx)“ nastavte komunikačné vlastnosti nasledovne ( pravým tlačidlom myši - Vlastnos ti)
• na lište V lastnosti-Por t Settings (Nastavenie portu) nastavte odpovedajúci
Bit per second a ďalšie parametre; môžete zmeniť i číslo COM por tu
• ďalej zvoľte lištu Vlastnosti -Advanced ( Rozšírené nastaven ia) – zvoľte typ
portu RS232 . Po zvole ní tlačidla „ DMA settings“ si up resníte nastavenie DMA
prístupu a ďalej zvoľte „A dv Baudrates ..“ a určite si buď „Use defa ult baud
rate“ alebo zvoľte „Use c ustom baud rate“ pre voľbu podľa vašich p ožiadaviek .
Potvrďte OK al ebo pomoco u Defaults sa vrátite na pôvodné nastave nia.
2.
Na „PCIe ECP paralel port (LPTx)“ nastavte komunikačné vlastnosti nasledovne ( pravým tlačidlom myši-Vlastnosti):
• na lište V lastnosti-Por t Settings (Nastavenie portu) zaškrtnite požadované
parametre pre uvedený port; môžete zmeniť i číslo LPT portu.
Inšt alácia pre in é OS: Ovláda če sú k stiahnu tiu tu: www.i-te c.cz. Postup ujte pod-
ľa pokynov v jednotlivých adresároch ovládačov (DOS, Linux) pre P CIe.
BEZPEČNOSTNÉ POKYNY
• Nevystavujte extrémnym teplotám a vlhkos ti vzduchu.
• Používajte zariadenie na plochých podložkách – v yvarujete sa tým sk ĺznutiu
a pádu na zem.
• Uschovajte manuál pre neskoršie možné použi tie.
V súčinnosti so servisným oddelením:
• Overte funkčnosť po páde do vody alebo na zem.
• Overte funkčnosť pri prasknutí k rytu.
• Reklamujte zariadenie nefungujúce podľa manuálu.
ČASTO KLADENÉ OTÁZKY k dispozícii na našom webe www.i-tec.cz
v záložke „FAQ“ pr i tomto produk te
Quick Start / PCIe to 2S Adapter 2x Serial 1x Parallel(PCE2S1P)
24
Page 25

Quick Start / PCIe to 2S Adapter 2x Serial 1x Parallel(PCE2S1P)
ĮVADAS:
PCIe to 2S 1P adapte r yra korta de dama į kompiu terio tipo P CI express P CIe lizdą.
Po valdiklių instaliacijos korta veikia kaip standartinis 2xCOM portas ir 1xLPTparalelinis portas. Korta siūlo RS232 tipo išėjimą DB9 Male asinchroniniam
prijungimui I/O įrengimo, kaip nuotolinis modemas, GSM modemas,
spausdintuvas su serial portu, brūkšninių kodų skaitytuvas ir pan. O taip pat
standartinis paralelinis portas (LPT) spausdintuvo prijungimui. Serial porto
greitis yra 56000 baud, asinchroniniame režime suteikia galimybes naudoti su
aplikacijomis automatizacijoje, monitoringe ir pramoninių procesų valdyme.
SPECIFIKACIJA:
• Sąsaja: PCI express specifi kacija 1.1
• Portas: 2x Serial RS 232 typ DB9 (Male) ir 1x paralelinis tipas DB25 (Female)
• UART: Suteikia paramą visiems UART tipams nuo 450 iki 550 ( pilnai
programuojamas)
• Duomenų perdavimo greitis: iki 1,5Mb/s
• FIFO imtuvas/siųstuvas dirba su duomenimis, kuri ų dydis 256 byte
• Parama Standard Paralel Port (SPP), Enhanced Paralel (EPP) & Enhanced
Capability Port (ECP)
• Greitis Paralel por te 1,5Mb/s, Serial porte 23040 0b/s
• Parama Plug&Play ir Hot Swap
• Operacinė sistema: Win 7/8/10 32+6 4bit, Linux, DOS
ĮPAKAVIME YRA:
• 1x PCIe to 2S1P adapteris
• 1x Panelis su kabeliais serialui 2xDB9
• 3x Low Profile skydas
• Vadovas
VALDIKLIŲ INSTALIACIJA:
(Pastaba: Valdymo pulteliai atsisiuntimui yra čia: www.i-tec.cz/en/)
Windows® 7/8/10 32 _64 bit
1.
PCIe kartos neinstaliuokite į kompiuterį, kol nebuvo suinstaliuoti atitinkami
valdikliai.
2.
Atsisiųskite atitinkamus tvarkiklius ir išimkite juos iš „zip“ diske HDD iš
www.i-tec.cz/en/).
3.
Užbaigę paspauskite mygtuką ties “StnSetup.exe” dėl tvarkiklių iš atitinkamo adresyno sk irto OS ir “Exit” įdiegimo.
LT
25
Page 26

LT
4.
Išjunkite PC ir atlikite PCIe kartos montažą į PC pagal instrukciją pateiktą
žemiau.
5.
Po kompiuterio star to OS atranda naujas hardwar ir užbaigią valdiklių instaliaciją. Pagal poreikį restartuokite PC.
PCIE MONTAŽAS Į KOMPIUTERĮ:
(dėmesio, pirmiausia perskaitykite valdiklių instaliacijos OS būdą, ir tik p o to tęskite)
Pastab a: COM konekto riaus prij ungimas- ra udona gysla l aide nuo DB-9 p riklauso
ženklui ∆ esančia me PCE kor toje.
1.
Išjunkite kompiuterį ir išjunkite iš 230V maitinimo tinklo.
2.
Nuimk ite PC dangtį ir atidarykite atitinkamo PCIe lizdo dangtį Serial portui.
3.
Tvi rta i įdėkite PCIe kortą į laisvą PCIe lizdą ir ją priveržkite varžtais. Po to
šalia varžtais priveržkite Serial port kor tą.
4.
Pritvirtinkite kompiuterio korpusą ir kompiuter į įjinkite į 230V tinklą. Įjunkite
kompiuterį.
Patikrinimas ar OS Windows® instaliacija buvo atlikta teisingai
Pasirinkite Įrengimo administratorių (pavyzdžiui Win10: dešinyis pelės mygtu kas
ant Start- Įrenginio administratorius -Įrengimo administratorius).
Eilutėje Portai (COM&LPT ) matysite naujus įrengimus:
2x PCIe to High Speed Serial Prievadas (COMx)
1x PCIe ECP Paralle l Port (LPTx)
PASTABA:
1.
„PCIe to High Speed Serial Prievade (COMx)“ nustatykite r yšio savybes
(dešiniuoju pelės mygtuku - Savybės):
• eilutėje Savybės- Port Settings (Porto nustaty mas) nustatykite atitinkamą
Bit per second ir kitus parametus; galima pakeisti porto COM numerį,
• po to pasirinkite Savybės-Advanced (Išplėstinis nustatymas) – pasirinkite
porto tipą RS232 . Pasirinkę mygtuką „DMA settings“ patikrinkite priėjimo
DMA nustatymą ir po to pasirink ite „Adv Baudrates..“ ir nustatykite „Use
default baud rate“ arba pasirinkite „Use custom baud rate“ priklausomai
nuo jūsų pageidavimų. Patvirtinkite OK arba per Defaults grįžkite į pradinį
nustatymą.
2.
„PCIe ECP paralel porte (LP Tx)“ nustatykite komunikacijos savybes se kančiai (dešiniuoju pelės mygtuku -Savybės):
• eilutėje Savybės- Port Settings (Portų nustatymas) paž ymėkite reikiamus
nurod yto porto parametrus; LP T porto numerį galima pakeisti
Quick Start / PCIe to 2S Adapter 2x Serial 1x Parallel(PCE2S1P)
26
Page 27

Quick Start / PCIe to 2S Adapter 2x Serial 1x Parallel(PCE2S1P)
Instaliacija kitam OS: Valdymo pulteliai atsisiuntimui yra čia: www.i-tec.cz/en/.
Vadovaukitės instrukcijomis esančiomis atskiruose adresynuose skirtuose
valdik liams (DOS, Linux), skirtuose PCIe (PCE2S1P).
NAUDOJIMO SAUGOS TAISYKLĖS
• Saugoti nuo aukštos temperatūros ir drėgmės.
• Įrenginį naudoti ant lygių neslidžių paklotų – išvengsite slydimo ir k ritimo
ant žemės.
• Vadovą saugokite vėlesniam naudojimui.
Bendradarbiaudami su servisu:
• Patikrinkite veikimą po įkritimo į vandenį arba nukritimo ant žemės.
• Įskilus dangčiui patikrinkite veikimą.
• Jeigu įrenginys neveikia pateikite pretenzijas vadovaudamiesi įrenginio
vadovu.
DAŽNAI UŽDUODAM I KLAUSIMAI rasite mūsų svetainėje: www.i-tec.cz/lt skiltyje
„FAQ“ prie šio produk to
LT
27
Page 28

NL
INLEIDING
De PCIe-naar-2S1P- adapter is een kaart voor in een PCIe -sleuf van het type PCI
Express. Na het installeren van de stuurprogramma's gedraagt de kaar t zich als
een standaard 2xCOM-poort en een 1xLP T-parallelle poor t. De kaart biedt DB9
Male RS232-uitvoer voor een asynchrone aansluiting van I/O-apparaten , zoals
een ex terne modem, GSM-modem, seriële poortprinter, barcodelezer, enz., evenals een standa ard paralle lle poort (LPT) voor het a ansluiten va n bijv. printer s. De
bereikte snelheid voor de seriële poort is maximaal 56.000 baud in asynchrone
modus en maakt toepassingen in de automatisering, bewaking en de besturing
van industriële processen mogelijk.
SPECIFICATIES
• Interface: PCI-express, spe cificaties 1.1
• Poort: 2x Serieel RS232 type DB9 (mannelijk) en 1x parallel type DB25
(vrouwelijk)
• UART: Ondersteunt alle UA RT-typen van 450 tot 550 (volledig programmeerbaar)
• Gegevensoverdrachtsnelheid: tot 1,5 Mbps
• De FIFO -ontvanger/zender werkt met data tot ee n grootte van 256 bytes
• Ondersteuning voor Standard Parallel Port (SPP), Enhanced Parallel (EPP) &
Enhanced Capability Port (ECP)
• Parallelle poortsnelheid tot 1,5 Mbps, tot 230400bps per seriële poort
• Ondersteuning voor Plug & Play en Hot swapping
• Besturingssystee m: Windows Win 7/8/10 32+64bit, Linux, DOS
VERPAKKING
• 1x PCIe naar 2S1P-adapter
• 1x paneel met 2xDB9 seriële kabels
• 3 x Low Profi le-afscherming
• Handleiding
STUURPROGRAMMA'S INSTALLEREN:
(Opme rking: De s tuurprog ramma's kun nen hier wor den opgeh aald: www.i-tec.cz/nl/)
Voor Windows® 7/8/10 32 _64bit
1.
Installeer de PCIe-kaart nie t op uw pc, voordat u de juiste stuu rprogramma's
hebt geïnstalleerd.
2.
Haal de j uiste stuur programm a's op en pak ze uit o p de HDD via www.i-tec.cz/nl/
28
Quick Start / PCIe to 2S Adapter 2x Serial 1x Parallel(PCE2S1P)
Page 29

Quick Start / PCIe to 2S Adapter 2x Serial 1x Parallel(PCE2S1P)
3.
Klik op de knop "StnSetup.exe" om de stuurprogramma's uit de bijbe horende
OS-map te installeren en op " Exit" als u k laar bent.
4.
Schakel uw pc uit en monteer de PCIe- kaart op uw pc zoals hierond er staat
beschreven.
5.
Nadat de pc opgestart is, detecteert het OS nieuwe hardware en voltooit de
installatie van de stuu rprogramma's. Start zo nodig uw pc opnieuw op.
MONTAGE VAN DE PCIE IN DE PC
(lees eerst de installatie van de stuurprogramma's in het besturingssysteem e n
ga dan pas verder)
Opmerking: Aansluiting van de COM-connector – de rode ader op de DB-9-kabel
behoo rt tot het ∆-teken op de PCE-kaar t
1.
Schakel uw computer uit en ontkoppe l de 230V-voeding.
2.
Verwijder de kap van de pc en verwijder de afdekking van de overeenko mstige PCIe -sleuf en ook de afdekking van de seriële poor t.
3.
Plaats de PCIe -kaart voorzichtig in de vrije PCIe-sleuf en schroef he m vast.
Schroef ver volgens ook de seriële poortkaart er in.
4.
Plaats het pc-deksel terug en sluit de pc aa n op het 230V-net. Zet uw pc aan.
Controleer of de installatie correct is in Windows® OS
Ga naar Apparaatbeheer (bijvoorbeeld in Win10: klik met de rechtermuisknop op
Start Apparaatbeheer).
Onder Poorten (COM & LPT) ziet u nieuwe apparaten:
2x PCIe naar High Speed Serial Port (COMx)
1x PCIe ECP Paralle l Port (LPTx)
OPMERKING
1.
In "PCIe to High Speed Se rial Port (COMx)", stelt u de communicatie -eigenschappen als volgt in (klikken met de rechtermuisknop - Eigenschappen):
• stel de overeenkomstige Bit per second en andere parameters in op het
tabblad Eige nschappen-Port Settings. U kunt ook het COM-poortnummer
wijzigen
• selec teer dan het tabblad Eigenschappen - Advanced (Uitgebreide instellingen) - en kies het RS232-poorttype. Nadat u de knop "DMA-instellingen" hebt
geselecteerd, geeft u D MA-toegangsinstellingen op en sel ecteert u "Adv Baudrates ..." en geeft u "Use default baud rate" op of se lecteert u "Use custom
baud rate" om uw keuze te selecteren. Bevestig met OK of gebruik Defaults
om terug te keren naar de oorspronkelijke instellingen.
NL
29
Page 30

NL
2.
In "PCIe ECP parallel port (LPTx)" stelt u de communicatie-eigenschappen
als volgt in (klikken met de rechtermuisk nop - Eigenschapp en):
• vink op h et tabblad Eigensc happen- Port Settings (Po ortinstellinge n) de
vereiste parameters voor de vermelde poor t in. U kunt ook het LPT-poor tnummer wijzigen.
Ins tall atie v oor an dere OS: De s tuur prog ramm a's ku nnen h ier wo rden opge haald :
www.i-tec.cz/nl/) Volg de instructies in alle stuurprogrammadirectory's (DOS,
Linux) voor PCIe (PCE2S1P).
VEILIGHEIDSINSTRUCTIES VOOR HET GEBRUIK VAN HET DOCKING
STATION
• Stel het product niet bloot aan externe temperaturen en lucht vochtigheid.
• Gebruik het produc t op vlakke ondergrond – u voorkomt op die manier dat
het product wegglijdt en op de grond valt.
• Bewaar d e drivers en de handle iding voor event. late r gebruik.
In samenwerk ing met de ser viceafdeling:
• Controleer de functionaliteit na het vallen van he t product in water of op de
grond.
• Controleer de functionaliteit als het product barste n vertoont.
• Reclameer dit product als het niet werkt in overeenstem ming met de
handleiding.
VEELGESTELDE VRAGEN
Beschikbaar op onze website www.i-tec.cz/nl/ op het tabblad “FAQ” bij dit
product.
Quick Start / PCIe to 2S Adapter 2x Serial 1x Parallel(PCE2S1P)
30
Page 31

NOTE: MARKING IS IN COMPLIANCE WITH EU WEEE DIRECTIVE
ENGLISH
This equipment is marked with the above recycling symbol. It means that
at the end of the life of the equipment you must dispose of it separately at an
appropriate collection point and not place it in the normal domestic unsorted
waste stream. This wil benefi t the environment for all. (European Union only)
DEUTSCH
Dieses Produkt trägt das Recycling-Symbol gemäß der EU-Richtinie. Das
bedeutet, dass das Gerät am Ende der Nutzungszeit bei einer kommunalen
Sammelstelle zum recyceln abgegeben we rden muss, (kostenloss). Eine
Entsorgung űber den Haus-/Restműll ist nicht gestattet. Dies ist ein aktiver
Beitrag zum Umweltschutz. (Nur innerhalb der EU)
FRANÇAIS
Ce dispositif est revêtu du marquage avec le symbole de recyclage indiqué
ci-dessus. Ça veut dire, qu’une fois découlée la vie utile dudit dispositif, vous
vous voyez dans l’obligation d’assurer, que le dispositif se trouve déposé en un
respectif centre de collec te, dûment établi à cette fin, et non en d’autres centres
de ramassage qui soient destinés à déposer de courants déchets municipaux
non triés. De cette manière, on contribue considérablement à une amélioration
en matière d’environnement où nous vivons tous. (Seulement pour l’Union
Européenne).
ESPAÑOL
El dispositivo está indicado por el símbolo de reciclaje. Esto signifi ca que al
final de la vida útil de la instalación, debe asegurarse de que se almacene por
separado en un punto de recolección establecido para este fin y no en los
lugares designados para la eliminación de desechos municipales ordinarios sin
clasificar. Co ntribuirá a m ejorar el me dio ambien te de todos noso tros. (Sólo pa ra
la Unión Europ ea)
EUROPEAN UNION ONLY
31
Page 32

ITALIANO
Questo dispositivo è contrassegnato con il seguente simbolo di riciclaggio. Si
chiede di consegnarlo alla fine del suo ciclo di vita a un Centro di raccolta dei
rifiuti differenziati istituita per questo scopo e non in altri centri indicati per
de pos ita re r ifi uti u rba ni n orm ali non d iff ere nzi ati . In q ues to m odo s i co ntr ibu isc e
al miglioramento della qualità dell’ambiente (valido soltanto per l’Unione
Europea).
ČEŠTINA
Toto zařízení je označeno výše uvedeným recyklačním symbolem. To znamená,
že na konci doby života zařízení musíte zajistit, aby bylo uloženo odděleně na
sběrném místě, zřízeném pro tento účel a ne na místech určených pro ukládání
běžného netříděného komunálního odpadu. Přispěje to ke zlepšení stavu
životního prostředí nás všech. (Pouze pro Evropskou unii )
SLOVENSKY
Toto zariadenie je označené vyššie uvedeným recyklačným symbolom. To
znamená, že na konci doby života zariadenia musíte zaistiť, aby bolo uložené
oddelene na zbernom mieste, zriadenom pre tento účel a nie na miestach
určenýc h pre uklada nie bežné ho netried eného komu nálneho od padu. Pris peje to
k zlepšeniu životného prostredia nás všetkých. (Iba pre Európsku úniu)
POLSKI
To urz ądzenie oznakowane jest specjalnym symbolem odzysku. Pookresie
użytkowania trzeba je zwrócic do odpowiedniego punktu zbiörki i nie wolno
umiestczać go razem z nieposortowanymi odpadami. Takie dzialanie przyniese
korzyść dla ś rodowiska. ( Tylko w Unii Europejskiej)
LIETUVIU
Šis gaminys yra pažymetas specialiu atlieku tvarkymo ženklu. Baigus
eksploataciją, gaminys turi buti atiduotas i atitinkamą surinkimo punktą ir
negal i buti šalin amas kartu s u nerušiu ojamomis at liekomis. Tok ie Jusu veiks mai
prisides prie aplinkos apsaugos. (Tik tai Europos Sąjungoje)
NEDERLANDS
Dit apparaat is voorzien van het bovenvermelde recyclingsymbool. Dit betekent
dat u aan h et einde van d e levensdu ur van het app araat erv oor dient te zo rgen dat
het afzonderlijk wordt op geslagen op een verzamelpunt dat hie rvoor is ing ericht
en niet op plaatsen die zijn aangewezen voor de verwijdering van gewoon
ongesorteerd gemeentelijk afval. Dit zal bijdragen aan de verbetering van de
leefomgeving van ons allemaal. (Alleen vo or de Europese Unie)
32
Page 33

EU DECLARATION OF CONFORMITY / EU KONFORMITÄTSERKLÄRUNG /
DÉCLARATION DE CONFORMITÉ / EU PROHLÁŠENÍ O SHODĚ /
EU PREHLÁSENIE O ZHODE / EU DECLARACJA ZGODNOŚCI /
Manuf acturer, Der He rsteller, Le fa bricant, Fa bricante, V ýrobce, Výr obca, Produ cent,
De fabrikant
i-te c Techno logies s.r.o., K alvodova 2,
709 00 Os trava – Mariáns ké Hory, Czec h Republic
decla res that this p roduct / erk lärt hier mit, dass das P rodukt /
décla re que ce prod uit /
/ týmto p rehlasuje , že výrobo k /
product
Produ ct, Bezeichnung , Le prénom, Pr oducto, Náze v, Názov, Naz wa, Naam:
i-tec PCI E xpress Card 2x se rial, 1x parallel card
Model, Modell, Modèle, Modelo, Model, Model, Model:
PCE2S1P
Determina tion, Bestimmung, la déte rmination, Determin ación, Určení, Určenie,
Opcje, Doel:
Produ ct is determ ined for usin g in PC as equip ment. Das Pro dukt ist für A ustattun g
und als Zu behör von Co mputern be stimmt. Le pr oduit est dé terminé po ur une
utilis ation sur PC c omme équip ement. El pr oducto se dete rmina para u sar en
PC com o equipo. Výr obek je urče n pro přístro jové vybaven í a jako příslušenství
do počítačů. Výrob ok je určený pr e prístrojov é vybaveni e a jako prísluš enstvo
do počítačov. Produ kt jest prz eznaczony do ws półpracy z k omputerem j ako
akceso rium. Het p roduct is be doeld als uit rusting voo r apparaten e n als
computeraccessoire.
Meets t he essential r equireme nts accordi ng to / Es entspr icht den Anf orderung en
der Ric htlinien / Ré pond aux exi gences ess entielles s elon/ Cump le los requis itos
esenciales
następujac e wymagan ia /
EMC dire ctive 2014/30/E U, RoHS direc tive 2011/65/EU:
EMI (For Radio parameters, Für Radioparamater, Pro Rádiové parametry, Pre
Rádiové parametre, Dla parametrów Radiowych, Para parametros de radio,
Radijo parame trams, Per i pa rametri del la radio):
EN55022:2010
EU-CONFORMITEITSVERKLARING
:
decla ra que este pro ducto / tímto pr ohlašuje, ž e výrobek
deklaruje, że produk t / verklaa rt hierbi j dat het
según/ Splňuje ty to požadavk y / Spĺňa tieto pož adavky / Sp ełnia
Het vol doet aan de vol gende verei sten:
33
Page 34

EMS (For EMC, Für EMC, Pro EMC, Pre EMC, Dla Kompatybilności elektromagne tycznej, P ara EMC, Sk irtas EMC , per la compa tibilità e lettroma gnetica):
EN61000-3-2:2014, EN61000-3-3:2013, EN55024:2010,
RoHS:
2011/65/EU; IEC 62321:2013
and it is s afety unde r conditio ns of standar d applicat ion / und ist si cher bei
stand ardmäßige r Nuttzun g /
stand ard / y es segur idad bajo con diciones d e aplicació n estándar / a je b ezpečný
za
podmí nek obvyk lého použi tí /
a je bezp ečný za podmienok obvyk
przy
stand ardowym w ykorzyst ywaniu /en is v eilig onder d e omstandi gheden van
normaal gebruik.
Additional information, Ergänzende Angaben, Information additionnelle, Información
Adicional, Doplňující informace, Doplňujúc e informácie , Dodatkowe inf ormacje,
Aanvullende informatie:
Identification Mark, Ide ntifikationskennzeichen, La marque d'identification, Marca
de identificación, Identifikační značka, Identifikačná značka, Zna k identy fikacyjny,
Identificatiemerk:
et c'es t la sécurité da ns des condi tions d'app lication
lého po užitia / oraz j est produk tem bezpie cznym
Ostrava 15. 11. 2018
34
Execut ive Name and Sig nature, Gesc häftsführer,
Exécut if et signature , Nombre y firma de l gerente,
Jednat el, Konatel, Na zwisko osoby up owaznionej,
Ing. Lumír Kraina
Zaakvoerde r
Page 35

FCC COMPLIANCE STATEMENT
This equipment has been tested and found to com ply within the limits
of a Class B digital device pursuant to Pa rt 15 of the FCC Rules. These
limits are designed to provide reasonable protection against harmful
inter ference in a residential installation.
35
Page 36

 Loading...