

Page 1
®
i-STAT
Technical BulleTin
UPDATING ANALYZER SOFTWARE
JAMMLITE UTILITY
The JammLite Utility must be used to update software in the i-STAT®1 Analyzer and can be used to update
the i-STAT Portable Clinical Analyzer and the Blood Analysis Module. The JammLite procedure is simple
with just one screen for all analyzer types and software versions.
To use this utility, you must have a computer with Windows® 95 or higher. An i-STAT Central Data Station
Version 5 or a Point of Care Central Workstation meet this requirement and can be used. An i-STAT/DE
server is not recommended for use with this utility.
If this is the first time you are updating your analyzer, follow the Detailed Procedure. If you just need
reminders, follow the Summary of the Procedure.
SUMMARY OF THE JAMMLITE PROCEDURE
How to Step Page
Check battery voltage
Save the data on Portable Clinical Analyzers
Disable Customization on the Central Data Station 2 2
Shut down all programs on the computer 3 2
Connect an IR Link or Downloader* to the computer 4 3
Access the C:\> prompt 5 4
Transfer the files from the JAMS disk to the computer 6 4
Access the JammLite Utility 7 5
Select the instrument (analyzer) type to be updated
Select the local port or select TCP\IP and enter the IP address 7 5
Select the Application software and CLEW
Click on Update and follow the directions on the screen 7 6
DO NOT
Click on Close 7 6
Click on Exit or X in upper right corner of screen 7 6
Re-start the CDS, update CLEW, re-eanable Customization 8 6
Insert an Electronic Simulator into each updated analyzer 9 7
move analyzer during update 7 6
1 2
7 5
7 5
* It is not neccessary to connect a serial Downloader if using network protocol to update i-STAT 1 Analyzer.
Abbott Point of Care Inc. • 104 Windsor Center Drive • East Windsor, NJ 08520 • (800) 366-8020
Art: 714329-00J Rev. Date: 08/14/06
Page 2

DETAILED JAMMLITE PROCEDURE
Step (1)
Step (2)
Save Stored Results & Check Battery Voltage
Save Data: All test records are erased in the i-STAT Portable Clinical Analyzer
(series 200) when the application software is updated. Download each analyzer
to the Central Data Station (CDS) program or ensure that all test records have
been transcribed before updating a Portable Clinical Analyzer. Test records are
not erased from the i-STAT1 Analyzer (series 300).
• There are two types of software in the analyzers: application (JAMS)
and CLEW.
• The Product Update lists the software that is to be updated.
• Test records will not be erased if only the CLEW software is updated.
Check Battery Voltage: Analyzers consume power during the software update. For the software update, the battery voltage should be well above the
7.5 V point at which the low battery message is displayed.
Disable Customization on CDS
If you do not use Customization or Customization is disabled, skip this step.
If you use Central Data Station Version 5 and your CDS is on Version 5.18a or
higher, skip this step.
If you are not sure if Customization is disabled, follow the steps below. The steps
to disable customization differ for the Central Data Station Version 4 and Central
Data Station Version 5. If you are not sure which CDS you have, click Help on
the main menu bar, then click on About....
Central Data Station Version 4:
1. Click on the i-STAT Analyzer Customization Profile Utility icon or
access by clicking Programs and i-STAT CDS.
2. Type in the Password. The default password is istat.
3. Click on File on the menu bar.
4. Click on Disable Customization.
5. Click Yes to the confirmation messages and the Utility will close.
Central Data Station Version 5:
1. Click on Administration in the main menu bar.
2. Click on Customization.
3. Type in the Password. The default password is istat.
4. Click off the checkmark in the box beside Enable Customization at the
top left of the window.
Step (3)
2
Shut Down All Programs
Exit the CDS and all other open programs.
Art: 714329-00J Rev. Date: 08/14/06
Page 3
Step (4)
Connect the IR Link and/or Downloader
IR Link connection:
• If using a Central Data Station Version 5, a Central Data Station
Version 4 with digiboard, or any other computer using Windows 95
or above, connect the IR Link to a 9 pin COM port using an i-STAT
Software Update Kit as illustrated below.
• If using a Central Data Station Version 4 with quad cards: Connect the
IR Link to COM5 on the back of the CDS using a Modular Data Cable
(i-STAT grey flat cable with RJ45 connectors). COM5 is first port from
the inside on the lower row.
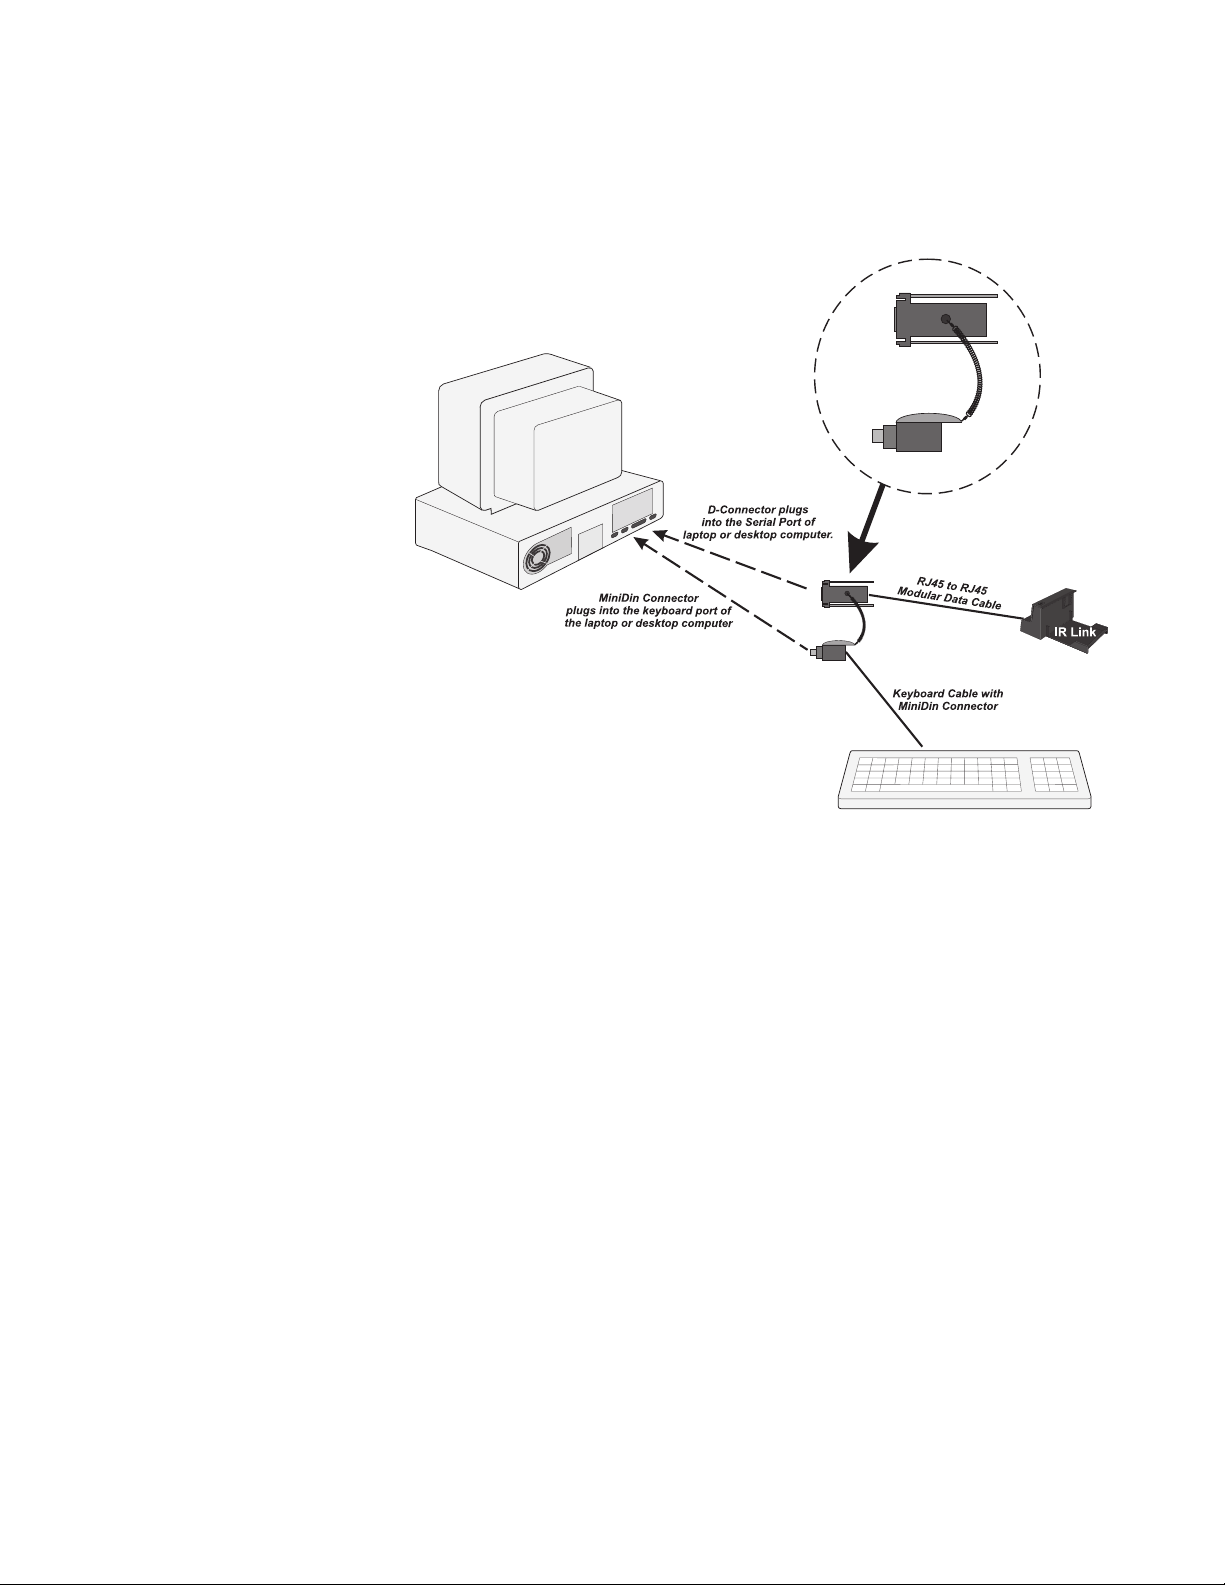
Blood Analysis Module connection:
• If using a Central Data Station Version 4, connect the BAM to COM5
on the back of the CDS using a Modular Data Cable (i-STAT grey flat
cable with RJ45 connectors).
• If using a Central Data Station Version 5 or another computer, connect
the BAM to a 9 pin COM port using the D-Connector and Mini Din
Connector from an i-STAT Software Update Kit.
Note: Do not connect the BAM until instructed to do so by the JammLite
program.
Art: 714329-00J Rev. Date: 08/14/06
3
Page 4

Serial Downloader connection:
Null Modem Cable
connected to Serial Port
Power Supply
with 12 V 3.0A
AC Adapter
• Connect a serial Downloader to a COM port using a DB9-DB9 Null
Modem cable and plug the Downloader’s power adapter into a wall
outlet.
Step (5)
Step (6)
Network Downloader connection:
• Connect a network Downloader to the network using a network patch
cable and plug the Downloader’s power adapter into a wall outlet.
The computer must also be connected to the network. The computer
must support the TCP/IP network protocol.
Access the Command Prompt
• Click Start in the lower left corner of the window.
• Click Run.
• Type: command and press the Enter key.
Note: If you do not have access to the Run command, contact your Point-
of-Care Coordinator or Information Technology (IT) department.
Transfer the Files
Place the JAMS diskette into the A:drive. At the Command prompt, type A:
transfer and press the Enter key.
4
Art: 714329-00J Rev. Date: 08/14/06
Page 5

Step (7)
Using the JammLite Utility
1. At the C:\>bins prompt, type jammlite and press the Enter key. The
following screen will be displayed with the new application and CLEW.
X.X is the current version of JammLite software.
2. Select the appropriate instrument from the Instrument drop-down list.
Note: i-STAT 200 Analyzer is the Portable Clinical Analyzer and the i-STAT
300 Analyzer is the i-STAT 1 Analyzer.
3. Select the port for the instrument being updated from the “Port” dropdown list. The JammLite program will list only available ports on the
computer. For updates using a network Downloader, select TCP/IP.
(The TCP/IP option is available only if i-STAT 300 is selected from the
“Instrument” drop down list.) Enter the IP address of the Downloader
in the “IP Address” box.
4. Select the appropriate Application and CLEW from the Application and
CLEW drop-down lists. Refer to the update package for the correct
Application and CLEW. If the update is for CLEW only, select None for
Application. Note that there are different application versions for the iSTAT 1 Analyzer, the Portable Clinical Analyzer and the Blood Analysis
Module. JammLite will display all application software and CLEW
appropriate for the selected instrument.
Art: 714329-00J Rev. Date: 08/14/06
5
Page 6

5. Click on the Update button to start the update. Appropriate
instructions will be displayed. Follow the directions on the screen.
The selected application and CLEW will be displayed on the Update
Line.
6. During the update, do not move the analyzer or unplug the Blood
Analysis Module until a screen is displayed indicating the update was
successful.
7. Click on Close. The JammLite program will return to step 7 to allow
any selections to be changed before starting another update.
8. When all analyzers have been updated, click on Exit or the X in the
upper right corner of the DOS window.
Step (8)
Restarting the Central Data Station
If using a Central Data Station, re-start the software, update the Customization
Profile(s) with the new CLEW and enable Customization if desired.
Central Data Station Version 4:
1. Click on the i-STAT Analyzer Customization Profile Utility icon or
access by clicking Programs and i-STAT CDS.
2. Type in the Password. The default password is istat.
3. Click on Setup Mode.
4. Click on NEXT for the Language window.
5. Click on the new CLEW in the CLEW window and click on NEXT.
6. Click on NEXT in the Unit Set window.
7. Click on FINISH in the Preference window.
8. Click on FILE and Exit Program or click on the x in the upper right
corner of the Utility window.
9. Click on the Central Data Station icon.
Central Data Station Version 5:
1. Click on the Central Data Station icon.
2. Click on Administration.
3. Click on Customization.
4. Type in the Password. The default password is istat.
5. Click the i-STAT Analyzer CLEW button.
6. Click the new version of CLEW and click OK.
7. If “Use Default Profile” is not check-marked beside any localizationbased customization profiles, double click the box with the CLEW
under the i-STAT Analyzer column (or Agilent BAM CLEW) and click
the new version of CLEW.
8. Click a checkmark in the box beside Enable Customization at the top
left of the window.
9. Click the x in the upper right corner of the Customization window to
close it.
6
Art: 714329-00J Rev. Date: 08/14/06
Page 7

Step (9)
TROUBLESHOOTING
PROBLEM RECOMMENDED ACTION
Verifying the Update
Run an external Electronic Simulator on updated analyzers and check the
Analyzer Status page for the new Application software and/or CLEW.
The Com port to be used for the update is not
listed in the Port List
A message appears on the screen that the
port specified for the update could not be
opened.
A message appears on the screen that the
specified application file could not be opened,
has an error, or is not a valid application file.
A message appears on the screen that the IR
Link could not be configured to perform the
application update.
A message appears on the screen that
there was an error encountered during
communication with the analyzer.
A message appears on the screen that the
specified CLEW file could not be opened, has
an error, or is not a valid CLEW file.
A message appears on the screen that the IR
Link could not be configured to perform the
CLEW update.
A message appears on the screen that the
Downloader could not be configured to
perform the update
A message appears on the screen indicating
that nothing was selected for the update.
Exit the JammLite program and ensure that
there are no other programs running which
may be using the port (such as the Central
Data Station). Restart the JammLite program
to determine if the port is now listed.
Verify that no other programs are using the
port and that the correct port was selected.
Verify that all other programs are closed and
that the proper application was selected before
re-attempting the update.
Verify that the IR Link is connected to the COM
port, that the LED on the IR Link is red, and
that the proper port is selected.
Ensure that the instrument is located properly
in the IR Link or Downloader, and this it is not
removed before the update is completed.
Ensure that all other programs are closed and
that the correct CLEW is selected before reattempting the update.
Verify that the IR Link is connected to the COM
port, that the LED on the IR Link is red, and
that the proper port is selected.
Verify that the Downloader is connected to the
COM port, the Downloader is powered, and
that the proper port is selected.
Select an Application and/or a CLEW prior to
clicking on the Update button.
Quality Check Code 13 - Invalid or Expired CLEW after on-line customization is restored
If this quality check code occurs after successfully downloading new software and restoring on-line
customization, the CLEW has not been updated to the new version in the Customization Profile. Update
CLEW in the customization profile(s) and download the analyzers. The new CLEW will be installed in the
analyzers.
Unsuccessful with Windows 95
Some computers with Windows 95 will not run JammLite. In this case, Jammit must be used to update
analyzers. Before accessing the Jammit Utility, the computer must be rebooted.
Art: 714329-00J Rev. Date: 08/14/06
7
Page 8

ANALYZER-TO-ANALYZER SOFTWARE UPDATES
i-STAT 1 Analyzer
1
Any updated analyzer can be used as the sending analyzer. Select the Utility option under the
Administration Menu on the sending analyzer. The Utility menu can be password protected. Enter the
password or press the Enter key if no password has been specified. From the Utility Menu select 1-
Send Software. Select 1 – JAMS and CLEW or 2-CLEW as required for the update. The message
“Waiting to Send” will be displayed.
2 Ensure that the receiving analyzer is off.
3 Place the sending and receiving analyzers facing each other on a flat surface about 30cm (1 foot)
apart and align their IR windows. Move one analyzer toward the other until the message “Sending…”
is displayed on the sending analyzer and a scrolling banner appears on the receiving analyzer.
4 Do not move the analyzers until the “Sending…” message is removed from the sending analyzer’s
display. The sending analyzer will return to the Send Software option and will display the result of the
last software update as “Successful” or “Unsuccessful.”
5 Select the Analyzer Status option under the Administration menu on the receiving analyzer and check
that the new JAMS and/or CLEW are listed.
i-STAT Portable Clinical Analyzer
1 Any updated analyzer can be used as the Sending Analyzer. Run the external Electronic Simulator on
the Sending Analyzer.
2 Transmit all data from the analyzer being updated (the Receiving Analyzer) to the Central Data Station.
Data stored in the handheld analyzer will be lost after an application software update.
3 With the Simulator test results showing on the display of the Sending Analyzer, press and hold the DIS
key and press the soft key for MENU. This displays the Utility Menu.
4 In the Utility Menu, select 3 - Send Software. The display will show the JAMS version and the CLEW
in this analyzer. Verify that these are the appropriate versions. The analyzer screen will also say
"Waiting to send".
5 Set both analyzers on a flat surface and align the Infrared Light-Emitting Diode (IR LED) windows so
they directly face each other. (Refer to the analyzer picture on page 2-1 of the i-STAT System Manual
for the location of the IR LED.)
6 On the Receiving Analyzer, make sure the display is off. Press and hold the * key and press the DIS
key. The Sending Analyzer will begin sending software to the Receiving Analyzer. The display on the
Sending Analyzer will change from "Waiting to send" to "Sending...", and a countdown bar will be
displayed.
Note: Do not move the analyzers while the software is being sent.
7 When the display of the Sending Analyzer changes back to the Electronic Simulator result, the
sending of software is complete. Do not press the DIS key on the Receiving Analyzer. Run the
Electronic Simulator on the Receiving Analyzer.
8 To update software in another analyzer, repeat these instructions from Step 2.
PERFORMING A JAMS AND CLEW UPDATE ON AN i-STAT 1 ANALYZER USING THE
CUSTOMIZATION WORKSPACE
1. Transfer the Files
• Place the JAMS diskette into the A: drive.
• Click
• Type:
Note: If you do not have access to the Run… command, contact your Point-of-Care Coordinator
8
Start Run…
a:transfer and press the Enter key.
or Information Technology (IT) department.
Art: 714329-00J Rev. Date: 08/14/06
Page 9

2. Start the Central Data Station Application (if not already open)
• Click on the Central Data Station icon.
3. Access the Customization Workspace
• Click on Main Open Administration Function Customization
• Type in the Password. The default password is
4. Enable Customization
• If the Enable Customization box is not already checked, click the box next to this listing.
• Under the “Location-based customization profile:” section, make sure Enable Updates is
checked for every location from which you wish to perform software updates on your i-STAT 1
Analyzers.
5. Select the Desired Analyzer CLEW and i-STAT 1 Software
• Under the “Default customization profile:” column, click on the i-STAT Analyzer CLEW button.
Click the new version of CLEW and click OK.
• Under the “Default Customization profile:” column, click on the i-STAT 1 Software button.
Click the new i-STAT 1 software file and click OK.
istat.
4
5
5
6. Update the Software in the i-STAT 1 Analyzer
• Go to the location where the i-STAT 1 Analyzers you wish to update are located.
• Press the On/Off button on the analyzer to turn the display on.
• Press the Menu key to bring up the Administration Menu.
• Press 7 for Utility. The Utility menu may be password protected. Enter the password or press
the Enter key if no password has been specified.
• From the Utility Menu, select 3-Receive Software
on the analyzer display.
• Place the analyzer in the downloader or downloader/recharger. A Communication in Progress
message will appear on the screen. After this message disappears, the analyzer display will
stay blank for approximately 5-10 seconds. Please note that this blank screen is normal
analyzer behavior during this part of the procedure.
• A scrolling bar will then appear on the analyzer display. This bar indicates that the software
is uploading into the analyzer. Do not move the analyzer while the scrolling bar appears on
the display screen. When the upload process is complete, the scrolling bar will disappear and
the analyzer display will again go blank for approximately 5-10 seconds. Please note that this
blank screen is normal analyzer behavior during this part of the process.
. The “Waiting to Send” message will appear
Art: 714329-00J Rev. Date: 08/14/06
9
Page 10

• A Waiting to Send message followed by a Communication in
Progress message will then appear on the analyzer display. After
these messages disappear, the analyzer display will go blank, and
the update process is complete.
7. Verify the Update
• Run an external Electronic Simulator on updated Analyzers and
check the Analyzer Status page for the new Application software
and/or CLEW.
i-STAT is a registered trademark of Abbott Laboratories.
Windows is a registered trademark of Microsoft Corporation.
10
Art: 714329-00J Rev. Date: 08/14/06
 Loading...