

Page 1
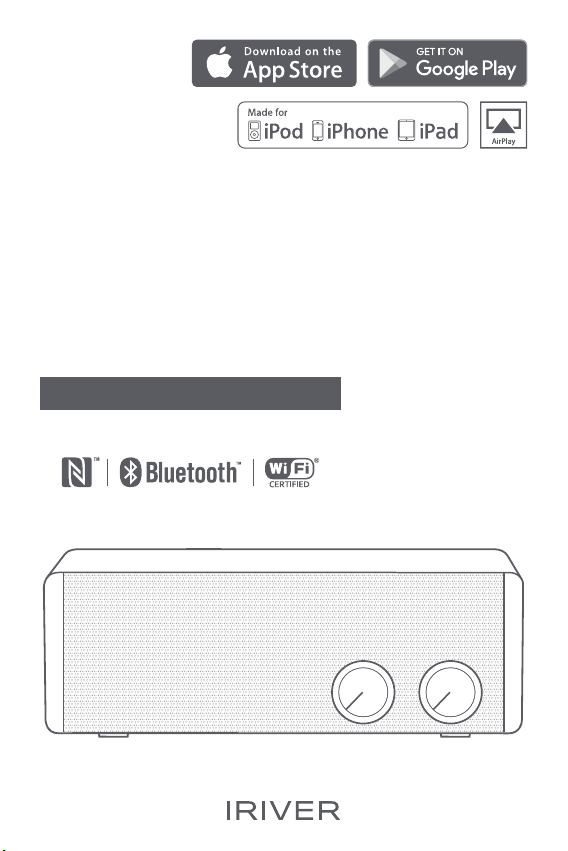
LS150
INSTRUCTION BOOK
Please read this instruction book carefully before
using the device.
Page 2

CONTENTS
Getting Started
What’s inside
Parts Name
How to Manage Power
Using the Device
Bluetooth Mode
Wi-Fi Mode
FM Radio Mode
Aux-in Mode
Miscellaneous
Safety Precautions
Troubleshooting
Certifications
Copyright
Disclaimers
Registered Trademarks
Specifications
Product Features
_03
_01
03
04
06
_02
07
10
15
17
18
23
23
24
24
25
25
26
Page 3
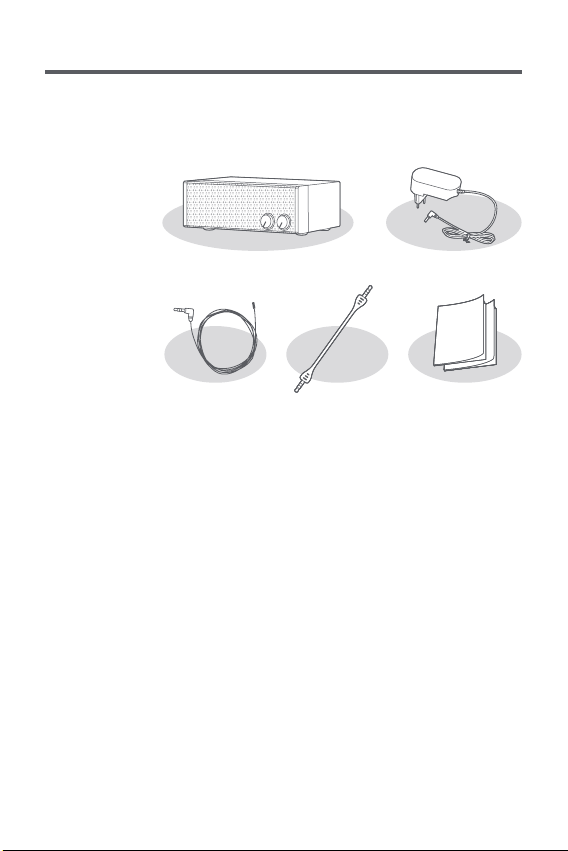
User Guide
What’s
inside
What’s inside may be changed without prior notice to
improve the performance or quality of the device.
LS150 Speaker Power Adapter
FM Antenna
Cable
Power Adapter: Supplies power by connecting it to the
speaker.
FM Antenna Cable: Receives signal to listen to FM radio
programming.
Audio Cable: Gets the sound of external devices out to the
speaker by connecting two ends.
Quick Start Guide: Describes basics of using the device.
Warranty Card: Do not misplace this warranty card as it
may be needed when you ask for warranty service.
User Guide: You can download it from
[http://www.iriver.com – SUPPORT – DOWNLOAD].
Audio Cable Quick Start Guide
& Warranty Card
Getting Started
03
Page 4
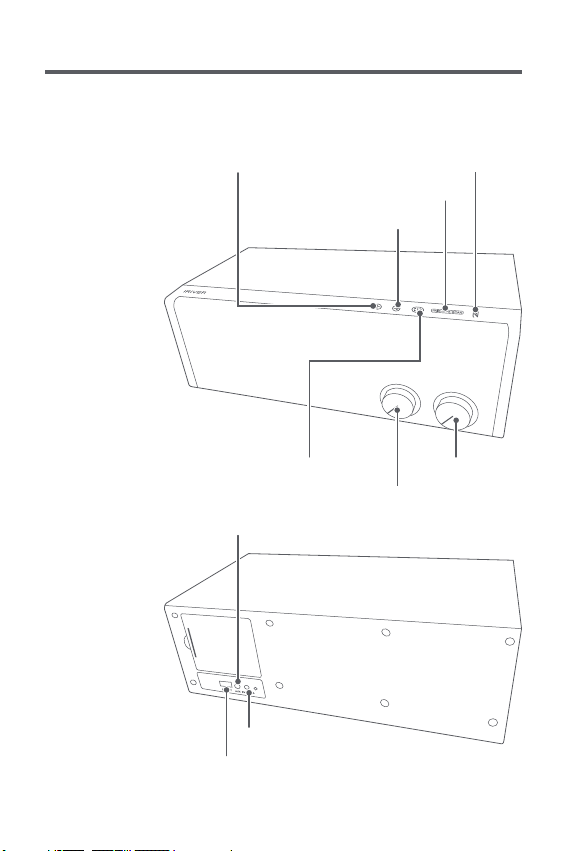
User Guide
Parts
Names
The appearance of the device as well as the printed and
engraved information may vary depending on model.
Previous Track/Previous Channel
Bluetooth Pairing/WPS/FM Scan
Next Track/Next Channel
Choose Power/Menu
Aux Input Port/FM Antenna Cable Connection Port
NFC Connection
Control VolumeReplay/Pause/Phone Call
DC Input Port
USB Output for Recharging
Getting Started
04
Page 5

User Guide
Previous Track/Previous Channel
While music is played: Moves to the previous song or to
the start of the same song
While listening to FM radio: Moves to the previous channel
Replay/Pause/Phone Call
While music is played: Play/pause
While listening to FM radio: Mute
While connecting to smartphone through Bluetooth:
Takes/terminates the phone call
Next Track/Next Channel
While music is played: Plays the next song.
While listening to FM radio: Moves to the next channel.
Bluetooth Pairing/WPS/FM Scan
Bluetooth Mode: Pairs with a Bluetooth device.
Wi-Fi Mode: Connects to Wi-Fi.
FM Radio Mode: Saves a radio channel currently on air.
NFC Connection: If you tag an NFC-enabled smartphone
to this part, you can connect with the NFC input mode.
Choose Power/Menu: You can turn on/off power or select
menus by turning the knob.
Control Volume: You can turn the volume wheel to adjust
the volume. USB Output for Recharging: You can recharge
the device by connecting it with the speaker through a
USB charging cable. (DC 5V/1A)
Aux Input Port: Gets the sound of external devices out to
the speaker by connecting through an audio cable.
FM Antenna Cable Connection Port: Connects the antenna cable.
DC Input Port: Supplies power to the device by connecting
a DC 9V/2.5A power adaptor.
Getting Started
05
Page 6
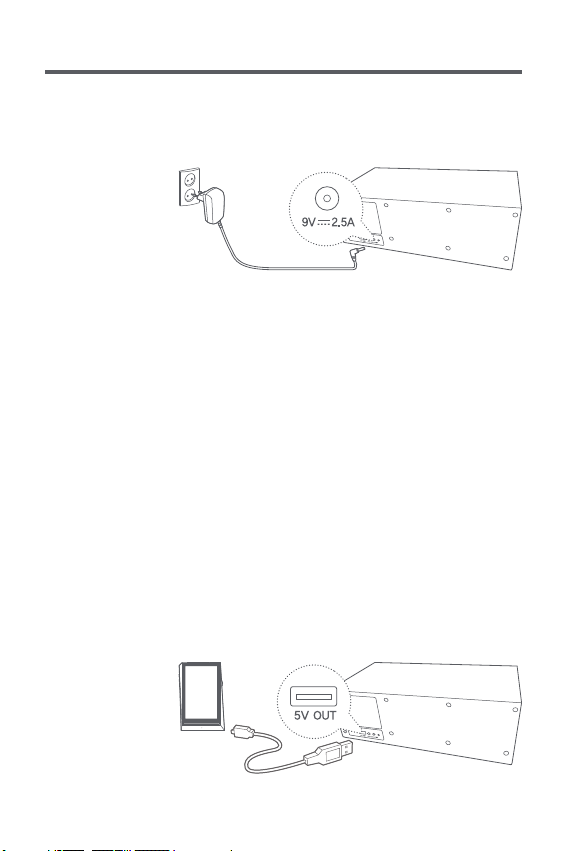
User Guide
Power
Management
Connecting Power Supply
1. If you connect the power adaptor's plug to [DC input port]
on the back of the device, power will be turned on.
Turning the Device On/Off
1. Power is turned on if you select a menu of your choice
by turning the [Power/Menu] wheel of the device.
2. Power is turned off if you turn the [Power/Menu] knob
to [Off].
Standby mode
1.
The device will turn to a standby mode automatically if there
is no input for 15 minutes on a connection standby mode.
2. You can lift the standby mode by pressing any button on
the device.
Recharging mobile device
1. If you connect the device with [USB output for recharging]
on the back of the device, the device will be recharged.
(DC 5V/1A)
Getting Started
06
Page 7

User Guide
Bluetooth
Mode
You can enjoy music wirelessly by using Bluetoothenabled devices.
Bluetooth Pairing
1. Select [ ] by turning the [Power/Menu] knob.
2. Turn on the Bluetooth button of the device you want to
connect (smartphone, tablet, or PC) after pressing the
[PAIR·WPS·SCAN] button on the upper part of the device.
3. Select [LS150_xxxxxx] from the list of Bluetooth devices.
4. Once pairing is completed, you will hear a sound
[Paired] and you can start replaying music using the
connected device.
Disconnecting Bluetooth pairing
1. When Bluetooth is connected, you can lift pairing if you
press the [PAIR·WPS·SCAN] button.
Bluetooth pairing through NFC
1. Select [ ] by turning the [Power/Menu] knob.
2. Turn on the NFC function on the device you want to
connect (smartphone, tablet, or PC).
3. If you put the device close to [ ] on the upper part of
the device for more than 2 seconds, you will see a pop up window indicating the device has been connected.
4. If you press [Yes], pairing would be completed with a
recorded sound [Paired].
5. You can replay music with the device.
Using the Device
07
Page 8

User Guide
If you put the device close to [ ] on the upper part of the
device again, pairing would be lifted.
If the device is in a metallic casing, please remove it before
attempting pairing.
Some NFC devices may not be available for pairing.
Bluetooth Support Specifications
Profile: A2DP, AVRCP
Device performance may be affected during Hi-Fi playback
(recommended specs below 48 kHz).
When connecting with an unauthorized device on Bluetooth
SIG, compatibility may not be guaranteed.
Please do not turn off the power of speaker or device while
Bluetooth is being connected.
When Bluetooth is not working, please try again after turning
off the power of speaker or device.
Pairing methods may differ for each individual Bluetooth
device. Always refer to respective instruction manuals for
details.
When connecting the product to a Bluetooth device, the
distance between the two must be within 20 cm.
Audio quality will degrade with longer distances, and
pairing may disconnect at a distance of 2 m (6.5 ft) or more
(Distances may vary depending on device and environment).
Crosstalk may be heard while using Bluetooth.
Malfunction, noise, and other undesirable effects may
occur due to environmental factors.
In case signal interference affects data transmission
(e.g., holding the device with a hand while wearing a
Bluetooth device, holding the device while holding
another electronic device, etc.)
In case the device or Bluetooth headset's radio transmitter
is touching parts of the body.
If the transmission strength is affected by walls, corners,
partitions, etc.
If devices using the same frequency bandwidth cause
interference (e.g., medical devices, microwave ovens,
Wi-Fi, etc.)
In places where signals are weak or there are many
interferences such as inside the elevator or underground,
NFC pairing will show no LS150 connection option with
connection info only.
Using the Device
08
Page 9

User Guide
Listening to Music
Adjust the volume by turning the [Volume] knob of the
device.
If you press the [ ] button on the upper side of the
device while replaying, it will pause. If you press it again,
it will replay.
If you press the [ / ] button on the upper side of
the device while replaying, it will play the previous/next
song.
Taking Incoming Phone Calls
To take an incoming call while replaying music, you can
press the [ ] button on the upper side of the device.
LED: Incoming phone call
If you press the [ ] button on the upper side of the
device while talking, the phone call will be terminated.
LED: Hanging up the phone call
Using the Device
09
Page 10

User Guide
Wi-Fi
Mode
Using features such as [IRIVER Live Stream/AirPlay/DLNA/
Multi-room/Windows 10 Cast Media to Device], you can
replay a variety of streaming services in addition to local
music by connecting to Wi-Fi network.
Downloading IRIVER Live Stream
Please install the [IRIVER Live Stream] app by downloading
1.
it from the device's app store.
Connecting wireless network manually
1. Select [Wi-Fi] by turning the [Power/Menu] knob in
front of the device.
2. Select [LS150_xxxxxx] on the Wi-Fi connection list of
the device.
3. Once you enter [10.10.10.254] in the browser’s address
bar, [LS150 Web Setup Menu] will appear.
4. If you select the [Wi-Fi] tab, you will see a list of APs to
which you can connect.
5. Select a desired [AP] to connect to the wireless network.
Additional information such as key index and network
key may be required depending on AP settings.
6. You can change AP settings after selecting [Revise
Network] by pressing the connected AP for a few seconds.
Connecting automatically using WPS
1. Select [Wi-Fi] by turning the [Power/Menu] knob in
front of the device.
2. Select [Wi-Fi Setup Wizard] after executing [IRIVER
Live Stream].
Using the Device
10
Page 11

User Guide
3. Enter a password and press [Next].
4. Press [PAIR·WPS·SCAN] on the upper side of the device,
and press [Next] on the device.
5. Once Wi-Fi network has been connected, you will see a
message [Device is connected to 00000 successfully]
on your device.
6.
Once you press [Next], IRIVER Live Stream will be executed.
Connection time may take longer depending on Wi-Fi network.
For detailed instructions on how to use IRIVER Live
Stream, please refer to the [IRIVER Live Stream] manual.
You can download the IRIVER Live Stream manual book
from [http://www.iriver.com – SUPPORT – DOWNLOAD].
Using the Device
11
Page 12

User Guide
Currently available streaming services include Spotify, TIDAL,
QQMusic, vTuner and iHeartRADIO and the list of available
streaming services may be expanded or curtailed in the future.
For devices supporting DLNA, you can select devices
indicated as [LS150_xxxxxx] on the Wi-Fi list or connect to
the same network.
Replay may not be smooth depending on device/computer
or Wi-Fi network environment.
How to use Multi-room functionality
You can listen to majestic stereo sound from up to 8 LS150
devices attached to the same network (Multi-mode).
1. Select [WI-Fi] by turning the
[Power/Menu] knob of the device
and connect to the Wi-Fi network.
iriver intro
2. Execute the [IRIVER Live Stream]
app.
How to use Multi-room functionality
1. Device can be added automatically
through WPS or manually.
2. You can replay the same music on
iriver intro
different devices if you move to
other devices to which you want
to connect while pressing the
Multi-room-enabled device on
[Device List].
iriver intro
Using the Device
12
Page 13

User Guide
Lifting Multi-room functionality
1. You can lift the Multi-room feature
if you move to an empty space on
the screen while pressing the
Multi-room-enabled device.
Performance can be limited depending on wireless network
and device environment.
The multi-room functionality can support sound signals
below 16 bits/48 Khz only.
Connecting AirPlay
1. Select [WI-Fi] by turning the
[Power/Menu] knob of the device
and connect to the Wi-Fi network.
2. On the screen of music players
connected to the same network
such as iPhone/iPod Touch/iPad,
an icon [ ] will appear.
3. Once you select [LS150_xxxxxx]
after pressing the [ ] icon, you
can replay music through the LS150.
LS150_xxxxxx
iriver intro
iriver intro
You can also connect AirPlay when the speaker is paired
through Bluetooth with iPhone/iPod Touch/iPad.
Using the Device
13
Page 14

User Guide
How to Use Windows 10 Cast Media to Device
You can stream songs on the computer by using the Cast
Media to Device functionality of Windows 10.
1. Right-click an audio file on the computer and select
[Cast to Device - LS150_xxxxxx].
2. Once you see the Windows music player, you can start
streaming songs.
If the song you want to replay through the Cast Media to
Device functionality is connected on Multi-mode through
the IRIVER Live Stream app, Cast Media to Device won't be
supported.
Resetting Wi-Fi
1. Select [Wi-Fi] by turning the [Power/Menu] knob in
front of the device.
2. If you press the [ / ] button on the upper side of the
device for more than 3 seconds, you will see a message
[Restore to Factory settings] with an alert, and another
message [Restore Wait].
3. Once Wi-Fi reset is completed, the device will reboot by
itself with a long alert, followed by a message [Wi-Fi].
Using the Device
14
Page 15

User Guide
FM Radio
Mode
Connecting an antenna
1. Connect an FM antenna cable to the device’s [FM
Antenna Cable Connection Port].
Setting up FM radio frequency bandwidth
In order for the FM radio to work properly, you need to set
up the FM radio frequency bandwidth.
1. Select [FM] by turning the [Power/Menu] knob.
2. If you press the [ / ] button on the upper side of the
device for 3 seconds, you will see a message [Set] on
the LED screen.
3. Select a frequency bandwidth you want from FM1/FM2
by pressing [ ] or [ ].
FM1 (Korea/CN/USA/EU): 87.5-108 MHz
FM2 (Japan): 76-90 MHz
Bandwidth selection must be made within 10 seconds.
The LS150 may not work properly in areas where bandwidth
of about 50 kHz is used.
Using the Device
15
Page 16

User Guide
Listening to FM radio
Select [FM] by turning the [Power/Menu] knob.
Adjust the volume by turning the [Volume] knob of the
device.
If you press the [ ] button on the upper part of the
device while listening to it, it turns to mute. With one
more press, it will lift.
If you press the [PAIR·WPS·SCAN] button on the upper
part of the device a long time, it can search for available
signals automatically and save them on the channel.
If you press the [ / ] button on the upper part of
the device while listening to music, it will move to a
saved previous/next channel.
Manual channel mode
1. If you press the [Pair/WPS/Scan] button on FM radio
mode, it will change to manual channel mode. If you
press [ / ], it will move by the gradation of every
0.1 MHz.
Semi-automatic search mode
1. If you press [ / ] for a long time on FM radio mode,
it moves saved channels back and forth.
2. Once you move to a frequency you want, the LED screen
flashes for 3 seconds, saves the channel, and the semi automatic search mode will terminate.
Using the Device
16
Page 17

User Guide
Aux-in
Mode
Connecting an External Device
Replays music by connecting with devices that do not
support Bluetooth or NFC
1. Connects an external device with the device’s [Aux Input
Port] through an audio cable (3.5 mm)
2. Select [Aux] by turning the [Power/Menu] knob in front
of the device.
3. You can replay music by using the connected external
device.
Using the Device
17
Page 18

User Guide
Safety
Precautions
Precautions at the Time of Installation
Warnings
Please make sure to use grounded sockets when
connecting the power adaptor.
Otherwise it may cause an electric shock due to short
circuit.
If a cable is inserted into the connected port, please
use caution not to apply too much pressure or shock.
Otherwise it may cause damage to the device or an
electric shock.
Never connect anything other than the cable to
connection ports.
Otherwise it may cause damage to the device or an
electric shock.
Please install it in places where there is no heat source.
Otherwise it may cause fire or an electric shock.
Please use rated voltage all the time.
Otherwise it may cause damage to the device or an
electric shock.
Please install it in dry places.
Otherwise it may cause damage to the device or an
electric shock due to moisture.
Make sure to install it in a sufficiently wide space (more
than 10 cm apart from the wall) with good ventilation.
Otherwise it may cause fire or cause the device to
malfunction due to high temperature.
Make sure to install it in places free from electromagnetic
interferences.
Otherwise it may cause damage to the device or an
electric shock.
Miscellaneous
18
Page 19

User Guide
Do not store or use it in hot and humid places such as
saunas.
Otherwise it may cause damage to the device or an
electric shock.
Please do not put any wet or dry object on the ventilation
opening.
Web objects may cause an electric shock or fire and any
object may obstruct free flow of air and lead to the
device’s malfunction.
Please do not leave power adaptor or any other electric
device on a busy corridor.
It may pose a risk of tripping and lead to an electric
shock, fire, device damage, or physical injury.
Caution
Please install it in places free from fall hazards.
Otherwise it may cause damage to the device or physical
injury.
Please install it in clean places free from dust or soot.
Excess dust may cause the device to malfunction.
Never install it on a bed cover, electric blanket, or carpet.
Otherwise it may cause damage to the device or an
electric shock.
Avoid exposing the device to direct sunlight or extreme
temperatures (-5°C - 40℃, 23°F - 104°F).
It may cause the device’s malfunction or damage.
Do not place the device near magnetic objects (magnets,
televisions, monitors, speakers, etc.).
It may cause the device’s malfunction or damage.
Do not store it for extended periods in a confined space
with the power on.
It may cause the device’s malfunction or damage.
Miscellaneous
19
Page 20

User Guide
Precautions related to power
Warnings
When pulling the power adaptor out of the adaptor,
make sure to do so by holding the plug.
If you pull the power adaptor too hard, it may cause
damage to the electric wire, posing an electric shock
and fire hazard.
Please remove the power adaptor and cables connected
with the device on a stormy day with thunders and
lightenings.
There is an electric shock risk.
When connecting the power adaptor, make sure that
the plug is inserted snugly.
If connection in not made properly, it may cause fire.
For power plugs, please use a surge protector and
make sure not to use it with other electrical devices or
heating appliances.
Otherwise it may cause fire or damage to the device due
to high temperature.
Never touch the power plug with wet hands. If there is
moisture or dust on the plug’s pins, make sure to dry
or clean them before plugging.
It may cause an electric shock due to moisture.
If you don’t want to use the device for a long time, please
remove the device’s power adaptor from the socket.
It may be a fire hazard and may cause a short circuit,
electric shock, or fire.
Miscellaneous
20
Page 21

User Guide
Warnings before moving
Warnings
Please make sure to turn off the power before moving.
It may cause damage to the device and an electric shock.
Please separate all cables before moving.
It may cause damage to the device and an electric shock.
Caution
Make sure not to cause any shock to the device when
moving.
It may cause damage to the device and physical injury.
Do not discard the box when you buy the device and
keep it for safer moving later.
Moving the device without proper packaging may be a
cause of damage to the device or physical injury.
How to manage and use the device
Warnings
If the device gets wet from rainwater, beverage, liquid
medicine, cosmetics, sweat, or moisture, never turn
the power on and instead wipe it with dry cloth and
take it to the nearest iriver service center
(malfunction due to exposure to water or liquid will be
repaired for a fee regardless of the warranty period
and such damage may not be repairable).
It may cause damage to the device or physical injury.
Miscellaneous
21
Page 22

User Guide
Never insert anything inside holes or ventilation
openings of the device.
It may cause the device’s damage or physical injury.
Never attempt to disassemble, repair, or alter the device.
It may cause the device’s damage.
Caution
Do not place heavy objects on the device.
It may cause the device’s damage.
Never use chemicals or cleaning products on the device
since they can damage the paint and surface coating.
It may cause the device’s damage.
If you use the device for a long time, it may get too hot.
It may cause the device’s damage.
If you experience ringing in the ears, please reduce
the volume or stop using the device.
It may cause physical injury.
Please do not use the device for an extended time with
the volume set too high.
It may cause physical injury.
Depending on frequency interference from other
devices or any other environmental cause, malfunction
or noise may occur when Bluetooth is on.
Miscellaneous
22
Page 23

User Guide
Troubleshooting
Certifications
Check for solutions to common problems.
1. The device won't turn on.
Make sure whether the power adaptor is properly
connected.
2. The sound won’t come out.
Make sure whether the volume is set at zero [0].
Check the volume of the connected device.
Find out whether the cable is connected properly and
the port is smeared with dust or soot.
Make sure that the music file is not corrupted.
Check whether the device is connected with the Wi-Fi
network properly.
3. I hear so much noise.
Please find out whether there is any device nearby
causing frequency interference. Try looking for an
optimal location for receiving signals by moving the
device slowly.
4. My device won’t connect with Bluetooth.
Please try putting the device within 1 m of the
Bluetooth device.
KC/CE/TELEC/CCC
Class B Device (Communications equipment for residential
use): This is a Class B Device and is registered for EMC
requirements for residential use. This device can be used
in residential areas and all other areas.
As this device is subject to frequency interference, it can’t
be used in relation to rescue operations.
Miscellaneous
23
Page 24

User Guide
Copyright
Disclaimers
iriver Limited retains the all rights to patents, trademarks,
copyrights, and other intellectual property rights related to
this manual. No contents of this user manual may be duplicated
or reproduced in any format or by any means without the
prior permission of iriver. Using or reproducing, in whole or
in part, the contents of this document is subject to penalties.
Copyrighted contents such as software, music files, videos
are protected by related laws like copyright laws. The user
accepts all legal responsibility for the unauthorized
reproduction or distribution of the copyrighted contents
from this product.
Companies, organizations, products, people, and events
used in the examples are not based on actual data. iriver
has no intention to be associated with any company,
institution, product, person, or incident through this
instruction manual, and no such inference must be made.
It is the responsibility of the user to comply with applicable
copyright laws.
©1999-2016 iriver Limited. All rights reserved.
The manufacturer, importer, and distributor shall not be
liable for damages including accidental and personal
injury due to the improper use or operation of this product.
The information contained in the user manual is based on
the specifications of currently available products. iriver
Limited, the manufacturer of this product, is currently
working on improving the product in terms of quality and
functionality and will continue to add new technology.
All specifications may be changed without prior notice.
We are not responsible for any data loss or damage for
use with the product.
Miscellaneous
24
Page 25

User Guide
Registered
Trademarks
The Spotify software is subject to third party licenses
found here:
www.spotify.com/connect/third-party-licenses
Product
Specifications
Model name
Connectivity
Bluetooth
FM Radio
Power
Supported Audio Formats
Frequency response
Speaker unit
Size
Color
LS150
Bluetooth, NFC, Wi-Fi 2.4 GHz, Aux 3.5 mm Stereo
Effective range:7-10 m (22-33 ft.)
Version:2.1 + EDR
CH1 : 88 ~ 108MHz, CH2 : 76 ~ 90MHz
Input voltage:AC 100-240 V, 50/60 Hz
Amp output:5 W (RMS) x 2 3Ω + 10 W (RMS) x 1 2Ω
Amp input sensitivity: ≤500 mV
Ratio of amp signal to noise: ≥ 75dB
THD: ≤1%
MP3, WMA, WAV, ALAC, AAC, APE, FLAC, OGG
50 Hz-20 KHz
Tweeter 1” (25.4 mm) x 2 Silk dome tweeter
Midrange 2“ (50.8 mm) x 2 Cone Paper, Ferrite Magnet
Subwoofer 3.5” (88.9 mm) x 1 Paper Cone, Ferrite Magnet
Passive Radiator 162 x 62 mm x 1
W350 x H117 x D179 mm
White
Miscellaneous
25
Page 26

User Guide
Device’s
Features
Customer
Service
Bluetooth/NFC Paring
Speaker that can support Bluetooth 2.1 + EDR/NFC and
can replay music wirelessly
Wi-Fi
Can use functionalities like [IRIVER Live Stream/AirPlay
/DLNA/Multi-room/Windows 10 Cast Media to Device]
by connecting with a Wi-Fi network
FM Radio
FM radio listening available
Connect to an external device through Aux cable
Replays music by connecting with a 3.5-mm Aux cable
for external devices that do not support Bluetooth or NFC
Please contact us for questions about the product’s
performance or to provide feedback.
http://www.iriver.com e-mail : webmaster@iriver.com
Miscellaneous
26
 Loading...