

Page 1
Instruction Manual
MULTI-CODECCDPLA YER/FMTUNER
Model iMP-900
Thank you for purchasing the product.
Please read the manual carefully before use.
http://www.iRiver.com
Model iMP-350
TM
Model iMP-900
http://www.iRiver.com
Page 2

Welcome
Welcometo iRiverWebsite
2
Thank your for your iRiver purchase.
The iMP-900 comes complete with a long list of advanced features.
It is important that you read the manual to ensure that you get the most out
of your new player.
URL : www.iRiver.com
Find information on our company, products, and customer and technical support.
Update your player with firmware downloads. Firmware upgrades offer
Consult the product FAQ.
Register your iRiver product online so that our Customer Service is able to
provide support as efficiently as possible.
All contents contained in this manual subject to change without notice to
improve ability of this player or according to changing of specification.
http://www.iRiver.com
1
Copyrights/Certification/Trademarks/LimitedLiability
Copyrights
iRiver Limited has all the rights of the patent, trademark, literary property and
intellectual property related to this manual. You may not reproduce any part of
this manual unless authorized by iRiver Limited. You can be punished by using
anypartof this manual illegally.
The software, audio and video which have an intellectual property are protected
by copyright and international laws. It is user s responsibilities when he/she
reproduce or distribute the contents created by this product.
The companies, institutions, products, people and events used in examples are
not realdata. We don t have anyintensionto be related withany companies,
institutions, products, people and events through this manual and should not
draw inferences. Users are responsible for observing the copyrights and
intellectual properties.
1999~2004 iRiverLimited, Allrightreserved
Windows, Windows 98 SE, Windows ME, Windows 2000, Windows XP and
Windows Media Player are the registered trademarks of Microsoft Corp.
Neither the Manufacturer, importers nor dealers is responsible for any
accidental damage including bodily injury or any damage resulting from
misuse or unsuitable operation by you.
The information on this manual is prepared with the current product
specifications. The manufacturer, iRiver Limited, is adding new features
to the product and may persistently apply new technologies hereafter.
All standards may be changed at any time without notice.
CE, FCC
Certification
Trademarks
LimitedLiability
GettingStarted
GettingStarted
Page 3
HandlingNoticesfor Safety
4
3
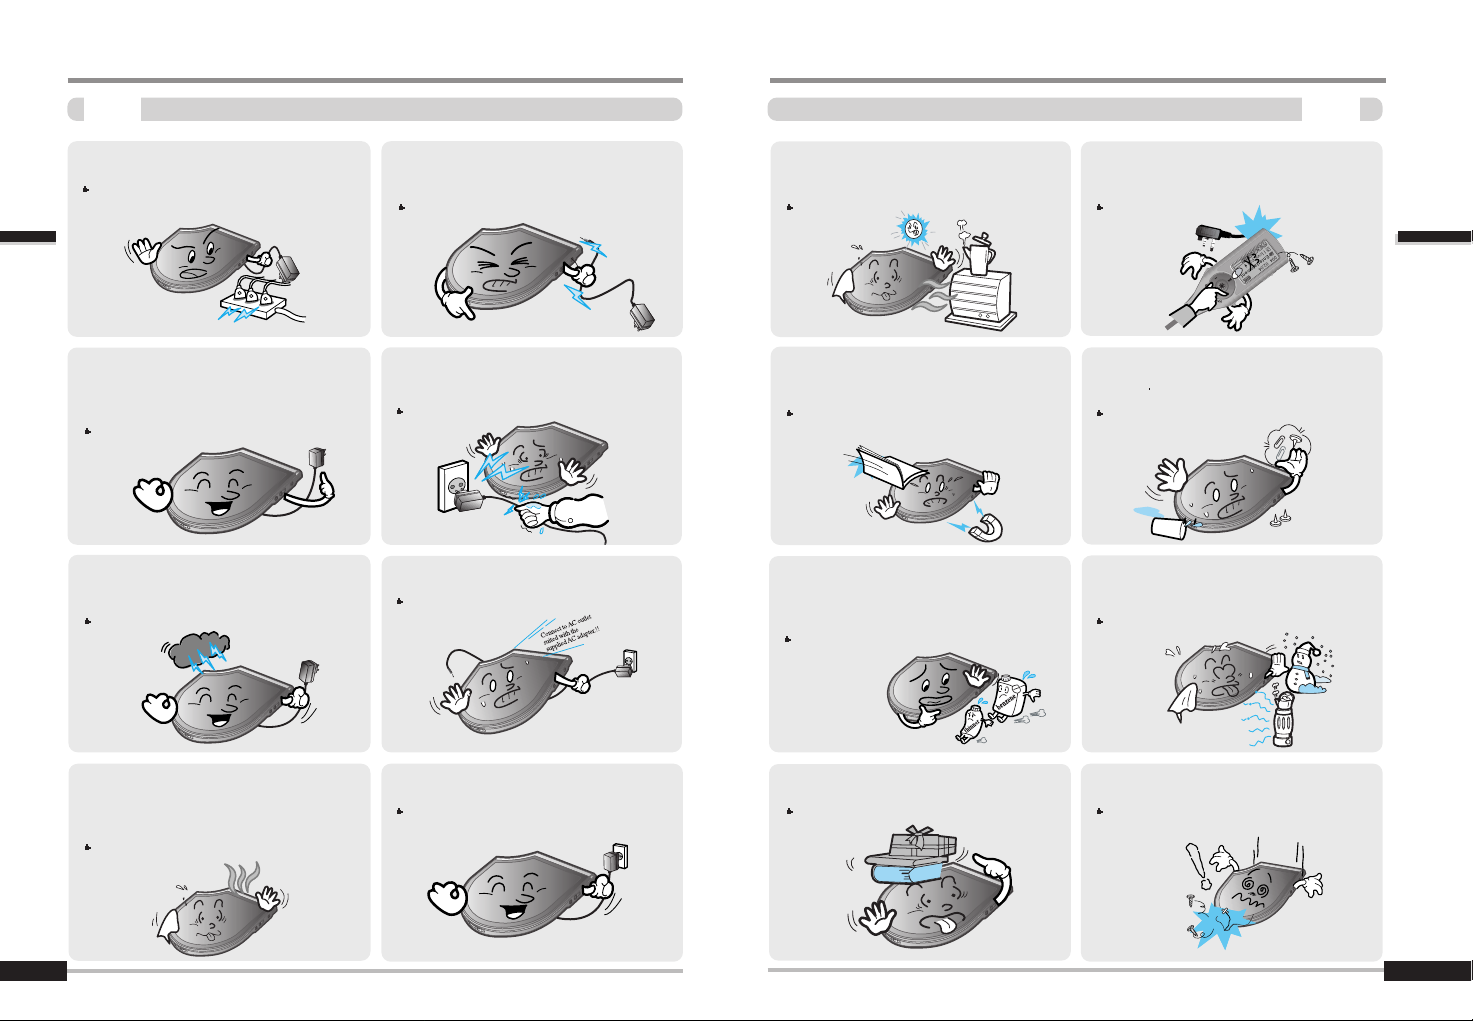
Do not handle power plug and adapter with
wet hands.
Electrical Shock may result.
Firmlyplugthe adapter into the wall socket.
Fire can result from improper use.
Do not overload a single power circuit.
Overheating or fire can result.
Use only the supplied AC adapter. Use of
non-authorized power adapters is not
recommended.
Damage to your player may result from
improper use.
HandlingNoticesfor Safety
Keep out of direct sunlight and extreme heat
and cold.
Damage to your player may result from
improper use.
Do not use excessive force on the buttons or
attempt to disassemble the device.
Damage to your player may result from
improper use.
Keep the player away from strong magnets or
excessive violation or dropping any material.
Damage to your player may result from
improper use.
Do not place objects inside the device other
than CD
s.
Damage to your player may result from
improper use.
Unplug the AC adapter during
electrical storms.
Electrical Shock may result.
Keep away from harsh environments
including humid, dusty, and smoky areas.
Damage to your player may result from
improper use.
Do not place heavy objects on the device.
Damage to your player may result from
improper use.
Do not drop or subject the device to impact.
Damage to your player may result from
improper use.
Power Player
Do not use wateror chemicals tocleanthe
player.
Clean the surface with a soft cloth.
Damage to your player may result from
improper use.
Unplug adapter when it s not in use.
Overheating or fire can result from
improper use.
Immediately power off the player and unplug
the AC adapter if smoke or odors emit from
the player or adapter.
Electrical Shock or fire can result from
improper use.
Do not kink or crease the power cable or
place heavy objectsonthe powercable.
Fire can resultfrom damaged power cables.
GettingStarted
GettingStarted
Page 4

5
HandlingNoticesfor Safety
6
Avoid contacting the player with water or
chemicals.
Damage to the internal parts of the player
may occur. If your player gets wet, dry the
outside with a soft cloth as soon as
possible.
Do not disassemble or modify.
Damage to your player may result from
improper use.
HandlingNoticesfor Safety
Do not use a newbatterywith a discharged
batteryin the device. Always replace all
batteries at the same time.
Damage to your player may result from
improper use.
Do not use different types of batteries
together.
Damage to your player may result from
improper use.
Do not use headphones / earphones while
cycling, driving, or operating any motorized
vehicle.
It is dangerous andis illegal insome areas.
Reduce volume while walking,
especially atpedestrian
crosswalk.
It is dangerous and is illegal in
some areas.
Do not use at high volume for continuous
listening.
Hearing experts advise againstlistening to
continuous, loud and extended play.
Reduce volume or stop using the player if
you experience a ringing in your ears.
Hearing experts advise againstlistening to
continuous, loud and extended play.
Keep headphones / earphones cords under
control at all times.
Cords may get caught on a variety of objects
and cause damage or injury.
Included earphones include soft covers for
your comfort. They may be used with or with
out covers at your preference.
Player Others
Battery(for usingexternalbattery)
GettingStarted
GettingStarted
Page 5

Contents
Contents
8
BeforeUsing
NOTE
7
Welcome
Copyrights / Certification / Trademarks / Limited Liability
HandlingNoticesfor Safety
1. Before using
Featuresof iMP-900
Components
2. Using the Controls
Locating the controls
Locating the controls(Remote Control)
Connecting player
3. Detailed Operation
ListeningtoMusic
Operating the FM Tuner
4. Specific features
Navigation mode
EQ Mode
Playback Mode
Interval repeat/Reservation
Program Mode
-10/+10Function
BOOKMARK
Other Features (Playlist)
MENU
MENU Operation
MENU Setup
Using the Password
5. Additional Information
Firmware Upgrade
Questions and Answers
Troubleshooting
Precautions
Product specifications
Regulatory Information
Safety Warning
1
2
3
9
10
11
13
15
19
21
25
26
27
28
29
31
32
33
34
36
38
53
55
56
62
64
66
67
68
GettingStarted
Page 6
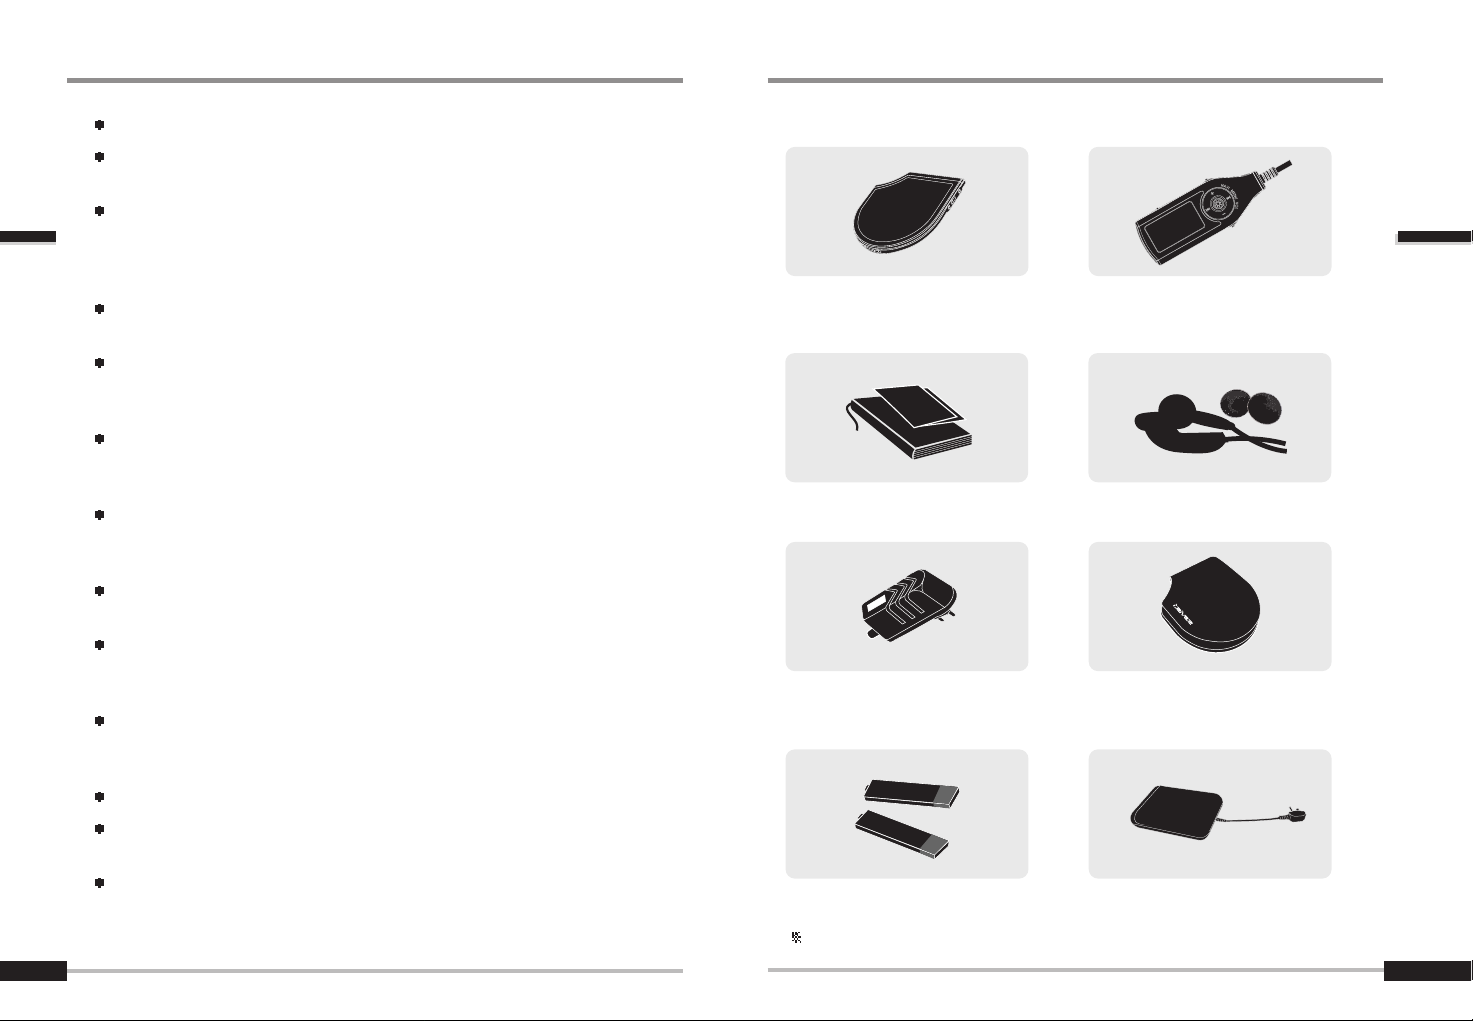
Components
10
FeaturesofiMP-900
9
Slim Design - Depth : 13.7 mm
Multi-Codec CD Player
Supports MP3, WMA, OGG and ASF formats as well as Standard Audio CD.
Enhanced Battery Life
With MP3 or WMA files, the iMP-900 can play for up to 120 hours (Using the
internal batteries andexternal batterypack). (ExternalBattery Pack:AA Size x 4)
(When using internal battery : 30hours)
Firmware Upgradeable
Provides the latest updated features via firmware upgrade.
Graphic LCD supporting Multiple Languages- support 40 languages
iMP-900 comes with 4 line graphic LCD which can support multiple languages
(40 languages) including traditionaland simplifiedChinese.
Built-in Recharging with Over Charge Protection Circuit
Over Charge protection circuit prevents over powering the batteries.
Discharging function helps to maximize battery life.
iRiver Shock Free Anti-Shock System+ESP function
Using exclusive iRiver anti-skip technology, the iMP-900 provides maximum skip
protection by buffering your music before playback.
Built in 6 Preset EQ
Normal, Rock, Jazz, Classic, U Bass, Metal
Xtreme EQ and Xtreme 3D
Customize your own EQ with Xtreme EQ and enhance bass and surround sound
with Xtreme 3D.
FM Tuner
Auto scanning and frequency memory function make it easy for you to listen to
the FM Radio.
Recognize Discs in Packet Write or Multi session Format
WinAmp Playlist support.
iMP-900 supports Winamp M3U Playlists. (maximum 20 lists)
GUI (GraphicUser Interface) Menu System
iMP-900 Player
Remote Control
Carrying Case
Earphones/ Earphone covers
AC Adapter (4.5V)
3
3
4
4
2
2
1
1
7
7
6
6
5
5
User Manual/Warranty card
Quick Start Guide
External Battery Pack
8
8
Accessories subject to change without notice and may vary from image shown.
BeforeUsing
BeforeUsing
Rechargeable Batteries
(Stick Type x 2)
Page 7
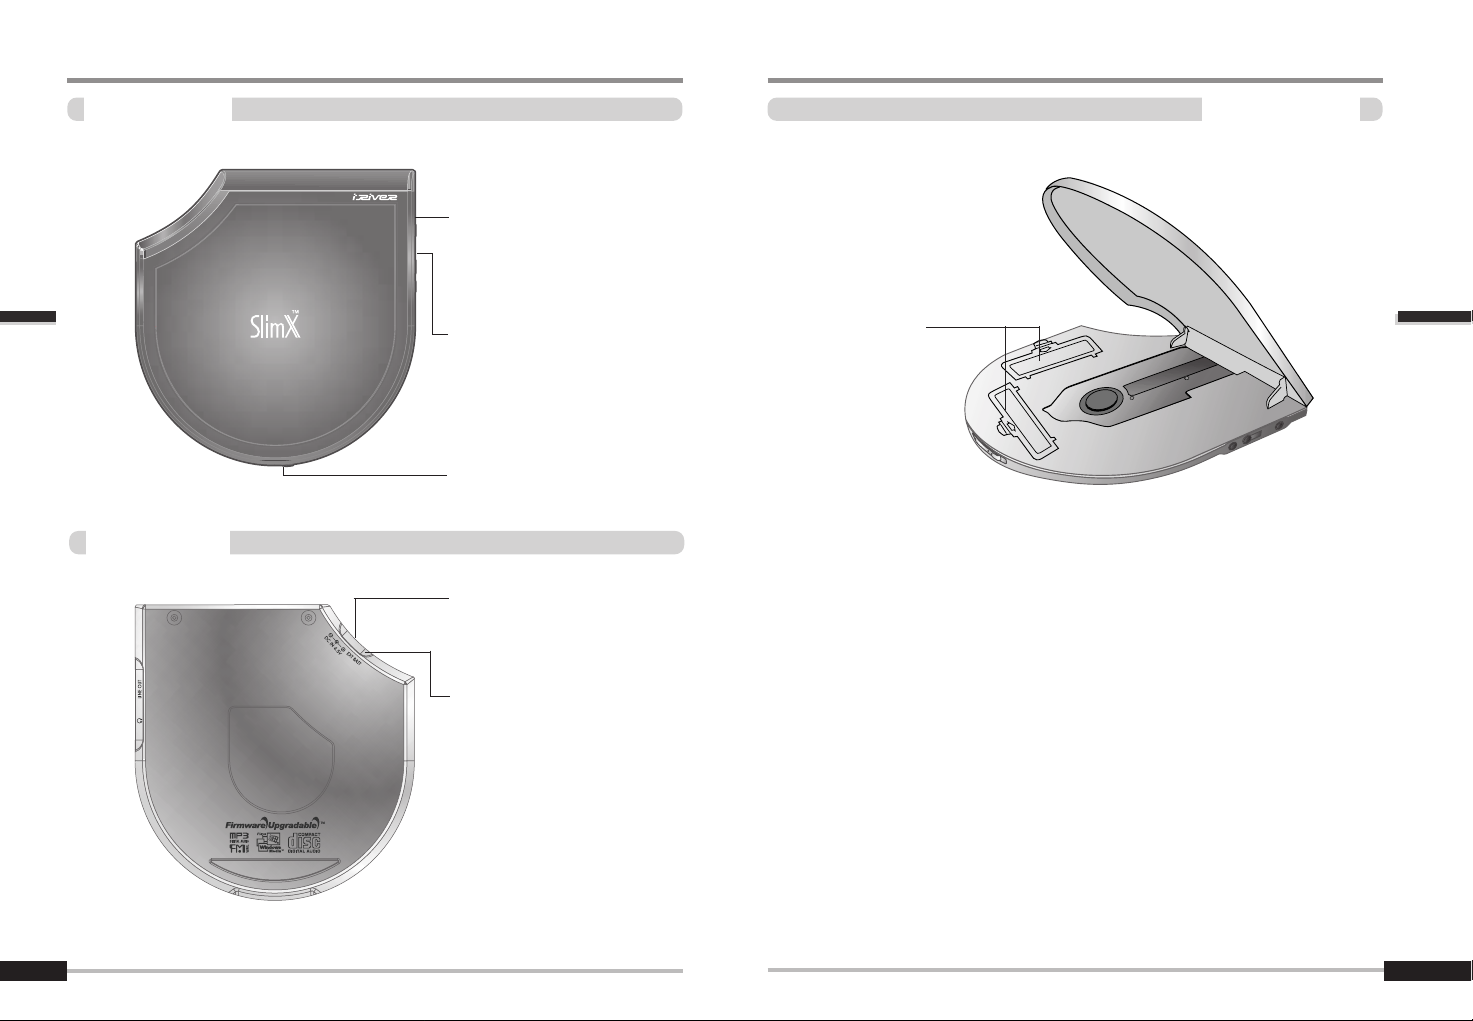
Locatingthecontrols
Player-InsideView
12
Locatingthecontrols
Player-FrontView
11
OPEN Button
DC IN 4.5V : Connect the Adapter to
charge rechargeable batteries or
using external power. Insert them by
matching the + and - polarity.
EXTENSION BATTERY PORT
LINE OUT
REMOTE CONTROL/
EARPHONE
BATTERY
COMPARTMENT
Player-RearView
UsingtheControls
UsingtheControls
Page 8
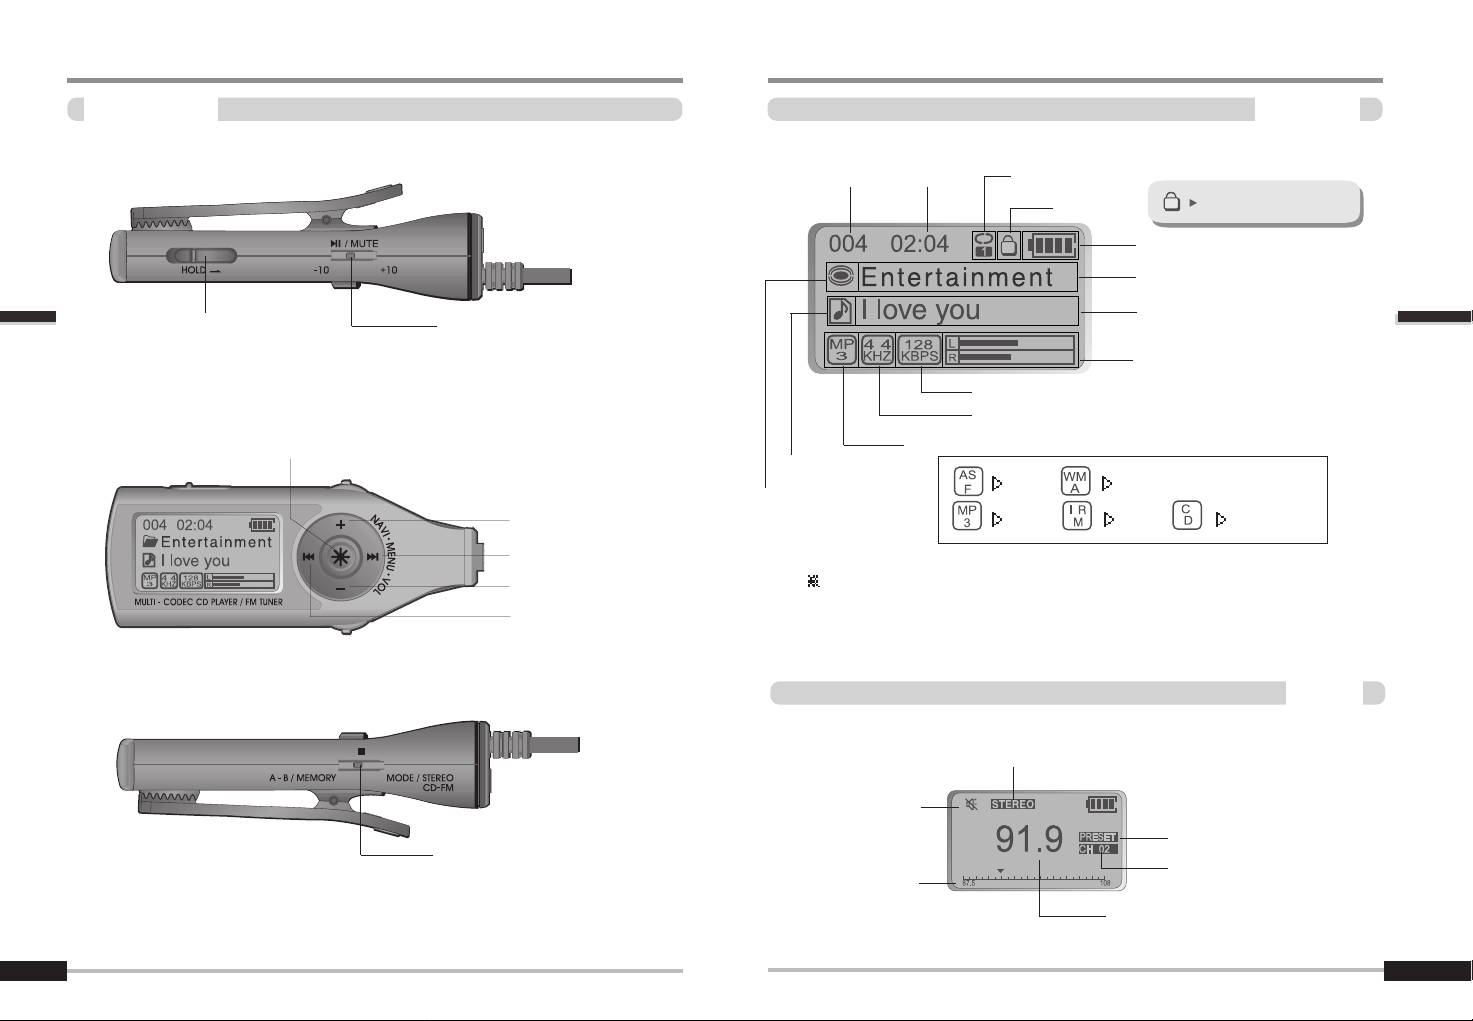
LCDscreendisplay
MusicMode
14
Locatingthecontrols
13
Track Number
BIT RATE
PlayTime
Playback Mode
Battery Indicator
VOLUME/EQ/LevelMeter
FolderName
SAMPLE RATE
Program/ Playlist
File Name
ID3 Tag Information
Hold
POWER ON,
NAVI / MENU,
PRESET Button
NEXT Button
PREVIOUS Button
Volume + Button
Volume - Button
Remote control is locked.
File Format
ASF WMA
MP3 IRM AUDIO CD
IRM (iRiver Rights Management)
iRiverRights Managementis a digital music format.
Please visit our web site for details about this music format.
Hold Switch
RemoteControl
iRiver Shock Free
FMMode
Stereo/Mono
PRESET ON / OFF
Channel
FM Frequency
Range
Station Frequency
PLAY / PAUSE / MUTE
-10/+10 Button
POWER OFF / STOP
A-B / MEMORY
MODE / STEREO / CD-FM Button
UsingtheControls
UsingtheControls
MUTE
Page 9
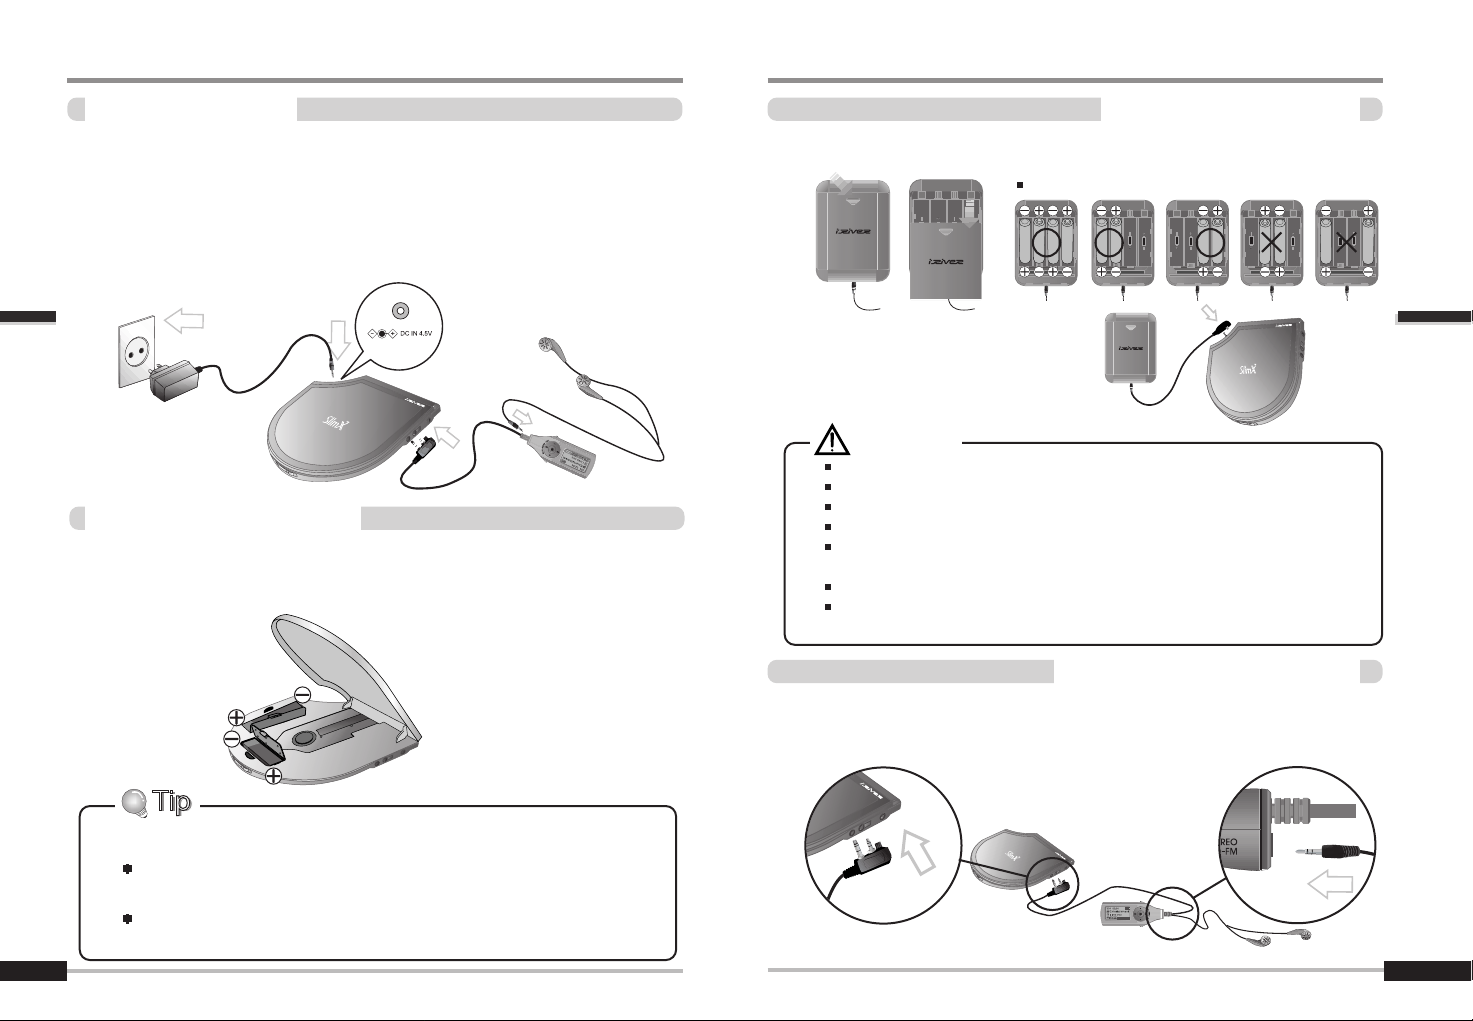
Connectingplayer
15
Connectingplayer
Chargingwith ACAdapter
16
Usingthe rechargeableBatteries
Use only the AC Power Adapter supplied with the player for safety.
Connect the AC adapter to the 5.0V DC jack onthe playerfirst and then into AC
outlet. (AC adapter of t hisplayer is f or 100~240V, 50~60Hz.)
The player will charge automatically when the player turns on after connecting
the AC adapter tothe player. (Referto page 17~18 fordetails)
Open the battery cover on the inside of the player.
Insertrechargeable batteries(Stick type x 2ea) matching+ and - and close the
battery cover.
3
3
2
2
1
1
2
2
1
1
Usingthe ExternalBatteryPack
Connect the external battery pack
as shown in the right figure.
Do not use mixedwith newbatteriesand usedbatteries.
Do not use different types of batteries together.
When the batteries are not to be used for a long time, remove them.
If battery leaks, remove them.
If battery leaks, wipe offany residue in the battery compartment and
insert new batteries.
Do not recharge a normal battery.
The internal and external batteries are used simultaneously,
the batteries can be charged according to batteries’ condition.
CAUTION!
1
1
ConnectRemote control/Earphones
Connect remote control cable to the player as shown on below diagram.
Connect earphone to the earphones jack of remote control.
2
2
1
1
When the battery level is low
It beeps every 10 minutes. ( Beep sound can be on/off. For details,
please refer to page 54)
iMP-900 may not function properly. Replacing battery or charging is
recommended
UsingtheControls
UsingtheControls
Open the battery cover on the external battery pack as below figure.
AA size battery x 4EA
Inserting batteries
2
2
Page 10
Connectingplayer
17
Connectingplayer
RechargingMethod
Insert rechargeable batteries into the battery compartment of the player
Connect the AC adapter to the player.
Press
button to power on the player and then it starts to charge.
It may be necessary to set the CHARGE FUNCTION to
CHARGE ON .(Refer
to page 41)
isscrolledwhenchargingduringplayback.
Press and hold the
button during playback to enter the standard charging
mode (see below image)
Once fully charged, charging is automatically stopped.
When Charging
Charging/Dischargingtime (Estimated with the rechargeable stick
batteries provided)
Charging : Approx. 4 hours (At full discharge)
Discharging : Approx. 5 hours (At full charge)
For long duration of battery life, we recommend selecting the
Discharge/Charge function once a month.
After charging is completed during playback mode, charging indicator
( ) is changed to adapter indicator( ).
The player automatically powers off when done charging.
(except when charging during playback.)
Once fullycharged, the player will nottryand charge the batteries.
3
3
4
4
2
2
1
1
6
6
5
5
18
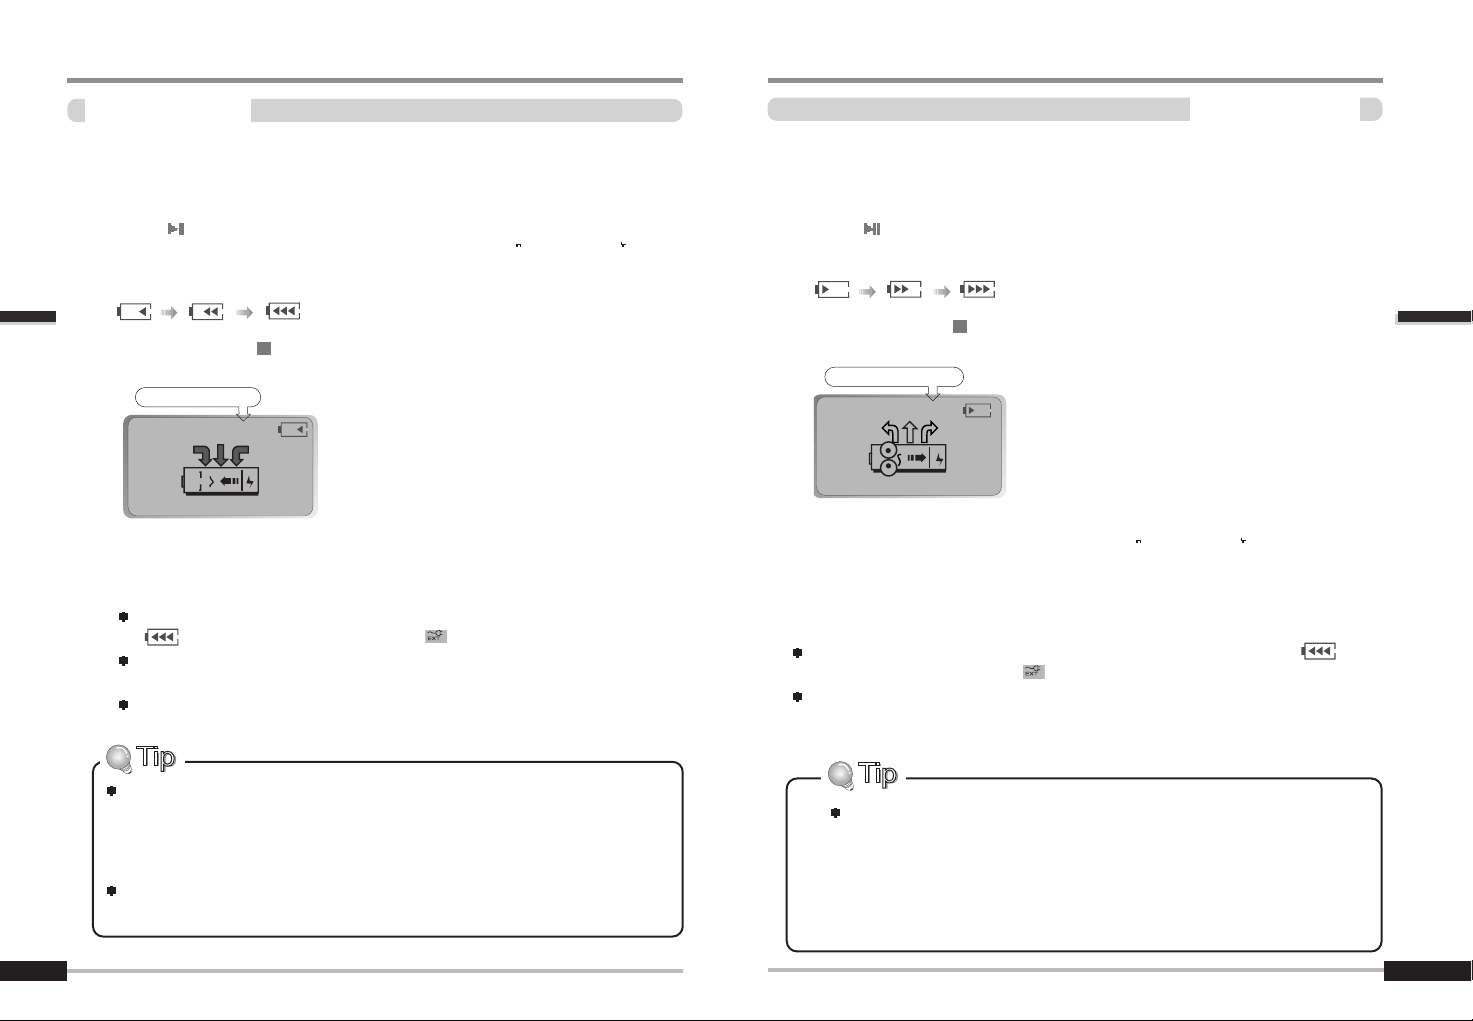
Discharge& Charge
Install rechargeable batteries.
Connect the AC adapter to the player.
Press
button to power on the player and set the “CHARGE FUNCTION
to DISCHARGE & CHARGE”to charge after discharging.(Refer to page 41)
is scrolled when discharging during playback.
Press andholdthe
button during playback to enter the standard discharging
mode (see below image)
After discharging is complete the player will switch to CHARGE mode and
CHARGE function in the menu is changed to
CHARGE ON .
Once fully charged, charging is automatically stopped.
After charging is completed at the playback mode, charging indicator( ) is
changed to adapter indicator( ).
The player automatically powers off when done charging.
(except during playback.)
When discharging
To make your batteries last longer.
- Set the SORT to “PHYSICAL ADDR”
- Set the TAG INFORMATION to“OFF”.
- Set the EQ mode to NORMAL, ROCK, JAZZ or CLASSIC.
- Set the BACK-LIGHTING time to the shortest possible.
-SettheSHUFFLEmodetoOFF.
3
3
4
4
2
2
1
1
6
6
5
5
7
7
UsingtheControls
UsingtheControls
Page 11
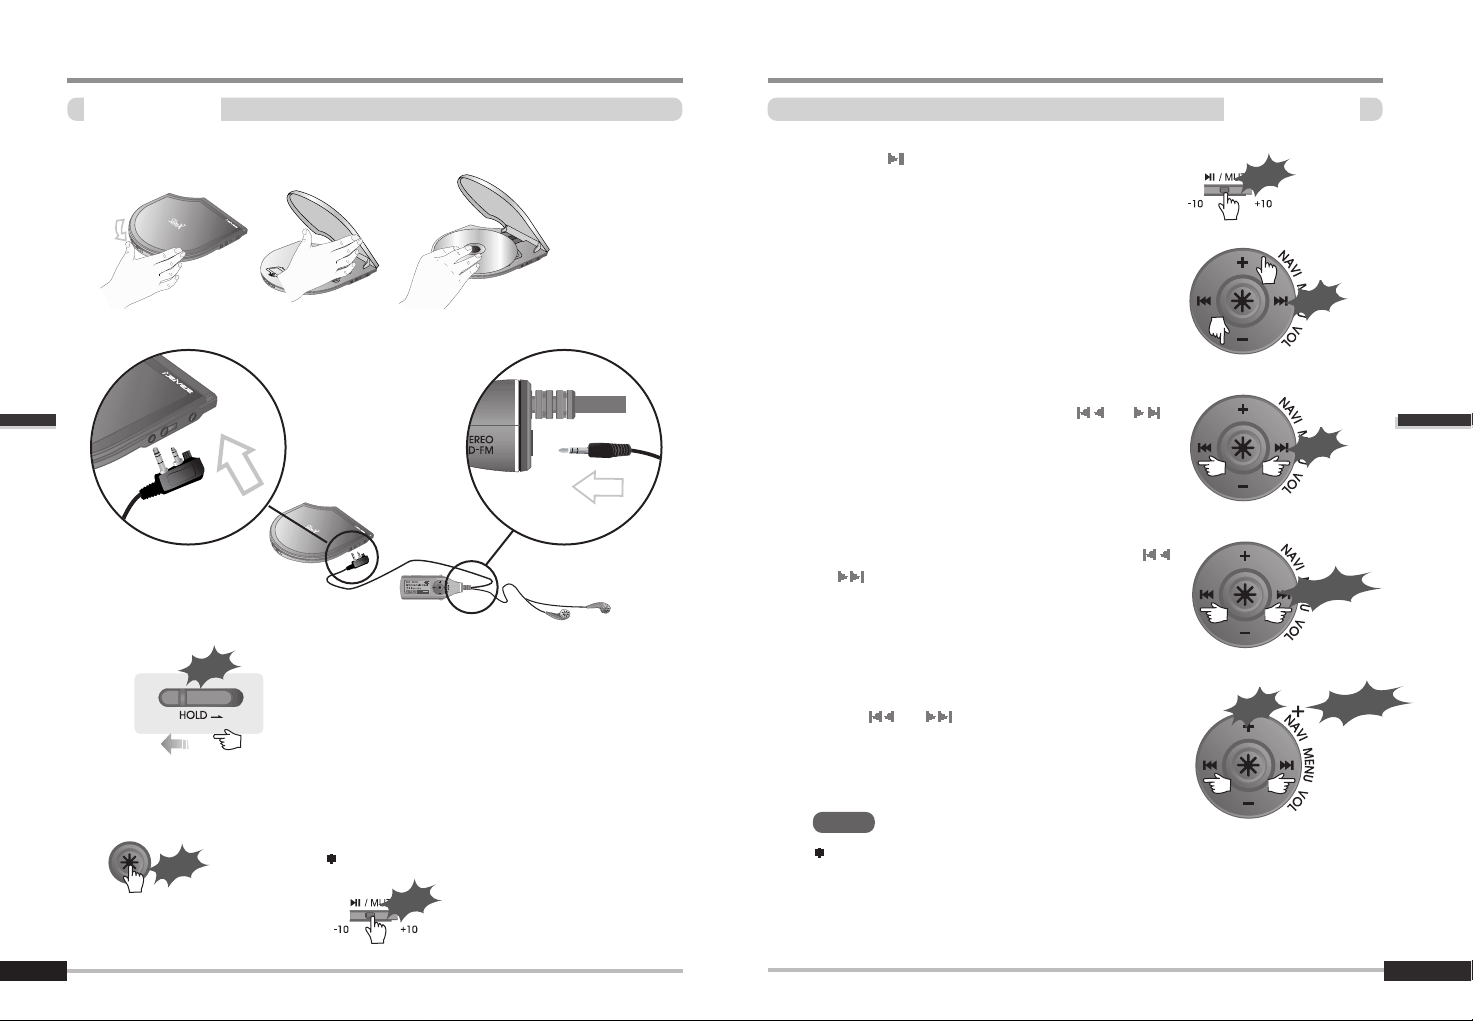
ListeningtoMusic
BasicOperation
20
ListeningtoMusic
BasicOperation
19
Slide the open button on the side of the player and insert the disc with
thedisclabelfacingout.Closethelid.
Connect Remote Control and Earphones.
Slide the HOLD switch on the remote to the Off position.
Press the NAVI/MENU button to play.
After powering on, the disc will play automatically.
Press the
buttontoplaymusicforpause
andpressitagaintoresumeplayback.
Push the NAVI/MENU switch toward+ or- to
adjust the volume.
Push the NAVI/MENU switch toward
or
to skip to previous or next track.
PushandholdtheNAVI/MENUswitchtoward
or toplayfast-backward orfast-forward within
a track.
Push and hold after pushing the NAVI/MENU switch
toward
or to skip to the previous or next
folder.
Refer to page 27 for details about searching the music.
4
4
2
2
1
1
3
3
5
5
9
9
7
7
6
6
8
8
To play while in stop mode
Click
Click
Click
Push
Push
Long Push
Long Push
DetailedOperation
DetailedOperation
NOTE
Push
Push
Page 12

22
OperatingtheFM Tuner
Listento FMradio(Frequency Range87.5MHz~108MHz)
21
Press the NAVI / MENU button to power on the player. To switch to the FM
Tuner, push and hold
switch toward MODE/STEREO/CD-FM.
Push the NAVI/MENU switch toward
or to select your desired station.
4
4
2
2
1
1
Push switch toward MODE/STEREO/CD-FM to select Stereo or Mono.
3
3
Push the NAVI/MENU switch toward + or - to adjust the volume.
5
5
Press the buttontoMutetheradio.andpressitagaintorelease.
Push
Push
Push
Long Push
Click
OperatingtheFM Tuner
AutoScan function
FM tuner reception will be affectedin weakreception areas.
Whenplayer does nothave anypreset channels, EMPTY will be displayed at
preset mode then fade out.
To select a station saved in memory, press the NAVI/MENU button to enter
PRESET mode then find a saved station by pushing the NAVI/MENU switch
toward
or .
STEREO
STEREO
STEREO
Example)
Click
Click
<PRESET RELEASING>
<PRESET SETTING>
Long Push
Findinga StationusingPRESET Mode
To Auto Scan for a station, release the PRESET mode by pressing the
NAVI/MENU button. Push andholdthe NAVI/MENU switch toward
or .
Find the station by scrolling
or .
DetailedOperation
DetailedOperation
Push
Page 13

23
OperatingtheFM Tuner
Memoryfunction (Storefavoritestations)
24
Push the Navi button to release PRESET mode, select the station by pushing
the NAVI/MENU switch toward
or .
PressIor
I
andsel ect t he
desired channel
Select CH02
Save complete
again
Pressi ng the button
will exit the memory
function without saving.
Push
Push
Up to 20 channels can be memorized.
3
3
2
2
1
1
Automemory function:(To savetheChannelsautomatically)
Long Push
Click
PushtheNAVIbuttontoreleasePRESET,pushthe switch toward AB/MEMORY.CH01toCH20willbesavedautomaticallywiththefirst20stations
the player finds.
It maynotbe savedin weak receptionareas.
OperatingtheFM Tuner
Memorydelete function(Deletesaved channels)
Select channel to be deleted by pushing the NAVI/MENU switch toward or
at presetmode.
Long Push
3
3
2
2
1
1
The next channelwill appear whenchanneldelete iscompleted.
Pushandholdthe
switch toward A-B/MEMORY. if you want to delete the
next channel also.
Push and hold the
switch toward A-B/MEMORY to delete the selected
station.
Push
DetailedOperation
DetailedOperation
Push the switch toward A-B/MEMORY to select a channel number to
assign to the frequency. Push it toward A-B/MEMORY to save the station
again.
<PRESET RELEASING>
NOTE
Page 14

25
Navigationmode
NavigationMode
26
File format
ASF WMA
MP3 CD
IRM (iRiver Rights Management)
iRiver Rights Management is a digital music format.
Please visit our web site for details about this music format.
IRM
4
4
2
2
1
1
3
3
Press the NAVI/MENU button to
display the list of audio tracks.
The current track will also be displayed.
Push the NAVI/MENU button toward
or to select a track or folder to
play.
You can easily select a track using the
switch toward -10/+10 in case there
are many trackson the CD.
Press the NAVI/MENU,
button or the NAVI/MENU switch toward to
move to the upper folderand toward
to move the lower folder.
Press the NAVI/MENU,
button or the NAVI/MENU switch toward or
toplaythe selected file.
PREV NEXT
Click
Push
EQMode
EQMode
Pushandholdthe switch toward A-B/MEMORY to display the current EQ.
Every time you push this button, the EQ mode scrolls in sequential order.
Xtreme EQ and 3D are set in the MENU, refer to page 51 through 52 for
details.
With EQ SELECT MENU, user can set only desired EQ function.
Refer to page 54 for setting the EQ SELECT.
Click
Specificfeatures
Specificfeatures
NOTE
NOTE
or or
Long Push
Page 15

27
PlaybackMode
Settingthe PlaybackMode
28
Playa selectedtrack repeatedly.
Playall tracks in the selected folder and stop.
Playall tracks in the selected folder repeatedly.
Playall tracks storedin the CD repeatedly.
Randomly play all tracks in the player and stop.
Playa single track repeatedly. Press
or to select a new
random track.
Randomly play all tracks in the selected folder and stop.
Randomly play all tracks in the selected folder repeatedly.
Randomly play all tracks in the CD repeatedly.
INTRO: Plays the beginning 10 seconds of each track in sequential order.
INTRO HIGHLIGHT: Plays 10 seconds from 1 minute into each track in
sequential order. You can set this function in the MENU function.
Whenever the switch is pushed
towardMODE/STEREO/CD-FM, the
icon in the playback mode indicator
is changed.
REPEAT
INTRO
SHUFFLE
IntervalRepeat /Reservation
IntervalRepeat (A-B)
Reservation
Playa selectedinterval repeatedly duringplay.
A-Bintervalwillberepeated.
Push the button toward A-B/MEMORY
once to select the beginning <A> point.
Push
Push
After selecting the song to play next by using Volume
+ or Volume - button, then push the
switch toward
A-B/MEMORY.
Press the NAVI/MENU button during playback to select the next song to be
played, then push the
switch toward A-B/MEMORY to queue that song.
Ex)
Press NAVI/MENU
button during playback,
Push
Press the button toward A-B/MEMORY
again to selectthe ending <B> point.
Click
Specificfeatures
Specificfeatures
You can set various Repeat and Shuffle options by choosing these selections under
Mode. Change the Repeat or Shuffle mode by pushing the
switch toward
MODE/STEREO/CD-FM. Please refer to the MENU-MODE functi on co ntr ols (page 48)
for user-defined configuration.
Page 16

29
ProgramPlayback
ActivatingProgram mode
30
The orderof
programmed track
Program Mode allows you to program a list of songs to play.
Program mode is activated while in Stop Mode.
RepeatA-B isactivatedwhile inPlay Mode.
While in Stop Mode, push the
switch toward A-B/MEMORY to enter
Program Mode.
Change to Program mode
Press the NAVI/MENU button again to display the file list.
After selecting the desired track using the Volume +, Volume - or -10, +10 button,
push the
switch toward A-B/MEMORY.
To add all the songs in a certain folder, use the NAVI/MENU button and select the
folder using
or button and then push the switch toward A-B/MEMORY.
(Subfolders can not be added.)
To remove a programmed song
Push the
switch toward MODE/STEREO/CD-FM. The program list will be
updated automatically.
Click
Push
1
1
2
2
The orderof track
in the CD
ProgramPlayback
ProgramPlayback
After programming, press to play the tracks in sequential order.
Click
CancelProgram Mode
The program mode icon appears
While Playing
Press the
buttontwicetocanceltheprogram.
Specificfeatures
Specificfeatures
While in Stop Mode
Press the button twice to cancel the program.
Double
Click
NOTE
NOTE
Page 17

31
-10/+10function
-10/+10function
32
During playback, press the switch toward -10 (+10) to go backward
(forward) 10 tracks.
iRiverShock Free
Push and hold the switch toward +10 to activate
orrelease the iRiver Shock Free Mode.
iRiver Shock Free
This is the function to prevent skipping when
playing a Standard Audio CD. In case the CD is
dirty or defective, iRiver Shock Free may skip more
than normal operation. In this case, use the player
after cancelling the iRiver ShockFree.
BOOKMARKfeature
BOOKMARK
This function allows youto BOOKMARKpartsof a track for easiersearching oflong
audio segments.
Bookmark function is activated under the Study mode.
(Refer to page 49 for Study mode.)
Long pushing of the switch toward -10 will add / delete / move the bookmark.
Bookmarks can be reserved up to 20 per disc.
A beep will represent the number of the indicated bookmark.
(One beep for 1, two beeps for 2, etc.).
- Bookmark Add : After long pushing the switch toward A-B/MEMORY and push
the
switch toward A-B/MEMORY to add the present location into the bookmark.
- Bookmark Delete : After long pushing the
switch toward -10 and push the
switch toward MODE/STEREO/CD-FM to delete the present location from the
bookmark.
Whenever you push the
switch toward MODE/STEREO/CD-FM, the bookmark
will be deleted in backward sequence.
- Moving to next bookmark : After long pushing the switch toward -10 and push
the NAVI/MENU switch toward
to move to the next bookmark.
Moving to previous bookmark : After longpushing the
switch toward -10 and
push the NAVI/MENU switch toward
to move to the previous bookmark.
Specificfeatures
Specificfeatures
Pressing the Mode button
for a few seconds while
playing will set the
Enhanced Anti-shock on
andoff.
NOTE
Push
Long Push
Page 18

Otherfeatures(Playlist)
Howto useWINAMPPLAYLIST
34
33
MakeaPLAYLIST(*.M3U) usingWINAMP.
Note : WINAMP software is not included with the player.
Winamp execution picture
2. Click "LIST OPTS"located on the right
bottom and click "SAVE LIST"
1. Launch WINAMP and add songs to make
alist.
Burn the disc with WinAmp play list and related files.
Load the disc into iMP-900.
Push the
switch toward A-B/MEMORY at stop
mode and LCD displays a list of M3U playlist files on
the disk. You can find the playlist you want to play by
using the Volume + or Volume - button.
Click the SAVE LIST button.
3. Name the file name (ex: iriver.m3u)
and click "SAVE" to save the list.
3
3
4
4
2
2
1
1
Otherfeatures(Playlist)
Howto useWINAMPPLAYLIST
Press the NAVI/MENU or button to play the tracks in the order of the playlist.
PL icon indicates PLAY LIST.
A total of 20 playlists can be recognized.
6
6
5
5
The player can play a Playlist (*.M3U) file on the disk.
Specificfeatures
Specificfeatures
Page 19

Menu
36
35
Function Control is subject to change with different firmware
versions. You can configure your own settings.
MAIN MENU SUB MENU
Whenyouselect a sub menu, youcan setyourpreference to be displayed.
Press and hold the NAVI button to display the menus.
It is composed of 6 main menus with sub-menus.
resume
language
cd esp
sort
charge function
multi session
password
load default
back light
lcd contrast
visualization
tag information
time
battery indicator
sleep
pwr off
FF/RW scan
FF/RW skip
FF/RW scan speed
scroll speed
+/-10 button
auto pause
repeat
shuffle
intro
study
name
GENERAL
CONTROL
MODE
User EQ
TIMERDISPLAY
Xtreme EQ
Xtreme 3D
DBE setting
3D EQ setting
adapter volume
sound volume
EQ limit
EQ setting
EQ select
beepvolume
fade in
Configuration
MenuOperation
SUB MENU Setting
Menuoperation
Toselect MainMenu
Press the buttontomovetoprevious
menu, press the
button to move to
next menu.
Click
ClickorClick
Click
or
Push
Toselect SubMenu
Shift between Main Menus
From Main Menu to Sub Menu
Push the NAVI/MENU switch toward or (or Volume +, Volume -) to
scroll between Sub Menu settings.
Push the NAVI/MENU switch toward or (or Volume +, Volume -) to
scroll between Sub Menu.
FromSubMenutoSubMenusettings
Specificfeatures
Specificfeatures
Page 20

38
37
Menuoperation
ExitSub Menu
To exit Main Menu
Press the STOP(
) button at the initial setting menu to exit Function Control
Mode.
Click
Click
To exit Sub Menu
Press the STOP(
) button to exit the sub menu and to display the initial setting
menu.
ExitMain Menu
MENU-General
GENERAL
You can select how to resume the last track played.
“ Track #”plays the beginning of the last track played,
while “ Track Time”resumes to the exact position in
the song.
Resume
Song title and ID3 tag information for the CD is
dependent on the version of the PC operating
system that was used to create it.
(Forexample, ifa CD iscreated ina Korean version
of Windows, the language setting should be Korean
for proper title display)
Language
(supports 40 languages)
This is the function to prevent skipping when playing
a Standard Audio CD.
For best sound quality, it is recommended to use the
40 SEC option, for maximum skip protection, 160 SEC
option is suggested.
If 160 SEC is selected, the sound quality of the music
will be degraded due to higher compression of the music in comparison with
40 SEC.
MP3 CD (128Kbps, 44KHz) isalways operated 480sec option.
CDESP
To save and exit Sub Menu Settings
Click
ExitSub MenuSettings
Specificfeatures
Specificfeatures
Page 21

MENU-General
SORT
39
MENU-General
PASSWORD
40
SORT
You should set sort while the player is stopped.
If directory structure is like as right picture, the
setting order is like as follows.
BREADTH FIRST :
DEPTH FIRST :
PHYSICALADDR. : It is sorted as the sequence of
recording order independent of directory structure.
* You should set sort at stop mode.
ex)
Select Charging or discharging for rechargeable
batteries.
OFF : The player will not charge.
CHARGE ON : Select to enable the player
to charge the internal batteries.
DISCHARGE & CHARGE : Charge after full discharging the internal batteries.
When discharging is completed, this setting will change to CHARGE ON.
(Referto page 17~18)
OFF : the player will not read Multi Session
written disks.
ON : the player will read Multi Session disks.
If you are not using audio CD's created in Multi
Session format, set this feature to OFF to shorten
the access time of your CDs.
CHARGEFUNCTION
MULTISESSION
Initialize to original factory setting.
Select “ YES” , then push the NAVI/MENU or
button to initialize.
OFF : Password function is not activated.
ON : Password function is activated.
CHANGE : To change the Password
- Refer topage 55~56.
LOADDEFAULT VALUE
Specificfeatures
Specificfeatures
Page 22

MENU-Display
TAGINFORMATION
42
MENU-Display
Display
41
Adjust LCD contrast of remote control.
Contrast can be adjusted by using the
and
(or Volume +, Volume -) buttons.
Visualizes audio signal at play mode.
LEVELMETER 1
LEVELMETER 2
WAVEFORM
PROGRESSIVE
Select the back-lighting time.
Adjust the lighting time (1~20Sec) byusing
and
(or Volume +, Volume -) button.
0 : Backlight is off.
21 : Backlight is always on.
ADAPTER ALWAYS ON : Select it by using button.If the adapter is connected,
backlight is always on.
BACK-LIGHT
LCDCONTRAST
VISUALIZATION
ON : Displays track with ID3 tag information or
with lyrics if there are lyrics.
OFF : Displays track with file name.
Normal : display elapsed time of the current track.
Remain : display remaining time of the current track.
Note:IncaseofVBRMP3file,
the remaining time may not display accurately.
You can select OFF/ON using button and tag
information display preference using
or
button.
PLAYTIME INFO
Adjust the level of the battery indicator to
compensate for different style of batteries.
Lower numbers will make the battery indicator
higher, higher numbers will make the battery
indicator lower.
BATTERYINDICATOR
CAPTION OFF : You can turn off lyric display of synchronized MP3.
Specificfeatures
Specificfeatures
Page 23

Menu-Timer)
Timer
43
MENU-Control
Control
44
Automatically turns power off at stop mode.
(Time range can be set from 1 to 60 minutes by one
minute increments.)
Use
or button (or Volume +, Volume -) to
adjust time.
Automatically powers off after fixed time
(Timerangecanbesetfrom0to99minutes).
Use
or button (or Volume +, Volume -) to
adjust time.
By using the NAVI/MENU or
button, you can select
beepsoundtoONorOFF.
SLEEPPOWER OFF
STOPPOWER OFF
ON : Long click of or button for fast scan
within the track.
Short click of
or button for next or
previous track.
OFF : Fast Scan through songs in a folder.
FF/RWSCAN
FF/RW SKIP
The fast scan speedcan range from 1x / 2x / 4x / 6x.
and button can be used for this setting.
FAST SKIP allows skipping 10 songs or 1 folder
forwardorbackwardbypressingandholdingtheor
buttons.
OFF : Disablesthe fastskip feature.
10 : Fast skipahead 10 tracksor back
10 tracks.
Directory : Jump to the Previous/Next folder.
FF/RW SCANSPEED
This function works in both CD and FM modes.
When the power is off, the sleep power off setting goes back to Zero setting.
This function only works in CD function.
As typical with MP3 files, particularly VBR (Variable Bit Rate) files, fast scan may
not be as smooth as conventional audio CD.
Specificfeatures
Specificfeatures
NOTE
NOTE
NOTE
Page 24

MENU-Control
45
MENU-Mode
46
PLAYBACKMODESCROLLSPEED
Adjust scrollspeedof character displayed
on the LCD (Title or Singer name) by 1x/2x/4x.
Vertical : The scroll goes from up to down
Horizontal : The scroll goes from the left to the right.
When Auto Pause is on, the player will
automaticallypause after a disc loads andafter
every song isplayed. youwill needto press Play
button to resume the playback again.
-/+10 : During playback, go back to the previous
10thtrack,andpushitto+10togoforwardtothe
next 10th track.
Directory : -/+10 button works as folder skip.
-10/+10 Button
AUTOPAUSE
REPEATMODE/ SHUFFLEMODE
Allows you to select the modesavailable when pressingthe MODE button during
playback.(Multi selection capable)
Only the selected play mode will be applied when you press the MODE button
(For details, please refer to page 29)
INTROMODE
Intro : Plays the beginning 10 seconds of each
track.
Intro Highlight : Plays 10 seconds at the 1 minute
mark of each track in sequential order.
Specificfeatures
Specificfeatures
Page 25

MENU-Mode
47
MENU-Mode
NAME
48
STUDY MODE
When click the -/+10 button, it is operated
as the setstatus.
OFF : Skip ahead 10 tracks.
5 SEC : Pushing of the switch toward -10 (+10)
will skip the current track 5 seconds ahead or backward.
10 SEC : Pushing of the
switch toward -10 (+10)
willskipthe current track 10 secondsahead or backward.
BEEP : A beep sound will be played when the buttons are operated.
If itis setto 5 Sec, 10 Sec, BEEP, itis operated as STUDY Mode.
BEEP VOLUME MODE
This mode is for blind persons. A beep sound
will be played when the buttons are operated.
It isoperatedas5 SEC MODE.
STUDYMODE
You can input your name or custom text. (maximum 12 characters in English)
Select the character by using and
button and press NAVI/MENU
button to input the character.
To delete the character, push
switch toward
MODE/STEREO/CD-FM.
To scroll between English
and your preferred
language, use
button
To move the cursor in the name window,
use + and - on Volume button.
To save the text and exit, use PLAY button.
Chinese and Chinese characters are not supported in the Name
feature.
Button Operation
The saved text is displayed during initial loading of disc and at stop mode
during play.
Initial loading
Stop during playback
Specificfeatures
Specificfeatures
NOTE
Page 26

MENU-Sound
DBESetting
50
MENU-Sound
SOUND
49
Youcanadjustthesoundtoyourpreference.
There are 5 bandfrequency steps, set from
-15dBto +15dBby 3dBstep.
XtremeEQ
1. Select the Frequency
step to set using the
, switch.
2. Adjust the level using
the VOL + or VOL switch.
3. To exitXtreme EQ
setting, press
or
NAVI/MENU button.
How to set Xtreme EQ
Click
Push
Push
Click
Xtreme3D
You can adjust the level of 3D sound(minimum,
Natural, and Maximum). You canextend 3D sound
by selecting Bass Boost or 3D EQ.
Youcan also adjustthe level of 3D sound
with the
or (orVOL +, VOL -) lever.
Select DBE or 3D EQ with the NAVI/MENU button.
Youcan selectthe BassCenterBandlevel from
Band 1 to 4. You can also set the Bass Boost gain
from0 dBto 15dB by3dB step.
Select band 3 or 12dB with Volume + or
Volume - button (If selectedcharacter is highlighted.)
and adjust the level with the
or (or VOL +, VOL -) button.
You can adjust the sound to your preference.
There are 5 bandfrequency steps, setfrom -15dB
to+15dB by3dB step.
Operation method isas same as it ofXtreme EQ.
35 ON : Volume will set to 35 when the AC
adapter is attached.
OFF : This function is not activated.
This feature is useful when connecting the
player to your car or home stereo system.
3DEQ Setting
ADAPTERVOLUME
Specificfeatures
Specificfeatures
NOTE
Page 27

MENU-Sound
EQLIMIT
51
MENU-Sound
BEEPSOUND VOLUME
52
ON : Limit the control of equalizer frequency to
prevent distortion of sound.
OFF : You can enjoy original sound though
distortion may occur.
TAGAUTO EQ
Automatically changes EQ by reading the genre of
TAG Information.
ON : Can automatically change EQ by
reading the genre of ID3 TAG
information.
OFF : EQ isset by the user.
EQ is selected by genre as follows :
Rock : Classic Rock, Rock, Altern Rock, Instrumental Rock, Southern Rock,
Rock & Roll, Hard Rock, Folk Rock, Gothic Rock, Progressive Rock,
Psychedelic Rock, Symphonic Rock, Slow Rock, Punk Rock
Jazz : Jazz, Jazz+Funk, Acid Jazz
Classic : Classical, Opera, Chamber Music, Sonata, Symphony
Metal: Metal,Heavy Metal, DeathMetal
Ubass : Bass, Booty Bass
Tag informationsavedas Dance andPop isoperatedas Normal EQ.
EQSELECT
You can select various EQ modes.
Press NAVI/MENU button after selecting EQ by
using
or (orVOL +, VOL -) switch.
Youcan not select NORMALEQ.
The adjusted EQ is automatically selected when you adjust the EQ
setting even though you do not select Xtrm EQ or Xtrm 3D.
Whenactivated, volume increases
gradually at playback mode to prevent sudden
loudness.
Set beepvolume ON/OFF orlevel.
Set to"0"for OFF.
SOUNDFADE IN
SOUNDBALANCE
When Sound Balance bar is moved to L (Left,
0),the sound outputs at the left earphone. When
the lever is moved to R (Right, 40) the sound
outputs at the right earphone. The default value is
20 and the sound outputs the same level at both
earphones.
Specificfeatures
Specificfeatures
NOTE
NOTE
Page 28

UsingthePassword
Settingthe Password
53
UsingthePassword
Changingthe Password
54
or
Push
or
If you select “ON”on the MENU
GENERAL Password, the right screen
is displayed after loading screen when
youturntheplayeron.
Select the menu you want on the “ MENU
GENERAL Password”.
(Refer to page 40)
Press
, (or Volume +, Volume -) to move the numeral and press the
or NAVI/MENU button to select it. The screen as below is displayed.
- The Password must input as 4 digits.
- The Password is initialized as “0000”when the firmware is upgraded.
CAUTION!
Click
Select “CHANGE”on the “MENU
GENERAL Password” .
Input the old password. (The
initial password is“0000”)
Input the new password of 4 digits.
Input the new password of 4 digits
to confirm once more.
If the password to change and the password to confirm are the same, the
password is automatically changed to the new one and the playback screen is
displayed on the LCD.
If you select “ON” on the password menu, you must input the new password to
turn on the player.
If the password to confirm is different from the changed password, the password
screen goes back to the Confirm screen.
Press the STOP button to exit changing the password, and the old password is
preserved.
The Password isinitializedas “0000”when the firmware isupgraded.
3
3
2
2
1
1
When the input password is correct, the above screen disappears and changes
to Total screen. Press the PLAY button to start the playback.
If the password is wrong, the screen goes back to the input screen.
3
3
4
4
2
2
1
1
Specificfeatures
Specificfeatures
NOTE
Page 29

FirmwareUpgrade
UpgradingFirmware
How to UPGRADE?
1. Download the latest firmware upgrade file from www.iRiver.com.
2. Execute the file after extraction.
3.BurntheiMP-900HEXfiletoaCD(besuretherearenootherfiles
on this CD.
4. Connect the power adapter tothe iMP-900.
(Note : Upgrade the firmware after connecting the adapter)
5.InserttheCDintotheiMP-900andplaytheCD.
6. Check whether your LCD window shows “Firmware Upgrade”
7. When the power goes off automatically, the upgrade is done.
8. Play your Music Disc and confirm the firmware version information
displayed during loading.
Upgrade your firmware at www.iRiver.com.
What is FIRMWARE?
It is the operating system that works in the iMP-900.
iRiverprovides you with the latest andbestfeaturesthrough Firmware
Upgrade. Visit www.iRiver.com to upgrade your Firmware.
55
56
Additional
Information
Additional
Information
QuestionsandAnswers
Player
How long does Anti-Shock last?
With MP3 files (128Kbps, 44.1Khz), Anti-Shock lasts up to 480 seconds.
With Audio CD, you can set it up to 40 or 160 seconds.
Mechanical noise is heard from the player.
When loading a CD or searching music, CD Pick-up makes noise moving at high
speed. This is not a malfunction. But if you hear mechanism noise through
earphones orhear excessive noise from the player, contact iRiver Customer
Service.
Does using CD's created on a computer reduce the life of the Lens?
There is no connection between using a disk created on a home computer and
the lifetime of the lens.
Why doesn't the player recognize a CD created at high speed?
In general, it is recommended to record the CD with 1~2 level lower than the
highest speed if you are experiencing playback difficulties.
A
A
Q
Q
A
A
Q
Q
A
A
Q
Q
A
A
Q
Q
Page 30

QuestionsandAnswers
Recording
HowdoIcopyMP3filesontoaCD?
YouneedtorecordMP3filesontoaCD-RorCD-RWdisctoplayintheiMP-900.
In general, there are two kinds of blank CDs.
CD-R (CD Recordable): Recordable but not erasable.
CD-RW (CD-ReWritable) : Recordable and can be used again after erasing.
ThereareseveralwaystoburnaCD.ACDiscreatedinsessions.
Single session: Close session after burning once.
Multi session: Do not close session after burning. More data can be
writtentothedisklater.
This iRiver player can play packet-written CD RW’s as well.
What do I need to burn MP3 files?
You need a CD recorder, recording software program, and a blank CD. For
details, refer to the “SUPPORT” at iRiver's homepage.
How do I make a CD from a tape or record?
To convert the tape's information into CD requires many items, including:
A player to play the tape or record, a stereo cable to attach the player to your
computer, andthird party recording software to capture and edit the audio.
Connect the stereo cable from the source to the line-in input on your computer
sound card; then use the third party software to record and edit the audio on the
tape or record.
Once the music is recorded onto your computer, use a program to copy the music
inAudioorMP3formattoaCD.
I recorded an MP3 CD but I only see less than 20 songs.
The CD was probably created as an Audio CD’s will only hold about 15~20
songs. To record a CD full of MP3’s be sure to set your CD creation software to
record Data.
57
58
Additional
Information
Additional
Information
A
A
Q
Q
A
A
Q
Q
A
A
Q
Q
A
A
Q
Q
QuestionsandAnswers
Recording
The player can’t read songs and I get 'No disc' message.
CD readabilitydepends on several factors:
1. CD-Media
2. The Burning/Recording Speed
3. The CD surface
When you create a CD, burning speed does matter as well as CD surface. When
you create a CD at a highspeed, the data writing may notbe reliable. In thatcase,
it is recommended to create a CD at a lower speed or to use brand name media.
Can I add songs to the CD I already burned?
Using multi-session or packet writing allows you to add songs to the CD.
Q
Q
Q
Q
A
A
A
A
Page 31

QuestionsandAnswers
Playing
How do I listen to a spot on the track I last listened to?
The iMP-900 provide a RESUME function. Go to Function, General and enter into
RESUME menu. Youcan setTrackTime or Track #.
The iMP-900 canrememberthe last10 CDs you played.
How many playlists can the iMP-900 play?
TheiMP-900canplayupto20playlists(*.m3u)
How many songs can the iMP-900 play?
The iMP-900 canrecognize 999 songs(20 Playlistincluded) and255 folders
including subfolders.
Does the iMP-900 play “ .ra”and “ .wav” formats?
TheplayableformatsontheiMP-900areMP3,WMA,andASFfiles.
RA, WAV, and other formats can not be played in this player.
Supporting formats such as “ .ra”and “.wav” are under consideration for the
future.
I don't see the title and it only displays Audio Track.
The iMP-900 can display the information that the song contains. With MP3 files,
the tag information may not be correct and with Standard Audio CD, it displays
only Audio Track.
To see the song title, you need to burn the CD using CD-TEXT function.
See your CD Creationsoftware.
The sound cuts out when the player skips.
If the player is shaken in a sudden or violent manner, or shaken excessively,
skipping may occur. Under normal circumstances, skipping will not occur.
Please carry and handle the player under normal circumstances (i.e., without
excessive shaking).
59
60
Additional
Information
Additional
Information
A
A
Q
Q
A
A
Q
Q
A
A
Q
Q
A
A
Q
Q
A
A
Q
Q
A
A
Q
Q
QuestionsandAnswers
Playing
IttakesalongtimetoloadaCD.
Using Multi-sessioned or Packet Written CD may affect the loading time rather
than using Single sessioned CD because the data is scattered in the CD.
To reduce the loading time, it is recommended you to burn in Single-session.
You may contact Customer Service if it takes longer than 1 minute to load a
single-sessioned CD or a Standard Audio CD.
It always stops after playing one song.
Check that the "Auto Pause" feature isturned off.
Also check that your player is not set to “ SFL 1”mode.
I hear a 'hiccup' sound while the song is playing.
Check the status of the file. What is likely happening is that the file is corrupted,
especially if you hear the same sound in the same spot. In this case, the music
file is maybe corrupted.
Check whetherthe samplingfrequency andbitrate of the music file istoo high
orlow. iMP-900 supports from 8KHz, 8Kbps to44.1KHz, 320Kbps. (In case of
48KHz, supports up to 256Kbps.)
Can I change the playing order?
The iMP-900 supports m3u file lists. Also, the Program function allows you to
select your preferred songs.
Is the sound better if I convert an MP3 file into WAV?
MP3 is a compressed a audio format. Audio quality is lost when converting
sound into MP3 format. Changing MP3 to WAV files will not restore data lost in
compression and will therefore not improve audio quality.
A
A
Q
Q
A
A
Q
Q
A
A
A2
A2
A
A
Q
Q
A1
A1
Q
Q
Q
Q
Page 32

QuestionsandAnswers
Playing
What kind of media can the iMP-900 support?
Standard Audio CD (8Cm, 12 Cm), CD-R, CD-RW DATACD with MP3, ASF and
WMA.
The iMP-900 also supports Mixed CD (Data Track + Audio Track), CD-Extra
(Audio Track + Data Track), Multi-sessioned and packet written CD.
What is VBR?
VBR is "Variable Bit Rate" . Some MP3 encoders support VBR. When enabled,
the compressor will use a bit rate that will fit the actual passage. If it is a complex
part, having much more variation in the sound, it will use a high bit rate. If there is
less variation in sound, it will use a lower bit rate. Usually, the average bit rate will
not be as high as a same-qualityMP3 withCBR (Constant BitRate). However,
there isshortcoming that it's hard tokeep track ofthe actual positionthat maynot
be favorable when studying language.
61
62
Additional
Information
Additional
Information
A
A
Q
Q
A
A
Q
Q
Troubleshooting!
Player will not power on
Loading stopped or
'No DISC' displayed on
LCD
No Sound or noise is
heard
Check whetherthe batter ies have beeninserted
inproperpolarity (+ and -).
Check whetherthe HOLD switchon remote is
ON(SwitchtoOFFposition)
Check whether the player door is opened.
Check whetherthe rechargeable batteries are
not charged or the batteries ran out.
Check whether the CD is dirty or defective
(clean it or change to new CD).
Check whether the CD is inserted properly.
Checktobesuretheopticallensisclean.
(Gently wipe with soft cloth.)
Check whether moisture condensation has
occurred (leave the CD player aside for several
hours until the moisture evaporates).
Make sure there is a CD in the player.
Problems canbe caused bythe CD creation
process on your PC. Re-record the disk at a
slower speed.
Use Full Format when creating packet a written
disk.
Check whetherVOLUME is setto “0”.
Connect the earphone/remote plug firmly.
Check whether the plug is dirty (clean the plug
with a dry and soft cloth).
Corrupted MP3, WMA file may have distortion or
not play. Try playing another music file.
Excessive jolting may affect MP3, WMA, and
audio CD disks during playback.
Should any problem continue after you have checked these symptoms,
please contact iRiver customer support.
Page 33

63
Troubleshooting!
64
AC adapter does not work.
Remote control does not
work.
Battery Life is short
Characters in LCD are
corrupted.
Poor FM Reception
charging and discharging
does not work.
Check whetherthe plug is connected tothe
proper jack on the player.
Check whetherthe HOLD switch isON.
(Switch to OFF position.)
Connect the earphones/remote plug firmly.
Ensure the rechargeable batteries are fully
charged.
Avoid the excessive operation of remote control.
Check out Menu
General Language and
confirm whether the right language has been
selected. (Refer topage 40.)
Adjust the position of the player and remote
control.
Electronic equipment can case interference with
the FM reception. Turn off any nearby electronics
or move the player away from the source.
Check whether the adapter plug is properly
connected.
Check whetherthe batteries inserted are
rechargeable.
Check whether2 rechargeable batteries are
inserted. The batteries ischarged anddischarged
when 2 batteries are inserted.
Should any problem continue after you have checked these symptoms,
please contact iRiver customer support.
Additional
Information
Additional
Information
On handling Disc
Avoid touching the surface (bright side) where
data is stored.
Disc Cleaning
Avoid cleaning the disc surface. If necessary,
clean the disc surface with a soft cloth following
the directions described.
Do not stick papers or tape labels onto the
surface (bright side).
Avoid using chemicals to clean the surface.
Should any solid objects or liquid fall into the player, unplug it and have it
checked by qualified personnel before operating it any further.
Do not put objects in the DC IN 4.5V jack (External Power output).
Use only the adapter provided with the player.
Precautions
OnHandling Disc
Onsafety
Page 34

20Hz~20KHz
9mW (L) + 9mW (R)(32
) Max. Volume
16mW (R) + 16mW (R) (16
) Max. Volume
0.57V rms(47K
)Max.Volume
90dB(CD-DA), 90dB(MP3 CD)
3dB(Line Out)
STEREO (L+R)
87.5MHz~108MHz
50dB
Headphone/Earphone-Cord Antenna
CD-DA, CD-Text(8cm/ 12cm)
CD-ROM Mode 1, Mode 2 Form1
Enhanced CD, Mixed CD
Packet Write, ISO9660, Joliet,
Romeo, Multi-Session
MPEG 1/2/2.5 Layer 3, WMA ,ASF, OGG
8Kbps ~ 320 Kbps
ID3 VI , ID3 V2 2.0, ID3 V2 3.0
DC 4.5V , 1.2A
Stick Type Ni-MH Rech argeable Battery x2ea
1.5V AA x4ea
Approx. 128(W) x 135.5(D) x 13.7(H)mm
Approx. 160g(without Battery)
0
~40
30hrs (with External Battery Pack : 120hrs)
(Ref : MP3, 128Kbps, 44.1KHz)
ProductSpecifications
66
Precautions
65
During playback, dirty or scratched CD's may cause audio distortion or
skipping.
Tracks with damaged or corrupted parts are skipped or forwarded to
next track.
Supported file types will have the extension MP3, WMA and ASF.
Folders and files are sorted in alphabetical order.
Use Navigation mode to select the tracks wanted.
Total 255 folders and 999 tracks (Including 20 playlist) within a disc
can be recognized.
Track information displayed is either filename or ID3 TAG information.
CD-TEXT discs are displayed with track names within the TOC (Table
of Contents) of the disc.
Maximum playback time is 120 hours with fully charged internal batteries
and the external battery pack attached.
(When playing Audio CDs, maximum playback time is 50 hours.)
(Reference : MP3, 44.1KHz, 128kbps, Volume Center)
Battery level indicator may vary depending on battery type and operation
mode.
To shorten the reading time of CD...
- Set the “ MULTI SESSION”to “ OFF” .
-CreateCDsataslowerspeed.
Frequency/Range
Headphone output
Line output level
S/N ratio
Frequency Characteristics
No. of Channels
FM Frequency range
S/N ratio
Antenna
CD Type
CD-R/RW Readability
File Type
Bit Rate
Tag
AC Adapter
Rechargeable Battery
ExternalBatteryPack
Dimension
Weight
OperationalTemperature
Maximum Playback Time
Specifications
Category
Item
Audio
(CD)
FM TUNER
CD Support
File Support
Power Supply
General
Additional
Information
Additional
Information
Page 35

The device manufactured and found to comply with limits for a Class B
computing de vice according to the specifications in FCC rules Part 15.
Operation is subject to the following two conditions;
1. This device may not cause harmful interference, and
2. This device must accept any interference received, including interference
that may cause undesired operation.
3. If your device needs repairs, you must arrange for the manufacturer to
make them if you are to keep the device's FCC registration valid.
This equipment, like other electronic equipment, generates and uses radio
frequency energy. If not installed and used according to the instructions in this
manual, this equipment may cause interference with your radio and television
reception.
If you think this equipment is causing interference with your radio or television
reception, try turning the equipment off and on. If the interference problems stop
when the equipment is switched off, then the equipment is probably causing the
interference. You may be able to correct the problem by doing one or more of the
following:
- Adjust the position of the radio or TV antenna
- Move away the device from the radio or TV
If necessary, consult your dealer or an experienced radio or television technician.
You may find this booklet helpful:"How to Identify and Resolve Radio and TV
Interference Problems"(Stock No. 004-000-00345-4), prepared by the FCC and
available from the U.S Government Printing Office, Washington, DC 20402. See
individual devices FCC ID and registration numbers.
The CE mark on the CD player is valid only for products marketed
in the European Union.
To prevent fire or shock hazard, do not expose the unit to rain or
moisture.
To avoid electrical shock, do not open the cabinet. Refer servicing to
qualified personnel only.
Certain countries may regulate disposal of the battery used to power
this product. Please consult with your local authority.
Listening for many hours at maximum volume may damage your
hearing.
CLASS 1 LASER PRODUCT
KLASSE 1 LASER PRODUKT
LUOKAN 1 LASER LAITE
KLASS 1 LASER APPARAT
PRODUCTO LASER CLASE 1
Use of controls, adjustments or performance of procedures other than
those specified herein may result in hazardous radiation exposure.
CAUTION-INVISIBLE LASER RADIATION WHEN OPEN AND INTER
LOCKS DEFEATED, AVOID EXPOSURE TO BEAM.
WARNING
RegulatoryInformation
FederalCommunications Commission(FCC)
67
68
Additional
Information
Additional
Information
SafetyWarning
SafetyWarning
Forthe customersinEurope
Page 36

NOTE
NOTE
70
69
Additional
Information
Additional
Information
 Loading...