

Page 1
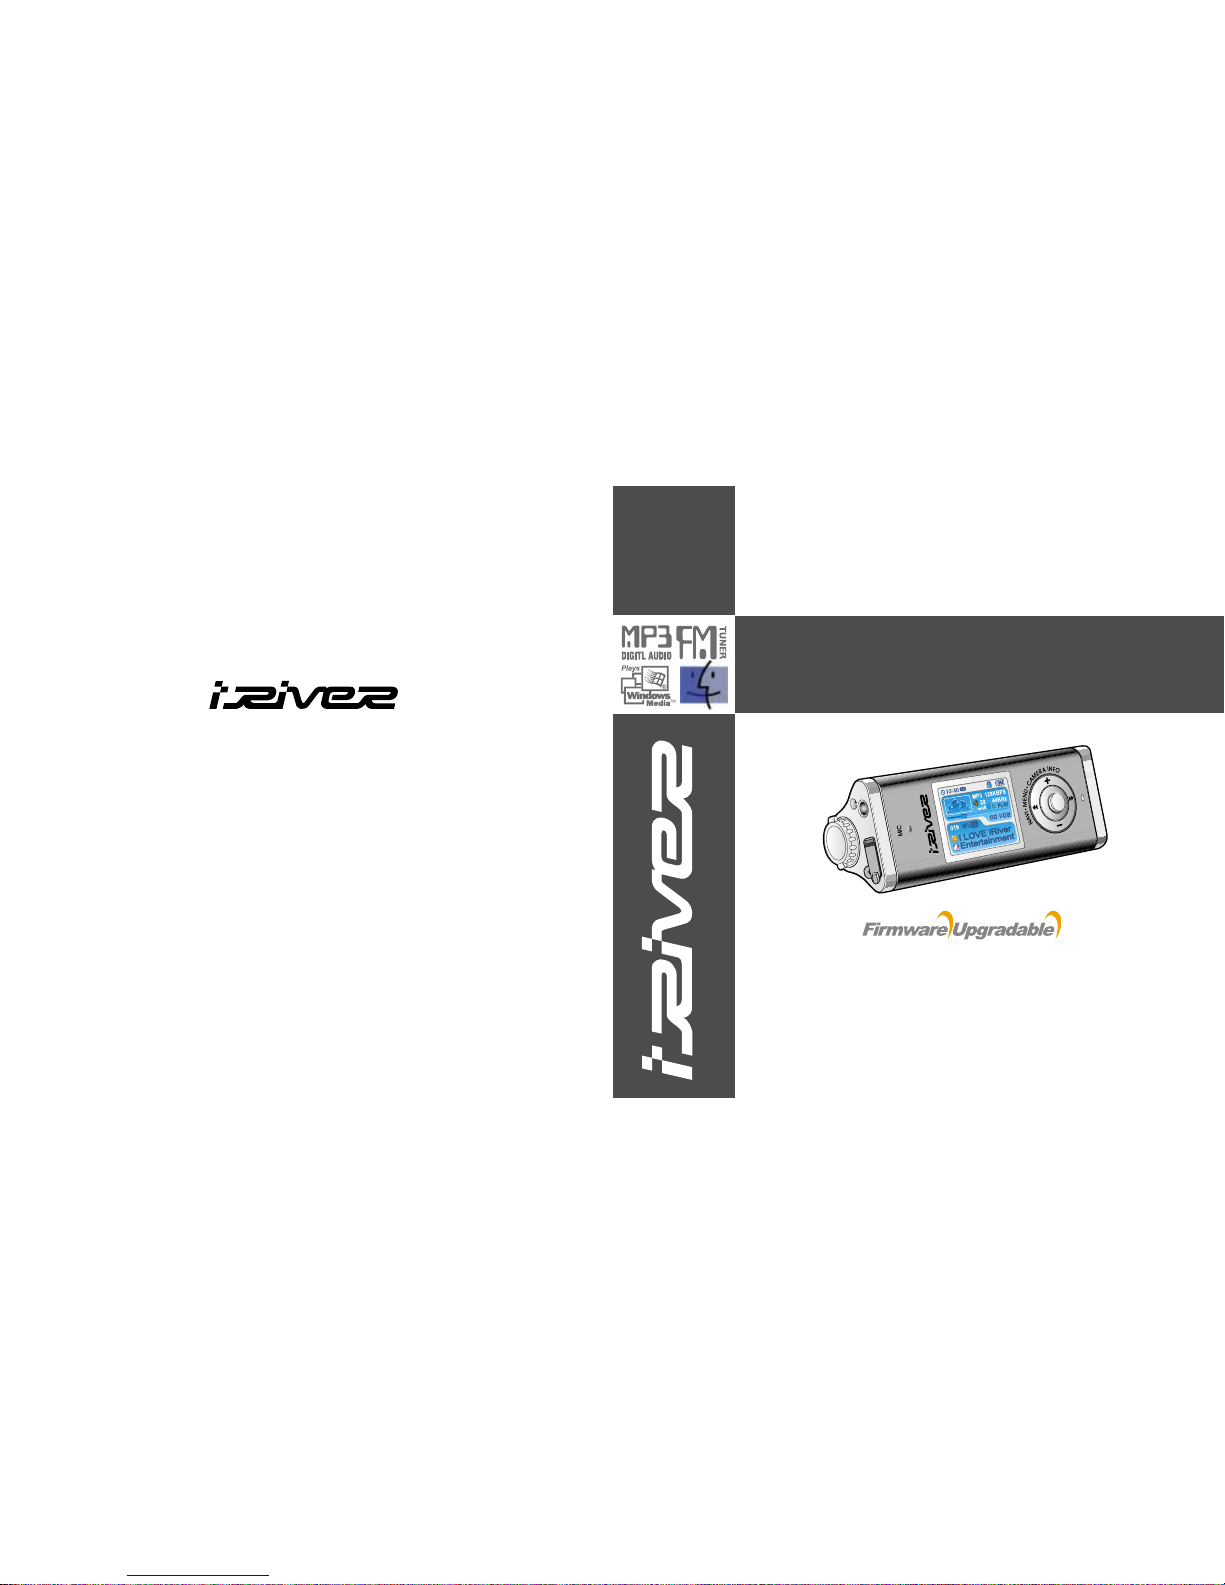
iFP-1000 Series
http://www.iRiver.com
Hardware Instruction Manual
Thank you for your purchase.
Please read this manual carefully
before using your new player.
http://www.iRiver.com
Digital Audio Player/recorder/Camera/FM Tuner
Model iFP-1000 Series
Page 2

Getting started
Locating the controls
PC software installation
Basic operation
Convenient Functions
Additional information
1
2
3
4
5
6
ContentsFFC Certification
This manual covers the installation and use of the player hardware. For details regarding
the software operation including transferring music to the player, please see the Software
Instruction Manual.
THIS DEVICE COMPLIES WITH PART 15 OF THE FCC RULES. OPERATION IS
SUBJECT TO THE FOLLOWING TWO CONDITIONS:
(1) THIS DEVICE MAY NOT CAUSE HARMFUL INTERFERENCE, AND
(2) THIS DEVICE MUST ACCEPT ANY INTERFERENCE, RECEIVED, INCLUDING
INTERFERENCE THAT MAY CAUSE UNDESIRED OPERATION.
Note :
This equipment has been tested and found to comply with the limits for a Class B digital
device, pursuant to part 15 of the FCC Rules. These limits are designed to provide
reasonable protection against harmful interference in a residential installation.
This equipment generates, uses and can radiate radio frequency energy and, if not installed
and used in accordance with the instructions, may cause harmful interference to radio
communications. However, there is no guarantee that interference will not occur in a
particular installation. If this equipment does cause harmful interference to radio or television
reception, which can be determined by turning the equipment off and on, the user is
encouraged to try to correct the interference by one or more of the following measures :
- Reorient or relocate the receiving antenna.
- Increase the separation between the equipment and receiver.
- Connect the equipment into an outlet on a circuit different from that to which the receiver
is connected.
- Consult the dealer or an experienced radio/TV technician for help.
NOTE:
THE MANUFACTURER IS NOT RESPONSIBLE FOR ANY RADIO OR TV
INTERFERENCE CAUSED BY UNAUTHORIZED MODIFICATIONS TO THIS EQUIPMENT.
SUCH MODIFICATIONS COULD VOID THE USER'S AUTHORITY TO OPERATE THE
EQUIPMENT.
Page 3

Getting started
Getting started
Contents
1
Getting started
Internet
Features
About power supply
1-1
1-2
1-3
This manual covers the installation and use of the player hardware. For details regarding
the software operation including transferring music to the player, please see the Software
Instruction Manual.
Page 4

Getting started
Features
1-2
Internet
Getting started
1-1
"
URL : www.iRiver.com
"
Find information on our company, products, and customer and technical
support.
"
Update your player with firmware downloads. Firmware upgrades offer
support for new CODECS and deliver new product features.
"
Consult the product FAQ.
"
Register your iRiver product online so that our Customer Service is able to
provide support as efficiently as possible.
"
All contents contained in this manual subject to change without notice to
improve ability of this player or according to changing of specification.
iRiver Limited does not assume any responsibility for errors or omissions in this
document or make any commitment to update the information contained herein.
iRiver is a registered trademark of iRiver Limited in the Republic of Korea and /or
other countries and is used under license. Microsoft Windows Media and the
Windows Logo are trademarks or registered trademarks of Microsoft Corporation in
the United States and /or other countries.
All other brand and product names are trademarks of their respective companies or
organization. All other product names may be trademarks of the companies with
which they are associated.
1999-2004 iRiver Limited. All rights reserved.
"
Multi-Codec Player
Supports MP3, WMA, OGG and ASF formats.
"
Firmware Upgrade
Provides the latest updated features via firmware upgrade.
"
260,000 color graphic LTPS LCD supporting Multiple Languages(40 languages)
iFP-1000 Series comes with 260,000 color graphic LTPS(Low Temperature Poly Silicon)
LCD which can support multiple languages.
"
Digital Camera
Built in camera and Color LCD screen.
"
FM Function
You can easily listen to FM stations and set your favorite stations by using Auto Preset and
Frequency Memory functions.
"
6 Preset EQ : Normal, Rock, Jazz, Classic, U Bass, Metal
"
Xtreme EQ and Xtreme 3D
Customize your own EQ with Xtreme EQ and enhance bass and surround sound with
Xtreme 3D.
"
GUI (Graphic User Interface) Menu System
"
Easy Navigation
The simple navigation makes it easy to find any song.
"
Supports 8 levels of subfolders, 500 folders total and up to 1500 files at one time.
"
Create your own playlists.
"
Record FM Radio, or Voice
Voice record level is automatically controlled by AGC function.
"
Convenient neck strap.
"
Built-in Rechargeable battery that charges directly from the USB port.
Page 5
Getting started
About power supply
Battery detach/attach
1-4
About power supply
Getting started
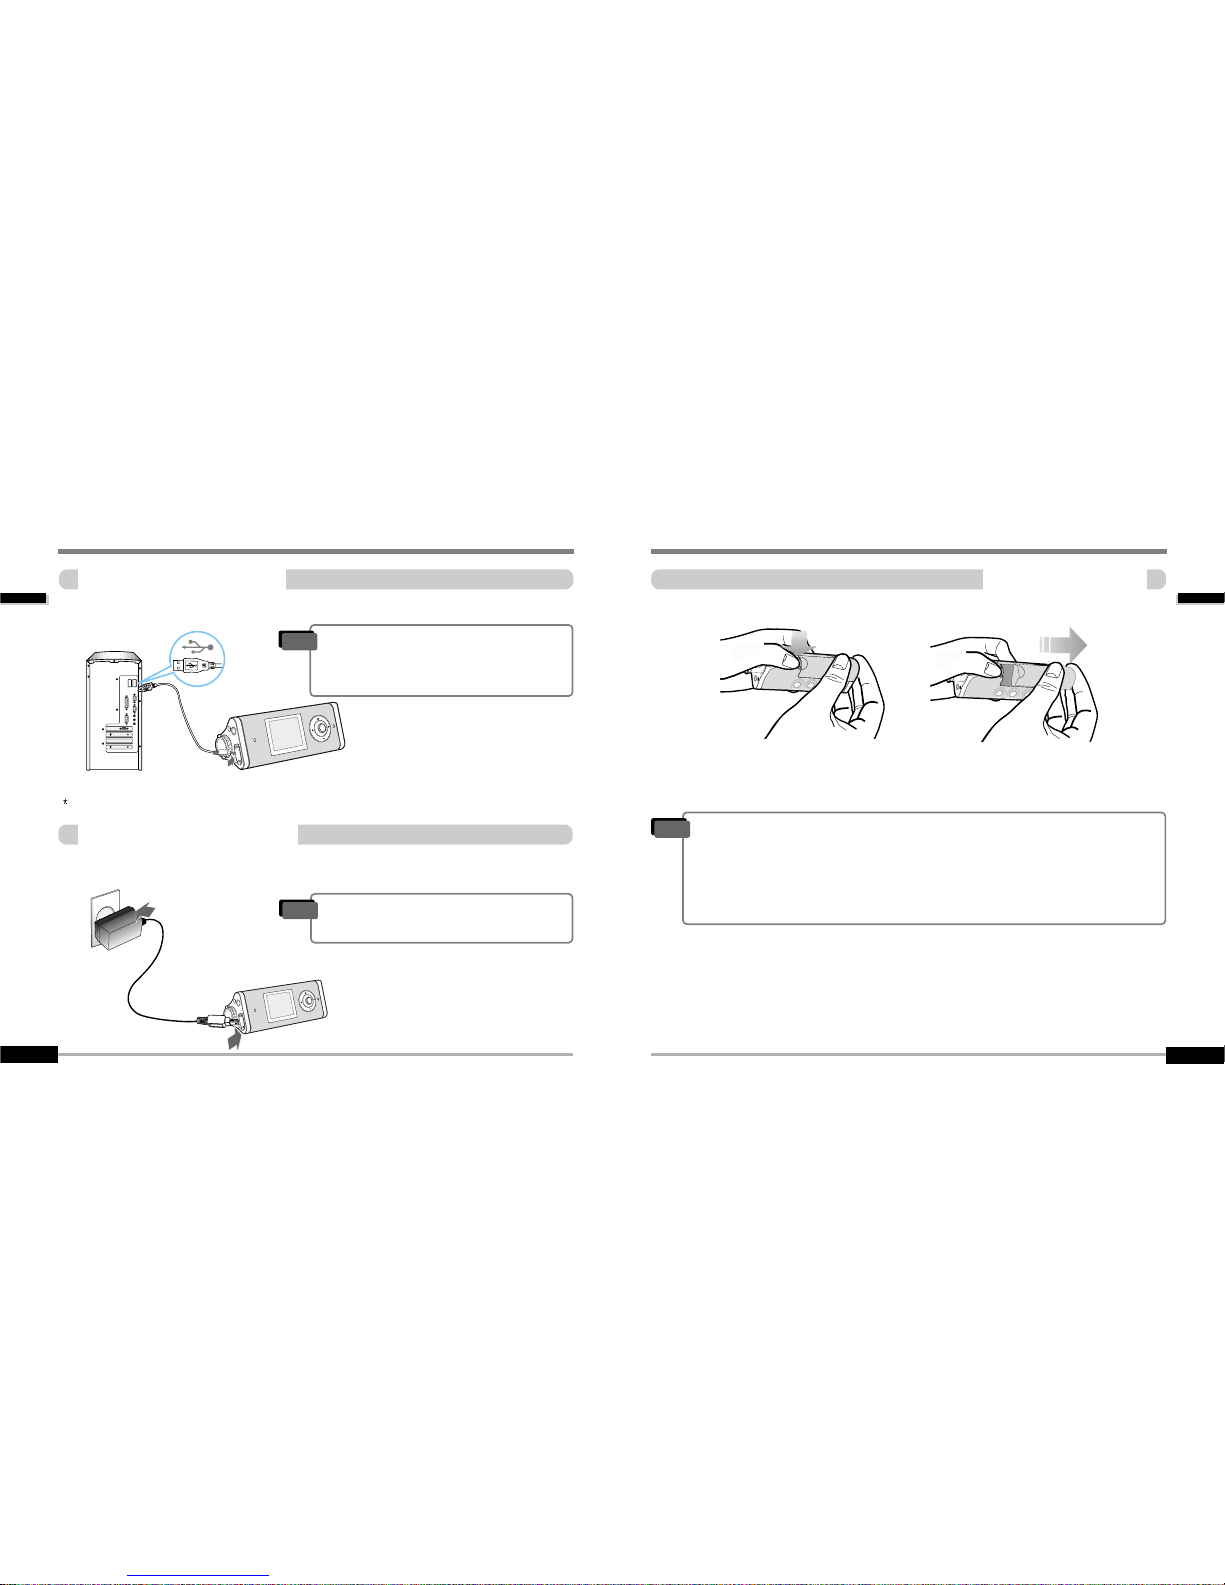
Charging by using USB cable
1-3
Connect the USB cable to the player and the PC. The iFP battery will begin charging.
Connect the AC Power Adapter supplied with the player to the USB connector of the player.
The AC operating voltage of this player is 100~240V, 50/60Hz.
Charging by using AC adapter
"
To detach : Press the tab to release the battery and slide it out of the player.
"
To attach : Slide the battery onto the player until it locks into place.
"
The charging time : Approx. 2.5~3 hours
(At full discharge)
Note
"
The player will charge even if it is turned off.
"
A charging indicator light will illuminate while
the player is charging. The light will turn off
when charging is complete.
Note
"
Charge and store the battery at room temperature.
It may not charge properly in hot or cold temperature environments.
"
Do to attempt to disassemble the battery. Do not expose the battery to open flame.
These activities could cause the battery to explode resulting in serious injury.
"
Do not contact the connectors of the battery to metal objects, or an electrical short
may occur.
Note
If the battery is worn out, “Low Battery” is displayed on the LCD.
Page 6
Locating the controls
Locating the controls
Contents
2
Front View
Rear View
LCD screen
2-1
2-2
2-3
Getting started
1-5
This manual covers the installation and use of the player hardware. For details regarding
the software operation including transferring music to the player, please see the Software
Instruction Manual.
Page 7
Locating the controls
Locating the controls
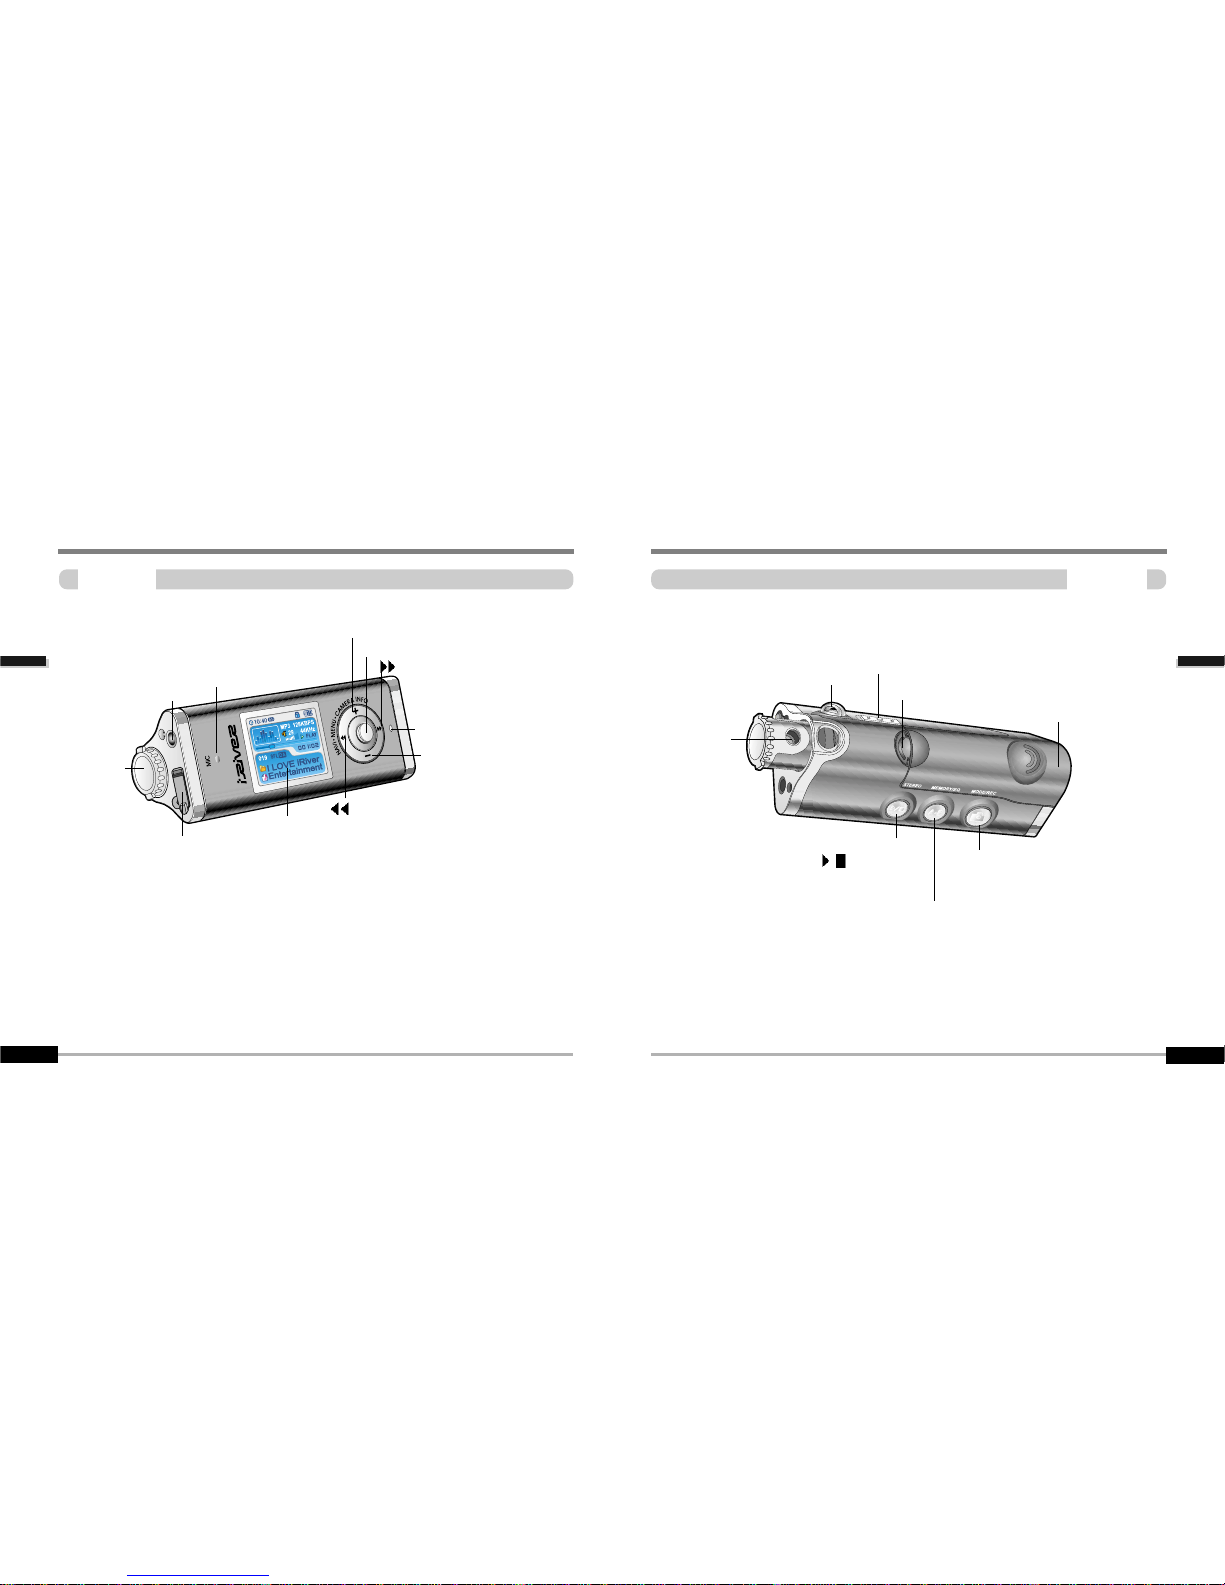
Rear view
2-2
Locating the controls
Locating the controls
Front view
2-1
Earphone
USB connection port
I
(Previous / Fast Reverse)
I (Next / Fast forward)
Volume +, Enlarge, Up
LCD Screen
NAVI/MENU
Microphone
Camera
Charging indicator
Volume -, Reduce, Down
Rechargeble Battery
Hold
Neck strap
Mode/REC/Shot
Power on/off,
/ (Play/Stop),
Stereo
MEMORY/EQ
A-B (Interval repeat)
Picture flip
Camera lense
Battery Lock
Page 8
PC software installaion
PC software installation
Contents
3
Note
Locating the controls
Locating the controls
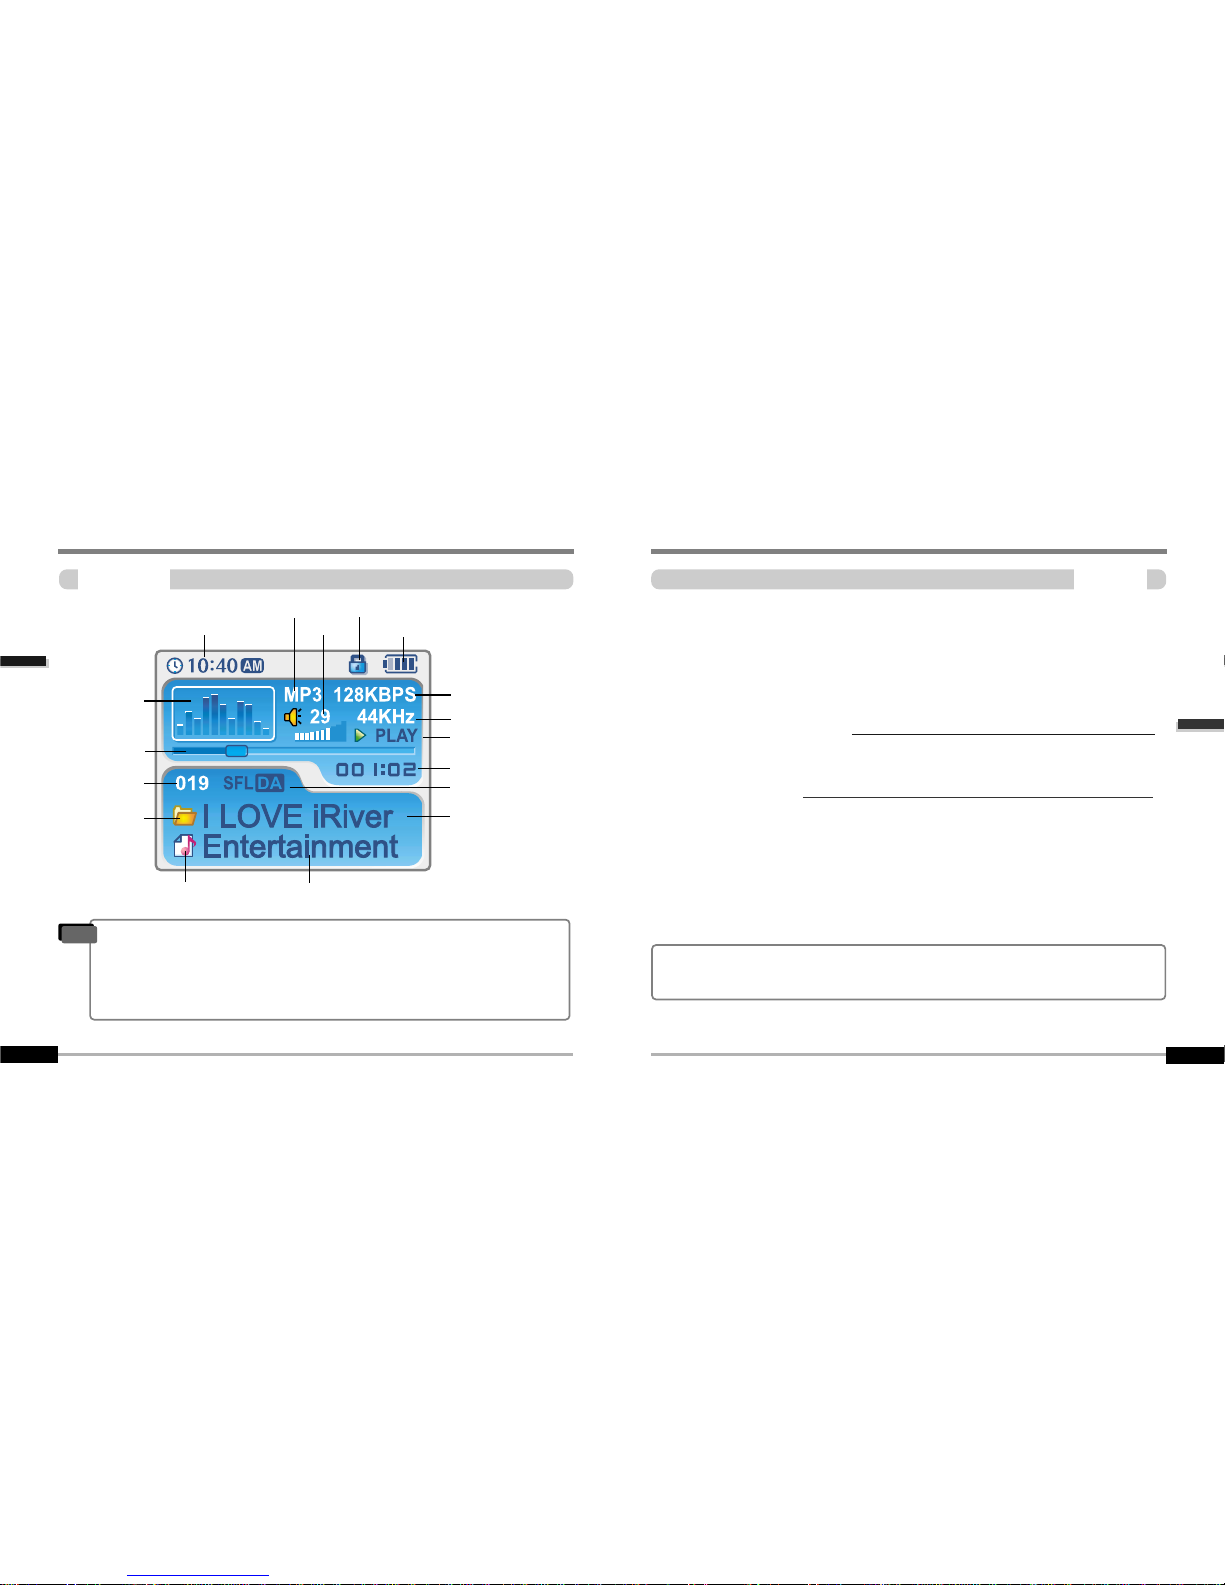
LCD Screen
2-3
File number
Bit rate
Playing time
Playback node
Battery indicator
Volume
Folder name
Sampling rate
Program/file icon
File format
Artist/title name
Hold
Equalizer
Visualization
Clock
Status
Current bar
Folder icon
ASF : ASF
IRM : IRM
MP3 : MP3
OGG : OGG
WMA : WMA
"
According to file type displayed as follows :
"
IRM (iRiver Rights Management) : iRiver Rights Management is a digital music format.
Please visit our web site for details about this music format.
PC software installation
Attach the player
3-1
3-4
This section covers the installation for Windows operating systems only.
For installation instructions for Mac OS, please see the Software Instruction Manual.
Page 9

PC software installaion
PC software installation
Software installation
3-2
PC software installation
PC software installaion
Software installation
3-1
Click “Next” to Install iRiver Music Manager.
Insert the Installation CD into the CD-ROM
drive. Installation start automatically.
Select the folder to Install. Click “Next”.
2
2
1
1
3
3
4
4
Click “Next” after selecting the language to
install.
System Requirements (Windows)
"
Pentium 133MHz or faster
"
USB port
"
Window 98SE / ME / 2000 / XP
"
CD-ROM drive
"
10MB free hard disk space
Note
"
The player can store MP3 files or files of any type.
You can upload files, other than music (MP3, WMA, OGG, ASF), to the PC using the iRiver
Music Manager Program.
"
Download latest versions of drivers and iRiver Music Manager at www.iRiver.com
"
Insert the Installation CD into the CD-ROM drive.
The following screen appears after inserting the CD.
"
If the installation doesn't automatically begin,
execute the "setup.exe" file in the installation
CD.
The installation program will begin.
"
The installation CD contains the following
contents :
- Device Driver
- iRiver Music Manager
- Manager Program for Mac
"
Please be sure your login has Administrator privileges if using Windows 2000 or Windows XP.
MPORTANT, please complete the steps in this section
BEFORE ATTACHING YOUR PLAYER TO YOUR PC.
Please note that the installation screens may differ slightly from those appearing
here, as software may be of a more recent version. If your screens differ, please
visit www.iRiverAmerica.com/software for an updated user guide
Page 10
PC software installaion
Attach the player
Connecting to the PC
3-4
PC software installation
PC software installaion
Software installation
3-3
Click “Install” to begin the installation.
5
5
6
6
7
7
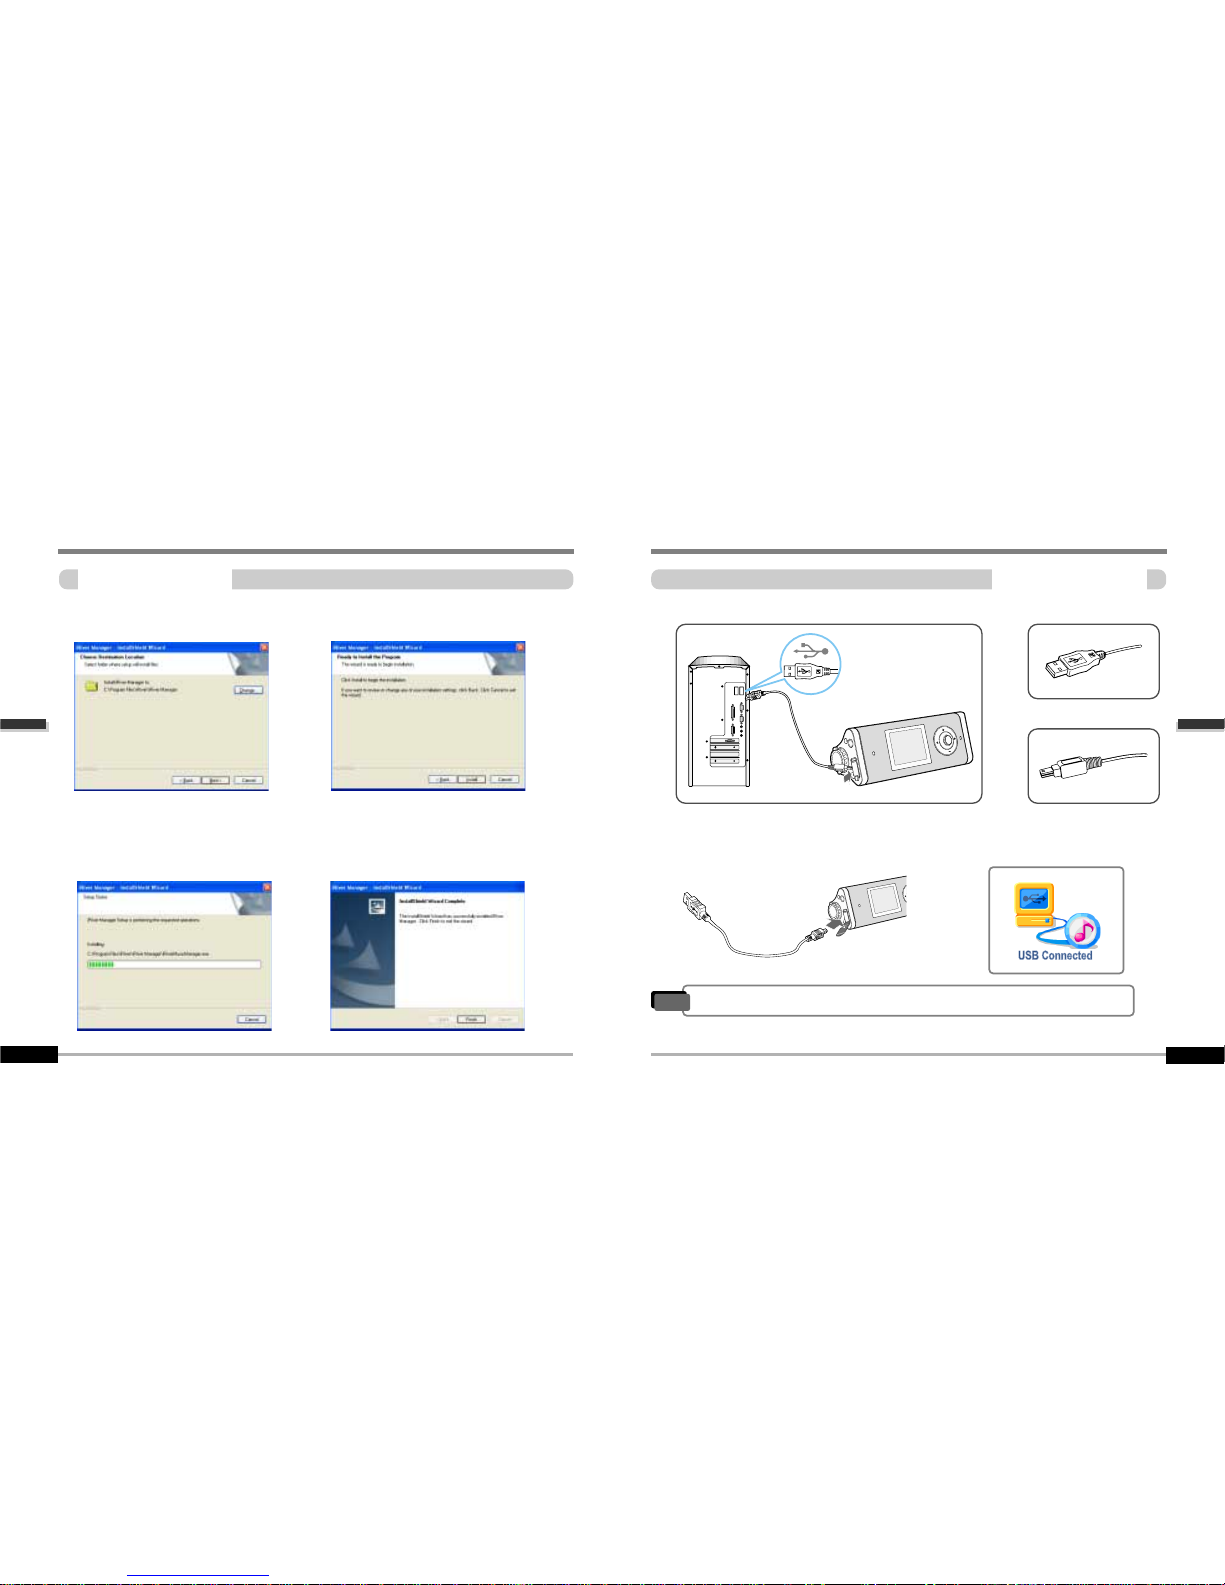
Connect the USB cable (provided) to the USB port of your computer.
Type “A”
Type “B”
USB port on the PC
USB port on the
iFP-1000 Series
USB cable
Type “A”
Type “B”
Turn on the player by pressing the button
marked STEREO. Lift the protective cover
over the USB port and connect the USB
cable to the player.
“USB CONNECTED” will appear on the
LCD screen of the player.
1
1
2
2
3
3
"
Connect the USB cable to the PC after playback stops to avoid errors.
Note
Click “Next” after confirming the
installation folder.
Installation is in progressing.
Click “Finish” after the installation is completed.
Page 11

PC software installaion
Attach the player
Installation of New Hardware
3-6
Attach the player
PC software installaion
Installation of New Hardware
3-5
Select “Install the software automatically
(Recommended)” and click “Next”.
If a "Hardware Installation" warning message
appears, click "Continue Anyway".
(Windows XP)
The iRiver software driver will not cause any
damage to your computer.
1
1
3
3
4
4
After installing iRiver Music Manager from
the CD and connecting the player to your
PC, "Found New Hardware" screen is
displayed.
2
2
The computer will automatically search to
find your new hardware.
Information screen is displayed on the PC. New hardware is installed successfully and
ready to use.
5
5
7
7
The installation will continue.
Click “Finish”
Completed the installation of “New hardware”.
6
6
"
Windows 98SE, Windows ME, Windows 2000 O.S do not need any other device
driver installation.
"
Install New Hardware after installing iRiver Music Manager program.
Note
Page 12
Basic operation
Basic operation
Contents
4
Attach the player
PC software installaion
Safely Removing the player from the PC
3-7
Basic Operation
Listening to Music
Listening to the FM radio
Recording from FM station
Digital Camera
Viewing to picture(My Album)
4-1
4-9
4-10
4-15
4-19
4-23
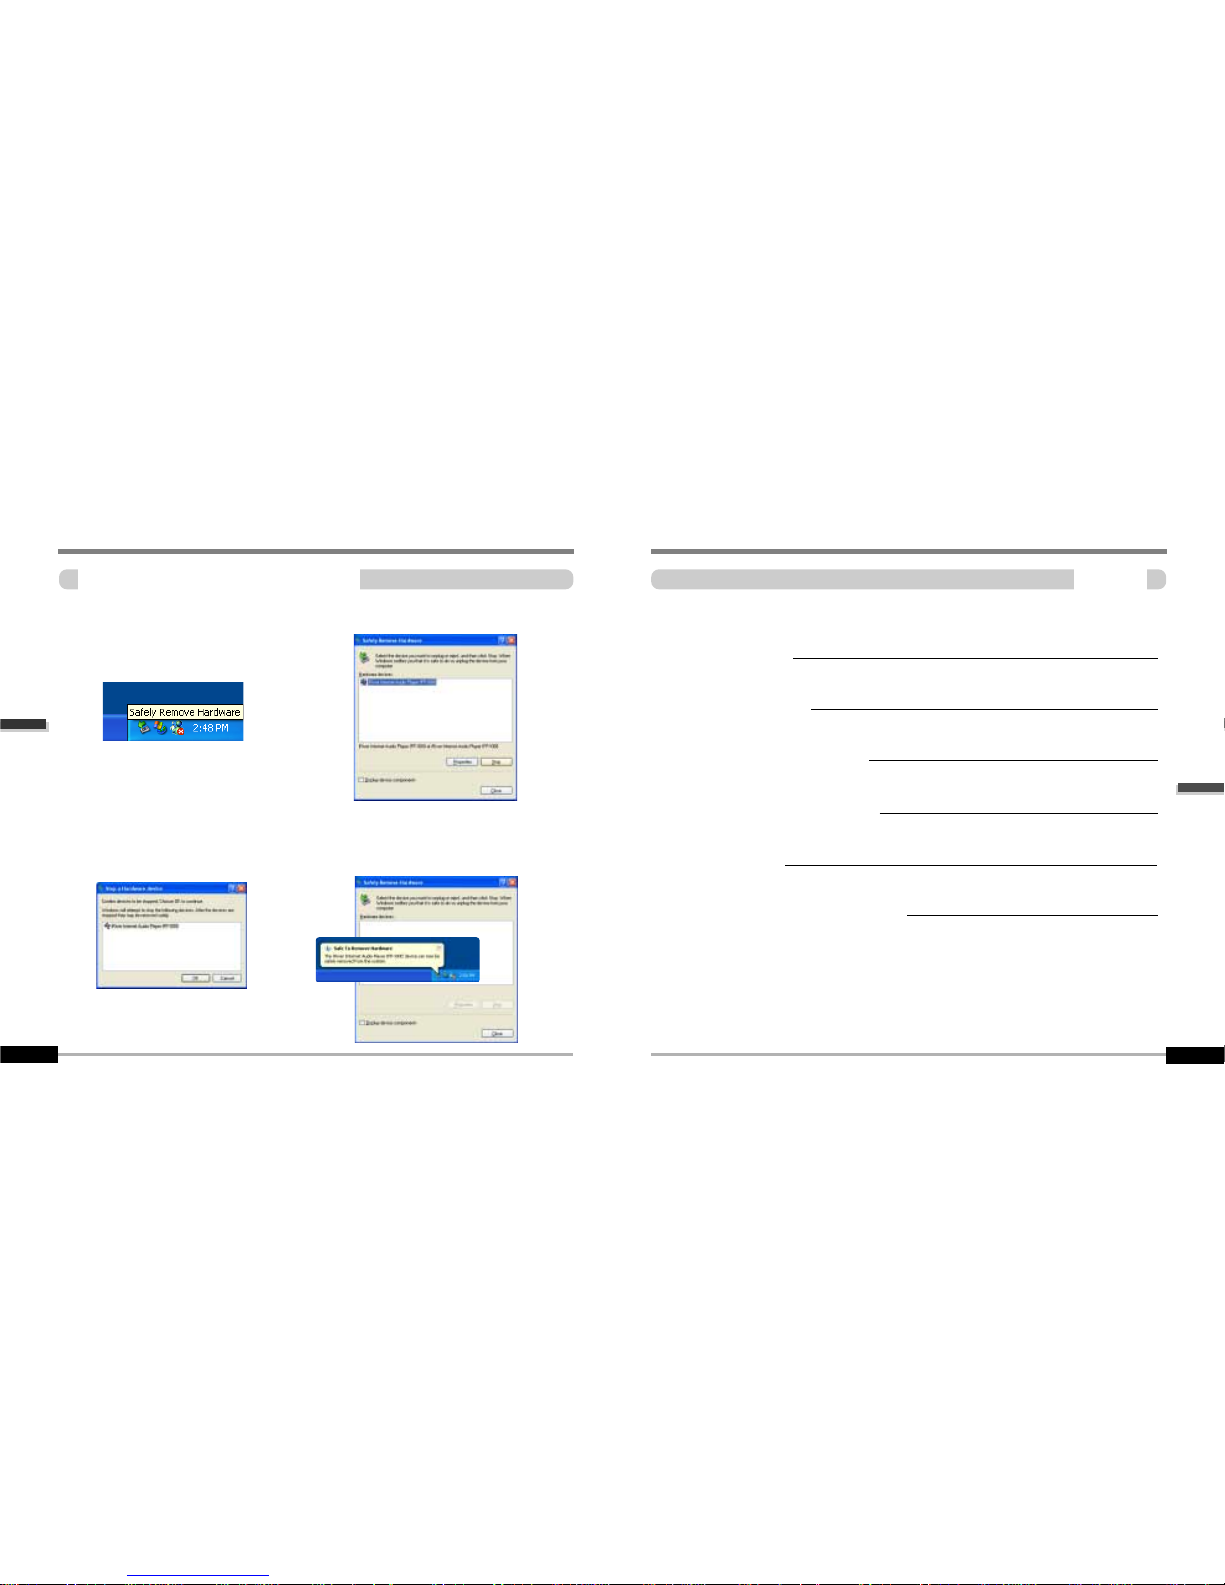
Click the “OK” after confirming the
hardware to remove.
1
1
3
3
4
4
Select the “Safely Remove hardware”
after clicking the “Safe To Remove
Hardware” by using the right button of
mouse.
2
2
Click the “Stop” after selecting the device
to remove.
Click the “Close” after confirming the
Safely Remove Hardware message.
(In case of Windows XP)
Page 13
Basic operation
Basic operation
4-2
Basic operation
Basic operation
Turning on the player
4-1
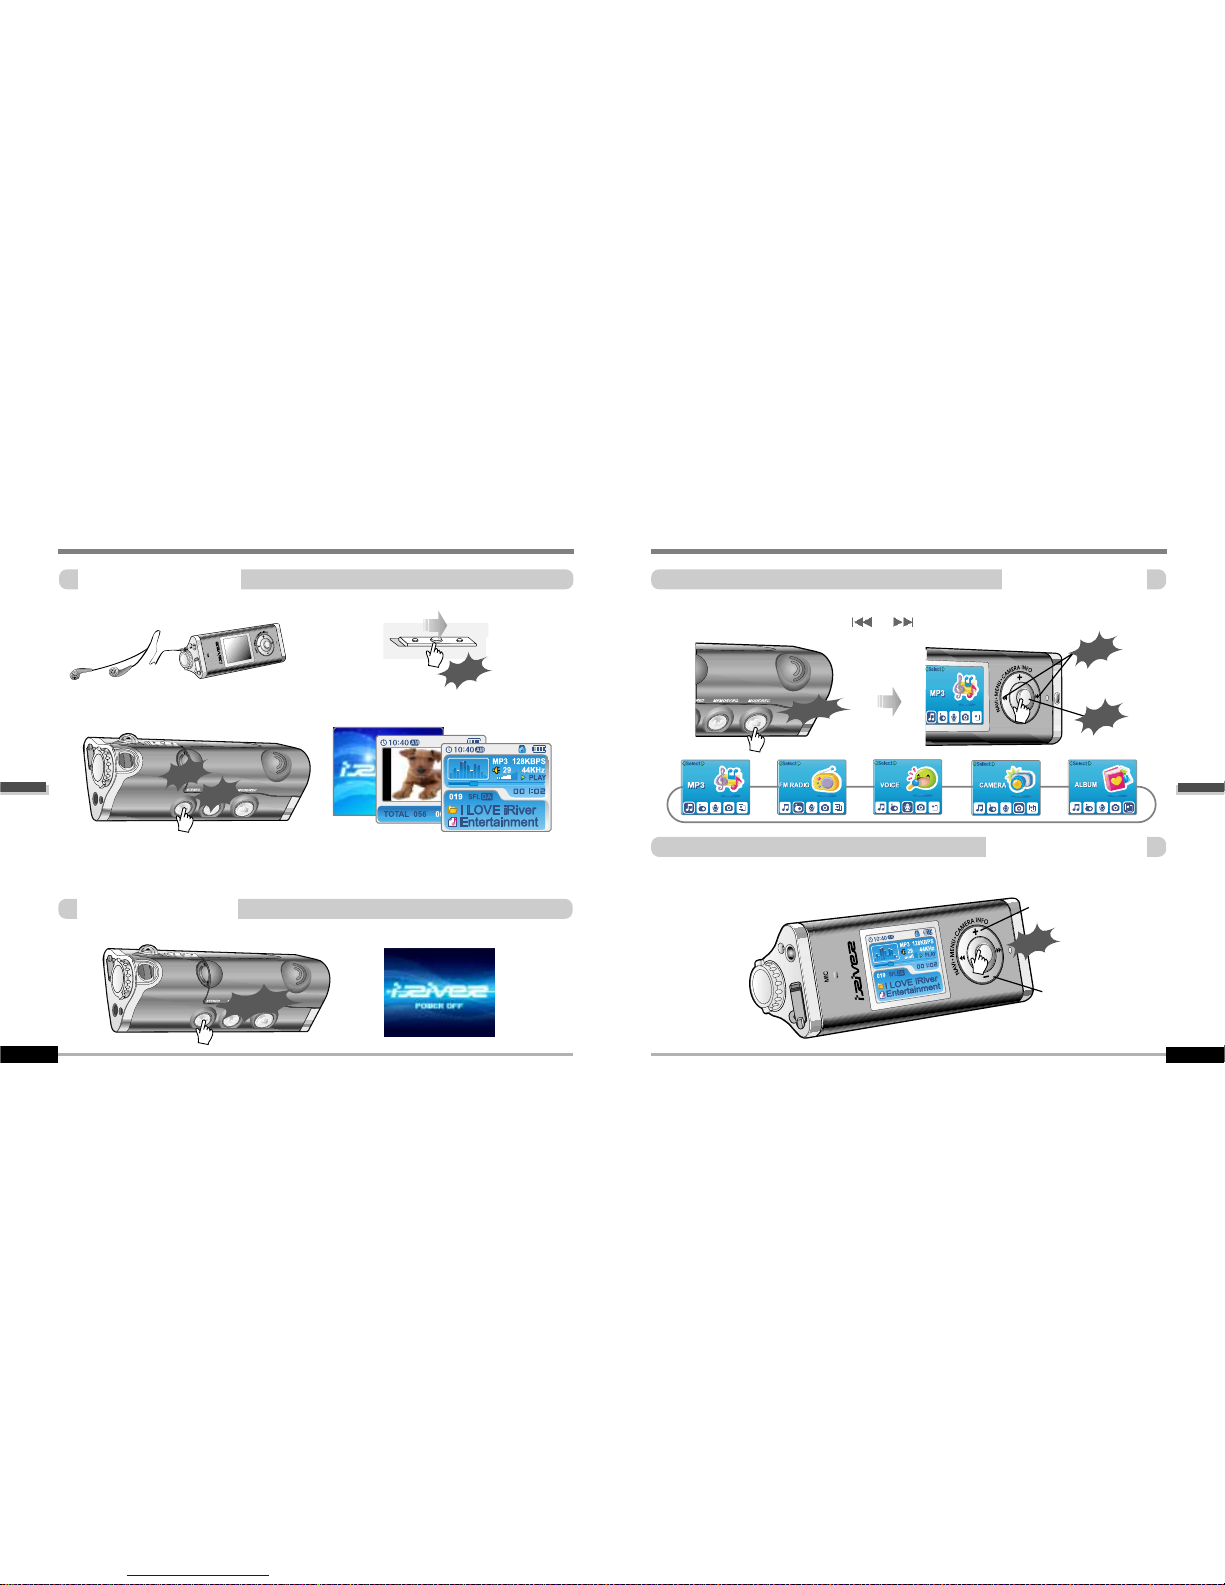
"
Put the HOLD switch to “OFF”.
"
Connect the earphones as shown below.
"
Press the PLAY/STOP button to turn on the player. The “My Image” appears on the LCD.
"
Press it again to play.
Click
Press the PLAY/STOP button to turn the player off.
Click
Long Click
OFF
Push
Turning off the player
To increase volume
To decrease volume
Push NAVI/MENU button to the VOL + direction to increase volume.
Push NAVI/MENU button to the VOL – direction to decrease volume.
Adjusting the volume
Changing functions
Press and hold MODE button to appears current function on the LCD screen.
Push the NAVI/MENU button toward
or
to select the desired function, then click the
NAVI/MENU button to enter that mode.
Click
Push
Push
Long Click
"
When "Hold" is ON, the buttons on the player will not function.
"
When stopped or in recording standby mode, the player automatically turns off according
to the setting of “STOP POWER OFF” on the MENU.(Refer to page 5-19)
Page 14
Basic operation
Basic operation
4-4
Basic operation
Basic operation
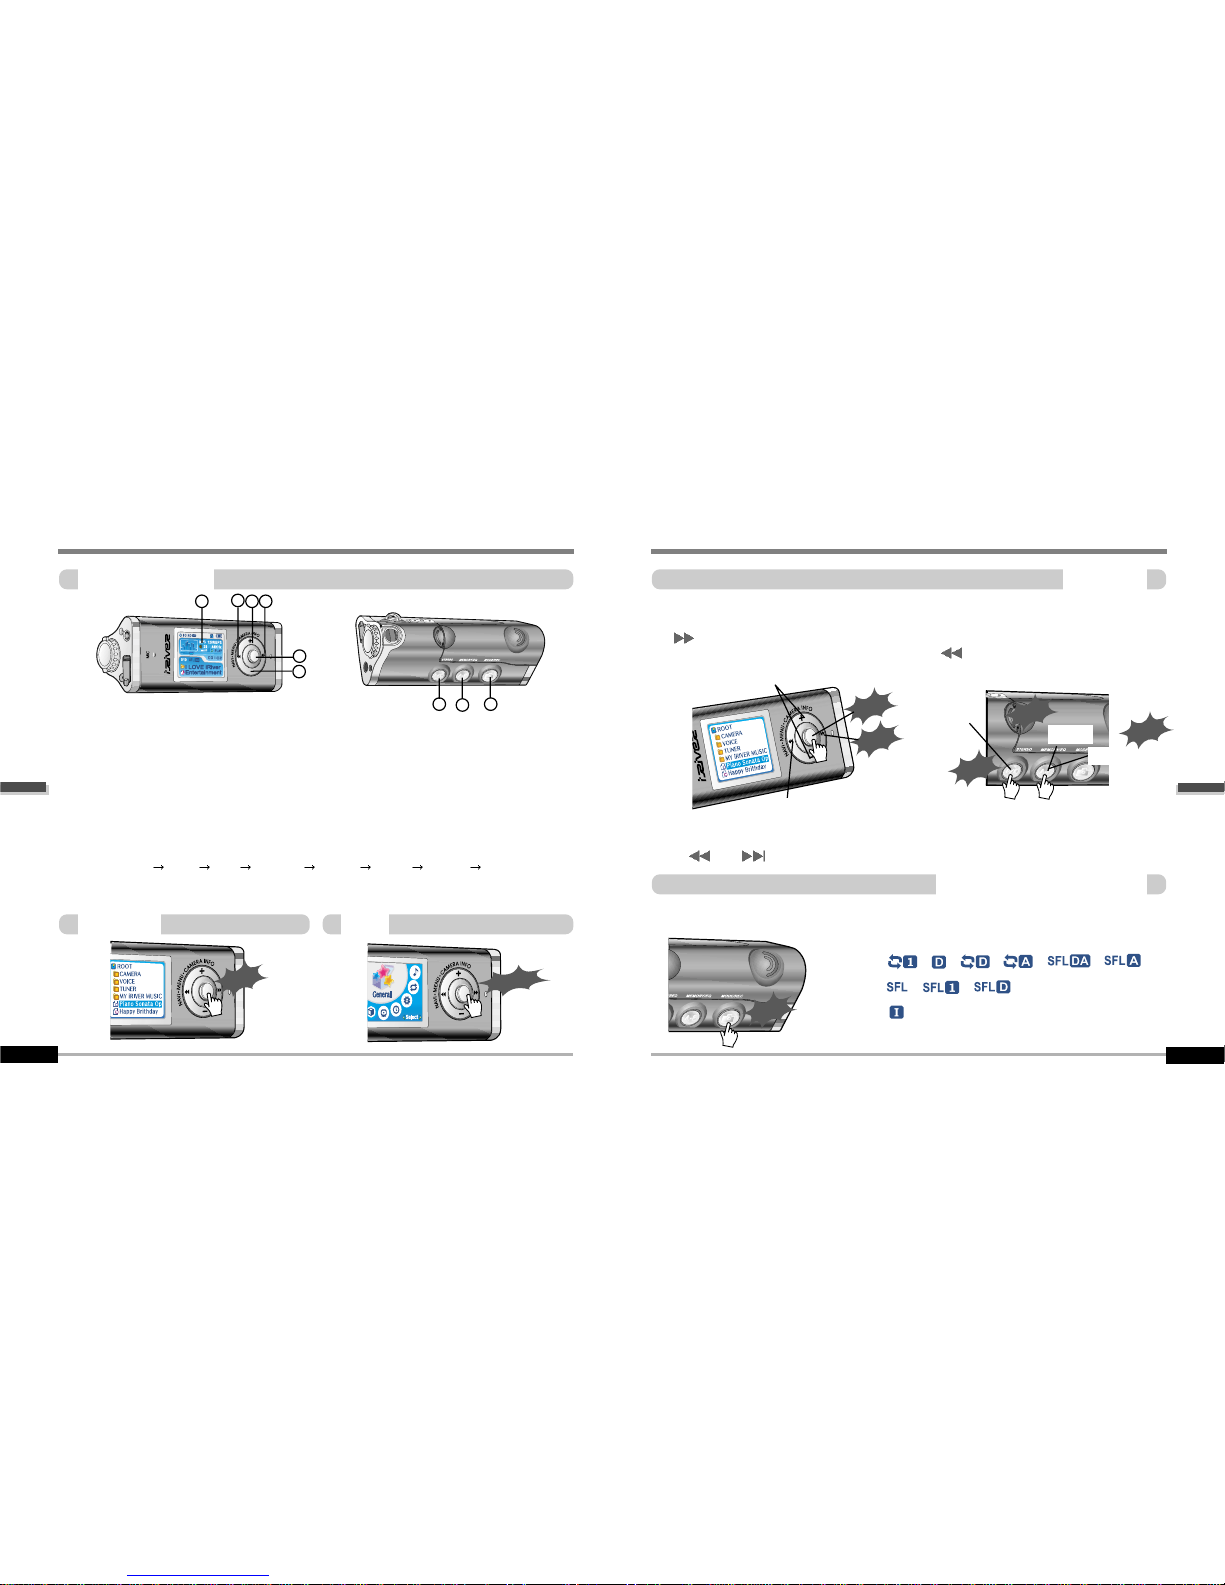
Listening to music
4-3
1
2
3
4
5
6
7
8
9
1. Displays the operating status of the player or pictures.
2. To skip to previous file, folder, picture, FM station or value.
3. To increase volume or zoom in a picture.
4. To skip forward to the next file, folder, picture, FM station or value.
5. To select NAVI/MENU function.
6. To decrease volume or zoom out a picture.
7. To turn on/off, to play or stop playback or to select FM mode
8. To select EQ mode, A-B repeat, or automatically store FM stations.
EQ : NORMAL
ROCK JAZZ CLASSIC U BASS METAL Xtrm EQ Xtrm 3D
9. To select function, playback mode,record/stop recording or shot.
Long Click
Click
Navigation Menu
Press NAVI/MENU button and find the desired music file by pushing NAVI/MENU button to VOL
+ or VOL – direction. To play the files, press the NAVI/MENU button, push NAVI/MENU/VOL to
the
I
direction or the PLAY/STOP button.
To move to the upper folder, NAVI/MENU/VOL to the
I
direction. If there is no upper folder,
NAVIGATION stops.
Navigation
Click
Push
Play
Up/Down
Upper folder
While an audio file is playing or the player is in stop mode, press MODE/REC to activate
selected modes, such as Repeat or Shuffle.
Click
Repeat :
Shuffle :
Intro :
Changing the playback mode
Click
Select the folder to delete in stop mode. Then Click the “MODE” button.
“FILE(or FOLDER) DELETE ARE YOU SURE?” is displayed on the screen. Select “YES” by
using
and (VOL + or VOL -) to delete. Then press NAVI/MENU button.
Delete
Delete
Click
Click
Page 15

Basic operation
Basic operation
4-6
Basic operation
Basic operation
Tuning FM stations
4-5
Shooting
Click
Click
Click
Push
Long Click
Setup start
Select
Settings
Click
Setting the camera
To flip a picture
Camera zoom in/zoom out
Push
Zoom in
Zoom out
Selecting the FM stereo/mono
Press the STEREO/PLAY/STOP button to select Stereo/Mono.
Click
Push NAVI/MENU/VOL to the
or
direction to select desired station.
Push
Exit
Page 16

Basic operation
Basic operation
4-8
Basic operation
Basic operation
Viewing a picture (My Album)
4-7
Full screen
Push
shifting the
zoom point
Zooming/cancel
Click
Push
Previous
Next
Push
Click
Click
Zooming a picture
Customizing the function settings(Menu)
1
2
3
Click
Push
Push
You can customize this setting menu according to your preference.
Press and hold NAVI/MENU button will enter the menu system.
1. Scroll between menus : Push NAVI/MENU button to the
or
diretion.
2. Select sub menus : Push NAVI/MENU button to the VOL+ or VOL- diretion.
3. Select Function : Press the NAVI/MENU button.
4. Exit : Push NAVI/MENU button to the VOL - direction.
Long Click
Click
4
Long Click
Press the button repeatedly to chose zoom size.
( x1 x1.5 x2.0 x2.5 x 3.0)
"
When "Hold" is ON, the buttons on the player will not function.
"
When stopped or in recording standby mode, the player automatically turns off
according to the setting of “STOP POWER OFF” on the MENU.(Refer to page 5-19)
Note
Page 17

Basic operation
Listening to the FM radio
FM radio listening
4-10
Listening to music
Basic operation
Playing music file
4-9
Press and hold MODE button. The current function appears on the LCD screen.
Push NAVI/MENU/VOL to the
or
direction to select FM radio.
Press NAVI/MENU/VOL button to confirm.
Push the NAVI/MENU button to the or direction to select FM frequency.
1
1
2
2
3
3
1
2
Click
Push
Push
Push
To increase
To decrease
Push
Previous
Next
To select music file
Adjusting the volume
Click
Power on/play/stop
A-B repeat
Click
Function
Long Click
To play the folder
Previous
folder
Next folder
Long Push
Push
To fast forward/reverse
Fast
reverse
Fast
forward
Long Push
Power off
playback mode
Click
Long Click
Long Click
Page 18

Basic operation
Listening to the FM radio
Programming station preset manually
4-12
Listening to the FM radio
Basic operation
4-11
3
3
Press and hold MEMORY(A-B) button.
Automatically appears memory icon and a reserved number of the preset stations.
4
4
Push the NAVI/MENU button to the or direction to select number of the preset.
5
5
Press MEMORY(A-B) button to store. Press PLAY/STOP button to cancel.
"
Up to 20 station can be stored.
to store
1
1
Automatically select stations and save them in sequential order.(It only activates while the player
is not in PRESET mode)
Auto store
Long Click
2
2
Press NAVI/MENU/VOL button to cancel
preset mode.
Press and hold MEMORY(A-B) button.
Automatically select stations and save
them in sequential order.
Click
Programming station preset automatically
Programming station preset manually
1
1
2
2
Press NAVI/MENU/VOL button to cancel
preset mode.
Push or long push NAVI/MENU/VOL to
the
or
direction to select FM
radio.
Click
Long Push
to cancel
PRESET
Click
to cancel
MEMORY
CH 04
MEMORY
CH 03
To slect number of
the preset stations.
Reserved number of
the preset stations.
Click
Push
"
Auto memory may not work within weak transmission areas.
Note
Page 19

Basic operation
Listening to the FM radio
Tuning stations automatically
4-14
Listening to the FM radio
Basic operation
Deleting preset station
4-13
Press NAVI/MENU/VOL button to cancel preset mode.
Push and hold the NAVI/MENU/VOL to
or
direction.
The frequencies are scanned automatically. When a broadcast is receied, canning stops.
Click
Long Push
Select the station to be deleted at preset
mode.
1
1
2
2
"
The next station will appear when station delete is completed.
"
Push the memory button if you also want to delete the next station.
Press and hold the MEMORY/EQ(A-B)
button.
PRESET
CH 03
PRESET
CH 04
To select stereo/mono
Press the STEREO/PLAY/STOP button to select Stereo/Mono.
Stereo/Mono
Click
"
FM Tuner reception may vary in different areas.
"
While in Preset mode, auto scan and auto memory functions are not available.
"
When the player doesn’t have any preset stations, EMPTY will be displayed at preset
mode then faded out.
Note
Auto scanning
To cancel PRESET
Page 20

Basic operation
Recording the FM stations
To stop FM recording
4-16
Recording the FM stations
Basic operation
Recording the FM stations
4-15
Press the MODE/REC button during FM reception.
The station will be recorded, the remaining recording time will be displayed on the LCD screen.
Press the MODE/REC button to stop recording.
"
The recorded file is saved as TUNER000.REC.
"
It is saved in the RECORD folder.
"
Recorded REC files can be converted to MP3 files using iRiver Manager.
(Refer to iRiver Music Manager Instruction Manual)
To play a recorded files
After changing to MP3 mode, select a Tuner file in the RECORD folder, press the PLAY/STOP
button.
To pause FM recording
Click
Click
"
Press the PLAY/STOP button to pause the recording process.
"
Press the PLAY/STOP button again to restart recording.
Click
"
Volume can not be controlled while recording.
Note
Click
Page 21

Basic operation
Recording voice
To play a recording files
4-18
Recording voice
Basic operation
Recording voice
4-17
Press and hold the MODE/REC button to appears current function on the LCD screen.
Press the MODE/REC button and to begin recording.
Press the NAVI/MENU button to the
or direction to select Voice mode.
Press the NAVI/MENU button (or PLAY/STOP) to go to Voice recording mode.
(The recorder will be in standby mode.)
1
1
2
2
3
3
Press the PLAY/STOP button while stop
mode.
Press the PLAY/STOP button to pause the
recording process. Press the PLAY/STOP
button again to restart recording.
To stop recording voice
To pause recording voice
Long Click
Click
Push
Click
Click
Click
Pause
Restart
Click
Click
Press the MODE/REC button to stop recording.
Note: After stopping a recording, starting again will create a new voice file.
"
The recorded file is saved as VOICE000.REC in the VOICE folder.
"
If “00:00:00” is displayed on the LCD, the player’s memory is full. To record, delete files and/or
folders on the player to make some space available.(Refer to page 5-3, Software Instruction Manual)
"
Keep the player far away enough from the source to avoid distortion in the recording.
"
The player can not record when the memory is full or the battery is low.
"
Recorded REC files can be converted to MP3 files using iRiver Manager.
(Referto to Software Instruction Manual)
Note
"
Pausing the recording
will not create a new file,
recording will be added
to the current file.
Note
Page 22

Basic operation
Digital camera
Shooting
4-20
Digital camera
Basic operation
Shooting
4-19
Press and hold MODE button. The current function appears on the LCD screen.
Lift the camera lens into position and use the LCD screen as the viewfinder.
1
1
3
3
4
4
Press MODE button to take a picture.
5
5
Push NAVI/MENU/VOL to the VOL+
or VOL-
direction to zoom in or zoom out. (
X1/X2/X3)
6
6
Press MEMORY/EQ(A-B) button to take a picture.
Press A-B button to flip a picture to flip a picture.
Long Click
Push
Zoom in
Zoom out
to flip
Click
A click sound will indicate
the picture is being taken.
Click
Push NAVI/MENU/VOL to the
or
direction to select camera.
Press NAVI/MENU/VOL button to confirm.
2
2
Enter
Push
Select
Click
"
The picture file is saved as P0206000.JPG(Pmmdd000.JPG) in the CAMERA folder.
Note
"
The lens can spin left or right.
Note
<Zoom in>
<Zoom out>
<Original>
<to flip>
Page 23

Basic operation
Digital camera
Camera settings
4-22
Digital camera
Basic operation
Camera settings
4-21
Press NAVI/MENU/VOL button.
The camera settings appear on the LCD
screen.
Press and hold NAVI/MENU/VOL button
to change the setting.
Press and hold NAVI/MENU/VOL
buttonbutton to view the available
settings.
1
1
2
2
3
3
4
4
I
Push NAVI/MENU/VOL to the Ior
I
direction to select desired setting.
7
7
Press PLAY/STOP(STEREO) button to
exit.
5
5
6
6
640x480
I
Push NAVI/MENU/VOL to the Ior Idirection to select value.
Press NAVI/MENU/VOL button to confirm.
"
Brightness : 0 ~ 100 % (10% step/default 50%)
"
Mode : Auto / Indoor / Outdoor
"
Resolution : 640 x 480 / 320 x 240 / 176 x 144
"
Effect : Normal / Monotone / Sepia / Negative / Solarization
Long Click
Click
Push
Select
Click
Push
Select
Click
Click
Page 24

Press and hold MODE/REC button. The
current function appears on the LCD
screen.
Push NAVI/MENU/VOL to the
or
direction to select My Album.
Press NAVI/MENU/VOL button to confirm.
Viewing a picture(Album)
Basic operation
Viewing a picture
4-23
1
1
2
2
3
3
4
4
I
Push NAVI/MENU/VOL to the VOL+, VOL- or
I
, Idirection to select a picture.
Press NAVI/MENU/VOL button to display.
5
5
I
Push MEMORY/EQ/(A-B) button to enlarge or to reduce a picture.(x1.5/x2.0/x3.0/x1.0)
Push MENU/NAVI button to the VOL+, VOL- or
I
, Idirection to shift the enlarged
point.
Push MENU/NAVI button to the Ior Idirection to select previous or next a picture.
Push
Previous
Next
Push
Click
Long Click
Enter
Push
Select
Click
Push
Shifting
the point
Enlarge
Click
Basic operation
Viewing a picture(Album)
Viewing a picture
4-24
Full screen
Push
Previous
Next
Push
Click
View /Information
"
When an image is displayed full screen, press the NAVI/MENU button to view the
picture information.
Note
Page 25

Convenient functions
Convenient functions
Contents
5
Viewing a picture(Album)
Basic operation
4-25
Searching the music files(Navigation)
Enjoying the sound equalizer(EQ)
Playback Mode
Playing in a favorite order(Program)
Customizing the function settings(Menu)
"
Basic operation
"
General
"
Display
"
Timer
"
Control
"
Mode
"
Sound
5-1
5-4
5-5
5-7
5-11
5-13
5-15
5-17
5-19
5-22
5-24
5-27
Deleting a picture
Press and hold NAVI/MENU button after
selecting the picture to delete.
My Image
1
1
2
2
Push MENU/NAVI button to the or
direction to select “Yes” or “No”.
Push MENU/NAVI button to confirm.
Enter
Yes/No
Click
Push
10:40
My Image
Long Click
Press and hold MEMORY/EQ button after
selecting a picture to use as the background
on the player.
1
1
2
2
Push MENU/NAVI button to the or
direction to select “Yes” or “No”.
Push
MEMORY/EQ
button to confirm.
Enter
Yes/No
Push
Click
10:40
Delete
Long Click
Page 26

Convenient functions
Searching the music files(Navigation)
Navigation
5-2
Searching the music files(Navigation)
Convenient functions
Navigation
5-1
Navigation is the function used for searching files.
Navigate to locate tracks to play.
To search
1
1
2
2
Scroll up
Scroll down
Click
Push
Select the file
Scroll up
Scroll down
Select the track
4
4
Select folder or scroll to upper folder
Upper folder
Scroll up
Select the
folder or file
Scroll down
3
3
Click
Push
or
Select folder or scroll to upper folder
Click
Push
or
Note
MP3
IRM
ASF
OGG
REC
WMA
"
According to file type displayed as follows :
"
IRM (iRiver Rights Management)
iRiver Rights Management is a digital music format.
Please visit our web site for details about this music format.
Navigation
Page 27

Convenient functions
Enjoying the sound equalizer(EQ)
EQ Mode
5-4
Searching the music files(Navigation)
Convenient functions
Deleting a folder or file
5-3
Click the “MODE” button. “FOLDER DELETE ARE YOU SURE?” is displayed on the screen.
Select “YES” by pushing the NAVI/MENU button to the
or
direction to delete.
Then press NAVI/MENU button.
Press the NAVI/MENU button wile the stop mode.
Push the NAVI/MENU button to the
or
direction to select a folder or file.
Select the upper folder
Scroll up
Select the folder or file
Scroll down
Click
Push
or
Select
Click
Click
Stop
Click
Delete
Delete
You can select EQ mode in accordance to the playing music genre.
Press and hold the MEMORY/EQ button to display the current EQ setting.
Then press the button repeatedly to chose a different EQ.
Long Click
1
1
2
2
Push
"
Please refer to the Function Control (Page 5-27/28) for configuring Xtreme EQ.
"
Please refer to the Function Control (Page 5-27/28) for configuring Xtreme 3D.
"
You can select your favorite EQ as the set value on the EQ SELECT menu.
"
The set value on the menu is saved but EQ mode is not changed in case of not
selecting Xtreme EQ and Xtreme 3D
"
Xtrm EQ and 3D are set in the MENU, refer to page 5-27/28 for details.
Note
"
You can only delete a blank folder.
"
In order to delete a folder, you must first delete the files in the folder.
"
You can only delete an empty folder.
Note
Page 28

Convenient functions
Playback Mode
Intro
5-6
Playback Mode
Convenient functions
Playback mode(Mode)
5-5
You can set various Repeat and Shuffle options
by choosing these selections under Mode.
Change the Repeat or Shuffle mode by pressing
the varied pressing the MODE button.
Please refer to the MODE function controls
(page 5-24) for user-defined configuration.
Play a single track repeatedly.
Play all tracks in the folder and stop.
Play all tracks in the folder repeatedly.
Play all tracks in the player repeatedly.
Plying repeatedly(Repeat)
Randomly play all tracks in the player and stop.
Play a single track repeatedly.
Skip forward will select a new random track to play repeatedly.
Randomly play all tracks in the folder and stop.
Randomly play all tracks in the folder repeatedly.
Randomly play all tracks in the player repeatedly.
Playing in random order(Shuffle)
Repeating a specific segment(A-B repeat)
You can play a specific segment repeatedly(A-B repeat).
Press the A-B/EQ/MEMORYbutton once to select the beginning <A> point.
Press the button again to select the ending <B> point.
A-B interval will be repeated.
INTRO: Plays the beginning 10 seconds of each track in sequential order.
INTRO HIGHLIGHT: Plays 10 seconds from 1 minute into each track in
sequential order. You can set this function in the MENU function.(Refer to
page 5-25)
Point A
Click
Point B
Click
Page 29

Convenient functions
Playing in a favorite order(Program)
Activiting program mode
5-8
Playing in a favorite order(Program)
Convenient functions
Activiting program mode
5-7
Program mode: Create your own playlist.
Click the MEMORY/EQ button at Stop playback. The program list is displayed.
If the player has been programmed already, the current program list will display.
Program No.
File name
Press NAVI/MENU button, then select the music to program by using the VOL+, VOL switch.
1
1
2
2
Up
Down
Push
Press the MEMORY/EQ button to save the program list.
Press the NAVI/MENU button, then select the music to program by using the VOL+, VOL switch.
"
Push the VOL + or VOL - switch to select a folder, then press the MEMORY/EQ button to save
all files in the folder.
"
Sub folders are not added.
3
3
4
4
Up
Down
Push
Click
Click
Click
Page 30

Playing in a favorite order(Program)
Convenient functions
Program play
5-9
Push MENU/NAVI button to the VOL direction at stop mode.
Program playback is cancelled and normal playback is started.
To remove files from the program list
Press the MODE/REC button after selecting the file to be deleted using the MEMORY/EQ
button at stop mode. The program list is automatically changed.
Exit
Push
Click
Delete
Convenient functions
Playing in a favorite order(Program)
To cancel program mode
5-10
After programming, press PLAY/STOP button to play the tracks in sequential order.
The program
mode icon appears
Click
"
To delete all programmed songs, press MEMORY/EQ button for a while.
Note
Page 31

Convenient functions
Customizing the function settings(Menu)
Configuration
5-12
Customizing the function settings(Menu)
Convenient functions
Configuration
5-11
"
Functions are subject to change with different firmware versions.
"
Users can configure their own settings.
Note
Page 32

Convenient functions
Menu-Basic operation
Enter Sub Menu
5-14
Menu-Basic operation
Convenient functions
Basic operation
5-13
Main menu Sub menu sub menu settings
"
Press and hold the NAVI/MENU button to display the menu system.
"
The MENU system is composed of 6 main menus with sub-menus.
Push the NAVI/MENU button to the
or
direction to select menu.
Click NAVI/MENU button.
Long Click
Previous
Next
Push
Click
You can set, cancel or change sub nenu by pushing the NAVI/MENU button toward or
or VOL +, VOL -.
Push MENU/NAVI button to the
or direction to select sub menu.
Push MENU/NAVI button to confirm.
Click the PLAY/STOP button to return Main
MENU at the sub-menu setting.
Exit sub menu
Exit main menu
Click the PLAY/STOP button to exit Main
Menu
To select Main Menu
1
1
2
2
Exit Sub Menu Exit Main Menu
Previouse
Next
Push
Up
Down
Click
Next
Push
Up
Click
Click
Click
Previouse
Page 33

Convenient functions
Menu-General
5-16
Menu-General
Convenient functions
Gerenal
5-15
ON : Playback resumes from the previous location in a song
when the player is stopped or powered off.
OFF : Playback begins from the first track after the player is
stopped or powered off.
Initialize menus to the original factory settings.
The button’s operation order is as below.
Click NAVI/MENU (select default menu)
or VOL+ (select
YES)
Press NAVI/MENU (select YES : Initialization)
Support 39 languages
Song title and ID3 tag information is dependent on the version of
the PC operating system that was used to create it. (For
example, if an MP3 file is created in a English version of
Windows, the language setting should be English for the proper
title display)
Resume
Loard Default
Language
Page 34

Convenient functions
Menu-Display
Scroll Speed
5-18
Menu-Display
Convenient functions
Display
5-17
You can adjust the time that the Backlight stays on.
SEC : Backlight stays on from 3 to 30 seconds.
MINUTE : Backlight stays on from 1 to 30 minutes.
Press the NAVI/MENU button to set SEC/MINUTE.
Back Light
During playback, you can display visisualtions, the elapsed time
of the track, or the free memory on your player
Normal : display elapsed time.
Remain : display remaining time.
On : Display track with ID3 tag information
Off : Display track with file name
Adjust scroll speed by 1x / 2 x / 4x / Vertical / Horizontal.
Vertical : The scroll goes up and down
Horizontal : The scroll goes from the left to the right.
Visualization
Waveform
Level Meter
Progressive
Free Space
Tag Information
Time
"
Time display may not be accurate for files encoded in Variable Bit Rate formats.
Note
"
File name will be displayed by default for songs with no ID3 information
Note
Page 35

Convenient functions
Menu-Timer
Set Time
5-20
Menu-Timer
Convenient functions
Timer
5-19
Automatically turns the power off at the stop mode.
(Time range can be set from 1 to 60 minutes by a minute)
Use the
or switch to adjust time.
Automatically turns the power off after a fixed time.
(Time range can be set from 0 to 180 minutes by one minute increments.)
You can listen to the beep sound at 1 minute before powering off
by setting BEEP to ON. Use the
or switch to adjust time.
Set BEEP ON/ OFF by pressing the NAVI/MENU button.
ON : A beep sound will play one minute before the player shuts off.
OFF : No beep sound is played.
Once powered off, the sleep timer will reset to 0.
min
Sleep Power Off
Stop Power Off
Alarm/Record Select
Set Alarm
Set the current time.
Push the NAVI/MENU switch toward Ior Ito select the
item and toward VOL + or VOL - to set the clock.
Use the
I
or Iswitch to adjust time.
OFF: The Alarm and Tuner Record functions are disabled and
the player will not power on at either indicated time.
ALARM : At the time indicated in the "Set Alarm" setting (see
below) the player will power on and begin music playback."
TUNER RECORD : At the time indicated in the "Tuner Rec.
Reservation" setting (see page 5-21) the player will power on
and begin recording from the selected radio station.
Set the working time of alarm.
Push the NAVI/MENU switch toward
I
or Ito select the
item and toward VOL + or VOL - to set the alarm
Page 36

Menu-Timer
Convenient functions
Tuner Rec. Reservation
5-21
Convenient functions
Menu-Control
Control
5-22
The fast scan speed can range from 1x / 2x / 4x / 6x.
OFF : Skip doesn’t activate.
10 : Skip 10 tracks at time.
DIRECTORY : Skip to previous or next folder.
This defines the operating method of short or long press of
or switch.
FF/RW Skip
FF/RW Scan Speed
Set the time and station to be recorded.
Push the NAVI/MENU switch toward
or to select the
item and toward VOL + or VOL - to set the recording time.
Page 37

Convenient functions
Menu-Mode
Mode
5-24
Menu-Control
Convenient functions
Voice Recording Mode
5-23
You can adjust recording quality when recording voice.
ON : When recording voice, the recording level is automatically
controlled and recordings from long distances are enhanced.
OFF : AGC(Automatic Gain Control) not activated.
The voice recording mode will automatically pause during
silence. This is useful for recording over a long period of time to save
memory.
OFF : Voice Auto Detection is disabled.
Voice Auto Detection (first slider) : Set the relative level of sound
needed to activate the recorder. (1-10).
Record pause time (second slider) : Set the number of seconds of
silence to record before pausing.(1-10)
Use this setting to playback audio files while the player is
attached to your PC.
OFF : The player will playback audio files while connected to the PC
(to save battery life).
ON : The player to show “Connected to USB” on the screen and you
can transfer files to the player.
While an audio file is playing, press MODE/REC to activate selected play modes, such as
Repeat or Shuffle. (Multi selecting available)
How to select
Push
Previous/Next
Click
On/Off
1
2
Repeat/Shuffle
Down Load Activity
Voice Auto Detection
"
This must be set to “ON” in order to transfer files to the player.
Note
"
Only the selected play mode will be available when you press the MODE/REC button
(For details, please refer to page 5-5/6)
Note
Page 38

Convenient functions
Menu-Mode
Name
5-26
Menu-Mode
Convenient functions
Intro
5-25
Intro: Plays the beginning 10 seconds of each track.
Intro Highlight : Plays 10 seconds from 1 minute into each
track in sequential order.
While playing, short slide of the , lever will skip the
current track set time ahead.
OFF : Study Mode is disabled.
The range is 1~60 seconds.
You can input your name or custom text.
"
Select the character by using and
switch and press Navi/Menu
button to input the character.
"
To delete the character, press MODE
button.
"
To scroll between English and your
preferred language, use MEMORY/EQ
button
"
To move the cursor in the name
window, use + and - on Volume switch.
"
Press PLAY/STOP button to save and
exit.
Study
Exit
Push
Charactor
Push
Click
Enter
Type position
Click
Language
Delete
"
Chinese and Chinese characters are not supported in the Name feature.
Note
Page 39

Convenient functions
Menu-Sound
Xtreme 3D
5-28
Menu-Sound
Convenient functions
Sound
5-27
You can adjust the sound to your preference.
There are 5 band frequency steps, set from -15dB to +15dB by 3dB
step.
1. Select the Frequency step
to set using the
or
switch.
2. Adjust the level using the
VOL + or VOL - switch.
3. To exit Xtreme EQ setting
Push
Slect the frequency
Push
Adjust level
You can adjust the level of 3D sound(minimum, Natural, and
Maximum).
You can extend 3D sound by selecting Bass Boost or 3D EQ.
You can also adjust the level of 3D sound with the
or lever.
Select DBE or 3D EQ with the Navi/Menu button.
You can select the Bass Center Band level from Band 1 to 4.
You can also set the Bass Boost gain from 0 dB to 15dB by 3dB step.
DBE (Dynamic Bass Enhancement) enhances Low & Middle
frequencies and only operates when using Xtreme 3D.
You can adjust the sound to your preference.
There are 5 band frequency steps, set from -15dB to +15dB by 3dB
step.
Xtreme EQ
"
How to set Xtreme EQ
DBE Setting
3D EQ Setting
Exit
Click
Page 40

Convenient functions
Menu-Sound
Beep Volume
5-30
Menu-Sound
Convenient functions
5-29
Sound Balance
Balance your sound to the right or left or keep it in the center
according to your preference. When Sound Balance bar is moved to L
(Left, 20),the sound outputs at the left earphone. When the lever is
moved to R (Right, 20) the sound outputs at the right earphone.
The default value is 0 and the sound outputs the same level at both
earphones.
ON : Limit the control of equalizer frequency to prevent distortion of
sound.
OFF : You can enjoy the original sound though distortion of sound
may occur.
0
You can select various EQ modes.
Press NAVI/MENU button after selecting EQ by pushing to the
derection
or .
EQ Limit
EQ Select
"
You can not select NORMAL EQ.
"
If you do not select Xtrm EQ or Xtrm 3D, Xtrm EQ or Xtrm 3D modes will not be
available during playback.
Note
Pade in
Set beep volume level.
Set to "0" for OFF.
When activated, volume increases gradually at playback mode
to prevent the sudden loudness.
Page 41

Contents
Additional
Information
6
Convenient functions
5-31
Trouble shooting
Precautions
Accessories
Specifications
6-1
6-2
6-3
6-4
Additional Information
Page 42

Safety
Additional
Information
Precautions
6-6-2
"
Avoid dropping or impacting the player.
The player is designed to operate while walking or running, but dropping or excessively impacting
the player maybe cause damage.
"
Avoid contacting the player with water.
Damage to the internal parts of the player may occur if the player comes into contact with water. If
your player gets wet, dry the outside with a soft cloth as soon as possible.
"
Do not leave the player in a location near heat sources, or in a place subject to direct sunlight,
excessive dust or sand, moisture, rain, Mechanical shock, unleveled surface, or in a car with
its windows closed.
"
Remove the battery if player is unused for long periods of time.
Battery left in the player for a long time can corrode and damage the device.
"
All data stored on this device may be erased by a excessive impact, a thunder or an
electricity failure, etc. on the device.
The manufacturer does not warrant and will not be held responsible in any way for damages or loss
of data, including loss of data stored on this device, resulting from a excessive impact, a thunder or
an electricity failure, You will be responsible for safe-guarding all data stored on this device.
"
Road Safety
Do not use headphones/earphones while driving, cycling, or operating any motorized vehicle.
It may create a traffic hazard and is illegal in some areas. It can also be potentially dangerous to
play your headsets at high volume while walking, especially at pedestrian crossings.
You should exercise extreme caution or discontinue use in potentially hazardous situations.
"
Preventing hearing damage
Avoid using headphones/earphones at high volume. Hearing experts advise against continuously
loud and extended play. If you experience a ringing in your ears, reduce volume or discontinue use.
"
Consideration for others
Keep the volume at a moderate level. This will allow you to hear outside sound and to be
considerate of the people around you.
On headphones andearphones
Trouble Shooting
6-1
Should any problem persist after you have checked these symptoms, consult your iRiver
dealer or contact support at www.iRiver.com.
No Power
No sound or distortion
during playback.
Characters in LCD are
corrupted.
Poor FM Reception.
Failed download of MP3 file
"
Check whether the HOLD switch on the player is ON
(Switch to OFF position)
"
Check the condition of the battery.
"
Insert a fresh battery.
"
Check whether VOLUME is set to "0".
"
Connect the earphones plug firmly.
"
Check whether the plug is dirty. Clean the plug with a
dry and soft cloth.
"
Corrupted MP3 or WMA files may make a static noise
and the sound may cut off. Listen to your files on the PC
to see if they are corrupted.
"
Check out Menu General Language and confirm
whether the right language has been selected.(Refer to
page 5-15)
"
Adjust the position of the player and earphones.
"
Turn off the power of other electric devices near the player.
"
The Earphone cord functions as the antenna, they must
be plugged in for best reception.
"
Check the condition of the battery.
"
Check the connection between your computer and the
player to ensure that the cable is secure.
"
Check the Manager program to make sure it is operating.
"
Check whether the player’s memory is full.
Additional
Information
Page 43

Accessories
Additional
Information
6-3
Additional
Information
6-4
Earphone/ Earphone cover
USB cable
Arm Band
Rechargeble Battery(1EA)
Carrying Case
UserManual/ Warranty
card/Quick Start Guide
Installation CD
Neck strap for carrying
Adapter
1
1
2
2
3
3
4
4
5
5
6
6
7
7
8
8
9
9
"
Accessories subject to change without notice and may vary from image shown.
Note
Specifications
Dimension
Weight
Battery
FM Tuner
Audio
File
Support
87.5 MHz ~ 108 MHz
(L)18 mW + (R)18 mW (16 Ohm) max. Volume
(L)12 mW + (R)12 mW (32 Ohm) max. Volume
60 dB
Headphone/Earphone-Cord Antenna
91.1(W) x 34(H) x 31.3(D) mm
63 g (Battery included)
Rechargeble Battery
20 Hz ~ 20 KHz
(L)18 mW + (R)18 mW (16 Ohm) max. Volume
(L)12 mW + (R)12 mW (32 Ohm) max. Volume
90 dB(MP3)
MPEG 1/2/2.5 Layer 3, WMA, OGG, ASF
8 Kbps ~ 320 Kbps
(OGG : 44.1KHz, 96Kbps ~ 256Kbps)
ID3 VI, ID3 V2 2.0, ID3 V2 3.0, ID 3 V2 4.0
260,000 Color Graphic LTPS(Low Temperature Poly Silicon)
LCD with Backlight
40 Languages
Approx. 35 hours (128 kbps, MP3, Volume : 20, EQ Normal)
USB 1.1(Full speed suported)
-5
~ 40
Category Item
Specifications
LCD
Language
Voice Recording
Max. Playtime
USB
Operational Temperature
Memory
Model No
256MB
iFP-1090
FM Frequency rang
Headphone Output
S/N ratio
Antenna
Frequency range
Headphone Output
S/N ratio
File Type
Bit Rate
Tag Info
Approx. 18:00 hrs
(32kbps, 256 MB)
512MB
iFP-1095
Approx. 36:00 hrs
(32kbps, 512 MB)
Memory is not expandable.
Page 44

 Loading...