

Page 1
Model H300 Series
Instruction Manual
PORTABLE STORAGE DEVICE
& MULTI - CODEC JUKEBOX
Model H300 Series
Thank you for your purchase.
Please read this manual carefully
before using your new player.
http://www.iRiver.com
Page 2
1
Thank you for buying the iRiver H300 Series. iRiver welcomes you to the world of
the H300 Series, the leading HDD type MP3 player.
We firmly believe that the H300 Series will give you complete satisfaction. We
know that the H300 Series will make your life more pleasurable in so many
different ways.
Thank your for your iRiver purchase.The H300 series comes complete with a
long list of advanced features. It is important that you read the manual to ensure
that you get the most out of your new player.
iRiver website address is www.iriver.com.
The site provides product information and customer support.
Use the firmware (system software) upgrade function of our products from the
site to continuously improve the product performance.
Page 3
32
iRiver Limited reserves all patents, trademarks, copyrights, and other
intellectual rights regarding the user manual. Copying the manual in part or in
full without the written permission of iRiver is prohibited. Illegal usage of part
or all of the document may result in criminal penalty.
Related laws, including the copyright law, protect copyrighted contents such as
software, music, or movies. If the product is used to copy or distribute copyrighted
contents illegally, the user must take all legal responsibility for such actions.
Companies, organizations, products, persons, and information on events used
in the examples in this manual are not actual data. The company has no
intention to link this user manual to any company, organization, product, or
person. Do not assume any such intention or connection. It is the user's
responsibility to comply with copyright laws.
1999-2004 iRiver Limited. All rights reserved.
CE, FCC
Windows, Windows 98 SE, Windows ME, Windows 2000, Windows XP, and
Windows Media Player are registered trademarks of Microsoft Corp.
SRS is a registered trademark of SRS Labs, Inc.
The manufacturer, importer, and dealer cannot be held responsible for
accidental damage, including personal injury or any other damage, due to
inappropriate usage of the product.
Information in the user manual is written for the current specification of the
product. The manufacturer, iRiver, continues to provide additional
functions and apply new technology to it. All specifications may be
changed without notice to individual users.
Please read and ensure you have fully understood the following safety guidelines
before using the product. The safety guidelines describe important details
regarding your safety and are classified into "Danger," "Warning," and "Caution."
The company cannot be held liable for accidents and product damage due to
non-observance of these safety precautions.
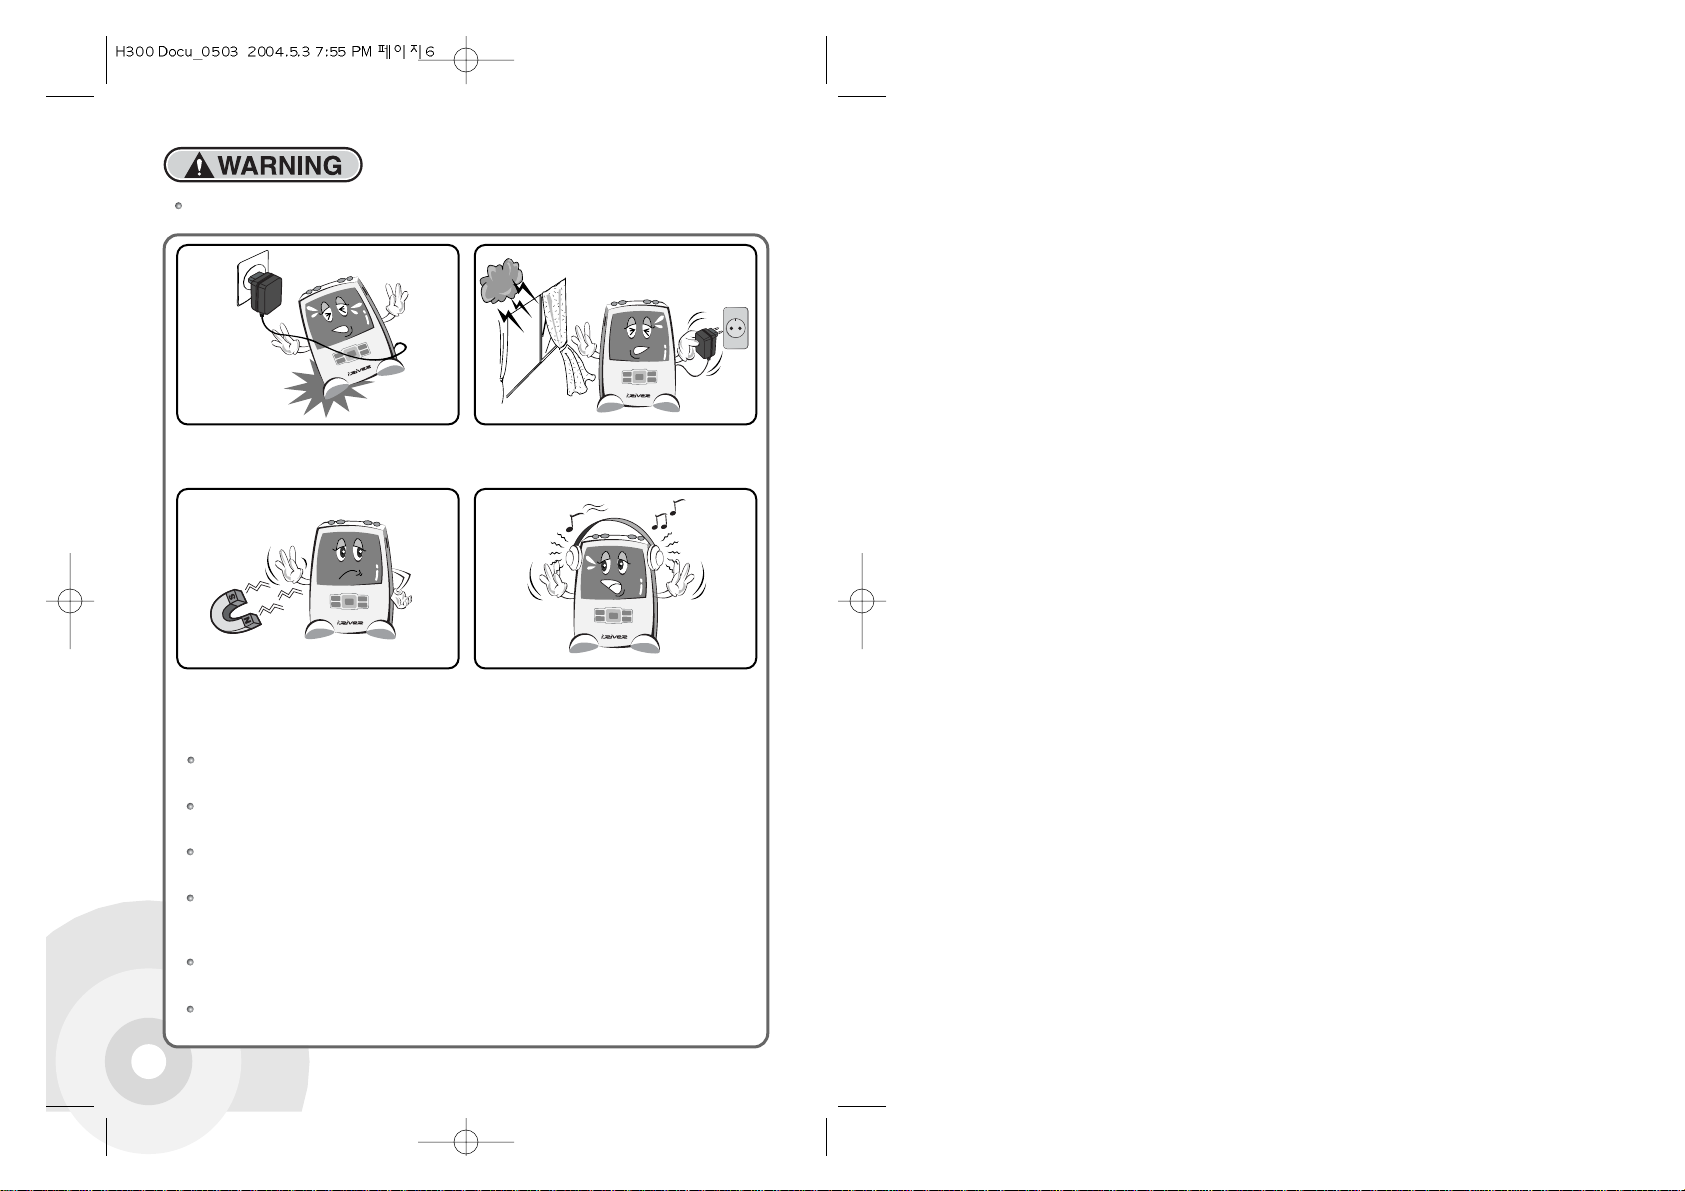
Serious injury or death can result if not handled as
directed.
Serious / minor injury or product / property damage
can result if not handled as directed.
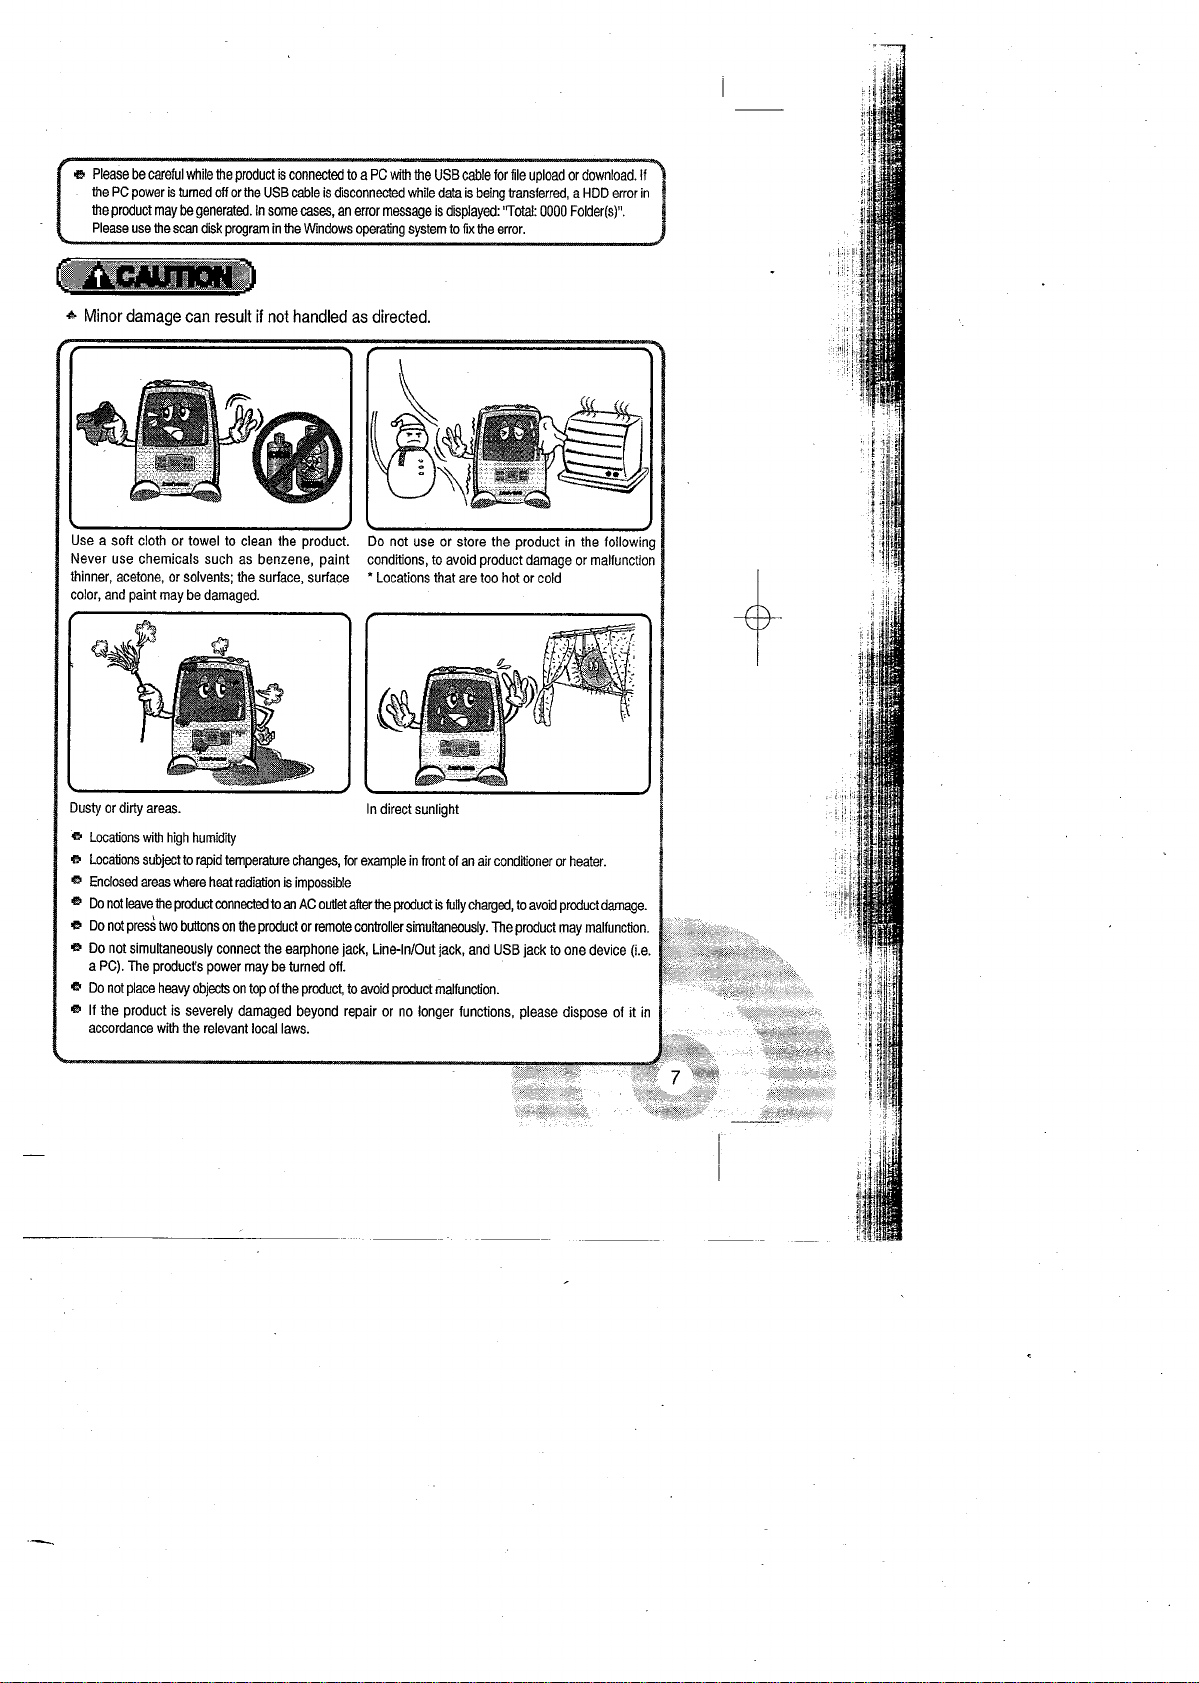
Minor damage can result if not handled as directed.
Page 4
54
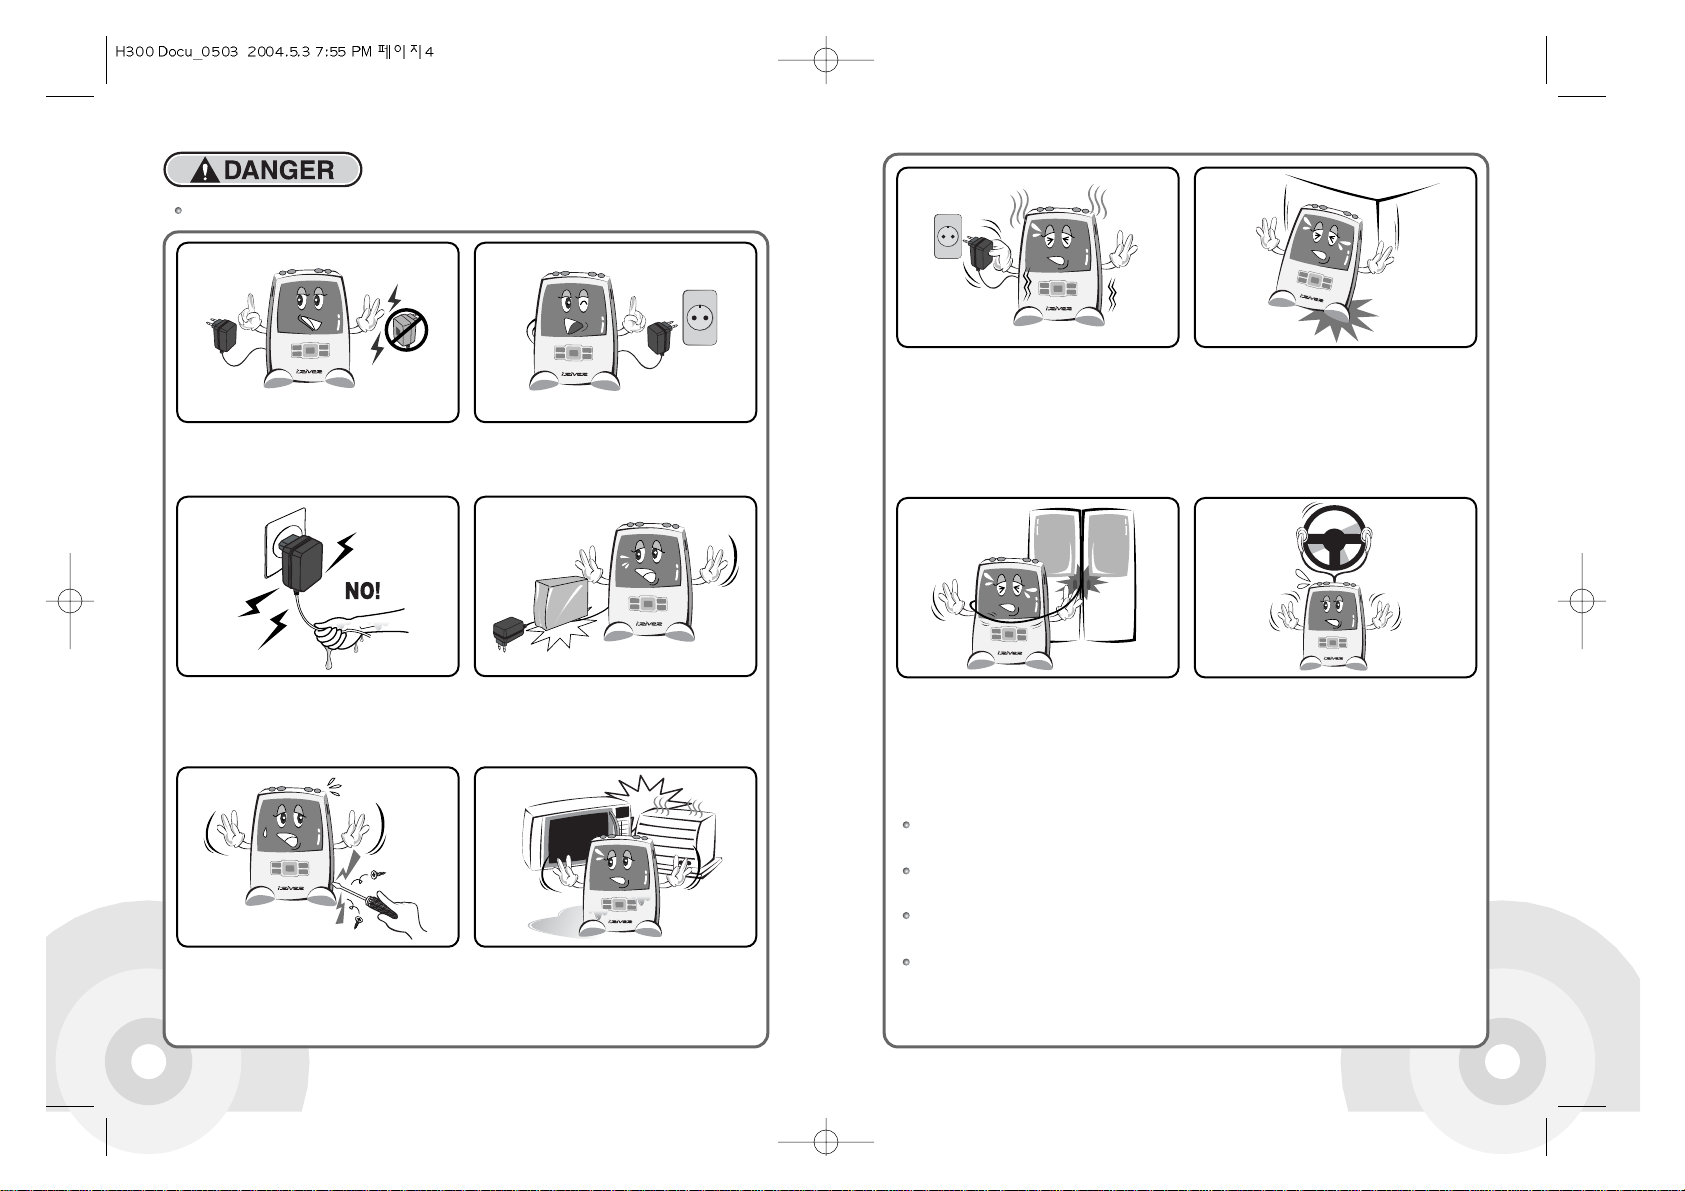
Serious injury or death can result if not handled as directed.
Use only the AC adapter included. Using any
other AC adapter may cause fire or electric shock.
Connect the AC Adapter only to rated power outlet
types as described in the user manual. Connecting
to other types may cause fire or electric shock.
Do not touch the AC adapter with wet hands. If the
inside or outside of the product get wet, an electric
shock may result.
Do not place heavy objects on the AC adapter cable.
Do not score, bend, twist, or pull the AC adapter
cable. A damaged AC adapter cable may cause fire
or electric shock.
Do not repair, disassemble, or modify the product.
Using the product under such conditions may cause
fire or electric shock.
To avoid a high probability of explosion or
malfunction, do not dry the product with a heater or
microwave oven when the product is wet (whether
with water or some other liquid).
Promptly turn the power of the product off and
disconnect the AC connector from the power
outlet if the product produces smoke, smells, or
unusual sounds. Using the product in abnormal
conditions may cause fire or electric shock.
Do not drop the product, or subject it to strong impact
or severe vibration, to avoid damage. Promptly turn
the power of the product off and disconnect from the
power outlet if the product is damaged. (Remove the
AC adapter if the product was being charged). Using
the product in abnormal conditions may cause fire or
electric shock. Contact customer support.
Do not allow the earphones to get trapped in a car
or train door. It can be extremely dangerous.
Promptly turn the power of the product off and disconnect the AC connector from the power outlet
during electrical storms to avoid fire or electric shock.
Turn off and unplug the power when it thunders or lightening flashes as quickly as possible.
It could result in a fire or electric shock.
Turn off the power during an electronical storm to avoid damage to the product and disconnect the
AC connector from the power outlet if foreign substances or liquid get into the product.
Keep the product and AC adapter away from children to avoid electric shock or exposure to
electrical fields.
Do not use earphones or headphones while driving a
vehicle, motorcycle, or riding a bicycle. Not only is it
dangerous, but also illegal in some jurisdictions. Do
not use the earphones or headphones while using a
pedestrian crossing or in other dangerous areas, to
avoid traffic accidents or other dangers.
Page 5
6
Serious / minor injury or product / property damage can result if not handled as directed.
Do not let the AC adapter cable or other cables lie
across walkways, to avoid accident or product
damage.
Promptly turn the power of the product off and disconnect the
AC connector from the power outlet during electrical storms, to
avoid product damage due to excessive current surges.
Do not place the product near sources of strong magnetism
such as magnets, TVs, monitors, speakers, or hands free
devices. The product uses a magnetic disk driver for data
storage, and magnetic fields can damage the product.
While using earphones or headphones, do not
use too high a volume or play for too long a
period of time, to avoid damage to your hearing.
Use only the AC adapter included.
Using other AC adapters may cause malfunction. Some malfunctions are not repairable.
Connect the AC Adapter to rated power outlet types as described in the user manual only.
Connecting to other types of outlet may cause malfunction. Some malfunctions are not repairable.
Do not repair, disassemble or modify this apparatus at discretion. It might be damaged and not be
repaired according to the level of damage.
Keep the product from getting wet from rainwater, drinks, medicines, or cosmetics. Wetting the product
may cause malfunction. Do not turn the power off if this happens. Promptly swap with dry swab[not clear,
and "swap" is not right] and ask for technical support. Some damage cannot be repaired.
External impact, lightning, power shorts or other events may damage the data stored in the product. The user is
solely responsible for data backup and the company will not be liable for loss of stored data under any circumstances.
If Bad Sectors are generated in the HDD due to physical impact or other cause, the product may not
function normally. Please use the scan disk program in the Windows operating system to fix the error.
Page 6
Page 7
8 9
Introducing the H300
The iRiver H300 series delivers superior sound and advanced features in a
extraordinarily sleek design. It is designed with a large, color LCD, ultra-fast
USB 2.0 music transfers, multi-codec support and a digital FM tuner. Plus, the
H300 features a rechargeable battery that lasts up to 16 hours per charge
making it the new standard in high-capacity music players.
The FM tuner included enables reception of FM radio broadcasting. And the
product supports firmware upgrades to continuously refine the product's
features via our website.
All these powerful features will enable you to have your best ever experience
with an MP3 player.
Welcome........................................................................................................................1
Copyright/Certification/Escape Clause......................................................................2
Warning..........................................................................................................................3
Before using the product
1.
Introducing the H300
.................................................................................9
2.
H300 features
..........................................................................................10
3.
Contents
..................................................................................................11
Getting started
1.
Names of parts
........................................................................................12
2.
Connecting the product
...........................................................................15
3.
Installing the software
..............................................................................28
Basic operation
1.
Getting up and running
............................................................................36
2.
Using the buttons
....................................................................................37
Useful features
1.
Playing music files
...................................................................................39
2.
Listening to the FM radio
.........................................................................40
3.
Setting preset channels
..........................................................................42
4.
Recording
................................................................................................44
5.
Using the text function
.............................................................................47
6.
Viewing Image
.........................................................................................50
7.
Using the Browser Function
....................................................................51
8.
Searching music
......................................................................................53
9.
EQ/SRS
..................................................................................................55
10. Setting play mode 56
11. Managing music information files 61
Menu configuration
1.
Opening the menu screen
.......................................................................63
2. Menu Map..............................................................................................64
3. General...................................................................................................64
4. Display....................................................................................................68
5. Timer.......................................................................................................70
6. Control....................................................................................................72
7. Mode.......................................................................................................73
8. Sound.....................................................................................................76
9. Record....................................................................................................78
Troubleshooting
.........................................................................................................82
Product Specification
................................................................................................83
Federal Communications Commission
................................................................84
Page 8
1110
H300 Features
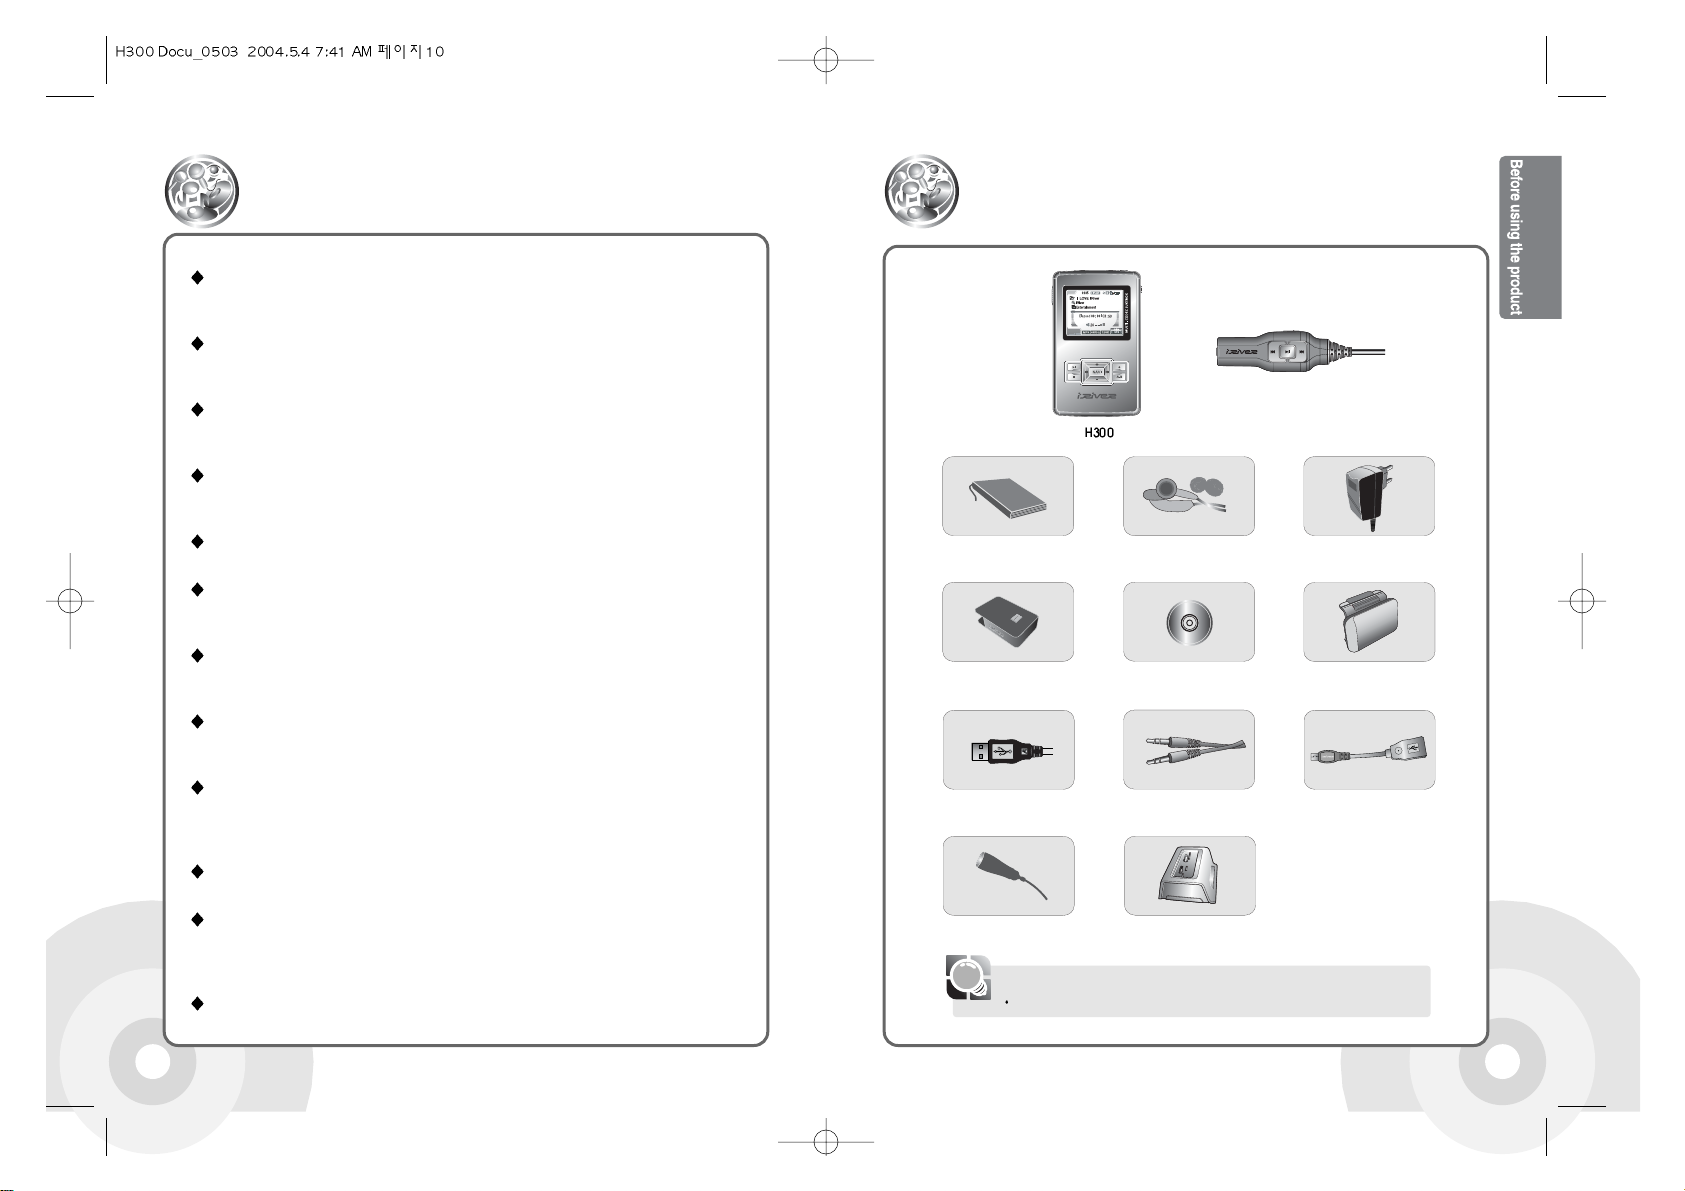
Contents
Unpack the product and check the following contents.
2 inch color LCD display. Both icons and menus are in color.
Superior color icons and menus previously unavailable are provided for a better user
experience.
Supports super size data - 20GB/40GB HDD
The system can be used as high capacity portable storage with 20GB(H320) and
40GB(H340) HDDs.
Data sharing without a PC - USB Host
The system can connect directly to other portable USB devices such as digital
cameras. No PC is required.
Fast file transfer - USB 2.0
The system supports a 480 Mbps USB 2.0 interface to maximize the portable
data storage feature.
Constant state-of-the-art performance - firmware upgrade
Add new features or improve performance with continuous firmw are upgrades.
Images and Text are OK! - Text and image viewer
View ebooks, lyrics, and stored Images with the Text Viewer and Image Viewer
features.
Magnificent 3D sound - SRS WOW sound effect
Experience the magnificent 3d and rich base sounds with the industry-recognized
SRS WOW technology.
5 Preset and 1 User set equalizers
Select one of the 5 preset EQs (Normal, Rock, Jazz, Classical, Ultra Bass) or set your
own with the Uesr EQ.
FM radio at your convenience - Built in FM tuner and FM recording.
Easy radio listening, with automatic search and frequency memory functions. Superior
technology for searching reception while moving will enhance your
experience.
Simple usage - Easy Navigation
H300 supports a maximum of 2000 folders and 9999 files structure for easier search.
Easy recording - Record voice and external sound sources.
Supports voice recording with high performance internal / external microphones, and
sound recording connecting to external devices such as CDs, tape players, or radio
receivers.
Connect external speakers - Supports an external output (Line-Out) feature
Contents may be changed without notice.
[Note]
User's guide (Including Product
Warranty Card), Quick start guide
Earphones and
Earphone covers
AC Adapter
Carrying Case
Installation CD
External Battery Pack
USB Cable
Cradle(H340 option)
USB Host Cable
External Microphone
Line In/Out Cable
Remote Control
Page 9
13
12
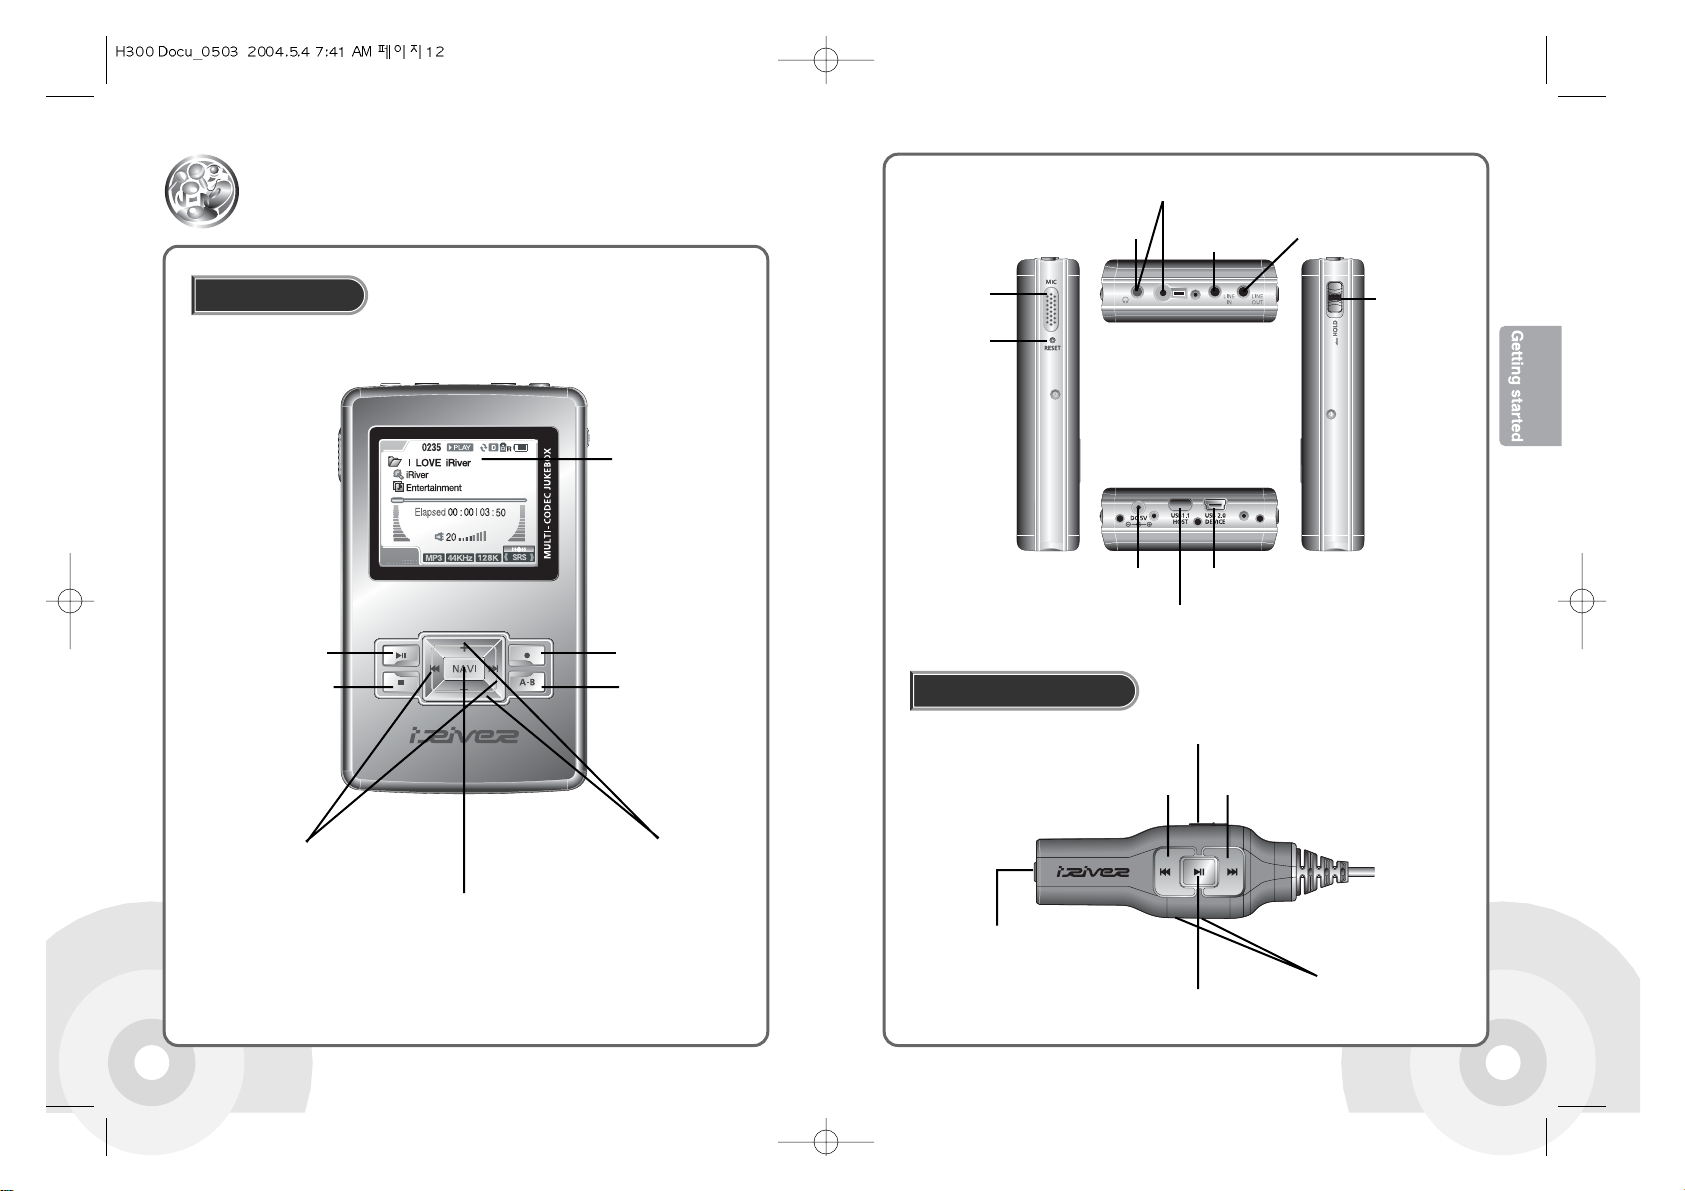
System
Names of parts
Remote Control
HOLD Switch
USB Port (2.0/DEVICE)DC IN 5.0V Port
USB Port (1.1/HOST)
RESET
MIC
LINE IN
Remote Control Port
Earphone Port
LINE OUT
Power ON/PLAY/
PAUSE Button
Power OFF/STOP Button
A-B/EQ Button
NAVI/MENU Button
Previous/Next Button
Volume Control Button
Record/Function
Conversion Button
Power ON/Power OFF/PLAY/PAUSE Button
Volume Control Button
Earphone Connecting Port
Previous Button Next Button
HOLD Switch
Color LCD Display
Page 10
1514
The following icons are displayed to indicate the type of file playing.
: MP3 file
: WMA file
: OGG file
: ASF file
: IRM file
What is IRM (iRiver Rights Management)?
The IRM is digital copyright information file designed by iRiver
Limited. The IRM technology protects copyright and property from
unauthorized usage of digital contents provided through iRiver
Limited.
The following icons are displayed to indicate HOLD status.
: The HOLD function is set in both the product and the remote control.
: The HOLD function is set in the product.
: The HOLD function is set in the remote control.
[Note]
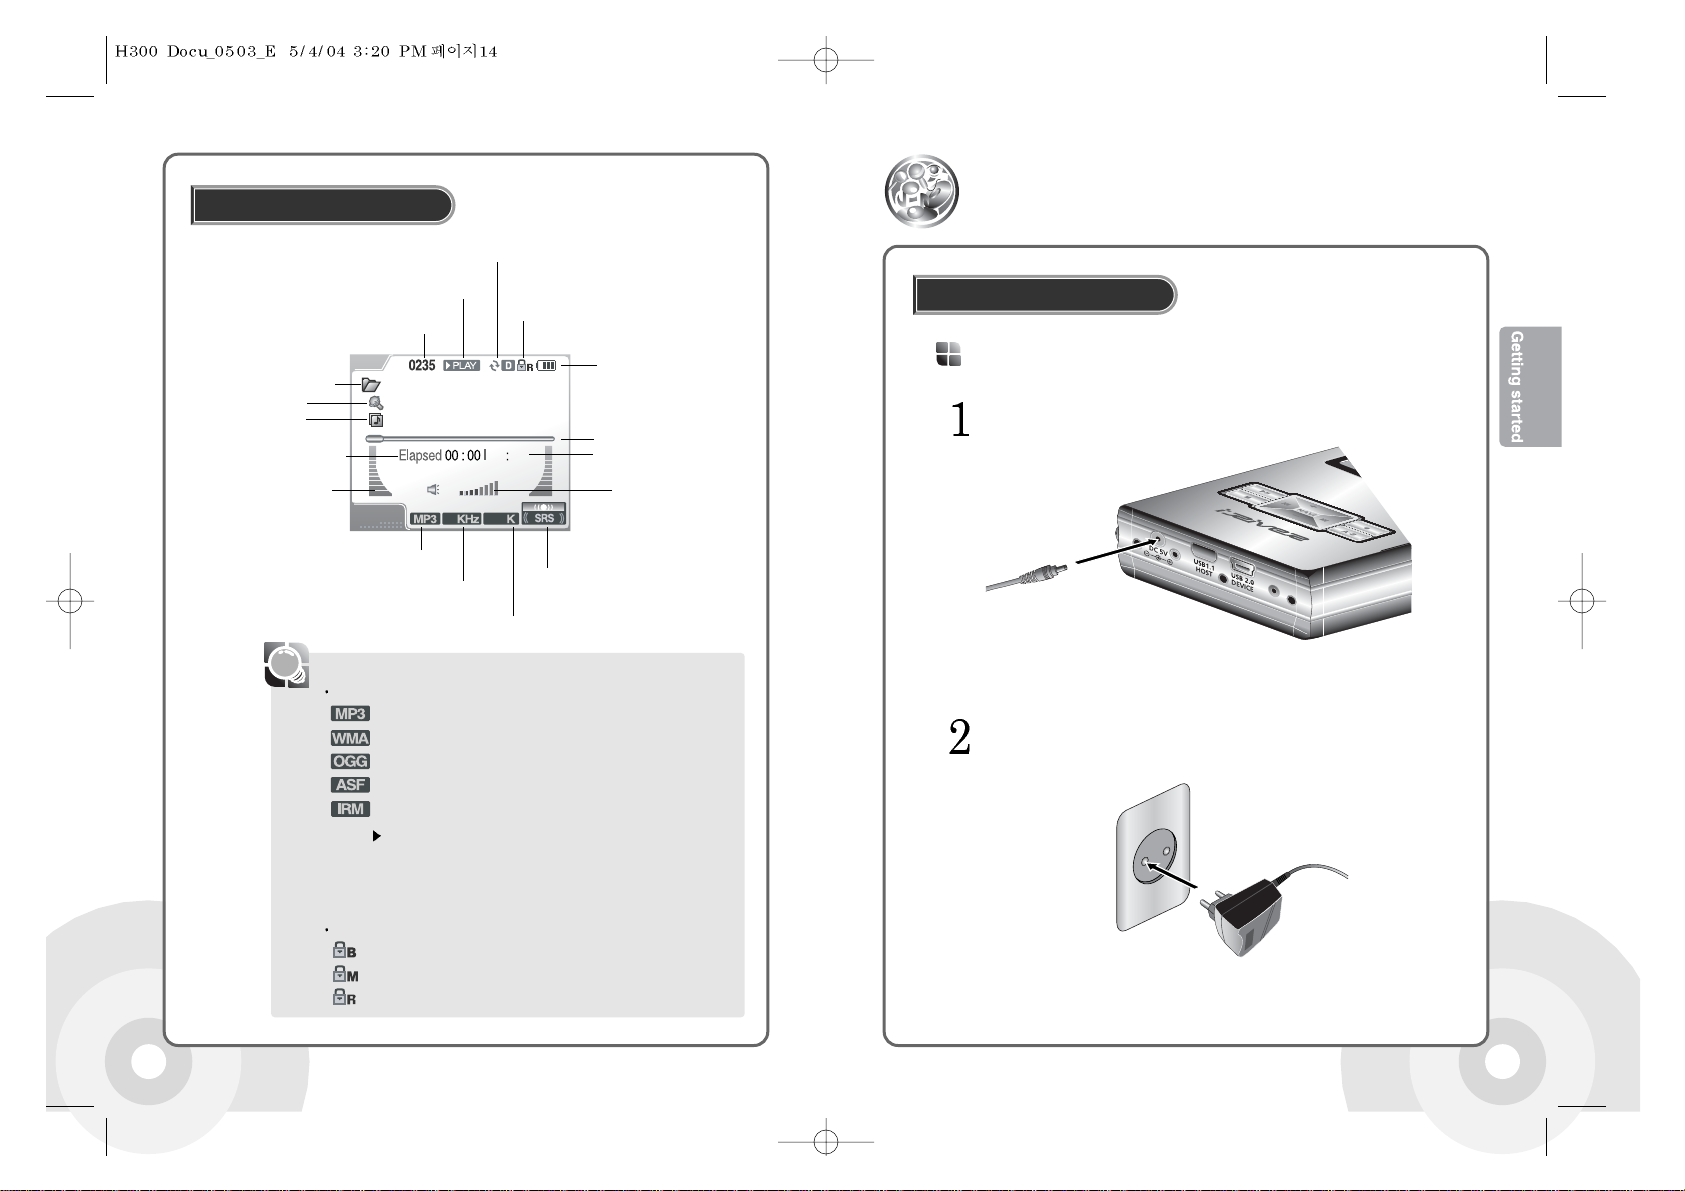
Using the LCD screen
iRiver
I LOVE iRiver
Entertainment
20
03 50
44 128
Folder Name
Music No.
Playback Condition
HOLD
Play Mode
Remaining battery
Playing Time
Progress Bar
Artist Name
Level Meter
Volume
Music Title
File Type
EQ/SRS
Sampling Rate
Bit Rate
Playback Time Information
Connect the AC adapter to the system's 5.0V DC connector.
Connect the AC adapter plug to a power socket.
AC adaptor for this product is 100~240V, 50~60Hz.
Connecting the adapter
Connecting the Power
Connecting the product
Page 11
1716
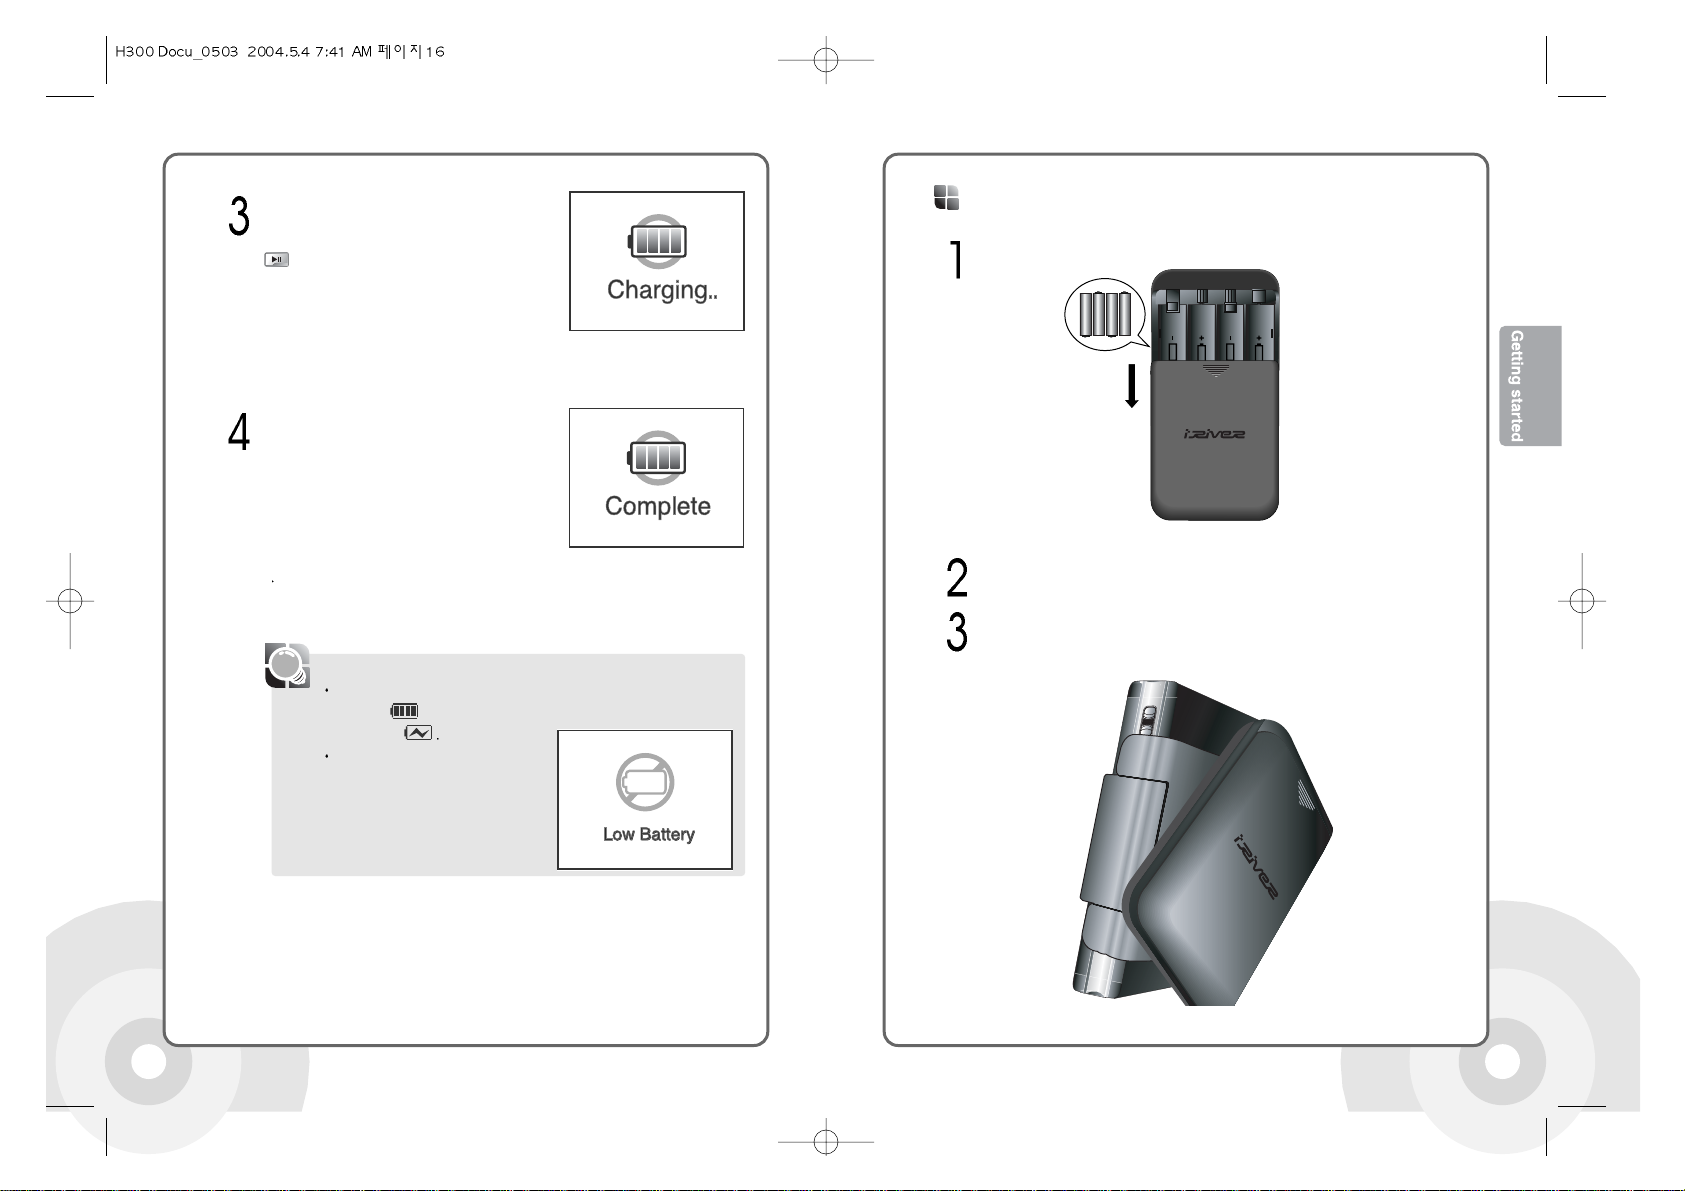
If the battery is fully charged, the charging
process is automatically terminated and the
charging indicator lamp is turned off.
Charge Time: 3 hours (if the battery is fully discharged)
[Note]
If the power source is connected when the product is turned on, the
battery icon is animated. After charging is finished, the icon
becomes a still
If the battery is fully discharged, the
following message is displayed in the
system LCD.
If a power source is connected when the
product is turned off, the following message
is displayed in the system LCD. Press the
button while charging to start the system
in play mode.
Slide the external battery pack cover to open it.
Insert four AA batteries, be careful to observe the correct polarity. Slide the
cover back into place.
Inserting external battery pack
Twist the external battery pack to UNLOCK direction. Insert the H300 to the
system slot of the external battery pack.
Page 12

18 19
Connect the AC adapter to the cradle's 5.0V DC connector.Twist the external battery pack to LOCK direction to secure the H300.
Connect the external battery pack cable located under the case to the 5.0V
DC connector of the H300.
Insert the product into the cradle.
Connecting the cradle
Connect the AC adapter plug to a power socket.
Page 13
20 21
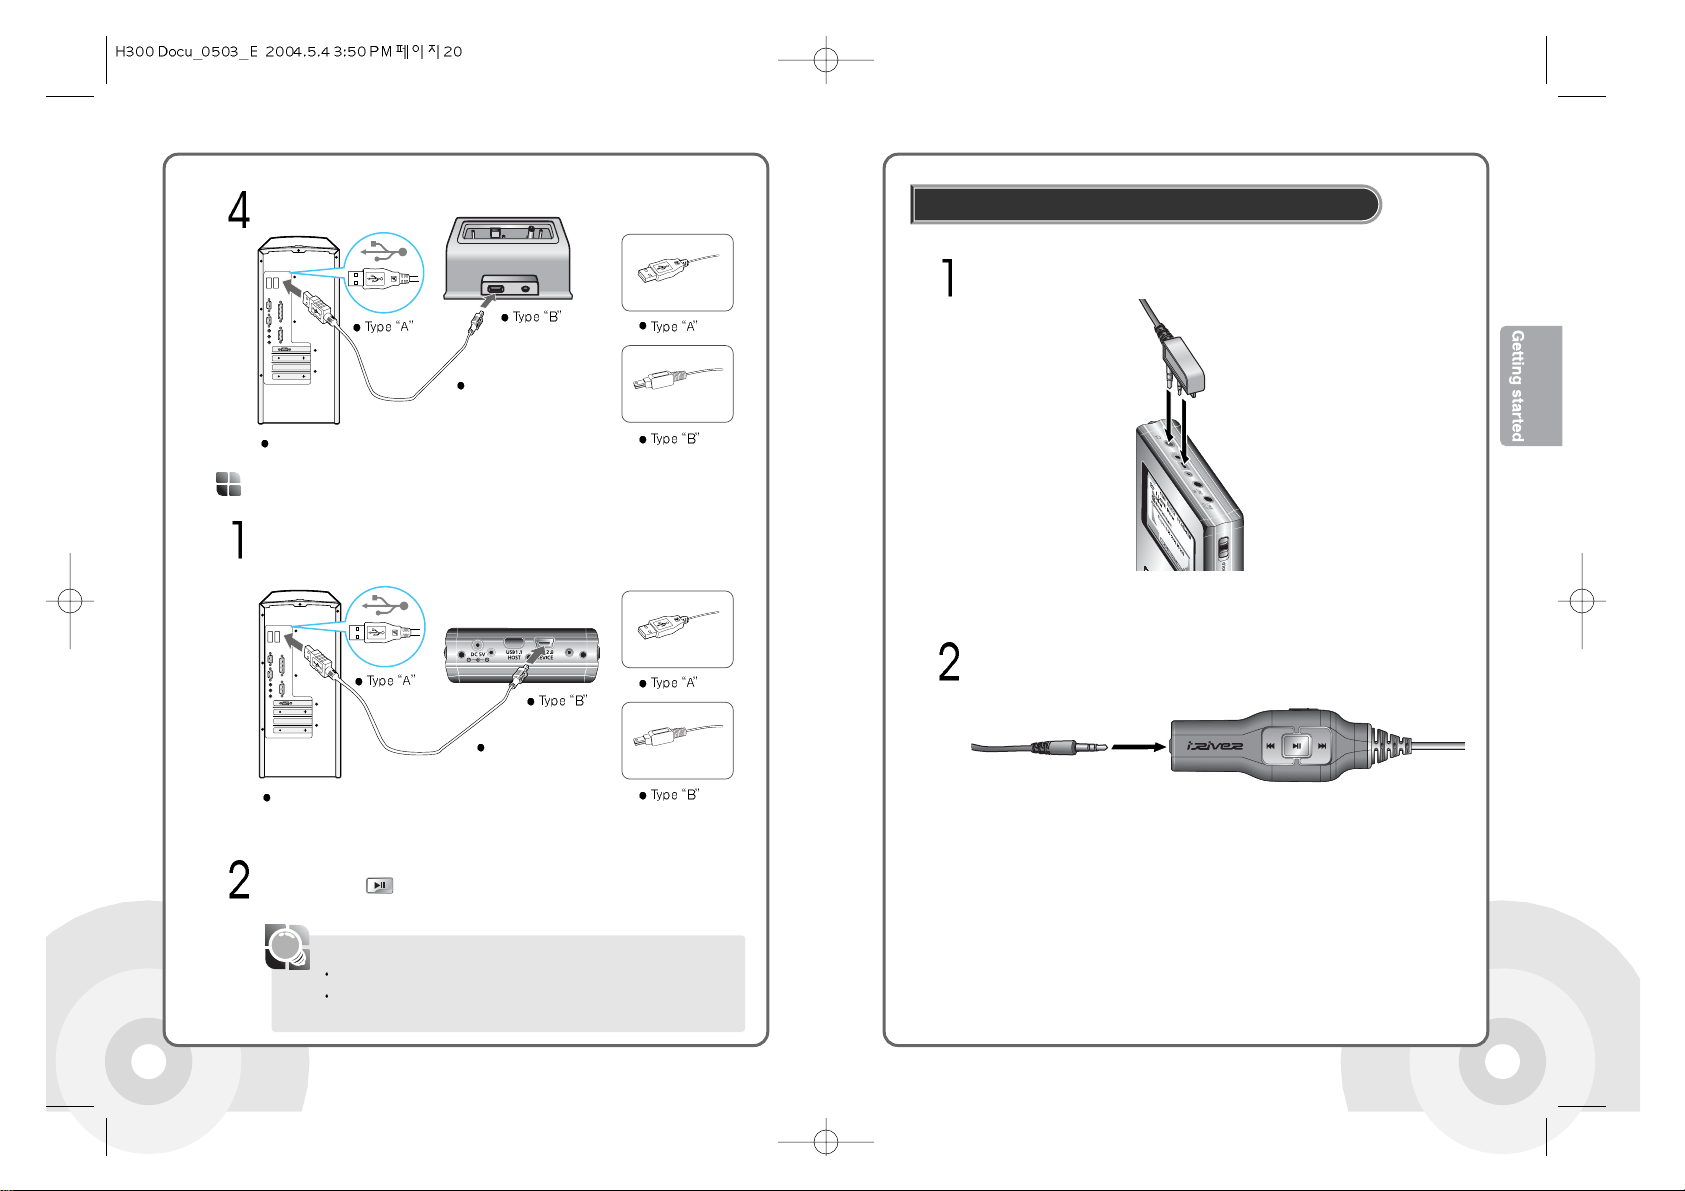
Connect the remote control to the socket on the top of the player.
Connect the earphones to the earphone socket of the remote control.
Connecting the remote control / earphones
Connect the product to a PC with the USB cable.
The battery will charge when the player is connected to a powered USB
port. Press the button while charging to switch to the PC connection
mode.
Connecting to a PC
PC-USB Port
Product-USB Port
(2.0/DEVICE)
[Note]
Battery may not charge if you switch to playback mode during USB charging.
If the USB Charging option in the Control menu under the main menu is set
to OFF, the battery will not charge when the system is connected to a PC.
Connect the cradle to a PC with the USB cable.
PC-USB Port
Product-USB Port
Page 14
2322
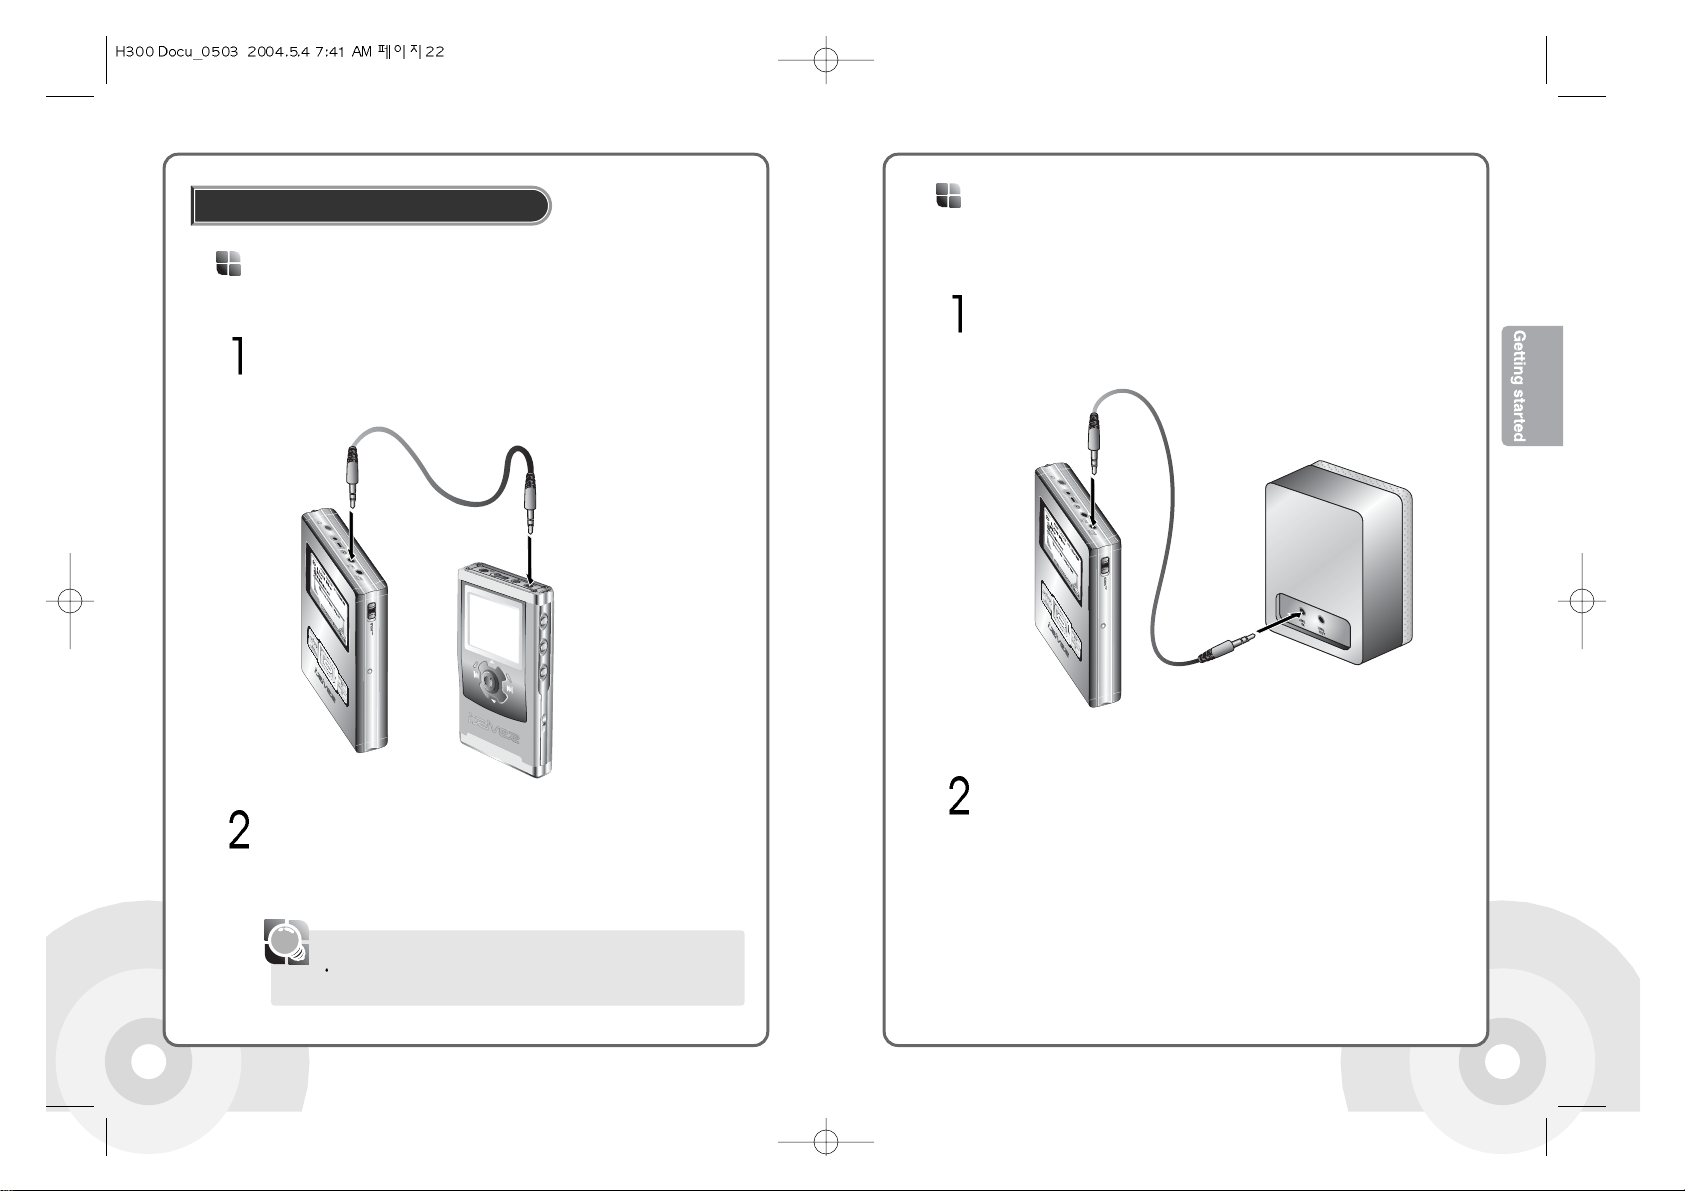
To use an external microphone for recording, connect the
external microphone cable to the Line-In socket.
Connect the Line-Out or earphone socket of the external device to the
Line-In socket of the product with the Line In/Out cable.
Connects external input devices
Use the recording feature to record with the desired setting. Please see
Page 44 for details.
Line-In
[Note]
Connecting external devices
Connect the Line-In socket of an external device to the Line-Out socket
of the product with the Line In/Out cable.
Use external devices such as speakers for output.
Speaker
Play as desired. Please see Page 39 for details.
Line-Out
Page 15

2524
Power on the player by pressing the button.
Use the USB cable included to connect the product to the PC.
The icon is displayed in the PC tray if successfully connected
The following screen is displayed in the product
LCD.
Connecting to a PC
Click the Start button then click Programs -> Accessories -> Windows
Check the new local disk drive is added. The factory default drive name is
H300.
If the PC power is turned off or the USB cable is disconnected
while data is being transferred, an HDD error in the product may
be generated. In some cases, an error message is displayed:
"Total: 0000 Folder(s)".
[Warning]
PC-USB Port
Product-USB Port
(2.0/DEVICE)
No software installation is required for Windows Me,
Windows 2000, Windows XP, Mac OS 9, or Mac OS
10. The player will appear as a new drive on these
systems without the need for any software.
Page 16

2726
Software installation is required for use under Windows 98 SE. See Page 31
to install the device driver.
If another external device is connected to the PC, connecting the product does
not add a second icon to the PC tray. Click the PC tray icon to view information
on both devices.
If an HDD error is detected, use the PC scan disk function to fix the error.
To start scan disk,
Select the product HDD in Windows Explorer and click with the right
mouse button.
Click the Properties in the popup window.
Click the Tools tab in the Properties window.
Click the "Check Now" button in the "Check Errors" box
[Note]
The tray icon may be hidden in some Windows XP operating system
settings. Click the "Display hidden icon" to view the hidden icon.
Hardware safe removal may not be available while using some applications
such as Windows Explorer or Windows Media Player. Please close all
applications using the product before the hardware safe removal process.
In some Windows XP operation system settings, hardware safe removal is
temporarily unavailable due to some internal system communication. Please
wait and try again.
Click the icon in the PC tray
Click the following popup message.
[Note]
Disconnecting from the PC
Click the Confirm button in the hardware safe removal window and physically
disconnect the USB cable.
The following message is displayed in the system LCD
Page 17

2928
Windows ME, Windows 2000, and Windows XP operating systems support USB 2.0 storage
without additional setup. Windows Explorer may be employed to use the product as a
portable storage device without installing any other information.
In the Windows 98 SE operating system however, the managing software is required to use
the product as a portable storage device.
When the operating program of the former model is installed in you PC, eliminate the former
operating program first then install new operating program.
Insert the program installation CD and double click the HManager\
HManager1.60.exe file. The following installation screen is displayed.
Click the "Next" button in the installation window
A message is displayed to disconnect the product from the PC. If the
product is connected, disconnect it from the PC and press the "OK"button.
The message is displayed even if the product is not connected to the PC.
[Note]
Installing the software, PC
Installing the software
Input user information and click the "Next" button
Select the installation folder and click the "Next" button.
Page 18

31
Installing the device driver
30
Click the installation option and click the "Next" button.
Click the "Finish" button when the installation complete screen is
displayed.
The managing software needs to be installed before installing the device driver. Please see
[Page 28] for details on installing the managing software.
Connect the product to a PC with the USB cable included.
If the product is not recognized by the PC, an "Add new hardware
wizard" window is opened. Click the "Next" button.
Click the "Search for the best device driver (recommended)" and click
the "Next" button.
[Note]
Windows 98 SE only
Device drivers are not
required for other operating systems. Please
disregard this section for Windows Me, Windows
2000, Windows XP, and Mac OS computers.
Page 19

3332
Click the ‘Specify a location’ option and click the "Browse" button.
Select the installation folder that includes the iRiverH.inf file (C:\Program
Files\iRiver\H300\drivers) and click the "OK" button.
When the folder is located, click the "Next" button.
Click the "Next" button
Click the "Finish" button to finish the installation.
Page 20

3534
[Warning]
Download the latest Firmware file from the company website
(www.iriver.com)
Uncompress the H300.hex file from the download file.
Copy the H300.hex file to the top folder of the H300 drive.
Connect the AC adapter to the product.
Press and hold the button to open the
Menu screen.
Use the , buttons in the Menu to
select the General option. Click the button
to open the General sub menu screen.
Use the , buttons to select the
Firmware Upgrade item. Press the
button to open the Firmware Upgrade screen.
Select YES in the Firmware Upgrade screen then confirm with the button.
Do not disconnect the AC adapter or turn the power off until the Firmware
Upgrade is completed.
The system is automatically turned off after completing the Firmware Upgrade.
Press the button to turn the power on.
Without the AC adapter, the firmware upgrade may fail due to battery
power shortage.
Disconnect the player from the USB cable.
Upgrading the Firmware
The Firmware is the internal operating system of
the H300. iRiver is continuously improving the
product by upgrading the Firmware.
Connect the product to a PC with the USB cable. Please see Page 24 for
how to connect the product to a PC.
[Warning]
Without the AC adapter, the firmware upgrade may fail due to battery
power shortage.
Disconnect the player from the USB cable.
Page 21

37
Main System
Using the buttons
36
If the product is not responding, check if the HOLD switch
is OFF. If the HOLD switch is set, the following message
is displayed in the product.
Connect the Remote Control and Earphones to the product.
Press the button to turn the power on.
See the initializing screen.
[Note]
Getting up and running
The playback standby screen is displayed.
Use the button to playback a music file. Use the
buttons while playing to playback another
music file.
Use the buttons to control volume.
Press the button again to pause the playback.
Press the button to end the playback. The playback standby screen is displayed.
Press and hold the button to turn the power off.
Press and hold the button to open the function selection
screen.
Use the buttons in the function selection screen to select a
desired function. Press the button to confirm the selection and run the selected function.
If there are too many saved files, the time that the Playback Standby Display appears may be
a bit delayed.
[Note]
Item
Description
Turns the power on when the power is off.
Plays a music file in the playback standby screen.
Pauses the play while playing a music file.
Press and hold the button to turn the power off when the power is on.
Stops Playback.
Stop current recording in record mode.
Changes the repeat mode while in playback standby or playing.
Press and hold the button to open the functions screen.
Starts recording in the recording standby screen.
Pauses the recording during a recording.
Press and hold the button while in playback standby or playing to open
the EQ Setting mode.
Changes EQ/SRS in the EQ Setting mode.
Press the button twice during playback for the section repeat function.
Please see Page 57 for details.
Opens the Navigation screen during playback.
Press and hold the button while in playback standby or playing to open
the Menu screen.
Increases volume while in playback standby, playing, or listening to radio.
Decreases volume while in playback standby, playing, or listening to radio.
Plays the previous title, when in playback.
Press and hold the button while playing to fast rewind.
Press the button and then hold it to the previous folder in playback
standby display or while playing.
Select the previous channel when listening to radio.
Plays the next title when playing.
Press and hold the button while playing to fast forward.
Press the button and then hold it to the next folder in playback
standby display or while playing.
Select the next channel when listening to radio.
Each button on the player may have multiple functions based on
the mode the player is on (Recording, playback, etc.)
Page 22

3938
Remote Control
Item
Description
Turns the power on when the power is off.
Plays a music file in the playback standby screen.
Pauses the play while playing a music file.
Press and hold the button to turn the power off when the power is on.
Plays the previous title when playing.
Press and hold the button while playing to fast rewind.
Press the button and then hold it to the previous folder in playback
standby display or while playing.
Select the previous channel when listening to radio.
Plays the next title when playing.
Press and hold the button while playing to fast forward.
Press the button and then hold it to the next folder in playback
standby display or while playing.
Select the next channel when listening to radio.
Increases volume while in playback standby, playing, or listening to radio.
Decreases volume while in playback standby, playing, or listening to radio.
Use the buttons to control volume.
Press the button again to pause the playback.
Press the button to end the playback. The playback standby screen is
displayed.
Press and hold the buttons while playing to fast forward or fast rewind
the title.
Press the or button twice and hold it to return to the previous folder or
forward to the next folder.
Please see Page 53 for the details on the music file search.
Press the button while playing to change the Repeat mode. Please see
Page 53 for more information about Repeat modes.
ID3 Tag information is displayed during the playback.
Only MP3, OGG, WMA, and ASF, IRM files are supported.
If a music file is damaged, the damaged section is skipped. If the file is
seriously damaged, the file is skipped.
The playback standby screen follows the
initialization screen when the power is turned
on. Basic playback information, including the
number of folders and music files, is
displayed.
Start playing with the button. Use the
buttons while playing to play another title.
[Note]
Playing Music
Playing music files
Page 23

41
40
Listening to the FM radio
Press and hold the button to
display the menu of player models.
Listening to the FM radio
Press the buttons in the radio screen to change frequency by 0.1
MHz. Keep pressing the button until the desired channel is found.
Manual Search
Searching for a FM radio frequency
Press and hold the buttons to search
for an available channel automatically.
Hold the button until the desired channel
is scanned.
Auto Scan
KOREA
STEREO
87.5 108
FM Tunner
CH 02
TOTAL 13CHs
Preset OFF
Searching
95.8
95.8
Use the buttons to select the Radio icon then press the button to
open the radio screen.
Press the buttons to select a channel.
Press and hold the buttons to search for
channels automatically. When a frequency is
found, the radio will stay on that station until
or is pressed again.
Press the button to switch between Stereo / Mono.
In areas where the signal is weak, some channels may be unavailable, or reception
may be poor.
[Note]
The AUTO SCAN and AUTO MEMORY functions do not work while
Preset is ON.
In manual search, using the buttons changes the frequency by
0.1MHz in Korea /U.S.A/Japan, and 0.05 MHz in Europe.
Press the button in the radio screen to
set the Preset ON.
Press the buttons to select the next / previous channel. Use the
buttons again until the desired channel is selected.
[Note]
Preset Function
Page 24

4342
Use the button in the radio screen to set the Preset OFF.
Use the buttons to select the desired
channel then press the button to display
the channel number.
Manual preset
Setting preset channels
KOREA
STEREO
87.5 108
FM Tunner
CH 02
TOTAL 13CHs
Preset OFF
Memory
95.8
95.8
Press the buttons to select the desired channel number. Press the
button to set it. The number of preset channels are displayed as in the
'TOTAL XXCHs'. Press the button to cancel the saving. A Maximum
of 20 channels can be set.
Use the buttons. Channels are in the radio screen to set the Preset
OFF.
Press and hold the buttons: you can see
the frequency increasing. Channels are
automatically scanned and saved in order in
Preset.
Auto Preset
If all preset channels are deleted, 'TOTAL 00CHs' is displayed, and pressing
the button does not switch the system to Preset ON mode.
[Note]
Use the button in the radio screen to set the Preset ON. (Preset
Listening Mode)
Press and hold the button to delete the channel and display the next
channel. Press and hold the button again to delete the next channel.
Use the buttons while the Preset is ON to select a preset channel to
delete.
Deleting Preset Memory
Volume control is disabled while recording.
The recorded file is saved as 'RECORD\AUDIO\TUNERXXX.MP3'
[Note]
Press the button while receiving FM radio to record it.
Press the button while recording to end the recording.
Press the button while recording to pause the recording.
Press the button again to resume the recording.
Recording FM radio broadcasting
In area with weak signals, some channels may not be saved.
[Note]
Page 25

4544
Press and hold the button to open
the functions menu.
Recording
Recording
Use the buttons to select the Record icon
then press the button to open the record
standby screen.
Press the button in the record standby screen to open the Record Setting
screen.
Press and hold the buttons in the Record
Setting screen to select the Source item. Setting
the Source option will change Bit rate, Input
Volume, and Output Volume accordingly.
The option (Bitrate/Input Volume/Output Volume) value for each source for the
recording is saved. It is also possible to change the preset options for each
Source option for recording.
Source Types
LINE IN: Analog signal from an external device
INT. MIC: Voice using the internal microphone
EXT. MIC: Voice using an external microphone
TUNER: Record FM radio
Bitrate
Quality of the recording. (40~320Kbps,
).
Input Volume(0~20)
Volume of the recording. High Input Volume increases the volume of the
recording file. But can also cause distortion in the recording.
Output Volume(0~40)
The product supports monitoring of the recording sound. This option changes
the monitoring volume and does not affect the recording file.
[Note]
Use the buttons to select an option and use the buttons to
change the Bit rate, Input Volume, or Output Volume. Press the button
to return to the Recording Standby display from the Record Setting display.
Volume control is not available while recording
For best results, experiment with various volume settings and microphone distances
in each setting you record in.
[Note]
Press the button to start the MP3 recording.
20
Page 26

46 47
Press the button in recording standby
mode to play the recorded file
Playing the recorded file
The recorded file is saved in the following location, depending on the Source.
LINE IN : RECORD\AUDIO\AUDIOXXX.MP3
TUNER: RECORD\AUDIO\TUNERXXX.MP3
INT/EXT MIC : RECORD\VOICE\VOICEXXX.MP3
Press the button to pause the playback. To resume playback, press the
button again.
[Note]
Press the button to finish the recording. The recording standby screen is
displayed.
Press the button again in standby mode to record into a new file.
Press the button while recording to pause the recording. Resuming the
recording will not create a new file.
The recording will automatically stop in the following conditions:
- Not enough space is available for the recording.
- Recorded MP3 file is over 200MB in size.
- Over 5 hours have been recorded - Insufficient battery
[Note]
Connect the product to a PC using the USB cable. An icon is displayed in
the PC tray if connection is successful.
Please see Page 24 for details.
Click Start -> Programs -> Accessories -> Windows Explorer.
Use Windows Explorer to create a folder named TEXT in the H300
drive.
Store .txt files to the TEXT folder.
Store txt files to the TEXT folder
Any text can be entered into a text file, including useful features such as book
sections or addresses and phone numbers.
Using the text function
Page 27

4948
Only Wan-Sung type Korean text files are supported. To use a Jo-Hap type
Korean text file, please convert it to a Wan-Sung type before using it.
[Note]
Press the button to exit the text function.
The maximum number of characters that can be displayed in the screen is:
English: 26 characters per line, 10 lines.
Text is not displayed in the LCD remote controller (sold separately).
The text reading feature is supported while playing an MP3 file.
Press the REC button while reading text to switch to the music mode (Hot key.)
[Note]
Press and hold the button in playback
standby mode or in the radio screen to open
the function menu.
Viewing text
Use the buttons to select the Text icon
then press the button to open the Text
screen. Check the tree structured file listing.
Use the buttons to select the desired
folder or file and press the button to select.
See the text file displayed in the LCD.
Normal Browsing
Text Browsing
Press the buttons to browse to the Previous/Next line while
reading a text file.
Press the buttons to browse to the Previous/Next page while
reading a text file.
Press the button to go to a desired location while reading a text file
Use the buttons to select a
desired location.
Press the buttons to select a desired number
Press the button to go to the new location.
GO TO Browsing
The numbers are in Kbyte unit.
[Note]
Page 28

5150
Viewing Image
Press and hold the button to view the current
image information. Press the button to exit the See
Image Information.
Press the button to view multiple images.
It doesn't support a PICTURE function when the size of an
image file is large. (BMP: more than 3MB/JPG: more than
1MB. But it will appear on the display regardless of the size
when Thumbnail size of a JPG file is less than 1MB.)
It doesn't support the PICTURE function for a Progressive JPG file.
What is Progressive JPG?
Progressive JPG is a JPG image that is displayed getting focused
on gradually. That is, an image is displayed with the low resolution
on the full screen and it is getting clearer and sharpener.
Press and hold the button to open
the functions menu.
[Note]
Use the buttons to select the Picture
icon then press the button to open the
Picture screen.
If a file is selected, the image is displayed in
the screen. If a folder is selected, the files in
the folder are displayed. Repeat step to open
a desired image. Use the buttons to view
the previous or the next image
You can see the files listed. Use the buttons to select an to
display.
Viewing Image
Connect H300 to an external device with the
HOST cable.
Use the Browser function to exchange data from supported devices via a direct USB
connection. Using Browser, you can perform the work connecting to external devices
such as digital camera etc.
Using the Browser Function
Press and hold the button to open the
Functions screen.
Use the buttons to select the Browser icon and press the button
to open the Browser screen.
Files in the product are listed in the Browser screen. The external device is
registered as HOST. Response time may vary depending on memory size
and type of the external device.
Press hold and the buttons to select the DEVICE. Files in the external
device are displayed.
The H300 can display JPG and
BMP images on the LCD screen.
Page 29

5352
Only one file or folder can be copied at a time. If a folder is copied, all files in
the folder are copied together. However, if there a sub folder, the sub folder is
not copied.
Use the same method to move data from the product to the external device.
When the Del is selected on the pop-up menu, you can remove the file or
folder. But, the subject folder will not be removed if there is a sub-folder within
the folder.
Select Info from the popup menu to display file name, size, and saved time.
Maximum viewable folders in the BROWSER screen are 500 folders and
Maximum viewable files in the BROWSER screen are 1,000 files.
[Note]
Press and hold the buttons to select the HOST.
Select the desired location and press the
button to open the popup menu window.
Press the button to select Paste and
press the button to paste the file.
Select a desired file and press the button
to open the popup menu window.
Use the buttons to select Copy and
press the button to copy the file.
If a folder is selected repeat the 2,3 step to select a desired title to play.
Press the button to move back to the parent folder or previous status.
Files in each folder are sorted in alphabetical order.
Following messages are displayed depends on the type of played file.
MP3 files OGG files
IRM files WMA files
ASF files
What is IRM (iRiver Rights Management)?
The IRM is digital copyright information file designed by iRiver
Limited. The IRM technology protects copyright and property from
unauthorized usage of digital contents provided through iRiver
Limited.
Maximum viewable folders in the Navigation screen are 2,000 and Maximum
viewable files in the Navigation screen are 9,999
Press the while in playback standby or
playing to display the title list as the current title
is selected.
Use the buttons to select a folder or title to play.
Press the button again to open the selected folder or play the selected title.
[Note]
Navigation using the File Tree
Searching music
Page 30

5554
Press the button to open the search
method dialog screen.
Press the buttons to select the desired search method. Press the
button to open the search screen. File, artist, album, and genre are
supported as options.
The selected sub screen is opened. If there are no further sub screens for
the selection, the title selected is played.
In the selected search screen, use the
buttons to select the desired folder or title
(search condition), then press the button to
confirm.
Navigation using Title Information (ID3 Tag)
The navigation function enables music files to be searched by filename or MP3 music
information (ID3 Tag). If the information file (iRivNavi.iDB) is damaged or deleted, or DB Scan
in the General Menu is set to No, Navigation using File Trees can be used instead. Please
see Page 67.
Refer Page 61 for how to manage the music information file.
If there are more sub screen choices, repeat steps & .
Press the button in a sub navigation screen to go back to the previous screen.
If the Select All option is selected, all titles meeting the set condition are
played and the icon is displayed. The List mode (repeat selected list of
titles) is canceled if the button is pressed while a playback is stopped.
To use the ID3 Tag Navigation function, folder and file names must use 52
characters or less.
Please try to use standard character sets such as English in the ID3 Tag
Navigation function. If you want to use special characters, please use only
the following:
, ,, , , , , , , , , , ,, , , , , , , , , , ,
, , , , , , , , , , , , , , , , , , , ,
, , , , , , , , , , , , , , , , , , , , , , , , , ,
, , , , , , , , , , , , , , , , , , , , , , ,
, , , , , , , , , , , , , , , , , ,., , , , ,
, , , , , , , , , , , , , , , , , , , , , ,
, , , , , , , , , , , , , , , , , , , , , , ,
, , , , , , , , , , , , , , , , , , , , , , ,
, , , , , , , , , , , , , , , , , , , , , , ,
, , , , , ,
[Note]
Press and hold the button to open the
EQ Setting mode. The icon is
displayed in the LCD.
EQ / SRS
EQ / SRS
Page 31

5756
If left idle, the EQ Setting mode automatically reverts to the previous mode (A-B
section repeat mode)
Normal, Rock, Jazz, Classical, U.Bass, and User EQ are supported for the EQ.
SRS, TruBass, WOW(PRESET), and WOW (USER) are supported for the SRS.
Please see [Page 76, 5. Menu configuration - 8. Sound] for details of configuring the
SRS.
The WOW (PRESET) functions under the pre-defined configuration of SRS,
TruBass, and Focus
The WOW (USER) functions under the user defined configuration of SRS, TruBass,
and Focus
Values set in the Bass Boost and Treble Boost are applied to the USER EQ. The EQ
is automatically set to USER EQ if either Bass Boost or Treble Boost is set.
[Note]
Press the button in the EQ Setting mode to change the EQ setting.
The following EQ settings are available.
Normal
Rock Jazz Classic U.Bass User EQ SRS
TruBass WOW(PRESET) WOW (USER)
A variety of playback modes are supported. To use the playback modes, set the Repeat
Play / Random Play / Intro Play configuration. Please see Page 73 for details.
Setting Play Mode
Repeat Play/Random Play/Intro Play
Press the button to select the start point of a section to repeat. An
icon is displayed in the screen.
Press the button again to select the end
point of the section to repeat. The selected
section is played repeatedly.
Section Repeat
Repeats a portion of the current file.
Press the button again to end the section repeat.
[Note]
If the play mode icon is not displayed when pressing the button, check if the
Repeat Play / Random Play / Intro Play function is selected in the Menu screen.
The modes are changed in the following cycle.
Not Set
1 Song Only Directory Directory All All Songs Shuffle 1
Song Only
Directory Directory All All Songs INTRO
[Note]
To use Repeat Play / Random Play / Intro Play,
press the button. Press it again for the
next mode. An icon is displayed to indicate the
current mode.
Page 32

58 59
Set the Study mode in the Mode menu. Please see Page 75 for setting the
Study mode.
Press the buttons while in playback to skip forward or backward by the
set period of time.
Study Mode
Skips a set period of time while playing.
Set Skip time in the Study Mode settings as shown on page 75.
[Note]
Press and hold the button in the playback
standby screen to display the PLAYLIST.
Use the and buttons to select a PLAYLIST in the PLAYLIST
screen.
Press the button or button to play the selected PLAYLIST.
PLAYLIST
A maximum of 200 lists are supported.
Creating the PLAYLIST
Use the Winamp software to create the PLAYLIST. Winamp is freeware
software and available for download from http://www.winamp.com/player/.
[Note]
Press the button while in playback to
display the Navigation screen.
Use the or buttons in the Navigation screen to select a music
title to play.
Use the button to reserve the selected title. The reserved title is
displayed after completing the current music title.
Play Reservation
Allows you to queue the next song to be played.
Double click the downloaded file to install.
After completing the installation, click Start -> Program -> Winamp ->
Winamp to start the Winamp software.
The H300 supports M3U playlists. This section describes how
to create these lists.
Page 33

6160
Click the PL button in the Winamp window to open the Playlist Editor window.
Click the Add button in the Playlist Editor window to select files or folders to add.
When the selected files are added and displayed, click the Manage Playlist then
click the Save Playlist button in the following pop menu.
[Note]
What is a Music Information File?
A music information file is a database file (iRivNavi.iDB), which is a collection of ID3 Tag
information. The files are required for the ID3 Tag navigation function.
[Note]
Updating music information files
Updates the music information file for the current MP3 file. Use the function to create or
repair the database file (iRivNaviiDB) if the information file is deleted or damaged.
Managing music information files
Input the file name in the Save Playlist dialog. Click the Save button to create an
*.m3u file.
Connect the product to a PC using the USB cable. An icon is displayed in
the PC tray if connection is successful. Please see Page 24 for details.
Click Start -> Programs -> Accessories -> Windows Explorer.
Select H300 with Windows Explorer and click it with right mouse button.
Click the Update DB File option in the popup menu to update the Music
Information File.
Click the OK button after finishing the update.
'Safe Remove' the USB cable to disconnect the product from the PC.
Please see Page 27 for details.
NO DB message in the screen means that there is no ID3 Tag information in the
MP3 file.
A failure message on the screen means that the file or folder name is using more
than 52 characters.
[Note]
Page 34

6362
Connect the product to a PC using the USB cable. An icon is displayed in
the PC tray if connection is successful. Please see Page 24 for details.
Click Start -> Programs -> Accessories -> Windows Explorer.
Adding a music information file
Add a new MP3 file's ID3 Tag information to the database file (iRivNavi.iDB).
Select H300 with Windows Explorer and click it with right mouse button.
Click the Add Music to DB option in the popup menu to add the information to
the database (iRivNavi.iDB). If there is no database file (iRivNavi.iDB), one is
created. Information File.
Click the OK button after finishing the update.
'Safe Remove' the USB cable to disconnect the product from the PC. Please
see Page 27 for details.
Use the menu configuration to setup detailed options for each function.
Press and hold the button in the playback standby screen or the radio screen
to open the menu screen.
The menu system has 7 main options and submenus for each option. Direct user
configuration of the product is supported.
Menus are subject to change with new firmware revisions.
Detailed menu features may vary depends on the firmware version.
[Note]
Opening the menu screen
Use the ADD function if you have copied new music to the H300 with out removing any file.
This will quickly add new songs to the database with out having to re-index every song.
If songs on the player are deleted, renamed, or moved to different folders you must Update
DB in order to keep the database current. Otherwise some songs will not play when using
the Artist, Title, Album, and Genre searching feature.
[Note]
Page 35

6564
The language for the title, folder, and text file depends on the PC environment where
the file is created. If the file is created in Korean Windows, select Korean. If the file is
created in Japanese Windows, select Japanese
If the title, folder name, and text file are created in Unicode, they are always displayed
correctly regardless of the language setting.
[Note]
Use the , buttons in the menu
screen to select General. Press the
button to open the General sub menu screen.
ON: Playback will begin from the same place
when the player is stopped or powered off.
OFF: Playback begins from the first song on
the device.
Resume
Set correct language display for title, folder
name, and text file. For example, if the title,
folder name, and text file are created in
German, use the German option to display the
information in German. Total 38 languages are
supported.
Use the , buttons to select a
language and press the button to confirm.
Language
Press the button or press and hold the button to exit the sub menu screen.
The main-menu screen is displayed.
[Note]
Use the , buttons in the menu
screen to select General. Press the button to
open the General sub menu screen.
Press the , buttons in the submenu to select the desired item.
Press the button to open the sub menu configuration screen.
General
Control
Mode
Sound
Scan Speed
Fast Skip
USB Charging
USB Conn. Mode
Sound Balance
Bass Boost
Treble Boost
SRS Setting
Beep Volume
Fade In
Repeat
Shuffle
Intro
Study
Record
Voice Monitor
Record Setting
EXT.MIC Volume
INT.MIC Volume
Line In Volume
Voice Detect
Auto Sync
Menu
General
Display
Resume
Language
Tuner Region
Load Default
Firmware Upgrade
DB Scan
Format
LCD Power Off (B.) : Battery
LCD Power Off (A.) : Adapter
LCD Contrast (M.) : Main
LCD Contrast (R.) : Remote
LCD Bright
Tag Information
Time
Scroll Type
Timer
Sleep Timer
Stop Power Off
Standby Power Off
Menu Map
Page 36

6766
Use an AC adapter when formatting the hard disk drive. If there is not enough battery
remaining and no AC adapter is used, the format process may fail.
[Note]
Do not disconnect the AC adapter during the format process. Serious problem
including power failure may result.
Formatting the H300 deletes all data in the H300.
The provided format feature in the menu will format the H300 as one partition.
[Warning]
Format the hard disk drive. (If Yes is selected)
Use the , buttons to select Yes
and press the button to start the format.
Select No to cancel the format. Formatting will
erase all the contents of your player.
Windows 2000 and Windows XP can not format drives over 32GB in
size. Please do not use the Windows 2000 or Windows XP format
utility to format the H340.
Please do not format the H300 into NTFS file system (Windows
2000, Windows XP). Formatting the drive as NTFS will cause the
player not to function.
Windows 98SE and Windows Me can format the drives over 32 GB.
To format a hard disk over 32GB in the Windows 2000, or XP, use a
third party hard disk drive management software.
For mat
Formatting from a PC
If the product is turned off after the firmware upgrade, press the Play button to turn
the system on.
[Note]
Upgraded firmware is not effected by the initialization.
[Note]
Set all configuration values to the factory
default (If Yes is selected). Please take caution
that all user set data is deleted if the product is
initialized to the factory default.
Press the , buttons to select Yes.
Press the buttons to start the initialization.
Select NO to cancel the initialization.
Load Default
Upgrade the current firmware. Please see
Page 84 for the detail.
Firmware Upgrade
Setting this option to Yes will cause few additional seconds of loading time depending
on the number of saved titles.
Turning this option to “Yes” while playing a title will pause the title.
[Note]
Use ID3 Tag music information in the saved
music file for title navigation (If Yes is selected)
Use the , buttons to select Yes
or No and confirm with the button.
DB Scan
Changing the Tuner Region deletes all the previous preset channels.
[Note]
Selects FM radio frequency and step.
Correct configuration is required for normal
radio reception. Korea, Japan, Europe, and
U.S.A are supported.
Use the , buttons to select
the tuner region and press the
buttons to confirm.
Tuner Region
Page 37

6968
Set the system LCD contrast. 0 to 15 values
are available.
Use the , buttons to set contrast
and confirm with the button.
LCD Contrast (M.) : Main
Set the remote controll LCD contrast. 0 to 20
values are available.
Use the , buttons to set contrast
and confirm with the button.
LCD Contrast (R.) : Remote
Set the LCD brightness. 1 to 10 values
are available.
Use the , buttons to set
brightness and confirm with the
button.
LCD Bright
Display or update ID3 Tag music file
information. (If ON is selected) If OFF is
selected, only the filename is displayed.
Use the , buttons to select ON or
OFF and confirm with the button.
Tag Information
Tag Information
ON OFF
Display
Press the button or press and hold the button to exit the submenu screen.
The main-menu screen is displayed.
[Note]
Use the , buttons in the menu
screen to select Display option. Press the
button to confirm. The Display submenu screen
is displayed.
Use the , buttons in the submenu to select the desired item.
Press the button to open the selected sub configuration screen.
Specify the number of seconds (3-60) for
the backlight to remain on when the player
is using battery power.
Use the buttons to set time and confirm
with the button.
LCD Power Off (B.) : Battery
Specify the number of seconds (3-59) for the
backlight to remain on when the player is
connected to the AC adapter.
Always: The LCD backlight will remain on until
the player is turned off or disconnected from the
AC adapter.
Use the buttons to set time and
confirm with the button.
LCD Power Off (A.) : Adapter
The LCD remote controller is sold separately.
Page 38

7170
Set sleep timer to turn the power off after the
set time. 1 to 99 minutes are available. Setting
this option to 0 will disable the sleep timer.
Use the , buttons to set sleep
timer and confirm with the button.
Sleep Timer
Set stop power off to automatically turn the
power off if the system is idle for the given
time. 1 to 60 minutes are available.
Use the , buttons to set time and
confirm with the button.
Stop Power Off
Set stop power off to automatically turn the
power off if the system is idle in the record
standby mode for the given time. 1 to 60
minutes are available.
Use the , buttons to set time and
confirm with the button.
Standby Power Off
If the product is automatically turned off after the set time, and manually turned
on later, the setting will be turned off.
[Note]
Press the button or press and hold the button to exit the sub-menu
screen.
The main-menu screen is displayed.
[Note]
Use the , buttons in the sub menu screen to select desired sub
option. Press the button to confirm. The selected sub menu configuration
screen is displayed.
Set scroll direction and speed of the current title
playback information. 1X, 2X, and 4X speeds,
and Vertical and Horizontal directions are
available.
Use the , buttons to select from
1X, 2X, 4X, Horizontal, or Vertical and confirm
with the button.
Scroll Type
If the current title is made with VBR, the remaining time may not be accurate.
[Note]
Use the , buttons in the menu
screen to select the Timer. Press the button
to confirm. The Timer sub menu screen is
displayed.
Timer
Display the remaining playtime of the current
title. Normal will display the played time and
Remain will display the remaining time.
Use the , buttons to select
Normal or Remain and confirm with the
button.
Time
Time
Normal
Remain
Page 39

7372
Recharge the battery with the USB cable and
PC connection. If this option is set to ON, the
system starts charging when connected to a
PC. If this option is set to OFF, the system does
not start charging when connected to a PC.
Use the , buttons to select from
ON or OFF and confirm with the button.
USB Charging
To use the Fast Skip function, set this option to 10 or Directory. While the system is
stop, press the button twice and hold it.
[Note]
Use the , to select the Mode
from the menu. Press the button to
confirm. The Mode submenu screen is
displayed.
Play Mode
Control
The fast scans function is useful for language learning function.
[Note]
Use the , buttons to select the
Control from the menu. Press the button
to confirm. The Control submenu screen is
displayed.
Use the , buttons to select the desired item from the submenu.
Press the button to confirm. The selected configuration screen is
displayed.
Sets speed of the fast scans function. 1X, 2X,
and 4X speeds are available. Set this option to
OFF to disable the fast scans function.
Use the , buttons to select from
Off, 1X, 2X, or 4X and confirm with the
button.
Scan Speed
Press the button or press and hold the button to exit the sub-menu
screen.
The main-menu screen is displayed.
[Note]
Connecting to USB, you can connect to you PC
directly or USB Hub that doesn't have the
power.
When the Hub mode is selected, you should
use the internal battery, not the power of PC.
USB Conn. Mode
[Note]
Skips 10 files or one folder in both forward and
backward direction. Select 10 to skip 10 files at
a time. Select Directory to skip the current
folder. Select OFF to disable the Fast Skip
function.
Use the , buttons to select from
Off, 10, or Directory and confirm with the
button.
Fast Skip
H300 Ver 1.00
Control
Scan Speed
Fast Skip
Fast Skip
Directory
OFF 10
Page 40

7574
Item Description Display
All titles in the hard disk drive are played in random and the playback
stops.
The currently selected title is repeated. Use the buttons to switch
to a new random song and play it repeatedly.
All titles in the selected folder are played once in random order and
the playback stops.
All titles in the selected folder are repeated in random order
All titles in the hard disk drive are repeated in random order.
Plays beginning or middle (1 minute from the
beginning) 10 seconds of each title in the hard
disk drive in order. Option ON for the
beginning 10 seconds and Highlight ON for the
middle 10 seconds.
Use the , buttons to select from
Off, On, or Highlight On. Press the button
to confirm.
Intro
Skip the set period of time while playback.
Maximum 10 minutes and 59 seconds are
supported.
Use the buttons to select minute or
second digit. Use the buttons to set the
numeric value.
Press the button to confirm.
Study
Use the , buttons to select one from Shuffle, 1 Song Only,
Directory, Directory All, or All Songs and the button to set it. Use
button or the button to exit.
Set repeat playback mode. If the Repeat mode
is set, use the button while playback to
use the Repeat function. The function is
normally set.
Following modes are supported.
Use the , buttons to select one from 1 Song Only, Directory,
Directory All, or All Songs and the button to set it. Use button or the
button to exit.
Repeat
Item Description Display
The currently selected title is repeated. Use the buttons to
repeat the previous or the next title.
All titles in the selected folder are played once and the playback stops.
All titles in the selected folder are repeated.
All titles in the hard disk drive are repeated.
Sets Shuffle playback mode. If set, use the
button while playback to use the Shuffle
playback function. The function is normally set.
Following modes are supported.
Shuffle
Use the , buttons to select the desired item from the submenu.
Press the button to confirm. The selected configuration screen is displayed.
Press the button or press and hold the button to exit the submenu screen.
The main-menu configuration screen is displayed.
[Note]
Page 41

7776
Sets the 3D sound effect. SRS, TruBass,
FOCUS, and Boost are available.
Following chart is details of each sound effect.
Use the buttons to select the desired item.
Use buttons to set step. Press the button to confirm.
SRS Setting
Item Description Steps Default
SRS setting
TruBass setting
Sound resolution
Sound boost value. Use proper boost value depends on
the earphones or headphone characteristics.
The set value from the Treble Boost is applied to the USER EQ setting.
Changing the Treble Boost value cause the EQ setting to change to the
USER EQ.
[Note]
Set the Treble output level. Maximum 64 dB can
be set. Change the value by 2 dB level.
Use , buttons to set level. Press
the button to confirm.
Treble Boost
The set value from the Bass Boost is applied to the USER EQ setting. Changing
the Bass Boost value cause the EQ setting to change to the USER EQ.
[Note]
Use the , buttons to select the
Sound from the menu. Press the button to
confirm. The Sound submenu screen is
displayed.
While configuring the Sound effect, the system supports real time testing of
the setting.
Sound
Use the , buttons to select the desired item from the submenu.
Press the button to confirm. The selected configuration screen is
displayed.
Sets left/right output balance for earphones and
headphone. Move to left to increase left speaker
volume and move to right to increase right
speaker volume. Maximum value is 20. Default
value is 0 which outputs same sound to both left
and right speakers.
Use , buttons to set level. Press
the button to confirm.
Sound Balance
Set the BASS output level. Maximum 24 dB can
be set. Change the value by 2 dB level.
Use , buttons to set level. Press
the button to confirm.
Bass Boost
Press the button of press and hold the button to exit the submenu screen.
The main-menu screen is displayed.
[Note]
Page 42

7978
Voice Monitor
Monitor recording status with earphones or
headphone. (If selected ON)
Use , buttons to select from ON
or OFF. Press the button to confirm.
AGC ON : When recording voice, the
recording level is automatically controlled and
the sound from a long distance is normally
recorded.
AGC OFF: AGC Control not activated.
AGC :Automatic Gain Control
Bitrate: Set the bit rate for each recording
mode separately.
Use the buttons to select source
item. Use the buttons to select the
recording method.
Record Setting
Item Description
Internal MIC Use the internal microphone
External MIC Use an external microphone
Line In Use an external device
Tuner Record from radio reception
Use the , buttons to select the desired item from the
submenu. Press the button to confirm. The selected configuration
screen is displayed.
Sets the beep volume for every time a button is
pressed on the player.
0: disable beep
Use , buttons to set volume.
Press the button to confirm.
Beep Volume
When activated, volume increases gradually at
playback mode to prevent sudden loudness.
Use , buttons to select from ON or
OFF. Press the button to confirm.
Fade In
Use the , buttons to select the
Record from the menu. Press the button
to confirm. The Record submenu screen is
displayed.
Record
SRS( ) is registered trademark of SRS Labs, Inc.
SRS( ) is ?
The SRS-WOW is virtual 3D sound effect system developed by the SRS Lab.
SRS includes sub functions such as SRS, TruBass, Focus, and WOW.
[Note]
Press the button or press and hold the button to exit the submenu screen.
The main-menu screen is displayed.
[Note]
View the following chart for Source item description.
Page 43

8180
Voice Detect
The voice recording mode will automatically
pause during silence. This is useful for
recording over a long
period of time to save memory.
Level : Set the relative level of sound needed
to activate the recorder. (Level 1-10). Set to
00 to disable Voice Detect
Sec : Set the number of seconds of silence to
record before
pausing. (1-10 Seconds)
Use the buttons to select Level option and use the
buttons to control.
Use the buttons to select Sec option and use the
buttons to control.
Press the button to confirm.
Auto Sync
While recording from an external device with
the Line-In, when recording from a tape, CD,
or record a new file will be created for each
track (pause) on the source.
OFF : Audio signal detection is disabled.
Audio signal detection time (1-5 seconds) :
The amount of silence the player will use to
determine when a track has ended and to
start a new file.
Use , buttons to set time. Press
the button to confirm.
Line In Volume
Controls volume for recording from an external
adevice. 0 to 20 levels are available.
Use , buttons to set volume.
Press the button to confirm.
EXT.MIC Volume
Controls external microphone volume. 0 to 20
levels are available.
Use , buttons to set volume.
Press the button to confirm.
INT.MIC Volume
Controls internal microphone volume. 0 to 20
levels are available.
Use , buttons to set volume.
Press the button to confirm.
[Note]
Item Description
Stereo Use stereo recording
Bitrate Set the recording bit rate. Higher bit rate makes higher quality but
larger file size. 40~320kbps are supported.
AGC, Stereo, Bit Rate
After setting the Source item, use the buttons to select a Stereo
(AGC) item and use the buttons for setting
Use the buttons to select Bitrate item and use the buttons
for setting.
Press the button to confirm.
Page 44

8382
Product Specification
The product has following specifications.
Type Item Specification
HDD Capacity 20GB(H320), 40GB(H340)
Size
1.8"
File system
FAT 32
PC
Operating System
Windows 98 SE/ME/2000/XP
Interface
USB 1.1(HOST)/2.0(DEVICE)
Audio Frequency
20Hz~20KHz
Headphone Output Left 20mW/ Right 20mW
(16 )
Left 12mW/ Right 12mW
(32 )
Signal to Noise ratio Left 90dB/ Right 90dB
(MP3)
Frequency Characteristics
2dB
FM Radio Channels
2
Channels
Frequency
87.5 MHz ~ 108.0 MHz
Signal to Noise ratio
50dB
Earphone- Antenna
Earphone-Cord Antenna
Cord Antenna File format
MPEG 1/2/2.5 Layer 3,
OGG, WMA, ASF,JPG, BMP
Bit Rate 8Kbps ~ 320Kbps
(OGG : 32Kbps ~ 500Kbps)
Tag ID3 V1, ID3 V2 2.0, ID3 V2 3.0
Power Supply AC Adapter
DC 5.0V, 2A
Battery Lithium Polymer Battery
General Dimension Approximately
62mm(W)X103mm(D)X22mm(H)(320)
Approximately
62mm(W)X103mm(D)X25mm(H)(340)
Weight Approximately183g(320),Approximately203g(340)
LCD TFT LCD with up to 260 thousand fixel colors.
Operation Temperature
0 ~ +40
Playback time
MP3 16 hours (44KHz/128Kbps/Volume 20/Normal
EQ fixel)
Troubleshooting
The section covers minor problems with basic operation.
Symptom
The player will not power on.
No sound
Buttons will not function
Heavy noise
Text in the LCD looks distored.
LCD screen too dark..
Heavy noise in radio reception.
Hard to search a channel.
Player will not transfer files or
does not appear on the computer
as a drive.
Solution
See if the batteries are discharged. Connect the AC adapter to
recharge.
Check if the volume level is 0.
Check if both remote controller and earphones are correctly
connected.
Check if the Hold function is set. If so, please unset the Hold
function.
Check if connectors of the remote controller and earphones are
clean. Dirty surface of the connectors may cause the noise.
Check the music file. Try another music file to confirm. If the file
data is damaged, heavy noise or skipping may result.
Check the correct language setting. Use Menu - General Language to see the language setting. Please see Page 65 for
details.
Check brightness setting of the LCD screen. Use Menu - Display
- LCD Contrast (M_) : Main to set the brightness. See Page 69
for details.
See if the earphones are connected. The earphones functions
as an antenna for the radio reception. Without the earphones,
the radio reception may not function.
If the earphones are connected, try moving direction of the
product and earphones.
Try turning off electrical appliances near the product. If noise is
reduced, try to move away from the appliance.
See if the USB cable is correctly connected.
See if the AC adapter is correctly connected. If there is not
enough battery charge, the download may not function properly.
Page 45

Federal Communications Commission
84
The device manufactured and found to comply with limits for a Class B computing
device according to the specifications in FCC rules Part 15. Operation is subject to
the following two conditions;
1. This device may not cause harmful interference, and
2. This device must accept any interference received, including interference
that may cause undesired operation.
3. If your device needs repairs, you must arrange for the manufacturer to
make them if you are to keep the device's FCC registration valid.
This equipment, like other electronic equipment, generates and uses radio
frequency energy. If not installed and used according to the instructions in this
manual, this equipment may cause interference with your radio and television
reception.
If you think this equipment is causing interference with your radio or television
reception, try turning the equipment off and on. If the interference problems stop
when the equipment is switched off, then the equipment is probably causing the
interference. You may be able to correct the problem by doing one or more of the
following:
- Adjust the position of the radio or TV antenna
- Move away the device from the radio or TV
If necessary, consult your dealer or an experienced radio or television technician.
You may find this booklet helpful:"How to Identify and Resolve Radio and TV
Interference Problems"(Stock No. 004-000-00345-4), prepared by the FCC and
available from the U.S Government Printing Office, Washington, DC 20402. See
individual devices FCC ID and registration numbers.
For the customers in Europe
The CE mark on the player is valid only for products marketed in
the European Union.
FCC
 Loading...