

Page 1
1 I English
Actual player may vary slightly from images shown.
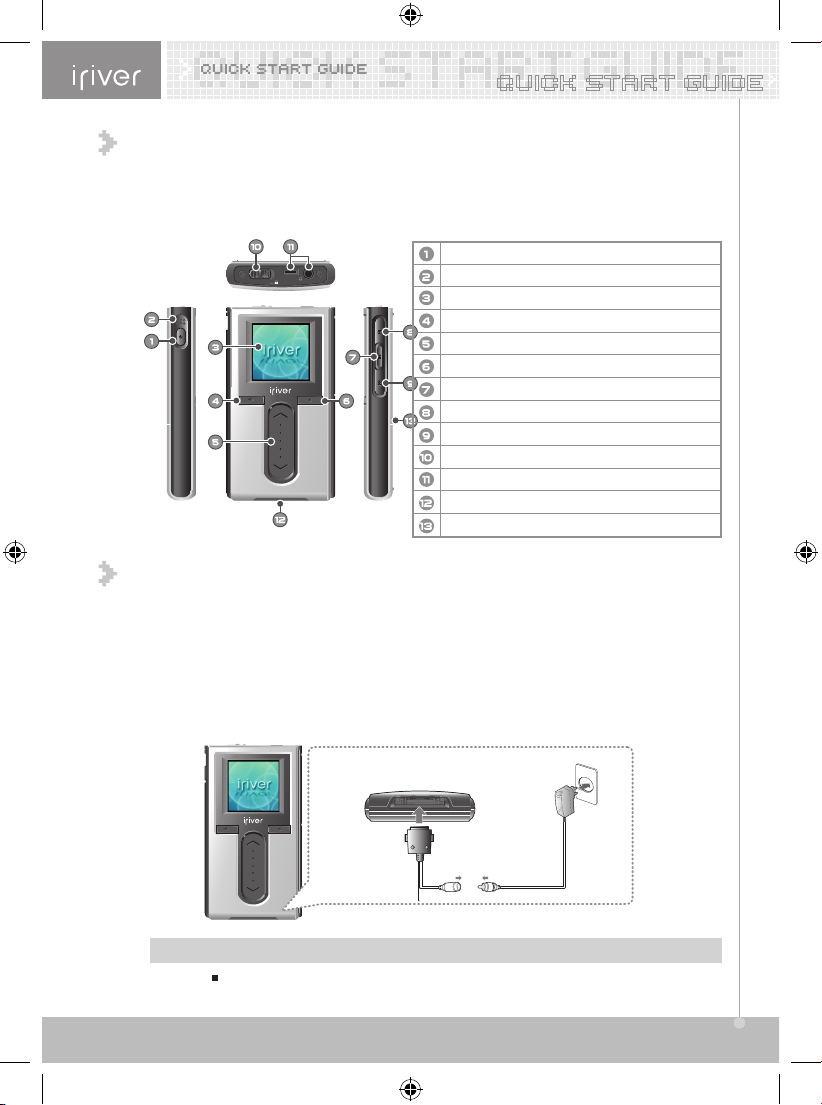
Battery release button
Power ON/OFF button
Built-in microphone
LCD screen
Cancel button
Up / Down scroll button
Select button
Play / Pause button
Previous button
Next button
HOLD switch
Earphone / Remote control jack
USB / Adapter jack
I H10 Player
1. Locating the controls
Be sure to use the supplied AC adapter to connect the cable to the player.
2. Connecting the product
I Connecting the power – connecting the adapter (player)
1. Connect the cable to the player.
2. Connect the AC adapter to the player's DC jack.
3. Connect the AC adapter plug to a power socket.
The rated voltage of the AC adapter is 100~240V, 50~60Hz.
<Bottom of the player>
If a power source is connected, the charging indicator will be turned on.
(The indicator is turned off after completion.)
Note
01-QSG-ENG.indd 1 2004-11-22 ¿ÀÈÄ 4:26:46
Page 2
3 I EnglishEnglish I 2
<Bottom of the player>
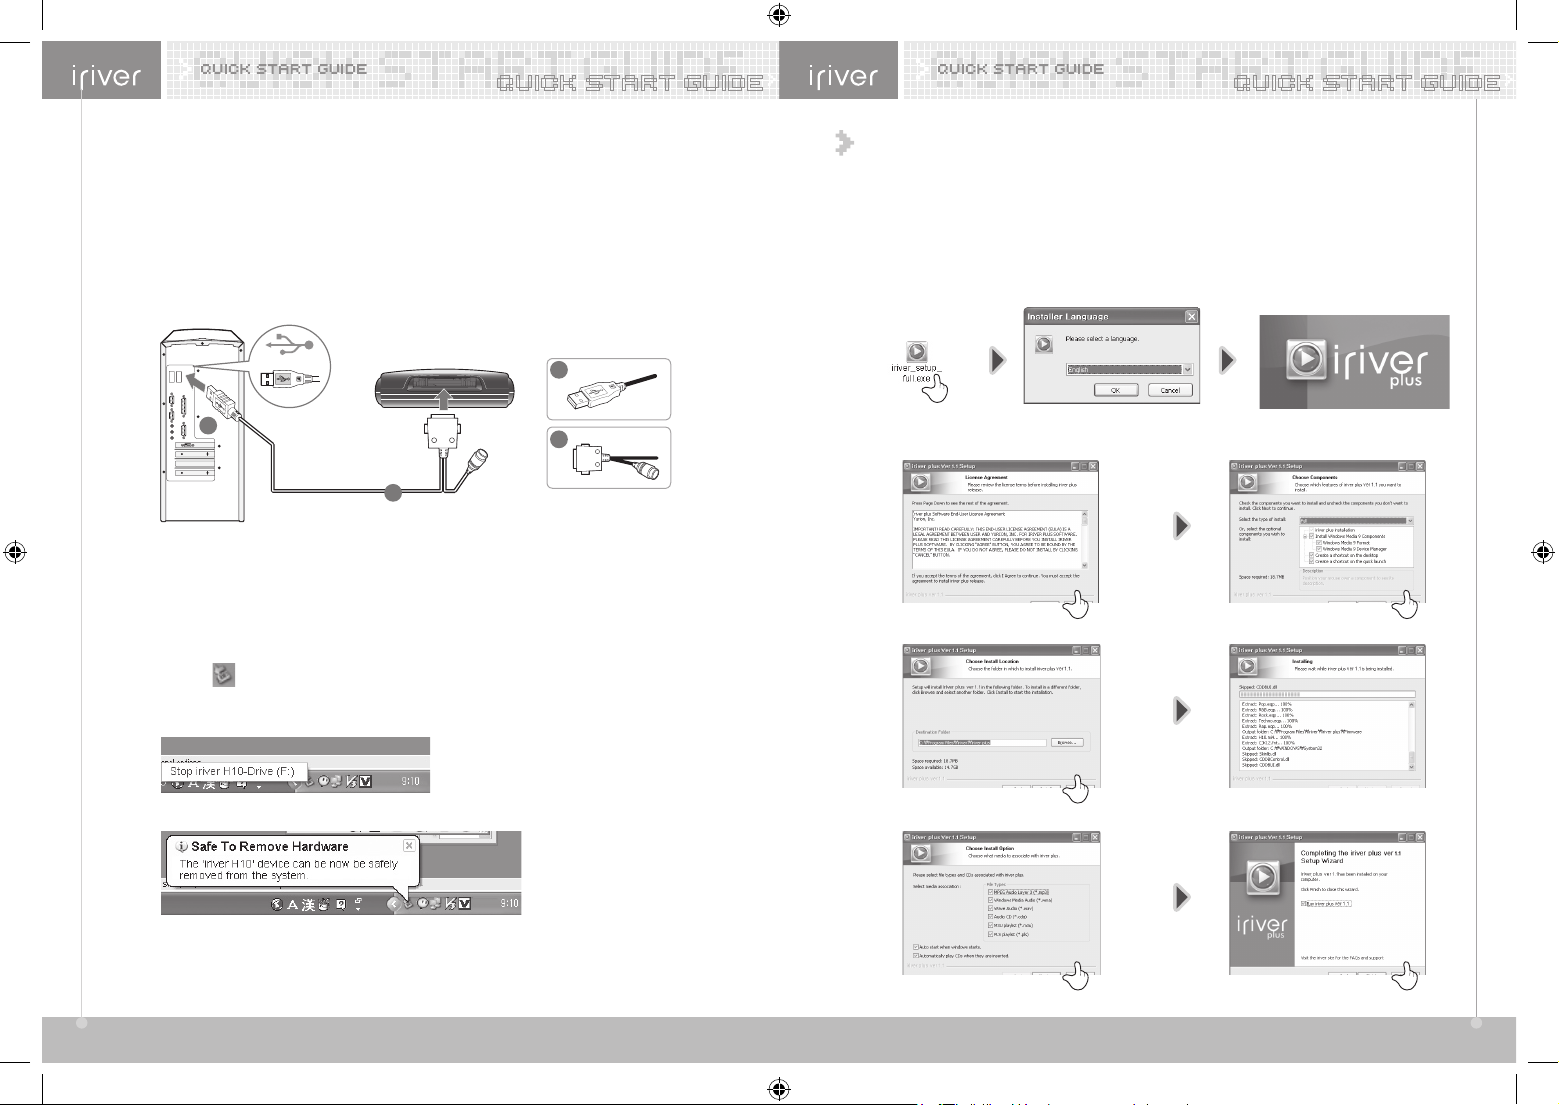
1. Connect the player and PC using the cable supplied with the player.
2. The icon will appear on the system tray when the player is connected successfully.
3. The driver icon (H10) will appear on the Windows Explorer.
I Connecting PC – Connecting cable
1. Click the icon on the system tray.
2. Click the popup message as shown below.
3. When the "Safe To Remove Hardware" popup window appears, disconnect the USB cable.
I Connecting PC – Disconnecting cable
A
A
B
B
I Installing iriver plus
3. Installing the software
1. The program installation process will start automatically after inserting the Installation CD to the PC's
CD-ROM drive. If the program installation process does not start automatically, click the "My Computer"
icon and run iriver_setup_full.exe file in the CD-ROM drive.
2. If the "Installer Language" window appears, select the desired language and click the "OK" button.
3. If the program starts, follow the on-screen menu of the Installer program.
01-QSG-ENG.indd 2-3 2004-11-22 ¿ÀÈÄ 4:26:48
Page 3

I Controlling volume
Use the [ / ] scroll to control volume during
playback.
: Volume up
: Volume down
1
5 I English
I Playing music files
5. Basic operation
Press the [ ] button after releasing the
HOLD switch to display the initial screen.
1
Press the [ ] button to display the Search
screen.
3
Select the <MUSIC> mode using the [/]
scroll when the main screen appears.
2
During playback, press the [ ] button to
pause playback. Press it again to resume
playback.
In the Search or main screen, press the
[ ] button to play the recently palyed music.
Press the [ ] button after selecting the
music file to play it.
During playback, press the [ ] button to
pauseplayback. Press it again to resume
playback.
In the Search or main screen, press the [ ]
button to play the recently palyed music.
5
Use the [/] scroll the select the item.
Example: In case of selecting <Titles>
[ ] : Press it to move to the desired
item.
[ / ] : Moves to the desired item.
[ ] : Press it to move to the previous
screen.
[ ] : Press and hold it to move to
the main screen directly.
4
English I 4
I About button usage
4. Quick start
Button image with white background = Press the button shortly.
Button image with black background = Press and hold the button.
I Turning on/off the player
Turning on the player
Press the [
] button.
The initial screen will be displayed.
1
Turning off the player
Press and hold the [
] button.
The player will be turned off.
1
If the player does not run after pressing the button,
check whether the HOLD switch is set to OFF or the
battery is discharged.
Note
Select Mode
Press the [ ] button to display the desired
mode screen.
2
If you press and hold the [ ] button in any screen,
you can return to the main screen.
3
I Changing mode
Select the “MUSIC” mode using the [ / ] scroll
when the main screen appears.
There are 7 modes including MUSIC, FM RADIO,
RECORDING, PHOTO, TEXT, BROWSER, SETTINGS
.
1
01-QSG-ENG.indd 4-5 2004-11-22 ¿ÀÈÄ 4:27:00
Page 4

7 I EnglishEnglish I 6
Playing previous/next file
Press the [
/
] button during playback to
play previous / next file.
: Plays previous file
: Plays next file
6
Fast-forward / Fast-reverse
Press and hold the [
/
] button during
playback for fast-forward or fast-reverse
playback.
: Fast-reverse
: Fast-forward
7
Select the <FM RADIO> mode using the
[ / ] scroll when the main screen appears.
1
Press the [ ] button to display the Sub
screen.
2
Setup the Preset by pressing the [ ] button
and press the [
/ ] button to select the
Previous/Next FM station.
: To previous station
: To next station
3
Use the [ / ] scroll to control volume during
listening to FM radio.
4
I Listening to FM radio
In areas where the signal is weak, some channels
may be unavailable or reception may be poor.
Note
01-QSG-ENG.indd 6-7 2004-11-22 ¿ÀÈÄ 4:27:12
Page 5

English I 8
Select the <RECORDING> mode using the
[ / ] scroll when the main screen appears.
1
Press the [ ] button to display the Recording
Source screen.
2
Move to <Voice> using the [ / ] scroll and
confirm it by pressing the [
] button.
3
Press the [ ] button to start recording.
4
Press the [ ] button to stop recording.
5
I Recording Voice
Volume control is not available while recording.
Keep the proper distance between the microphone
and the mouse while recording.
Note
01-QSG-ENG.indd 8 2004-11-22 ¿ÀÈÄ 4:27:12
 Loading...