

Page 1

DESIGN BY IRIVER
E300
USER GUIDE
Page 2

CONTENTS
01 03
Getting Started
Components
Locating the Controls
Power Management
Connecting the Product
Using iriver plus 4
03
03
05
06
09
Other Information
Important Safety Information
Troubleshooting
Copyrights
Certification
Registered Trademark
Exemption
02
Using E300
Home Screen
MUSIC
VIDEO
PICTURE
FM RADIO
RECORDING
TEXT
BROWSER
SETTING
FITNESS
12
13
15
17
18
20
22
23
24
25
27
28
29
30
30
30
Page 3
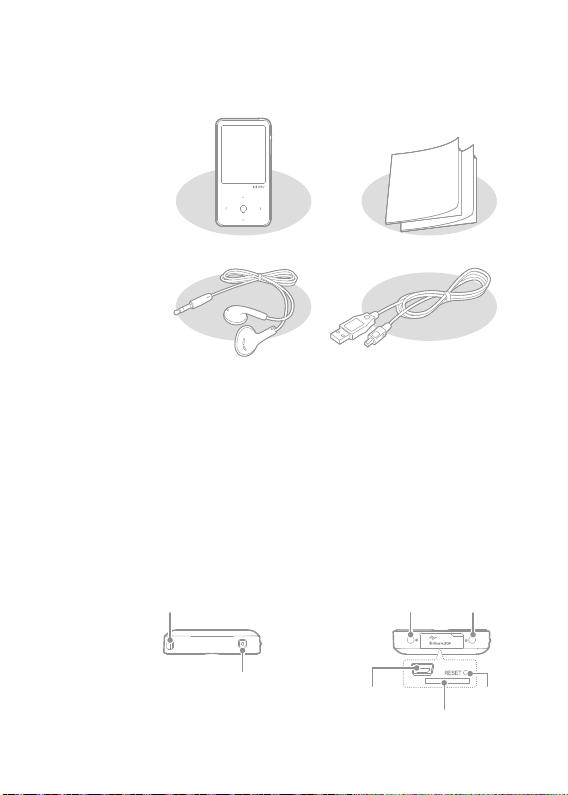
Components
Components may be changed without prior notice for improvement
of product performance or quality.
Locating the Controls
Getting Started
03
E300
Earphones
Earphones: You can connect this to the product to output sound.
USB Cable: You can connect this to the computer and use it to
recharge the power.
Quick Start Guide: This is the manual explaining how to use our device.
Product Warranty: Please keep this in a safe place for use during any
warranty repairs.
The exterior and the contents printed or engraved may differ by model
or according to the name of each part.
Necklace Connection Loop Line-In Jack Earphones Jack
Power
Quick Start Guide &
Product warranty
USB Cable
RESET Key USB Port
Micro SD Card Slot
Page 4
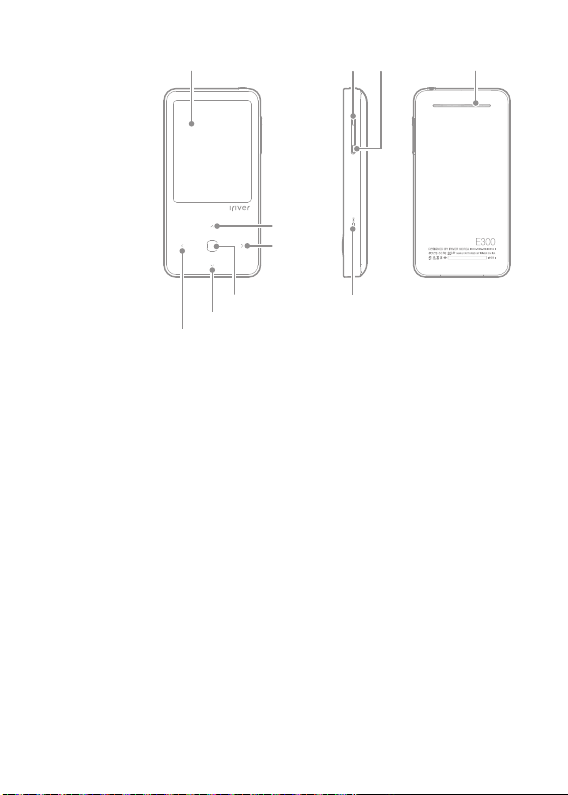
LCD Volume -Volume + Speaker
Up
Sub Menu
Select MIC
Down
Upper Menu/Previous
Necklace Connection Loop: Connects with the necklace.
Power: Turn off the power by pressing and holding. Switch to standby
mode by pressing briefly.
You can switch to the standby mode by pressing it briefly.
Line-In Jack: Connects external device when Line-in recording.
Earphone Jack: Connect earphone here.
USB Port: Connect to computer or recharge the battery using this port.
RESET: Resets the product.
Micro SD Card Slot: Inserts the Micro SD card to
view and replay the files on the card.
LCD: Screen displays.
Volume: Controls the sound volume.
Speaker: Produces sounds.
MIC: Records voice.
Direction Key: Moves menu/list.
Access Key: Executes file/menu.
Getting Started
04
Page 5

Power Management
Power on/off
1. Press and hold the [ ] until power comes on.
2. If you press and hold the [ ] when the product is turned on,
then the power will be turned off.
This model supports an automatic power-saving feature to minimize battery
consumption. Depending on [SETTING – Timer Settings - Auto Power off], the
product will be automatically turned off when keys are not operated for a specified
time. (Refer to page 25)
Using the Hold Function
1. If you press the [ ] button while using the device, it will be locked.
2. Unlock the device by pressing the [ ] button again.
Using the Reset Function
1. If buttons will not work while the device is being used, open the
cover of Micro SD card slot to release the cap and then press [RESET].
Even if you use reset function, current time and memory data will be preserved.
Do not use reset function while the product is playing. It may cause severe damage
to its memory.
Charging the Battery
1. Turn on your computer.
2. Connect the product to your computer. The internal battery will
charge automatically.
To avoid malfunctions, only use the USB cable provided.
Verify that the product is connected to a high-power USB 2.0 port. Some low-power
USB ports built into certain peripheral devices, such as some types of keyboards
and USB hubs without internal power may not provide enough power to charge.
While the PC is switched to standby mode, the product may not be charged.
Getting Started
05
Page 6

Turn the product off when charging. Leaving the device turned on during recharge
may prevent “Charge Complete” from being displayed.
The battery will be fully charged within about 4 hours 30 minutes. (Based on fully
discharged, power Off).
Charging times may vary if device is used during recharge.
Charge and store the product only at room temperature. Do not expose the device to
extremes in temperature while recharging. The rechargeable battery is a consumable
and the available usage time of charged battery becomes shorter over time.
Connecting the Product
Getting Started
06
Connecting Earphones
1. Connect the earphones to the earphone jack.
Connecting to Your Computer
1. Turn on the power of the device and computer.
2. If you connect the device to your computer, you will see the screen
where you can select connection mode.
- Power & Data: The connection between the product and the
computer is established and you can start transferring data.
- Power & Play: The product is currently being charged and a file is
being played.
- Power Only: The product is currently being charged.
Do not use cables other than the USB cable provided. It may cause malfunction.
For successful computer/USB connection, disable all functions.
Check that the product is connected to a high-power USB 2.0 port. Connecting to a
keyboard or a USB hub without a power supply of its own may result in malfunction.
File system does not support other than FAT32. Format this device into FAT32.
Page 7
Getting Started
07
Disconnecting from your computer
1. Safely disconnect the product from your computer by clicking the
icon on the taskbar of the computer screen.
2. Confirm the device disconnection by clicking [Confirm].
Depending on the operating system for example Windows XP, the icon may be
hidden from the taskbar. Hidden icons can be displayed by clicking indicator.
Safe disconnection may not be performed if application programs such as Windows
Explorer or Windows Media Player are being used.
Make sure that the product is safely disconnected after all the active application
programs are closed. If safe disconnection fails, try again later. Failure to safely
disconnect result in data loss.
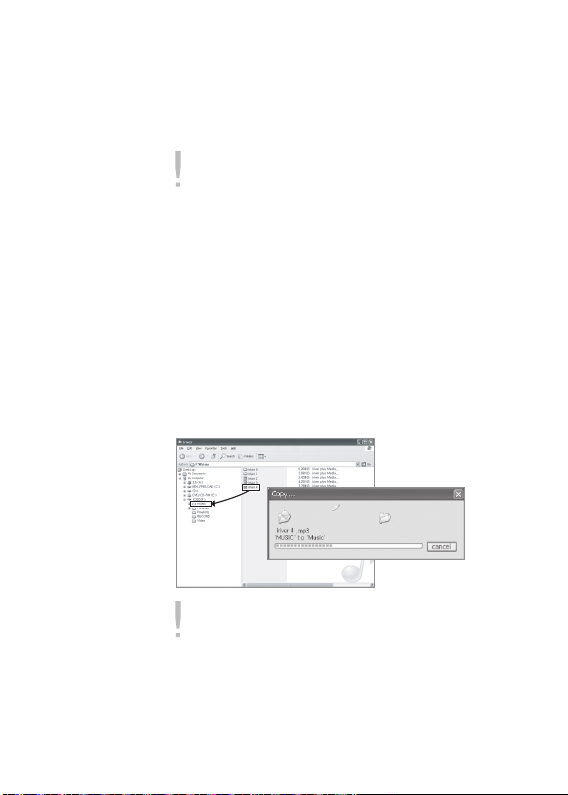
Copying Files (Folders) to the Product
1. After selecting files/folders to copy from your computer, drag and
drop the selected file/folder to the added drive.
2. Files (or folders) will be transferred to folders below according to
their content type.
- Music : Music - Pictures : Pictures
- Video : Video - Text : Text
Please connect the USB cable properly.
If the power of the computer or product is tur ned off or the USB cable is
disconnected while copying or moving files/folders, serious damage to the memory
may result.
Transfer rate may differ depending on the computer or OS environment available for
your region.
It is recommended to save music, video, text and document files using iriver plus 4.
When saving through a removable disk, rebuild Database in [SETTING – Advance
Settings - Rebuild Library]. (Refer to page 25)
Page 8
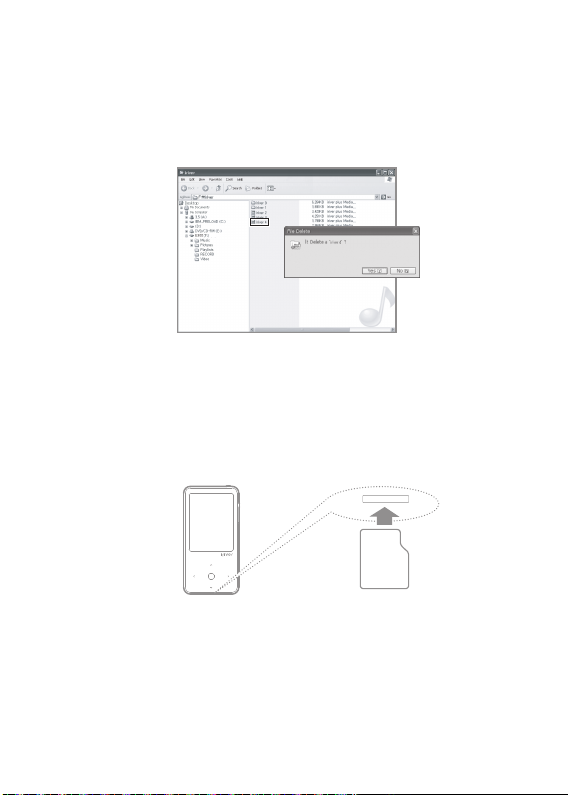
Deleting Files (Folders) from the Product
1. Select the files/folders to be deleted, right-click on them and select
[Delete].
2. Click [Yes] when the [Confirm File/Folder Deletion] window pops up,
and the selected files/folders will be deleted.
Inserting/removing the Micro SD card
1. Turn the power off, place the SD card (see the figure below) in the
SD card slot, and press gently.
2. Press it in once more and the card can be removed.
Getting Started
08
Recommended SD cards
Brand: SanDisk, Transcend
Page 9

Insert/remove the Micro SD card while the power is off.
Do not force the Micro SD card. It may cause malfunction and damage to the Micro
SD card.
Do not remove the Micro SD card when in use. It may delete data, cause
malfunction, or damage the Micro SD card.
Please do not repeatedly insert/remove the Micro SD card.
If the Micro SD card is not positioned properly, the product may malfunction or the
card may become stuck.
Use only the recommended Micro SD cards. The use of other Micro SD cards may
cause malfunction.
The transfer rate of the Micro SD card may differ according to the computer status.
When formatting a Micro SD card, all the data are deleted. Make sure that the data
is backed up before formatting.
Format the a Micro SD card to FAT 32 system.
If a Micro SD card is not recognized or malfunctions, reformat and retry.
Micro SD cards can be purchased separately.
It is recommended that you use a Micro SD card up to 32GB.
Using iriver plus 4
Getting Started
09
iriver plus 4 is integrated software that manages a variety of multimedia
files. Using iriver plus 4, you can transfer files on the computer to the
product and do automatic firmware upgrade.
Installation
1. After installing the iriver plus 4 software program, you will see the
installation guide screen appearing.
2. Follow the step-by-step instructions on the screen to complete
the installation process.
Please download the iriver plus 4 software program from the iriver website
(www.iriver.com).
Minimum computer specifications are:
Windows® XP
- Intel® Pentium® 233MHz or above
- Memory: 64MB or above
- 30MB or more free space
- 16bit Sound Card and Speaker
- Microsoft Internet Explorer V 6.0 or above
- SVGA or high-resolution monitor (min 1024x768 resolution)
Page 10

Windows® Vista Specifications
(For Windows® Vista, note that only the 32-bit version will be supported.)
- Intel® Pentium® 800MHz or above
- Memory: 512MB or above
- 20MB or more free space
- 16 bit Sound Card and Speaker
- Microsoft Internet Explorer V 6.0 or above
- SVGA or high-resolution monitor (min. 1024x768 resolution)
Windows® 7 Specifications (For Windows® 7, note that only 32-bit version will be
supported.)
- 1GHz or above, 32-bit processor
- Memory: 1GB or above
- 16GB or more free space
- DirectX 9 Graphic Device with WDDM 1.0 higher Drive
- SVGA or high-resolution monitor (min. 1024x768 resolution)
- Maximum file size for transfer: 4GB.
Adding Media to the Library
1. When iriver plus 4 is first run, the Add Media Wizard will be executed.
2. According to the screen instructions, you can add to the library
media files such as music, and e-books stored in the computer.
Extracting Media from a CD
1. Insert a music CD into the CD drive and execute iriver plus 4.
2. Select the music checkboxes you want to extract from [CD] tab in
iriver plus 4 and click [CD Ripping] at the bottom left.
3. When the music extraction is complete and [All Music] is selected,
you will see the extracted music files added to the library.
Getting Started
10
Transferring Media to the Product
1. Connect the product to your computer’s USB port and then
execute iriver plus 4.
Page 11

2. Select the file checkboxes you want to transfer from your computer
to the Product and then click [Transfer] button or drag & drop the file
to Device icon at the bottom or Device window.
You will see the file transfer status in the [File Transfer] tab.
3. When the file transfer is complete, you will see the selected music
files added to the device library.
Initializing the Disc
1. Connect the device to your computer’s USB port and then execute
iriver plus 4.
2. Select [Device > Initialize Disc]. When the window pops up asking
whether to proceed with initializing the disc, click [Start].
3. When the initialization process is finished, the Complete window will
be displayed and the device can be disconnected from your computer.
File recovery is not possible if files have been deleted from the device. Backup all
data before initializing the disc.
Upgrading the Firmware
1. Connect the device to your computer’s USB port while connected
to the Internet and then execute iriver plus 4.
2. Select [Device > Firmware Upgrade], and the Upgrade window will
be displayed. Complete the firmware upgrade by following the
instruction window.
If there is not enough battery, a firmware upgrade may not be initiated.
Never disconnect the device from your computer while a firmware upgrade file is
being downloaded.
After the download is finished, the upgrade will be initiated when the device is
disconnected from your computer.
A pop-up window will display the version of firmware installed.
When newer firmware versions are available, a notification window will be displayed
when the device is connected to the computer.
Getting Started
11
Page 12

Home Screen
Home Screen Legend
: Shows battery status.
MUSIC: Plays music. (Pages 13~15)
VIDEO: Plays video files. (Pages 15~17)
PICTURE: Plays pictures. (Pages 17~18)
FM RADIO: Listens to or record FM radio. (Pages 18~20)
RECORDING: Records voice or sound from external device.
(Pages 20~22)
TEXT: Reads text files. (Pages 22~23)
BROWSER: Checks the files stored in the product and Micro SD card.
(Pages 23~24)
SETTING: Sets the user environment. (Pages 24~25)
FITNESS: Checks exercise time, exercise distance or calories burned
when executing this function and starting an exercise. (Pages 25~26)
Selecting Options
1. Once you turn on the power, you will see the home screen.
If you hold and press the [ ] while using the device, you will also
see the home screen.
2. Press the [ / ] to select the mode you want and press [ ]
or [ ] to play the mode.
Using Hotkeys
They are the shortcut keys which enable to implement key functions.
1. If you press and hold the [ ] while using the device,
you will see the key functions including the lists of MUSIC /
FM RADIO / RECORDING / FITNESS.
2. If you press the [ / / / ] to select the mode you want,
the mode will be played.
: MUSIC
: FITNESS
: FM RADIO
: RECORDING
Using E300
12
Page 13

Hotkeys provide convenient shortcuts for some modes only.
MUSIC
Using E300
13
Selecting Music
1. If you select [MUSIC] on the home screen, you will see the music list.
2. Press the [ / / / ] button in the music list to select the
music you want, and press the [ ] button or the [ ] button to
play the selected music.
: Move to the upper list/folder.
: Move to the sub menu/folder. Play when selecting files.
/ : Move within the list.
: Play the selected file.
In [Dir List], music can be searched by folder.
Press and hold the [ ] in the [Bookmark List] to delete the bookmark.
In the [MUSIC] mode, only music files located in the Music Folder will be displayed.
To search and play music files in any other folders, use the [BROWSER] mode.
Continuous Playback Time : approx. 27 hours (based on MP3, 128Kbps, 44.1KHz,
Volume 20, EQ Normal, LCD OFF, earphones).
Supported file formats: MP3 (8~320Kbps), WMA (8~320Kbps), OGG (Q1~Q10),
WAV, APE, FLAC, and ASF
Playlists can be managed using iriver plus 4.
When the Micro SD card is inserted, you can select [Internal Memory & External
Memory].
Playing Music
- Press the [ ] to control volume.
- While playing, press the [ ] to pause/resume.
- While playing, press the [ / ] to play the previous/next music.
- If you press and hold [ / ] while music is being played, the file
will start rewinding/fast forwarding.
- While playing, select [ ] button at point A and press the
[ ] button again to select point B. Now the player plays between
point A and B repeatedly. While playing, press the [ ] button again
to deactivate the loop playback.
Page 14

Using E300
14
LCD Display for Playing Music
FITNESS Playing Mode Lock mode
Current status
EQ
Current time
Rating Elapsed time
Progress bar
Battery
Album art
AB repeat
File name
Album name
Play mode
Total playing time for the current file
Additional Features
1. The list of additional features are displayed when pressing and holding
[ ] while a file is being played.
2. Press the [ / ] button to select the additional feature and press
the [ ] or [ ] button to display the window for setting it up.
: Moves to the upper list.
3. Press the [ / ] button to set the feature up and press the [ ]
or [ ] button to save / operate it.
- Play Mode: Set the play mode during playback.
- Study Mode: Set a time interval by pressing the [ / ] during
playback. (When the power is off, the Study Mode is deactivated.)
- Select EQ: Set the EQ during playback.
- Set Sound: Set the sound related items.
+ User EQ: Set according to the taste of the user.
+ SRS WOW HD: Sets stages for stereophonic sound effects.
(WOW HD™ improves the quality of sound when playing audio by providing
stronger bass and clearer high frequency range, and conveying the
entertainment experience through dynamic 3D sound effects.)
Page 15

SRS: Set virtual three-dimensional sound effect.
TruBass: Set the extent of emphasis on low sound.
FOCUS: Set the sound clarity level.
WOW : Set amplification value according to the characteristics
of the earphone being used.
Definition: Restore missing sound to the level of original sound.
+
Fade In: Make an audio signal increase gradually when playing music.
- Repeat Frequency: Set the repeat frequency.
- Repeat Interval: Set the repeat interval.
- Scan Speed: Set the speed for searching songs for playback.
- Lyric Display: Select whether to display the lyrics on the screen.
- Rate: Set the rate of the selected music.
- Add Bookmark: Add the location of a song being played to the
bookmarks list.
- Delete Files: Delete the selected file.
- Information: Display information for the selected file.
VIDEO
Using E300
15
Selecting Video
1. In the home menu, select the [VIDEO] to display the video scan list.
2. In the video list, press the [ / / / ] to select the video and
press [ ] or [ ] to play the selected video.
: Move to the upper list/foler.
: Move to the sub list/folder. Play selected file.
/ : Move within the list.
: Play the selected file.
While playing video, the picture orentation and key directions are inverted by screen orientation.
In [Dir List], browse video by folder.
In [Bookmark List], press and hold [ ] to delete the bookmark.
In the [VIDEO] mode, only video files in the Video folder are displayed.
To play other video files in any other folder, use the BROWSER mode.
Continuous Playing Time: Approx. 8 hours - Video: Xvid, 320×240@30fps, Approx.
500Kbps / Audio: MP3, 44 KHz, 128 Kbps (LCD Lightness - Medium, Volume 20)
The playing time may vary depending with image type.
Supported file formats: AVI, WMV
If there is a caption file (.smi), you can encode it together with video file using iriver
plus 4. (Be sure to match both names of video and caption files.)
Be sure to use iriver plus 4 when transferring video files. Otherwise, unexpected
errors occur during video playback.
- Playback for this file is not allowed / - The sound is not synchronized with the
screen / - Playback is choppy
If Micro SD card is inserted, you can select [Internal Memory & External Memory].
Page 16

Playing Videos
- Press the [ ] button to control the volume.
- While playing, press the [ ] button to pause / resume.
- While playing, press the [ / ] button to play previous/next file.
- While playing, press and hold the [ / ] button to fast reverse or
fast forward.
- While playing, press the [ ] button to change the play mode.
LCD Display for Playing Videos
Lock mode
Volume
Current time
Battery
Using E300
16
File name
Play mode
Elapsed time Progress bar
Total playing time for the current file
Additional Features
1.
While playing, press and hold [ ] to display the list of additional features.
2. Press the [ / ] button to select the additional feature and press
the [ ] or [ ] button to display the window for setting it up.
: Move to the upper list.
3. Press the [ / ] button to set the feature up and press the the
[ ] or [ ] button to save / operate it.
- Play Mode: Set the repeat playback mode of video file.
- Scan Speed: Set the speed of fast forward and reverse.
Page 17

- Resume: Select whether video is resumed from the last played
point or from the beginning.
- Play Next File: Select whether the next file will be played when the
name of file is in sequential order.
- Add Bookmark: Bookmark a specific point of time.
- Delete File: Delete the selected file.
- Information: Display information for the selected file.
PICTURE
Using E300
17
Selecting Picture
1. In the home screen, select [PICTURE] to display Picture Scan List.
- [Play All] Display all the pictures with DBs stored in the product.
- [Dir List] Select picture file by internal / external memory.
- [Picture Playlists] Display picture files created using iriver plus 4.
2. In the list, press the [ / / / ] to select the picture and press
the [ ] or [ ] to play it with full screen.
: Move to upper list/folder.
: Move to the sub list/folder. Display the picture in full screen.
/ : Move within the list.
: Display the selected picture in full screen.
In the [PICTURE] mode, only picture files located in the Picture Folder will be
displayed.
To search and play picture files in any other folders, use the [BROWSER] mode.
Supported file formats: JPEG, BMP, PNG, GIF
(Some file types may not be fully compatible.)
Be sure to use iriver plus 4 when you transfer image file. Otherwise, unexpected
errors might occur during image playback.
If Micro SD card is inserted, you can select [Internal Memory & External Memory].
Viewing Pictures
- While viewing pictures, press the [ ] button to start /stop slide show.
- While viewing pictures, press the [ / ] button to play the
previous / next picture.
- While viewing pictures, press the [ ] button to enlarge the picture.
(Zoom may not be available in some picture resolutions or formats.)
Page 18

Additional Features
1. While viewing pictures, press and hold the [ ] button to display
additional features.
2. Press the [ / ] button to select the additional feature and press
the [ ] or [ ] button to display the window for setting it up.
: Move to the upper list.
3. Press the [ / ] button to set the feature up and press the [ ]
or [ ] button to save / operate it.
- Slide Time: Set the time each image is displayed in slide show
- Rotation: Set the direction of rotation.
- Zoom-in: Set the ratio to enlarge picture.
Press [ ] to return to the original size.
- Delete Files: Delete the selected file.
- Information: Display the properties of the selected picture.
While playing slide show, the additional feature does not display.
(Zoom may not be available in some picture resolutions or formats.)
FM RADIO
Using E300
18
Executing FM Radio
1. If you select [FM RADIO] in the home screen, the last-selected
radio frequency will be received.
2. Select a radio frequency by pressing [ / ].
While listening to radio, the earphones serve as antenna. Pease make sure to
connect. (Use the supplied earphones. If you use other earphones, the reception
rate might be deteriorated.)
Listening to FM Radio
- Control the volume while listening by pressing the [ ] button.
- Set the preset on or off by pressing [ ] while listening.
- Move to a higher-level or lower-level frequency signal by setting the
preset off and pressing [ / ].
Page 19

- Move to a higher-level or lower-level frequency signal that is receivable
by setting the preset off and pressing and holding [ / ].
- Move to a higher-level or lower-level preset channel by setting the
preset and pressing [ / ].
- While listening to radio, press [ ] to record the radio broadcasting
you are listening.
+ Record the broadcast while listening by pressing the [ ] button
and stop recording by pressing [ ] button again.
LCD Display for FM Radio
Using E300
19
Battery
Frequency
indicator
Channel
Number
PRESET
On/Off
Current
frequency
Current time
Additional Features
1. The list of additional features are displayed when pressing and holding
[ ] while listening.
2. Press the [ / ] button to select the additional feature and press
the [ ] or [ ] button to display the window for setting it up.
: Move to the upper list.
3. Press the [ / ] button to set the feature up and press the [ ]
or [ ] button to save / operate it.
Page 20

- Recording: You can record the radio broadcasting you are listening.
+
If you press the [ ] button, the recording will begin; press the same
button once more, the recording will pause. If you press the [ ] button
during recording, the recording will be terminated and the file will be recorded.
- FM Recording Quality: Set FM recording quality.
- Save / Delete Preset: Save the frequency signal being received
currently to a channel.
- Auto Preset: Search the frequency signals that are receivable
and save them to channels automatically.
+ Up to 20 channels can be saved.
- Channel List: Display the list of the channels saved.
+ Press [ / ] to select the channel you want, and press [ ]
to listen to the radio broadcasting.
- Tuner Region: Set broadcasting frequencies and steps depending
on the region.
Korea/US: 87.5~108.0MHz / Japan: 76.0~108.0MHz /
Europe: 87.50~108.00MHz
Volume cannot be changed while recording.
Recording will be automatically stopped when the available memory or power is
insufficient.
The recorded file will be saved in the [Recordings – FM Radio] folder in the following format.
TUNERYYMMDDXXX.WMA (YY: year, MM: month, DD: day, XXX: Sequential number)
The file size per one minute varies by the recording quality.
Low: Approx. 480K / Medium: Approx.720K / High: Approx. 960K
Recording can be done for up to 5 hours.
RECOR DING
Using E300
20
Recording
1. In the home screen, select [RECORDING] to display the select
recoding window.
-
[Line-In] Records sound from the external device connect to Line-In terminal.
- [Internal Mic] Records sound using internal Mic.
- [External Mic] Records sound using external Mic.
2. Select [ / ] and press [ ] or [ ] to display the standby window.
3. You can start recording by pressing [ ] and end it by pressing again.
4. Press [ ] button to stop recording and the recorded file will be saved.
Volume cannot be changed while recording.
Recording will be automatically stopped when the available memory or power is
insufficient.
Page 21

The recorded file will be saved in the following format.
Line-In: [Recordings > Line-In] AUDIOYYMMDDXXX.WMA
Internal Mic: [Recordings > Voice] VOICEYYMMDDXXX.WMA
External Mic: [Recordings > Voice] EXMICYYMMDDXXX.WMA
(YY: year, MM: month, DD: day, XXX: Sequential number)
The size for recorded files per minute according to recording quality is as below.
Low: Approx. 480K / Medium: Approx. 720K / High: Approx. 960K
Maximum recording time is 5 hours.
LCD Display for Recording
Using E300
21
Current time
Battery
Recording mode
Recorded time
Current status
Name of
recorded file
VOICE110505001
Remaining
time
Recording quality
Additional Features
1. If you press and hold [ ] in the recording standby window, the list
of additioanl features will be displayed.
2. Press the [ / ] button to select the additional feature and press
the [ ] or [ ] button to display the window for setting it up.
: Move to the upper list.
3. Press the [ / ] button to set the feature up and press the [ ]
or [ ] button to save / operate it.
[External /Internal Mic] Option
- Recording Quality: Set the quality of recorded voice.
Page 22

[Line-In] Option
- Recording Quality: Set the quality of recorded voice via external input.
- Auto Sync: Automatically start and ends recording according to
the input volume during external recording.
- External Input Volume: Set up the volume of external input.
In the factory default setting, [Auto Sync] is set under the [Line-In] option. If you press
[Line-In] and input sound, recording will automatically start.
When the sound volume of external device sets to maximum, it may cause voice
distortion. To eliminate distortion, turn down the volume.
TEXT
Using E300
22
Selecting Texts
1. In the home screen, select [TEXT] to display text search list.
2. If you select a file for display by pressing [ / / / ] in the list,
and press [ ] or [ ], the text will be displayed.
: Move to the upper list/folder.
: Move to the sub list/folder. Display it when selecting the file.
/ : Move within the list.
: Display the selected file.
In the [TEXT] mode, only text files within a folder are displayed. Text files in other
folders should be displayed after being searched for in the [Browser] mode.
Supported File Format: TXT (Large files more than 10MB cannot be open.)
When Micro SD card is inserted, you can select [Internal Memory & External
Memory].
Viewing Texts
- While viewing texts, press the [ ] button to start / stop the
automatic scroll function.
-
While viewing texts, press the [ / ] button to move texts up or down.
- While viewing texts, press the [ ] button to bookmark the location
played.
Page 23

Additional Features
1. In the Text screen, press and hold the [ ] button to display
additioanl features.
2. Press the [ / ] button to select the additional feature and
press the [ ] or [ ] button to display the window for setting it up.
: Move to the upper list.
3. Press the [ / ] button to set the feature up and press the [ ]
or [ ] button to save / operate it.
- Skip to: press and hold [ / ] to move the location of text
based on the designated percentage.
- Auto Scroll Speed: Set the scroll speed.
- Font Size: Set the font size of the text.
- Add Bookmark: Bookmark a specific location of the text played.
- Delete File: Delete the selected file.
Page Movement: Move to a page you want to go if you enter [ / ].
-
BROWSER
Using E300
23
You can execute and manage a variety of files stored in the device.
Selecting File
1. In the home screen, select [BROWSER] to display the file list.
2. In the list, press the [ / / / ] button to select the file and
press the [ ] or [ ] button to play it.
: Move to upper folder.
: Move to the sub folder. Play when selecting the file.
/ : Move within folder.
: Play the selected file.
When Micro SD card is inserted, you can select [Internal Memory & External
Memory].
To browse and play music files in folders other than Music folder, use the
[BROWSER] mode.
To browse and play picture files in folders other than the Video folder, use the
[BROWSER ] mode.
To browse and play picture files in folders other than the Picture folder, use the
[BROWSER] mode.
Page 24

Deleting File
1. In the file list screen, select the file and press and hold the [ ]
button to display the confirmation message.
2. Once you select [Yes] using the [ / ] button and press the
[ ] or [ ] button, the device will delete the selected file.
SETTING
Using E300
24
You may set up your own user environment. The pre-installed menu
structure may differ depending on the firmware version.
Settings
1. Please select [SETTING] on the home screen.
2. If you select items you want by clicking [ / ] and pressing [ ]
or [ ], you will see the setup list.
3. If you select the additioanl features settings you want by pressing
[ / ] and then press [ ] or [ ], the function settings
window will be displayed.
4. If you set the function by pressing [ / ] and then press [ ] or
[ ], the function will be saved.
Timer Settings
Set the current time.
- : Set the menu. - : Move within the list.
Screen Settings
Backlight: Set the time backlight is on.
Brightness: Set the screen brightness.
Theme: Set the display theme.
Page 25

Timer Settings
Auto Power Off: Power will be automatically turned off when there
is no user activity, such as like manipulating the buttons or
using the device, for a preset time.
Sleep Setting: Power will be automatically turned off when the
preset time is reached.
Advanced Settings
Rebuild DB: Rebuild database of files.
Format Internal Memory: Delete all the data in internal memory.
Format External Memory: Delete all the data in external memory.
System Information: Display the device system information.
Reset All Settings: Restore to the fractory default settings.
Backup all valuable files before formatting, since deleted files cannot be recovered.
(We recommend formatting the memory using E300.)
Check the available battery power before you start formatting.
Setting Languages
Menu Language: Select languag for menu.
Countries: Select language for tag and text.
FITNESS
Using E300
25
You can check duration of exercise, its distance or calories burned
while you are implementing FITNESS and taking an exercise.
Page 26

Taking Exercise
1. In the home screen, select [FITNESS].
2. When pressing [ ], FITNESS mode will start.
3. When you press [ ], you can check the step, exercise distance
and calories burned.
4. If you press [ ], you can pause the FITNESS mode. If you press
[ ], you can stop the mode.
While using the FITNESS feature you can use other features in the multitasking
mode once you press the [ ] button for more than a few seconds. (Features
supported in multitasking mode: MUSIC, FM RADIO, SETTING, HOME.)
Additional Features
1. If you press the [ ] button for more than a few seconds, you will
see the option list.
2. After selecting an additional feature of your choice by pressing the
[ / ] button, you can find the additional feature installation
window by pressing the [ ] or [ ] button.
: Move to the upper list.
3. Once setting up customized features by pressing the [ / ]
button, you can save / operate additional features by pressing the
[ ] or [ ] button.
- Goal Setting: You can select a goal in terms of time/distance/calorie.
- Record: You can view your previous exercise records.
- Delete Record: Initializes data.
Using E300
26
Page 27

Important safety information
Relating to the Product
- If the same screen is turned on for a long time, there may be an
after-image on the screen.
- Do not allow metal (coins, hairpins, etc.) or foreign substances that
burn easily to get inside the product.
- Do not place heavy objects on top of the product.
- If the product gets wet from rain, drinks, medicines, cosmetics, sweat,
or moisture, do not turn the power on, and after quickly wiping the
product with a dry cloth, go to the closest iriver service center and
get it checked. (Failure due to submersion will be charged regardless
of the warranty period, and repair may be impossible.)
- Do not keep in places where there is moisture, dust, or soot.
- Do not disassemble, repair, or modify.
- Do not keep in direct sunlight or places where the temperature is too
high or too low (-5C ~ 40 C).
- Do not keep next to magnets, TVs, monitors, speakers, or other
objects with strong magnetism.
- Do not use chemicals or cleaners on the product; they may degrade
the surface and cause damage to the finish.
- Do not drop the product, or subject it to strong impact or vibration.
- Do not press multiple keys simultaneously.
- Do not disconnect from USB cable when transmitting data.
- When connecting the product with a computer, use a USB port on
the back of the computer. Some generic computers with sub-
standard USB ports can cause damage to the product.
- Do not insert devices other than earphones in the earphone terminals.
- Images may appear darker when the screen is covered by an LCD
protective film or clear sticker.
Others
- Do not use or handle headphones/earphones when driving a bicycle,
car, or motorcycle.
It is not only dangerous but can also be illegal according to the region.
- Do not use when driving, walking, or climbing.
Other Information
27
Page 28

- Accidents can happen, so use only in safe place.
- When using while on the move, check if there are any dangerous
obstacles.
- There is a risk of electric shock during electrical storms.
Avoid use if possible.
- If tinnitus (ringing in the ears) occurs, reduce the volume or
discontinue use.
- Do not use for long periods at high volume.
- Do not use headphones/earphones at high volume.
- Be careful that headphones/earphones do not get caught or
snagged in other objects.
- Do not sleep with earphones on, or use them for a long period of time.
Trouble shooting
Other Information
28
Check!
+ The power does not come on.
- Check available power in the battery.
Charge using USB cable and turn the power on.
- Press the reset key using a pointed tool.
+ There is an error on the PC when charging battery using USB cable.
- Check if the product is properly connected to the USB cable.
+ There is an error on the computer when connecting the USB.
- Check if the product is properly connected to the USB cable.
+ The capacity changes after formatting.
- There can be slight changes in capacity according to the OS of the
computer you are using.
+ The screen is turned off without warning.
- To save power consumption to lengthen the audio file replay time,
the device is designed to be turned off after certain inactivity.
Please adjust the length of time before turnoff in [SETTING –
Display – Auto Display Off].
+ The screen is not normal.
- Check for foreign substances on the screen.
Page 29

+ There is poor FM radio reception with heavy noise.
- Check for foreign substances in the earphone terminals.
- Check that the earphones are connected properly.
(When listening to FM radio, earphones serve as antenna.)
- Adjust the position of the player and earphones.
- Turn off any nearby electronic equipment to avoid potential interference.
+ There is no sound or there is too much noise.
- Check that the volume is set to ‘0’.
- Check that the earphones are connected properly or if there are
foreign substances in the terminal.
- Check that there are any errors in the music file.
+ The device is not connected to my computer.
- Please connect the device to the USB port located on the
backside of the computer.
Sometimes, power voltage of USB ports may be different.
+ Files are not replayed or some file images are blurry.
- Depending on the file type or image quality, the following problems
may occur:
It is difficult or impossible to replay the file.
The device may malfunction due to a problem with the file.
The images on the device’s screen may be displayed differently
from those on the computer.
There may be performance differences between the device and
the computer such as replay speed. There may be differences
in specifications.
- Retry after converting the file to an appropriate format or use a
different file.
Copyrights
Other Information
29
iriver Ltd. owns the patent rights, trademark, copyright, and other
intellectual property relating to this manual. Thus, none of the
contents of this manual can be copied or reproduced in any form or
by any method without the consent of iriver Ltd. Using any part or all
of the document may result in legal sanctions. Software, sound
sources, videos, and other content with copyrights are protected
under the related provisions of copyright regulations, etc. The user
will be held legally responsible for any copying or distributing of
contents with copyrights without permission, using this product.
Page 30

None of the companies, organizations, products, people, or events
cited in the examples is real.
Our company has no intention to imply a relationship with any
company, organization, product, person or event through this
manual, and none should be inferred.
It is the user’s responsibility to observe the relevant copyright
regulations.
©1999~2011 iriver Limited. All rights reserved.
Certification
Registered Trademark
Exemption
Other Information
30
KC / FCC / CE / CCC
Grade B device (home broadcasting and communication device) is
mainly for domestic use (grade B), and can be used in all areas.
Windows 2000, Windows XP, Windows Vista, Windows 7, Windows
Media Player are trademarks of Microsoft corp.
is a trademark of SRS Labs, Inc.
WOW HD technology is incorporated under license from SRS Labs, Inc.
The manufacturer, importer, and agencies will not be held liable for
damage caused by accidents including injuries or inappropriate use
or handling of the product. The information in the manual is based on
the current specifications of the product.
iriver Ltd., the manufacturer of this product, continues to add new
features and apply new technologies to it. All standards may be
changed without prior notice to individual users.
We cannot be held responsible for data loss caused by the use of
the product.
 Loading...