

Page 1

2nd IRIVER STORY
COVER STORY
USER GUIDE
Page 2

Table of Content
01
Getting Started
Components
Locating the Controls
Power Management
Charging the Battery
Connecting the Product
Using iriver plus 4
Using Adobe Digital Editions
02
Using iriver story
Home Screen
Selecting Files
Viewing Files
Memo/Snapshot
Wi-Fi Service
Music
Recording
Dictionary
Setup
03
03
05
06
07
11
14
16
17
20
22
25
28
29
30
31
03
Other Information
Important Safety
Information
Troubleshooting
Copyrights
Certification
Registered Trademark
Exemption
33
35
37
48
48
48
Page 3

Components
Components may be changed without prior notice for improvement of
product performance or quality.
Quick Start Guide
Player + Stylus Pen
Quick Start Guide: This is the manual explaining how to use our device.
Product Warranty: Please keep this in a safe place because you may
need it at the time of warranty repairs.
USB Cable: You can connect this to the computer and use it to
recharge the power.
& Product warranty
USB Cable
Locating the Controls
The exterior and the contents printed or engraved may differ by model
or according to the name of each part.
Menu
Home
Previous/Next Pages
Previous
Getting Started
03
Stylus Pen
EPD
Page 4
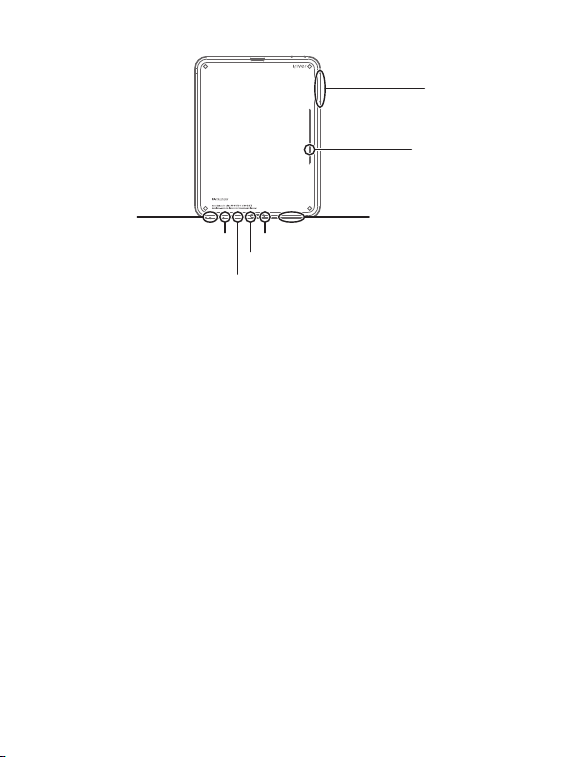
Volume
Speaker
SD Card SlotPower
Earphones Jack
USB Port
MIC
Recharge LED
Power: You can turn the power off by pressing and holding it for a while.
You can switch to the standby mode by pressing it briefly.
Home: Indicates the initial screen.
Menu: Shows the menu list during mode operation.
Previous: Stands for previous screen.
Previous/Next Page: Shows the previous/next page on file list or file viewing.
Stylus Pen: This is the pen-shaped writing apparatus used when you
touch the screen.
EPD: The screen that feels and reads like a paper-based book.
Earphone Jack: You can listen to the sound by connecting an
earphone to it.
USB Port: You can use this to connect using a USB cable and the
computer, or to recharge the battery.
SD Card Slot: You can connect this to the SD card to view and replay
the files on the card.
MIC: You can record your voice through it.
Recharge LED: Once power recharge is completed, the recharge
LED light is turned off.
Volume: Controls the sound volume.
Speaker: Used to reproduce the sound.
Getting Started
04
Page 5

Power Management
Turning on/off
1. Press and hold the [ ] and the power comes on.
2. If you press and hold the [ ] when the product is turned on,
then the power will be turned off.
This model supports an automatic power-saving feature to minimize battery
consumption. Depending on the power-saving mode settings, the product will
be automatically turned off if keys are not operated for a given time.
(refer to page 32)
Switching to Standby Mode
1. If you press the [ ] key briefly when the product is on, you can
switch to standby mode.
2. If you press the [ ] key briefly again, standby mode is terminated.
Using the Reset Function
1. If the product does not respond to key presses, reset it by pressing
the [ ] + [ ] keys for more than six seconds.
Even if you use reset function, current time and memory data will be preserved.
Don't use reset function while the product is playing. It may cause severe
damage to its memory.
Getting Started
05
Page 6

Charging the Battery
Charging the Battery Using Your Computer
1. Open the cover on the bottom of the product.
2. Turn on your computer and connect the product to your computer.
The internal battery will charge automatically.
Replay Time
- Continuous Book Replay Time: Max. 11,000 page view
- Continuous Music Replay Time: Max. 30 hours (based on MP3 128 Kbps,
44.1 KHz, Volume 10, EQ Normal).
Once recharging is completed, the Recharge LED will turn off.
Do not use cables other than the USB cable provided. It may cause malfunction.
Check if the product is connected to a high-power USB 2.0 port. Some
low-power USB ports built into certain peripheral devices, such as some types
of keyboards and USB hubs without internal power may not provide enough
power to charge. While your computer is switched to standby mode, the
product may not be charged.
Turn the product off or switch to Standby mode when charging. If charged
when the power is on, charging may take longer.
Charge and store the product only at room temperature. The product may not be
charged in extremely hot or cold place. The rechargeable battery is a consumable.
The available usage time of charged battery becomes short over time.
The battery will be fully charged within about 5 hours.
(Based on fully discharged, power OFF)
The charging time might be extended if you use the product while charging.
If the battery is completely discharged and has not been used for a long time,
power will not come on again until it has been charged for at least ten minutes.
In case where you recharge the batteries using the adapter, we do not provide
warranties for adapters other than those sold by iriver.
Getting Started
06
Page 7
Charging the Battery Using the USB Adapter
1. Open the cover on the bottom of the product.
2. If you connect the USB adapter to the device and power plug,
the internal battery will charge automatically.
USB adapter can be purchased separately.
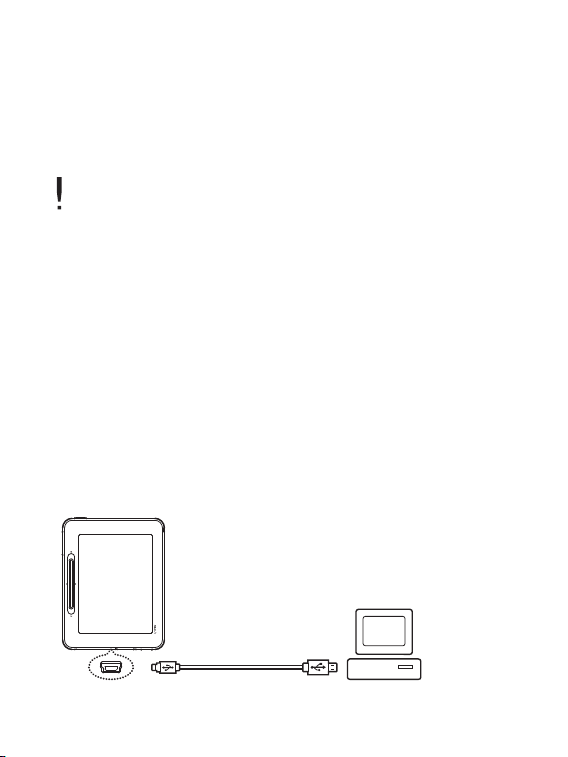
Connecting the Product
Connecting with the Computer
1. Open the cover on the bottom of the product.
2. Turn on the power of the device and computer.
3. If you connect the device to your computer, you will see the screen
where you can select connection mode.
- Portable Disk Connection: The connection between the product
and the computer is established and you can start transferring data.
- Battery Recharge: The recharge of the product will begin.
Getting Started
07
Page 8

Do not use cables other than the USB cable provided. It may cause malfunction.
For successful connection between your computer and the USB cable, make
sure that all the functions are disabled before connection.
Check if the product is connected to a high-power USB 2.0 port. If connected
to a keyboard or a USB hub without a power supply of its own, connection with
the computer may not be troublefree.
Disconnecting from your computer
1. Safely disconnect the product from your computer by clicking the
icon on the taskbar of the computer screen.
2. Confirm the device disconnection by clicking [Confirm].
Depending on the operating system for example Windows XP, the icon may be
hidden from the taskbar. Hidden icons can be displayed by clicking indicator.
Safe disconnection may not be performed if application programs such as
Windows Explorer or Windows Media Player Windows are being used.
Make sure that the product is safely disconnected after all the active
application programs are closed. If safe disconnection fails, try again later.
Failure to safely disconnect may cause data loss.
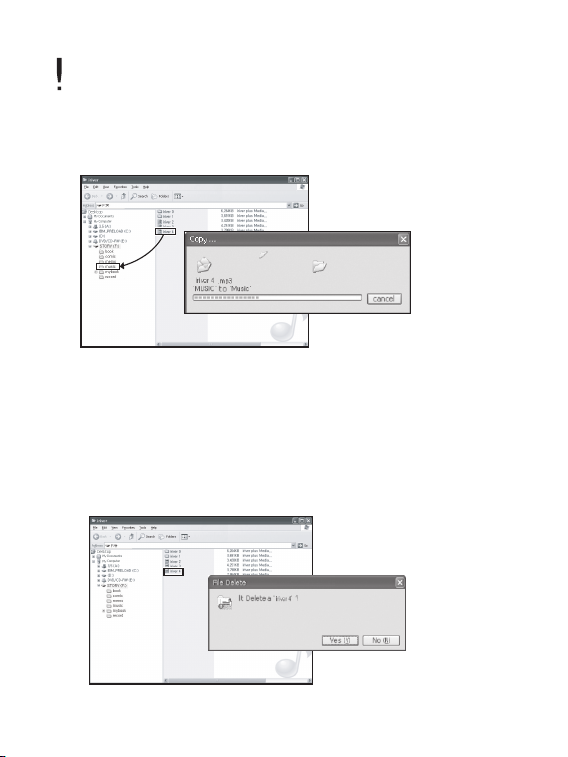
Copying Files (Folders) to the Product
1. After selecting files/folders to copy from your computer, the selected
file/folder will be copied if you drag and drop it to the added drive.
2. Files (or folders) will be transferred to folders below according to
their content type.
- E-Book: book - Comic Book: comic - Music: music
Getting Started
08
Page 9
Please connect the USB cable in the proper manner. If the power of the
computer or product is turned off or the USB cable is disconnected while
copying or moving files/folders, it may cause serious damage to the memory.
Transfer rate may differ depending on the computer or OS environment
available for your region.
Deleting Files (Folders) from the Product
1.
Select the files/folders to be deleted, right-click on them and select [Delete].
2. Click [Yes] if the [Confirm File/Folder Deletion] window pops up,
and the selected files/folders will be deleted.
Getting Started
09
Page 10

Inserting/removing the SD card
1. Open the cover on the bottom of the product.
2. Turn the power off, place the SD card (see the figure below) in the
SD card slot, and press it in gently.
3. Press it in once more and the card can be removed.
Recommended SD cards
Brand: SanDisk, Transcend
Insert/remove the SD card while the power is off.
Do not force the SD card. It may cause malfunction and damage to the SD card.
Do not detach the SD card when in use. It may delete data, cause malfunction,
or damage the SD card.
Please do not repeatedly insert/remove the SD card.
If the SD card is not positioned properly, the product may malfunction or the
card may get stuck. If SD cards other than the recommended ones are used, it
may cause malfunction.
The transfer rate of the SD card may differ according to the computer status.
SD cards cannot be formatted using the product. Please format after connecting
the card reader or the product to the computer through UMS.
When formatting a SD card, all the data are deleted. Make sure that the data is
backed up before formatting.
Getting Started
10
Page 11

It is recommended that you format a SD card to FAT 32 system. If a SD card is
not recognized or malfunctions, try to use it again after formatting.
SD cards can be purchased separately.
It is recommended that you use a SD card up to 32GB.
Using iriver plus 4
iriver plus 4 is an integrated software which manage a variety of
multimedia files. Using iriver plus 4, you can transfer files on the
computer to the product and do automatic firmware upgrade.
Installation
1. Please download the iriver plus 4 software program from our iriver
website (www.iriver.com). Once you finish downloading it, you will
see the installation guide screen appearing.
2. Please follow step-by-step instructions on the screen to complete
the installation process.
The minimum specifications required for the computer are as follows.
Windows® 2000/XP
- Intel® Pentium®
- Free space more than 30MB - 16bit Sound Card and Speaker
- Microsoft Internet Explorer V 6.0 or above
- SVGA or high-resolution monitor (min 1024x768 resolution)
Windows® Vista Specifications (For Windows® Vista, note that only the 32-bit
version will be supported.)
- Intel® Pentium®
- Free space more than 20MB - 16 bit Sound Card and Speaker
- Microsoft Internet Explorer V 6.0 or above
- SVGA or high-resolution monitor (min. 1024x768 resolution)
Getting Started
11
Ⅱ
233MHz or above - Memory: 64MB or above
Ⅱ
800MHz or above - Memory: 512MB or above
Page 12

Windows® 7 Specifications (For Windows® 7, note that only 32-bit version will
be supported.)
- 1GHz or above, 32-bit processor - Memory: 1GB or above
- Free space more than 16GB
- DirectX 9 Graphic Device with WDDM 1.0 higher Drive
- SVGA or high-resolution monitor (min. 1024x768 resolution)
Adding Media to the Library
1. When iriver plus 4 is first run, the Add Media Wizard will be executed.
2. According to the screen instructions, you can add to the library
media files such as music, and e-books stored in the computer.
Extracting Media from a CD
1. Insert a music CD into the CD drive and execute iriver plus 4.
2. Select the music checkboxes you want to extract from [CD] tab in
iriver plus 4 and click [CD Ripping] at the bottom left.
3. When the music extraction is complete and [All Music] is selected,
you will see the extracted music files added to the library.
Transferring Media to the Product
1. Connect the product to your computer’s USB port and then
execute iriver plus 4.
Getting Started
12
Page 13

2. Select the file checkboxes you want to transfer from your computer
to the product and then click [Transfer] button or drag & drop the
file to Device icon at the bottom or Device window.
You will see the file transfer status in the [File Transfer] tab.
3. When the file transfer is complete, you will see the selected music
files added to the device library.
Initializing the Disc
1. Connect the device to your computer’s USB port and then execute
iriver plus 4.
2. Select [Device > Initialize Disc]. When the window pops up asking
whether to proceed with initializing the disc, click [Start].
3. When the initialization process is finished, the Complete window will
be displayed and the device can be disconnected from your computer.
File recovery will not be possible if files have been deleted from the device.
Please make sure to perform backup before initializing the disc.
Upgrading the Firmware
1. Connect the device to your computer’s USB port while connected
to the Internet and then execute iriver plus 4.
2. Select [Device > Firmware Upgrade], and the Upgrade window will
be displayed. Complete the firmware upgrade by following the
instruction window.
Getting Started
13
Page 14

If there is not enough battery, a firmware upgrade may not be initiated.
Never disconnect the device from your computer while a firmware upgrade file
is being downloaded.
After the download is finished, the upgrade will be initiated when the device is
disconnected from your computer.
If the device firmware is the latest version, a pop-up window will be displayed
to indicate that it is the latest version.
If there is newer firmware version, notification window will be displayed
automatically when the device is connected to the computer.
Using Adobe Digital Editions
You can transfer copyrighted e-book files onto the portable device
easily by using Adobe Digital Editions.
Installation
1. Please download Adobe Digital Editions from the Adobe website.
Once you finish downloading it, you will see the installation guide
screen appearing.
2. Please complete the installation process by following the step-by-
step instructions.
Authenticating the Computer and the Product
1. After you execute the Adobe Digital Editions program, please begin
the [Library-Computer Authentication] process.
Getting Started
14
Page 15

2. Once you type in your ID and password on the computer's
authentication window, press the authentication button.
You can obtain the Adobe ID from the Adobe website.
3. After authentication is completed, the device installation helper
window will appear if you connect the device to your computer.
4. Press the device authentication button.
Transferring Files to the Device
1. Execute the Adobe Digital Editions program.
2. Please select content to be saved on to the device and drag &
drop the file.
Activating Adobe
1. Select [Setup] on the main screen.
2. On menu, select [System Management-Adobe Activation].
3. On the Adobe Activation window, enter Adobe ID and password
and press [Authentication]. Then you will see the AP list, which will
show that you can connect.
4. If you select an AP that you want, you can complete the Adobe
Activation process.
- Depending on AP, you may have to enter the key index and
network key.
Getting Started
15
Page 16

Home Screen
For several models sold in markets other than Korea, some functions
may not be supported.
Home Screen Legend
: Indicates Wi-Fi connection status.
: Shows battery status.
Book: You can view books and documents saved on the device
(pp.17-22).
Comic: You can view comic books saved on the device (pp. 17-22).
Bookmark: You can view bookmarked files from books and comic
books (pp. 17-22).
My Folder: You can explore files saved on the device and SD card.
Memo/Snapshot: You can create or read memos and view files that
you clipped from books and comic books (pp. 22-24).
Wi-Fi Service – Book2: You can purchase books
(pp. 25-26; may differ depending on device model).
- Email: You can manage email accounts that you have
set up (pp. 26-28; may differ depending on model).
Media+ - Music: You can listen to music (pp. 28-29).
- Voice Recording: You can record voice or replay pre recorded files (pp. 29-30).
-
Setup: You can set up user environment for your device (pp. 31-32).
Dictionary: You can look up words for their meaning (pp. 30-31).
Using the EB05
16
Page 17

Selecting Options
1. Once you turn on the power, you will see the home screen.
- If you press the [ ] in the middle of using the device, you will
also see the home screen.
2.
If you touch the function button on the screen, you can enjoy the function.
3.
If you press the [ ] during function operation, the previous screen will appear.
Please use the stylus pen when using the touch screen. When touching the
screen, please do so gently; if you touch it hard with a sharp object, the screen
may be damaged.
When parking the stylus pen, keep inserting it into the groove until it clicks.
Selecting Files
Selecting Files
1. Once you select [Book/Comic/Bookmark/My Folder] on the Home
screen, you will see the file list.
2. On the file list, select the tab on the left side.
- Book: View All Books / Books You Are Reading / Bookmarked
- Comic Book: Cover Story / SD Card
- Bookmark: Book / Comic Book
- My Folder: Cover Story / SD Card
3. If you select a file of your choice, you can open the file for viewing.
Files saved on the SD card can be viewed by searching in My Folder.
Book Formats Supported: Comic Book Formats Supported: DF, EPUB, TXT,
DOC, PPT, XLS, HWP, DJVU, and FB2
Using the EB05
17
Page 18

Compressed File Formats Supported: JPG, BMP, PNG, GIF, and Zip
compressed file formats for all the above formats.
It may take longer for progressive JPEG files to open or to turn pages.
File List Screen Legend
Progress Bar on File Name: Indicates how much of the file is read.
Format: Specifies the file’s format.
: Designates the files registered as favorites.
Viewing Previous/Next List Page
- If you press the [ / ] on the file list or push the [ / ] button on the
bottom-right side of the screen, you can move to the previous/next page.
- If you push the [ / ] and hold it for a few seconds, you can
continuously move to the previous/next page.
Searching Files
1. On the file list, if you press the [ ] on the top right of the screen,
you can search for files by typing in search words.
Registering a File as a Favorite
1. If you press the [ ] on the top right of the screen, you can activate
the [ ] icon right next to the file name.
2. If you press the [ ] icon next to the file, you can register the file as
your favorite.
Using the EB05
18
Page 19

Deleting Files
1. On the file list, if you push the [ ] button on the top right of the
screen, you can activate [ ] icon next to the file name.
2. If you press the [ ] icon next to the file, you can delete the file.
Deleting All Bookmarks
1. On the file list, if you press the [ ] on the top right of the screen,
ALLALL
you can delete all bookmarks.
Deleting Bookmarks
1. On the file list, if you press the [ ] on the top right of the screen,
you can activate [ ] icon next to the bookmark.
2. If you press the [ ] icon next to the bookmark, you can delete the
bookmark.
Book/Comic List Menu
1. On the file list, if you press the [ ], you will see the menu list
coming on.
2. You can select menu and set up items.
- Change Cover/Title List: Sets up the sorting types of the book list.
- Change Alignment Type: Sets up the alignment types of the book list.
Using the EB05
19
Page 20

Viewing Files
File Viewing
- If you slide the [ / ] or press the left/right on the screen while
viewing, you will see the previous/next page.
-
If you slide the [ / ] while viewing, you will see the page status bar. Having
moved to a page you want after pressing the [ / ], you can view the page
if you press the [ ]. (If you want to cancel continuous moving, press the [ ].)
-
If you press and hold a search word while viewing, you will see a window with
dictionary lookup results. (This function may not be supported depending on file format.)
- If you press the [ ] while viewing, you will see the previous screen.
How to Use Toolbar
If you press the screen while viewing, you will see a toolbar window.
: Uses the simple function in [Music] mode (Book/Comic).
1-2/20 : Indicates the page you are viewing and the total number of
pages (Book/Comic).
: Opens a simple memo window while viewing and enables you
to create drawings (Book/Comic).
S
:
Enables you to take the snapshot of the page you are viewing (Book/Comic).
(Snapshot files are saved in the Snapshot folder under the [Memo/Snapshot] mode.)
: Bookmarks the page you are viewing (Book/Comic).
: Looks up the dictionary while viewing (Book).
Aa
: While viewing a PDF file, you can enlarge the text size with this
if the reflow function is on. You can cut the outer margins of the file
if the reflow function is off (Book).
Using the EB05
20
Page 21

: Resizes the screen size according to the size of the file (Comic).
Auto
: Sets up the auto page turner function (Comic).
: Creates drawings on the page you are viewing (Book/Comic).
: Deletes drawings on the page you are viewing (Book/Comic).
: (Book/Comic)
If you choose: Sets up the thickness of the pen.
If you choose: Sets up the thickness of the eraser or
deletes all drawings you have entered.
Book Viewing Menu
1. While reading books, press [ ] to view the list of menu.
2. You can select a menu and set up items.
- Page Moving: Enables you to move to the page you entered.
- Rotate: Rotates the screen.
- Table of Contents: If there is a table of contents in the file, you can view
it with this function. If you select a table of contents you can move to
the page that you select. This function supports PDF/EPUB files only.
- Main Text Search: If you type in a keyword, you can find sentences
in the main text containing the word.
- Link Search: If there is a link in a PDF and EPUB document, it will
enable you to move to the linked location. If you select the Main Text
Link Search function, you can move to the linked location in the main text.
- Dithering On/Off: If the color scheme used in the original file is impossible
to reproduce, it will be replaced by one most similar to the original.
-
Reflow On/Off: If the page is too crowded with text, which may make it hard for
you to read, this function will simplify the page and thereby improve readability.
Using the EB05
21
Page 22

Depending on file format, you may not be able to see the menu.
Once you view a file, you will see the same status of the file (e.g., zoom in,
landscape viewing) on your next viewing.
Comic Viewing Menu
1. While reading comic books, press [ ] to view the list of menu.
2. You can select a menu and set up items.
- Page Moving: Enables you to move to the page you entered.
- Change Viewing Order: Changes the viewing order of the comic
book you are reading (left to right and right to left).
- Dithering On/Off: If the color scheme used in the original file is impossible
to reproduce, it will be replaced by one most similar to the original.
- Setup to Standby Screen: Sets up the page you are viewing now as
the standby screen.
Memo/Snapshot
Selecting Memo/Snapshot File
1. Once you choose [Memo/Snapshot] on the Home screen, you will
see the Memo/Snapshot list.
- On the Memo/Snapshot list, press the tab on the left side of the
screen to select a Memo/Snapshot.
2. If you select a Memo/ Snapshot file you will see the Memo/Snapshot.
Using the EB05
22
Page 23

Deleting Memo/Snapshot File
1. If you press the [ ] on the top right of the screen on Memo/
Snapshot list, you can activate the [ ] icon next to Memo/Snapshot.
2. If you press the [ ] icon next to the Memo/Snapshot file to delete,
you can delete the Memo/Snapshot.
Creating Drawings
1.
On the Memo/Snapshot list, press the tab on the left side and select Drawing.
2.
If you press [ ] on the top right of the screen, you will see a memo window.
: Creates a drawing.
: Switches to the eraser mode.
If you choose: Sets up the thickness of the pen.
If you choose: Sets up the thickness of the eraser or
deletes all you have entered
: Sets up background memo pad.
3. Once you enter a drawing and press the [ ] on the screen,
you can save the drawing.
Viewing Drawings
If you select a memo on the list, you can see the memo that you
chose and toolbar.
: Sends an email with the memo as an attachment.
: Revises the drawing.
: Deletes the drawing.
/ : Indicates the previous/next memo.
Using the EB05
23
Page 24

Creating Text Memos
1. On Memo/Snapshot list, press the tab on the left of the screen and
select a Text memo.
2. If you press the [ ] button on the top right of the screen, you can
T
see a memo window.
3. Once you enter a memo using the virtual keyboard and press the
[ ] on the screen, you can save the memo you typed.
Viewing Text Memos
If you select a memo on the list, you can see the memo that you
chose and toolbar.
: Sends an email with the memo as an attachment.
T
: Revises the text memo.
: Deletes the text memo.
/ : Indicates the previous/next memo.
Viewing Snapshots
On the Snapshot list, if you select Snapshot, you will see a Snapshot
and toolbar.
: Sends an email with the memo as an attachment.
: Deletes the snapshot file.
/ : Indicates the previous/next memo.
Using the EB05
24
Page 25

Wi-Fi Service
The Wi-Fi service function may not be available for some models.
This function allows you to connect to the wireless Internet and buy
books online and send and receive emails. For several models sold in
markets other than Korea, some functions may not be supported.
How to Buy Books Online
1. On the Home screen, select [Wi-Fi Service-Book2] and you will see
the Book2 site.
- Please enter your ID and password on the Adobe activation window.
2. Log in by typing in your ID and password.
- You must be a member of the online service.
3. After selecting [Buy Now] at the bottom of the book to buy and fill
out the payment form.
4. If you press [Download], you will see the book you bought begin
downloading.
For how to connect to the wireless Internet, refer to the following page (pp. 25-26).
For how to activate Adobe, refer to the following page (pp. 14-15).
Connecting to Wireless Internet
1. Select [Setup] on the Home screen.
2. Select [System Management – Wi-Fi Setup] on Menu.
3. If you press the [Search Wireless LAN] tab, you will see the AP list
that you can access nearby.
Using the EB05
25
Page 26

- If you press the [Search Again] button below the [Search Wireless
LAN] tab, you will see the AP list searched again.
4. Once you select the AP to connect and press [Connect], you will
see the wireless network connecting.
-
Depending on AP, you may have to enter the key index and network key.
If you select a menu requiring wireless network connecting, you will see the AP
list window appearing.
Adding Email Accounts
1. If you select [Wi-Fi Service-Email] on the Home screen, you will see
the email account list.
2. If you press the [ ] on the top right of the screen on the email
account list, you will see the email management window appearing.
3. If you press the [ + ] on the top of the screen, you will see the add
email window appearing.
(Please refer to the example below when you add email accounts.)
- Account ID: iriver
- Email Address: iriver.story@gmail.com
- Account Password: 12345
- Incoming Mail Server: pop.gmail.com
- Outgoing Mail Server: smtp.gmail.com
- Incoming mail server port: 995
- Outgoing mail server port: 587
4. If you press the [Confirm] after finishing filling out the form, you are
all set to adding email accounts.
For some information you enter when adding accounts, please visit your email
service provider’s website.
Using the EB05
26
Page 27

Deleting Email Accounts
1. Once you press the [ ] on the top right of the email management
window, you can delete [ ] next to the account.
2. If you press the [ ] icon next to the account to be removed, you
can delete it.
Viewing Email Account
1. If you select an email account you want on the email account list,
you will see the email list.
2.
You can activate functions by pressing icons on the top right of the screen.
: Allows you to compose new mail messages and send them.
: Refreshes the screen and shows you new mail messages.
: Enables you to activate the delete window and delete mail
messages of your choice.
: Manages email address book.
Send: Activates selected windows and sends mail
messages to selected addresses.
If you press [Save] after composing a mail message, the
composed message will be saved on the temporary folder.
Add: Adds new addresses.
Delete: Activates the Delete window and deletes addresses you want.
Revise: Activates the Revise window and revises addresses you want.
3. If you select the mailbox by pressing the tab on the left of the screen,
you will see the mail list.
4. If you select a mail message of your choice, you will see the message.
- If you press the [ + ] key next to the sender’s email address in the
inbox, you can add the address to your address book.
- If there is any attachment, you can see the attachment list by
pressing the attached file.
Using the EB05
27
Page 28

- If you press the [Reply] on the bottom of the inbox screen,
you can reply to the message you received.
- If you press the [Forward] on the bottom of the inbox screen,
you can forward the message you received.
While viewing mail messages, if you press the [ / ] or the [ / ] on the
bottom right of the screen, you can move to the previous/next page.
Music
Selecting Music
1.
If you select [Media – Music] on the Home screen, you will see the music list.
2. If you select a music file you want, you can replay it.
- You can select a memory you want by pressing the tab on the left
of the screen on file list.
If you press and hold the [ / ] button on music list, you can move to the
previous/next page continuously.
If you press the [ / ] button or [ / ] on the bottom right of the screen on
music list, you can move to the previous/next page.
If you press the [ ] button on the bottom left of the screen on music list, you
can move to the upper-level folder.
Supported file formats: MP3, WMA, OGG
Listening to music
- While playing, press the [ / ] to control volume.
- While playing, press the [ / ] to stop/replay.
Using the EB05
28
Page 29

- While playing, press the [ / ] to play the previous/next music.
- While playing, touch the location of the progress bar while replaying,
you can move to a location you want.
- If you press the [EQ] on the screen, you can change the EQ.
- If you press the [Replay Mode] on the screen, you can change the
replay mode.
Music Listening Menu
1. If you press the [ ] on music list or while replaying, you can
see the menu list.
2. You can select menu and set up items.
- Change the sorting type: Sets the sorting type for the music list.
- Delete file: Deletes selected music.
Recording
Recording
1. Once you choose [Media/Recording] on the Home screen,
the standby screen will be displayed.
2. Once you press the [ ], recording starts. If you press [ ] in the
middle of recording, recording terminates.
- If you press the [LOW/MEDIUM/HIGH] on the top right of the screen,
you can change the quality of the recording.
You cannot control volume while recording.
If the remaining memory space or power is insufficient, recording will be
automatically stopped.
Using the EB05
29
Page 30

The recorded file will be saved in the following format. VOICEYYMMDD-
XXX.mp3 (YY:Year, MM:Month, DD:Day, XXX: saved number)
The size for recorded files per minute according to recording quality is as below.
low: Approx. 240KB / medium: Approx. 380KB / high: Approx. 720KB
Recording can be done for up to 5 hours.
Listening to recorded files
1. From the recording standby window, press the [Replay] key on the
left of the screen to view the list of recorded files.
2. If you select a file you want, you can see the file replayed.
- While playing, press the [ / ] to control the volume.
- While playing, press the [ / ] to stop/replay.
- While playing, press the [ / ] to play the previous/next file.
- While playing, touch the location of the progress bar while replaying,
you can move to a location you want.
Dictionary
Looking up Dictionary
1. If you select [Media-Dictionary] on the Home screen, you will see
the keyword input window.
2. Select a dictionary for a lookup by pressing the [ / ] button
on the screen.
3. Pressing [Enter] after typing in a search word will produce the
dictionary lookup results.
Using the EB05
30
Page 31

Moving to Previous/Next Page
1. If you press the [ / ] on the lookup results screen, you can
move to the previous/next page.
Moving to Previous/Next Entry
1. If you press the [ / ] on the lookup results screen, you can
move to the previous/next entry page.
Setup
You may set up your own user environment. The pre-installed menu
structure may differ depending on the firmware version.
Settings
1. Please select [Setup] on the Home screen.
2.
If you select items you want by clicking the tab, you will see the setup list.
3. Please select the setup you want.
- Personal Information Management
Set up My Name: Sets up the name to appear on the main screen.
Personal Information: Sets up my own name and phone number.
- Other Management
Mail Setup: Sets up items related to your email account.
Using the EB05
31
Page 32

+ Data Update: Sets up the time interval during which the mailing
system fetches email messages.
+ BCC to Yourself: Sets up the mail program so that it could
always send a BCC (blind carbon copy) to yourself.
+
Signature: Sets up the signature of yours at the end of the mail message.
Auto Memo Setup: Sets up a function whereby a memo pad
appears whenever you pull out the stylus pen on the initial screen.
Auto Screen Direction Setup: Sets up the screen horizontally or
vertically depending on how you locate the device.
Virtual Keyboard Language Setup: Sets up the language that you
will use on the virtual keyboard on the language input screen
Home Screen Main Theme Setup: Sets up the main theme of the initial screen.
Screen Output Direction Setup: Sets up the direction of the screen output.
Standby Screen Initializing: Initializes the standby screen that the user set up.
- System Management
Power Management: Sets up the power-saving function so that
the device can be turned off after the passage of certain hours.
Time Setup: Sets up the current time.
Language Setup: Selects the language to be used.
Wi-Fi Setup: Connects to Wi-Fi and indicates information related to Wi-Fi.
Adobe Activation: Activates Adobe.
Coordinate Adjustment: Adjusts coordinates.
Device Initialization: Initializes the device to the original state at the
time of shipping.
(It will delete all the settings, data, memos, and snapshot files.)
System Information: Indicates the system information of the device.
Using the EB05
32
Page 33

Important safety information
Relating to the Product
- If the same screen is turned on for a long time, there may be an after
-image on the screen.
- Do not allow metal (coins, hairpins, etc.) or foreign substances that
burn easily to get inside the product.
It may cause failure.
- Do not place heavy objects on top of the product.
It may cause damage or failure.
- If the product gets wet from rain, drinks, medicines, cosmetics, sweat,
or moisture, do not turn the power on, and after quickly wiping the
product with a dry cloth, go to the closest iriver service center and
get it checked. (Failure due to submersion will be charged regardless
of the warranty period, and repair may be impossible.)
It may cause damage or failure.
- Do not keep in places where there is moisture, dust, or soot.
It may cause failure.
- Do not disassemble, repair, or modify.
It may cause damage or failure.
- Do not keep in direct sunlight or places where the temperature is too
high or too low (-0
It may cause failure.
- Do not keep next to magnets, TVs, monitors, speakers, or other
objects with strong magnetism.
It may cause failure.
- Do not use chemicals or cleaners on the product; they may degrade
the surface and cause damage to the finish.
It may cause failure.
℃
~ 40℃).
Other Information
33
Page 34

- Do not drop the product, or subject it to strong impact or vibration.
It may cause damage or failure.
- Do not press multiple keys at the same time.
It may cause damage or failure.
- Do not disconnect from your computer when transmitting data.
It may cause failure.
- When connecting the product with a computer, use a USB port on
the back of the computer.
Some generic computers with sub-standard USB ports can cause
damage to the product.
- Do not insert devices other than earphones in the earphone terminals.
It may cause damage or failure.
- Back up important data on the device and keep it in a safe place.
- The EPD is highly susceptible to shock and pressure. Please use
extreme caution when handling the device.
- The magnet on the device’s cover may damage the magnetic stripes
on your credit card/mass transit pass/calling card/tape recorder.
Please keep the device away from these.
Others
- Do not use or handle headphones/earphones when driving a bicycle,
car, or motorcycle.
It is not only dangerous but can also be illegal according to the region.
- Do not use when driving, walking, or climbing.
There is danger of injury.
- Accidents can happen, so use only in safe place.
There is danger of injury.
Other Information
34
Page 35

-
When using while on the move, check if there are any dangerous obstacles.
There is danger of injury.
- There is a risk of electric shock during electrical storms, so do not
use if possible.
There is danger of injury.
- If you experience tinnitus, reduce the volume or stop use.
There is danger of injury.
- Do not use for long periods at high volume.
There is danger of injury.
- Do not use headphones/earphones at high volume.
There is danger of injury.
- Be careful that headphones/earphones do not get caught or snagged
in other objects.
There is danger of injury.
- Do not sleep with earphones on, or use them for a long period of time.
There is danger of injury.
Troubleshooting
Check!
+ The power does not come on.
- Check if there is battery power left. Charge and turn the power on.
- Reset the device by pressing the [ ] + [ ] keys for more
than six seconds.
+ There is an error on the computer when charging battery.
- Check if the product is properly connected to the computer.
Other Information
35
Page 36

+ There is an error on the computer when connecting the USB.
- Check if the product is properly connected to the computer.
+ The capacity changes after formatting.
- There can be slight changes in capacity according to the OS of
the computer you are using.
+ The screen is not normal.
- Check if there are foreign substances on the screen.
+ The device is not connected to my computer.
- Please connect the device to the USB port located on the backside of
the computer. Sometimes, power voltage of USB ports may be different.
+ I cannot open book files.
- Please check if the device supports the file format.
+ There is no sound or there is too much noise.
- Check if the volume is set to ‘0’.
- Check if the earphones are connected properly or if there are
foreign substances in the terminal.
- Check if there are any errors in the music file.
+ The screen responds too slowly and it takes too much time for the
after-image to disappear.
-
The EPD by its nature is slower than any other comparable devices; especially
when it changes menu screens, it flickers and takes more time than usual.
- The EPD by its nature may leave after-images on the screen.
- If the EPD is exposed to low or high temperature, the device may
leave more after-images and respond even slower
(range of temperature for normal EPD operation: 0-40 degrees Celsius).
- If the EPD is exposed to direct sunlight, the screen may leave horizontal
lines. The screen will go back to normal if you move to shaded area.
Other Information
36
Page 37

Copyrights
iriver Ltd. owns the patent rights, trademark, copyright, and other
intellectual property relating to this manual. Thus, none of the contents of
this manual can be copied or reproduced in any form or by any method
without the consent of iriver Ltd. Using any part or all of the document may
result in legal sanctions. Software, sound sources, videos, and other
content with copyrights are protected under the related provisions of
copyright regulations, etc. The user will be held legally responsible for any
copying or distributing of contents with copyrights without permission,
using this product.
None of the companies, organizations, products, people, or events cited
in the examples is real.
Our company has no intention to imply a relationship with any company,
organization, product, person or event through this manual, and none
should be inferred.
It is the user’s responsibility to observe the relevant copyright regulations.
©1999~2010 iriver Limited. All rights reserved.
This program is free software: you can redistribute it and/or modify it under
the terms of the GNU General Public License as published by the Free
Software Foundation, either version 2 of the License, or (at your option)
any later version. This program is distributed in the hope that it will be
useful, but WITHOUT ANY WARRANTY; without even the implied warranty
of MERCHANTABILITY or FITNESS FOR A PARTICULAR PURPOSE. See
the GNU General Public License for more details. You should have
received a copy of the GNU General Public License along with this
program. If not, see < http://www.gnu.org/licenses/ > The source codes
are available on the web site. Access the following web site to download,
www.iriver.com/linux_opensource.html In addition a request for a copy of
the source code on CD ROM /SD card may be requested at
webmaster@iriver.com. You will be charged a service fee for this offer.
Other Information
37
Page 38

GNU GENERAL PUBLIC LICENSE
Version 2, June 1991
Copyright (C) 1989, 1991 Free Software Foundation, Inc.,
51 Franklin Street, Fifth Floor, Boston, MA 02110-1301 USA
Everyone is permitted to copy and distribute verbatim copies
of this license document, but changing it is not allowed.
Preamble
The licenses for most software are designed to take away your
freedom to share and change it. By contrast, the GNU General Public
License is intended to guarantee your freedom to share and change free
software--to make sure the software is free for all its users. This
General Public License applies to most of the Free Software
Foundation's software and to any other program whose authors commit to
using it. (Some other Free Software Foundation software is covered by
the GNU Lesser General Public License instead.) You can apply it to
your programs, too.
When we speak of free software, we are referring to freedom, not
price. Our General Public Licenses are designed to make sure that you
have the freedom to distribute copies of free software (and charge for
this service if you wish), that you receive source code or can get it
if you want it, that you can change the software or use pieces of it
in new free programs; and that you know you can do these things.
To protect your rights, we need to make restrictions that forbid
anyone to deny you these rights or to ask you to surrender the rights.
These restrictions translate to certain responsibilities for you if you
distribute copies of the software, or if you modify it.
For example, if you distribute copies of such a program, whether
gratis or for a fee, you must give the recipients all the rights that you have.
You must make sure that they, too, receive or can get the source code.
Other Information
38
Page 39

And you must show them these terms so they know their rights.
We protect your rights with two steps: (1) copyright the software, and
(2) offer you this license which gives you legal permission to copy,
distribute and/or modify the software.
Also, for each author's protection and ours, we want to make certain
that everyone understands that there is no warranty for this free software.
If the software is modified by someone else and passed on, we want its
recipients to know that what they have is not the original, so that any
problems introduced by others will not reflect on the original authors'
reputations.
Finally, any free program is threatened constantly by software patents.
We wish to avoid the danger that redistributors of a free program will
individually obtain patent licenses, in effect making the program proprietary.
To prevent this, we have made it clear that any patent must be licensed for
everyone's free use or not licensed at all.
The precise terms and conditions for copying, distribution and modification follow.
GNU GENERAL PUBLIC LICENSE
TERMS AND CONDITIONS FOR COPYING, DISTRIBUTION AND
MODIFICATION
0. This License applies to any program or other work which contains
a notice placed by the copyright holder saying it may be distributed
under the terms of this General Public License. The "Program", below,
refers to any such program or work, and a "work based on the Program"
means either the Program or any derivative work under copyright law:
that is to say, a work containing the Program or a portion of it,
either verbatim or with modifications and/or translated into another
language. (Hereinafter, translation is included without limitation in
the term "modification".) Each licensee is addressed as "you".
Other Information
39
Page 40

Activities other than copying, distribution and modification are not covered
by this License; they are outside its scope. The act of running the Program
is not restricted, and the output from the Program is covered only if its
contents constitute a work based on the Program (independent of having
been made by running the Program).
Whether that is true depends on what the Program does.
1. You may copy and distribute verbatim copies of the Program's
source code as you receive it, in any medium, provided that you
conspicuously and appropriately publish on each copy an appropriate
copyright notice and disclaimer of warranty; keep intact all the notices that
refer to this License and to the absence of any warranty; and give any other
recipients of the Program a copy of this License along with the Program.
You may charge a fee for the physical act of transferring a copy, and
you may at your option offer warranty protection in exchange for a fee.
2. You may modify your copy or copies of the Program or any portion
of it, thus forming a work based on the Program, and copy and distribute
such modifications or work under the terms of Section 1 above, provided
that you also meet all of these conditions:
a) You must cause the modified files to carry prominent notices
stating that you changed the files and the date of any change.
b) You must cause any work that you distribute or publish, that in
whole or in part contains or is derived from the Program or any
part thereof, to be licensed as a whole at no charge to all third
parties under the terms of this License.
c) If the modified program normally reads commands interactively
when run, you must cause it, when started running for such
interactive use in the most ordinary way, to print or display an
announcement including an appropriate copyright notice and a
Other Information
40
Page 41

notice that there is no warranty (or else, saying that you provide
a warranty) and that users may redistribute the program under
these conditions, and telling the user how to view a copy of this
License. (Exception: if the Program itself is interactive but
does not normally print such an announcement, your work based on
the Program is not required to print an announcement.)
These requirements apply to the modified work as a whole. If
identifiable sections of that work are not derived from the Program,
and can be reasonably considered independent and separate works in
themselves, then this License, and its terms, do not apply to those
sections when you distribute them as separate works. But when you
distribute the same sections as part of a whole which is a work based
on the Program, the distribution of the whole must be on the terms of
this License, whose permissions for other licensees extend to the
entire whole, and thus to each and every part regardless of who wrote it.
Thus, it is not the intent of this section to claim rights or contest your rights
to work written entirely by you; rather, the intent is to exercise the right to
control the distribution of derivative or collective works based on the
Program.
In addition, mere aggregation of another work not based on the Program
with the Program (or with a work based on the Program) on a volume of
a storage or distribution medium does not bring the other work under
the scope of this License.
3. You may copy and distribute the Program (or a work based on it,
under Section 2) in object code or executable form under the terms of
Sections 1 and 2 above provided that you also do one of the following:
a) Accompany it with the complete corresponding machine-readable
source code, which must be distributed under the terms of Sections
1 and 2 above on a medium customarily used for software interchange; or,
Other Information
41
Page 42

b) Accompany it with a written offer, valid for at least three
years, to give any third party, for a charge no more than your
cost of physically performing source distribution, a complete
machine-readable copy of the corresponding source code, to be
distributed under the terms of Sections 1 and 2 above on a medium
customarily used for software interchange; or,
c) Accompany it with the information you received as to the offer
to distribute corresponding source code. (This alternative is
allowed only for noncommercial distribution and only if you
received the program in object code or executable form with such
an offer, in accord with Subsection b above.)
The source code for a work means the preferred form of the work for
making modifications to it. For an executable work, complete source
code means all the source code for all modules it contains, plus any
associated interface definition files, plus the scripts used to
control compilation and installation of the executable. However, as a
special exception, the source code distributed need not include
anything that is normally distributed (in either source or binary
form) with the major components (compiler, kernel, and so on) of the
operating system on which the executable runs, unless that component
itself accompanies the executable.
If distribution of executable or object code is made by offering
access to copy from a designated place, then offering equivalent
access to copy the source code from the same place counts as
distribution of the source code, even though third parties are not
compelled to copy the source along with the object code.
4. You may not copy, modify, sublicense, or distribute the Program
except as expressly provided under this License. Any attempt
otherwise to copy, modify, sublicense or distribute the Program is
void, and will automatically terminate your rights under this License.
However, parties who have received copies, or rights, from you under
Other Information
42
Page 43

this License will not have their licenses terminated so long as such
parties remain in full compliance.
5. You are not required to accept this License, since you have not
signed it. However, nothing else grants you permission to modify or
distribute the Program or its derivative works. These actions are
prohibited by law if you do not accept this License. Therefore, by
modifying or distributing the Program (or any work based on the
Program), you indicate your acceptance of this License to do so, and
all its terms and conditions for copying, distributing or modifying
the Program or works based on it.
6. Each time you redistribute the Program (or any work based on the
Program), the recipient automatically receives a license from the
original licensor to copy, distribute or modify the Program subject to
these terms and conditions. You may not impose any further
restrictions on the recipients' exercise of the rights granted herein.
You are not responsible for enforcing compliance by third parties to
this License.
7. If, as a consequence of a court judgment or allegation of patent
infringement or for any other reason (not limited to patent issues),
conditions are imposed on you (whether by court order, agreement or
otherwise) that contradict the conditions of this License, they do not
excuse you from the conditions of this License. If you cannot
distribute so as to satisfy simultaneously your obligations under this
License and any other pertinent obligations, then as a consequence you
may not distribute the Program at all. For example, if a patent
license would not permit royalty-free redistribution of the Program by
all those who receive copies directly or indirectly through you, then
the only way you could satisfy both it and this License would be to
refrain entirely from distribution of the Program.
If any portion of this section is held invalid or unenforceable under
any particular circumstance, the balance of the section is intended to
Other Information
43
Page 44

apply and the section as a whole is intended to apply in other
circumstances.
It is not the purpose of this section to induce you to infringe any
patents or other property right claims or to contest validity of any
such claims; this section has the sole purpose of protecting the
integrity of the free software distribution system, which is
implemented by public license practices. Many people have made
generous contributions to the wide range of software distributed
through that system in reliance on consistent application of that
system; it is up to the author/donor to decide if he or she is willing
to distribute software through any other system and a licensee cannot
impose that choice.
This section is intended to make thoroughly clear what is believed to
be a consequence of the rest of this License.
8. If the distribution and/or use of the Program is restricted in
certain countries either by patents or by copyrighted interfaces, the
original copyright holder who places the Program under this License
may add an explicit geographical distribution limitation excluding
those countries, so that distribution is permitted only in or among
countries not thus excluded. In such case, this License incorporates
the limitation as if written in the body of this License.
9. The Free Software Foundation may publish revised and/or new
versions of the General Public License from time to time. Such new
versions will be similar in spirit to the present version, but may differ in detail
to address new problems or concerns.
Each version is given a distinguishing version number. If the Program
specifies a version number of this License which applies to it and "any
later version", you have the option of following the terms and conditions
either of that version or of any later version published by the Free
Software Foundation. If the Program does not specify a version number
Other Information
44
Page 45

of this License, you may choose any version ever published by the Free
Software Foundation.
10. If you wish to incorporate parts of the Program into other free
programs whose distribution conditions are different, write to the author
to ask for permission. For software which is copyrighted by the Free
Software Foundation, write to the Free Software Foundation; we
sometimes
make exceptions for this. Our decision will be guided by the two goals
of preserving the free status of all derivatives of our free software and
of promoting the sharing and reuse of software generally.
NO WARRANTY
11. BECAUSE THE PROGRAM IS LICENSED FREE OF CHARGE,
THERE IS NO WARRANTY FOR THE PROGRAM, TO THE EXTENT
PERMITTED BY APPLICABLE LAW. EXCEPT WHEN OTHERWISE
STATED IN WRITING THE COPYRIGHT HOLDERS AND/OR OTHER
PARTIES PROVIDE THE PROGRAM "AS IS" WITHOUT WARRANTY OF
ANY KIND, EITHER EXPRESSED OR IMPLIED, INCLUDING, BUT NOT
LIMITED TO, THE IMPLIED WARRANTIES OF MERCHANTABILITY AND
FITNESS FOR A PARTICULAR PURPOSE.
THE ENTIRE RISK AS TO THE QUALITY AND PERFORMANCE OF THE
PROGRAM IS WITH YOU. SHOULD THE PROGRAM PROVE DEFECTIVE,
YOU ASSUME THE COST OF ALL NECESSARY SERVICING, REPAIR
OR
CORRECTION.
12. IN NO EVENT UNLESS REQUIRED BY APPLICABLE LAW OR
AGREED TO IN WRITING WILL ANY COPYRIGHT HOLDER, OR ANY
OTHER PARTY WHO MAY MODIFY AND/OR REDISTRIBUTE THE
PROGRAM AS PERMITTED ABOVE, BE LIABLE TO YOU FOR
DAMAGES, INCLUDING ANY GENERAL, SPECIAL, INCIDENTAL OR
CONSEQUENTIAL DAMAGES ARISING OUT OF THE USE OR INABILITY
TO USE THE PROGRAM (INCLUDING BUT NOT LIMITED TO LOSS OF
DATA OR DATA
Other Information
45
Page 46

BEING RENDERED INACCURATE OR LOSSES SUSTAINED BY YOU OR
THIRD PARTIES OR A FAILURE OF THE PROGRAM TO OPERATE WITH
ANY OTHER PROGRAMS), EVEN IF SUCH HOLDER OR OTHER PARTY
HAS BEEN ADVISED OF THE POSSIBILITY OF SUCH DAMAGES.
END OF TERMS AND CONDITIONS
How to Apply These Terms to Your New Programs
If you develop a new program, and you want it to be of the greatest
possible use to the public, the best way to achieve this is to make it free
software which everyone can redistribute and change under these terms.
To do so, attach the following notices to the program. It is safest to attach
them to the start of each source file to most effectively convey the
exclusion of warranty; and each file should have at least the "copyright" line
and a pointer to where the full notice is found.
<one line to give the program's name and a brief idea of what it does.>
Copyright (C) <year> <name of author>
This program is free software; you can redistribute it and/or modify
it under the terms of the GNU General Public License as published by
the Free Software Foundation; either version 2 of the License, or
(at your option) any later version.
This program is distributed in the hope that it will be useful,
but WITHOUT ANY WARRANTY; without even the implied warranty of
MERCHANTABILITY or FITNESS FOR A PARTICULAR PURPOSE. See the
GNU General Public License for more details.
You should have received a copy of the GNU General Public License along
with this program; if not, write to the Free Software Foundation, Inc.,
51 Franklin Street, Fifth Floor, Boston, MA 02110-1301 USA.
Other Information
46
Page 47

Also add information on how to contact you by electronic and paper mail.
If the program is interactive, make it output a short notice like this
when it starts in an interactive mode:
Gnomovision version 69, Copyright (C) year name of author
Gnomovision comes with ABSOLUTELY NO WARRANTY; for details type
`show w'.
This is free software, and you are welcome to redistribute it
under certain conditions; type `show c' for details.
The hypothetical commands `show w' and `show c' should show the
appropriate parts of the General Public License. Of course, the
commands you use may be called something other than `show w' and
`show c'; they could even be mouse-clicks or menu items--whatever suits
your program.
You should also get your employer (if you work as a programmer) or your
school, if any, to sign a "copyright disclaimer" for the program, if necessary.
Here is a sample; alter the names:
Yoyodyne, Inc., hereby disclaims all copyright interest in the program
`Gnomovision' (which makes passes at compilers) written by James Hacker.
<signature of Ty Coon>, 1 April 1989
Ty Coon, President of Vice
This General Public License does not permit incorporating your program into
proprietary programs. If your program is a subroutine library, you may
consider it more useful to permit linking proprietary applications with the
library. If this is what you want to do, use the GNU Lesser General
Public License instead of this License.
Other Information
47
Page 48

Certification
KCC / FCC / CE / CCC
Grade B device (home broadcasting and communication device) is
mainly for domestic use (grade B). It is EMC certified, and can be
used in all areas.
Registered Trademark
Windows 2000, Windows XP, Windows Vista, and Windows Media
iriver E-book contains Adobe® Reader® Mobile software under license
from Adobe Systems Incorporated, Copyright © 1995-2010 Adobe
Systems Incorporated. All rights reserved.
Adobe and Reader are trademarks of Adobe Systems Incorporated.
Exemption
The manufacturer, importer, and agencies will not be held liable for
damage caused by accidents including injuries or inappropriate use or
handling of the product. The information in the manual is based on the
current specifications of the product.
Other Information
48
Page 49

iriver Ltd., the manufacturer of this product, continues to add new
features and apply new technologies to it. All standards may be
changed without prior notice to individual users.
We cannot be held responsible for data loss caused by the use of the
product.
The technical limits in the manufacturing process may cause EPD Panel to
have approx. 0.0012% bright or dark pixels.
However, it does not affect the capability of the product.
Other Information
49
 Loading...