

Page 1

AKT1
INSTRUCTION BOOK
User Guide
Page 2

CONTENTS
Getting Started
Safety Precautions
Package Contents
AKT1 at a Glance
Assembly
Power Cable Management
Connections
Firmware Upgrade
_01
02
06
07
09
11
12
15
Using the Device
Basic Operations
Home Screen
Playback Screen
Selecting Music
MQS Streaming
AK Connect App
Listening to Music
Listening to Internet Radio
Purchasing Music from the Store
Connecting an External Device
Settings
Connecting to a Network
Equalizer Setup
Miscellaneous
Notes
Troubleshooting
Copyright
Certifications
Registered Trademarks
Disclaimers
Specifications
_03
_02
16
20
22
24
26
27
32
33
35
36
38
42
43
45
45
47
47
48
48
49
Page 3

User Guide
Safety
Precautions
To ensure safe product usage, check the [Safety Precautions]
before you begin using the product.
Device
Discontinue use of this product immediately if it does not
operate normally or a failure occurs.
When a plug is inserted into the AUX, Optical, or USB
port or a card is inserted into the microSD slot, do not
apply any force or shock to the plug or card.
Do not insert any metal objects (coins, hairpins, etc.) or
flammable debris into the device.
Do not place heavy objects on the device.
If water or other liquids enter the device, immediately
disconnect the power cord from the outlet, wipe the
surface with a dry cloth, and contact the nearest 'iRiver
Zone' for customer support.
Water-damaged devices will be repaired for a fee regardless
of warranty status, but the device may not be repairable.
Do not attempt to disassemble, repair, or modify the product.
iRiver is not liable for any damage incurred due to
unauthorized disassembly, repair, or modification of the
product.
Never use chemicals or cleaning products on the device
since they can damage the paint and surface coating.
Avoid dropping or subjecting the device to a strong impact
(excessive vibration, etc.).
When inserting a cable into any audio connection port,
do not apply force or shock to the plug.
This may cause damage to the audio ports.
The use of defective USB plugs or microSD cards may
cause the product to malfunction.
Getting Started
02
Page 4

User Guide
Never attempt to insert an unsuitable cable into a connector.
Never connect a damaged cable to the product.
Doing so may cause a malfunction.
Using poor quality protective films or adhesive stickers
on the screen may cause damage.
Use clean, dry hands when touching the screen.
Do not apply excessive pressure when touching the screen.
Displaying one image for an extended period may cause
screen burn-in (afterimage).
Power Cable and Plug
Do not connect/disconnect the power plug with wet hands.
Insert the power plug into a 110V - 220V (50Hz - 60Hz)
AC outlet.
Unplug the power plug from the outlet before attempting
to clean the power plug pins or mounting surface.
Observe the following when handling the power cord:
Do not damage the power code. / Do not attempt to modify
the cord. (e.g. extension) / Do not subject the cord to
excessive heat or heavy weight. / Do not pull the cord. /
Do not attempt to jam the cord into a tight space. /
Do not forcibly bend the cord. / Do not twist the cord. /
Do not tie multiple power cords together.
This may cause a fire or electric shock.
Avoid touching the power cord during lightning strikes or
thunderstorms.
This may cause a fire or electric shock.
Do not use any power cords other than the one supplied
with the product.
Do not use the supplied power cord with any other device.
This may cause a fire or electric shock.
Getting Started
03
Page 5

User Guide
Plug the power cord into a grounded power outlet.
Hold the power plug firmly when disconnecting it from
the outlet.
Disconnect the power cord from the outlet when the
device is not being used for an extended period.
This may cause a fire or electric shock.
Installation
To reduce the risk of fire or electric shock, do not expose
this product to rain or moisture.
Avoid exposing the product to water, and do not place
objects filled with liquids, such as vases, on top of the device.
Do not place the device in the following locations:
Doing so may cause a fire or electric shock.
Humid areas such as bathrooms or areas where water may
splash / Areas where the device may be in direct contact
with rain or mist / Outdoor areas with exposure to rain /
High-temperature areas such as near a fire or radiator /
Areas where the device is exposed to direct sunlight /
Areas with high concentrations of dust, oil, or smoke
(e.g. kitchen) / Areas with extreme temperatures (Normal
operating temperatures: -5°C ~ 40°C / 23°F ~ 113°F) /
Areas with rapidly fluctuating temperatures / Areas exposed
to strong vibrations / Unstable or sloped surfaces / Near
objects with strong magnetic fields such as magnets, TVs,
monitors, or speakers / Near corrosive gases (e.g. sulfite,
hydrogen sulfide, chlorine, ammonia, etc.)
If you notice any color changes on a TV in the vicinity of this
product or audio interference from the TV, relocate the
product farther away from the TV.
Getting Started
04
Page 6

User Guide
USB Storage Device
The USB port on this product only supports USB host
functionality.
A computer cannot be connected to the USB device port.
Large-capacity USB devices may require several minutes
to fully scan.
If static electricity is generated when connecting a USB
device, playback may not function normally.
In this case, disconnect and then reconnect the USB device.
DRM-protected files (WMA-DRM* tracks) cannot be
played on this product.
* DRM (Digital Rights Management): Technical means
used to control or limit the use of digital media content.
Specially encoded or encrypted files cannot be played
on this product.
Do not disconnect a USB device while a file on the device
is being played.
This may cause both the product and the USB device
to malfunction.
USB devices connected via a USB hub or extension
cable may not be recognized by the product.
Devices that require separate drivers are not supported.
Some USB devices may not be recognized or work correctly.
Some USB devices that require a separate power supply
(external HDD, etc.) may not function properly.
iRiver is not responsible for any data loss that occurs on
a USB device used in conjunction with this product.
Getting Started
05
Page 7
User Guide
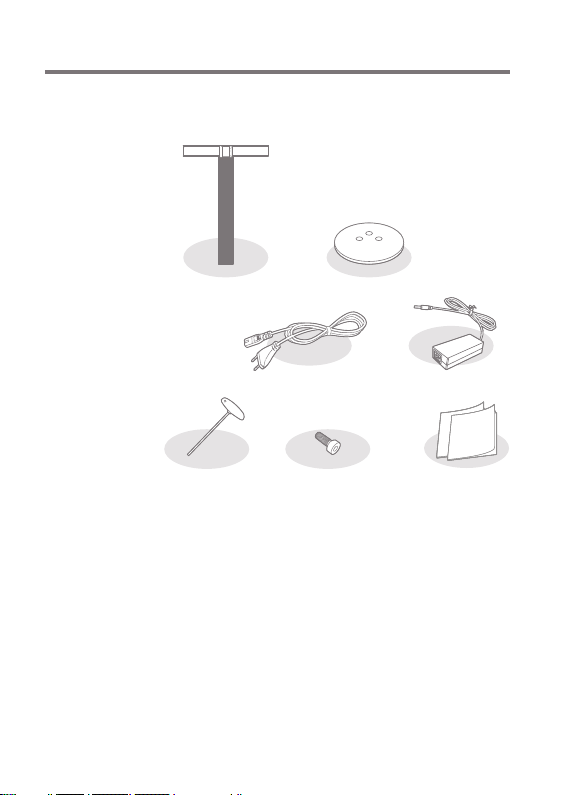
Package
Contents
Components may be changed without prior notice to improve
the performance or quality of the product.
AKT1 Base
Power Cord
T-wrench
Base: Connects to the bottom of the AKT1.
Power Cord & Adapter: Connects to the device to supply power.
T-wrench: Used to fasten/loosen bolts.
Bolts: Used to fasten/loosen the base and support.
Quick Start Guide: Basic overview of device functionality.
Warranty Card: The Warranty Card is required for customer
and technical support. Do not misplace the card.
User Guide: The User Guide can be downloaded from the
Astell&Kern website. [http://www.astellnkern.com > Support
> Download]
Bolts
Adapter
Quick Start Guide
& Product Warranty
Getting Started
06
Page 8
User Guide
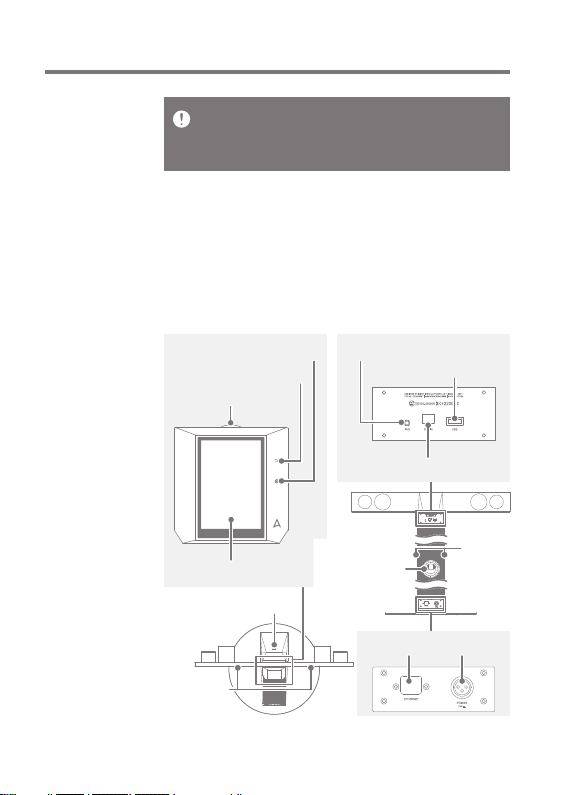
The AKT1 requires assembly of the top, main unit, base, and
support by the user.
Refer to [Assembly] on page 9~10 or assembly guide printed on
the packaging above the stand for detailed assembly instructions.
AKT1 at a
Glance
The appearance of the product as well as printed and
engraved information may vary depending on the model.
Main Unit
Home Button
Back Button
Power/Volume Key
LCD Touchscreen
microSD Card Slot
Tweeter/
Mid-range
AUX Port
USB-HOST Port
OPTICAL IN Port
Woofer
Woofer Port
Power InputLAN Port
Getting Started
07
Page 9

User Guide
Power/Volume Key: When the wheel key is pressed, the
product will power on, and the [ ] logo will appear on the
screen.
LCD Touchscreen: Display with touch control.
Back Button: Pressure-sensitive metal capacitive touch
interface.
A light touch will return the user to the previous screen.
Home Button: Pressure-sensitive metal capacitive touch
interface.
A light touch will redirect the user to the main menu.
microSD Card Slot: A microSD card can be inserted, and
music files can be selected for playback.
USB-HOST Port: A USB storage device can be connected
and music files selected for playback.
AUX Port: An external device can be connected for music
playback.
OPTICAL IN Port: An external device can be connected for
music playback.
LAN Port: Connect a LAN cable for a wired connection.
Power Input: Connect the power cable. The power input is
located at the base of the product.
(Refer to [Connecting the Power Supply] on page 11 for
detailed instructions.)
Getting Started
08
Page 10
User Guide
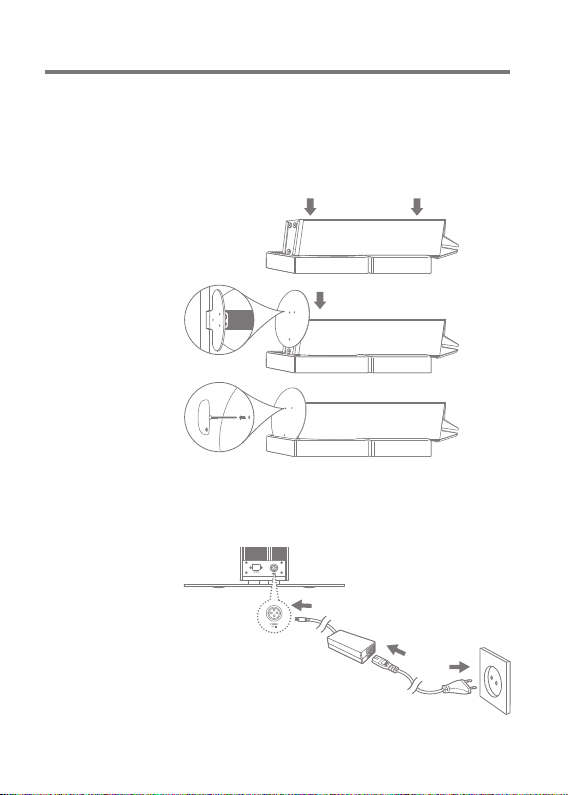
Assembly
1. Please refer to the assembly guide printed on the packaging
above the stand.
2. Align the bolt holes on the main unit and base, and secure
the base to the main unit using the supplied T-wrench and
bolts.
3. Connect the power cord to the adapter, and then connect
the adapter to the [Power Input] port on at the base of the
main unit.
Getting Started
09
Page 11
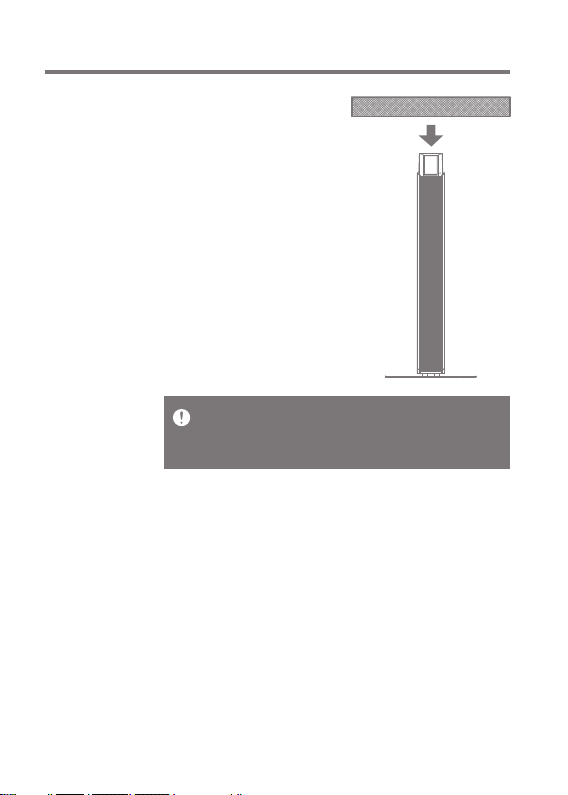
User Guide
4. Align the connection points
on the stand and behind the
LCD screen, and then securely
connect the two parts.
Do not apply excessive force to the top of the product and the
grill on the main unit.
Please note that any impact or shock during assembly may
damage the product.
Getting Started
10
Page 12
User Guide
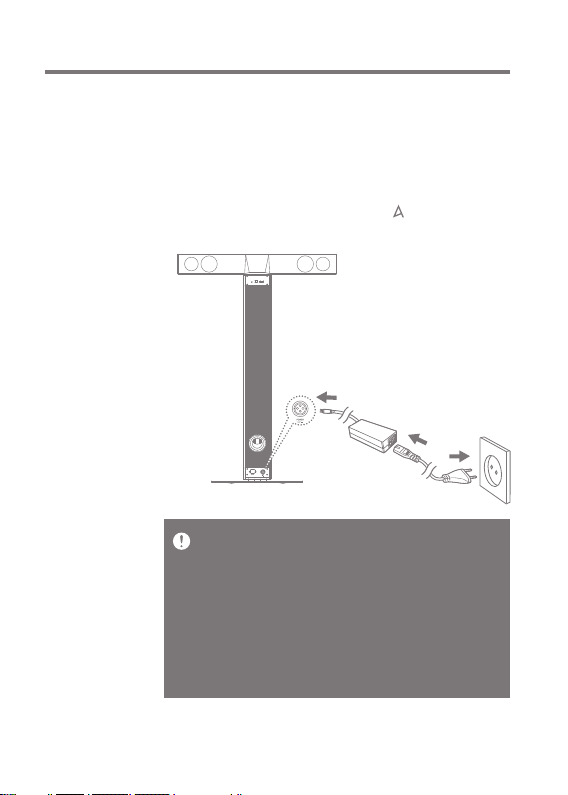
Power
Cable
Management
Connecting the Power Supply
1. Connect the power cord to the [Power Input] located at
the base of the unit.
2. Connect the power cord to the outlet and press the [Power
Wheel] located above the LCD screen for 2 to 3 seconds.
The product will power on, and the [ ] logo will appear
on the screen.
After connecting the power cord to the product, insert the
power plug into an available outlet.
To avoid malfunction or damage to the device, only use the
power cord supplied with the product.
Unplug the power supply from the outlet when the device is
not in use for an extended period.
The product packaging includes the appropriate power cable
for the U.S., Japan, Europe, and U.K. regions.
Please check the respective certification mark on the power
plug, and use the correct power cable for the appropriate
region.
Getting Started
11
Page 13
User Guide
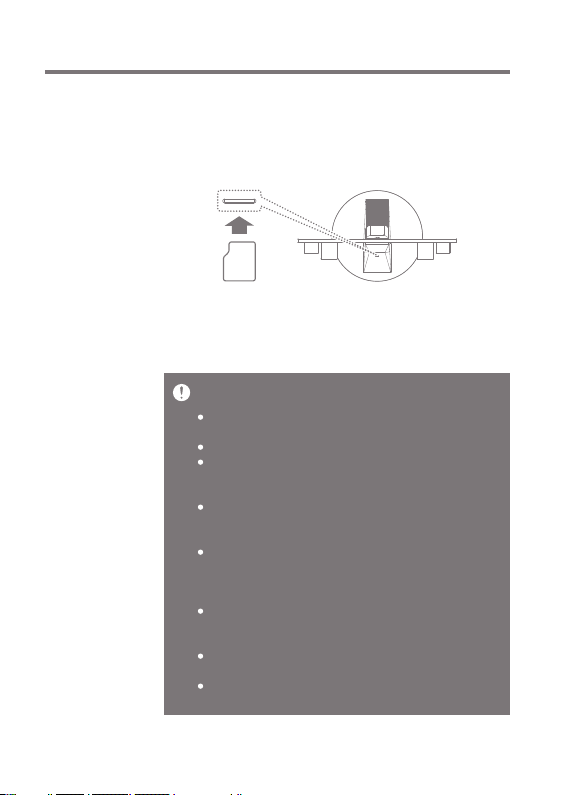
Connections
Inserting/Removing a microSD Card
1. Refer to the diagram and gently insert a microSD card
into the [microSD Card Slot].
2. Gently press the microSD card to release it from the slot.
Recommended microSD Cards
Brand : SanDisk, Transcend
64GB microSD card is recommended.
Notes on inserting a microSD card
Do not force the microSD card into the slot. Doing so may
cause damage to the device and/or the microSD card.
Do not repeatedly insert/remove the microSD card.
Inserting the microSD card improperly may damage the
device or prevent it from being removed.
Notes on removing a microSD card
Be sure to safely unmount and remove the microSD card
from the device. Not following the proper procedure may
corrupt data and cause serious damage to the system.
Do not remove the microSD card while it's in use.
Doing so may damage the microSD card, corrupt or delete
data and cause the device to malfunction.
Miscellaneous
If the device fails to recognize the microSD card and/or
malfunctions, format the memory card in the FAT32 format
before use.
Using microSD cards other than the recommended brands
may cause the device to malfunction.
A microSD card is not included with this device. Please
purchase separately.
Getting Started
12
Page 14
User Guide
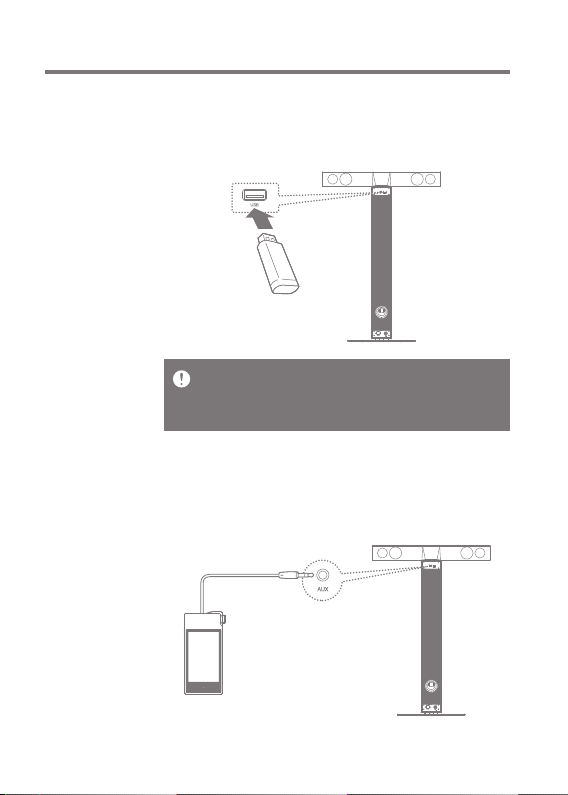
Connecting a USB Storage Device
1. Connect a USB storage device to the [USB Port] on the
product.
Devices that require separate drivers or the creation of multiple
drives (multi-card readers, etc.) may not be supported.
Some USB devices that require a separate power supply
(external HDD, etc.) may not function properly.
Connecting an External Device to the AUX Port
1. Connect an external device to the [AUX Port] using an
AUX cable.
Getting Started
13
Page 15
User Guide
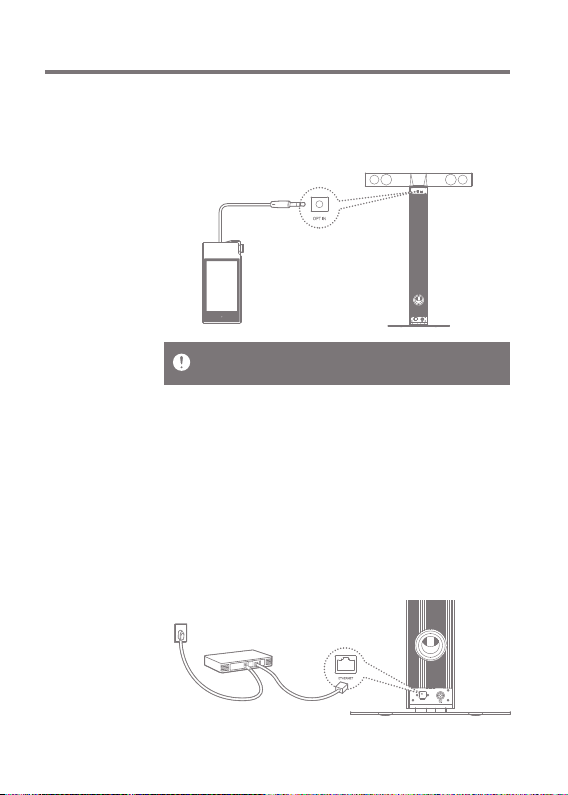
Connecting an External Device to the OPTICAL Port
1. Connect an external device to the [OPTICAL IN Port]
using an optical cable.
Gently insert the cable into the port. Avoid using excessive force.
Do not move the product while a cable is connected.
Connecting to a Network
1. Connect the appropriate Internet-ready network cable
(ADSL, VDSL, cable modem, wired/wireless router, etc.)
to the [LAN Port] on the back of the product, or connect
wirelessly to an access point (AP) that provides Wi-Fi access.
2. When connected to a network, the Connect Library menu
is activated on the Home screen. You may check the
network connection status from the Settings menu.
Getting Started
14
Page 16

User Guide
Firmware
Upgrade
Firmware Upgrade
1. Connect the product to a wired or wireless network.
2. When a new firmware version is available, the screen
displays a Firmware Update Guide window.
3. Select [Update] and choose the items for update.
4. Follow the on-screen instructions and proceed with the
Firmware Upgrade.
Refer to page 42 for more information on connecting to a
network.
Moving to another screen during a file download will cancel
the download.
Do not disconnect from the wireless network during a
Firmware Upgrade. Doing so may cause data corruption
and/or damage to the system.
Do not turn off or disconnect the product from the power
code while the firmware update file is being upgraded.
If an error occurs or the notice in the Notification Bar
disappears during an upgrade, you can download the
Firmware Upgrade again through [Settings - Update].
Getting Started
15
Page 17

User Guide
Basic
Operations
Using the LCD Touchscreen
1. This device features an LCD touchscreen that allows you
to perform operations by touching the screen. Touch the
desired item from the on-screen menu (icon) to run the
selected function.
To prevent damage to the screen, do not use a sharp object or
excessive force.
Basic Settings
A welcome screen is displayed when the product is turned
on for the first time. The basic setup process will begin.
1. Select the desired language
from the list of displayed
languages and press [ ] on
the screen.
2. Select the appropriate time
zone from the world time
settings screen, and then
press [ ].
Using the Device
16
Page 18

User Guide
3. Enter a name for the device in
the name settings screen, and
then press [ ].
4. Connect to a network from the
network settings screen.
Wired network: The device
will automatically connect to
your network when a LAN
cable is connected.
Wireless network: To connect
to a wireless network, select
your network from the list of
available access points (AP).
Using the Device
17
Page 19

User Guide
5. Press [Start] after completing
the network setup to begin
using the AKT1.
Refer to page 42 for more information on connecting to a
network.
Using the Device
18
Page 20

User Guide
Moving up/down in the list
1. Scroll through a list by dragging
[Down Up] / [Up Down]
on the screen.
Previous Screen
1. Press [ ] to return to the
previous screen.
Using the Device
19
Page 21

User Guide
Home
Screen
Navigating on the Home Screen
Drag the Home screen [Up Down] to move through
the menus.
After entering a menu, press [ ] at the top of the screen
or the [ ] key on the right to return to the previous screen.
Press [ ] on the right of the screen to be redirected to
the Home screen.
Connect Library : You can select other storage devices on
the same network as the AKT1 including a PC, NAS,
AK500N, and AK380.
Connect Speaker : Set the sound output to the AKT1 on a
product such as the AK500N or AK380 to activate the
corresponding menu.
vTuner : Use vTuner, an Internet radio service.
Bluetooth : Connect to the AKT1 from an external device
via Bluetooth to activate the corresponding menu.
AKT1 supports the high-quality aptX audio codec.
Using the Device
20
Page 22

User Guide
SD Card : Mount a microSD card to activate the corresponding
menu and select music for playback through the AKT1.
AUX : Connect an external device to the AKT1 via an AUX
cable to activate the corresponding menu and output sound
through the AKT1.
USB : Connect a USB storage device to activate the
corresponding menu and select music for playback through
the AKT1.
Optical : Connect an external device to the AKT1 via an
optical cable and touch the Optical menu to output sound
through the AKT1.
Store : Use the Groovers Store.
Settings : Adjust network, equalizer, screen brightness, and
other settings.
Multiple menu items can be activated simultaneously.
However, multiple activated menu items are not run
simultaneously.
To use Bluetooth functionality, the AKT1 must be connected
to an external device.
The Store function can only be used in Korea.
Using the Device
21
Page 23

User Guide
Playback
Screen
1
2
3
4
5
6
1
2
3
4
5
6
Previous Screen
Details
Title
Artist
Album Cover
Song Progress
Return to the previous screen.
Displays bitrate and sampling
frequency data.
Song title information.
File name is displayed when
ID3 metadata is unavailable.
Artist name.
Displays album covers.
Indicates song duration.
Using the Device
22
Page 24

User Guide
4
5
1
2
3
1
2
3
4
5
6
7
Progress Bar
Play/Pause
Previous/
Rewind
Repeat Mode
Play Mode
Song Duration
Next/
Fast-Forward
6
7
Indicates song progress. Drag the
progress indicator to move to the
desired track time.
Play or pause the current song.
Short press: Previous song.
Long press: Rewind the current song.
Set the repeat mode.
Set the playback mode.
Indicates the song’s total duration.
Short press: Next song.
Long press: Fast forward the
current song.
Using the Device
23
Page 25

User Guide
Selecting
Music
Selecting Music on a Server
Music on a server on the same network as the AKT1 can be
played back in real-time.
1. Select [Connect Library] from
the Home screen to display a
list of devices available for
connection.
2. Select a device to be used as
a library to display its database
contents.
If the device connected to Connect Library supports the AK
database, the contents will be automatically sorted according
to Songs, Artists, Albums, Genres, and Folders.
Press [ ] at the top of the screen to display the current
playback screen.
Press [ ] at the top of the screen to refresh the list.
The device you want to use via Connect Library must be on
the same network as the AKT1.
Refer to page 42 for more information on connecting to a
network.
Using the Device
24
Page 26

User Guide
Selecting Music on a microSD Card
1. Mount a microSD card to activate the microSD card menu.
2. Select the activated microSD Card menu to display a list
of music files on the microSD card.
Refer to page 12 for more information on connecting a
microSD card.
Press [ ] at the top of the screen to display the current
playback screen.
Selecting Music on a USB Storage Device
1. Connect a USB storage device
to the USB-HOST port to
activate the USB menu.
2. Select the activated USB menu
to display a list of music files
on the USB storage device.
Using the Device
25
Page 27

User Guide
Refer to page 13 for more information on connecting a USB
storage device.
Press [ ] at the top of the screen to display the current
playback screen.
Devices that require separate drivers or the creation of
multiple drives (multi-card readers, etc.) may not be
supported.
Some USB devices that require a separate power supply
(external HDD, etc.) may not function properly.
MQS
Streaming
Music on a PC on the same network as the AKT1 can be
played back in real-time.
MQS Streaming Server Installation
1. Visit the Astell&Kern website and download the MQS
Streaming Server installer that corresponds to your
operating system.
[http://www.astellnkern.com > Support > Download]
2. Run the downloaded installer and follow the on-screen
instructions.
3. Check the User Guide within the program for detailed
information on using the Music Streaming Server.
Please refer to the following PC/Mac minimum system
requirements:
PC Minimum System Requirements
OS : Windows XP, Windows 7/8 (32 & 64-bit)
Mac Minimum System Requirements
Mac OS X Lion (10.7) or later
Using the Device
26
Page 28

User Guide
Selecting an MQS Streaming Server
1. Complete the installation and run the MQS Streaming
Server from the computer. Refer to [MQS Streaming Server
Help] on the Astell&Kern website for installation help.
[http://www.astellnkern.com > Support > Download]
2. When the AKT1 and your PC are connected to the same
network, your PC will be displayed in a list when Connect
Library is selected on the AKT1.
3. Music contained in the shared folder set in the MQS
Streaming Server can be played in real-time on the AKT1.
AK
Connect
App
The AKT1 can be operated wirelessly from a smartphone or
tablet via the AK Connect app.
Installing the AK Connect App
1. Enter "akconnect" in the search field of the Google Play
Store or Apple App Store depending on your smartphone
or tablet model to download and install the appropriate
application.
Please download the HD version of the app for tablets.
Alternatively, you can also search for “astell” to find and
download the app.
Using the Device
27
Page 29

User Guide
Connecting to a Library
1. Select the downloaded app to
run the AK Connect wireless
control app.
2. A list of available devices on
the same network will be
displayed.
3. Select the desired device to
display a list of folders and files.
The device you want to connect via AK Connect must be on
the same network (access point) as the AKT1.
When connected to the network wirelessly, music streaming
may stutter or next song playback may be slow depending on
wireless network conditions. (Setting the access point to
802.11/n is recommended.)
We strongly recommend using a wired network environment
when streaming MQS music.
Using the Device
28
Page 30

User Guide
App Screen
Player: The currently-playing song can be controlled via the
Next, Previous, Play, Stop, and Volume buttons.
NowPlaying: Displays a list of songs currently playing.
Playlist: Displays the playlist. Songs can be added or
removed.
Library: Select from an external device with the songs you
want to play.
Speaker: Select the sound output device.
Using the Device
29
Page 31

User Guide
Creating a Playlist
1. Press [ ] at the top-right
corner of the Library screen,
and then select a playlist for
adding songs.
Existing Playlist: Add the selected
file to an existing playlist.
New Playlist: Add the
selected file to a new playlist.
NowPlaying List : Add the
selected file to the current
playlist.
2. Select the song you want to
add, and then press [+ ADD TO]
to add the song to the playlist.
Editing a Playlist
Press the appropriate icon at the
top-right corner of the playlist
screen to edit playlists.
: Delete playlist.
: Add playlist.
Using the Device
30
Page 32

User Guide
Connecting Speakers
1. Select [Speaker] at the bottom
of the Library screen to display
a list of speakers on the same
network.
2. Select the desired speaker to
output sound through the
speaker.
App Usage Example
Select the AKT1 from the AK Connect app's [Speaker] menu.
Specify [NAS] in the Library menu, and then select the
desired song to play back music through the AKT1.
Smartphone/Tablet
The AK Connect app, AKT1, and NAS must all be connected
to the same network.
A product that does not support the DLNA standard like NAS
may not be connected.
AKT1
NAS
Using the Device
31
Page 33

User Guide
Listening
to Music
Music Playback
1. Select a song from the list to begin playback.
Select [Folder] to search music by folder.
Supported file formats: FLAC, WAV (8-192 kHz, 8/16/24-bit),
WMA (8-320 kbps), MP3 (8-320 kbps), OGG, APE (Normal,
Fast, High), AAC, AIFF, ALAC, DFF, DSF
Listening to Music
Adjust the volume by turning the [Power/Volume Wheel
Key] above the LCD touchscreen.
When the volume is displayed on the screen, adjust the
sound level by dragging the screen [Up Down].
Press [ ] during playback to pause and press [ ] to
resume playback.
Press [ / ] during playback for the previous/next song.
You can also drag the album cover image [Up Down]
or [Down Up] from the playback screen to play the
previous/next song.
Long-press [ / ] during playback to rewind/fast forward.
Drag the progress bar to the desired location during playback.
Press [ ] during playback to cycle through different
repeat modes.
: Repeat the entire playlist.
: Repeat the current song.
: Disable repeat mode.
Press [ ] during playback to cycle through different
play modes.
: Sequential playback.
: Shuffle playback.
Press [ ] to return to the previous screen.
Press [ ] from the playlist screen to display the current
music playback screen.
Using the Device
32
Page 34

User Guide
Listening
to Internet
Radio
Internet Radio Playback
You can listen to a variety of Internet radio stations provided
by vTuner.
1. Select [vTuner] from the Home
screen to display the Internet
Radio home screen.
2. Select the desired item from
the Internet Radio home screen
to display a list of available
stations.
3. Select the desired station for
Internet radio playback.
Using the Device
33
Page 35

User Guide
You must be connected to the Internet to listen to Internet
radio stations.
Internet radio playback may stutter or be delayed depending
on network conditions.
Available Internet radio stations may vary by region.
Listening to Internet Radio
Press [ ] during playback to pause and [ ] to resume
playback.
Press [ - ] from the station list or radio playback
screen to display the Internet Radio home screen.
Press [ - ] at the top-right corner of the screen to
display the search field. Enter search terms and press
[ ] to search for and display a list of Internet radio
stations that contain the keyword(s).
Press [ - ] to refresh the list of stations.
Press [ ] from the station list or the right side of the
radio playback screen to store the selected station in the
favorites list. Press the button once more to remove the
station from the favorites list.
Using the Device
34
Page 36

User Guide
Purchasing
Music from
the Store
You can conveniently purchase music from the Store
Purchasing Music
1. Press [STORE] from the Home screen to display the Store.
2. Check the user guide or help menu within each store for
detailed information.
For Groovers, select [Menu > User Guide] within the
store for detailed instructions.
3. Purchased music is downloaded to a connected USB
storage device or microSD card.
You cannot download music unless a USB storage
device or microSD card is connected.
You must be connected to the Internet to access the Store.
Refer to page 42 for more information on connecting to a
network.
Currently, is available within the Store.
The Store function can only be used in Korea.
Show
Menu
User
Guide
Using the Device
35
Page 37

User Guide
Connecting
an External
Device
You can listen to music through the AKT1 by connecting an
external device.
Connecting via Bluetooth
1. Select [Bluetooth] from the external device’s settings,
and set it to ON.
2. Select the AKT1 from the list of available Bluetooth
devices to begin pairing.
3. The [Bluetooth] menu item will be activated on the Home
screen. Select a song from the external device to begin
playback through the AKT1’s speakers.
Bluetooth Support Specifications
Profile: A2DP
Device performance may be affected during Hi-Fi playback.
(48 kHz or lower is recommended)
DSD playback is unavailable via Bluetooth.
Do not turn off the device while connected to Bluetooth.
Pairing methods may be different for each individual
Bluetooth device. Always refer to the respective instruction
manual for details.
Maintain a distance of 20 cm (8 in) between the AKT1 and the
paired Bluetooth device.
Audio quality will degrade with longer distances, and the
pairing may disconnect at a distance of 2 m (6.5 ft). (Distances
may vary depending on device and environment.)
Crosstalk may be heard while using Bluetooth.
For multi-point devices, make the necessary connections
prior to use.
Malfunction, noise, and other undesirable effects may occur
due to environmental factors.
Instances in which signal interference affects data transmission.
(Holding the external device while wearing another Bluetooth
device, holding the external device while holding another
electronic device, etc.)
Using the Device
36
Page 38

User Guide
Instances in which the device or Bluetooth headset's radio
transmitters are touching parts of the body.
Instances in which the transmission strength is affected by
walls, corners, partitions, etc.
Devices using the same frequencies may cause interference.
(e.g. medical devices, microwave ovens, Wi-Fi, etc.)
Areas with an excessive amount of interference or weak
signals (e.g. elevators, underground, etc.) affect performance.
Connecting via AUX Port
1. Connect an external device to the AKT1’s [AUX Port]
using an AUX cable.
2. Select the [AUX] menu item from the Home screen and
set to [ON].
3. Music from the external device can now be output
through the AKT1’s speakers.
Connecting via Optical In
1. Connect an external device to the AKT1’s [OPT IN] using
an optical cable.
2. Select the [Optical] menu item from the Home screen and
set to [ON].
3. Music from the external device can now be output
through the AKT1’s speakers.
Refer to page 13~14 for detailed instructions on how to
connect an external device.
Using the Device
37
Page 39

User Guide
Settings
Set up the device according to the user's needs.
The settings menu may vary depending on the firmware version.
Setup
1. Select [Settings] from the Home screen.
2. Select the desired item for setup.
Network
Select the [Network] icon to set up a wired or wireless network.
: Change wireless network
settings and turn Wi-Fi on
or off.
: Change wired network
settings.
After selecting the desired icon,
select the network menu to adjust
the settings.
The device will automatically connect to your network when a
LAN cable is connected. To connect wirelessly, disconnect
the LAN cable and set up the network again.
Refer to page 42 for more information on connecting to a
wireless network.
Using the Device
38
Page 40

User Guide
Equalizer
Set the equalizer according to the user's preferences.
Pro EQ: EQ preset recommended by professionals.
User EQ: Adjust the frequencies according to the user's
preferences.
Equalizer is not supported during DSD playback.
Using the equalizer may negatively affect device
performance.
Refer to pages 43~44 of the manual for more information on
using the equalizer.
Device Name
You can change the device name
by using the on-screen keyboard.
The defined device name will
appear on the network.
Gapless
Play the next song without any interruptions/silence.
Gapless playback is only supported between two files
with identical bitrates, sampling rates, and channels.
Using the Device
39
Page 41

User Guide
LR Balance
Set the left/right balance of the sound output.
Turn the dial to adjust the left/right balance.
Brightness
Adjust screen brightness settings.
LED Brightness
Adjust the LED brightness on the front of the device.
Date and Time
Manually set the current date and time.
Language
Select a language.
English, Korean, Japanese, Chinese (Simplified/Traditional),
German, French, and Russian.
Keyboard
Set a suitable keyboard for the selected language.
Screen Off
Set a time for the screen to automatically turn off.
Using the Device
40
Page 42

User Guide
Update
Automatically update the firmware via OTA (over-the-air)
when a new version is available.
System Information
View system information, device name, firmware version,
USB storage device capacity, and microSD card capacity.
Storage capacity is displayed according to OS standards.
Some variance in displayed capacity may be present.
Default Setting
Revert all user settings back to their original values.
Never turn off the power while a factory reset is in progress.
Using the Device
41
Page 43

User Guide
Connecting
to a
Network
Connecting to a Wired Network
1. Connect the appropriate Internet-ready network cable
(ADSL, VDSL, cable modem, wired/wireless router, etc.)
to the [LAN Port] on the back of the product, or connect
wirelessly to an access point (AP) that provides Wi-Fi
access.
2. You can access the network when IP information is
confirmed in the IP Address field.
We recommend using a wired network for the best network
performance.
Connecting to a Wireless Network
1. Select [Settings - Network - ] to display a list of
available access points (AP).
2. Select the desired AP to connect to the wireless network.
Additional information (encryption key, index, etc.) may
be required depending on the network settings.
The device will automatically connect to your wired network
when a LAN cable is connected. To connect wirelessly,
disconnect the LAN cable.
You will not be able to wirelessly connect to the your network
if additional authentication is required (e.g. web browser
authentication, etc.)
Channels 1 through 11 are supported.
Using the Device
42
Page 44

User Guide
Equalizer
Setup
Equalizer Setup
1. Enable the equalizer menu
from [Settings - Equalizer].
2. Press [USER EQ] at the top of
the screen and select [ADD].
3. Enter a name for the equalizer,
and then select [OK].
4. Set the equalizer according to
the user's preferences.
Resetting the Equalizer
1. Select the desired EQ setting and press [ ] to revert the
EQ to its default settings.
Using the Device
43
Page 45

User Guide
Deleting an Equalizer
1. Press [ ] next to the desired EQ setting. Press [YES] to
complete process.
Renaming an Equalizer
1. Select [ ] next to the desired EQ setting, and then
enter a new name.
2. Press [OK] to complete the process.
Using the Device
44
Page 46

User Guide
Notes
Troubleshooting
Cleaning the Device
Keep the device clean to ensure the best possible
performance from this unit.
Disconnect the power cord before cleaning.
Wipe off any stains with a soft cloth. For heavy stains,
wipe with a damp cloth, and then finish with a dry cloth.
Please keep the following in mind to avoid reduced
performance and damage to the device/paint:
Do not clean with an abrasive cloth. / Do not use
excessive force when cleaning. / Do not clean with
paint thinner or benzene. / Avoid extended contact with
rubber and plastics. / Do not spray the surface with
volatile substances such as insecticides.
Check for solutions to common problems.
1. The device won't turn on.
Make sure that the power supply is properly connected.
2. The operation of the product is unstable.
Press the power button for 10 seconds or more to turn
off the device. Turn on the product again and check the
operation.
3. The screen turns off repeatedly.
The screen turns off automatically after a defined period
of time to reduce battery consumption. Set the time in
[Settings - Screen Timeout].
4. The screen does not display images properly.
Check the screen for debris.
Miscellaneous
45
Page 47

User Guide
5. There is no sound, or there is static/interference.
Verify that the volume is not set to [0].
Check that the appropriate cables are plugged in properly.
Make sure that no obstructions such as debris are on
the audio ports or plugs.
Verify that the audio settings have been properly set.
Verify that the music file is not corrupted.
6. File will not play back, or a specific file causes instability.
The following may occur due to the condition of a file:
Playback is unstable or difficult.
The device may not function properly.
The file may sound different from a computer.
There may be a difference in the performance of
playback or other functions.
The file may not be compatible with playback
specifications.
A file conversion or use of a different file is recommended.
7. A LAN cable is connected, but a network connection
cannot be established.
Select [Settings – Network - ], select [Change] to
refresh the list, and then select the network again.
Miscellaneous
46
Page 48

User Guide
Copyright
Certifications
iRiver Limited retains the rights to patents, trademarks,
copyrights, and other intellectual property rights related to
this manual. No contents of this user manual may be duplicated
or reproduced in any format or by any means without the
prior approval of iRiver. Using or reproducing, in whole or
part, the contents of this document is subject to penalties.
Software, audio, video, and any other copyrighted contents
are protected in accordance with relevant copyright laws.
The user accepts all legal responsibility for the unauthorized
reproduction or distribution of the copyrighted contents from
this product.
Companies, organizations, products, people, and events used
in the examples are not based on actual data. iRiver has no
intention to be associated with any company, institution,
product, person, or incident through this instruction manual,
and no such inference should be made. It is the responsibility
of the user to comply with all applicable copyright laws.
©1999-2015 iRiver Limited. All rights reserved.
The AKT1 was designed and audio-tuned under the
advisement of MSD.
KCC / FCC / CE / TELEC
Class B Device (Communication equipment for residential use):
This is a Class B Device and is registered for EMC requirements
for residential use. This device can be used in residential
and all other areas.
FCCID: QDMDSF11
This device complies with Part 15 of the FCC Rules, Operation
is subject to the following two conditions: (1) this device may
not cause harmful interference, and (2) this device must
accept any interference received, including interference that
may cause undesired operation.
Miscellaneous
47
Page 49

User Guide
Registered
Trademarks
Disclaimers
Windows 2000, Windows XP, Windows 7, Windows 8, and
Windows Media Player are trademarks of Microsoft Corp.
© 2012 CSR plc and its group companies. The aptX® mark
and the aptX logo are trade marks of CSR plc or one of its
group companies and may be registered in one or more
jurisdictions.
The manufacturer, importer, and distributor shall not be liable
for any damage including accidental and personal injury due
to the improper use or operation of this product.
The information in this user manual was written based on
current product specifications. The manufacturer, iRiver
Limited, is adding new complementary features and will
continue to apply new technologies in the future.
All specifications are subject to change without prior notice.
There is no warranty against data loss due to the use of this
product.
Miscellaneous
48
Page 50

User Guide
Specifications
Speaker System
Active CrossOver
Frequency Range
Display
DAC
Supported Audio Format
Sample Rate
Network
Bluetooth
Audio Inputs
Other Inputs
Internet Radio & Streaming
Control App
Dimension(WHD)
Weight
3 Way Multi Channel Active Speakers
(4th CrossOver filter)
0.75” Tweeter x2, 2.0” Midrange x2,
6.5” Wooferx2
Hybrid Amplifier(Analog Amplifier for Tweeter,
Digital Amplifier for Midrange/Woofer)
48Hz ~ 22kHz
4.0-inch(101.6mm), 480x800 Touch Display
Cirrus Logic CS4398x2 (Dual DAC)
WAV, FLAC, WMA, MP3, OGG, APE, AAC,
ALAC, AIFF, DFF, DSF
FLAC, WAV, ALAC, AIFF : 8~192kHz
(8/16/24bits per Sample)
DSD64(1bit 2.8MHz), DSD128(1bit, 5.6MHz)
Wi-Fi(802.11b/g/n) 2.4GHz,
Ethernet(10/100/1000Mbps), DLNA(UPnP)
BT3.0 with aptX
AUX x1, Optical x1
USB type A(Host) x1, microSD card slot x1
vTuner
AK Connect (iOS/Android)
700 X 998 X 404 mm
about 20kg
Miscellaneous
49
 Loading...