

Page 1

AK Jr
INSTRUCTION BOOK
User Guide
Page 2

CONTENTS
_01
Start
Components
Names of parts
Power supply management
Connecting
Upgrading the firmware
02
03
04
05
10
Using the Device
Basic operations
Listening to the music
USB DAC Functionality
Using Bluetooth
Settings
Miscellaneous
Safety cautions
Problem-solving
Copyright
Certification
Registered trademark
Escape clause
Specifications
_03
_02
11
11
14
17
19
21
22
24
25
25
25
26
Page 3
User Guide
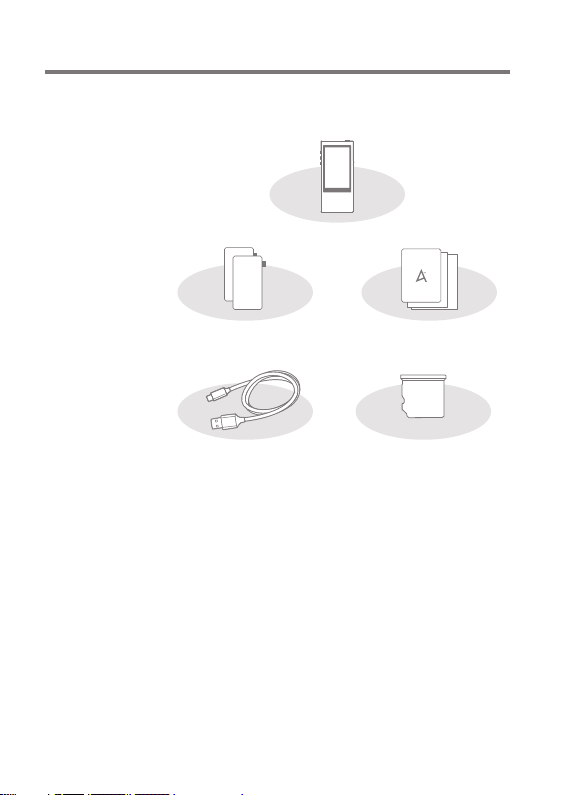
Components
Components may be changed without prior notice to
improve the performance or quality of the product.
AK Jr
2 sheets of
protective film
Micro USB cable
Protective film: It protects the appearance of the product.
Micro USB cable: You can connect the product to the
computer and charge it.
Quick start guide: It describes the basic method of
using the product.
Warranty Card: Please keep the product warranty card in a
safe place for use in the event your product needs service.
Micro SD Card Slot Cover: When there is no micro SD
card, this cover protects the slot.
It is installed in the product by default.
User guide: Download the user guide from [Support >
download in http://www.astellnkern. com/].
Quick Start Guide
& Warranty Card
Micro SD Card
Slot Cover
Start
02
Page 4
User Guide
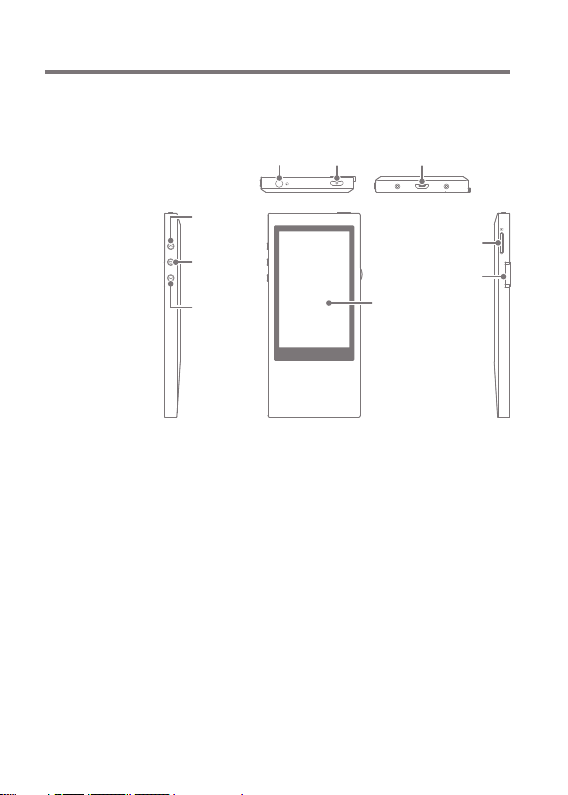
Names of
parts
The appearance of the product, printed and engraved
information may vary depending on the model.
Earphone Power Micro USB terminal
Previous/
Rewind
Play/
Pause
Next/
Fast
forward
Earphone terminal: Connect the earphone and output
sound through the earphone.
Power: short press- Turns the screen on or off.
Long press- Turns the product on and off.
Micro USB terminal: Connect to a computer or charge the device.
Previous/Rewind: Play the previous song or restart the song.
Long press- Rewind.
Play/Pause: Play or Pause a song.
Long press- Display the playback screen.
Next/Fast Forward: Skip to the next song.
Long press - Fast forward.
Touch LCD: Display the screen, and touch the screen to start.
Micro SD card slot: Insert the micro SD card to view saved files.
Volume: Control the volume by turning the wheel.
Micro SD
card slot
Volume
Touch LCD
Start
03
Page 5
User Guide
Power
supply
management
Turn on/off
1. Long press the [ ] button to turn on the device.
2. When the device is turned on, press and hold the
[ ] key to turn it off.
This device has an automatic shutdown feature to
reduce battery consumption. The device will turn off after
a defined period when there is no user input according to
the [ - Power settings - Auto power off]. (See page 20.)
Turn on/off the screen
1. When the screen is turned off, press the [ ] key
to turn it on.
2. If you press the [ ] key again, the screen will be
turned on.
This device has an automatic timeout feature to reduce
battery consumption. The screen will turn off after a
certain period when there is no user input according to
the [ - Power settings - Screen Timeout]. (See page 20.)
Using the reset function
1. If the product malfunctions or stops while in use, press
the [ ] key for more than 10 seconds to turn it off.
Then you can turn it back on and use it.
When you use the reset function, the current time and
memory data will not be deleted.
Do not use the reset function while the product is in
use. It may seriously damage the memory.
Start
04
Page 6

User Guide
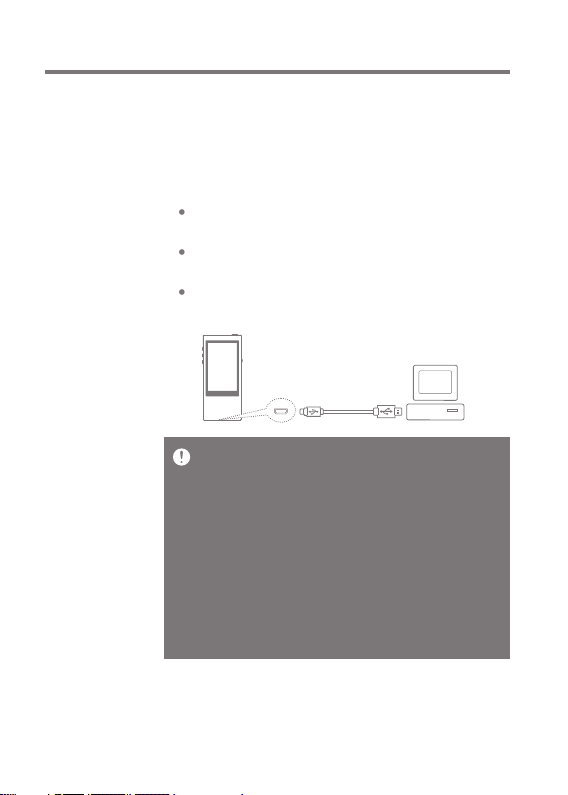
Charging
1. Turn on the computer.
2. If you use a Micro USB cable to connect the product
to the computer, the built-in battery will be charged
automatically.
If you connect it to the PC for charging, the charging
time may vary depending on whether it is turned On or Off.
If you use a separate 5V 2A output adapter to charge
it, it will take up to 4 hours. (Assuming full discharge
and power OFF)
If the device is On and/or being used while charging, the
charge time may be longer or the battery may not fully
charge. Charging with the device turned Off is recommended.
The device may not be charged if the PC or USB
connection goes into standby/sleep mode.
The device may charge slowly or not charge at all in
extreme temperatures. Charging in a room-temperature
setting is recommended.
The built-in battery will gradually lose capacity over
time according to the number of charges/discharges.
Check if it is connected to the high-power USB 2.0 port.
A low-powered USB port (i.e. keyboard or USB hub
without a dedicated power supply) will increase the
charge time.
Do not use any Micro USB cable other than the one
provided with the product.
It may cause malfunction.
Connecting
Connecting the earphone
1. Connect the earphone to the earphone terminal of
the product.
Start
05
Page 7
User Guide
Connecting to a computer
1. Turn on the product and computer.
2. When you use a Micro USB cable to connect the
product and the computer, the connection mode
selection window will be displayed on the screen.
Charging and playback: You can play back while
charging the product.
Connect removable disk: It can transmit data while
connected to a computer.
Using it as USB DAC: You can listen to music from
a PC on the device.
Connect the computer and the product when all
functions are stopped.
Do not use any Micro USB cable other than the one
provided with the product. It may cause malfunction.
Please connect it to the high-power USB 2.0 port. If
you connect the product to a keyboard or a USB hub
without its own power supply, it may not be connected
to the computer.
Only the FAT 32 file system is supported, and if you
format the product, please use the format function of
the device (See [System information] on page 20 ).
MAC users must use the format function of the device to
format it. The device may fail to recognize files at times.
Start
06
Page 8
User Guide
Disconnecting it from the computer
1. Click the icon displayed in the task bar of the
computer screen to safely remove it.
2. Click [OK] to confirm that the device has stopped.
An icon may be hidden in the task bar depending on
the operating system like Windows XP. When you
click the hidden icon, it will be displayed.
If application programs like Windows Explorer or
Windows Media Player are working, you may not be
able to safely remove it.
Safely remove it after exiting all application programs.
If the hardware is not safely removed, safely remove it
again a little later. If it is not safely removed, the
information in the memory may be lost.
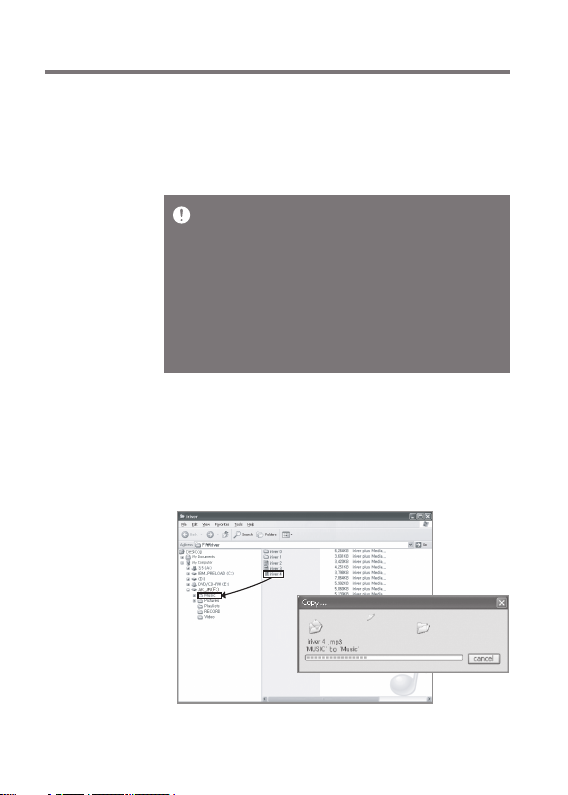
Copy files (folder) to the product
1. If you select the file/folder to copy from the computer,
and drag&drop it to the drive added by the product,
the selected file/folder will be copied.
Start
07
Page 9
User Guide
Make sure that the Micro-USB cable is securely
connected.
If the computer or product is turned off or the Micro
USB cable is removed while the file/folder is being
copied or removed, the memory can be seriously
damaged. So please use caution.
The transmission speed may slow down depending
on the computer and OS environment of the user.
If you saved the file using a removable disk, re-generate
the DB in [ - Re-generate DB].
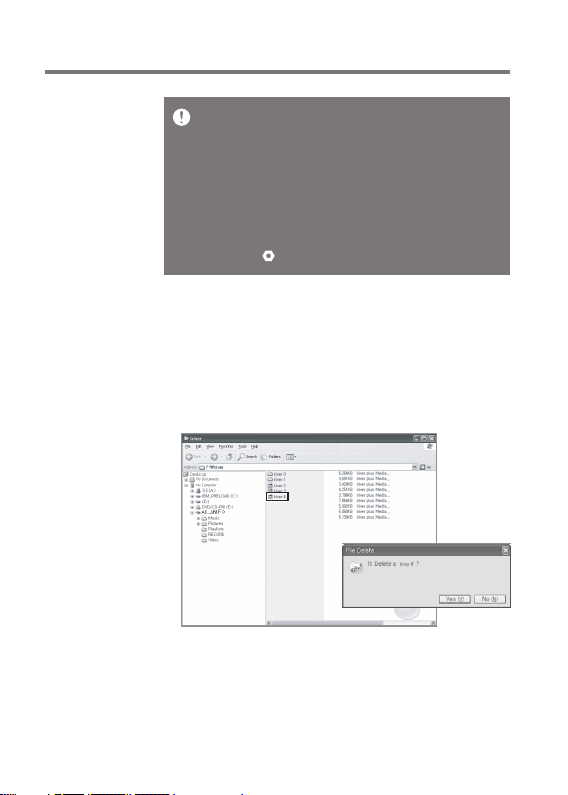
Delete the files (folders) of the product
1. Select the file/folder to delete, right-click the mouse,
and select [Delete].
2. Select [Yes] in the [Confirm File/Folder Deletion]
window to delete the selected files/folders.
Start
08
Page 10

User Guide
Insert/Remove a micro SD Card
1. When the product is turned
off, gently push and insert
the micro SD in the micro
SD card slot of the product
in the direction shown in
the figure.
2. If you press it one more time, the card will be removed.
Recommended micro SD Cards
Brand: SanDisk, Transcend
Insert/remove the micro SD card while the product is
turned off.
When inserting the micro SD card, do not use excessive
force. It may cause the failure of the product or
damage of the Micro SD card.
Do not remove the micro SD card while it is in use. It
may delete data, damage the micro SD card, and cause
the product to malfunction.
Do not insert/remove the micro SD card repeatedly. If
the micro SD card is inserted the wrong way, it may
cause the product to malfunction, or you may not be
able to remove the card.
The use of micro SD cards other than those
recommended may cause the product to malfunction.
The transmission speed of the micro SD card may
vary depending on the state of the PC.
Formatting the micro SD card will delete all data on
the memory card. Be sure to backup any important
files before formatting.
If the Micro SD card is not recognized or malfunctions,
format it before using it.
The Micro SD card is not included in the components.
Please purchase it separately.
Start
09
Page 11

User Guide
Upgrading
the
firmware
Upgrading the firmware
1. Use a computer connected to the Internet to download
the latest firmware file from [Support > download in
http://www.astellnkern. com/].
2. Use the Micro USB to connect the product to the
computer.
3. Select the UMS (USB Mass Storage) to which the
product is connected and copy the downloaded
firmware file to it.
4. After the copying is done normally, remove the USB
safely and disconnect the product and the computer.
5. You can check the progress of firmware upgrade in
the screen of the product.
6. After the firmware upgrade is completed, the product
will be rebooted, and you can use it.
There must be at least 100MB of free space in the
internal memory during a firmware upgrade.
If the battery runs low, the firmware update may not
be completed.
Do not disconnect the product from the computer
while the firmware update file is being downloaded.
After the firmware file has been copied, be sure to
disconnect the USB device safely .
Start
10
Page 12

User Guide
Basic
operations
Listening
to the
music
Using the touch LCD
1. This product has a touch LCD system that allows you
to perform operations by touching the screen.
Touch the desired icon among those on the screen to
launch it.
Moving up/down in the list
1. You can move the list by dragging the list screen
[up down] / [down up].
Do not use a sharp object or excessive force to avoid
damaging the screen.
Selecting music
1. Select the search option from the Home Screen to
display a list of music.
2. Select a song from the list to begin playback.
Select [Folder] to search music by folder.
Continuous play time: about 12 hours (MUSIC: FLAC,
16bit, 44KHz, volume 37, EQ Off, LCD Off)
Supported file formats: FLAC, WAV[8~192KHz(8/
16/24bit)], WMA (8~320Kbps), MP3(8~320Kbps), OGG,
APE(Normal, Fast, High), AAC, AIFF[8KHZ~192KHZ
(8/16/24BIT PER SAMPLE)], ALAC, DFF, DSF, DSD
Using the Device
11
Page 13

User Guide
Listening to the music
1. Turn the [volume wheel] to adjust the volume.
Press [ ] during playback to pause and press
2.
You can also pause/restart when you press the [ ] key.
[ ]
to restart.
3. During playback, press [ / ] to play the previous
/next song.
You can also play the previous/next music by pressing
the [ / ] key.
4. During playback, Long-press [ / ] to rewind/
fast forward.
You can also rewind/fast forward by pressing the
5.
Gapless: Play the next song without any interruption/silence.
※
Gapless playback is only supported when the currently
[ / ]
key.
playing music file and the next music file are saved
in the same folder and have the same specifications
(sampling rate, bit and channels).
Gaplee Supported Format :
FLAC, WAV, AIFF, ALAC, AAC
6. Repeat mode: Change the repeat mode.
: Release the repeat play mode.
:
Repeat-play the entire list of music that is now playing.
: Repeat the current song.
1
7. Play mode: Change the play mode.
: Play the music saved in the memory in sequence.
: Play the music saved in the memory in random
sequence.
8. Press [ ] to return to the previous screen.
9. Press the [ ] to go to the Home Screen.
10. Press [ ] to display the music play screen.
11.
Drag the progress bar to the desired location during playback.
12. Press [ ] to display the current play list.
13. Press [ ] during playback to display the lyrics,
and press again to hide them.
Using the Device
12
Page 14

User Guide
Music play screen
Gapless
EQ
Play mode
Repeat mode
Now playing
Previous screen
Album art
Sequence of songs
Play mode settings
Played time
Previous song/rewind
Play/pause
Lock
Line out
Bluetooth connection status
Present time
BatteryExternal memory
Home screen
Artist name
Title name
Gapless
Repeat mode explanation
Total playtime of this song
Next song/fast forward
Option
LyricsCurrent play list
Music option
1. Press [ ] in the waiting screen or during playback
to display the option list.
2. Select the desired menu and set it up.
3. Press [ ] to return to the previous screen.
Equalizer: Set the equalizer according to the
①
user's preference. (When setting the EQ, the
response speed of the device may become slower.)
User EQ: Adjust the frequencies according to
the user's preferences.
Pro EQ: EQ Preset recommended by professionals.
When using the equalizer, some product functions
may operate more slowly.
Playlist: Add the music you are playing now to the Playlist.
②
Press [ ] to add a playlist.
Music information: Display the information on
③
the music that is now playing.
Using the Device
13
Page 15

User Guide
Using
USB DAC
The USB DAC functions allow the AK Jr to be recognized as
a sound card on the computer and the music played on the
computer to be heard through the earphone terminal of AK Jr.
USB DAC Specifications
USB DAC functions can be used in the following operating systems.
1.
Windows XP, Vista, 7, 8 (32/64Bit), MAC OS X 10.7.5 and up
2. USB DAC functions support 16Bit 44.1~192kHz and
24Bit 44.1~96kHz.
3. Control the volume with the AK Jr’s volume wheel.
The 64Bit operating system does not support USB
DAC functions through the USB 3.0 port. Please use
the USB 2.0 port.
If the USB is has been used extensively or the PC begins
operating slowly, the played sound may be interrupted.
There may be issues with audio-to-video synchronization during video playback depending on the sound
quality and operating environment.
USB DAC Installation
1. Connect AK Jr to a USB port of the PC and select
[Connect to USB DAC].
2. Since the device driver has been installed automatically,
it is not necessary to install a separate driver or program.
If a driver has not been automatically installed, use
the device manager to automatically search for and
install the desired driver.
3. Change the default 'Sound Output' device according
to the operating system as seen in the images below.
Using the Device
14
Page 16

User Guide
XP: Control Panel > Sound and Audio Devices >
Audio tab > Change the default audio device under
'Sound playback' to [iriver USB DAC].
Vista/7/8: Control Panel > Hardware and Sound >
Manage Audio Devices > Right click [iriver USB
DAC] and right-click the mouse- to select [Set as
default device].
< Windows XP >
< Windows 7 >
Using the Device
15
Page 17

User Guide
For high-quality playback, in Windows Vista/7/8, it is
recommended to double-click [iriver USB DAC] in the
Control Panel > Hardware and Sound > Audio Device
Control, and change the Advanced – Basic Mode to
‘24bit, 96000Hz’.
Macintosh OS X: System Preferences > Sound >
Output tab > Select [iriver USB DAC].
Using the Device
16
Page 18

User Guide
Only when using the AK Jr with USB DAC for the first
time is it necessary to perform this step. No follow-up
measure needs to be taken to select the AK Jr for
sound output.
Using
Bluetooth
You can use devices supporting Bluetooth to enjoy
music wirelessly.
Connecting Bluetooth
1. Select [ - Bluetooth settings] in the home screen.
Set Bluetooth to [ON] to display a list of available devices.
2.
3. Select the desired device from this list to connect it
to the product.
4. Turn on the product and enjoy music wirelessly.
Originating/terminating a phone call during Bluetooth
connection
Terminating: The music playing when a call is received
will be paused, and Bluetooth will be disconnected.
Originating: The music playing when a call request is
made will be paused, and Bluetooth will be disconnected.
Disconnecting Bluetooth
1. Select a connected device to disconnect from it.
Using the Device
17
Page 19

User Guide
Deleting Bluetooth
1. Press [ ] in the Bluetooth list to delete it.
Bluetooth Support Specifications
- Profile: A2DP, HID (The HID profile can be supported
only through iriver’s IAA01 model.)
- Device performance may be affected during Hi-Fi
playback. (48 kHz or lower is recommended)
- EQ is not applied.
- Bluetooth will not be supported for sound sources
with a sampling rate less than 32kHz.
Do not turn off the device while connected to Bluetooth.
If Bluetooth malfunctions, turn off the Bluetooth device,
and turn it back on.
Since registration methods may vary for different
Bluetooth devices, please read the user manual for
each device before connecting to it.
When connecting the product to a Bluetooth device,
the distance between the two must be within 20cm.
Audio quality will degrade with longer distances, and
the pairing may disconnect at a distance in excess of
3m. (Distances may vary depending on the user’s
environment and device).
Crosstalk may be heard while using Bluetooth.
For multipoint devices, make the necessary connections prior to use.
Car audio Bluetooth connections are not supported.
There may be a malfunction or noise depending on the
user’s environment and Bluetooth’s battery charging state.
-
Signal interference affects data transmission. (i.e. holding
the device while wearing a Bluetooth device, holding the
device while also holding another electronic device, etc.)
- In case part of the body touches the radio sender and
receiver of the product or Bluetooth headset
In case the received transmission is affected by obstacles
like walls, corners and partitions that block radio waves
- In case there is radio interference from devices using
the same frequency like medical devices, microwave
ovens and wireless LANs
- In areas where there are many interfering signals
like inside elevators and underground
Using the Device
18
Page 20

User Guide
Settings
Users can set up their own product environment. The
structure of the settings menu may vary depending on
the version of the firmware.
Setup
1. Select [ ] in the home screen.
2. Select the desired item and set it up.
3. Press [ ] to display the previous screen, and press
[ ] to display the home screen .
Date and time settings
Set up the current date and time.
Language settings
Select a language.
Brightness settings
Adjust screen brightness settings.
Power settings
Auto power off: Once a certain amount of time passes
without any operation of the product and buttons, it
will be automatically powered off.
Screen off: Once a certain amount of time passes
without any operation of the product and buttons,
it will be automatically powered off.
Sleep timer: Once a certain amount of time passes, it
will be automatically powered off.
Using the Device
19
Page 21

User Guide
Bluetooth settings
You can use a device supporting Bluetooth to enjoy
music wirelessly. (For more details, please see
[Bluetooth connection]on page 17.)
Re-generation of DB
Update the DB.
Line Out
If you set line out, you can set line out in the volume
screen.
Locking
If you set the volume lock function, you cannot control
the volume with the LCD off.
System Information
You can check the system information of the product
and format the product.
Initialization of settings
Return all user settings back to their original values.
Using the Device
20
Page 22

User Guide
Safety
cautions
related to the product
If the same screen is maintained for an extended
period, an afterimage may remain in the screen.
Do not insert any metal (coins, hairpins, etc.) objects
or flammable debris into the device.
Do not place heavy objects on the device.
If the product gets wet from rain (water), beverages,
medicines, sweat or moisture, do not turn it on. Wipe
it with a dry cloth and have it checked at the nearest
iriver service center. (Malfunctions due to exposure to
liquids will be repaired for a fee regardless of the
warranty period, and may not be repairable.)
Do not keep the product in a moist or dusty location.
Never attempt to disassemble, repair or alter the product.
Avoid exposing the headphone to direct sunlight or
extreme temperatures (-5℃ ~ 40℃).
Do not keep the product next to strongly magnetic
objects like magnets, TVs, monitors or speakers.
Since chemicals and detergents may damage the
product’s surface and remove paint, do not let them
come in contact with the device.
Do not drop or expose the product to strong impacts
(places where there is strong vibration. etc.).
Do not press multiple buttons simultaneously.
Do not disconnect the Micro-USB cable during data transfer.
When connecting the Micro-USB cable, use the USB
port on the back of the PC. In some PCs, defects may
have occurred when the USB port was assembled.
Never connect anything other than earphones to the
earphone connection terminal.
Miscellaneous
21
Page 23

User Guide
If a defective screen protection film or sticker is
attached to the screen, the screen may be dimmed.
Do not remove the micro SD card while it is in use.
Other
Do not use the headphone/earphone or operate the
product while operating a bicycle, automobile or
motorcycle. It is not only dangerous, but also violates
the law in some regions.
Do not use the product during physical activity
(driving, walking, hiking, etc.).
Always use in a safe environment to avoid accidents.
If you are using the product while moving, make sure
there are no dangerous obstacles nearby.
Since there is a risk of electric shock during lightning
strikes, do not use the product during storms.
If there is a ringing in the ears during or immediately
after use, reduce the volume or discontinue using the
product and obtain medical advice.
Do not continuously use the earphone at a high volume.
Do not use the headphone/earphone at a high volume.
Make sure that the headphone/earphone does not get
stuck in another object or get caught between other objects.
Do not sleep with the earphone in your ear or use the
earphone for an extended period.
Miscellaneous
22
Page 24

User Guide
Problemsolving
Please check!
1. The device won't turn on.
Check the battery charge status.
Use the Micro USB cable for charging and checking
the battery.
2. The battery does not charge even when the product
is connected to the computer with the Micro-USB cable.
Check that the USB cable is connected correctly.
3. An error occurs on the PC when the Micro USB is
connected.
Check that the USB cable is connected correctly.
4. The volume is changed after formatting.
The volume may vary slightly depending on your
PC’s OS.
5. The screen turns off repeatedly.
O reduce power consumption during file playback,
the screen will be turned off after a certain period.
Set up time in [ - Power setting - Turn off the screen].
6. The screen does not display images properly.
Check the screen for debris.
7. There is no sound, or there is static/interference.
Check that the volume setting is above [0].
Check the earphone terminal connection and inspect
the terminal for foreign material.
Check the music file’s status.
8. It cannot be connected to the computer.
Connect the product to the USB port on the back
of the computer. Differences may occur in the
output voltage of USB ports.
Miscellaneous
23
Page 25

User Guide
9. The file does not play, or the product is unstable
when a certain file is used.
The following may occur depending on the files
used, their quality and condition.
- Playback is unstable or difficult.
- The device may not function properly.
- The file may sound different from a computer.
- There may be a difference in the performance of
playback or other functions.
- The file may not be compatible with playback
specifications.
A file conversion or use of a different file is recommended.
Copyright
iriver Limited retains the rights to patents, trademarks,
copyrights, and other intellectual property rights related
to this manual. That is, no contents of this user manual
may be duplicated or reproduced in any format or by any
means without the prior approval of iriver. The unauthorized use of all or part of this document may be subject to
legal proceedings. Copyrighted contents like software,
sound sources and video will be protected by relevant
laws like the Copyright Act. Any unauthorized reproduction or distribution of the copyrighted contents of this
product is the legal responsibility of the user.
Companies, organizations, products, people, and events
used in the examples are fictional. iriver has no intention
to be associated with any company, institution, product,
person or incident through this instruction manual, and
no such inference should be made. It is the responsibility
of the user to comply with all applicable copyright laws.
©1999-2015 iriver Limited. All rights reserved.
Miscellaneous
24
Page 26

User Guide
Certification
Registered
trademark
Escape
clause
KCC / FCC / CE / TELEC
Class B Device (Communication equipment for residential use):
This device is EMC equipment (class B) for use primarily
in homes. It can be used in all regions.
FCCID : QDMPPE11
This device complies with Part 15 of the FCC Rules,
Operation is subject to the following two conditions: (1)
this device may not cause harmful interference, and (2)
this device must accept any interference received,
including interference that may cause undesired
operation. Changes or modifications not expressly
approved by the party responsible for compliance
could void the user's authority to operate the equipment.
Windows XP, Windows Vista and Windows Media
Player are registered trademarks of Microsoft Corp.
The manufacturer, importer, and distributor shall not be
liable for damages including accidental and personal
injury due to the improper use or operation of this
product. The information contained in this instruction
manual is based on the current product’s specifications.
iriver, the manufacturer of this product, is adding new
functions and will continue to apply new technologies in
the future. All specifications may be changed without
any prior notice to the user.
There is no warranty against data loss due to the use of
this product.
Miscellaneous
25
Page 27

User Guide
Specifications
General specifications
Product Name
Model
Body Color
Body Material
Display
Supported Audio
Formats
Sampling rate
Output Level
DAC
Decoding
Input
Outputs
Bluetooth
Dimensions
Weight
Operating temperature
Feature Enhancements
Audio Specifications
Frequency Response
S/N
Crosstalk
THD+N
IMD SMPTE
Output impedance
Clock Jitter
Memory
Built-in Memory
External Memory
Battery
Capacity
Supported OS
Supported OS
AK Jr
PPE11
Silver
Aluminum
3.1inch WQVGA (240x400) / Touch Screen
WAV, FLAC, WMA, MP3, OGG, APE(Normal, High, Fast),
AAC, ALAC, AIFF, DFF, DSF
FLAC, WAV, ALAC, AIFF: 8kHz ~ 192kHz (8/16/24bits per Sample)
DSD : DSD64(1bit 2.8MHz), Stereo (DSD to PCM)
Unbalance 1.95Vrms
Wolfson WM8740 x 1(Single DAC)
Support up to 24 bit / 192 kHz Bit-to-Bit Decoding
USB Micro-B input(for charging & data transfer (PC & MAC))/
Connection Mode : UMS (USB Mass Storage)
PHONES(3.5mm)
V4.0 (A2DP, AVRCP)
2.08” (52.9mm)[W] x 4.60” (117mm)[H] x 0.35” (8.9mm)[D]
3.45oz (98g)
-5℃ ~ +45℃ (23℉ ~ 113℉)
Firmware upgrade supported (UMS - Firmware File Copy Type)
±0.04dB (Condition: 20Hz~20kHz) Unbalance
±0.3dB (Condition: 20Hz~70kHz) Unbalance
112dB @ 1kHz, Unbalance
120dB @ 1kHz, Unbalance
0.005% @ 1kHz, Unbalance
0.0006% 800Hz 10kHz
2ohm
50ps(Typ)
64GB[NAND]
microSD(Max. 64GB) x 1
1450mAh 3.7V Li-Polymer Battery
Windows XP, Windows 7,8(32/64bit)
MAC OS X 10.7. and up
Miscellaneous
26
 Loading...