

Page 1

AK500N
INSTRUCTION BOOK
User Guide
Page 2

CONTENTS
01 02
Before Use
Saftey precautions
02
Remark
07
Product Overview
08
Product specification
11
Package contents
12
Name of each part
13
Managing power
16
Connections
17
Upgrading the firmware
27
Using the Device
Basic operation
28
Notification bar
30
Music list screen
32
Music playback screen
34
Listening to music
35
Ripping the CD
36
Managing the current playlist
38
Managing the playlist
39
Searching files
42
Managing Files
42
MQS streaming
45
Purchasing music in the store
47
Using USB DAC function
48
Using bluetooth
51
Settings
52
Connecting to the network
56
Setting the equalizer
57
03
Miscellaneous
Trouble shooting
59
Copyright
60
Certiications
60
Gracenote
63
Trademarks
63
Disclaimers
63
Page 3
SAFTEY
PRECAUTIONS
Please check [Safety Instructions] before using the device for a safety use.
Descriptions :
Instructions are divided into “Warning” and “Caution”, and the meanings are explained in the following.
Warning indicates a serious danger. Caution indicates a hazard.
Explanations of Symbols
Indicates “Forbidden” or “Prohibited matters”. Indicates “Required Action” or “Perform as instructed”.
Use
Warning
Users should not decompose, repair or change the product randomly.
- iriver does not take responsibility for any problems caused by a random decomposition, change or repair.
Do not place the metal (coins, hairpins, etc.) or inflammable foreign object inside the product.
When lightning do not touch the power cord.
- You can cause fire or electric shock.
Stop using the product immediately, if the operation is not smooth or a failure occurs.
If water or foreign object get inside the product, disconnect the power plug from the outlet immediately,
quickly wipe with a dry cloth, and get the AS through the near iriver zone.
Repair for the damage due to inundation may cost, or even not possible, regardless of the quality assurance period.
Before Use
02
Page 4

Pay attention not to apply force or press on the part of the cable is connected, if the cable is connected
to the connection port.
- You can break the sound terminal products.
Do not disconnect the USB cable during data transfer.
Use a USB port at the rear of the PC USB cable connection.
- Connection to the USB port with assembly defect or malfunction may develop product failure.
Do not use products such as chemicals or cleaning agents, because they spoil the surface and strip lacquer.
If you attach a bad LCD protective film or stickers to the screen, the darkening screen phenomenon can occur.
If you keep the same screen, an afterimage may remain on the screen.
When you touch the screen, use a clean and dry hand.
When you touch the screen, do not press with too strong pressure.
Caution
Do not put your hands on the CD inserting slot.
Do not use a non-circular disc.
Do not use a disc with serious scratches or foreign substances.
- This may cause a malfunction.
Do not stand on the product.
Do not place heavy objects on the product.
Never connect any other type of cable to the terminal except an appropriate cable.
You can lose your hearing if you plug earphones or headphones in your ears and hear a large volume.
Before Use
03
Page 5

POWER CODE AND PLUG
Warning
Do not plug or unplug with wet hands.
Plug the power plug into a 110~220V(50~60Hz) AC outlet.
If there is dust on the power plug pins or mounting surface, please remove the power plug, and then
remove the dust.
When handling the power cord, please observe the following:
Do not compromise. / Do not transform.(ex: extension) / Do not apply heat. / Do not place heavy objects.
Do not insert it in a small space. / Do not bend forcibly. / Do not twist. /Do not tie several codes together.
- You can cause a fire or electric shock.
Caution
Do not use a power code except the one comes with the product.
Do not use the power code that came with the product to other products.
- You can cause a fire or electric shock.
Please use a grounded plug as a power plug.
When removing the power plug from the outlet, hold the power plug strongly.
When you do not use the product for long periods of time, unplug the power plug from the outlet.
- You can cause a fire or electric shock.
Before Use
04
Page 6

INSTALLATION
Warning
To reduce the risk of fire or electric shock, do not expose the product to rain or moisture.
Do not let the product contact with water, and do not place objects with liquids, such as vases, on the product.
Do not place or use the product on following. You can cause a fire or electric shock.
A place where you can splash water or a dump place such as a bathroom. / A place where rain or fog can flow directly./
Outside of the rainy season. A place with a high temperature like near fire or a heater/
A place where is exposed to direct sunlight/ A place where are dust, oil, or smoky (ex. Kitchen)/
A place where temperature (-5°C~40°C) is too high or low, or where there is a sudden temperature changes/
A place with a strong vibration/ A unstable place such as a wobble table a slanted surface/
A place where are strong magnetic objects such as magnets, TV, monitor, speakers, etc. /
A place with a corrosive gas (ex. Sulfite, hydrogen sulfide, chlorine ammonia)
Please move away the product from the TV, if TV changes its color near the product, or if it makes a noise.
USB Device
- You cannot connect a computer to the USB memory port on the product.
- If a USB has a large capacity, it may take several minutes or more to navigate to the file.
Before Use
05
Page 7

- If static electricity is generated when connecting a USB device, a playback can run abnormally.
In this case, disconnect the USB device and then re-connect.
- A copyrighted track (WMA-DRM* tracks) cannot be played on this product.
* DRM (Digital Rights Management): several technical methods that are used to control or limit the use of
digital media contents.
- Coded or encrypted tracks in a special way cannot be played on this product.
- Do not disconnect the device when playing a file on the USB device.
Both the product and the USB device can cause a malfunction.
- If you connect by using a USB hub or extension cable, it maybe not recognized by this product.
- Devices that need to install a separate drive are not supported.
- Some USB devices may not be recognized or function correctly.
- iriver does not take responsibility for any loss of data on the USB device that occurs when using this product.
Before Use
06
Page 8

Remark
Cleaning the Device
To ensure the best performance from this device, you must keep discs and equipment clean.
- Disconnect the power cord before cleaning.
- Wipe the stain with a soft cloth. If there are a lot of stains on the device, wipe clean with a dry cloth, after
wiping with a damp cloth in water.
- The performance of the device can be degraded, damaged, or the paint may peel off, therefore please note
the following:
Do not wipe with a hard cloth. / Do not wipe too hard. / Do not wipe with thinner or benzene. /
Do not leave for a long time in contact with rubber or plastic/ Do not spray volatile material such as insecticide.
Disc Handling
- Do not touch or scratch the recorded reflective surface.
- Do not apply foreign substances or write on the label. Do not bend the disc.
- When you clean the disc, use a soft cloth in a straight line from the center
towards the edge.
Do not use thinner, benzene, record cleaner or antistatic sprays.
Before Use
07
Page 9

Product
Overview
The AK500N is the first stationary network audio product from Astell&Kern that truly combines advanced
digital technology with analog sound.
Perfect Extractor
How are you enjoying your precious CD collection?
Are you still listening to your music one CD at a time?
Import your CD collection into the AK500N with the one click.
By taking the acclaimed cdparanoia’s CD ripper, in its highly-optimized ripping engine, the AK500N provides
users with flawless CD rips through enhanced jitter and error correction support.
The highest sound quality is captured with enhanced jitter correction and excellent CD track error detection
and correction.
Two speeds (Normal / Fast) are available for CD-ripping, and the tracks can be saved in either WAV or FLAC.
In addition, Album art and music data are automatically imported from Gracenote’s latest music DB.
Gracenote is the most well-recognized and accurate source of music DB in the world.
Also, touch the keypad to enter the CD title, artist, genre, year of release information yourself.
Pure Sound
A common factor in devices operating in AC power is that the AC power supply is a point of entry for
unwanted external noise and exit for device noise. These are the main causes of sound quality degradation.
The AK500N does not allow even 1% of external noise.
Before Use
08
Page 10

Although the AK500N is stationary audio devise, it was designed to use a built-in battery for noise isolation.
The AK500N physically blocks noise generated in the AC power supply to prevent sound degradation at all levels.
Music playback on the AK500N is achieved with battery-only operation, creating a truly Pure Sound.
PCM to DSD
The AK500N features a dedicated DSD chipset for DSD playback and converts PCM file to DSD64 data
through audio engine of Astell&Kern.
The AK500N converts high-resolution 32 bit/384 kHz WAV PCM and 24 bit/352 kHz FLAC PCM file to
DSD64 data without any down-sampling.
Surely, real time PCM file to DSD64 data playback available.
Go one step further to original sound with this feature by converting, without any distortion, the unique audio
information contained within the sound source.
Advanced Network
The network capability of the AK500N is another attractive feature that can't be missed.
The AK500N connects to PCs as well as NAS servers through its DLNA implementation using LAN, Wi-Fi
and is easily controlled with an app on smartphones and tablets.
Music on your PC or NAS can be freely streamed and played back without the hassle of having to turn on
your PC and connecting a cable and it can output the sound in conjunction with the network speaker.
The AK500N can be easily kept up-to-date with OTA (Over-the-Air) firmware updates.
Before Use
09
Page 11

Four BAY SSD
The AK500N features multi-level cell (MLC) SSD rather than a triple-level cell (TLC) SSD for increased
durability and reliability.
The vibration noise generated by conventional HDDs has been eliminated completely.
Save and load large amounts of data even faster than traditional HDDs through the superior speed and
stability of SSDs.
1TB/2TB/4TB SSD options are offered to satisfy each user’s needs.
By implementing RAID 0 and 5 capabilities optimized for each drive capacity, user data is protected and
storage space is efficiently utilized.
Physically independent drives can be combined into a single drive through RAID 0, and one drive in a RAID
5 configuration is used for data parity, ensuring user data safety.
Powerful Connections
The AK500N supports a wide range of inputs and outputs.
Connect various high-end products through the AK500N's digital inputs and outputs (AES/EBU, Coaxial, Optical, BNC).
In addition, the analog output supports both Fixed and Variable signals for a direct connection to a powered amplifier.
A simple but high-level premium system configuration is possible through the AK500N's flexible digital and
analog connections.
For user convenience, the inputs and outputs are expressed in easy-to-read graphics on the touch-screen menu.
Before Use
10
Page 12

Product
specification
Display
DAC
Storage
Digital _Out
_Input
Analog _Fixed & Variable Out
Fixed output level
Variable output level
Channel Separation
Frequency Response
THD(Total Harmonic Distortion)+N
SNR(Signal to Noise Ratio)
Audio File Supported
Audio Sample Rate
USB Supported
USB DAC Supported
Network Supported
CD Ripping audio format
Battery
Dimension / Weight
Specifications and appearance can be changed without previous notice.
The Auto Spec has been measured by the Balanced of the Analog Out.
7”WVGA(1280x800) Touch Display
Cirrus Logic CS4398 x2 (Dual DAC)
SSD 1TB/2TB/4TB(RAID 0,5)
AES/EBUx1, BNCx1, Coaxialx1, Opticalx1
AES/EBUx1, BNCx1, Coaxialx1, Opticalx1
Balanced (L/R) x2, RCA (L/R) x2
3V(RCA, Balanced)
7.5V(RCA) / 10V(Balanced)
>135dB / 1kHz
± 0.02dB / 20Hz ~ 20kHz, ± 0.4dB / 10Hz ~ 70kHz
< 0.0008% / 1kHz / 10v, <0.001% / 10Hz ~ 20kHz / 10v
118dB / 1kHz / 10v
WAV, FLAC, WMA, MP3, OGG, APE, AAC, ALAC, AIFF, DFF, DSF
8kHz ~ 384kHz (8/16/24bits per sample)
DSD Native : DSD64(1bit/2.8MHz) / DSD128(1bit/5.6MHz)
Type A(Host) x2, Type B(Device) x1
UAC(USB Audio Class) 2.0 / DSD64, DSD128, PCM
Wi-Fi 802.11b/g/n(2.4GHz) & Ethernet 10/100/1000, DLNA(DMS,DMC,DMR)
WAV, FLAC
Capacity : 10.4A / Voltage : 7.4V(Normally) / Type : Li-Ion
214[W] x 238[H] x 243[D](mm) / 11.4kg
Before Use
11
Page 13
Package
contents
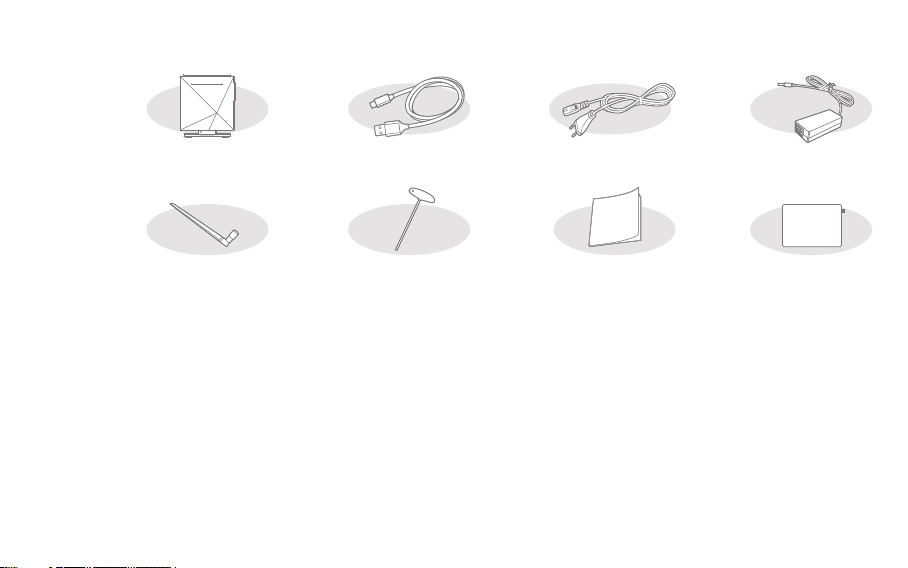
Components may be changed without notice to improve product performance and quality.
AK500N
for data transfer
Quick Start Guide
& Warranty Card
Power Code & Adapter: Connect with the product to recharge the product.
USB Cable for data transfer: Connects the product to the computer and sends data.
Antenna: It is an antenna for wireless network connection. Please tighten it on the [ANT] terminal of the back
of the product.
T Wrench: Use when combine or spate the body and stand of AK500N.
Quick Start Guide: A manual of basic methods of using the product.
Product Warranty: Please keep the Product Warranty well, because it is necessary when you apply for AS.
Protective Film: You can use for LCD protection.
User Manual: You can download User Manual from [http://www.astellnkern.com > Support > Download] or
check from [Settings-Help] of the product.
Protective FilmT wrenchAntenna
Before Use
AdapterPower codeUSB cable
12
Page 14
Name of
each part
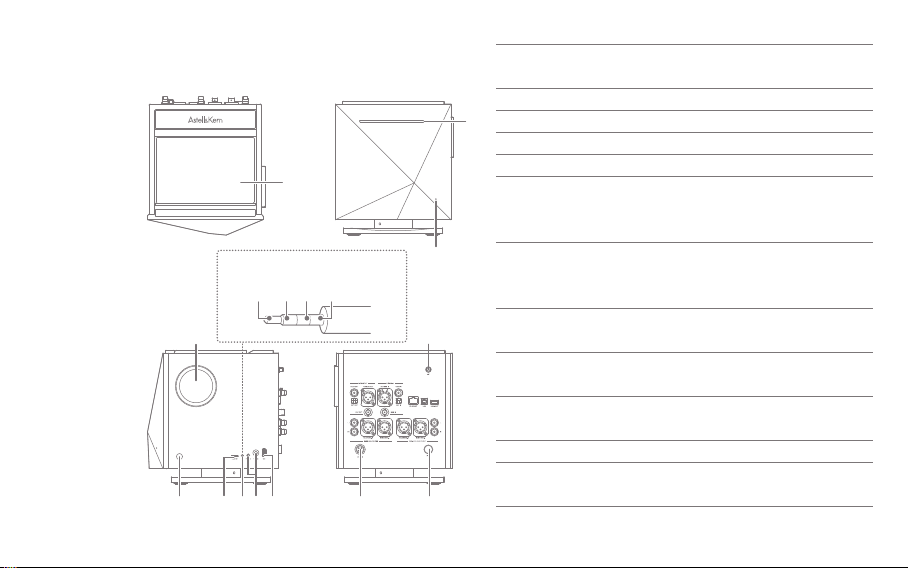
Appearance of the product and the printing,
stamping contents may vary depending on a model.
1
Balanced audio pin map
R- R+ L+ L-
4 10
6 8 975
3
1211
1
Touch LCD
2
CD Insertion
3
Power LED
2
4
Volume Wheel
5
Power
6
Micro SD Card
Slot
7
Balanced Port
Headphone/Earphone
8
Jack Connector
USB Host
9
Connector
10
Wireless Network
Antenna
11
Power Port
12
LED Power
Jack Stands
Displays the screen, and you can
touch the screen to operate.
Push the CD to insert.
Displays the Power On/Off status.
Turn the wheel to adjust the size of the sound.
You can turn On/Off the power of the product.
You can equip a Micro SD card
into the product, and play music
files of the MicroSD card.
You can listen to the sound source by
connecting the earphone and headphone
which support the balance cable.
Output the sound through the earphone
by connecting headphones/earphones.
You can connect a USB storage device to
play music files on a USB storage device.
Rotate the wireless network
antenna to connect.
Connect the power adapter.
Attach the power LED stand.
(It will be released in the future)
Before Use
13
Page 15
3 621 7 84 5
1
Digital Out
Digital In
Unable to adjust volume when Digital Out is selected.
BNC Output Port
2
Optical Output Port
3
Coaxial Output Port
4
AES/EBU Output Port
5
AES/EBU Input Port
6
Coaxial Input Port
7
Optical Input Port
8
BNC Input Port
Connect a BNC output cable to
the port to output to digital.
Connect an optical cable to the
port to output to digital.
Connect a coaxial cable to the
port to output to digital.
Connect an AES/EBU cable to
the port to output to digital.
Connect an AES/EBU cable to
receive a digital input.
Connect a coaxial cable to the
port to receive a digital input.
Connect an optical cable to the
port to receive a digital input.
Connect a BNC input cable to the
port to receive a digital input.
Before Use
14
Page 16
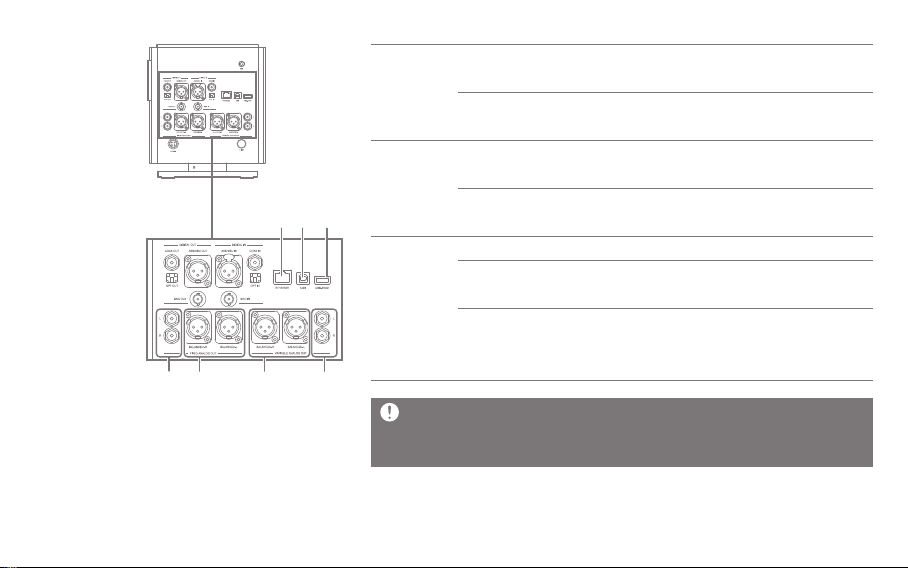
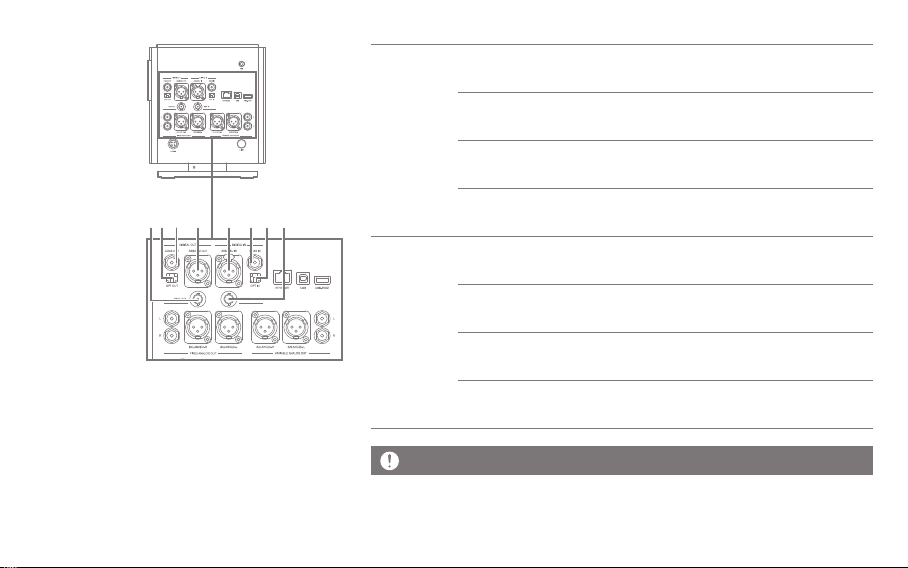
2
1 43
5 6 7
1
Fixed
Analog Out
Variable
Analog Out
System 단자
Fixed RCA Port
2
Fixed Balanced
Port
3
Variable
Balanced Port
4
Variable RCA
Port
5
Ethernet Port
6
USB Port
Connect RCA cable to the port to
output to digital.
Connect Balanced cable to the port to
output to analog.
Connect Balanced cable to the port to
output to analog.
Connect RCA cable to the port to
output to analog.
Connect a wired LAN cable to the port.
Connect USB B type cable to the port
and the computer.
7
USB-HOST Port
You can connect a USB storage
device to play music files on a
USB storage device.
Digital In/Out and Analog Out can be set in a notification bar or the [Settings-
Sound-Sound In/Out].
Unable to adjust volume when Fixed Analog Out is selected.
Before Use
15
Page 17
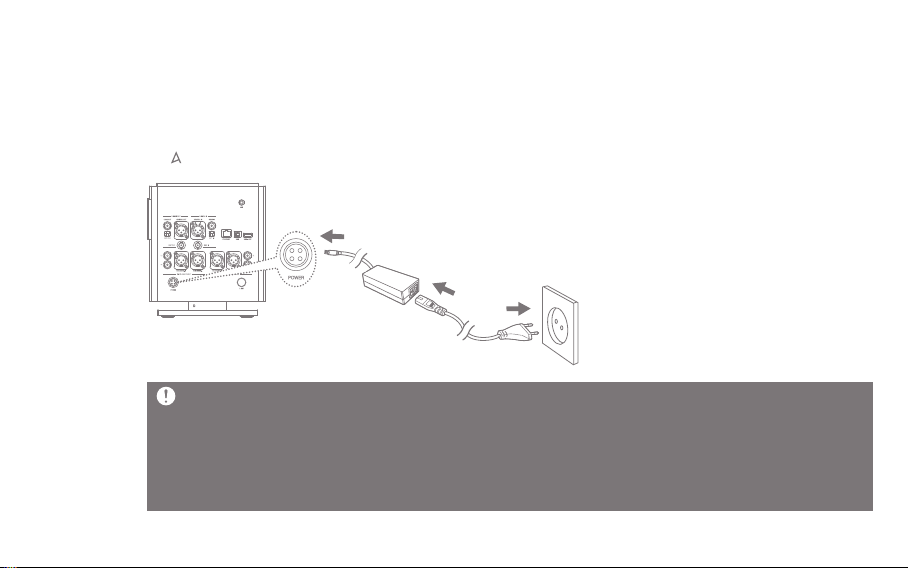
Managing
power
Connecting the Power
1. Connect the adapter and the power cord.
2. Connect the adapter cable to the [Power] on the rear panel, and turn the mounting ring to tighten.
3. Connect the power cord and then press the [Power] button on the product for 2-3 seconds.
4. [ ] logo appears on the screen while the product is booted.
Connect the power cord to a wall outlet after completing the connection of the product, an adapter, and the power cord.
Use only the power cord and the adapter supplied in order to prevent malfunction or damage of the device.
Keep unplug the power cord from the outlet when you go out or you are not using the product for a long time.
The product contents include suitable cables for each country such as the United States, Japan, Europe and the UK.
Please separately check the national certification mark on the plug part, and use an appropriate power cable for each
area to connect to an adaptor.
Before Use
16
Page 18
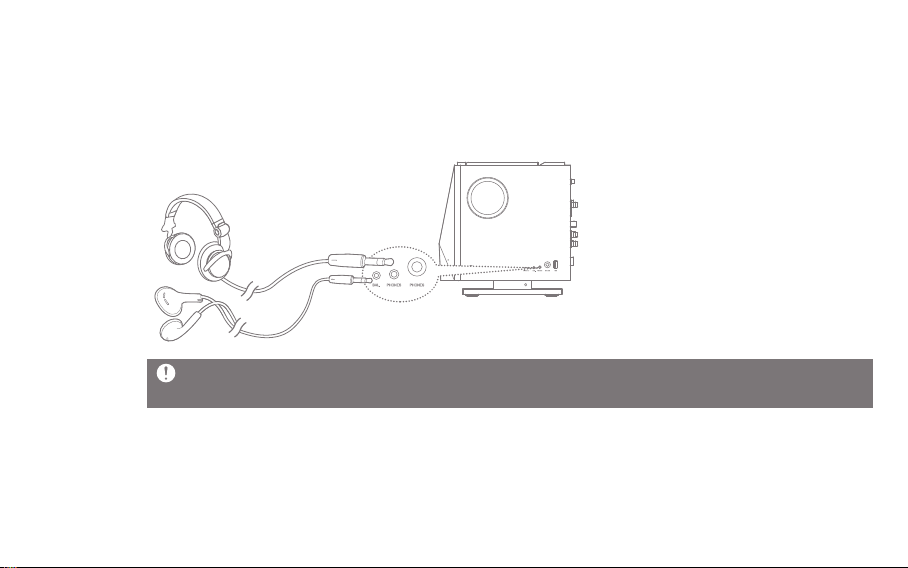
Connections
Earphones/Headphones
- Connect earphones or headphones to the [BAL], [PHONES] port of the side of the product.
- Connect earphones or headphones that support the balance cable to [BAL] port on the side of the product.
- You can use various earphones/headphones that fit 2.5Φ, 3.5Φ, 6.5Φ.
Do not raise the volume to loud when connecting earphones or headphones.
You can lose your hearing if you plug the earphones or headphones on your ears and listen to the large volume.
Before Use
17
Page 19
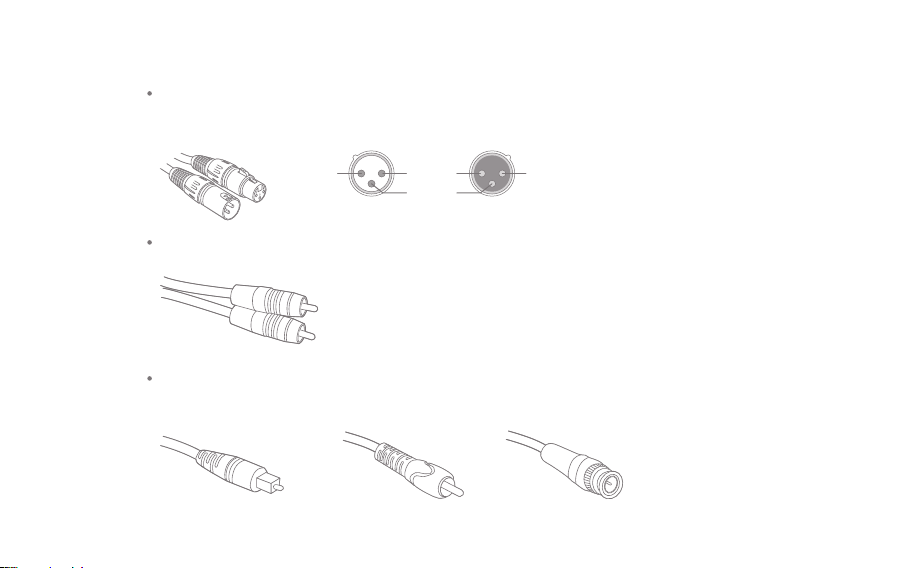
Available Types of Cable
Balanced (XLR) Cable
Balanced calbes used in professional audio interfaces have better response capacity than regular cable,
and can be transmitted from a long distance.
12
Ground
3
1 2
HOTHOT
3
COLD
Female Male
UnBalanced(RCA) Cable
It is the most commonly used basic cable to transmit the audio signal.
Optical/Coaxial/BNC Cable
Optical cable and coaxial cable(Coaxial/BNC Cable) are the cables that can be used to connect to the
digital inputs and outputs.
Optical Cable Coaxial Cable BNC Cable
Before Use
18
Page 20
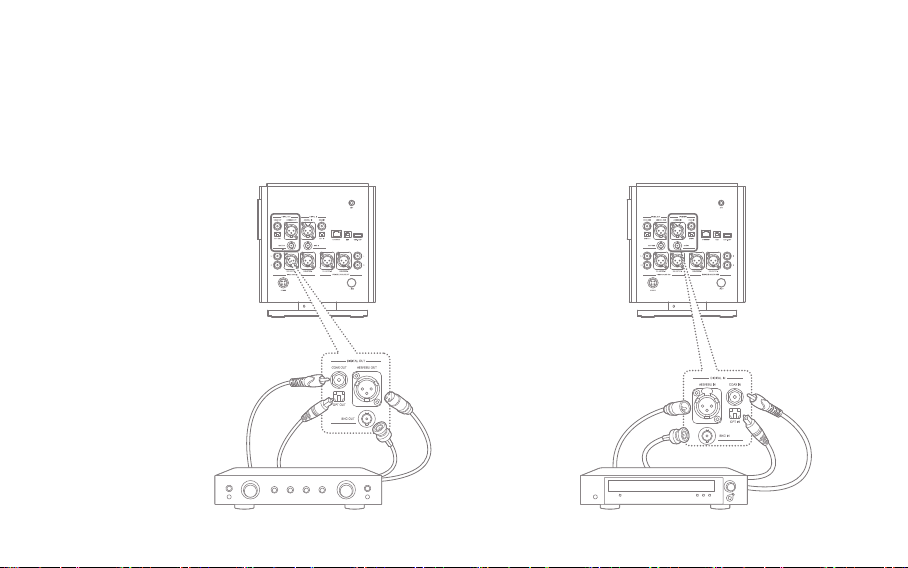
Connecting DIGTAL OUT
Connecting DIGITAL IN
1. You can connect the product to an external amplifier
device by using AES/EBU, Optical, Coaxial, BNC
cables to [AES/EBU OUT], [OPT OUT], [COAX OUT],
[BNC OUT] port of the rear panel.
Coaxial
Cable
Optical
Cable
BNC Cable
AES/EBU
Cable
1. You can connect the product to an external source
device by using AES/EBU, Optical, Coaxial, BNC
cables to the [AES/EBU IN], [OPT IN], [COAX IN]
port of the rear panel.
AES/EBU
Cable
BNC Cable
CD Player
Coaxial
Cable
Optical
Cable
Before Use
19
Page 21

Connecting Fixed Analog Out
Connecting Variable Analog out
1. You can connect ‘Blacned’ and ‘RCA cable’ to an
external amplifier device from [FIXED ANALOG
OUT] of the back the product.
RCA Cable L/R
Balanced Cable L/R
1. You can connect ‘Balanced’ and ‘RCA cable’ to an
external amplifier device from [VAIRABLE ALALOG
OUT] of the back of the product.
Balanced
Cable L/R
This product supports both ‘Fixed Analog Out’ and ‘Variable Analog Out’. If it is set to ‘Fixed
Analaog Out’, you can not adjust the volumen in this product.
Please check the interface port before using a cable.
When connecting a cable, do not force strongly, and connect it by pushing it gently.
Do not shake too strongly when it is connected to a cable.
RCA Cable L/R
Before Use
20
Page 22

Inserting/Removing CD
1. Refer to the CD label and gently insert into the CD slot.
2. If you select [ ] from the notification bar on the home screen, the CD will
be realised.
This product does not suport the CD Play function.
When you insert the CD, the CD-Ripping fuction will be activated.
Cautions for CD insertion
- Do not put excessive force when inserting a CD. This can cause malfuction and CD breakage.
- If the CD is inserted incorrectly, the product can be damaged or the CD can not be separated.
- A damaged CD or a CD with foreign substances can generate a problem.
Cautions for CD Separation
- Do not remove the CD during operation, it can cause a malfuction and a breakage of the CD.
Static may occur during CD ripping depending on the CD’s condition.
Before Use
21
Page 23

Inserting/Removing the MicroSD Card
Recommended MicroSD card
1. Place the microSD card in the slot like the figure
and press gently.
2. If you choose [Safely Remove SD Card] from the
notification bar on the home screen, the microSD
card will be removed safely.
3. If you press the microSD card one more time, the
card will be separated.
Brand: SanDisk, Transcent
Cautions for inserting the MicroSD card
Do not force the SD card. This may cause a
malfuction of the product and damage to the
microSD card.
Please do not repeatedly insert/remove the microSD
card.
If the microSD card is not positioned properly, the
product may mulfuction or the card may become
un-removable.
Cautions for removing microSD card
- Please remove the microSD card through ‘Safe
Removal’. If not, the memory or the system of the
product can be damanged.
- Do not remove the microSD card while using the
microSC card.
It can cause a deletion of data, a malfuction of the
product, and damage to the microSD card.
Other Cuations for using microSD card
- If microSD card is not recognized or has
malfuctioned, please reformat the card to the FAT32
system which is recommended.
-If you use other cards rather than recommended
microSD card, a malfuction can occur.
- MicroSD card is not included in the compenent.
You can purchase separately.
Before Use
22
Page 24

Connecting USB Storage
1. Connect the USB storage device to the [USB] port
on the side of the product.
Some products that require a separate driver installation or multiple drive generation(multi-card reader), etc. may not
be supported.
Some products that require a separate power source(external HDD, etc.) may not be supported.
The USB host cable is optional.
1. Connect the USB storage device to the [USB-HOST]
port on the back of the product by using a USB cable.
Before Use
23
Page 25

Connecting to a Wireless Network Antenna
Connecting to the Network
1. Connect the antenna for the wireless network to
[ANT] port of the product.
1. Connect the internet connections(ADSL, VDSL,
cable model and wired/wireless router, etc.) to the
[ETHERNET] port on the back of the product, or
connect to an AP that provides WI-Fi.
2. Check the notification bar and the setting menu if
network is connected or not.
Before Use
24
Page 26

Connecting to a Computer
Separating with the Computer
1. Connect the [USB] port and a computer by using
the supplied USB cable for data transfer.
1. Check if there is a work in process between the
product and the computer before disconnecting
the USB cable for data transfer.
Native DSD plays to PCM while connected to a PC as MTP.
If it is connected to MTP via a USB cable while playing Native DSD, Native DSD will be terminated automatically.
If you are a MAC user, please download a MTP program from [Support > Download of http://www.astellnkern.com]
and install to use.
Do not use a cable other than the USB cable supplied for data transfer. This cay cause a malfuction.
Please connect at the state all the features stopped, for a smooth connection of the computer and a USB cable for
data transfer.
Please connect to a high-power USB 2.0 port. The connection with a computer can be not good, if you connect a
keyboard or a self-powered USB hub, etc.
If you are a Windows XP user, you need Service Pack 2 or more, Windows Media Player 10 or newer version
installation to recognize and use the USB disk.
You can download the Service Pack and Media Player from [http://www.microsoft.com].
If you disconnect the USB cable for data transfer during a work in process, it may cause fatal errors on the product.
Before Use
25
Page 27

Copying a File(Folder) to the Product
Deleting a File(Folder) of the Product
1. If you select the files/folders to copy from a computer,
drag and drop(Drop&Drop) to the drive added by
the product, the selected files/folders will be copied.
1. Select files/folders to delete and click the right
mouse key, then select [Delete].
If you click [Yes] in the [File/Folder Delete Confirmation]
2.
window, the selected file/folder will be deleted.
Please connect the USB cable for data transfer correctly.
If you copy files/folders, or the computer is off or the USB cable for data transfer is disconnected while moving it, it
may cause serious damage on memory.
The transmission speed can be slow depending on the computer and OS environment that you use.
If you copy or move a file during PCM to DSP playback, the sound may be distorted or break up.
Before Use
26
Page 28

Upgrading
the
firmware
Upgrading the Firmware of the Product
1. Connect the product to a wired or wireless network.
2. When the new firmware is verified, the firmware update instruction appears.
3. Select [Update], and select the item you want to update.
4. Follow the prompts on the screen to proceed the firmware upgrade.
Refer to page 56 for a network connection method.
If you move to another screen while downloading upgrade files, the download will be stopped.
Please do not turn off the network connection while downloading upgrade files.
It can cause serious damage to the system, because the upgrade file cannot be downloaded properly.
If an error occurs or notification bar is gone while downloading upgrade files, you can re-download the firmware via
[Settings-Update-System Update].
Before Use
27
Page 29

Basic
operation
Using the Touch LCD
1. The product is equipped with a touch screen LCD
system that operates by a direct touch. If you touch
the desired icon on the screen, the selected function
will be operated.
Do not use a sharp object or excessive force to
prevent damage to the screen.
Basic Setting
1. Set the language to be
used in the language
setting screen that is
displayed when you turn
on the power for the first
time after purchasing the
product, and then click [Next].
2. Set the time to use from
the world time settings,
and then click [Next].
3. The default setting will
be completed if you click
[Start], and the Feature
Guide for using AK500N.
4. You can use the product,
if you click [Start] after the
function guide is finished.
Using the Device
28
Page 30

Moving to the Previous Screen
Setting Sound In/Out
1. Click [ ] while using
the product to move to
the previous page.
Moving Up/Down from the List
1. Drag the screen [down to
the top]/[top to the down]
from the display list to
move the list.
1. You can set in the
notification bar screen or
[Settings-Sound-Sound
In/Out].
If ‘Sound In/Out’ is connected to ‘Digital In(Coax,
OPT, AES/EBU, BNC), you can not output the sound
with ‘Digital Out’.
If you choose ‘Digital In’ from the ‘Sound In/Out’
selection screen, ‘Digital Out’ is not available.
While ‘Sound In/Out’ is connected to ‘Digital In(Coax,
OPT, AES/EBU, BNC), the connection will be
canceled and [CLOSE] menu will be activated, if you
re-click the connected port icon.
The volume adjustment is only available if [BAL] and
[PHONES] of the side and ‘Variable Analog Out’ from
the ‘Sound In/Out’ selection screen.
Using the Device
29
Page 31

Notification bar
The Notification Bar will be displayed if you
drag up and click the notification icon at the
bottom.
1
2
3 4 5 7 8 96
Display of
1
notification
message
Screen
2
Brightness
Wireless Network
3
Bluetooth
4
Ethernet
5
CD Extraction
6
CD Ripping
7
Computer
8
Connection
Mode
Gab-less
9
The content is displayed if there is a
notification. The notification will disappear
if you push the notification information aside.
Move the location of the Brightness Adjustment
Bar to adjust the brightness of the screen.
Turns on/off the wireless network.
Turns on/off the Bluetooth to use
Bluetooth remote control.
Turns on/off Ethernet.
Extract the inserted CD from the CD slot.
(Only activated when a CD is inserted)
Turns on/off the automatic CD ripping function.
Select the run mode when connected
to a computer.
MTP: is connected to a computer, you
can transfer media files.
DAC: You can listen to music of PC
via the product.
Turns on/off gab-less.
Using the Device
30
Page 32

1
32 4 5 6
1
Automatic Battery
Charging Set
2
Play mode
7
8
Sets the automatic battery charging
function while playback.
Sets the playback mode.
: Plays the music of the list being
played in order
: Plays the music of the list being
played in random order
3
Repeat
Mode
Sets the repeat mode.
: Repeats playback of the list
being played
Repeats the currently playing music
:
: Turn off ‘Repeat Mode’
4
5
Sound In/Out
Charging
Battery
Indicates the setting screen.
When automatic battery charging
function is off during playback, select
Start to begin battery charging.
6
7
Sound Set
Remaining
Displays the sound setting(EQ, etc.) screen.
Indicates the current battery level.
Battery Power
8
CLEAR
Removes a notification message
displayed on the screen.
Using the Device
31
Page 33

Music list
screen
2 43 65 7 8 9 1011 13 14 12
1
MQS
1
Streaming
List Display
2
Method
Position Information
3
Title
4
Display the Network Server and
Network Player list.
Activate Server/Player in settings
menu to use the function.
The music list is displayed
differently depending on how the
list displayed in the left menu.
Indicates the current playback position.
Displays the song title. If ID3TAG does
not exist, the file title is displayed.
5
6
7
8
9
10
11
12
13
14
Progression
State Bar
Play Time
Previous
Music/Rewind
Play/Pause
Next Music/
Fast Forward
Repeat Mode
Playback Mode
Search
Current Play List
Set
CD Ripping
Displays the state of the progress.
If you move the position of the
bar, it moves to where you want.
Displays the total duration of the song.
Short: Plays the previous song.
Long: Rewinds the music being played.
Pauses or replays the music
Short: Plays the next song.
Long: Forwards fast to the playing music.
Sets the repeat mode.
Sets the playback mode.
Enter a search term in the search
box to search for the file.
Displays the current playlist.
Displays the setting screen.
If you set CD Ripping as ‘Manual’
from the setting, an additional menu
appears when you insert the CD.
Using the Device
32
Page 34

21 3
Music List
1
Display a music list of the current position. Press
the [ ] next to the desired music to delete a file,
add to the play list, or add to the current play list.
Sort by List
2
You can select the music list sorting method
as ‘ALL/MQS/DSD/Ripping’.
You can select the music list sorting method
as ‘Bit/Sample Rate’.
Add-ons List
3
Displays the add-ones window of the music lists.
The functions are displays differently by music
4
retrieval scheme.
: Copies the file. (Activates only in folders)
: Moves the file. (Activates only in folders)
: Adds the file to the play list.
: Adds the file to the current play list.
: Changes the name.
(Activates only in folders)
: Deletes the file.
Album List
4
Display
You can choose the album list display method
as ‘Thumbnail/List’.
Using the Device
33
Page 35

Music
playback
screen
9
10
1
2
3
4
1 2 84 5 6 73
Title Name
Artist Name
Album Art
Information
11 12 13 14 1615
Displays the title of the music.
If ID3TAG does not exist, the file
name is displayed.
Displays the name of the artist.
Displays the album art
Displays the information about
the currently playing music.
5
6
7
8
9
10
11
12
13
14
15
16
Lyrics
Sound Set
Gap-less
Current Playlist
Progression
State Bar
Play Time
Play Mode
Previous
Music/Rewind
Play/Pause
Next Music/
Fast Forward
Repeat Mode
Play Time
Displays the lyrics.
Displays the sound set(EQ, etc.) screen.
Turns on/off the gab-less.
Displays the current playlist.
Displays the state of the progress.
If you move the position of the bar,
it moves to where you want.
Displays the total duration of the song.
Sets the play mode.
Short: Plays the previous song.
Long: Rewinds the music being played.
Pauses or replays the music
Short: Plays the next song.
Long: Forwards fast to the playing music.
Sets the repeat mode.
Displays the playing time.
Touch to change a display of the
remaining playtime.
Using the Device
34
Page 36

Listening
to music
Select Music
1. Select a music retrieval method from the menu
located on the left to display the music list for that
classification.
2. Press the music to play on the music list that
appears on the screen to play music.
You can browse the music by folders in the [Folder].
Playback Time: About 7 hours (16bit/44.1kHz,
Unbalanced output, Volume 75, EQ OFF, LCD OFF
Standard)
Continuous playback time is based on 1TB model.
Continuous playback time varies with SSD capacity.
Supported File Formats: WAV[8~384kHz(8/16/32bit)],
FLAC[8~352kHz(8/16/24bit)]
Listening to Music
- Turn the [Volume Wheel] to adjust the volume.
- Press [ ] to pause, and [ ] to restart during
playback.
- Press [ / ] to play the previous/next music
during playback.
+ You can play the previous/next music by dragging
the album art image in the music playback screen
in [up down]/[down up] direction.
- Press and hold the [ / ] to rewind/fast forward.
- Move the position of the progress bar during
playback to move to the desired location.
- Press [ ] to display the previous screen.
- Press [ ] to display the home screen.
- Press [ ] to display a list of currently playing music.
Using the Device
35
Page 37

Ripping
the CD
Ripping the CD Automatically
1. Insert the CD into the CD
insertion slot of the
product
2. Import the metadata
information of the CD
that is inserted in the
Grace Notes.
3. When you have finished
importing the information,
CD ripping starts.
4. When ripping is complete
and if you press [OK] in
the results window, the
CD automatically comes
out from the insertion slot.
Ripping the CD Manually
You can select auto/manual
ripping from [Settings- CD
Ripping- Automatic CD Ripping].
1. If you insert the CD to the
insertion slot of the product,
[CD Ripping] menu on the
left menu, gets activated.
Press the [CD Ripping] menu,
2.
and select the ripping file
format as FLAC or WAV.
3. If select the file format,
it starts search for the
Grace Note DB.
When DB search is completed,
4.
click [Start] to start ripping.
You can directly choose the
5.
song to rip in the selection
box in front of each track.
Using the Device
36
Page 38

CD Ripping Results CD Ripping Screen
- : Tells CD Ripping is successfully completed.
- : Indicates a failure of CD ripping, because of a
physical scratch generated in the CD, etc.
3
- : Tells an error occurred, but CD ripping is
completed through error correction.
To recall the Grace Note DB data, AK500N has to be
connected to the network before ripping. Refer to page
56 for the network connection method.
Set the location of the ripped file from [Settings-CD
Ripping]. If you have not set the location, it will be saved
in the current folder.
It is possible there is not the relevant information about
Grace Note, depending on the CD.
Grace Note DB search time may be longer depending on
the network environment.
File formats and the ripping speed can be selected from
[Settings > CD Ripping].
If you enable error-checking function in [Settings > CD
Ripping] menu, it attempts to compensate for data errors
several times.
So if you enable this function, the CD ripping becomes slow.
If you rip a CD manually, press the song you want to change
from the whole music information screen to select the name
of the album, artist, and genre on the touch keypad.
During CD ripping, the playback will be stopped if WAV,
FLAC files that are 24bit/352kHz or more are converted
into DSD64.
4
5
Ripping Speed
1
Album Information
2
Album Art
3
Ripping Progress Bar
4
Ripping Error Information
5
Ripping Progress State
6
Ripping Success
7
Ripping Failure
8
Skip Ripping
9
1 2
6
7
8
9
Displays the ripping speed.
Displays the information
about the album.
Displays the album art.
Displays the ripping progress.
Displays the ripping error.
Displays the ripping progress state.
Displays the success of the ripping.
Displays the failure of the ripping.
Skips the ripping.
Using the Device
37
Page 39

Managing
the current
playlist
Adding the song in the current playlist to the playlist
1. Press [ ] next to the
song, and select [ ].
2. You can add the selected
songs to your playlist.
- Add a playlist: Create
a new playlist and add the songs you selected.
- Add to the playlist: Select the playlist to add the
songs that you selected to the list.
Deleting songs in the current playlist
1. Select [ ] next to the
song.
2. Press [ ] to remove the
selected song from the
current playlist.
Changing the music order of the current playlist
1. Press [ ] next to the
song.
2. Hold [ ], and move the
selected song to up/down
to change the position of
the song selected.
Using the Device
38
Page 40

Managing
the playlist
Creating the Playlist
1. If you select [Playlist]
from the left menu, the
playlist is displayed.
2. Select [Playlist], and
press [Add Playlist] at
the top.
3. If you set the name of the
playlist, and click [OK],
a new playlist will be added.
Add a playlist to the current playlist
1. Press [ ] next to the
desired playlist from the
playlist, and select [ ].
2. Select the location you
want to add.
- Add after the current playlist: Adds the selected
playlist at the end of the playlist.
- Add after the currently playing song: Adds the
selected playlist after the current playing song.
You can also add a playlist
to the current playlist in
the following way:
- If you press and hold
the desired playlist
from the playlist, a check box is displayed.
Select the check box, and then select [Add to the
current playlist] on the top.
Using the Device
39
Page 41

Adding music to playlists
1. A playlist is displayed, if
you press [Add Song] on
the top of the playlist.
2. Check a select box in
front of the music you
want to add, and press
[Add], then the selected
music will be added to
the playlist.
Changing the name of the playlist
1. Select [ ] next to the
desired playlist from the
playlist, and select [ ],
then a window for changing
name will be displayed.
2. Type a new name and
press [OK], then the name
of the playlist will be changed.
Deleting a playlist
1. Press [ ] next to the
desired playlist from the
playlist, select [ ] and
press [OK], then the
selected playlist will be
deleted.
Using the Device
40
Page 42

Adding a song in the playlist to the current playlist
1. Select the desired playlist
from the playlist, and
select [ ] next to the
song you want to add.
2. Press [ ], and select
the location you want to add.
- Add after the current playlist: Adds the selected
playlist at the end of the playlist.
- Add after the currently playing song: Adds the
selected playlist after the current playing song.
You can also add a playlist
to the current playlist in
the following way:
- If you press and hold
the desired playlist from
the playlist, a check box is displayed. Select the
check box, and select [Add to the current playlist]
on the top.
Add a song in the playlist to the playlist
1. Select the desired
playlist from the playlist,
and select [ ] next to
the song you want to add.
2. Press [ ], and add the
selected song to the playlist you want.
- Add a playlist: Create a new playlist and add the
songs you selected.
- Add to the playlist: Select the playlist to add the
songs that you selected to the list.
Songs in the USB memory or a USB external disk can
be played in the folder menu, but they cannot be
added to the play list.
Using the Device
41
Page 43

Searching
files
Searching files
1. If you press [ ] on the top right of the playlist, a search bar will be displayed.
2. Select Songs/Albums/Artists you want to search.
3. Type search term in the search input window, and browse the file.
Managing
Files
Folder Copy
1. Select [ ] next to the
folder you want to copy.
2. Select [ ], and press
[Paste]. Then the selected
folder will be copied.
If you press [ ] on the right of a music list, the music list add-ons window will be displayed.
Copying a folder is only available if you selected [Folder] from the menu.
You can make a new folder by pressing [New Folder].
Moving Folders
1. Select [ ] next to the
folder you want to move.
2. Select [ ], and press
[Paste]. Then the selected
folder will be moved.
Using the Device
42
Page 44

Deleting folders
1. Select [ ] next to the
folder you want to delete.
2. If you press [ ] on the
music list add-ons
window, the selected
folder will be deleted.
Adding to the playlist
1. Select [ ] next to the
folder you want to add to
the playlist.
2. Select [ ] on the music
list add-ons window, then
select the list you want
to add.
3. If you press [OK], the
selected file will be added
to the playlist.
You can also ad folders
to the playlist in the
following way:
- If you press and hold
the folder you want to
add to the playlist, a check box appears in front of
the folder list. Select the check box, and then select
[Add to the playlist] on the top.
This function remains available when folder is
moved, copied or deleted.
Using the Device
43
Page 45

Adding to the current playlist
1. Select [ ] next to the
file you want to add to
the current playlist.
2. If you select [ ] on the
music add-ons window,
the selected file will be
added to the current playlist.
Changing a name
1. Select [ ] next to the
folder you want to change
the name.
2. If you select [ ] on the
music add-ons window,
a name-changing window
will be displayed.
If you press [OK], the folder
3.
name will be changed.
The name can be changed only if you select one
folder.
Playlist applies only to the internal storage. It does
not support an external storage.
During a media scan, you can add to the playlist or
the current playlist or modify.
You can use the file browser navigation and
playback during a media scan.
Using the Device
44
Page 46

MQS
streaming
You can play or download the music from a PC on the same network via AK500N in real time.
Installing MQS Streaming Server
1. Download MQS Streaming Server from [Support >
Download of http://www.astellnkern.com/]
depending on the version of the PC.
2. After running the setup file, install it according to
the installation guide screen.
3. You can check the using method for MQS Streaming
Server via the Help in the Server Program.
PC/MAC must meet the following conditions.
Supported PC Specifications
- OS: Windows XP, Windows 7, 8(32, 64 bit)
Supported MAC Specifications
- MAC OS 10.7 (Lion) or later version
Choosing MQS Streaming Server
1. Install the MQS streaming
server from the PC, and run it.
2. If you press [500N] on the
left menu when AK500N
and PC are connected in
the same network, the PC list will be displayed on
the [Network Server] list.
3. If you select the PC you want to connect, the left
menu will be displayed as the list that PC has.
4. If you select [Network Player], wireless network
devices that are on the same network will be
searched. If you select those devices, you can
output the sound.
You can connect to the NAS products that support
DLNA function.
Using the Device
45
Page 47

Wireless Control PP
1. You can operate this product wirelessly through the application.
2. Recommended Control APP: Android(BubbleUPnP) / iOS(Sitecom Media Controller, Network Audio Remote)
3. You can download relevant applications from Google Play Market and Apple App Store.
For the use method of applications, please refer to the help for the application.
In order to connect to Network Server and Network Player, AK500N and the product you want to connect must be
connected in the same network.
For the detail connecting method of the network player or Wi-Fi speaker, please refer to the user guide of the each
product.
When connected to a wireless network, the streaming can be disconnected or the next song play can be slow
depending on the network condition.
If the streaming is operated when AK500N, PC, smartphone/tablet are all connected to a Wi-Fi, the connection may
not be smooth or the song can be stopped depending on the network condition. (Please set AP as 802.11/g or
802.11/n.)
If other work is in progress on the server PC, the server reaction can be slow.
If you are streaming and downloading at the same time, AK500N reaction can be slow depending on the wireless
network or the condition of the server PC.
If you touch the item being downloaded from the notification bar or turns off the MQS streaming function, the
download will be stopped.
When you operate this product with wireless control APP, the data in the USB memory stick or USB external disks
are not visible in the wireless control APP.
Using the Device
46
Page 48

Purchasing
music in
the store
Purchasing music
1. Connect AK500N to the network.
2. If you press [Store] in the menu, and select ‘Groovers’ from the list appears, the APP will be activated.
3. You can check the using method through the user guide and help in the STORE.
For the network connection method, refer to page 56.
The currently supported STORE is ‘Groovers’.
‘Groovers’ of the store menu is displayed if you currently select [Setting> Date and Time > GMT+09:00, Korea
Standard Time].
Purchase/Payment via ‘Groovers’ is only available in the Republic of Korea.
Using the Device
47
Page 49

Using
USB DAC
function
USB DAC function is a function to recognize AK500N via a sound card and listen to sound through the
earphone port of AK500N.
USB DAC Specifications
- Supported USB DAC OS
+ Windows XP (32bit) / Windows 7 (32bit / 64bit) / Windows 8 (32bit / 64bit) / Mac OS 10.7 (Lion) or later
- USB DAC Support Specifications
+ Supported formats: WAV, FLAC, WMA, MP3, OGG, APE (Normal, High, Fast), AAC, ALAC, AIFF, DFF,
DSF + Sample Rate: 44.1Khz ~ 192Khz
+ Bit rate: 16bit / 24bit
+ Supported DSD Specifications: DSD64, DSD128
- You can adjust the sound volume output through the volume wheel on the AK500N.
The sound does not play when you set exceeds the '24bit 192kHz'.
If the USB usage is a lot or PC becomes slow, the sound may not be played.
When playing video sources, the sync of video and sound may not fit, depending on the quality of the original and
output, and the using circumstance.
When USB DAC is operating, you cannot output to the Digital Out (AES / EBU, Optical, Coaxial, BNC).
You cannot adjust the sound with Windows Basic Volume, but you can adjust the volume with the volume wheel or
the volume of the program you are using.
Using the Device
48
Page 50

Installing USB DAC
1. Set [Settings-Connecting
USB] as [DAC input].
2. Connect the product and
a PC by using a USB
cable for data transfer.
3. Run the ‘Setup.ext’ file
on the Driver.
4. Press [Next] if the
following screen appears.
- When the following
screen appears, please
check if [Settings-
Connecting USB] is set
as [DAC Input].
5. Press [Browser] to set the
folder to install the driver,
and then press [Install].
6. If the following screen is
displayed, press [Finish]
to complete the installation.
<After installing the driver>
Using the Device
49
Page 51

7. According to the operating
system, you can change
the default device to output
the sound with the following
methods:
- MAC OS X: Select the
Output tab from the sound
menu under the System
Preferences, and select
[AK500N USB DAC].
- XP: Change the default
sound playback device
to [AK500N USB DAC]
from ‘Control Panel> Sounds and Audio Device’.
- 7/8: Select [AK500N USB DAC] from ‘Control
Panel>Sound>Playback’ tab, and select [Set as
Default Device] on the bottom.
You need to complete this step, only if you are using AK500N with USB DAC for the first time.
You do not need a separate follow-up to select AK500N for the sound output.
If you connect to USB DAC when paying PCM or Native DSD, the music being played will be stopped automatically.
If you press [Connect to a Media device] on the screen when it is connected to the USB DAC, the USB DAC will be
disconnected, and reconnect to MTP mode again.
If you reboot AK500n after the connection to the USB DAC, it will be changed MTP mode again.
For high sound quality, it is recommended to change the default format to
[24bit, 192000Hz(Studio quality)] on the advanced tab, after clicking the ‘Properties’
button of [AK500N USB DAC] from Panel>Sound in Windows 7/8.
Using the Device
50
Page 52

Using
bluetooth
Bluetooth on/off
1. Please refer to the instruction manual of the
Bluetooth remote control handset for a pairing.
Pairing Bluetooth
1. Select the Bluetooth
remote control you want
to pair from the list you
can use.
Supported Bluetooth Specifications
- Supported profiles: A2DP (Only Bluetooth remote control can be connected.)
Do not turn off the power during the Bluetooth connectivity.
If Bluetooth is malfunctioning, turn off the power of the Bluetooth device, and turn it on again.
The registration method can be different depending on a Bluetooth device, so please refer to the instruction manual
of each device when connecting.
Please proceed at around 20cm when connecting products and Bluetooth devices.
If the product and the Bluetooth are more than 2 meters away, the connection will be broken. (The distance can be
different depending on the operating environment and the Bluetooth model.)
Interference can occur while using a Bluetooth.
Abnormal motion and noise may occur depending on the Bluetooth operation environment and the charge status of
the device.
- If a part of body touches the product or the electric wave transmitter of the Bluetooth headset external device.
- If the received power changes by the electric wave obstructions such as walls, corners, partitions
- If there is the interference of the device using the same frequency band such as medical devices, microwave ovens,
wireless LAN, etc.
Using the Device
51
Page 53

Settings
You can manually set your own production environment. Set menu structure may vary depending on the firmware version.
Settings
1. Select [AK500N-Settings] on the home screen.
2. Set by selecting the desired item.
You can also select the setting menu by selecting [ ]
on the top, or [Notification bar] screen at the bottom
of the screen.
Bluetooth
Connect of disable the Bluetooth remote control.
Please refer to [Using Bluetooth] on the page 45 for
a detail method of setting the Bluetooth.
Ripping the CD
Automatic CD Ripping: Set an automatic CD ripping.
Ethernet
Connect of disable the wired network.
- Auto IP: IP is set automatically.
- Manual IP: Set by directly entering information
such as IP address, DNS.
Manual CD Ripping: If you set the ‘Manual CD Ripping’,
[CD Ripping] menu will be activated after the device
recognizes the CD from the CD insertion slot.
Ripping folder: Set the folder to save the ripped files.
Ripping file format: Set the format of the file for ripping.
Ripping speed: Set the ripping speed.
Set Error checking: Turn on/off the function that
Wi-Fi
Connect of disable the wireless network.
Please refer to the page 56 for a detail method of
setting the network.
checks errors while ripping.
This product does not support playing a CD.
If you activate the Error checking function, it will
attempts compensate for data errors for several
times. So the CD ripping speed will be slow if you
activate this function.
Using the Device
52
Page 54

Sound
Equalizer: Set the equalizer to suit your tastes.
- PRO EQ: Recommend Preset EQ by experts
- USER EQ: Change the height of the equalizer on
your tastes
Sound In/out: Connect or disconnect Sound in/out
If Sound In/Out is connected to Digital In(Coax, OPT, AES
/EBU, BNC), you cannot output the sound as ‘Digital Out’.
- If you select ‘Digital In’ on the ‘Sound In/Out’ select
screen, you cannot select ‘Digital out’.
If ‘Sound In/Out’ is connected to ‘Digital In(Coax, OPT, QES/
EBU, BNC)’, it will be disconnected if you click the icon of the
connected port again, and [CLOSE] menu on the bottom
will be activated.
You can only adjust the volume if ‘Variable Analog Out’
and [BAL], [PHONES] on the left side is selected on the
‘Sound In/Out’ selecting screen.
Gap-less: Plays music files after the currently playing music
and continue to the next file in a row without interruption.
- It only works if the currently playing music and the
following music have the same specification
(the sample rate, bit, channel).
Balance Output: Set the left/right balance of the
sound output.
PCM to DSD: Converts PCM file to DSD64 data,
and turns on/off the playing function.
It does not convert PCM files in the internal
storage to DSD64 files.
The equalizer is not applied when playing DSD.
Using the equalizer function can slow down the
operation of the product.
For details on how to set up the equalizer, please
refer to the page 57-58.
In order to use the PCM to DSD feature, you have to
activate it from ‘Settings> Sound’. This feature supports
only WAV, FLAC files with DXD format. (DXD format means
WAV, FLAC files with 24bit / 352kHz or more.)
If Sound In / Out is connected to the Digital Out (Coax,
OPT, AES / EBU, BNC), Native DSD cannot be played.
- If it is set to Digital Out, Native DSD will automatically be
changed to PCM and played.
- If it is set to Digital Out DXD will automatically be changed
to PCM and played.
If it is played or paused as Native DSD, you cannot select
‘Digital Out’ from ‘Sound In/Out’.
Using the Device
53
Page 55

Screen
Language
Screen Brightness: Set the brightness of the screen.
Screen Off: Set the screen off time in 6 steps.
Server/Player
Server/Playe : Server/Player function is available.
MQS Server/Player Setting : Set Network server &
player specific features.
- 500N Server : If you turn off the network server,
AK500N is not found in other product.
- Network Server Name : Set the name of the server.
- 500N Player : If you turn off the network player,
AK500N is not found in other product.
- Network Player Name : Set the name of the player.
Download folder settings: Set the saving location
when downloading files.
Date and Time
Set the date and the time.
Set the language.
- Korean, English, Japanese, Chinese(Simplified/
Traditional), German are supported.
Power
Charging during playback: If you activate the
charging option during playback, the battery is
automatically charged even while playing.
Enable to set automatic shutdown and sleep timer.
If you charge when battery status is less than 5%
and the power is completely off, it takes about 3
hours to fully charge the battery.
Battery charging time is based on 1TB model.
Charging time varies with SSD capacity.
Automatic shutdown is not supported during set operation.
Playback stops at the sleep specified time.
Connecting to USB
Media devices (USB DISK): You can transfer media
files when it is connected to a computer.
DAC Input: You can listen to music of the PC
through the product.
Using the Device
54
Page 56

Update
System Update: Updates the system when there is
a new update.
System Information
System Information: You can check the model
number of the product, Firmware version, Memory
usage information, the license of the product, and
you can munt the microSD card/USB Storage or
delete the data.
Formatting the microSD card will delete all the data
on the memory card. Be sure to backup any important
files before formatting.
When formatting the microSD card from a computer,
be sure to select the FAT32 system.
Internal memory capacity specifications differ depending
on OS. Therefore, the capacity may be different.
SSD 4TB model with RAID5 uses about 1TB for data
backup, which makes this region unavailable as user
space.
Initialization
Database Initialization: Initialize the database within
the product.
The database initialization time may be longer
depending on the number of products within the file.
Reset: Reset the custom setting to the factory defaults.
Factory Reset: Initialize to the factory default state,
and all data will be deleted.
HELP
HELP : Select Help to find a manual in selected
language.
Using the Device
55
Page 57

Connecting
to the
network
Connecting to a wireless network
1. If you press and hold [ ]
in the notification bar, or
turns on [Settings –
Wireless Network], the
AP lists of available
connection appear.
2. If you choose the AP to
connect, the wireless
network will be connected.
You may need to type the
-
key index and network key
according to the AP setting.
3.
If you press and hold [Modify
Network] with the connected AP,
you can modify the AP history.
You cannot use if you need an additional certification
except wireless network connection, such as a web
browser certifications.
It supports channels up to 1-13.
Connecting to a wired network
1. Connect the wired LAN
cable to the [ETHERNET]
on the back of the product.
2. If the IP information is
confirmed in the IP
address field, you can
use the network.
3. If you want to change the
IP address, click [Change]
button, type the information
such as IP address, DNS,
and then click [OK].
It is recommended to use a wired network for
smooth network feature utilization.
If you use a wireless network feature, please set AP
to connect to this product as ‘802.11/g’ or ‘802.11/n’.
Using the Device
56
Page 58

Setting the
equalizer
Setting the equalizer
1. Activate the equalizer
menu at [Settings –
Sound – Equalizer].
2. Press [PRO EQ] on the
bottom.
3. Select [Create] on the
bottom.
4. Set the name of the
equalizer, and select [OK].
5. Set by changing the
height of the equalizer to
suit your tastes.
Using the Device
57
Page 59

Reset Equalizer
Renaming the equalizer
1. Press [ ] to reset the
equalizer.
Deleting Equalizer
1. Select the equalizer you
want to delete.
2. Press [Delete] on the
bottom of the equalizer,
and press [OK] to delete
the selected equalizer.
1. Press [Rename] on the
bottom of the equalizer,
and type a new name.
2. If you press [OK] after
typing a new name of the
equalizer, the name of the
equalizer will be changed.
Using the Device
58
Page 60

Trouble
shooting
Check!
1. The device won’t turn on.
Please check if the power supply is correctly
connected.
2. The operation of the product is unstable.
If you press and hold the power button on the side
longer than 10 seconds, the product will be turned
off. Please turn on the product again and check.
3. The screen turns off repeatedly.
After a certain period time, the screen turns off to
reduce power consumption when playing the file.
Set the time on [Settings – Power- Screen off].
4. The screen is not displaying properly.
Check whether debris is on the screen.
5. There is no sound or there’s static.
Verify that the volume isn’t set to [0].
Check that the earphones are plugged in properly,
and make sure debris isn’t in the port or on the plug.
Verify that the music file is not corrupted.
Verify that the audio settings have been properly
set (balanced, line out, etc.)
6. File will not playback or a specific file causes
instability.
The Following may occur due to the condition
of the file:
- Playback is unstable or difficult.
- The device may not function properly.
- The file may sound different from a computer.
- There may be a difference in the performance
of playback or other functions.
- The file may not be compatible with playback
specifications.
A file conversion or using a different file is
recommended.
Miscellaneous
59
Page 61

Copyright
iriver Limited retains the rights to patents, trademarks, copyright, and other intellectual property rights
related to this manual. No contents of this manual may be copied or duplicated in any form or by any means
without the prior written consent of iriver Limited. Using or reproducing in whole or part, the contents of this
document is subject to penalties. Software, audio, video, and any copyrighted contents are protected in
accordance with copyright laws.
Unauthorized reproduction or distribution of the copyrighted contents from this product is the legal
responsibility of the user.
Companies, organizations, products, people, and events used in the examples are not based on actual data.
It is not the intention of iriver Limited to correlate any companies, organizations, products, people, and
events with this manual. It is the responsibility of the user to comply with applicable copyright laws.
© 1999-2014 iriver Limited. All rights reserved.
Certiications
KCC/FCC/CE/TELEC
Class B Device (Communication equipment for residential use): This is a Class B Device and is registered for
EMC requirements for residential use. This device can be used not only in residential areas but in all other areas.
FCCID : QDMDPF11
This device complies with Part 15 of the FCC Rules, Operation is subject to the following two conditions: (1) this
device may not cause harmful interference, and (2) this device must accept any interference received, including
interference that may cause undesired operation. Changes or modifications not expressly approved by the
party responsible for compliance could void the user's authority to operate the equipment.
Changes or modifications not expressly approved by the party responsible for compliance could void the user's
authority to operate the equipment.
Miscellaneous
60
Page 62

(b) For a Class B digital device or peripheral, the instructions furnished the user shall include the following or
similar statement, placed in a prominent location in the text of the manual:
NOTE: This equipment has been tested and found to comply with the limits for a Class B digital device,
pursuant to part 15 of the FCC Rules. These limits are designed to provide reasonable protection against
harmful interference in a residential installation.
This equipment generates, uses and can radiate radio frequency energy and, if not installed and used in
accordance with the instructions, may cause harmful interference to radio communications. However, there is
no guarantee that interference will not occur in a particular installation. If this equipment does cause harmful
interference to radio or television reception, which can be determined by turning the equipment off and on, the
user is encouraged to try to correct the interference by one or more of the following measures:
- Reorient or relocate the receiving antenna.
- Increase the separation between the equipment and receiver.
- Connect the equipment into an outlet on a circuit different from that to which the receiver is connected.
- Consult the dealer or an experienced radio/TV technician for help
Miscellaneous
61
Page 63

Body-Worn operation
This device was tested for typical body-worn operations with the back of the portable music player kept 5mm.
from the body. To maintain compliance requirements, use only belt-clips, holsters or similar accessories that
maintain a 1cm separation distance between the user’s Body and the back of the Portable music player,
including the antenna.
The use of belt-clips, holsters and similar accessories should not contain metallic components in its assembly.
The use of accessories that do not satisfy these requirements may not comply with CE RF exposure require-
ments, and should be avoided.
Body-worn accessory exposure conditions
“Specific information must be included in the operating manuals to enable users to select body-worn
accessories that meet the minimum test separation distance requirements. Users must be fully informed of
the operating requirements and restrictions, to the extent that the typical user can easily understand the
information, to acquire the required body-worn accessories to maintain compliance. Instructions on how to
place and orient a device in body-worn accessories, in accordance with the test results, should also be
included in the user instructions. All supported bodyworn accessory operating configurations must be clearly
disclosed to users through conspicuous instructions in the user guide and user manual to ensure unsupported
operations are avoided. All body-worn accessories containing metallic components must be tested for
compliance and clearly identified in the operating manual. The instruction must inform users to avoid using
other body-worn accessories containing metallic components to ensure RF exposure compliance.”
Miscellaneous
62
Page 64

Disclaimers
The Manufacturer, importer, and distributor shall not be liable for damages including accidental and personal
injury due to the improper use or operation of this product. The information in this user manual was written
based on current product specifications. The manufacturer, iriver Limited, is currently adding new complementary features and will continue to apply new technologies in the future. All standards are subject to
change without prior notice.
There is no warranty against data los due to the use of the product.
Trademarks
Gracenote
Windows 2000, Windows XP, Windows 7, Windows 8, Windows Media Player are Trademarks of Microsoft corp.
This application or device contains software from Gracenote, Inc. of Emeryville, California (“Gracenote”).
The software from Gracenote (the “Gracenote Software”) enables this application to perform disc and/or file
identification and obtain music-related information, including name, artist, track, and title information
(“Gracenote Data”) from online servers or embedded databases (collectively, “Gracenote Servers”) and to
perform other functions. You may use Gracenote Data only by means of the intended End-User functions of
this application or device.
You agree that you will use Gracenote Data, the Gracenote Software, and Gracenote Servers for your own
personal non-commercial use only. You agree not to assign, copy, transfer or transmit the Gracenote
Software or any Gracenote Data to any third party. YOU AGREE NOT TO USE OR EXPLOIT GRACENOTE
DATA, THE GRACENOTE SOFTWARE, OR GRACENOTE SERVERS, EXCEPT AS EXPRESSLY PERMITTED HEREIN.
You agree that your non-exclusive license to use the Gracenote Data, the Gracenote Software, and
Miscellaneous
63
Page 65

Gracenote Servers will terminate if you violate these restrictions. If your license terminates, you agree to
cease any and all use of the Gracenote Data, the Gracenote Software, and Gracenote Servers. Gracenote
reserves all rights in Gracenote Data, the Gracenote Software, and the Gracenote Servers, including all
ownership rights. Under no circumstances will Gracenote become liable for any payment to you for any
information that you provide. You agree that Gracenote, Inc. may enforce its rights under this Agreement
against you directly in its own name.
The Gracenote service uses a unique identifier to track queries for statistical purposes. The purpose of a
randomly assigned numeric identifier is to allow the Gracenote service to count queries without knowing
anything about who you are. For more information, see the web page for the Gracenote Privacy Policy for
the Gracenote service.
The Gracenote Software and each item of Gracenote Data are licensed to you “AS IS.” Gracenote makes
no representations or warranties, express or implied, regarding the accuracy of any Gracenote Data from in
the Gracenote Servers. Gracenote reserves the right to delete data from the Gracenote Servers or to
change data categories for any cause that Gracenote deems sufficient. No warranty is made that the
Gracenote Software or Gracenote Servers are error-free or that functioning of Gracenote Software or
Gracenote Servers will be uninterrupted. Gracenote is not obligated to provide you with new enhanced or
additional data types or categories that Gracenote may provide in the future and is free to discontinue its
services at any time.
GRACENOTE DISCLAIMS ALL WARRANTIES EXPRESS OR IMPLIED, INCLUDING, BUT NOT LIMITED TO,
IMPLIED WARRANTIES OF MERCHANTABILITY, FITNESS FOR A PARTICULAR PURPOSE, TITLE, AND
NON-INFRINGEMENT. GRACENOTE DOES NOT WARRANT THE RESULTS THAT WILL BE OBTAINED BY
YOUR USE OF THE GRACENOTE SOFTWARE OR ANY GRACENOTE SERVER. IN NO CASE WILL
GRACENOTE BE LIABLE FOR ANY CONSEQUENTIAL OR INCIDENTAL DAMAGES OR FOR ANY LOST
PROFITS OR LOST REVENUES.
© Gracenote, Inc. 2009
Portions of the content are copyright © of Gracenote or its providers.
Miscellaneous
64
 Loading...