

Page 1
© 2007 IRIS CORPORATION BERHAD.ALL RIGHTS RESERVED.
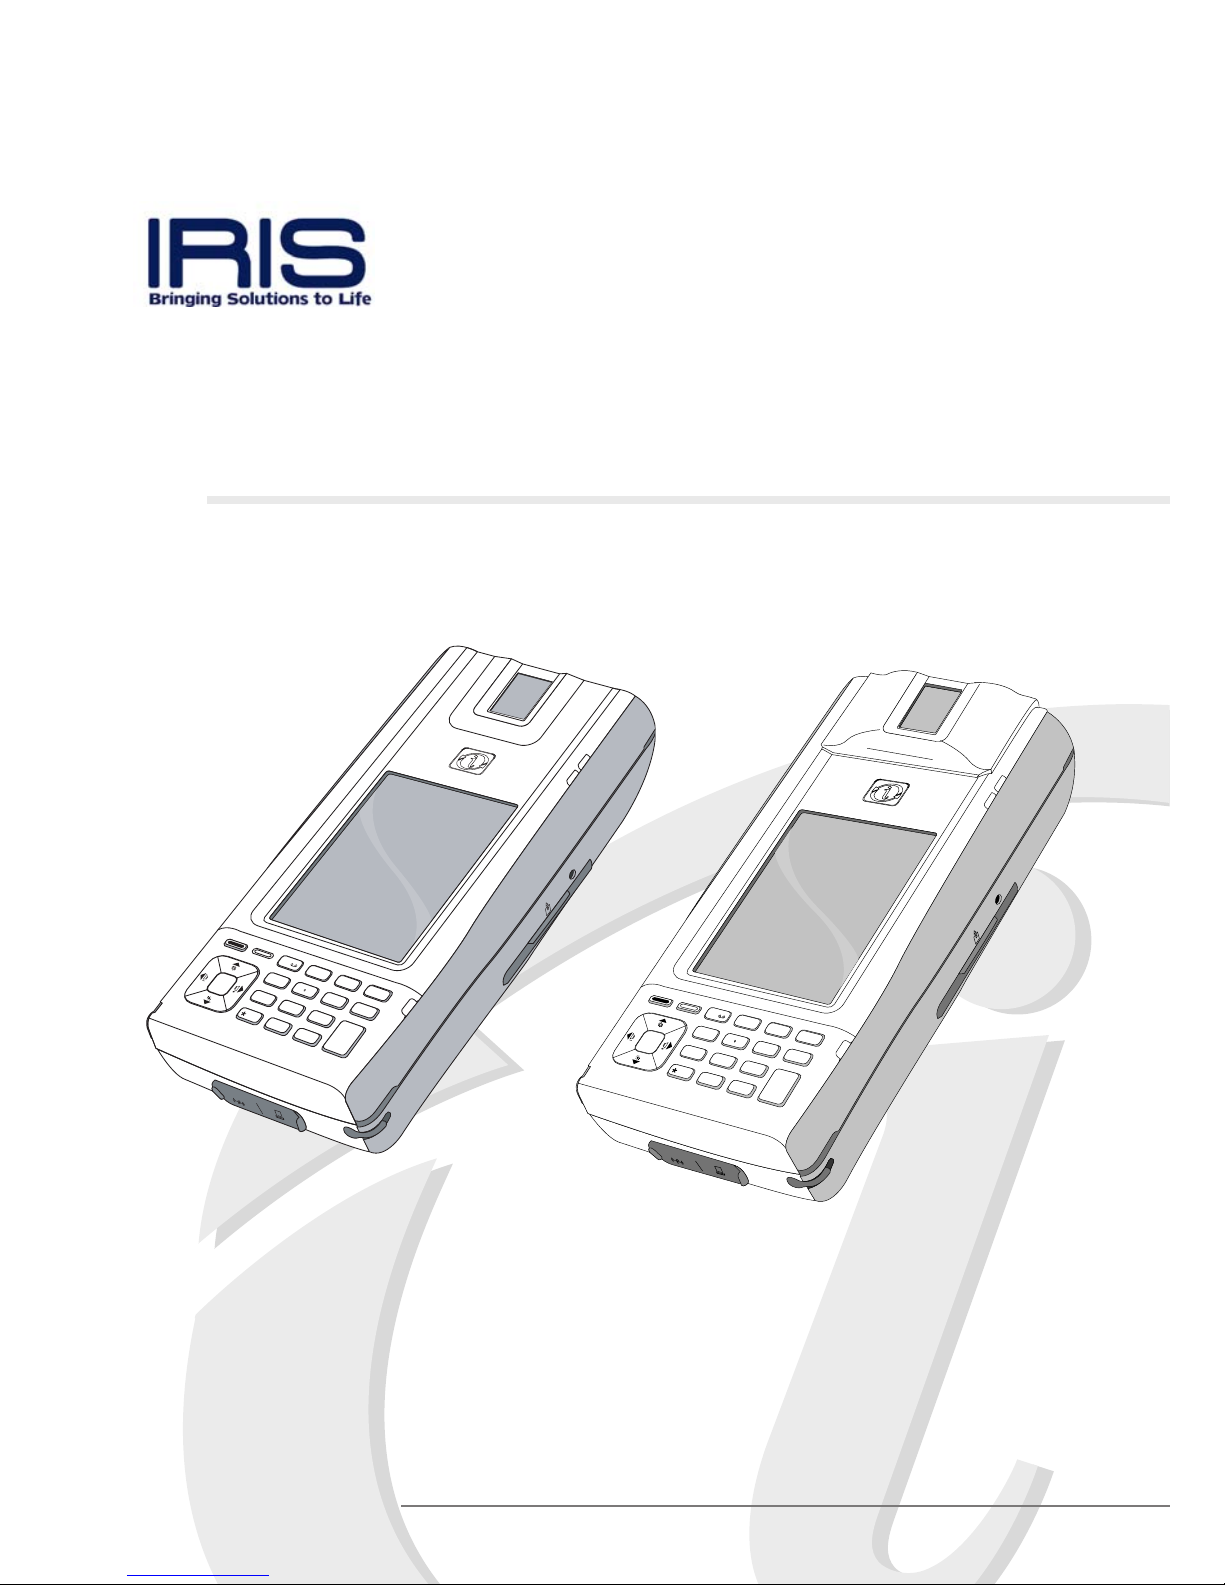
IRIS Mobile SmartTerm
ST4ex/ST4i
User Guide
8
9
0
#
7
1
C
l
e
a
r
a
b
c
d
e
f
g
h
i
j
k
l
m
n
o
p
q
r
s
t
u
v
a
/
A
w
x
y
z
+
C
a
n
c
e
l
E
n
te
r
2
3
4
5
6
R
E
S
E
T
D
C
5
V
ST4ex with Optical Scanner
ST4ex/ST4i Standard
8
9
0
#
7
1
C
le
a
r
a
b
c
d
e
f
g
h
i
jk
l
m
n
o
p
q
r
s
tu
v
a
/A
wxyz
+
C
a
n
c
e
l
E
n
t
e
r
2
3
4
5
6
R
E
S
E
T
D
C
5
V
Page 2

NOTICE
2
www.iris.com.my
● IRIS CORPORATION BERHAD (IRIS) assumes no responsibility for any
damage or loss resulting from the use of this manual.
● IRIS CORPORATION BERHAD (IRIS) assumes no responsibility for any loss
or claims by third parties that may arise through the use of this product.
● IRIS CORPORATION BERHAD (IRIS) assumes no responsibility for any
damage or loss caused by deletion of data as a result of malfunction, repairs,
or battery replacement. Be sure to back up all important data on other media to
protect against its loss.
● Data can be uploaded from this unit to a personal computer for storage on a
hard disk, floppy diskette, or other storage medium. Be sure to make multiple
copies of all important data to protect against its accidental loss.
● The contents of this manual are subject to change without notice.
● No part of this manual may be reproduced in any form without the express
written consent of the manufacturer.
● Sample displays shown in this manual may differ somewhat from the displays
actually produced by the product.
● Non-contractual photographs and renderings.
©
2007 IRIS Corporation Bhd. All rights reserved.
Copyright Information
● Microsoft, ActiveSync, Windows logo are either registered trademarks or
trademarks of Microsoft Corporation in the United States and/or other countries.
Microsoft products are licensed to OEMs by Microsoft Licensing, Inc., a wholly
owned subsidiary of Microsoft Corporation.
● All other product and company names mentioned herein may be the trademarks of
their respective owners.
Notice
Page 3
SAFETY PRECAUTIONS
3
www.iris.com.my
Safety Precautions
Congratulations upon your selection of the ST4ex/ST4i. Be sure to read the following
Safety Precautions before trying to use it for the first time.
Note:
All mentions of “the unit” in the following precautions refer to the ST4ex/ST4i.
Markings and Symbols
The following are the meanings of the markings and symbols used in these Safety
Precautions.
Danger
This symbol indicates information that, if ignored or applied incorrectly,
creates the danger of death or serious personal injury.
This symbol indicates information that, if ignored or applied incorrectly,
creates the possibility of death or serious personal injury.
This symbol indicates information that, if ignored or applied incorrectly,
creates the possibility of personal injury or property damage.
● A diagonal line indicates something you should not do. The symbol shown
here indicates you should not try to take the unit apart.
● A black circle indicates something you should do. The symbol shown here
indicates you should unplug the unit from the wall outlet.
Warning
Caution
Page 4
SAFETY PRECAUTIONS
4
www.iris.com.my
● Should any foreign matter (metal, water or other liquid) ever get into the unit
immediately turn off the power, unplug the AC adapter from the wall outlet,
remove the batteries, and contact your original dealer or an authorized IRIS
service provider to request for servicing.
Water and Foreign Matter
● Should the unit ever fall or otherwise become damaged, unplug the AC
adapter from the power outlet, remove the batteries, and contact your dealer
or an authorized IRIS service provider. Continued use creates the danger
of fire and electrical shock.
Dropping and Damage
● Never try to take the unit apart or modify it in any way. Doing so creates the
danger of fire and electrical shock. The unit is also protected by tamperproof feature, doing so will cause the whole program memory to self-destruct.
Disassembly
● If you are fitted with a pacemaker, keep the unit away from your chest area.
In particular, do not carry the unit in your breast pocket. Magnetic force
generated by the speaker built into the unit could possibly affect the operation
of a pacemaker. Should you ever suspect a problem, immediately move
away from the unit and contact your physician.
Magnetic Force
Health Precautions
Warning
● Long continuous use of the unit when you are tired is not good on your
health, and should be avoided.
Caution
● Be sure to allow for adequate rest when using the unit for long periods.
As a general rule, you should allow for 10 to 15 minutes of rest per hour.
Precautions During Use
Warning
● Discontinue use of the unit if it emits smoke or strange odor as it may create
the danger of fire and electrical shock. Immediately turn off the power, unplug the AC adapter from the wall outlet, remove the batteries, and contact
your original dealer or authorized IRIS service provider to request for
servicing.
Abnormal Conditions
Page 5
SAFETY PRECAUTIONS
5
www.iris.com.my
Caution
● Be sure to keep separate copies of all important data by saving it on a
computer hard disk or other medium. Note that all data stored in unit
SDRAM’s memory is deleted whenever batteries go flat. Memory contents
can also become lost or corrupted due to malfunction and repair of the unit.
Memory Protection
● Do not locate the unit in an area subjected to large amounts of humidity or
dust. Doing so can create the danger of fire and electrical shock.
● Keep the unit away from food preparation area, stoves and anywhere else
it might be exposed to oil, smoke or steam. Such conditions can create the
danger of fire and electrical shock.
Location
● Never place the unit on an unstable surface, on a high shelf, or in any other
unstable location. Doing so can create the danger of the unit falling and
causing personal injury.
Avoid unstable surfaces
● Keep the unit away from ATM cards, credit cards, and any other magnetic
card during transport and storage. Magnetic force generated by its speaker
can render magnetic cards unusable.
● Keep the unit away from televisions and other radio wave receivers. Magnetic
force generated by its speaker can cause interference with radio wave
reception.
Magnetic Force
Rechargeable Battery Pack
● Risk of explosion will occur if battery is replaced with an incorrect type.
Dispose used batteries according to the instruction.
Caution
● Never try to take apart the battery pack or modify it in any way. The battery
pack has built-in safety and protection mechanisms that ensure safe
operation. Damaging these mechanisms creates the danger of fire, smoke
emission and explosion.
● Never allow the positive (+) and negative (-) terminals of the battery pack to
be connected by metal. Never transport or store the battery pack together
with a necklace, hairpins or other metal objects. Doing so can short circuit
the battery pack, which creates the danger of fire, overheating and explosion.
● Never use or leave the battery pack next to open flame, near a stove, or any
other area exposed to temperatures above 50°C/122°F or greater. Doing
so creates the danger of fire and explosion.
Danger
Page 6

SAFETY PRECAUTIONS
6
www.iris.com.my
AC Adapter
● Never use a voltage that is different from that for which the AC adapter is
rated. Also, do not plug the unit into a power outlet that is shared by other
devices. Doing so creates the danger of fire and electrical shock.
● Never modify the power cord or excessively bend, twist, or pull it. Doing so
creates the danger of fire and electrical shock.
● Do not allow the power cord to become damaged. Do not place heavy objects
on the power cord or expose it to heat. A damaged power cord creates the
danger of fire and electrical shock.
● Never touch the AC adapter while your hands are wet. Doing so creates the
danger of electrical shock.
● Should the power cord ever become seriously damaged (internal wiring
exposed or shorted), contact your original dealer or an authorized IRIS
service provider to request for servicing. Continued use of a seriously
damaged power cord creates the danger of fire and electrical shock.
● Use only the AC adapter specified for this unit. Use of another type of AC
adapter can damage the battery pack and create the danger of fire and
personal injury.
Warning
● Never charge the battery pack near a stove, under direct sunlight, in an
automobile parked in the sun, or any other area subject to high temperatures.
High temperature can cause the battery pack's safety mechanism to operate
making it impossible to achieve a full charge. Heat can also cause an
abnormal chemical reaction, which creates the danger of fire and explosion.
● Never pierce the battery pack with nails, hit it with a hammer, step on it, or
throw it. Doing so can cause internal shorting, which creates the danger of
fire and explosion.
● Never use a battery pack whose exterior is extremely damaged or deformed.
Use of such a battery pack creates the danger of fire, overheating, and
explosion.
● Never use the battery pack with any device other than this product. Doing
so will cause abnormal current that damages the battery pack and creates
the danger of fire.
● Never expose the battery pack to direct flame, do not throw it into fire, fresh
water, or seawater. Doing so can damage the built in safety and protection
mechanisms, and cause battery fluid to ignite, creating the danger of fire
and explosion.
● If the battery pack does not achieve full charge after the normal charge
time, stop charging. Continued charging creates the danger of fire,
overheating, and explosion.
Warning
Danger
Page 7
SAFETY PRECAUTIONS
7
www.iris.com.my
● Unplug the AC adapter from the wall outlet whenever leaving the unit
unattended for long periods.
● At least once a year, unplug the AC adapter from the power outlet and clean
the area around the prongs of the plug. Dust build up around the prongs
can create the danger of fire.
● Be sure to unplug the AC adapter from the wall outlet before attempting to
move the unit to another location.
● Be sure to grasp the AC adapter when unplugging it from a wall outlet.
Pulling on the power cord can damage it, and create the danger of fire and
electrical shock.
● Keep the power cord away from stoves and other sources of heat. Heat can
melt the insulation of the power cord and create the danger of fire and
electrical shock.
Display Screen Precautions
● Never apply strong pressure to the LCD screen or subject it to strong impact.
Doing so can cause the LCD panel glass to crack or break.
● Should the LCD panel glass ever crack or break, never touch the liquid
inside of the panel. LCD liquid can lead to skin irritation.
● Should LCD panel liquid ever get into your mouth, gargle with water and
contact your physician immediately.
● Should LCD panel liquid ever get into your eyes or onto your skin, flush the
exposed area with clean water for at least 15 minutes, and then contact
your physician.
Caution
Caution
Page 8

CONTENTS
8
www.iris.com.my
Contents
1: Getting Started
............................................................................................
10
● Welcome ............................................................................................ 10
● Where to Find Information ................................................................. 10
● Symbols and Conventions ................................................................. 10
2: Basic Skills
...................................................................................................
11
● Control and interfaces ........................................................................ 11
● About the [Action] Control .................................................................. 12
● Charging ST4ex/ST4i ......................................................................... 12
● First Time Used .................................................................................. 13
● Touch Screen ..................................................................................... 14
● Guideline for using SD card ............................................................... 15
● Guideline for installing SIM / SAM card ............................................. 16
● USB Installation ................................................................................. 17
● Start Menu ......................................................................................... 20
● Taskbar Item ...................................................................................... 20
■
Shell taskbar
● Customizing your ST4ex/ST4i............................................................ 21
■
LCD Brightness Control
■
Power
■
Software Input Panel
■
Keypad
■
English Hand Writer
■
Display Property
■
Button Assignment
■
Mouse Property
■
Keyboard Setting
■
Audio Volume Setting
■
Stylus Property
■
Dialing Property
■
Regional Setting
■
Storage Property
■
System Property
■
Password
Page 9

CONTENTS
9
www.iris.com.my
Appendix A: Troubleshooting
● Reset the ST4ex/ST4i and Clear Memory
● Battery Loses Power
● If you run out of Memory
● Screen Freezes or Responds Slowly
● Screen is Blank
● Screen is Dark
● Inaccurate Response to Stylus Taps
● Slow or No response
● Infrared (IR) Connection Problems
● Network Connections
● Routine Maintenance
● Battery Guidelines
● Travel Guidelines
Appendix B: Regulatory Notices
● European Union Notice
● Battery Warning
● Airline Travel Notice
● Power Cord
Appendix C: Hardware Specifications
● Technical Specifications
● Physical Specifications
● Operating Environment
3. Microsoft ActiveSync
.................................................................................
29
● Installing ActiveSync .......................................................................... 29
● Troubleshooting ................................................................................. 30
4. Companion Program
..................................................................................
31
● WordPad ............................................................................................ 31
5. Internet Explorer
.........................................................................................
35
6. Getting Connected
.....................................................................................
37
Page 10

GETTING STARTED
10
www.iris.com.my
1: Getting Started
Welcome
Thank you for purchasing your SmartTerm Windows® Powered PDA (ST4ex/ST4i).
With the capabilities of your ST4ex/ST4i, you can keep your most important business, personal information and customize software close at hand.
Microsoft® ActiveSync increases the power of your ST4ex/ST4i by allowing you to
synchronize the information on your desktop or laptop computer with your Mobile
SmartTerm.
Where to Find Information
This manual provides an overview of the programs on your Mobile SmartTerm, and
explains how to connect your device to a desktop computer, network, or the Internet.
For instructions on setting up your ST4ex/ST4i, see the Quick Guide card. For instructions on installing ActiveSync, see Chapter 3.
Symbols and Conventions
Some or all of the following format conventions may be used in this guide to
distinguish elements of text:
● Names of menus, commands and icons are shown in bold type as they appear
on the display, for example, Settings, Power.
Important!
Browsing the Web or synchronizing a large number of mobile favorites can cause your
device to run low on storage space. To free storage space, open Internet Explorer and tap
Tools and then Options. On the General tab, tap Clear Cache and Clear History to delete
all Web pages stored on your device, including offline favorite content.
Page 11
BASIC SKILLS
11
www.iris.com.my
2: Basic Skills
Learning to use your Mobile SmartTerm is easy. This chapter describes the basic concepts
of using and customizing your Mobile SmartTerm.
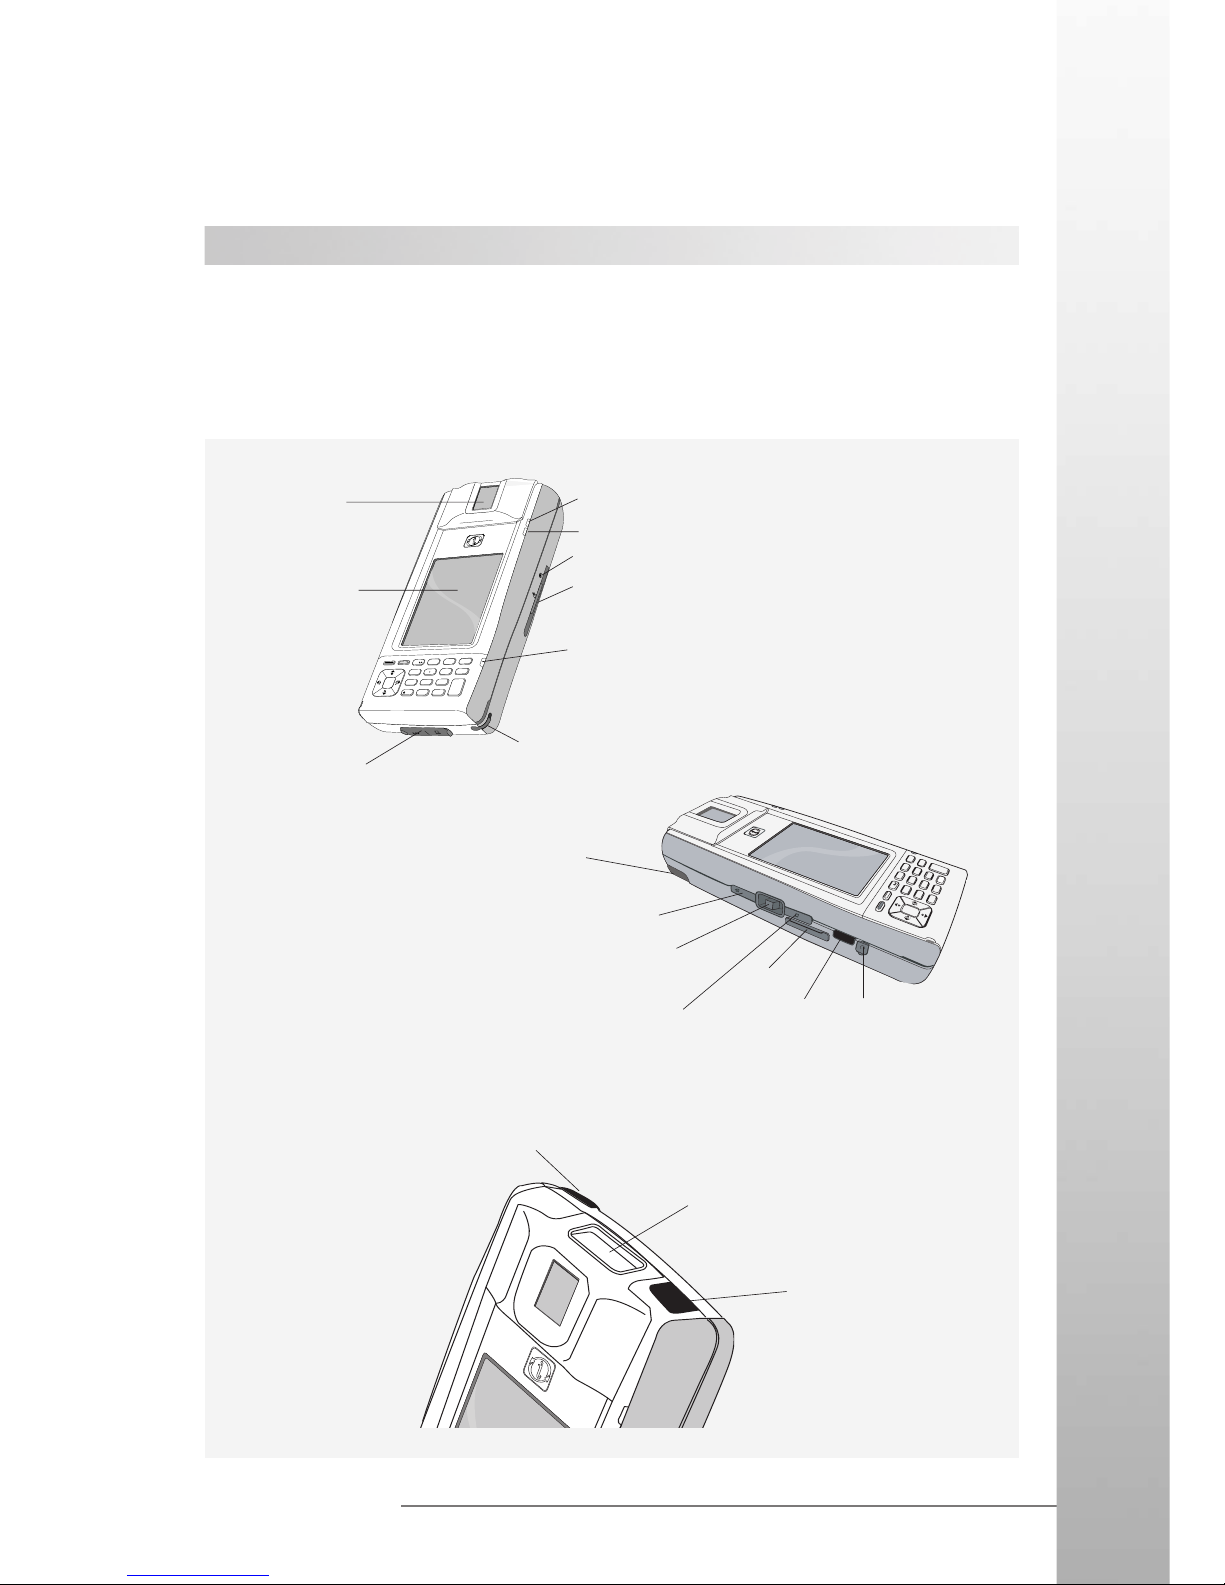
Controls and Interfaces
(i) ST4ex/ST4i
1
2
5
4
7
*
3
6
a
b
c
g
h
i
j
k
l
m
n
o
d
e
f
pqrs
a/A
8
0
#
E
n
t
e
r
C
a
n
c
e
l
C
l
e
a
r
tu
v
+
9
w
x
y
z
S
D
Power Button
Action Control*
See “About the Action
Control” for detail
SD Card
Slot
Handsfree Kit
Connector
8
9
0
#
7
1
C
l
e
a
r
a
b
c
d
e
f
g
h
i
j
k
l
m
n
o
p
q
r
s
t
u
v
a
/
A
wxyz
+
C
a
n
c
e
l
E
n
t
e
r
2
3
4
5
6
R
E
S
E
T
D
C
5
V
Touch Screen
Perform
operations and
data input by
tapping and
writing directly
on the screen
AC Charging/
ActiveSync
Connector
Biometric
Scanner
For Fingerprint
scanning
GSM/GPRS Indicator
Reset Button
Card Slot
For accessing ISO7816 smart cards
Power Indicator
Turns red and green
when the Battery is
charging and then
green when charging
is complete
Stylus
Bluetooth/WLAN Indicator
IrDA
Barcode Optical
Scanner
Remote Control
(Optional)
GSM Antenna
Bluetooth/WLAN
Button
Shortcut for launching
wireless applications
GSM Antenna
Page 12
BASIC SKILLS
12
www.iris.com.my
About the [Action] Control
Operations can be performed by pressing the [Action] control.
Pressing the [Action] control performs an operation similar to the
Enter key of a computer keyboard. Pressing up and down will toggle
up and down.
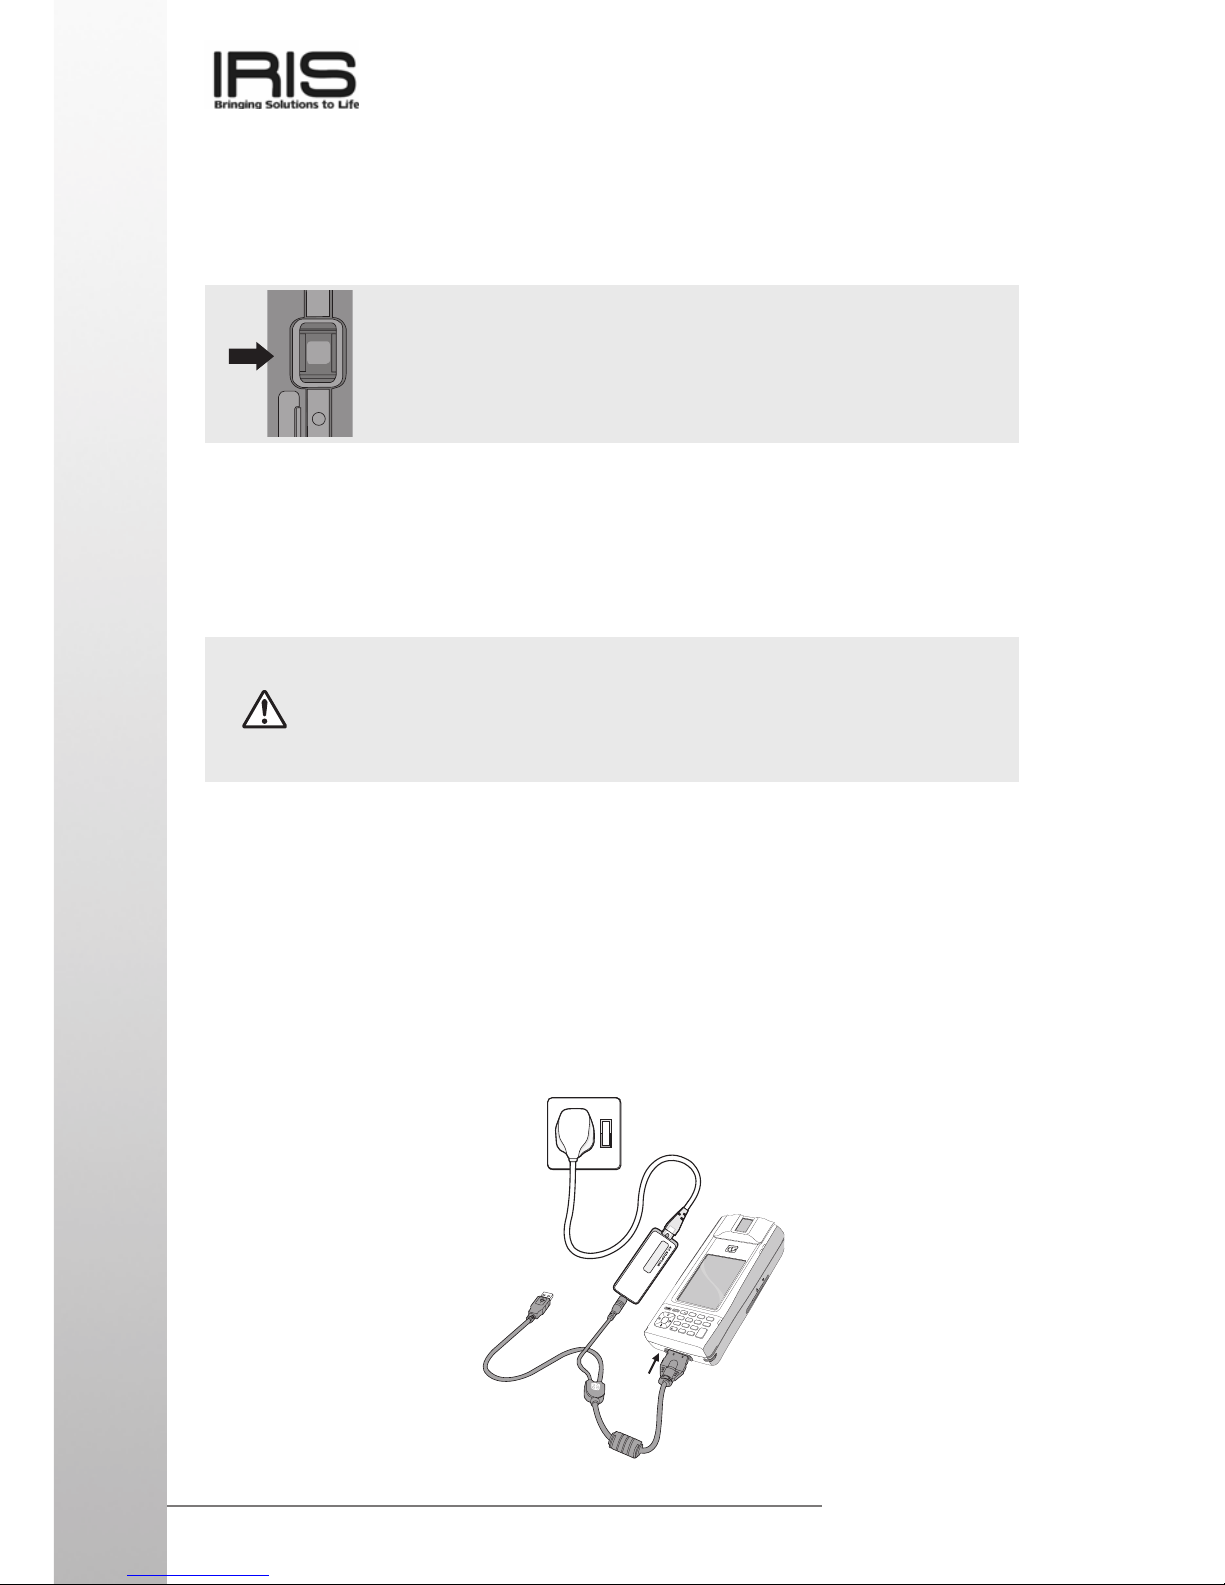
Charging ST4ex/ST4i
Your ST4ex/ST4i contains two rechargeable Lithium Polymer batteries that are charged
when you plug in the AC Adapter. You will not need to replace the batteries. Just leave
the ST4ex/ST4i connected to the AC Adapter for one to two hours. To confirm that the
battery is fully charged, check the LED status (Power indicator): RED & GREEN for
CHARGING and GREEN only for FULLY CHARGED.
● Connect the AC Adapter to the AC Adapter Terminal and turn on the wall socket
switch.
● Charging starts automatically as soon as you attach the AC Adapter. The green
power indicator will turn on once it detects AC power.
● The red power indicator will turn on if charging is in progress, and turns off when
charging is completed.
● It takes about one to two hours to be fully charged.
● The time required to be fully charged may be longer for the first time.
● Turn off the wall socket switch and remove the AC Adapter after charging is
completed.
Be sure to use the AC Adapter to charge the Rechargeable Battery Pack(s)
if the unit has been left unused for a few days. Your device will not operate
properly before charging the batteries. The embedded Backup Battery will
be fully charged when the AC Adapter or Rechargeable Battery Pack is
present.
8
9
0
#
7
1
C
l
e
a
r
a
b
c
d
e
f
g
h
i
j
k
l
m
n
o
p
q
r
s
t
u
v
a
/
A
w
x
y
z
+
C
a
n
c
e
l
E
n
te
r
2
3
4
5
6
R
E
S
E
T
D
C
5
V
U
P
Page 13
BASIC SKILLS
13
www.iris.com.my
IMPORTANT
Perform the following steps for Full Reset:
● Press and hold the “4” button [DO NOT release this button].
● Press the “Reset” button and release it instantly.
● When “Erasing Memory” dialog box prompts out, release the number “4” button.
● After a few seconds, the SWLD246C1 (Wireless network) dialog box will prompt
out. Follow the screen instructions to complete the whole process.
First time use
Once the charging has completed. Turn on the unit by pressing the power button, it will
start up and it will show an IRIS front page. On the first time basis, it is advisable to
calibrate the stylus calibration by going to Start > Setting > Control Panel > Stylus.
Follow the cursor and tap on it. After this, Time, Date and Time Zone configuration screen
will required to be set as the default time, date and time zone differ from places to places.
IMPORTANT
Power Button Feature
● If unit is ON, a short press will turn OFF the unit.
● If unit is OFF, a short press will turn ON the unit.
Backlight Toggle Feature
● If unit is ON, a long press will Toggle the LCD Backlight OFF.
● If backlight is ON, a tap on the LCD screen will turn it ON.
Page 14
BASIC SKILLS
14
www.iris.com.my
Touch Screen Operations
The following defines the various operations that you can perform with the stylus.
Tap ................................ Touch the screen once with the stylus to select items or options.
Double Tap ....................Tap the item twice to open or execute a program.
Drag .............................. Hold the stylus on the screen and drag across the screen to
select text and images. Drag in a list to select multiple items.
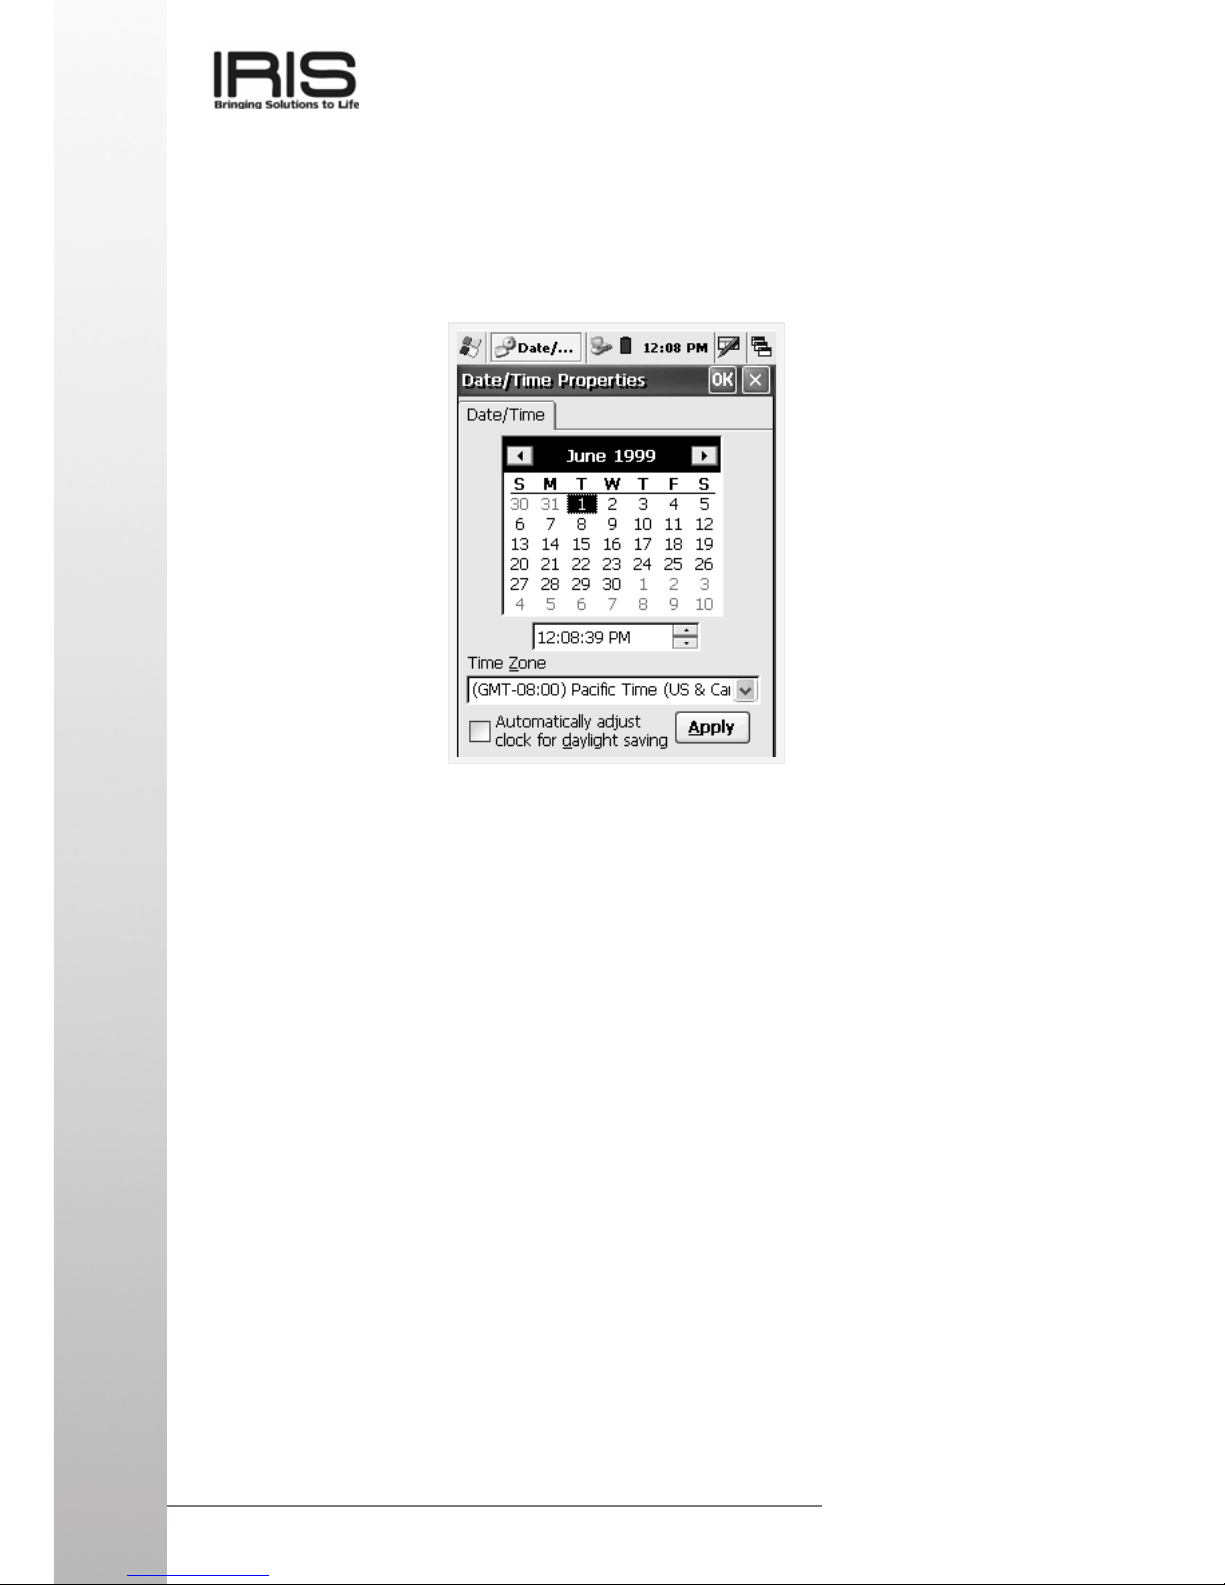
Time, Date and Time Zone configuration / first time used
Go to Start > Setting > Control Panel > Date/Time. “Time, Date and Time Zone
configuration” application will be shown as below.
Page 15
BASIC SKILLS
15
www.iris.com.my
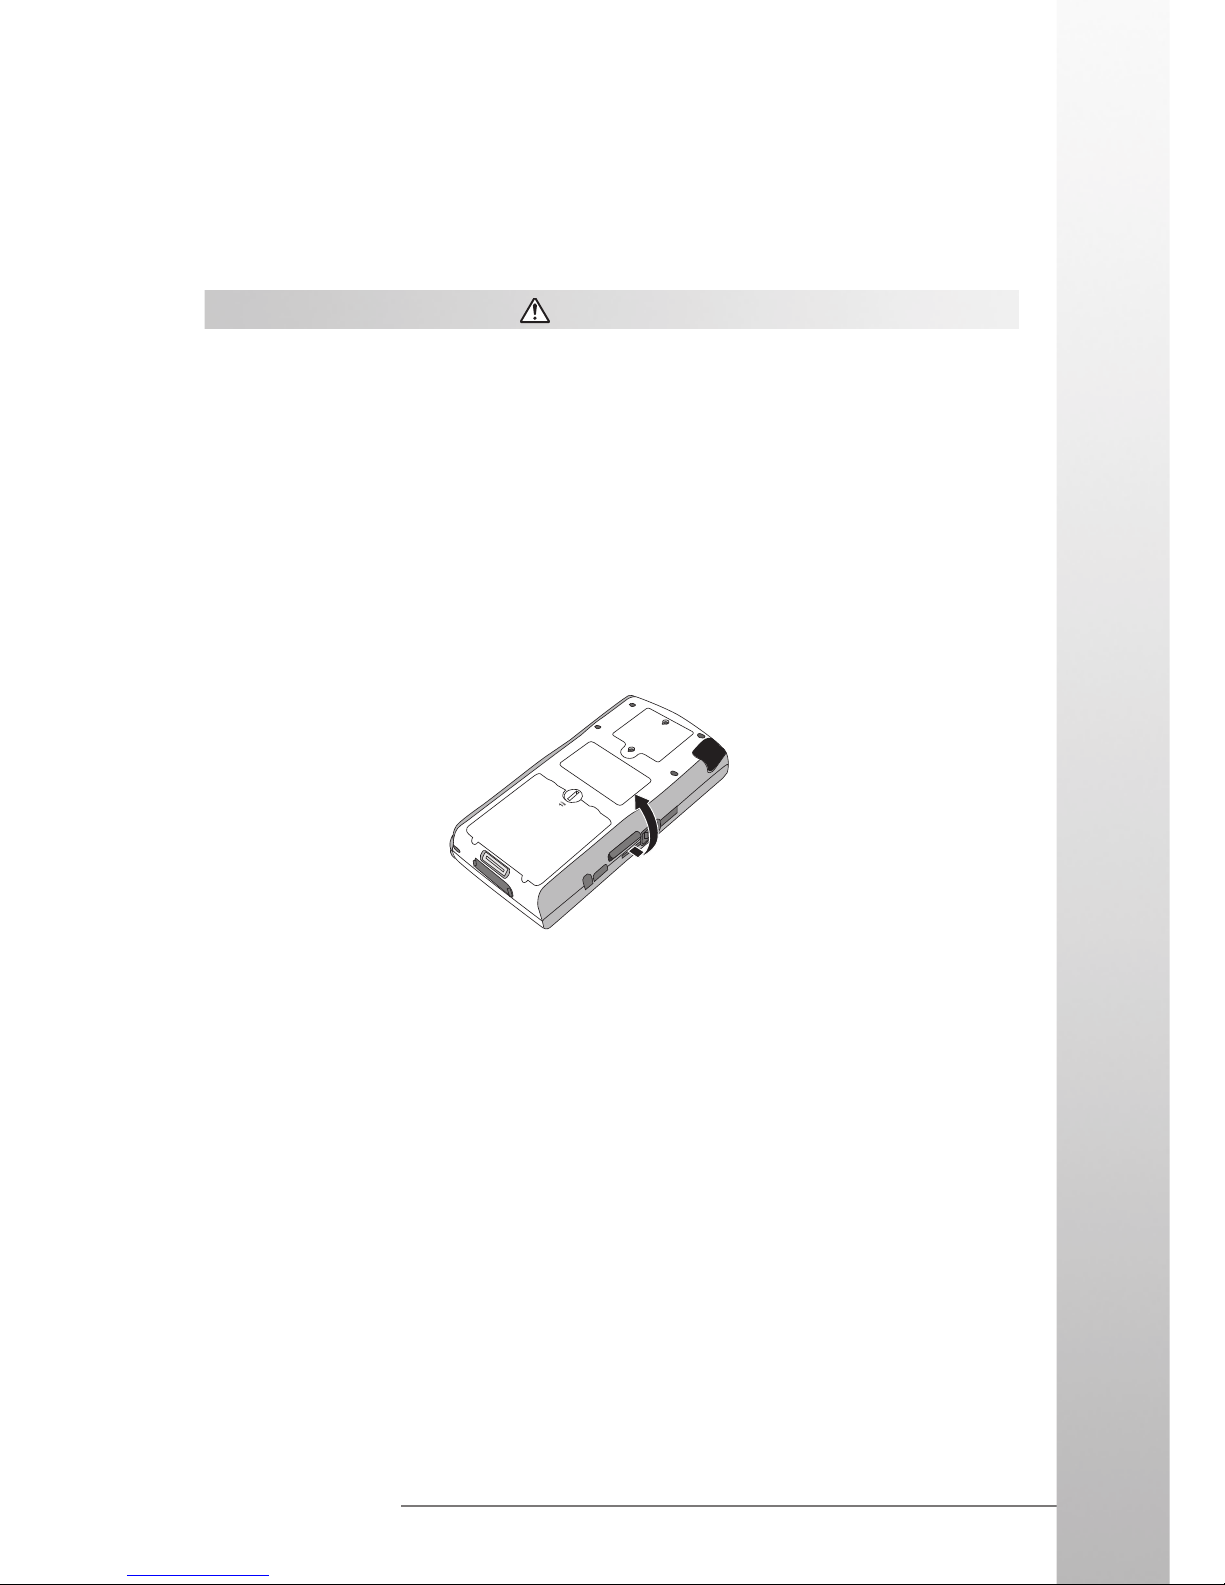
1. Make sure your ST4ex/ST4i is turned off.
2. Slide the cover to the side by pulling it out gently but firmly.
3. If there is already a card in the slot, press on the card and then remove it.
4. Slide the card you want to use into the card slot.
IMPORTANT
● Pull the cover out of the slot.
● Gently but firmly slide the card into the place as far as it can go, but do not force
it. Forcing a card can damage connectors. If you have problems inserting a card,
pull it out and make sure it is oriented correctly.
● We strongly recommend that you store all unsaved data which you have input or
edited before performing this procedure.
● If you want to leave the card inside the slot, place the cover back into the slot so
that the cover will not interfere with your mobility while using it and it will protect
the cards from water, dust and heat.
Guidelines for Using Secure Digital Card
Your ST4ex/ST4i supports SD memory cards.
Page 16

BASIC SKILLS
16
www.iris.com.my
Using the Stylus
Data input and virtually all other operations are performed using a stylus, which is housed
inside the stylus holder at the right corner of the ST4ex/ST4i.
IMPORTANT
● Avoid misplace or lose the stylus by always storing it in the stylus holder when
not in use.
● Avoid breaking the tip of the stylus.
● Use only the stylus that comes with the ST4ex/ST4i, or some other stylus type
instrument with a soft, blunt point to perform touch screen operations. Never use
a pen, pencil, or other sharp writing implement.
● Make sure the top of the card is facing towards the top of the ST4ex/ST4i
unit.
A card that is not oriented correctly will not slide all the ways into the slot.
● Slide the card into the slot carefully as far as it can go.
● Press the card in gently until you hear it clicks into place.
5. Close the SD cover.
Guideline for Installing SIM / SAM card
When you subscribe to a cellular network, you are provided with a SIM card loaded
with your subscription details (PIN, optional services available and etc).
Warning:
● Keep all SIM cards out of the reach of children.
● The SIM card and its contacts can be easily damaged by scratches or bending. Be
careful when handling, inserting or removing the card.
● Before installing the SIM card, always make sure that the ST4ex/ST4i is fully charged as
the application will not work properly with insufficient amount of power. Hence, charge the
unit first before turning on iMobile application (See Application Manual: iMobile)
Bottom
To p
Page 17

BASIC SKILLS
17
www.iris.com.my
O
P
E
N
L
O
C
K
O
P
E
N
L
O
C
K
O
P
E
N
L
O
C
K
O
P
E
N
L
O
C
K
O
P
E
N
L
O
C
K
O
P
E
N
L
O
C
K
L
O
C
K
OPEN
LOCK
SAM C
SAM A
SIM
SAM B
USB Installation
1. Installation Procedure
Step 1: Plug in Active Sync Cable to the device and USB slot.
Windows will prompt “Found New Hardware”.
8
9
0
#
7
1
C
l
e
a
r
a
b
c
d
e
f
g
h
i
j
k
l
m
n
o
p
q
r
s
t
u
v
a
/
A
w
x
y
z
+
C
a
n
c
e
l
E
n
t
e
r
2
3
4
5
6
R
E
S
E
T
D
C
5
V
UP
To insert the SIM card.
● Firstly turn off all programs and then the unit.
● Removed the lid and battery.
● Slide the slot back and then insert the SIM card as shown below.
● When inserting the SIM card, ensure that the cut corner faces top right and
the fold contacts of the card face into the unit.
● Close the SIM card holder and slide back the slot.
● Place the battery back followed by the lid. Make sure to close the knob.
To insert SAM cards.
● It will be the same as inserting the SIM card, but on the other three slots.
● SAM card is for internal security.
Note:
Once the SIM card is inserted, please refer to Application Manual: iMobile for further
detail. As for SAM cards, its usage depend on user’s preferences.
Page 18

BASIC SKILLS
18
www.iris.com.my
Step 2: Click on “Next” button.
Step 3: Select first option “Search for a suitable driver for my device”.
Step 4: Insert the SmartTerm IV Product CD into the CD-ROM first. Click on
Browse button to find the “Wceusbsh.inf” file from the CD-ROM drive.
Page 19

BASIC SKILLS
19
www.iris.com.my
Step 5: Click on “Next” button, to install the driver.
Step 6: It will prompt if installation is completed. Click “Finish” to close
installation wizard.
Page 20

BASIC SKILLS
20
www.iris.com.my
Start Menu
Your ST4ex/ST4i pre-installed with a collection of useful programs. These include Microsoft
WordPad and IRIS customized programs. You can select the program you want from the
Start button or by tapping on the screen, a list of IRIS customized programs will be
shown.
IMPORTANT
To ensure the stable system operations, do not have too many programs running at the
same time. Otherwise, the unit will be very slow in response.
Taskbar Items
The Control Panel includes the following standard items which allow user to customize
system wide properties.
Status Icon Meaning
Start Menu, Tap to switch to a program
Indicate unit connected to PC ActiveSync
Batteries are charging
Batteries are fully charged
Batteries are low
Quick Launch Menu
Tap for Keyboard, tap and hold to choose other input method
GSM/GPRS is not powered ON
GSM/GPRS is powered ON
GSM signal strength
Connect to DialUp Signal
Internal battery is low
Internal battery is very low
Page 21

BASIC SKILLS
21
www.iris.com.my
Shell taskbar
The taskbar appears on the top of your ST4ex/ST4i screen.
iMo...
1345679
1 Start button ............................ Single tap to display the Start menu.
2 Active application .................. Display the latest application running.
3 Direct Connection .................. Single tap to execute the direct network status dialog.
4 Bluetooth Network ................. Double tap to execute Bluetooth network setting.
5 WI-FI Connection .................. Double tap to execute the WI-FI network setting.
6 Power icon ............................. Single tap to display the power status on your ST4ex/
ST4i.
7 Time ...................................... Single tap to display the time, date and time zone menu.
8 Software Input Panel (SIP) .... Single tap to display the Keypad.
9 Application switching ............. Single tap to display all the active application.
Note:
● An internal battery icon appears in the status icon area when battery power is
low. See Taskbar Item on page 20 for more information about icons.
● Messages also appear on the screen to warn you when the battery power is low.
You can check the current battery level at any time by tapping Start, Settings,
Control Panel, Power to display Power Properties.
Customizing your ST4ex/ST4i
You can customize your setting of your ST4ex/ST4i to suit your particular needs. E.g.
setting password, so that nobody can use your SmartTerm or change the background
display and etc.
2
8
Page 22

BASIC SKILLS
22
www.iris.com.my
Tap on Start, Settings then Control Panel, as shown on the previous page. In the
menu, it contains icon showing different settings that can be customized.
LCD Brightness Control
The unit can be powered by either battery or external power. User’s may change the
brightness of the LCD backlight through the backlight control panel applet according to
the power mode.
Enable Backlight Power
Tap and click Settings and choose Control Panel. On the Control Panel, tap
Dimming. On the screen box, there is a check box to enable Backlight Power.
When check box is selected, backlight will turn on when touch screen is tapped or button
is pressed. It will turn off after a period of idle time. When check box is deselected,
backlight will be off all the time.
Adjusting Display Brightness
Use the following operations to adjust display brightness to make it easier to read.
Tap and click Settings and choose Control Panel. On the Control Panel, tap
Dimming. A screen box will appear. Tap the dark or bright tab to control the brightness
of the screen.
Page 23

BASIC SKILLS
23
www.iris.com.my
Power
User may check the power status of the main and backup battery by clicking on the
power icon. In the power properties menu, user may select the power schemes : user
idle/system idle/suspend… by clicking from the schemes menu.
The schemes allow the user to switch to idle mode when it is not used for awhile. This is
to save the power consumption. It also shows the device status.
Page 24

BASIC SKILLS
24
www.iris.com.my
“Keypad” refers to the ST4ex/ST4i keypad. English Handwriter recognizes user handwriting and input the text automatically.
Software Input Panel (SIP)
On the taskbar of the ST4ex/ST4i, tap and hold on the SIP icon. The software input panel
options will launch as shown below. Select the input panel type to use.
Page 25

BASIC SKILLS
25
www.iris.com.my
Keypad
Learning to use your keypad is easy. This section will describe the basic concept of
using the keypad in writing a message or executing a task like increasing volume.
Controls and Interfaces
● Toggle function
When pressing, an icon will appear on the taskbar. This will enable the keypad
function which is highlighted in blue.
● Menu button
When pressed, a menu will appear on the screen. User can select the IRIS
customized programs by tapping on the respective screen.
● Nav. Left & Right or Increase & Decrease Volume
If toggle function is OFF, the navigation will be for left and right. If toggle function
is ON, and by pressing the buttons, it will increase and decrease the volume of
the speaker.
● Nav. Up & Down or Dim & Brighten Backlight
If toggle function is OFF, the navigation will be up and down. If toggle function is
ON, and by pressing the buttons, it will dim or brighten the backlight.
● Enter button or accept call button
Pressing it will perform enter function or skip to the next line when writing. If
iMobile is running, pressing this button will accept incoming call.
● Cancel Selection or Terminate Call
This is to cancel selection or end a call.
● Clear
This button allows user to clear entry or use as backspace function.
● Alpha numerical keypad
It will act as numerical keypad when toggle function is OFF. Once ON, you can
write any words just by pressing and holding on the button until the character
appears.
Menu
Toggle function
Alpha Numerical keypad
Clear Entry &
Backspace function
Cancel Selection or
Terminate Call
Enter button or
Accept call button.
Nav. Left & Right or
Increase & Decrease
volume
Enter button
Nav. Up & Down or Dim &
Brighten backlight.
Page 26

BASIC SKILLS
26
www.iris.com.my
You can customize your ST4ex/ST4i to create a shortcut to any program that you wish to
access just by a single click. You can set it from the Button Menu’s applet in control panel
folder as shown on the two figures above. Tick the “Tap Screen to execute application”
and type in the Name of the program on the “Caption” then click “Browse” as shown on
the figure. Name the path of the program, refer to the figure above. You can set 16 short
paths in this menu. Once completed, you are able to see the figure as shown below on
the screen after tapping on it.
Note:
Once the Menu is active, the icon on the window desktop will no longer be accessible
when tapping on the screen. The Menu will pop up unless it is disabled. If the Menu is left
idle, it will close after 15 seconds.
Button Menu
Page 27

BASIC SKILLS
27
www.iris.com.my
Display
You can customize your screen display by changing the picture on the Display Properties.
Or you may insert new picture just by transferring it from your personal computer. Note
that it can only support bmp file and the screen size is 240 x 320. You can tile your
desired image on the display property.
Registry Backup
By tapping on the registry backup icon, it will show a page with Registry Backup and
Registry Delete features. Registry Backup provides the function for user to backup the
registry into the Pocket Store, so when the main battery, backup battery and external AC
power are removed, the registry changes that have been done are maintained. If the
registry’s changes are no longer needed, Registry Delete helps to remove the backup
registry’s settings from the Pocket Store.
Mouse
On the Mouse Menu, you can check the sensitivity and speed of double clicking.
Keyboard
In the Keyboard Menu, you can set two things: repeat delay and repeat rate.
Audio Volume
When you choose the Volume and Sound properties, on the first page you can set the
volume of the speaker and enable sounds for certain warning or applications.
When you click on Sound page, you could set the window events’ sound.
Stylus Property
In this stylus property, you can recalibrate the sensitivity of the stylus.
Dialing Property
This is a standard feature for all windows. This is when a modem is being used and you
can set the dialing property to connect to the internet server. However, ST4ex/ST4i do
not have modem feature.
Network and Dial-Up Connection
When you tap on the network and dial-up connection, a default connection will be created
which is “USB ActiveSync” (Please refer to 3: Microsoft ActiveSync for functionality),
besides, you can also create “IrDA Connection” or “VPN Connection” (Please refer to
the products’ manuals for details.)
Regional Setting
On the regional setting, you can set your local, language, number, current time and date
accordingly.
Owner
On the owner properties, you could insert your own personnel information and network
ID. This depends on user’s preferences.
Page 28

BASIC SKILLS
28
www.iris.com.my
PC Connection
PC connection is to enable the unit to directly communicate with personnel computer or other
communication devices. The default is set to USB ActiveSync. However, if there is more than
one connection being created on the "Network and Dial-Up Connection", you need to change
the connection setting before any of the communication devices can be linked, e.g. IrDA.
Storage Property
In the storage property, you can manage your storage by formatting it, dismounting it or
create new partition on it.
System Property
In the system property, it will show you the system information, memory, device name
and copyrights. In addition, you can adjust the amount of memory allocated for Storage
Memory or Program Memory.
Password
You can set the password to maintain secrecy or protect people from reading your ST4ex/
ST4i.
Screen Rotation
This feature allows you to rotate the screen display. It is useful for viewing landscape picture.
Taskbar & Secure Shell Setting
Allow you to set the taskbar location and Secure Shell feature. Secure Shell enables you
to control accessibility of Control Panel.
Wireless Devices Configuration
Allow you to turn on/off Wireless LAN and Bluetooth features.
Bluetooth Device properties
Allow you to scan and pair with connecting Bluettoth devices. The ST4ex/ST4i Bluetooth
feature must be turn on for it to scan.
Input Panel Selection
Allow you to change current input panel state: Keyboard, Keypad or English Handwriter.
Single tap on the SIP at the taskbar will activate the input panel selection.
Date & Time Setting
Allow you to configure the date, time and time zone. It also have the daylight saving
features.
Internet Options
Allow you to configure the network connection setting and the default homepage.
Remove Programs
Allow you to remove installed programs systematically.
System
Display system hardware and software properties. Allow memory allocation configuration.
PDA Backup
Allow you to save Windows database and applications.
Page 29

MICROSOFT ACTIVESYNC
29
www.iris.com.my
3: Microsoft ActiveSync
Using Microsoft ActiveSync®, you can synchronize the information on your desktop computer with the information on your ST4ex/ST4i. Synchronization compares the data on
your ST4ex/ST4i with your desktop computer and updates both computers with the most
recent information.
NOTE : By default, ActiveSync does not automatically synchronize all types of information.
Use ActiveSync option to turn synchronization on and off for specific information
types.
With ActiveSync, you can also:
● Back up and restore your ST4ex/ST4i data.
● Copy (rather than synchronize) files between your ST4ex/ST4i and desktop
computer.
● Control when synchronization occurs by selecting a synchronization mode. For
example, you can synchronize continually while the ST4ex/ST4i is connected to
your desktop computer (using a cradle or the cable), or only when you choose
the synchronize command.
Installing ActiveSync
● Insert the SmartTerm IV Product CD into the CD-ROM drive of your desktop
computer. Double click to launch the setup file located at CD-ROM drive
ActiveSync folder. (E.g:
d:\
ActiveSync x.x.x\MSASYNC.exe).
After installation is completed, the setup wizard tells you to connect your device to your
computer, helps you set up a partnership, and guides you through your first syncronization.
During synchronization, ActiveSync compares the changes you’ve made to the data on
your device and desktop computer and updates both computers with the latest information.
After the first synchronization, take a look at Calendar, Contacts, and Tasks on your
device. You will notice the information you have stored in Microsoft Outlook or Microsoft
Schedule on your desktop computer has been copied to your device and you did not
have to type a word. Disconnect your device from your computer and you are ready to
go!
At any time, you can view the synchronization status by double-clicking the ActiveSync
icon placed on the taskbar during setup or by selecting Microsoft ActiveSync from the
Start menu. In the ActiveSync window, click the Options button to change what was
synchronized and when it was done.
Page 30

MICROSOFT ACTIVESYNC
30
www.iris.com.my
Troubleshooting
To communicate, the two computers need to recognize each other. If you encounter
problems during installation, try the following:
● Make sure the cable is connected firmly for both computers.
● Unplug and reconnect the cable to your device.
● Shut the device off and turn it on again.
● On the File menu in ActiveSync, click Get Connected.
If you continue to have problems, see ActiveSync Help.
You can learn more about ActiveSync from the following sources:
● ActiveSync Help, for information on synchronizing and exchanging files with a
desktop computer.
● Device Help, to learn about communications software on your device.
● The Readme file, located on the CD, for updates and detailed technical
information.
● The Windows CE Web site, for getting up-to-date information on your device:
http://www.microsoft.com/windowsce/
Page 31

COMPANION PROGRAMS
31
www.iris.com.my
4: Companion Programs
WordPad
● About WordPad
You can create and edit documents and templates in WordPad, using buttons and menu
commands that are similar to those used in the desktop version of Microsoft Word. You
can work with files in either Normal or Outline view.
WordPad documents are usually saved as .pwd files, but you can also save documents
in other file format, such as .rtf or .doc.
● Select text
To select
any amount of text
a word
a single paragraph
an entire document
a picture
Do this
Drag the stylus or pointer over the text.
Double-tap or double-click the word.
Double-tap or double-click within the paragraph.
Select Edit > Select All.
Tap or click the picture.
Page 32

COMPANION PROGRAMS
32
www.iris.com.my
● Replace text
1. To replace text in one part of a document, select that part.
Otherwise, the whole document is searched.
2. Select Edit > Replace.
3. Enter the text you want to find and the text you want to replace with it.
4. Select the replacement options you want.
5. Select Find Next.
6. On the Find/Replace toolbar, select the appropriate button.
● Move, copy, or delete text
1. Select the text you want to move, copy, or delete.
2. To move or delete text, select the Cut button.
To copy the text, select the Copy button.
3. To paste the information, move the insertion point to the desired location,
and select the Paste button.
Notes :
• To undo an action, select Edit > Undo.
• To restore the action, select Edit > Redo.
● Set the default font
1. Select Format > Font.
2. Select the font you want.
3. Select Set As Default.
4. To confirm that your changes will be applied to subsequent documents you
create, select Yes.
Note :
To apply the default font and style to selected text, select Apply Default.
● Select a different font
1. Select the text you want to change.
To select all text, select Edit > Select All.
2. From the Font list, select the font you want.
3. From the Font Size list, select a size.
Note :
To see more formatting options, select Format > Font.
● Change font formatting
1. Select your desired text.
2. Select the Bold, Italic, or Underline button.
3. To change the color, select Format > Font and select the color you want from
the Color list.
Page 33

COMPANION PROGRAMS
33
www.iris.com.my
● Adjust the paragraph alignment
1. Select the paragraph you want to align.
2. Select the Align Left, Center, or Align Right button.
Note
To see more formatting options, select Format > Paragraph.
● Find text
1. To search for text in one part of a document, select that part.
Otherwise, the whole document is searched.
2. Select Edit > Find.
3. Enter the text you want to find.
4. Select the search options you want.
5. Select Find Next.
6. To continue searching, select Edit > Find Next.
● Indent a paragraph
1. Select the paragraph you want to indent.
2. Select Format > Paragraph.
3. Adjust the indentation settings as needed.
● Set tabs
1. Select Format > Tabs.
2. Change the tab settings as needed.
● Wrap text in the window
• Select View > Wrap to Window.
● Display the document using the full screen
• Select View > Full Screen.
• To exit Full Screen view, select Restore.
• To move the Restore button, drag the bar on the left side.
● Zoom in or out
• Select View > Zoom, and select the desired percentage.
Note
For Custom, enter the exact percentage and select OK.
● Switch between Normal and Outline views
• Select View > Normal or Outline.
Page 34

COMPANION PROGRAMS
34
www.iris.com.my
● Assign and change outline levels
1. Select View > Outline.
2. Select the appropriate buttons on the toolbar.
● Printing a Document
1. Select File > Print.
2. Select the printing options you want.
● Tips
• Port lists the available printer ports.
• If Network is selected from the Port list, enter the path to the network printer
in the Net Path box.
● Setting a Password for a Document
1. Select File > Password.
2. Type and verify the password.
3. You must save the document (File > Save) to retain the password.
Page 35

INTERNET EXPLORER
35
www.iris.com.my
The start page of Internet Explorer. The View menu user has the option
of limiting the taskbar to be shown
and font size.
5: Internet Explorer
Internet Explorer makes it easier to get the most from the World Wide Web, whether you
are searching for new information or browsing your favorite Web sites.
In the control panel menu, under the internet option, user may customize the appearance
of the browser when the program is launched. User may also customize other options
relating to connection, security and advanced.
Page 36

INTERNET EXPLORER
36
www.iris.com.my
User could also go to a webpage,
by typing the internet address - for
example, www.iris.com.my in the
address bar and then click the Go
button. The Back and Forward
buttons will enable user to return
to the previous page or view the
next page.
The stop button will enable user to
stop viewing a page when the web
page is taking too long to open.
When receiving a message that a
web page cannot be displayed or
to make sure you have the latest
version of the page, click the
refresh button.
On the Favorite menu, user may
store and organize webpages that
are used frequently by adding the
shortcut in the Favorite list.
User may also synchronize the list
of favorite link in ST4ex/ST4i with
another desktop computer where
changes can be made to either
one. For more information on
synchronization, see Active Sync
Help on desktop computer.
Page 37

GETTING CONNECTED
37
www.iris.com.my
Go to Start > Setting > Control Panel >
Wireless Devices Configuation
The above window will be shown. The
will appear on the globe if it is not
enabled or functioning. By clicking on
the Enable button, the WI-FI will be
functioning.
Once enable, the Globe will light up as
shown above and the enable turn
green, Click OK.
6: Getting Connected
Wireless LAN (Wi-Fi) Usage
ST4ex/ST4i has build in wireless LAN which enable user to access Internet by accessing available wireless provided that provided at café, company or home. To access this
feature first turn it ON by following the instructions below.
In order to conserve power, it is advisable to disable this function if it is not being used.
This will prolong the life span of the ST4ex/ST4i. Just follow the same step and press the
disable button to disable the function.
Before accessing the internet, there is another step required.
Whenever a new network detected, this
window will pop up. This will happen
when the WI-FI is enable. To connect to
one of this network, click on the network
and highlight it by single click. Then
press connect, a Wireless Properties
window will be shown. See next figure.
Just click “OK” and it will automatically
connect to the network. Just look at the
status and signal strength to determine
it is usable.
Note: Certain networks are protected
and required password to access.
To access internet, please refer to ITEM 5: INTERNET EXPLORER for further detail.
Page 38

GETTING CONNECTED
38
www.iris.com.my
To scan for devices, go to Start >
Setting > Control Panel > Bluetooth
Device Properties. The above window
will be shown. Click on the “Scan
Device”. It will take a minute or two to
detect any nearby Bluetooth devices.
Bluetooth Usage
To access Bluetooth function it has the same as WI-FI. Go to Start > Settings > Control
Panel > Wireless Devices Configuration by clicking on Enable on the Bluetooth.
In order to work with some of the devices,
it required certain cab or exe file provided
by the manufacturer. If not it will not able
to work properly or even communicate.
Note: this feature is too wide scope and
before using this, read the user manual of
the product for detail before
communicating with our devices.
The list will show the detect Bluetooth
within range.
To communicate with the device it need
to be trunk. It will show this message:
If click “Yes”, it will popup this Enter Pin.
Inserting this Pin will required the other
Bluetooth to have the same pin in order
to communicated. If click “No” it will trunk
without needing pass key. Once trunk,
double click on the device and click Active.
A tick will appear on the side of the
device. This indicated it can be
communicated.
Page 39

GETTING CONNECTED
39
www.iris.com.my
Infrared Communication
The infrared port of this unit can be used to exchange data with another ST4ex/ST4i, or
with another device equipped with infrared communication capabilities. Remember that
the two infrared ports must be pointed directly at each other when performing
communication. The distance between the two infrared ports must be less than 20 cm.
For infrared data communication with another device, the other device must confirm with
IrDA 1.2 standards, and it must specifically support infrared data communication with
ST4ex/ST4i.
IMPORTANT
● Make sure the units do not move while infrared data communication is in progress.
● Infrared data communication may be impossible under strong sunlight or inverter
type fluorescent lighting.
● Infrared data communication problems can be caused by the distance and angle
between the two ports, outdoor sunlight, and low battery level.
● Dirt and dust on the infrared port surface can cause communication errors and
other problems. Use a soft, dry cloth to wipe off the dirt and dust.
Page 40

TROUBLESHOOTING
40
www.iris.com.my
Appendix A: Troubleshooting
Reset the ST4ex/ST4i and clear memory
To reset the ST4ex/ST4i
If your ST4ex/ST4i responds slowly, stops responding as expected, or “freezes”, try
r
esetting it. A reset causes the ST4ex/ST4i to restart and re-adjust its memory allocation.
Any unsaved data in the open windows may be lost.
● Use the stylus to press the Reset button.
To clear memory
If you forget your ST4ex/ST4i password or want to clear all data in your ST4ex/ST4i and
restore the factory settings, you can run memory initialization.
Warning: Memory initialization deletes all data and restores the ST4ex/ST4i to its
default settings. Programs installed at the factory will remain, while data that
you have created and programs that you have installed are erased.
Re-initialization
● Turn the ST4ex/ST4i on.
● Press and hold the number “4” button, and use the stylus to press the Reset
button.
● A message will appear on the screen to confirm that you want to do memory
initialization. Follow the instruction on the screen.
Use ActiveSync to keep a backup of your ST4ex/ST4i data so that if you need to
clear memory, you can restore the data on your ST4ex/ST4i. For more information, see ActiveSync Help.
Low Battery Power
When batteries are running low, you will see a low battery icon in the navigation bar.
Replace or recharge the batteries as soon as possible. When the main battery is
discharged, your data will be preserved using the backup battery. Under normal conditions,
a fully charged battery can be used for long hours. Here are a few tips to help you get the
most from them.
Warning: If the backup battery is low, you run the risk of losing the data in your ST4ex/ST4i.
Use external power whenever possible
Use the AC adapter to plug your ST4ex/ST4i into external power whenever possible,
especially when:
● Establishing a remote connection (some modems use a lot of power).
● Using the backlight feature of your ST4ex/ST4i display.
● Connecting to a desktop computer.
Shorten the auto-suspend time
While on battery power mode, your ST4ex/ST4i will automatically suspend after a
predefine idle period. Maximize the battery’s life by shortening the idle time. Tap and
then Settings. On the Control Panel tab, tap Power, and then adjust the Schemes
setting.
Page 41

TROUBLESHOOTING
41
www.iris.com.my
Turn off the sounds when necessary
The ST4ex/ST4i produces sounds in response to a number of events, such as warnings,
appointments, and screen taps or when you press hardware-button. To optimize battery’s
life, turn off any unnecessary sound. Tap and then Settings. On the Control Panel
tab, tap Volume & Sounds and clear checked boxes on the Events, Application,
keyClicks and Notification tabs.
If ST4ex/ST4i is run out of memory
Memory on your ST4ex/ST4i is shared between storage memory and program memory.
Storage memory is used to store the information you created and programs you installed.
Program memory is used to run programs in your ST4ex/ST4i. The ST4ex/ST4i
automatically manages the allocation between storage and program memories. However,
in some situations, such as when memory is low, the ST4ex/ST4i may not be able to
automatically adjust the allocation. If you receive a message stating that storage or program
memory is unavailable, try the following solutions.
Storage memory-Secure Digital (SD) Storage Card
● Move data to a Secure Digital (SD) Storage Card.
● Tap , Program and then Windows Explorer. A folder named “Storage Card”
will appear once the SD memory card is inserted.
● This folder will disappear automatically once the card is taken out from the slot.
● Move any file or data into the “Storage Card” folder for backup purposes.
● Files or data save in the SD card can be opened in any other SD card reader or
computer.
● Files copied from computer can also be opened in the ST4ex/ST4i unit, as long
as it does not exceed the memory of the unit.
Page 42

TROUBLESHOOTING
42
www.iris.com.my
Program memory
● Stop programs you are not currently using. In most cases, programs automatically stop to free needed memory. However, in some situations, such as when
confirmation dialog boxes are waiting for a user’s response, the program may
not be able to stop automatically. To check the status of your active programs,
press Task Manager, a window will pop-up showing the active programs. If the
program is not working, press End Task to close the program.
● Clear storage memory as described in the preceding section. This will free some
storage memory so that it can be allocated to program memory.
● Reset your ST4ex/ST4i, as described in “Reset the ST4ex/ST4i and clear
memory”, earlier in this appendix.
Screen freezes or responds slowly
Reset your ST4ex/ST4i. See “Reset the ST4ex/ST4i and clear memory”, earlier in this
appendix.
Screen is blank
If the ST4ex/ST4i does not respond when you press the Power button briefly, press and
hold the button for a full second. If this does not work:
● Make sure your battery cover is locked and all expansion slots are secured.
● Plug the ST4ex/ST4i into AC power.
● Change or recharge the main batteries.
Screen is dark
Prolonged exposure to direct sunlight may cause your ST4ex/ST4i screen to be temporarily darken. This is normal for LCD screens and it is not permanent.
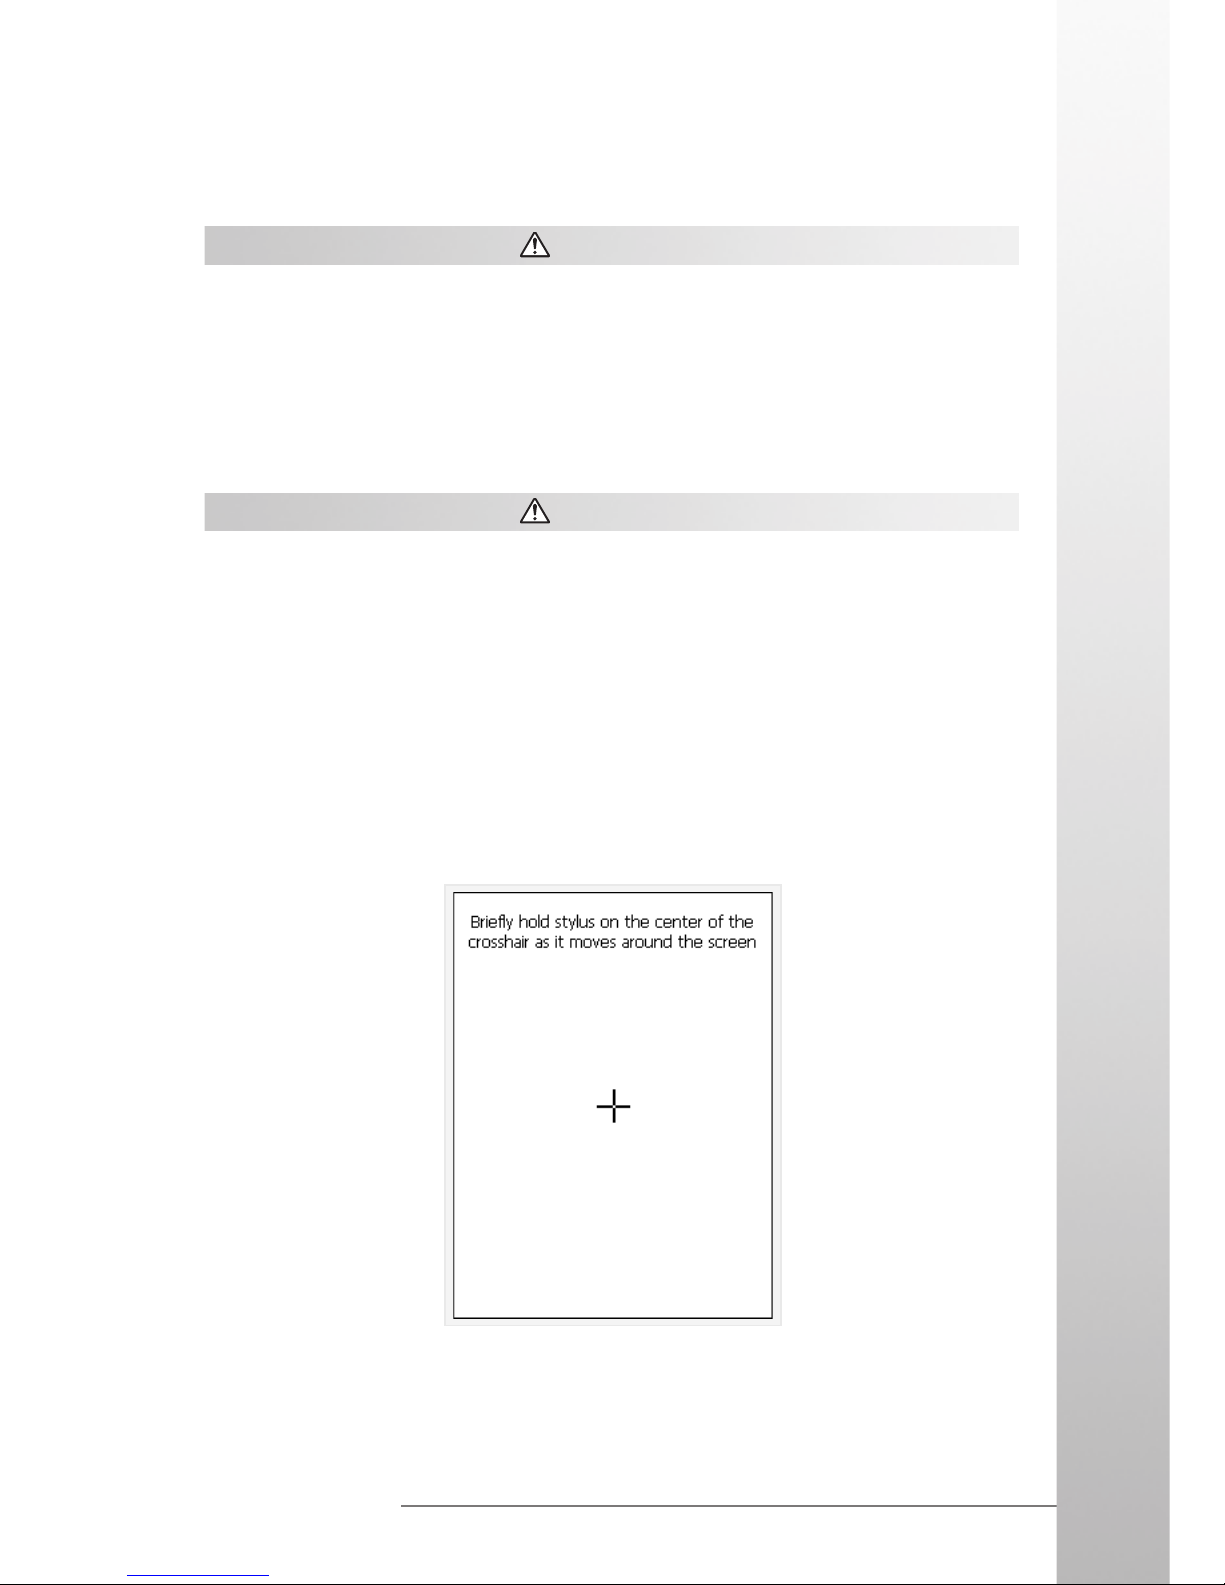
Inaccurate response to stylus taps
Adjust the touch screen to respond more accurately to screen taps. Tap and then
Settings. On the Control Panel, tap Stylus. In the Stylus Properties, choose
Calibration. Tap “Calibrate” and follow the instructions on the screens as shown below:
Page 43

TROUBLESHOOTING
43
www.iris.com.my
Slow or no response
Reset the ST4ex/ST4i. See “Reset the ST4ex/ST4i and clear memory”, earlier in this
appendix.
Infrared (IR) connection problems
If you are unable to use IR to transfer information, try the following:
● Transfer only one file.
● Orient the IR ports so that there is a straight, unobstructed path in between with
no more than 20cm apart.
● Make sure nothing is in between the two IR ports.
● Adjust the room lighting. Some types of light interfere with IR connections. Try to
relocate or turning off some lights.
Network connection problems
The following solutions may help if encounter problems when using a CF Ethernet card
for network connections.
● Click “Start” then “Setting”.
● Select Network icon and click it.
● Search from the list for VRETHER1 and choose it.
● Click on the Properties.
● Key in the IP Address, Subnet mask, gateway, DNS &WINS or obtain IP address
via DHCP. Choose either one of these depending on the network.
● Click “OK” after finished choosing.
● Reset the unit to complete the setting.
● Click on the IE and it will connect to the web.
● If problem persists, send the unit to manufacturer for services.
Routine Maintenance
This section provides recommended guidelines for taking care of your ST4ex/ST4i. Following these guidelines helps to ensure the longevity of your ST4ex/ST4i and reduces
the risk of damage.
Routine Care
To keep your ST4ex/ST4i in good condition and working properly, follow these guidelines:
● Keep your ST4ex/ST4i away from excessive moisture and extreme temperature.
Do not expose your ST4ex/ST4i to liquids or precipitation.
● Do not place anything on top of your ST4ex/ST4i to prevent damage to the screen.
● Store your ST4ex/ST4i in a protective case when not in use.
● Clean your ST4ex/ST4i by wiping the screen and the exterior with a soft, damp
cloth moistened only with water.
To reduce the risk of electric shock or damage to the internal components,
do not spray liquid directly on the screen or allow excess liquid to drip
inside your ST4ex/ST4i. Using soap or other cleaning products on the
screen may discolor the finish and damage the screen.
Page 44

TROUBLESHOOTING
44
www.iris.com.my
● Avoid exposing your ST4ex/ST4i to direct sunlight or strong ultraviolet light for
extended periods of time. Also avoid scratching the surface of the screen and
banging it against hard objects.
● Use the ST4ex/ST4i stylus only to prevent scratching the screen.
Battery Guidelines
Follow local regulations regarding the safe disposal of your ST4ex/ST4i. Your IRIS vendor can advise you on local regulations, and/or the existence of any battery disposal
programs in the operation.
The ST4ex/ST4i should not be disposed off along with the general household waste. In
order to forward them to recycling or dispose them properly, please use the public collection system or return them to IRIS, the authorized IRIS partners, or their agents.
Travel Guidelines
For safety and convenience when traveling with your ST4ex/ST4i, follow these guidelines:
● Back up your data before you leave.
● Take a backup copy of your data with you.
● Disconnect all external equipment from your ST4ex/ST4i.
● Take the AC adapter and new batteries with you.
● Hand-carry your ST4ex/ST4i in a protective case. Do not check in with your
luggage.
● Beware of potential effects of airport security devices on your ST4ex/ST4i.
There are three types of airport security devices: X-ray machines, magnetic
detectors (the device you walk through), and security magnetic wands. You
can send your device through airport X-ray machines. However, IRIS
recommends that you do not send your ST4ex/ST4i through magnetic detectors or expose it to security magnetic wands.
● Check with the airline if you plan to use your ST4ex/ST4i on the plane. In-flight
use of electronic devices is at the discretion of the airline.
International Travel
Before traveling internationally with your ST4ex/ST4i, be sure to:
● Check local customs regulations on wireless devices.
Shipping Guidelines
When shipping your ST4ex/ST4i, follow these guidelines:
● Safeguard your data by making a backup copy.
● If shipping the backup copy, be sure that the medium (diskette, tape, or SD card)
is not exposed to electrical or magnetic impulses while stored or in transit.
● Turn off your ST4ex/ST4i and disconnect all external devices.
● Pack your ST4ex/ST4i and all external devices (such as the cradle, cords, and
cables) in their original packing boxes or in similar packaging with sufficient packing material to protect them.
Page 45

REGULATORY NOTICES
45
www.iris.com.my
Appendix B: Regulatory Notices
European Union Declaration of Conformity
This device complies with the essential requirements of the R&TTE Directive (1999/5/
EC). The following test methods have been applied in order to prove presumption of
conformity with the essential requirements of the R&TTE Directive (1999/5/EC):
● EN60950-1:2001 A11:2004
Safety of Information Technology Equipment
● EN50371:2002-03
Generic standard to demonstrate the compliance of low power electronic and
electrical apparatus with the basic restrictions related to human exposure to
electromagnetic fields (10MHz - 300GHz)
● EN300330-1 V1.3.2: (2002-12)
Electromagnetic compatibility and Radio spectrum Matters (ERM); Short Range
Devices (SRD); Radio equipment in the frequency range 9kHz to 25MHz and
inductive loop systems in the frequency range 9kHz to 30MHz; Part 1: Technical
characteristics and test methods
● EN300330-2 V1.1.1: (2001-06)
Electromagnetic compatibility and Radio spectrum Matters (ERM); Short Range
Devices (SRD); Radio equipment in the frequency range 9kHz to 25MHz and
inductive loop systems in the frequency range 9kHz to 30MHz; Part 2: Harmonized
EN under article 3.2 of the R&TTE Directive
● EN301489-1 V1.7.1: (2006-07)
Electromagnetic compatibility and Radio spectrum Matters (ERM);
ElectroMagnetic Compatibility (EMC) standard for radio equipment and services;
Part 1: Common technical requirements
● EN301489-3 V1.4.1: (2002-08)
Electromagnetic compatibility and Radio spectrum Matters (ERM);
ElectroMagnetic Compatibility (EMC) standard for radio equipment and services;
Part 3: Specific conditions for Short-Range Devices (SRD) operating on
frequencies between 9kHz to 40GHz
Page 46

REGULATORY NOTICES
46
www.iris.com.my
Federal Communication Commission Interference Statement
This equipment has been tested and found to comply with the limits for a Class B digital
device, pursuant to Part 15 of the FCC Rules. These limits are designed to provide
reasonable protection against harmful interference in a residential installation. This
equipment generates, uses and can radiate radio frequency energy and, if not installed
and used in accordance with the instructions, may cause harmful interference to radio
communications. However, there is no guarantee that interference will not occur in a
particular installation. If this equipment does cause harmful interference to radio or
television reception, which can be determined by turning the equipment off and on, the
user is encouraged to try to correct the interference by one of the following measures:
● Reorient or relocate the receiving antenna.
● Increase the separation between the equipment and receiver.
● Connect the equipment into an outlet on a circuit different from that to which the
receiver is connected.
● Consult the dealer or an experienced radio/TV technician for help.
FCC Caution: Any changes or modifications not expressly approved by the party
responsible for compliance could void the user’s authority to operate this equipment.
This devise complies with Part 15 of the FCC Rules. Operation is subject to the following
two conditions: (1) This device may not cause harmful interference, and (2) this device
must accept any interference received, including interference that may cause undesired
operation.
IMPORTANT NOTE:
Radiation Exposure Statement:
This equipment complies with FCC radiation exposure limits set forth for an uncontrolled
environment. End users must follow the specific operating instructions for satisfying RF
exposure compliance. To maintain compliance with FCC RF exposure compliance
requirements, please follow operation instruction as documented in this manual.
This transmitter must not be co-located or operating in conjunction with any other antenna
or transmitter.
Page 47

Appendix C: Hardware Specifications
Item Specification
Operating System WinCE 5.0
Processor
Memory
Display
Keypad 22 function button keypad
Expansion Slot 1 x (Secure Device) SD Card / SDIO Slot
Communication
Interface
Intel XScale PXA270 520MHz processor
SDRAM 128 MByte
Flash 128 MByte
3.5” (240 x 320) Transflective TFT Color
Touch Screen
Bluetooth
(Model
dependence)
Wireless
LAN
(Model
dependence)
GSM
(Model
dependence)
USB Host 1 x USB Host 1.1
Ver1.2, Class 2 Standard with Tx output
5dBm
802.11 b/g Standard with Tx output 16dBm
Class 10, Quad band, 850, 900, 1800 &
1900. 1x SIM slot
HARDWARE SPECIFICATIONS
Biometric
Engine
(optional)
Barcode Engine
(optional)
Smart Card
Reader
Contactless
Card Reader
USB Client 1 x USB Client 1.1 (ActiveSync)
IrDA IrDA 1.2
Serial COM 1 x Standard UARTs
Sensor Capacitive Fingerprint Sensor
Module SC2-V2 Biometric Engine
Connection Serial COM (Simple UARTs)
Sensor 1.3M Pixel CMOS Sensor
Module Opticon MDI-1000 ASIC Decoding Engine
Connection Serial COM (Standard UARTs)
ID-1 card 1 x landing contact slot with 200k duty cycle
ID-0 SAM 3 x ID-0 SAM slot
ISO 15693 – read/write (2kbit and 16kbit
iCLASS credentials)
HID
ISO14443, Type A-read only (MIFARE®
card serial number
ISO 1443B2 read/write (16kbit iCLASS
credential)
* Basic model (ST4i, FCC ID: UY9ST4xx) is without Bluetooth, Wireless LAN & GSM
www.iris.com.my
47
Page 48

HARDWARE SPECIFICATIONS
48
www.iris.com.my
Main
Rechargeable 2 x 3.7V Lithium-Polymer
Battery 1200mAh
Backup Rechargeable 3V Lithium-ion 100mAh
AC Adaptor
Car Adaptor
9V, 2A Car adaptor
(optional)
IO Cable ActiveSync + DC input Cable
Stylus Hybrid Stylus
Pouch
PBC Leather Pouch
(optional)
External
Gang charge for 2 x Li-polymer batteries.
battery
Additional USB Hub features
charger
(optional)
Accessories
(Subject to
change)
9V, 3A AC/DC adaptor with power
(2- or 3-pin type upon request).
Page 49

HARDWARE SPECIFICATIONS
49
www.iris.com.my
Physical Specifications
Model ST4ex/ST4i
Height 188 mm
Width 94 mm
Depth 38.5 mm (Standard model) or 46 mm (Barcode model)
Weight ~ 400 g (inclusive of battery packs)
Operating Environment
Condition Metric
Temperature Operating 0º to 50º C
Non-operating (Storage) -20º to 65º C
Relative Humidity Operating 20 to 85 %
(Non-condensing) Non-operating (Storage) 20 to 85 %
Environmental Resistance
Rugged IP 64
Page 50

IRIS Corporation Berhad (302232-X)
IRIS Smart Technology Complex, Technology Park Malaysia,
Bukit Jalil, 57000 Kuala Lumpur, Malaysia.
Tel: 603-8996 0788 Fax: 603-8996 0441
Email: sales@iris.com.my
P/N:4000-0025
 Loading...