

Page 1

I
USER'S GUIDE
(EXECUTIVE)
USER'S
GUIDE
Page 2

II
© 2001 I.R.I.S. All rights reserved
OCR and Linguistic technology by I.R.I.S.
PCR-II recognition technology, PBR bar code reading,
PHR handprinting recognition technology and Read & Speak by I.R.I.S.
Speech technology by Lernout & Hauspie
© 2001 I.R.I.S. All rights reserved
Page 3

III
USER'S GUIDE
INTRODUCING THE IRISPEN
The IRISPen may be the biggest sensation in computerland since the mouse!
As efficient as computers are, you have to encode your data first. If you’ve ever
rekeyed text, you know how boring and time-consuming it can be....
The IRISPen, a unique product for every computer user, offers instantaneous
text retrieval at your fingertips. Text recognition where you want it, when you
want it.
The IRISPen consists of two components: a unique greyscale pen-sized OCR
scanner and the powerful PCR-II (“Pen Character Recognition”) text recognition technology.
The basic principle could hardly be easier: slide the IRISPen over a line of text
and it is entered into your application instantly, as if keyed in but up to 30 times
faster. Up to a 100 characters can be entered per second. Cut from paper, paste
to Windows©: can you imagine a simpler way of entering text?
Imagine you have to write a report. The IRISPen copies excerpts from books,
magazines, newspapers and typed or printed matter, and enters them directly in
your wordprocessor at the cursor position.
Encode last minute data from the stock exchange into your notebook before
you have that brainstorm with your director. And why not enter your appointments in your office software automatically? Rule the IRISPen over your visitor’s
business card to put him in your personal organizer. Or fix that meeting right
away in your electronic agenda.
Encoding checks, invoices, bank statements etc. becomes a cinch: the IRISPen
copies your numeric data directly into your database, spreadsheet and bookkeeping software. Recognition can be limited to numeric characters and customized
character sets.
The IRISPen offers many other advanced features for professional applications: character conversion, automatic execution of keyboard commands, detection of table cells etc. The IRISPen is undoubtedly the most advanced data entry
solution available!
Page 4

IV
Since the IRISPen connects to the computer’s USB port without the need for
an external power supply, you have a portable OCR system, an ideal solution,
even for notebook owners.
Finally, the IRISPen allows you to scan small graphics: logos, signatures, hand-
written notes etc. are inserted directly in your documents by sliding the pen scanner over them.
ON TO THE IRISPEN EXECUTIVE!
The IRISPen Executive software converts your IRISPen into a multifunc-
tional productivity tool. This software-only upgrade extends the capabilities of the
pen-sized OCR scanner dramatically; as a result, your IRISPen becomes unquestionably the most versatile reading device available!
Up to now, you were able to recognize printed and typed material. The Execu-
tive software extends your system with four major add-on capabilities: speech
synthesis, bar code reading, handprinting recognition and recognition of dot matrix documents. Furthermore, the IRISPen Executive is equipped with advanced
image adjustment features that allow to read a wider range of documents and a
multiline reading mode that increases the pen scanner’s ease of use.
The speech synthesis capability “Read & Speak” opens the door for multi-
media applications and allows “hands- and eyes-busy” data entry as your sound
card reads out all recognized text. You no longer have to look up to the computer
screen to verify the results: the IRISPen results are rendered by a human voice,
the most natural way of interfacing with a machine!
A single speech library is supplied standard; text-to-speech modules for addi-
tional languages can further extend your system.
Bar code reading opens a world of new applications to IRISPen owners as
their pen scanner becomes an ergonomic, light-weight and compact bar code
scanner for the office environment. Information desks, marketing surveys, cus-
Page 5

V
USER'S GUIDE
tomer identification, order picking and many other examples of high accuracy
data entry can benefit greatly from this bar code reading solution.
Although all widespread bar code standards or “symbologies” are supported,
you don’t have to specify the bar code type: the user-friendliness is such that the
IRISPen automatically detects which bar code standard is used! The IRISPen
Executive offers transparant bar code reading into any Windows application. No
programming or parameter setting is involved in its operation, its use is automatic
and immediate.
You can even use a mixed reading mode where bar codes are read alongside other data - for instance “normal” text. The IRISPen “auto-detects” which
type of data is being read. For instance, you can scan address labels where the
printed data is complemented by a bar code without ever changing the reading
mode.
Encoding forms and labels can also benefit greatly from numeric handprinting
recognition. This proprietary recognition technology supports all natural writing
styles - American and European; contrary to many other handwriting recognition
solutions, no training phase or imposed style is required.
And there’s another reading capability added: recognition of dot matrix
printed documents. “Draft” or “9 pin” dot matrix symbols are made up of isolated, separate dots, and require highly specialized recognition routines to recognize them.
Advanced image adjustment features optimize the images for the OCR process: as the scanning brightness gets adjusted to the color tones of your documents, documents that are otherwise illegible can be recognized. “Despeckling”
removes “noise” from the scanned images, again resulting in higher OCR accuracy.
Finally, the multiline scanning mode increases the ease-of-use. It allows
you to scan several lines of text. All scanned data is temporarily “buffered” until
you press the pen button to “trigger” the output. This scanning mode also ensures
a natural prosody. When the speech synthesis has to pronounce individual text
Page 6

VI
lines, rather than full sentences, the intonation may be somewhat less than “human”.
HOW DOES THE IRISPEN WORK?
The pen-sized scanner functions as a greyscale camera that sends an image
to the computer. To recapture printed or typed information, you simply rule the
pen over a line of text. You start scanning as soon as you press the IRISPen onto
the paper; the scanned text is lit up by the scanner. As you scan the text, an
image consisting of intense points (so-called “pixels”) on a lighter background is
generated and transmitted to the PC.
When you stop scanning by lifting the pen from the paper, the software takes
over. Intelligent routines convert the greyscale images into black-and-white images. The text recognition software converts these images into editable characters and sends the recognized text promptly to the target application where it is
inserted at the current cursor position.
As you are operating a “hand-held” scanner, you will inevitably get wavy,
distorted images. The highly specialized character recognition software PCR-II
is nevertheless able to cope beautifully with this low-quality “material”.
This proprietary technology was designed specifically for pen scanners. It
allows real-time text recognition despite wavy, low-contrast and poor quality images containing highly distorted font shapes, and incorporates advanced image
processing techniques and unique artificial intelligence routines to this end.
TABLE OF CONTENTS
Introducing the IRISPen ..........................................................................................III
On to the IRISPen Executive! ...................................................................................IV
How Does the IRISPen Work?..................................................................................VI
Table of Contents .................................................................................................... VI
Credits and Copyrights.......................................................................................... XII
Page 7

VII
USER'S GUIDE
Chapter 1: Installation
System Requirements ................................................................................................1
What You See Is What You Get..................................................................................2
Installing the IRISPen Software..................................................................................2
Installing the IRISPen Hardware.................................................................................6
Uninstalling the IRISPen Software.............................................................................. 7
IRISPen “uninstall” program.................................................................................................................... 7
Windows (un)install wizard ....................................................................................................................... 8
Register to Vote! ........................................................................................................9
Getting Product Support .......................................................................................... 11
Getting in Touch with I.R.I.S. .................................................................................... 12
Chapter 2: Guided Tour
Having a Look at the Pen Scanner ..............................................................................1
Starting the Software up ............................................................................................3
Setting up the Necessary Parameters..........................................................................6
Reading Mode .............................................................................................................................................. 6
Language....................................................................................................................................................... 6
Translate to (IRISPen Translator) .......................................................................................................... 7
Bar Codes (IRISPen Executive) ............................................................................................................... 7
Dot Matrix (IRISPen Executive) ............................................................................................................ 7
Output Target .............................................................................................................................................. 7
Multilines (IRISPen Executive and Translator) ................................................................................... 8
About the Status Window... .......................................................................................8
... and the IRISPen Control on the Taskbar ..................................................................9
Putting Pen to Paper ..................................................................................................9
Acquiring Sleight of Hand ....................................................................................... 11
The IRISPen and Direct Image Scanning...................................................................16
Good OCR for Bad Images ....................................................................................... 19
The IRISPen is a Line Scanner .................................................................................. 21
Setting the Brightness ............................................................................................. 22
Black is Black and White is White ............................................................................ 30
Highlighting Excerpts .............................................................................................. 31
Reading Dot Matrix Documents ............................................................................... 32
Scanning Paragraphs ............................................................................................... 33
Isolating Text Efficiently .......................................................................................... 36
Scanning Multiple Lines .......................................................................................... 37
Page 8

VIII
Extracting Key Words ..............................................................................................37
Cut from Paper, Paste to Windows!©........................................................................ 39
Completing Databases ............................................................................................. 41
Add the Currency... or Drop It .................................................................................. 41
Of Rows and Columns ............................................................................................. 43
More Fun for Number Crunchers..............................................................................46
The Reading Pen... Even Speaks! .............................................................................49
The IRISPen Takes You around the World ................................................................ 50
The IRISPen Changes Languages As Needed .......................................................... 55
Unity is Strength .....................................................................................................56
The Law of Inertia....................................................................................................57
Restoring the Application to the Foreground ...........................................................59
More about the Pen Button ......................................................................................61
Getting On-line Help ................................................................................................ 64
Acquiring Upgrades ................................................................................................65
More about the IRISPen Executive............................................................................67
... and the IRISPen Translator ................................................................................... 70
Equipping Your IRISPen with Options ...................................................................... 72
Chapter 3: Read & Speak
Preparing for Speech Synthesis..................................................................................2
Repeating the Speech ................................................................................................3
A Word about Text to Speech ....................................................................................4
From Writing to Sounds ............................................................................................................................ 4
From Isolated Sounds to Real Speech ..................................................................................................... 6
Turning Speech Patterns into Sound Waves .......................................................................................... 7
Experiment to Learn! ..................................................................................................7
Learning More........................................................................................................... 7
Chapter 4: Bar Code Reading
How Does the IRISPen Work on Bar Codes? ..............................................................1
Preparing for Bar Code Reading .................................................................................3
Fine-tuning the Operation ..........................................................................................3
Reading Bar Codes alongside Other Data ...................................................................5
Scanning Tips ...........................................................................................................6
Good Reading of Bad Images .....................................................................................8
Page 9

IX
USER'S GUIDE
Setting the Brightness ...............................................................................................9
Adding Auditive Feedback ...................................................................................... 11
Which Bar Codes Can the IRISPen Read?.................................................................12
Learning More... ...................................................................................................... 14
Chapter 5: Handprinting Recognition
Preparing for Handprinting Recognition .....................................................................1
Handprinting or Handwriting?....................................................................................2
Fine-tuning the Operation ..........................................................................................3
A Word about the Technology ..................................................................................5
Mixing Handprinting and Other Data..........................................................................7
Adding Auditive Feedback ........................................................................................9
Learning More.........................................................................................................10
Chapter 6: Command Reference
IRISPen Application Window ....................................................................................1
Reading Mode .............................................................................................................................................. 3
Language....................................................................................................................................................... 5
Translate into (IRISPen Translator) ...................................................................................................... 8
Dot Matrix (IRISPen Executive) .......................................................................................................... 10
Bar Codes (IRISPen Executive) ............................................................................................................. 10
Output Target ............................................................................................................................................ 10
Multilines (IRISPen Executive - IRISPen Translator) ...................................................................... 11
Related Command ..................................................................................................................................... 12
IRISPen Control on Windows Taskbar ...................................................................... 12
Open ............................................................................................................................................................ 13
Greyscale Image ........................................................................................................................................ 13
Status Window ........................................................................................................................................... 13
Scan Test .................................................................................................................................................... 14
Help Topics ................................................................................................................................................ 14
Exit.............................................................................................................................................................. 14
Greyscale Image Window......................................................................................... 15
Status Window ........................................................................................................ 16
Translation Window (IRISPen Translator) ................................................................ 17
Toolbar ................................................................................................................... 18
Scan Test .................................................................................................................................................... 19
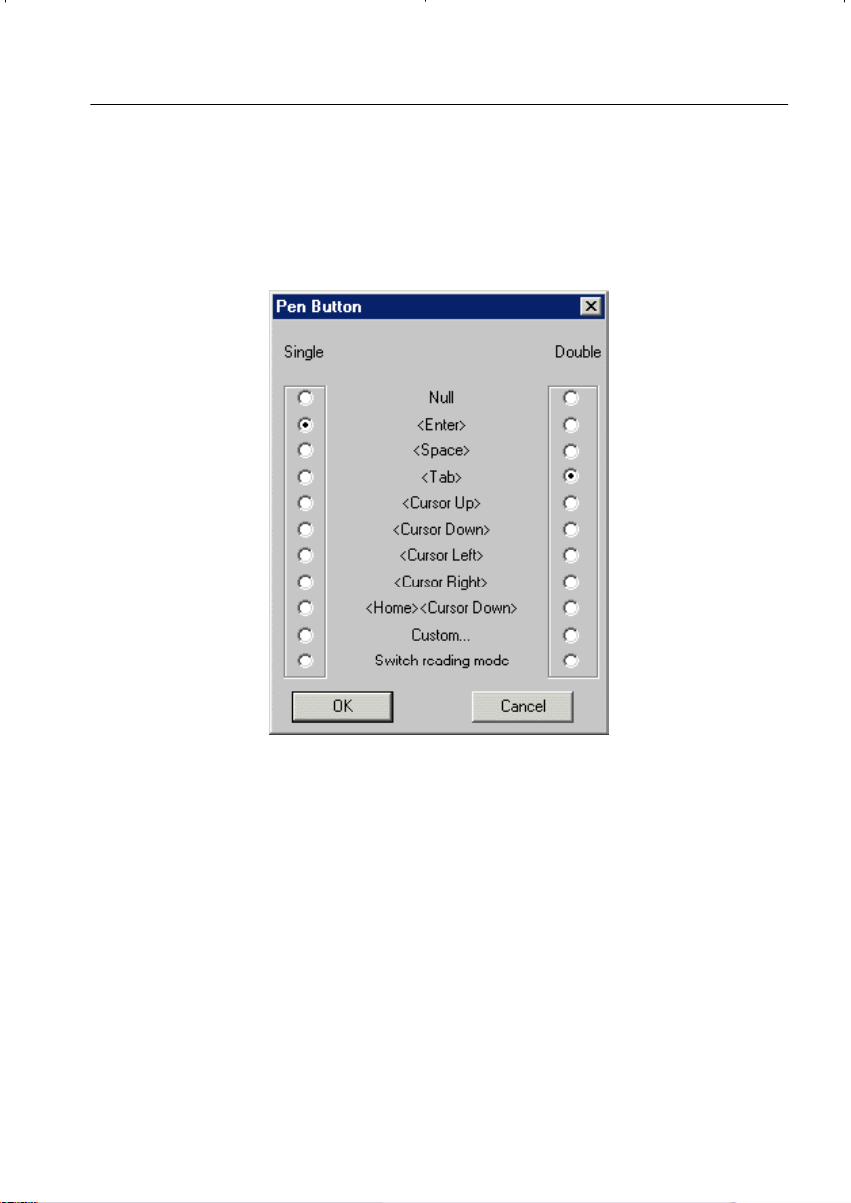
Pen Button ................................................................................................................................................. 22
Alignment .................................................................................................................................................. 26
Output Subset ............................................................................................................................................. 28
Bar Codes (IRISPen Executive) ............................................................................................................. 31
Page 10

Handprinting (IRISPen Executive) ....................................................................................................... 33
Speech (IRISPen Executive - IRISPen Translator) ............................................................................ 35
Sound ........................................................................................................................................................... 36
File Menu................................................................................................................ 37
Open Settings ............................................................................................................................................ 37
Save Settings .............................................................................................................................................. 38
Exit.............................................................................................................................................................. 40
Last Settings .............................................................................................................................................. 41
Settings Menu ......................................................................................................... 41
Hotkeys ...................................................................................................................................................... 42
Pen Button .................................................................................................................................................43
Alignment .................................................................................................................................................. 43
Table Frame Conversion ......................................................................................................................... 44
Character Conversion .............................................................................................................................. 45
Unknown Symbol ..................................................................................................................................... 46
Bar Codes (IRISPen Executive) ............................................................................................................. 46
Handprinting (IRISPen Executive) ....................................................................................................... 47
Output Subset ............................................................................................................................................. 47
Options Menu .........................................................................................................47
Scan Test .................................................................................................................................................... 47
Speech (IRISPen Executive and IRISPen Translator) ....................................................................... 47
Repeat Speech (IRISPen Executive and IRISPen Translator) ......................................................... 47
Sound ........................................................................................................................................................... 47
Left-Handed Scanning ..............................................................................................................................48
Negative Image ......................................................................................................................................... 48
Translate Clipboard (IRISPen Translator) .......................................................................................... 49
Greyscale Image ........................................................................................................................................ 49
Status Window ........................................................................................................................................... 50
Save Settings on Exit ............................................................................................................................... 50
Register Menu.........................................................................................................50
Registration Wizard.................................................................................................................................. 50
Upgrade.......................................................................................................................................................51
Help Menu .............................................................................................................. 56
Help Topics ................................................................................................................................................ 56
Product Support ........................................................................................................................................ 57
Contact I.R.I.S. ......................................................................................................................................... 58
I.R.I.S. on the Internet ............................................................................................................................ 59
About the IRISPen ....................................................................................................................................59
X
Appendix A: Product Description
IRISPen Product Range.............................................................................................. 1
System Requirements ................................................................................................2
IRISPen Standard ......................................................................................................3
Page 11

XI
USER'S GUIDE
IRISPen Executive......................................................................................................5
IRISPen Translator ....................................................................................................7
IRISPen for Banking World ........................................................................................9
IRISPen Options........................................................................................................9
Appendix B: Syntax Rules Speech Synthesis
American English Syntax Rules ..................................................................................2
Brazilian Syntax Rules ................................................................................................7
British English Syntax Rules .................................................................................... 11
Dutch Syntax Rules ................................................................................................. 16
French Syntax Rules ................................................................................................ 19
German Syntax Rules ............................................................................................... 23
Italian Syntax Rules ................................................................................................. 26
Mexican Spanish and Spanish Syntax Rules ............................................................. 28
Russian Syntax Rules .............................................................................................. 31
Appendix C: Bar Code Symbologies
Code 39 .....................................................................................................................1
Code 93 .....................................................................................................................3
Interleaved 2 of 5 .......................................................................................................4
Codabar ....................................................................................................................5
UPC-A ......................................................................................................................5
EAN-8 .......................................................................................................................6
EAN-13 .....................................................................................................................7
Code 128 ...................................................................................................................8
Appendix D: Handwriting and Form Design Rules
The writing is in the pen ............................................................................................1
Drop out means background ......................................................................................2
Don't stylize too much ...............................................................................................3
Loops opened and closed ..........................................................................................4
How to write ones......................................................................................................4
Avoid broken characters ............................................................................................5
Avoid retracing.......................................................................................................... 6
Page 12

XII
CREDITS AND COPYRIGHTS
The IRISPen, the IRISPen Executive and the IRISPen Translator software
were designed and developed by I.R.I.S. OCR and Linguistic technology by
I.R.I.S. I.R.I.S. detains the copyrights to the IRISPen software, the IRISPen
Executive software, the IRISPen Translator software, Read & Speak, the PBR
(“Pen Bar Code Reading”) technology, the PCR-II (“Pen Character Recognition”) technology, the PHR (“Pen Handprinting Recognition”) technology, the
linguistic technology, the on-line help system and this manual.
The I.R.I.S. logo, the IRISPen, PBR, PCR-II, PHR, I.R.I.S. Linguistic Tech-
nology and Read & Speak are trademarks of I.R.I.S.
The L & H logo and L & H Quality Speech are trademarks of Lernout &
Hauspie.
Excel, Outlook, Windows and Word are registered trademarks of Microsoft
Corp. Intel is a registered trademark of Intel Corp.
Page 13

1 - 1
USER'S GUIDE
Chapter 1
I NSTALLATION
This chapter discusses the system requirements and installation of the IRISPen,
the IRISPen Executive and the IRISPen Translator. The IRISPen consists of a
hardware component and a software package.
SYSTEM REQUIREMENTS
This is the minimal system configuration required to use the IRISPen:
q a 486 based Intel PC or compatible. A Pentium based PC is recom-
mended.
q 16 MB RAM.
q 50 MB hard disk space for the Standard software, 60 MB for the Ex-
ecutive software and 80 MB for the Translator software. Substract 10
MB when you leave the electronic manual on the CD-ROM.
q a 256 color monitor. It is recommended that you dispose of a 256 color
monitor to display the greyscale images generated by the pen scanner.
q the Windows ME, 2000 or 98 operating system.
q a free USB port to connect the IRISPen scanner.
The speech synthesis of the IRISPen Executive and the IRISPen Translator requires that your PC is equipped with a Windows compatible sound card.
For quality sound, preference is given to a 64-bit sound card. All Windows compatible audio cards are supported - Creative Labs SoundBlaster and compatibles
etc.
To install additional speech modules, 5 MB of free hard disk space is required per language. Ten languages are currently available: English and British
Page 14

1 - 2
English, Brazilian, Dutch, French, German, Italian, Mexican, Russian and Spanish.
To install additional translation pairs, 15 MB of free hard disk space is re-
quired.
Contact your computer reseller if necessary.
WHAT YOU SEE IS WHAT YOU GET
The IRISPen product package should contain the pen scanner, the IRISPen
CD-ROM, this manual, a registration card and a collection of IRISPen test sheets.
Contact your I.R.I.S. reseller if any items are missing from your package.
INSTALLING THE IRISPEN SOFTWARE
The IRISPen software is delivered exclusively on an autorunning CD-ROM .
To install, simply insert the CD-ROM in your CD-ROM drive and wait for the
installation program to start running. Follow the on-screen instructions.
Should the installation not begin to run when the CD-ROM is inserted in your
CD-ROM drive, run the setup program MENU.EXE to install the software.
Users of Windows 2000 must ensure that they have the necessary access
rights - contact the system administrator if necessary.
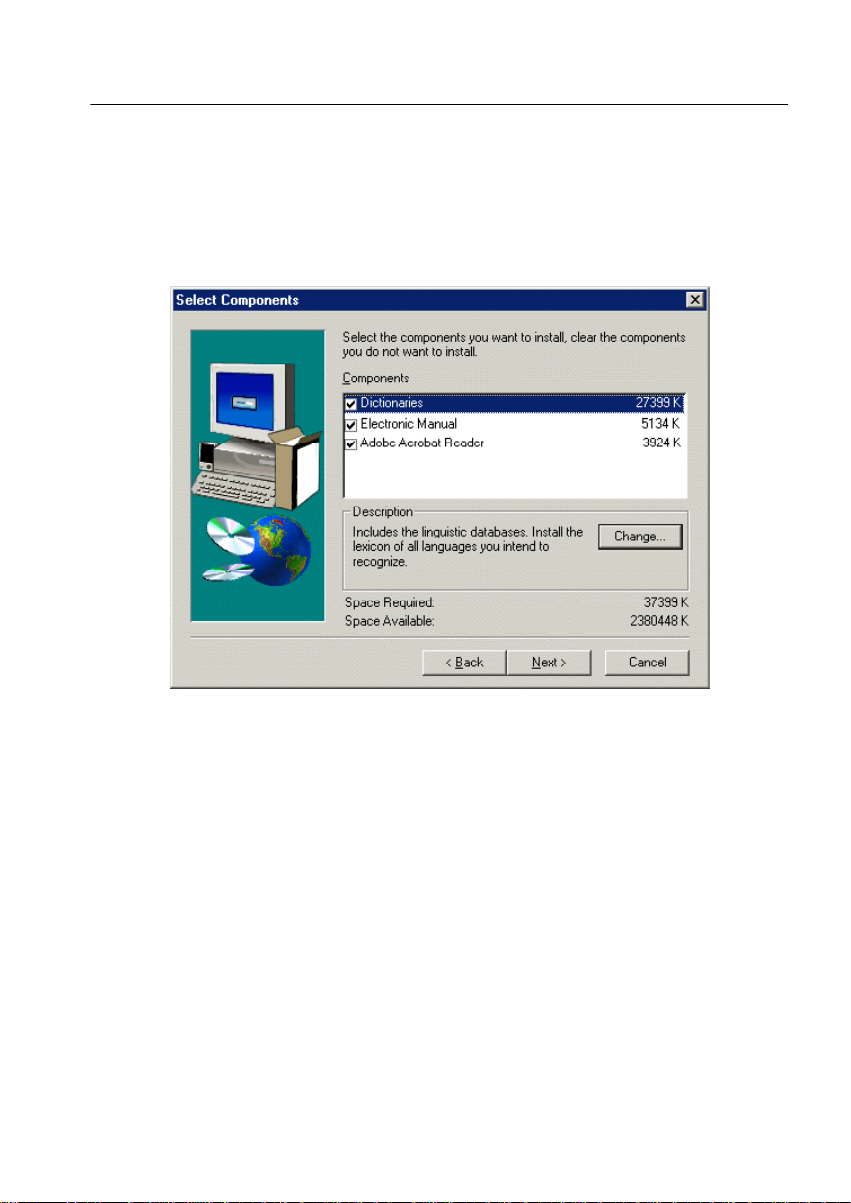
Some installation options are offered. Be sure to install the Acrobat Reader
software required to access the software documentation, should this be necessary. The electronic manual is by default copied to your hard disk. You can also
leave it on the CD-ROM.
Install the linguistic databases of all languages you intend to read. By de-
fault, all lexicons are installed.
Page 15
1 - 3
USER'S GUIDE
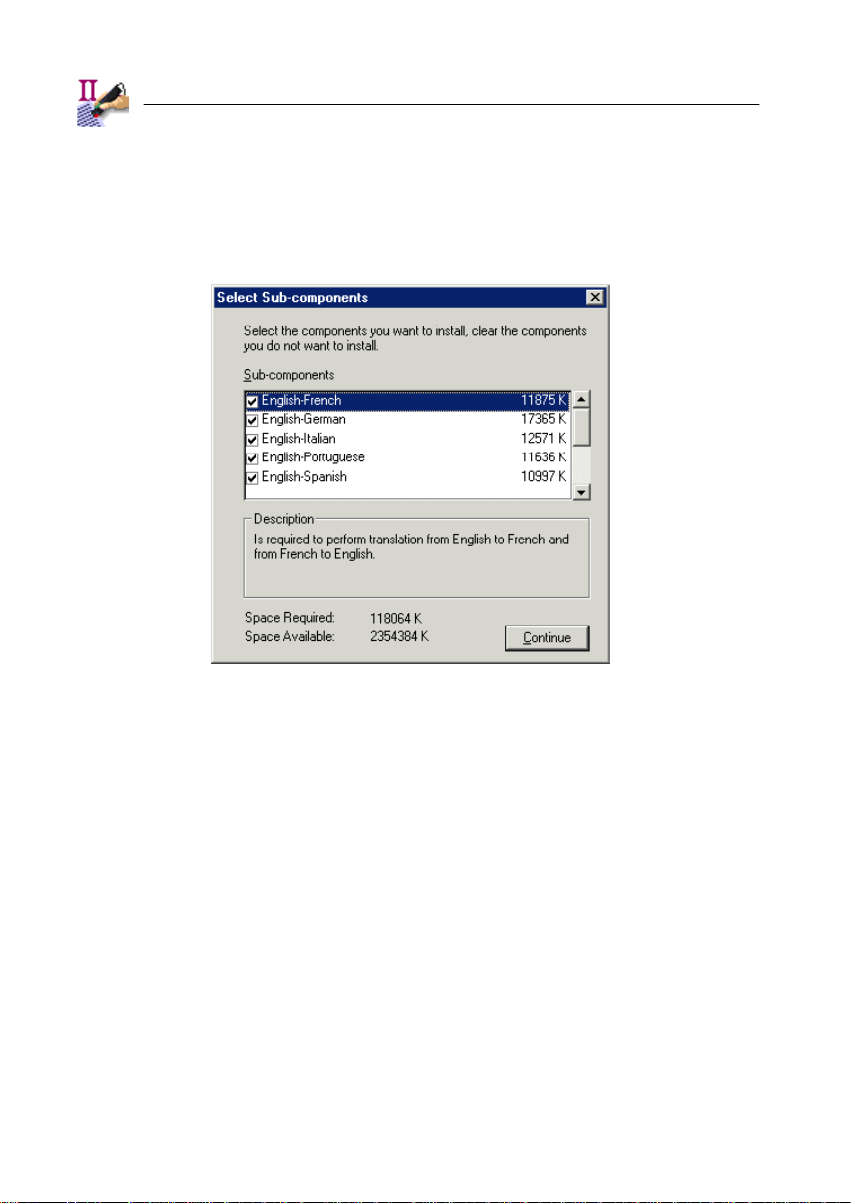
For the IRISPen Translator, you also have to select a language pair for the
bidirectional translation. For instance, the IRISPen Translator English-French
translates English into French and French into English. IRISPen Translator owners are entitled to one language pair. Extra language pairs can be purchased
separately from I.R.I.S.
Page 16
1 - 4
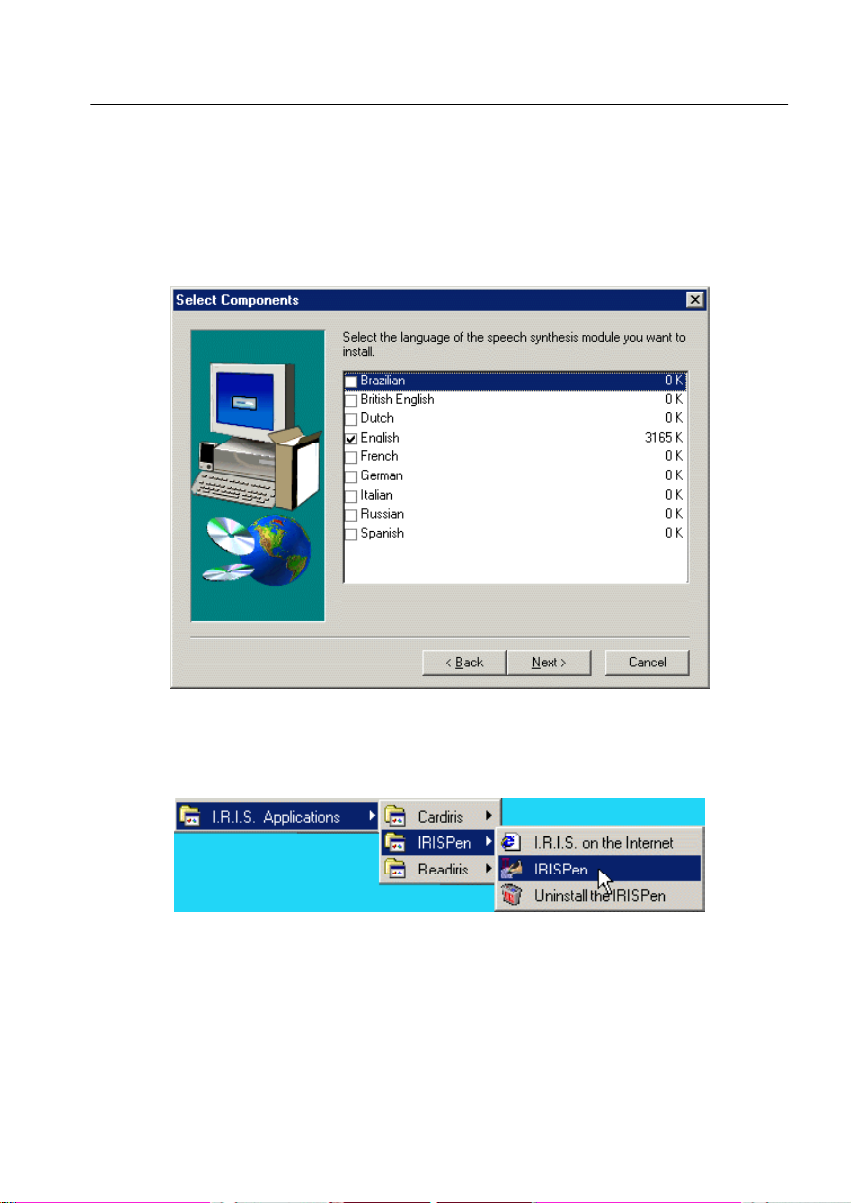
IRISPen Executive owners are entitled to one speech library of their choice;
hence, they will be invited to select the language of the speech synthesis. The
IRISPen Translator is equipped with the speech libraries of both languages in the
translation pair. Extra speech modules can be purchased separately from I.R.I.S.
Page 17
1 - 5
USER'S GUIDE
The submenu "I.R.I.S. Applications - IRISPen" under the "Programs" menu is
created automatically by the installation program.
The installation program also creates a shortcut for the IRISPen application
on the Windows desktop. As a result, you are able to start the IRISPen software
directly from your desktop.
Page 18

1 - 6
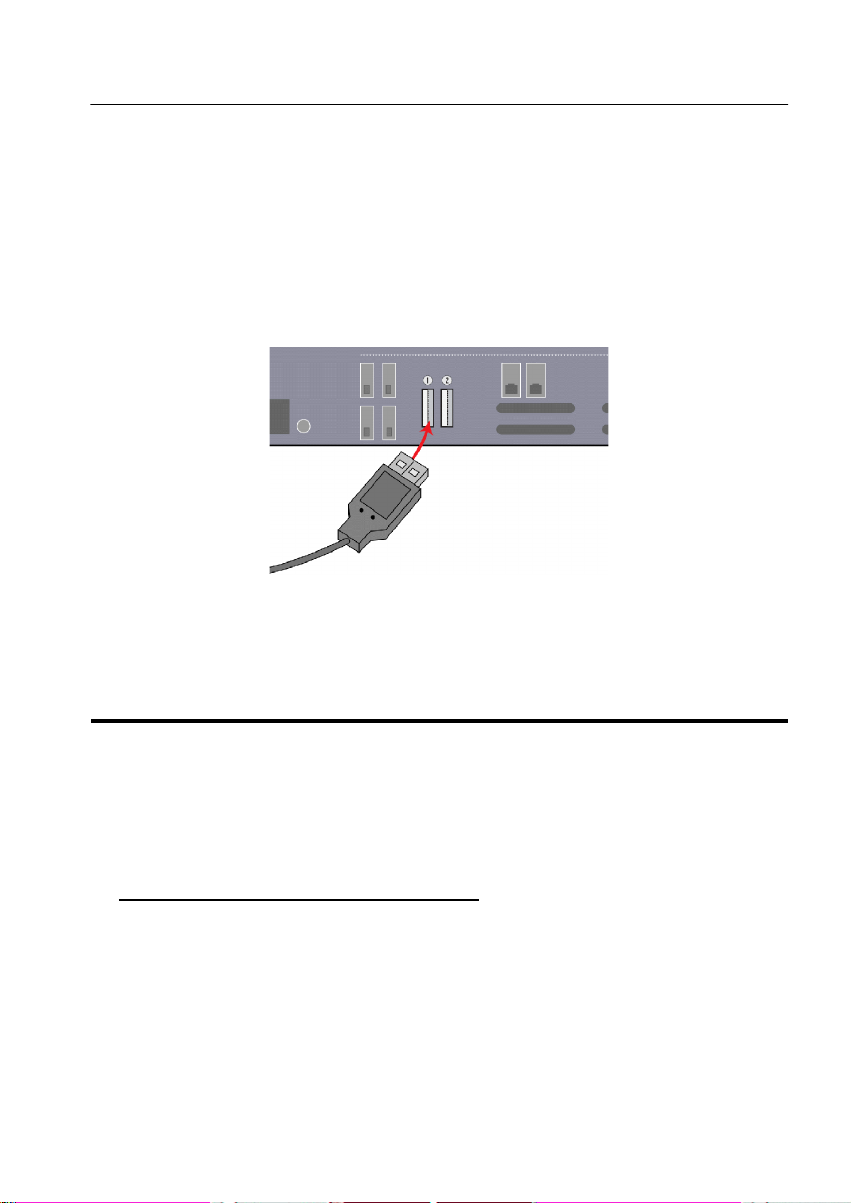
INSTALLING THE IRISPEN HARDWARE
The IRISPen uses a USB connection. Standard PCs are equipped with two
USB ports; this capability can be extended by installing a USB “hub” on your PC.
Note above all that USB support requires the operating system Windows ME,
2000 or Windows 98!
Secondly, you are recommended to install the software before the hardware:
as soon as you connect a USB device to your PC, the operating system starts
looking for appropriate drivers - which are installed automatically by the installation program.
Page 19
1 - 7
USER'S GUIDE
The hardware installation of the pen scanner couldn’t be easier: you can
“hot plug” the pen scanner into the PC’s USB port without having to reconfigure
or reboot your PC.
The use of the USB port also implies that no external power supply is required
for the pen scanner: the PC supplies the necessary power via the USB port!
UNINSTALLING THE IRISPEN SOFTWARE
There are only two correct ways of uninstalling the IRISPen: using the IRISPen
“uninstall” program and using the Windows (un)install wizard. You are strongly
recommended not to uninstall the IRISPen software or its software modules by
manually erasing the program files.
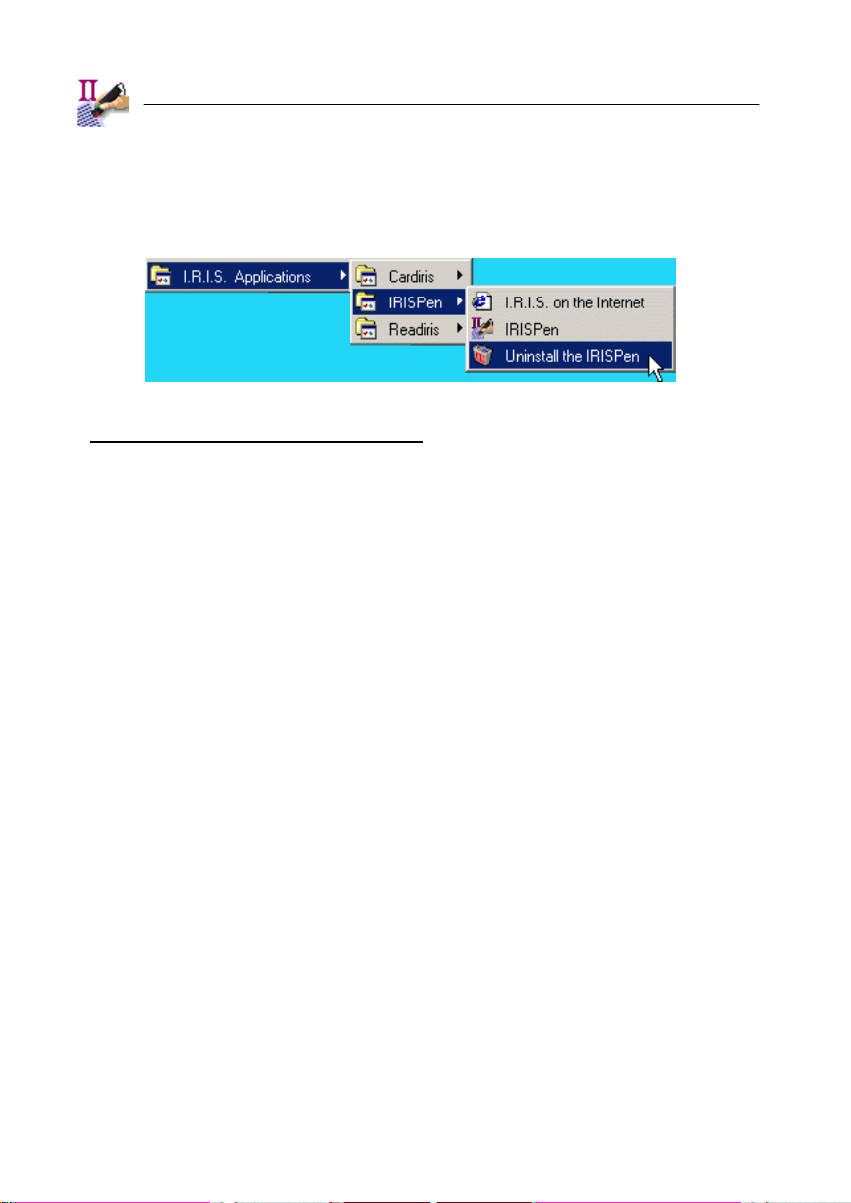
IRISPen “uninstall” program
Select "Uninstall IRISPen" under the submenu "I.R.I.S. Applications IRISPen" to start the IRISPen “uninstall” program and follow the on-screen instructions.
Page 20
1 - 8
Windows (un)install wizard
Execute the following steps to make use of the Windows (un)install wizard.
q Click "Settings" under the "Start" menu of Windows and go to the "Con-
trol Panel".
q Click the icon "Add/Remove Programs" under the control panel.
q The IRISPen is listed under the "Install/Uninstall" tab.
Page 21

1 - 9
USER'S GUIDE
q Select IRISPen and click the "Add/Remove" button to remove the
IRISPen software.
q Follow the on-screen instructions.
REGISTER TO VOTE!
Don’t forget to register your IRISPen licence! Doing so will allow us to keep
you informed of future product developments and related I.R.I.S. products. The
Page 22
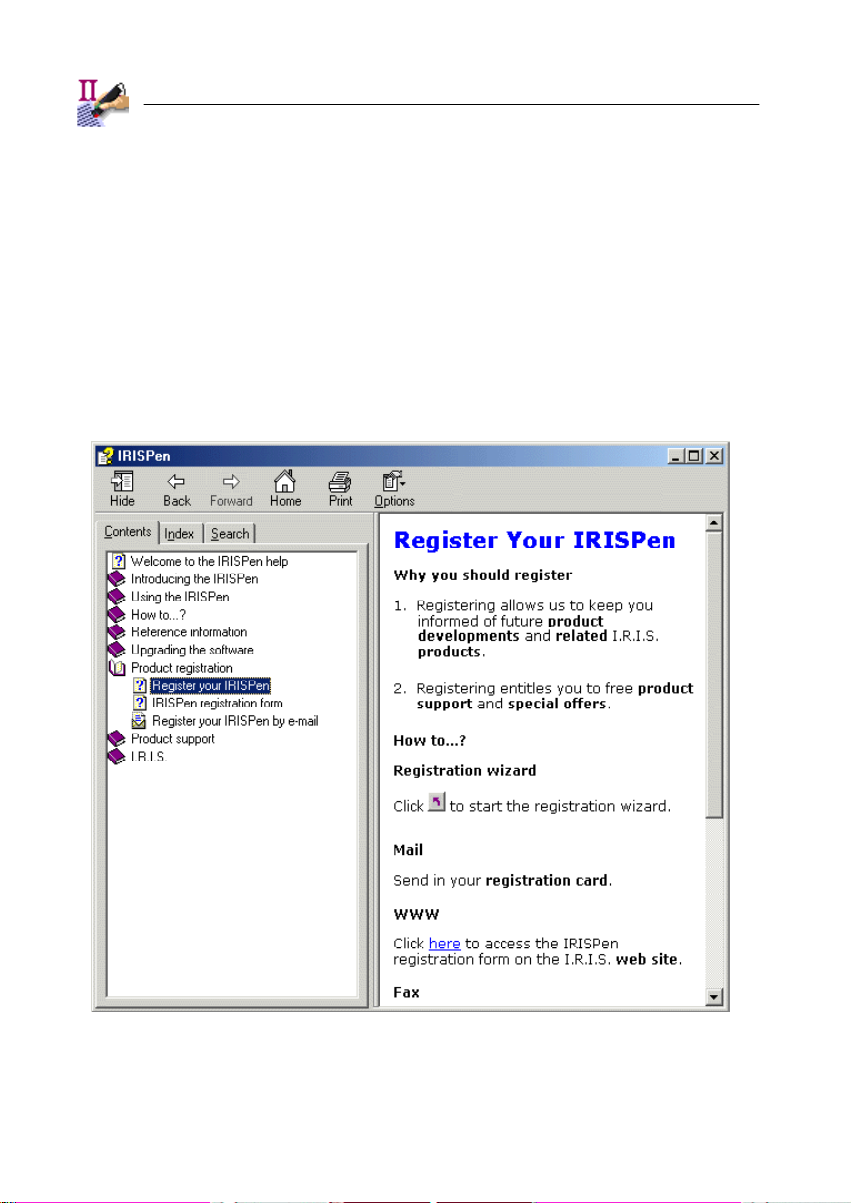
1 - 10
registration benefits, including free product support and special offers, are strictly
limited to registered users.
You can register in many ways: by sending in your registration card or faxing
its electronic counterpart, by calling I.R.I.S. during working hours and by filling
out a registration form on the I.R.I.S. web site!
Page 23

1 - 11
USER'S GUIDE
The IRISPen registration wizard as you’ll find under the menu "Register" of
the IRISPen software can guide you through the registration process comfortably.
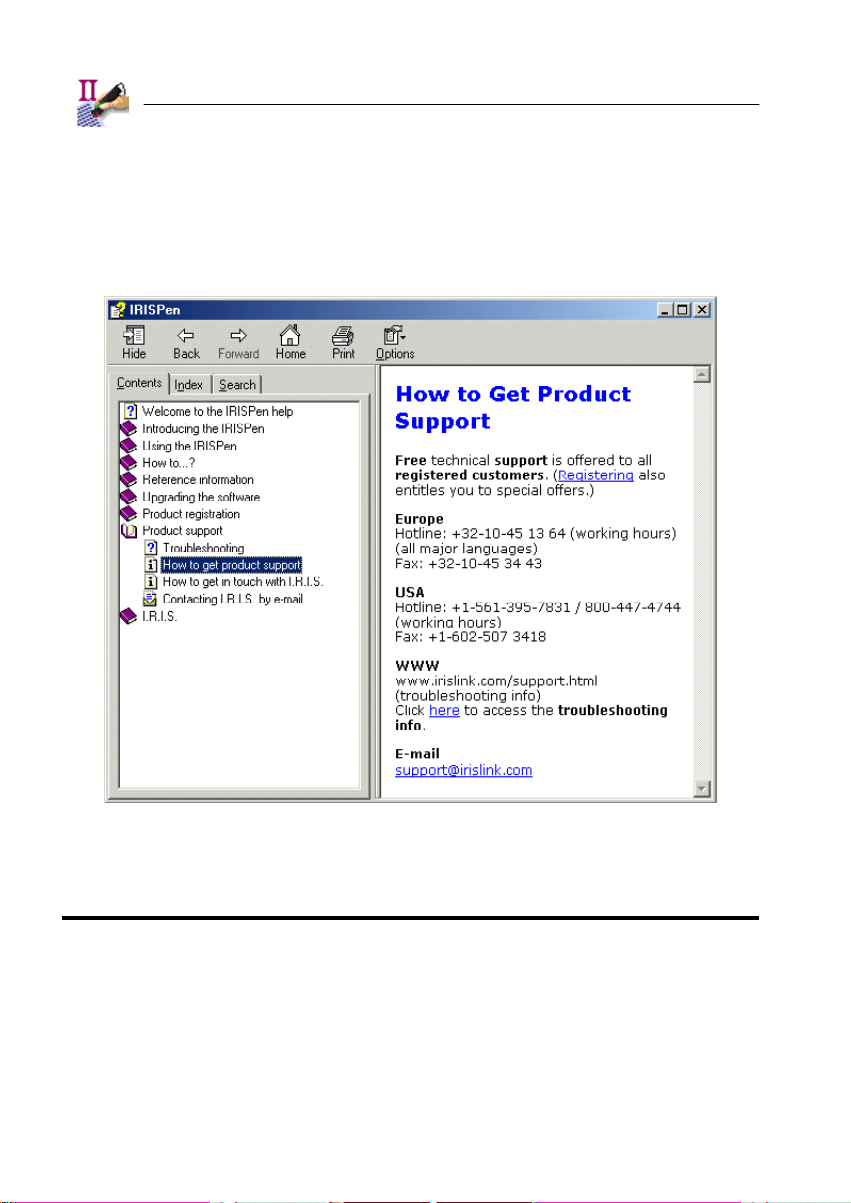
GETTING PRODUCT SUPPORT
The command "Product Support" under the "Help" menu of the IRISPen software details how you can get technical support. Please describe the phenomenon
you experience clearly and include all relevant data concerning your IRISPen
and your computer system.
Page 24
1 - 12
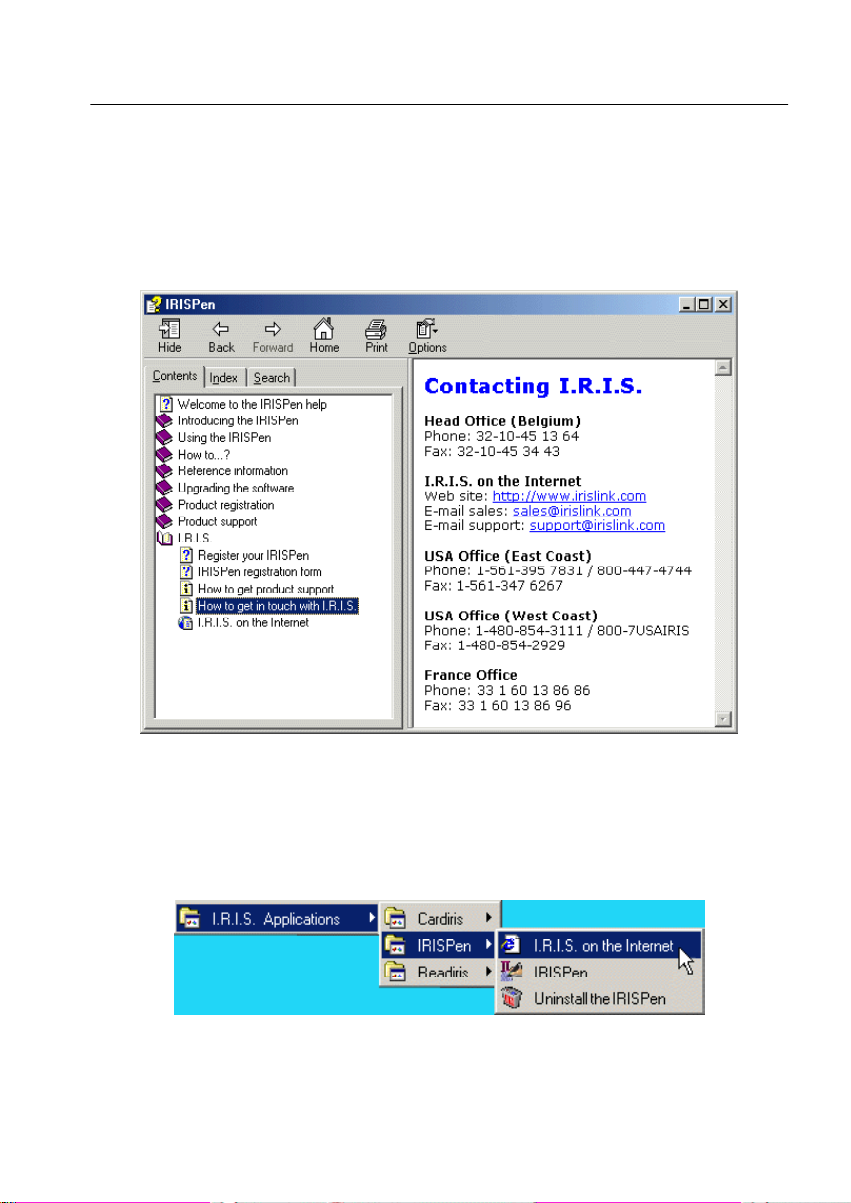
GETTING IN TOUCH WITH I.R.I.S.
You can contact I.R.I.S. to learn more about complementary software and
related products; the command "Contact I.R.I.S." under the "Help" menu of
IRISPen details in which ways you can get in touch with I.R.I.S.
Page 25
1 - 13
USER'S GUIDE
An application icon in the submenu "I.R.I.S. Applications - IRISPen" under
the "Programs" menu takes you directly to the I.R.I.S. home page. So does the
command "I.R.I.S. on the Internet" under the "Help" menu of the IRISPen software.
Page 26

1 - 14
Page 27

2 - 1
USER'S GUIDE
Chapter 2
GUIDED TOUR
The IRISPen is a sophisticated product equipped with many advanced features for professional applications. Although it is impossible to explore every imaginable application, we will discuss in this chapter the major applications and add
many tips and hints concerning the use of the IRISPen.
Let’s have a look at the pen scanner first. What should you know about the
hardware and how do you use it?
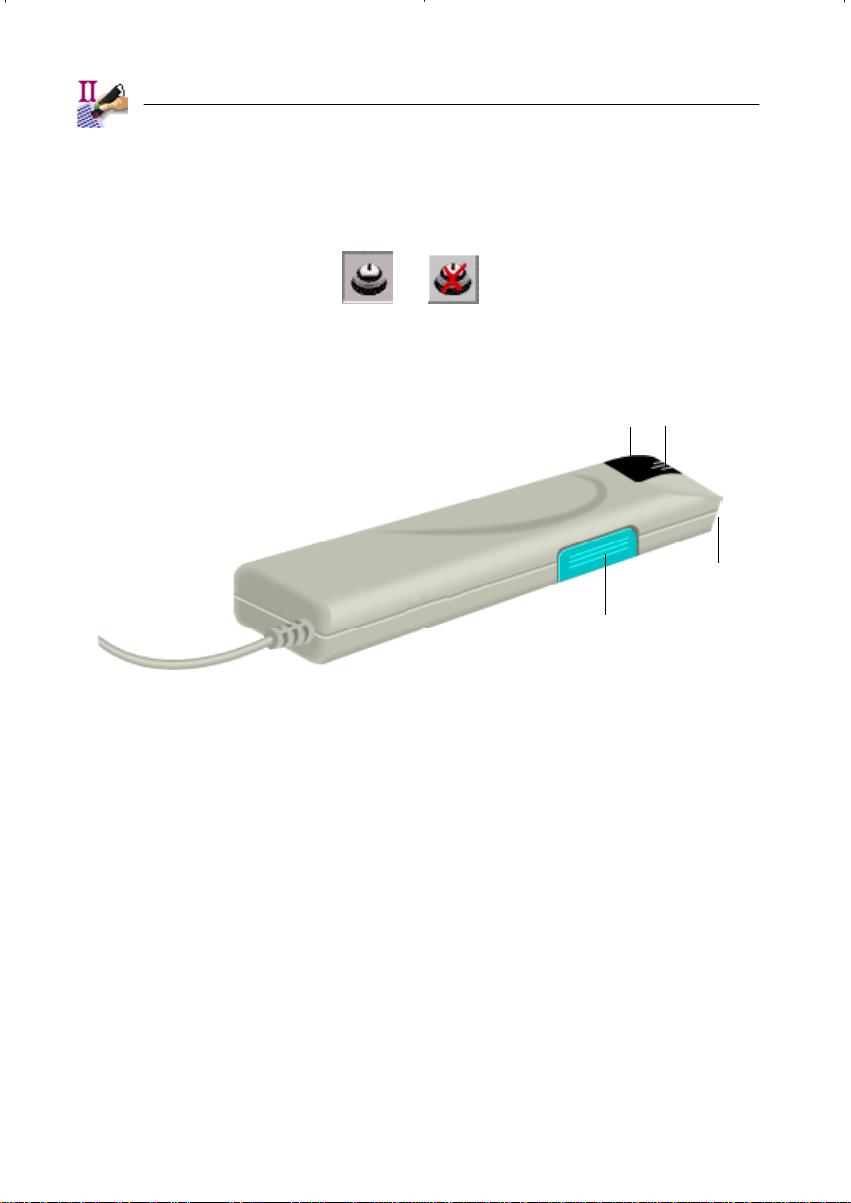
HAVING A LOOK AT THE PEN SCANNER
The IRISPen is equipped with a roller which functions as start switch: when
you press the IRISPen onto a piece of paper, you turn it on, when you lift the pen
scanner away, the scanning ends. (The start switch only comes on if you hold the
IRISPen at the correct angle.)
As you scan data line by line, you should always be able to see what you are
scanning. The view window allows this. As soon as the start switch is activated,
a red beam from the view window lights up the area you’re scanning.
The scanning can also be accompanied by sound: an option activates your
computer’s speaker when you start and stop scanning and when you send the
recognized text to the output target. So, you will hear three system beeps for
each scan.
Whether you do so, depends on the "Sound" button on the toolbar (or the
option "Sound" under the "Options" menu).
Page 28
2 - 2
This option is not compatible with the speech synthesis of the IRISPen Execu-
tive and the IRISPen Translator: you cannot produce system beeps and pronounce the recognized text at the same time!
View Window
Pen Button
Line Guide
Start Switch
The line guide on the view window helps you scan accurately. Steady scan-
ning not only improves the recognition but is specifically useful when you want to
read text with limited interline spacing. The line guide allows you to isolate the
correct information: the IRISPen recognizes the text line closest to the line guide.
The pen button is a programmable command button: when you press the
button, you can execute a keyboard command, for instance <Enter>, add characters such as "$" etc. As you are scanning, you can execute necessary keyboard
commands directly with your IRISPen. As is the case with a computer mouse,
the single and double-click of the pen button correspond to different commands.
Page 29
2 - 3
USER'S GUIDE
ST ARTING THE SOFTWARE UP
So much for the pen scanner. Let’s get started with the software: now that we
have installed the IRISPen system, we want to start scanning text into our applications.
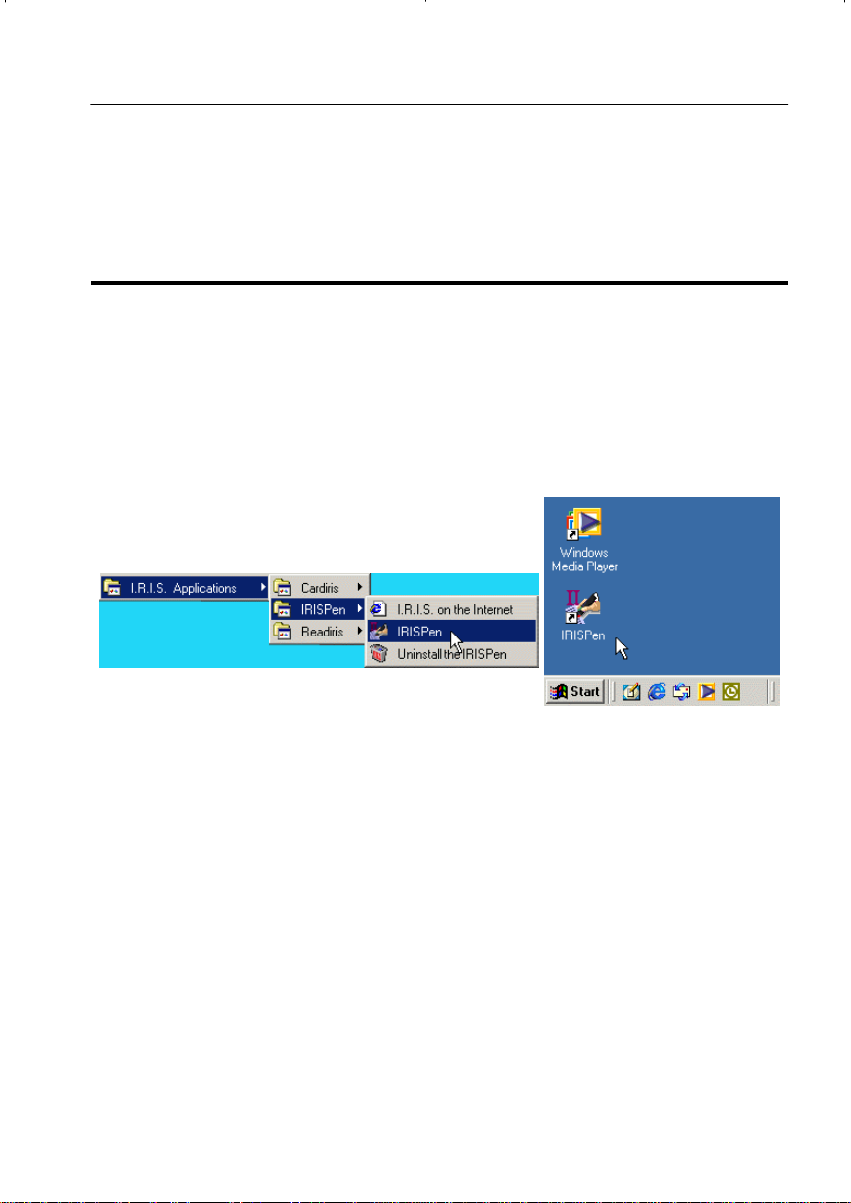
To start the IRISPen software, click on the IRISPen application in the submenu
"I.R.I.S. Applications - IRISPen", or use the shortcut created by the installation
program on the Windows desktop.
The IRISPen startup screen appears for a few seconds. It displays the version and copyrights of the IRISPen software. It also gives direct access to the
I.R.I.S. home page - simply click on the URL www.irislink.com to visit the
I.R.I.S. web site.
Page 30

2 - 4
Next, the IRISPen application window and two additional windows, the
(greyscale) image window and the status window, are displayed.
Page 31

2 - 5
USER'S GUIDE
We’ll concentrate on the IRISPen application window first. It consists of three
parts: the menu bar comprises all software commands, the toolbar gives quick
Page 32

2 - 6
access to all frequent commands and the window pane contains the basic settings.
SETTING UP THE NECESSARY PARAMETERS
Let’s have a look at the basic IRISPen settings in the application’s window
pane.
Reading Mode
Determines the reading mode: alphanumeric, bar codes, black-and-white bitmap
to clipboard, greyscale bitmap to clipboard, handprinting and numeric. The options "Bar Codes" and "Handprinting" are limited to the IRISPen Executive.
Select "Alphanumeric" for the time being.
Language
Indicates the language of the text you want to recognize. The IRISPen sup-
ports no less than 55 languages!
Select "English" for now.
Page 33
2 - 7
USER'S GUIDE
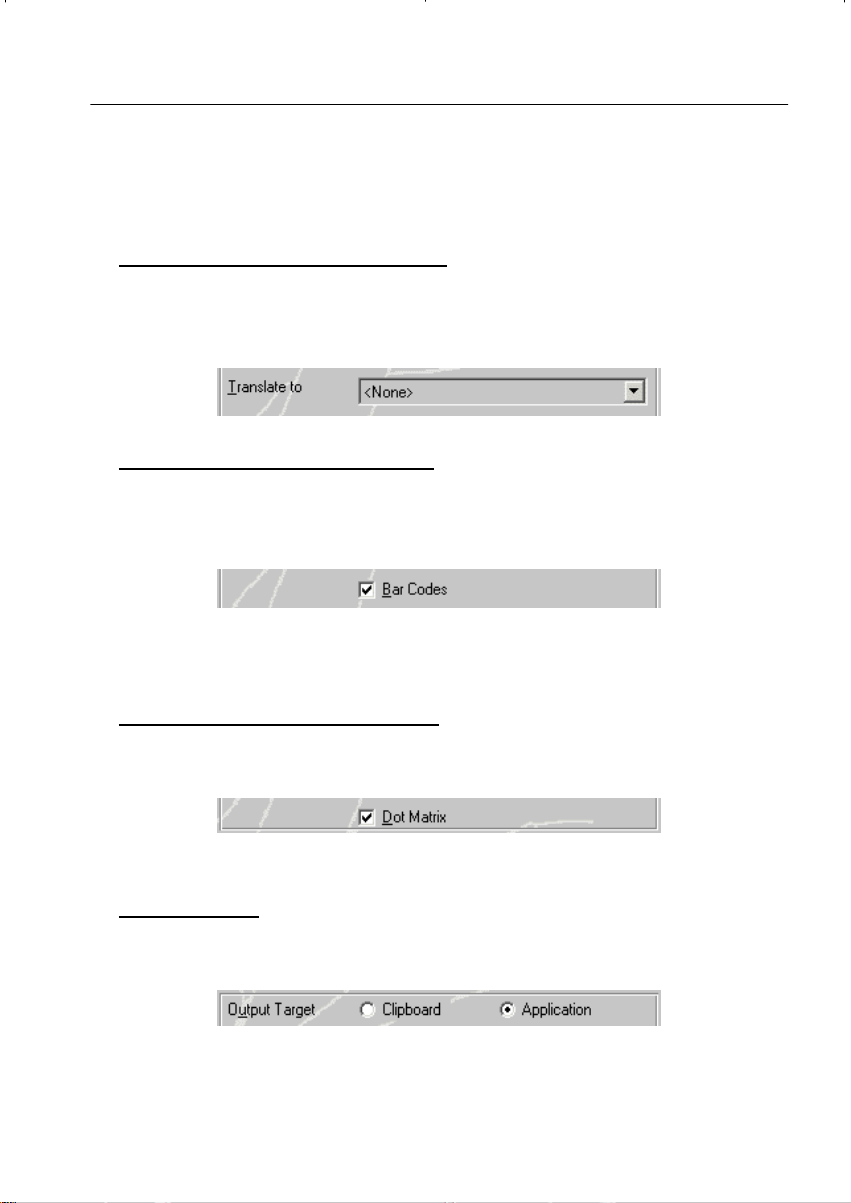
Translate to (IRISPen Translator)
Indicates the target language of the translation: you scan for instance English
text and translate it into French. Sentence translation is obviously limited to the
IRISPen Translator.
Bar Codes (IRISPen Executive)
Enables a mixed reading mode where bar codes are read alongside other
data. The parameter "Reading Mode" sets the primary reading mode, this option
determines whether you read bar codes at the same time.
Simultaneous bar code reading is limited to the IRISPen Executive.
Leave this option disabled for the time being.
Dot Matrix (IRISPen Executive)
This option determines whether you are recognizing “normal” or dot matrix
printed documents. Dot matrix recognition is limited to the IRISPen Executive.
Leave this option disabled for the time being.
Output Target
The recognized text can be inserted directly in the active application or transferred to the clipboard for later pasting.
Obviously, the clipboard can only contain the recognized text of the last scan!
A Windows application is mostly on the receiving end. Select "Application"
here.
Page 34

2 - 8
Multilines (IRISPen Executive and Translator)
The option "Multilines" sees to it that multiple lines are “buffered” before they
get inserted in the target application. You can for instance send an entire paragraph to your Windows application at once. It takes a click on the pen button to
“flush” the scanned text.
This option is limited to the IRISPen Executive and the IRISPen Translator.
ABOUT THE STATUS WINDOW...
The basic settings are displayed in the IRISPen status window. Minimally,
this window lists the reading mode, the selected language and the output target.
The status window also indicates more advanced settings: whether the dot
matrix reading is enabled and whether the simultaneous bar code reading is active.
For the IRISPen Translator, the translation direction is indicated. You translate
for instance English text into French.
Whether the status window is displayed or not depends on the option "Status
Window" under the "Options" menu. It is enabled by default. Don’t hesitate to
drag the status window to another position on the screen!
Page 35

2 - 9
USER'S GUIDE
Click the "OK" button to minimize the IRISPen application; clicking the "Minimize" button in the upper right corner amounts to the same thing. The IRISPen
application now runs in the background.
... AND THE IRISPEN CONTROL ON THE TASKBAR
The Windows taskbar confirms that the IRISPen application is running: you’ll
find the IRISPen control on the Windows taskbar!
The IRISPen control indicates whether the pen scanner is available - if it is
detached from your USB port, the Windows taskbar will indicate this.
You can call up some frequent commands by right-clicking the IRISPen control: amongst others, you can restore the IRISPen application, enable the status
window and the greyscale image viewer. More about the greyscale image viewer
shortly.
PUTTING PEN TO PAPER
Start WordPad or another text-based application. Keep your I.R.I.S. test sheet
to hand.
Page 36

2 - 10
Hold the IRISPen like a pencil. When you press the pen scanner onto the
paper, you activate the start switch and the data you want to scan is illuminated
through the view window by a red light. The design of the IRISPen is such that
the start switch only comes on when you hold this device at the correct angle.
Rule the IRISPen over a text line of the I.R.I.S. test sheet at a steady rate. As
soon as you lift the IRISPen, the recognized, editable text appears in your text
editor or text application.
Left-handed users can adapt the scanning direction for optimal comfort. By
default, the pen scanner is operated from left to right, but when you enable the
option "Left-Handed Scanning" under the "Options" menu, you can slide the
IRISPen in a right-to-left direction.
This only works when you hold the pen scanner rotated by 180° so that the
pen button faces towards you, while the document itself retains its normal orientation! The software “compensates” the scanning direction by rotating the image
by 180°.
(Alternatively, when you rotate the page and the pen scanner by 180°, you
can disable the option "Left-Handed Scanning" and still scan right-to-left.)
Try to maintain a straight line and constant speed during your scan. The more
regularly you scan, the better the recognition result will be.
Page 37

2 - 11
USER'S GUIDE
You can scan some 3.15" (8 cm.) per second. When you scan too fast, image
information gets lost, and the status window blinks for a few seconds inviting you
to scan slower.
The IRISPen reads the text line directly under or closest to the line guide.
Lift the IRISPen to stop scanning. As soon as you do, the recognition software
analyzes the image and the scanned text appears instantly in the output target.
You now have editable characters in your text editor.
ACQUIRING SLEIGHT OF HAND
During the first scans, you may not be satisfied with your results. This is
undoubtedly because you do not scan comfortably. For some users, the IRISPen
takes a little getting used to.
The greyscale image window and the scan test mode allow you to see the
image you generate by scanning. Use these viewers to judge the quality of the
images you produce and improve your scanning skills.
Let’s start with the greyscale image window. This small window displays
the “raw” greyscale images as they are generated by the pen scanner. Let’s not
forget that the IRISPen is the first greyscale pen scanner!
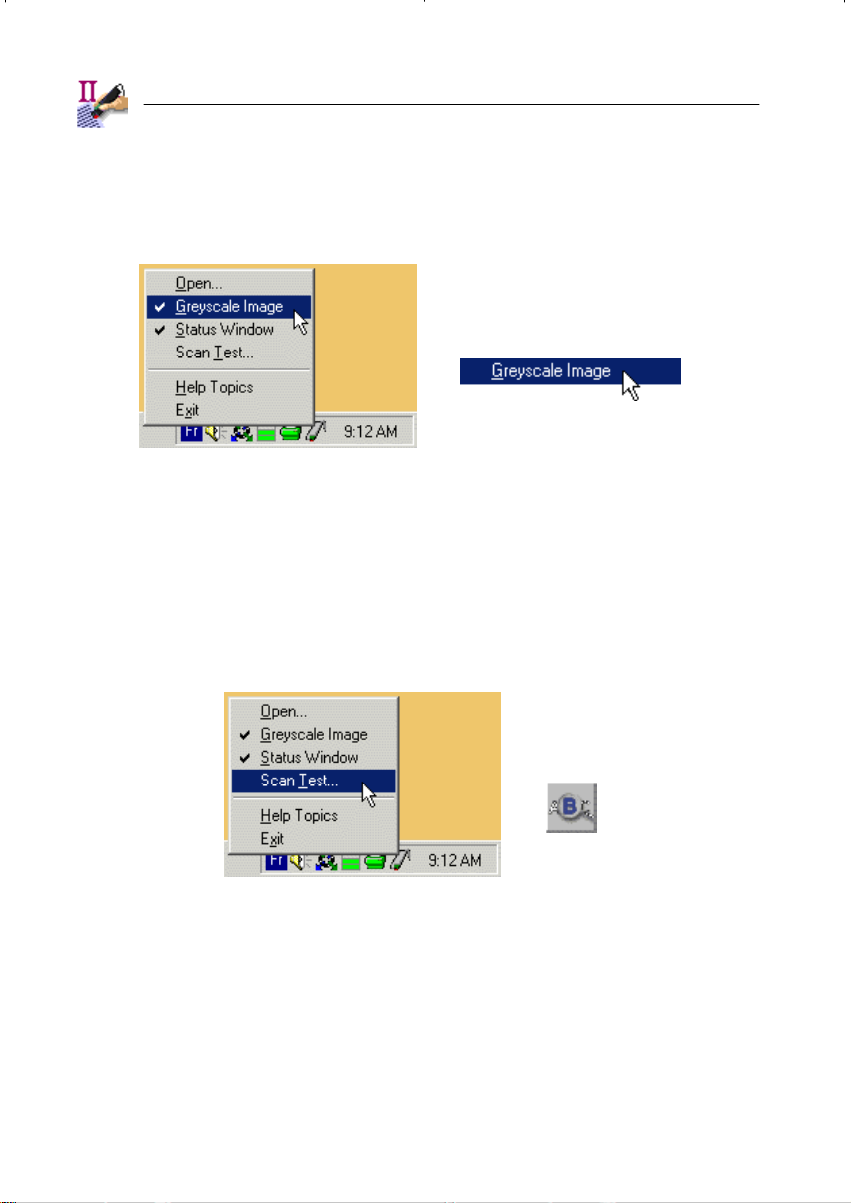
This window is enabled by default; you can activate it by right-clicking the
IRISPen control on the Windows taskbar and selecting the command "Greyscale
Image", and you can select the command "Greyscale Image" under the "Options"
menu of the IRISPen software. Click the close button to close it.
Page 38
2 - 12
As is the case for the status window, you shouldn’t hesitate to drag the status
window to another position on the screen. (The position of the status window and
greyscale image window are maintained when you save the default settings.)
To access the scan test window, right-click the IRISPen control on the Win-
dows taskbar and select the command "Scan Test". Or select the "Scan Test"
button on the IRISPen toolbar or even the command "Scan Test" from the "Options" menu of the IRISPen software.
The image you generate will now be displayed in conjunction with the recog-
nized data. The scan test window displays a black-and-white version of the
scanned image, while the image window displays the actual - greyscale - scan.
Page 39

2 - 13
USER'S GUIDE
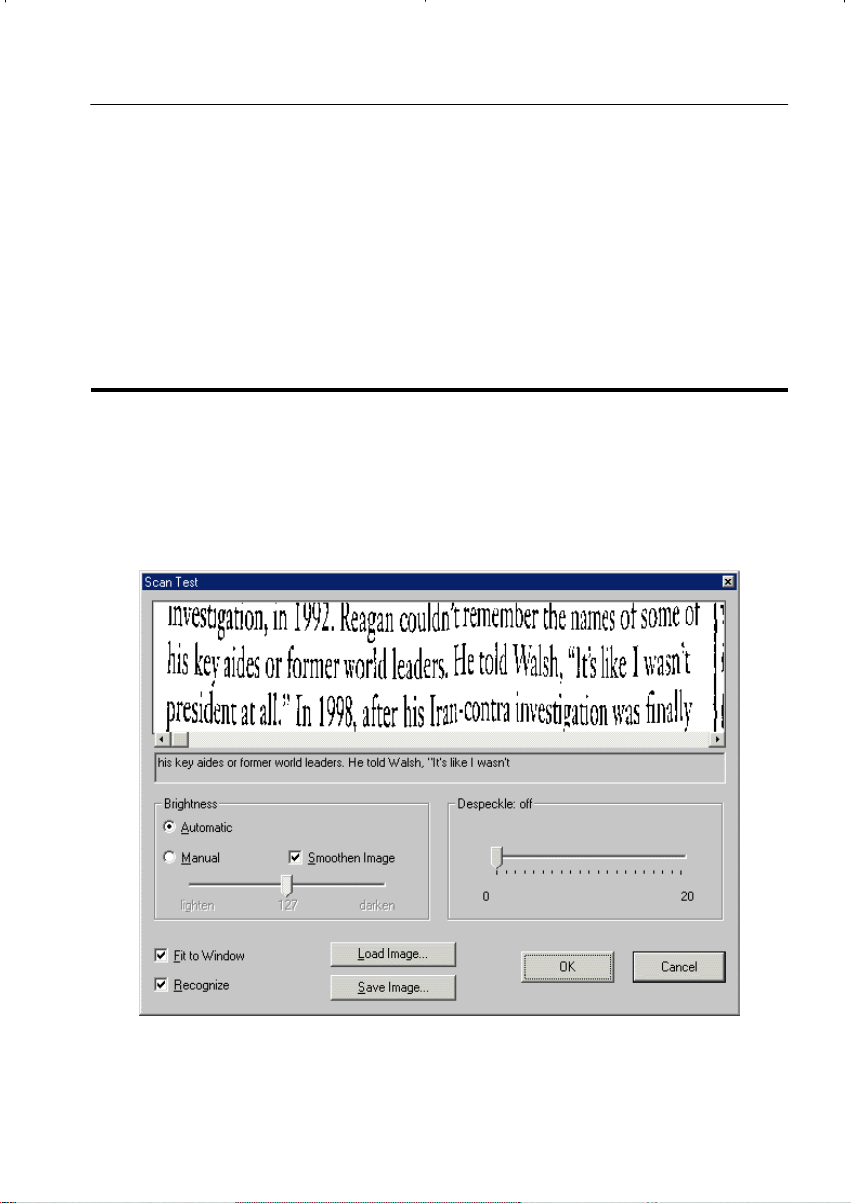
The option "Fit to Window" ensures that the entire image is displayed in the
scan test window, whatever the length of the scanned line may be.
This option is enabled by default. With this option disabled, the image isn’t
compressed horizontally when the scanning is completed. Use the scroll bar to
display various parts of the image successively. The example below offers an
illustration: a long line was scanned as the recognized text indicates, nevertheless
only a small portion of the image is displayed.
Page 40

2 - 14
The line length is limited to 12" (30.5 cm.) per scan. The pen scanner simply
shuts down when you scan a longer line.
When the scanned line is very long, you may have to scroll to display the
recognized text entirely. Place the cursor in the text zone and press the End key
to go directly to the end of the recognized text; press Home to return to the
beginning.
Page 41

2 - 15
USER'S GUIDE
To obtain an optimal image, slide the pen smoothly and evenly over the paper.
Do not lift the IRISPen away from the paper, as this ends your scan. These are
not unrealistic conditions. Acquire some experience with your IRISPen and all
will come naturally; you can use the I.R.I.S. test sheets to get some training.
Once you have developed the necessary “sleight of hand”, the agility of the
IRISPen is such that you can scan text from books, bottles etc., very much like
you use a bar code reader. This kind of flexibility cannot be obtained with a
sheetfed or flatbed scanner!
As soon as you have to scan text from physical, non flat objects, the IRISPen
offers a unique solution. The IRISPen as a “3D” OCR product, you might say...
Or you could call the IRISPen the first true handy scanner!
Page 42
2 - 16
THE IRISPEN AND DIRECT IMAGE SCANNING
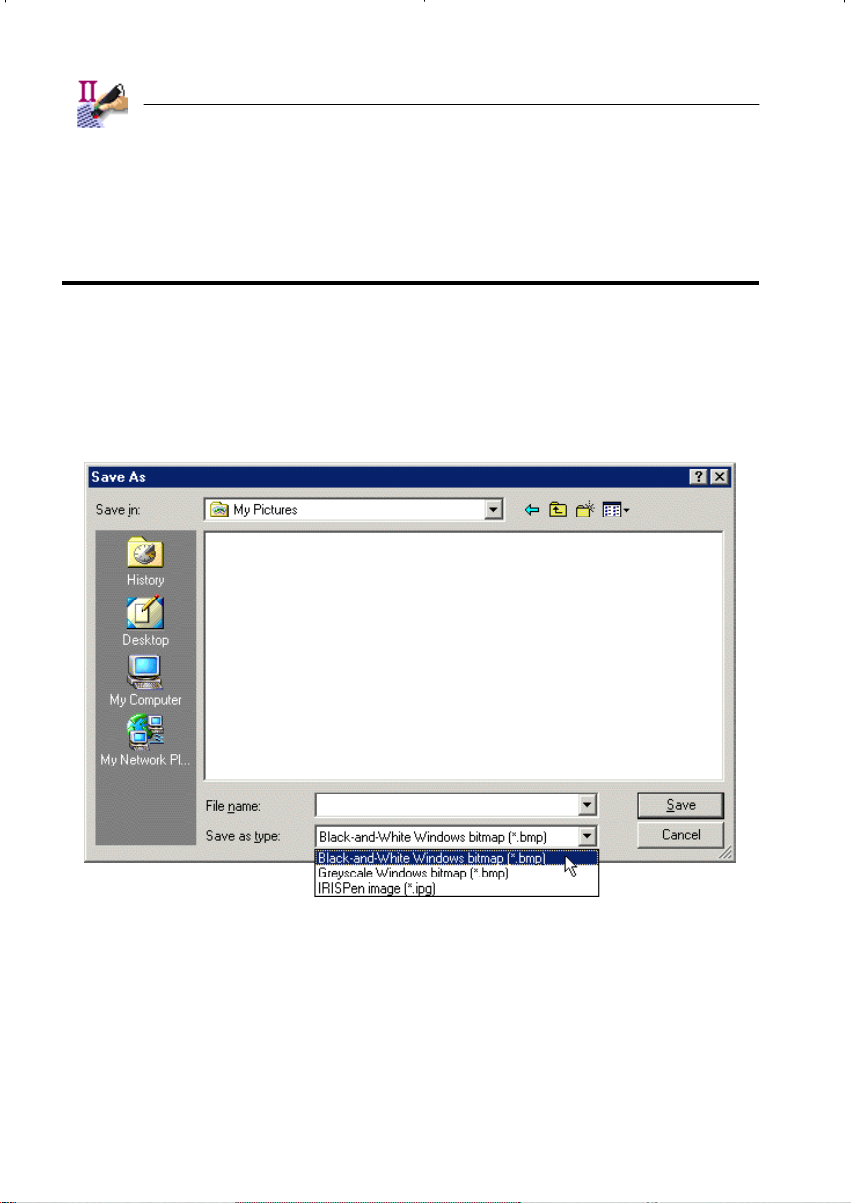
Clicking the button "Save Image" saves the scanned image in a graphic file.
Three file formats are available: black-and-white and greyscale Windows bitmaps
(BMP) and a proprietary black-and-white graphic format called "IRISPen image". IRISPen graphics should be used for diagnostic purposes only.
Windows bitmaps can also be used to save images: use them to scan small
graphics such as logos, signatures etc.
Page 43

2 - 17
USER'S GUIDE
Bitmaps and IRISPen graphic files can be loaded into memory with the button
"Load Image".
The option "Recognize" sees to it that all images you scan or open are recognized. (When the scan test mode is used to save graphics instead of scanning
data, you can disable this option: scanning a graphic, the IRISPen software won’t
find any text anyway. When the reading mode "Black-and-White Bitmap to Clipboard" or "Greyscale Bitmap to Clipboard" is selected in the IRISPen application
window, the option "Recognize" is replaced by the option "Bitmap to Clipboard".)
Enabling the scan test mode and saving the image in a Windows bitmap is just
one way of saving small graphics. The IRISPen software offers a much directer
way of inserting such graphics in your documents. You don’t have to save the
image in a file which you insert in your document later on; using the Windows
Page 44

2 - 18
clipboard, you can paste it directly in your application. On the down side, you
cannot retouch the contents of the clipboard!
Select the reading mode "Black-and-White Bitmap to Clipboard" or "Greyscale
Bitmap to Clipboard" in the IRISPen application window for direct image scan-
ning. (Note that you can no longer select an output target now!) Place the text
cursor in your Windows application and scan the graphic. A blinking status window will display the message "Image in Clipboard" for a few seconds to indicate
that the image has been copied to the clipboard.
Execute a paste operation to insert the image in your document. You can now
resize the graphic, move or align it etc. Is there a simpler way of inserting logos,
signatures, handwritten annotations etc. in faxes and letters?
Page 45

2 - 19
USER'S GUIDE
GOOD OCR FOR BAD IMAGES
Back to text! Although we rightly emphasized the importance of steady scanning, it should be noted that the OCR software is very powerful. Given the unstable scanning by the human hand holding a greyscale pen scanner, the recognition technology has to cope with images of very bad quality.
Page 46
2 - 20
The greyscale image window allows you to see exactly how bad the image
quality can be. Colors are a first factor - think of low-contrast documents where
the background virtually has the same color as the text. Furthermore, the images
can be highly distorted: wavy and skewed lines, contracted, stretched and rotated
characters the “raw” material the IRISPen has to process.
Page 47
2 - 21
USER'S GUIDE
So, the IRISPen offers OCR at its best: the unique PCR-II technology PCR is short for “Pen Character Recognition” - executes character recognition
despite every handicap imaginable.
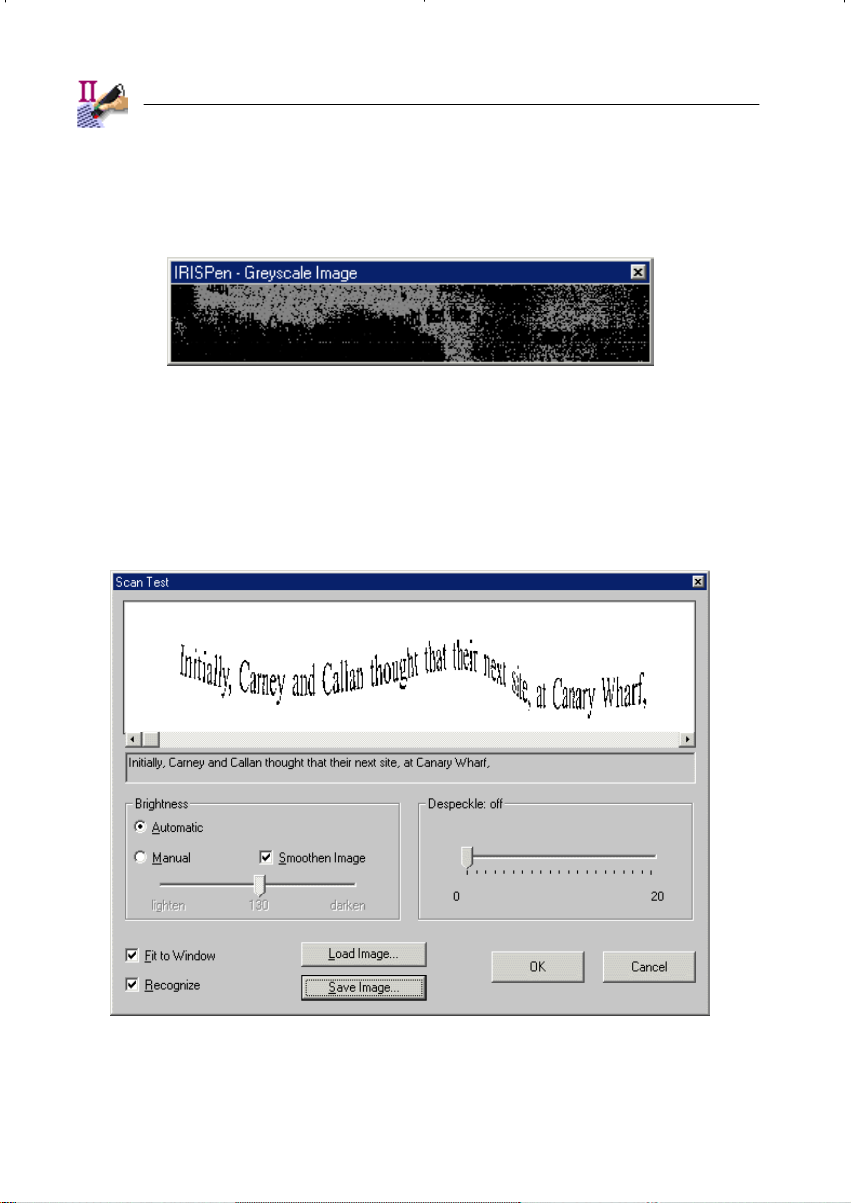
THE IRISPEN IS A LINE SCANNER
The greyscale image and the scan test windows illustrate another characteristic of the IRISPen, central line tracking . It is an essential feature: although
you scan strokes of about 0.4" (1 cm.) high, containing in many cases several
lines of text, the IRISPen recognizes only a single line of text per scan.
In the above example, we have scanned with a single stroke two complete
lines and the major part of a third line. Another column separated by a gutter line
Page 48

2 - 22
starts on the right side. The IRISPen isolates the correct visual information without any help.
The IRISPen software automatically picks up the “central” line, that is the line
directly under or closest to the line guide on the pen scanner. Where the interline
spacing is reduced, the line guide on your pen scanner’s view window helps you
select the correct information.
The scanning height of about 0.4" (1 cm.) explains why you are limited to
character sizes of 22 point: bigger characters are simply cut when you scan
them. The IRISPen reads point sizes of 8 to 22 point (0.11 to 0.31" or 0.28 to
0.78 cm.).
SETTING THE BRIGHTNESS
Furthermore, scan tests are useful to set the brightness correctly. As we al-
ready mentioned, the scan test window displays a black-and-white version of the
scanned image, while the greyscale image window displays the actual scan. We
also know that the IRISPen is the first greyscale pen scanner.
In the Executive version, the scan test window is equipped with advanced
imaging features to adjust the scanning to the color tones of your document. (You
are recommended to keep the greyscale image visible when you’re modifying
these parameters.)
Page 49

2 - 23
USER'S GUIDE
In some instances, scanning in greyscale is mandatory to obtain good OCR
results! When text was printed on a color background, scanning in greyscale may
create the tone differences that are lacking in black-and-white images. When
there is only limited contrast between the text and the background, the background can create “noise” in black-and-white images that renders the recognition
difficult or impossible!
Think for instance of black text printed on a dark background: when scanning
such a document in black-and-white, you would not be able to “drop” the background color without losing the text information as well.
Thanks to its powerful intelligent routines, the IRISPen even solves tough
cases - here’s how our “difficult” image gets binarized!
Please note that the IRISPen handles changes - gradual and other - in the
background beautifully. To cope with varying colors and varying color intensity in
images, the binarization is “adaptive”. The software chooses the optimal blackand-white threshold locally: a different threshold can apply to each small region
of the image.
Page 50

2 - 24
Should this be necessary, you can optimize the image further for the OCR
process. The IRISPen Executive uses some complicated concepts here, and we
need to discuss them in detail.
The option "Smoothen Image" renders the greyscale images more homoge-
neous by “flattening”, smoothing out relative differences in intensity. As a result,
a sharper contrast is created between the foreground - the text - and the background - a color, artwork etc. We suggest that you leave this option enabled at all
times.
The brightness now. By “brightness”, we actually mean the black-and-white
threshold. As indicated earlier, the setting "Automatic" determines the bilevel
threshold automatically but with a great deal of intelligence. Leave the default
automatic setting for all normal documents. Apply a different threshold when
Page 51

2 - 25
USER'S GUIDE
necessary by darkening or lightening the black-and-white image: when you darken
the image, more pixels become black in the black-and-white version, when you
lighten the image, less pixels become black.
Note that the recognition is re-executed promptly each time you modify the
image settings!
Page 52

2 - 26
Page 53

2 - 27
USER'S GUIDE
The last option, "Despeckle", concerns the black-and-white image.
“Despeckling” means that the “parasite pixels” (also called “salt and pepper noise”)
will be removed from the black-and-white images.
Be sure that you don’t erase spots that are too big, otherwise you might start
erasing the dots on "i", portions of dot matrix letters etc.! (The recognition is reexecuted promptly each time you modify this setting.)
Page 54

2 - 28
Page 55

2 - 29
USER'S GUIDE
Thanks to the image adjustment features of the IRISPen Executive, a larger
range of documents can be read. You make documents legible that couldn’t be
read in any other way: think for example of documents where the colored background would otherwise render the recognition impossible.
However, a red or yellow background will never be picked up by the pen
scanner: red and yellow are the IRISPen’s “drop out” or invisible colors. This
implies that all text printed in red and yellow is illegible!
Page 56

2 - 30
BLACK IS BLACK AND WHITE IS WHITE
Now that we’re discussing colors: light text on a dark background is legible,
provided that you enable the option "Negative Image" under the "Options" menu.
(You can also use this option to scan “negative” graphics.)
The image in the greyscale image window is left untouched. The inversion is
only visible in the black-and-white image: black “pixels” become white, white
pixels become black.
The status window indicates whether this option is enabled or not. As light
text on a dark background is the small minority, it is disabled by default.
Page 57

2 - 31
USER'S GUIDE
HIGHLIGHTING EXCERPTS
Start your wordprocessor now and scan a few text lines. If you have to enter
small portions of text into a wordprocessor, the IRISPen is your ideal partner!
You can enter several thousands of characters per minute, much more than even
the fastest secretary using a keyboard. (Actually, the IRISPen software pro-
cesses about 1,000 characters per second, but no user can scan that fast!)
Even a traditional OCR software package with a sheetfed or flatbed scanner
is no competition when it comes to scanning excerpts and abstracts! To read a
few lines of text, you’d have to scan an entire page with your sheetfed or flatbed
Page 58

2 - 32
scanner, draw a frame around the text snippet to be recognized and wait until the
OCR is executed, then transfer the text result to your wordprocessor...
The IRISPen on the other hand offers real-time recognition. Slide your pen
over your text and in less than a second, it appears on your screen. Use the
IRISPen and you can type... with a stroke of a wand! The IRISPen gives you
text recognition at your fingertips!
It is important to note that you do not have to wait for the text result to appear
on your screen before you start scanning another line.
The IRISPen always inserts the recognized text at the cursor position. The
formatting as is active in your target application applies. When you have selected, say, Palatino 12 point bold in your wordprocessor, the text you insert will
be in Palatino 12 point bold, whatever the original font, typestyle and point size
may have been.
READING DOT MATRIX DOCUMENTS
However, in some cases, you have to indicate the font of the source text! The
option "Dot Matrix" in the IRISPen application window determines whether you
are recognizing “normal” or dot matrix printed documents. Dot matrix recognition is limited to the IRISPen Executive.
Setting this parameter correctly is mandatory: “draft” or “9 pin” dot matrix
symbols are made up of isolated, separate dots, and highly specialized recognition
routines are required to recognize them.
Page 59

2 - 33
USER'S GUIDE
“Letter quality” dot matrix printing, also called “25 pin” or “NLQ” dot matrix,
requires the normal setting, as do the printing qualities typeset, typewritten,
laser printed and inkjet printed.
The status window indicates whether the dot matrix reading mode is enabled
or not. Obviously, this option is disabled by default.
SCANNING PARAGRAPHS
When you have a few lines of text, you are recommended to make use of the
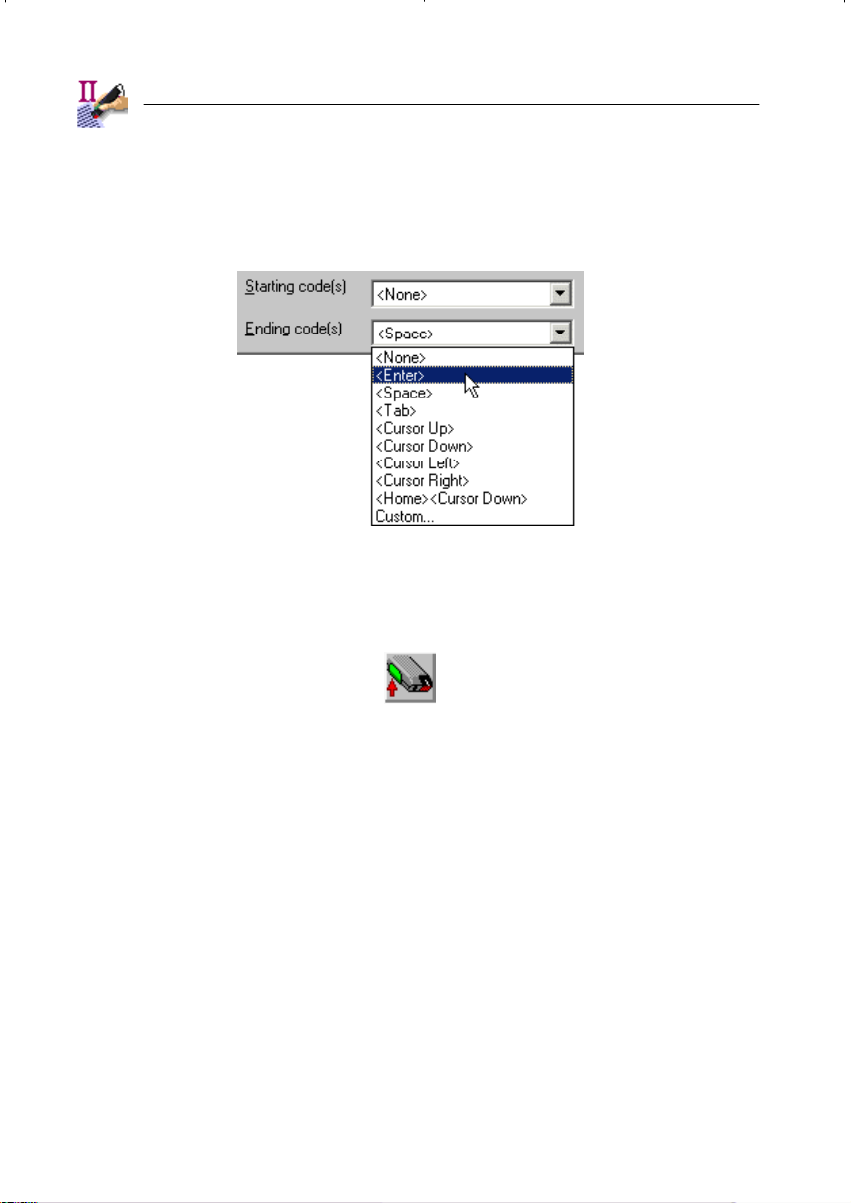
"Alignment" button on the toolbar (or the "Alignment" command under the "Settings" menu) and specify an ending code.
An ending code is any optional combination of characters and keyboard commands which you add at the end, after the recognized text. To scan in a few lines
of text, you’ll normally select <Space> as suffix. Doing so ensures that you add a
space after each line automatically. If you read two lines, "The second line" and
"follows the first.", the resulting output is "The second line follows the first.". The
space after the word "line" has been added by the IRISPen software.
Page 60
2 - 34
A second option allows you to indicate the start of a new paragraph. The
programmable pen button takes care of this. Select the "Pen Button" button on
the toolbar (or the command "Pen Button" from the "Settings" menu).
Indicate which keyboard command you want to execute or which characters
you want to insert when you press the pen button once. To start a new paragraph
for example, you will program the pen button to execute the <Enter> key. When
you press the button, you execute a carriage return, thus starting a new line.
Page 61
2 - 35
USER'S GUIDE
Also note that the pen button makes it easier to insert the scanned text at the
right location. When data is to be entered in, say, a database, the <Tab> key can
be assigned to the pen button to move the cursor to the next field. (The pen button
incorporates some other features which will be discussed later.)
The pen button and starting and ending code options allow you to execute
any combination of characters and keyboard commands: single characters and
character strings and one or more keyboard commands are allowed. Even combinations of characters and keyboard commands can be entered automatically
without touching the keyboard.
Another option, "Restore Paragraph", also concerns body text. When this option is enabled, hyphens at the end of a line are deleted and the ending code - if
one is defined - is ignored.
Page 62

2 - 36
Let’s give an example to clear things up. When you read two lines, "The new
presi-" and "dent waved from the balcony.", the resulting output is "The new president
waved from the balcony.". The end hyphen of "presi-" was ignored and so was the
“normal” suffix <Space>. If the two following two lines are: "His lovely wife" and
"had joined him.", the output will be "His lovely wife had joined him.", with the space
after the word "wife" added by the IRISPen software as the normal ending code.
In other words, this option really does restore paragraphs by “recomposing”
hyphenated words and adding suffixes only where they are needed.
It is interesting to note that the IRISPen does more than recognize text: key-
board commands you want to execute on your computer system during the scans
are taken care of by the IRISPen software. There is no need to lose any time
recurring to the keyboard while you are scanning!
ISOLATING TEXT EFFICIENTL Y
An additional problem when reading text may be that you scan clippings
from columnized articles in magazines. How do you isolate the target text comfortably? The "Alignment" command again offers the answer.
Page 63

2 - 37
USER'S GUIDE
There are four word cropping options: you can output all scanned characters, drop the first word (or incomplete word), drop the last word or drop both. By
default, all characters are retained.
The last option is particularly useful when scanning closely columnized text:
to ensure that you do not miss any significant words, you start scanning in the
previous column and end scanning in the next column. The IRISPen takes care
of deleting the unwanted word parts. In this way, you capture the correct information without having to scan with great precision.
SCANNING MULTIPLE LINES
When you are reading text excerpts, it may be a good idea to enable the option
"Multilines" in the IRISPen application window. This option is limited to the
IRISPen Executive and the IRISPen Translator.
The scanned lines are “buffered” until they are inserted in the target application (or sent to the clipboard). The user presses the pen button to “trigger” the
output process. After each scanned line, a blinking status window displays the
message "Press pen button to flush" for a few seconds. Only do so at the end of
a sentence or paragraph!
Note that you can start rescanning immediately, you can ignore this warning
entirely!
EXTRACTING KEY WORDS
An additional cropping function, "Ignore Rejected Characters in First and Last
Position", is useful when the IRISPen is used to capture key words.
Page 64

2 - 38
In this case, you will scan with more precision. If you start or stop a bit too
early, you have erroneously scanned part of a previous or following word, giving
you an unrecognized symbol. This option sees to it that these rejected characters
are ignored by the IRISPen. When the gutter between two columns is narrow, or
when wordspacing is reduced, this feature comes in handy.
Unrecognized characters are by default represented by a tilde (the "~" sym-
bol), but you can select a different symbol with the command "Unknown Symbol"
under the "Settings" menu.
Entering less than a line of text is certainly a major application of the IRISPen.
Think of scanning contacts and addresses from brochures, catalogs, business
cards in a database, contact or personal manager etc. The IRISPen is the easiest
and most practical highlighter imaginable!
Page 65

2 - 39
USER'S GUIDE
CUT FROM PAPER, PASTE TO WINDOWS!
Wordprocessors are indeed just a single example of software the IRISPen
complements. Actually, the IRISPen will output to any Windows application:
spreadsheets, databases, office software with e-mail and electronic agendas,
personal and contact managers, text editors, encoding utilities, bookkeeping software etc. The list of supported applications is really endless!
©
Page 66

2 - 40
The key to the “universality” of the IRISPen is its keyboard emulation. The
IRISPen effectively replaces your keyboard by imitating keyboard strokes as
soon as the application is running in the background, so you can use this tool to
insert text wherever you have a text cursor on your Windows PC.
Basically, the IRISPen establishes a “copy and paste” operation: you copy
text from paper documents and paste it in your Windows applications.
In the above example, we used the IRISPen to enter some quotes from a
press article into an e-mail message.
Page 67

2 - 41
USER'S GUIDE
COMPLETING DATABASES
When you enter data in a database, the possibility to add starting and ending
codes at the beginning and/or end of the recognized text is particularly useful.
When you choose for example the keyboard command <Tab> as ending code,
the cursor will reposition itself in the next field, ready for the next scan.
Imagine you want to add addresses to your contact manager. You scan the
company name: the IRISPen puts the company in the corresponding field and
relocates the cursor in the name field. You can go on with the person’s name, his
title, the address, telephone and fax number etc. without having to reposition the
cursor each time using the keyboard or mouse.
Here again, a “standard” OCR package falls short of this task as it does not
allow you to insert data directly in a database field. You have to generate a
structured text file which you import into your database later on. The IRISPen
effortlessly incorporates a flexibility which no other system can offer.
ADD THE CURRENCY... OR DROP IT
Let’s discuss some other suggestions concerning prefixes and suffixes: you
can use them to add text. A typical application is encoding price lists where you
add the currency, for instance "$" or "USD", to the figures you recognize. Or you
encode telephone numbers and the system adds "Tel: " in front.
All this means that the IRISPen does more than just recognize text, it also
completes and formats it for you!
The character conversion feature is additional proof of this. By character
conversion we mean that recognized characters are simultaneously replaced by
any combination of characters and keyboard commands: single characters and
character string, one or more keyboard command(s) or even combinations of
characters and keyboard commands are accepted. Characters can also be deleted (replaced by nothing). A typical application is eliminating the currency in a
price list.
Page 68

2 - 42
Select the command "Character Conversion" under the "Settings" menu. A
window shows you a list of all characters; characters to which conversion applies are highlighted. Click on them to see how they are converted. Click the
option "No Conversion" to disable the active conversion. The button "Unconvert
All" disables all active conversions with a single click.
In the example below, the "$" symbol is ignored, erased because the user
wants to enter some numeric data in a spreadsheet. The figures are relevant,
the currency isn’t. Scanning "$2.99" leads to "2.99" being entered in the worksheet.
Page 69

2 - 43
USER'S GUIDE
OF ROWS AND COLUMNS
There’s another feature of major importance to the scanning of tables of figures: the detection of table cells as you find in the example below.
The command "Table Frame Conversion" under the "Settings" menu offers
the key. Some common keyboard commands are presented by default, but you
Page 70
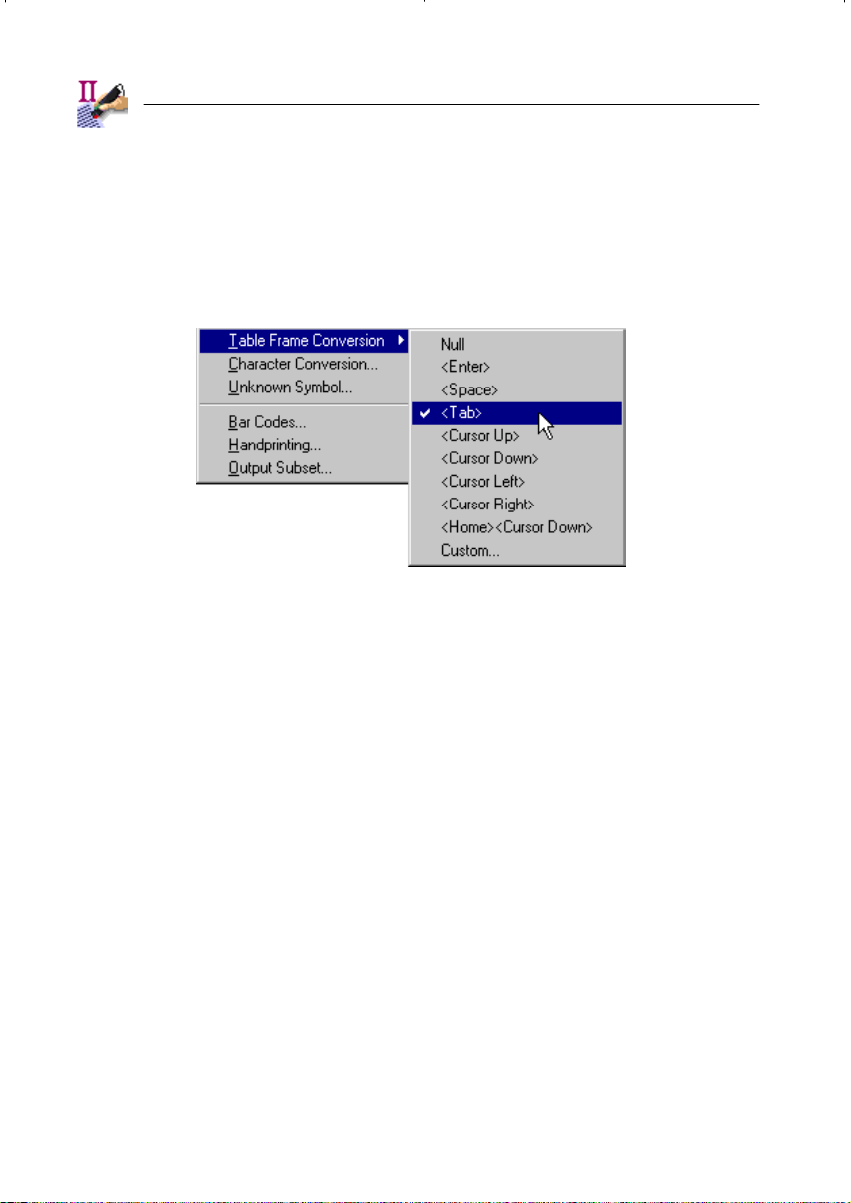
2 - 44
can also enter user defined characters, keyboard commands and any combination of these.
For instance, when you select <Tab>, the IRISPen will execute a <Tab> when-
ever it encounters a vertical bar. As a <Tab> moves your cursor to the next cell,
scanning this table into a spreadsheet will put the individual figures in separate
cells. Add <Home><Cursor Down> as ending code to relocate the cursor on the
next row.
Page 71

2 - 45
USER'S GUIDE
In other words, you can recreate the typical table structure with rows and
columns by simply scanning line after line!
Mind you, this only works when continuous vertical bars separate the table
columns: the IRISPen software has to encounter a physical mark, detect a border between two columns.
Where the original document does not contain vertical bars, the easiest procedure is to quickly add them with a pen and a ruler. Another solution is reading the
figures one by one and programming the pen button with the "Pen Button" button
on the toolbar. The single pen button click should be programmed as <Tab> - the
cursor is moved to the next cell - , the double-click as <Home><Cursor Down>
to start a new row.
In some cases, even the command "Character Conversion" from the "Settings" menu can offer the answer as it allows you to replace scanned characters
Page 72

2 - 46
by a cursor command. Here’s an example: to insert the line "2,55£ 5.99£ 65£"
in a worksheet, it suffices to replace the symbol "£" by <Tab> to place the individual figures in separate cells.
MORE FUN FOR NUMBER CRUNCHERS
Entering tabular data in a spreadsheet is one of the most popular IRISPen
applications. Actually, the IRISPen is capable of entering numbers faster and
more accurately than any human being can. It’s a text book example of “machine
beats man”!
The IRISPen will recognize your tables of figures with even more precision
when you set the reading mode to numeric. This is accomplished in the IRISPen
application window. Doing so limits the set of recognized characters to numeric
symbols, in which case you will only recognize the characters '0' to '9' and some
punctuation symbols such as ".", ",", some currencies - the dollar and Euro sign
etc. By doing this, you eliminate any chance of recognition errors such as the
confusion between '5' and "S", '0' and "O", '9' and "g", '8' and "B" etc.
In fact, you can fully customize the set of recognized characters for your
encoding utilities by creating character subsets that exclusively contain those
symbols you want to recognize. (Each time you do, the recognition speed is increased somewhat.)
An example: you want to read figures from a price list. Unfortunately, the
price list also contains some currency symbols such as $ and £. The standard
numeric character mode obviously won’t do. You can nevertheless read such
data faultlessly by extending the basic numeric symbol set with the symbols "$"
and "£".
Click on the "Output Subset" button on the toolbar (or select the command
"Output Subset" under the "Settings" menu).
Page 73
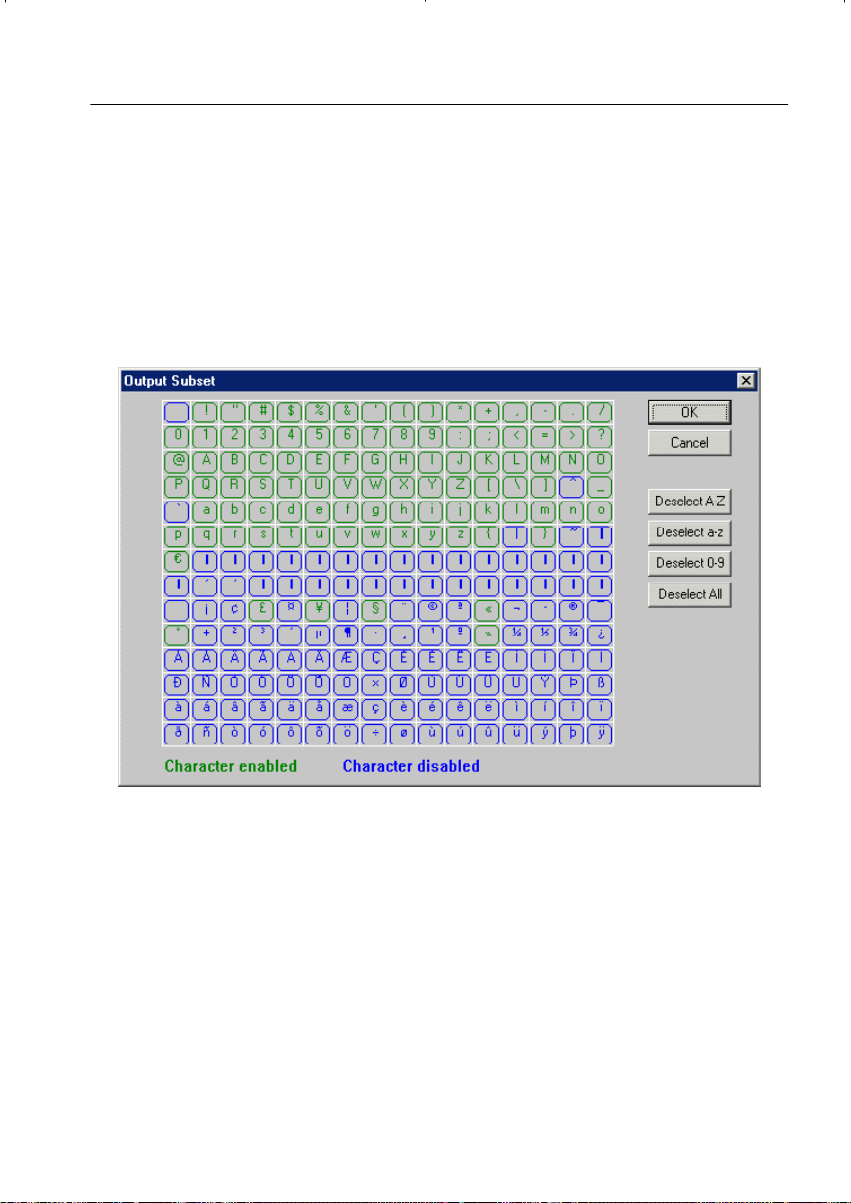
2 - 47
USER'S GUIDE
Click on a symbol to select and deselect it. The buttons "Select A-Z", "Select
0-9" etc. provide a faster method of selecting ranges of symbols; click on these
buttons to add and remove symbol ranges.
To read standardized financial documents such as printed checks, bonds, bank
statements etc., you could limit recognition to the OCR-B characters by enabling
exclusively the numeric symbols, "<", ">" and "+". (OCR-B is actually more than
a character set. It is also a highly specialized typeface used only in standardized
documents, and I.R.I.S. has a specialized version of the IRISPen software for
the financial market.)
Page 74
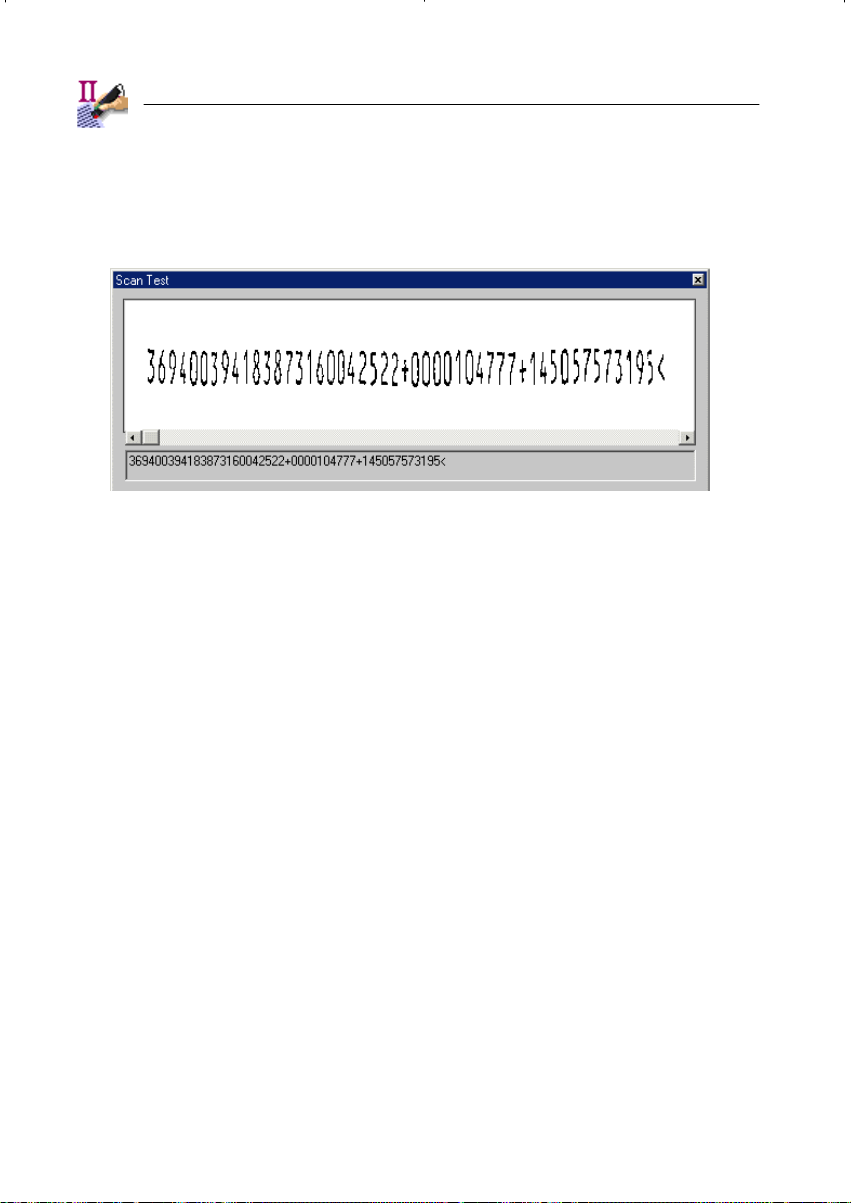
2 - 48
A third example is reading data strings with a specific syntax. Think for ex-
ample of the serial numbers found on product labels. Such character strings go
beyond the numeric symbols, but never contain the full alphabetic range of characters.
The reason for limiting the character set is that you keep excluding recognition
errors as the confusion between '5' and "S", '0' and "O" etc. and that you make
the recognition somewhat faster.
However, the IRISPen does not recognize all characters which are displayed
in the output subset window! Some special characters, like © and ®, are not
recognized by the IRISPen but can be used in character and table frame conversions, in starting and ending codes and be inserted with pen button clicks.
The window below tells you exactly which symbols can and cannot be recog-
nized - the highlighted symbols are not recognized by the IRISPen.
Page 75

2 - 49
USER'S GUIDE
THE READING PEN... EVEN SPEAKS!
When you are scanning figures and structured character strings, precision and
speed are of major importance. Thanks to the IRISPen’s integrated “Read &
Speak” speech technology, you can go ahead and scan your text without looking
up to the screen to verify the result.
“Hands- and eyes-busy” data entry become possible as the speech synthe-
sis provides you with clear, natural sounding auditive feedback of all recognized
text. Encode addresses and your sound card will pronounce them, enter figures
into a spreadsheet or encoding utility, enter invoices into your bookkeeping software and the IRISPen software reads the figures aloud for verification. Sec-
Page 76

2 - 50
ondly, the speech feature opens a world of multimedia applications to the IRISPen
users.
Refer to chapter 3 to learn more about it all!
THE IRISPEN TAKES YOU AROUND THE WORLD
Customizing the character set is actually also what you do when you select a
language in the IRISPen application window.
The IRISPen is far from limited to English: up to 55 languages are supported!
All American and European languages are supported, including the Central-European languages, Greek, Turkish, the Cyrillic (“Russian”) and the Baltic languages.
Page 77
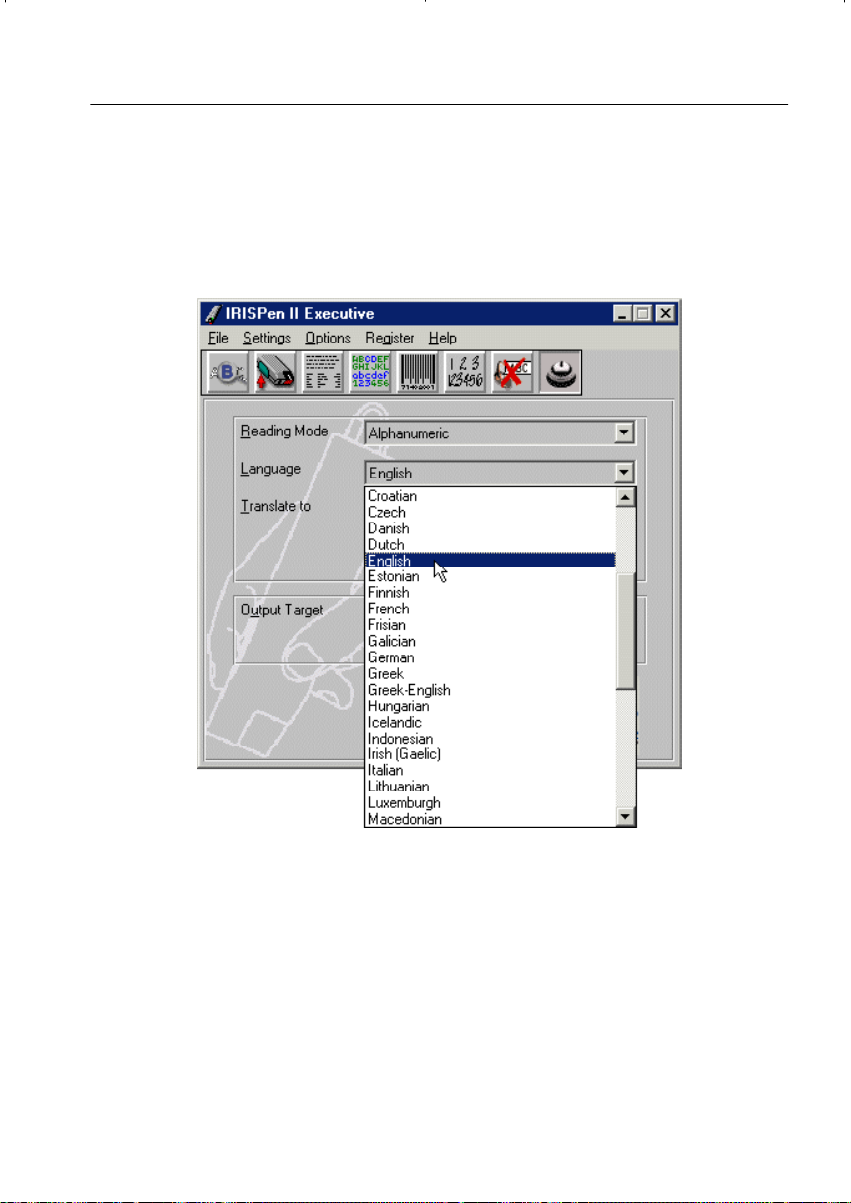
2 - 51
USER'S GUIDE
Also note that the British and American - or should we say “international”? variants of the English language are distinguished. The same goes for Spanish
and Mexican.
You can press a letter key to move to it directly: if English is currently selected, and you want to select Hungarian, you can click the "H" key on your
keyboard to go directly to the Hungarian language. When several languages have
the same initial, press the letter several times to go through the options. Let’s give
an example: the IRISPen reads Polish and Portuguese. By pressing "P" once,
Page 78

2 - 52
you select Polish, by pressing "P" a second time, you select Portuguese, and by
pressing "P" a third time, you’re back on Polish. (To go to another letter, say T,
press BackSpace before you enter the "T" character.)
It takes the appropriate Windows configuration to display Central-European,
Greek, Turkish, Cyrillic and Baltic characters. You may have to install the Windows module "Multilanguage Support" before your Windows system is able to
cope with these languages. Select the icon "Add/Remove Programs" under the
"Control Panel" to find out if this Windows module is installed on your PC.
Page 79
2 - 53
USER'S GUIDE
To read exotic languages, you also need to enable the correct keyboard layout
under Windows! By doing so, an appropriate font is activated.
The Windows control panel "Keyboard" allows you to install the necessary
keyboard layouts.
Page 80

2 - 54
Selecting the proper document language is imperative. Based on the selection
of a language, the software knows which symbol set to recognize. Multilinguistic support ensures that “exotic” characters such as ç, ß, ñ, γ and ø are recognized correctly.
Secondly, the software extensively uses linguistic databases to validate its
results. Suppose that you have to read the word "president" where an ink stain
makes the "r" look like an "f". Looking things up in the English lexicon, the IRISPen
will detect autonomously that the word "president" is being read and that it doesn’t
make any sense to recognize the symbol "f". This “self-learning” technique is
of course highly dependant on the linguistic context.
Linguistics also offer useful help to solve ambiguous cases such as an "O"
which might be mistaken for a '0'. Another typical example is the letter "l" and the
number '1' which have an identical form in many fonts - think of texts produced
on old typewriters! The linguistic context helps to determine whether you are
dealing with "l" or '1'.
Page 81

2 - 55
USER'S GUIDE
The illustration below shows various shapes of '1' and "l". The shapes on the
first line are unambiguous, the shapes on the second line are ambiguous, but
linguistics can solve them.
THE IRISPEN CHANGES LANGUAGES AS NEEDED
But the buck doesn’t stop here: the IRISPen can switch languages in the
middle of a sentence without any help from the user! When Western words pop
up in Greek and Cyrillic documents - many untranscrible proper names, brand
names etc. are written using the familiar Western symbols -, the IRISPen can
switch to the correct alphabet automatically. In other words, you can activate a
mixed alphabet of Greek or Cyrillic and Western characters.
Be sure to select "Greek-English" or the appropriate Cyrillic language setting
- for instance "Byelorussian-English". In other words: don’t try to just select
"Greek" or "Byelorussian" as document language and hope that the Western symbols will come out fine!
Here’s an example where a Greek text contains an English word!
Page 82

The result looks like this when opened with the wordprocessor - don’t forget
to enable the “exotic” keyboard layout to read and display such texts.
2 - 56
To mix other languages, simply select the language with the most extended
character set. If you have a document where the, say, French translation is placed
alongside an English text, you have to select French as language to ensure that
the accentuated characters such as ç, é and ù get recognized correctly.
UNITY IS STRENGTH
So much for the major features and options which enhance and customize the
operation of the IRISPen. One element should still be stressed here: the fact that
these commands are by no means separate elements! On the contrary, for optimal use of the IRISPen, you will typically combine several features.
Let’s give two examples. To scan an English columnized text into a
wordprocessor, you could do the following: select English as the document lan-
Page 83

2 - 57
USER'S GUIDE
guage in the IRISPen application window, enable a cropping option to read the
middle column comfortably, have the paragraphs restored and add a space as
ending code with the "Alignment" command and finally program the single pen
button click to execute <Enter> and start a new paragraph.
To scan a table of figures in a spreadsheet, you could combine the following
features: limit recognition to the numeric characters in the IRISPen application
window or enable a custom character set with the "Output Subset" command,
filter the currency "$" from the output with the "Character Conversion" command, execute a <Tab> when vertical bars are met with the "Table Frame Conversion" command to put the scanned figures in separate cells and program
<Home><Cursor Down> as ending code with the "Alignment" command to start
a new row automatically.
THE LAW OF INERTIA
Correctly setting these operational parameters doesn’t take much time. Still,
the IRISPen software allows you to save them in settings files. This is accomplished in two ways.
First, you can save settings as default configuration by enabling the option
"Save Settings on Exit" under the "Options" menu.
When you quit the application, the current settings will be saved in the file
DEFAUL T.IPC. (When this file is erased, the factory settings apply.) These
settings will take effect as soon as you start the software up again.
Secondly, you can save configuration files for specific applications. The command "Save Settings" from the "File" menu saves the current IRISPen settings
for future use.
Page 84

2 - 58
For clarity, give meaningful names to your IRISPen configurations, for in-
stance GERMAN, TABLE etc.
The command "Open Settings" under the "File" menu loads IRISPen configu-
rations into memory.
Settings files contain all operational parameters: the reading mode, language
and output target, the programming of the pen button clicks and hotkeys, table
frame and character conversions, the output subset, alignment options and starting and ending codes, the presence and position of the greyscale image window
and whether bar code reading functions as secondary reading mode, whether the
dot matrix reading mode, the left-handed scanning, the image inversion and the
speech feature or the system sound are enabled.
Page 85

2 - 59
USER'S GUIDE
Also note that the last four settings are directly available on the "File" menu;
simply click a configuration to load it.
RESTORING THE APPLICA TION TO THE FOREGROUND
As we’re talking ease of use now, we’ll go on with some additional features.
We already know that the IRISPen software is equipped with a toolbar for quick
access to all frequently used commands. Let’s briefly repeat what the buttons
stand for.
Scan Test
Alignment
Pen Button
Output Subset
* Limited to the IRISPen Executive
** Limited to the IRISPen Executive and the IRISPen Translator
Bar Codes *
Handprinting *
Speech **
Sound
What else is there? What is, say, a quick way of accessing the IRISPen application window, for instance to modify the language, output subset etc. First of all,
you can restore the IRISPen application by right-clicking the IRISPen control on
the Windows taskbar and selecting the command "Open".
Page 86

2 - 60
To switch directly to the IRISPen application, you can right-click or double-
click the status window. The status window does more than provide information,
it also gives you direct access to the IRISPen application!
Finally, you can define a hotkey with the command "Hotkeys" under the "Set-
tings" menu. Enter a key combination to restore the application. Evidently, you
should not use key combinations such as Ctrl+V which are used by your target
application(s).
So, restoring the IRISPen application which normally runs in the back-
ground is a cinch. Another interesting feature is that you can switch between the
reading modes with equal comfort. The command "Hotkeys" under the "Settings"
menu again offers the solution.
Page 87

2 - 61
USER'S GUIDE
When you have selected "Alphanumeric" as your reading mode and you execute the hotk, the IRISPen switches to the mode "Bar Codes". When you repeat
the hotkey a few times, you switch to "Black-and-White Bitmap to Clipboard",
"Greyscale Bitmap to Clipboard", "Handprinting", "Numeric" and back to "Alphanumeric".
MORE ABOUT THE PEN BUTTON
And why not use the pen button to switch modes? You can program a button
click to switch between the reading modes. To encode documents where text
and figures are mixed on the page, just clicking the pen button can do the job.
Page 88

2 - 62
The fact that the single and double click of the pen scanner button are pro-
grammed separately adds all the more flexibility! Let’s give some illustrations.
Imagine you are encoding addresses from business cards, brochures, catalogs
etc. you collected during a trade show in a database. Depending on the addresses,
some fields will be skipped. For some addresses, the country will be added, and
for others, it won’t, some contacts have an e-mail address while others don’t etc.
To encode these data efficiently, the single pen button click is programmed as
<Tab>, even though we already have <Tab> as ending code. The suffix <Tab>
moves the cursor to the next field automatically, and you click the pen button
once when a database field should be skipped. To start a new record when an
address was completed, you normally click a button with your mouse. Here, you
can program the double button click of the pen button to correspond with that
button’s shortcut.
Page 89

2 - 63
USER'S GUIDE
In this example, we can skip the empty fields with a single button click and
start a new record by programming the double pen button click as Alt+S, the
shortcut for the "Save and Close" button.
Or you have to encode forms with addresses and coded numbers in a database. The codes are strictly numeric, the address is of course composed of alphanumeric data. To add complexity, the data must be distributed among different database fields. Here’s how you can proceed: use the single button click to
move the cursor to a new database field and use the double button click to toggle
between the alphanumeric and numeric reading mode.
Page 90

2 - 64
Spreadsheets offer another application when figures are read one by one: the
single click is programmed as <Tab> and allow to move the cursor to the next
cell, the double-click is programmed as <Home><Cursor Down> and moves the
cursor to the next row.
GETTING ON-LINE HELP
This concludes our overview of the IRISPen. Some last-minute information
may not be included in this manual. We thus recommend you to consult the online help system for additional information on the IRISPen’s capabilities.
Go to the "Help" menu to do so. The command "Help Topics" and its shortcut
key F1 allow you to navigate through the many help topics.
Page 91

2 - 65
USER'S GUIDE
ACQUIRING UPGRADES
The command "Upgrade" under the "Register" menu tells you how to upgrade
the IRISPen software to the multifunctional reading pen IRISPen Executive or
the translation and language learning tool IRISPen Translator, and how to acquire
extra options for your IRISPen.
Page 92

2 - 66
Basically, the IRISPen product range uses a modular approach: by installing
an upgrade, you add whatever extra feature you don’t have yet. You can upgrade
from the IRISPen Standard to the IRISPen Executive and to the IRISPen Translator, from the IRISPen Translator to the IRISPen Executive, from an IRISPen
Executive to an IRISPen Translator etc.
Page 93

2 - 67
USER'S GUIDE
MORE ABOUT THE IRISPEN EXECUTIVE...
The software-only upgrade to the IRISPen Executive offers numerous major add-on capabilities: speech synthesis, bar code reading, handprinting recognition, recognition of dot matrix documents, advanced image adjustment features
and multiline scanning. As a result, your IRISPen becomes unquestionably the
most versatile scanner available!
We already mentioned that the speech synthesis capability is limited to the
IRISPen Executive - where the user is entitled to a single language of his choice
- and to the IRISPen Translator - which is equipped with the speech libraries of
the two languages in the language pair. (Speech modules for additional languages
can further extend his system. Ten languages are currently available: English and
British English, Brazilian, Dutch, French, German, Italian, Mexican, Russian and
Spanish.)
Bar code reading opens a world of new applications to IRISPen owners as
their pen scanner becomes an ergonomic and compact bar code scanner for the
office environment. Information desks, marketing surveys, customer identification, order picking and many other examples of high accuracy data entry in the
office environment can benefit greatly from this bar code reading solution.
All widespread bar code standards or “symbologies” are supported: Code 39,
Code 93, Codabar, EAN-8, EAN-13, UPC, Interleaved 2 of 5 and MSI Pharma.
(Support of the Code 128 symbology is optional.) The user can but does not have
Page 94

2 - 68
to specify the symbology: the user-friendliness is such that the IRISPen automatically detects which bar code standard has been scanned! There is no programming or parameter setting involved in its operation, its use is automatic and
transparent.
You can even enable a mixed reading mode where bar codes are read
alongside other data - for instance “normal” text. The IRISPen “auto-detects”
which type of data is being read. For example, you can scan address labels where
the printed data is complemented by a bar code without ever changing the reading mode!
Page 95

2 - 69
USER'S GUIDE
Encoding forms and labels can also benefit greatly from numeric handprinting
recognition. This proprietary recognition technology is based on more than 1
million writing samples! All natural writing styles - American and European - are
supported; contrary to most other handprinting recognition solutions, no training
phase or imposed style is required.
Furthermore, the IRISPen Executive supports dot matrix recognition. Dot
matrix symbols are made up of isolated, separate dots, and highly specialized
recognition routines are required to recognize them!
Page 96

2 - 70
Multiline scanning increases the “user-friendliness” of the IRISPen: sev-
eral lines are “buffered” before they get inserted in the target application. You
can send full paragraphs consisting of several lines to your Windows applications
at once. The multiline reading mode also leads to a more natural prosody: when
the text-to-speech module has to pronounce individual lines, rather than full sentences, the intonation may be somewhat less than “human”.
Finally, the IRISPen Executive is equipped with advanced imaging features
to adjust the scanning to the color tones of the documents to be scanned. As you
can optimize the images generated by the pen scanner for the OCR process, a
much larger range of documents becomes legible. Think for example of documents where the colored background would otherwise render the recognition
impossible.
... AND THE IRISPEN TRANSLATOR
The software-only upgrade to the IRISPen Translator offers the following
major add-on capabilities: speech synthesis in two languages, bidirectional sentence translation of a language pair and multiline scanning.
The IRISPen Translator is a great tool for language learning and translation
aid: you encode and translate foreign language texts by scanning them, and you
hear the words spoken.
Page 97

2 - 71
USER'S GUIDE
The IRISPen Translator provides bidirectional, real-time sentence translation of all scanned text; the text is inserted in your active application, the transla-
tion “pops up” on your computer screen in a speech bubble.
Page 98

2 - 72
The IRISPen Translator software also offers clipboard translation. You
translate texts without scanning, the text to be translated is simply copied to the
clipboard: think of texts entered on the keyboard, wordprocessor files you open,
e-mail messages you receive, Internet web pages you consult etc.
The IRISPen Translator English-French translates English into French and
vice versa. Extra translation libraries can be installed. The currently available
versions are: English-French, English-German, English-Italian, English-Portuguese
and English-Spanish. Contact I.R.I.S. to learn the availability of new language
pairs.
The speech synthesis opens the door to a world of new applications! To
learn how to speak a language, you can just scan a text and hear the PC pronounce the words. The speech feature is offered for the language pair: the English-French version of the IRISPen Translator for instance has the English and
French speech libraries. (Speech modules for additional languages can further
extend the user’s system. Ten languages are currently available: English and
British English, Brazilian, Dutch, French, German, Italian, Mexican, Russian and
Spanish.)
The multiline scanning is mandatory for the IRISPen Translator. As sen-
tences in most cases comprise several lines of text, “multiline” scanning allows to
buffer several lines before the output process - text insertion, pronunciation and
translation - is triggered. Otherwise you would pronounce partial sentences and
(try to) translate ungrammatical text lines as you scanned them, with unavoidably
weak results.
EQUIPPING YOUR IRISPEN WITH OPTIONS
Finally, there are some options available for the IRISPen product range.
The speech synthesis of the IRISPen Executive is limited to a single lan-
guage of your choice, the IRISPen Translator is equipped with the speech libraries of the two languages in the language pair. You can extend your system by
installing text-to-speech modules for additional languages. Ten languages are cur-
Page 99

2 - 73
USER'S GUIDE
rently available: English and British English, Brazilian, Dutch, French, German,
Italian, Mexican, Russian and Spanish.
Secondly, the IRISPen Executive supports all widespread bar code symbologies, but support of Code 128, a specialized bar code used in the financial world,
is optional.
The same goes for the recognition of the specialized banking fonts (OCR-A,
OCR-B, E13B and CMC-7). This reading capability is offered by the special
software version for the financial world. Contact I.R.I.S. for more information.
Page 100

2 - 74
 Loading...