

Page 1
Rechargeable Mattress Cleaner
by IRIS USA, Inc.
IC-FDC1U USER MANUAL
Thank you for your purchase. Please read this instruction manual carefully to
ensure proper use. Read all safety precautions prior to use. Please store this
instruction manual in a safe place for future reference.
CONTENT PAGE
Safety and Usage Precautions ...................1
Parts .........................................................3
Usage Instructions
Charging ....................................................4
Operation Instructions ...............................5
Cleaning Bedding ......................................6
About the Sensors .....................................6
Clear Dust (Clean Dust Mesh Filter) ...........7
Cleaning and Maintenance ........................8
Replaceable Components .......................... 9
Spare Parts ..............................................10
Other
Troubleshooting ........................................11
Specifications ........................................... 12
Limited Lifetime Warranty ........................13
Page 2

SAFETY PRECAUTIONS
When using an electrical appliance, basic precautions should always be followed. Please read the manual before
use and carefully follow all safety precautions to avoid injury or property damage and to reduce the risk of fire or
electrical shock. Save the instructions in a safe place for later use.
IMPORTANT SAFETY INSTRUCTIONS
When using an electrical appliance, basic precautions should always be followed, including the following:
READ ALL INSTRUCTIONS BEFORE USING (THIS APPLIANCE)
WARNING - To reduce the risk of fire, electric shock, or injury:
a) Do not leave appliance when plugged in. Unplug from outlet when not in use and before servicing.
b) Do not allow to be used as a toy. Close attention is necessary when used by or near children.
c) Use only as described in this manual. Use only manufacturer's recommended attachments.
d) Do not use with damaged cord or plug. If appliance is not working as it should, has been dropped, damaged, left outdoors,
or dropped into water, return it to a service center.
e) Do not pull or carry by cord, use cord as a handle, close a door on cord, or pull cord around sharp edges or corners. Do not
run appliance over cord. Keep cord away from heated surfaces.
f) Do not unplug by pulling on cord. To unplug, grasp the plug, not the cord.
g) Do not handle plug or appliance with wet hands.
h) Do not put any object into openings. Do not use with any opening blocked; keep free of dust, lint, hair, and anything that
may reduce air flow.
i) Keep hair, loose clothing, fingers, and all parts of body away from openings and moving parts.
j) Turn off all controls before unplugging.
k) Use extra care when cleaning on stairs.
l) Do not use to pick up flammable or combustible liquids, such as gasoline, or use in areas where they may be present.
m) Do not pick up anything that is burning or smoking, such as cigarettes, matches, or hot ashes.
n) Do not use without dust bag and/or filters in place.
o) Do not use outdoors or on wet surfaces.
SAVE THESE INSTRUCTIONS
Battery
• Placing the battery into water to avoid overheating may result in leakage or fire.
• Please use only the manufacturer recommended battery. Use of any other battery may cause risk of fire.
• Only use the manufacturer recommended charger. Using another device to charge the battery may cause leakage,
overheating or other damage.
• Dropping or pressing firmly on the battery may cause leakage, overheating or other damage.
• Battery may leak if misused, dropped, or damaged. Avoid contact, as this can cause irritation or burns. Flush with water.
If battery liquid comes into contact with eyes, do not use your hands to wipe or rub. Flush eyes thoroughly with water and
seek medical help.
• Do not use if battery or vacuum is damaged or modified as this may result in fire, explosion, or injury.
• Please do not connect the power terminals to any other pieces of metal. (Do not connect batteries together using metal
chains, hairpins, etc. as this may cause leakage, overheating, breakage or fire.)
• Please do not splash or immerse the battery in water as this could cause a short circuit resulting from overheating.
• To ensure that the safety of the product is maintained, please do not disassemble, repair or reassemble the battery on
your own as this may cause leakage, overheating or breakage. If an issue occurs, please contact IRIS USA, Inc. Customer
Service.
• Do not expose the vacuum and battery to fire or temperatures above 265°F/130°C as this can cause the product to
explode.
• Please follow charging instruction carefully and within the optimal temperature range (41°F/5°C to 95°F/35°C) to reduce
the risk of fire or damage.
• Be careful not to hold the menu button down when picking up or carrying the vacuum as this can cause the product to
accidentally start and cause accidents.
1 2
Please do not splash or immerse the vacuum and battery in water.
Do not use near water or in spaces with high humidity levels, such as bathrooms.
Do not use to clean liquid or damp materials as this may cause a short circuit, electrical shock or breakage.
Please do not use while unit is charging. Unplug unit prior to use. (Improper uses could cause injury, property damage,
deformation, etc.)
Please do not disassemble, repair or reassemble the product or the battery on your own to avoid fire, injury or improper
functionality. (Please change any replaceable parts per manual directions.)
Please remove the plug from the outlet and remove dust or dirt regularly to avoid electrical shock or injury.
Please charge the battery in a 120V AC outlet. Do not charge in a DC outlet or with an electric generator as this may cause fire
or electrical shock.
Please clean dust off the device regularly to avoid buildup resulting in poor insulation.
Please be sure that the plug is tightly inserted into the power base to avoid electrical shock, short circuits or fire.
To avoid electrical shock or accidentally starting the unit, please remove the battery before changing replaceable pieces,
making adjustments, or storing vacuum.
Please remove the battery when unit is not in use.
When issues occur, please stop use immediately to avoid smoking, fire or electrical shock. (Please cut off the power, unplug
the device, and contact IRIS USA, Inc. customer service to determine the issue and make any repairs.)
Examples of issues:
• The device doesn't work when the switch is "ON."
• The device consistently stops while running.
• The charging or power cord does not function properly.
• The device is damaged or overheats when it shouldn't.
• The device smells like it is burning.
• The device makes an abnormal noise while running
Please keep away from heat as this may damage the vacuum and can result in a short circuit or fire.
Do not run the vacuum for extended periods of time.
Using the vacuum with a buildup of dust may result in overheating, product damage, breakage or fire.
Do not drag the device as this may damage the floor.
Do not use or store the product in areas of high heat with temperatures reaching 104°F/40°C (car sitting in the sun, near
heaters, etc.) in case the vacuum becomes damaged, resulting in short circuits or fire.
Do not drop, break, hit against other objects or put pressure on the vacuum.
Please clean the contents out of the dust cup, and avoid collected dust splattering. (Parts of the mesh filter should be cleaned
in water.)
Do not use without the dust cup and/or filters in place.
Please properly assemble the dust cup and place it into the device to avoid injury or product damage.
Pick up the device by the handle to avoid risk of dropping and property damage.
Do not attempt to repair or modify the unit or battery except as indicated in the instructions for use and care. Any other
servicing should be performed by an authorized service representative.
Usage Cautions
Use only on cloth products such as mattresses, futons, pillows, carpet, sofa, car seats, etc.
For household use only.
Do not use to clean the following:
• Liquid
• Wet litter/debris
• Powder
• Broken glass
• Sharp or pin type objects
• Do not use on floors, walls, or unupholstered furniture. Do not pull on the main body and avoid hitting walls or furniture.
• Before use, make sure that the filter is installed correctly.
Page 3
USING AND CHARGING PRODUCT
WARNING
DO NOT CHARGE BATTERY WITH OTHER CHARGER EXCEPT THE ORIGINAL BRAND.
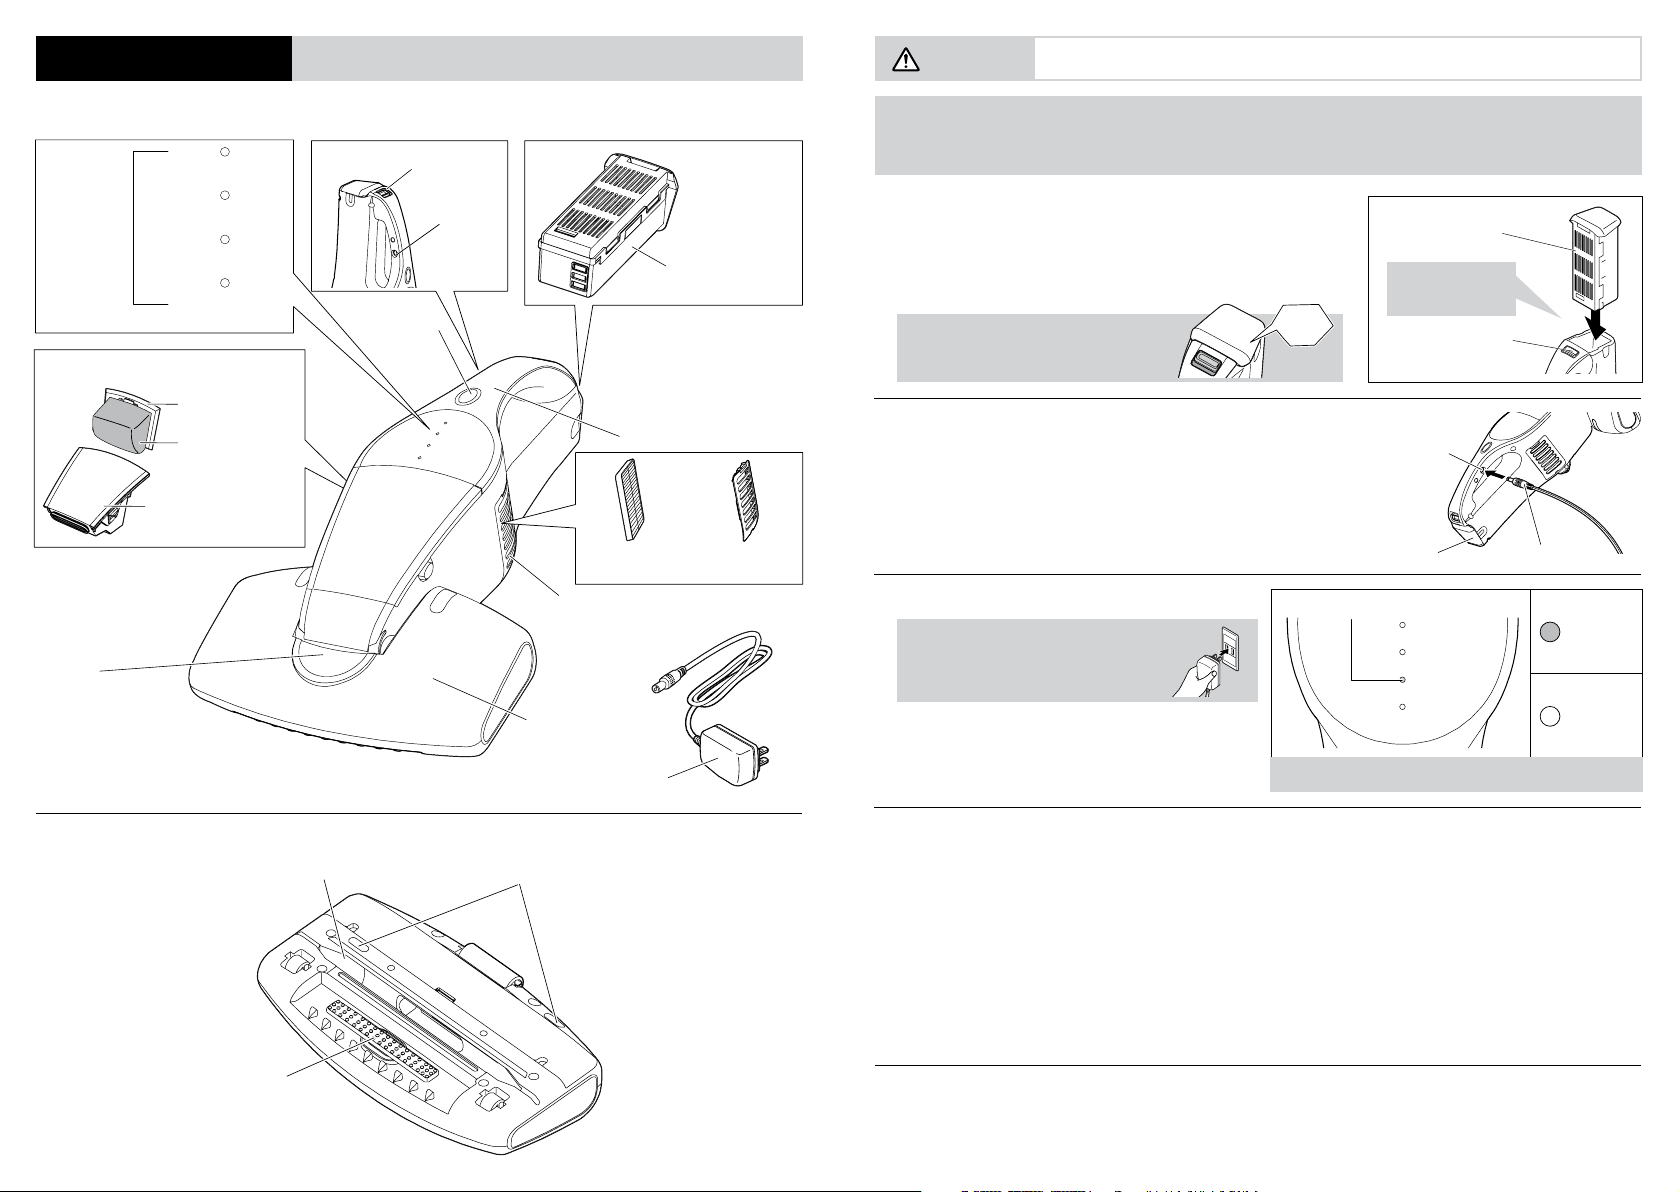
Cleaner Body
Indicator
light
DUST CUP
Dust indicator light
Battery Level
Safety Lock
(hold for 3 sec)
Mesh filter set
Mesh filter frame
Mesh filter
(replaceable)
Dust cup
High
Low
Battery release button
Power port
Menu Button
Handle
Exhaust filter
(replaceable)
Exhaust outlet (left and right)
Collection head
Battery
(replaceable)
Exhaust filter
cover
• Battery does not come fully charged. Please charge to full power before first use. Full charge will take approximately
3.5 hours.
• Please do not use the device while charging.
1. Please put the battery into the vacuum cleaner.
Place the battery into the vacuum. Press battery into the socket
Battery
until you hear a clicking sound.
*Failure to fully insert the battery into the socket will affect
operation and can result in injury or damage.
Please insert the battery tightly and
firmly into the socket until there is a
clicking sound.
Clicking
Sound
Insert until clicking
sound is heard
Battery release
button
2. Plug the charger plug into the power outlet.
Power outlet
Battery Charger plug
3. Insert the charger into power socket.
Please insert the charger into the power
socket tightly and firmly.
* Power indicator red color light means starting charging.
Power indicator light
Batter y Level
Safety L ock
(hold for 3 seconds)
High
Low
ON
Charging
OFF
Finished
Collection Head
Agitator
Dust intake port
Charger
4. Finished.
Sensors
The indicator light will shut off when done charging.
• For first time use or non-use for more than 6 months, please charge 2 or 3 times before use to achieve
full charge.
• If more than 10 days since last use, charge before next use.
• Continual charging will decrease charge hold time.
• Charging and running time will vary due to temperature and operating conditions.
• Charge between temperatures of 41°F/5°C and 95°F/35°C. Charging in too low or too high temperatures
can cause decreases in working time or lengthening in charging time.
• Charger will be warm. This is normal.
5. Removing the battery.
• Press the battery release button and take out the battery.
3 4
Standard charging time about 3.5 hours
Page 4

USAGE INSTRUCTIONS (OPERATION INSTRUCTIONS)
USAGE INSTRUCTIONS (CLEANING BEDDING)
1. Adjust the collection head angle.
Please place the vacuum on the floor, then adjust the angle
up and down by hand.
• Please adjust the vacuum body to the horizontal
position, which should be used for soft surfaces such
as bedding.
• The collection head is fastened in horizontal position
by a magnet to keep it in place during use.
2. Unlock.
Hold the menu button for 3 seconds, wait for the safety lock
indicator to light up, then start cleaning as directed below.
• Safety lock will automatically lock again after one
minute of non-use.
• Device will not work when locked. Pressing the menu
button to start when it is locked will cause the safety
light to blink.
3. Insert the battery into power socket.
Pressing the menu button changes the mode.
• Press the menu button to change to high mode.
• Press the menu button again to change to low mode.
4. Finish.
Press the menu button to change the mode until the vacuum
stops and the indicator light shuts off.
• Device will automatically lock after one minute of
non-use.
• Please follow step 2 to restart.
Storage status
Carpet o r car cushion
material angle.
High
Low
Battery L evel
Safety Loc k
(hold for 3 seconds)
Menu
ON/OFF
High
Low
Battery L evel
Safety Loc k
(hold for 3 seconds)
Menu
ON/OFF
Bedding
appliance
angel
Safety lock
Indicator light
High
Low
Stop
1. Please spread out the bedding or mattress pad to lay flat (no folds).
2. Adjust the vacuum to the horizontal position.
3. When the device is in high mode, move back and forth every 10 seconds.
Please do not forcefully press down the collection head.
Adjusted to 90°, the device will not work.
• Adjusted to the horizontal position, the collection head is fastened in
place by a magnet.
• When cleaning furniture, cushions, carpets, etc. with the collection
head in between, the head is not locked in place and may be unstable.
ABOUT THE SENSORS
Dust Sensor:
Top
Dust and dust mite sensor works during use, and
light indicates the amount of dust on the surface
area.
*When cleaning carpets or other items with high
dust levels, indicator light will not turn green.
Magnet
Dust indicato r light
Red: Not clean
Yellow: Almost clean
Green: Clean
• Battery level indicator light will blink
when battery power is low.
• When battery runs out of power,
battery level indicator light will blink
rapidly before shutting off, and motor
will stop. Please recharge.
Notice:
High
Low
Battery Lev el
Safety Lock
(hold for 3 seconds)
Menu
ON/OFF
Indicator Light
Blinking: Low power
Blinking rapidly (then off ): No power
• Do not use this vacuum cleaner to clean the following objects:
· Liquid · Wet litter/debris · Powder · Broken Glass · Sharp or pin type objects
• Please do not clean large amounts of litter/debris in one pass to avoid blocking the intake port and decreasing suction.
• Do not use on floors, walls or furniture. Do not pull on the main body and avoid hitting walls or furniture.
• Empty the dust cup after use to avoid decreased suction or issues with the sensor.
5 6
Bedding Sensor:
Device will conserve power and decrease speed
when both sensors lose contact with the object
being cleaned.
Bottom
Bedding sensors
Page 5
CLEAR DUST (CLEAN DUST MESH FILTER) CLEANING AND MAINTENANCE
Please clear and clean regularly to maintain higher suction capabilities.
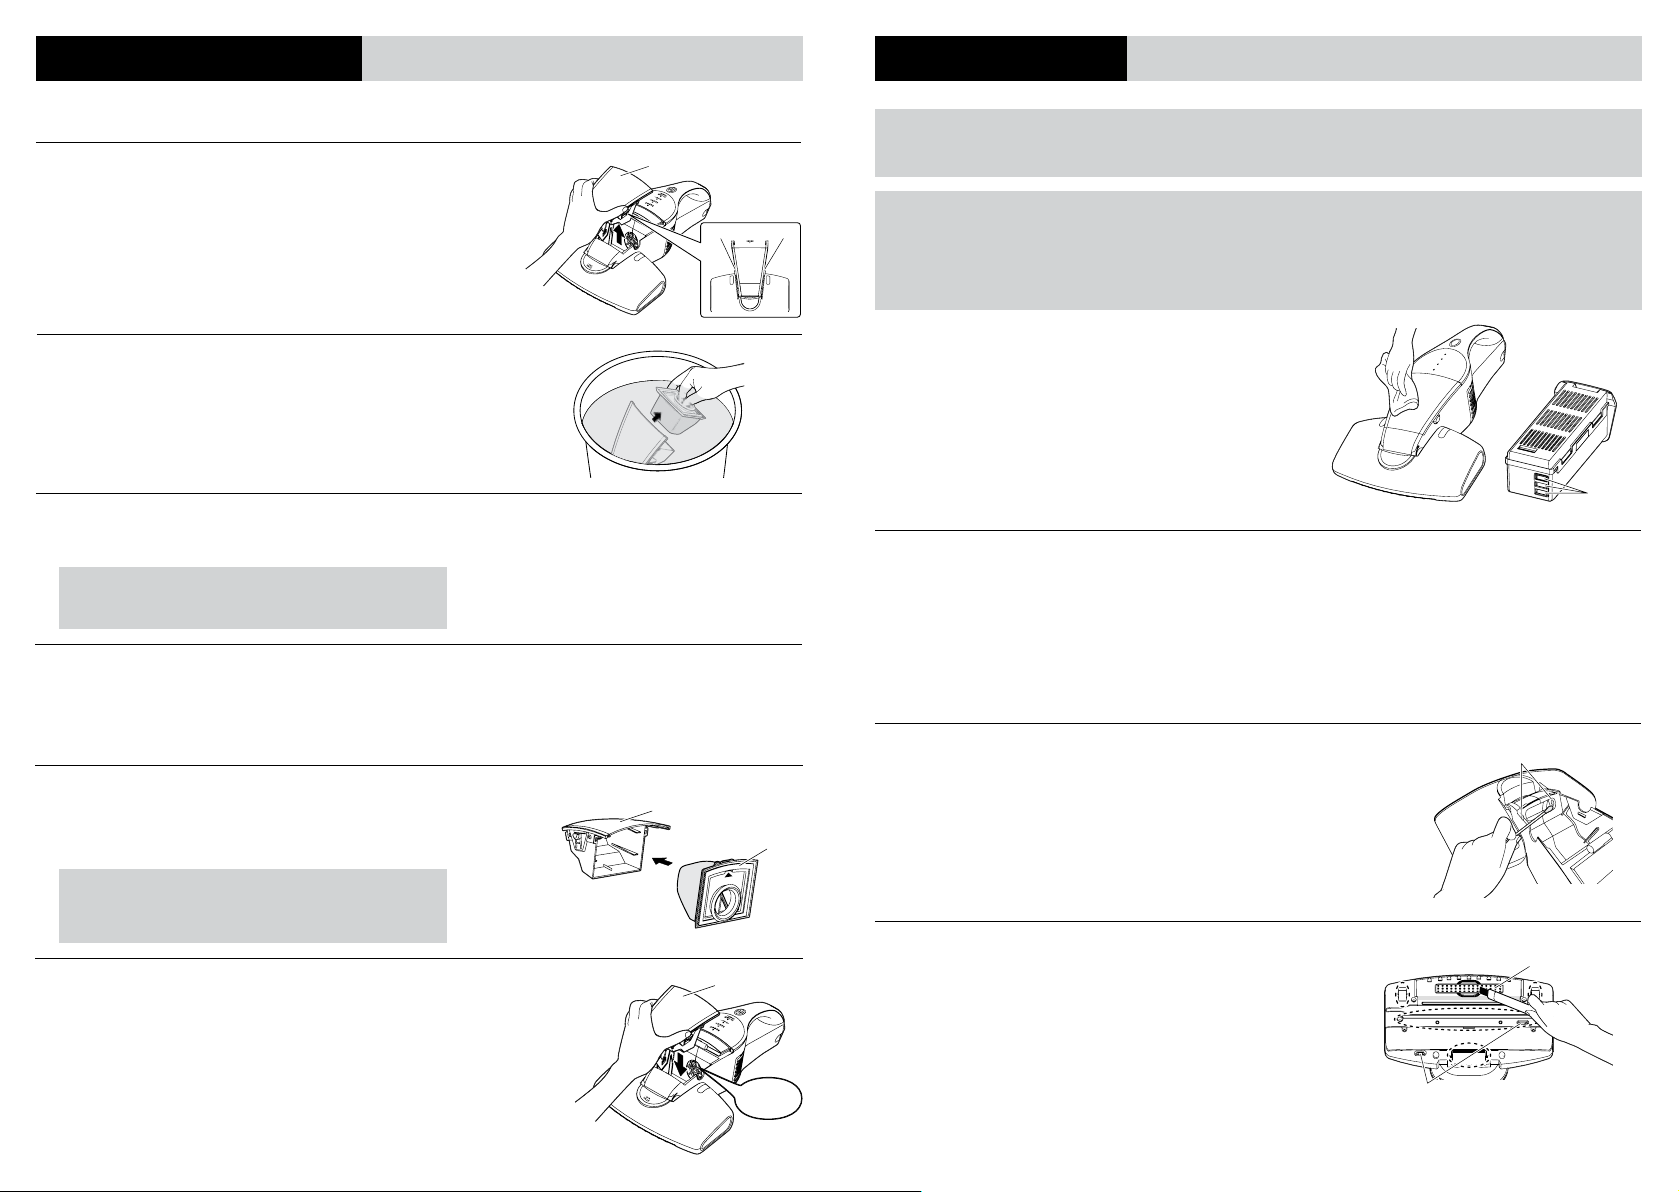
1. Remove the dust cup.
Press the buttons on either side of the dust cup to remove it.
2. Remove the mesh filter in water.
To avoid splattering of dust, please remove the mesh filter from the dust
cup in water.
3. Clean the mesh filter.
Remove the dust stuck to the filter, then rinse the filter with running water.
Soak the dust cup in water with a diluted cleaning agent for
several minutes for easy removal of accumulated dust.
4. Dry.
Place the dust cup and filter in a well ventilated area until fully dry.
*When cleaning the mesh filter set, please do not use washing machine
or other heated device as this may cause product deformation.
5. Reassemble the mesh filter.
Place the mesh filter set back into the dust cup.
*Pay attention to the direction.
Dust cup
Dust cup
Button Button
Mesh filter set
Warning:
Cleaning and maintenance must be done after removing the battery.
Notice:
Please do not splash water on the vacuum body as this could cause damage.
Use a diluted neutral cleaning agent.
Use of strong cleaning agents such as amyl acetic ester, alcohol, oil, etc. can cause fading, deformation or breakdown.
Vacuum Body:
Fully wring out a rag and use it to wipe down the body and any
remaining cleaner.
Battery:
Please use a dry rag on the terminal parts of the battery to clear
out accumulated dirt which can disrupt product use.
• Incorrect assembly of the mesh filter and dust cup can
allow dust and dirt inside which can damage the terminals.
Dust Indicator:
Dust indicator
Remove the dust cup and clean both sides of the sensors with a
cotton swab.
• Please clean regularly to avoid dust buildup, causing sensor
to function poorly.
Terminal
Notice:
Please reassemble correctly to avoid damaging the product.
6. Reattach the dust cup.
Place the mesh filter in the dust cup, and then place the dust cup back
into the vacuum body until you hear it click into place.
Please verify that both buttons are clicked firmly in place.
7 8
上
Dust cup
Clicking
sound
Collection Head:
• Clean hair, string and other small objects from the dust
intake port using tweezers to prevent dust buildup and
decreased suction. Please clean it regularly.
• Please clean dirt on the agitator with a brush.
• Please clean bedding sensors with a cotton swab.
• Clean regularly to prevent dust buildup causing sensors to
function poorly.
Agitator
Bedding sensor
Page 6
REPLACEABLE COMPONENTS ABOUT SPARE PARTS
Please follow the instructions below for replacing the mesh dust filter, mesh exhaust filter, and battery.
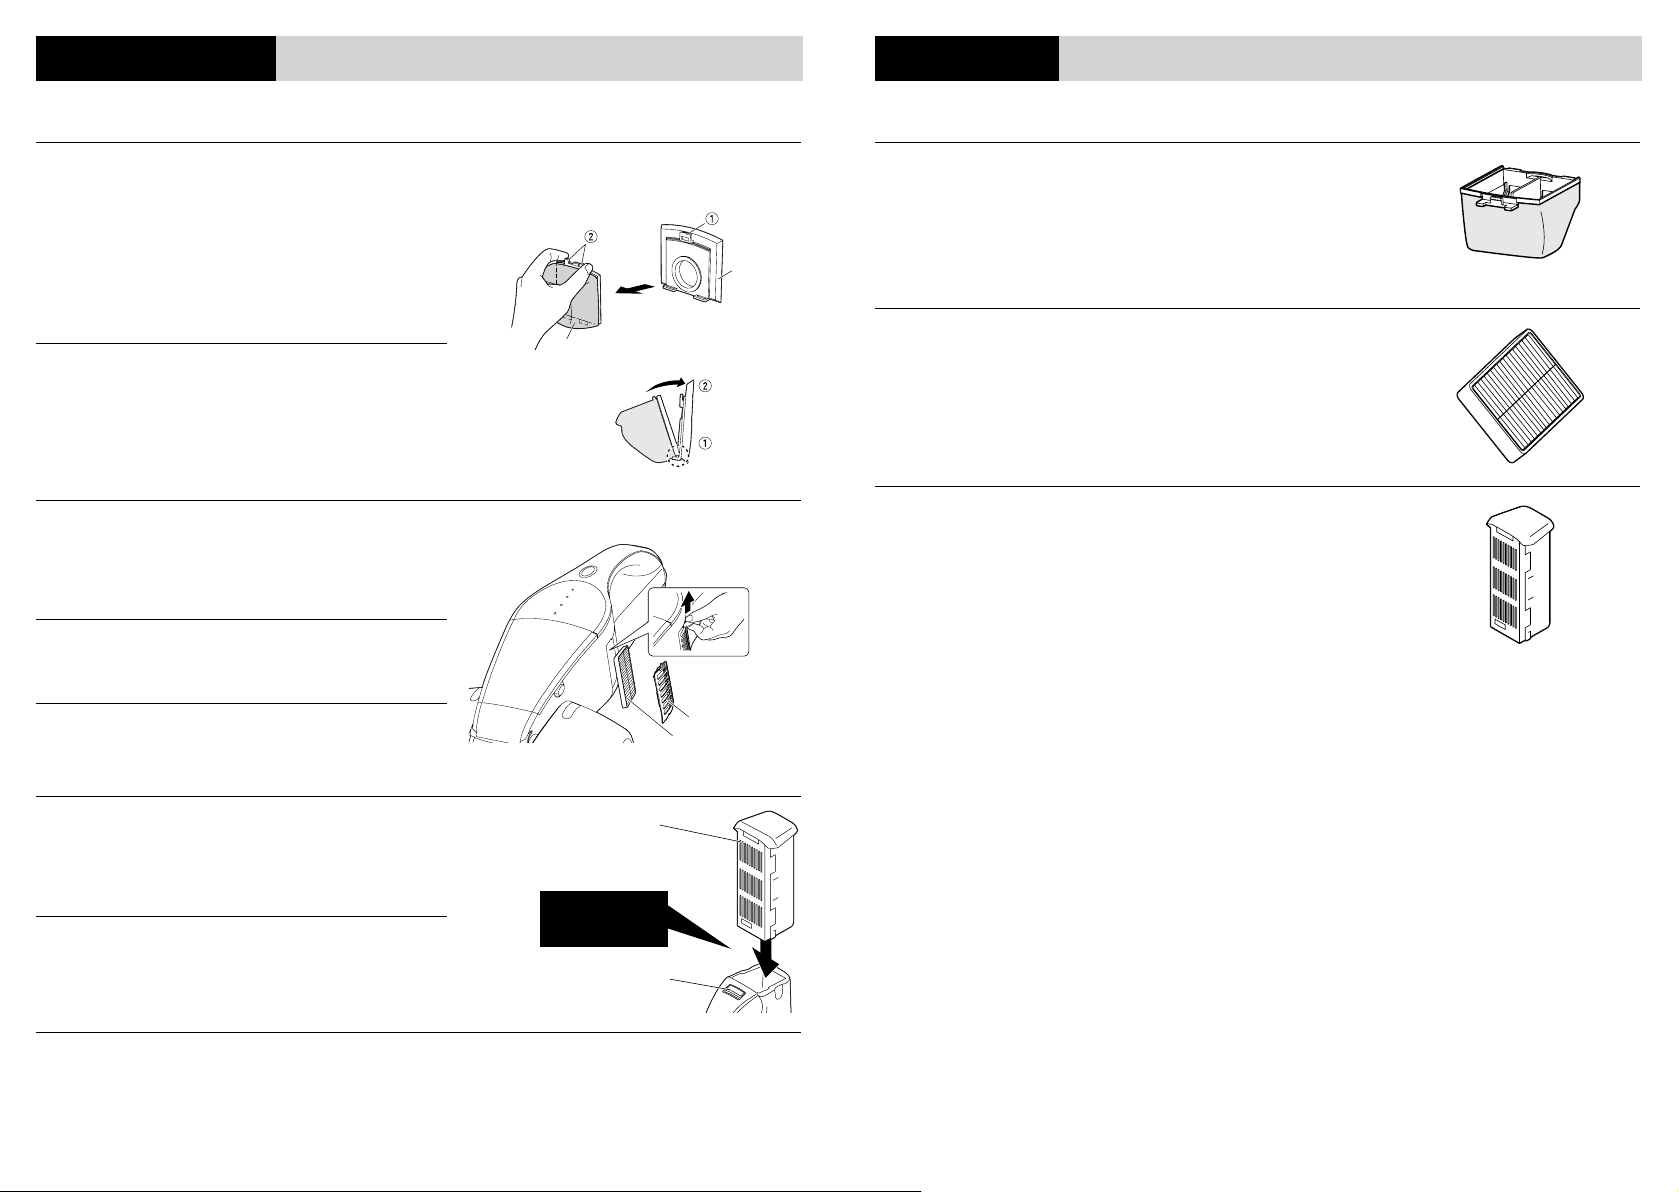
Dust Filter Replacement
*Please see P7 “Clear Dust” for how to remove filter set.
1. Remove the dust filter.
Remove
• Press the filter frame with fingers.
• Pull the mesh filter button out of the hole and the
filter away from frame.
2. Insert new dust filter.
• Insert the joint jaw of the new mesh filter into the
Dust mesh filter
Insert
Push in
frame.
• Press the filter button into the frame until it clicks
into place.
Insert joint jaw
Exhaust Filter Mesh Replacement
1. Remove exhaust filter cover.
• Use a coin to pull out filter covers on both sides.
2. Change exhaust filter.
• Remove filters from both sides and insert new filters.
Filter frame
Please purchase replacement parts from IRIS USA, Inc.
Dust Cup Mesh Filter, (3 PC)
Should be replaced every 6 to 12 months depending on frequency
of use. If broken or damaged, please replace.
Model number: CF-FS1
Exhaust Filter, (4 PC)
Should be replaced every 2 years. If broken or damage, or if poor
ventilation or abnormal odors occur, please replace.
Model number: CF-FH1
Battery
Should be replaced when operating time greatly decreases.
If broken or damaged, please replace.
Model number: CBN-1420WP (white)
CBN-1420B ( brown)
3. Replace filter cover.
• Put both filter covers back into place.
Battery Replacement
Battery
Exhaust filter cover
Exhaust filter
1. Remove the battery.
• Remove the battery by pressing the battery release button.
Insert until clicking
2. Assemble the new battery.
• Insert the new battery facing correctly until it clicks into place.
Failure to do so could result in battery falling out and breaking.
sound is heard
Battery release button
About Battery Disposal
Replace battery as instructed above. Please dispose of old battery according to proper governmental regulations.
9 10
IRIS USA, Inc.
13423 West Cactus Road
Surprise, AZ 85379
www.irisusainc.com
Page 7
TROUBLESHOOTING
SPECIFICATIONS
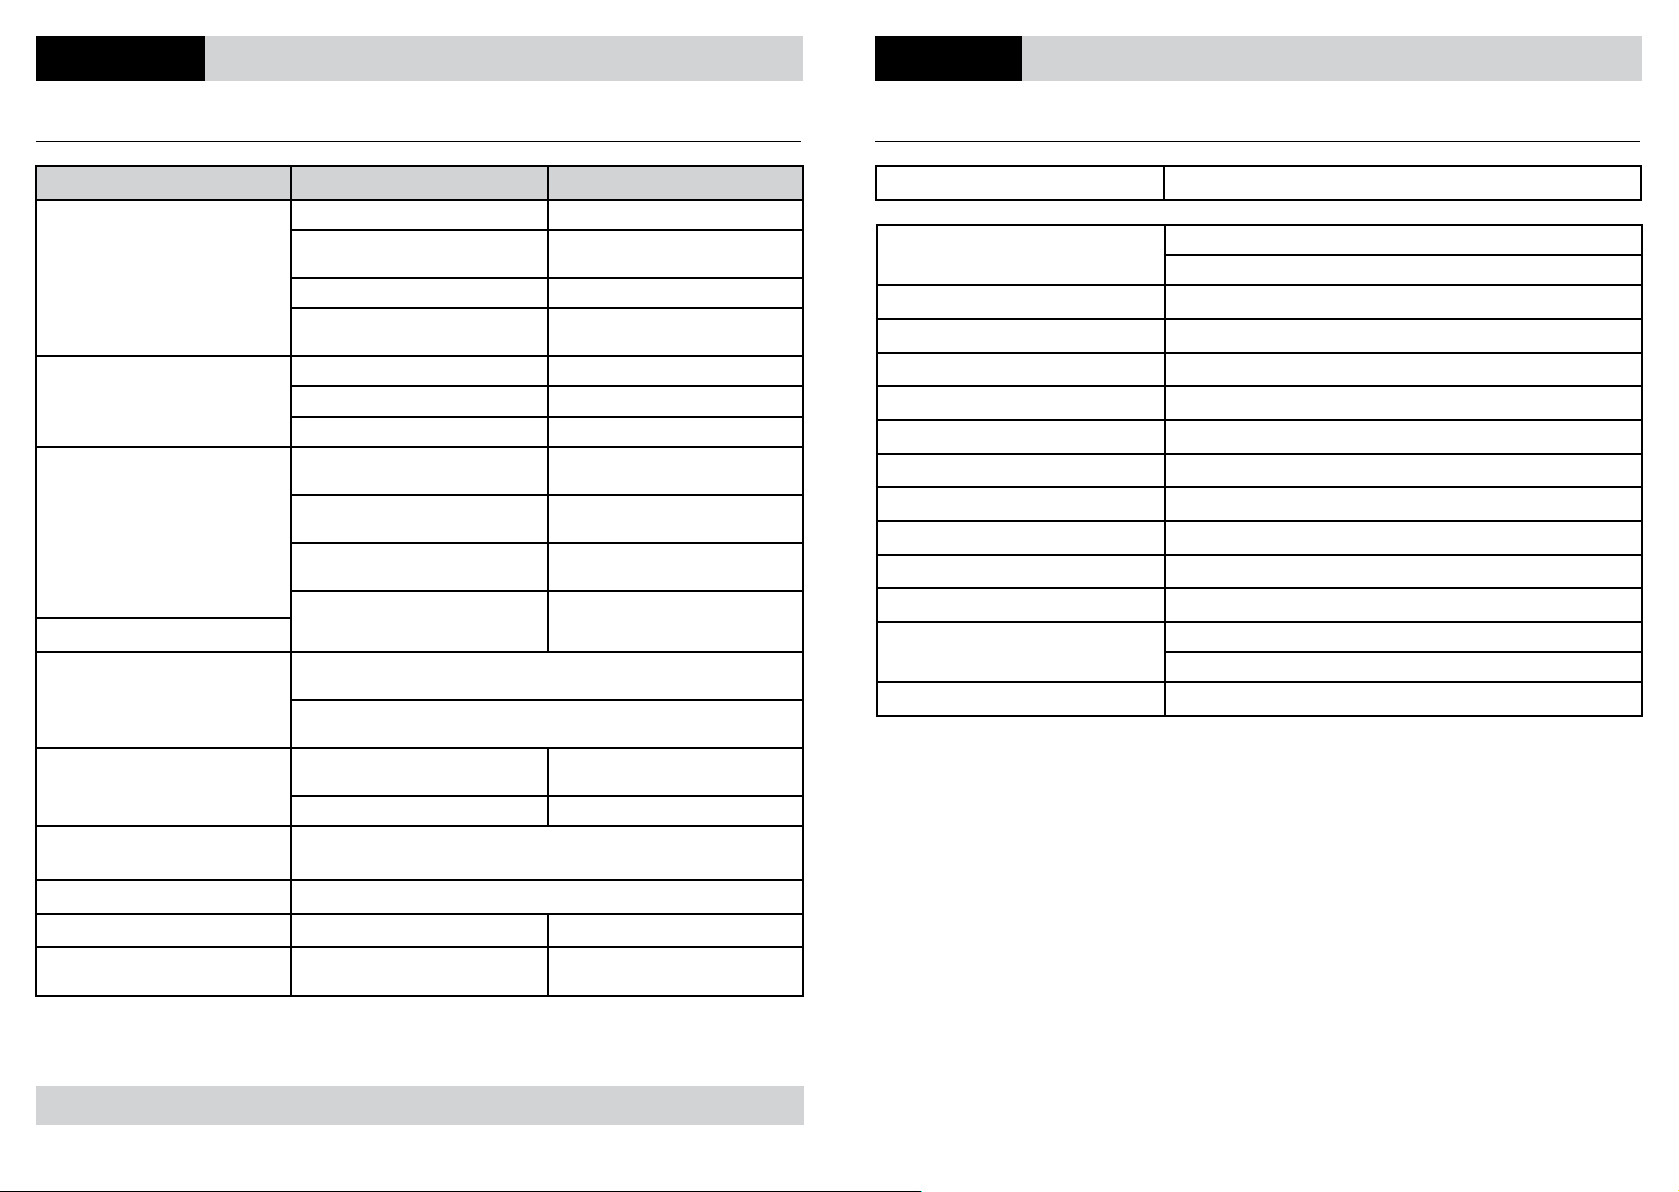
Before making repairs, please read the following content carefully to fix common problems.
STATUS POSSIBLE CAUSE REMEDY
Battery has no charge. Please charge battery.
Please make sure battery clicks into
place.
Please hold menu button for 3 seconds
to unlock.
Please make sure charger is plugged
in.
Please make sure charger is firmly in
place.
Please make sure battery clicks into
place.
Please remove battery and clean
terminals with a rag.
Please charge in recommended
temperature conditions.
Not powering on
Low suction
Won’t charge
Stops during operation
Battery level light is ON while
running
Decreased running time on full
battery
Battery not properly assembled.
Device is connected to the charger. Please unplug charger.
Still in safety lock mode.
Battery power is low. Please charge battery.
Filter is clogged. Please clean or replace.
Dust cup is clogged. Please remove dust.
Charger is not plugged into the power
outlet.
Charger plug isn’t fully plugged into the
charging port.
Battery not assembled correctly.
Battery is dirty.
Charging time varies based on conditions and lengths of use.
Charging may take up to 5 hours
If charged for more than 5 hours and indicator light is still on, please contact
IRIS USA, Inc. customer service.
Device was charged in a high
temperature area.
Battery has lost ability to hold charge. Please replace the battery.
Before making repairs, please read the following content carefully to fix common problems.
ITEMS INCLUDE
Product Size
Product Weight
Working Temperature Range
Running Time
Charger Length
Charger Model Number
Charger Manufacturer
Battery
Battery Capacity
Battery Lifespan
Rated Voltage
Charger Power
Charging Time
*Specifications are subject to change without prior notice.
Vacuum, charger, battery (1 PC)
OPERATING: 10.0x17.7x6.2in 254x449x158mm
STORED: 10.0x6.0x18.0in 254x153x458mm
About 4.6lbs/2.1kg (body/battery)
32°F/0°C ~ 104°F/40°C
About 20 minutes (full power/new battery/68°F/20°C)
70.8in / 1.8m
YLS0241A-T200120
Dongguan Yinli Electronics Co., Ltd.
Ni-MH battery (CBN-1420WP or CBN-1420B)
SC2,000mAh
About 300 times (full charges)
DC14.4V
Input: AC100-240V 50/60Hz 0.8 A
Output: DC20V 1.2 A
About 3.5 hours
Vacuum and charger heat up while
charging
Vacuum body heats up while running
Not running, but dust sensor is on
Running, but dust sensor is off
Temperature rise is caused by the current. This is normal.
Temperature rise is caused by the battery heating up from use. This is normal.
Sensor is coated in dust. Please clean sensor (P8).
Significantly lower suction.
Problems that could not be resolved.
Please contact the dealer of purchase or IRIS USA, Inc. customer service.
Warning:
Do not disassemble, repair or modify the product yourself.
11 12
Please clean or replace filter, and
empty contents from the dust cup.
Page 8

THE MANUFACTURER WARRANTS
Your IRIS USA, Inc. products are to be free from defects in material and workmanship under normal
non-commercial, household use, when operated and cared for in accordance with the Manufacturer’s written
instructions provided.
THE LIMITED LIFETIME WARRANTY (“WARRANTY”) DOES NOT COVER
Any damage caused by accident, misuse, or abuse, including without limitation, damage caused by use in a humid
area, improper cleaning, neglect, alteration, fire, theft, non-recommended temperature use and does not apply to
minor imperfections, scratches, stains, discoloration, surface markings as a result of shipping or other damage to
external or internal surfaces which does not impair the utility and/or functionality of the product.
TO OBTAIN SERVICE
If service should be necessary, you should contact IRIS USA, Inc. Customer Service (“Customer Service”) at
1-800-320-4747. You may then return the properly packaged product(s), (using adequate packing and shipping
material to prevent damage in transit), with postage prepaid along with name, address, telephone number, model
number, and proof of date of purchase (a copy of the receipt) and a detailed description of the claimed defect. This
warranty shall not cover any damage incurred to the products during transit to Customer Service. You shall have
the obligation and responsibility to: pay for all services and parts not covered by the warranty.
MANUFACTURER’S OBLIGATION
The Warranty may not be altered, expanded, extended, revised or varied except by written instrument executed by
the Manufacturer.
THE MANUFACTURER’S LIABILITY UNDER THIS WARRANTY IS LIMITED TO THE REPAIR OR REPLACEMENT OF
THE DEFECTIVE PRODUCT(S) AT THE MANUFACTURER’S SOLE AND EXCLUSIVE OPTION. THE MANUFACTURER
WILL REPLACE ANY ITEM FOUND TO BE DEFECTIVE IN MATERIAL OR WORKMANSHIP WITH THE MOST
COMPARABLE CURRENT ITEM. IRIS USA, INC. DOES NOT ACCEPT SPECIAL REQUESTS, NOR DO WE HAVE
THE ABILITY TO UPGRADE IN EXCHANGE FOR MONEY. THE MANUFACTURER SHALL NOT BE LIABLE FOR ANY
SPECIAL, INCIDENTAL OR CONSEQUENTIAL DAMAGES, WHETHER DIRECT OR INDIRECT. THE WARRANTIES SET
FORTH HEREIN ARE EXCLUSIVE AND NO OTHER WARRANTIES, EXPRESS OR IMPLIED, INCLUDING BUT NOT
LIMITED TO ANY WARRANTY OF MERCHANTABILITY OR FITNESS FOR A PARTICULAR PURPOSE OR USE ARE
MADE WITH RESPECT TO THE PRODUCTS.
Some states do not allow the exclusion of limitation of incidental or consequential damages, so the above
limitation exclusions may not apply. This Warranty gives specific legal rights, and there may also be other rights
which vary from state to state.
DISCONTINUED ITEM RETURNED
If the item returned is discontinued and is no longer available, IRIS USA, Inc. will automatically replace your item
with the most comparable item currently manufactured.
Limpiador recargable de colchón
by IRIS USA, Inc.
IC-FDC1U USER MANUAL
Gracias por su compra. Lea este manual de instrucciones para garantizar un
uso adecuado. Lea todas las precauciones de seguridad antes de usar. Guarde
este manual de instrucciones en un lugar seguro para consultas futuras.
CONTENIDO PÁGINA
Precauciones de seguridad ................................... 15
Piezas ................................................................... 17
Instrucciones de uso
Carga ................................................................... 18
Instrucciones de funcionamiento .......................... 19
Limpieza de la ropa de cama ................................ 20
Acerca de los sensores......................................... 20
Limpiar polvo (Limpiar el filtro de malla de polvo) . 21
Limpieza y mantenimiento .................................... 22
Componentes reemplazables................................ 23
Piezas de Repuesto .............................................. 24
Attn: Customer Service (Returns Department)
IRIS USA, Inc.
13423 West Cactus Road
Surprise, AZ 85379
©2017 IRIS USA, Inc. All rights reserved.
Otros
U
L
C
US
LISTED
13
Solución de problemas ......................................... 25
Especificaciones ................................................... 26
Garantía limitada por vida .....................................27
14
Page 9

PRECAUCIONES DE SEGURIDAD
Al usar un aparato eléctrico, hay ciertas precauciones básicas que se deben seguir siempre. Lea el manual antes
de usar y siga con cuidado todas las precauciones de seguridad para evitar lesiones o daños a la propiedad y
para reducir el riesgo de incendio o descarga eléctrica. Guarde las instrucciones en un lugar seguro para su uso
posterior.
INSTRUCCIONES DE SEGURIDAD IMPORTANTES
Al usar un aparato eléctrico, hay ciertas precauciones básicas que se deben seguir siempre, incluyendo las siguientes:
LEA TODAS LAS INSTRUCCIONES ANTES DE USAR ESTE APARATO
ADVERTENCIA: Para reducir el riesgo de incendio, descarga eléctrica o lesiones:
a) No dejar el aparato enchufado. Desconectar del tomacorriente cuando no esté en uso o antes de realizar el mantenimiento.
b) No permitir que se utilice como juguete. Se debe prestar mucha atención cuando los niños lo utilizan o si se lo utiliza cerca
de estos.
b) Usar sólo como se describe en este manual. Utilizar sólo los accesorios recomendados por el fabricante.
d) No utilizar si el cable o el enchufe están dañados. Si el aparato no funciona como debe, se ha caído, dañado, dejado a la
intemperie o caído al agua, devuélvalo a un centro de servicio.
e) No jalar o arrastrar por el cable, utilizar el cable como agarradera, cerrar una puerta sobre el cable o tirar del cable
alrededor de bordes o esquinas afiladas. No pasar el aparato sobre el cable. Mantener el cable alejado de las superficies
calientes.
f) No desenchufar tirando del cable. Para desenchufar, agarre el enchufe, no el cable.
g) No manipular el enchufe o el aparato con las manos mojadas.
h) No poner ningún objeto en las aberturas. No utilizar con ninguna abertura bloqueada; mantener libre de polvo, pelusas,
cabellos o cualquier cosa que pueda reducir el flujo de aire.
i) Mantener pelos, ropa suelta, dedos y todas las partes del cuerpo lejos de las aberturas y las piezas móviles.
j) Apagar todos los controles antes de desenchufar.
k) Tener sumo cuidado al limpiar las escaleras.
l) No usar para recoger líquidos inflamables o combustibles, como la gasolina, ni usar en áreas donde estos puedan estar
presentes.
m) No recoger nada que se esté quemando o humeando, como cigarrillos, fósforos o cenizas calientes.
n) No usar sin la bolsa de polvo y/o filtros en su lugar.
o) No usar en exteriores o sobre superficies mojadas.
GUARDE ESTAS INSTRUCCIONES
Batería
• Colocar la batería en agua para evitar sobrecalentamiento puede causar fugas o incendios.
• Utilice solamente la batería recomendada por el fabricante. El uso de cualquier otra batería puede causar riesgo de incendio.
• Utilice únicamente el cargador recomendado por el fabricante. El uso de otro dispositivo para cargar la batería puede causar fugas,
sobrecalentamiento u otros daños.
• Dejar caer o presionar con fuerza la batería puede causar fugas, sobrecalentamiento u otros daños.
• La batería puede tener fugas si se usa mal, se deja caer o se daña. Evite el contacto, ya que esto puede causar irritación o quemaduras.
Enjuagar con agua. Si el líquido de la batería entra en contacto con los ojos, no use las manos para limpiarse o frotarse. Enjuáguese bien
los ojos con agua y busque ayuda médica.
• No lo utilice si la batería o el vacío están dañados o modificados, ya que podrían producirse incendios, explosiones o lesiones.
• No conecte las terminales de alimentación a cualquier otra pieza de metal. (No conecte las baterías entre sí con cadenas metálicas,
pines, etc., ya que puede causar fugas, sobrecalentamiento, roturas o incendios.)
• No salpique ni sumerja la batería en agua ya que puede causar un cortocircuito resultado de un sobrecalentamiento.
• Para garantizar la seguridad del producto, no desarme, repare o vuelva a armar la batería por su cuenta, ya que esto podría causar fugas,
sobrecalentamiento o roturas. Si se produce un problema, póngase en contacto con el Servicio de Atención al Cliente de IRIS USA, Inc.
• No exponga la aspiradora y la batería al fuego o a temperaturas por encima de 265 °F/130 °C, ya que esto puede hacer que el producto
explote.
• Siga las instrucciones de carga cuidadosamente y dentro del rango óptimo de temperatura (41 °F/5 °C a 95 °F/35 °C) para reducir el
riesgo de incendio o daños.
• Tenga cuidado de no presionar el botón de menú cuando recoja o transporte la aspiradora ya que esto puede provocar que el producto
comience a funcionar casualmente y provocar accidentes.
15 16
No salpique ni sumerja la aspiradora y la batería en agua.
No utilizar cerca del agua o en espacios con altos niveles de humedad, tales como los cuartos de baño.
No use un limpiador líquido ni materiales húmedos ya que pueden causar cortocircuitos, descargas eléctricas o roturas.
No utilizar mientras la unidad se esté cargando. Desenchufe la unidad antes de usarla. (Los usos inadecuados pueden causar lesiones, daños a
la propiedad, deformación, etc.)
No desinstalar, reparar o vuelva a ensamblar la batería por cuenta propia para evitar incendios, lesiones o un funcionamiento incorrecto. (Cambie
cualquier pieza reemplazable de acuerdo con las instrucciones del manual.)
Quite el enchufe del tomacorriente y quite el polvo o suciedad con frecuencia para evitar descargas eléctricas o lesiones.
Cargue la batería en un tomacorriente de 120 V de CA. No cargar en un tomacorriente de CC o con un generador eléctrico ya que esto puede
causar incendios o descargas eléctricas.
Limpie el polvo del dispositivo con frecuencia para evitar acumulaciones que reduzcan el aislamiento.
Asegúrese de que el enchufe esté bien insertado a la base de alimentación para evitar descargas eléctricas, cortocircuitos o incendios.
Para evitar descargas eléctricas, quite la batería antes de cambiar las piezas reemplazables, hacer ajustes o guardar el vacío.
Retire la batería cuando la unidad no esté en uso.
Cuando surjan problemas, deje de usarlo de inmediato para evitar la generación de humo, incendios o descargas eléctricas. (Interrumpa la
alimentación, desconecte el dispositivo y contacte al servicio de atención al cliente de IRIS USA, Inc. para determinar el problema y hacer
cualquier reparación.)
Ejemplos de problemas:
• El dispositivo no funciona cuando el interruptor está en "ON" (encendido).
• El dispositivo se detiene constantemente cuando está en funcionamiento.
• La carga o el cable de carga no funcionan bien.
• El dispositivo está dañado o se sobrecalienta cuando no debería.
• El dispositivo huele como si se estuviera quemando.
• El dispositivo hace un ruido anómalo cuando está en funcionamiento.
Mantener la aspiradora alejada del calor ya que podría dañarse y causar un cortocircuito o incendio.
No encender la aspiradora por períodos prolongados de tiempo.
Usar la aspiradora con acumulación de polvo puede causar sobrecalentamiento, daño del producto, roturas o incendios.
No arrastre el dispositivo ya que podría dañar el piso.
No utilizar ni almacenar el producto en áreas con mucho calor donde las temperaturas lleguen a 104°F/40°C (vehículos al sol, cerca de
calentadores, etc.) ya que la aspiradora puede dañarse y causar cortocircuitos o incendios.
No dejar caer, romper, golpear con otros objetos ni aplicar presión sobre la aspiradora.
No intente reparar o modificar la unidad o la batería, excepto como se indica en las instrucciones de uso y cuidado. Cualquier otro servicio debe
ser realizado por un representante de servicio autorizado.
Limpie el contenido del recipiente de polvo y evite que se esparza el polvo. (Las piezas del filtro de malla se deben limpiar en agua.)
No usar sin el recipiente de polvo y/o filtros en su lugar.
Ensamble correctamente el recipiente de polvo y colóquelo en el dispositivo para evitar lesiones o daños al producto.
Tome el dispositivo por el asa para evitar riesgos de caídas o daños a la propiedad.
Precauciones de uso
Usar solo con productos de tela como colchones, futones, almohadas, alfombras, sofás, asientos de vehículos, etc.
Solo para uso doméstico.
No usar para limpiar lo siguiente:
• Líquidos
• Suciedad/desechos húmedos
• Polvo
• Vidrios rotos
• Objetos filosos o puntiagudos
• No usar sobre pisos, paredes o muebles sin tapizar. No lo hale por el cuerpo principal y evite golpear las paredes o muebles.
• Antes de usarlo, asegúrese de que el filtro esté bien instalado.
• Para uso en interiores y en vehículos.
Page 10

PIEZAS
Advertencia
NO CARGUE LA BATERÍA CON UNA MARCA DE CARGADOR DIFERENTE.
Cuerpo de la aspiradora
Luz
indicadora
RECIPIENTE DE POLVO
Luz indicadora de polvo
Battery Level
Safety Lock
(hold for 3 sec)
Juego de filtro de malla
Marco del filtro de malla
Filtro de malla
(reemplazable)
Recipiente de polvo
High
Low
Botón de liberación de la batería
Puerto de
alimentación
Botón de menú
Asa
Filtro de malla
de salida
(reemplazable)
Salida (izquierda y derecha)
Cabezal de colección
Batería
(reemplazable)
Cubierta del
filtro de salida
• La batería no viene completamente cargada. Cárguela por completo antes del primer uso. La carga completa
tomará aproximadamente 3.5 horas.
• No use el dispositivo mientras se está cargando.
1. Coloque la batería en la aspiradora.
Presione la batería para que entre en la ranura y hasta que oiga un
clic.
*Si no inserta la batería por completo en el tomacorriente afectará
el funcionamiento y puede causar lesiones o daños.
Inserte la batería con firmeza en la
ranura hasta que oiga un clic.
Clic!
Batería
Insertar hasta oír
un clic
Botón de liberación
de la batería
2. Conecte el enchufe del cargador al tomacorriente.
Tomacorriente
3. Inserte el cargador al tomacorriente.
Luz indicadora
Inserte el cargador al tomacorriente con
firmeza.
* Una luz indicadora roja significa que el dispositivo se está
cargando.
Batería
High
Low
Batter y Level
Safety L ock
(hold for 3 seconds)
Enchufe del cargador
ENCENDIDO
Carga
APAGADO
Completa
Cabezal de colección
Puerto de entrada de polvo
Agitador
Cargador
4. Completa.
Sensores
La luz indicadora se apagará cuando se termine la carga.
• Para el primero uso o tras no usarla por más de 6 meses, cárguela 2 o 3 veces antes de usarla para
completar la carga.
• Si pasaron más de 10 días desde el último uso, cárguela antes del uso siguiente.
• La carga continua disminuirá el tiempo de carga.
• El tiempo de carga y ejecución variará debido a las condiciones de temperatura y funcionamiento.
• Cargar entre temperaturas de 41 °F/5 °C y 95 °F/35 °C. Cargar en temperaturas demasiado bajas o altas
pueden causar disminuciones en el tiempo de funcionamiento o duración de la carga.
• El cargador se calentará. Esto es normal.
5. Quitar la batería.
• Presione el botón de liberación de la batería y quite la batería.
17 18
El tiempo de carga estándar es de aproximadamente 3.5 horas.
Page 11

INSTRUCCIONES DE FUNCIONAMIENTO
LIMPIEZA DE ROPA DE CAMA
1. Ajustar el ángulo del cabezal de colección.
Coloque la aspiradora en el piso y luego ajuste el ángulo hacia
arriba y abajo con la mano.
• Coloque el cuerpo de la aspiradora en posición horizontal
cuando la utilice para superficies suaves como ropa de
cama.
• El cabezal de colección está sujetado en posición horizontal
mediante un imán que lo mantiene fijo durante el uso.
2. Desbloquear.
Mantenga pulsado del botón de menú por 3 segundos, espere
que se encienda el indicador de bloqueo de seguridad y luego
comience a limpiar como se indica a continuación.
• El bloqueo de seguridad se activará automáticamente tras un
minuto de desuso.
• El dispositivo no funcionará cuando esté bloqueado. Pulsar
el botón de menú para comenzar mientras está bloqueada
hará que la luz de seguridad parpadee.
3. Comenzar a limpiar.
Pulsar el botón de menú cambia el modo.
• Pulse el botón de menú para cambiar al modo alto.
• Pulse el botón de menú otra vez para cambiar al modo bajo.
4. Cuando termine de limpiar.
Pulse el botón de menú para cambiar el modo hasta que la
aspiradora se detenga y la luz indicadora se apague.
• El dispositivo se bloqueará automáticamente tras un
minuto de desuso.
• Siga el paso 2 para reiniciar.
Ángulo de almacenamiento
Ángulo pa ra material
de alfombr a o
acolchado del vehículo
Ángulo pa ra
material d e tela o
ropa de cama
High
Low
Battery L evel
Safety Loc k
(hold for 3 seconds)
Menu
ON/OFF
High
Low
Battery L evel
Safety Loc k
(hold for 3 seconds)
Menu
ON/OFF
Bloqueo de
seguridad
Luz indicadora
High
Low
Stop
1. Extienda la ropa de cama o edredón para que quede plano (sin arrugas).
2. Coloque la aspiradora en posición horizontal.
3. Cuando el dispositivo esté en el modo alto, muévalo hacia atrás y adelante cada 10 segundos.
No presione el cabezal de colección hacia abajo con fuerza.
Ajustado a 90°, el dispositivo no funcionará.
• En posición horizontal, el cabezal de colección está sujetado mediante un
imán.
• Al limpiar muebles, almohadones, alfombras, etc., con el cabezal de
colección en el medio, el cabezal no está bloqueado y puede ser inestable.
ACERCA DE LOS SENSORES
Sensor de polvo:
El sensor de polvo y ácaros del polvo funciona
mientras lo usa, y la luz indica la cantidad de
polvo en el área de la superficie.
*Cuando limpie alfombras u otros elementos con
gran cantidad de polvo, la luz indicadora no se
Tapón del filtro
Luz indicadora de polvo
Rojo: Mucho polvo
Amarillo: Algo de polvo
Verde: Limpio
encenderá verde.
Magneto
19
High
Low
Battery Lev el
Safety Lock
(hold for 3 seconds)
Menu
ON/OFF
• La luz indicadora de nivel de batería
parpadeará cuando el nivel de batería esté
bajo.
• Cuando la batería se agote, la luz indicadora
de nivel de batería parpadeará rápido antes de
apagarse y el motor se detendrá. Recárguela.
Aviso:
• No usar para limpiar lo siguiente::
· Líquidos · Suciedad/desechos húmedos · Polvo · Vidrios rotos · Objetos filosos o puntiagudos
• No limpie cantidades grandes de suciedad/desechos en una pasada para evitar que se bloquee el puerto de entrada y que disminuya
la succión.
• No usar sobre pisos, paredes o muebles. No lo hale por el cuerpo principal y evite golpear las paredes o muebles.
• Para evitar una disminución de succión, filtro obstruido, o daños en el producto, vacíe el recipiente de polvo después de su uso.
Luz indicadora
Parpadeo: Baja potencia
Parpadeo rápido
(luego se apaga): Sin alimentación
Sensor de ropa de cama:
El dispositivo conservará energía y disminuirá
la velocidad cuando ambos sensores pierdan
contacto con el objeto que se limpia.
Disminución de velocidad, pérdida de succión,
detención inmediata.
Parte inferior
20
Sensor de ropa de cama
Page 12

LIMPIAR POLVO (LIMPIAR EL FILTRO DE MALLA DE POLVO)
LIMPIEZA Y MANTENIMIENTO
Despejar y limpiar con frecuencia para mantener la capacidad máxima de succión.
1. Quite el recipiente de polvo.
Recipiente de polvo
Pulse los botones de ambos lados del recipiente de polvo para quitarlo.
Botón Botón
2. Quite el filtro de malla en el agua.
Para evitar el esparcimiento de polvo, quite el filtro de malla del
recipiente de polvo en el agua.
3. Limpie el filtro de malla.
Quite la suciedad adherida al filtro y luego enjuague el filtro con agua corriente.
Remoje el recipiente de polvo en agua con un agente de limpieza diluido por varios
minutos para la remoción del polvo acumulado.
4. Secar.
Coloque el recipiente de polvo y el filtro en un área bien ventilada hasta que se seque por completo.
*Cuando limpie el conjunto del filtro de malla, no use la lavadora u otros dispositivos con calor ya que pueden
deformar el producto.
5. Vuelva a ensamblar el filtro de malla.
Coloque el conjunto del filtro de malla en el recipiente de polvo.
*Preste atención a la dirección.
Recipiente de polvo
Juego de filtro de malla
Advertencia:
La limpieza y el mantenimiento se deben hacer después de quitar la batería.
Aviso:
No salpique agua sobre el cuerpo de la aspiradora ya que esto podría causar daños.
Use un agente limpiador diluido y neutro.
El uso de agentes limpiadores potentes como éster acetato de amilio, alcohol, aceite, etc., puede causar descoloramiento,
deformación y rotura.
Cuerpo de la aspiradora:
Escurra bien un trapo y úselo para quitar lo que reste de
limpiador en el cuerpo.
Batería:
Use un trapo seco sobre las piezas terminales de la batería para quitar la suciedad acumulada la cual puede
estropear el uso del producto..
• El ensamblaje incorrecto del filtro de malla y del recipiente de polvo puede permitir el ingreso de polvo y
suciedad los cuales pueden dañar las terminales.
Indicador de polvo:
Indicador de polvo
Quite el recipiente de polvo y limpie ambos lados de los sensores
con un hisopo.
• Limpie con frecuencia para evitar la acumulación de polvo,
lo que disminuye la eficacia del sensor.
Terminal
Aviso:
Vuelva a ensamblar correctamente para evitar daños al producto.
6. Volver a colocar el recipiente de polvo.
Coloque el filtro de malla en el recipiente de polvo y luego coloque la
parte posterior en el cuerpo de la aspiradora hasta que oiga un clic.
Verifique que ambos botones hagan clic.
21
上
Recipiente de polvo
Clic!
Cabezal de colección:
• Quite los cabellos, hilos y otros objetos pequeños del
puerto de entrada de polvo con pinzas para evitar la
acumulación de polvo y la disminución de succión. Límpielo
con frecuencia.
• Limpie la suciedad del agitador con un cepillo.
• Limpie el sensor de ropa de cama con un hisopo.
• Límpielo con frecuencia para evitar la acumulación de
polvo, lo que disminuye la eficacia del sensor.
Agitador
Sensor de ropa de cama
22
Page 13

COMPONENTES REEMPLAZABLES
ACERCA DE LAS PIEZAS DE REPUESTO
Siga las instrucciones a continuación para reemplazar el filtro de malla del polvo, el filtro de malla de salida, y la
batería.
Reemplazo del ltro del polvo
*Consulte la pág. 21 “Limpiar polvo” donde se detalla cómo quitar el conjunto del filtro.
1. Quite el filtro del polvo.
• Presione el marco del filtro con los dedos.
Quitar
Marco del filtro
• Hale el botón del filtro de malla fuera del conjunto y
el filtro fuera del marco.
2. Inserte el nuevo filtro de polvo.
• Inserte la mordaza de la junta del nuevo filtro de
malla en el marco.
• Pulse el botón del filtro contra el marco hasta que
haga clic.
Filtro de malla de polvo
Inserte
Empujar
Insertar la
mordaza de
la junta
Reemplazo del ltro de malla de salida
1. Quite la cubierta del filtro de salida.
• Use una moneda para quitar las cubiertas de los
filtros de ambos lados.
2. Cambie el filtro de salida.
• Quite los filtros de ambos lados e inserte filtros nuevos.
Compre piezas de repuesto de IRIS USA, Inc.
El ltro de malla del recipiente de polvo, (3 PC)
se debe reemplazar cada 6 a 12 meses en función de la frecuencia
de uso. Si se rompe o daña, reemplácelo.
Número de modelo: CF-FS1
El ltro de salida, (4 PC)
se debe reemplazar cada 2 años. Si se rompe o daña, hay poca
ventilación o se generan olores anómalos, reemplácelo.
Número de modelo: CF-FH1
Batería
La batería se debe reemplazar cuando el tiempo de funcionamiento
disminuye en gran medida. Si se rompe o daña, reemplácela.
Número de modelo: CBN-1420WP (Blanco)
CBN-1420B (Marrón )
3. Vuelva a colocar la cubierta del filtro.
• Coloque ambas cubiertas de los filtros de regreso
en su lugar.
Reemplazo de la batería
Batería
Cubierta del filtro
de salida
Filtro de salida
1. Quite la batería.
• Quite la batería pulsando el botón de liberación de la batería.
Insertar hasta oír
2. Instale la batería nueva.
• Inserte la batería nueva con la polaridad correcta hasta
que haga clic. De lo contrario la batería podría caerse
y romperse.
un clic
Botón de liberación
de la batería
Acerca de la eliminación de la batería
Reemplace la batería como se indicó anteriormente. Elimine la batería vieja de acuerdo con los reglamentos
gubernamentales correspondientes.
23
IRIS USA, Inc.
13423 West Cactus Road
Surprise, AZ 85379
www.irisusainc.com
24
Page 14

SOLUCIÓN DE PROBLEMAS
ESPECIFICACIONES
Antes de hacer reparaciones, lea el siguiente contenido en detalle para solucionar los problemas comunes.
ESTADO POSIBLE CAUSA SOLUCIÓN
La batería no está cargada. Cargue la batería.
Asegúrese de que la batería haga clic cuando
la inserte.
Mantenga pulsado el botón de menú por 3
segundos para desbloquear.
Los sensores de ropa de cama no funcionan
o funcionan con lentitud sobre negro/azul
oscuro. Limpie de otra manera.
Asegúrese de que el cargador esté
conectado.
Asegúrese de que la batería haga clic cuando
la inserte.
Quite la batería y limpie las terminales con
un trapo.
Cargar bajo las condiciones de temperatura
recomendadas.
Reemplazar la batería.
Limpie o reemplace el filtro y vacíe el
contenido del recipiente de polvo.
No se enciende
Bajo poder de succión
No se carga
Se detiene mientras funciona
La luz de nivel de batería está
ENCENDIDA mientras funciona
Tiempo de funcionamiento
reducido con la batería
completamente cargada
La aspiradora y el cargador se
calientan mientras se carga
El cuerpo de la aspiradora se
calienta mientras funciona
No funciona, pero el sensor de polvo está
encendido
Funciona, pero el sensor de polvo está
apagado
La batería no está bien colocada.
El dispositivo está conectado al cargador. Desconecte el cargador.
Aún está en modo de bloqueo de seguridad.
La batería tiene poca carga. Cargue la batería.
El filtro está tupido. Limpiar o reemplazar.
El recipiente de polvo está tupido. Quite el polvo.
El cargador no está enchufado al
tomacorriente.
El enchufe no está bien conectado al puerto
de carga.
La batería no está bien colocada.
La batería está sucia.
El tiempo de carga varía en función de las condiciones y el período de uso. La carga puede
tomar hasta 5 horas.
Si la carga por más de 5 horas y la luz indicadora sigue encendida, comuníquese con el
servicio de atención al cliente de IRIS USA, Inc.
Se cargó el dispositivo en un área con
temperatura alta.
La batería perdió la capacidad de retener
carga.
La corriente causa el aumento de temperatura. Esto es normal.
El calentamiento de la batería por el uso causa el aumento de temperatura. Esto es normal.
El sensor está cubierto de polvo. Limpie el sensor (pág. 22).
Muy bajo poder de succión.
Antes de hacer reparaciones, lea el siguiente contenido en detalle para solucionar los problemas comunes.
ARTÍCULOS INCLUIDOS
TAMAÑO DEL PRODUCTO
PESO DEL PRODUCTO
RANGO DE TEMPERATURA DE
FUNCIONAMIENTO
TIEMPO DE FUNCIONAMIENTO
LONGITUD DEL CARGADOR
NÚMERO DE MODELO DEL CARGADOR
FABRICANTE DEL CARGADORR
BATERÍA
CAPACIDAD DE LA BATERÍA
VIDA ÚTIL DE LA BATERÍA
TENSIÓN NOMINAL
POTENCIA DEL CARGADOR
TIEMPO DE CARGA
*Especificaciones sujetas a cambios sin previo aviso.
Aspiradora, cargador, batería (1 pieza)
OPERARIO: 10.0x17.7x6.2in 254x449x158mm
ALMACENAMIENTO: 10.0x6.0x18.0in 254x153x458mm
Aproximadamente 4.6 libras/2.1 kg (cuerpo/batería)
32°F/0°C ~ 104°F/40°C
Aproximadamente 20 minutos (carga completa/batería nueva/68 °F/20 °C)
70.8in / 1.8m
YLS0241A-T200120
Dongguan Yinli Electronics Co., Ltd.
Ni-MH batería (CBN-1420WP o CBN-1420B)
SC2,000mAh
Aproximadamente 300 veces (cargas completas)
DC14.4V
ENTRADA: AC100-240V 50/60Hz 0.8 A
SALIDA: DC20V 1.2 A
Aproximadamente 3.5 horas
Problemas que no se pueden resolver.
Comuníquese con su distribuidor o con el servicio de atención al cliente de IRIS USA, Inc.
Advertencia:
No desmonte, repare o modifique el producto.
25
26
Page 15

EL FABRICANTE GARANTIZA
Los productos IRIS USA, Inc. están libres de defectos en los materiales y mano de obra bajo uso normal
doméstico, no comercial, cuando se los utiliza y cuida de acuerdo con las instrucciones por escrito del fabricante
que se proporcionan.
LA GARANTÍA LIMITADA DE POR VIDA ("GARANTÍA") NO CUBRE
Todo daño causado por accidente, uso incorrecto o abuso, incluidos entre otros, daño causado por el uso en un
área húmeda, limpieza inadecuada, negligencia, alteración, incendio, robo, temperatura de uso no recomendada y
no aplica a imperfecciones menores, rayones, manchas, decoloración, marcas en la superficie como resultado del
envío u otro daño a las superficies externas o internas que no perjudiquen la utilidad o funcionalidad del producto.
PARA OBTENER SERVICIO AL CLIENTE
Si necesita ayuda, debe comunicarse con el Servicio al cliente de IRIS USA, Inc. (“Servicio al cliente”) al
1-800-320-4747. Puede devolver el producto empacado apropiadamente (usando el embalaje y material de
protección adecuados para evitar que se dañe durante el envío) con el franqueo prepagado, nombre, dirección,
número de teléfono, número de modelo y prueba de la fecha de compra (una copia del recibo) y una descripción
detallada de la avería reclamada. Esta garantía no cubrirá los daños causados a los productos durante el envío al
Servicio al cliente. Usted tiene la obligación y responsabilidad de: pagar todos los servicios y piezas que no cubra
la garantía.
OBLIGACIÓN DEL FABRICANTE
La Garantía no se puede alterar, expandir, extender, revisar o variar excepto bajo instrumento por escrito del
fabricante.
LA RESPONSABILIDAD DEL FABRICANTE BAJO ESTA GARANTÍA ESTÁ LIMITADA A LA REPARACIÓN O
REEMPLAZO DEL PRODUCTO (O PRODUCTOS) DEFECTUOSO(S) A LA DISCRECIÓN ÚNICA Y EXCLUSIVA DEL
FABRICANTE. EL FABRICANTE REEMPLAZARÁ CUALQUIER ARTÍCULO DEFECTUOSO EN MATERIAL O MANO
DE OBRA CON EL ARTÍCULO ACTUAL QUE MEJOR SE COMPARE. IRIS USA, INC. NO ACEPTA SOLICITUDES
ESPECIALES, NI TIENE LA POSIBILIDAD DE HACER MEJORAS A CAMBIO DE DINERO. EL FABRICANTE NO SERÁ
RESPONSABLE POR DAÑOS ESPECIALES, INCIDENTALES O CONSECUENTES, SEAN DIRECTOS O INDIRECTOS.
LAS GARANTÍAS AQUÍ ESTABLECIDAS SON EXCLUSIVAS Y NO SE HACE NINGUNA OTRA GARANTÍA, EXPRESA O
IMPLÍCITA, INCLUIDAS ENTRE OTRAS, GARANTÍA DE COMERCIALIZACIÓN O APTITUD PARA UN PROPÓSITO O
USO ESPECÍFICO CON RESPECTO A LOS PRODUCTOS.
Algunos estados no permiten la exclusión o limitación de daños incidentales o consecuentes, por lo que las
exclusiones de limitación mencionadas podrían no aplicar. Esta garantía le brinda derechos legales específicos y
podría haber otros derechos que varíen de un estado a otro.
DEVOLUCIÓN DE ARTÍCULO DESCONTINUADO
Si el artículo devuelto está descontinuado o ya no está disponible, IRIS USA, Inc. remplazará automáticamente su
artículo con el que mejor se compare y fabrique en ese momento.
Aspirateur pour matelas
by IRIS USA, Inc.
IC-FDC1U USER MANUAL
Merci de votre achat. Veuillez lire attentivement ce guide d’utilisation afin
d’assurer sa bonne utilisation. Lire les précautions de sécurité à prendre avant
utilisation. Veuillez conserver ces instructions pour référence future.
CONTENU PAGE
Précautions de sécurité ......................................................... 29
Pièces ................................................................................... 31
Instructions d’utilisation
Charge .................................................................................. 32
Mode d’emploi ....................................................................... 33
Nettoyage de la literie ............................................................ 34
Concernant les capteurs ........................................................ 34
Enlever la poussière (Nettoyer le filtre à poussière maillé) ..... 35
Nettoyage et entretien ........................................................... 36
Composants interchangeables .............................................. 37
Pièces de rechange ............................................................... 38
Attn: Customer Service (Returns Department)
IRIS USA, Inc.
13423 West Cactus Road
Surprise, AZ 85379
©2017 IRIS USA, Inc. Todos los derechos reservados.
Autre
U
L
C
US
LISTED
27
Dépannage ............................................................................ 39
Caractéristiques .................................................................... 40
Garantie à vie limitée ............................................................. 41
28
Page 16

PRÉCAUTIONS DE SÉCURITÉ
Lors de l’utilisation d’un appareil électrique, veuillez impérativement respecter les consignes de sécurité
élémentaires. Veuillez lire le manuel avant utilisation et suivre attentivement toutes les consignes de sécurité afin
d’éviter les blessures et dégâts matériels et de réduire le risque d’incendie ou de choc électrique. Veuillez
conserver ces instructions en lieu sûr pour référence future.
IMPORTANTES PRÉCAUTIONS DE SÉCURITÉ
Lors de l’utilisation d’un appareil électrique, veuillez impérativement respecter les consignes de sécurité élémentaires, y compris :
LIRE TOUTES LES INSTRUCTIONS AVANT UTILISATION (DE CET APPAREIL)
AVERTISSEMENT - Pour réduire le risque d’incendie, de choc électrique ou de blessure:
a) Ne pas laisser l’appareil branché. Débrancher de la prise de courant entre chaque utilisation ou avant tout entretien.
b) Ne pas permettre que cet appareil soit utilisé comme un jouet. Une étroite surveillance est nécessaire lorsque cet appareil
est utilisé par ou près des enfants.
c) Doit être utilisé exclusivement tel que décrit dans ce manuel. Utiliser uniquement les accessoires recommandés par le
fabricant.
d) Ne pas utiliser si le cordon ou la fiche d’alimentation sont endommagés. Si l’appareil ne fonctionne pas correctement, ou s’il
est tombé, a été endommagé, laissé à l’extérieur ou s’il est tombé à l’eau, renvoyez-le à un centre de service.
e) Ne pas tirer sur le cordon d’alimentation ou porter l’appareil en tirant dessus, utiliser le cordon comme une poignée ou
le faire passer autour d’angles ou de coins tranchants. Ne pas faire passer l’appareil sur le cordon. Garder le cordon loin
des zones de chaleur.
f) Ne pas débrancher en tirant sur le cordon. Pour le débrancher, tirer sur la fiche d’alimentation, et non sur le cordon.
g) Ne pas toucher la fiche d’alimentation ou l’appareil avec les mains mouillées.
h) Ne pas insérer d’objet dans les ouvertures. Ne pas utiliser si une ouverture est bloquée et s’assurer de l’absence de
poussière, peluche, cheveux ou de tout autre dépôt affectant la circulation d’air.
i) Éloigner les cheveux, les vêtements amples, les doigts et toute autre partie du corps des ouvertures et des pièces mobiles.
j) Éteindre toutes les commandes avant de débrancher l’appareil.
k) Faire preuve de prudence lors du nettoyage des escaliers.
l) Ne pas utiliser pour ramasser des liquides inflammables ou combustibles comme l’essence, ou dans un endroit pouvant en
contenir.
m) Ne pas ramasser de matériaux enflammés ou fumants, tels que cigarettes, allumettes ou cendres chaudes.
n) Ne pas utiliser sans sac à poussière et/ou filtres en place.
o) Ne pas utiliser à l’extérieur ou sur des surfaces humides.
CONSERVER CES INSTRUCTIONS
Batterie
• Mettre la batterie dans l’eau pour éviter une surchauffe peut provoquer une fuite ou un incendie.
• Utiliser uniquement la batterie recommandée par le fabricant. L’utilisation de toute autre batterie peut entraîner un risque d’incendie.
• Utiliser uniquement le chargeur recommandé par le fabricant. - L’utilisation d’un autre appareil pour charger la batterie peut provoquer
une fuite, une surchauffe ou un autre dommage.
• Faire tomber la batterie ou appuyer trop fort dessus peut provoquer une fuite, une surchauffe ou un autre dommage.
• La batterie risque de fuir en cas de mauvaise utilisation, chute ou dommage. Éviter tout contact, car cela pourrait provoquer une irritation
ou des brûlures. Rincer à l’eau. En cas de contact accidentel du liquide de la batterie avec les yeux, ne pas frotter ou essuyer avec les
mains. Rincer abondamment les yeux à l’eau et obtenir de l’aide médicale.
• Ne pas utiliser si la bat terie ou l'aspirateur est endommagé ou modifié, car cela peut provoquer un incendie, une explosion ou des
blessures.
• Ne pas mettre les bornes d’alimentation en contact avec d’autres pièces métalliques. (Ne pas raccorder les batteries à l’aide de chaînes
métalliques, d’épingles à cheveux, etc. car ceci peut produire une fuite, une surchauffe, un bris ou un incendie.)
• Ne pas asperger la batterie d’eau, ni la submerger dans l’eau, car cela peut provoquer un court-circuit à la suite d’une surchauffe.
• Pour garantir le maintien du niveau de sécurité de l’appareil, ne pas démonter, réparer ou remonter la batterie soi-même, car ceci peut
produire une fuite, une surchauffe ou un bris. En cas de problème, veuillez contacter le service à la clientèle d’IRIS USA, Inc.
• Ne pas exposer l’aspirateur et la batterie au feu ou à des températures supérieures à 265°F/130°C, car cela pourrait faire exploser le
produit.
• Bien suivre les instructions de chargement et la plage de températures idéale (41°F/5°C à 95°F/35°C) pour réduire le risque d’incendie ou
d’endommagement.
• Veiller à ne pas appuyer sur la touche Menu en prenant ou en transportant l’appareil, car cela pourrait accidentellement allumer le produit
et provoquer un accident.
29 30
Ne pas asperger l’aspirateur ou la batterie d’eau ni les submerger dans l’eau.
Ne pas utiliser à proximité d’eau ou dans des pièces très humides telles que les salles de bain.
Ne pas utiliser pour nettoyer des tissus humides ou aspirer des liquides, car ceci peut produire un court-circuit, un choc électrique ou un bris.
Ne pas utiliser alors que l’appareil est en charge. Débrancher l’appareil avant utilisation. (Une utilisation inadéquate peut entraîner des
blessures, des dégâts matériels, une déformation, etc.)
Ne pas démonter, réparer ou remonter la batterie soi-même afin d’éviter un incendie, des blessures ou un mauvais fonctionnement. (Remplacer
les pièces interchangeables selon les instructions dans ce manuel.)
Débrancher de la prise de courant et éliminer régulièrement la poussière ou les saletés pour éviter un choc électrique ou autre blessure.
Ne charger la batterie que sur une prise de courant alternatif 120V. Ne pas charger sur une prise de courant continu ni sur un groupe
électrogène, car ceci peut produire un incendie ou un choc électrique.
Dépoussiérer régulièrement l'appareil afin d’éviter un dépôt pouvant diminuer sa capacité d’isolation.
S’assurer que la prise est bien enclenchée dans le socle d’alimentation afin d’éviter un choc électrique, un court-circuit ou un incendie
Pour éviter un choc électrique, retirer la batterie avant de changer les pièces interchangeable, faites des ajustements ou rangez le vide.
Retirez la batterie lorsque l'appareil n'est pas utilisé.
En cas de problème, interrompre l’usage immédiatement afin d’éviter une surchauffe, un incendie ou un choc électrique. (Éteindre et débrancher
l’appareil, et contacter le service à la clientèle d'IRIS USA, Inc. pour le diagnostic et les réparations éventuelles.)
Exemples de problèmes:
• L’appareil ne fonctionne pas alors que l’interrupteur est en position « Marche ».
• L’appareil cesse régulièrement de fonctionner alors qu’il est allumé.
• Le cordon de chargement ou d’alimentation ne fonctionne pas correctement.
• L’appareil est endommagé ou il surchauffe sans raison.
• Une odeur de brûlé émane de l’appareil.
• L’appareil fait un bruit anormal quand il est en marche.
Ne pas laisser l’appareil près d’une source de chaleur, car ceci peut endommager l’aspirateur et produire un court-circuit ou un incendie.
Ne pas utiliser l'appareil pendant de longues périodes de temps.
Utiliser l'appareil avec un dépôt de poussière peut entraîner une surchauffe, l’endommagement du produit, un bris ou un incendie.
Ne pas traîner l’appareil, car ceci peut endommager les sols.
Ne pas utiliser ni entreposer le produit dans des endroits très chauds dont la température peut atteindre 104°F/40°C (voiture stationnée en plein
soleil, à proximité de radiateurs, etc.) si l'aspirateur est endommagé, produisant un court-circuit ou un incendie.
Ne pas faire tomber ni briser l’aspirateur, ne pas le heurter contre d’autres objets ni lui appliquer de pression.
Nettoyer le contenu du bac à poussière en évitant d’en faire tomber. (Les composants du filtre maillé doivent être nettoyés à l’eau.)
Ne pas utiliser sans bac à poussière et/ou filtres en place.
Assembler correctement le bac à poussière et le placer dans l’appareil afin d’éviter de se blesser ou d’endommager le produit.
Agrippez l’appareil par sa poignée pour éviter de le faire tomber et de l’endommager.
N'essayez pas de réparer ou de modifier l'unité ou la batterie, sauf comme indiqué dans les instructions d'utilisation et de soin. Tout autre
service doit être effectué par un représentant agréé du service.
Mises en garde concernant l’utilisation
N’utiliser que sur des produits en tissu tels que matelas, futons, oreillers, tapis, canapés, sièges de voiture, etc.
Destiné exclusivement à un usage ménager.
Ne pas utiliser pour nettoyer :
• Liquides
• Litière ou débris humides
• Poudre
• Verre brisé
• Objets pointus ou épingles
• Ne pas utiliser sur des sols, murs ou meubles non tapissés. Ne pas tirer sur le boîtier principal et éviter de heurter les murs ou les
meubles.
• Avant utilisation, s’assurer que le filtre est bien installé.
Page 17

PIÈCES
Avertissement
NE PAS CHARGER LA BATTERIE À L’AIDE D’UN CHARGEUR DE MARQUE DIFFÉRENTE.
Boîtier de l’aspirateur
Voyant
lumineux
BAC À POUSSIÈRE
Bac à poussière
Voyant lumineux
du niveau
de poussière
High
Low
Battery Level
Safety Lock
(hold for 3 sec)
Système de filtre maillé
Bouchon de filtre maillé
Filtre maillé
(interchangeable)
Bouton de dégagement
de la batterie
Port
d’alimentation
Touche Menu
Batterie
(interchangeable)
Poignée
Filtre maillé
d’échappement
(interchangeable)
Sortie d’échappement (gauche et droite)
Tête de collecte
Couvercle du filtre
d’échappement
• La batterie fournie n’est pas complètement chargée. Charger complètement la batterie avant le premier usage. La
pleine charge prend environ 3,5 heures.
• Ne pas utiliser alors que l’appareil est en charge.
1. Placer la batterie dans l’aspirateur.
Insérer la batterie dans la prise et appuyer jusqu’au déclic
d’enclenchement.
*Mal insérer la batterie dans la prise affectera le fonctionnement
et peut entraîner des blessures ou dégâts.
Bien insérer fermement la batterie dans
la prise jusqu’au déclic.
Déclic
Bouton de dégagement
Batterie
Insérer jusqu’au
déclic.
de la batterie
2. Brancher la che du chargeur dans la prise de courant.
Prise de courant
3. Insérer le chargeur dans la prise de courant.
Bien insérer fermement le chargeur dans
la prise de courant.
* Le voyant lumineux rouge indique que l’appareil est en
charge.
Voyant lumineux
Batterie
High
Low
Batter y Level
Safety L ock
(hold for 3 seconds)
Prise du chargeur
MARCHE
En charge
ARRÊT
Terminé
Bas du tête de collecte / évent pour l’ai chaud
Port d’entrée de la poussière
Agitateur
Chargeur
Le temps de charge standard est de 3,5 heures.
4. Terminé.
Cylindre
Le voyant lumineux s’éteint lorsque le chargement est terminé.
• Pour la toute première utilisation ou la première utilisation depuis plus de 6 mois, charger 2 ou 3 fois
avant usage pour obtenir la pleine charge.
• Si non utilisé depuis plus de 10 jours, charger avant la prochaine utilisation.
• Charger de manière continue permet de réduire le temps de charge.
• Le temps de charge et la durée de fonctionnement varient selon la température et les conditions
d’utilisation.
• Charger lorsque la température est comprise entre 41°F/5°C et 95°F/35°C. Charger lorsque la
température est trop basse ou trop élevée peut diminuer la durée de fonctionnement ou augmenter le
temps de charge.
• Le chargeur deviendra chaud. Ceci est normal.
5. Retirer la batterie.
• Appuyer sur le bouton de dégagement de la batterie et la retirer.
31
32
Page 18

MODE D’EMPLOI
NETTOYAGE DE LA LITERIE
1. Ajuster l’angle de la tête de collecte.
Placer l’aspirateur sur le sol, ajuster l’angle manuellement vers le
haut ou le bas.
Angle d’entreposage
Angle pour t apis ou
sièges de voi ture en
tissu.
• Mettre le boîtier de l’aspirateur en position horizontale pour
une utilisation sur des surfaces souples (literie par ex.).
• La tête de collecte est fixée en position horizontale à
Angle pour
literie ou tissu.
l’aide d’un aimant qui la maintient en place pendant son
utilisation.
2. Déverrouiller.
Appuyer sur la touche Menu pendant 3 secondes, attendre que le
voyant lumineux de verrouillage de sécurité s’allume et commencer
à nettoyer selon les instructions ci-dessous.
• Le verrouillage de sécurité s’activera de nouveau après une
High
Low
Battery L evel
Safety Loc k
(hold for 3 seconds)
Verrouillage
de sécurité
minute de non-utilisation.
• L’appareil ne fonctionnera pas s’il est verrouillé. Appuyer sur
la touche Menu lorsqu’il est verrouillé fera clignoter le voyant
ON/OFF
Menu
de sécurité.
3. Commencer le nettoyage.
Appuyer sur la touche Menu change le mode de fonctionnement.
• Appuyer sur la touche Menu pour passer au mode Élevé.
• Appuyer de nouveau sur la touche Menu pour passer au mode Faible.
4. Lorsque le nettoyage est terminé.
Appuyer sur la touche Menu pour changer de mode jusqu’à ce
que l’aspirateur s’arrête et que le voyant lumineux s’éteigne.
• L’appareil se verrouillera automatiquement après une
minute de non-utilisation.
• Suivre l’étape 2 pour le rallumer.
• Le voyant lumineux de niveau de la batterie
clignote quand la charge est faible.
• Si la batterie est déchargée, le voyant
lumineux de niveau de la batterie clignote
rapidement avant de s’éteindre et le moteur
s’arrête. Recharger.
Note:
• Ne pas utiliser pour nettoyer:
· Liquides · Litière ou débris humides · Poudre · Verre brisé · Objets pointus ou épingles
• Ne pas aspirer de grandes quantités de débris en une seule fois pour éviter de bloquer le port d’entrée et de diminuer la puissance
d’aspiration.
• Ne pas utiliser sur des sols, murs ou meubles. Ne pas tirer sur le boîtier principal et éviter de heurter les murs ou les meubles.
• Pour éviter une perte de puissance d’aspiration, filtre encrassé ou endommagement du produit, vider le bac à poussière après utilisation.
High
Low
Battery Lev el
Safety Lock
(hold for 3 seconds)
Menu
ON/OFF
High
Low
Battery L evel
Safety Loc k
(hold for 3 seconds)
Menu
ON/OFF
Voyant lumineux
Clignotement: Charge faible
Clignotement rapide
(puis arrêt): Aucune alimentation électrique
Voyant lumineux
High
Low
Stop
1. Bien étaler la literie ou le couvre-matelas à plat (sans plis).
2. Mettre l’aspirateur en position horizontale.
3. Quand l’appareil est en mode Élevé, le déplacer d’avant en arrière toutes les 10 secondes.
Ne pas appuyer trop fort sur la tête de collecte.
L’appareil ne fonctionnera pas à un angle de 90°.
• En position horizontale, la position de la tête de collecte est maintenue
à l’aide d’un aimant.
• Si la tête de collecte se trouve entre des meubles, coussins, tapis, etc.,
la position de la tête ne sera pas fixée et peut être instable.
CONCERNANT LES CAPTEURS
Capteur de poussière:
Le capteur de poussière et d’acariens est
en marche pendant le fonctionnement, et
le voyant indique la quantité de
poussière sur la surface.
*Lors du nettoyage de tapis ou d’autres
articles à hauts niveaux de poussière, le
Haut
Voyant lumineux
du niveau de
poussière
Rouge : Beaucoup de poussière
Jaune : Un peu de poussière
Vert : Propre
voyant lumineux ne passera pas au vert.
Capteur de literie:
Bas
Capteurs de literie
L’appareil économisera son énergie et
réduira sa vitesse lorsque les deux
capteurs ne touchent plus l’objet à
nettoyer.
Vitesse réduite, moins de puissance
d’aspiration, arrêt.
Aimant
33
34
Page 19

ENLEVER LA POUSSIÈRE (NETTOYER LE FILTRE À POUSSIÈRE MAILLÉ)
NETTOYAGE ET ENTRETIEN
Déboucher et nettoyer régulièrement pour maintenir des capacités d’aspiration élevées.
Bac à poussière
1. Retirer le bac à poussière.
Appuyer sur les boutons de chaque côté du bac à poussière pour le
retirer.
Bouton Bouton
2. Retirer le filtre maillé dans l’eau.
Pour éviter de faire tomber de la poussière, retirer le filtre maillé du bac
à poussière dans l’eau.
3. Nettoyer le filtre maillé.
Retirer la poussière collée au filtre, puis rincer le filtre sous l’eau.
Faire tremper le bac à poussière dans de l’eau contenant un agent nettoyant
dilué pendant plusieurs minutes pour retirer facilement la poussière accumulée.
4. Laisser sécher.
Mettre le bac à poussière et le filtre dans un endroit bien aéré jusqu’à ce qu’ils soient bien secs.
*Pour le nettoyage du système de filtre maillé, ne pas laver à la machine ou utiliser d’autre appareil chauffant,
car ceci pourrait déformer le produit.
5. Remonter le filtre maillé.
Remettre le système de filtre maillé dans le bac à poussière.
*Bien suivre cette instruction.
Note:
Remonter correctement pour éviter d’endommager le produit.
6. Remettre le bac à poussière en place.
Bac à poussière
Système de filtre maillé
上
Bac à poussière
Mettre le filtre maillé dans le bac à poussière, puis remettre le bac à
poussière dans le boîtier de l’aspirateur jusqu’au déclic.
Vérifier que les deux boutons sont bien enclenchés.
Déclic
Avertissement:
Le nettoyage et l’entretien doivent être effectués une fois la batterie retirée.
Note:
Ne pas asperger le boîtier de l’aspirateur d’eau, car ceci pourrait l’endommager.
Utiliser un agent nettoyant neutre dilué.
L’utilisation d’agents nettoyants puissants tels que de l’acétate d’amyle, de l’alcool, de l’huile, etc. peut provoquer une
décoloration, une déformation ou un bris.
Boîtier de l’aspirateur:
Utiliser un chiffon bien essoré pour essuyer le boîtier et tout
produit nettoyant restant.
Batterie:
Utiliser un chiffon sec sur les bornes de la batterie pour enlever la saleté accumulée pouvant perturber le
fonctionnement du produit.
• L’assemblage incorrect du filtre maillé et du bac à poussière peut permettre à la poussière ou aux saletés
de pénétrer et d’endommager les bornes.
Indicateur de poussière:
Indicateur de poussière
Retirer le bac à poussière et nettoyer les capteurs des deux
côtés avec un coton-tige.
• Nettoyer régulièrement pour éviter les dépôts de poussière
qui peuvent produire un mauvais fonctionnement des
capteurs.
Tête de collecte:
• Retirer les cheveux, ficelles ou autres petits objets du port d’entrée
Agitateur
de la poussière à l’aide d’une pince à épiler pour éviter les dépôts
de poussière et la réduction de la capacité d’aspiration. Nettoyer
régulièrement.
• Nettoyer les saletés déposées sur l’agitateur à l’aide d’une brosse.
• Nettoyer les capteurs de literie à l’aide d’un coton-tige.
• Nettoyer régulièrement pour éviter les dépôts de poussière qui
Capteurs de literie
peuvent produire un mauvais fonctionnement des capteurs.
Borne
35
36
Page 20

COMPOSANTS INTERCHANGEABLES
CONCERNANT LES PIÈCES DE RECHANGE
Suivre les instructions ci-dessous pour remplacer le filtre à poussière maillé, le filtre maillé d’échappement, et la
batterie.
Remplacer le ltre à poussière
*Voir les instructions page 35 « Enlever la poussière » pour savoir comment retirer le système de filtre.
1. Retirer le filtre à poussière.
• Presser le cadre de filtre avec les doigts.
• Tirer sur le bouton du filtre maillé pour le retirer du
Retirer
Cadre de filtre
système et séparer le filtre de son cadre.
2. Insérer un nouveau filtre à poussière.
• Insérer le joint articulé du nouveau filtre maillé dans
le cadre.
Filtre à poussière maillé
Insérer
Pousser
• Pousser le bouton du filtre dans le cadre jusqu’à
enclenchement.
Insérer le
joint articulé
Remplacer le ltre maillé d’échappement
1. Retirer le couvercle du filtre d’échappement.
• Utiliser une pièce de monnaie pour retirer les
couvercles de filtre des deux côtés.
2. Changer le filtre d’échappement.
• Retirer les filtres des deux côtés et insérer de
nouveaux filtres.
3. Remplacer le couvercle du filtre.
• Remettre les deux couvercles de filtre en place.
Couvercle du
filtre d’échappement
Filtre d’échappement
Acheter les pièces de rechange chez IRIS USA, Inc.
Le ltre maillé du bac à poussière, (3 PC)
doit être changé tous les 6 à 12 mois selon la fréquence d’utilisation.
Si brisé ou endommagé, le remplacer.
Numéro de modèle: CF-FS1
Le ltre d’échappement, (4 PC)
doit être changé tous les 2 ans. Si brisé ou endommagé, ou en cas
de mauvaise circulation d’air ou de mauvaises odeurs, le remplacer.
Numéro de modèle: CF-FH1
Batterie
La batterie doit être changée dès que la durée de fonctionnement
diminue grandement. Si brisée ou endommagée, la remplacer.
Numéro de modèle: CBN-1420WP (Blanc)
CBN-1420B (Brun)
Remplacer la batterie
Batterie
1. Retirer la batterie.
• Retirer la batterie en appuyant sur le bouton de
dégagement de la batterie.
2. Assembler la nouvelle batterie.
• Insérer la nouvelle batterie tournée du bon côté jusqu’à
enclenchement. Mal enclenchée, la batterie peut tomber
et se briser.
Insérer jusqu’au
déclic.
Bouton de
dégagement
de la batterie
Concernant la mise au rebut de la batterie
Remplacer la batterie selon les instructions ci-dessus. Jeter la vieille batterie selon la réglementation
gouvernementale en vigueur.
37
IRIS USA, Inc.
13423 West Cactus Road
Surprise, AZ 85379
www.irisusainc.com
38
Page 21

DÉPANNAGE
CARACTÉRISTIQUES
Avant d’effectuer des réparations, lire attentivement la section suivante pour la résolution des problèmes
courants.
ÉTAT CAUSE PROBABLE SOLUTION
La batterie est déchargée. Charger la batterie.
S’assurer du bon enclenchement de la
batterie.
Appuyer sur la touche Menu pendant 3
secondes pour déverrouiller.
S’assurer que le chargeur est branché.
S’assurer que le chargeur est bien
enclenché.
S’assurer du bon enclenchement de la
batterie.
Retirer la batterie et essuyer les bornes
à l‘aide d’un chiffon.
Charger dans un environnement aux
températures recommandées.
Ne s’allume pas
Faible aspiration
Ne charge pas
Cesse de fonctionner brusquement
Le voyant de niveau de la batterie
s’allume pendant le fonctionnement
La durée de fonctionnement d’une
batterie pleinement chargée diminue
La batterie est mal montée.
L’appareil est branché sur le chargeur. Débrancher le chargeur.
Est toujours en mode de verrouillage.
La batterie a besoin d’être chargée. Charger la batterie.
Le filtre est bouché. Nettoyer ou remplacer.
Le bac à poussière est bouché. Dépoussiérer.
Le chargeur n’est pas branché dans la
prise de courant.
La prise du chargeur est mal
enclenchée dans le port de chargement.
La batterie est mal montée.
La batterie est sale.
Le temps de chargement dépend des conditions et de la durée d’utilisation.
Le chargement peut prendre jusqu’à 5 heures.
Au-delà de 5 heures de chargement avec le voyant lumineux toujours allumé,
contacter le service à la clientèle d’IRIS USA, Inc.
Le chargement de l’appareil est effectué dans un endroit trop chaud.
La batterie ne tient plus sa charge. Remplacer la batterie.
Avant d’effectuer des réparations, lire attentivement la section suivante pour la résolution des problèmes
courants.
ÉLÉMENTS INCLUS
TAILLE DU PRODUIT
POIDS DU PRODUIT
PLAGE DE TEMPÉRATURES ACCEPTABLES
DURÉE DE FONCTIONNEMENT
LONGUEUR DU CHARGEUR
NUMÉRO DE MODÈLE DU CHARGEUR
FABRICANT DU CHARGEUR
BATTERIE
CAPACITÉ DE LA BATTERIE
DURÉE DE VIE DE LA BATTERIE
TENSION NOMINALE
PUISSANCE DE CHARGE
TEMPS DE CHARGEMENT
*Spécifications sous réserve de modification sans préavis.
Aspirateur, chargeur, batterie (1 pièce)
MODE D’EMPLOI: 10.0x17.7x6.2in 254x449x158mm
RANGEMENT: 10.0x6.0x18.0in 254x153x458mm
Environ 4,6 lb / 2,1 kg (boîtier/batterie)
32°F/0°C ~ 104°F/40°C
Environ 20 minutes (pleine puissance/nouvelle batterie/68°F/20°C)
70.8in / 1.8m
YLS0241A-T200120
Dongguan Yinli Electronics Co., Ltd.
Ni-MH batterie (CBN-1420WP ou CBN-1420B)
SC2,000mAh
Environ 300 fois (pleines charges)
DC14.4V
Entrée: AC100-240V 50/60Hz 0.8 A
Sortie: DC20V 1.2 A
Environ 3,5 heures
L’aspirateur et le chargeur chauffent
pendant la charge
Le boîtier de l’aspirateur chauffe
quand l’aspirateur est en marche
N’est pas en marche, mais le capteur
de poussière est allumé
Est en marche, mais le capteur de
poussière est éteint
Une hausse de température est causée par le courant. Ceci est normal.
Une hausse de température est causée par la batterie qui chauffe pendant
l’utilisation. Ceci est normal.
Les capteurs sont recouverts de
poussière.
La puissance d’aspiration a grandement
diminué.
Problèmes qui n’ont pas pu être résolus.
Contacter le vendeur ou le service à la clientèle d’IRIS USA, Inc.
Avertissement:
Ne pas démonter, réparer ou modifier le produit vous-même.
39
Nettoyer les capteurs (P36).
Nettoyer ou remplacer le filtre et vider
le bac à poussière.
40
Page 22

LE FABRICANT GARANTIT CE QUI SUIT
Vos produits IRIS USA, Inc. sont exempts de tout défaut matériel et de fabrication dans des conditions d’utilisation
normales non commerciales et ménagères, lorsqu’ils sont utilisés et entretenus conformément aux instructions
écrites fournies par le fabricant.
LA GARANTIE À VIE LIMITÉE (« GARANTIE ») NE COUVRE PAS CE QUI SUIT
Tout dommage occasionné lors d’un accident, d’une mauvaise utilisation ou d’une utilisation abusive, y compris
sans limitation, les dégâts causés par une utilisation dans un endroit humide, un nettoyage inadéquat, une
négligence, une altération, un incendie, un vol, une utilisation à une température non recommandée, et ne
s’applique pas dans les cas d'imperfections mineures, d’égratignures, de taches, de décoloration ou de tout autre
dégât sur des surfaces externes ou internes qui ne nuisent pas à l’utilité et/ou au bon fonctionnement du produit.
POUR OBTENIR LE SERVICE SOUS GARANTIE
Si un tel service s'avère nécessaire, vous devez contacter le service à la clientèle (« Service à la clientèle ») d'IRIS
USA, Inc. au 1-800-320-4747. Vous pouvez renvoyer le(s) produit(s) correctement emballé(s) (avec les matériaux
d'emballage et d’expédition adéquats afin de prévenir tout dommage pendant le transport), port payé avec votre
nom, adresse, numéro de téléphone, numéro du modèle et preuve de la date d’achat (copie du reçu) et une
description détaillée du défaut signalé. Cette garantie ne couvre pas les dommages causés aux produits pendant
leur transport jusqu’au service à la clientèle. Vous avez l’obligation et la responsabilité de : payer pour tous les
services et toutes les pièces qui ne sont pas couverts par la garantie
OBLIGATION DU FABRICANT
La garantie ne peut être modifiée, prorogée, étendue, mise à jour ou changée sauf par document écrit signé par le
fabricant.
LA RESPONSABILITÉ DU FABRICANT DANS LE CADRE DE CETTE GARANTIE SE LIMITE À LA RÉPARATION OU
AU REMPLACEMENT DU/DES PRODUIT(S) DÉFECTUEUX À LA SEULE ET UNIQUE DISCRÉTION DU FABRICANT.
LE FABRICANT REMPLACERA TOUTE PIÈCE S’AVÉRANT DÉFECTUEUSE EN RAISON D’UN DÉFAUT MATÉRIEL OU
DE FABRICATION PAR LA PIÈCE LA PLUS COMPARABLE À CE MOMENT-LÀ. IRIS USA, INC. N’ACCEPTE PAS DE
DEMANDE PARTICULIÈRE, ET N’A PAS NON PLUS LA CAPACITÉ DE METTRE À NIVEAU CONTRE PAIEMENT. LE
FABRICANT NE SERA PAS TENU RESPONSABLE DE DOMMAGES SPÉCIAUX, ACCESSOIRES OU CONSÉCUTIFS,
QU’ILS SOIENT DIRECTS OU INDIRECTS. LES GARANTIES STIPULÉES ICI SONT EXCLUSIVES ET AUCUNE
AUTRE GARANTIE, EXPLICITE OU IMPLICITE, Y COMPRIS, ENTRE AUTRES, D’AUTRES GARANTIES DE VALEUR
MARCHANDE OU D’ADÉQUATION À DES FINS OU USAGES PARTICULIERS, N’EST ÉTABLIE EN CE QUI A TRAIT
AUX PRODUITS.
Certains États/certaines provinces ne permettent pas l’exclusion ou la limitation des dommages consécutifs ou
accessoires; par conséquent, les exclusions de la limitation précédente pourraient ne pas être applicables. La
présente garantie vous confère des droits juridiques spécifiques; vous pouvez également avoir d’autres droits, qui
varient d’un État à l’autre et d’une province à l’autre.
RETOUR D’ARTICLES DISCONTINUÉS
Si un article est discontinué et n’est plus disponible, IRIS USA, Inc. remplacera automatiquement votre article par
l’article le plus comparable fabriqué à ce moment-là.
Attn: Customer Service (Returns Department)
IRIS USA, Inc.
13423 West Cactus Road
Surprise, AZ 85379
©2017 IRIS USA, Inc. Tous droits réservés.
41
C
LISTED
U
L
US
 Loading...