

Page 1

Irisi700UTa bl e t User’sGuide
Dear User:
Thanks for purchasing this Iris i700U Tablet . This product bases on Android platform,
supports 3G module (via the external USB interface) and WiFi network accessing. Front
camera 2.0M pixels and Rear camera 5.0M pixels . Support 1080P video playing and perfect
3D display capacity. It will bring you brand new user experience.
This Manual introduces the functions, operation tips and precautions. Please read this
guide carefully before using.
Page 2

Contents
Iris i700U Tablet User’s Guide..................................................................................................1
1 Precautions.......................................................................................................................3
2 Appearance and Button Descriptions...............................................................................5
3 First usage........................................................................................................................6
4 User interface...................................................................................................................8
5 System basic settings........................................................................................................9
6 Internet...........................................................................................................................17
7 Music playing.................................................................................................................18
8 Video playing.................................................................................................................19
9 Picture browsing.............................................................................................................19
10 Software Installation and Management.......................................................................... 20
11 FAQ................................................................................................................................20
Page 3

1 Precautions
This Manual contains important security measures and the correct use of the
product information. To avoid the accidents, please be sure to read this manual carefully
before using it.
●Avoid using this device in the environment with extreme temperature, high humidity,
dust, and avoid putting it in the car when the windows are closed in hot summer.
●Avoid knocking at or impacting this device, especially the violent shaking of the display
screen, or it will be damaged and can not work as usual.
●Please adjust the proper volume when you listen with the earphone, it is not advised
listening at high volume for a long time. If there is a ringing in your ears or other
symptoms, please turn down the volume or stop to use.
●In the following circumstances please charge:
A、 The battery power ICONS shows have no electricity.
B、 The system to be automatic shutdown, and booting again but be shutdown soon.
C、 It is no responsible to operate the buttons.
●When the product is in the formating process or upload and download data, please do
not turn off the power connection suddenly, it may cause the application errors.
●We are not responsible for data loss caused by product damaged, maintenance or any
other problems. Please follow the user manual for standardized operation.
●Do not disassemble by yourself and do not clean the shell with alcohol, diluent or
benzene class.
●It is forbid to use this device in some special areas such as on the plane.
●To avoid accidents do not use the earphone when you are crossing the road or driving
automobile.
※ The Company reserves the right to improve products, product specifications and
designs are subject to change without notice!
★ (This product has no waterproof function.)
Note: The pictures included in this operating manual are just for reference! Product
specifications and appearance are subject to change without notice!
★ This device complies with Part 15 of the FCC Rules. Operation is subject to the
following two conditions: (1) this device may not cause harmful interference, and (2) this
device must accept
any interference received, including interference that may cause undesired operation.
Page 4

changes or modifications not expressly approved by the party responsible for compliance
could void the user's authority to operate the equipment.
NOTE: This equipment has been tested and found to comply with the limits for a
Class B digital device, pursuant to Part 15 of the FCC Rules. These limits are
designed to provide reasonable protection against harmful interference in a
residential installation. This equipment generates, uses and can radiate radio
frequency energy and, if not installed and used in accordance with the
instructions, may cause harmful interference to radio communications. However,
there is no guarantee that interference will not occur in a particular installation.
If this equipment does cause harmful interference to radio or television reception,
which can be determined by turning the equipment off and on, the user is
encouraged to try to correct the interference by one or more of the following
measures:
-- Reorient or relocate the receiving antenna.
-- Increase the separation between the equipment and receiver.
-- Connect the equipment into an outlet on a circuit different
from that to which the receiver is connected.
-- Consult the dealer or an experienced radio/TV technician for help.
★ FCC RF Radiation Exposure and SAR Statements SAR Statement The Iris i700U
Tablet has been tested for body-worn Specific Absorption Rate (SAR) compliance. The
FCC has established detailed SAR requirements and has established that these
requirements. RF Exposure Information The radio module has been evaluated under
FCC Bulletin OET 65C (01-01) and found to be compliant to the requirements as set
forth in CFR 47 Sections, 2.1093, and 15.247 (b) (4) addressing RF Exposure from radio
frequency devices. This model meets the applicable government requirements for
exposure to radio frequency waves. The highest SAR level measured for this device was
0.265 W/kg.
Page 5
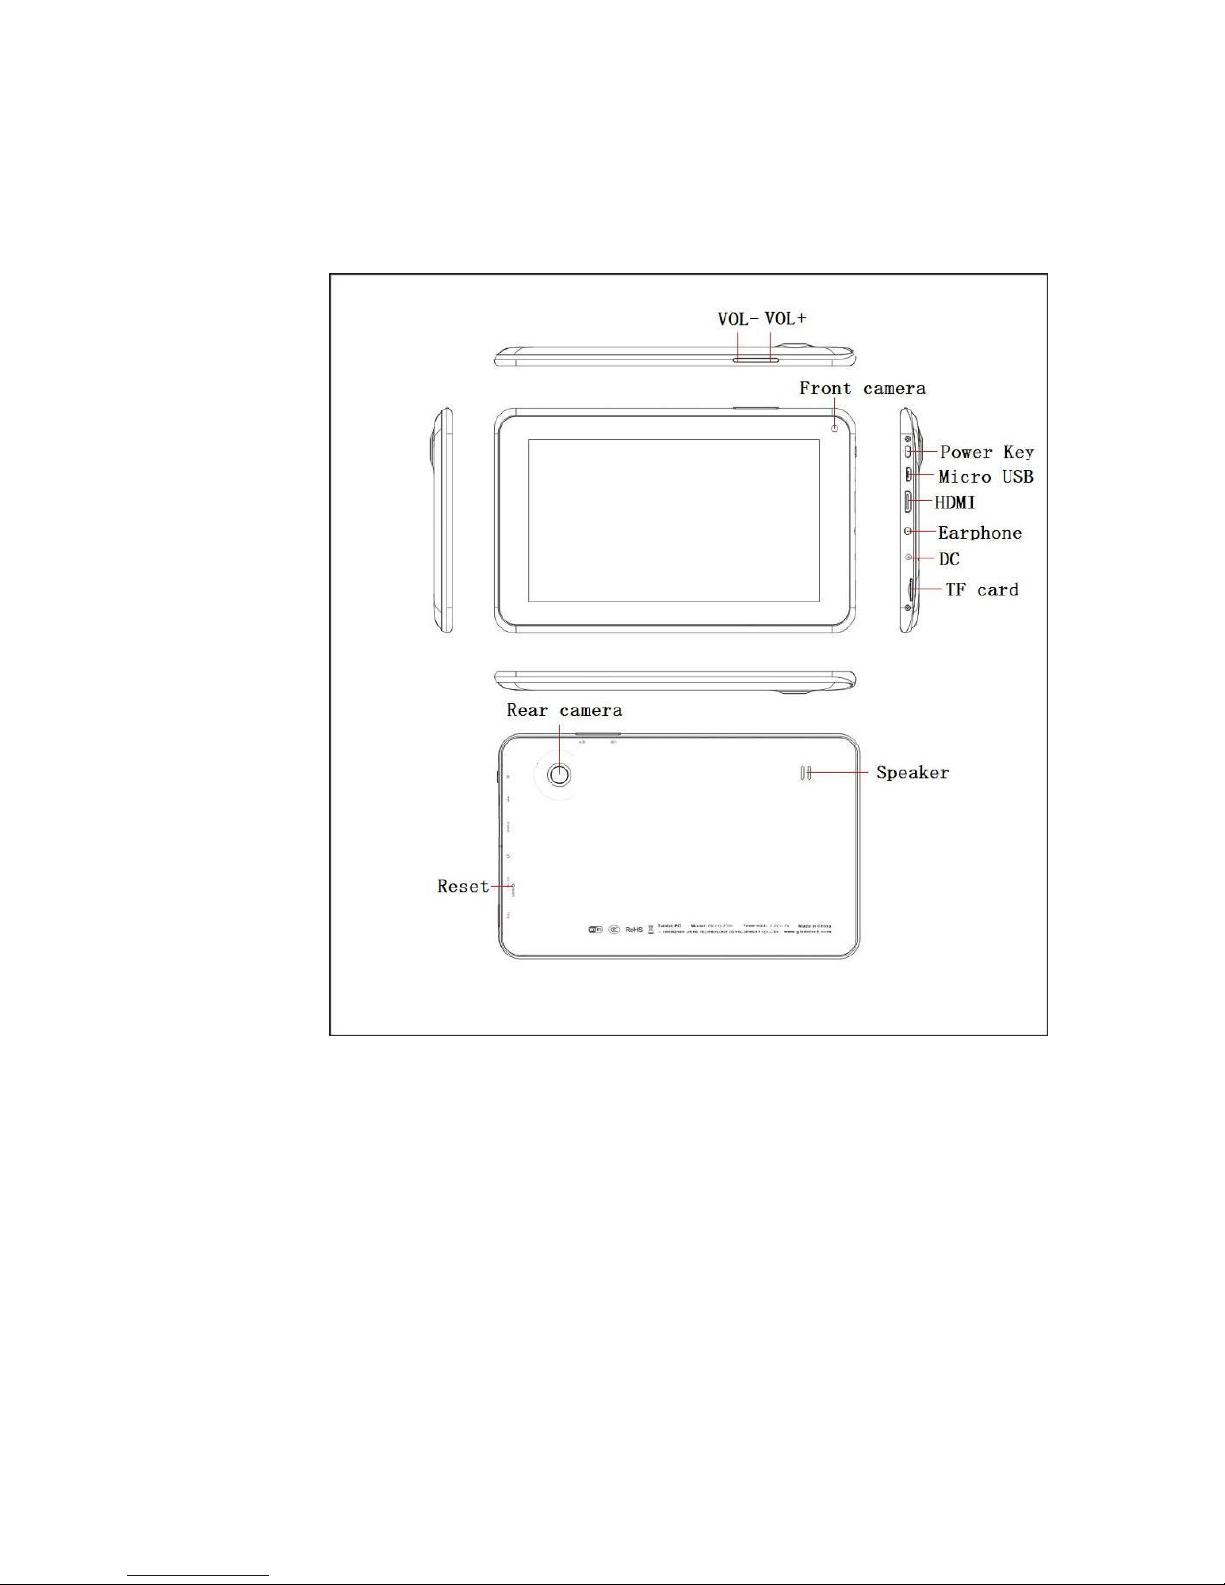
2 Appearance and Button Descriptions
2.1 Touch screen
7 inches Five-point capacitive touch screen: click, drag and other operations in the
touch region;
2.2 Power key
Power on: Press and hold the Power key to display the boot screen to enter the
main menu interface.
Power off: Press and hold the Power key for about 3 seconds to pop up the
device options in the main menu interface , and select Power off to shut
down normally; Press and hold the Power key for about 6 seconds in the
Page 6

main interface can shutdown forcedly.
Lock screen: Press the Power key shortly to lock or unlock screen.
Note:
1. The system will shut down automatically in the case of low battery;
2. In the case of illegal shutdown, the restart process will scan and repair the disk to
protect the system, and the boot interface will stay a long time than usual.
2.3 Increase or Decrease the Volume
Press the "+", "-" key to increase or decrease the volume quickly or slowly;
2.4 Earphone Jack
3.5mm standard earphone jack;
2.5 Video output interface
Mini HDMI video output interface;
2.6 TF-CARD
TF-CARD slot: external expansion via the T-FLASH(Micro SD) memory card;
2.7 Micro USB
Micro USB interface: to connect to the computer for data transfer, battery charging
or external link to the USB flash disk;
2.8 Reset key
In the case of system or programs crashes, press the RESET key by the small objects
such as paper clip, the device will be forced to restart.
Note: Unless it can not shut down the system normally to use the RESET key! It is
recommended to shut down in accordance with shutdown procedure under the normal
circumstance; otherwise it will cause damage to the system and device.
3 First usage
3.1 Battery management and charge
Before the first use of the device, please set the battery is fully charged:
Charging by plug the charger into the DC port of device;
It is recommended to keep 6 hours at least in the first two charging, and keep 4
hours after it.
Note: This device adopts built-in polymer battery, and it is must to use original
charger for charging. The product provides DC charging and also the USB interface to
charge. You can choose to charge via the USB interface charger, but it is recommended to
use the formal charger with high quality to do it, or it will cause the irreparable damage
to the device.
Page 7
The battery icon will scroll on the screen during charging.
The battery will turn green and stop to scroll on the screen when the charging is
completed.
In order to extend the life of this device, it is recommended to run out all of the
power in the first two usages and then charging.
Note:
In order to avoid damage caused by the excessive consumption of the battery in a
long time without using, be sure to charge and discharge completely to prevent the
battery run out within a month.
The device will show the battery is low and charged when start charging after
low-power shutdown, and then it will enter the main interface automatically when
charging enough before waiting some time.
In order to achieve the normal charging time, the charging need to be in the
standby state that the screen is full dark. As to the consumption of the device and the
screen themselves, it will take a long time than usual under normal using.
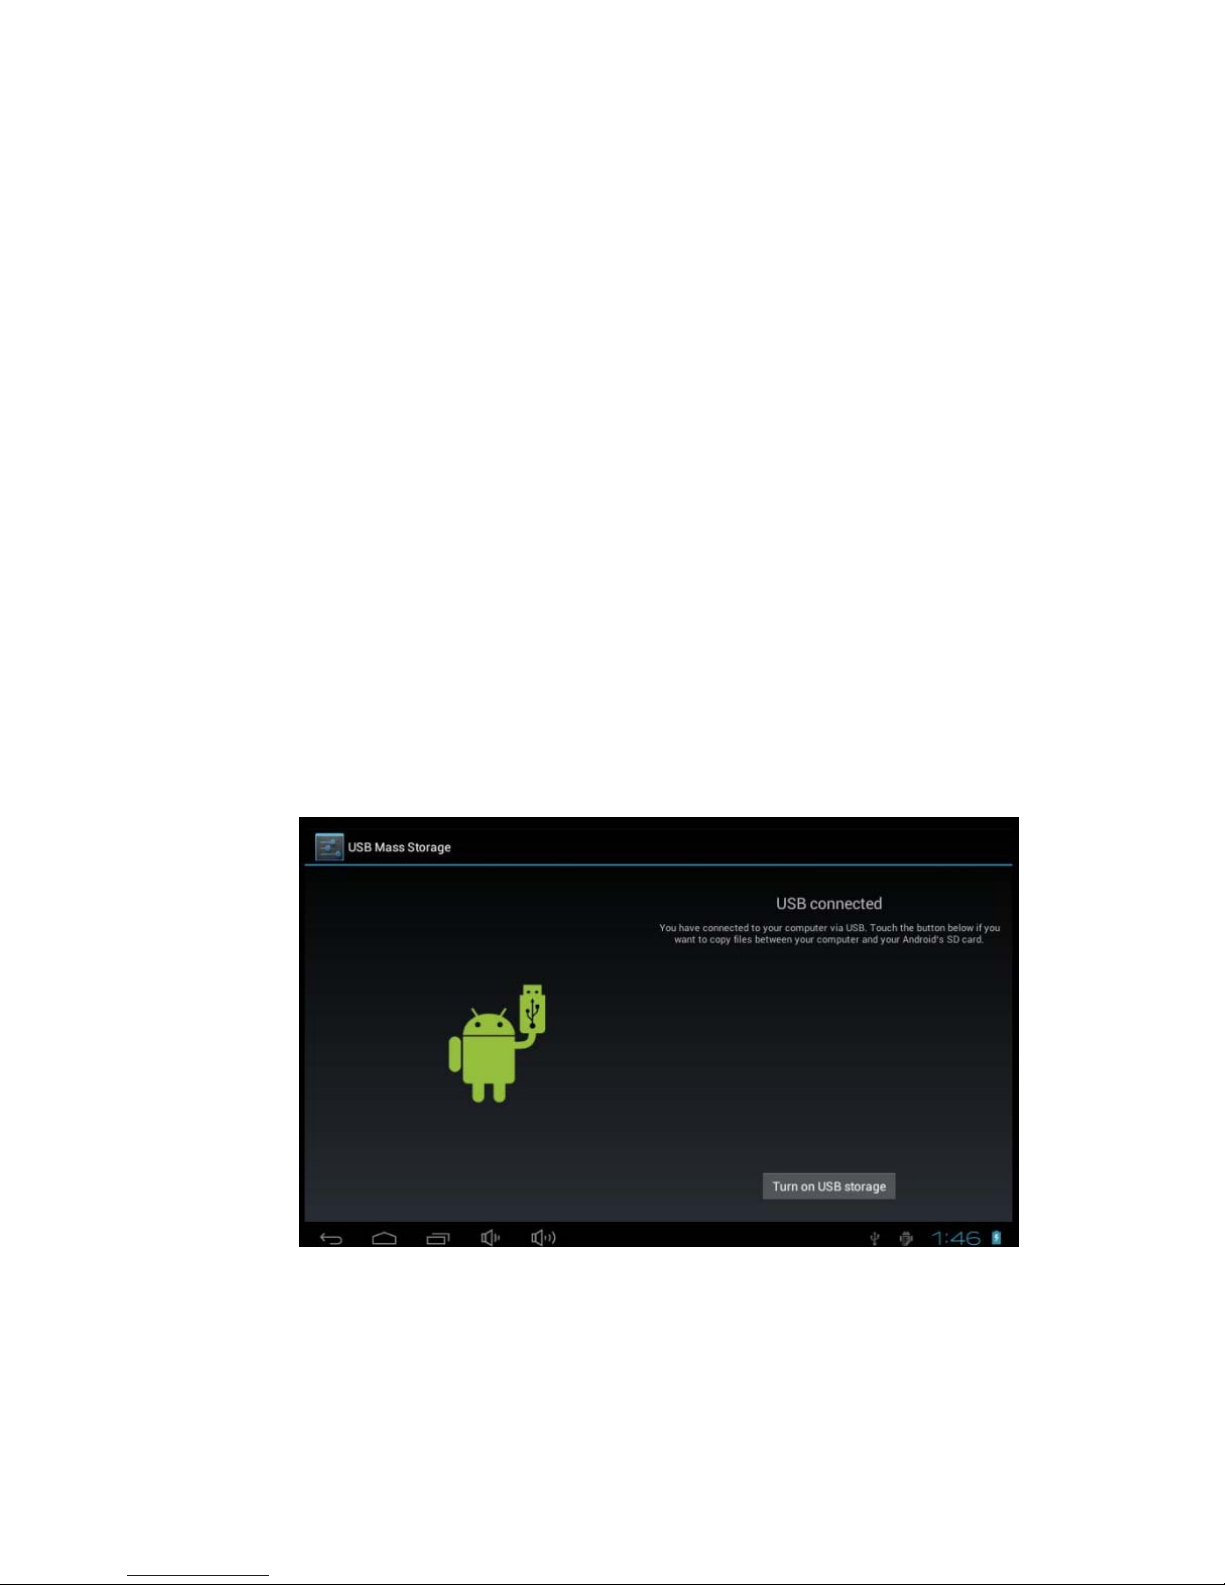
3.2 Connect to PC
Using the supplied USB cable to connect a PC and the device will pop us a USB
connection dialog, you can choose to load to transmit your important data or let it
charged by select not.
Going to the loading model, then you can copy, delete and manage the files on your
device and memory card through your PC.
Page 8

4 User interface
4.1 The main interface
Enter the main interface after booting the device:
The operation in the main interface:
Manage the software icon: it will be changed larger by pressing and hold the
icon for about 3 seconds, and you can drag it to any location.
Delete the software icon: Press and hold the icon for about 3 seconds, and drag it
to the Recycle bin till it is changed to red color, then release touch on the screen.
Page 9

4.2 Status bar
Return key, click on it to go back in any interface.
Home key: click on it to go to the main interface.
Daemon key: click on it to see the running programs in the background.
Note: It has the same features and functions by click the Return key, Home key,
Daemon key in the right of the Tablet PC as clicking the status bar.
Volume key: click on it to adjust the volume.
Notification from right to left are: Battery icon
(display the current battery capacity, it will show the lightning bolt symbol when
charging), Mobile network signal icon (via the external 3G network card), WIFI icon
(appears when link to the WIFI network), Time icon, Notification / Other icon
(depending on the running programs and display / hide automatically)
Program tray key: click on it to pop up the list of applications.
Search key: search.
5 System basic settings
Settings: Click the “Settings” icon in the main menu to open the system
settings interface.
Page 10

5.1 Internet access and WIFI usage
1. Enter
“Settings” -> “Wireless and network” -> “Wi-Fi” to activate the
wireless network in the right of the WIFI icon, and then select the network you want to
link and enter the passwords.
Page 11

2. When you use the external 3G module by USB to access Internet, it will show the
"3G" logo after setting right the 3G module to surfing. Enter
“Settings” ->
“Wireless and network” -> “more” -> “Mobile network” -> “Access point name” ->
Build a name on the Internet.
5.2 Bluetooth
Enter
“Settings” -> “Wireless and network” -> “Bluetooth”, Open the Bluetooth ,
connect the Bluetooth devices.
5.3 Sound settings
Adjust volume: adjust the volume of media, also can adjust directly by press the
volume key.
Page 12

5.4 Display
Brightness: adjust the brightness of your screen.
Wallpaper: select the wallpaper on your screen.
Hibernate: adjust the delay time before the screen is shut down automatically.
There have 6 options to select: 15 seconds, 30 seconds, 1 minute, 2 minutes, 10 minutes,
and never standby.
Gravity sensor coordinate system: change the direction automatically when
rotating the device.
5.5 HDMI
Enter “HDMI”,There are “Turn on HDMI”, “HDMI Resolution”, “Screen Zoom” ,
Page 13

But for the corresponding settings.
5.6 Storage
You can find the usage space and capacity of the internal storage, internal space and the
external SD card.
5.7 Applications
Applications management
Page 14

How to remove the unwanted software:
1. Enter
"Settings"->"Applications"->"Applications management", then it will
show the list of all the installed programs.
2. Click on the software icon that want to remove, then it will pop up a delete dialog.
3. Click the "Uninstall" key to remove the selected software rightly.
How to move the software to the SD card:
1. Enter
"Settings"->"Applications"->"Applications management", then it will
show the list of all the installed programs.
2. Click on the software icon that want to remove, then it will pop up a delete dialog.
3. Click the "Move to the SD card" key, then it will move the software selected to the
SD card.
Page 15

Note: Some third-party applications must run in the TF card properly, not all the
third-party applications downloaded are fit in this device to install.
5.8 Language and keyboard
Setting the region (include the language and region), text input and auto-correction
options;
Select area: 54 languages are provided to select
Note: android system supports 54 languages. The menu interface supports 14
languages.
Android keyboard: Android keyboard settings (The sound when clicking the key /
Automatically capitalizes)
Show Suggestions: automatically display suggested words and enter
Auto-complete: auto-complete spaces and punctuation and insert the stressed word
automatically
Google Pinyin Input Method: Google Pinyin Input Method settings
Clicking sounds / Associate Input
Note: This software allow you to install your personal input method, and it works
normally by setting in this way after the installation.
Keyboard device: built-in keyboard settings
Automatically replace: Correct the error words entered
Automatic Capitalization: the first letter of the sentence capitalized
Automatically add punctuation: Press the Space key twice to insert "."
User Dictionary: add words to user dictionaries, and remove words from the user
dictionary
5.9 Backup and Reset
You can restore the factory settings
Page 16

5.10 Date and Time
Setting the date, time, region and display format
Setting date: go to the date settings to set the right date
Setting region: go to the region settings to set the right region
Setting time: go to the time settings to set the right time
Setting Format: select the different formats to show the date and time
5.11 Developer mode
Can be set to keep awake mode and other modes
5.12 About device
Page 17

6 Internet
6.1 Internet surfing
After connecting to the network, open the web browser and enter the web address to
browse the web directly; or enter the web address in the search bar on the desktop to
open the web.
6.2 Online video
Run the installed online video playing software, online TV playing software, and online
music software, then you can watch online video or TV, and listen to online radio.
Page 18

The user also can download other third-party applications, including web browsing,
video playing, website client, instant communication, etc.
7 Music playing
Click the “Music” icon in the main menu to enter the music playing interface.
Which all the audio files in user data area of the system will be listed, as shown below:
You can upload audio files through USB synchronization, or insert a SD card with
audio files, or download from the Internet.
Select a label and view the “Artist”, “Album”, or “Music”. Select a track to play.
Page 19

8 Video playing
Click “Super-HD Player” in the main menu to enter the interface, in which all the
video files and picture files are listed, as shown below:
Select a video file to enter the video playing interface, as shown below. You can select
“Play”, “Stop”, “Vol+”, “Vol-”, “FF”, “FR”, and “Progress bar” to control the playing.
9 Picture browsing
Click “Super-HD Player” in the main menu to enter the interface, in which all the
video files and picture files are listed. Select a picture file to enter picture playing
interface, sliding around on the screen to play your pictures
Page 20

10 Software Installation and Management
This device supports for third-party applications based on the android platform,
most applications can be obtained from the network and copied to the flash or SD card.
Click on the .apk file in the files manager, then pops up the .apk installation
interface to install the APK.
Installation: Click on the .apk file in the files manager, then pops up the .apk
installation interface to install the APK.
After the operation completed, you can go back to the main menu to find the
corresponding software.
11 FAQ
◆ Why the PC can’t be started?
1. Check whether the battery has been used up
2. Connect the power adapter and then press the Power key to check whether the PC
can be started
3. If all above methods 1 and d 2 are invalid, please contact our after service
personnel.
Why the screen has been flashing or power failure after booting the system
successful?
Page 21

1 Low battery, please recharge
Why the earphone doesn’t have sound?
1 Please check whether the volume is set to 0
2 Please check whether the music file is broken. Try playing other music to be
confirmed. It may result in a very serious noise or sound skips
Can’t copy files or play music files, etc.
1 Make sure the computer and the player is properly connected
2 Verify that the memory storage space is full
3 Make sure USB cable is not damaged
4 USB has been disconnected
If starting is unable to enter the system or crash in the Boot LOGO?
Because the system file damaged,
Please refresh the system.
Open the official website"www.giadatech.com"--"Support"--"Download"--"select
Product(Tablet PC)"--"select Model"--"Go"
Download " firmware burning guide and the burn tool Livesuit installation file "
and " system burning firmware ", According to "firmware burning guide" complete
system refresh.
 Loading...